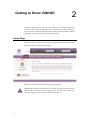
1
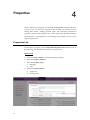
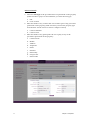
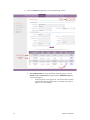
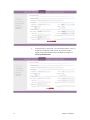
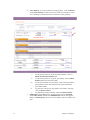
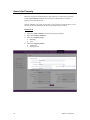
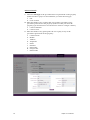
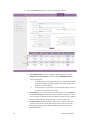
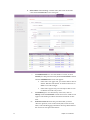
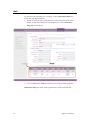
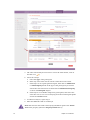
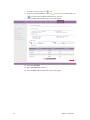
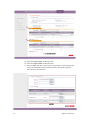
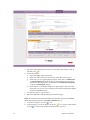
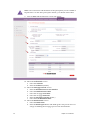
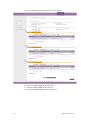
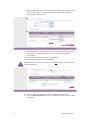
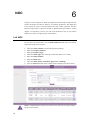
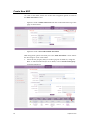
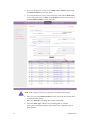
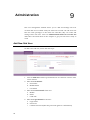
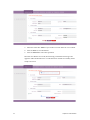
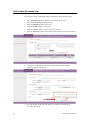
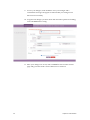
Emirates Real Estate Solutions (ERES) OQOOD Off-Plan Property Management Solution Property Developers Guide Version 1.1 http://www.oqood.ae/ Copyrights © Emirates Real Estate Solutions (ERES) 2010. All Rights Reserved. You may not redistribute, modify or reproduce any part of this document in any form or by any means, without the express written permission of ERES. ii Contents Overview .............................................................................................................................. 1 What is OQOOD? ............................................................................................................. 1 This User Guide ................................................................................................................ 1 Getting to Know OQOOD .................................................................................................... 2 Home Page ....................................................................................................................... 2 Main Page......................................................................................................................... 3 Participants ......................................................................................................................... 4 Add Person ....................................................................................................................... 4 Add Company ................................................................................................................... 6 List/Edit Participants.......................................................................................................... 7 Properties .......................................................................................................................... 10 Properties List ................................................................................................................. 10 Add Property (Villa) ......................................................................................................... 17 Add Unit .......................................................................................................................... 19 Property Termination ....................................................................................................... 20 Add Payment Plan .......................................................................................................... 22 Procedures ........................................................................................................................ 25 Procedures List ............................................................................................................... 25 Search for Property ......................................................................................................... 28 Sell ................................................................................................................................. 32 Lease to Own .................................................................................................................. 37 Sell with Mortgage........................................................................................................... 43 NOC.................................................................................................................................... 49 List NOC ......................................................................................................................... 49 Create New NOC ............................................................................................................ 50 Contracts ........................................................................................................................... 54 Contracts List .................................................................................................................. 54 Vouchers ........................................................................................................................... 57 Vouchers List .................................................................................................................. 57 Administration ................................................................................................................... 60 Add New Sub User .......................................................................................................... 60 Sub Users Accounts List ................................................................................................. 62 iii Overview 1 The introduction of freehold ownership has sparked interest in improving the real estate market in Dubai and identified the need for a registration process for all off-plan properties and transactions. Oqood has been launched in response to the foreseen needs for a comprehensive Off-Plan Properties Management System. What is OQOOD? Over the last decade, off-plan property transactions have seen a tremendous growth across the UAE, and particularly, in the Emirate of Dubai. Dubai Land Department and Real Estate Regulatory Department (RERA) have always sought to find a uniformed and centralized method for managing offplan property transactions and contracts. Oqood is a powerful, flexible and easy to use off-plan property management system, developed based on emerging technologies such as Oracle 10g and Microsoft ASP.net. As the name suggests, Oqood, meaning “contracts” in Arabic, aims to register all types of contracts between off-plan properties developers and buyers. In addition to that, Oqood allows you to manage your off-plan properties and participants within a simple framework and user friendly bilingual Arabic-English interface. Oqood monitors, automats and regulates off-plan properties market by providing top-notch e-services and enforcing standards and best practices gathered by Dubai Land Department over the last 50 years. This User Guide This user guide provides Property Developers with detailed instructions on how to use the Oqood system from A to Z. It guides you through all system modules including Participants, Properties, Procedures, NOC, Contracts, Vouchers and the system Administration module. Read this manual thoroughly before you start working on Oqood to get your work done faster and more efficiently. 1 Getting to Know OQOOD 2 Oqood is a simple and easy to use system. There are no complicated menus or screens. The overall design helps you to navigate to any functionality in few steps only. Following the instructions in this guide is all what it takes to perform your tasks successfully and with efficiently. Home Page Before you login to Oqood, take a moment and read more about the system through our general information pages: Enter your user name and password to login to Oqood. Note: Make sure that you obtain new user name and password for the new Oqood. Old accounts are not valid anymore. For any assistant, contact our customer support center on the numbers shown above. 2 Main Page Once you login to Oqood, you will notice that the main pages of all the modules have the same structure. In the following, we will show you an example of these main pages and will briefly describe its components: 3 Component Description Main Menu Select an item from the main menu to navigate to one of the system modules Sub Menu For every main menu item, a list of sub menu items appears to the left of the main page. Contact Us Use our contact information to ask for assistant from our customer support team Application Language Click on Arabic ( )عربيlink and switch to the Arabic interface of Oqood Chapter 2- Getting to Know OQOOD Participants 3 The participants are the parties - whether they are individuals or companies that participate in any procedure performed on the application. In this chapter, we will show you how to add a person or a company as a participant and how to list participants to view or edit their details. Click on one of the links (as shown below) and start adding your individual or company participant: Add Person To add a person as a participant, click on Participants> Participants List and click on the link Add New Person as show above: 1. In the Persons Management screen, enter the following details: a. Person Details including the title, first and last name in Arabic and English b. Address and Contact Details including the mobile, land line and fax numbers c. 4 Personal Details including passport and residence details 2. To save the participant details, click on Save and a confirmation message will appear upon saving successfully. Click on Cancel to return to the 3. 5 main Participant Management screen To cancel the operation, click on Cancel before saving Chapter 3- Participants Add Company To add a company as a participant, click on Participants>Participants List and click on the link on the top of the page as show below: 1. In the Companies Management screen, enter the following details: a. Company Details as per the trade license b. Contact Person Details, the first point of contact in the company c. Address and Contact Details including phone numbers, fax, email and exact location 2. To save the participant details, click on Save and a confirmation message will appear upon saving successfully. Click on Cancel to return to the 3. 6 main Participant Management screen To cancel the operation, click on Cancel before saving Chapter 3- Participants List/Edit Participants To search for a participant, click on Participants>Participants List and enter one of more of the following search criteria: 1. Enter the participant Name 2. Enter the participant Type: Person or Company 3. Enter the participant Phone Number 4. Enter the participant Mobile 5. Enter the Developer Name that this participant is associated with (the developer who has added this participant to Oqood) 6. Enter the developer License Number 7. Enter the participant Passport Number 8. Enter the participant National ID 9. Enter the contract details (a contract in which the participant is involved): a. Contract Number b. Contract Year: select a date from the calendar 10. Select the participant Nationality 11. Select the Property Type (participants to be retrieved were parties in a procedure performed on this type of properties) 12. Click on Search and the search result will be displayed as show below: 7 Chapter 3- Participants 13. Click on the name of the participant and one of the following screens will appear: a. If the participant you are searching for is associated with your development company (in other words, the participant was added by a user belong to your company), then you will be able to edit all the participant information as show below: i. Make your changes and click on Save. A confirmation message will appear upon saving successfully. Click on Cancel to return to the main Participant Management screen ii. To cancel the editing operation, click on Cancel before saving the changes 8 Chapter 3- Participants b. If the participant you are searching for is associated with another development company (in other words, the participant was added by a user belongs to another company), then you will only be able to view the participant information as show below: Note: Contact information will not be display to preserve confidentiality 9 Chapter 3- Participants Properties 4 In this chapter we will guide you through the Properties module and show you how you can add new properties and manage the existing ones by editing their details, adding payment plans and submitting termination requests to release sold properties. It is worth mentioning here that adding a payment plan is a prerequisite for performing any procedure on any of the approved properties. Properties List To search for a property, click on Properties>Properties List and select one of the following search methods to retrieve your properties: Basic Search 1. Select the Project Name to which the property belongs 2. Enter the Property Number 3. Enter the Property Type: a. Building b. Villa 4. Select the Property Status a. Approved b. Not approved 10 Advanced Search 5. Select the Sell Type of the procedure that was performed on the property (make sure that a project is selected before you select the sell type) a. Sell b. Lease to Own 6. Enter the details of any contract that was issued as part of any procedure performed on the property (make sure that you select the property type from the basic search criteria to retrieve a unique contract) a. Contract Number b. Contract Year 7. Enter the details of any participant who was a party in any of the procedures performed on the property: a. Contact Name b. Mobile c. Address d. Telephone e. Email f. Emirates g. Nationality h. Passport No. i. 11 National ID Chapter 4- Properties 8. Click on Search and perform one of the following actions: a. 12 View/Edit Details: To view the details of the property, click on Details under View Details column and the Add/Edit Property screen will appear: i. If the property is not approved, you will be able to edit its details. Edit the property details –if needed- and click on Save to save the changes. Chapter 4- Properties ii. 13 If the property is approved, you will only be able to view its details in a read-only mode screen. If you need to edit approved property details, then visit DLD and request a Property Modification. Chapter 4- Properties b. View History: To view the history of the property, click on History under View Details column and a new window will appear with a list of all the procedures that have been done on the property. i. c. 14 To show the parties of all the listed procedures, click on Show all Procedure Parties link ii. To show the parties of a specific procedure, click on Show Parties link next to the procedure iii. To show the details of a procedure, click on the procedure year/number and a new window will open with all the procedure details iv. To print the contract (for procedures end with a contract), click on Print Contract v. To print the procedure details, click on Print Procedure Add Units: If the building has no units, then click on Add Unit under Unit Count column and Add/Edit Unit screen will appear. Refer to Add Property section for more details on how to add a new unit. Chapter 4- Properties d. Show Units: If the building contains units, then click on the unit count and the Units Lists screen will open: 15 Chapter 4- Properties i. View/Edit Details: To view the details of a unit, click on Details (for that particular unit) under View Details column and the Add/Edit Unit screen will appear: i. 16 If the unit is not approved, you will be able to edit its details. Edit the unit details –if needed- and click on Save to save the changes. To cancel the operation, click on Cancel. If the unit is approved, you will only be able to view its details in a read-only screen. If you need to edit approved property details, then visit DLD and request a Property Modification. Chapter 4- Properties ii. 17 View History: To view the history of the unit, click on History under View Details column and a new window will appear with all the procedures that have been done on the unit. Chapter 4- Properties Add Property (Villa) To add a property, click on Properties>Properties List and then click on the Add New link on top of the Properties List screen (as shown above in Property List Section). In Add/Edit Property screen, enter the following details: Land Details 1. Select the Project Name 2. Select the Land number and all other land details will automatically appear Property Details 3. Enter the Property Number 4. Enter the villa Address 5. Select the Sub Type of the villa 6. Enter the Number of Floors 7. Enter the Number of Parking lots 8. Select the Completion Date 9. Enter the Actual Area (in Sq Ft) of the villa 10. Enter the Number of the villa’s Rooms 11. Click on Save to save the details and the following conformation message will be displayed: 12. Click on Cancel to go back to the main screen Note: Buildings can be added through DLD only 18 Chapter 4- Properties Add Unit To add a unit to one of your existing buildings, then click on Properties> Properties List and search for a specific building as illustrated above in Properties List section. - If your building doesn’t contain any units, then click on Add Unit under Unit Count column in the search results screen - If your building already contains units, then click on the number of units under Units Count column and click on the Add New link on top of the Units List screen Once you reach to Add/Edit Unit screen, follow the next steps to add a unit to the selected building: 1. Enter the Unit Number 2. Select the Unit Type 3. Enter the Number of Rooms 4. Enter the Floor Number 5. Enter the Balcony Area 6. Enter the Common Area 7. Enter the Total Area of the unit 8. The Suit Area will be calculated automatically once the Balcony, Common and Total Area fields are filled 9. Enter the number of the Parking lots allocated for this unit 10. Click on Save to save the unit details and the following confirmation will be displayed: 11. Click on Cancel to return back to the main screen 19 Chapter 4- Properties Property Termination To terminate a property, click on Properties>Property/Unit Termination and search for a property as illustrated in Properties List section: Note: Make sure that at least one procedure has been performed on the property to be terminated. Properties with no procedures are not allowed to be terminated. Once the property/unit termination procedure screen appears, follow the next steps to terminate the selected unit or villa: 1. Upload the required documents for the termination procedure as shown below (you need to upload at least one document in every section): a. Click on Browse and select the Screenpoint document from your local drive b. Click on Browse and select the Undertaking Letter from your local drive c. Click on Browse and select the Last Reminder document from your local drive 20 Chapter 4- Properties 2. Click on Save to save the attached documents and the following screen with a confirmation message will appear: 3. To review the attached document(s), click on the document link 4. Once your reached to the above screen, you will have two options: a. To go on with your request, click on Cancel and the application will take you back to the main termination screen b. To cancel the termination request before it is submitted to DLD, click on Cancel Procedure Note: All termination requests will be in pending status waiting for DLD approval. Note: Cancelled termination requests will appear in the property history and Procedures Lists screen as a Property Termination Procedure and its status will be Cancelled. 21 Chapter 4- Properties Add Payment Plan To add a payment plan for a property (villa or unit), click on Properties>Add Payment Plan and search for your property as illustrated in Properties List section. - If you are adding a payment plan for a villa, then click on Create Payment Plan under Actions column in the search results. - If you are adding a payment plan for a unit, then click on the number of units under Units Count column and the Units List screen will appear with a list of units that belongs to the selected building. If you like to fitter the search results further, use the search criteria in Units List screen. For a specific unit, click on Create Payment Plan under Actions column. Note: Payment plans can be added for units and villas only. Once you reach to Create Payment Plan screen, follow the next steps to add a payment plan for the selected villa or unit: 22 1. Click on Add New Row button to add the first installment details 2. Select the Payment Date 3. Enter the Payment Amount 4. Enter the payment Percentage of the total payment amount 5. Specify whether the amount is paid or unpaid 6. 7. To add more installments, repeat the steps 1-5 as many times as needed To delete a row, click on Remove link next to a specific row Chapter 4- Properties 8. Enter your Remarks on the payment plan 9. Click on Save to save the payment details and as conformation message will appear as the following: 23 Chapter 4- Properties 10. Click on Print to print the payment plan. The payment plan report will be displayed in a new window: a. To export the payment plan to an external file, then select a format from the list and click on Export. The file download dialog box will appear: i. Click on Open to open the file ii. Click on Save to save the report on your local drive iii. Click on Cancel to close the dialog b. To print the payment plan without saving in on your local drive, click on the printer icon as shown above and select your printing preferences c. If the report consists of more than one page, then use the arrows on top on the report screen to navigate to other pages d. Click on Close to close the payment plan report window 24 Chapter 4- Properties Procedures 5 The Procedures module is the main component of this application. All other modules serve this module to achieve its main function which is to perform various types of procedures on off-plan properties. This chapter provides you with detailed instructions on how to perform the following Procedures: Sell, Lease to Own, NOC and Sell with Mortgage. All procedures require DLD approval first so that the contracts and certificates issued from the system are considered officially valid. Before you start It is important to always remember that procedures can be performed on properties that satisfy the following conditions - Properties must be approved by DLD first - Procedures can be performed on villas and units only All properties must have a payment plan In addition to that, you need to always be sure that you have enough balance in your prepaid account before carrying out any procedure. You can always top-up your account through DLD. Procedures List To search for a procedure you have already performed earlier, and view its details, click on Procedures> Procedures List and enter any of the following search criteria to filter the results: 1. Procedure Number and Procedure Year: usually appear linked together 2. in this format: procedure number/procedure year Procedure Type: Some of the procedure listed here will be performed by DLD only while others can be performed by the developers and DLD at the same: Note: You will be able to view the details of the procedures performed by you and not those performed by DLD. Only a summary of the DLD procedures will be displayed. 25 a. NOC Procedure b. Sell - Pre registration: search will retrieve all Sell procedures c. including those performed as part of Sell with Mortgage procedures Mortgage Pre-Registration: Search will retrieve all Mortgage procedures including those performed as part of Sell with Mortgage procedures d. Lease to Own Pre-Registration e. Property Termination Procedure f. Grant Pre-Registration (Done by DLD) g. Mortgage Release Pre-Registration (Done by DLD) h. Lease to Own Release Pre-Registration (Done by DLD) i. Property Approval Procedure (Done by DLD) j. Property Modification (Done by DLD) k. Procedure Cancellation (Done by DLD) l. 3. Procedure Modification (Done by DLD) Procedure Status: a. Pending: Procedures that have been submitted and not yet approved by DLD b. Audited: Procedures that have been audited and saved by DLD but c. not yet approved Completed: Procedures that have been approved by DLD d. Cancelled: Procedure that have been cancelled by the developer or DLD 4. Contract Details: The contract that was issued as part of the procedure a. Contract Number b. Contract Year 5. Voucher Details: Any voucher that was issued for one of the procedure parties a. Voucher Number b. Voucher Year 6. Participant Details: Any of the participants who were involved in the procedure a. Participant Name b. Participant Number 7. Property Details: The property on which the procedure was performed a. Property/Unit Number b. Property Type: Villa or Unit 8. Project Name: The project to which the property belongs Click on Search to retrieve the procedures matching your search criteria: 26 Chapter 5- Procedures To retrieve all the procedures, click on Search without specifying any of the search criteria. 27 Chapter 5- Procedures Search for Property The first step before performing any procedure is to search for a property. Click on Procedures and then click on the procedure link you want to perform from the sub menu. Choose whether you prefer to search for your property using the basic or the advanced search and follow the next steps based on your choice: Basic Search 1. 2. 3. 4. 28 Select the Project Name to which the property belongs Enter the Property Number Select the Property Type: a. Building b. Villa Select the Property Status a. Approved b. Not approved Chapter 5- Procedures Advanced Search 9. Select the Sell Type of the procedure that was performed on the property (make sure that a project is selected before you select the sell type) a. Sell b. Lease to Own 10. Enter the details of any contract that was issued as an output of any procedure performed on the property (make sure that you select the property type from the basic search criteria to retrieve a unique contract) a. Contract Number b. Contract Year 11. Enter the details of any participant who was a party in any of the procedures performed on the property: a. Contact Name b. Mobile c. Address d. Telephone e. Email f. Emirates g. Nationality h. Passport No. i. National ID 29 Chapter 5- Procedures 12. Click on Search and perform one of the following options: a. View/Edit Details: To view the details of the property, click on Details under View Details column and the Add/Edit Property screen will appear: i. If the property is not approved, then you will be able to edit its details. Edit the property details –if needed- and click on Save to save the changes. ii. If the property is approved, you will only be able to view its details in a read-only mode screen. b. View History: To view the history of the property, click on History under View Details column and a new window will appear with a list of all the procedures that have been done on the property. (More details are illustrated in Properties list section in Chapter 4) c. Perform Action: Based on the procedure that you have chosen to perform, click on the action (Sell, Lease To Own, NOC, Sell with Mortgage) and follow the steps illustrated in the section of each procedure below. 30 Chapter 5- Procedures d. Show Units: If the building contains units, then click on the unit count and the Units Lists screen will open: i. View/Edit Details: To view the details of a unit, click on Details (for that particular unit) under View Details column and the Add/Edit Unit screen will appear: If the unit is not approved, you will be able to edit its details. Edit the unit details –if needed- and click on Save to save the changes. If the unit is approved, you will only be able to view its details in a read-only screen. ii. View History: To view the history of the unit, click on History under View Details column and a new window will appear with all the procedures that have been done on the unit. iii. Perform Action: Based on the procedure that you have chosen to perform, click on the action (Sell, Lease To Own, NOC, Sell with Mortgage) and follow the steps illustrated in the section of each procedure below. 31 Chapter 5- Procedures Sell To perform a sell procedure on a property, click on Procedures>Sell and follow the next steps in details: 1. Search for your property using the basic or advanced search (for more details on the basic and advanced search criteria, refer to Search for Property section above): 2. Click on Sell under Actions column for one of the resulted properties Remember! Sell procedures can be performed on villas and units only 32 Chapter 5- Procedures 3. The seller will already be selected. To review the seller details, click on the edit icon ( 4. ) Search for a buyer a. Select the Type of the participant b. Enter any of the other search criteria to filter the search results c. If the buyer is not a participant in Oqood, then click on Add Person or Add Company based on the type of the participant you want to add. Follow the instructions as illustrated in Add Person/Company sections in Participant chapter d. If the buyers are available in Oqood as participants, then select the check box next to one or more buyer(s) from the resulted participants and click on Select button. 5. To add more buyers, repeat step 5 6. Enter the Area allocated for each buyer Note: the total area allocated to the buyer(s) should be equal to the Actual Area of the property (shown in Property Details above) 33 Chapter 5- Procedures 7. To remove a buyer, click on ( 8. To edit a participant details, click on ( ( 9. ) icon ) icon. Click on the refresh icon ) to retrieve the updated information to your list Click on Next and the following screen will appear: 10. Select the Sell Date 11. Enter the Sell Price (in Dhs.) 12. Click on Next and the following screen will appear: 34 Chapter 5- Procedures 13. Select the Payee Name of the buyer fees 14. Select the Payee Name of the Seller fees 15. Click on Next. The last screen of the sell procedure will be displayed to review all the details of the transaction and to attach the required documents as shown below: 35 Chapter 5- Procedures 16. Click on Save to complete the transaction. A confirmation message will be displayed to indicate that the procedure has been completed successfully. 17. To go back to the previous step, click on Back 18. To cancel the operation, click on Cancel Note: Once the transaction is saved, you will not be able to edit any of the transaction details. 19. Click on the document links to show the uploaded documents 20. Click on Print Procedure and a report with the procedure details will be displayed. 21. Click on Print Contract and the Contracts List screen with a list of contracts related to this procedure will appear: 22. Click on View Details to view the contract details Note: The procedure will be in Pending status until it is approved by DLD upon the vouchers’ payment. 36 Chapter 5- Procedures Lease to Own To perform a Lease to Own procedure (Ejarah) on a property, click on Procedures>Lease To Own and follow the next steps in details: 1. Search for your property using the basic or advanced search (for more details on the basic and advanced search criteria, refer to Search for Property section above): 2. Click on Lease To Own under Actions column for one of the resulted properties Remember! Lease to Own procedures can be performed on villas and units only 37 Chapter 5- Procedures 3. The seller will already be selected. To review the seller details, click on the edit icon ( 4. ) Search for a buyer a. Select the Type of the participant b. Enter any of the other search criteria to filter the search results c. If the buyer is not a participant in Oqood, then click on Add Person or Add Company based on the type of the participant you want to add. Follow the instructions as illustrated in Add Person/Company sections in Participant chapter d. If the buyers are available in Oqood as participants, then select the check box next to one or more buyer(s) from the resulted participants and click on Select button. 5. 38 To add more buyers, repeat step 5 Chapter 5- Procedures 6. Search for a leasee by following the same steps of adding a buyer. Repeat the same steps to add more leasees - if needed. 7. Enter the Area allocated the buyer(s) and the leasee(s) Note: the total area allocated to the buyer(s) and the total area allocated for leasee should be equal to the Actual Area of the property (shown in Property Details above) 8. To remove a buyer or a leasee, click on ( 9. To edit a buyer or a leasee details, click on ( icon ( ) icon ) icon. Click on the refresh ) to retrieve the updated information to your list. Note: You’re allowed to edit the details of the participants you have added to Oqood earlier. To edit other participants’ details, you should contact DLD. 39 Chapter 5- Procedures 10. Click on Next and the following screen will appear: 11. Full in the Lease To Own Details section a. Select the Sell Date b. Enter the Sell Price (in Dhs.) c. Select the Lease Start Date d. Select the Lease End Date e. Enter the Lease Price (in Dhs.) 12. Click on Next and the following screen will appear: 40 Chapter 5- Procedures 13. Select the Payee Name of the leasee fees 14. Select the Payee Name of the seller fees 15. Click on Next. The last screen of the sell procedure will be displayed to review all the details of the transaction and to attach the required documents as shown below: 41 Chapter 5- Procedures 16. Click on Save to complete the transaction. A confirmation message will be displayed to indicate that the procedure has been completed successfully. 17. To go back to the previous step, click on Back 18. To cancel the operation, click on Cancel Note: Once the transaction is saved, you will not be able to edit any of the transaction details. 19. Click on the document links to show the uploaded documents 20. Click on Print Procedure and a report with the procedure details will be displayed. 21. Click on Print Contract and the Contracts List screen with a list of contracts related to this procedure will appear: 22. Click on View Details to view the contract details Note: The procedure will be in Pending status until it is approved by DLD upon the vouchers’ payment. 42 Chapter 5- Procedures Sell with Mortgage To perform a Sell with Mortgage procedure on a property, click on Procedures>Lease To Own and follow the next steps in details: 1. Search for your property using the basic or advanced search (for more details on the basic and advanced search criteria, refer to Search for Property section above): 2. Click on Sell with Mortgage under Actions column for one of the resulted properties Remember! Sell with Mortgage procedures can be performed on villas and units only 43 Chapter 5- Procedures 3. 4. 5. 6. The seller will already be selected. To review the seller details, click on the edit icon ( ) Search for a buyer e. Select the Type of the participant f. Enter any of the other search criteria to filter the search results g. If the buyer is not a participant in Oqood, then click on Add Person or Add Company based on the type of the participant you want to add. Follow the instructions as illustrated in Add Person/Company sections in Participant chapter h. If the buyers are available in Oqood as participants, then select the check box next to one or more buyer(s) from the resulted participants and click on Select button. To add more buyers, repeat step 5 Enter the Area allocated the buyer(s) and the leasee(s) Note: the total area allocated to the buyer(s) should be equal to the Actual Area of the property (shown in Property Details above) 7. To remove a buyer, click on ( 8. To edit a buyer or a leasee details, click on ( icon ( 44 ) icon ) icon. Click on the refresh ) to retrieve the updated information to your list. Chapter 5- Procedures Note: You’re allowed to edit the details of the participants you have added to Oqood earlier. To edit other participants’ details, you should contact DLD. 9. Click on Next and the following screen will appear: 10. Full in the Sell Details section a. Select the Sell Date b. Enter the Sell Price (in Dhs.) 11. Full in the Mortgage Details section a. Enter the Bank Reference Letter Number b. Select the Bank Reference Date c. Select the mortgage Start Date d. Select the mortgage End Date e. Enter the Mortgage Amount (in Dhs.) f. Select the Last Installment Date 12. Full in the Bank Details section a. Select the Bank Name b. Enter the Bank Agent details. The bank agent is the person who is in charge of handling the mortgage process from the bank side. 45 Chapter 5- Procedures 13. Click on Next and the following screen will appear: 14. Select the Payee Name of the buyer fees 15. Select the Payee Name of the seller fees 16. Select the Payee Name of the mortgagor fees 46 Chapter 5- Procedures 17. Click on Next. The last screen of the sell procedure will be displayed to review all the details of the transaction and to attach the required documents as shown below: 18. Click on Save to complete the transaction. A confirmation message will be displayed to indicate that the procedure has been completed successfully. 19. To go back to the previous step, click on Back 20. To cancel the operation, click on Cancel Note: Once the transaction is saved, you will not be able to edit any of the transaction details. 21. Click on the document links to show the uploaded documents 22. Click on Print Procedure and a report with the procedure details will be displayed. 47 Chapter 5- Procedures 23. Click on Print Contract and the Contracts List screen will appear with a list of contracts related to this procedure: 24. Click on View Details to view the contract details Note: The procedure will be in Pending status until it is approved by DLD upon the vouchers’ payment. 48 Chapter 5- Procedures 6 NOC Property owners require an NOC (No Objection Certificate) issued from the master developer in order for them to re-sell their properties. This NOC has to be issued for every re-sell procedure the new owner performs. For this purpose, Oqood has a separate module to handle NOC procedures. In this chapter, we will show you how you can issue an NOC for any of your clients and how to retrieve all previously issued NOCs. List NOC To search for an issued NOC, click on NOC>NOC List and enter one of more of the following search criteria: 1. Select the Project Name to which the property belongs 2. Enter the Property Number 3. Enter the Property Type 4. Select the NOC Type (for which procedure the NOC was issued) 5. Enter the NOC Number 6. Enter the NOC Year 7. Select the NOC Status: Cancelled, Approved or Pending 8. Click on Search and the search results will be displayed as show below: Note: Completed NOCs are the ones which were used in a re-sell procedure by the current owner 49 Create New NOC To create a new NOC, follow one of the next navigation options to reach to the NOC Procedure screen: - Option 1: Click on NOC> NOC List and click on the link on the top of the page as show below: - Option 2: Click on Procedures>NOC Procedure Both navigation options will lead you to the NOC Procedure screen. Follow the next steps to create a new NOC: 1. Search for the property that you want to prepare an NOC for, using the Basic or Advanced Search (for more details, refer to Search for Property section in chapter 5): 50 Chapter 6- NOC 2. To create an NOC for a villa, click on NOC under Actions column and the NOC Procedure screen will open 3. To create an NOC for a unit, click on the unit count and the Units Lists screen will open. Click on NOC under Actions column as shown below, and the NOC Procedure screen will open Note: NOC cannot be issued for properties owned by the developer. 4. Once you are in the NOC Procedure screen, follow the next instructions to fill-in the NOC details 5. Enter any Remarks regarding the issuance of the NOC 6. Select the NOC Type and the corresponding fields to add the participants will appear (different procedures have different types of participants) 51 Chapter 6- NOC 7. If the participant is a bank, select the Bank Name from the list (a bank could be a participant in Sell with Mortgage, Mortgage and Lease to Own procedures) 8. If the participant is a person or a company, then enter the participant number– if available- and click Enter key 9. If the participant is not available, then: a. Click on Add Person or Add Company and a new window will appear b. Add the details of the participant and click on Save (for detailed steps, refer to section Add Person/Company in Chapter 3) c. Note down the participant number and close the participant window d. Enter the Participant Number and click Enter to retrieve the participant details 10. To remove a participant, click on this icon ( ) 11. Enter the Area allocated for each participant Note: The total area allocated for each party should be equal to actual area of the property 52 Chapter 6- NOC 12. Enter the English and Arabic Description of the NOC 13. Click on Browse to attach the Procedure Documents and the Parties Document 14. Click on Save to save the NOC details or Cancel to cancel the operation 15. Once you click on Save, you’ll have two options: a. To terminate the NOC Procedure, click on Terminate b. To return to the NOC main screen, click on Cancel 53 Chapter 6- NOC Contracts 7 Different types of contracts are generated as an output of every procedure performed through the application. These contracts are official once signed by the parties involved in the procedure. Through this module, you can search for your contracts and upload multiple ones to the application at once. In this chapter, we will show you how to search and view the details of your contracts. Uploading contracts will be illustrated in a separate user guide. Contracts List Click on Contracts>Contracts List and enter any of the following search criteria to retrieve particular contracts related to a property or to a procedure: 1. Enter the Contract Number and Year 2. Enter the Procedure Number and Year 3. Select the Procedure Type 4. Enter the Property Number 5. Select the Property Type Click on Search and the search results will be displayed as shown below: 54 Click on View Details next to any of the contracts to view its details and save it on your local drive- if needed. In the following, we will show you an example of the Initial Contract of Sale that will be issued for Sell procedures and as part of Sell with Mortgage procedures. 55 Chapter 7- Contracts Note: Sell with Mortgage procedure will generate two contracts, Mortgage Contract and Initial Sale Contract 56 Chapter 7- Contracts Vouchers 8 Contract parties will be entitled to pay certain fees depending on their role in the procedure that is performed on Oqood. For every payment, a voucher will be issued in the name of the payee as specified by the developer, who is performing the procedure. Voucher can be paid only through DLD. Vouchers List 1. Click on Vouchers>Vouchers List and enter any of the following search criteria to retrieve particular vouchers related to a contract, property or procedure: a. Enter the Voucher Number and Year b. Enter the Contract Number and Year c. Enter the Procedure Number and Year d. Select the Property Type e. Select the Procedure Type f. Select the Status of the voucher: Paid or Not Paid g. Enter the Property Number 2. 57 Click on Search and the search results will be displayed as shown below: 3. Click on View Details next to any of the vouchers to view its details: a. If the voucher is not paid yet, then the following screen will be displayed: b. If the voucher is already paid, The following screen with a paid stamp will appear: 4. 58 To print the payment receipt, click on Print Receipt link and the following new window will open: Chapter 8- Vouchers 5. 59 Click on Close to close the receipt window. Chapter 8- Vouchers Administration 9 Our user management module allows you to add and manage sub user accounts that are associated with your main user account. All sub users will have the same privileges as the main user and thus, they can create and manage other sub users. Click on Administration>Sub User Account List and follow the instructions in this chapter to get your sub users ready to work. Add New Sub User To add a new sub user, follow the next steps: 1. 2. Click on Add New on the top of the Sub User Account List screen to add a new sub user Enter the User Details: a. First Name b. Middle Name 3. c. Last Name Enter the Contact Details of the user a. Mobile b. Email 4. c. Land Line Enter the Login Details for the user: a. Login name b. Password c. 60 Confirm Password (enter the password again for confirmation) 5. Select the check box Active if you want to activate the user once created. 6. Click on Save to save the details 7. Click on Cancel the cancel the operation Once the user details are saved, the following confirmation message will appear to indicate that the user account has been created successfully and is ready to be used: 61 Chapter 9- Administration Sub Users Accounts List To search for a user -and edit its details if needed- follow the next steps: 1. Enter the Name (the first, middle or last name) of the user 2. Enter the User Name (the login name) 3. Enter the Mobile number of the user 4. Enter the Email address of the user 5. Select the Status of the account, Active or Inactive 6. Click on Search and the search results will be displayed as shown below: 7. To edit any of the sub user details, click on its user name and the following screen will appear: 8. For any editing of the sub user details, you have to reset the user account’s password 62 Chapter 9- Administration 9. To save you changes, Click on Save to save your changes and a confirmation message will appear to indicate that your changes have been saved successfully 10. To ignore the changes you have done and cancel the operation of editing, click on Cancel before saving 11. Once your changes are saved, click on Cancel to exit from the current page and go back to main screen of Sub User Account List 63 Chapter 9- Administration


![For [FAWRI Project]](http://vs1.manualzilla.com/store/data/005942470_1-7e115a4ef84b8e803738bbfc66741d9c-150x150.png)