1
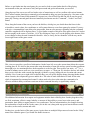
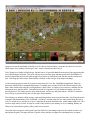
So we have some machine guns along the line that should be used to soften things up, but we also have some
tanks. Since we know artillery fire in incoming we don’t want to move forward into the field of fire, so take
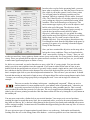
ranged fire shots with your guns. If you select one of the tanks with a 37mm gun you will see 3 options under
loads – SH, AP & CA. SH would be good for ranged fire against any non-hard target such as infantry or heavy
weapons. AP would be for hard targets such as other tanks or bunkers and finally CA is canister and should be
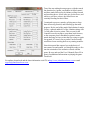
used against infantry at 1 hex range. You can get further details on weapons and their loads by pressing F3 or
going to weapon data in the Help menu.
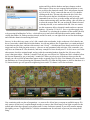
Once you have completed this round of softening its time to allow the Central Powers to take a crack at you. We
do this by clicking the “Next Turn” button, but a note before you do. This will activate the AI and you will see
each and every fire it makes along with the target it is shooting at. Once you gain a comfort with the system you
may want to speed the AI’s turn up a bit. You can do this by pressing the F8 key, or by going to the AI menu
and selecting Fast AI Processing. This will significantly speed things up. Go ahead and proceed with the Central
Powers turn – when it is done and it’s time for your next turn do nothing after advancing the turn, as your
rolling barrage will come into play. Let this fully execute before attempting to do anything within the game.
There will be 12 vollies of three rounds each to complete the barrage.
Ok, now we have 2 chemical rounds left and some further softening to do before kicking off our infantry
assault. Target any remaining bunkers along the line and try to hit them with chemicals. Then you can start
moving your tanks forward focusing on the nearest points of the line and any close objective hexes. The tanks
will help clear the way for your infantry.
Be looking for your kick off points for your assault as well. Ideally you will move troops forward into cratered
hexes in order to give them as much cover as possible. You also want to avoid any hexes that have chemicals
deployed in them! And finally, before you start moving forward you will want to fire some smoke rounds to
create a screen between you and the enemy forces. The smoke rounds can only be fired by the heavy mortars, so
depending on how many chemical rounds you shot will determine how much smoke you can let fly. Smoke also
dissipates after a single turn, so only fire it right before you are going to move troops in that area.
It should be noted that trenches only offer full protection when being attacked from hexes forward and behind
them – so you need to aim to get infantry inside the trench line as swiftly as possible in order to attack with
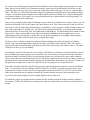
maximum effectiveness. In my scenario I am targeting the trench line between 18,13 & 22,12 as I have three
tanks in the immediate area to support the assault, my chemical attacks on the two adjacent bunkers were
successful, and initial intelligence shows a slightly lighter defense in this area.
So with that, I toggle my left most mortar to smoke and fire off three rounds of smoke to mask my infantry’s
movements. I let fly with all the heavy machine guns in the area and then blow the whistle to send my boys over
the top.