1
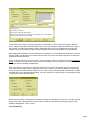
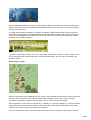
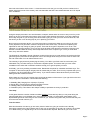
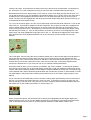
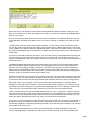
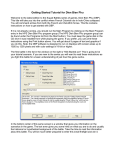
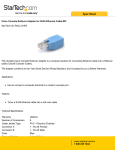
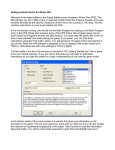
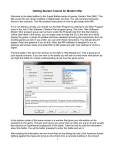
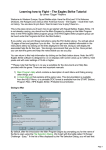
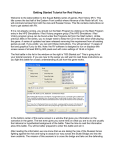
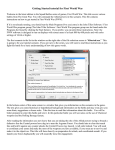
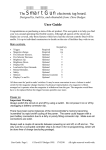
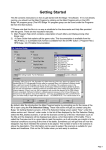
THE TUTORIAL FOR THE KOREAN WAR
Learning How to Fight
By Wild Bill Wilder
Welcome to Korea!
In less than five years after the global conflict known as World War II, hostilities again broke out between
Communist North Korea and the democratic government of South Korea. When UN forces came to the aid of
the South Koreans, the conflict escalated into a hot war that lasted for three years.
Now you are about to relive many of those moments in military history with this newest Squad Battles game.
If you are new to the game system you will want to follow the steps in this tutorial to get "a feel" for how the
game works.
Going to War
Of course the first step is to start the game. Once the introduction is finished (you can skip it after you’ve
seen it once by simply hitting the "Enter" key while it is being presented), the File Selection Dialog will
appear. The first battle in the list in the window is "Commando Courage-Beginner’s Version." This is going to
be your tutorial scenario.
Note that there are two versions of this battle. One is for the first-timer playing Squad Battles. The second is
a more difficult version for the more adept and experienced at the game. So if you are new to this system of
play, make sure the "Commando Courage-Beginner’s Version" is highlighted.
Page 1
In the center of the screen is a window that gives you information on the scenarios in the game. Take the
time to read the information about this battle. Here you will see instantly the general size and time of play of
the scenario. You’ll also get the date, location and design notes to help you understand how to play this
firefight. Finally, there is historical data on the actual battle and source books listed if you are interested.
After reading the information we now know that we are taking the role of the British Royal Marines, which are
a part of Task Force Drysdale. The mission of this scenario is to rescue our fellow troops who are tied down
by Chinese Communist forces.
Once you hit the enter key or click on "Okay," you’ll see another menus of choices. This is the AI Selection
Dialog. In this menu you’ll pick which side you will be controlling. So choose "Manual" for the Allied AI. This
means you will be controlling the Allied side.
Next, click either on "Automatic" or "Automatic with FOW" for the Communist side. Now the computer will
control the Chinese troops. "FOW" means fog of war. If you choose it, you won’t be able to see any enemy
units until they come within the line of sight of one or more of your units. Playing with FOW turned on makes
the battle much more challenging and exciting. If you are, however, a first time player, it will be easier to play
in "Automatic" without the Fog of War.
Notice the word "Rules" at the bottom of the Menu. Clicking on it will allow you to turn on or off other optional
things in the game. We’ll leave that alone for this time. After you have picked the method of play in the AI
Selection Dialog Menu, click on "Okay."
On the Battlefield
Page 2
Now the battlefield is before you! Since you are playing the Allies you will have your turn first. That may not
always be the case. This box will appear at the beginning of each one of your turns. You close it by simply
clicking your mouse on it.
A smaller menu appears now telling you "Support is Available." What does that mean? It means that you
have either off map artillery or air support and that it is already available. What is the support? First click on
"Okay" to acknowledge this fact and then look at the top of the menu. See the section that says "Leader"
and then "Air and Artillery Support."
You have 3 105mm guns ready to fire for you if you need it. Looking over the map, you see no enemy units
so you will pass for the moment on the offer. You will need them later, I am sure. For now, however, just
close the window.
Reviewing the Troops
Now you see before you the battlefield and your troops. Looking carefully over the map, no enemy troops can
be seen. What can be seen is an objective worth five points directly in front of you. If you want more
information on objectives, strength or victory status, click on ‘Info" at the top of the screen.
Notice also that you can zoom in or out with the "1" (distant) or "2" (Close). Clicking on "1" lets us survey the
map quicker and get that big picture. Since we set our scenario up with Fog of War turned off, any enemy
units that were on the map when you started would appear.
So for the moment the coast is clear. Now, take a look at your forces. Left click on any stack of units and
Page 3
then look at the bottom of the screen. I chose the stack on hex 5,8 (you can find your hex numbers in the
bottom right hand corner of the screen), and I see that within that hex I have a bazooka team and "B" Squad
from 3rd Platoon.
Using this simple procedure I can see information, weapons, status and a lot more on every one of my units.
While you do this, notice that at the bottom of the screen other pertinent information, such as the date and
time of day are given to you. Knowing more about what is going on, what your men can and cannot do, and
the terrain you are in can be a big help to you in planning your tactics.
But in order to have proper tactics, you must know what your goals are? What are you trying to do here?
Victory depends on a point ratio. Points are acquired or lost in three ways. The first one is capturing the
objectives on the map. Doing so gives you points. There are other types of objectives, such as an "exit"
objective. You get extra points if you move your forces to those hexes and then remove them from the map
with the Command Menu at the top. Some objectives will be of the "Capture" type. Once you have taken
them, they cannot be retaken.
The objective in this battle is simple. Whoever controls it (the last one to move into the hex) at the end of the
game will get the point value of the objective. Thus it can change hands every turn but accrues no value until
the end of the battle. You can take and then lose it.
The next way to get points is by destroying the enemy. You add to your final score for each enemy unit
eliminated. They can often add up to more than the objective points. This means that you must create
casualties on the other side in sufficient numbers to help you to get the points you need.
And finally, you win by avoiding excessive losses. Remember the points for casualties work both ways. The
computer or other human player will get points for losses that you suffer. Thus it is very important that you try
to preserve your force while taking out the enemy. If you remain aware of these three factors you will have a
better game with a better final score.
Where were we now? Oh yes, looking at the Unit list at the bottom of the screen. If you right click on the Unit
List you’ll get more information. This includes the following:
1. Reliability (Rel): Ranging from A (best) to F (worst)
2. Range (Rng): Just how far the weapon will reach in hexes
3. Lethality (Leth): The effectiveness of the weapon
4. Penetration (Pen): This refers to the weapon’s ability to penetrate an enemy’s protection
"Hot Help"
In this game there are a series of what are called Hot Keys. These are keys that you can press during the
game that will allow you to facilitate many of the features included. It is just another great feature of the
Squad Battle games to make things so much easier for you. Practice using them and you’ll find that they will
soon become second nature to you.
Time for Action
With this information it is time to go into action. Much of what I am going to mention now is already
thoroughly covered in the User’s Manual, but I’ll help you out a bit here so the play can continue. Since there
is no visible enemy, the logical thing to do is to move toward the objective. But how do you move a unit?
Page 4
There are two ways. First make sure the button at the top to the far left is not depressed. You depress it to
fire. Go ahead. Try it. Now undepress it so that you can move and not waste shots firing into thin air.
Remember that each unit is always either in "fire" mode or "move" mode. Right now we want to move. You
can do that in two ways. You can highlight the unit (double clicking on it) or units in a hex, then right click in
an adjacent hex. The highlighted unit will move there. You can keep doing that until your unit runs out of
moves. The other way is to highlight the units in the hex and then while holding down the left mouse key, go
to the desired hex and release the key.
Try it. You can do it both ways in one turn if you have enough moves and the terrain allows for it. Look for the
units in hex 6,7. That would be Sergeant Yost and A Sqd/3 Pn. We are going to move them. Highlight both
units by double clicking with the left mouse key on the hex. Notice how they light up at the bottom of the
screen. Now right click on hex 7,7. Remember you can left click on any hex and nothing will happen. Doing
that will help you find hex 7,7. If you do that, however, you’ll have to go back to 6,7 and highlight the units
again. Okay, with units highlighted, simply right click on hex 7,7. That will be the adjacent hex to the upper
right. Notice that the arrow appears behind the unit so you see where you have moved from and your
direction.
Let’s move again, this time using the second method. Double click on the two units again but hold down the
mouse key this time after the second click. Now move your mouse over hex 7,6 (the objective hex) and
release the key. Your units will move into the hex and take it. Now those five points belong to you, not to the
Chinese. But you have other units to be moved. You’ll want to protect Sgt. Yost and the squad that has
moved to the objective hex. Try to move your men so you will have mutual protective fire.
One element that is vital to your success are your leaders. Sgt. Yost is a leader. He has special qualities.
His purpose is to keep the men in good order during combat. Do not risk your leaders by putting them too far
up front. Place them instead in positions of less danger but readily available to aid the men. For example, Sgt
Yost is stacked with A Squad. Should A squad be fired upon and become "pinned" or "demoralized," it will be
his responsibility to rally those troops. Without the presence in the hex of a leader, rallying troops is more
difficult.
As you move about, remember that you have a number of handy helps represented by the icons at the top of
the map. Let’s mention two of them before you move your men. To check the LOS (Line of Sight) of a unit,
start by selecting a hex with units. Let’s pick hex 5,8, which contains B Sqd and a bazooka team. Now from
the toolbar click on the Visible Hexes button or use the hotkey "S."
When you press this button, the hexes that can be seen by the highlighted units are brighter against the
darker background. As you can see the visibility will extend up to 30 hexes except where the terrain blocks
LOS. In this case the fact the unit is on a lower elevation somewhat curtails what it is able to see.
Page 5
Now if you select from the toolbar the Reachable Hexes button or the hotkey "C", you will be shown the
hexes to which this selected unit will be able to move. The shaded portions of the map are out of the range of
this unit this turn. You have enough Movement Points to reach the 6,6 in support of Sgt Yost. Movement
points are listed in the Unit List Area to the right of the unit picture. Most infantry units that do not fire or have
to change position begin with 24 movement points.
Go ahead and move your other units. Be sure and review all the handy icons by simply moving your mouse
key slowly across them. What each one does will be shown in a small white box. Once you have completed
all movements, you may want some of your units to "go to ground." This simply means that instead of
standing the units are in a crouched or lying down position.
That can be done by choosing units and then clicking on the sixth button from the left, or the "toggle ground"
button. When you do that, your units will have a narrow white line at the bottom of their icon indicating their
state. It will also be written on them in the unit list.
Still no Enemy?
So once you have finished your moves, look all around. Did your movement find the presence of the enemy?
Apparently not. Let’s now end the turn by clicking on the end turn icon (the fifth button from the left, the one
with a clock on it. Don’t worry about saving. Just hit cancel when the turn save box appears.
Now the Communist forces have their turn. The Communist Turn Dialog box appears. Click on it and the
Chinese will begin their turn.
Notice that when the Chinese appear they immediately begin advancing on your forces. In this AI turn your
units will use what is called "opportunity" fire. They will fire on the enemy automatically as they have the
opportunity. Once the AI is done, your Turn Dialog box will appear. Click on it and you see a new screen.
Reinforcements! This is great news. But where are they? You have to click them onto the map. Click on the
turn icon and a window listing your reinforcements appears.
Page 6
Wow! Just in time. The reinforcing units include Colonel Drysdale and other forces sent to help you in your
fight. As you double click on each, they appear on the map. You will want to move them forward right away in
support of your forces.
But you also have opportunity to fire on the enemy. Now it is YOUR turn! You have been fired upon and you
might have taken casualties or the status of one of your units is "pinned" or "disrupted." So what do you do
now?
You will want to move your other units toward the objectives. You may want to check just what the enemy
can see. No need to move into their line of fire if you don’t have to do so. Instead, select the hex in which the
enemy soldiers are in and then select the Visible Hexes button. This shows you what the enemy can actually
see. Use this knowledge to plot a course where you outflank and surround the enemy units, while staying out
of their sight.
Of course you are ready to fire upon the enemy. They are far too close for comfort! Remember first of all, that
as units move they lose points for firing. Some units you won’t move at all, such as Sgt Yost and his men.
They are "hunkered down" and in good shape. Leave them where they are. This means that they will get three
shots at the enemy.
The Move/Fire Mode button (first button on the left at the top of the screen) on the toolbar toggles between
Move and Fire Modes. When in Move mode the cursor will appear with a cross in the center. When in fire
mode the cross will change to a sight or "crosshairs." Now here is a handy tip for you. More experienced
players leave it in Move Mode and switch to Fire Mode by simply holding down the Ctrl Key. Letting up the
Ctrl Key returns it to Move Mode. With a little practice, you’ll become proficient at making this change with a
minimum of effort. It will quickly become second nature to you.
Select the unit with which you are going to fire upon the enemy with. I’ve chosen Sgt Yost and the squad with
him in hex 7,6 to fire. In some cases, I may want to check the type of ammunition the units will be firing. As
an example, a tank should not fire HE (High explosive) against another tank but AP (armor piercing) ammo.
With these units it is not necessary so we’ll now fire upon these Chinese attackers. I hold down Ctrl to
activate Fire mode and set the crosshairs on the Chinese units in hex 8,5, adjacent to me. With my units in
good order and at such a range, even my powerful short range weapons such as a "Sten gun" will work well.
I right click to fire. You should do the same. With any luck you’ll take out most of these Chinese.
I wish I could tell you that the rest of the battle will be that easy. It won’t, I promise you. Things are going to
get much tougher the next couple of turns. Don’t forget about your off-map artillery that is waiting to be used.
To access it, find your leader with the radio, double click on him, then hit the leader icon and see if you can
target your artillery. Be careful! Don’t get it too close or you may suffer from friendly fire.
As you play, you may find that some of the Chinese are very hard to finish off. In that case, try an assault. An
assault occurs when you attempt to move into a hex containing enemy troops. It is resolved automatically
and winning it depends on a few things including the morale of your units, the types of weapons you have and
the condition of the enemy units.
I recommend trying assaults only if you feel your units are superior in number and state to those of the
enemy units being attacked. Otherwise you may come out on the losing end. It can be very effective but it
Page 7
can also be a disaster for you.
I’m going to leave you on this battlefield now, Commander. You know how to see, move, shoot and assault.
You have the basics. You are ready to do your own fighting. Please do not forget that you learn by doing as
much or more than reading when it comes to playing the game. The more you play, the more adept you
become as a commander. Many of the things we have mentioned here will become second nature to you.
You’ll go from a glorious victory to an ignominious defeat on occasion, but you will be learning and improving
every time you play.
When the scenario is over the Command Report will pop up with a message that the time limit is up. Clicking
OK will then bring up the Victory Dialog. This box will show you the losses for both sides, the points awarded
for Objectives captured, the Victory Values, Total Points scored and the Outcome.
You can display the Victory Dialog at any time during the scenario from the Info/Victory menu item. This will
allow you to follow your progress, but do not be alarmed to see that your side is losing, particularly in the
early part of a scenario. Often the winning side is not determined until the last couple of turns and you have
plenty of time to accomplish your mission.
Feel free to save this battle and come back to it later if you want to do more exploring at this point. Whatever
battle file you save can be given a name to identify it for later play. For example, you could name your save
command courage1. When you go back to the game simply click on "Open" from the file menu at the upper
left.
All the members of this design team want this to be the start of many exciting gaming hours for you as you
fight your way through the battles and campaign included in Korea. If you wish to play them chronologically,
check the scenario list in the helps file. The battlefield awaits you, Commander!
Page 8