1
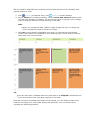
Five Minute Rapid Start Guide
A task is something you have to do, such as write a letter, or wash the car. You can
predict and manage your workload effectively, and give yourself focus, by creating a list
of all your tasks in Microsoft® Outlook® and then automatically scheduling them using
Taskline.
To schedule your tasks for the first time:
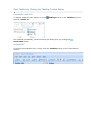
1. In Outlook, open your Tasks folder.
2. Enter how long you think each task will take. To do this, first open an existing task
in Outlook, for example by double clicking it, or create a new task by clicking:
Outlook 2007 – File menu → New → Task
Outlook 2010 – Home tab → New Items → Task
Outlook 2013 – HOME tab → New Items → Task
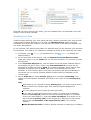
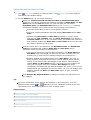
3. On the Taskline tab of the task form, enter how long you think the task will take in
the Total work box, which is set to 0 by default. If you don't yet have a Taskline
tab, use the Details tab. You can enter the Total work as a number of minutes,
hours, days or weeks; the abbreviations are m, h, d and w. For example, to set
Total Work to 3 hours, you can type "3h" or "3 hours". When you have updated
Total work, click Save and Close.
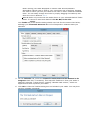
4. Once you have assigned each task some Total work, start Taskline by clicking the
Settings button on the Outlook ribbon. Or, if you are using Outlook 2007, click
the
Taskline button on the Outlook toolbar.
Click OK on the Taskline dialog to accept the default options and schedule your
tasks.
5. When Taskline has finished, double-click a task to display the Taskline tab. Notice
that Taskline has calculated Scheduled start and Scheduled end dates and times
for each task. The Scheduled start is the recommended or most likely start date.
The Scheduled end is the calculated completion date. More about these dates.
6. Depending on which options you selected during Taskline Setup, Taskline might also
place task entries in Outlook's calendar. These are entries in the calendar that
represent your tasks. Task entries make it very easy to see what you are scheduled
to do on any given day. Open your Outlook calendar and take a look! If you don't
see task entries in your calendar and you would like them:
1. Start Taskline by clicking the
Settings (on Outlook 2007,
Taskline)
button in Outlook.
2. Click the Calendar tab
3. Select the Create for tasks that are Not Started or In Progress check
box
4. Click OK to have Taskline reschedule your tasks
More on calendar task entries.
7. You will probably want your tasks to be carried out in a certain order. One way of
setting this order is to give each task a Priority (A1) value. Open each task that
you want to schedule and give it a Priority (A1) value, which is set on the
Taskline tab of the task form in Outlook. For example, give the first task that you
want to do a Priority (A1) value of B10, the second task B20, and so on. Now
start Taskline again. On the Tasks tab of the Taskline dialog, set Order by to
Priority (A1), then click OK. Your tasks will now be rescheduled in the order you
have set.
Scheduling tasks using Natural Order is another popular method of setting the
Scheduling tasks using Natural Order is another popular method of setting the
task order. Tasks in Outlook have a natural order, which is the order Outlook
displays them in when sorting and grouping is turned off. The benefit of using
natural order is that task ordering can be changed simply by dragging tasks, or
groups of tasks, up and down the task list. This method can often be quicker than
changing priority values.
Notice that you use two main workflows in Taskline:
1. The Taskline application – Start Taskline by clicking the
Settings (on Outlook
2007,
Taskline) button in Outlook, or by using the Windows® Start menu.
Taskline displays the options that control how it runs. Clicking OK will then schedule
your tasks.
2. The Taskline task form – If you want to set options for scheduling an individual task
with Taskline, such as Total work, you open the task in Outlook and set options on
the Taskline tab of the form.
Some time management advice:
You must leave some free time in your schedule, to allow for unforeseen items, or
small items such as phone calls which cannot be scheduled individually but
nevertheless collectively consume time. Scheduling yourself for every minute of
your work day is not viable and you will inevitably fall behind schedule if you do
this. You can build slack time into your schedule by setting the Start work and/or
the Stop work times conservatively, or by adding day time breaks specifically for
slack time. All these settings are on the Working Hours tab of Taskline's dialog, if
you are using Taskline Professional Edition. For Taskline Standard Edition, they're
on the Working Week tab. Another useful method is to overestimating task Total
work times.
Some other things you can do are:
On Outlook 2007, move the Taskline toolbar so that it takes up less screen space. If
your display is wide enough, you can drag the small vertical bar to the left of the
Taskline toolbar and move it to the end of the standard Outlook toolbar.
If you have a simple list of tasks created using a text editor, word processor or
similar, you can have Taskline convert this list into Outlook tasks. How?
Read or work through the Taskline tutorial.
Use Natural Order to set the order in which tasks are scheduled. How?
Tell Taskline when you wish to start working on your task list. How?
Force a task to start or finish on, before or after a certain date. You do this by
placing a constraint on a task. More. Note that setting a task's Start or Due date
has no effect on the way Taskline schedules tasks.
Have Taskline update the task Start and Due dates, as well as Scheduled start
and Scheduled end. How?
Tell Taskline what days you work, and what hours you work on those days, so that
Taskline can accurately schedule your work. If you are using Taskline Professional
Edition, you enter this information on the Working Hours tab of the Taskline dialog
box. If you are using Taskline Standard Edition, you use the Working Week tab.
How?
Limit the amount of time allocated to a task per day or per week, for example to
spread a longer task out over several days or weeks, rather than working on it
exclusively until it is completed. How?
Manually override some or all of Taskline's scheduling by Pinning tasks or parts of
tasks in Outlook's calendar.
Update the tasks table view in Outlook to show task information particularly
relevant to Taskline tasks, such as the Scheduled start and Schedule end dates,
Priority (A1) and Total work. How?
Read some useful tips and guidelines on Planning Your Work effectively.
Find out how Taskline can help you.
What Taskline Can Do For You
A task is something you have to do, such as fill in your expenses claim, or wash the car.
Many people write down all their tasks on a piece of paper, to create a to-do list.
Outlook's task list is a computerized version of this paper to-do list. The standard Outlook
task list allows you to create tasks, display them in a list and delegate them to others.
However, Outlook cannot automatically schedule tasks, so you do not know when
anything will get completed, or should be started. You do not know if deadlines can be
met. This is where Taskline can help.
If you place appointments in the Outlook calendar, Taskline can put the tasks there too,
so that you have one view that completely details everything you have to do. Taskline will
keep the calendar automatically updated as things change.
Taskline accomplishes a similar job to expensive project management applications; it
offers much of the power of the critical path analysis, but without the complexity. Taskline
gives you answers to fundamental time-planning questions, such as:
1. When should I start each task, and when can I expect to finish?
2. When will I finish my current to-do list?
3. Are all my current deadlines actually achievable?
With Taskline, you can also quickly re-schedule your tasks, in response to changing
priorities or new commitments. Unfinished tasks are automatically carried forward. Is it
possible to complete that new assignment by the required deadline, given all your existing
commitments? Taskline can tell you.
Taskline organizes your schedule in the following ways:
Assigns each task a recommended, or most likely, start and end date and time. This
process is called Task Scheduling. Such scheduling takes into account:
Preferred task order.
Your normal working week, and breaks during the day, such as lunch breaks.
The other commitments in your calendar, such as meetings and holidays.
Traveling time to and from meetings and other appointments.
External influences on tasks, such as deadlines.
Tells you when you can expect to finish your task list, or parts of it.
Tells you how new work will affect your existing commitments.
Tells you whether deadlines are achievable.
Carries forward unfinished tasks, rescheduling them for a future date.
Gives you the expected dates of milestones, or goals, which are significant events in
your task list, such as finishing a package of work.
Issues enhanced reminders when or before tasks are due to start.
Tracks tasks that are complete or in progress.
Keeps a record of your completed work, either in the calendar or in a separate tasks
folder.
Visually distinguishes certain categories of Tasks on the Outlook Calendar so that
you can glance at the Calendar and see the status, or categories, of tasks, such as
all tasks not yet started.
Allows you to assign each task to a project, to help you organize your tasks more
effectively.
effectively.
To learn the capabilities of Taskline, read or work through the Taskline tutorial.
Taskline Tutorial
As well as reviewing this tutorial, you may also wish to view the 5 minute Taskline movie
on our web site.
This tutorial will bring you quickly up to speed with Taskline. The first 4 activities, which
cover Taskline basics, take approximately 20 minutes to complete. The remaining
activities will take a further 25 minutes. Completing these will enable you to get the most
out of Taskline.
The tutorial describes basic activities in Taskline that you might want to accomplish in the
typical work week. The tutorial uses the example of a technical writer in a large
corporation. However, all of the activities are familiar ones that you might encounter in
most professional settings or your personal life.
Important
This tutorial is designed for Taskline Professional Edition only. If you are using the
evaluation version of Taskline, make sure you are using Professional edition. If
necessary, select the Professional edition radio button on the Help / About tab
of Taskline’s dialog, and then click Apply, to change Taskline versions.
Note
While running through this tutorial, we recommend that you open this help file by
clicking the Taskline Tutorial button on the Help / About tab of Taskline's dialog.
Using this method will leave the help file open even when Taskline closes.
In our tutorial, the first three activities describe how to begin using Taskline:
Entering the times that you work each week. You generally do this just once when
you first start using Taskline.
Planning specific tasks, including the estimated time for each task.
Scheduling your work and showing your tasks in your Outlook calendar.
You use two general workflows in Taskline:
If you want to enter general settings for your Outlook Calendar, your work week,
and so forth, or you want to schedule your tasks, you click
Settings on the
ribbon in Outlook 2010 or 2013. For Outlook 2007, click the
Taskline button. Or
click Taskline on your Windows Taskbar, or the Desktop.
If you want to set options for tracking an individual task with Taskline, such as a
scheduling constraint or the task priority, you open the task and set options on the
Taskline tab.
Create New Folders for the Tutorial Tasks and Appointments
For the purposes of this tutorial, we will create a new Outlook folder to contain the tutorial
tasks and a second new folder for the tutorial appointments. This is to avoid existing
tasks and appointments being intermingled with the items created during the tutorial. We
will make these folders sub-folders of the existing Tasks and Calendar folders.
To create the new tasks folder:
1. If Outlook's Folder List isn't already displayed, have Outlook display it:
In Outlook 2007 and 2010, click View → Navigation Pane → Normal and
then click the Folder List icon
at the bottom of the Navigation Pane:
In Outlook 2013, click '...' at the bottom of the main window and then click
Folders on the pop up menu:
2. On the Folder List, right click your Tasks folder and click New Folder on the pop
up menu:
The Create New Folder dialog will be displayed.
3. Type "Tutorial Tasks" in the Name box, which is the name of our new folder. Make
sure that Folder contains shows Task Items and that the Tasks folder is selected
in the Select where to place the folder list.
4. Click OK to have Outlook create the new folder.
To create the new calendar folder:
1. On Outlook's Folder List, right click your Calendar folder and click New Calendar
on the pop up menu.
2. Type "Tutorial Cal" in the Name box. Make sure that Folder contains shows
Calendar Items.
3. Click OK to have Outlook create the new folder.
Now we need to tell Taskline to use the folders we have just created:
1. Click
Settings in Outlook to start Taskline, or click the
Taskline button in
Outlook 2007.
2. On the Tasks tab of the Taskline dialog, click the Select button for the Schedule
the tasks in option. This will display the Select Folder dialog.
3. Select the Tutorial Tasks folder. You may need to click the + or sign, to the left
of the Tasks folder entry, to display the Tutorial Tasks folder. OK the Select
Folder dialog.
4. On the Calendar tab of the Taskline dialog, click the Select button for the My
appointments are in option.
5. Select the Tutorial Cal folder and click OK.
6. Still on the Calendar tab, click the Select button for the Write task entries to
option.
7. Select the same Tutorial Cal folder and click OK.
8. Back on the Taskline dialog, click the Apply button to save these changes.
Tip
For more information about options and settings on any dialog box, click the
Question Mark button ( or
depending on your Windows version) at the top
right hand corner of the dialog and then click a dialog option.
We have now finished the initial tutorial housekeeping.
Entering Your Working Hours
Note
Note
Times in this tutorial are shown using a 12 hour AM/PM format. If you are using a
different time format, please convert to your local format when entering times.
When using Taskline for the first time, you must tell Taskline the hours that you work. In
our tutorial example, as a technical writer for a large corporation, your typical week runs
from 9:00 AM until 5:00 PM, Monday through Friday, with a one-hour break starting at
12:00 PM.
1. If Taskline is not already running, click
Settings (on Outlook 2007, click
Taskline) in Outlook.
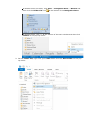
2. Click the Working Hours tab on Taskline's dialog, then enter the following
information:
In the Working hours drop down list at the top of the dialog, make sure
Default work week is selected. If it is not, select it now.
Taskline Professional Edition supports working different hours on different
days of the week, but in our tutorial example we will work the same hours
Monday through Friday. The Mon, Tue, Wed, Thu and Fri check boxes
should already be selected. The Sat and Sun check boxes should not be
selected. If this is not the case, make these selection changes now. The check
boxes allow you to enter the time for different weekdays simultaneously,
typing the information only once.
In the Mon row of the Start work column of edit boxes, enter "9 AM". You
can omit this step if all five Mon to Fri boxes already show "9 AM".
In the box to the right, the Stop work column, enter "5 PM". You can omit
this step if all five Mon to Fri boxes already show "5 PM".
In the next box, the From column, enter "12 PM". This is the time your lunch
break starts.
In the next box, the To column, enter "1 PM". This is the time your lunch
break ends.
Make sure that both Default hours and Schedule tasks that have been
assigned these hours are selected.
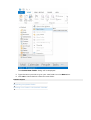
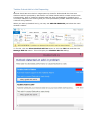
3. The Working Hours tab should now look like the following screen shot. Click
Apply to save your settings and click Cancel to close the dialog box.
How Many Hours Do You Work in a Day?
Some people work 10 hours a day, others much less. When we tell Taskline or Outlook
that a task lasts for 1 day, or for 1 week, how many hours does that mean? So, for the
final part of our initial setup, we must now tell Outlook how many working hours there are
in a day and in a week:
If you are using Outlook 2007, click Tools menu → Options → Other tab →
Advanced Options button, to display the Advanced Options dialog.
If you are using Outlook 2010 or 2013, click File (or FILE in Outlook 2013), then
Options in the left hand bar, then Tasks in the left hand bar.
1. In Task working hours per day, enter 7. Note that this information excludes your
lunch hour.
2. In Task working hours per week, enter 35.
3. Click OK on all the open Outlook dialogs.
Entering Your Tasks
The first stage in work scheduling is to break your work down into small chunks, or tasks.
Each task should represent a specific part of your work. It should be short in duration –
ideally just a few hours and certainly no more than a few days.
In our tutorial example, the first step in your work week involves planning three projects
that are due soon:
Chapter 2 of a user manual, which you think will take you 2 days and is your first
priority.
Proof read a booklet, which will take you 3 hours and is your second priority.
Research documentation tools, which will take you 1 day and is your third priority.
To create the first task, take the following steps:
1. In Outlook, open the Tutorial Tasks folder you created earlier by clicking the
Tutorial Tasks entry in the Folder List. If you cannot see the Tutorial Tasks
entry, then click the + or signs to the left of the Tasks folder on the Folder List.
This will display sub-folders. Now click the Tutorial Tasks folder to open it.
2. Create a new task:
In Outlook 2007, click File menu → New → Task.
In Outlook 2010 and 2013, click the New Task button on the Home (Outlook
2013 HOME) ribbon.
Or, for any Outlook version, simply double click a blank area of the task list.
3. Enter the following information:
On the Task tab, enter "User Manual chapter 2" in the Subject box.
On the Taskline tab, in the Total work box, enter "2d". This is shorthand for
2 days.
In the Priority (A1) box, enter "A10". With Priority (A1), you must enter a
letter. The number is optional.
4. Click Save & Close.
You are now ready to create the second and third task.
1. To create the second task, repeat the previous steps, 1-3, entering the following
information:
On the Task tab, enter "Proof read Quick Start Guide" in the Subject box.
On the Taskline tab, in the Total work box, enter "3h". This is shorthand for
3 hours.
In the Priority (A1) box, enter "A20".
Click Save & Close.
2. To create the third task, repeat the previous steps, 1-3, entering "Research
documentation tools" in the Subject box, "1d" in the Total Work box, and "A30" in
the Priority (A1) box.
Tips
You can enter fractions in durations, for example "1.5 hours".
Setting task priorities with a letter and numeric value ending in zero, such as
A10, A20, and so forth, allows you to insert other tasks in the future that may
have priorities in between the priorities of your original list of tasks. In
Taskline, you can also reprioritize your tasks quickly and easily by selecting
the Options tab and then clicking the Renumber or Re-letter Priority (A1)
button.
You are not restricted to using Priority (A1) to order your tasks. For
example, you can tell Taskline to schedule your tasks in the order they are
displayed in Outlook's task list instead, when all sorting and grouping is
turned off. This is called Natural Order. Displaying and scheduling tasks in
Outlook's Natural Order is convenient, because tasks can be reprioritized by
dragging them up and down the task list. However, this tutorial uses Priority
(A1), which is also a flexible method of prioritizing tasks.
Notice that when you have entered a value for Total work, the Ignore this
task check box is deselected. All new tasks are ignored by Taskline by
default, but as soon as you add some Total work, the Ignore this task
check box will be automatically deselected. If you wish to have Taskline
schedule a milestone, which is a task with zero Total work, you will need to
manually deselect the Ignore this task check box.
Taskline also works with the tasks you already have, before you installed the
software. When Taskline runs, it converts standard Outlook tasks to Taskline
tasks.
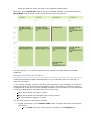
To view your tasks, you can click the Tutorial Tasks folder in Outlook. With
Outlook 2013, you should see something like this:
Now that you have planned your tasks, you can schedule them, as described in the next
activity in this tutorial example.
Scheduling Your Tasks
Taskline makes planning your work quick and easy. Taskline schedules your work around
existing appointments and also to fit in with your Working hours. When you have
scheduled your tasks with Taskline, you can also view them in the Outlook Calendar, like
any other appointment.
In our example, let's assume that today is a Saturday and you are planning your activities
for next week. You want to run Taskline to schedule all three of your tasks for next week.
1. In Outlook, click
Settings (on Outlook 2007, click
Taskline) to display the
Taskline dialog.
2. For the purposes of this tutorial, clear the Default to current date and time
check box, which is on the Tasks tab. For real work however, it is common to leave
this selected.
3. In the First task starts at box, click the down arrow and select whatever date is
the Monday just gone. Then, click on the First task starts at box and use the
keyboard to change the time to 9 AM. Or, if today is Monday, select today's date,
but again change the time to 9 AM. This date is the starting point for your
schedule. It is not usual to plan in the past, but selecting the previous Monday is
convenient for our tutorial, because Outlook initially opens the calendar on the
current week.
4. On the Order by list, select Priority (A1) and (if necessary) Ascending. This
makes sure that Taskline schedules your tasks in the order of their Priority (A1)
values.
Tips
Task ordering, for example by using Priority (A1), is a simple system that is
used in place of the complex logic links used by Project Management
software.
You can change the priority later by editing the task.
If you want to make task priority more visible, you may wish to manually
prefix the Priority (A1) value to the start of the task subject, for example
"A20 Proof read chapter 2", and then Order by Subject. This allows you to
see and change Priority (A1) on the Subject line, although you will not be
able to use the Renumber or Re-letter Priority (A1) if you use this
method.
Order by Natural Order is another popular method of ordering your Taskline
Order by Natural Order is another popular method of ordering your Taskline
tasks. Having your tasks displayed in natural order and scheduled in
descending natural order is often a very convenient way of working, because
the order in which you see your tasks is the order in which Taskline schedules
them. You can easily change this order by simply dragging the tasks up and
down the view in Outlook. More.
Natural Order only works with the tasks shown in your selected Outlook Tasks
folder. It cannot be used with Outlook's To-Do Bar/To-Do List.
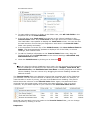
Your Tasks tab of the Taskline dialog should now look like the screen shot below,
although your First task starts at date will will depend on whatever date you
selected:
5. On the Calendar tab, select the Create for tasks that are Not Started or In
Progress check box, if necessary. This step tells Taskline to show your tasks in
Outlook's calendar. It does this by creating "calendar task entries", which are
appointments that represent your tasks.
6. Click OK to close the Taskline dialog box and schedule your tasks. You may then
see this message presented:
Taskline warns you because starting your schedule in the past is unusual. However,
we have chosen a start date of last Monday just for the purposes of this tutorial, so
select the Don’t tell me about this again check box and click Yes to continue.
When Taskline has finished, the Summary of Task Schedule dialog box may
appear. This contains useful information about your task list that we won't explore
in this tutorial, so simply click OK to close this.
Taskline will now have updated your task list and your calendar. To see the results of
these steps, in Outlook, click the Tutorial Tasks folder and double-click a task. When
you open your tasks in Outlook, you can see that dates have been set in the Scheduled
start and Schedule End boxes on the Taskline tab. These are the estimated or most
likely start and end dates for your tasks.
As few people can predict future work with 100% accuracy, for example a meeting may
take longer than anticipated, you cannot usually start and finish every task exactly on
schedule. However, the Scheduled start and Scheduled end dates give you a very
good idea of when you are likely to start working on a task, and when you are likely to
finish it.
You should have the same days and times as those shown below, but because your task
dates depend on your chosen First task starts at date, dates have been removed from
these screen shots:
Now open your Tutorial Cal folder to see your tasks in Outlook’s calendar. The calendar
shows exactly the same date and time information as the tasks, it is just the view of that
information that is different:
Calendar task entries (the appointments that represent tasks) usually get deleted and
recreated each time Taskline is run, so it is best not to change them, but rather change
the task instead.
Tip
You can pin calendar task entries so that they survive a Taskline reschedule. This
enables you to use Taskline to automatically schedule your tasks and then tweak
those results manually.
You have finished the first three activities that describe how to start using Taskline:
Setting your work week.
Entering tasks.
Scheduling tasks.
Viewing your schedule in Outlook's calendar.
Tip
When you are working with your own tasks, bear in mind that it is often difficult to
predict all your tasks in advance and as such you should make an allowance in your
schedule for unpredictable or spontaneous work. Working on unscheduled tasks can
result in unnecessary pressure, because it almost inevitably means that you get
behind with your scheduled work. Never schedule yourself for every minute of every
day. Instead, build some contingency, or slack time, into your schedule. Some
methods for doing this are:
Enter less Working hours in Taskline than you actually do.
Enter an extra break during the day, to represent contingency.
Over estimate Total work on your tasks.
You now know the basics for using Taskline. The remaining activities, continuing the same
example from the first activities, describe how you can get the most out of Taskline:
Customizing your Tasks folder so that you can easily view and edit Taskline
information, such as Priority (A1).
Adding new appointments to your Outlook Calendar after you have planned your
week. Taskline automatically adjusts your task schedule for new appointments.
Managing new work and deadlines.
Using more than one set of Working hours, so that different tasks can be
scheduled for different time slots.
Adding colors to tasks in your Outlook calendar, so that you can quickly identify the
Status or Category of different tasks.
Completing tasks.
If you prefer not to undertake any further activities, please now jump to the last section
of this tutorial, Tidy Up.
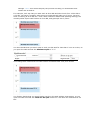
Getting a Better View of Your Tasks in Outlook
You can customize the columns in your Task folder to view any information that Taskline
tracks. This is convenient if you would like to quickly view a short list of your tasks,
identify tasks by sorting the list, or print a checklist of your planned week.
In our tutorial example, after you have scheduled your tasks, you decide to change the
Tutorial Tasks folder view to show some Taskline information. You want to see A1,
Total work, Scheduled Start and Scheduled end as columns in the Tutorial Tasks
folder in Outlook. A1 represents Priority (A1).
First, you must customize the view of the task folder so that you can select Taskline
column headings.
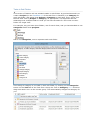
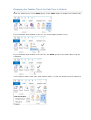
1. In Outlook, open the Tutorial Tasks folder. Point to the column headings in the
Tutorial Tasks folder, such as Subject, right-click, and select Field Chooser on
Tutorial Tasks folder, such as Subject, right-click, and select Field Chooser on
the shortcut menu:
2. To start adding columns, or fields, to the folder view, click All Task fields in the
dropdown list on the Field Chooser.
3. In the list box, drag Total work from the box to the column headings in the
Tutorial Tasks folder. Drop Total work at the right end of the column headings.
The Task folder view updates to display the Total work column. You can now see
the total amount of work that you assigned to each task in the Tutorial Tasks
folder view quickly and easily.
4. In the dropdown list at the top of the Field Chooser, click User-defined fields in
folder. The list automatically updates to display a list of the fields, or column
headings, that Taskline uses.
5. To add the Taskline information to the Tutorial Tasks folder view, drag the
following fields off the Field Chooser to the column headings: Scheduled end,
Scheduled start and A1.
6. Close the Field Chooser by clicking on its close box
Tip
You can place the column headings in any order. For the purposes of this example,
column headings are displayed in the following order: Subject, Total work, A1,
Scheduled start, and Scheduled end. Due Date is usually displayed as a default
column heading. You can remove it by dragging the column heading outside the
Outlook window.
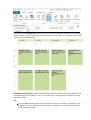
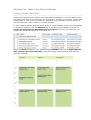
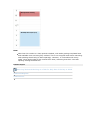
The Tutorial Tasks folder now displays columns that represent each of the fields that
you selected. You can sort the columns to identify the order of tasks. For example, to
view the tasks in order of priority, you can click the A1 column heading. The picture
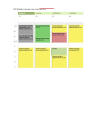
below shows the columns in the Tutorial Tasks folder. Again, the dates have been
removed from the screen shots, which show only days and times. This is to avoid
confusion, as your dates depend on your choice for the First task starts at date.
Now that you can easily view your tasks in the Tutorial Tasks folder, you can change
task properties by clicking in a row.
Important
Important
You cannot manually edit the Scheduled start and Scheduled end dates. These
are the dates that Taskline calculates.
The next activity illustrates how Taskline automatically adjusts your task schedule to
accommodate new appointments.
Adding New Appointments
When you add a new appointment to your Outlook Calendar, Taskline automatically
adjusts your tasks around the new appointment.
In our tutorial example, you remember that you have a training course on Wednesday
morning. Take the following steps to add a new appointment to your Outlook Calendar:
1. In Outlook, open your Tutorial Cal Outlook folder.
2. Create a new appointment:
In Outlook 2007, click File menu → New → Appointment.
In Outlook 2010 and 2013, click the New Appointment button on the Home
(Outlook 2013 HOME) ribbon.
Or, for any Outlook version, simply double click a blank area of the calendar.
Or, again for any Outlook version, type Control+Shift+A.
3. On the Appointment tab, enter "Training course" in the Subject box.
4. Select Out of Office from the Show as setting, which is in the Options section of
the ribbon. This makes sure that Taskline schedules your tasks around this
appointment.
Tip
When working with Taskline in the future, if you want Taskline to ignore an
appointment, select Free in the Show as list.
5. Deselect the All day event check box, if it is selected, because this training course
lasts only for the morning.
6. In the first Start time box, enter the date corresponding to Wednesday of the
current week. In the second Start time box, enter a time of "9:00 AM" and in the
End time box, enter "12 PM".
7. For the purposes of this tutorial, we’ll turn off the appointment reminder. Choose
None from the Reminder drop down list, which is shown underneath the Show as
setting on the ribbon.
8. Click the Save & Close button.
Tip
You can set travel times before and after appointments on your Calendar.
You now need to tell Taskline to Reschedule your work, to take account of the new
appointment:
1. Click
Settings (on Outlook 2007, click
Taskline) then, when the dialog
appears, simply click OK on the Taskline dialog to run Taskline.
2. If the Summary of Task Schedule dialog appears, click OK to dismiss it.
Tip
You can run Taskline immediately, without showing the Taskline dialog first, by
clicking
Reschedule on the ribbon or, if you are using Outlook 2007, holding
clicking
Reschedule on the ribbon or, if you are using Outlook 2007, holding
down the Shift key while you click on the Taskline toolbar button.
Now open your Tutorial Cal folder to see your updated schedule. If you have Outlook's
Work Week view selected, it should look like the screen shot below:
The next activity in our tutorial explains how to handle new tasks and accommodate
deadlines.
Managing New Tasks and Deadlines
Taskline automatically adjusts existing tasks, on your Calendar and in the task list, to
allow for new tasks.
In our tutorial example, you get a call from your supervisor. Your colleague is ill and your
supervisor wants you to take on the colleague’s work. The company newsletter needs to
be finished by Friday and is a work package consisting of several tasks. You jot the names
of the new tasks and the estimated hours on a sticky note:
Write article about new office, 4 hours
Write article about how the sales office works, 4 hours
Put the newsletter together, 3 hours
You can now enter the new tasks in Outlook.
1. Create a new task in your Tutorial Tasks folder in Outlook and enter the following
information:
On the Task tab, enter "Article about new office" in the Subject box.
On the Task tab, enter "Article about new office" in the Subject box.
On the Taskline tab, enter "4h" in the Total work box.
You prefer to get your own work done first, so enter a low Priority (A1)
value of B10.
Click Save & Close
2. Create a second task and enter the following information:
On the Task tab, enter "Article about sales office work" in the Subject box.
On the Taskline tab, enter "4h" in the Total work box.
It doesn’t matter in which order you do this and the previous task, so you
enter the same Priority (A1) value of B10.
Click Save & Close
3. Create a third task and enter the following information:
On the Task tab, enter "Complete newsletter" in the Subject box.
On the Taskline tab, enter "3h" in the Total work box.
Finishing off the newsletter must happen after the previous 2 tasks have been
completed, so you enter a Priority (A1) value of B20 to ensure this.
Click Save & Close
Your task list should now look like the screen shot below. As usual, the dates have been
removed from the screen shots:
Now you add the same deadline to all three of the tasks that you have just added. This
makes sure that all three tasks are scheduled to be completed by the same date.
1. In Outlook, double-click the Complete newsletter task, if the task is not still open.
2. On the Taskline tab, in the Task should box, click Finish on or before.
3. In the Enter Date box, just to the right of Finish on or before, click the down
arrow and enter the date corresponding to Friday of this week. Leave the time
blank, as you are happy for the tasks to be finished any time on Friday.
4. The selected deadline applies only to this one task. To apply the deadline to the
other tasks in the work package too, click the Select any other tasks also
affected by this constraint check box.
5. In the list, click "Article about new office" and "Article about sales office work". This
makes sure that these two tasks are scheduled for completion before the final task:
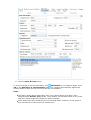
"Complete newsletter". The Taskline task form should now look like the following
picture:
6. Click the Save & Close button.
To see the results of the previous steps, click
Reschedule to run Taskline again. Click
OK on the Summary of Task Schedule dialog box. Taskline automatically adjusts the
existing tasks to allow for the new work and the new deadline:
Notes
The tasks "Article about sales office work" and "Article about new office" were
assigned equal Priority (A1) values. Thus Taskline can schedule these in any order
and your results might have these two tasks swapped.
Some tasks have been scheduled for the following week. However, screen shots in
this tutorial will only show the first week’s work.
Tip
Task constraints, such as deadlines, override task ordering, but only if this is
necessary for the constraint to be met. In our example, "Research documentation
tools" gets scheduled last, even though it has a higher priority than the newsletter
tasks. This is so that the newsletter deadline can be met. In general, you don’t need
to worry about work deadlines when setting task order – Taskline will worry about
this for you.
The next tutorial activity shows how to define and use more than one set of Working
hours.
Scheduling Different Tasks to Different Time Slots
Let’s assume that you work at home on Tuesdays. You decide to do your documentation
work in the office, because you often need to talk to other people. You also decide that
you would like to do your "Research documentation tools" task at home, where you get
fewer interruptions. To handle this requirement in Taskline, we create a 2nd set of
Working hours for just Tuesdays:
1.
2.
3.
4.
Click
Settings (on Outlook 2007, click
Taskline) to start Taskline.
Click the Working Hours tab.
Click the New button, which is near the top of the dialog.
On the New Working hours dialog:
Enter "@Home" in the Enter a unique name box.
Select the Start with empty settings option.
Click OK.
5. You will now see the empty "@Home" Working Hours tab. On the row for
Tuesday, enter "9" in the 1st box, "5" in the 2nd box, "12" in the 3rd and "1" in the
4th. You have now defined the "@Home" hours and any task assigned these hours
will only get scheduled on a Tuesday. Your Working Hours tab should look like the
screen shot below:
6. In the Working hours drop down list, select "Default work week".
7. Deselect the Tue check box and then select and delete the text in the Start work
box for Tuesday. This means that any task assigned the "Default work week" hours
will not get scheduled for a Tuesday. Your Working Hours tab should look like the
screen shot below:
8. Click Apply to save your changes.
Having defined the "@Home" hours, we now need to tell the "Research documentation
tools" task to use these hours:
1. Open the "Research documentation tools" task by double clicking it.
2. On the Taskline tab, in the Scheduling control section, select "@Home" in the
Working hours drop down list.
3. Click Save & Close
Finally, reschedule your tasks by clicking OK on Taskline's main dialog. Your results
should look like the screen shot below. "Research documentation tools" has moved to
Tuesday and other tasks have been shunted to accommodate this:
Tips
In this example, we explicitly assigned the "@Home" Working hours to the task.
In this example, we explicitly assigned the "@Home" Working hours to the task.
However, in many cases Taskline will automatically locate and use the correct hours
for you. If a task’s Working hours are blank, then Taskline will look at that task’s
Categories and Project. If there exists some Working hours with exactly the
same name as an assigned Category or Project, then Taskline will automatically
use those hours. For example, if we had a Category called "@Home", and we had
assigned that Category to our "Research documentation tools" task, then Taskline
would have automatically used the "@Home" hours; there would be no need to
explicitly assign them.
If a task has Working hours left empty, and there is no Working hours match on
Category or Project, then Taskline will use whichever hours have Default hours
selected on the Working Hours tab. After installation, these hours are "Default
work week".
Being able to define more than one set of Working hours is a powerful feature and
there are many uses for it. See Using Different Working hours for Different Tasks
for more ideas and suggestions.
The next activity in our tutorial shows how to customize the color of calendar task entries,
for example to distinguish task entries from regular appointments.
Distinguishing Task Entries on Your Calendar
Taskline allows you to give different calendar task entries different colors. Example uses
of this feature are to distinguish calendar task entries from regular appointments, or to
highlight task entries of a certain Project or with a certain Status value.
In our tutorial example, you decide that you'd like to distinguish calendar task entries
from your appointments by using a specific color. You want to see all tasks that haven't
been started in orange and all work that has been completed in gray (completing tasks
will be looked at in the next section of the tutorial).
1. Click
Settings (on Outlook 2007, click
Taskline) in Outlook.
2. Click the Calendar tab and then the Define Colors button to display the Calendar
Task Entry Colors dialog.
3. Click <Not Started> in the Category Etc column. If the Category Etc column is
empty, select the <Not Started> entry from the drop down list just beneath the
column.
4. In the Color dropdown list, click the color that you want to apply to task entries
that have not been started. In this case, click orange. To insert this new rule into
the list, click the Insert New button. However, if the <Not Started> rule already
existed within Taskline, click on a blank area within the list to update the existing
rule.
5. Repeat the previous step, but choosing <Completed> for Category Etc and gray
for the color. Again, click the Insert New button if you created a new rule, or click
on a blank area within the list to update an existing rule.
6. Click OK to close the Calendar Task Entry Colors dialog.
7. Click Apply to save your changes and update the Calendar colors; there is no need
to run Taskline again in this case. Now click Cancel to close Taskline's dialog. Now
all Not Started tasks display the color orange on your Outlook Calendar.
all Not Started tasks display the color orange on your Outlook Calendar.
Tips
You can also visually distinguish calendar task entries based on Category, Project,
Working hours, Priority (High/Medium/Low), Priority (A1) (letter only),
Overdue and Pinned.
To prevent the creation of calendar task entries for one or more Category Etc
values, you can select
from the color drop down list.
Note
Calendar Task Entry Colors are only shown if calendar task entries do not have
any categories assigned. Because, in this latter case, Outlook prefers to use the
category color.
The final activity in our tutorial example describes how you can mark tasks as completed.
Accounting for Completed Work
Taskline allows you to track and view the work that you complete both on your Outlook
calendar and your Outlook task list. Marking a task as Complete also tells Taskline to stop
scheduling that task for a future date.
You'd like to keep a record in your calendar of what you did, and when. We need to
change a setting on Taskline to enable this:
1. In Outlook, click
Settings (on Outlook 2007, click
Taskline) to display
1. In Outlook, click
Settings (on Outlook 2007, click
Taskline) to display
Taskline's main dialog.
2. Click the Calendar tab.
3. Select the Keep a record of completed work check box, if necessary.
4. Click Apply to save this change and then Cancel to close the Taskline dialog.
In our tutorial example, it is now Monday evening and you want to update your schedule
for the rest of the week. During Monday you did 7 hours work on the "User manual
chapter 2" task, as planned. However, you now think that this task involves 16 hours
work and not the 14 hours you originally estimated. You update the task to reflect your
progress and latest estimate as follows:
1. In Outlook, open the Tutorial Tasks folder.
2. Double click the "User manual chapter 2" task to open it.
3. On the Taskline tab:
Change Total work from "2d" to "16h".
In the Actual Work box, enter "1d" to account for the time you have spent
on this task so far. Press the Tab key on your keyboard to update the form.
You will see that Work remaining gets updated to show 9 hours remaining
and that Status gets updated to show In Progress.
Click Save & Close.
Your Tutorial Cal folder will immediately update to show the task progress you have just
entered. This is shown in gray, because of the Calendar Task Entry Colors setting we
entered in the previous tutorial activity:
We now need to reschedule our remaining work to take account of the extended "User
manual chapter 2" task:
1. Click
Settings (on Outlook 2007, click
Taskline) to start Taskline.
2. On the Tasks tab of Taskline’s dialog, move the First task starts at date forward
one day from Monday to Tuesday. You can do this either by typing in your change,
or by clicking the down arrow and selecting a new date.
Note
When you change the date, Taskline might change the time, so retype the
time if necessary so that it remains at "9 AM".
3. Click OK to have Taskline reschedule your work. You should see the following
results (some tasks are scheduled for the following week, but as usual our screen
shots show only the first week):
Tip
You can also open a calendar task entry and mark it as Complete. Sometimes this
is more convenient than recording progress on the task.
Now that you have completed basic tasks in this tutorial, you are ready to start using
Taskline to manage your work tasks quickly and efficiently. You now know how to
complete the following activities:
complete the following activities:
Enter your work week.
Plan tasks.
Schedule tasks.
Customize the Tasks folder view to display information from Taskline.
Show tasks in your Outlook Calendar.
Identify the status of different tasks on your Outlook Calendar.
Define and use multiple Working hours.
Adjust your work schedule when you complete tasks.
The Planning Your Work topic is now recommended further reading. It offers useful
guidelines on how to plan your work effectively.
Some other topics you might now like to explore, which were not covered in this tutorial,
are:
Organizing Completed Tasks
Recording Task Progress via Outlook's Calendar
Using Projects
Preparation and Travel Time on Appointments
Changing how Taskline Splits Tasks during Scheduling
Pinning to Manually Override some or all of Taskline's Scheduling
Giving Calendar Task Entries Colors
Defining the Subject of Calendar Task Entries
Tidy Up
1. On the Tasks tab on Taskline's dialog, reset the Schedule the tasks in folder back
to the folder that contains your main task list.
2. On the same tab, you may also wish to select the Default to current date and
time check box. This tells Taskline to automatically use the current date and time
as the starting point for your schedule. Selecting this check box saves you having to
continually select a new date.
3. On the Calendar tab of Taskline's dialog, reset the My appointments are in and
Write task entries to folders back to your main calendar.
4. You may now wish to delete the Tutorial Tasks and Tutorial Cal folders you
created at the start of this tutorial, by dragging them to the Deleted Items folder.
5. On Taskline's Advanced Options dialog, select the Reset "Don't tell me about
this again" messages check box and click OK. This is so that any messages that
were permanently dismissed, for the purposes of the tutorial, are now shown again.
Introduction to Outlook Tasks and Taskline
Planning Your Work
If you have a large amount of work to do, you generally need to plan the execution of
that work, so that you know:
1.
2.
3.
4.
5.
What you should be working on at any given moment.
When you can expect to get current and future work finished.
Whether you can meet all of your deadlines.
What effect taking on new work will have on existing tasks.
Whether you're behind or ahead of schedule. If you're behind schedule, you'll want
to know as soon as possible, because the later you leave corrective action the more
difficult it is to remedy the situation.
Planning your work is called Work Scheduling or Task Scheduling, and is an example of
good Time Management.
The first stage in work scheduling is to break your work down into small chunks, or tasks.
Each task should represent a specific part of your work. It should be short in duration —
ideally just a few hours and certainly no more than a few days. For example, if you had to
design a new expenses form, you might split that item of work down into 1) Consulting
current users of the form to get their improvement suggestions, 2) Collating feedback, 3)
Creating the new form design, and 4) Getting approval for the new design.
Splitting up your work into short tasks has two advantages:
It increases the accuracy of your work schedule, since the shorter a task is, the
more accurate your time estimate will generally be.
It makes it easier to know whether you're on schedule, since you'll know which
tasks should have been completed by now. For example, if you're part way through
an 18 day task, it's difficult to know whether you're on schedule, because you only
have subjective means of measuring your progress. But if you had split the task up
into six three-day tasks, and you've completed the first two tasks, you'll know in
this latter case that you're exactly one third of the way through your work.
You cannot predict all tasks in advance and consequently you should make an allowance
in your schedule for unpredictable or spontaneous tasks and events, such as phone calls.
Working on unscheduled tasks can result in unnecessary pressure, because it almost
inevitably means that you get behind with your scheduled work. Building in some
contingency (or slack time) into your schedule is a simple way to address this very
common problem. You could do this by adding a day time break to represent the
contingency, for example. Over-estimating the Total work for some of your tasks is
another good method.
Another issue to consider is whether it is correct to omit from your schedule tasks that
might be too short to schedule individually. For example, you can't schedule in every
phone call. However, although an individual phone call may take up only a very small
amount of time, collectively this might not be the case. If you find, for example, that you
spend 30 minutes per day on the phone, you should schedule yourself 30 minutes each
day as a consequence. You could do this using a recurring appointment, or by entering a
30 minute day time break (phone calls are not a break, but this is a quick and convenient
way to reserve daily time in your schedule).
You should also consider scheduling yourself some personal or "thinking" time during the
day, perhaps by entering the time you start work slightly later than is actually the case.
day, perhaps by entering the time you start work slightly later than is actually the case.
Once you have a set of tasks with time estimates, Taskline can create a time schedule for
you, so that you get to see the big picture.
Next: Setting Your Working hours
Starting Taskline
Click
Settings in Outlook (on Outlook 2007, click
display the Taskline dialog.
Taskline) to start Taskline and
Setting Your Working hours
You need to tell Taskline what hours you work so that it can schedule your tasks
correctly. How you do this depends on whether you are using Taskline
Professional or
Standard editions.
Tips
When setting up your working week, consider the following important points:
You cannot predict all tasks in advance and hence you should make an allowance in
your schedule for unpredictable or spontaneous events, such as phone calls. Build
some contingency (or slack time) into your schedule. You could do this by adding a
day time break to represent the contingency, for example. Over-estimating the
Total work for your tasks is another good method.
Consider planning some personal or thinking time at the start of the day, perhaps to
plan the day's work. You could do this by entering a start work time slightly later
than the time you actually arrive at work. Similarly, you can schedule thinking time
at the end of the day, perhaps to plan the next day's work.
Professional Edition
Taskline Professional Edition allows you to define several different sets of working hours.
For example, you might wish to plan your work tasks during the day and your personal
tasks at evenings and weekends, in which case you would define one set of hours for
work tasks and another set for personal tasks. You give each set of hours a different
name, such as "Office Hours," and these names are displayed in the drop down list at the
top of the Working Hours tab.
To enter your working hours, click the Working Hours tab on Taskline's main dialog,
then do one of the following:
To Choose the Working hours You Wish to View or Edit
Select the hours from the drop down list at the top of the Working Hours tab.
To Set the Hours You Work
For each day you intend to work on your tasks, enter the time you intend to start
working in the Start work box and the time you intend to finish in the Stop work
box.
If these boxes are left blank, Taskline assumes that no work is done for the current
working hours on that day.
Tip
A time of 23:59 will leave the last minute of the day unworked. To work this last
minute, use 0:00 for midnight.
To Set Day Time Breaks, Such as Lunch Breaks
Enter break start and end times in the From and To boxes for each day you work.
If these boxes are left blank, Taskline assumes you work with no breaks on that
day.
You can define up to 9 breaks per day. Use the radio buttons to the right of the
From and To boxes to select which break you wish to view or edit.
To Edit Several Days in One Operation
You can edit the times for multiple days in a single operation. To do this, select the
appropriate day check boxes on the left side of the dialog tab.
Selecting or deselecting the check box at the head of the column will select or
deselect all the days of the week.
Any changes you make in any time box on a day with a selected check box will have
that same change applied to all the selected days.
To Create an Additional Set of Working hours
Click the New button to display the New Working hours dialog.
Enter a unique name for the hours and choose whether to create an empty set of
hours or to copy an existing set.
Click OK to create the new hours.
To Delete a Set of Working hours
Select the hours you wish to delete from the drop down list box and then click the
Delete button.
You cannot delete working hours that are currently assigned to one or more tasks –
you must assign different working hours first.
There must always be at least one set of working hours defined, so if you delete the
last remaining set, Taskline will automatically insert a new set of hours called
"Default work week".
To Set the Default Hours
The default hours are used for tasks that have no working hours assigned. Exactly one of
the defined working hours must be the default. To specify which one, select the Default
hours radio button.
To Schedule or Ignore tasks Assigned the Current Hours
You can have Taskline ignore all tasks assigned the current working hours by deselecting
the Schedule tasks that have been assigned these hours check box. Conversely,
selecting the check box will mean that the tasks are scheduled.
To Set Your Working hours per Day and Week
Taskline also needs to know the number of working hours in a day and in a week. Outlook
and Taskline use this information to convert days and weeks to hours, and vice versa.
These settings are contained within Outlook. To view or change them:
Outlook 2007 – click Tools → Options to display the Options dialog. Click the
Other tab and then the Advanced Options button. On the Advanced Options
dialog, set Task working hours per day and Task working hours per week as
appropriate.
Outlook 2010 and 2013 – click File (FILE on Outlook 2013) → Options → Tasks
tab. Set Task working hours per day and Task working hours per week as
appropriate.
Most of the time the values for the working hours settings are simple to calculate. For
example, if you work from 9am to 12pm on Saturday and Sunday, you work 3 hours per
day and 6 hours per week. However, if you don't work the same hours on each day, see
If You Work Different Hours on Different Days.
To Change the Calendar Shading in Outlook
The calendar in Outlook has its own working week specified. This is simply used to set the
calendar shading. On the Working Week view in Outlook's calendar, hours that are
outside the calendar's working week are shaded differently. To change the calendar's
working week, and hence change the calendar shading:
Outlook 2007 – click Tools → Options → Preferences tab → Calendar Options.
Then set Start time and End time as appropriate.
Outlook 2010 and 1013 – click File (FILE on Outlook 2013) → Options →
Calendar tab. Then set Start time and End time as appropriate.
To Assign Working hours to a Task
Select the hours from the Working hours drop down list on the Taskline tab of the task
form in Outlook.
Tip
Sometimes you may want tasks of a certain project or category to automatically
have the same working hours assigned. For example, you may want tasks of
category "Personal" to be scheduled for weekends. If you give the Working hours
exactly the same name as a Project or Category, Taskline will automatically
assign the Working hours to the task for you. More.
Standard Edition
In Taskline Standard Edition, you can only define one set of working hours. Furthermore,
Taskline assumes that you work the same hours on each working day, although you can
use recurring appointments to give some extra flexibility if this is not the case (this is
discussed below).
To enter your working week, start Taskline. Then, on the Working Week tab, do one of
the following:
Set Day Time Breaks, Such as Lunch Breaks
Enter break start and end times in the From and To boxes of the I take breaks at the
following times during the day area. If this option is left blank, Taskline assumes you
work with no breaks.
Set Which Days You Work
In the I work on the following days area, click the check boxes for each day you work.
Clear the boxes corresponding to the days you don't work.
Set the Working Day
The Working Day area displays the time you start work, for example 8:30, and the time
The Working Day area displays the time you start work, for example 8:30, and the time
you finish work, such as 17:00. These values are shared with Outlook and can only be
changed from within Outlook. How?
Tip
If you don't work the same hours each day, enter the earliest time you start work in
the I start work at edit box, and the latest time you end work in the I stop work
at edit box. Then enter recurring appointments to "blank out" the times when
you're not working. You can change individual occurrences of recurring
appointments, should you decide to leave early or work late on a particular day.
Set Your Working hours per Day and Week
Taskline also needs to know the number of working hours in a day and in a week. Outlook
and Taskline use this information to convert days and weeks to hours, and vice versa.
Most of the time the values for the working hours settings are simple to calculate. For
example, if you work from 9am to 12pm on Saturday and Sunday, you work 3 hours per
day and 6 hours per week. However, if you don't work the same hours on each day, see
If You Work Different Hours on Different Days.
Tip
You can change some options in either Taskline or Outlook. You can change the
Working day and the I work on the following days settings in Outlook.
Changing them in Taskline also changes the Outlook settings, and vice versa. For
the changes to take effect in both applications, you must close and start Taskline
and Outlook. To change the days you work, start and stop times, and other options,
in Outlook, see the online Help for Outlook.
Next: Creating a New Task
Related Topics
Using Different Working hours for Different Tasks
If You Work Different Hours on Different Days
Working hours Tab
Working Week Tab
Creating a New Task
1. In Outlook, click the Tasks folder.
2. At the top of the table view, click a row and enter the details of the new task. The
information varies according to the columns that you display in Outlook. You must
enter information in the Subject column.
3. To enter information using the Taskline form, double-click a row. The Taskline
form appears, displaying options from Outlook and Taskline. More.
4. On the Task tab, enter any settings that you may want.
5. On the Taskline tab, enter an estimated figure in the Total work box. Taskline
requires this information to work with your tasks. More.
6. Click Save and Close on the form to save your changes and add the task to your
Outlook task list.
Tips
You can also set up reminders on the task form. If set, Outlook displays an
automatic reminder when or before a task is due to start.
Outlook does not restrict you to one Tasks folder. This is useful if you want to
organize your tasks in a specific way. For example, you may wish to have current
and future work in one tasks folder and past work in another.
If you have a simple list of tasks created using a text editor, word processor or
similar, you can have Taskline convert this list into Outlook tasks. How?
Next: Creating Tasks from Other Outlook Items
Related Topics
Creating New Outlook Folders
The Taskline Form in Outlook
Creating Tasks from Other Outlook Items
Creating a Task from an Appointment
To make it easier to plan your work in Outlook's calendar, as well as in the task list,
Taskline includes an option to create a task from an appointment. Right click any standard
Outlook appointment and click either Create Task or Create Task and Pin. Both options
create a Taskline task from the appointment; attributes such as Subject, body text,
Categories etc are also copied.
The appointment is also converted into a Taskline calendar task entry, i.e. it becomes
exactly like other calendar task entries Taskline creates for each task when it runs. Be
careful – like all calendar task entries, the converted appointment will be deleted and
recreated the next time Taskline runs, so any changes or attachments will be lost. If you
don't want this to happen, select the Create Task and Pin option instead. Or, if you
want to create a task from an appointment and leave the appointment unchanged, use
the standard Outlook feature of dragging the appointment onto your Tasks folder.
Note
Create Task is only available for appointments that are not recurring.
Tip
The task is automatically opened after it has been created. If you don't want this,
deselect the Open task after 'Create Task' from appointment check box, which
is on the Advanced Options dialog.
Creating a Task from an Email, Note or Contact Item
You can also quickly create tasks from Outlook emails, notes and contact items. Right
click any of these items and click Create Task. A Taskline task will be created with many
attributes, such as Categories, being automatically copied from the item to the new task.
If a task is created from an email, and that email has been flagged for Follow Up, the
Follow Up date will be used to automatically set a Finish on or before constraint on the
task.
Note
Unlike the Create Task menu option on appointments, Create Task for emails,
notes and contacts leaves the original Outlook item unchanged.
Next: Setting Total work
Related Topics
Creating New Appointments
The Taskline Form in Outlook
Setting Total work
Total work is your estimate of how long a task will take – effectively how much work it
entails. It is the task's duration.
1. Open an existing task in Outlook, for example by double clicking it, or create a new
task by double clicking a blank area of Outlook's task list.
2. On the Taskline tab, enter how long you think the task will take in the Total work
box, which is set to 0 by default. If you don't yet have a Taskline tab, use the
Details tab. You can enter the Total work as a number of minutes, hours, days or
weeks; the abbreviations are m, h, d and w. For example, to set Total Work to 5
hours, you can type "5h" or "5 hours." When you have updated Total work, click
Save and Close.
Tips
If you wish to set the Total work values of several tasks in one step, you can add
a Total work column to the tasks table view. How?
Outlook converts large numbers of small time units to larger time units. For
example, "120 minutes" converts to 2 hours, and 8 hours converts to 1 day,
assuming that there are 8 working hours in the day. See Working Hours Per Day
and Week for information on how to set the number of working hours in a day.
Tasks with a Total work of zero are called milestones, or goals. Milestone tasks
represent significant events, rather than routine work items. More
Next: Milestones
Related Topics
Progress: Working Through Your Task List
Milestones
Milestones
Milestones, or goals, are normal Taskline tasks with a Total work of zero. Milestone tasks
represent significant events, rather than routine work items. An example might be
finishing an important package of work, e.g "Phase 1 Completed." The Summary of Task
Schedule report, displayed when Taskline has finished processing, lists the date of the
next uncompleted milestone in your schedule, as well as other information.
Milestones mostly work in the same way as other tasks, with a few exceptions:
When you create a task with 0 in the Total work box, the Ignore this task check
box on the Taskline tab of the Taskline form is selected by default. You will need
to uncheck this check box to have Taskline schedule the milestone.
Taskline will not show milestones in the calendar unless the Create all day events
for milestones option is selected on the calendar tab of Taskline's dialog.
Milestones cannot be progressed using Actual Work, as they have no work to
progress. You can set only milestones as Not Started or Completed – you cannot
have a partially completed milestone.
You can color milestones on the calendar differently, to highlight them. How?
Next: Defining the Order in Which Tasks are Scheduled
Related Topics
Giving Calendar Task Entries Colors
Defining the Order in Which Tasks are Scheduled
In most cases you will want your tasks to be carried out in a certain sequence. This may
be just personal preference, or it may be a necessity, for example you can't bind the
handouts into a booklet until you've photocopied them.
Use the Schedule tasks in the following order drop down list boxes, on the Tasks tab
of the Taskline dialog, to control scheduling order. This simple system is used in place of
complex logic links used by Project Management software. For tasks with constraints,
such as a Finish on constraint, an additional method of using the Taskline task form to
select all the tasks that are affected by the constraint can also be used. More about
constraints.
Tasks can be ordered using more than one field. In this case, if tasks have the same
values for the first field, then they are ordered according to the second field, and if they
have the same values for the second field, they are then ordered by the values of their
third field.
Taskline overrides the task order, if necessary, under the following conditions:
Task constraints, such as a Finish On constraint, override task order, but only if
this is necessary to make sure that the constraint is met. This allows you to forget
about deadlines when setting the task order – Taskline keeps track of these for you.
A task with a missed constraint, or a recurring task that has missed its recurrence
date, is regarded by Taskline as overdue. Overdue tasks take priority over all
others.
Different tasks assigned different Working Hours can get scheduled out of order,
because some time slots might only be available to certain tasks.
If you have turned off Task can be split or if you have set Minimum split on a
task, then it's possible that a higher priority task isn't able to use the first available
free time slot, because it's too small. Thus the task will get scheduled in a later time
slot, leaving the earlier one free for another (perhaps lower priority) task.
Note
For tasks that have an external constraint and are part of a Select any other
tasks also affected by this constraint selection, then the order of those tasks is
rigidly adhered to. However, for reasons outlined above, you could still get gaps
between such tasks and these gaps could get filled by other tasks, to give a more
optimum schedule.
The task fields you can use to set the order in which tasks are scheduled are:
Natural order. Tasks in an Outlook folder have a natural order. This is the order in
which they are displayed when all sorting and grouping is switched off, and is the
order you created the tasks in. By default, Taskline schedules your tasks in
Outlook's natural order. In Outlook, you will need to turn off sorting and grouping,
and preferably filtering too, if necessary, should you want to view your tasks in
their natural order:
Outlook 2007 – Click View → Current View → Customize Current View
menu option, then use the Sort and Group By buttons on the View
Summary dialog box to set the Sort Items by and Group items by fields to
none.
Outlook 2010 and 2013 – Click View (Outlook 2013 VIEW) ribbon → View
Settings button to display the Advanced View Settings dialog. Then use
the Sort and Group By buttons on this dialog to set the Sort Items by and
the Sort and Group By buttons on this dialog to set the Sort Items by and
Group items by fields to none.
Having your tasks displayed in natural order and scheduled in descending natural
order is often a very convenient way of working, because the order in which you
see your tasks is the order in which Taskline schedules them. You can easily change
this order by simply dragging the tasks up and down the view in Outlook.
Note
Natural Order only works with the tasks shown in your selected Outlook Tasks
folder. It cannot be used with Outlook's To-Do Bar/To-Do List.
Tip
If you are viewing sorted tasks on Outlook 2007 only, you can make the order
tasks are currently being displayed in the natural order. To do this, click the
Actions → Save Task Order menu option.
Priority (A1). You can enter a letter from A-Z and an optional number from 0 to
99 to define Priority (A1) for tasks. Giving related tasks, for example tasks of the
same project or category, the same Priority (A1) letter makes it easy to
reprioritize the whole set of tasks in one step, by using the Renumber or Reletter Priority (A1) dialog. More.
You should consider leaving gaps between priorities, so that you can easily
introduce a new task at a later date between two existing tasks. For example, you
might give the first task that you want to do a task priority of B10, the second task
a task priority of B20, and so on.
Tips
Priority (A1) Ascending order means that A01 gets scheduled first and Z99
last.
Taskline automatically sets the ABC task field to contain just the letter of
Priority (A1). This allows you to group Outlook views by this letter.
You can also bulk change the priority of tasks. Click
Settings (on Outlook
2007, click
Taskline) → Options tab → Renumber or Re-letter Task
Priorities button. You may wish to give groups of related tasks the same
priority letter, so that the priority of the whole group can be changed in one
go by using the Renumber or Re-letter Priority (A1) facility.
Priority. This is the Low/Normal/High setting that Outlook uses. It is useful in
that Outlook gives you symbols in the task table view showing the priority (↓ for low
and ! for high), but is limited in that only three settings are available. The Priority
(A1) option on the Taskline tab of the Taskline form gives you much more
flexibility in scheduling tasks by priority and reordering them easily.
Due Date. The Due date is supported by standard Outlook tasks. Ordering by Due
date can be useful if you have an existing task list to which you've already added
Due dates. Ordering by Due date works slightly differently to other Order by
options in that Taskline will not only order by this date, but will also try and make
sure that the task is completed on or before the Due date.
Tasks without Due dates are scheduled in no particular order, so you will probably
need a secondary ordering method if you use Order by Due date.
Ordering by Due Date is something of a legacy method. It is helpful if you want to
get Taskline working quickly and you already have lots of Due dates on your tasks.
Using a different ordering method and placing Finish on or before constraints on
your tasks achieves a similar effect, and offers more flexibility than using a Due
your tasks achieves a similar effect, and offers more flexibility than using a Due
date, because of all the constraint options available. More about task constraints.
Total work. This is how long a task is expected to take. If, for example, you
wanted to work on your shorter tasks first, then you would sort on Total work.
More.
Status. Status can be Not Started, In Progress, Completed, Waiting On
Someone Else, or Deferred. Ordering on Status can be useful, because it is a
way of pushing Waiting On Someone Else and Deferred tasks to the end of your
list.
Subject. Ordering your tasks by subject is useful if you prefix your tasks with a
code or a priority.
Project. Ordering by Project is a two step process:
On the Tasks tab of Taskline's dialog, select Project in the Order by list,
then select Ascending.
On the Projects tab of Taskline's dialog, put the Project List into priority
order, by selecting projects and using the Move Up and Move Down
buttons.
Tip
You will usually also need a second level of ordering when Order by Project
is used. This is because you will need to set the order of the tasks within each
project, as well as the order of the projects themselves.
Task priority. This field defines the priority for tasks created with Taskline Version
2.0 and earlier. Use with Versions 2.1 and newer is not recommended. Unlike the
Priority (A1) field, this field supports only numbers, not numbers and letters.
Custom fields. You can also order your tasks by most custom Outlook tasks fields,
also known as User Defined Fields. See below for more information.
Ordering Tasks by Outlook Custom Fields
To do this:
1. Click Custom fields..., which is the last entry in each Order by/And then by list.
The Custom Field Chooser dialog will be shown.
2. Select the custom fields you wish to appear in the Order by drop down lists, then
click OK.
3. The custom fields you selected will now appear in the Order by drop down lists.
Now simply select them, as appropriate, just like any other fields.
Note
Not all custom field types are shown in the Custom Field Chooser dialog. For
example, it doesn't really make sense to order by Keywords. You can order by Text,
Number, Currency, Yes/No, Date/Time, Duration and Integer fields.
Tip
If you Order by one or more custom fields, and some tasks do not have values
assigned to those fields, then those tasks will always go to the end of the task
order, regardless of whether you choose Ascending or Descending.
Next: Setting When the First Task Should Start
Related Topics
Setting When the First Task Should Start
Using Projects
Setting When the First Task Should Start
You must tell Taskline where to start placing your tasks.
1. Start Taskline, for example by clicking the
Settings (on Outlook 2007,
Taskline) button in Outlook.
2. On the Tasks tab, do one of the following:
Type in a date and a time, for example "May 5 2014 9am", in the First task
starts at box. Note that the date and the time must be separated by a space.
Enter only a date in the First task starts at box. If the time is omitted,
Taskline adds the current time.
Click the Default to current date and time check box. Taskline then enters
the current date and time for you. If this is outside normal working hours, it is
rounded up to the start of the next working period. For example, if you work
8am to 5pm Monday to Friday, and you click this check box at 9am on
Tuesday, Taskline enters 9am Tuesday for you. If you click this check box on
Saturday, Taskline enters 8am next Monday for you.
By default, the current time is also rounded up to the next 15 minute interval.
For example, if the current time is 9:06am, Taskline will set 9:15am. You can
control the amount of rounding by setting the Round 'Default to current
date and time' to next option, which is on the Advanced Options dialog.
Click the arrow to the right of the Date and Time box. You can then choose
a date from the calendar control. If necessary, you can click the year to
choose a different year, and you can click the arrows to the left and right of
the month to choose a different month. Once the calendar displays the correct
month, select a date by clicking it. When you select a date, Taskline adds the
time the working day starts to the end of the date.
Next: Scheduled start and Scheduled end
Related Topics
Defining the Order in Which Tasks are Scheduled
Task Constraints
Scheduled start and Scheduled end
When Taskline has finished scheduling your tasks, each one is assigned a start date and
time and an end date and time. This information is stored in the Scheduled Start and
Schedule End fields. More.
Scheduled start is the estimated or most likely start date for the task. For a new task, it
is initially unset, but is recalculated each time you run Taskline. The Taskline calculation
takes into account things like appointments in your calendar, the priorities of your tasks,
and any constraints on them. As few people can predict work with 100% accuracy, for
example a meeting might take longer than anticipated, you cannot usually start every
task exactly on schedule. However, the Scheduled start date gives you a very good
indication of when you are likely to start working on a task.
Scheduled end is the estimated finish date for the task. It is initially clear and is
recalculated each time you run Taskline. The calculation takes the Scheduled start date
and adds to it the task's Total work. Taskline then adjusts for your normal working
week, such as your daily breaks and appointments in your calendar, to derive the most
likely end date for your task. You usually do not finish your tasks exactly as scheduled,
because of unanticipated interruptions or because the task simply took longer than the
Total work estimate. However, the Scheduled end date gives you a very good idea of
when you are likely to finish a task.
For a task that is part completed, Scheduled start shows when the remaining part of the
task should be started, and Scheduled end shows when the task is due to be fully
completed. For a completed task, Scheduled start shows when the task started.
By default, tasks that are not scheduled have their Scheduled start, Scheduled end
and Week commencing dates cleared by Taskline. This makes it easy to see which tasks
have been scheduled, and which have not. You can change this behavior by using the
Clear Scheduled start and Scheduled end if task not scheduled setting, which is on
the Advanced Options dialog. A task might not be scheduled because for example the
Ignore this task check box is selected or perhaps because the project a task belongs to
is not scheduled.
Tips
You can add Scheduled start or Scheduled end columns to Outlook's task table
view. How?
You might want to sort the Task folder table view into Scheduled start order, so
that the tasks are listed in the order in which you want to work. How? However,
both displaying and scheduling the task list in Natural Order is often the most
convenient way to work.
In the task table view, Outlook regards uncompleted tasks with a Due date in the
past as being overdue, and these are shown in red by default.
You can tell Taskline to set the task Start and Due dates to keep them in step with
the Scheduled start and Scheduled end dates. To do this, select the Taskline
should set the Start and Due dates to the Scheduled dates check box, which
is on the Options tab of Taskline's dialog. More. Note that Outlook's Start and Due
dates can only show dates and not times. In contrast, Scheduled start and
Scheduled end show both dates and times.
Next: Using Projects
Related Topics
Defining the Order in Which Tasks are Scheduled
Defining the Order in Which Tasks are Scheduled
Task Constraints
Predefined Outlook Views
Using Projects
On the Taskline tab of the task form in Outlook, you can assign a project name to each
task. You do this by clicking on the Project drop down list, to select an existing project
name, or by typing in a new project name.
There are several advantages to assigning projects to tasks:
1. It improves task organization. Giving a task a project name is useful for grouping
together related tasks. One way of doing this would be to group your Outlook task
view by Project. How?
2. With projects, you now have a second way of categorizing tasks, in addition to the
standard Outlook method of categories. A Project describes a related set of tasks,
for example all the work for one particular customer, or a description of a significant
collection of work, such as an office relocation. Categories on the other hand refer
to the type of work, such as administration, report writing, meetings etc. As a
guide, categories tend to be fixed, while projects tend to change over time.
3. It allows you to schedule your tasks in Project order. To do this:
i. Put the Project List into priority order, by selecting projects and using the
Move Up and Move Down buttons.
ii. On the Tasks tab, select Project in the Order by list, then select
Ascending.
Tip
You will usually also need a second level of ordering when Order by project
is used. This is because you will need to set the order of the tasks within each
project, as well as the order of the projects themselves.
4. If you have the Show task summary when task reschedule is complete check
box selected, which is on the Options tab of Taskline's dialog, you will see a
summary of work remaining for each project when Taskline has finished task
scheduling.
On the Projects tab of Taskline's dialog, you can also:
Have Taskline ignore all the tasks of one or more projects. On the Projects List, if
the check box next to the project name is selected, Taskline will schedule that
project. If it is deselected, Taskline will ignore it.
Add new project names. Simply type the name in and click the Insert New button.
Delete old project names. Taskline keeps track of all the project names you have
used previously, so that you can select them from a list rather than type their
names in. To permanently delete old project names that you don't intend to use
again, select them and click the Delete button.
Note
By default, Taskline stores the project name assigned to a task in an Outlook User
Defined Field called Project. However, if the ClearContext project compatibility
advanced option is selected, Taskline instead uses an Outlook custom field called
CC-TopicName. This is the name used by the ClearContext® Outlook Add-In and
so aids compatibility if you also have that Add-In installed.
Related Topics
Project and The Taskline Task Form in Outlook
Taskline Dialog Box Projects Tab
Introduction to Outlook Appointments and Calendars
About Appointments
You may well have many events happening that temporarily stop you working on your
tasks – meetings, dental appointments, holidays, conferences, training courses and so on.
Some of these may be one-offs, such as a training course, others may happen regularly,
such as a weekly management meeting.
You should enter such events into Outlook's calendar, which is like an electronic diary.
Outlook calls calendar entries appointments. When scheduling your tasks, Taskline
checks your diary to see what appointments you have, and schedules your tasks around
them. It can also be convenient for you to see all of your appointments etc listed in the
calendar.
Taskline will only take into account appointments that have been set to show the time
they occupy as Busy. Taskline will ignore appointments whose time has been set to be
shown as Free. This is useful if you wish to mark events in your calendar that do not stop
you working for any appreciable time, such as an important football match you might
want to check the result of.
By default, appointments with Show time as set to Out of Office , Tentative or (for
Outlook 2013 and later) Working Elsewhere are also taken into account by Taskline,
i.e. tasks are scheduled around them. However, you can change this behavior using the
Ignore 'Out of Office' appointments, Ignore 'Tentative' appointments and Ignore
'Working Elsewhere' appointments Advanced Options.
To change how an appointment's time is shown, open the Appointment form, by double
clicking on an appointment, or right clicking on an appointment and selecting Open from
the pop up menu. Choose your option from the Show time as drop down list.
Alternatively, right-click the appointment and select Show time as from the pop up
menu.
For more efficiency in planning your time, Taskline allows you to add time allowances
before and after the appointments in your calendar. This helps when you need to allow for
travel or planning time before or after an appointment. Taskline does not schedule tasks
during these times. More.
Related Topics
Travel and Preparation Time on Appointments
Calendar Views
Creating New Appointments
Recurring Appointments
Showing Your Tasks in the Outlook Calendar
Calendar Views
There are several different calendar views available. The Day, Week and Work Week
views are drawn to a time scale, which makes them particularly useful. The Work Week
view shows all the days that you work, one day per column. The following example shows
a three-day working week:
The Month view shows a square grid, with one day per square. All the appointments on a
day will be listed in each square:
You can switch between calendar views by clicking on the appropriate buttons on the
Calendar toolbar/ribbon.
You can also view appointments in a table format:
Consult Outlook's online help for details on creating Calendar Table views.
Related Topics
About Appointments
Creating New Appointments
Recurring Appointments
Showing Your Tasks in the Outlook Calendar
Creating New Appointments
There are several ways to enter a new appointment into Outlook's calendar:
Enter the details of your appointment on the Appointment form. To get an
appointment form for a new appointment:
In Outlook 2007, click File menu → New → Appointment.
In Outlook 2010 and 2013, click the New Appointment button on the Home
(Outlook 2013 HOME) ribbon.
Or, for any Outlook version, simply double click a blank area of the calendar.
Or, again for any Outlook version, type Control+Shift+A.
On a Day, Week or Work Week view, you can also click or drag to select a time
period, and simply type in the subject of your appointment.
On the Day, Week or Work Week calendar views, you can edit the start and end time of
your appointment by dragging its top or bottom up or down. For other views, you will
need to double click the appointment (or right click and select Open) to get presented
with the appointment form, then edit the times on the form.
If your appointment lasts all day, select the All day event check box on the appointment
form. Outlook calls appointments that last all day Events. Events are only shown as small
entries at the top of the Day, Week and Work Week views, but they still encompass the
whole day. On the Month view, you can distinguish events by them not displaying start
or end times. By default, Outlook marks the time taken by an all day event as Free.
Taskline will not schedule tasks around calendar entries that have been marked as Free,
therefore on the appointment form you may wish to change this setting to something
else.
You should consult Outlook's documentation and online help for full information on how to
work with Outlook's calendar. Only the aspects of the calendar most relevant to Taskline
users have been discussed here.
Tip
You can also create a Taskline task from a standard Outlook appointment. How?
Related Topics
About Appointments
Calendar Views
Recurring Appointments
Showing Your Tasks in the Outlook Calendar
Recurring Appointments
Recurring appointments represent appointments and events that occur more than once,
according to some regular pattern. For example, every Friday from 9am to 10am. As well
as being useful for normal appointments, you can use recurring appointments to model an
irregular working week (How?), or to periodically schedule yourself some personal or
"thinking" time during the day.
There are many ways to create recurring appointments. Only one quick way is
documented here:
1. Go to the Day or Work Week view for the day you want your recurring
appointment to begin.
2. Highlight (by dragging with the mouse) the time slot or slots that encompass your
appointment.
3. Right-click the highlighted area, and select New Recurring Appointment.
4. Enter the recurrence pattern and the appointment details into the 2 forms that
present themselves. You will need to consult the Outlook documentation for help
with the Appointment Recurrence dialog options.
You can make an existing appointment recurring by opening it (to present the
appointment form), and then clicking on the Recurrence toolbar button.
To delete one of the recurring appointments, but not the whole series, select the
appointment and press the Delete key, or click the Delete toolbar button. In the
Confirm Delete dialog, choose Delete this one. This is useful if, for example, your
regular Friday management meeting is canceled this week, but is still scheduled for future
weeks.
This is only a brief summary of recurring appointments. See the Outlook documentation
for full details.
Related Topics
About Appointments
Calendar Views
Creating New Appointments
Showing Your Tasks in the Outlook Calendar
Showing Your Tasks in the Outlook Calendar
Creating Calendar Task Entries
Taskline can integrate your task list with your Outlook calendar, in a time-scaled format.
Everything you have to do, and when you should do it, is shown in one place, rather than
having some of your work in the task list, and some in the calendar. You can also print
out this calendar in daily, weekly or monthly formats.
To have Taskline display task entries for tasks (or parts of tasks) that are still outstanding
on Outlook's calendar, click the Calendar tab on Taskline's main dialog and check the
Create for tasks that are Not Started or In Progress check box. For example, you
might make the following entries in the task list:
When the Show as option on the Taskline dialog Calendar tab is set to Appointments,
with accurate start and end times, your tasks result in the following task entries in
Outlook's calendar:
Notice how a single task can result in several task entries. This is because few tasks are
worked on non-stop. You may do some of a task in the morning, stop for lunch, do some
more in the afternoon, stop at the end of the day and then finish it off the following day.
Task entries show all this information, whereas tasks only summarize it by showing only
dates for the Scheduled start and the Scheduled end.
When the Show as option is set to All day events from task Scheduled start to
Scheduled end, the tasks are shown as below. This is the same schedule, just
represented differently:
Other guidelines for task entries are as follows:
You can color task entries differently from regular appointments. How?
You can use the Show time as list on the Calendar tab of Taskline's main dialog
box to have Calendar task entries created as Busy, Free, Tentative, Out of
Office or (for Outlook 2013 and later) Working Elsewhere. You can use this
feature to help distinguish Calendar task entries from regular appointments in any
version of Outlook.
Further to the previous point, you can override Show time as on a per-task basis,
by setting Show as on the Taskline tab of the task form in Outlook. This could be
used to differentiate certain task in the calendar.
If you want milestone tasks, which have 0 Total work, to be displayed in the
Calendar too, select the Create all day events for milestones check box on the
Calendar tab of the Taskline dialog.
Tip
When you create a task with 0 Total work, this is ignored by Taskline by
default. To have Taskline schedule the milestone, uncheck the Ignore this
task check box on the Taskline tab of the Taskline form in Outlook.
More about goals and milestones.
High Priority tasks result in Calendar task entries of High Importance, while
Low Priority tasks give Low Importance ones.
You can also maintain task entries for completed and partly completed tasks, to
keep a record of what you have achieved in your calendar. How?
If you make a change to one or more of your tasks, you will need to run Taskline
again, for example by clicking the
Reschedule button, to synchronize the
calendar. More.
Usually, uncompleted calendar task entries are deleted and recreated each time
Taskline runs. So, if you change a calendar task entry in Outlook, for example to
change the Category, this change will usually be lost when Taskline is next run. If
you need to make a change, change the task instead and then re-run Taskline.
However, you can Pin selected calendar task entries so that they survive a Taskline
reschedule – see below.
You can Pin individual calendar task entries so that they survive a Taskline
You can Pin individual calendar task entries so that they survive a Taskline
reschedule. This is so that you can use Taskline to automatically schedule your
tasks and then tweak those results manually. Pinned entries do not get deleted and
recreated during a Taskline reschedule, rather they stay put. Moving a calendar
task entry will automatically pin it. More.
If you have the Keep a record of completed work option selected, completed
calendar task entries are left untouched by Taskline. However, if this option is not
selected, Taskline will delete completed task entries when it runs.
You may not wish to have your calendar filled up with tasks for many days or weeks
ahead. Sometimes, it helps to just focus on short term goals. You can achieve this
by setting the Limit tasks in calendar to first ... days option, which is on the
Calendar tab of Taskline's main dialog.
By default, calendar task entries do not have a category. However, you can instruct
Taskline to copy any categories assigned to a task to its calendar task entries. Or,
Taskline can assign the same category or categories to all calendar task entries.
These settings are in the Advanced Options dialog. More
Related Topics
Giving Calendar Task Entries Colors
Accessing a Task via its Task Entry
Keeping Task Entries Private
Displaying Times for All Appointments on the Calendar
About Appointments
Calendar Views
Defining the Subject of Task Entries
Manually Overriding Some or all of Taskline's Scheduling
Giving Calendar Task Entries Colors
Taskline optionally creates calendar task entries, which are appointments in Outlook's
calendar that represent tasks. How? You can tell Taskline to give calendar task entries
certain colors, for example to distinguish them from ordinary appointments, or highlight
important items.
Note
Taskline uses a feature of Outlook 2003 and earlier called Labels to color calendar
task entries. Outlook 2007 and later work correctly with labels, but label
commands are no longer shown in Outlook's menus and dialogs. Instead, Outlook
2007 and later prefer to use Categories to color appointments. In Outlook 2007
and later, if appointments or calendar task entries are assigned a category, then
the category color is shown, rather than the label color. Thus if you want to color
calendar task entries using labels, you must select Taskline's Always set to
Advanced option and leave the edit box blank. More. In Outlook 2007 and later,
label colors are only shown if appointments and calendar task entries do not have
any categories assigned.
Taskline allows calendar task entries to be colored differently according to task attributes,
such as Category or Project. Select the Calendar tab of Taskline's main dialog and click
the Define Colors button. The resultant Calendar Task Entry Colors dialog allows you
to setup rules that control whether calendar task entries are created and, if so, how they
are colored. The table on this dialog lists the existing rules. You can color and control the
creation of calendar task entries based on:
High/Medium/Low This refers to the High/Medium/Low priority that can be assigned
Priority
to Outlook tasks, for example by using the Priority drop down list
on the Tasks tab of the task form. Each priority can be assigned
a different color.
Priority letter
You can color tasks based on the letter of their Priority (A1)
value; the Priority (A1) number is ignored. The Category Etc
drop down list will only show those Priority (A1) letters that are
currently assigned to tasks.
Milestones
You can color milestones differently to highlight them on the
calendar. You will need to place the Milestones rule before any
Not Started Tasks or Completed Tasks rules, as milestones are
also tasks.
Completed or Not You can color completed work differently to outstanding work.
Started
Category
Tasks can be assigned a category in Outlook, for example by
clicking on the Categories button on the Tasks tab of the task
form. You can then instruct Taskline to color calendar task entries
differently, depending on the category that has been assigned to
the task. Note that the Category Etc drop down list will only
display task categories that are currently assigned to tasks. If no
task categories have been assigned, no categories will be
displayed in the drop down list.
Project
Tasks can be assigned a Project using the Taskline tab of the
task form in Outlook. How? The Categories Etc drop down list
will display all current project names. You cannot add new project
names from the Calendar Task Entry Colors dialog. Use the
Projects tab to do this. More about projects.
Working hours
Working hours are defined using the Working Hours tab of the
Working hours
Overdue
Pinned
Working hours are defined using the Working Hours tab of the
Taskline dialog How? and assigned to tasks using the Taskline task
form in Outlook. How?
Overdue tasks are defined as those with a missed Task should
constraint or tasks where the Due date is in the past.
Use this setting to color Pinned calendar task entries differently.
Note
To prevent the creation of calendar task entries for one or more Category Etc
values, select
from the color drop down list.
Tip
If a task satisfies multiple rules, it will be assigned a color according to the earliest
rule in the list. You can use the Move Up and Move Down buttons to change a
rule's position in the list.
To Do
This
Do This
Add a
new
rule
Update
an
existing
rule
Delete
a rule
Select a task Category Etc and a Color using the drop down lists, then click the
Insert New button. You cannot create more than one rule for the same
Category Etc.
You can update an existing rule by clicking on it to select it, and then changing
the Category Etc or the color using the drop down lists below the table. To
commit your change, click a blank area of the table, or click a different rule in
the table, or click the Update button.
Select a rule and click Delete to remove it.
In the following example, task "Interviews for new admin assistant" has been completed,
and task "Produce internal phone directory" is currently in progress. All the other tasks
are not yet started. Additionally, tasks have been assigned a Category:
The Calendar Task Entry Colors dialog is then used to assign a color to each calendar
task entry, based on Category. Additionally, completed calendar task entries will
always be shown gray (because this rule is first in the list):
The resultant calendar view looks like this:
Displaying Times for Task Entries on the Calendar
Calendar task entry without times
Calendar task entry showing start
and end times by using the
<StartEndTime> token
Outlook does not display times on the calendar's Week view. If you want your calendar
task entries to display times:
Use the <StartEndTime> token to display start and end times. To do this:
1. Click the Calendar tab on the Taskline dialog.
2. Click the Define Subject button.
3. Enter the token in the Subject for outstanding entry box on the Calendar
Task Entry Subject dialog. More
Select the Enable times tokens option, which is also on the Calendar Task Entry
Subject dialog.
Accessing a Task via its Task Entry
Taskline adds an Open Task button to a calendar task entry, so that you can quickly
open the task it represents. In Outlook 2007, this button is on the Appointment toolbar,
on Outlook 2010 and 2013 it's on the Taskline section of the Appointment ribbon:
1. Open the calendar task entry to display the Calendar Task Entry toolbar or
ribbon.
2. Click the Open Task toolbar or ribbon button to open the task associated with the
open calendar task entry.
Tips
You can also open the task by right clicking a calendar task entry in Outlook's
calendar and selecting Open Task from the popup menu. This is usually quicker as
there's no need to open the item first.
You can also open several tasks at once by selecting several calendal task entries
and right clicking any one of them.
Keeping Task Entries Private
If you work in a group and your calendar folder is visible to other people, for example you
use Microsoft Exchange Server to share your calendar folder, then you may wish to keep
some or all of your task entries private:
To have Taskline create all task entries as private, select the Mark all as private
checkbox, which is on the Calendar tab of Taskline's main dialog box.
If the Mark all as private option is not selected, then Taskline will create private
calendar task entries only for those entries that represent private tasks.
Related Topics
Giving Calendar Task Entries Colors
Showing Your Tasks in Outlook's Calendar
About Appointments
Calendar Views
Tokens
Defining the Subject of Task Entries
You can control what subject Taskline gives task entries created in the calendar. By
default, a task called "Tidy office" that starts at 9am and ends at 10:30am will have its
task entry called "9:00 AM-12:00 PM Tidy office [1.5 hrs]".
Click the Define Subject button on the Calendar tab of the Taskline dialog box to
display the Calendar Task Entry Subject dialog box. This allows you to change the
templates that are used to define the Subject of a calendar task entry. The templates
usually contain tokens, which are the items starting with < and ending with >. These are
replaced by actual values from the task or task entry to create the task entry subject.
There are four templates shown in four boxes. The first template is used to define the
subject of task entries for work that is still outstanding. The second template is used to
task entries that represent completed work. The third is used for milestones that are yet
to be achieved and the last is used for completed milestones. More about milestones.
For example, if you type "<TaskSubject>" as the template, then each task entry will be
given the same subject of the task it represents. <TaskSubject> is an example of a
token – which is some text that gets replaced by whatever it represents. There are many
different tokens available. For example, <TaskTotalWork> represents the task's
duration.
Any characters in the template that are not part of a token get copied to the task entry
subject unchanged. For example, if you entered "Task duration is <TaskTotalWork>" as
your template, then for the example above, the task entry would be given the Subject
"Task duration is 1.5 hrs."
A link to the complete list of available tokens is shown below. Some represent task
details, others represent task entry details. On the Calendar Task Entry Subject dialog,
you can see whether the template you type in is correct, because the dialog shows you
the results of processing your template for an imaginary task and milestone.
Note
The Enable times tokens option allows you to quickly remove times from the
subjects of calendar task entries. This can be useful when switching between
Outlook views, because some Outlook calendar views benefit from times, while
others don't. Specifically, if this option is deselected, then the following tokens act
as empty strings: <StartEndTime>, <StartTime> and <EndTime>. All other
tokens are unaffected.
Related Topics
Tokens Reference
Showing Your Tasks in the Outlook Calendar
Milestones
Tokens That Refer To Calendar Task Entries
Token Name
Description
<EndDate>
The date the task entry ends on.
<EndTime>
The time the task entry ends on.
<StartEndTime> This token converts to nothing (an empty string) if task entry
alignment is off, otherwise it is equivalent to "<StartTime> <EndTime> ", for example "9:00 – 10:30 ". Note the space at the
end of the token.
<StartDate>
The date the task entry starts on.
<StartTime>
The time the task entry starts on.
<Work>
The duration of the task entry.
Tokens That Refer To Tasks
Token Name
Description
<Task%Complete> How complete the task is. This value is not necessarily the
<AlignStartEndTime> same as the % Complete value entered on the task form, as
Actual Work is taken into account as well More information.
This token is blank if the task is not started.
<Task%Rem>
How much work remains to be done on the task, expressed as
a percentage.
<TaskA1>
The task's Priority (A1) value.
<TaskActualStart>
The task's Actual start date.
<TaskAttach>
Shows [A] if the task has attachments.
<TaskCategories>
The task's Categories.
<TaskCompanies>
The task's Companies text, taken form the Details tab of the
task form.
<TaskContacts>
The list of Contacts that have been assigned to the task.
<TaskEndDate>
The task's Scheduled end date.
<TaskEndTime>
The task's Scheduled end time.
<TaskHours>
A task's Working hours.
<TaskNotes>
<TaskProject>
<TaskRole>
<TaskStartDate>
<TaskStartTime>
<TaskSubject>
<TaskTotalWork>
<TaskWorkDone>
<TaskWorkRem>
Shows [N] if the task has notes.
The Project setting for a task.
The task's Role text. This is a standard task property that is
not shown on the task form. You must add a column to the
task view in Outlook to set it.
The task's Scheduled start date.
The task's Scheduled start time.
The task's Subject.
The task's Total work.
How much has already been done on the task, expressed as a
duration.
How much work remains to be done on the task, expressed as
<TaskWorkRem>
How much work remains to be done on the task, expressed as
a duration.
Related Topics
Defining the Subject of Task Entries
Getting the Most out of Outlook Views
This section summarizes aspects of Outlook's view handling that are most useful to
Taskline users. You should consult Outlook's own documentation for full information on
how to work with Outlook's views – only brief details are included here.
Customizing the Task Table View
This section describes how to get Outlook's task table looking just how you want. Once
you have done that, you may well want to name and save your settings, so that you can
switch to a different view, and then switch back to your own custom view settings very
easily.
Before you start to customize a view, it is safer to create a new view first, and customize
that. How?
Creating New Views and Copying Existing Views
Rather than alter one of Outlook's predefined views, it is safer to first create a new view
to contain your custom view settings. You must do this before you start customizing the
view, if you don't want to modify the current view as well.
It is often quicker to create a copy of an existing view, and modify that, rather than
create a new view from scratch, so this is the technique that will be described here.
Outlook 2007
1. Click View menu → Current View → Define Views to open the Custom View
Organizer dialog.
2. Select the existing view you wish to copy, for example <Current view settings>.
3. Click the Copy button.
4. Enter a name for your new view.
5. Choose the appropriate Can be used on setting.
6. Click OK. The Customize View dialog will appear; assuming you don't want to
change anything, just click OK.
7. You should now be back on the Define Views dialog. Click the Apply View button
to make the new view the current view.
You are now ready to start customizing this view.
Outlook 2010 and 2013
1. Click the View ribbon (or VIEW in Outlook 2013) → Change View → Save
Current View As a New View. The Copy View dialog will appear.
2. Enter a name for your new view.
3. Choose the appropriate Can be used on setting.
4. Click OK. Then follow the instructions for switching named views below.
Switching Named Views
To switch to a different view:
Outlook 2007 – Click View menu → Current View. Then choose your view from
the list presented in the menu. Alternatively, select a view from the Current View
the list presented in the menu. Alternatively, select a view from the Current View
drop down list on the Advanced Outlook toolbar.
Outlook 2010 and 2013 – Click View (Outlook 2013: VIEW) ribbon → Change
View
Resetting Standard Outlook Views
If you inadvertently change one of Outlook's predefined views, you can revert to its
original settings:
Outlook 2007 – Open the Define Views dialog (How?), select the view you want
reverting and press the Reset button.
Outlook 2010 and 2013 – Click View (Outlook 2013: VIEW) ribbon → Reset View
Adding New Columns
You will probably want to add extra columns to the task view to show some useful
Taskline task information, such as Scheduled start and Priority (A1). You may want to
create a new view before adding new columns How?.
To add new columns, right-click any column heading and select Field Chooser from the
pop up menu. You can now drag fields off the Field Chooser dialog and onto the table
view column headers. The table view will then display that field for each task.
To get the Field Chooser to display fields that are special to Taskline tasks, click the
drop down list at the top of the Field Chooser dialog and select the User-defined fields
in folder option.
Once the User-defined fields in folder option is selected, you will see all of the special
fields that Taskline defines for Taskline tasks. You can drag these off the Field Chooser
and onto the table column headers, to have the table view display Taskline fields.
Note
Any field beginning with an "@" symbol is for Taskline's internal use only; if you
alter these fields you will probably stop Taskline from working correctly.
Because of a restriction in the way Outlook works, Taskline special fields that
represent a duration, such as Work remaining, are always displayed as a number
of minutes in the task table view.
Related Topics
Fields Specific to Taskline Tasks
Changing the Way Columns and Column Values are Displayed
Removing Unwanted Columns
Sorting
Grouping
Predefined Outlook Views
Fields Specific to Taskline Tasks
Field Name
A1
Description
This field represents how important each task is, so that Taskline can
schedule the more important tasks first. This field is equivalent to the
Priority (A1) value on the Taskline form. A1 contains a letter and an
optional number. This field represents the same priority field used by
FranklinCovey® PlanPlus. More.
ABC
ABC contains just the letter of Priority (A1), if set. This allows you to
group Outlook views by this letter.
Actual start This is the date the task actually started. It is only set for a task that is in
progress or completed. See Progress Fields on a Taskline Task for more
information.
Constraint This is the external constraint on the task. It can either be blank, or set to
one of Start on, Start on or After, Finish on or Finish on or Before.
More.
Constraint This is the date and time corresponding to any constraint. If no constraint
date
time is set, a time of 0:00 is shown. More.
Hours
This is same as the value for Work remaining, but is always represented
remaining as a number of hours.
Ignore task If this box is checked, Taskline completely ignores the task.
Max time
This is used to limit how much time is allocated each day to a longer task.
per day
More.
Max time
This is used to limit how much time is allocated each week to a longer
per week
task. More.
Min split
This is the smallest duration that a task can be split into. More
Missed
This field is normally zero. However, when a task constraint can't be
constraint met, Taskline sets Missed constraint to the elapsed gap between the
scheduled date and the Constraint date.
Project
This denotes the name of the project that the task belongs to, if any. More.
Remind
Whether a Taskline Reminder has been set. More about reminders.
Remind
If a Taskline Reminder has been set, this field represents how many
Minutes
working minutes before the Scheduled start the Reminder should go off.
More about reminders.
Scheduled The date and time the task is scheduled (or planned) to end. More.
end
Scheduled The date and time the task is scheduled (or planned) to start. More.
start
Show as
The Show as value to be assigned to this task's calendar task entries.
Split
A way of showing if the task can be split into several shorter parts during
scheduling. The value is true if the task can be split and false otherwise.
More.
Task priority A way of saying how important each task is, so that Taskline can schedule
the more important ones first. This field supports tasks created with
Taskline Version 2.0 and older. This field is not recommended for use with
tasks created with Taskline Version 2.1 and newer.
Week
The date of the start of the week that the task starts on. This field is useful
commencing for grouping tasks on an Outlook table view. More about grouping.
Work
You cannot set Work remaining as Taskline calculates this value. Work
Work
remaining
Working
hours
You cannot set Work remaining as Taskline calculates this value. Work
remaining shows the amount of work that is still outstanding on the task.
More.
The Working hours assigned to the task. More.
Related Topics
The Taskline Task Form
Changing the Way Columns and Column Values are Displayed
By default, columns in Outlook's tasble views get the name of the field they represent.
This is usually fine, but sometimes you may wish to change it. For example, you may wish
to change the name of the Scheduled end column to Sched End, to make the column
narrower.
To rename a column:
Outlook 2007 – Right-click the column heading and select Format Columns from
the menu.
Outlook 2010 and 2013 – Right-click the column heading and select View Settings
from the menu. Then click the Format Columns button.
The Format Columns dialog box will appear. You can change the column name by
changing the Label text on the dialog box. Other controls on this dialog box allow you to
change how the column values are displayed, for example left, centre or right aligned.
Note
Because of a restriction in the way Outlook works, Taskline special fields that
represent a duration, such as Work remaining, are always displayed as a number
of minutes in the task table view.
Removing Unwanted Columns
Simply drag an unwanted column off the column heading row.
Sorting
You can sort on a column simply by clicking the column header. For example, to sort your
task list into Scheduled start order, click the Scheduled Start column heading. Click a
second time to sort into reverse order.
To sort on a field that is not displayed, or to sort on more than one field, or to switch off
sorting, you will need to use the Sort dialog box. To access this, do the following:
Outlook 2007 – Click the View → Current View → Customize Current View
menu option, then press the Sort button on the View Summary dialog box.
Outlook 2010 and 2013 – Right-click the column heading and select View Settings
from the menu. Then click the Sort button.
If you wish to sort on any Taskline special fields, you will need to select User-defined
fields in folder from the Select available fields from drop down list on the dialog box.
Grouping
A group is a set of items with something in common, such as the same priority. You can
group common items together under one heading, which can be expanded by clicking on
the + or buttons to show all of the contained items, or contracted, by clicking on the or buttons, to conceal them. For example, Taskline tasks contain a Week commencing
field – this can be a convenient way of grouping tasks:
field – this can be a convenient way of grouping tasks:
To choose what field to group by, right click on a column heading and select Group By
This Field from the pop-up menu. For more control, for example to group by more than
one field, do the following:
Outlook 2007 – Select the View → Current View → Customize Current View
menu option, then press the Group By button on the View Summary dialog box.
Outlook 2010 and 2013 – Right-click the column heading and select View Settings
from the menu. Then click the Group By button on the Advanced View Settings
dialog.
If you wish to sort on any Taskline special fields, you will need to select User-defined
fields in folder from the Select available fields from drop down list on the dialog box.
Related Topics
Customizing the Task Table View
Creating New Views and Copying Existing Views
Switching Named Views
Resetting Standard Outlook Views
Adding New Columns
Using Grouping Instead of Sub-Folders
Predefined Outlook Views
Predefined Outlook Views
This section summarizes some of the predefined Outlook views that may be useful to
Taskline users.
Note that the Task Timeline, Next Seven Days and Overdue Tasks views all use the
task Due Date, with the Task Timeline view using Start Date as well. Therefore, for
these views to work correctly, you must either:
1. Have the Taskline should set Start and Due to the Scheduled dates Taskline
option enabled How?
2. Or change the view properties so that these views use Scheduled start and
Scheduled end instead. Do one of the following:
Outlook 2007
Select the View → Current View → Customize Current View menu
option.
On the View Summary dialog, click the Fields button. This takes you
to the Date/Time Fields dialog, which allows you to change the fields
these views use to ascertain the start and ends of tasks
Outlook 2010 and 2013
Click View ribbon (or VIEW in Outlook 2013) → View Settings
On the Advanced View Settings dialog, click the Columns button.
This takes you to the Date/Time Fields dialog, which allows you to
change the fields these views use to ascertain the start and ends of
tasks
Task TimeLine View
The Task Timeline view shows a time scaled bar chart:
To use this view:
Outlook 2007 – select the View → Current View → Task Timeline menu option.
Outlook 2010 and 2013. These version of Outlook do not come with a predefine
Task Timeline view so you will need to create one:
Click View ribbon (or VIEW in Outlook 2013) → Change View → Manage
Views
Click the New button to display the Create a New View dialog.
Give the view a name and select the Timeline option in the Type of view
list.
OK all the open dialogs.
Next Seven Days
This view displays only those tasks that are due in the next 7 days. But be careful – this
view excludes overdue tasks!
Overdue Tasks
This view displays only those tasks that are not yet complete but with a Due Date that
has passed.
Related Topics
Customizing the Task Table View
Printing Your Task Schedule
Having a printed Taskline schedule on your desk really helps to give you focus by
reminding you what needs to be done and by when. Printing out a calendar containing
Taskline's calendar task entries is particularly helpful, because you can easily see what
you should be currently working on. To print your calendar schedule, open your calendar
folder and then:
1. For Outlook 2007, click File menu → Print to display the Print dialog.
2. For Outlook 2010 and 2013, click File (or FILE in Outlook 2013) ribbon → Print to
display the Print screen.
3. In the Settings (or Print style in Outlook 2007) list on the Print screen or dialog,
click the style you wish to print. Monthly Style is particularly useful for printouts,
and corresponds to the Monthly calendar view.
4. If you are using Outlook 2010 or 2013, click the Print Options button to display
the Print dialog. Outlook 2007 users can omit this step.
5. Choose a date range by using the Print Range settings on the Print dialog to say
when you want the printout to start and end.
6. Set the font for printing. Click the Page Setup button on the Print dialog. Here you
can change the print font without changing the on-screen font. Arial Narrow is
particularly useful for printing.
7. On the same dialog, for the Monthly Style only, it is often useful to clear the Print
Exactly One Month Per Page check box, if you are printing out a schedule midmonth.
8. Click OK on the Page Setup dialog to save your changes and then click OK on the
Print dialog to print your schedule.
9. You may also wish to filter your calendar before printing. For example, you may
have routine reminders in your calendar that you don't want to appear on your
printout. You could filter on for example category or Show time as to remove
certain types of appointments from your printout. Please consult Outlook's
documentation for instructions on filtering views.
Progress: Working Through Your Task List
As you work through your task list, you will want to mark up your progress for the
following reasons:
1. You know what has been done and what is still to do.
2. Taskline carries forward uncompleted work, scheduling it for a future date. If
Taskline isn't told when task work has been completed, this work will get carried
forward too, and hence the resultant schedule will not be correct.
Marking up progress also optionally allows you to keep an accurate record of what work
you have completed, and when it was done.
When scheduling tasks, Taskline places tasks (or parts of tasks) that still have
outstanding work after the First task starts at date. Completed tasks, or completed
parts of tasks, are never scheduled by Taskline. These are left alone as they form a
historical record of past work. On completed tasks you have the opportunity to record
information about how the task went, such as how much time you actually spent on it –
Actual Work – and when you actually started it – Actual start.
Tasks can be at any stage of progress, from Not Started, to Completed, or any part
completed stage in between. Taskline can also show tasks in the calendar. These
appointments, used to represent tasks, are called "calendar task entries" and they can
also record progress. Unlike tasks however, calendar task entries cannot be partcompleted, but rather only Not Started or Completed. You can mark up progress on
both tasks and calendar task entries. Adding progress to a task will automatically add the
same amount of progress to its calendar task entries, and vice versa.
Sometimes it's sufficient to mark tasks as complete and then just forget about them.
However, if you wish to keep a record of exactly what you did, and when, you should
select the Keep a record of completed work option, which is on the Calendar tab of
Taskline's main dialog. If this option is selected, completed calendar task entries are left
alone by Taskline. If things didn't go exactly according to schedule, and you want to
maintain an accurate historical record of your work, you edit the completed calendar task
entries in Outlook, just like you would any other appointment, to reflect what actually
happened.
Keeping a work record can be very useful, both as a time record for yourself and others,
and also as a bank of historical information which can be used to help produce more
accurate time estimates for future work.
If you are not interested in past work, deselect the Keep a record of completed work
option. This will instruct Taskline to delete completed calendar task entries when it runs
(completed tasks are not deleted).
Related Topics
Progress Fields on a Taskline Task
The Effect on Calendar Task Entries of Adding Task Progress
Recording Task Progress via Outlook's Calendar
Keeping Task Work Estimates Up-to-Date
Organizing Completed Tasks
Progress Fields on a Taskline Task
On the Taskline tab of the task form in Outlook, there are several fields that specifically
relate to task progress. You record your progress by updating one or more of these fields:
Actual start This field records exactly when you started work on a task. Before you add
any progress, you have the opportunity to set this field, although doing so
is optional. If you don't set it, Taskline will set it for you:
If calendar task entries exist for the task, then the task Actual start
is taken from the Start of the first calendar task entry.
Otherwise, it's assumed that the task started on schedule and Actual
start is set to equal to the Scheduled start.
Other Actual start guidelines are:
For a task that is part completed, Actual start will show when the
task started, Scheduled start will show when the remaining part of
the task should be started, and Scheduled end will show when the
task is due to be fully completed.
For a completed task, Scheduled start will show when the task
started (i.e. it is set to be the same as Actual start) and Scheduled
end will show when it ended.
Actual work This field gives you the opportunity to record the amount of work you have
actually done on a task to date. Setting Actual Work to something greater
than zero will update the Status to In Progress. Updating this field is
optional, you can simply ignore it if you prefer. However, Actual Work is
useful because it gives you the opportunity to record how much time you
actually spent on a task, as opposed to the Total Work field, which is how
much time you originally thought you would spend on it. It may be useful to
look back at this information when scheduling similar work at a future date.
Or, you or your manager may find the information useful now, so that you
both know where all your precious time went!
% Complete Similar to Actual Work, this records what percentage of the task has been
completed to date. Updating this field is optional, you can simply ignore it if
you prefer. Setting % Complete to zero will automatically set Status to
Not Started, setting it to 100% will set Status to Completed and setting
it to a value between 0 and 100 will automatically set Status to In
Progress.
Because of a restriction in the way Outlook works, % Complete is
always rounded to the nearest whole number. For example, Taskline
will see 10.5% as 11%, even though the task form shows 10.5%.
For convenience, a % Complete setting of 33% is taken to be
exactly one third, and a % Complete setting of 67% is taken to be
exactly two thirds. For example, a 6 day task that is 33% complete
will have exactly 4 days remaining.
Work
remaining
Status
This information is display only – you cannot edit it. As you enter progress,
the Work remaining field updates to show you how much work remains to
be done.
This field has several values but the three that concern progress are Not
Started, In Progress and Completed. Setting Status to Not Started will
automatically set % Complete to zero and setting Status to Completed
will set % Complete to 100. Setting the Status to In Progress does not,
in itself, add progress to a task. It merely marks the task as having been
started.
Tips
You can add any of the above fields to an Outlook task table view, so that you don't
need to open the form to see these items.
You can set the % Complete and Status fields on either the Task tab, or the
Taskline tab, of the task form.
For tasks, whether you set % Complete or Actual Work is up to you. If you think to
yourself "I have done half of this task," then it is natural to set % Complete to 50%. If,
on the other hand, you think to yourself "I have spent 3 hours on this task so far," then
set the Actual Work to 3 hours. However:
Milestones (or goals) cannot be progressed using Actual Work, as they have no
work to progress. Use % Complete or Status to mark milestones as complete.
More about goals and milestones.
You cannot mark a task as Complete by setting Actual Work alone. You can only
mark a task as complete by checking the Complete check box, or setting Status to
Completed, or by setting % Complete to 100%.
You can set both % Complete and Actual Work if you wish. In this case, Taskline uses
the field that gives the greatest amount of progress. For example, if a 10 hour task is
marked as 20% complete and with 5 hours of Actual Work, Taskline will treat the task
as being 50% complete, because 5 hours Actual Work out of 10 hours Total work is
50%.
A minimalist approach to tracking progress is to simply set Status to Completed as
tasks are finished. This method doesn't track progress accurately, and doesn't give you an
"actual versus predicted" task history, but nonetheless it is still a perfectly valid way of
working.
Related Topics
Progress: Working Through Your Task List
The Effect on Calendar Task Entries of Adding Task Progress
Recording Task Progress via Outlook's Calendar
Keeping Task Work Estimates Up-to-Date
Organizing Completed Tasks
The Effect on Calendar Task Entries of Adding Task Progress
Adding or removing progress on a task will automatically set an equivalent amount of
progress on that task's calendar task entries. Because a calendar task entry can only be
Not Started or Complete, this may involve splitting calendar task entries. For example,
if a 1 hour task with a single 1 hour calendar task entry is made 33% complete, this will
result in one completed 20 minute calendar task entry and one Not Started 40 minute
calendar task entry.
If you have set Actual start when task progress is first added, then the first calendar
task entry will be moved so that it starts on the task's Actual start.
Related Topics
Creating task entries in the calendar
Progress: Working Through Your Task List
Progress Fields on a Taskline Task
Recording Task Progress via Outlook's Calendar
Keeping Task Work Estimates Up-to-Date
Organizing Completed Tasks
Recording Task Progress via Outlook's Calendar
There is just one progress field on a calendar task entry – Complete. To set this:
1. Open the calendar task entry to display the Outlook Appointment form.
2. Click the Complete button on the ribbon to mark the calendar task entry as
completed and click Save and Close to commit your change.
Tips
You can also use the context menu, which is often quicker. Right click the calendar
task entry in Outlook's calendar and click Complete in the popup menu.
You can also add or remove progress to or from several items at once by selecting
several calender task entries and right clicking any one of them. The clicked menu
option will then apply to all selected calendar task entries.
When using the right click menu, there is also a Whole Task is Complete menu
option. This is equivalent to clicking the Open Task button, then setting Status to
Completed and clicking Save and Close on the task.
Note
If a calendar task entry is only partially complete, and you wish to record this, then
you will need to add progress via the task.
Adding or removing progress on a calendar task entry will automatically add or remove an
equivalent amount of progress on the task:
If a task has just one calendar task entry, then setting the calendar task entry as
Complete will also mark the task as Complete. Similarly, clearing the Complete
check box on a calendar task entry will mark the task as Not Started. In both
cases, task Actual Work will be updated.
If one task has several calendar task entries, then the task will be updated
proportionately. For example, consider a 2 hour task which has two 1 hour calendar
task entries:
Marking one of these calendar task entries as Complete will set the task to
50% Complete, Status to In Progress and Actual Work to 1 hour.
Marking the second calendar task entry as also Complete will set the task to
100% Complete, Status to Complete and update Actual Work to 2 hours.
If a calendar task entry took more or less time than expected, first edit it in Outlook to
reflect this, then mark it as Complete.
If you started work on a task at a different date and/or time to the one scheduled, and
you want to record this, move the first calendar task entry to its correct time slot before
marking it as Complete. This will set the task's Actual start accordingly.
For example, consider a 1 hour task with a single 1 hour calendar task entry. The task
was scheduled to start at 10am and finish at 11am. However, you actually started at
9:30am, but finished as scheduled at 11am. In this case, change the calendar task entry's
Start Time to 9:30am and then mark it as Complete. The task's Actual start will get
set to 9:30am and the task's Actual Work will be set at 1.5 hours.
Related Topics
Creating task entries in the calendar
Progress: Working Through Your Task List
Progress Fields on a Taskline Task
The Effect on Calendar Task Entries of Adding Task Progress
Keeping Task Work Estimates Up-to-Date
Organizing Completed Tasks
Keeping Task Work Estimates Up-to-Date
As you enter progress, the Work remaining field on the Taskline tab of the task form
updates to show you how much work remains to be done. You could also add the Work
remaining field to an Outlook task table view, so that you don't need to open the form to
see this information.
It may be that once you've started a task, you realize that your initial time estimate was
not accurate. If this happens, you should update Total work, as well as Actual Work or
% Complete. For example, if a task was initially estimated to take 8 hours, but after 4
hours work you realize that you have another 6 hours left to complete the task, mark the
Actual Work as 4 hours (or the % Complete as 40%) and the Total work as 10 hours.
The Work remaining will then update to show 6 hours.
A common and serious mistake when scheduling work is to not update future work
estimates to reflect past experience. For example, consider a 4 day task that you find
yourself only half way through after 3 days. If the first half of the task took you 3 days,
then it is generally reasonable to assume that the second half will also take 3 days.
Therefore, the Total work should usually be updated to 6 days in this case.
Related Topics
Progress: Working Through Your Task List
Progress Fields on a Taskline Task
The Effect on Calendar Task Entries of Adding Task Progress
Recording Task Progress via Outlook's Calendar
Organizing Completed Tasks
Organizing Completed Tasks
Generally speaking, completed tasks contain important information that you will want to
keep track of for some time. However, completed tasks can clutter up your task list. They
can be especially inconvenient if you view your list in Scheduled start order, since the
completed tasks will appear at the top of the list.
One possible strategy for dealing with completed tasks would be sort your task view by
Complete (Ascending) first, and then by Scheduled start (Ascending) second. How?
This will show tasks in Scheduled start order, but with completed tasks moved to the
bottom of the list. You could also group tasks on Status. How? This would group together
all your Not Started tasks and show them first, then show your In Progress tasks, with
the Completed tasks grouped together at the bottom of the list.
Another method would be to move completed tasks to a different folder, perhaps keeping
one folder for current and future work, and another for past work. If you prefer this
method of organizing tasks, you can have Taskline automatically move completed tasks
for you. Check the Move completed tasks to [folder name] option on the Tasks tabs
of the Taskline main dialog, and then click the Select button to choose the folder that is
to contain the completed tasks. Taskline will then move any completed tasks to this folder
each time it is run. Moving completed tasks to a different folder also has the advantage of
making Taskline run quicker. Note that only tasks that are 100% complete can get
moved. Thus if you entered progress using Actual Work, you should also set the Status
to Complete, to tell Taskline that the task can be moved.
Tip
The selected folder need not be in the same store as your main tasks folder. You
could, for example, have your main task list in one .PST file, and have Taskline
move completed tasks into another .PST file.
Related Topics
Working Through Your Task List
Keeping Task Work Estimates Up-to-Date
Advanced Scheduling Techniques
Task Constraints
Often it is not sufficient to simply have one task follow on after another. External
constraints, such as deadlines, influence tasks. Taskline can take deadlines and other
types of constraints into account when scheduling work.
Taskline features a rich set of constraints that can be used to override the normal
sequencing of tasks. Constraints are set on the Scheduling control section of Taskline's
task form. To set a constraint, you must first set the type of constraint using the Task
should drop down list, and then you set the constraint date by typing the date in, or by
using the Date Picker control. Setting a constraint time is optional; omitting it means
that the constraint applies at any time during the specified day. This gives Taskline more
scope to optimize the schedule.
Taskline supports 5 types of constraints:
Select Start on to make the task start on the constraint date.
Select Start on or after to make the task start on or after the constraint date.
Select Finish on to make the task finish on the constraint date.
Select Finish on or before to make the task finish on or before the constraint
date. Both Finish on and Finish on or before constraints are useful for deadlines.
Select Work between when you need to work on a task between 2 dates. For
example, you have a deadline of 3 weeks tomorrow but you can't start work on the
task until after a meeting next Monday.
To place a task rigidly, use a Start On constraint or a Finish On constraint with both a
date and a time. Because such a task cannot be moved, they usually result in other tasks
being split to work around the fixed task. Using these two constraints with just a date,
and no time, gives Taskline some flexibility in scheduling and generally results in a less
fragmented schedule.
Tips
Task constraints will override the normal task ordering, but only if this is necessary
for the constraint to be met.
If the task reschedule is producing results that are difficult to understand, you can
use the Advanced Options dialog to tell Taskline to temporarily ignore task
constraints. How? This should simplify the process and help you understand how
results are arrived at.
Task constraints should be the exception, not the norm. Most of your tasks should
be unconstrained and only those with deadlines or other external date issues should
have constraints. If you place constraints on most of your tasks, then you are
effectively manually scheduling and therefore stopping Taskline from working
effectively.
Missed constraints
It is not guaranteed that constraints will be met – there are some circumstances when
they might not be:
Two or more tasks have conflicting constraints. For example, several tasks might
have Start on or Finish on constraints for exactly the same day. If the sum of the
Total work for those tasks exceeds the amount of working time available on that
day, then it is probably going to be impossible to satisfy all of those constraints.
The constraint is attempting to place the task before the First task start at date.
When a constraint can't be met, Taskline warns you in three ways:
You get an alert when Taskline has finished updating your tasks. This lists any
problems, although if there are a lot of them, only the first few task subjects are
displayed.
The Missed constraint task field, which is normally zero, is set to the elapsed gap
between the scheduled date and the constraint date. This enables you to create
an Outlook view highlighting tasks that need attention, optionally sorted into an
order showing which tasks have missed their constraints by the greatest amounts.
Taskline can also prefix the subject of a task that misses its constraint with some
warning text. By default, this text is "!! ", but you can change it to anything you
want. To do this, start Taskline and click the Options tab. Then change the If a
task constraint is missed, prefix task subject with edit box to your preferred
warning prefix. The text will automatically be removed once the constraint problem
has been resolved.
Recurring Tasks
Recurring tasks have implied constraints which position such tasks on the date of their
recurrence. By default, if a recurring task has an Outlook Start date, then this acts like a
Start on or after constraint. But if a recurring task has a Due date and no Start date,
then that task is scheduled as if it has a Finish on constraint. This default way of
scheduling recurring tasks can be changed using the options in the Recurring tasks
section of the Advanced Options dialog. More
A missed recurrence date will also result in Taskline issuing a missed constraint alert.
Regenerating Tasks
Milder warnings are issued for regenerating tasks that miss their recurrence date. These
warnings will go away if the Taskline should set Start and Due to the Scheduled
dates option is set. Furthermore, regenerating tasks that miss their dates will not mark
the task as requiring attention. This is because regenerating tasks generally represent
something that needs doing repeatedly, but not on specific dates.
Regenerating tasks are a specific type of recurring task.
Entering Constraints on Outlook's Task Table View
You can also enter task constraints in Outlook's table view, if you have added the
Constraint and Constraint date columns to your view (see Adding New Columns for
information on how to do this). Just type the name of the constraint, for example Finish
on, in the constraint column for the appropriate task. To reduce typing, the constraint
abbreviations "SO", "SOOA", "FO", "FOOB" and "WB" can also be used. These stand for
Start On, Start on or after, Finish On, Finish on or before and Work between
respectively.
To remove a constraint, select the blank Task should entry on the task form, or delete
the constraint description on the task table view. You cannot add a constraint to a
recurring task, since Taskline places recurring tasks on their Start or Due date, as
appropriate.
Constraints Which Affect a Sequence of Several Tasks
By default, a constraint only affects the task with the constraint on. However, sometimes
this is not what is required. For example, you may have a deadline to meet, which
involves completing a sequence of several related tasks, not just one task. To do this for
a Finish On or Finish on or before constraint, click on the Select any other tasks
a Finish On or Finish on or before constraint, click on the Select any other tasks
also affected by this constraint check box and select the tasks from the list that you
want to finish immediately before the current task. Similarly, for tasks with Start On or
Start on or after constraints, select the tasks that you would like to start immediately
after the current task. To deselect a task, simply click on it again.
The following types of tasks cannot be made dependent upon other tasks and hence will
not be displayed in the Select any other tasks also affected by this constraint list:
Completed tasks.
Recurring tasks, because these are already constrained to happen on a certain day
and you can't have two constraints on one task.
Delegated tasks, because someone else is doing them.
Tasks with their Status set to Deferred or Waiting on someone else, because
these are effectively on hold and hence Taskline ignores them.
Tasks with the Ignore check box checked. These are, by definition, ignored by
Taskline.
Tasks with constraints, again because you can't have two constraints on one task.
Using Different Working Hours for Different Tasks
This feature is supported in Taskline Professional Edition only.
Taskline Professional Edition allows you to define several different sets of Working hours.
This allows some powerful time planning scenarios, some examples of which are
discussed below.
Work and Personal Tasks
Probably the most obvious use is for scheduling work tasks during work time and personal
tasks during personal time. In this case you would set up 2 sets of Working hours,
perhaps called "Office Hours" and "Personal Task Time". How? You then assign these
Working hours to each task, as appropriate. How?
Getting Work Done During Commute Time
If you have a regular commute to and from work, it may be that certain types of work
can be carried out during this journey. For example, if you commute on the train, you
may wish to read reports during this time. To schedule tasks specifically during your
commute time, create a set of Working hours to represent this time and assign these
hours to the tasks in question. How? You may also have some tasks that could be done
during commute time, or could be done during normal work time, it doesn't matter. In
this latter case, create a set of Working hours that encompasses both your normal work
day and your commute time, and assign these hours to such tasks. For example, if you
work from 9am to 5pm and commute from 8 am to 9am and 5pm to 6pm, you would
create a set of Working hours from 8am to 6pm.
Getting Low Priority Tasks Done
Low priority tasks are usually at the tail end of your task list and are generally the last
things to get done. However, there is a danger that they'll never get done, because
higher priority tasks keep getting inserted above them. To make sure these tasks do get
worked on, you may wish to devote some time specifically to low priority tasks. For
example, the last 2 hours on Friday afternoon. To do this:
1. Create a set of Working hours for just 2 hours on Friday (or whatever times you
choose). How?
2. Assign these hours to the low priority tasks. How?
3. Make sure your Working hours used for the other tasks also include the same 2
hours on Friday, since we still want to use this time even when there are no low
priority tasks to do.
4. Set Outlook's standard task priority setting on these tasks to Low.
5. On the Tasks tab of Taskline's dialog, set the first Order by to Priority
(Low/Medium/High) Descending. This will schedule the low priority tasks first.
This may seem counter intuitive, but it will ensure that the low priority tasks use up
the Friday afternoon slots first. Once there are no remaining low priority tasks, the
remaining (higher priority) tasks will be scheduled into these slots instead.
Working Out of Hours
You may have a need to work on certain tasks at odd hours, for example working late one
night to get something finished. You can force a task to start or end at any time you wish
by placing a Start on or Finish on constraint on the task and then assigning the
standard "24/7" Working hours, which are set up to allow working 24 hours per day, 7
standard "24/7" Working hours, which are set up to allow working 24 hours per day, 7
days per week.
Dividing Your Time – Working in Several Locations or on Several Projects
You may work at different offices and only certain tasks can be done at certain offices. Or
you may work on several projects at once and wish to divide your time equally between
them. Creating Working hours specific to each office or project will allow you to address
this requirement in a simple and flexible way.
Spreading a Long Task Out Over Several Days
Taskline currently allocates time for all of a task before moving on to the next one. This is
usually the most productive way of working. However, there may be times when you
want to spread a long task out over several days, for example working 2 hours per day on
it. You can address this requirement by creating a set of Working hours for 2 hour each
day, and assigning these to the task.
Tip
The Max time per day and Max time per week settings offer a better way to
spread a long task out over time, if you don't mind which time slots allocated. More.
Modeling Recurring Tasks
If, for example, you had a task that recurred every Monday for 1 hour each morning, you
could use the same technique described in the previous section to represent this.
Specifically in this case, you'd create a 10 hour task and assign to it Working hours that
were restricted to 1 hour on Monday morning.
Tip
In the same way, you can also use the Max time per day and Max time per
week settings to represent recurring tasks. More.
Accounting for Logistical Considerations
You may need to take into account certain task restrictions or preferences when
scheduling your work. For example, certain tasks may need a piece of equipment that you
only have occasional access to. Or perhaps some tasks can only be done when a
colleague is also in the office. Or you may simply wish to group together similar tasks, for
example you may like to reply to emails first thing in the morning. Again, Working
hours can be used to address all of these requirements.
The Getting Things Done Outlook Add-In
Taskline's named Working hours support the concept of GTD Actions, such as @Home
and @Office. Simply create Working hours with the same names as GTD Actions and
with the hours defined appropriately. Taskline will then automatically match Action
(which is set by using an Outlook category) to the Working hours of the same name.
There is no need for you to open the task and set the Working hours manually. More
about GTD
Related Topics
Setting Your Working hours
The Taskline Task Form in Outlook
Delegating Tasks
Outlook has a system of task delegation, whereby a task can be delegated to another
person. You delegate a task by clicking on the Assign Task toolbar button on the task
form. Thus one person's task list could consist of tasks they have entered themselves,
tasks delegated to them by others, and tasks they have delegated to others.
Delegation is an Outlook feature. Please consult the Outlook documentation for
information on how to use it.
You can delegate Taskline tasks in the same way that you can delegate standard Outlook
tasks. If the recipient has Taskline, they will see Taskline tasks, otherwise they will see a
standard Outlook task.
When scheduling your tasks, Taskline ignores tasks that have been delegated to others,
as someone else is carrying them out for you.
Important
There is an issue with Outlook in that delegated tasks lose all the values in User
Defined Fields. This impacts delegating Taskline tasks as Taskline's custom fields,
such as Scheduled start and Priority (A1), are lost when a Taskline task is
delegated
Preparation and Travel Time on Appointments
You can tell Taskline to leave time before and after an appointment free of scheduled
tasks, for example for traveling time to and from meetings.
You can define a default traveling time for all appointments on the Calendar tab of the
Taskline dialog. You can then enter a value in the Before and the After boxes. This is
the amount of time in minutes or hours that you want Taskline to allow before and after
an appointment on the Outlook Calendar.
For example, you might need 15 minutes to travel to most of your appointments on your
Calendar, including your off-site meeting at 2:30. So you enter "15 m" in the box. As a
result, Taskline schedules your work to end at 2:15 PM, 15 minutes before your 2:30
meeting. This gives you enough time between the end of the task and the beginning of
the meeting to leave your office and get to the meeting on time.
You should remember that the settings for an individual appointment override this
default setting, when you enter special tokens in the Subject box of the appointment.
Overriding the Default Times Before and After an Appointment
Taskline Professional Edition allows you to override the default appointment allowance
times for individual appointments. To do this, place the following text, with the times
adjusted accordingly, anywhere in the appointment Subject box:
Note
Spaces are optional.
If the time unit is omitted, minutes are assumed.
{30 m / 1 h} 30 minutes before the appointment and 1 hour after
{/ 1 h}
Use the default time before the appointment and 1 hour after it
{1 h /}
Use the default time after the appointment and 1 hour before it
{30 m}
30 minutes before and after an appointment
Example appointment subject: "Strategy meeting at head office {1.5h}". This tells
Taskline to leave 1.5 hours free before and after the appointment.
Related Topics
Calendar tab
Setting Start and Due Dates for Tasks
1. Click
Settings in Outlook (on Outlook 2007, click
Taskline) to start Taskline
and display the Taskline dialog.
2. On the Options tab, do one of the following:
Select the Taskline should set Start and Due to the Scheduled dates
check box. This action ensures that Taskline updates the Start Date and Due
Date boxes on the Task tab when you open the task, as well as the
Scheduled start and Scheduled end dates on the Taskline tab. Keeping
these dates updated can be useful under the following circumstances:
You want these dates to be as up-to-date as possible.
You have existing standard views that display Start Date and/or Due
Date.
Outlook uses Start date and Due date by default in certain views,
such as the Task Timeline view, the Next Seven Days view and the
Overdue Tasks view. If you use these views, you should set options so
that Taskline updates the Start date and Due date each time you click
the Taskline button on the toolbar.
Clear the check box if you want only the Scheduled start and Scheduled
end dates modified. Not updating Start date and Due date can be
preferable under the following circumstances:
You want to leave your original date estimates in the Start Date and
Due Date fields unchanged, so that you can later compare how you
actually got on with how you initially thought you would get on.
Outlook regards uncompleted tasks with a Due Date in the past as
being overdue, and these are shown in red by default, which can be
useful. If you want to take advantage of this feature, have Taskline
update Start and Due dates initially, and then turn this updating off
once you are happy with your schedule. Due dates then stays
unchanged, and tasks that get behind schedule are shown in red. If you
subsequently get swamped out with too much red, you can always have
Taskline update the Start and Due dates again, to give yourself a
fresh start.
Click Restore My Original Dates to reapply the dates you had before you
ran Taskline.
Tip
For more information about options and settings on any dialog box, click the
Question Mark button ( or
depending on your Windows version) at the top
right hand corner of the dialog and then click a dialog option.
Related Topics
Options for Start and Due Dates
Defining the Order in Which Tasks are Scheduled
Task Constraints
Predefined Outlook Views
Splitting Tasks During Scheduling
When Taskline schedules your tasks, the software places the tasks into available time
slots. However, if a task requires more time than a time slot has available, Taskline splits
the task into shorter parts, according to the default settings for the software. For
example, the following "Tax return" task gets split, with some work scheduled before
lunch and some after lunch:
Usually the default way that Taskline splits tasks is sufficient. However, sometimes you
might want more control:
For some tasks, you might want to specify the minimum length of time for each
part of the task.
At other times, you might want to schedule an entire task in one time slot, without
dividing the task into shorter parts. In this case, you need to completely turn off
task splitting for a specific task.
The default Taskline setting is to split tasks and schedule any remaining part into the next
available time slot, no matter how short the slot is. However, you may want to control the
length of each part. You can do this when you set a minimum number of hours or minutes
that Taskline can split a task into. For example, if you work more efficiently in one-hour
increments, you would not want to schedule part of a task in a time slot that lasts only
thirty minutes. You would want each part of the task to last at least one hour.
You can set a default minimum number of hours or minutes for all split tasks by clicking
the Taskline button and then selecting the Options tab. You can enter a value in the
Default minimum task split box. Now, when Taskline schedules a task and encounters
conflicting items, the software splits the task into parts no shorter than the value that you
enter.
To allow Taskline to split a task, the Task can be split check box, on the Taskline tab of
the task form in Outlook, must be selected. This check box is selected by default when
you create a task. On the other hand, if you want to completely prevent Taskline from
splitting a specific task, open the task and clear the Task can be split check box.
Tips
For specific tasks, you can also override the setting in the Default minimum task
split box on the Taskline dialog by setting the minimum number of hours that
Taskline can divide that specific task into. To do this, open the task in Outlook and
enter a value in the Minimum split box on the Taskline tab of the Taskline form.
If the task reschedule is producing results that are difficult to understand, you can
use the Advanced Options dialog to tell Taskline to temporarily ignore task split
use the Advanced Options dialog to tell Taskline to temporarily ignore task split
settings. How? This should simplify the process and help you understand how
results are arrived at.
For example, let's say that you start work at 9:00 AM and take lunch from 12:30 PM to
1:30 PM. You have a monthly sales report to write that will take you 3 hours. You also
have a meeting at 9:30 AM for 1 hour. With Taskline's default task splitting settings, the
monthly sales report task finishes at 2:00 PM, and gets split into 3 parts:
You then decide that you don't want to work on this task for less than 1 hour at a time, so
you open the task and set the Minimum split to "1 h":
This change also means that the task finishes somewhat later now, at 2:30 PM:
You further decide that you would rather work on this task without interruption, so you
open the task and clear the Task can be split check box. The task now finishes at 4:30
PM:
PM:
Note
Note how this results in a less optimal schedule, with tasks getting completed later
and available time not being fully utilized. This is not untypical and hence restricting
task splitting should only be done sparingly. However, in a schedule with many
tasks, other tasks could fill the unused time slots, assuming that their own task
splitting settings allowed this.
Related Topics
Recurring Tasks and Working on a Task for Only Part of the Day or Week
Taskline Dialog Box
Taskline Form
Recurring Tasks and Working on a Task for Only Part of the Day or Week
These features are only available on Taskline Professional Edition.
Sometimes you may wish to:
Spread a long task out over several days or weeks, working on it for maybe just a
few hours a day.
Work on several tasks at once, dividing your time between them.
Repeat a task, for example you might wish to spend 30 minutes reading an industry
journal every Friday.
You do these by using the Max time per day and Max time per week settings. These
are in the Scheduling control section of the Taskline task form in Outlook. For example,
let's say that you work 8 hours a day, 5 days a week and that you have a 16 hour task to
complete:
With both Max time per day and Max time per week unset, the task will get
scheduled for 2 contiguous days. Note: Like all the examples here, this assumes
that no other appointments or higher priority tasks influence the scheduling.
Let's say that the task is boring and you only fancy doing a bit each day. If you set
Max time per day to 2 hours, the task will now get scheduled over 8 working
days, 2 hours each day.
Let's assume that the task is a report that you want to spread out over 4 weeks,
writing it as the information you require gradually comes in. Set Max time per
week to 4 hours to achieve this.
Tips
You can set both Max time per day and Max time per week on the same task.
This gives you a great deal of flexibility as to how longer tasks are scheduled.
Max time per day, Max time per week, Minimum split and task constraints can
all interact during task scheduling and as a consequence it can sometimes be
difficult to understand why Taskline has scheduled tasks in the way it has. To
simplify matters, and help you understand the results of a reschedule, Taskline has
options to switch off certain task settings, such as Minimum split. These are in the
Understanding Taskline section of the Advanced Options dialog.
Recurring Tasks
If you have a task you wish to do repeatedly, you can use the Max time per day or Max
time per week settings to represent this. For example, if you wish to spend 1 hour a
week catching up on email newsletters, you could set up a 12 hour task and set Max
time per week to 1 hour. This would of course stop after 12 weeks, so you might wish to
change this number, or create a new task after 12 weeks, as appropriate. If you only
wanted to do this reading on a Friday, you could assign the task Working Hours that
only had working time on a Friday. This would still allow Taskline the flexibility to
schedule that work any time on Friday, fitting in with your other work. But if you
specifically wanted to do this reading between say 4pm and 5pm, or you wanted a task
with a more complicated recurring pattern, you would be better off creating a recurring
appointment instead.
You can also create a recurring task in Outlook. However, in this case Taskline will only
schedule the next occurrence of that task.
Related Topics
Task Form
Recurring Tasks
Splitting Tasks During Scheduling
Manually Overriding Some or all of Taskline's Scheduling
You may wish to use Taskline to automatically schedule your tasks but then perhaps
make some manual adjustments to the resultant schedule. This could for example be
because parts of a task can only be worked on while someone else is with you, or to work
on parts of a task outside normal working hours, or simply personal preference.
You handle these cases by simply dragging a task entry in Outlook's calendar to a new
time slot, or dragging its start or end time, or both. When you manually edit a calendar
task entry in this way, it becomes pinned. Normally, calendar task entries get deleted and
recreated each time Taskline runs. However, this does not happen to pinned entries –
they stay untouched and survive a Taskline reschedule.
You can also pin a calendar task entry without changing it. Open the item and click the
Pin button in the Taskline section of the Appointment ribbon. The calendar task entry
will then stay put during subsequent task reschedules:
To unpin a calendar task entry, open the item and click the Pinned button in the
Appointment ribbon.
Pinned calendar task entries have their subjects' prefixed with a ^ character so you can
tell at a glance which entries have been pinned.
Note
Pinned calendar task entries that are Not Started and have an End date on or
before the First task starts at date (i.e. those pinned items that are in the past)
are automatically unpinned and rescheduled when you reschedule your tasks.
Tips
You can also pin and unpin items by right clicking a calendar task entry in Outlook's
calendar and selecting Pin or Pinned as appropriate from the popup menu. This is
usually quicker as there's no need to open the item first:
You can pin or unpin several tasks at once by selecting several calender task entries
and right clicking any one of them. The clicked menu option will then apply to all
selected calendar task entries.
You can have pinned and unpinned items display in different colors. How?
Related Topics
Showing Your Tasks in the Outlook Calendar
Choosing Outlook Folders
When you first install Outlook, you get one task folder, called Tasks, and one calendar
folder, called Calendar. These are the only task and calendar folders you actually need,
but you may find it convenient to create new folders. For example, you may wish to keep
your current Outlook tasks in one folder and your completed work in another. Folders in
Outlook are very much like folders in Windows Explorer. They are a hierarchical method
of organizing items. They are hierarchical because folders can contain other folders. One
difference is that Outlook folders can only contain items of one type. For example, task
folders can only contain tasks (although you can place Office documents directly into
folders that contain mail items, such as the Inbox).
On the Tasks tab of the main dialog, Taskline lets you specify where the tasks are that
you want scheduling, and where to optionally move completed tasks to. On the Calendar
tab, Taskline lets you specify the folder containing your appointments, and optionally the
folder that is to contain your task entries. In all cases, you specify your choice of folder by
clicking on the Select button to bring up the Select Folder dialog. From here you can
choose an existing folder, or create a new one.
Creating New Outlook Folders
1. If Outlook's Folder List isn't already displayed, have Outlook display it:
In Outlook 2007 and 2010, click View → Navigation Pane → Normal and
then click the Folder List icon
at the bottom of the Navigation Pane:
In Outlook 2013, click '...' at the bottom of the main window and then click
Folders on the pop up menu:
2. On the Folder List, right click an existing folder and click New Folder on the pop
up menu:
The Create New Folder dialog will be displayed.
3. Type the name you wish to give your new folder into the Name box.
4. Click OK to have Outlook create the new folder.
Related Topics
Organizing Completed Tasks
Showing Your Tasks in the Outlook Calendar
Reminders
Outlook tasks and appointments can issue reminders before they are due to start. This
can be an excellent memory jogger.
Taskline tasks introduce their own reminder system, so with tasks you have 2 choices;
you can use either the standard Outlook reminder, or you can use Taskline's reminder
facility. However, you cannot use both at the same time on the same task, because the
Taskline reminder works by setting up the Outlook reminder for you.
Outlook Task Reminders
Open the task form for a task. On the Task tab you will see the Reminder check box. If
you check this, Outlook will issue you a reminder at the date and time you specify.
Taskline Task Reminders
The standard Outlook reminders ask you to specify the exact date and time of the
reminder. However, it is difficult to set a reminder time because you will not know when
the task is due to start until it has been scheduled by Taskline, and even then it may
change if you run Taskline again in response to a change in circumstances. Taskline task
reminders address this issue by allowing you to set the reminder to an amount of time
before the task is scheduled to start.
To set a Taskline reminder, go to the Taskline tab of the task form. At the bottom of the
form, check the Reminder check box, and then enter the amount of notice you require
before the task is scheduled to start. Note that the time entered is working time, not
elapsed time. This means that non-working time (i.e. time when you are not at work or
are on a break) is ignored when deciding when the reminder should be issued. For
example, consider a task scheduled to start at 2pm on a working day that has a lunch
break from 1pm to 2pm. If the task has a 30 minute reminder, that reminder will be
issued at 12:30pm, rather than at 1:30pm when you're probably not there. If lunch was
from 12pm to 1pm, then in this case working time and elapsed time are the same – the
reminder would be issued at 1:30pm.
Taskline reminders work by setting up the standard Outlook reminder on your behalf.
Thus you can't use both types of reminder on the same task at the same time.
If you set the Taskline reminder, you must clear the Taskline reminder to remove it.
Clearing the standard Outlook reminder will not work, because it will just get set up again
the next time you run Taskline.
When you clear the Taskline reminder, this clears the standard Outlook reminder as well.
Recurring Tasks
Taskline will schedule the next occurrence of a recurring task. By default, Taskline will
attempt to place a recurring task on its Start date, or its Due date if no Start date is set.
However, this behavior can be changed by setting the Recurring tasks options on the
Advanced Options dialog.
You need to make sure that you mark recurring tasks as Complete as and when you
finish each occurrence. Failing to do so will leave the task's Start and/or Due dates in the
past, as only when a task is marked as Complete will Outlook generate a new task
occurrence, with updated Start and Due dates
Note that the Start and Due dates of recurring tasks are never updated by Taskline, even
if you have the Taskline should set Start and Due to the Scheduled dates option
set. This is because changing the Start or Due date of a recurring task usually generates
a new (and unwanted) task occurrence. However, Taskline can update the Start and Due
dates of regenerating tasks, which are a specific type of recurring task. They generally
represent something that needs doing repeatedly, but not on specific dates. For this
reason, regenerating tasks that miss their dates will not mark the task as requiring
attention.
Tips
You can have Taskline delete completed occurrences of recurring tasks, if required.
How?
If you need all occurrences of a recurring task to be scheduled, we suggest you use
a recurring appointment instead. The effect is quite similar.
You can also use the Max time per day or Max time per week settings to
represent recurring tasks. How?
Deferred and Waiting Tasks
Tasks that have their Status set to Deferred or Waiting on someone else will not be
scheduled by Taskline and will have their Scheduled start, Scheduled end and Week
commencing fields cleared.
Private Tasks
Private tasks are scheduled as normal by Taskline. Private tasks create private calendar
task entries, if one of the options to create these is enabled.
Related Topics
Recurring Appointments
Recurring Tasks and Working on a Task for Only Part of the Day or Week
Advanced Options for Recurring Tasks
Tasks in Sub-Folders
This version of Taskline will not schedule tasks in sub-folders. A good workaround is to
create a Project (on the Taskline tab of the task form in Outlook) or a Category for
each sub-folder, and assign that Project or Category to each task. Then, group your
Outlook task view by Project or Category, as appropriate. This approach has the
advantage over multiple folders in that you can see the tasks for more than one subfolder in a single view.
For example, say you have three folders, one for each client, and you have decided to use
categories rather than projects:
Add 3 new categories, one to represent each sub-folder:
Then assign a category to one task in each sub-folder, by clicking on the Categories
button on the Task tab of the Task form. Group the view on Category How? and then
drag each task in turn to the correct group. This automatically assigns the category for
you.
To create a new category, open any task to display the Task form and go to the Task tab.
Click the Categorize button, and then click All Categories.
Related Topics
More on Grouping
Projects
Automated Background Task Scheduling
The Taskline command line option /NoDialog allows you to run Taskline in the
background using the Windows task scheduler. When Taskline runs in the background,
you will not have the opportunity to change any Taskline settings, so you must make sure
that the current settings are appropriate. In particular, running in the background will
usually require that the Default to current date and time option, on the Tasks of the
Taskline dialog, is enabled, so that tasks are always schedule from time now. To change
settings, start Taskline normally, make any required changes, and then click Apply to
save your changes and Cancel to close the dialog without running Taskline.
Now, set up a schedule for running Taskline using the Windows Task Scheduler:
Instructions for Windows XP
1. Click Start menu → (All) Programs → Accessories → System Tools →
Scheduled Tasks.
2. Double click Add Scheduled Task.
3. The Scheduled Task Wizard will appear. Click Next.
4. On the list of programs, click Taskline and then click Next.
5. Choose when you'd like to schedule your tasks, for example Daily. Click Next.
6. Choose the appropriate start time and date settings and then click Next.
7. If you have to enter a password when you log on to your computer, you will need to
enter the same password here. Then click Next.
8. Click the Open advanced properties for this task when I click Finish check
box and then click Finish.
9. On the properties dialog that appears, click in the Run edit box. Move the cursor to
the end of the box and type a space followed by "/nodialog". Click OK.
Instructions for Windows Vista
1. Click Start menu → All Programs → Accessories → System Tools →
Scheduled Tasks.
2. In the list of Actions, click Create Basic Task. The Create Basic Task Wizard will
appear.
3. Now continue from Step 4 in the Windows 7 and Windows 8 instructions below.
Instructions for Windows 7, Windows 8 and Windows 8.1
1. Start Windows Control Panel and click Administrative Tools. If you are grouping
the Control Panel items by Category, you will need to click System and
Security first.
2. In the new Administrative Tools window that opens up, double click Task
Scheduler.
3. In the Task Scheduler window, click Action menu → Create Basic Task. The
Create Basic Task Wizard will appear.
4. In the Name box, type "Taskline". Click Next.
5. On the Task Trigger page, choose when you'd like to schedule your tasks, for
example Daily. Click Next.
6. Choose the appropriate start time and date settings and then click Next.
7. On the Action page, click Start a program. Click Next.
8. On the Start a Program page:
i. Click the Browse... button next to the Program/Script box.
ii. Locate your Taskline install folder. By default this is:
32-bit versions of Windows: C:\Program Files\ResultsWare\Taskline\
<UserName>
64-bit versions of Windows: C:\Program Files
(x86)\ResultsWare\Taskline\<UserName>
iii. Select the Taskline.exe file and click the Open button.
iv. Enter "/NoDialog" (without the double quotes) in the Add arguments box.
v. Click Next.
vi. Click Finish.
Important
The /NoDialog option has the following effects:
It runs Taskline immediately, rather than display the dialog.
It does not display the progress box.
It does not display the Summary of Task Schedule dialog, even if the
Show summary when task reschedule is complete is enabled.
An alert is not displayed if tasks constraints can't be met. As such, you will
need to ensure that you have told Taskline to highlight the subject of any task
with a missed constraint. How?
Although an alert is not displayed if tasks constraints can't be met, other alerts are
still displayed if unexpected errors arise during scheduling.
If you have to enter a password when you start Outlook, then background
scheduling will only work if Outlook is already running. Otherwise, when Taskline
starts up Outlook, it will stay inactive, waiting for someone to enter the Outlook
password.
Taskline Dialog Box
You can access the Taskline dialog box by clicking
Settings (on Outlook 2007, click
Taskline) in Outlook or clicking the Taskline icon on the Desktop. The dialog box displays
several tabs: Tasks, Projects, Calendar, Working Week, Working hours, Options
and Help/About.
This button displays Help for an item on the dialog box. When you click this
help button, the cursor will change to an arrow and a question mark. If you
click one of the controls on the dialog box, a help window displays information
on the control you just click.
This button closes the dialog box. It has the same effect as clicking Cancel.
OK
Click OK to save all of your changes and run Taskline.
Cancel Click Cancel to throw away any changes and close the dialog box without
running Taskline. Cancel does not lose any changes that have been previously
saved by clicking OK or Apply.
Apply Click Apply to save your changes. Apply does not run Taskline and the dialog
box will stay on screen. Note that Apply only becomes available if unsaved
changes exist.
Help
Click Help to display this help file. The Help topic for the current tab appears.
Related Topics
Tasks Tab
Projects Tab
Calendar Tab
Working hours Tab
Working Week Tab
Options Tab
Help/About Tab
Tasks Tab
First task starts at
First task starts at Enter the date and time that the first task in your task list should
start. All other tasks will then follow on after that task. Note that a
constraint on the first task, for example a Start On constraint, can
override the First task starts at date.
The date and the time should be separated by a space.
You can also enter a date by clicking on the arrow to the right of the
First task starts at box to display the calendar. You can then select
a date by clicking on it with the mouse. More.
Default to current Click this option to have Taskline enter the current date and time for
date and time
you in the First task start at box. If this is outside normal working
hours, it is rounded up to the start of the next working period. For
example, if you work 8am to 5pm Monday to Friday, and you click this
option on a Saturday, Taskline enters 8am next Monday.
Schedule tasks in the following order
Order by,
And then by
These drop down lists allow you to define the order in which your
tasks are scheduled. Natural Order or Priority (A1) are common
choices, but you can order by many other fields too, including Outlook
custom fields More. You can override this order with task constraints,
such as a Finish On constraint. More.
You can also choose whether to order your chosen task property into
ascending or descending order. For example, ordering tasks by
Descending Total Work schedules the longest tasks first.
Folders
Schedule the
tasks in…
Click the Select button to choose which Outlook Tasks folder
Taskline should schedule. The text to the left of the Select button
tells you which folder is currently selected.
Move completed You can optionally have Taskline move completed tasks to a different
tasks to…
Outlook folder, to help keep your task list focused and uncluttered. To
enable this feature, click this option, and choose a suitable folder by
clicking on the Select button. More about task progress.
Delete completed Select this option to have Taskline always delete completed
occurrences of
occurrences of recurring tasks, regardless of the Move completed
recurring tasks
tasks to… setting. Such tasks are moved to the Deleted Items folder,
rather than being permanently deleted.
Related Topics
Taskline Dialog Box
Projects Tab
Calendar Tab
Working hours Tab
Working Week Tab
Options Tab
Help/About Tab
Projects Tab
Tasks can be assigned a Project using the Taskline tab of the task form in Outlook.
How? This tab of the Taskline dialog allows you to manage those projects.
Project list This is the list of current projects. You can click a Project to select it. Use
box
Control+Click to select more than one Project, or Shift+Click to select a
range of Projects.
If, on the Tasks tab of the dialog, you have chosen to Order By Project,
then projects will be scheduled in the order shown in this list. Select one or
more projects and use the Move Up and Move Down buttons to change
this order.
Move Up
If, on the Tasks tab of this dialog, you have chosen to Order By Project,
Move Down then projects will be scheduled in the order shown in the list. To change this
order, select one or more Projects and click the Move Up or Move Down
buttons.
Delete
You can select one or more Projects in the list and click Delete to remove
them. You cannot delete projects that are current assigned to tasks.
Insert New To create a new project, enter a unique name in the box to the left of the
Insert New button and click the button. Alternatively, simply type in a new
project name on the Taskline tab of the task form in Outlook.
Related Topics
Using Projects
Project and The Taskline Task Form in Outlook
Taskline Dialog Box
Tasks Tab
Calendar Tab
Working hours Tab
Working Week Tab
Options Tab
Help/About Tab
Calendar Tab
Creating task entries in the calendar
Create for
tasks that are
Not Started
or In
Progress
Keep a
record of
completed
work
Click this option to have Taskline create calendar task entries for tasks, or
parts of tasks, that are still outstanding. Task entries enable you to see
your tasks in Outlook's calendar view, as well as the task list.
Select this check box to have Taskline keep calendar task entries that
have been marked as complete. This enables you to maintain a record in
your calendar of exactly what you've worked on, and when. Deselect the
check box if you are only interested in current and future work. In this
case, Taskline will delete completed calendar task entries when it runs.
More about task progress.
Create all day Click this checkbox to have Taskline create an all-day event on the
events for
Outlook Calendar for each task that you designate as a milestone. You can
milestones
designate a task as a milestone by entering 0 in the Total work box on
the Taskline tab of the Taskline form. By default, tasks with zero Total
work are ignored by Taskline, so you must uncheck the Ignore this task
checkbox, on the same tab, to have Taskline process the task as a
milestone.
Options for task entries in the calendar
Mark all as
private
This option affects who can see your calendar task entries when your
Outlook Calendar is being shared. If this option is selected, all task entries
are created as private, so that only you can view them. If this option is
not clicked, only calendar task entries representing private tasks will be
created as private.
Limit tasks in You may not wish to have your calendar filled up with tasks for many
calendar to days or weeks ahead. Sometimes, it helps to just focus on short term
first ... days goals. This feature allows you to limit how many days in the calendar,
after the First task starts at date, display scheduled tasks.
Show as
Completed work is always represented using appointments on the
calendar, if the option to create calendar task entries for completed work
is enabled. However, outstanding work can be represented by
appointments or all day events. You can choose from the following
options:
Appointments, with accurate start and end dates and times –
The tasks display like appointments that begin and end with the
Scheduled start and Scheduled end dates that appear on the
Taskline tab of the Taskline form.
All day events from task Scheduled start to Scheduled end –
The tasks display as all-day events, in a continuous box beginning
and ending with the Scheduled start and Scheduled end dates
that appear on the Taskline tab. For example, if a task starts on
Monday and ends on Wednesday, the all-day event appears from
Monday to Wednesday.
All day events on task Scheduled start date – The tasks display
as all-day events on the Scheduled start date that appears on the
Taskline tab. For example, if a task starts on Monday and ends on
Wednesday, the all-day event appears on Monday only.
All day events on task Scheduled end date – The tasks display
All day events on task Scheduled end date – The tasks display
as all-day events on the Scheduled end date that appears on the
Taskline tab of the form. For example, if a task starts on Monday
and ends on Wednesday, the all-day event appears on Wednesday
only.
All day events on task Scheduled start, unless Finish
constraint – The tasks display as all-day events on the Scheduled
start date, which is shown on the Taskline tab of the form.
However, if the task has a Finish on or Finish on or before
constraint, the All day event is placed on the task's Scheduled end
date. For example, if a task starts on Monday and ends on
Wednesday, the all-day event appears on Monday, unless you have
entered a Finish constraint. In that case, the all-day event is shown
on Wednesday.
All day events on task Scheduled end, unless Start constraint
– The tasks display as all-day events on the Scheduled end date,
which is shown on the Taskline tab of the form. However, if the
task has a Start on or Start on or after constraint, the All day
event is placed on the task's Scheduled start date. For example, if
a task starts on Monday and ends on Wednesday, the all-day event
appears on Wednesday, unless you have entered a Start constraint.
In that case, the all-day event is shown on Monday.
Define
Subject
Click this button to display the Calendar Task Entry Subject dialog box,
which allows you to customize the appointment subject Taskline assigns
to calendar task entries. More.
Define Colors Click this button to display the Calendar Task Entry Colors dialog. This
allows you to set up various colors for the task entries that Taskline
creates in Outlook's calendar. More.
Show time as Use this drop down list to set the Free/Busy status of your task entries
in Outlook's calendar. This is a default value that can be overridden per
task by using the Show as drop down list on the Taskline tab of the task
form in Outlook.
Default time allowances before and after an appointment
Before
After
Enter the amount of time in minutes or hours that you want Taskline to
allow before the start of an appointment on the Outlook Calendar. This is
useful if you want to allow for travel or preparation time before an
appointment. More.
For Taskline Professional Edition only, this is
treated as a default value and the settings for an individual appointment
can override this setting. How?
Enter the amount of time in minutes or hours that you want Taskline to
allow after the end of an appointment. This is useful if you want to allow
for travel time after an appointment. More.
For Taskline Professional
Edition only, this is treated as a default value and the settings for an
individual appointment can override this setting. How?
Folders
My
Click the Select button to choose the folder that contains your
appointments appointments. Taskline will schedule your tasks around your
are in…
appointments, so that the two don't overlap. The text to the left of the
Write task
entries to…
Select button tells you which folder is currently selected.
Click the Select button to choose the folder that is to contain your task
entries. This can be the same as your appointments folder, and the text to
the left of the Select button tells you which folder is currently selected.
the left of the Select button tells you which folder is currently selected.
Task entries enable you to see your tasks in Outlook's Calendar view, as
well as the task list. More. If the Select button is disabled, click the
Create for tasks that are Not Started or In Progress option, which is
also on the Calendar tab of the dialog box.
Related Topics
Calendar Task Entry Colors
Calendar Task Entry Subject
Taskline Dialog Box
Tasks Tab
Projects Tab
Working hours Tab
Working Week Tab
Options Tab
Help/About Tab
Working Week Tab
This tab is only present on Taskline Standard Edition.
I take breaks at the following times during the day
From
To
If you take a regular break during the day, such as a lunch break, enter
the time you start your break in the first available From box.
If you take a regular break during the day, such as a lunch break, enter
the time you end your break in the To box.
Working day
I start work at This field displays the time you are ready to start working on your tasks
on a normal working day.
Note
The I start work at and I stop work at times can only be changed from
within Outlook:
Outlook 2007 – click Tools menu → Options tab → Calendar
Options button. On the Calendar Options dialog, you will see the
Start time and End time settings.
Outlook 2010 and 2013 – click File (FILE on Outlook 2013) →
Options → Calendar tab. Then update the Start time and End
time settings as required.
I stop work at This field displays the time that you stop working on your tasks on a
normal working day. The value shown is read-only. See Note above for
details on how to change this.
Working
Enter the number of hours you work each working day. For example, if
hours per
you start work and 9:00am, end work at 5:30pm, and take a 1 hour
day
break during the day, enter 7.5 hours. Note that this setting does not
affect the length of the working day. Rather, it is used by both Outlook
and Taskline to convert between days and hours. For example, if a value
of 8 is supplied, Outlook and Taskline will know that when "2d" is entered
for, say, task Actual Work, this equates to 16 hours.
Working
Enter the number of hours you work each week. Note that this setting
hours per
does not affect the length of the working week. Rather, it is used by both
week
Outlook and Taskline to convert between weeks and hours. For example,
if a value of 40 is supplied, Outlook and Taskline will know that when "2w"
is entered for, say, task Total work, this equates to 80 hours.
I work on the following days
Mon, Tue etc Select each day you work.
Important
You cannot predict all tasks in advance and hence you should make an allowance in
your schedule for unpredictable or spontaneous events, such as phone calls. Build
some contingency (or slack time) into your schedule. You could do this by adding a
day time break to represent the contingency, for example. Over-estimating the
Total work for your tasks is another good method.
Total work for your tasks is another good method.
Tip
Consider planning some personal or thinking time at the start of the day, perhaps to
plan the day's work. You could do this by entering a start work time slightly later
than the time you actually arrive at work. Similarly, you can schedule thinking time
at the end of the day, perhaps to plan the next day's work.
Related Topics
Taskline Dialog Box
Tasks Tab
Projects Tab
Calendar Tab
Options Tab
Help/About Tab
Working Hours Tab
This tab is only present on Taskline Professional Edition.
Working Hours
Working
hours
New
Delete
Use this list to select the Working hours you wish to view or edit. The
Working hours define the times during which tasks assigned these hours
can be scheduled.
Click the New button to create a new set of Working hours.
Click the Delete button to delete the currently selected Working hours.
You cannot delete Working hours that are currently assigned to one
or more tasks.
There must always be at least one set of Working hours defined, so
if you delete the last remaining set, Taskline will automatically insert a
new set of hours called "Default work week".
Mon, Tue
etc
You use these check boxes when you want to make the same change to
several days. Select the check boxes for the days you want to edit. Then,
when you make a change, all the selected days will be changed
simultaneously. Clicking the check box at the head of the column is a
shortcut for selecting or deselecting all seven check boxes in one operation.
Start work Enter the time you are ready to start working on your tasks on this day. If
you do not work this day, leave all the boxes on the row blank.
Stop work Enter the time you stop working on your tasks on this day. Use 0:00 for
midnight. If you do not work this day, leave all the boxes on the row blank.
From
If you take a regular break during the day, such as a lunch break, enter the
time you start your break here.
To
Enter the time you end your break here.
1st, 2nd
You can define up to 4 breaks during the day. Use these radio buttons to
etc break select which break you want to view or edit.
Options
Default
hours
If a task has no Working hours assigned, the Default Hours are used.
You define which hours are the default ones by selecting this radio button.
Schedule If you want Taskline to ignore (i.e. not schedule) all tasks assigned these
tasks that Working hours, deselect this check box.
have been
assigned
these
hours
Important
You cannot predict all tasks in advance and hence you should make an allowance in
your schedule for unpredictable or spontaneous events, such as phone calls,
interruptions etc. Build some contingency (or slack time) into your schedule. You
could do this by adding a day time break to represent the contingency, for example.
Over-estimating the Total work for your tasks is another good method.
Tips
Tips
To assign Working hours to a task, select the hours from the Working hours
drop down list on the Taskline tab of the task form in Outlook. Note that Taskline
can sometimes automatically set Working hours for you, when Working hours
have the same name as the Project or Category. More.
Consider planning some personal or thinking time at the start of the day, perhaps to
plan the day's work. You could do this by entering a Start work time slightly later
than the time you actually arrive at work. Similarly, you can schedule thinking time
at the end of the day, perhaps to plan the next day's work.
Related Topics
Setting Your Working hours
Working hours and The Taskline Task Form in Outlook
Using Different Working hours for Different Tasks
Taskline Dialog Box
Tasks Tab
Projects Tab
Calendar Tab
Options Tab
Help/About Tab
Options Tab
Task Start and Due dates
Taskline
should set
the Start
and Due
dates to
the
Scheduled
dates
If this option is clicked, the Start and Due dates are always kept up-to-date
and in step with the Scheduled start and Scheduled End dates. Any
standard Outlook views that require correct Start or Due dates will work
correctly and tasks that exceed their Due dates will be highlighted in red by
Outlook. More about standard task views. However, any Start or Due dates
you had previously entered will get overwritten, although the Restore my
original Start and Due dates feature can restore these.
Clear this option to have Taskline leave the Start and Due date fields alone,
and only update the Scheduled start and Scheduled End dates.
Notes
This option is not available if you are ordering your tasks by Due
date, because it's confusing to order by something that is about to
get changed.
The Start and Due dates of recurring tasks are never updated by
Taskline, even if you have the Taskline should set Start and Due
to the Scheduled dates option set. This is because changing the
Start or Due date of a recurring task usually generates a new (and
unwanted) task occurrence.
This does not apply to regenerating tasks, which are affected by this
setting. More
Restore
my
original
Start and
Due dates
If you run Taskline with the Taskline should set Start and Due to the
Scheduled dates option enabled, Taskline resets all the Start Dates and
Due Dates on your tasks. If you now want to get your original dates back
again, click this button to restore any Start and Due dates previously
overwritten.
Outlook task form initial tab (for existing tasks)
This option allows you to specify which tab is initially presented on the
Taskline form in Outlook. New tasks always display the standard Outlook
Task tab.
Miscellaneous
If a task
constraint
is missed,
prefix task
subject
with
Default
minimum
task split
If you enter some text into this box, Taskline will prefix the subject of any
task whose constraint cannot be met with this text. The prefix will be
automatically removed once the constraint can be met. Leave this box blank
if you don't want Taskline to highlight missed constraints in this manner.
More.
Enter the minimum number of hours or minutes that you want Taskline to
split a task into, when scheduling that task around other items, such as
appointments and breaks. You can enter h to designate hours and m to
designate minutes.
You can override this setting for individual tasks if you so wish by using the
Task can be split and Minimum task split options on the Taskline tab of
the task form in Outlook. More.
the task form in Outlook. More.
Show
summary
when task
reschedule
is
complete
Re-number
or re-letter
Priority
(A1)
Import
Tasks
In Outlook, when you create or modify a task and enter hours or minutes in
the Total Work box, the Task can be split check box is selected by
default. When Taskline schedules this task and encounters conflicts, such as
appointments on the Calendar, the software breaks the task into shorter
parts using the value that you enter. More about task splitting.
If this option is clicked, the Summary of Task Schedule dialog box is
presented when Taskline has finished scheduling your tasks. More.
Click this button to display options that allow you to change the Priority
(A1) values of your tasks. More.
Click this button to display a dialog that allows you to import tasks from a
simple text list of task names. More.
Advanced Click this button to see less frequently used options. More.
Options
Related Topics
Advanced Options
Renumber or Re-letter Priority (A1)
Import Tasks
Taskline Dialog Box
Tasks Tab
Projects Tab
Calendar Tab
Working hours Tab
Working Week Tab
Help/About Tab
Advanced Options
Tasks
Show the Taskline When this option is enabled, new tasks will always have the Taskline
tab for tasks in all tab available. Otherwise, new tasks only show the Taskline tab if
Outlook folders
they are in your nominated Schedule the tasks in... Outlook tasks
folder, which is set on the Tasks tab of Taskline's main dialog.
Require that all
If this option is clicked, all new Taskline tasks created in Outlook
tasks are assigned must be assigned a category, and any existing tasks with a
a category
category cannot have their category removed, although it can be
changed.
Keep Priority
Keeps Priority and Priority (A1) synchronized such that Low
(Low/Medium/High) Priority corresponds to an A1 letter C, Medium Priority corresponds
and Priority (A1)
to an A1 letter B and High Priority corresponds to an A1 letter A.
synchronized
On new tasks,
You can tell Taskline to ignore certain tasks by selecting the Ignore
have 'Ignore this
this task check box, which is on the Taskline tab of the Task Form
task' initially set
in Outlook. For a new task, choose whether you want Ignore this
task to be initially set or unset. Even if you have Ignore this task
defaulting to being set, it will be automatically unset if some Total
work is set on the task.
Clear Scheduled
Some tasks are not scheduled, for example because the Ignore
start and
this task check box is selected or perhaps because the project a
Scheduled end if
task belongs to is not scheduled. If this option is selected, then
task not scheduled unscheduled tasks will have their Scheduled start, Scheduled end
and Week commencing dates cleared by Taskline. This makes it
easy to see which tasks have been scheduled, and which have not.
Don't display
If a task with a Finish on constraint is scheduled to finish before its
warnings for
constraint date, then normally Taskline treats this as a missed
"Finish On" tasks constraint. But setting this option means that finishing such tasks
that are scheduled early is not a concern and Taskline will no longer identify the task as
early
having missed its constraint.
Round 'Default to The Default to current date and time check box, which is on the
current date and
Tasks tab of Taskline's main dialog, is rounded up to the next time
time' to next
interval that you set here. This time interval must be between 1
minute and 1 hour.
Recurring tasks
Schedule on Start
date, if set
Schedule on or
after Start date, if
set
Ignore Start date
Taskline should schedule a recurring task on its Start date.
Taskline should schedule a recurring task on or after its Start date.
Taskline should ignore the Start date on a recurring task and
schedule it just like any other task.
Schedule on Due If set, Taskline will schedule a recurring task on its Due date, but
date, if set
only if the Start date is unset or the 'Ignore Start date' option is
selected.
Schedule on or
If set, Taskline will schedule a recurring task on or before its Due
before Due date, if date, but only if the Start date is unset or the 'Ignore Start date'
set
option is selected.
Ignore Due date
Taskline should ignore the Due date when scheduling a recurring
task.
Calendar
Ignore 'Out of
Office'
appointments
Normally Taskline schedules your tasks around the appointments in
your calendar, unless the appointment have Show time as set to
Free. Select this option to have Taskline ignore Out of Office
appointments, as well as Free appointments, so that tasks can be
scheduled during time set aside for Out of Office appointments.
Ignore 'Tentative' Select this option to have Taskline ignore appointments with Show
appointments
time as set to Tentative when it's scheduling your tasks. With this
option not selected, which is the default setting, Taskline will
schedule your tasks around Tentative appointments.
Ignore 'Working
This option is only available with Outlook 2013 and later. Select it to
Elsewhere'
have Taskline ignore appointments with Show time as set to
appointments
Working Elsewhere when it's scheduling your tasks.
Calendar task entries
Set reminders on
calendar task
entries
This option tells Taskline to put Outlook reminders on the calendar
task entries created by Taskline. Since one task can give rise to
several calendar task entries, enabling this option can result in a lot
of reminders.
Close calendar
When you open a calendar task entry, a Taskline toolbar is displayed
task entry when
and you can click the Open Task button to open the associated
Open Task button task. If this option is selected, the calendar task entry is closed as
clicked
the task is opened. Otherwise, it is left open.
Show list of
This option shows, on the calendar task entry, the names of any
attachments
attachments on the task.
Open task after
You can right click on a standard appointment in Outlook's calendar
'Create Task' from and click Create Task or Create Task and Pin from the context
appointment
menu. This creates a Taskline task from the appointment. Select this
check box to have that task opened after the command has run.
Copy contacts
Copies the list of Contacts from the task to its calendar task entries.
from task
Enabling this option will slow Taskline down slightly.
Copy notes from
Copies notes from a task to its calendar task entries. Only the text,
task (text only)
excluding formatting, is copied.
Category of calendar task entries
Copy from task
Always set to
This option tells Taskline to copy a task's categories to its calendar
task entries.
Select this option to have Taskline create all calendar task entries
with the same category. Leave blank to create calendar task entries
with no category assigned.
Note
If calendar task entries are assigned a category, then Outlook shows the
category color, rather than the colors set in Taskline's Calendar Task Entry
Colors dialog. Thus if you want Outlook to use the Calendar Task Entry Colors,
you must select the Always set to option and leave the edit box blank.
Miscellaneous
Selecting this option means that all the messages that no longer
Reset "Don't tell
me about this
again" messages
Selecting this option means that all the messages that no longer
appear, because you selected the Don't tell me about this again
check box, will now be displayed. The Don't tell me about this
again option will still be available, should you wish to hide them
again.
ClearContext
By default, Taskline stores the project name assigned to a task in an
project
Outlook User Defined Field called Project. However, if the
compatibility
ClearContext project compatibility advanced option is selected,
Taskline instead uses an Outlook custom field called CCTopicName. This is the name used by the ClearContext® Outlook
Add-In and so aids compatibility if you also have that Add-In
installed.
Understanding Taskline
If the task reschedule is producing results that are difficult to understand, try selecting
one or more of the following options. The first 4 options temporarily remove rules from
the reschedule logic, to simplify the process and hopefully make it easier to understand.
Ignore Max time
If the reschedule is producing results that are difficult to understand,
per day
try this option. It will tell Taskline to ignore the Max time per day
setting on all tasks, so that you can see what difference this makes.
This check box is reset each time you run Taskline – changes are
not saved.
Ignore Max time
Similar to the previous option, this option tells Taskline to ignore the
per week
Max time per week setting on all tasks. This check box is reset
each time you run Taskline – changes are not saved.
Ignore task split
Tells Taskline to ignore the minimum split setting on a task, and
settings and allow also the default minimum split setting on the Options tab of the
tasks to be split
main dialog, so that you can see what difference this makes. This
without restriction check box is reset each time you run Taskline – changes are not
saved.
Ignore task
Tells Taskline to ignore task constraints, so that you can see what
constraints
difference this makes. This check box is reset each time you run
Taskline – changes are not saved.
Give reasons for
If Taskline is ignoring some tasks and you're not sure why, try
tasks not being
selecting this option. It will display a summary of why tasks are not
scheduled
scheduled.
Renumber or Re-letter Priority (A1)
Click the Renumber or Re-letter Priority (A1) button on the Options tab of the
Taskline dialog box to display the following options.
Renumber
Only
update
numbers,
leave
letters
unchanged
Priority of
first task
Select this option to leave the letter part of Priority (A1) unchanged. Only
the number part will be updated.
This option, when used in conjunction with the Step field, allows you to
renumber the Priority (A1) values on all of your Taskline tasks. Enter
values for the letter and number values of the priority of the first task in the
first two boxes. You can then click the OK button to renumber the task
priorities.
Tip
You set the Priority (A1) values on a task when you open the task
and enter values on the Taskline tab of the Taskline form.
Step
This option, when used in conjunction with the Priority of first task
settings, allows you to enter the difference between the Priority (A1)
values on all of your Taskline tasks. Enter whatever gap you want between
consecutive tasks here. For example, if the priority of your first task is B10,
and you enter 5 here, your tasks are assigned Task Priorities of B10, B15,
B20, B25, and so forth. Usually, you should enter a larger Step value; later,
this allows you to quickly add a new task between existing tasks. Click the
OK button to renumber the task priorities.
Change letter
Change
This option allows you to change the letter of the Priority (A1) values on all
___ to ___ of your Taskline tasks to a new letter that you enter. The numeric part of
the Priority (A1) value is not changed. Enter the letter that you want to
change in the first box. In the second box, enter the new letter that should
replace it. Click the OK button to re-letter the task priorities.
Tip
You set the Priority (A1) values on a task when you open the task
and enter values on the Taskline tab of the Taskline form.
Renumber or re-letter the following task types too
Ignored
tasks
Normally, Taskline does not process tasks which have the Ignore this task
check box set. This check box is on the Taskline tab of the task form.
However, you can select the Ignored tasks check box to have Taskline
renumber or re-letter ignored tasks too, which is useful if you have some
tasks that are temporarily on hold but you don't want them to get out of
sequence during a renumber.
Tasks that Normally, Taskline does not process tasks that have their Status set to
are
Deferred or Waiting on someone else. However, you can select this
deferred or
Deferred or Waiting on someone else. However, you can select this
deferred or option to have Taskline renumber or re-letter these tasks too, which is
waiting on useful if you have some deferred or waiting tasks that you don't wish to get
someone out of sequence during a renumber.
else
Related Topics
Defining the Order in Which Tasks are Scheduled
Priority (A1) on the Taskline Task Form
Import Tasks
Taskline allows you to take a task list created in a text editor or a word processor, such as
Notepad or Word, and create a set of tasks in Outlook from that list. Your list should be
one task subject per line. Each line of text will result in the creation of one new task, with
the task's subject taken from that line of text.
To import tasks:
1. Select your list in your text editor and copy it to the Windows clipboard.
2. Open the Import Tasks dialog. To do this, start Taskline by clicking the Taskline
toolbar button in Outlook. Then click the Options tab, and then the Import Tasks
button.
3. If the list you have copied to the clipboard was a bulleted or number list, select the
This is a numbered or bulleted list check box. The bullets or numbers will then
be removed, as you won't want these in the task subject. If your list was simple
text, leave this check box deselected. The dialog shows the subject of the first task
so you can immediately see the effects of selecting the check box.
4. Optionally, select initial values for the Total work, Project and Working hours
that will be assigned to each task created. You can of course change these values
after the tasks have been created.
Note that Working hours is only shown if
you are using Taskline Professional Edition.
5. Click OK to import the tasks. These will be created in the Schedule the tasks in...
folder you have selected on the Tasks tab of the dialog.
Notes
For very long lines of text, only the first part of the text will be placed in the task
subject. In the cases where the task subject is truncated, the whole line of text will
be added to the task notes.
Blank lines will be ignored by the import process.
Help / About Tab
Purchase
Click this button to be taken to the purchase information page of
Taskline's web site. This page gives details on Taskline pricing and
delivery.
Enter Product
This button displays the Enter Product Key dialog box, which is
Key
where you can enter the registration information sent to you when you
purchase Taskline. If your registration email is in Outlook, click the
Auto Process Registration Email button to have Taskline read the
email and fill in the dialog box for you.
Taskline Tutorial Click this button to display the Taskline tutorial.
Help and Support Click the button to find out about your options for getting Taskline
help and support.
Choose which
Taskline is available in 2 editions – Standard and Professional. During
Taskline version your evaluation period, you can switch between editions so that you
to evaluate
may evaluate each. To change editions, select the appropriate radio
button and click Apply.
Related Topics
Purchase Taskline
Taskline Dialog Box
Tasks Tab
Projects Tab
Calendar Tab
Working hours Tab
Working Week Tab
Options Tab
Newsletter Articles
Taskline Tip — Comparing How You've Done With How You Thought You'd Do
If you're brave enough to want to compare your actual performance with your scheduled
performance, try this. Enable the Taskline should set Start and Due to the Schedule
dates option, run Taskline, and then turn this option off for subsequent reschedules. You
can now compare your original dates (the Start and Due dates) with your latest
estimates (the Scheduled start and Scheduled end dates), or when you actually
started (Actual start).
Taskline Tip — Unscheduled Tasks
One of the most common reasons for slipping behind schedule is the failure to adequately
plan for unscheduled tasks and interruptions. It's a mistake we even make ourselves.
Phone calls, people stopping to talk and the odd 5 minute task that needs your prompt
attention all add up. Collectively, if not individually, these items are predictable, so
schedule them in. You could do this by adding a recurring appointment, or a day time
break to reserve the necessary time, or by simply telling Taskline that your working day is
shorter than it actually is. Doing so will increase your job satisfaction and make the dates
you give to others more reliable.
Taskline Tip — Printing Schedules
Most people find time management difficult. This is human nature. We prefer doing the
things we like and we put off the things we don't like, for example. Having an Outlook
printout of your Taskline schedule on your desk really helps to combat these traits by
giving you focus. Printing out a calendar, complete with calendar task entries, is
particularly useful in this regard. You can then refer to the printout during the day to see
what you should be working on and how you're doing.
There are several lesser known Outlook features that can assist when it comes to printing
out a schedule:
Date range. With your Outlook calendar open, click File → Print. You can then use
the Print Range settings to say when you want the printout to start and end.
Setting the font for printing. Click the Define Styles button on the Print dialog.
Click on the style you prefer (I use the Monthly Style) and click Edit. Here you can
change the print font without changing the on-screen font. Arial Narrow is
particularly useful for printing.
On the same dialog, for the Monthly Style, it is often useful to clear the Print
Exactly One Month per Page check box if you are printing out a schedule midmonth.
You may wish to filter the calendar view before printing. If you wanted a calendar
view of just your Taskline tasks for example, you could do this by setting up a filter.
Click View → Current View → Customize Current View → Filter → Advanced
tab → Fields → User defined fields in folder → @CreatedByTaskline. Set the
condition to exists. Outlook 2003 users need to click View → Arrange By →
Current View → Customize Current View etc.
You could also filter on label, category or Show time as to remove certain types of
appointments from your printout.
Taskline Tip — Printing a Whole Online Help Chapter in One Step
With the online help, you can click on a chapter heading in the Contents tab (i.e. the
lines with the purple closed book icon) to select it. If you then click the Print toolbar
button, you'll be given an option to Print the selected heading and all subtopics.
button, you'll be given an option to Print the selected heading and all subtopics.
Thus the whole chapter gets printed out. The pagination isn't great, but it works.
Taskline Tip — Lost Product Key
Should you ever lose your Taskline product key, you can have it automatically resent via
our web site. The 2nd entry in the Support FAQ on the site gives full details:
www.taskline.com/FAQ.asp#KeyQ
Taskline Tip — A Scheme for Prioritizing and Organizing Tasks
Task prioritization is important in encouraging you to do the most important tasks first.
But how do you prioritize your tasks when you have hundreds of them? This is an
interesting method devised by Taskline user Aviv Riftin. He is a Project Manager who
works in a hectic environment, dealing with 40 different projects and tasks that originate
from around 20 different people. He also has to cope with urgent requests from his boss
and ends up having almost 50% of his tasks that weren't planned for originally
To cope with this, and to keep the amount of time he spends prioritizing tasks to a
minimum, he has agreed a 12 level task categorization scheme with his boss, which is a
sort of priority map. For example, a "show stopper" is A10, a task related to his boss is
A20 and so on. He recalls that actually setting up these priorities was a useful exercise in
itself, because it was a good opportunity to agree with colleagues on how tasks should be
prioritized.
Each time a new task arrives, it gets categorized and then given a priority based on that
category. Then he immediately runs Taskline, and looks out for warnings about missed
constraints. If that happens, he does one of three things:
1. Delay some constraint, if possible.
2. Phones the client to tell them to expect a delay. As he points out, this step is
important; clients will usually accept some delay if you tell them about it in
advance.
3. Phones his wife to tell her he's going to be working late...
Taskline Tip — An Alternative Scheme for Prioritizing and Organizing Tasks
This is how our support engineer, Charles Sinclair, manages his tasks. Charles has a lot of
scheduled work to do, such as authoring our web site and Taskline Q/A work, as well as
handling all of our support. He wrote:
Personally, I don't use Priority (A1). I prefer to use Natural Order for several reasons:
1. I can only work on one task at any one time and so I like a system that forces me
to put tasks into priority order. With Priority (A1), you can give several tasks the
same priority, and so continually defer "What shall I do next?" decisions. This can
be unproductive if you end up revisiting the same issue several times.
2. I can change the priority of a task visually, by dragging it up or down the task list.
3. You cannot get duplicate priorities. When you change a task's priority, other tasks
in effect have their priorities automatically updated to accommodate this.
Of course, if you have 100's of tasks, deciding individual priorities is difficult. To get round
this, I just keep roughly 30 to 90 (it varies a lot!) of my most pressing tasks in my Tasks
folder. The rest I move to a 2nd task folder I call "Future Work". Keeping this split helps
me focus on the work in hand and also helps psychologically — staring at a huge task list
can be depressing! I keep my "Future Work" list in approximate priority order. When my
working task list gets down to about 20 tasks, I move the 30 or so most important tasks
from my Future Work folder to my working tasks folder, putting them into the exact order
I intend to work on them in the process.
I intend to work on them in the process.
Periodically, when I want to see the big picture, I run Taskline on my Future Work folder.
When I do this, I set the First Task Start At date to the finish date of the last task on
my working task list. This then gives me a good feel for when long term work is likely to
be completed.
Task Planning With Taskline — A Recommended Approach
We often get asked about "best practice" with Taskline. Best practice is hard to define as
different processes work for different people in different situations, but the following
approach should work well for most people.
1. Firstly, working to an unachievable schedule is stressful and disheartening, so take
a little time to make sure that your schedule is achievable. Check that:
a. You haven't left any tasks out
b. Task Total work values are reasonable
c. Appointment travel times are reasonable
d. Task ordering is correct
e. Any applicable deadlines have been entered
f. You have left yourself enough free time to manage the inevitable unscheduled
interruptions that happen during the day — phone calls, coffee breaks, people
walking in for a chat, thinking time (very important) etc. You could do this by
making an existing day time break longer than it needs to be, or by entering
a day time break specifically for this purpose, or perhaps by setting the I
start work at and I stop work at times conservatively.
2. Run Taskline and visually check that the schedule looks reasonable (i.e. you have
not made any mistakes). Then print the schedule off and keep it on your desk as a
reference.
3. Try and stick to the schedule. It'll give you focus:
a. At the start of each day, quickly look at what you're expected to achieve that
day.
b. At the end of each day, take a quick look at what you've got on for tomorrow.
4. Mark tasks off as complete (or part complete if you prefer) when you've done them,
to keep the schedule up to date, and to remind yourself that you are making
progress!
5. When a new task comes in, give it a priority and a Total work value. Then
a. If it's urgent, rerun Taskline there and then. You may then need to print off
an updated schedule.
b. If it's non-urgent, there's probably no point in running Taskline just yet, as it
may rearrange your short term schedule, which you may not want.
6. Eventually, the schedule will get out of shape. At this stage, don't stress yourself
out chasing the unachievable. So:
a. Look at why the schedule got out of shape. Can you make any adjustments to
improve the accuracy of the next one?
b. Rerun Taskline to calculate a new schedule.
c. If any deadlines are now being missed, or dates promised to others can no
longer be achieved, tell them. The earlier you give people notice of delays,
the more willing they will be to accept them, not least because it gives them
time to adjust too.
7. So, how often will you run Taskline? It depends:
a. A survey of Taskline users revealed that the average was 6 times per week,
but some people (who I guess have tasks coming at them from all angles) run
it up to 50 times a week.
b. If you have a fairly stable schedule, or if you need to try and stick to an
agreed schedule, then once a week or less is sufficient.
Outlook Tip — Use Auto Formatting To Differentiate Different Task Types
Outlook has some nice auto-formatting capabilities. You could use these to, for example,
highlight tasks that are due this week in bold or show tasks that are ignored by Taskline
in gray.
To highlight tasks due this week, open your tasks folder and click View → Current View
→ Customize Current View. Outlook 2003 users click View → Arrange By → Current
View → Customize Current View. Click the Automatic Formatting button and then
click the Add button. Give the rule a name (for example, "Due This Week") and then click
the Condition button. On the Filter dialog, click the Advanced tab, then the Field
button and choose the Forms entry. On the dialog that appears, make sure Personal
Forms is selected in the drop down list at the top of the dialog, then add Taskline to the
right hand list box and Close the dialog. Click the Field button again but this time click
Taskline, which should now be visible in the list, and then click Scheduled end. Then
simply set the condition to this week and click the Add to List button. OK the Filter
dialog to return to the Automatic Formatting dialog and then click the Font button to
select how you wish tasks due this week to be highlighted.
To highlight tasks ignored by Taskline, the procedure is very similar, but you would set up
a condition of Ignore task equals Yes on the Filter dialog.
Outlook Tip — Using Grouping to Edit Many Items in One Go
Outlook allows you to group table views by any field. For example, you may choose to
group your tasks by Project. This groups together all tasks with the same project, under
a project heading, and also allows you to collapse or expand the display of individual
projects. But a less well known feature of grouping is that it also acts as an edit facility for
multiple items. For example, if your task view was grouped by project, you can drag and
drop tasks between groups to change the project. This isn't restricted to one item at a
time — you can select as many items as you want and drag them between groups, to
change many tasks in one go. This can be used with almost any field on any item. For
example, it could be used as a quick way to make many appointments in your calendar
Private, or to bulk change categories on any Outlook item.
How to use grouping in Outlook views is described in Taskline's online help. On the
Contents tab of the help, navigate to:
Getting the Most out of Outlook Views
→ Customizing the Task Table View
→ Grouping
The Taskline Task Form in Outlook
If you open an Outlook task, the task form for Outlook appears, displaying task
information that you can also modify. The standard Outlook task form has two tabs: Task
and Details.
If you open a Taskline task, instead of the standard Outlook task form, the Taskline task
form appears. This is identical to the standard task form, except that a new tab is
present, the Taskline tab. This tab displays all of the information and options useful to
task scheduling, such as dates, duration, progress and so on. While most options, such as
Subject and Project, appear on only one tab of the form, a few appear on two tabs,
allowing you to enter the information on either.
Tips
When you create a new task, the standard Outlook Task tab is initially displayed.
However, when you open an existing task, you can nominate which tab is initially
shown by using the Outlook task form initial tab drop down list, on the Options
tab of Taskline's main dialog.
By default, the Taskline tab is only shown for tasks in your nominated Schedule
the tasks in Outlook folder, which is set on the Tasks tab of Taskline's main
dialog. If you want it shown for all tasks, open the Advanced Options dialog and
select the Show the Taskline tab for tasks in all Outlook folders check box.
Dates and duration
Scheduled This is the estimated or most likely start date for the task. It is initially clear
start
and is recalculated each time you run Taskline. The Taskline calculation
takes into account things like appointments in your calendar, the priorities
of your tasks, and any constraints on them. As few people can predict work
with 100% accuracy, for example a meeting taking longer than anticipated,
you cannot usually start every task exactly on schedule. However, the
Scheduled start date gives you a very good idea of when you are likely to
start working on a task.
For a task that is partly completed, Scheduled start shows when the
remaining part of the task should be started, and Scheduled end displays
when the task is due to be fully completed. For a completed task,
Scheduled start shows when the task started, and Scheduled end
displays when it ended. More about scheduled dates.
Scheduled This is the estimated or most likely finish date for the task. It is initially
end
clear and is recalculated each time you run Taskline. The calculation takes
the Scheduled start date and adds to it the task’s Total Work. Taskline
then adjusts for things like your normal working week, your daily breaks
and appointments in your calendar, to derive the most likely end date for
your task. You may not finish a task exactly as scheduled, because of
unanticipated interruptions or because the task simply took longer than your
Total work estimate. However, the Scheduled end date gives you a very
good idea of when you are likely to finish a task. More about scheduled
dates
Total work A task’s Total work is your estimate of how long a task will take –
effectively how much work it entails. More.
You can enter the Total work as a number of minutes, hours, days or
weeks; the abbreviations are m, h, d and w. For example, to set Total
Work to 5 hours, you can type "5h" or "5 hours".
When you create a new task, the Ignore this task check box is initially
selected. This is automatically cleared by Taskline when you set Total work
to a non-zero value. If you want to create a task with zero Total work, to
represent a significant milestone or goal in your task list, you must
remember to clear the Ignore this task check box yourself, since Total
work is zero in these cases.
Outlook will convert large numbers of small time units to larger time units.
For example, "120 minutes" converts to 2 hours, and 8 hours converts to 1
day, assuming that there are 8 working hours in the day. See Setting the
Working Week for information on how to set the number of working hours in
a day.
Progress
Actual start This is the date the task actually started. It is set only for a task that is in
progress or completed. You don't need to set this field unless you want to –
if you leave it blank, Taskline sets it for you. More.
Status
This is the standard Outlook field that is also on the Task tab of the task
form. Note that Taskline will not schedule tasks whose status is set to
Deferred or Waiting on someone else and such tasks will also have their
Scheduled start, Schedule End and Week Commencing fields cleared.
Actual work Actual Work is the amount of time spent on the task to date. This is in
contrast to Total work, which is how much time you thought you would
spend on the whole task. Actual Work is optional, but it is often useful to
record how your time has been spent. You can also look back at this
information when scheduling similar work in the future.
When you get part way through a task, you may then realize that your
initial estimate is not correct. In this case, you should update Total work as
well, so that your schedule remains realistic and achievable.
You can set either Actual Work or % Complete, or set both of them, or
ignore these fields and set none of them. More.
The format of the Actual Work field is the same as Total work and is a
number followed by a time unit, such as "5h" for 5 hours.
% Complete The percentage of the task that has been completed. If you don't think in
terms of percentages, you can enter information in Actual Work instead.
Both of these fields are optional. More.
Work
This information is display only and you cannot edit it. Work remaining
remaining shows the amount of work that is still outstanding on the task. More.
Reminder
Reminder
Click the Reminder check box and enter an amount of time to set a
reminder on a task. Taskline task reminders use working time, not elapsed
time. So, for example, if you wish to be reminded one day in advance about
something that starts on Monday, Taskline instructs Outlook to remind you
on Friday, assuming that you do not work weekends.
Taskline reminders work by setting up the standard Outlook reminder on
your behalf. Thus you can't use both types of reminder on the same task at
the same time. More.
Scheduling control
Ignore this Select this box to have Taskline completely ignore a task. Setting a task to
task
Ignore clears the Scheduled start, Schedule End and Week
commencing options. This check box is selected by default. However, when
commencing options. This check box is selected by default. However, when
you enter information in the Total work box, this clears the Ignore this
task check box, allowing Taskline to schedule the task. Thus, tasks that
have zero hours for the Total work box are not scheduled unless you
unselect the Ignore this task check box.
Show as
Task can
be split
Project
You can change the default value for Ignore this task on the Advanced
Options dialog.
Use this drop down list to set the Free/Busy status of the calendar task
entries for this particular task. If it is left blank then the Show time as
setting on the Calendar tab of Taskline's main dialog is used. The Show
time as setting is the default value for all tasks; this default can be
overridden by using this setting.
Select this option to allow Taskline to divide a task into shorter parts when,
during task scheduling, it encounters fixed items such as calendar
appointments and day time breaks. This makes optimum use of your
available time. Clear this check box if you want the whole task to be
scheduled as one contiguous item, assuming a sufficiently long time slot is
available. More about task splitting.
Use the Project control to optionally enter the name of a project that the
task belongs to. Giving a task a project name is useful for grouping together
related tasks. You can type a new project name into the box, or click on the
down arrow to select an existing project name that you have used before.
With Projects, you now have a second way of categorizing tasks, in addition
to the standard Outlook method of Categories. A Project describes a related
set of tasks, for example all the work for one particular customer or a
description of a significant collection of work, such as an office relocation.
Categories on the other hand refer to the type of work, such as
administration, report writing, meetings etc. As a guide, categories tend to
be fixed, while projects tend to change over time.
Minimum
split
Working
hours
After a while, you may find that the Project list contains previously used
project names that you do not intend to use again. In this case, you can
remove these old names from the list by clicking the Projects tab of the
Taskline dialog. More about projects.
This option is only available if the Task can be split option is selected. It
specifies the shortest part that Taskline may split a task into. For example,
if you enter 30 m for 30 minutes, then if Taskline needs to split the task,
each part will be 30 minutes or greater in duration.
You can set a default minimum split for all tasks by using the Default
minimum task split option on the Options tab of the Taskline dialog.
More. The Default minimum task split is only used when Minimum split
is set to zero on the task form. More about task splitting.
Taskline Professional Edition only. Set the Working hours to tell
Taskline which hours are applicable to this task. You can type the name of
the working hours in, or select it from the drop down list. But you must
first define your working hours, using the Working Hours tab of
Taskline's dialog. How?
If no hours are assigned to a task, then the default hours are used. You set
which working hours are the default ones by selecting the Default hours
radio button on the Working hours tab of Taskline's dialog.
Sometimes you may want tasks of a certain project or category to always
have the same working hours assigned. For example, you may want tasks
have the same working hours assigned. For example, you may want tasks
of category "Personal" to be scheduled for weekends. If you give the
Working hours exactly the same name as a Project or Category,
Taskline will automatically assign the Working hours for you. Specifically,
if the Working hours are currently unset, then:
1. If some working hours exist that have the same name as an
assigned category, then those hours are automatically assigned.
2. Or, if some working hours exist that have the same name as the
assigned project, then those hours are automatically used.
Priority (A1) Enter a Priority (A1) value. A valid Priority (A1) must consist of at least
one letter, A-Z, followed by an optional number ranging from 0 to 99.
Examples of valid Priority (A1) values are B, A05 and X40.
Priority (A1) is one of the ways of ordering your tasks. More about task
ordering. It is usually advantageous to leave gaps between the task
priorities of consecutive tasks, so that you may later give another task a
priority between existing ones, without having to reprioritize existing tasks.
For example, you might wish to give the first task you want to work on task
priority A10, the second one task priority A20, and so on. Priority (A1) is
like the Outlook Priority option, except that Priority lets you use only
three values: Low, Normal, and High.
You can reassign Priority (A1) values by clicking the Renumber or Reletter Priority (A1) button on the Options tab of Taskline's main dialog.
More.
Max time
per day
Max time
per week
There is no need for the logic links used in Project Management software –
Taskline uses task ordering to achieve a similar result.
Max time per day is used to limit the amount of time allocated to a
task each day. It can be used to spread a longer task out over several days
or weeks, for example to divide your time between 2 or more tasks, rather
than working on a single task exclusively until it's completed.
Max time per week is used to limit how much time is allocated each
week to a long task.
External constraint
Task
should
Usually you need only tell Taskline in which order to schedule your tasks.
You do this by using the Order by settings on the Tasks tab of the
Taskline dialog. Priority (A1) or Natural Order are both common choices
for task ordering. More. Sometimes however, external constraints come into
play, such as deadlines, or perhaps you are waiting on a delivery before you
can start work on a task. For such tasks, select a constraint from the Task
should dropdown list. For example, Finish on or before constraints work
well with deadlines. More.
Once you've entered a constraint, you will need to enter a date for that
constraint. When is the deadline, or when is that delivery due? You do this
by entering a date to the right of the calendar icon or by clicking on the
dropdown list to display the Date picker and clicking a date on that.
If you need to be accurate, you can also enter a time for the constraint.
Important
Important
Task constraints should be the exception, not the norm. Most of your
tasks should be unconstrained and only those with deadlines or other
external date issues should have constraints. If you place constraints
on most of your tasks, then you are effectively manually scheduling
and therefore stopping Taskline was working effectively.
Select any
other tasks
also
affected by
this
constraint
For tasks with a constraint, you can optionally tell Taskline that other tasks
are also affected by that constraint. For example, you might have a package
of work that consists of three tasks, and none of them can start until
someone else gives you a report they're writing. In this case, you would:
1. Set a Start on or a Start on or After constraint on the first task you
wish to work on.
2. Check the Select any other tasks also affected by this constraint
check box.
3. Select the other two tasks from the list by clicking on them. To deselect a
task, click it again.
The following types of tasks cannot be made dependent upon other tasks
and hence will not be displayed in the Select any other tasks also
affected by this constraint list:
Completed tasks.
Recurring tasks, because these are already constrained to happen on
a certain day and you can't have two constraints on one task.
Delegated tasks, because someone else is doing them.
Tasks with their Status set to Deferred or Waiting on someone
else, because these are effectively on hold and hence Taskline ignores
them.
Tasks with the Ignore check box checked. These are, by definition,
ignored by Taskline.
Tasks with constraints, again because you can't have two constraints
on one task.
Show
projects
Do not try to use the Select any other tasks also affected by this
constraint list to set task order. You should use Order by for that. How?
This dependency list is only used when a constraint applies to more than
one task.
You may have tasks with the same subject but in different projects. For
example, each of your projects may have a "Produce final project report"
task. To differentiate different tasks with the same subject, select the Show
projects check box. This will prefix the project name to the task subject in
the Select any other tasks also affected by this constraint list box.
Taskline Outlook Add-In is Not Responding
Outlook 2013 has some built-in target start up times for Outlook Add-Ins that even
skeleton Add-Ins produced by Microsoft's own Visual Studio Add-In wizard cannot meet.
Consequently, both of Taskline's Outlook Add-Ins often get disabled by Outlook 2013.
This stops Taskline from working and you must permanently enable Taskline's Add-Ins to
continue using Taskline.
When you start up Outlook 2013, you may see ADD-IN PROBLEM just below the main
window's ribbon:
To fix this, click the View Disabled Add-ins button or click the FILE tab and then the
Manage Add-ins button. This will display the Disabled Add-ins dialog:
Click the Always enable this add-in buttons for both Taskline's Add-Ins.
Outlook VBA Code and Taskline
Accessing Taskline Custom Task Properties (User Defined Fields)
To access Taskline's custom task properties, use:
Task.UserProperties("Name of Property")
For example, to assign to the Priority (A1) property, use:
Task.UserProperties("A1") = "B25"
A full list of Taskline custom properties is available at Fields Specific to Taskline Tasks
Example Code
The following example creates a new Taskline task. It then assigns values to various
standard and Taskline-specific task properties.
Private Sub CreateTasklineTask()
Dim Task As TaskItem
Set Task = CreateItem(olTaskItem)
' Task.Display causes Taskline's Add-In to add all the Taskline User Defined
' Fields to a new task. It can be omitted for existing tasks.
Task.Display
With Task
.Subject = "Example Taskline Task"
.TotalWork = 60 ' This is 60 minutes
With .UserProperties
.Item("A1") = "B25"
.Item("Working hours") = "24/7"
End With
.Close (olSave)
End With
End Sub
Related Topics
Fields Specific to Taskline Tasks
Purchase Taskline
Taskline is available free of charge for 10 days of usage. After this period, you must buy
the product if you wish to continue to use it. When you decide to buy, you immediately
receive a temporary Product Key, which allows you to continue use Taskline for a further
30 days. Then, approximately two weeks after purchase, you will receive a personalized
and permanent product key, which will allow you to use Taskline indefinitely.
Your purchase is risk free, because it comes with a 30-day, unconditional, money-back
guarantee. We are confident that you will find Taskline to be an invaluable product that
will quickly pay for itself in terms of improved control, organization and productivity.
Pricing
The single license price for Taskline v4 Standard Edition is US$39.95, €35.95 or £24.95,
while Taskline v4 Professional Edition is priced at US$79.95, €69.95 or £49.95. Existing
users of Taskline v3 or earlier can upgrade to version 4 at substantial discount. Discounts
are also available for multiple licenses and educational use.
These prices may change however. Please visit www.taskline.com/buy.aspx for an up-todate quotation in your local currency.
How to Order
We accept company purchase orders, most credit and debit cards as well as payment by
PayPal. To order online, please visit our secure payment facility at
www.taskline.com/buy.aspx.
Full terms and conditions for purchase order acceptance are also set out on
www.taskline.com/buy.aspx
How to Contact Us
ResultsWare Limited
7 Woodbank Drive
Shrewsbury
SY3 8RW
UK
Sales: [email protected]
Office Hours, Monday to Friday
UK Time
Central European Time
Eastern Time
Pacific Time
10am to 5:00pm
11:00 to 18:00
5am to 12:00pm
2am to 9:00am
What's New
For the latest What's New? information, please visit www.taskline.com/whatsNew.asp
Taskline Version 4.1
December, 2014
New Features Specific to Outlook 2013
The Calendar Task Entry context (right click) menu now works on Outlook 2013 too.
Commands available are Open Task, Complete, Whole Task is Complete and
Pin/Unpin.
You can set Show time as for calendar task entries to Working Elsewhere.
There is a new Advanced Option – Ignore 'Working Elsewhere' appointments.
New Features for all Versions
There are 2 new right click menu options for standard Outlook appointments:
Create Task and Create Task and Pin. These enable you to do some planning in
the calendar and then easily convert appointments into Taskline tasks. The
appointment is itself converted into a Taskline calendar task entry, like those
created by Taskline when it runs.
There is a new Create Task right click menu option for Outlook emails, notes and
contacts. This creates a new task from the item, leaving the original Outlook item
unchanged.
Pinned calendar task entries that are Not Started and have an End date on or
before the First task starts at date (i.e. those pinned items that are in the past)
are now automatically unpinned and rescheduled.
The Taskline section of the ribbon in Outlook has a new
button to display
Taskline's online help.
Outlook Label names have been removed, only Label colors are now shown and
the word Label has been replaced by Color. This gives a cleaner and simpler
interface.
Calendar task entry colors and subjects now update when you click Apply – there's
no longer a need to reschedule to have them updated.
You can now have up to 9 day time breaks, up from the 4 previously supported.
There is a new ClearContext project compatibility advanced option. If enabled,
Taskline reads and writes task Project information from and to the Outlook CCTopicName custom field, instead of the usual Project UDF.
Tasks in the Calendar Can Now be Colored Based on New Task Attributes
Overdue so you can color overdue tasks differently.
Pinned so you can color pinned and unpinned tasks differently.
Priority (A1) letter, so for example A tasks can be colored differently to B tasks.
There is a new color type on the Define Colors (formally Define Labels) dialog such
that you can now prevent the creation of calendar task entries for tasks with certain
attributes.
The Following Bugs Have Also Been Fixed
If a task subject contained non-European characters, the subjects for the
corresponding calendar task entries were being replaced by question marks. Now
fixed.
Taskline Version 4
March, 2014
Product Requirements and Compatibility
Taskline now requires Outlook 2007 or above.
Taskline is now compatible with both the 32-bit and 64-bit versions of Outlook 2010
and 2013.
Taskline no longer uses a custom Outlook task form. Instead, an Outlook form
region is used. This should eliminate most conflicts with other Outlook Add-Ins.
Task Scheduling
There is a new Work Between constraint type, which allows you to specify 2 dates
between which a task must be carried out.
You can now edit Taskline-created task entries in the calendar and pin these so that
they survive a Taskline reschedule. So you can use Taskline to automatically
schedule your tasks and then tweak those results manually. Pinned entries do not
get deleted and recreated during a Taskline reschedule, rather they stay put.
Moving a calendar task entry will automatically pin it.
For Taskline Professional Edition only, there is a new Max time per day
setting. This is used to limit the amount of time allocated to a task each day. It can
be used to spread a longer task out over several days or weeks, for example to
divide your time between 2 or more tasks, rather than working on a single task
exclusively until it's completed.
For Taskline Professional Edition only, there is a new Max time per week
setting. This is used to limit how much time is allocated each week to a long task.
Miscellaneous Changes
You can now limit how many days in the calendar, after the First task starts at
date, display scheduled tasks.
User Interface Changes
The Taskline toolbar button is replaced by ribbon controls on Outlook 2010 and
above. The ribbon has a new Reschedule button which runs Taskline immediately,
without showing the dialog first.
Ribbon support is added for calendar task entries.
For Outlook 2007 and 2010 only, context (right click) menu support for calendar
task entries is also added. This has 4 menu items – Open Task, Complete and
new Whole Task Is Complete and Pin features.
Taskline Standard Edition
Taskline Standard Edition now supports the same labels functionality as
Professional Edition; different labels (colors) can be assigned to different types of
Professional Edition; different labels (colors) can be assigned to different types of
tasks.
What Was New in Previous Taskline Versions
Taskline Editions
Taskline is available is 2 editions – Standard and Professional. Both Taskline editions have
powerful features that enable you to automatically schedule your future work. However,
Taskline Professional Edition offers extra task scheduling power and flexibility:
Multiple named sets of working hours can be defined and different tasks can be
scheduled to different working hours. For example, work tasks can be scheduled
Monday to Friday during the day, and personal tasks can be scheduled for evenings
and weekends.
You can instruct Taskline to ignore all tasks which have been assigned particular
working hours.
Different days of the week can have different working hours. Taskline Standard
Edition follows Outlook's model of having a single start work time and stop work
time for all working days.
Working 24 hours a day is supported in Professional Edition. If the To time of a
break or the Stop work time is 0:00, this is taken as 24:00. With Standard Edition,
you must work at least one minute in the day. Again, this follows Outlook's model.
Up to 9 day time breaks can be defined. Standard Edition supports 3 breaks.
Taskline allows travel time to be defined for appointments, so that tasks will not be
scheduled during this time. Additionally, Professional Edition allows you to override
this travel time on a per-appointment basis.
Taskline Professional Edition adds Max time per day and Max time per week
scheduling settings to a task. These can be used to spread a longer task out over
several days or weeks, rather than working on a task exclusively until it is
completed.
Related Topics
Purchase Taskline
Setting Your Working hours
Using Different Working hours for Different Tasks
Preparation and Travel Time on Appointments
Recurring Tasks and Working on a Task for Only Part of the Day or Week
Frequently Asked Questions
If your question is not answered here, please consult the Taskline web site
www.taskline.com/FAQ.asp for the latest version of this FAQ.
Ordering
What if I lose my Product Key?
What if I lose my copy of Taskline?
Will I be sent a boxed product?
I have both desktop and laptop computers. Do I need to buy 2 licenses if I want to
install Taskline on both computers?
Do you give discounts for educational use?
About Taskline
Is a PDF version of the help file available?
Where can I download the current or a previous version of Taskline?
If I install Taskline, will anything else get installed as well?
Is Taskline suitable for planning the work of a team?
What is your upgrade policy?
How can I report a bug?
Requirements and Compatibility
What are the system requirements for Taskline?
What version of Outlook does Taskline require?
Does Taskline work with Microsoft Exchange Server?
Will Taskline work with Outlook® Express?
Is there a version of Taskline for the Mac?
Taskline and the Getting Things Done Outlook Add-In
Is Taskline compatible with Netcentrics' Getting Things Done Outlook Addin?
Do you have any recommendations on how Taskline and GTD can work together?
Task Scheduling
Nothing changes when I run Taskline. Why?
Why are there gaps of unused time in my schedule?
I am ordering my tasks by Natural Order, but they are getting scheduling in a
completely different order. Why?
Why are some tasks not scheduled in the order I specified?
I have set a Due date on a task, but Taskline is ignoring this. Why?
How do I define task order?
How can I override Taskline’s normal scheduling and schedule a task for exactly
when I want to do it?
I don't understand why Taskline schedules some tasks the way it does.
Can I have my tasks automatically scheduled on a regular basis?
Calendar Issues
I want to see my tasks in Outlook's calendar, but when I run Taskline, nothing
appears. Why?
The Week and the Month calendar views in Outlook show the appointment times
twice. How can I stop this?
Taskline seems to ignore some appointments in my calendar. This results in tasks
being scheduled at times that clash with these appointments. Why does this
happen?
Using Outlook with Taskline
I want to schedule my tasks in Natural Order, but in Outlook, when I try to drag
tasks up or down the task list to change the order, nothing happens. Why?
What if I want to track my tasks in a separate spreadsheet or other software?
I want to export Taskline task information to another program. However, Outlook
does not let me access the Taskline custom fields.
Miscellaneous Issues
Nothing happens when you click the Taskline button on Outlook's toolbar, or the
Taskline buttons are missing from Outlook's Ribbon, or you get the message
"Taskline's Outlook Add-In is not responding" when you start Taskline.
You get strange errors with Taskline or Taskline Setup, for example User Defined
Field (UDF) errors.
Ordering
What if I lose my Product Key?
No problem. Just click here to visit our Resend Product Key web page and have your
registration information automatically resent.
What if I lose my copy of Taskline?
Just download another copy from our web site. All versions will always be available for
download.
Will I be sent a boxed product?
No. Taskline is downloaded from our web site. We have a policy of continuous product
improvement and easy access to downloadable product updates makes this possible. It
also keeps the software price down by removing packaging and shipping costs.
I have both desktop and laptop computers. Do I need to buy 2 licenses if I want to install Taskline on both
computers?
With a single Taskline license you may install Taskline on up to three computers, provided
that Taskline is used exclusively by you. So, in this circumstance, you need only buy one
license.
Do you give discounts for educational use?
Yes. Discounts are available for students and teachers of legitimate educational
institutions. Please click here for further information.
About Taskline
Is a PDF version of the help file available?
Full online help is included with Taskline. However, if you prefer the user guide in a PDF
format, you can download it here:
Letter sized paper
A4 sized paper
Where can I download the current or a previous version of Taskline?
Please click here to access our download page.
If I install Taskline, will anything else get installed as well?
Absolutely not. Our Setup program installs Taskline and nothing else. There is absolutely
no adware, spyware, or anything else of that nature.
Is Taskline suitable for planning the work of a team?
Taskline is designed to help one person plan and manage their own work. It is not suited
to one person planning the work of several others. In a team environment, each person
would plan their own work using Taskline, perhaps keeping tasks in a central or shared
location, such as on Microsoft Exchange Server.
What is your upgrade policy?
We are committed to continuously improving Taskline and intend to produce regular
upgrades. Upgrades are priced at around 40% of the purchase price. Upgrades are free if
you have purchased Taskline within three months of an upgrade release.
We also produce regular minor updates to fix any bugs and keep the current version up to
date. These updates are free.
How can I report a bug?
We are very keen to fix any problems you may find with our software. If you find a bug,
we ask that you tell us about it, so that we may fix it. To report a bug, please click on the
Help and Support button on the Help / About tab of Taskline's main dialog. Then choose the
Report a Bug option and click OK.
Requirements and Compatibility
What are the system requirements for Taskline?
System requirements are detailed at the end of the Product Details page.
What version of Outlook does Taskline require?
Taskline Version 4 requires Microsoft® Outlook® 2007 or the 32-bit or 64-bit versions of
Outlook 2010 or 2013. Taskline Version 3 works with Outlook 2000, 2002, 2003 and
2007.
Does Taskline work with Microsoft Exchange Server?
Yes, Taskline works well when Outlook is connected to Microsoft Exchange Server. But
please note that Taskline has not been tested with non-Microsoft Exchange Server
replacements, such as HP Open Mail or SUSE OpenExchange Server. We recommend that
you do not install Taskline if you are using a non-Microsoft exchange server.
Will Taskline work with Outlook® Express?
No. Taskline requires Outlook. Outlook Express does not support tasks.
Is there a version of Taskline for the Mac?
Is there a version of Taskline for the Mac?
No, sorry. Taskline requires Microsoft Windows.
Taskline and the Getting Things Done Outlook Add-In
Is Taskline compatible with Netcentrics' Getting Things Done Outlook Addin?
Yes, Taskline is compatible with GTD.Click here to find out more about how these two
great tools can work together to manage your workload and save you time.
Do you have any recommendations on how Taskline and GTD can work together?
Yes. Please click here for details.
Task Scheduling
Nothing changes when I run Taskline. Why?
Check that you are scheduling the folder that contains your tasks. Be especially careful if
you have several folders with the same name. The tasks folder that Taskline will schedule
is shown on the Schedule the tasks in... setting, which is on the Tasks tab of Taskline's main
dialog.
If you are using more than one Outlook Data Store (e.g. PST file), check that you haven't
selected task and/or calendar folders in the wrong data store.
Why are there gaps of unused time in my schedule?
Do you have any All day events in your calendar? Taskline will not schedule work
on days that have All day events on them, unless they have Show time as set to
Free.
Do you have a filtered calendar view? Are you sure that you can see all of your
appointments? Taskline won't schedule tasks where there are appointments already
occupying that time.
Check your Task can be split and Minimum split settings. Perhaps the gaps in
your schedule are too small to be utilized? For example, a 3 hour task that cannot
be split will not be able to use any part of a free 2 hours time slot. The Default
minimum task split setting, on the Options tab of Taskline's dialog, also plays a
role here. You can check whether the task split settings are resulting in unexpected
gaps by telling Taskline to temporarily ignore these settings. To do this, click the
Advanced Options button on the Options tab of Taskline's dialog. Then select the
Ignore task split settings and allow tasks to be split without restriction
check box.
Gaps can also be caused by travel time on appointments. Check the Default time
allowances before and after an appointment settings, which are on the
Calendar tab of Taskline's dialog. Also check, for Taskline Professional Edition,
whether any individual appointments have overridden these settings using the "
{30m/1h}" style on the appointment subject.
Check task constraints. Start on, Start on or after, Finish on and Work
between constraints can stop tasks being scheduled earlier than would otherwise
be possible and hence can force gaps into schedules. You can check whether task
constraints are resulting in unexpected gaps by telling Taskline to temporarily
ignore them. To do this, click the Advanced Options button on the Options tab of
Taskline's dialog. Then select the Ignore task constraints check box.
I am ordering my tasks by Natural Order, but they are getting scheduling in a completely different order.
Why?
Check that you have Order by set to Natural Order Descending.
Check that you can drag tasks up and down Outlook's task list using the mouse. If
you can't, then your tasks are not in Natural Order.
Are you looking at the Outlook Tasks folder selected in Taskline, or are you looking
at Outlook's To-Do list? The To-Do list uses a different Natural Order to the Tasks
folder. Taskline's Natural Order does not work with the To-Do list. You have to use
Natural Order in your Outlook Tasks folder. The To-Do list contains tasks and
emails from all your Outlook folders, whereas Taskline only schedules tasks in
whatever folder you have selected on the Tasks tab of Taskline's main dialog.
It's possible that your Outlook view is corrupt. Try creating a new one. How to do
this is documented in Taskline's online help. See Getting the Most out of Outlook
Views.
Why are some tasks not scheduled in the order I specified?
Tasks do sometimes get scheduled out of order. There are several reasons for this:
1. Firstly, check that you are looking at the Outlook Tasks folder selected in Taskline.
Taskline does not support Outlook's To-Do Bar, which uses a different ordering
system to the Tasks folder.
2. Task constraints, such as a Finish on constraint, override task order, but only if
this is necessary to make sure that the constraint is met.
3. A task with a missed constraint, or a recurring task that has missed its recurrence
date, is regarded by Taskline as overdue. Overdue tasks take priority over all
others.
4. Different tasks assigned different Working hours can get scheduled out of order.
5. If you have turned off Task can be split or if you have set Minimum split on a
task, then it's possible that a higher priority task isn't able to use the first available
free time slot, because it's too small. Thus the task will get scheduled in a later time
slot, leaving the earlier one free for another (perhaps lower priority) task.
I have set a Due date on a task, but Taskline is ignoring this. Why?
Taskline doesn't actually take a task's Due date into account when scheduling, mainly
because many people prefer Taskline to actually set the Due date when it runs. However,
you can certainly specify a date that the task must finish on or by, for example to meet a
deadline. You do this by setting up an external constraint, which is simply a matter of
selecting the Finish on or Before constraint type from the Task should drop down list
on the Taskline task form in Outlook.
How do I define task order?
To define task order, you should not use constraints, such as a Finish on or before
constraint. Rather, on the Tasks tab of Taskline's dialog, there is the section entitled
Schedule tasks in the following order . That is how to define task order. Whatever
method you choose, you then set the corresponding information on the task
appropriately. Most people use Priority (A1) or Natural Order. It is then just a matter
of setting the appropriate Priority (A1) value on a task, or dragging tasks up and down
the task list to set their Natural Order. Things like Finish on or before constraints only
come into play if you have a deadline to meet. And, even if you have a deadline, you only
need to select other tasks if the deadline applies to several tasks, not just one.
For further information on task ordering, please see Defining the Order in Which Tasks
are Scheduled.
How can I override Taskline’s normal scheduling and schedule a task for exactly when I want to do it?
You can place a constraint on a task to have it scheduled to a specific date and time. On
the Taskline tab of the task form in Outlook, External constraint section, set Task
the Taskline tab of the task form in Outlook, External constraint section, set Task
should to Start on or Finish on. Then enter a date to the right. If you want to lock
down the task to the exact minute, enter a time too. You can also use constraints for
deadlines – a Finish on or before is generally ideal for this.
I don't understand why Taskline schedules some tasks the way it does.
If the task reschedule is producing results that you don’t understand, try selecting one or
more of the Understanding Taskline options, which are on the Advanced Options
dialog.
Can I have my tasks automatically scheduled on a regular basis?
Yes, you can set up the Windows® task scheduler to do this for you. See Background
Task Scheduling for more information.
Calendar Issues
I want to see my tasks in Outlook's calendar, but when I run Taskline, nothing appears. Why?
On the Calendar tab of Taskline's main dialog, Task entries in the calendar section, check
that you have selected the Create for tasks that are Not Started or In Progress option.
Check that the folder chosen to contain calendar task entries is the one you think it
is. This is the Write task entries to option on the Calendar tab of Taskline's main dialog.
Be especially careful if you have several calendar folders with the same name.
If you are using more than one Outlook Data Store (e.g. PST file), check that task
entries aren't being written to a calendar folder in the wrong data store.
Calendar task entries are not created for tasks with a Total Work of zero unless you
have the Create all day events for milestones option enabled on the Calendar
tab of the Taskline dialog. Total Work is your best guess at how long you think each
task will take. If it is set to 0, the task is called a milestone, and it will start and end
at the same time. Milestones represent significant events, or goals, in your task list.
It is possible that the task has been created in the calendar, but at a date you did
not expect. To check, open the task in Outlook. Go to the Taskline tab of the task
form in Outlook and note the Scheduled start date. Now check the calendar at this
date to see if the Taskline created calendar task entry exists.
The Week and the Month calendar views in Outlook show the appointment times twice. How can I stop
this?
The problem is that both Outlook and Taskline are showing the appointment time. To stop
Taskline displaying appointment times, start up Taskline and go to the Calendar tab of the
Taskline dialog. Click the Define Subject button to show the Calendar Task Entry Subject dialog.
Locate the text box entitled Subject for outstanding entry and delete the text "<StartEndTime>".
Repeat for the other three boxes and OK the dialog.
See Defining the Subject of Task Entries if you would like more information on
<StartEndTime> and other tokens.
Taskline seems to ignore some appointments in my calendar. This results in tasks being scheduled at times
that clash with these appointments. Why does this happen?
Taskline ignores any appointment that has Show time as set to Free. By default Outlook sets
up all day event appointments as free time. To change this, double click on the appointment
in Outlook to open the appointment form. Then change the Show time as drop down list to
be Tentative, Busy or Out of Office.
You can also instruct Taskline to ignore appointments with Show time as set to Out of
Office. This setting is on Taskline's Advanced Options dialog.
Using Outlook with Taskline
I want to schedule my tasks in Natural Order, but in Outlook, when I try to drag tasks up or down the task
list to change the order, nothing happens. Why?
To display tasks in their natural order in Outlook:
Outlook 2007 – Click View → Current View → Customize Current View menu
option, then use the Sort and Group By buttons on the View Summary dialog box
to set the Sort Items by and Group items by fields to none.
Outlook 2010 and 2013 – Click View (Outlook 2013 VIEW) ribbon → View
Settings button to display the Advanced View Settings dialog. Then use the Sort
and Group By buttons on this dialog to set the Sort Items by and Group items
by fields to none.
Having your tasks displayed in natural order and scheduled in descending natural order is
often the most convenient way of working, because the order you see your tasks in is the
order that Taskline will schedule them in. It's also easy to change this order by dragging
the tasks up and down the task list.
What if I want to track my tasks in a separate spreadsheet or other software?
Outlook allows you to export your tasks to a comma separated values file. In Outlook,
click File menu → Options → Advanced tab → Export button. To export the Taskline
custom fields, see the FAQ entry below.
I want to export Taskline task information to another program. However, Outlook does not let me access
the Taskline custom fields.
Outlook does not support the export of custom fields. However, you can get round this to
a large extent by creating a task table view showing the fields you wish to export,
selecting the tasks you wish to export, and then right clicking and selecting Copy. The task
table view is then copied to the clipboard as tab separated text which can, for example,
be pasted straight into Excel.
See Getting the Most out of Outlook Views for instructions on customizing the Outlook
task table view.
Miscellaneous Issues
Nothing happens when you click the Taskline button on Outlook's toolbar, or the Taskline buttons are
missing from Outlook's Ribbon, or you get the message "Taskline's Outlook Add-In is not responding"
when you start Taskline.
It's possible that one or both of Taskline's Add-Ins have been disabled somehow. If so,
re-enable them:
If you are using Outlook 2007:
Outlook, click Tools menu → Trust Center.
Click Add-ins in the left hand list on the Trust Centre dialog.
On the Manage drop down list near the bottom of the dialog, select Disabled
Items then click Go.
Select Taskline Add-In 2007 and click Enable.
Click Close.
OK the Trust Center dialog.
If you are using Outlook 2010 or 2013:
Click File (Outlook 2013: FILE) ribbon → Options.
Select the Add-Ins tab.
Select the Add-Ins tab.
In the Manage drop down list, select Disabled Items and click Go.
If any of Taskline's Add-Ins are listed, re-enable them. Then Close the Disabled
Items dialog.
In the Manage drop down list, select COM Add-Ins and click Go.
Select the check boxes for both Taskline Add-In 2007 and Taskline Add-In
Ribbon.
Click OK to close the COM Add-Ins dialog.
There are additional issues on Outlook 2013. Please see Taskline Outlook Add-In is Not
Responding for full information.
You get strange errors with Taskline or Taskline Setup, for example User Defined Field (UDF) errors.
A conflict with another Outlook Add-In or some data corruption within Outlook is possible.
First, try temporarily disabling other Outlook add-ins:
For Outlook 2007:
Click Tools menu → Trust Center.
On the Trust Center dialog, click Add-ins to list the installed Add-ins.
Select COM Add-ins from the Manage drop down list at the bottom of the dialog
and click the Go button. You will then be presented with the COM Add-ins dialog.
Write down which items are checked and which are unchecked, then uncheck all
non-Microsoft Add-ins and click OK. This will temporarily disable them.
Then go back into the Trust Center and again display the list of Add-ins. This time
select Exchange Client Extensions from the Manage drop down list and click Go.
On the Add-In Manager dialog, again note down which items are checked, then
uncheck all non-Microsoft items and click OK.
Now shut down Outlook and retry Taskline Setup.
Finally, go back into the Add-In Manager dialog and put things back how you
found them.
For Outlook 2010 or 2013:
Click File (Outlook 2013: FILE) ribbon → Options.
Select the Add-Ins tab.
In the Manage drop down list, select COM Add-Ins and click Go.
Write down which items are checked and which are unchecked, then uncheck all
non-Microsoft Add-ins and click OK. This will temporarily disable them.
Now shut down Outlook and retry Taskline Setup.
Finally, go back into the Add-Ins tab and COM Add-Ins dialog and put things back
how you found them.
If disabling Add-Ins does not help, repair any possible data corruption:
Are you using a local PST (Personal Folders) file, or are your tasks on Exchange Server? If
your Outlook data is on a server, Outlook will create a local OST file, which can
sometimes get corrupted. We can get Outlook to recreate this file. First, locate the OST
file:
In Outlook, right click on the root of the folder list, usually called your Mailbox name
or your email address.
Click on Properties or Date File Properties in the popup menu.
Click the Advanced button. The filename will be shown on the dialog.
Then, rename this file. This will make Outlook create a new one:
Close Outlook.
Rename your OST file to anything you like.
Restart Outlook.
If instead you're using a PST file, try running a Microsoft program called ScanPST. This
checks PST files for problems and can usually fix any it finds. To run this:
Close Outlook.
Use Windows Search to look for scanpst.exe. Typical locations for this program are:
For 64-bit Outlook 2013:
C:\Program Files\Microsoft Office 15\root\Office15
For 32-bit Outlook 2010 on 64-bit versions of Windows:
C:\Program Files (x86)\Microsoft Office\Office14
For Outlook 2007:
C:\Program Files\Microsoft Office\Office12
When you've found scanpst.exe, double click the file to run it.
Select your PST file by clicking the Browse button and then click the Start button
to start the check. If you don't know the filename of your PST file:
In Outlook, right click on the root of the folder list, usually called "Personal
Folders" or simply "Outlook".
Click on Properties or Date File Properties in the popup menu.
Click the Advanced button. The filename will be shown on the dialog.
Return to top of page
Customer Support
Before contacting us, you might get a quick answer when you check the following
information:
This online Help. You can click the Index or Search tab in the online Help to find
an answer to your question.
The Support FAQ.
Popup help. For information about options and settings on any dialog box, click the
Question Mark button at the top right hand corner of the dialog and then click a
dialog option.
The online Help for the Taskline task form in Outlook®. To access this, open a task
in Outlook and click the icon on the Taskline tab of the form.
Ways of Requesting Assistance
Click the Help and Support button on the Help / About tab of Taskline's main
dialog.
Support Form (www.taskline.com/supportForm.asp)
Office Hours, Monday to Friday
UK Time
Central European Time
Eastern Time
Pacific Time
10am to 5:00pm
11:00 to 18:00
5am to 12:00pm
2am to 9:00am
Taskline Software License Agreement
Taskline is not free. You may install Taskline to test and evaluate it for 10 days (such
days do not need to run consecutively) but after this time you must either buy a license
to continue to use Taskline, or you must uninstall Taskline from your computer.
You are allowed to make any number of copies of the unregistered version of Taskline and
its associated files. The unregistered version constitutes Taskline without a product key.
You can give a copy of the unregistered version of Taskline to anyone, providing that no
additional fee is charged and that the distribution files are not modified in any way.
Anyone distributing Taskline for any kind of remuneration must first contact ResultsWare
Limited for authorization.
When you purchase a license to use Taskline, you will be supplied with a product key and
other associated registration information. When the information thus obtained is entered
into Taskline, Taskline becomes registered. This registered version of Taskline may be
installed on up to three computers, provided that Taskline is used exclusively by a single
person, or it may be installed on exactly one computer and used by one or more persons,
but NOT both. This is strictly a single use license.
You may not utilize any registration information that you have not legitimately purchased.
You may not install this copy of Taskline for access through any network, without first
obtaining a license for each computer that will access Taskline over that network,
regardless of whether they are accessing Taskline concurrently or otherwise.
You may not alter or reverse engineer Taskline or its help and other support files in any
way. You may not give, distribute, rent, lease, or lend the registered version of Taskline,
nor may you give, distribute, rent, lease or lend any Taskline product key.
ResultsWare Limited warrants that Taskline will perform substantially as described in its
documentation and that Taskline is reasonably but not wholly free of defects. For up to six
months after you purchased Taskline, ResultsWare Limited will refund in full the purchase
price of the software if Taskline does not conform to this warranty. However, you use
Taskline at your own risk. ResultsWare Limited will not be liable for any data loss,
damages, loss of profits or loss of any other kind, direct or consequential, which may
result from the use of this software.
This agreement shall be governed and construed in accordance with the Laws of England.
By installing and using Taskline you accept all the terms and conditions of this license
agreement. If you do not agree with anything in this license, you must remove Taskline
from your storage devices and cease to use the software.
Taskline® and ResultsWare® are Copyright© 2002-2015 ResultsWare® Limited. All
rights reserved.
If You Work Different Hours on Different Days
When we tell Taskline or Outlook that a task lasts for 1 day, or for 1 week, how many
hours does that mean? Taskline needs to know the number of working hours in a day and
in a week. Both Outlook and Taskline use this information to convert days and weeks to
hours, and vice versa. These settings are set in Outlook:
If you are using Outlook 2007, click Tools menu → Options → Other tab →
Advanced Options button, to display the Advanced Options dialog.
If you are using Outlook 2010 or 2013, click File (or FILE in Outlook 2013), then
Options in the left hand bar, then Tasks in the left hand bar.
If you work the same hours each day, the hours you work each day and week are
obvious. However, if you work different hours on different days, what values should you
use?
For Working hours per week, add up all the hours you actually work in a week. To set
a suitable value for Working hours per day, consider a task that takes one day to
complete. Then ask yourself how many hours that task would take to complete – this is
the setting you should use for working hours per day. Generally, if you work the same
hours on most days, enter that many hours. If you work different hours almost every
day, enter the number of working hours per week divided by the number of days you
work.
Example 1. You work 9am to 6pm Monday to Thursday, and 9am to 4pm on a Friday,
with a 1pm to 2pm lunch break each day:
You could enter the Working hours per day as either 8 (your Monday to Thursday
hours), or 7.6 (your average working day). 8 is probably the better choice.
Enter the Working hours per week as 38.
Example 2. You work 9am to 5pm Monday to Friday, and 9am to 12pm on Saturday, with
a 12:30pm to 1:30pm lunch break Monday to Friday:
Enter Working hours per day as 7.
Enter Working hours per week as 38.
Further Considerations for Taskline Standard Edition
If you are using Taskline Professional Edition, Taskline directly supports the working
weeks in the above examples. However, users of Taskline Standard Edition can
sometimes use recurring appointments as workarounds when you work different hours on
different days.
Example 1. You work 9am to 6pm Monday to Thursday, and 9am to 4pm on a Friday,
with a 1pm to 2pm lunch break each day:
Enter your working week as Monday to Friday.
Enter I start work at as 9am and I stop work at as 6pm.
Enter a daytime break From 1pm to 2pm.
Enter an appointment in the Outlook calendar from 4pm to 6pm on a Friday. Set
this to recur every Friday. You might wish to name it something like "Non working
time."
Example 2. You work 9am to 5pm Monday to Friday, and 9am to 12pm on Saturday, with
a 12:30pm to 1:30pm lunch break Monday to Friday:
a 12:30pm to 1:30pm lunch break Monday to Friday:
Enter your working week as Monday to Saturday.
Enter I start work at as 9am and I stop work at as 5pm.
Enter a daytime break From 12:30pm to 1:30pm.
Enter an appointment in the Outlook calendar from 12pm to 5pm on a Saturday.
Set this to recur every Saturday, and name it something like "Non working time."
Related Topics
Setting the Working Week
Recurring Appointments
Microsoft® Exchange Server Synchronization Issues
Your Outlook information (emails, appointments, tasks etc) will generally either be stored
locally on your own computer (for example, in a .PST file), or stored centrally on a
computer running Microsoft Exchange Server.
Outlook 2000 and above have a facility for offline working. If you connect to Microsoft®
Exchange Server whilst at work, offline working allows you to access the information in
your Outlook folders even when not connected to Exchange Server and your company
network.
Offline working works by keeping two copies of your Outlook information. One copy is
kept on Exchange Server, and another copy is stored locally on your computer. Keeping
these two copies mutually consistent is called synchronization.
If your Outlook installation has been set up such that your tasks folder is already
available when not connected to Exchange Server, then this arrangement will continue to
work with Taskline. If however you cannot access your tasks when you are not connected
to Exchange Server, and you would like to, then you may find the advice below helpful.
Important: Setting up task synchronization is not a trivial issue. Do not change any
synchronization settings without the prior approval of your Systems Administrator.
Outlook 2000
By default, the Tasks folder is not available when offline. To change this, click the Tools
→ Synchronize → Offline Folder Settings menu option, and check the folder that
contains your Taskline tasks. Typically, this might be "Mailbox – Username" → Tasks.
Unfortunately, even when you update the Offline Folder Settings, quite often Outlook
still refuses to automatically synchronize your offline folders. If, when you go offline, you
find that you are looking at an old version of your task list, then you will need to
synchronize your tasks folder manually before you shut down Outlook when connected to
Exchange Server. To do this, make your tasks folder the current folder, and then click the
Tools → Synchronize → This Folder menu option.
If you forget to manually synchronize your tasks folder, when you go offline your tasks
folder will effectively contain an old out-of-date copy of your task list. It is advisable not
to run Taskline on these out-of-date tasks, or indeed change them in any way, whilst
offline. If you do so, Outlook's automatic re-sync will most likely fail when you reconnect
to Exchange Server. Failed synchronization is shown by the task icon being replaced by
crossed swords. You will then need to open tasks to resolve each synchronization conflict
manually.
Outlook 2002
By default, the Tasks folder may or may not be available when offline – it depends on
how the account was set up. When you go offline, if you find that your tasks are out of
date, then you may wish to investigate the options below:
1. Manually synchronize your tasks while connected to Exchange Server and before
you shut down Outlook. You can do this by making your tasks folder your current
folder and pressing Shift+F9, or click the Tools → Send/Receive → This Folder
(Microsoft Exchange Server) menu option.
2. To have your tasks synchronized automatically whenever you do a Send/Receive (or
press F9), make the folder containing your Taskline tasks your current folder. Then
press F9), make the folder containing your Taskline tasks your current folder. Then
click the click the Tools → Send/Receive Settings → Make This Folder
Available Offline option. If this menu option is not present, it usually means that
you lack the necessary folder permissions.
3. Even if your local tasks folder is set to synchronize with Exchange Server when you
do a Send/Receive, you can still get out-of-date tasks by changing some tasks, and
then exiting Outlook before you do a Send/Receive. To address this, you may wish
to have Outlook perform an automatic Send/Receive on exiting:
i. Click the Tools → Send/Receive Settings → Define Send/Receive
Groups option. This will display the Send/Receive Groups dialog.
ii. On the Send/Receive Groups dialog, select the appropriate send/receive
group from the list, and check the Perform an automatic send/receive
when exiting check box, and then Close this dialog. Important: If you have
several Send/Receive groups listed, consult your System Administrator as to
which one you should change. Note that if you change the All Accounts
group, this will synchronize all your offline folders on exit. If you only wish to
synchronize your tasks on exit, consult point 4 below.
4. To have Outlook automatically synchronize only your tasks just before you exit
Outlook, when you are connected to Exchange Server:
i. Click the Tools → Send/Receive Settings → Define Send/Receive
Groups option. This will display the Send/Receive Groups dialog.
ii. Click the New button, which will display the Send/Receive Group Name
dialog. Give the group a name of your choice (for example "Tasks"), and OK
the dialog.
iii. You will now have the Send/Receive Settings – Tasks dialog on screen
(the exact title of the dialog may differ, depending on what you called your
Send/Receive group).
iv. Select Microsoft Exchange Server from the Accounts bar on the left hand
side of the dialog. Select the Include account in this send/receive group
check box, which is located at the top of the dialog.
v. In the Check folders to include in send/receive list, check the folder
containing your Taskline tasks.
vi. Check the Synchronize forms check box and uncheck both the Send mail
items and Receive mail items check boxes. Then OK the dialog.
vii. You should now have the Send/Receive Groups dialog back on screen.
Select the send/receive group you just created, and check the Perform an
automatic send/receive when exiting check box, and then Close this
dialog.
If you are manually synchronizing tasks to your offline folders, and you forget to do this,
when you go offline your tasks folder will effectively contain an old out-of-date copy of
your task list. It is advisable not to run Taskline on these out-of-date tasks, or indeed
change them in any way, whilst offline. If you do so, Outlook's automatic re-sync will
most likely fail when you reconnect to Exchange Server. Failed synchronization is shown
by the task icon being replaced by crossed swords. You will then need to open tasks to
resolve each synchronization conflict manually.
Outlook 2003
If you have Outlook 2003, you should have no synchronization issues if you enable
Cached Exchange Mode. If you prefer not to use Cached Exchange Mode, then please
follow the guidelines for Outlook 2002. However, note that the Outlook 2002 menu item
Tools → Send/Receive Settings has moved in Outlook 2003 to Tools →
Send/Receive → Send/Receive Settings.
Send/Receive → Send/Receive Settings.
Related Topics
Synchronization Conflicts
Using Taskline with FranklinCovey® PlanPlus
Taskline is compatible with FranklinCovey® PlanPlus versions 1 thru 6.
When using both PlanPlus and Taskline, there are a few minor issues to note:
Taskline and PlanPlus use the same Priority (A1) setting on a task. Taskline allows
values for Priority (A1) ranging from A00 to Z99. However, for maximum
compatibility with PlanPlus, you should restrict your use of Priority (A1) values to
the range A00 to C99.
By default, Taskline will not schedule PlanPlus Masters tasks, which are tasks
without a Due date, that are in the default Tasks folder. However, in other tasks
folders, tasks with Due dates are scheduled. You can have Taskline schedule
PlanPlus Masters tasks by selecting the Schedule PlanPlus Masters tasks option,
which is on the Advanced Options dialog.
The Require that all tasks are assigned a category option, on the Advanced
Options dialog, is not supported. You cannot force tasks to have a category
assigned when PlanPlus is installed.
The PDA sync software that comes with PlanPlus will not synchronize Taskline tasks.
Franklin Covey® is a registered trademark of Franklin Covey Co.
Related Topics
Advanced Options Dialog
Using Taskline with the Getting Things Done Outlook Add-In
Taskline is compatible with NetCentrics Corporation's Getting Things Done Outlook add-in,
versions 1, 2, 2.5 and 2.7.5.
When you create a task using Getting Things Done, you may get a standard Outlook task.
To have GTD create a Taskline task, you will need to change a GTD setting. Please click
here to see our FAQ entry on this subject.
How can Taskline and GTD Work Together?
We suggest you generally use Taskline as you would anyway, i.e. use it to schedule your
task list. But some specific recommendations are:
Total work. Taskline requires that each task is assigned an amount of Total work,
which is your best guess at how long you think the task will take. For tasks that are
created from emails by GTD, we suggest that you select the Show Created Task
check box on the Add to Action List dialog, and add the Total work there and
then, at task creation time. If you don't want Taskline to schedule the task, leave
Total work as zero.
Taskline Professional Edition works well with GTD Actions, such as @Home,
@Office etc
Create a set of Taskline Working hours for each GTD Action that requires
its own hours. How?
If you give your Working hours the same names as the GTD Actions they
apply to, then those Working hours will be automatically selected by
Taskline when it runs. For example, you may wish to create some daytime
Working hours called "@Office" and some Working hours to cover
evenings and weekends called "@Home". These match up with the GTD
Actions of the same name.
Not all GTD Actions will require their own Taskline Working hours. For
example, you may be happy to do @Computer tasks at any time during
normal office hours. When the GTD Actions and the Taskline Working hours
have different names, you will need to manually select the correct Working
hours on the Taskline tab of the task form in Outlook.
Someday tasks. If you keep all your future work in the "Somedayed" Project Actions
folder, you might prefer to have Taskline schedule that folder, rather than the Tasks
folder.
Task prioritization. You will also need to prioritize your tasks, so that you do the
most important tasks first. Without this vital step, there is a danger of
procrastinating when deciding what to do next. This can be time consuming in itself.
Or you may find yourself always picking the most enjoyable tasks, rather than the
most important ones. Prioritization brings focus to your task list. Most people use
either task Natural Order or Priority (A1) to define task priority. Natural Order
is nice to use because it allows you to graphically reprioritize by dragging tasks up
and down Outlook's task list. However, to do this you need to set up a task view
with sorting and grouping switched off. Alternatively, use Priority (A1), perhaps by
adding an "A1" column to the standard GTD task views. With Priority (A1), tasks
are given a priority ranging from A00 to Z99.
In your Weekly Review, reassess task priorities. Also check that you have not
forgotten anything – omitting tasks is a common mistake. Then run Taskline to
reschedule your task list and set the new focus for the coming week, and beyond.
Copyright© 2002-2015 ResultsWare® Limited
All Rights Reserved
Taskline® and ResultsWare® are registered trademarks of ResultsWare® Limited
Outlook® and Windows® are registered trademarks of Microsoft® Corporation
Taskline Shortcut Key
You can start Taskline by using the Ctrl + Alt + F5 shortcut key, if you selected this
option when you ran Taskline Setup. If you didn't select the option, and you would like to
use the shortcut key, run Taskline Setup again (do not uninstall first).
Summary of Task Schedule
The Summary of Task Schedule dialog reports information about your task list. The
main list summarizes information by either Project or Category, depending on which
Task analysis option you have selected.
The Copy Table to Clipboard enables you to quickly copy and paste the summary
information into another application, such as Microsoft Excel.
The summary is only shown if the Show summary when task reschedule is complete
check box, which is on the Options tab of Taskline's dialog, is selected.
Related Topics
Using Projects
Synchronization Conflicts
If you sometimes use Exchange Server offline, or sync with a mobile device, then you
may get a "Synchronization Conflict" error or warning when you run Taskline. This
happens when your local copy of an Outlook item is different to the copy held on
Exchange Server or other device, and Outlook is unable to reconcile the differences
automatically. The Taskline message should give you the name of the task or
appointment that is causing the conflict.
The tasks or appointments that have failed to synchronize are shown on the task table
view or the calendar with the task or appointment icon being replaced with a yellow
diamond with red arrows. You will need to open these tasks or appointments to resolve
each synchronization conflict manually.
If you can't see the yellow diamond, you'll need to add the icon column to the task table
view, for example by using the Outlook Field Chooser.
You also need to make sure that your current view has filtering switched off, otherwise
you may end up hiding those tasks or appointments that have the synchronization
conflicts.
Related Topics
Microsoft® Exchange Server Synchronization Issues
Start Taskline by Clicking the Taskline Toolbar Button
Outlook 2010 and 2013
To display Taskline's main dialog, click the
Outlook's Home tab:
Settings button in the Taskline group of
Run Taskline immediately, without showing the dialog first, by clicking the
Reschedule button
Outlook 2007
If you are using Outlook 2007, simply click the Taskline button on the main Outlook
toolbar:
Displaying the Taskline Tab of the Task Form in Outlook
Click the Taskline icon in the Show group of the Task ribbon to display the Taskline tab.
If your Outlook task window is narrow, you'll see slightly smaller icons:
If your Outlook task window is too narrow, the Show group on the task ribbon may be
collapsed:
You'll need to either make your task window wider, or click the down arrow to expand it:
Uninstall Procedure
If you use Exchange Server, you must connect to your network before uninstalling
Taskline.
To uninstall Taskline, do one of the following:
1. On Windows XP, Vista and Windows 7, click on the Windows Start menu, then click
the Uninstall Taskline entry in the Taskline sub-menu.
2. On Windows 8 and 8.1, click the Uninstall Taskline entry on the Start or Apps
screen.
3. On all Windows versions, open Windows Control Panel. Then:
On Windows XP, click Add or Remove Programs
On Windows 7, 8 and 8.1:
Optionally first click Programs, if you are in Category view
Click Programs and Features
Select Taskline Outlook Task Scheduler v4.1 from the list, and click the
Uninstall or Remove button
Important
You will see 1 or 2 entries in Control Panel's list of installed programs
for Taskline Outlook Add-Ins. Do not Uninstall these. If you do, you will
end up with a partially uninstalled version of Taskline. Always only
Uninstall Taskline Outlook Task Scheduler v4.1 and this will
uninstall the Outlook Add-Ins for you.
Tip
If you wish to reinstall Taskline, you do not generally need to uninstall first.
What Was New in Previous Taskline Versions
Taskline Version 3
June, 2008
Product Requirements and Editions
Taskline now requires Outlook 2000 or above.
There are now two different Taskline editions – Standard and Professional.
Taskline Version 3 is now compatible with the Getting Things Done Outlook Add-In
v2.7.5, FranklinCovey® PlanPlus v5, OneNote® 2007 and Mindjet® MindManager®
7
Professional Edition
The following new features are in Taskline Professional Edition only (all other new features
are in both editions):
Multiple named sets of Working hours can be defined and different tasks can be
scheduled to different time slots. For example, work tasks can be scheduled Monday
thru Friday during the day, and personal tasks can be scheduled for evenings and
weekends.
You can instruct Taskline to ignore tasks which have been assigned particular
Working hours.
Different days of the week can have different working hours.
Working 24 hours a day is supported. If the To time of a break or the Stop work
time is 0:00, this is taken as midnight.
Up to 4 day time breaks can be defined.
Standard Edition
This contains all the new features listed below. Additionally, there are two differences
from Taskline v2.1:
You can no longer override travel time per appointment. This feature is only
supported in Taskline Professional Edition.
You can only assign a single label (color) to calendar task entries. Professional
Edition supports different labels (colors) being assigned to different types of tasks.
Task Progress
The task progress model has been updated. Taskline no longer schedules completed
tasks backwards from the First task starts at date. Instead, completed tasks are
left unchanged by Taskline. In effect, the scheduled dates are assumed to have
been correct. If things didn't go to plan, you can optionally reflect this by updating
the tasks or the calendar task entries.
Progress can now be updated from the calendar, as well as directly on the task
itself.
When opened, calendar task entries now feature a Taskline toolbar. This enables
you to open the task, or mark the calendar task entry as Complete.
Projects
A new Projects tab allows you to create and delete projects and set a project
order.
You can now order tasks by Project.
You can instruct Taskline to ignore all tasks which have been assigned a particular
Project.
Calendar task entries can be colored according to Project.
Task Scheduling
Order by Due date, which previously existed in earlier Taskline versions, has been
reinstated. Ordering by Due date now works slightly differently to other Order By
options in that Taskline will not only order by this date, but will also try and make
sure that the task is completed on or before the Due date.
You can now specify a constraint time for recurring tasks, to force recurring tasks
to start or finish at a specific time, as well as on a specific date.
When a task misses a constraint, Taskline now allows you to prefix the task subject
with some text, so that you have a record of which tasks need attention. The
default characters are "!!". Missed task constraints still result in a message box at
the end of the task reschedule.
There is a new Missed constraint task field which gives the elapsed gap between
the scheduled date and the constraint date. This enables you to create an Outlook
view highlighting tasks that need attention, optionally sorted into an order showing
which tasks have missed their constraints by the greatest amounts.
Regenerating tasks now get a warning message, rather than an error message,
when their date is missed. This message will go away if the Taskline should set
Start and Due to the Scheduled dates option is set. Furthermore, regenerating
tasks that miss their dates will not mark the task as requiring attention. This is
because regenerating tasks generally represent something that needs doing
repeatedly, but not on specific dates. Regenerating tasks are a specific type of
recurring task.
Background reschedules no longer pop up an alert if task constraints are missed.
There are new reschedule options, on the Advanced Options dialog, that help you
to understand how Taskline schedules your tasks.
Miscellaneous Changes
A task import feature creates tasks from text, one task per line of text. This is to
quickly convert a text To Do list into Outlook tasks.
There is a new Advanced Options dialog, which keeps the less often used options
out of the main dialog tabs.
There is a new advanced option to explicitly set the Category of Taskline-created
calendar task entries.
The Summary of Task Schedule dialog has been enhanced. It now shows a perproject or per-task category breakdown and also allows this information to be
copied to the clipboard for pasting into a spreadsheet.
If no time unit is supplied for appointment traveling time, minutes is now assumed.
Previously, hours were assumed.
A new ABC field on tasks contains the letter of Priority (A1), if set. This allows you
to group Outlook views by this letter.
Taskline now supports Hungarian date formats (which have a separator at the end
of the date).
Tasks set to Deferred or Waiting now have their Due dates cleared. This is to
remove them from Outlook's daily To Do list and also from the calendar.
When there are multiple accounts on one computer, Taskline Setup now has the
option to install Taskline for all users, or just the current user.
Taskline Version 2.1
December, 2004
You can now control how Taskline splits a task into shorter parts during scheduling.
You can switch off task splitting and you can specify the minimum duration of the
parts of a split task. How?
You can specify a time allowance before and after an appointment, to allow for
traveling time or meeting preparation. You define a default traveling time for all
appointments on the Calendar tab of the Taskline's dialog, which can be overridden
on a per-appointment basis. How?
There are new options to show task entries in the calendar as all day events. More.
There is a new option to show milestones in the calendar as all day events. More. If
you use Outlook 2002 or newer, you can also use labels to give milestones a
different color on the calendar, to highlight them. How?
Task priorities now use the A00-Z99 format. The Task priority option has been
replaced with the Priority (A1) option on the Taskline form. The former Task
priority option in Taskline versions 1 and 2.0 is still supported, but does not appear
on the Taskline form.
A new read-only task field is available to add to the task list view in Outlook: Hours
remaining. This is same as the value for Work remaining, but is always
represented as a number of hours.
The Ignore this task check box is selected by default in this version of Taskline.
However, when you enter information in the Total work box, this automatically
clears the Ignore this task check box, allowing Taskline to schedule the task.
Thus, to schedule milestones, which have zero hours Total work, you will now
need to manually clear the Ignore this task check box.
Taskline 2.1 is now compatible with FranklinCovey® PlanPlus versions 1, 2 and 3.
You can now order tasks by the task subject. This is useful if you, or other software,
place a code or priority at the start of the task subject.
You can now assign each task to a project, to help you organize your tasks more
effectively.
There is now a command line option /NoDialog which allows you to run Taskline in
the background using the Windows task scheduler. How?
Taskline Version 2
January, 2004
Task Scheduling
Taskline now supports recurring tasks. You can schedule the next occurrence of a
recurring task.
You can specify task constraints, such as a Finish On constraint, with a date and
omit the time. This reduces data entry and allows Taskline to optimize the schedule.
If you don't supply a time, the constraint applies to any time during the specified
day.
If several tasks are dependent upon a constraint, such as several tasks affected by
a deadline, you can select the other tasks from the Taskline task form in Outlook.
This feature replaces and is more efficient than the Taskline version 1 Task
Sequences feature.
When you do not enter a value in Total work, a warning message displays.
You can instruct Taskline to not schedule a task on the Outlook Calendar by clicking
the Ignore this task check box on the Taskline task form.
Setting Ignore for a task or setting the task status to Waiting on someone else
or Deferred clears the Scheduled Start, Schedule End and Week commencing
boxes.
Taskline no longer supports the following constraints that were not used very often:
Start on or Before and Finish On Or After.
Taskline Version 2 now reschedules tasks faster than Version 1.
Improvements to the Taskline Task Form in Outlook
You can select dates more accurately and efficiently with a Calendar control. This
feature is not supported in Outlook 97.
You can get Help from the Taskline form when you open a task.
You can set whether the Task tab or the Taskline tab appears first on the
Taskline form when you open a task.
You can set an option so that all new tasks are assigned a category and that you
cannot remove the category from existing tasks, although you can change the
category.
Compatibility
Taskline is now compatible with:
Outlook® 2003
NetCentrics Getting Things Done Versions 1 and 2
Franklin Covey® PlanPlus Version 1
Chapura® Inc's PocketMirror®
Calendar Task Entries
Taskline Version 1 introduced the ability to view your tasks in the Outlook calendar.
If you use Outlook 2002 or 2003, then Taskline Version 2 now allows you to view
your Calendar task entries quickly and easily in different colors. You can use the
Outlook Labels feature to color tasks on the Calendar; for example, you might
want to apply the color red to all high-priority tasks on the Calendar. More.
Calendar task entries now get assigned the same values for category and
importance as the tasks they represent.
You can now create calendar task entries to show the following settings: Busy,
Tentative, Free or Out of Office.
Miscellaneous
You can run Taskline from within Outlook by clicking a button on the Outlook
toolbar.
You can set up the main options for Taskline during Setup.
When Taskline schedules assigned tasks, you can prevent Outlook from sending
update emails back to the task owner. This prevents Outlook from generating
unnecessary emails.
You can apply changes without closing the Taskline dialog box with the new Apply
button.
The Summary of Task Schedule dialog that appears when Taskline completes
now shows enhanced content and presentation.
Taskline can optionally update task Start date and Due date. Version 2 also adds
the ability to restore the original Start date and Due date, if Taskline changes
these dates.
You can renumber tasks quickly with the new Renumber Task Priorities feature.
Folder names on the Taskline dialog box now show the full folder path, rather than
just the folder name. This removes ambiguities when two or more folders have the
same name.
When you enter tasks in Outlook's table view, you can use the constraint
abbreviations SO for Start On, SOOA for Start On or After, FO for Finish On, and
FOOB for Finish On or Before.
Taskline installs completely and correctly on Windows NT, 2000, and XP, even if you
do not have Administrator access rights.
The evaluation period of the unregistered version is now 10 non-consecutive days,
instead of 30 consecutive days.
What's New
For the latest What's New? information, please visit www.taskline.com/whatsNew.asp
Taskline Version 4.1
December, 2014
New Features Specific to Outlook 2013
The Calendar Task Entry context (right click) menu now works on Outlook 2013 too.
Commands available are Open Task, Complete, Whole Task is Complete and
Pin/Unpin.
You can set Show time as for calendar task entries to Working Elsewhere.
There is a new Advanced Option – Ignore 'Working Elsewhere' appointments.
New Features for all Versions
There are 2 new right click menu options for standard Outlook appointments:
Create Task and Create Task and Pin. These enable you to do some planning in
the calendar and then easily convert appointments into Taskline tasks. The
appointment is itself converted into a Taskline calendar task entry, like those
created by Taskline when it runs.
There is a new Create Task right click menu option for Outlook emails, notes and
contacts. This creates a new task from the item, leaving the original Outlook item
unchanged.
Pinned calendar task entries that are Not Started and have an End date on or
before the First task starts at date (i.e. those pinned items that are in the past)
are now automatically unpinned and rescheduled.
The Taskline section of the ribbon in Outlook has a new
button to display
Taskline's online help.
Outlook Label names have been removed, only Label colors are now shown and
the word Label has been replaced by Color. This gives a cleaner and simpler
interface.
Calendar task entry colors and subjects now update when you click Apply – there's
no longer a need to reschedule to have them updated.
You can now have up to 9 day time breaks, up from the 4 previously supported.
There is a new ClearContext project compatibility advanced option. If enabled,
Taskline reads and writes task Project information from and to the Outlook CCTopicName custom field, instead of the usual Project UDF.
Tasks in the Calendar Can Now be Colored Based on New Task Attributes
Overdue so you can color overdue tasks differently.
Pinned so you can color pinned and unpinned tasks differently.
Priority (A1) letter, so for example A tasks can be colored differently to B tasks.
There is a new color type on the Define Colors (formally Define Labels) dialog such
that you can now prevent the creation of calendar task entries for tasks with certain
attributes.
The Following Bugs Have Also Been Fixed
If a task subject contained non-European characters, the subjects for the
corresponding calendar task entries were being replaced by question marks. Now
fixed.
Taskline Version 4
March, 2014
Product Requirements and Compatibility
Taskline now requires Outlook 2007 or above.
Taskline is now compatible with both the 32-bit and 64-bit versions of Outlook 2010
and 2013.
Taskline no longer uses a custom Outlook task form. Instead, an Outlook form
region is used. This should eliminate most conflicts with other Outlook Add-Ins.
Task Scheduling
There is a new Work Between constraint type, which allows you to specify 2 dates
between which a task must be carried out.
You can now edit Taskline-created task entries in the calendar and pin these so that
they survive a Taskline reschedule. So you can use Taskline to automatically
schedule your tasks and then tweak those results manually. Pinned entries do not
get deleted and recreated during a Taskline reschedule, rather they stay put.
Moving a calendar task entry will automatically pin it.
For Taskline Professional Edition only, there is a new Max time per day
setting. This is used to limit the amount of time allocated to a task each day. It can
be used to spread a longer task out over several days or weeks, for example to
divide your time between 2 or more tasks, rather than working on a single task
exclusively until it's completed.
For Taskline Professional Edition only, there is a new Max time per week
setting. This is used to limit how much time is allocated each week to a long task.
Miscellaneous Changes
You can now limit how many days in the calendar, after the First task starts at
date, display scheduled tasks.
User Interface Changes
The Taskline toolbar button is replaced by ribbon controls on Outlook 2010 and
above. The ribbon has a new Reschedule button which runs Taskline immediately,
without showing the dialog first.
Ribbon support is added for calendar task entries.
For Outlook 2007 and 2010 only, context (right click) menu support for calendar
task entries is also added. This has 4 menu items – Open Task, Complete and
new Whole Task Is Complete and Pin features.
Taskline Standard Edition
Taskline Standard Edition now supports the same labels functionality as
Professional Edition; different labels (colors) can be assigned to different types of
Professional Edition; different labels (colors) can be assigned to different types of
tasks.
What Was New in Previous Taskline Versions