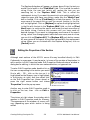
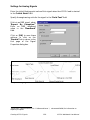
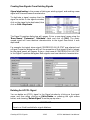
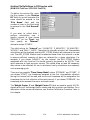
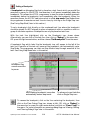
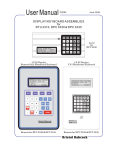
1
ACCOL Workbench
User Manual
Bristol Babcock
Version: 8.3
D4051 – September, 2004
NOTICE
The information in this document is subject to change without notice.
Every effort has been made to supply complete and accurate information.
However, Bristol Babcock assumes no responsibility for any errors that
may appear in this document.
Bristol Babcock does not guarantee the accuracy, sufficiency or suitability
of the software delivered herewith. The Customer shall inspect and test
such software and other materials to his/her satisfaction before using them
with important data.
There are no warranties, expressed or implied, including those of
merchantability and fitness for a particular purpose, concerning the
software and other materials delivered herewith.
Additional copies of instruction manuals may be ordered from the address
below per attention of the Sales Order Processing Department. List the
instruction book numbers or give the complete model, serial or software
version number. Furnish a return address that includes the name of the
person who will receive the material. Billing for extra copies will be
according to current pricing schedules.
ACCOL is a trademark and Bristol is a registered trademark of Bristol
Babcock. Other trademarks or copyrighted products mentioned in this
document are for information only, and belong to their respective
companies, or trademark holders.
Copyright (c) 2004, Bristol Babcock, 1100 Buckingham St., Watertown,
CT 06795. No part of this manual may be reproduced in any form without
the express written permission of Bristol Babcock.
SECTION 2 – ODD HEADER
A Few Words About Bristol Babcock
For over 100 years, Bristol has been providing innovative solutions for the measurement and
control industry. Our product lines range from simple analog chart recorders, to sophisticated
digital remote process controllers and flow computers, all the way to turnkey SCADA systems.
Over the years, we have become a leading supplier to the electronic gas measurement, water
purification, and wastewater treatment industries.
On off-shore oil platforms, on natural gas pipelines, and maybe even at your local water company,
there are Bristol Babcock instruments, controllers, and systems running year-in and year-out to
provide accurate and timely data to our customers.
Getting Additional Information
In addition to the information contained in this manual, you may receive additional assistance in
using this product from the following sources:
Help Files / Release Notes
Many Bristol Babcock software products incorporate help screens. In addition, the software
typically includes a ‘read me’release notes file detailing new features in the product, as well as
other information which was available too late for inclusion in the manual.
Contacting Bristol Babcock Directly
The address for our world headquarters is:
Bristol Babcock
1100 Buckingham Street
Watertown, Connecticut 06795 USA
Our main phone numbers are:
(860) 945-2200
(860) 945-2213 (FAX)
Regular office hours are Monday through Friday, 8:00AM to 4:30PM Eastern Time, excluding
holidays, and scheduled factory shutdowns. During other hours, callers may leave messages using
Bristol's voice mail system.
Telephone / E-Mail Support - Technical Questions
During regular business hours, Bristol Babcock's Application Support Group can provide
telephone/e-mail support for your technical questions.
i
2/2004
SECTION 2 – EVEN HEADER
Please refer to the table, below, for a list of products, and their associated technical support
contact information:
Product
Support Phone
Number(s):
(860) 945-2394
(860) 945-2286
(860) 945-2502
E-Mail Address:
TeleFlow series (3530-xx)
(860) 945-8604.
[email protected]
ACCOL, Open BSI, UOI, all other software
except for ControlWave and OE.
(860) 945-2286
[email protected]
OpenEnterprise (OE) software
(860) 945-3865
[email protected]
Radio telemetry services (interfacing Bristol
Babcock hardware to radios)
(407) 629-9463
(407) 629-9464.
[email protected]
ControlWave series (hardware and software)
Network 3000 hardware except for TeleFlow
series
[email protected]
[email protected]
The Application Support Group also maintains an area for registered users of our web site that
includes technical support information. Go to: www.bristolbabcock.com/services/
Telephone / E-Mail Support - Non-Technical Questions, Product Orders, etc.
Questions of a non-technical nature (product orders, literature requests, price and delivery
information, etc.) should be directed to the nearest sales office (listed on the back cover of this
manual) or to your Bristol-authorized sales representative. Please call the main Bristol Babcock
number (860-945-2200) if you are unsure which office covers your particular area.
Visit our Site on the World Wide Web
For general information about Bristol Babcock and its products, please visit our site on the World
Wide Web at: www.bristolbabcock.com
Training Courses
Bristol Babcock’s Training Department offers a wide variety of courses in Bristol hardware and
software at our Watertown, Connecticut headquarters, and at selected Bristol regional offices,
throughout the year. Contact our Training Department at (860) 945-2343 for course information,
enrollment, pricing, and schedules.
2/2004
ii
Who Should Read This Manual?
This manual is intended for the ACCOL programmer, who will be using ACCOL
Workbench to create an ACCOL source file.
It assumes familiarity with the following subjects:
!
The ACCOL II programming language. See An Introduction to ACCOL
(document# D4056) and the ACCOL II Reference Manual (document# D4044)
for details.
!
Use of personal computers, the DOS operating system, and the Windows™
user-environment. Users should be familiar with how to point and click with
a mouse, how to double-click, how to enter data in dialog boxes, and how to
use scroll bars, list boxes, pull down menus, etc. See your Windows™
documentation for details on these subjects.
!
Open BSI Utilities software, which is necessary for downloading, and on-line
communication. See the Open BSI Utilities Manual (document# D5081) for
details.
Variations between Windows™ Versions
The screens presented in this manual may appear slightly different
depending upon which version of Microsoft® Windows™ you are using. For
example:
1)
Titles, and names in title bars, may appear centered,
instead of left justified.
2)
Certain Windows dialog boxes for opening files, etc. may
have slightly different names, and may have different
labels on push buttons, for example [OK] instead of
[Open].
There may be other minor variations; in general, the differences should be
self-explanatory.
iii
BLANK PAGE
Table of Contents
Chapter 1 - Introduction - What is ACCOL Workbench? ........................................................1-1
What is an ACCOL Source File?..................................................................................1-1
Summary of Files Generated By ACCOL Workbench......................................1-2
Chapter 2 - Installing ACCOL Workbench on the PC.............................................................2-1
Chapter 3 - Starting ACCOL Workbench................................................................................3-1
Methods For Creating An ACCOL Source File ............................................................3-2
Chapter 4 - Quickstart For Experienced Users.......................................................................4-1
Chapter 5 - Creating, Editing, and Saving A New ACCOL Source File..................................5-1
ACCOL Source File Sections........................................................................................5-2
Editing the Source Code Directly .....................................................................5-3
Typing In New Text .........................................................................................5-4
Cutting, Copying, and Pasting Text.................................................................5-4
Finding and/or Replacing Text.........................................................................5-5
Editing the Properties of the Section ...............................................................5-6
Saving the New ACCOL Source File ...........................................................................5-7
Saving Subsequent Changes........................................................................................5-8
Deleting A Section of the ACCOL Source File .............................................................5-8
Opening An Existing ACCOL Source File ...................................................................5-8
Closing An ACCOL Source File and Exiting ACCOL Workbench ...............................5-9
Chapter 6 - Specifying the Target Node Type (*TARGET section) .........................................6-1
Editing the *TARGET section properties (Edit Properties Mode)...............................6-1
Editing the Source Code Directly (Edit Code Mode)....................................................6-1
Chapter 7 - Defining Passwords (*SECURITY-CODES section) ............................................7-1
Password Encryption...................................................................................................7-2
Changing Passwords in Edit Properties Mode ............................................................7-3
Chapter 8 - Defining Communication Ports (*COMMUNICATIONS Section) .......................8-1
General Instructions for Editing the Properties of the *COMMUNICATIONS Section
(Edit Properties Mode) .....................................................................................8-1
Editing the Source Code Directly (Edit Code Mode)....................................................8-2
Defining A Master Port In Edit Properties Mode ........................................................8-3
Defining A Master Port in Edit Code Mode .................................................................8-4
Defining An Expanded Addressing Master Port in Edit Properties Mode ..................8-5
Defining An Expanded Addressing Master Port in Edit Code Mode ...........................8-6
Defining A Serial CFE Port in Edit Properties Mode .................................................8-8
Defining A Serial CFE Port in Edit Code Mode...........................................................8-8
Defining A Slave, Pseudo-Slave, or Pseudo-Slave with Alarms Port in Edit Properties
Mode.................................................................................................................8-9
Defining A Slave, Pseudo-Slave, or Pseudo-Slave with Alarms Port in Edit
Code Mode........................................................................................................8-9
Defining A VSAT Slave Port......................................................................................8-11
Defining A VSAT Slave Port in Edit Code Mode .......................................................8-11
Defining An RIOR Port in Edit Properties Mode.......................................................8-12
Defining An RIOR Port in Edit Code Mode ...............................................................8-13
v
Defining A Logger Port in Edit Properties Mode.......................................................8-14
Defining A Logger Port in Edit Code Mode ...............................................................8-14
Defining A Custom Port in Edit Properties Mode .....................................................8-16
Defining A Custom Port in Edit Code Mode ..............................................................8-16
Defining An Optional Comm (TANO) Port in Edit Properties Mode.........................8-18
Defining An Optional Comm (TANO) Port in Edit Code Mode .................................8-18
Defining A Columbia Natural Gas Port in Edit Properties Mode .............................8-19
Defining A Columbia Natural Gas Port in Edit Code Mode ......................................8-19
Defining An Internet Protocol (IP) Port in Edit Properties Mode .............................8-21
Defining An Internet Protocol (IP) Port in Edit Code Mode ......................................8-21
Defining Additional Buffers in Edit Properties Mode................................................8-22
Defining Additional Buffers in Edit Code Mode ........................................................8-22
Defining Parameters For An IP Custom Protocol in Edit Properties Mode ..............8-23
Defining Parameters For An IP Custom Protocol in Edit Code Mode .......................8-25
Chapter 9 - Specifying Memory Requirements (*MEMORY section) ......................................9-1
Specifying Memory in Edit Properties Mode (386EX Protected Mode Units ONLY) .............9-1
Specifying Memory in Edit Properties Mode (186 & 386EX Real Mode Units ONLY)...........9-3
Specifying Memory in Edit Code Mode (386EX Protected Mode Units ONLY) .....................9-5
Specifying Memory in Edit Code Mode (186 & 386EX Real Mode Units ONLY) ...................9-8
Chapter 10 - Declaring Process I/O Boards (*PROCESS-I/O Section) ..................................10-1
Declaring Process-I/O Boards in Edit Properties Mode.............................................10-1
Declaring Process I/O Boards in Edit Code Mode......................................................10-2
Chapter 11 - Defining Low-Level Board Inputs (*LOW-LEVEL Section) .............................11-1
Creating the *Low-Level Section ...............................................................................11-1
Chapter 12 - Creating ACCOL Signals (*SIGNALS section) ...............................................12-1
Signal Names.............................................................................................................12-1
Signal Characteristics ...............................................................................................12-2
Defining New ACCOL Signals ...................................................................................12-2
Settings for Logical Signals ...........................................................................12-3
Settings for Logical Alarm Signals................................................................12-6
Settings for Analog Signals ...........................................................................12-8
Settings for Analog Alarm Signals ..............................................................12-10
Settings for String Signals ..........................................................................12-13
Editing Signal Characteristics.................................................................................12-15
Creating New Signals From Existing Signals .........................................................12-16
Deleting An ACCOL Signal .....................................................................................12-16
Defining Base Name Text For Signals.....................................................................12-18
Chapter 13 - Defining Signal Lists........................................................................................13-1
Chapter 14 - Creating An ACCOL Task (*TASK Section) ....................................................14-1
Editing the Task Characteristics Line (Edit Properties Mode) .................................14-1
Editing the Task Characteristics Line (Edit Code Mode)..........................................14-1
Inserting Modules In The Task .................................................................................14-3
Entering Signal Names..............................................................................................14-4
Getting Help on Configuring A Particular Module....................................................14-5
Customizing the Module Menu to Include Frequently Used Modules.......................14-6
Re-sequencing the Line Numbers For Modules in the Task......................................14-7
vi
Going to a Particular Line of the File........................................................................14-8
Searching for Items Throughout the Entire Source File............................................14-8
Undoing the Last Keystroke(s)..................................................................................14-9
Deleting Text From the Current Cursor Position to the End of the Line................14-10
Removing Unused Module Terminals......................................................................14-10
Defining A Signal’s Type From Within A Module or Task (Check-in Feature) .......14-11
Chapter 15 - Defining Data Arrays (*A-ARRAY and *L-ARRAY sections)...........................15-1
Read Write Arrays .....................................................................................................15-2
Read-Only Arrays ......................................................................................................15-2
Example 1 - Initializing An Entire Read-Only Array ...............................................15-3
Example 2 - Initializing Individual Cells In A Read-Only Array .............................15-4
Modifying Arrays In Edit Code Mode ........................................................................15-4
Chapter 16 - Defining Communication FORMATS (*FORMAT Section)..............................16-1
Chapter 17 - Defining Archive Files (*ARCHIVE Section)....................................................17-1
Archive Definition in 3305 and 386EX PM Units......................................................17-1
Archive Definition in 3530-series Units.....................................................................17-4
Archive Calculation Formulas ...................................................................................17-7
Chapter 18 - Using the BUILD Command to Generate ACO and ACL Files .......................18-1
Using the Batch Build Feature..................................................................................18-3
Chapter 19 - Using the DOCUMENT Command to Generate an LST File ..........................19-1
Signal Cross-Reference ..............................................................................................19-1
Load Statistics ...........................................................................................................19-1
Memory Usage and Memory Map..............................................................................19-2
Chapter 20 - Reverse Compiling an ACO File to Get an ACC File .......................................20-1
Performing A Batch Reverse.....................................................................................20-1
Chapter 21 - Operating ACCOL Workbench in On-Line Mode ............................................21-1
Activating the Downloader ........................................................................................21-2
Starting Debug Mode.................................................................................................21-2
Exiting Debug Mode ..................................................................................................21-2
Determining the Editing Capabilities For the Current ACCOL Load.......................21-3
Summary of Debugging Techniques ..........................................................................21-3
Using Debugging Flags in an ACCOL Task ..............................................................21-6
Accessing the ACCOL Task............................................................................21-7
Setting a Breakpoint ......................................................................................21-8
Setting an Abort.............................................................................................21-9
Setting a Skip...............................................................................................21-10
Using Step Mode ..........................................................................................21-11
Clearing All Debug Flags in a Task .............................................................21-12
Viewing, Setting, and Clearing Debug Flags ...............................................21-12
Viewing the Error Array Window ............................................................................21-14
Viewing and Changing Data On-Line.....................................................................21-16
Methods for Changing Data .........................................................................21-16
Using the Watch Window.............................................................................21-17
Using the Change Signal Value Dialog Box .................................................21-20
Toggling Signal Inhibit/Enable Bits.............................................................21-20
Conducting A Signal Search.........................................................................21-21
vii
Using the Signal Detail Window ..................................................................21-21
Changing Values in a Read/Write Data Array.............................................21-22
Changing the Floating Point Format of Data ..............................................21-23
Toggling the First Column of an Array Between Analog and
Timestamp Data...............................................................................21-23
Keeping Column 1 Visible While Scrolling Through an Array.....................21-23
Editing ACCOL Load Structures On-Line..............................................................21-24
Changing Values in a Read-Only Data Array .............................................21-25
Editing Titles and Signals in an Archive Definition ....................................21-26
Editing A Format .........................................................................................21-27
Editing A Signal List....................................................................................21-28
Editing Module Terminals and Calculator Equations in a Task .................21-29
Updating Initial Values in Your ACCOL Source File ..................................21-30
Saving Changes to the Source File on the Hard Disk ..................................21-30
Appendix A - Upgrading ACCOL Source Files from Previous Versions
or Using Files in different CPU Platforms...................................................... A-1
Appendix B - Listing of ACCOL Modules & Control Statements .......................................... B-1
Appendix C - Keyboard Shortcuts .......................................................................................... C-1
Appendix D - Customizing the User Environment.................................................................D-1
Viewing Open BSI Setup Parameters.........................................................................D-1
Turning On/Off the Tool Bar ......................................................................................D-1
Turning On/Off the Status Bar...................................................................................D-1
Opening/Closing the Output Window .........................................................................D-1
Opening/Closing the Watch Window ..........................................................................D-2
Re-Arranging the Windows on the Desktop................................................................D-2
Using the Workspace Settings Dialog Box .................................................................D-2
Setting File and Backup Parameters ..............................................................D-2
Setting the Line Numbers in ACCOL Tasks...................................................D-4
Specifying Parameters For On-Line Operation..............................................D-5
Specifying Refresh Rates For On-Line Windows............................................D-6
Changing the Fonts Used in ACCOL Workbench Code Windows...................D-7
Choosing Which Warning Messages Should Be Displayed .............................D-8
Using Filters To Limit Which Signals Are Displayed in Signals Window................D-10
Sorting Signals Alphabetically in the Signals Window ............................................D-12
Turning ON/OFF Signal Filtering ............................................................................D-12
Restoring A Backup File...........................................................................................D-12
Appendix E - Using Initial Value Scan - Valscan................................................................... E-1
Appendix F - *DEFINE and *INCLUDE Statements ............................................................ F-1
Text Substitution Using *DEFINE............................................................................. F-3
Text Insertion Using *INCLUDE ............................................................................... F-4
Glossary..................................................................................................................................G-1
viii
Notational Conventions In Syntax Boxes
This manual includes numerous syntax boxes which define the syntax rules for
editing particular sections of the ACCOL source file. The notational conventions
within syntax boxes are different from those in the rest of the text.
Syntax Rules - *PROCESS-I/O Section
Within the syntax box, the following notational conventions apply:
bold text
should be entered exactly as shown
italic text
indicates a place where the ACCOL programmer must
substitute a particular value, or entry. Possible entries for
this value are then listed.
[text in brackets]
indicates optional fields, which need not be entered,
unless that particular option is required. DO NOT type
the brackets.
ix
Chapter 1 - Introduction: What is ACCOL Workbench?
ACCOL Workbench is a Windows™-based software tool that allows you to create,
modify, and document an ACCOL source file, and to build an ACCOL load file. If
your Network 3000-series controller model supports it, you can also perform on-line
operations through ACCOL Workbench including downloading, debugging, and online changes to data and ACCOL structures.
What is an ACCOL Source File?
The ACCOL source file defines the programming instructions which will be used by
a Bristol Babcock Network 3000-series remote process controller.
The ACCOL programmer chooses whichever specific programming instructions
(ACCOL modules, signals, control statements, etc.) are necessary for the intended
user application, and enters them in the ACCOL source file, using ACCOL
Workbench, or any ASCII text editor.
The source file, when completed, is
compiled and linked using the ACCOL
Workbench "Build" command.
The build process translates the
programmer's
instructions
into
an
intermediate ACCOL Object File and a
final ACCOL Load File. The ACCOL
Load
File
contains
the
original
programming instructions in a machinereadable format which can be executed by
the Network 3000-series controller. In
order for the controller to execute the
instructions, however, the ACCOL Load
File must be downloaded into the
controller's memory using the Open BSI
Downloader.
Any errors detected during the build process are reported, within ACCOL
Workbench, and in a listing file. ACCOL Workbench allows the programmer to go
directly to the line which caused the error. Once the programmer has corrected the
errors, the "Build" command can be initiated again.
ACCOL Workbench User Manual
1-1
Introduction
A summary of the different types of files used by ACCOL Workbench is presented
in the table below. The files created by ACCOL Workbench use the file extensions
listed in the table.
Summary of Files Generated By ACCOL Workbench
File
Extension
.ACC
Description
This extension indicates an ACCOL source file. An ACCOL source
file is in ASCII format, and may be edited, according to pre-defined
syntax rules, by any ASCII text editor, or by ACCOL Workbench.
The ACCOL programmer defines, within the ACC file, the ACCOL
modules, signals, statements, and structures which will be used to
program the Network 3000-series controller for its intended
application. The ACC file cannot be used directly by the Network
3000 controller, therefore, it must be compiled and linked to
generate an ACCOL Object file, and an ACCOL Load file.
Backups of ACCOL source files, when the Backup feature has been
activated through the Workspace Settings dialog box, are named
using the file base name, with the addition of an underscore ’_’ and
a 3 digit version number. The same file extension (.ACC) is used. For
example, if there is an ACC file named MYFILE.ACC, its first
backup file would be named MYFILE_001.ACC.
.ACO
.ACL
.LIS
Introduction
NOTE: These backup files are for previous versions of the source file.
Users should always save a copy of their current ACCOL source files
on a separate diskette to guard against a hard disk failure.
This extension indicates an ACCOL object file. An ACO file is
created when a "Build" command is issued from within ACCOL
Workbench, and is an intermediate step in the creation of an
ACCOL load file. The ACO file is used by the Open BSI Utilities for
various purposes, and shares the same file base name as the ACC
file it was created from.
This extension indicates an ACCOL load file. It contains, in a
machine-readable format, the ACCOL modules, statements, and
structures defined in the ACC file. The ACL file is the final output of
the "Build" command. It is downloaded into the memory of the
Network 3000-series controller using the Open BSI Downloader.
Once in memory, the modules and statements in the ACL file are
executed by the Network 3000-series controller.
This extension indicates a listing file. The listing file contains any
error or status messages which occur as a result of executing the
"Build" command. If the listing option is active, this file may also
include a tabulated listing of the ACCOL source file (.ACC). If the
cross-reference option is active, this file may also include a simple
cross-reference of the signals used in the file.
1-2
ACCOL Workbench User Manual
File
Extension
.LST
Description
This extension indicates a documentation file, which contains a
complete listing of the ACCOL source, as well as a signal cross
reference, and various load statistics. It is created by executing the
"Document" command.
ACCOL Workbench User Manual
1-3
Introduction
BLANK PAGE
Chapter 2 - Installing ACCOL Workbench on the PC
ACCOL Workbench software is installed as part of the standard Open BSI Utilities
installation. Select the "ACCOL Workbench" option when running the installer
from the Open BSI CD ROM. See Chapter 2 of the Open BSI Utilities Manual
(document# D5081) for details.
NOTE: ACCOL Workbench is generally NOT backward-compatible, i.e. once you
edit an .ACC file in a given version of ACCOL Workbench, structures may
change such that it CANNOT be readily edited within an earlier version of
ACCOL Workbench.
ACCOL Workbench User Manual
2-1
Installation
BLANK PAGE
Chapter 3 - Starting ACCOL Workbench
1
To start ACCOL Workbench, click as follows:
Å ProgramsÅ OpenBSI ToolsÅ Workbench.
Start
Once started, a window, with the words ’Accol Workbench’ in the title bar, will
appear on the screen.
7LWOHEDU
0HQXEDU
7RROEDU
6WDWXVEDU
IMPORTANT: If this is the very first time ACCOL Workbench has been
started on this particular computer, you will be prompted to register the
software. Otherwise, the software can only be used for a maximum of 30
days. For more information on the registration process, see Chapter 2 of
the Open BSI Utilities Manual (document# D5081).
ACCOL Workbench functions can be activated by clicking on the menu bar items,
and selecting choices from pull-down menus. Some items are also accessible by
clicking the right mouse button, and choosing from pop-up menus.
In addition to access from the menus, certain options may also be selected from the
1
If you are using Open BSI 3.0 (or newer), you can also start ACCOL workbench by clicking on the icon
for a particular RTU in NetView, pressing the right mouse button, and choosing “RTU” and then
“Workbench” from the pop-up menus.
ACCOL Workbench User Manual
3-1
Starting ACCOL Workbench
tool bar. Positioning the mouse over a particular tool bar icon will cause a label to
be displayed, indicating the function of that tool bar icon. Click on the icon to
activate the function.
Finally, keyboard shortcuts are available for the most common functions. These are
discussed in Appendix C.
ACCOL Workbench status messages appear, periodically, in the Status Bar.
2
ACCOL Workbench allows you to have multiple windows open, allowing you to view
different sections of the same ACCOL source file, or more than one ACCOL source
file, simultaneously, and to switch between them quickly.
Methods For Creating An ACCOL Source File
There are two basic methods available to create an ACCOL source file.
Method 1:
Open an existing ACCOL source (ACC) file, and save it under a
different name. Then edit the ACCOL source file to fit your particular
application, either with ACCOL Workbench, or with any ASCII text
editor.
NOTE: If you intend to modify an ACC file from an earlier version of ACCOL Tools
(Version 5.13 or earlier), this may generate syntax or parsing errors when brought
into ACCOL Workbench. Please review the instructions in ’Appendix A - Upgrading
Old ACCOL Source Files’ for details.
Method 2:
Create an all new ACCOL source file using ACCOL Workbench. This
process is discussed in detail in the sections that follow. Experienced
ACCOL programmers may wish to read the ’Quickstart For
Experienced Users’ (Chapter 4) which provides a quick overview of
using ACCOL Workbench. Other users who are unfamiliar with the
syntax rules for ACCOL source files should start with ’Creating,
Editing, and Saving A New ACCOL Source File’ (Chapter 5). That
chapter, and the chapters that follow it, describe in detail the syntax
rules for each part of the ACCOL Source File.
IMPORTANT NOTE FOR EITHER METHOD
The output files (.ACO, .ACC) created by ACCOL Workbench ARE
INCOMPATIBLE with DOS-based versions of the ACCOL Tools (AIC5, ABC5,
REV5, etc.)
2
If desired, either the Tool Bar, Status Bar, or both, may be removed from the screen by de-selecting
them on the View pull down menu.
Starting ACCOL Workbench
3-2
ACCOL Workbench User Manual
Chapter 4 - Quickstart For Experienced Users
This section assumes that ACCOL Workbench software, and Open BSI standard
utilities software, have already been installed on the PC Workstation.1
The next few pages are intended to get you started; if you run into problems with a
particular step, refer to other sections of the manual for more detailed explanations.
As you navigate through the ACCOL Workbench software, you can
access on-line help via the "Help" menu bar item. There is also
context-sensitive help, in which you point at the item for which you
need help. Context-sensitive help is accessible through the icon shown
at left. You can also obtain context-sensitive help, for the currently
selected item or dialog box, by pressing the [F1] key.
Step 1 - Start ACCOL Workbench
Å
Å
Click on Start Programs OpenBSI Tools
ÅWorkbench
Step 2 - Open A New ACCOL Source File
Click on File
ÅNew, -OR- click on the new file icon, shown at left.
A dialog box will appear which
requires you to choose whether your
Network 3000-series controller is a
Real Mode unit, or a Protected Mode
unit. (This depends upon the type of
CPU board installed in the controller.)
Choose the appropriate controller
type, and click on [OK], and a new
ACCOL source file will be opened.
1
For information on installation of ACCOL Workbench, see Chapter 2. For information about Open BSI
Utilities software, see the Open BSI Utilities Manual (document# D5081).
ACCOL Workbench User Manual
4-1
Quickstart for Experienced Users
The new file will be called ACCOL.ACC and will include either a ’PM’ for Protected
Mode, or an ’RM’ for Real Mode in the title bar. (You should rename it later, when
you save the file.)
You’ll notice that the file comes with certain sections pre-defined, each of which is
represented by an icon. There are icons for the target node type, memory,
communication ports, security codes, process I/O, signals, base names, and Task 0.
Additional sections for tasks, low-level I/O, formats, archive files, data arrays, and
signal lists can be added as necessary. (We will discuss this in step 5).
In general, a section can be edited in one of two ways:
a)
double-click on the icon for the section; this will call up a dialog box, or a
window, in which you can make selections or enter data for the section. This
is called ’editing the properties’ of the section.
b)
click on the icon for the section; then click on Edit Code. This calls up a
window with the actual ACCOL source code for the section. This source code
follows a strict set of syntax rules which are discussed later in this manual.
This method of editing is called ’editing the code’ of the section.
Å
NOTE: You also have the option of clicking once on the icon for a section, and then
pressing the right mouse key. A pop-up menu will allow you to choose whether you
want to edit the code, or the properties, of the selected section.
IMPORTANT
Whichever of these editing methods you use, it is important to remember that ACCOL
Workbench DOES NOT VALIDATE the source code you create; it only checks for basic
syntactic errors. Other errors may only be detected during a "Build" operation.
Quickstart for Experienced Users
4-2
ACCOL Workbench User Manual
Step 3 - Define Communication Ports, Memory, and Process-I/O Boards
Each of these sections are accessed
by
double-clicking
on
the
appropriate icon, and entering
values in dialog boxes or windows.
For purposes of this explanation we
will show how to define process I/O
boards; the basic methods for
defining communication ports and
memory are similar.
Double-click on the Process I/O icon, shown at left. The dialog box
shown above will appear.
Next, select the kind of board which resides in the first slot from the "Board Type"
list box.
Click on the [Insert] push button, and the board will be added to the list of boards.
Repeat this process for each and every board. Boards should be defined in
ascending order based on their slot number in the Network 3000 controller.
To change the definition of a board in the list, click on the board entry in the list,
make any necessary changes to the "Board ID" and "Board Type" fields, and click
on the [Modify] push button.
To delete a board definition, click on the board entry in the list, then click on the
[Remove] push button. You will be prompted to confirm deletion of the board
definition. Click on [Yes] to proceed, or [No] to cancel the deletion request.
When you are finished editing, click on [OK] to exit the dialog box.
If desired, the resulting source code may be viewed and edited by clicking on the
’Process-I/O’ icon, then clicking on Edit
Code, -OR- by clicking on the ’Edit Code’
icon (the pencil).
Å
ACCOL Workbench User Manual
4-3
Quickstart for Experienced Users
The actual source code for the *PROCESS-I/O section, as currently defined, will
appear on the screen, and may be directly edited according to ACCOL syntax rules,
defined elsewhere in this manual.
*PROCESS-I/O
1
8DI
2
4AI
3
2AO
4
8DO
Close the window, when finished editing.
Step 4 - Create ACCOL Signals
It is recommended that signals either be explicitly defined first in the *SIGNALS
section, before they are used in signal lists or module templates, or that they be
‘checked in’ when entered in a module or task through the Check-in feature (see
Chapter 14.) This is because signals entered in module templates (see Step 5) or in
signal lists, are assigned their signal type (logical, logical alarm, analog, analog
alarm, or string) during the "Build" process based on the context in which the
signal is used. If the type of signal required cannot be determined by its usage, it
will be defined as a logical signal, which may not be the desired signal type for your
particular application. An advantage of defining signals first in the *SIGNALS
section is that they may be dragged from the *SIGNALS window, directly to a
module terminal, or signal list, thereby reducing the need to re-type signal names.
To create a new ACCOL signal,
double-click on the signals icon.
The Specify Signal Filter window
will appear.
Click on [OK], an empty signal
window will appear.
Quickstart for Experienced Users
4-4
ACCOL Workbench User Manual
Å
Next, click on Edit
Insert (Or press the right mouse button, and select "Add
Signal" from the pop-up menu.) In either case, the Signal Properties dialog box
will appear.
Type the signal base name in
the "Base Name" field, the
signal extension (if used) in
the "Extension" field, and the
signal attribute (if used) in
the "Attribute" field.
The type of signal (analog,
analog alarm, logical, logical
alarm, or string) is selected
from the "Type" list box.
To specify a different security
level for operator read access
to this signal, enter a number
(from 1 to 4) in the "Read
Security" field.
To specify a different security level for operator access to change (i.e write to) this
signal, enter a number (from 1 to 4) in the "Write Security" field.
To manually enable the signal, the "Manual Enable" check box must be selected
(which is the default choice). To manually inhibit the signal, this check box must be
de-selected.
To control enable the signal, the "Control Enable" check box must be selected
(which is the default choice). To control inhibit the signal, this check box must be
de-selected.
Click on the "Settings" tab to specify other characteristics of the signal, such as its
initial value, units or ON/OFF text, etc. The settings required vary somewhat
depending upon the type of signal being defined.
When finished defining the signal, click on [OK] to exit the Signal Properties dialog
box.
If multiple signals are to be defined which share the same characteristics, they may
be created using the Duplicate feature, which is available via the Edit pull down
menu.
ACCOL Workbench User Manual
4-5
Quickstart for Experienced Users
Step 5 - Insert New Sections For Tasks, Lists, Arrays, etc.
To insert a new section, close the section
you are currently editing first. New
sections must be explicitly created for each
data array, archive file, signal list, task,
format, or low-level board. For purposes of
illustration, we will show how to add a new
ACCOL task to the source file. New
sections are added by clicking on Edit
Insert. In the list box, select ’Task’ as the
type of section to be added, and click on
[OK].
Å
A Configure Task dialog box will be
displayed which allows you to
configure the first line of the task.
Specify a task rate, priority, and, if
applicable, a redundancy frequency.
Click on [OK].
The Task Window will now be opened,
showing the first line, as you just
configured it.
To insert ACCOL modules into the task, position the cursor on the line where you
would like to add the module.
Click on Modules
ÅInsert. The Select Module dialog box will appear.
Use the scroll bar to view the different
module names. Click on the name of the
module you would like to insert. If you are
choosing an I/O module with interleaved
terminals such as INPUT 1, INPUT 2
INPUT 3, etc. enter the number of sets of
interleaved terminals in the “Number of
Terminals” field.
Quickstart for Experienced Users
4-6
ACCOL Workbench User Manual
(For detailed information on individual modules, consult the ACCOL II Reference
Manual (document# D4044).)
Click on [OK]. A template for the module will be inserted at the current line of the
source file.
The module name will be preceded by the next sequential line number for this task.
(Task line numbers must be in ascending order).
The module template includes the module terminals, with descriptions of the likely
signal type required for each terminal. If the module includes interleaved
terminals, the number of terminal sets you specified in the Select Module dialog box
will be created. The descriptions must be replaced with the actual signal names or
constants which will be used by the module.
There are two ways to enter the signal names, you can either:
1)
Manually type the signal names in place of the existing descriptions.
-OR2)
Drag the signal name from the *SIGNALS section to the desired module
terminal. To do this, open a Signal window, as described in Step 4. With the
window for the Task also in view, position the cursor on the desired signal.
Depress and HOLD the left mouse key. While continuing to hold the left
mouse key, move the cursor to the desired module terminal in the other
window; an outline box of the signal being copied will appear to help you
position it correctly. When you are on the proper terminal, release the mouse
key. The signal name will now appear on the terminal in the module
template. This method is called drag and drop, and greatly reduces the
2
amount of typing required. This method only works, of course, if you had
previously defined the desired signals, as recommended in Step 4.
2
This same ’drag and drop’ method may be used in the creation of signal lists.
ACCOL Workbench User Manual
4-7
Quickstart for Experienced Users
In the figure, below, a copy of the signal name STATION1.HUMID.PCNT is
dragged from the *SIGNALS section to the INPUT terminal of an ANIN module.
Use either of these methods to define signals, as required, for each module
terminal.
Call up the Select Module dialog box, as previously described, and repeat the entire
process for each module to be added to the task. If you copy and paste modules in
different locations, make sure task lines are in ascending order. When finished,
close the window. A new icon will appear for this task.
Step 6 - Save the ACCOL Source File
When you have finished making edits, click on the Save icon, -OR- click
on File Save or File Save As from the menu bar. The File Save As
dialog box will appear. Select a drive, directory and file name (other
than ACCOLn) and use the extension of (.ACC). Click on [OK].
Å
Quickstart for Experienced Users
Å
4-8
ACCOL Workbench User Manual
Step 7 - Issue a "Build" Command
To initiate a "Build" command on the currently open ACCOL source file,
click on the "Build" icon (the hammer, shown at left), - OR - click on
Actions Build. ACCOL Workbench will commence building an
ACCOL Object (.ACO) file, and an ACCOL Load (.ACL) file. As the
building operation proceeds, various messages will appear on the status
line, indicating the progress of the build.
Å
If the operation is successful, a message similar to the one below will be displayed.
Skip to Step 9.
If errors are detected during the build process, they must be corrected. Correcting
errors is discussed in Step 8.
Step 8 - Correct Any Errors and Re-Build
Unless the ACCOL source file is syntactically perfect, some errors will be detected.
In the figure, below, there are two errors which need to be corrected.
ACCOL Workbench User Manual
4-9
Quickstart for Experienced Users
In some cases, if the location of the error is identifiable, you can double-click on the
error line, and go directly to the source of the error. Double-clicking on Error 61, for
example, calls up a source code window for the task showing the location where
ACCOL Workbench first identified there was an error.
In this case, both errors were caused by an improper line number in a Calculator
Module; the line "135 :ENDIF" should have a line number greater than 140 and
less than 160, instead of 135.
You can make corrections right in the source code window, then save the changes,
and issue a "Build" command again (see Step 7). If there are numerous errors in
the file, you can jump from error to error by clicking from the menu bar on
View Next Error or View Previous Error. Repeat the building and error
correcting process until no errors occur, and the ’Compilation Successful’ and ’Link
Successful’ messages are generated. These messages mean that .ACO and .ACL
files have been successfully created.
Å
Å
Step 9 - Download the Completed File Using the Downloader
Once an ACCOL load file has been successfully created, it can be
downloaded into the Network 3000-series controller. There, the ACCOL
programming instructions in the load file are executed, in order to
measure and/or control the particular user process.
For users with firmware and ACCOL Workbench versions which support on-line
Workbench operation, the Open BSI Downloader can be activated from within
Workbench by clicking on the icon (shown above) or by clicking on
Actions Download. For users with older Workbench versions which do NOT
support on-line operation, the Downloader must be started from within Open BSI
Utilities. For instructions on starting Open BSI communications, and downloading,
see the Open BSI Utilities Manual (document# D5081).
Å
Step 10 - Perform Debugging, Make On-Line Edits
(ONLY FOR Versions of ACCOL Workbench which support On-line operation)
If errors exist, debugging, and on-line editing may be performed by
activating Debug Mode. This is done by clicking on the Debug icon.
ACCOL Tasks may be viewed, along with the signal values associated with each
module in the task. Signals may also be edited via the Change Signal Value dialog
box.
Quickstart for Experienced Users
4-10
ACCOL Workbench User Manual
There are three types of debugging flags which can be set to help isolate problem
areas in an ACCOL task. They may only be placed on numbered task lines.
Breakpoint flags stop task execution at a certain point, and allow it to
continue, one task line at a time, by clicking on the single step icon.
Task lines containing skip flags are ’skipped over’ and so do NOT execute.
Task lines containing abort flags, and all task lines following them are
ignored. Task execution resumes from the beginning of the task.
These flags may be set by clicking on the numbered task line where the flag should
be placed, and then clicking on the icon associated with the flag (shown above).
Debug flags may also be set and
cleared using the Debug Flags for
Load dialog box, which is accessible by
clicking as follows: View
Node
Information
Debug Flags.
Å
ACCOL Workbench User Manual
Å
4-11
Quickstart for Experienced Users
For more information on debugging, see ’Using Debugging Flags in an ACCOL
Task’ in Chapter 21.
Performing On-Line Edits to Data ONLY
Edits to signal values, read/write data array entries and signal inhibit/enable bits
may be made simply by clicking on the appropriate field (signal value, array value,
or inhibit flag) in any on-line window, and using the resulting dialog box to change
the data. Each of these types of changes affect data only; they do NOT change the
structure of the ACCOL load.
Performing On-Line Edits Which Affect the Structure of the Load File
Read-Only data arrays, formats, archive entries, module terminals, and calculator
equations may also be edited on-line. Each of these types of changes, however,
change the structure of the ACCOL load, and so must be explicitly sent to the
controller, and saved in the ACC file on disk at the conclusion of the debugging
session.
The basic procedure for performing on-line edits to these structures is to click on
the section to be edited, then click on Edit Change On-Line.
Å
An Edit Code window (or dialog box in the case of archives or read only arrays) will
appear in which changes may be made. Once changes are complete, they must be
explicitly sent to the controller either by clicking on the [Commit Changes] button
(if one is provided) or by clicking on Edit Commit Changes.
Å
To exit debugging mode, click on the icon (shown at left) or click on
Actions Stop Debugging. You will be prompted to save changes to the
ACC file on the hard disk, if you have not already done so.
Å
Quickstart for Experienced Users
4-12
ACCOL Workbench User Manual
Chapter 5 - Creating, Editing, and Saving A New
ACCOL Source File
Start ACCOL Workbench, as described in Chapter 3.
Next, click on the ’New’ icon, shown at left, -OR- click on File
ÅNew.
A dialog box will appear which
requires you to choose whether your
Network 3000-series controller is a
Real Mode unit, or a Protected Mode
unit. (This depends upon the type of
CPU board installed in the controller.)
Choose the appropriate controller
type, and click on [OK], and a new
ACCOL source file will be opened.
The new file will be called ACCOL.ACC and will include either a ’PM’ for Protected
Mode, or an ’RM’ for Real Mode in the title bar. (You should rename it later, when
you save the file.) A window containing several icons, with the label ’Accoln’ in the
title bar, will appear on the screen.1
Each of the icons (Target, Security, Memory, Communications, Base names, Process
I/O, Task 0, and Signals) corresponds to one of the sections of the ACCOL source
file. Some other sections, besides those shown, will need to be added later. A
complete list of ACCOL source file sections is shown in the following table.
1
Each time a new ACCOL source file is opened in ACCOL Workbench, the file is assigned a ’PM n’ or
’RM n’ number to differentiate it from other open files. ’n’ is a number which starts at 1 and is
incremented based on the number of source files open. For example, the first real mode file opened has
an RM1 in its title bar, second real mode file opened has an RM2 in its title bar, etc.
ACCOL Workbench User Manual
5-1
Creating/Editing/Saving the File
ACCOL Source File Sections
Section Name
Purpose of Section
*TARGET
Defines the type of Network 3000 controller which
will receive the downloaded file. This section also
includes a user-defined version number for the ACO
file. Only one *TARGET section is allowed.
*SECURITY-CODES
Specifies the security codes for security levels 1
through 6. The encryption feature may also be
activated in this section. Only one *SECURITYCODES section is allowed.
*COMMUNICATIONS
Defines the usage of communication ports (e.g.
Master Port, Slave Port, Logger Port, etc.) in the
Network 3000 unit. Also included here are the
number of additional communication buffers, and
the number of Alarm Timestamp buffers. Only one
*COMMUNICATIONS section is allowed.
*MEMORY
Defines the amount of memory installed in the
controller. The size of the ACCOL load cannot
exceed this amount. This section also defines the
amount of memory required for certain ACCOL
structures. Only one *MEMORY section is allowed.
*PROCESS-I/O
Defines the process I/O boards installed in your
controller, or in attached remote I/O racks. Only one
*PROCESS-I/O section is allowed.
*LOW-LEVEL
Defines the input types for the Low-Level Analog
Input Board, if it is included in this unit, or in a
Remote I/O Rack attached to this unit. Multiple
*LOW-LEVEL sections are allowed.
*TASK
Defines overall task characteristics (e.g. Task Rate,
Task Priority, Redundancy Frequency) and includes
all ACCOL modules and control statements for this
task. Multiple *TASK sections are allowed. Note:
ACCOL Workbench automatically creates a special
non-executing task called Task 0. This task is
generally reserved for special non-executing
modules.
*BASENAMES
Defines the base name text for ACCOL signal base
names. Only one *BASENAMES section is allowed.
*SIGNALS
Defines and initializes user-created signals. Only
one *SIGNALS section is allowed. Also defines
system signals based on entries in other sections.
Note: System signals are automatically defined by
ACCOL Workbench; the user does NOT create
them.
*LIST
Defines signal lists. Multiple *LIST sections are
allowed.
Creating/Editing/Saving the File
5-2
ACCOL Workbench User Manual
Section Name
*A-ARRAY
Purpose of Section
Defines analog data arrays. Multiple *A-ARRAY
sections are allowed
*L-ARRAY
Defines logical data arrays. Multiple *L-ARRAY
sections are allowed.
*FORMAT
Defines ASCII communication Formats. Multiple
*FORMAT sections are allowed.
Defines the archive files. Multiple *ARCHIVE
sections are allowed.
*ARCHIVE
Editing the Source Code Directly
There are basically two ways to edit most sections of the ACCOL source file. One
way to edit the ACCOL source file is to edit the actual text (also called the source
code) in the file. (The other way to edit the file will be discussed, later.)
To edit the source code, click on the icon
corresponding to the section you would like to
edit, so it is highlighted (as the Memory icon is
highlighted, in the picture, at right.) Next, click
on the ’Edit code’ icon (the pencil icon, shown
above) - OR - click on Edit Code -OR- press
the right mouse button and choose "Edit Code"
from the pop-up menu.
Å
A new window will appear, showing the exact text of this section of the ACCOL
source file. For example, if you click on the Memory icon, and then click on the ’Edit
Code’ pencil icon, you will see a window similar to the one shown below:
You may edit the text in the window, as described, below:
ACCOL Workbench User Manual
5-3
Creating/Editing/Saving the File
Typing In New Text
Once you are in Edit Code mode, you can enter new text. To do this, position the
cursor at the location in the window where you would like to enter new text, and
click the left mouse button, then type the new text. (Note: Information on the
syntax rules for each particular section of the source file is included later in this
manual.)
In addition to simply typing in new text, you can cut, copy, and paste text as
described below. (Note: You must be in Edit Code mode to use any of the functions
below.)
Cutting, Copying, and Pasting Text
Cut
To cut text, position the cursor immediately before the text you would
like to cut. Click and hold the left mouse button down while dragging
the cursor in order to highlight the desired text. Release the mouse
button, then click on the scissors (the ’Cut’) icon ( - OR - click on Edit
Cut ), (- OR - depress the right mouse button, and select "Cut" from the
pop-up menu). The selected text will disappear from the window and
will be temporarily copied to the Windows™ Clipboard. If you would like
to move the text to another location, whether in this file, or in another
ACCOL source file, use the paste function immediately, otherwise, the
text in the Clipboard will be over-written by the next copy/cut operation.
Å
Copy
To copy text, position the cursor immediately before the text you would
like to copy. Click and hold the left mouse button down, while dragging
the cursor in order to highlight the desired text. Release the mouse
button, then click on the 'Copy' icon ( - OR - click on Edit Copy ), OR - depress the right mouse button, and select "Copy" from the pop-up
menu. The selected text will remain on the screen, and will be
temporarily copied to the Windows™ Clipboard. If you would like to
copy the text to another location, whether in this file, or in another
ACCOL source file, use the paste function immediately, otherwise, the
text in the Clipboard will be over-written by the next copy/cut operation.
Å
Paste
To paste text, which has been stored in the Clipboard via a previous
Cut/Copy command, position the cursor at the location where you would
like to paste the text, and click. Then click on the 'Paste' icon ( - OR click on Edit Paste), - OR - depress the right mouse button, and select
"Paste" from the pop-up menu. The selected text will be copied from the
Windows™ Clipboard to the new location.
Å
Creating/Editing/Saving the File
5-4
ACCOL Workbench User Manual
Finding and/or Replacing Text
You can also search in the Edit Code mode for particular text strings, and/or replace
them with new text.
Find
Å
To find a particular string of characters, click on Edit Find, (-OR
depress the right mouse button, and click on "Find" in the pop-up
menu.)
The Find dialog box will appear, as shown above. Enter the text string
you would like to locate in the "Find What" field. If you want the text
to match exactly with regard to upper and lower case letters, make
sure the "Match Case" box is checked. Click on [Find Next] to
initiate the search. The first occurrence of the string, in the specified
Direction, from the current location in the file, will be highlighted. If
desired, click on [Find Next] again, to continue the search, and locate
the next occurrence. If you would like to change the direction of the
search, you can do this by clicking on the opposite "Direction" button
from what is currently selected. The "Down" direction button causes
the search to start from the current position, and end when it reaches
the end of the file. The "Up" direction button causes the search to start
from the current position, and end when it reaches the beginning of
the file. When you are finished with the Find dialog box, click on
[Cancel] to exit.
Replace
To find a particular string of characters, and replace it with a different
string of characters, click on Edit Replace (-OR- depress the right
mouse button and click on "Replace" in the pop-up menu.)
ACCOL Workbench User Manual
Å
5-5
Creating/Editing/Saving the File
The Replace dialog box will appear, as shown above. Enter the text you
would like to locate in the "Find What" field. This is called the search
string. Enter the new text (which will replace the text you are
searching for) in the "Replace With" field. This is called the
replacement string. If you want the search string to match exactly with
regard to upper and lower case letters, make sure the "Match Case"
box is checked. Click on [Find Next] to initiate the search. The first
occurrence of the search string, past the current location in the file,
will be highlighted. Click on [Replace] to replace the highlighted text
in the file with the text in the "Replace With" field, or click on [Find
Next] again, to continue the search and locate the next occurrence of
the search string. Continue this process until you have made all
desired changes. If you want to change every occurrence of the search
string, rather than changing each individual occurrence, one at a time,
you can click on [Replace All]. The [Replace All] push button causes
all occurrences of the search string to be replaced with the replacement
string. When you are finished with the Replace dialog box, click on
[Cancel] to exit.
Editing the Properties of the Section
Although most sections of the ACCOL source file may be edited directly in Edit
Code mode, in some cases, it may be easier, in terms of the number of keystrokes, to
edit a section in Edit Properties mode. Edit Properties Mode activates a window or
dialog box for editing, in which the user makes selections, or types entries.
To enter Edit Properties mode, double-click on
the icon corresponding to the section you would
like to edit, - OR - click on the icon so it is
highlighted (as the Memory icon is highlighted,
in the picture, at right), and then either click
on the Edit Properties icon (shown above) or
press the right mouse button and choose
"Properties" from the pop-up menu.
Another way to enter Edit Properties mode is
to click on the icon, then click on Edit
Properties.
Å
The picture at right shows the window which
appears in Edit Properties mode for Memory.
The appearance of the window, of course, will
vary depending upon which section is being
edited.
Creating/Editing/Saving the File
5-6
ACCOL Workbench User Manual
When editing in the window is completed, close it, in order to exit Edit Properties
mode.
NOTE:
The *BASENAMES, *FORMAT, *LOW-LEVEL, *LIST, and *TASK sections do
not have selectable entries in Edit Properties mode, therefore, a window for
editing the source code (similar to Edit Code mode) will appear, instead.
IMPORTANT
Whether you use Edit Code mode, Edit Properties mode, or a mixture of the two,
you must make sure that the entries you make follow the syntax rules of ACCOL.
The sections which follow discuss these rules.
Saving the New ACCOL Source File
If you are saving an ACCOL source file which is new (i.e. it has never been
previously saved under its current name,) or if you want to re-name an existing
ACCOL source file, click on File Save As. The Windows™ File Save As dialog box
will appear.
Å
Specify the path for your ACCOL source files (which must not include spaces); then
type a file name in the "File Name" field. Names must start with a letter, and be
followed by alphanumeric characters, with no spaces. A file extension of '.ACC' will
be appended. Click on [Save] to save the ACCOL source file. The file will be saved,
and the ACCOL source file name will appear in the title bar of windows in ACCOL
Workbench.
ACCOL Workbench User Manual
5-7
Creating/Editing/Saving the File
Saving Subsequent Changes
Once the ACCOL source file has been named, any subsequent changes to it are
saved by clicking on the Save icon, shown above, - OR - by clicking on File Save.
Å
Deleting A Section of the ACCOL Source File
To delete a section of the ACCOL source file, click once on the icon for the section
you would like to delete, so it is highlighted. Click on Edit Delete. You will be
prompted to confirm that you want to delete the section. If you click on the [Yes]
push button, the section will be deleted. NOTE: Only those sections which the user
specifically adds to the file (Tasks, Arrays, Formats, Archive, Low-Level, and Lists)
can be deleted.
Å
Opening An Existing ACCOL Source File
If you want to open an existing ACCOL source file for modification, click on
2
File Open from the menu bar - OR - click on the ’Open’ icon, shown above.
Å
2
If the particular ACCOL source file is one of the last four you edited, its name will appear in the File
pull down menu, and you can click on it directly to open it; otherwise you must use the Open File dialog
box.
Creating/Editing/Saving the File
5-8
ACCOL Workbench User Manual
In the Windows™ Open File dialog box, select the drive and directory in which the
ACCOL source file resides, then double-click on the ACCOL source file name. The
file will then be opened for modifications.
Closing An ACCOL Source File and Exiting ACCOL Workbench
To close an ACCOL source file, click on File
or not you wish to save changes.
ÅClose. You will be prompted whether
Click on [Yes] to save changes, - OR - click on [No] to abandon any changes made
since the last time the file was saved, - OR - click on [Cancel] to abandon the close
operation, and return to editing the source file.
ÅExit.
The same prompt for save, shown above, will appear if you click on FileÅExit,
Once the file is closed, you may exit ACCOL Workbench by clicking on File
without having previously saved the source file.
ACCOL Workbench User Manual
5-9
Creating/Editing/Saving the File
BLANK PAGE
Chapter 6 -Specifying the Target Node Type (*TARGET section)
The *TARGET section specifies the type of Network 3000-series controller which
this ACCOL load file will be downloaded into.
NOTE
If you need to convert a Real Mode ACCOL load to a
Protected Mode load, or vice-versa, you MUST edit the
target section manually in an ASCII text editor, PRIOR
to opening it in ACCOL Workbench.
Editing the *TARGET section properties (Edit Properties Mode)
Access the *TARGET section by double-clicking on the ’Target’ icon, or by one of the
other methods discussed in Chapter 5 under ’Editing the Properties of the Section’.
Choose the type of Network 3000-series controller this ACCOL load will reside in,
from the "Target" list box. If you select ‘3530’ you will be prompted whether or not
to include the SYS_3530 Module in Task 0.
The ACC file version number starts at 1, and stays at that value until explicitly
changed by the user. If desired, the version number of the ACC file may be changed
by manually entering a new number in the "Version" field. Click on [OK] to exit
the Target dialog box.
Editing the Source Code Directly (Edit Code Mode)
Click on the '*TARGET' icon, then click on the 'Edit Code' icon (the pencil). The
actual source code for the *TARGET section, as currently defined, will appear on
the screen. A typical *TARGET section definition appears below.
*TARGET 33XX-386EXPM VERS: 1
ACCOL Workbench User Manual
6-1
Specifying the Target Node Type
Syntax Rules - *TARGET Section:
*TARGET target_name [VERS:nnnn]
where target_name is one of the following:
386EXPM
33XX-386EX
3330
3308
3305
3530
nnnn
Specifying the Target Node Type
for 386EX Protected Mode units
for 386EX Real Mode units
for 186-based DPC 3330, DPC 3335
or RTU 3310
for GFC 3308-x units
for RTU 3305 units
for EGM 3530/RTU 3530 units
is the version number of
ACCOL source file.
6-2
this
ACCOL Workbench User Manual
Chapter 7 - Defining Passwords (*SECURITY-CODES section)
ACCOL supports 6 possible security levels (1 to 6), with 6 being the highest level.
Each level has, associated with it, a password. Any operator using ACCOL
Workbench, Open BSI Utilities, or certain other programs, to communicate on-line
with a particular Network 3000-series controller, must sign-on with one of the
controller’s passwords. Once signed-on, the Operator is then allowed access to any
signal or system function which accepts a security level less than or equal to the
security level of the password entered. For example, an operator signing on with the
security level 4 password has access to all functions requiring level 1 to 4, but is
prohibited from accessing functions requiring security level 5 or 6.
Passwords are defined in the *SECURITY-CODES section of the ACCOL source
file. There is one password for each of the 6 possible security levels.
Passwords consist of any combination of 1 to 6 uppercase letters or numbers (alphanumeric characters) excluding spaces and any punctuation marks. Lowercase
letters entered are automatically converted to uppercase.
When creating a new ACCOL source file, ACCOL Workbench automatically assigns
a default initial password for each security level, as shown in the table, below. It is
recommended that users change the password for each level to something different
from the default, or else anyone reading this manual will know the passwords for
your system.
Default Initial Password:
111111
222222
333333
444444
555555
666666
Security Level:
1
2
3
4
5
6
IMPORTANT
Bristol Babcock CANNOT assist you in accessing a file or
function if you forget your password.
ACCOL Workbench User Manual
7-1
Defining Passwords
Password Encryption1
Passwords in the ACCOL source file are stored in an encrypted format. They appear
as 12 strings of 6 scrambled alpha-numeric characters (even though the actual
password entered is 6 characters or less). Casual users viewing the scrambled
characters would be unable to easily determine the actual password.
Although you may view the scrambled characters in Edit-Code mode, do not
attempt to edit the codes.
IMPORTANT
DO NOT ATTEMPT TO EDIT PASSWORDS IN EDIT
CODE MODE. Doing so will further scramble the saved
password, and will result in your passwords becoming
unusable.
In addition to being encrypted
within the ACCOL source file
(ACC), passwords can also be
encrypted in the ACCOL Object file
(ACO) and ACCOL Load file (ACL)
by
selecting
the
"Encrypt
Passwords"
option
in
Edit
Properties Mode.
To turn OFF encryption for
ACO/ACL files, de-select the
"Encrypt Passwords" option. You
will be forced to provide the Level 6
password in order to do this.
1
Password encryption requires ACCOL Workbench (RM) 1.0 (or newer RM version) -ORACCOL Workbench (PM) 6.2 (or newer PM version), or ACCOL Workbench 7.0 (or newer). In addition,
the following minimum firmware revisions are required: RMS04, AM, LS501, TFA01/TRA01,
PLS02/PLX02 (or newer).
Defining Passwords
7-2
ACCOL Workbench User Manual
Changing Passwords in Edit Properties Mode:
Access the *SECURITY-CODES section by
double-clicking on the ’Security’ icon, or by one of
the other methods discussed in Chapter 5 under
’Editing the Properties of the Section’.
Click on the [Change Level n] push button in
which n corresponds to the security level for
which you would like to change the password.
(For example, to change the password for Security
Level 5, click on the [Change Level 5] push
button.) The password dialog box will appear.
To change the password, first type the current
password in the "Old Password" field. (If this is
an all new ACCOL source file, use the default
initial password, discussed previously in this
chapter.) Next type the new password in the
"New Password" field, and type the same new
password in the "Verify Password" field.
In all cases, asterisks (*) will be shown in the field instead of the actual password.
Click on the [OK] push button to save the revised password, or the [Cancel] push
button to abandon the modification.
Repeat this procedure, for any other security level passwords you want to change,
beginning from the [Change Level n] push button.
ACCOL Workbench User Manual
7-3
Defining Passwords
BLANK PAGE
Chapter 8 - Defining Communication Ports
(*COMMUNICATIONS Section)
A Network 3000-series controller communicates to other Network 3000 controllers,
and to other devices (the PC workstation, printers, etc.) through its communication
ports. There are many different configuration options for the communication ports,
and these must be specified in the *COMMUNICATIONS section of the ACCOL
source file. The section may be edited either via Edit Properties Mode -OR- via Edit
Code Mode, as described, below:
IMPORTANT: Information on the usage and restrictions which apply to each port
type is included in the ’Communication Ports’ section of the ACCOL II Reference
Manual (document# D4044).
General Instructions for Editing the Properties of the *COMMUNICATIONS
Section (Edit Properties Mode)
Access the *COMMUNICATIONS section by double-clicking on the
’Communications’ icon, or by one of the other methods discussed in Chapter 5 under
’Editing the Properties of the Section’.
When the Communications window first appears, all ports will be shown as unused.
Ports should be defined from top-to-bottom in the list box. Click on the port to be
configured, and then click on the [Change Type] push button.
ACCOL Workbench User Manual
8-1
Defining Communication Ports
Select the desired port type
from the Change Type dialog
box, and click on [OK].1
A dialog box will appear for
editing port characteristics,
such as the baud rate. Details
of the dialog box vary,
depending upon the type of port
being defined. See the portspecific sections which follow.
When editing is completed, click on the [OK] push button to exit the port settings
dialog box. If you want to change the settings for a particular port, double-click on
the port -OR- click on the port, then click on the [Edit] push button. The dialog box
for editing the port will appear.
Click on the [OK] push button to exit the Communications window.
Editing the Source Code Directly (Edit Code Mode)
Click on the ’Communications’ icon, then click on the ’Edit Code’ icon (the pencil).
The actual source code for the *COMMUNICATIONS section, as currently defined,
will appear on the screen.
All port definitions appear under a single *COMMUNICATIONS section header. A
typical *COMMUNICATIONS section definition appears below:
*COMMUNICATIONS
BIP_1
BIP_2
PORT_A
PORT_B
PORT_C
PORT_D
TSBUFFERS
BUFFERS
PSLAVE_ALM 9600
PSLAVE 9600
SLAVE 9600
MASTER 9600 20 10
MASTER 9600 30 10
UNUSED
10
50
Specific syntax rules for the *COMMUNICATIONS section, and for each type of
port, are on the next several pages. Make any necessary edits following those rules,
and close the window, when finished.
1
This dialog box may also be accessed from "Change Type" push buttons within dialog boxes used to set
port characteristics.
Defining Communication Ports
8-2
ACCOL Workbench User Manual
Syntax Rules - *COMMUNICATIONS Section
*COMMUNICATIONS
[port definition]
[port definition]
[port definition]
[port definition]
[port definition]
.
.
.
[port definition]
[comm buffers definition]
[timestamp buffers definition]
where
[port definition] defines the characteristics for
each configured port in the following order, topto-bottom (BIP_1, BIP_2, ETHRNT, PORT_A,
PORT_B, ..., PORT_J).
The rules for a
particular port type are discussed in the section
on each port.
[comm buffers definition] defines the number of
additional communication buffers, and is
discussed later.
[timestamp buffers definition] defines the
number of additional alarm timestamp buffers,
and is discussed later.
Note: Unused ports need not be defined.
Defining A Master Port In Edit Properties Mode
In the Communications window, select the port to be configured, and click on the
[Change Type] push button. Click on ’Master’ in the Change Type dialog box, then
click on [OK]. The Master Settings dialog box will appear.
ACCOL Workbench User Manual
8-3
Defining Communication Ports
Choose the appropriate baud rate
from the "Baud Rate" list box.
Enter the highest local address,
from among the slave nodes on this
master port, in the "High Slave
Addr"
field,
and
enter
a
"Timeout" value in tenths of
seconds. Click on [OK] to save the
changes.
Defining A Master Port in Edit Code Mode
Click on the ’Communications’ icon, then click on the ’Edit Code’ icon (the pencil).
The actual source code for the *COMMUNICATIONS section, as currently defined,
will appear on the screen. In the example, below, ports BIP_1, C, and D are defined
as Master Ports. Note that, as required, their high slave addresses are defined in
ascending order, from top-to-bottom, i.e. BIP 1’s valid slave address range would be
1 to 20, Port C’s valid slave address range would be 21 to 30, and Port D’s valid
slave address range would be 31 to 40.
*COMMUNICATIONS
BIP_1
PORT_C
PORT_D
MASTER 9600 20 10
MASTER 9600 30 10
MASTER 9600 40 10
Make any necessary edits following the syntax rules, below, and close the window,
when finished.
Defining Communication Ports
8-4
ACCOL Workbench User Manual
Syntax Rules - Master Ports
PORT_x MASTER baud_rate high_slave_addr time_out
- OR BIP_y MASTER baud_rate high_slave_addr time_out
where
x is one of the following port names:
A, B, C, D, G, H, I, J
(Note: K, L, M, N, and O are
reserved for FUTURE USE)
y is one of the following built-in ports:
1, 2
baud_rate is one of the following allowable baud rates:
150, 300, 600, 1200, 2400, 4800, 9600, 19200, 38400. 187500,
1MEG, or RASCL. Note: 187500 and 1MEG are only
supported on Ports A, B, C, D, G or I, and RASCL is only
supported on Ports A, B, C, or D.
high_slave_addr is the highest local address from among all the
slave nodes reporting to this master port. This must be an integer
from 1 to 127. Note: The range of local addresses for slave nodes of
a given Master/Expanded Master Port must be higher than those
on the port preceding it; e.g. if both Port A and C are Master Ports,
and Port A’s slaves have local addresses from 1 to 25, resulting in a
high slave address of 25, Port C’s lowest slave address cannot be
less than 26.
time_out is the length of time (in tenths of seconds) that this master
node will wait for the beginning of a response message to be sent.
This value must be an integer from 1 to 250.
Defining An Expanded Addressing Master Port in Edit Properties Mode
In the Communications window, select the port to be configured, and click on the
[Change Type] push button. Click on ’Expanded Master’ in the Change Type
dialog box, then click on [OK]. The Expanded Master Settings dialog box will
appear.
ACCOL Workbench User Manual
8-5
Defining Communication Ports
Choose the appropriate baud rate from the "Baud Rate" list box. Enter the highest
local address from among the slave nodes on this master port in the "High Slave
Addr" field. Enter the highest local address from among the nodes on the level
below the virtual nodes on this port2 in the "Exp. High Slave Addr" field. Next,
enter a "Timeout" value in tenths of seconds. Click on [OK] to save the changes.
Defining An Expanded Addressing Master Port in Edit Code Mode
Click on the ’Communications’ icon, then click on the ’Edit Code’ icon (the pencil).
The actual source code for the *COMMUNICATIONS section, as currently defined,
will appear on the screen.
In the example, below, Built-In Port 1 (BIP 1), and Port B have been configured as
Expanded Addressing Master Ports, and have been defined with baud rates of 9600
and 19200 respectively; the highest slave addresses are 20 and 40, and both have
timeout values of 10 seconds. The highest expanded addressing slave addresses for
the ports are 5 and 15, respectively.
*COMMUNICATIONS
BIP_1
EMASTER 9600 20 5 100
PORT_B
EMASTER 19200 40 15 100
2
See the ’Expanded Node Addressing’ section of the ACCOL II Reference Manual (
D4044) for details on this subject.
Defining Communication Ports
8-6
document#
ACCOL Workbench User Manual
Make any necessary edits following the syntax rules, below, and close the window,
when finished.
Syntax Rules - Expanded Addressing Master Ports
PORT_x EMASTER baud_rate high_slave_addr exp_high_slave_addr time_out
- OR BIP_y EMASTER baud_rate high_slave_addr exp_high_slave_addr time_out
where
x is one of the following port names: A, B, C, D, G, H, I, J
(Note: K, L, M, N, or O are reserved for FUTURE USE)
y is one of the following built-in ports: 1, 2
baud_rate is one of the following allowable baud rates:
150, 300, 600, 1200, 2400, 4800, 9600, 19200, 38400, 187500,
1MEG, or RASCL. Note: 187500 and 1MEG are only
supported on Ports A, B, C, D, G or I, and RASCL is only
supported on Ports A, B, C, or D.
high_slave_addr is the highest local address from among all the
slave nodes reporting to this master port. This must be an integer
from 1 to 127. Note: The range of local addresses for slave nodes of
a given Master/Expanded Master Port must be higher than those
on the port preceding it; e.g. if both Port A and B are Master Ports
and Port A’s slaves have local addresses from 1 to 25, resulting in a
high slave address of 25, Port B’s lowest slave address cannot be
less than 26.
exp_high_slave_addr is the highest local address from among all
the nodes below the virtual nodes on this port. This must be an
integer from 1 to 127. These slaves must follow the same rules as
discussed under high_slave_addr.
time_out is the length of time (in tenths of seconds) that this master
node will wait for the beginning of a response message to be sent.
This value must be an integer from 1 to 250.
ACCOL Workbench User Manual
8-7
Defining Communication Ports
Defining A Serial CFE Port in Edit Properties Mode
In the Communications window, select the port to be configured, and click on the
[Change Type] push button. Click on ’Serial CFE’ in the Change Type dialog box,
then click on [OK]. The Serial CFE Settings dialog box will appear.
Choose the appropriate baud rate
from the "Baud Rate" list box.
Click on [OK] to save the changes.
Defining A Serial CFE Port in Edit Code Mode
Click on the ’Communications’ icon, then click on the ’Edit Code’ icon (the pencil).
Syntax Rules - Serial CFE Ports
PORT_x CFE baud_rate
- OR BIP_y CFE baud_rate
where
x is one of the following port names:
A, B, C, D, G, H, I, J
(Note: K, L, M, N, or O are reserved
for FUTURE USE)
y is one of the following built-in ports:
1, 2
baud_rate is one of the following allowable baud rates:
150, 300, 600, 1200, 2400, 4800, 9600, 19200, 38400, 187500,
1MEG, or RASCL. Note: 187500 and 1MEG are only
supported on Ports A, B, C, D, G or I, and RASCL is only
supported on Ports A, B, C, or D.
Note: Only one Serial CFE Port can be defined in an ACCOL source file, and
there cannot be a Slave Port, or a VSAT Slave Port in the same source file.
Defining Communication Ports
8-8
ACCOL Workbench User Manual
The actual source code for the *COMMUNICATIONS section, as currently defined,
will appear on the screen.
In the example, below, Port A has been configured as a Serial CFE port, running at
9600 baud.
*COMMUNICATIONS
PORT_A
CFE 9600
Make any necessary edits following the syntax rules, on the previous page, and
close the window, when finished.
Defining A Slave, Pseudo-Slave, or Pseudo-Slave with Alarms Port in
Edit Properties Mode
In the Communications window,
select the port to be configured, and
click on the [Change Type] push
button. Click on ’Slave’, ’Pseudo
Slave’ or ’Pseudo Slave-Alarms’ in
the Change Type dialog box, then
click on [OK].
The Slave Settings dialog box will appear. Choose the appropriate baud rate from
the "Baud Rate" list box. Click on [OK] to save the changes.
Defining A Slave, Pseudo-Slave, or Pseudo-Slave with Alarms Port in
Edit Code Mode
Click on the ’Communications’ icon, then click on the ’Edit Code’ icon (the pencil).
The actual source code for the *COMMUNICATIONS section, as currently defined,
will appear on the screen.
In the following example, BIP 1 has been configured as a Pseudo-Slave with Alarms
Port running at 1200 baud; Port A has been configured as a Slave Port, running at
9600 baud, and Port B has been configured as a Pseudo-Slave Port running at 9600
baud.
*COMMUNICATIONS
BIP_1 PSLAVE_ALM 1200
PORT_A
SLAVE 9600
PORT_B
PSLAVE 9600
ACCOL Workbench User Manual
8-9
Defining Communication Ports
Make any necessary edits following the syntax rules, below, and close the window,
when finished.
Syntax Rules - Slave, Pseudo Slave, or Pseudo Slave with Alarms Ports
PORT_x slave_port_type baud_rate
-ORBIP_y slave_port_type baud_rate
where
x is one of the following port names: A, B, C, D, G, H, I, J
(Note: K, L, M, N, or O are reserved for FUTURE USE)
y is one of the following built-in ports: 1, 2
slave_port_type is one of the following:
SLAVE
PSLAVE
PSLAVE_ALM
to denote a slave port
to denote a pseudo-slave port,
to denote a pseudo-slave with alarms port
baud_rate is one of the following allowable baud rates:
150, 300, 600, 1200, 2400, 4800, 9600, 19200, 38400, 187500,
1MEG, or RASCL. Note: 187500 and 1MEG are only
supported on Ports A, B, C, D, G or I, and RASCL is only
supported on Ports A, B, C, or D.
Note: Only one Slave Port can be defined in an ACCOL source file, and there
cannot be a Serial CFE Port, or a VSAT Slave Port in the same source file.
Note: Up to 8 Pseudo-Slave ports may be defined in the same ACCOL source file,
one of which can be a Pseudo-Slave with Alarms Port.
Defining Communication Ports
8-10
ACCOL Workbench User Manual
Defining A VSAT Slave Port
In the Communications window, select the port to be configured, and click on the
[Change Type] push button. Click on ’VSAT Slave’ in the Change Type dialog box,
then click on [OK]. The VSAT Slave Settings dialog box will appear.
Choose the appropriate baud
rate from the Baud Rate list box,
and enter the minimum and
maximum response times in
tenths of seconds. Make sure all
entries follow the syntax rules
defined in the syntax box, below.
Click on [OK] to save the
changes.
Defining A VSAT Slave Port in Edit Code Mode
Click on the ’Communications’ icon, then click on the ’Edit Code’ icon (the pencil).
The actual source code for the *COMMUNICATIONS section, as currently defined,
will appear on the screen.
In the example, below, BIP 1 has been configured as a VSAT Slave Port running at
9600 baud. Its minimum response time is 5, and its maximum response time is 10.
*COMMUNICATIONS
BIP_1 VSATSLV 9600 5 10
Make any necessary edits following the syntax rules, below, and close the window,
when finished.
ACCOL Workbench User Manual
8-11
Defining Communication Ports
Syntax Rules - VSAT Slave Ports
PORT_x VSATSLV baud_rate min_resp_time max_resp_time
-ORBIP_y VSATSLV baud_rate min_resp_time max_resp_time
where
x is one of the following port names: A, B, C, D, G, H, I, J
(Note: K, L, M, N, or O are reserved for FUTURE USE)
y is one of the following built-in ports: 1, 2
baud_rate is one of the following allowable baud rates:
1200, 2400, 4800, 9600, 19200.
min_resp_time is the minimum amount of time, from when a
request for data is received, that the Network 3000 controller will
wait before responding. This value must be an integer from 1 to
255, and is in units of tenths of seconds.
max_resp_time is the maximum amount of time the controller can
wait before responding to a request for data. This value must be an
integer from 1 to 255, and is in units of tenths of seconds.
Note: Only one VSAT Slave Port can be defined in an ACCOL source file, and
there cannot be a Serial CFE Port, or a Slave Port in the same source file.
Defining An RIOR Port in Edit Properties Mode
In the Communications window, select the port to be configured, and click on the
[Change Type] push button. Click on ’Remote I/O’ in the Change Type dialog box,
then click on [OK]. The Remote I/O Rack Settings dialog box will appear.
Choose the appropriate
baud rate from the "Baud
Rate" list box, and enter
the maximum address of
the Remote I/O Racks on
this port in the "Max.
Address" field. Click on
[OK] to save the changes.
Defining Communication Ports
8-12
ACCOL Workbench User Manual
Defining An RIOR Port in Edit Code Mode
Click on the ’Communications’ icon, then click on the ’Edit Code’ icon (the pencil).
The actual source code for the *COMMUNICATIONS section, as currently defined,
will appear on the screen.
In the example, below, Port B has been configured as an RIOR Port running at
187500 baud. The maximum address of Remote I/O racks on this port is 3.
*COMMUNICATIONS
PORT_B
RIOR 187500 3
Make any necessary edits following the syntax rules, below, and close the window,
when finished.
Syntax Rules - RIOR Ports
PORT_x RIOR baud_rate max_rio_addr
where
x is one of the following port names: A, B, C, D
baud_rate is one of the following allowable baud rates:
187500, 1MEG, or RASCL
max_rio_addr is the maximum remote I/O rack address on this
port, which must be an integer from 1 to 10.
ACCOL Workbench User Manual
8-13
Defining Communication Ports
Defining A Logger Port in Edit Properties Mode
In the Communications
window, select the port to
be configured, and click on
the [Change Type] push
button. Click on ’Logger’
in the Change Type dialog
box, then click on [OK].
The
Logger
Settings
dialog box will appear.
Choose the appropriate baud rate from the "Baud Rate" list box. Choose the
number of stop bits from the "Stop Bits" list box, and select odd, even, or no parity
from the "Parity" list box. The data width is selected from the "Data Bits" list box,
and either half duplex or TTY mode is selected from the "Duplex" list box.
Handshaking options are selected from the "Handshaking" list box. Click on [OK]
to save the changes.
Defining A Logger Port in Edit Code Mode
Click on the ’Communications’ icon, then click on the ’Edit Code’ icon (the pencil).
The actual source code for the *COMMUNICATIONS section, as currently defined,
will appear on the screen.
In the example, below, Port C has been configured as a Logger Port running at 1200
baud, with even parity, 1 stop bit, 7 bit width, CTS, and half duplex.
*COMMUNICATIONS
PORT_C
LOGGER 1200 PARITY_E SBIT_1 BIT_7 CTS H_DPLX
Make any necessary edits following the syntax rules, below, and close the window,
when finished.
Defining Communication Ports
8-14
ACCOL Workbench User Manual
Syntax Rules - Logger Ports
PORT_x LOGGER baud_rate parity stop_bits width duplex handshake
-ORBIP_y LOGGER baud_rate parity stop_bits width duplex handshake
where
x is one of the following port names: A, B, C, D, G, H, I, J
(Note: K, L, M, N, or O are reserved for FUTURE USE)
y is one of the following built-in-ports: 1, 2
baud_rate is one of the following allowable baud rates:
110, 150, 300, 600, 1200, 2400, 4800, 9600, 19200, and 38400
parity is one of the following:
PARITY_O to indicate odd parity
PARITY_E to indicate even parity
PARITY_N to indicate no parity
stop_bits is one of the following:
SBIT_1
SBIT_1.5
SBIT_2
to indicate 1 stop bit
to indicate 1 1/2 stop bits
to indicate 2 stop bits
width is one of the following:
BIT_6 to indicate 6 bits
BIT_7 to indicate 7 bits
BIT_8 to indicate 8 bits
duplex is one of the following:
H_DPLX
TTY
to indicate half duplex
to indicate TTY mode
handshake is one of the following:
NO_CTS
to indicate no output control needed
CTS
to indicate clear to send
XON_XOFF to indicate line turn-on/off with
characters
ACCOL Workbench User Manual
8-15
special
Defining Communication Ports
Defining A Custom Port in Edit Properties Mode
In the Communications window,
select the port to be configured,
and click on the [Change Type]
push button. Click on ’Custom’ in
the Change Type dialog box, then
click on [OK]. The Custom
Settings dialog box will appear.
Choose the appropriate baud rate from the "Baud Rate" list box. Choose the
number of stop bits from the "Stop Bits" list box, and select either odd, even or no
parity from the "Parity" list box. The data width is selected from the "Data Bits"
list box. The "Mode", "P1", and "P2" values vary depending on which particular
interface is used (see the ACCOL II Custom Protocols Manual, document# D4066
for information.) Click on [OK] to save the changes.
Defining A Custom Port in Edit Code Mode
Click on the ’Communications’ icon, then click on the ’Edit Code’ icon (the pencil).
The actual source code for the *COMMUNICATIONS section, as currently defined,
will appear on the screen.
In the example, below, Port D has been configured as a Custom Port running at
1200 baud, with even parity, 1 stop bit, 7 bit width, using mode 17, a P1 value of 1,
and a P2 value of 813.
*COMMUNICATIONS
PORT_D
CUSTOM 1200 PARITY_E SBIT_1 BIT_7 PARAM: 17 1 813
Make any necessary edits following the syntax rules, below, and close the window,
when finished.
Defining Communication Ports
8-16
ACCOL Workbench User Manual
Syntax Rules - Custom Ports
PORT_x CUSTOM baud_rate parity stop_bits width PARAM: mode p1 p2
-ORBIP_y CUSTOM baud_rate parity stop_bits width PARAM: mode p1 p2
where
x is one of the following port names: A, B, C, D, G, H, I, J
(Note: K, L, M, N, or O are reserved for FUTURE USE)
y is one of the following built-in-ports: 1, 2
baud_rate is one of the following allowable baud rates:
110, 150, 300, 600, 1200, 2400, 4800, 9600, 19200, and 38400
parity is one of the following:
PARITY_O to indicate odd parity
PARITY_E to indicate even parity
PARITY_N to indicate no parity
stop_bits is one of the following:
SBIT_1
SBIT_1.5
SBIT_2
to indicate 1 stop bit
to indicate 1 1/2 stop bits
to indicate 2 stop bits
width is one of the following:
BIT_6 to indicate 6 bits
BIT_7 to indicate 7 bits
BIT_8 to indicate 8 bits
mode is an integer ranging from 0 to 255
p1
is an integer ranging from 0 to 255
p2
is an integer ranging from 0 to 65535
Note: The mode, p1, and p2 values are specified based on the type of interface
you are using; see the ACCOL II Custom Protocols Manual (document# D4066)
for details.
ACCOL Workbench User Manual
8-17
Defining Communication Ports
Defining An Optional Comm (TANO) Port in Edit Properties Mode
The Optional Comm (TANO) Port is only for use with the TANO proprietary
protocol. Although available for use with 186-based and 386EX Real Mode
firmware, this port type is NOT SUPPORTED BY PROTECTED MODE
FIRMWARE.
In the Communications window, select the port to be configured, and click on the
[Change Type] push button. Click on ’Optional Comm’ in the Change Type dialog
box, then click on [OK]. The port will automatically be configured for 1200 baud,
since this is the only baud rate available for an Optional Communications port.
Defining An Optional Communications (TANO) Port in Edit Code Mode
The Optional Comm (TANO) Port is only for use with the TANO proprietary
protocol. Although available for use with 186-based and 386EX Real Mode
firmware, this port type is NOT SUPPORTED BY PROTECTED MODE
FIRMWARE.
Click on the ’Communications’ icon, then click on the ’Edit Code’ icon (the pencil).
The actual source code for the *COMMUNICATIONS section, as currently defined,
will appear on the screen.
In the example, below, Port A has been configured as an Optional Communications
(TANO) Port:
*COMMUNICATIONS
PORT_A
OPT_COMM 1200
Make any necessary edits following the syntax rules, below, and close the window.
Syntax Rules - Optional Communication (TANO) Ports
PORT_x OPT_COMM 1200
-ORBIP_y OPT_COMM 1200
where
x is one of the following port names: A, B, C, D, G, H, I, J
(Note: K, L, M, N, or O are reserved for FUTURE USE)
y is one of the following built-in-ports: 1, 2
Note: Only 1 OPT_COMM port may be defined in an ACCOL source file.
Defining Communication Ports
8-18
ACCOL Workbench User Manual
Defining A Columbia Natural Gas Port in Edit Properties Mode
A Columbia Natural Gas (CNG) Port can be configured either for Master operation
or Slave operation. (This port type is NOT SUPPORTED BY PROTECTED MODE
CUSTOM FIRMWARE PRIOR TO PCP03.)
In the Communications window,
select the port to be configured,
and click on the [Change Type]
push button. Click on ’Columbia
Natural Gas’ in the Change Type
dialog box, then click on [OK]. The
Columbia Natural Gas Settings
dialog box will appear.
Choose the appropriate baud rate from the "Baud Rate" list box, and choose
whether this will be a Columbia Natural Gas Master Port, or a Columbia Natural
Gas Slave Port in the "Type" list box.
Click on [OK] to save the changes.
Defining a Columbia Natural Gas Port in Edit Code Mode
A Columbia Natural Gas (CNG) Port can be configured either for Master operation
or Slave operation. (This port type is NOT SUPPORTED BY PROTECTED MODE
CUSTOM FIRMWARE PRIOR TO PCP03.)
Click on the ’Communications’ icon, then click on the ’Edit Code’ icon (the pencil).
The actual source code for the *COMMUNICATIONS section, as currently defined,
will appear on the screen.
In the example, below, Port G has been configured as a Columbia Natural Gas
Slave Port running at 1200 baud.
*COMMUNICATIONS
PORT_G
CNG 1200 SLAVE
Make any necessary edits following the syntax rules, below, and close the window.
ACCOL Workbench User Manual
8-19
Defining Communication Ports
Syntax Rules - Columbia Natural Gas Ports
PORT_x CUSTOM baud_rate mode
-ORBIP_y CUSTOM baud_rate mode
where
x is one of the following port names: A, B, C, D, G, H, I, J
(Note: K, L, M, N, or O are reserved for FUTURE USE)
y is one of the following built-in-ports: 1, 2
baud_rate is one of the following allowable baud rates:
300, 600, 1200, 2400, 4800 or 9600
mode is one of the following:
SLAVE
MASTER
Defining Communication Ports
to indicate this is a CNG Slave Port
to indicate this is a CNG Master Port
8-20
ACCOL Workbench User Manual
Defining An Internet Protocol (IP) Port in Edit Properties Mode
(Open BSI Utilities Version 3.0 and newer only)
In the Communications window, select the ’ETHRNT’ port, and click on the
[Change Type] push button. Click on ’Internet Protocol’ in the Change Type dialog
box, then click on [OK], then click on [OK] again. No additional configuration is
required within ACCOL Workbench for this port.
NOTE: Additional configuration for this port may be required using the LocalView
tool in Open BSI Utilities.
NOTE: The [IP Custom] push button, shown in the Communications window, is
currently non-functional, and is reserved for future use.
IMPORTANT:
Although ACCOL Workbench allows you to specify the serial or built-in ports as
the Internet Protocol (IP) Port, currently, the hardware Ethernet port IS THE
ONLY PORT WHICH MAY BE USED FOR THIS PURPOSE. In future releases
of the product, other ports may be configurable for IP usage, however, currently,
only the Ethernet port may be used.
Defining An Internet Protocol (IP) Port in Edit Code Mode
(Open BSI Utilities Version 3.0 and newer only)
Click on the ’Communications’ icon, then click on the ’Edit Code’ icon (the pencil).
The actual source code for the *COMMUNICATIONS section, as currently defined,
will appear on the screen.
Make any necessary edits following the syntax rules, below, and close the window,
when finished. There is no other configuration within ACCOL Workbench.
*COMMUNICATIONS
.
.
ETHRNT
IP
NOTE: Additional configuration for this port may be required using the LocalView
tool in Open BSI Utilities.
Syntax Rules - Ethernet Port
ETHRNT IP
ACCOL Workbench User Manual
8-21
Defining Communication Ports
Defining Additional Buffers in Edit Properties Mode
Besides defining ports, the *COMMUNICATIONS section also defines buffers.
Although each ACCOL load has a certain default number of buffers, the
Communications window allows you to allocate memory for additional
Communications and/or Alarm Timestamp buffer space.
To specify additional Communications or Alarm Timestamp buffers, enter the
number of additional buffers in the "Communications" or "Timestamp" fields in
the Communications window.
Click on [OK] to save the changes.
Defining Additional Buffers in Edit Code Mode
Click on the ’Communications’ icon, then click on the ’Edit Code’ icon (the pencil).
The actual source code for the *COMMUNICATIONS section, as currently defined,
will appear on the screen.
In the example, below, 100 additional communication buffers, and 50 additional
alarm timestamp buffers have been defined.
*COMMUNICATIONS
BUFFERS 100
TSBUFFERS 50
Make any necessary edits following the syntax rules, below, and close the window,
when finished.
Defining Communication Ports
8-22
ACCOL Workbench User Manual
Syntax Rules - Buffers
BUFFERS comm_buffers
TSBUFFERS timestamp_buffers
where
comm_buffers is an integer from 0 to 255 indicating the number
of additional communications buffers
timestamp_buffers is an integer from 0 to 255 indicating the
number of additional alarm timestamp buffers.
Defining Parameters For An IP Custom Protocol in Edit Properties
Mode
If you are using a particular custom communication protocol which has been
implemented to communicate using Internet Protocol (IP), you must identify certain
parameters for it in the IP Custom dialog box. This dialog box is accessible from the
[IP Custom] push button in the Communications window.
Parameter information should be entered as follows:
Mode
indicates a protocol number which is used to select which protocol
should be enabled at the RTU for use with the Custom Module. The
following modes are currently supported:
51
ACCOL Workbench User Manual
Gould Modbus Slave
8-23
Defining Communication Ports
52
53
Param 1
is a protocol-specific value (P1) which may be utilized at RTU
initialization. Its value defaults to 0 when there is no value for
“Mode”. When a value is included for “Mode”, the “Param 1” value
is defined as follows:
When Mode is:
51
52
53
Param 2
Enron Modbus Slave
Modbus Master (Gould or Enron)
Param 1 is:
TCP Port Number
TCP Port Number
TCP/IP Connection ‘Time to
Live’ in seconds. If no activity
within
this
period,
the
connection is shut down.
With a default of:
502
502
120
is a second protocol-specific value (P2) which may be utilized at RTU
initialization. Its value defaults to 0.
Enter values in the fields, then click on the [Insert] push button to enter the
parameters. Click on [OK] to save the changes.
Defining Communication Ports
8-24
ACCOL Workbench User Manual
Defining Parameters For An IP Custom Protocol in Edit Code Mode
Click on the ’Communications’ icon, then click on the ’Edit Code’ icon (the pencil).
The actual source code for the *COMMUNICATIONS section, as currently defined,
will appear on the screen.
In the example, below, a custom IP application will use mode 78; its P1 parameter
will be 1, and its P2 parameter will be 5.
*COMMUNICATIONS
:
:
IPCUSTOM Param: 78 1 5
Make any necessary edits following the syntax rules, below, and close the window,
when finished.
Syntax Rules - IP Custom
IPCUSTOM Param: mode p1 p2
where
mode is a protocol number used to identify internal tables at the
RTU. Current modes supported are 51, 52, and 53.
p1
is a protocol-specific value which may be used at RTU
initialization. Depends on choice of mode.
p2
is a protocol-specific value which may be used at RTU
initialization.
ACCOL Workbench User Manual
8-25
Defining Communication Ports
BLANK PAGE
Chapter 9 - Specifying Memory Requirements
(*MEMORY section)
The *MEMORY section specifies the total amount of memory in the Network 3000series controller, as well as how much of the available memory should be reserved
for certain structures.
The *MEMORY section differs, somewhat, depending upon which type of controller
you are using. If you are using a 186-based controller, or a 386EX Real Mode
controller, your unit has 64K (65,536 bytes) of base memory. Most units also
include some amount of expanded memory for holding certain special ACCOL
structures. The base/expanded concept does NOT apply, however, if you are using a
386EX Protected Mode controller.
Specifying Memory in Edit Properties Mode (386EX Protected Mode Units ONLY)
Access the *MEMORY section either by double-clicking on the Memory icon, or by
one of the other methods discussed in Chapter 5 under ’Editing the Properties of the
Section’.
Specify the amount of memory in your controller using the "Total RAM" list box.
NOTE: Entries in the remaining fields only need to be made if the particular
structure involved is used in this ACCOL source file.
If you are using a Custom application (using the Custom Port, and/or the Custom
Module) which requires memory to be specifically allocated, enter the number of
bytes required, in the "Custom Size" field. Alternatively, custom applications,
which have been specifically designed to do so, can use the number of K bytes
specified in the "Global Storage" area.
ACCOL Workbench User Manual
9-1
Specifying Memory Requirements
If you are using the Audit/EAudit Module to hold alarms and events, enter the
number of Alarms and/or Events to be saved in the "Audit Alarms" and "Audit
Events" fields.
If you are using the Storage Module to hold historical data, enter the number of
storage rows required in the "Storage Rows" field.
If this Network 3000 controller has a Serial CFE Port, enter the number of
templates which Enterprise Server will require in the "Templates" field.
An approximation of the number of templates can be calculated by the following
formula; the result should be rounded up to the nearest integer, and it is
recommended that some additional templates be added as spares.
templates = A + L + (5 * R)
38 49
where
A=
the total number of analog signals in this controller, and
in all nodes below it in the network.
B=
the total number of logical signals in this controller, and
in all nodes below it in the network.
R=
the total number of Network 3000-series nodes which
send data to Enterprise Server through this node,
including this node itself.
If you will NOT be using IP communication, click on [OK] to save the changes.
If you will be using IP
communication, click on the
’IP’
tab,
and
enter
parameters on the IP page,
as described, below:
For IP communication "Global Storage" is used for one of two purposes: If you
have created your own custom (non-standard) data link, you can allocate additional
RAM for it here. Alternatively, this area can be used to provide additional RAM for
the IP system. NOTE: If you are experiencing memory allocation failures (as
reported by #IPSTAT..) increasing global storage may solve the problem.
Specifying Memory Requirements
9-2
ACCOL Workbench User Manual
"Packets" refers to the maximum number of IP communication packets maintained
for pending communication work. Each packet uses 1,500 bytes of RAM. A
guideline for setting this value is:
10 + (3 * (maximum number of simultaneous active IP connections))
"Connections" consists of the maximum number of PCs or controllers (RTUs)
which can communicate with this controller simultaneously. If this value is set too
small, communications will be extremely degraded. Generally, it should be set to
between 20 and 30.
"Pending Requests" consists of the maximum number of requests to this node, or
a node below this node, that will be tracked. If this value is set too small,
communications will be extremely degraded. Generally, it should be set to between
100 and 200. (Pending requests refers to RDB requests which enter this node in IP
format and must be converted to BSAP message formats in order to be passed on to
other BSAP nodes.)
"Alarm Report(ARM)" is the maximum number of alarm reports to be maintained
by the IP system, for transmission to any one destination.
When finished editing, click on [OK] to save the changes.
Specifying Memory in Edit Properties Mode (186 & 386EX Real Mode Units ONLY)
Access the *MEMORY section either by double-clicking on the Memory icon, or by
one of the other methods discussed in Chapter 5 under ’Editing the Properties of the
Section’.
ACCOL Workbench User Manual
9-3
Specifying Memory Requirements
Specify the amount of expanded memory in your controller using the "Expanded
Memory" list box. The structures using expanded memory must also be specified
on the ’Location’ page of the dialog box, discussed later.
NOTE: Entries only need to be made in the remaining fields if the particular
structure involved is used in this ACCOL source file.
If you are using a Custom application (using the Custom Port, and/or the Custom
Module) which requires memory to be specifically allocated, enter the number of
bytes required, in the "Custom Size" field.
If you are using the Audit/EAudit Module to hold alarms and events, you must
specify the number of alarms and events to be stored. If your controller firmware
stores events and alarms together, in a combined buffer, specify the total number of
alarms and events in the "Audit Combined" field. If, conversely, the firmware
stores alarms and events in separate buffers, enter the number of alarms to be
saved in the "Audit Alarms" field, and the number of events to be saved in the
"Audit Events" field. To find out which versions of controller firmware use which
buffer storage scheme, see the ’Audit/EAudit’ section of the ACCOL II Reference
Manual (document# D4044).
If you are using the Storage Module to hold historical data, enter the number of
storage rows required in the "Storage Rows" field.
If this Network 3000-series controller has a Serial CFE Port, enter the number of
templates which Enterprise Server will require in the "Templates" field.
An approximation of the number of templates can be calculated by the following
formula; the result should be rounded up to the nearest integer, and it is
recommended that some additional templates be added as spares.
templates = A + L + (5 * R)
38 49
where
A=
the total number of analog signals in this controller, and
in all nodes below it in the network.
B=
the total number of logical signals in this controller, and
in all nodes below it in the network.
R=
the total number of Network 3000-series nodes which
send data to Enterprise Server through this node,
including this node itself.
Click on the "Locations" file tab to go to the second page of the dialog box. The
’Locations’ page of the dialog box allows you to specify which ACCOL structures
should be stored in base memory, and which should be stored in expanded memory.
Specifying Memory Requirements
9-4
ACCOL Workbench User Manual
(For certain controller models there are restrictions concerning where structures
may be stored.)
By default, all structures are stored in base memory. To make use of the expanded
memory, and thereby free up space in base memory, you must explicitly choose
which structures should be moved to the expanded memory.
The structures which may be moved from base to expanded memory are: "ReadOnly Arrays", "Read/Write Arrays", "AGA8" calculations, Calculator
"Equations", Signal "Lists", and "Signals". To do this, choose either ’Base’ or
’Expanded’ from the list box next to each type of ACCOL structure.
When finished editing, click on [OK] to save the changes, and exit the dialog box.
Specifying Memory Requirements in Edit Code Mode
(386EX Protected Mode Units ONLY)
Click on the ’Memory’ icon, then click on the ’Edit Code’ icon (the pencil). The actual
source code for the *MEMORY section, as currently defined, will appear on the
screen. Here is sample source code for the *MEMORY section.
*MEMORY
TOTAL_RAM
CUSTOM_SIZE
STORAGE_ROWS
AUDIT_EVENTS
AUDIT_ALARMS
TEMPLATES
GLOBAL_STORE
IP_GLOBAL_STORE
IP_PACKETS
IP_CONNECTIONS
IP_PENDREQS
IP_ARMS
ACCOL Workbench User Manual
512K
20
52
320
320
50
32
0
13
10
32
5
9-5
Specifying Memory Requirements
Make any necessary edits following the syntax rules, below, and close the window,
when finished.
Syntax Rules for the *MEMORY Section (386EX Protected Mode Users ONLY)
*MEMORY
TOTAL_RAM size
CUSTOM_SIZE bytes
STORAGE_ROWS rows
AUDIT_EVENTS events
AUDIT_ALARMS alarms
TEMPLATES templates
GLOBAL_STORE global_bytes
IP_GLOBAL_STORE global_ip
IP_PACKETS packets
IP_CONNECTIONS connections
IP_PENDREQS requests
IP_ARMS max_alarms
where:
bytes
is the number of bytes of memory to be reserved for use
by certain Custom applications. This value must be an
integer between 0 and 32,000.
size
represents the total amount of RAM memory available
in this Network 3000-series controller. Valid entries
are: 512K, 1.5MB, 2.5MB, 3.5MB or 4.5MB.
rows
is the number of Storage rows used by the Storage
Module. Each row uses 64 bytes of memory. This
value must be an integer from 0 to 5120.
events
is the number of Audit Trail / EAudit Module events to
be stored. If wrap-around mode is used, reserve 1 more
than the number of events. The extra space is used by
the system for buffer management. This value must be
an integer from 0 to 65,535.
alarms
is the number of Audit Trail / EAudit Module alarms to
be stored. If wrap-around mode is used, reserve 1 more
than the number of events. The extra space is used by
the system for buffer management. This value must be
an integer from 0 to 65,535.
(Continued on next page)
Specifying Memory Requirements
9-6
ACCOL Workbench User Manual
Section (Syntax Rules for the *MEMORY 386EX Protected Mode Users ONLY)
(Continued)
where:
templates
if this controller has a Serial CFE Port, this is the
number of templates which will be sent from
Enterprise Server. This value must range from 0 to
2000.
global_bytes is the number of K bytes of global storage RAM to be
used. The global storage area may be used, instead of
the Custom area, by Custom applications, specifically
designed to use it.
global_ip
is the number of K bytes of additional RAM to be
available for one of two purposes: If you have created
your own custom (non-standard) data link, you can
allocate additional RAM for it here. Alternatively, this
area can be used to provide additional RAM for the IP
system. NOTE: If you are experiencing memory
allocation failures (as reported by #IPSTAT..)
increasing the global_ip value may solve the problem.
packets
is the maximum number of IP communication packets
maintained for pending communication work. Each
packet uses 1,500 bytes of RAM. A guideline for setting
this value is:
10 + (3* (max. number of simultaneous active IP connections))
connections is the maximum number of PCs or controllers (RTUs)
which can communicate with this controller
simultaneously. If this value is set too small,
communications will be extremely degraded.
Generally, it should be set to between 20 and 30.
requests
consists of the maximum number of requests to this
node, or a node below this node, that will be tracked. If
this value is set too small, communications will be
extremely degraded. Generally, it should be set to
between 100 and 200.
max_alarms is the maximum number of alarm reports to be
maintained by the IP system, for transmission to any
one destination.
ACCOL Workbench User Manual
9-7
Specifying Memory Requirements
Specifying Memory Requirements in Edit Code Mode
(186 and 386EX Real Mode Units ONLY)
Click on the ’Memory’ icon, then click on the ’Edit Code’ icon (the pencil). The actual
source code for the *MEMORY section, as currently defined, will appear on the
screen.
Here is sample source code for the *MEMORY section.
*MEMORY
EXPANDED_MEM
RO_ARRAY_LOC
EQUATION_LOC
RW_ARRAY_LOC
AGA8_LOC
LIST_LOC
SIGNAL_LOC
CUSTOM_SIZE
STORAGE_ROWS
TEMPLATES
AUDIT_EVENTS
AUDIT_ALARMS
320K
EXP
BASE
BASE
BASE
EXP
EXP
40
24
50
100
100
OR specify EVENTS 200
if the firmware uses a combined
buffer
Make any necessary edits following the syntax rules, on the next page, and close
the window, when finished.
Specifying Memory Requirements
9-8
ACCOL Workbench User Manual
Syntax Rules for the *MEMORY Section (186 & 386EX Real Mode Users ONLY)
*MEMORY
EXPANDED_MEM
RO_ARRAY_LOC
EQUATION_LOC
RW_ARRAY_LOC
AGA8_LOC
LIST_LOC
SIGNAL_LOC
CUSTOM_SIZE
STORAGE_ROWS
TEMPLATES
AUDIT_ALARMS
AUDIT_EVENTS
-OREVENTS
where:
size
location
location
location
location
location
location
bytes
rows
templates
alarms
events
combined
location
is either BASE for base memory or EXP for expanded
memory.
bytes
is the number of bytes of memory to be reserved for use
by certain Custom applications. This value must be an
integer between 0 and 32,000.
size
represents the total amount of expanded memory
available in this Network 3000-series controller. Valid
entries are: 0K, 64K, 192K, 320K, 440K, 444K, 448K.
rows
is the number of Storage rows used by the Storage
Module. Each row uses 64 bytes of memory. This
value must be an integer from 0 to 5120.
alarms
is the number of Audit Trail / EAudit Module alarms to
be stored. If wrap-around mode is used, reserve 1 more
than the number of alarms. This value must be an
integer from 0 to 4,096.
events
is the number of Audit Trail / EAudit Module events to
be stored. If wrap-around mode is used, reserve 1 more
than the number of events. This value must be an
integer from 0 to 4,096.
combined
This option is supported for backward compatibility
purposes ONLY. If your controller firmware stores
events and alarms together in a single buffer, specify
the total number of alarms and events, and omit the
AUDIT_EVENTS and AUDIT_ALARMS lines.
ACCOL Workbench User Manual
9-9
Specifying Memory Requirements
Syntax Rules for the *MEMORY Section (186 & 386EX Real Mode Users ONLY)
(Continued)
where:
templates
if this controller has a Serial CFE Port, this is the number
of templates which will be sent from Enterprise Server.
This value must range from 0 to 2000.
Specifying Memory Requirements
9-10
ACCOL Workbench User Manual
Chapter 10 - Declaring Process I/O Boards (*PROCESS-I/O Section)
Process I/O boards allow the Network 3000-series controller to communicate with
external instruments such as flowmeters, pressure transmitters and level
transmitters.
Each installed process I/O board occupies a numbered slot, either in the controller
itself, or in one or more attached RIO 3331 Remote I/O Racks.
Declaring Process-I/O Boards in Edit Properties Mode
Access the *PROCESS-I/O
section either by doubleclicking on the Process-I/O
icon, or by one of the other
methods discussed in Chapter
5 under ’Editing the Properties
of the Section’.
Defining A Board
Choose the slot number for the
board to be defined in the
"Board ID" field. Next, select
the kind of board which resides
in the slot from the "Board
Type" list box.
Click on the [Insert] push button, and the board will be added to the list of boards.
Repeat this process for each and every board. Boards should be defined in
ascending order.
To change the definition of a board in the list, click on the board entry in the list,
make any necessary changes to the "Board ID" and "Board Type" fields, and click
on the [Modify] push button.
To delete a board definition, click on the board entry in the list, then click on the
[Remove] push button. You will be prompted to confirm deletion of the board
definition. Click on [Yes] to proceed, or [No] to cancel the deletion request.
ACCOL Workbench User Manual
10-1
Declaring Process I/O Boards
Declaring Process I/O Boards in Edit Code Mode
Click on the ’Process-I/O’ icon, then click on the ’Edit Code’ icon (the pencil). The
actual source code for the *PROCESS-I/O section, as currently defined, will appear
on the screen.
Here is sample source code for the *PROCESS-I/O section:
*PROCESS-I/O
1
4AI
2
4DI
3
4AO
4
4DO
Make any necessary edits following the syntax rules, below, and close the window,
when finished.
Syntax Rules - *PROCESS-I/O Section:
*PROCESS-I/O
board_ID
board_type
board_ID
board_type
.
.
board_ID
board_type
where
each board_ID is the number of the slot in the Network 3000series device which contains this particular process I/O board.
board_type is a code which identifies the type of process I/O
board. See the tables, on the pages that follow, for valid board
type codes.
Note: The number of board definitions, number of slots, and types of boards
available vary depending on the type of Network 3000-series device. See
the ACCOL II Reference Manual (document# D4044) for details.
NOTES ABOUT MIXING LOW DENSITY BOARD DEFINITIONS WITH
HIGH DENSITY HARDWARE AND VICE VERSA:
Beginning with ACCOL Protected Mode firmware PLS/ PLX/ PES/ PEX 04.30,
boards defined in ACCOL Workbench software as high density (8AI, 4AO, 16DI,
16DO), can reference all I/O points on the physical low-density hardware (4AI, 2AO,
8DI, 8DO, respectively) without generating an error. Similarly, boards defined in
ACCOL Workbench as low density (4AI, 2AO, 8DI, 8DO) can reference their defined
number of physical I/O points on high density I/O hardware (8AI, 4AO, 16DI, 16DO,
respectively.)
Declaring Process I/O Boards
10-2
ACCOL Workbench User Manual
Board Names used in DPC 3330, DPC
3335, RTU 3310, RIO 3331
Use with
These
Module(s)
Number
of
Signals
Board
Type
Code
Digital Input board: 4 points
DIGIN,
RDIGIN,
PDM, RPDM,
LSCOUNT,
RLSCOUNT
4 signals
4DI
Digital Input board: 8 points
DIGIN,
RDIGIN,
PDM, RPDM,
LSCOUNT,
RLSCOUNT
8 signals
8DI
Digital Input board: 16 points
DIGIN,
RDIGIN,
PDM, RPDM,
LSCOUNT,
RLSCOUNT
16 signals
16DI
Digital Output board: 4 points
DIGOUT,
RDIGOUT,
WATCHDOG,
PDO, RDPO
4 signals
4DO
Digital Output board: 8 points
DIGOUT,
RDIGOUT,
WATCHDOG,
PDO, RPDO
8 signals
8DO
Digital Output board: 16 points
DIGOUT,
RDIGOUT,
WATCHDOG,
PDO, RPDO
16 signals
16DO
Analog Input board: 4 points
ANIN, RANIN
4 signals
4AI
Analog Input board: 8 points
ANIN, RANIN
8 signals
8AI
Analog Output board: 2 points
ANOUT,
RANOUT
2 signals
2AO
Analog Output board: 4 points
ANOUT,
RANOUT
HSCOUNT,
RHSCOUNT
4 signals
4AO
4 signals
HSC
High Speed Cntr board: 4 points (High speed counter)
ACCOL Workbench User Manual
10-3
Declaring Process I/O Boards
Board Names used in DPC 3330, DPC
3335, RTU 3310, RIO 3331
Use with
These
Module(s)
Number
of
Signals
Board
Type
Code
Low Level AI board: 4 points (Low Level Analog
Input)
LLANIN,
RLLANIN
HSCOUNT,
RHSCOUNT
4LL
High Speed Analog board: 4 points (High Speed
Analog Input)
HSANIN
4 signals
HSA
Check Before Operate: 8 points
HCBO, LCBO
8 signals
CBO
Honeywell Transmitter: 8 points (Honeywell
Smartline Transmitter Interface)
HWSTI
8 channels
HWT
GLOBAL BBTI: 8 points (Bristol Babcock TeleTrans
Interface)
GBBTI
8 channels
8GT
LOCAL BBTI: 8 points (Bristol Babcock TeleTrans
Interface)
LBBTI
8 channels
8LT
High Density HSC board: 8 points
HSCOUNT
8 signals
8HSC
Board Name used in GFC 3308-xx
Use with
These
Module(s)
Number
of
Signals
Board
Type
Code
Analog Input board: 1 point (in Slot 1)
ANIN
1 signal
1AI
Analog Input board: 4 points (in Slot 2 - requires slot
4, 5 to be unused)
ANIN
4 signals
4AI
Analog Output board: 2 points (in Slot 3 - requires slot
4, 5 to be unused)
ANOUT
2 signals
2AO
Digital Input board: 6 points (in Slot 4 - requires slot
2, 3 to be unused; DI/DO points shared with DO board
in Slot 5)
DIGIN, PDM,
LSCOUNT
6 signals
(total among
slot 4, 5)
6DI
Digital Output board: 6 points (in Slot 5 - requires
slot 2, 3 to be unused; DI/DO points shared with DI
board in Slot 4)
DIGOUT,
PDO,
WATCHDOG
6 signals
(total among
slot 4,5)
6DO
Declaring Process I/O Boards
10-4
ACCOL Workbench User Manual
Board Name used in RTU 3305
Use with
These
Module(s)
Number
of
Signals
Board
Type
Code
3305 - Digital Input board: 14 points (in Slot 1; all
slots refer to a single Multi-Function I/O Board. 8
DI’s (#7 through #14) are always present, each of the
remaining 6 points (#1 through #6) are hardwareselectable as either DI’s or DO’s.
DIGIN, PDM,
LSCOUNT
8 to 14
signals,
depending
upon
number of
DO signals
defined in
slot 2.
14DI
3305 - Digital Output board: 8 points (in Slot 2; all
slots refer to a single Multi-Function I/O Board. 2
DO’s (#7 and #8) are always present, each of the
remaining 6 points (#1 through #6) are hardwareselectable as either DI’s or DO’s.
DIGOUT,
PDO,
WATCHDOG
2 to 8
signals,
depending
upon
number of
DI signals
defined in
Slot 1.
8DO
3305 - Analog Input board: 4 points (in Slot 3; all slots
refer to a single Multi-Function I/O board.)
ANIN
4 signals
4AI
3305 - Analog Output board: 2 points (in Slot 4; all
slots refer to a single Multi-Function I/O board.)
ANOUT
2 signals
2AO
Board Names used in EGM 3530 TeleFlow
Use with
These
Module(s)
Number
of
Signals
Board
Type
Code
3530 - Digital Input board: 2 points to 10 points
Only allowed in Slot 1
DIGIN
2 to 10
signals,
depending
upon the
number of
DO points
referenced
by DIGOUT
modules on
the board in
Slot 2.
DI2
or
DI10
DIGOUT
2 to 10
signals,
depending
upon the
number of
DI points
referenced
by DIGIN
modules on
the board in
Slot 1.
DO2
or
DO10
2 DI’s (#1 and #2) are always present; each of the
remaining 8 points are software selectable (via
ACCOL module usage) as either DI’s or DO’s. They
are shared with the board in Slot 2. Do NOT specify a
point to be BOTH a DI and a DO because results are
indeterminant.
3530 - Digital Output board: 2 points to 10 points
Only allowed in Slot 2
2 DO’s (#1 and #2) are always present; each of the
remaining 8 points are software selectable (via
ACCOL module usage) as either DO’s or DI’s. They
are shared with the board in Slot 1. Do NOT specify a
point to be BOTH a DO and a DI because results are
indeterminant.
ACCOL Workbench User Manual
10-5
Declaring Process I/O Boards
Board Names used in EGM 3530 TeleFlow
Use with
These
Module(s)
Number
of
Signals
Board
Type
Code
3530 - Analog Input board: 1 point or 5 points
Only allowed in Slot 3
ANIN
1 or 5
signals
AI1
or AI5
3530 - High Speed Counter board: 1 point or 2 points
Only allowed in Slot 4
HSCOUNT
1 or 2
signals
HSC1 or
HSC2
3530 - Analog Output board: 1 point
Only allowed in Slot 5
ANOUT
1 signal
AO1
Board Names used in RTU 3530 - TeleRTU
Use with
These
Module(s)
Number of
Signals
Board
Type
Code
3530 - Digital Input board: 2 points to 10 points
Only allowed in Slot 1
DIGIN
2 to 10
signals,
depending
upon the
number of
DO points
referenced
by DIGOUT
modules on
the board in
Slot 2.
DI2
or
DI10
DIGOUT
2 to 10
signals,
depending
upon the
number of
DI points
referenced
by DIGIN
modules on
the board in
Slot 1.
DO2
or
DO10
3530 - Analog Input board: 4 points or 8 points
Only allowed in Slot 3
ANIN
4 or 8
signals
AI4 or
AI8
3530 - High Speed Counter board: 2 points or 3 points
Only allowed in Slot 4
HSCOUNT
2 or 3
signals
HSC2 or
HSC3
3530 - Analog Output board: 1 point
Only allowed in Slot 5
ANOUT
1 signal
AO1
2 DI’s (#1 and #2) are always present; each of the
remaining 8 points are software selectable (via
ACCOL module usage) as either DI’s or DO’s. They
are shared with the board in Slot 2. Do NOT specify a
point to be BOTH a DI and a DO because results are
indeterminant.
3530 - Digital Output board: 2 points to 10 points
Only allowed in Slot 2
2 DO’s (#1 and #2) are always present; each of the
remaining 8 points are software selectable (via
ACCOL module usage) as either DO’s or DI’s. They
are shared with the board in Slot 1. Do NOT specify a
point to be BOTH a DO and a DI because results are
indeterminant.
Declaring Process I/O Boards
10-6
ACCOL Workbench User Manual
Notes about setting DEVICE and INITIAL terminals on
I/O modules when utilizing fixed I/O boards (3305, 3530
TeleFlow/TeleRTU)
Setting the DEVICE value:
For most Network 3000-series controllers, the choice of slot for an I/O board is
entirely at the discretion of the user; the board could be placed in any open I/O slot.
The DEVICE terminal on the I/O module (ANIN, ANOUT, DIGIN, DIGOUT, etc.)
referencing that board would be set to the number of that slot. The INITIAL
terminal would then typically be set to 1, to reference the first I/O point on the
board.
In the case of controllers which use fixed slots however, this is NOT the case. The
RTU 3305, TeleFlow series, and TeleRTU series use boards which reside in fixed
slots. In some cases, a single multi-function I/O board contains ALL the I/O.
While we still refer to the term ’slot’ in these cases, the I/O actually might reside all
on one physical fixed board. To use I/O modules (ANIN, DIGIN, etc.) with these
types of controllers, the just remember that the DEVICE terminal for a given type of
I/O module will always be the same.
RTU 3305
If you want to use this type of I/O Its DEVICE terminal should always be
Module…
set to this value:
DIGIN, PDM, LSCOUNT
1
DIGOUT, PDO, WATCHDOG
2
ANIN
3
ANOUT
4
3530 series - TeleFlow / TeleRTU
If you want to use this type of I/O Its DEVICE terminal should always be
Module…
set to this value:
DIGIN
1
DIGOUT
2
ANIN
3
HSCOUNT
4
ANOUT
5
Setting the INITIAL value:
DIGIN and DIGOUT are the only modules where you are likely to set INITIAL
values other than 1.
ACCOL Workbench User Manual
10-7
Declaring Process I/O Boards
•
For the RTU 3305, 8 digital inputs (DIs 7 through 14) are always present, and 2
digital outputs (DOs 7 and 8) are always present. Another 6 digital I/O points (1
through 6) are each individually selectable as either DI or DO.
•
For the 3530 series (TeleFlow / TeleRTU), 2 digital inputs (DIs 1 and 2) are
always present, and 2 digital outputs (DOs 1 and 2) are always present. Another
8 digital I/O points (3 through 10) are each individually selectable as either DI or
DO.
Example:
A user wants to configure a RTU 3305 with 10 digital inputs and 6 digital outputs.
One possible configuration that meets this requirement is shown below:
2DO, 2DI, 2DO, 8DI, 2DO
To configure this in ACCOL Workbench, DIGIN and DIGOUT modules would be
configured as follows:
10 * DIGOUT
DEVICE
INITIAL
OUTPUT
TRACK
RESET
OUTPUT
TRACK
RESET
20 * DIGIN
DEVICE
INITIAL
INPUT
INPUT
30 * DIGOUT
DEVICE
INITIAL
OUTPUT
TRACK
RESET
OUTPUT
TRACK
RESET
40 * DIGIN
DEVICE
INITIAL
INPUT
INPUT
INPUT
INPUT
INPUT
INPUT
INPUT
INPUT
50 * DIGOUT
DEVICE
INITIAL
OUTPUT
TRACK
RESET
OUTPUT
TRACK
RESET
2 ; in the 3305, DEVICE should always be 2 for a DIGOUT
1 ; the 1st and 2nd DI/DO selectable points are used as DO
1
DO.1.
1
DO.1.TRAK
1
DO.1.RSET
2
DO.2.
2
DO.2.TRAK
2
DO.2.RSET
1 ; in the 3305, DEVICE should always be 1 for a DIGIN
3 ; the 3rd and 4th DI/DO selectable points are used as DI
1
DI.1.
2
DI.2.
2 ; in the 3305, DEVICE should always be 2 for a DIGOUT
5 ; the 5th and 6th DI/DO selectable points are used as DO
1
DO.3.
1
DO.3.TRAK
1
DO.3.RSET
2
DO.4.
2
DO.4.TRAK
2
DO.4.RSET
1 ; in the 3305, DEVICE should always be 1 for a DIGIN
7 ; these are the fixed DIs which are always present
1
DI.3.
2
DI.4.
3
DI.5.
4
DI.6.
5
DI.7.
6
DI.8.
7
DI.9.
8
DI.10.
2 ; in the 3305, DEVICE should always be 2 for a DIGOUT
7 ; these are the fixed DOs which are always present
1
DO.5.
1
DO.5.TRAK
1
DO.5.RSET
2
DO.6.
2
DO.6.TRAK
2
DO.6.RSET
Declaring Process I/O Boards
10-8
ACCOL Workbench User Manual
Chapter 11 - Defining Low-Level Board Inputs
(*LOW-LEVEL Section)
For each Low-Level Analog Input board defined in the *PROCESS-I/O section, the
input types on the low-level board must be defined in a separate *LOW-LEVEL
section.
NOTE:
A complete list of LOW-LEVEL board input types is included in the
’LLANIN/RLLANIN’ section of the ACCOL II Reference Manual
(document# D4044).
Creating the *Low-Level Section
By default, the Low-Level icon does not appear when creating a new ACCOL source
file. The *Low-Level section must be explicitly created, according to the following
procedure:
From the ACCOL Workbench main
window, click on Edit Insert.
(Note: If the Insert option does not
appear in the pull down menu, it
means you are still in Edit Code
Mode or Edit Properties Mode.)
Å
Click on ’Low-Level’ in the New Section dialog box; an Edit Code window will
appear. Make necessary edits following the syntax rules on the next page, and close
the window, when finished.
In the sample source code, shown below, there are two low-level sections, each of
which must be created separately. One was created for a low-level board that
resides in a 3310/3330/3335 (board slot 4) and a second is for a board that resides in
an RIO 3331 remote I/O rack (board 101).
*LOW-LEVEL 4
B B B B
*LOW-LEV EL 101
B J K B
ACCOL Workbench User Manual
11-1
Defining Low-Level Board Inputs
Syntax Rules - *LOW-LEVEL section:
*LOW-LEVEL board_ID
num1 num2 num3 num4
where
board_ID is the slot number in the Network 3000series device which contains this Low Level board.
(The Low Level board must have been previously
defined in the *PROCESS-I/O section.)
num1 through num4 are the input type codes for each
of the four inputs on the board residing in a DPC3330,
DPC 3335, RTU 3310, or RIO 3331. Valid input type
codes are: B, E, J, K, R, S, T, RTD, and 10MV.
See the ’LLANIN/RLLANIN’ section of the ACCOL II Reference
Manual (document# D4044) for a description of each input type.
Defining Low-Level Board Inputs
11-2
ACCOL Workbench User Manual
Chapter 12 - Creating ACCOL Signals (*SIGNALS section)
ACCOL user-created signals are defined in the *SIGNALS section.1 Each ACCOL
signal in the section has associated with it, a signal name, and a set of signal
characteristics. The signal characteristics vary depending upon the type of signal.
Signal Names
All ACCOL signal names must conform to the convention, shown in the box, below.
Syntax Rules - ACCOL Signal Names
basename.extension.attribute
where
basename is from 1 to 8 characters in length. The first
character must be a letter, and the remaining characters can
be any mix of letters or numbers. As shown, above, the
basename must be immediately followed by a period.
extension is from 0 to 6 characters in length. The extension
can consist of any mix of letters and numbers. As shown,
above, the extension must be immediately followed by a
period, even if the extension is 0 characters in length.
attribute is from 0 to 4 characters in length. The attribute can
consist of any mix of letters and numbers.
Here are some examples of valid signal names:
STATION1.TEMP.HIGH
S3..
PT23.004.2
TANK2.LEVEL.
F127..ON
Note that S3.. has a basename, which is always required, but has no extension or
attribute. TANK2.LEVEL. has no attribute, and F127..ON has no extension.
1System
signals are also defined in the *SIGNALS section, however, ACCOL Workbench generates them
automatically. Some are created when the file is opened; others are created later based on other entries
in the file. System signals are distinguished from other signals by the pound sign ’#’ at the start of the
basename.
ACCOL Workbench User Manual
12-1
Creating ACCOL Signals
Signal Characteristics
Signal characteristics vary depending upon the type of signal being defined. There
are five types of signals: Logical Signals, Logical Alarm Signals, Analog Signals,
Analog Alarm Signals, and String Signals. The syntax for each of these signal types
will be discussed individually, in the discussion of defining new signals.
Defining New ACCOL Signals
To create a new ACCOL signal, doubleclick on the signals icon, to open up the
*SIGNALS section for editing. The
Specify Signal Filter dialog box will
2
appear. Click on the [OK] push button.
An empty signal window will appear.
NOTE: This is NOT an Edit Code
Window, signals must be edited via
dialog box.
Å
Next, click on Edit Insert (OR press
the right mouse button, and choose "Add
Signal" from the pop-up menu). The
Signal Properties dialog box will appear.
Type the signal base name in the "Base
Name" field, the signal extension (if
used) in the "Extension" field, and the
signal attribute (if used) in the
"Attribute" field.
2The
Specify Signal Filter dialog box is discussed, in greater detail, in Appendix D. Once the Signals
Window is displayed, you can re-call the Signal Filter dialog box by pressing the right mouse button,
and choosing "Set Filter" from the pop-up menu.
Creating ACCOL Signals
12-2
ACCOL Workbench User Manual
The type of signal (analog, analog alarm, logical, logical alarm, or string) is selected
from the "Type" list box.
To specify a different security level for operator read access to this signal, enter a
number (from 1 to 4) in the "Read Security" field.
To specify a different security level for operator access to change (i.e write to) this
signal, enter a number (from 1 to 4) in the "Write Security" field.
To manually enable the signal, the "Manual Enable" check box must be selected
(which is the default choice). To manually inhibit the signal, this check box must be
de-selected.
To control enable the signal, the "Control Enable" check box must be selected
(which is the default choice). To control inhibit the signal, this check box must be
de-selected.
Click on the "Settings" tab to specify other characteristics of the signal, such as its
initial value, units or ON/OFF text, etc. The settings required vary somewhat
depending upon the type of signal being defined.
Settings for Logical Signals
Enter ON/OFF text in the "On Text"
and "Off Text" list boxes, -or- choose an
existing ON/OFF text pair from the
"On/Off Pairs" list box.
If this logical signal should be initially
ON when the ACCOL load starts up,
click on the "Initially On" check box. If
this is a global signal, select "Mark as
Global". If this is an RBE signal, select
"Report By Exception".3
Click on [OK] to save these settings, or
click on the "General" tab to return to
the first page of the Signal Properties
dialog box.
3See
the ’RBE’ section of the ACCOL II Reference Manual (
Report by Exception.
ACCOL Workbench User Manual
12-3
document# D4044) for information on
Creating ACCOL Signals
Syntax - Logical Signals:
name L [read_security] [write_security][ce][me][rbe][l/gl][initial][text]
where
Creating ACCOL Signals
name
is the signal name
L
indicates this is a logical signal
read_security
is the security level an operator needs to
read this signal’s value. This is expressed
as the letter R immediately followed by a
number from 1 to 4. The default is R1.
write_security
is the security level an operator needs to
change this signal’s value. This is
expressed as the letter W immediately
followed by a number from 1 to 4. The
default is W3.
ce
is the initial state of the control enable /
control inhibit bit for this signal. CE
specifies control enabled; CI specifies
control inhibited; the default is CE.
me
is the initial state of the manual enable /
manual inhibit bit for this signal. ME
specifies manual enabled; MI specifies
manual inhibited; the default is ME.
rbe
the word RBE designates this to be an
RBE signal; by default, signals are not
RBE signals.
12-4
ACCOL Workbench User Manual
Syntax - Logical Signals (continued)
l/gl
indicates local or global. Enter GLB to
indicate a global signal or LOC to
indicate a local signal. The default is
local.
initial
is the initial value of this signal. Specify
0 (OFF) or 1 (ON). The default is 0.
text
is ON/OFF text of the signal. The default
is ON and OFF, however both the OFF
text and the ON text may be changed to
other text which is up to 6 characters
long, for example ’OPENED’ and
’CLOSED’. To change the text, use two
six character fields, separated by a blank,
with ON text appearing first, and OFF
text appearing second. If not all six
characters are used, blanks must used to
pad the field. If the text for a particular
state is to be all blanks, enter the word
BLANKS.
Sample Logical Signal Definition
ACCOL Workbench User Manual
12-5
Creating ACCOL Signals
Settings for Logical Alarm Signals
These settings are identical to
those for logical signals, except
for the following differences:
The "Mark As Global" option
does not appear because
alarms
are
automatically
considered global.
Select the "Alarm Enable"
check box to enable this alarm,
otherwise the signal is alarm
inhibited. The default is alarm
enabled.
In the "Alarm Type" list box
choose either:
’Alarm on True’ if the signal should generate an alarm message when
the signal is ON, or
’Alarm on False’ if the signal should generate an alarm message when
the signal is OFF, or
’Alarm on Change of State’ if the signal should generate an alarm
message any time the signal transitions from ON to OFF or from OFF
to ON.
In the "Alarm Priority" list box choose either ’Critical’, ’Non-Critical’, ’Operator
Guide’, or ’Event’.
Sample Logical Alarm Signal Definition
Creating ACCOL Signals
12-6
ACCOL Workbench User Manual
Syntax - Logical Alarm Signals:
name LA [read_security] [write_security][ce][me][rbe][initial][text] [ae]
[alarm_type][alarm_priority]
where
name, read_security, write_security, ce, me, initial, and text
require the same syntax as that for logical signals
LA
indicates this is a logical alarm signal
rbe
the word RBE designates this to be an
RBE signal; by default, signals are not
RBE signals. Note: Logical Alarm Signals
should generally NOT be declared as
RBE signals because this can cause
unwanted side-effects in data collection.
ae
specifies whether this signal is alarm
inhibited or alarm enabled. Enter AE for
alarm enabled, or AI for alarm inhibited.
The default is AE.
alarm_type
specifies which state of the signal causes
the alarm to be activated. Enter TRUE to
have the alarm activated when the signal
value is ON. Enter FALSE to have the
alarm activated when the signal value is
OFF. If the signal should be activated
any time the value of the signal changes
from OFF to ON or from ON to OFF enter
CHANGE in this field. The default is
TRUE.
alarm_priority
specifies the alarm priority. Use one of
the following codes;
C
N
O
E
ACCOL Workbench User Manual
12-7
- critical
- non-critical
- operator guide
- event
Creating ACCOL Signals
Settings for Analog Signals
Enter the initial floating point value of this signal when the ACCOL load is started
in the "Initial State" field.
Specify the engineering units for the signal in the "Units Text" field.
If this is an RBE signal, select
"Report By Exception".4
Enter an RBE deadband
value in the "Deadband"
field.
Click on [OK] to save these
settings, or click on the
"General" tab to return to the
first page of the Signal
Properties dialog box.
Sample Analog Signal Definition
4
See the ’RBE’ section of the ACCOL II Reference Manual (
Report by Exception.
Creating ACCOL Signals
12-8
document# D4044) for information on
ACCOL Workbench User Manual
Syntax - Analog Signals:
name A [read_security] [write_security][ce][me][rbe][l/gl][initial][text]
[RDB: rbedb]
where
name, read_security, write_security, ce, me, and l/gl require
the same syntax as that of a logical signal.
A
indicates this is an analog signal
rbe
the word RBE designates this to be an
RBE signal; by default, signals are not
RBE signals. If RBE is chosen, an RBE
deadband should be specified. See rbedb.
initial
is the initial value of this signal. Specify
a floating point value.
text
is engineering units text of the signal for
example MSCFH, GPM, MGD, INCHES,
etc. The engineering units text may be up
to 6 characters long. If not all six
characters are used, blanks must be used
to pad out the six character field.
RDB: rbedb
is the RBE deadband. Use only if this is
an RBE signal.
ACCOL Workbench User Manual
12-9
Creating ACCOL Signals
Settings for Analog Alarm Signals
These settings are identical to those for analog signals, except for the following
differences:
The "Mark As Global" option does
not appear because alarms are
automatically considered global.
It is recommended that "Report by
Exception" NOT be selected for any
alarm signal.
Click on the [Alarm Limits] push
button to configure alarm limits and
alarm deadbands from the Alarm
Limits dialog box:
Values for the "Low Deadband", "High Deadband", "Low Limit", "High Limit",
"Low Low Limit", or "High High Limit" may be entered directly, or a signal
name may be entered. Alarm limits and deadbands should use the same
engineering units as the analog alarm signal.
In addition, alarm priorities of Critical, Non-Critical, Operator Guide, or Event may
be specified for each alarm limit.
Click on [OK] to close the Alarm Limits dialog box and return to the Signal
Properties dialog box.
Creating ACCOL Signals
12-10
ACCOL Workbench User Manual
Read Security
Initial Value
Write Security
Signal Name
Signal Type
COMPRSR4.TEMP.
AA R3 W4 CE MI
LDB: 5.0
Low and High
HDB: 5.0
Deadbands
LALM: -5.0 N
Alarm priorities
for each alarm
HALM: 90.0 N
limit
LLALM:-10.0 C
HHALM: COMPRSR4.HHALM. C
RDB: 1.0
RBE Deadband
Alarm Limits
Units text
Control
Enable/Inhibit
0.0
DEGF
RBE signal or Not
RBE
Manual
Enable/Inhibit
For this particular alarm
a
signal has been used to hold
limit,
alarm limit value
the
Sample Analog Alarm Signal Definition
ACCOL Workbench User Manual
12-11
Creating ACCOL Signals
Syntax - Analog Alarm Signals:
name AA [read_security] [write_security][ce][me][rbe][initial][text][ae]
LDB: lowdb
HDB: highdb
LALM: lowalarm alarm_priority
LALM: highalarm alarm_priority
LALM: lowlowalarm alarm_priority
HHALM: highhighalarm alarm_priority
[RDB: rbedb]
where
name, read_security, write_security, ce, and me require the
same syntax as logical signals.
initial and text require the same syntax as an analog signal
Creating ACCOL Signals
AA
indicates this is an analog alarm signal
rbe
the word RBE designates this to be an
RBE signal; by default, signals are not
RBE signals. It is recommended that
analog alarm signals NOT be declared as
RBE signals, as this may cause unwanted
side effects in data collection.
ae
specifies whether this signal is alarm
inhibited or alarm enabled. Enter AE for
alarm enabled or AI for alarm inhibited.
The default is AE.
LDB:lowdb
lowdb specifies the low deadband value
for this signal.
HDB:highdb
highdb specifies the high deadband value
for this signal.
12-12
ACCOL Workbench User Manual
Syntax - Analog Alarm Signals (continued)
LALM:lowalarm alarm_priority
HALM:highalarm alarm_priority
LLALM:llalarm alarm_priority
HHALM:hhalarm alarm_priority
lowalarm is the low alarm limit
highalarm is the high alarm limit
llalarm is the low low alarm limit
hhalarm is the high high alarm limit
alarm_priority is one of the following
codes:
C - critical
N- non-critical
O - operator guide
E - event
(These alarm limits may be entered
either as constant floating point values,
or as a separate analog signal name
whose value is the alarm limit.)
RDB: rbedb
is the RBE deadband. Alarm signals
should generally not be RBE signals.
Settings for String Signals
Enter the maximum number of
characters for the value of this signal in
the "Length" field, then enter the actual
initial value of the signal (the actual
string of characters) in the "Initial
State" field.
Click on [OK] to save these settings, or
click on the "General" tab to return to
the first page of the Signal Properties
dialog box.
ACCOL Workbench User Manual
12-13
Creating ACCOL Signals
Syntax - String Signals:
name S [read_security] [write_security][ce][me] LEN: n ’string_text’
where
name, read_security, write_security, ce, and me require the
same syntax as logical signals.
S
indicates this is a string signal
LEN: n
is the maximum number of characters in
the string. This maximum string length n
must be an integer ranging from 1 to 64.
IMPORTANT: There must be a blank
space between LEN: and the string
length value n.
’string_text’
is the initial value of this string signal.
This must be from 1 to 64 characters of
alpha numeric text which may also
include blanks. The text must be
surrounded by single quotation marks
and MUST ALL APPEAR ON THE
SAME LINE.
Sample String Signal Definition
Creating ACCOL Signals
12-14
ACCOL Workbench User Manual
5
Editing Signal Characteristics
Once a signal has been created, its characteristics may be changed by doubleclicking on the signal in the window, and making any necessary changes in the
Signal Properties dialog boxes.
5There
is no Edit Code window for signals. Changes MUST be made using the Edit Signal dialog boxes.
ACCOL Workbench User Manual
12-15
Creating ACCOL Signals
Creating New Signals From Existing Signals
Signal duplicating is the process of taking an existing signal, and making a new
signal with the exact same characteristics.
To duplicate a signal requires that the
signal be visible in the signals window;
click on the signal to be duplicated, then
click on Edit Duplicate.
Å
The Signal Properties dialog box will appear. Enter a new signal name using the
"Base Name", "Extension", "Attribute" fields and click on [OK]. The newly
named signal will have identical characteristics to the signal from which it was
duplicated.
For example, the logical alarm signal COMPRSR3.FAILUR.STAT was selected, and
a Signal Properties dialog box with all the properties of that signal filled in (except
for the signal name) will appear. Enter a new name of COMPRSR9.FAILUR.STAT
in the Signal Properties dialog box. Both signals now have identical characteristics.
Deleting An ACCOL Signal
You can delete an ACCOL signal in the Signal window by clicking on the signal
name, and then either clicking on Edit Delete, or pressing the right mouse
button, and choosing "Delete Signal" from the pop-up menu.
Å
IMPORTANT
There is no ‘Undo’ available for signal deletions.
Creating ACCOL Signals
12-16
ACCOL Workbench User Manual
Selecting Multiple ACCOL Signals For Deletion
If desired, you can select multiple signals for deletion all at the same time.
Selecting the Signals
To select the signals, hold down the [Ctrl] key on your keyboard, and while doing
so, click on each of the signals you want to select.
Å
To select all user-created ACCOL signals, click on Edit Select All. If desired, you
can then hold down the [Ctrl] key and de-select individual signals, one by one.
To select all signals except for those you have currently selected, click on Edit
Invert Selection.
Å
Deleting the Signals
Å
Either click on Edit Delete, or press the right mouse button, and choose "Delete
Signal" from the pop-up menu. Answer [Yes] to the prompt for deleting each
signal. (You will be prompted to confirm deletion for each and every signal.)
ACCOL Workbench User Manual
12-17
Creating ACCOL Signals
Defining Base Name Text For Signals
Any signal base name can have, associated with it, base name descriptive text. All
signals with the same base name share the same base name descriptive text.
To define the base name text, double-click on the Basenames icon. The Edit Code
window will appear.
The base name text may be entered directly, or may be defined via a separate string
signal, which you may either type in, or drag in from the Signal window. Define the
base name descriptive text according to the syntax rules, below, and close the
window, when finished.
Syntax - Base Name Descriptive Text:
*BASENAMES
basenam1
’string text’
basenam2
base.ext.attr
where
basenam1,
basenam2
are signal base names of signals defined in the *SIGNALS
section. They can be from 1 to 8 alpha-numeric characters,
and must start with a letter.
’string text’
is the base name descriptive text. It can consist of from 1 to
64 alpha-numeric characters, and must be surrounded by
single quotation marks. An alternative method for defining
base name descriptive text, is to define it in a separate string
signal.
base.ext.attr
is the name of a separate ACCOL string signal. This signal
must be defined in the *SIGNALS section. Its value will be
used as the base name descriptive text. Note: base.ext.attr
must NOT be surrounded by quotation marks.
Example:
*BASENAMES
COMPRSR1 ’COMPRESSOR NO.1 - MAIN STREET’
COMPRSR2 ’COMPRESSOR NO.2 - ELM STREET’
COMPRSR3 ’COMPRESSOR NO.3 - PINE AVENUE’
PUMP1
PUMP1.TAG.NAME
PUMP2
PUMP2.TAG.NAME
PUMP3
PUMP3.TAG.NAME
Creating ACCOL Signals
12-18
ACCOL Workbench User Manual
Chapter 13 - Defining Signal Lists
Signals may be grouped in lists for organizational purposes, and for use with
certain ACCOL modules.
Å
To define a signal list click on Edit
Insert. Select "List" from the New
Section dialog box, and click on [OK].
An Edit Code window for Signal Lists
will appear. Edit the List Number as
necessary. Each signal list must have a
unique list number.
Signal entries may be typed directly
into the signal list, according to the
syntax rules defined later in this
section.
ACCOL Workbench User Manual
13-1
Creating Signal Lists
Alternatively, if signals have already been defined in the *SIGNALS section of the
source file, they may be dragged from the Signals window into the Edit Code
window for the signal list. To do this, position the cursor on the desired signal in
the Signals window. Depress and HOLD the left mouse key. While continuing to
hold the left mouse key, move the cursor to the desired position in the signal list (in
the other window); an outline box of the signal being copied will appear to help you
position it correctly. When properly positioned, release the mouse key. The signal
will be added to the list at that position with an appropriate list line number.
No matter which method is used to put signals in the list, each entry should consist
of the list line number, followed by one or more spaces, and then the signal name.
Optionally, the signal type code may be included. If not included, and the signal has
not been defined elsewhere in the file, the signal will default to being a logical
signal.
Signal list line numbers must appear in ascending order going from the top to the
bottom of the list. If your version of ACCOL Workbench supports it, you may renumber list line numbers so that they will be in the proper ascending order by
clicking on Signal
Resequence. The increment of list line numbering is defined
in the Workspace Settings dialog box.
Å
If this signal list will be used by the Open BSI Signal Extraction Utility to generate
®
®
a data base, for example, for Intellution FIX software, the keyword NETMON,
preceded by a space, must follow the List Number.
When finished editing, close the window.
Creating Signal Lists
13-2
ACCOL Workbench User Manual
Syntax - Signal Lists
*LIST x [NETMON]
list-line#1 signal1 [signal_type]
list-line#2 signal2 [signal_type]
.
.
list-line#n signaln [signal_type]
where
x
is the list number. This must be an integer from 1 to
255. A separate *LIST definition must be created for
each signal list in the ACCOL source file.
NETMON
designates this list for use by the Open BSI Signal
Extraction utility.
list-line#1...
list_line#n are the line numbers of this signal list. These numbers
must be in ascending order.
signal1...
signaln
are the signals in this signal list.
signal_type is optionally used to designate the signal type of a
given signal. A signal list can include any mixture of
signals of different types. Signal type must be one of
the following: L - Logical signal, LA - Logical Alarm
signal, A - Analog signal, AA - Analog Alarm signal, S
- String signal. The default signal type is logical. Note:
The type specified must be consistent with any other
usage of this signal in the file. Signal types CANNOT
be changed within the source file.
Example:
*LIST 23
10
PUMP1.RUN.TIME
20
PUMP1.ON.
30
PUMP1.NAME.TAG
40
TANK3.LEVEL.HIGH
ACCOL Workbench User Manual
A
S
LA
13-3
Creating Signal Lists
BLANK PAGE
Chapter 14 - Creating An ACCOL Task (*TASK Section)
A separate *TASK section must be
defined for each task in the source
file.1 To create an ACCOL task,
click on Edit Insert. The New
Section dialog box will appear.
Choose ’Task’ from the list box, and
click on [OK].
Å
The Configure Task dialog box will
be displayed to allow you to specify
the characteristics of the task.
Editing the Task Characteristics in Edit Properties Mode:
Edit the "Rate", "Priority" and (if
applicable), the "Redundancy Frequency"
for this task. Click on [OK] when finished.
When edits are completed, the code window
for the task will be displayed. When the
code window is closed, an icon will appear
for
the
new
task,
displaying
its
characteristics.
You can call up the Configure Task dialog box again, to edit characteristics by
double-clicking on the icon for the task.
Editing the Task Characteristics Line in Edit Code Mode
The first line of the task
defines
certain
task
characteristics. It includes
the task number, the task
rate, the task priority, and
the redundancy frequency.
Though it is often more manageable to use 1 or 2 tasks, an ACCOL source file may
include many separate tasks, provided there is sufficient memory to handle them.
2
Each task is identified by a unique task number, which is an integer.
1With
the exception of the Task Characteristics Line, Edit Code mode and Edit Properties mode are
essentially the same when editing tasks; a code window is used, therefore no distinction between the
modes will be made in this section.
2ACCOL Workbench automatically creates a special ACCOL Task called Task 0. This is a nonexecuting task, used to hold special non-executing modules. Because it does not execute, it does not have
a Task Characteristics Line. Debug flags also CANNOT be added to Task 0.
ACCOL Workbench User Manual
14-1
Creating An ACCOL Task
Specify the task rate, task priority, and redundancy frequency (if applicable) on the
same line as the task number. See the syntax rules box for more information on
these parameters. Once the task characteristics line is defined, you may proceed to
add modules to the task.
Syntax Rules - Task Characteristics Line
*TASK task_num RATE: rate PRI: priority REDUN: redundancy_frequency
where:
task_num
is an integer which uniquely identifies
this task. See the ACCOL II Reference
Manual
(document#
D4044)
for
information on the maximum number of
available tasks.
rate
is the task rate in seconds. This specifies
how often the controller will attempt to
start execution of this task, and can range
from 0 to 5400 seconds. Leave at least 1
blank space between RATE: and the
specified rate. Special Notes: 1) If this is a
continuously executing task enter ’C’
without quotes. 2) If the task rate is 0, the
task WILL NOT EXECUTE.
priority
is the task priority. This value must be an
integer from 1 to 64. Exercise care when
setting this number to see that it does not
cause a conflict with system-level tasks. In
general, priorities from 1 to 32 do not
result in conflicts, however, this is
application dependent.
redundancy_frequency
specifies the redundancy frequency.
Specify 0 if this ACCOL file will NOT be
running in a redundant unit. If it will be
executing redundantly, it is strongly
recommended that this be set to 1. See the
’Redundancy Concepts’ section of the
ACCOL II Reference Manual (document#
D4044) for details.
NOTE: Task 0 is a special non-executing task which does not have any
characteristics other than the task number. It is created, automatically, by
ACCOL Workbench.
Creating An ACCOL Task
14-2
ACCOL Workbench User Manual
Inserting Modules In The Task
To insert a module in a task, you must be in the code window for the task. Position
the cursor at the location where you would like to insert the module. If this is a new
task, the cursor should be placed on the line immediately following the task
characteristics line.
With the cursor at the desired insertion point,
click on Modules Insert (OR depress the right
mouse button, and choose "Insert" from the popup menu.) The Select Module dialog box will
appear.
Å
Use the scroll bar to view the different module
names. For detailed information on individual
modules, consult the ACCOL II Reference
Manual (document# D4044). Click on the name
of the module you would like to insert. If you are
choosing an I/O module with sets of interleaved
terminals (see picture, below), you should also
enter the number of interleaved terminals in the
“Numbers of Terminals” field. Finally, click
on the [OK] push button.
ACCOL Workbench User Manual
14-3
Creating An ACCOL Task
After you click on [OK] a template for the module will be inserted at the current
position. The module name will be preceded by the next sequential line number for
this task. The module template includes the module terminals, with in-line
3
comments that describe the likely signal type required for each terminal.
If this module includes sets of interleaved terminals, the number of sets you
specified in the “Number of Terminals” field of the Select New Module dialog box
will appear. (If you forgot to enter the number of terminal sets, you can use the copy
and paste options to create the additional sets of terminals from the first set. Renumber each new set of terminals in ascending order.)
Entering Signal Names
Signal names and/or constants must be entered in place of the commented
descriptions. There are two ways to enter the signal names; you can either:
1)
Manually type the signal names in place of the existing descriptions. You can
then define it through the Check-in feature, discussed later in this chapter.
-OR2)
Drag the signal name from the *SIGNALS section to the desired module
terminal. (This method may only be used if you have previously defined the
needed signals in the *SIGNALS section.) To drag a signal, first open a
window for the *SIGNALS section. With the window for the Task also in
view, position the cursor on the desired signal. Depress and HOLD the left
mouse key. While continuing to hold the left mouse key, move the cursor to
the desired module terminal in the other window; an outline box of the signal
being copied will appear to help you position it correctly. When you are on
the proper terminal, release the mouse key. The signal name will now appear
on the terminal in the module template. This method is called drag and
drop, and greatly reduces the amount of typing required.
3
DEVICE and INITIAL terminals on process I/O modules (ANIN, ANOUT, DIGIN, DIGOUT, etc.)
MUST be replaced with constants by the user. They cannot be replaced with signals, and they are
NEVER optional.
Creating An ACCOL Task
14-4
ACCOL Workbench User Manual
In the figure, below, a copy of the signal name STATION1.HUMID.PCNT is
dragged from the *SIGNALS section to the INPUT terminal of an ANIN module.
Use either of these methods to define signals, as required, for each module
terminal. When the module is configured, use the Select Module dialog box to add
more modules in the same way.
IMPORTANT
Signals entered on module terminals in the *TASK section are NOT
automatically defined in the *SIGNALS section. If you do NOT subsequently
define it in the *SIGNALS section, and the signal type is NOT obvious based on
the context in which it is used, the signal will be declared as a logical signal
during a Build operation.
Getting Help on Configuring A Particular Module
If you have the current version of the Bristol Babcock User Documentation CD
ROM (Bristol Babcock part# 395575-01-0) in your CD ROM drive, and have
installed the reader software on your PC, you can access the section of the ACCOL
ACCOL Workbench User Manual
14-5
Creating An ACCOL Task
II Reference Manual (document# D4044) which describes the module you are
currently working on. To do this, press the right mouse button while your cursor is
positioned in the text for the module, then choose “Module Info” from the pop-up
menu. Adobe® Acrobat® Reader will be activated to display the appropriate section
of the manual. (If this is the first time you have used this feature, you will be
prompted to identify which drive letter represents your CD ROM drive.)
NOTE: For this feature to work, you must have a version of the CD ROM which
includes information on the appropriate module; if you are using an all-new
ACCOL module, it may not be described on your CD ROM. If you are experiencing
problems in accessing the CD from within ACCOL Workbench, verify that your PC
has a copy of an initialization file called MODULES.INI in your \WINDOWS or
\WINNT directory; this file should have been created automatically during your
normal ACCOL Workbench installation.
Customizing the Module Menu to Include Frequently Used Modules
Any available module may be inserted in the task from the Select Module dialog
box, as previously described. In some cases, however, you may have to scroll
through a long list of modules to find the one you are looking for.
If your ACCOL source file uses only a few different modules, or uses certain
modules frequently, you may want to customize the Module Menu to include the
names of those modules; this allows you to avoid scrolling through the Select
Module dialog box each time you want to insert a module in the task.
Å
To customize this menu, click on Setup Module Menu. The Configure Module
Menu dialog box will appear.
For your convenience, up to 10 of the modules you intend to use most frequently can
be added to the Module Menu. Click on the names of up to ten such modules in the
list box of "Available modules", then click on the [Add] push button.
Creating An ACCOL Task
14-6
ACCOL Workbench User Manual
The modules will be added to the "Modules in menu" list box.
If you want to change the "Modules in menu" list, and the maximum number of 10
have already been added to the list box, you must remove some first. To do this,
click on the module(s) you want to remove, and then click on the [Remove] push
button.
When you are finished with the dialog box, click on [OK].
The modules in the "Modules in menu" list may now be inserted into the task by
clicking on "Modules" in the menu bar, and selecting the module name directly
from the Module pull down Menu, -OR- by pressing the right mouse key, and
selecting the module name directly from the pop-up menu.
Re-sequencing the Line Numbers For Modules in the Task
When a Build command is issued, all modules in an ACCOL task must be in
ascending order based on the task line number. Calculator equation lines must also
be in ascending order. After cutting and pasting modules in different locations in
the task, however, these line numbers may be out of sequence.
For example, in the figure, below, the task line number of 30 for the ANIN module,
and the task line number of 20 for the DIGIN module are not in the correct
sequence, and will cause an error, because they are not in ascending order.
Å
To re-sequence these numbers, click on Modules Resequence (-OR- while the
cursor is in the window for the task, press the right mouse button, and click on
"Resequence" in the pop-up menu.) The line numbers will be re-numbered as
shown below:
ACCOL Workbench User Manual
14-7
Creating An ACCOL Task
Note: To change the increments by which lines are numbered, see ’Appendix D Customizing the User Environment’.
Note: Only syntactically valid task lines and Calculator equation lines can be
properly re-numbered by this feature. Continuation characters ’@’ on the numbered
task line prior to the full module name will cause improper re-numbering.
Going to a Particular Line of the File
Å
You can jump to a particular line in the file by clicking on Edit
Goto (-OR- while
the cursor is in the window for the task, press the right mouse key and then click on
"Goto" in the pop-up menu.)
Enter a line number (not *TASK line) and click on [OK]. The cursor will jump to
that line.
Searching For Items Throughout the Entire Source File (Find Global/ Signal
Cross-Reference)
You
can
locate
all
occurrences of a particular
string of text by using the
Find Global / Signal CrossReference feature. Click on
Edit
Global Find; and
the Find Global / Cross
Reference dialog box will
appear.
Å
Creating An ACCOL Task
14-8
ACCOL Workbench User Manual
Enter the text you want to search for in the “Find” field, then click on the [Find]
push button. A list of all occurrences of that text which could be located will appear.
You can jump to the location in the file of a particular occurrence by double-clicking
on it in the list, or by clicking once on it, and then clicking on the [Goto] push
button.
Searching For Specific Signals Throughout the File (Signal Cross Reference)
This process is similar to
the one described, above,
except it is invoked from
within the window for the
Signals section.
Click on the name of the
signal you want to search
for in the Signals window,
and then press the right
mouse button, and choose
“Cross Reference” from
the pop-up menu.
The Find Global / Cross
Reference dialog box will
appear, with the signal’s
name already entered in
the “Find” field. Click on
the [Find] push button. A
list of all occurrences of
that text which could be
located will appear.
You can jump to the location in the file of a particular occurrence by double-clicking
on it in the list, or by clicking once on it, and then clicking on the [Goto] push
button.
Undoing the Last Keystroke(s)
If you make a mistake when typing, you can ‘undo’ the last keystroke by clicking on
Edit Undo. Alternatively, you simultaneously press the [Ctrl] and [Z] keys.
Å
To undo several keystrokes, you can repeatedly invoke these undo commands.
IMPORTANT NOTE: Not all actions can be undone.
ACCOL Workbench User Manual
14-9
Creating An ACCOL Task
Deleting Text From the Current Cursor Position to the End of the Line
To delete text from the current cursor position to the end of the current line, click
on Edit Delete to end of line, or press [Alt] + [K].
Å
Removing Unused Module Terminals
In some cases, certain module terminals in a module template may be unnecessary.
This may occur because those module terminals are optional, or are inappropriate
for the particular mode in which the module is being used.
Unused module terminals in a particular task may be removed by clicking on
Modules Strip Unused Terminals, (-OR- while the cursor is in the window for
the task, press the right mouse key, and click on "Strip Unused Terminals" from
the pop-up menu.)
Å
In the example, below, the TIMER module has two unused terminals; RESET and
OUTPUT_2:
Using the "Strip Unused Terminals" option will remove these unused terminals.
Creating An ACCOL Task
14-10
ACCOL Workbench User Manual
Defining A Signal’s Type From Within A Module or Task (Check-in Feature)
If you enter a signal name on a module terminal, and that signal has NOT been
previously defined in the *SIGNALS section, ACCOL Workbench will attempt to
assign its signal type based on the context in which it is used, but it may NOT
necessarily be your intended choice.
To avoid this situation, it is possible to define the signal’s type, when you enter it on
a module terminal, by using the Check-in feature.
Activating the Check-in feature
Click within the module or task where you have typed in signal names.
Once you have typed in the
signal’s name, you can call up the
List of Undefined Signals dialog
box by pressing the right mouse
button, and choosing either
“Check Signal in Task” or
“Check Signal in Module”
(these same options are also
available from the “Modules”
pull down menu.)
ACCOL Workbench User Manual
14-11
Creating An ACCOL Task
The List of Undefined Signals dialog box shows all signals in the task (or module,
depending upon your previous selection) which do not yet have a specified signal
type.
To completely define a particular
signal, including its signal type,
read and write priorities, initial
value, etc., click on the signal
name in the list of undefined
signals, so it is highlighted, then
click on the [Define Manually]
push button, -or- simply doubleclick on the signal. The Signal
Properties dialog box will appear.
(See Chapter 12 for help on
defining signals.)
To just define a particular signal’s signal type, click on the signal name in the list of
undefined signals, then click on the desired “Signal Type” and click on the
[Define Automatically] push button.
If all of the signals you have entered in a particular task or module are to be of the
same signal type, you can specify the signal type for all of them in one operation by
choosing the “Signal Type”, and then clicking on [Define All Automatically].
Once you have defined the signals, they will disappear from the list, and they will
now exist in the *SIGNALS section defined as whichever signal type you chose.
Creating An ACCOL Task
14-12
ACCOL Workbench User Manual
Syntax Rules - ACCOL Tasks
The general task format is as follows
task_characteristics_line
taskline1
:
tasklinen
where:
task_characteristics_line
taskline1 through tasklinen
defines the task number, task rate, etc. as
discussed previously on page 14-2.
are the numbered lines of the task. Task
lines must be numbered in ascending
order, and consist of control statements,
module definitions (which typically
require more than 1 line), and comment
lines. The actual line number of the task
must be followed with a ’*’ character.
Syntax Rules - Control Statements
taskline# * statement_name [p1] [p2]... [pn]
where
taskline#
is the task line number. It must be
followed by a * character.
statement_name
is the name of this control statement.
There are many control statements such
as SUSPEND, RESUME, WAIT_DI, etc.
See the ACCOL II Reference Manual
(document# D4044) for details.
[p1] ... [pn]
are the parameters for this statement. A
parameter could be a signal name or some
other textual entry depending on the
rules
for
this
particular
control
statement.
Note:
Not
all
control
statements have parameters.
Example - WAIT_DELAY control statement:
90 * WAIT DELAY COMPRSR.DELAY.TIME M
ACCOL Workbench User Manual
14-13
Creating An ACCOL Task
Syntax Rules - ACCOL Modules
Modules are defined by a module name followed by module terminal(s):
taskline# * module_name
terminal1 [set#] value1
-ORterminal1 [set#] signal1 [signal_type]
:
terminaln [set#] valuen
-ORterminaln [set#] signaln [signal_type]
where:
taskline#
is the line number of the task. It must be
followed by a * character.
module_name
is the name of this module. A list of modules is
included in Appendix B.
terminal1
through terminaln are names of the module terminals. See
Appendix B. Depending on the terminal, it may
require either a signal name or a constant value.
See the ACCOL II Reference Manual (document#
D4044) for information on specific terminals.
Note: Not all module terminals are required in
all applications; if a module terminal is unused,
it may be removed.
[set#]
signal1
through signaln
[signal_type]
Creating An ACCOL Task
if required, defines a set number. Some modules
include sets of interleaved terminals with the
same name, for example, multiple INPUT,
SPAN, and ZERO terminals. Each such terminal
has an identifying set number. Module templates
typically only include the first such set, therefore
if additional sets are required, they should be
copied to the Clipboard, pasted in, and renumbered.
are ACCOL signal names.
optionally specifies the signal type of the ACCOL
signal on the same line. Types are: A - analog;
AA - analog alarm; L - logical; LA - logical alarm;
or S - string.
14-14
ACCOL Workbench User Manual
Syntax Rules - ACCOL Modules (continued)
value1 through
valuen
is a constant value. The choice of whether values
or signal names are used is dependent on the
rules for using this particular module terminal.
See the ACCOL II Reference Manual (document#
D4044) for details.
Examples: (Note: text to the right of semi-colons ’;’ are in-line comments)
30 * ANIN
DEVICE
INITIAL
INPUT
ZERO
SPAN
INPUT
ZERO
SPAN
40 * MUX
INLIST
SELECT
OUTPUT
1
1
1
1
1
2
2
2
COMPRSR1.FLOW.
AA
COMPRSR1.FLOW.ZERO
COMPRSR1.FLOW.SPAN.
COMPRSR2.FLOW.
COMPRSR2.FLOW.ZERO
COMPRSR2.FLOW.SPAN
;module name
;value
;value
;signal name AND signal type
;signal name
;signal name
;signal name
;signal name
;signal name
MUX.INLIST.SIG
MUX.SELECT.SIG
MUX.OUTPUT.SIG
;signal name
;signal name AND signal type
;signal name
A
OTHER IMPORTANT NOTES ABOUT MODULES AND TASKS:
If a signal type is specified next to a signal name, the type MUST BE
CONSISTENT with any previous definition in the *SIGNALS section. Signal
types CANNOT be changed within a running ACCOL load file.
A task line cannot exceed 71 characters. To continue a line, place the symbol @ at
the end of the line. The first non-blank character following the @ is where the
line continues. If blanks are an integral part of the line, and these blanks fall
within the start of a continued line, you must indent seven spaces before entering
your required blanks.
Indentation, in most other cases, is not required, however, it may be added for
readability purposes.
Calculator Modules have a slightly different syntax, and are discussed on the
next page.
ACCOL Workbench User Manual
14-15
Creating An ACCOL Task
Syntax Rules - Calculator Modules
Calculator Modules are slightly different from other ACCOL Modules in that
they do NOT have module terminals; instead, Calculator Modules have equation
lines. A single-line Calculator can be used for a simple equation; otherwise a
Calculator with multiple lines is required. Calculators with multiple lines have
their own line numbers (which must be in ascending order) which are
independent of task line numbers:
taskline# * CALCULATOR equation_line1
- OR taskline# * CALCULATOR
calc_line#1 equation_line1
calc_line#2 equation_line2
:
calc_line#n equation_linen
where:
taskline#
is the task line number. It must be
followed by a * character.
calc_line#1 through
calc_line#n
are line numbers of the calculator. These
numbers must be in ascending order and
are independent of the task line#s.
equation_line1 through
equation_linen
are mathematical equations using ACCOL
structures. See the ’Calculator’ in the
ACCOL II Reference Manual (document#
D4044). Equations which exceed the
maximum line length can be continued on
the next line by using an @ sign. Note: If
this is a single-line calculator, the
CALCULATOR name and equation all
must fit on a single line.
Examples:
40 * C SINGLE LINE CALCULATOR
50 * CALCULATOR COMPRSR.SETPNT.SP=1500
60 * C CALCULATOR MODULE DEFINITION WITH MULTIPLE LINES
70 * CALCULATOR
10
TEMP.SETPNT.HIGH=100.0
20
:IF TEMP.VALUE.>TEMP.SETPNT.HIGH
30
TEMP.VALUE=TEMP.SETPNT.HIGH
40
:ENDIF
80 * C THIS IS A COMMENT LINE
.
Creating An ACCOL Task
14-16
ACCOL Workbench User Manual
Syntax Rules - Comment Lines
Comment lines allow for explanatory text to be added to the file:
taskline# * C text_of_the_comment
where:
taskline#
is the line number of the task. It must be
followed by a * character.
C
indicates this is a comment. The C MUST be
immediately
preceded,
and
immediately
followed, by a single blank character.
comment_text
follows the blank character, and is the actual
explanatory text being added. Comments can
include any combination of numbers, letters, or
symbols, however, tabs are NOT allowed. The
maximum length of the comment including the
*C and following blank is 71 characters.
Comments can be continued on the following line
including the @ symbol at the end of the line.
Example:
120 * C THIS TASK FOR COMPRESSOR CONTROL
Syntax Rules - In-Line Comments:
There is another type of comment called an ’in-line’ comment. In-line comments
may be placed anywhere in the file by entering a semi-colon ’;’. All characters on
the same line and to the right of the semicolon are considered to be comments. Inline comments are NOT preserved in the .ACO file, and so will be absent from
any ACC file created via a reverse-compile from the ACO.
Example:
10 * DIGIN ; This is an in-line comment
DEVICE
1
ACCOL Workbench User Manual
14-17
Creating An ACCOL Task
BLANK PAGE
Chapter 15 - Defining Data Arrays
(*A-ARRAY and *L-ARRAY sections)
Data arrays are essentially tables of analog or logical data. To create a data array,
click on Edit Insert. Click on ’Array’ in the New Section dialog box, then click on
[OK].
Å
The Array window will appear. Each logical data array or analog data array is
identified by a number. Note that ACCOL allows duplication of array numbers if
the arrays contain different types of data (i.e., there can be both an analog array
number 1, and a separate logical array number 1). Enter the array number in the
"Array ID" field.
The array size must also be specified using the "Number of Columns" and
"Number of Rows" fields.
ACCOL Workbench User Manual
15-1
Defining Data Arrays
Specify the type of array by selecting either "Analog" or "Logical" in the Type area.
The default type is logical.
Read Write Arrays
If this will be a Read/Write array, which means the data in the array is determined
by the execution of ACCOL modules, and cannot be pre-initialized, click on "Read
/Write" in the Access area, then click on [OK] to close the window; a new icon will
be created for this array.
Read-Only Arrays
If this will be a Read-Only array, which means the data in the array must be preinitialized, and can be read, but cannot be changed, during program execution, click
on "Read-Only" in the Access area.
To initialize the read-only array click on the [Set Values] push button. This will
call up the Set Array Values window. Enter values in the list box; values should be
separated by at least one space.
By default, values should be specified left to right in row-column order. If values
are not specified for an analog array, the array cell values will default to 0. If
values are not specified for a logical array, the array cell values will also default to
0 (OFF). Click on [OK] to save the array values, then close the Array window. A
new icon will be created for the array.
Defining Data Arrays
15-2
ACCOL Workbench User Manual
Example 1 - Initializing An Entire Read-Only Array
A 3 column by 2 row read-only
analog array is specified in the
array window. The values 1.2,
4.3, 5.8, 8.2, 9.5, and 5.3 are
specified in the Set Array
Values window.
The first value of 1.2 in the Set Array Values window, going left to right in the list
box, will be assigned to the (Row1, Column1) cell of the array; the second value of
4.3 will be assigned to the (Row1, Column2) cell; the third value of 5.8 will be
assigned to the (Row1, Column3) cell; the fourth value of 8.2 will be assigned to the
(Row2, Column1) cell; the fifth value of 9.5 will be assigned to the (Row2, Column2)
cell; and the sixth value of 5.3 will be assigned to the (Row2, Column3) cell.
The table, below, shows the array:
ACCOL Workbench User Manual
1.2
4.3
5.8
8.2
9.5
5.3
15-3
Defining Data Arrays
Example 2 - Initializing Individual Cells In A Read-Only Array
Individual cells may be explicitly initialized by specifying the row and column, in
parentheses, and then specifying the value.
If, for example, a 5 column by 2 row read-only logical array is specified; all cells will
automatically default to 0 (OFF).
To change the values in the (row1, column4) cell and (row2, column2) cell to 1 (ON),
enter the following in the Set Array Values window:
All other cells in the 5 column by 2 row array will still have the default value of 0
(OFF). The array appears as shown below:
0
0
0
1
0
0
1
0
0
0
Modifying Arrays In Edit Code Mode
Because an icon for a given array does NOT exist until after the array has been
inserted via the New Section dialog box, it is generally easier to simply define the
array in the dialog boxes. If desired, however, the array section could be created, via
the New Section dialog box, and then edited in Edit Code Mode.
Å
To do this, click on the already created array section icon, and click on Edit Code.
Follow the syntax rules for array editing, and close the window when finished.
Defining Data Arrays
15-4
ACCOL Workbench User Manual
Syntax Rules - Data Arrays (*L-ARRAY, *A-ARRAY sections)
*type-ARRAY array-ID access_type (m_rows, n_cols)
[value1 value2 ... value(m x n)]
-OR*type-ARRAY array-ID access_type (m_rows, n_cols)
[(row1,col1) value1 (row1,col2) value2 .... (row_m, col_n) value(m x n)]
where:
type
is either L to indicate a logical array, or A to
indicate an analog array.
array-ID
is the array number. There can be overlapping of
logical array and analog array numbers.
access_type is either RO to indicate a read-only array, or RW
to indicate a read/write array.
m_rows
is the number of rows in the array.
n_cols
is the number of columns in the array.
[value1 value2 ... value(m x n)]
ACCOL Workbench User Manual
are values to be assigned to a READ-ONLY
ARRAY (RO access_type only). Values for analog
arrays must be floating point values; values for
logical arrays must be either 0 (for OFF) or 1 (for
ON). There can be as many values as there are
cells in the array, i.e. m_rows multiplied by
n_cols number of values. Values will be assigned
to the array cells in row-column order, i.e. all the
columns of row 1 will be filled first, starting with
column1, then all the columns of row 2 will be
filled, etc. Any cells not filled will default to 0.
DO NOT INCLUDE THESE VALUES IF THIS
IS A READ/WRITE ARRAY (RW access_type).
15-5
Defining Data Arrays
Syntax Rules - Data Arrays (Continued)
[(row1,col1) value 1….
(row _m,col_n) value (mxn)]
are values to be assigned to a READ-ONLY ARRAY
(RO access_type only). Values for analog arrays
must be floating point values: values for logical
arrays must be either 0 (for OFF) or 1 (for ON). In
this method of assigning values, the actual cell
(row, column) is given in parentheses first, and
then the value is given. Values need not, therefore,
be assigned in row-column order. Any cells not
filled will default to 0. DO NOT INCLUDE THESE
VALUES IF THIS IS A READ/WRITE ARRAY (RW
access_type).
Example Array Statements, and Pictures of the Resulting Arrays:
*L-DATA 1 RW (1,7)
0 0 0 0 0 0 0
*L-DATA 2 RO (2,3)
(1,3) 1 (2,2) 1
0 0 1
1 1 0
*A-DATA 1 RW (2,2)
0 0
0 0
*A-DATA 3 RO (1,6)
1.2 47.6 16.2 73.3 88.2
1.2
47.6
16.2
73.3
88.2
0
*A-DATA 4 RO (2,3)
(1,1) 3.4 (1,2) 43.2 (1,3) 83.2 (2,1) 83.1 (2,2) 82.5 (2,3) 73.2
3.4
43.2
83.2
83.1
82.5
73.2
Defining Data Arrays
15-6
ACCOL Workbench User Manual
Chapter 16 - Defining Communication FORMATS (*FORMAT
Section)
Communication formats allow ASCII text to be transmitted to external devices such
as printers or terminals, via a Logger Port.
To create a format, click on
Edit Insert. Click on ’Format’ in
the New Section dialog box, then
click on [OK].
Å
A window for entering the format will appear. This same basic window is used in
both Edit Code Mode or Edit Properties Mode.
Enter format information in the window. Syntax rules on formats are in the box, on
the next page.
Detailed instructions on creating formats, and information on all available format
descriptors, are provided in the ACCOL II Reference Manual (document# D4044).
ACCOL Workbench User Manual
16-1
Defining Communication Formats
Syntax Rules - *FORMATS section
A separate FORMATS section must be created for each communication format to
be used:
*FORMAT number
format_line#1 descriptor, descriptor
format_line#2 descriptor, descriptor
:
format_line#n descriptor, descriptor
where:
number
format_line#1 to
format_line#n
descriptor
is the number of the format. This must be an
integer from 1 to 9999.
are line numbers for the format. These must be
in ascending order from 1 to 9999.
are format descriptors. These are listed in the
ACCOL II Reference Manual (document#
D4044). The descriptors are shown separated by
blanks and commas for readability, however,
this is not necessary. The maximum length of
each format line (following the line number) is
71 characters. To continue a line on the next
line, place a @ symbol at the end of the line, and
do not include a new line number on the next
line. ACCOL Workbench continues to process
the line after finding the first non-blank
character or after finding 7 blanks. Therefore, if
blanks are an integral part of the format line, as
in a quoted literal string, and these blanks are
situated at the start of a continuation line, you
must indent 7 spaces before entering the
required blanks. If the start of a continuation
line is not part of a quoted literal string, any
blanks beyond the first 7 will be interpreted as a
separator. If a separator is not valid at that
point in the format, an error message will be
generated during a build.
NOTE ABOUT SEMICOLONS IN YOUR FORMAT STATEMENTS
If, as part of your formatted output, you want to include the semicolon character ‘;’ you
cannot type it in directly, because ACCOL Workbench interprets a semicolon as the start of
an in-line comment, and will ignore all characters on the line following the semicolon.
To avoid this problem, enter the pound sign, and the number 59, anywhere you want to show
a semicolon: #59
Defining Communication Formats
16-2
ACCOL Workbench User Manual
Chapter 17 - Defining Archive Files (*ARCHIVE Section)
Archive ’files’ are similar to data arrays,
except that they receive their data
directly from a pre-defined set of ACCOL
1
signals. Like arrays, they use rows and
columns, however the rows are called
records, and each column has a textual
label associated with it. A separate
*ARCHIVE section must be created for
each archive file.
Å
To create an archive file, click on Edit Insert. Click on ’Archive’ in the New
Section dialog box, then click on [OK].
Archive File Definitions in the 3305 and 386EX Protected Mode Units
(DPC 3330, DPC 3335 or RTU 3310 with 386EX PM, also RTU 3305)
To define the archive
file, enter the file
number
in
the
"Archive ID" field. An
up-to-8 character file
name
should
be
entered in the "File
Name" field, and the
number of rows in the
file should be entered
in the "# of Records"
field.
1In
order to use archiving, the ARC_STORE Module must also be configured. See the ACCOL II
Reference Manual ( document# D4044) for details.
ACCOL Workbench User Manual
17-1
Defining Archive Files
Click on the ’Column’ tab to go to the second page of the dialog box.
Enter a label for a given column in the "Title" field, and enter the name of the
"Signal" which will hold the data for that column.
Click on the [Insert] push button to
add the Title and Signal pair to the list
box. The pair will be inserted
immediately before the
currently
highlighted line. Corrections may be
made to entries in the list box by
clicking on them, and then entering
changes in the "Title" and/or "Signal"
fields, and clicking on the [Modify]
push button.
To remove a Title and Signal pair, click on it in the list box, and click on the
[Remove] push button. You will be prompted to confirm the deletion.
Click on [OK] when all edits are completed.
IMPORTANT: Although ACCOL Workbench allows you to define up to 255
columns; buffer size limits an archive record to only 225 bytes (8 of
which are consumed by the timestamp, global, and local sequence
numbers). Each analog signal column consumes 4 bytes; each
logical signal column consumes 1 byte. Therefore, your archive
could have a maximum of 217 columns if storing all logical signals,
or a maximum of 54 columns if storing all analog signals. If you are
mixing analog and logical signals, you can perform your own
calculations to ensure you do not exceed 217 bytes; alternatively,
ACCOL Workbench 8.01 will issue an error during compilation if
you exceed the archived record size.
Defining Archive Files
17-2
ACCOL Workbench User Manual
Syntax - *ARCHIVE Section (386EX Protected Mode Units or RTU 3305)
A separate *ARCHIVE section must be created for each archive file.
*ARCHIVE archive_ID NAME: file_name NUM_RECS: records
COLUMN TITLE: title1 SIGNAL: signal_name1
COLUMN TITLE: title2 SIGNAL: signal_name2
:
COLUMN TITLE: title255 SIGNAL: signal_name255
where:
archive_ID
is a unique archive file ID number. This can
range from 1 to 65535.
file_name
is the archive file name. Up to 8 alphanumeric characters, beginning with a letter,
may be used.
records
is the number of rows in the archive file. This
is limited only by available memory. One
extra row should be specified.
title1 ...
title255
signal_name1...
signal_name255
are the titles which will appear across the top
of columns. Up to 255 columns may be
defined. Titles may consist of from 1 to 16
ASCII characters.
is the signal name associated with the
corresponding column.
Example:
*ARCHIVE 10 NAME: COMPRSR1 NUM_RECS: 1000
COLUMN TITLE: FLOW SIGNAL: COMPRSR1.FLOW.
COLUMN TITLE: DP SIGNAL: COMPRSR1.DIFPRS.
COLUMN TITLE: TEMP SIGNAL: COMPRSR1.TEMP.
ACCOL Workbench User Manual
17-3
Defining Archive Files
Archive File Definitions in 3530-series units
(EGM 3530 TeleFlow / RTU 3530 TeleRTU)
To define the archive file, enter
the file number in the "Archive
ID" field. An up-to-8 character file
name should be entered in the
"File Name" field, and the
number of rows in the file should
be entered in the "# of Records"
field.
If you want to collect data /
perform calculations over a
specific interval of time choose
’PERIODIC’ for the "Type", and
then specify an "Interval",
otherwise choose ’OTHER’.
The valid entries for "Interval" are ’1_MINUTE’, ’5_MINUTES’, ’15_MINUTES’,
’HOURLY’ and ’DAILY’. NOTE: These are the intervals at which all intermediate
calculations will be finalized, and the ARC_STORE Module will advance to the next
row. The ARC_STORE Module must be executed faster than this interval in order
to ensure sufficient amounts of data are collected for a given calculation. For
example, if you choose ’HOURLY’ for the interval, the ARC_STORE Module
associated with this Archive File should typically be placed in an ACCOL Task
which executes at least once per minute. This would allow at least 60 temporary
data values to be collected, for use in whichever hourly calculations are necessary
such as averaging, etc.
There are two possible "Time Stamp Mode" values ’STORAGE’ and ’START’. If
you choose ’START’, the timestamp assigned at the first intermediate collection
during this interval will be used, and the current timestamp will be assigned as the
timestamp for the first collection of the next interval. If you choose ’STORAGE’, the
timestamp at the moment the row is archived is used.
The "Weight Factor 1" and "Weight Factor 2" fields are used to specify ACCOL
signals which will hold weight factor values used during certain calculations. For a
description of the various calculations, see ’Archive Calculation Formulas’ later in
this chapter.
Defining Archive Files
17-4
ACCOL Workbench User Manual
Click on the ’Column’ tab to go to the second page of the dialog box.
Enter a label for a given column in the "Title" field, and enter the name of the
"Signal" which will hold the data for that column. Specify what type of calculation
should be performed on the signal value using the "Characteristic" list box. A
description of how the calculations are performed is described under ’Archive
Calculation Formulas’ later in this section.
Click on the [Insert] push
button to add the Title and
Signal pair to the list box. The
pair
will
be
inserted
immediately
before
the
currently
highlighted
line.
Corrections may be made to
entries in the list box by clicking
on them, and then entering
changes in the "Title" and/or
"Signal" fields, and clicking on
the [Modify] push button.
To remove a Title and Signal pair, click on it in the list box, and click on the
[Remove] push button. You will be prompted to confirm the deletion. Click on
[OK] when all edits are completed.
IMPORTANT: Although ACCOL Workbench allows you to define up to 255
columns; buffer size limits an archive record to only 225 bytes (8 of
which are consumed by the timestamp, global, and local sequence
numbers). Each analog signal column consumes 4 bytes; each
logical signal column consumes 1 byte. Therefore, your archive
could have a maximum of 217 columns if storing all logical signals,
or a maximum of 54 columns if storing all analog signals. If you are
mixing analog and logical signals, you can perform your own
calculations to ensure you do not exceed 217 bytes; alternatively,
ACCOL Workbench 8.01 will issue an error during compilation if
you exceed the archived record size.
ACCOL Workbench User Manual
17-5
Defining Archive Files
Syntax - *ARCHIVE Section (3530-series units)
(NOTE: A separate *ARCHIVE section must be created for each archive file.)
*ARCHIVE archive_ID NAME: file_name NUM_RECS: records
ARC_TYPE: type ARC_INTRVL: interval
WGHT_FCTR1: wfsig1 WGHT_FCTR2: wfsig2 TS_MODE: timestamp_mode
COLUMN TITLE: title1 SIGNAL: signal_name1 CHARTRSTCS: calc_type1 DISP_PREC: 0
COLUMN TITLE: title2 SIGNAL: signal_name2 CHARTRSTCS: calc_type2 DISP_PREC: 0
:
COLUMN TITLE: title255 SIGNAL: signal_name255 CHARTRSTCS: calc_type255 DISP_PREC:0
where:
archive_ID
is a unique archive file ID number. This can range from
1 to 65535.
file_name
is the archive file name. Up to 8 alpha-numeric
characters, beginning with a letter, may be used.
records
is the number of rows in the archive file. This is limited
only by available memory. One extra row should be
specified.
type
is the Archive Type, either ’PERIODIC’ or ’OTHER’.
Most user applications will require ’PERIODIC’.
interval
is the Archive Interval. The following are valid values
for
the
interval:
’1_MINUTE’,
’5_MINUTES’,
’15_MINUTES’, ’HOURLY’, ’DAILY’ or ’NONE’.
wfsig1
is the name of the signal used for Weight Factor 1, in
archive calculations.
wfsig2
is the name of the signal used for Weight Factor 2, in
archive calculations.
timestamp_mode
is either ’STORAGE’ or ’START’.
title1 ...title255
are the titles which will appear across the top of
columns. Up to 255 columns may be defined. Titles may
consist of from 1 to 16 ASCII characters.
signal_name1...
signal_name255
calc_type1...
calc_type255
DISP_PREC:0
is the signal name associated with the corresponding
column.
is the calculation type for this column of data. Valid
values for calc_type are discussed under ’Archive
Calculation Formulas’.
Display precision field (Reserved for future use; do NOT
delete)
Example:
*ARCHIVE 9 NAME: TANK17 NUM_RECS: 48
ARC_TYPE: PERIODIC ARC_INTRVL: HOURLY
WGHT_FCTR1: WEIGHT.F.1
WGHT_FCTR2: WEIGHT.F.2 TS_MODE: STORAGE
COLUMN TITLE: LEVEL SIGNAL: TANK17.LEVEL. CHARTRSTCS: INSTANTANEOUS DISP_PREC: 0
COLUMN TITLE: AVG
SIGNAL: TANK17.LEVEL. CHARTRSTCS: AVERAGE DISP_PREC: 0
COLUMN TITLE: MAX
SIGNAL: TANK17.LEVEL. CHARTRSTCS: MAXIMUM DISP_PREC: 0
Defining Archive Files
17-6
ACCOL Workbench User Manual
Archive Calculation Formulas
Calculations are performed when the ARC_STORE Module executes. The type of
calculation performed for a particular signal is specified by the CHARTRSTCS
field. If a user needs different calculations to be performed for the same signal, that
signal must be entered in multiple columns, with the different calculation specified
in the CHARTRSTCS field for each column.
Two Weight Factor fields are included in the Archive Definition. They specify
signals on which the user can enter weight factors for use in averaging and other
calculations.
Although calculations may be performed each time the ARC_STORE Module
executes, the only results archived are those made at the end of an interval (in
periodic logging) or when the module advances to the next row based on a change
in the MODE value.
The following calculations may be specified in the CHARTRSTCS field for a
column.
INSTANTANEOUS
No calculation performed, simply store the current value
of the signal.
MINIMUM
Store the minimum value among all values collected
during this interval.
MAXIMUM
Store the maximum value among all values collected
during this interval.
CUMULATIVE
Store the final value during the interval, and reset the
signal which provides it, to zero.
STRAIGHT_TIME_AVERAGE
(using Weight Factor1) Perform calculation according to the following formula:
ACCOL Workbench User Manual
17-7
Defining Archive Files
AVERAGE:
(using Weight Factor2)
Perform calculation according to the following formula:
SQUARE ROOT AVERAGE:
(using Weight Factor2) Perform calculation according to the following formula:
SQUARE OF THE SQUARE ROOT AVERAGE:
(using Weight Factor2) Perform calculation according to the following formula:
Defining Archive Files
17-8
ACCOL Workbench User Manual
INTEGRATION:
(using Weight Factor2)
Perform calculation according to the following formula:‘
ACCOL Workbench User Manual
17-9
Defining Archive Files
BLANK PAGE
Chapter 18 - Using the BUILD Command to
Generate ACO and ACL Files
Once you have finished creating the ACCOL source (.ACC) file, and have edited
each section to fit the requirements of your particular application, it is time to build
an ACCOL object (.ACO) file and an ACCOL load (.ACL) file. This may be done in
four basic steps:
Step 1 - Save the ACCOL Source File
Make sure you have saved any changes to your ACCOL source file, prior to
initiating the "Build" operation; otherwise those changes will not be included in the
.ACO and .ACL files.1 (ACCOL Workbench can be set to save automatically before
starting a ’build’; see Appendix D for details.)
Step 2 - Issue A "Build" Command
To initiate a "Build" command on the currently open ACCOL source file, click on
the "Build" icon (the hammer, shown above), - OR - click on Actions Build.
ACCOL Workbench will commence building an ACCOL Object (.ACO) file, and an
ACCOL Load (.ACL) file. As the building operation proceeds, various messages will
appear on the status line, indicating the progress of the build.
Å
If the operation is successful, a message similar to the one below will be displayed.
Skip to Step 4.
If, however, errors are detected during the build process, they must be corrected.
Correcting errors is discussed in Step 3.
1
If your file is still named ACCOLn.ACC, it is recommended that you re-name it to a more meaningful
name prior to initiating the "Build" operation; otherwise the .ACO and .ACL files will also be created
with the ACCOLn file base name.
ACCOL Workbench User Manual
18-1
Using the Build Command
Step 3 - Correct Any Errors
Unless the ACCOL source file is syntactically perfect, some errors will be detected.
In the figure, below, there are two errors which need to be corrected. In some cases,
if the location of the error is identifiable, you can double-click on the error line, and
go directly to the source of the error.
Double-clicking on Error 61, for example, calls up a source code window for the task
showing the location where ACCOL Workbench first identified there was an error.
In this case, both errors were caused by an improperly numbered task line.
You can make corrections right in the source code window, then save the changes,
and issue a "Build" command again (see Step 2). If there are numerous errors in
the file, you can jump from error to error by clicking on View Next Error or
View Previous Error. Repeat the building and error correcting process until no
errors occur, and the ’Compilation Successful’ and ’Link Successful’ messages are
generated. These messages mean that .ACO and .ACL files have been successfully
created.
Å
Å
Step 4 - Download the ACCOL Load File
Once an ACCOL Load (.ACL) File has been successfully created, it may
then be downloaded into the Network 3000-series controller, using the
Open BSI Downloader. The Downloader is accessible in on-line mode via
the "Actions" menu bar item, or by clicking on the icon shown at left (see
Chapter 21).
Using the Build Command
18-2
ACCOL Workbench User Manual
For additional information on the Downloader, see the Open BSI Utilities Manual
(document# D5081).
NOTE: The “Build” command is disabled for a particular ACCOL load while that
ACCOL load is being downloaded.
Using the Batch Build Feature
If you have several different ACCOL source files, for which you would like to
generate ACO and ACL files, you can do this by using the Batch Build feature. To
do this, create a text file (using any ASCII text editor) with the extension (.BLD).
Each line of the file should be the name of one of the ACCOL source files (without
the file extension .ACC).
Save the file in the same directory that contains your ACCOL files, and click on
File Batch Build.
Å
Select the .BLD file you just created. ACCOL Workbench will perform a build
operation on each source file in the order in which they appear in the .BLD file.
If necessary, the build process can be aborted by clicking on Actions
Stop Build, or by clicking on the Stop Build icon, shown at left.
ACCOL Workbench User Manual
18-3
Å
Using the Build Command
Errors will be displayed in the window.
Once you have corrected the errors, you can initiate another Batch Build. Repeat
this process until compilation and linking are successful for all files.
Using the Build Command
18-4
ACCOL Workbench User Manual
Chapter 19 - Using the DOCUMENT Command
to Generate an LST File
Although an ACCOL Source File displays all ACCOL structures including modules,
tasks, signals, etc., there is certain other information which might be useful to you
as you debug your ACCOL load, but which is not included in the source file. For
example, it would be nice to know everywhere a given signal is used in the file. This
sort of information is provided in the LST File.
To generate an LST file from the currently open ACCOL source file, click on the
Document icon, shown above, or click on Actions Document. ACCOL Workbench
will generate a file with the extension (.LST) and the same file base name as the
ACCOL source file.
Å
Besides listing all ACCOL structures, similar to the listing in the (.ACC) file, the
(.LST) file includes the following types of information:
Signal Cross-Reference
This part of the .LST file shows where every signal in the source file is used. The
cross-reference for one signal is shown, below:
STATION1.TEMP.DEGF
tsk
1 ln
10 ANIN
INPUT
tsk
1 ln
50 AVERAGE INPUT
tsk
1 ln
80 CALC EQ
tsk
1 ln
80 CALC EQ
79 Signal
tsk
1 ln
80 CALC EQ 130 Signal
tsk
1 ln
80 CALC EQ 140 Signal
tsk
1 ln
80 CALC EQ 160 Signal
tsk
1 ln
80 CALC EQ 170 Signal
List
1 Element
2
78 Signal
20
From the figure, you can see that the signal STATION1.TEMP.DEGF is used in an
ANIN module, in an AVERAGER module, in several lines of a CALCULATOR
module, and in a signal list.
NOTE: Another method for performing a signal cross-reference is discussed in
Chapter 14.
Load Statistics
This part of the .LST file shows how many structures of each type (signals, arrays,
signal lists, etc.) are included in the ACCOL file.
ACCOL Workbench User Manual
19-1
Using the Document Command
Memory Usage and Memory Map
The LST file also displays information on the amount of available memory in the
ACCOL load, and how memory is currently used.
In addition, a memory map is available which provides information which may be
useful to Bristol Babcock Field Service personnel, to help diagnose controller
memory problems.
Using the Document Command
19-2
ACCOL Workbench User Manual
Chapter 20 - Reverse Compiling an ACO File to Get an
ACC File
Normally, the ACCOL programmer creates an ACCOL source file, saves it, and uses
the "Build" command to generate an ACCOL Object File and an ACCOL Load File.
Reverse compiling is the process by which an ACCOL Object (.ACO) file is
translated back into the ACCOL source (.ACC) file. This should only be necessary if
an existing ACC file has been lost or corrupted.
To reverse compile the ACO file, click on File
appear.
ÅReverse. The Open dialog box will
Select the ACO file which you would like to reverse and click on [Open]. If an
existing ACC file would be over-written by the Reverse operation, you will be
prompted to confirm that you want to proceed.
NOTE: Note, any in-line comments, previously entered, will not appear in the new
ACC file.
Performing A Batch Reverse
If you have several different ACO files, from which you would like to re-generate
ACC files, you can do this by using the Batch Reverse feature. To do this, create a
text file (using any ASCII text editor) with the extension (.REV). Each line of the
file should be the name of one of the ACCOL object files (without the file extension
.ACO).
ACCOL Workbench User Manual
20-1
Reverse Compiling
Save the file in the same directory as your ACCOL files, and click on File
Reverse.
ÅBatch
The Open dialog box will appear. Select the .REV file you just created. ACCOL
Workbench will perform a reverse operation on each ACO file in the order in which
they appear in the .REV file.
Reverse Compiling
20-2
ACCOL Workbench User Manual
Chapter 21 - Operating ACCOL Workbench in On-Line
1
Mode
The previous sections of this manual have covered the methods required for creating an
ACCOL source (.ACC) file, and building an executable ACCOL Load (.ACL) file. There
are some other important steps, however, to getting an ACCOL load ‘up-and-running’:
"
Downloading - The ACCOL Load file cannot be executed until it has been
downloaded into the memory of the Network 3000 controller.
"
Debugging - Like programmers in any language, even the most experienced
ACCOL programmers may encounter problems when they first try to run a new
program. Incorrect data may be generated, or certain aspects of the program
logic may need to be ‘fine-tuned’ in order to obtain the desired results. The
programmer may need to examine task execution closely, on a step-by-step basis,
or disable certain modules in order to isolate problems. Once the problem has
been located, it may be necessary to perform on-line edits in order to correct it.
This may involve the ‘re-wiring’ of signals on module terminals, or the changing
of signal or array values. This entire process of trouble-shooting errors in a load
is referred to as debugging.
IMPORTANT NOTES
All on-line operations require that Open BSI communications be active.
Only certain sections of the ACCOL load can be edited on-line; other
sections can only be edited off-line, as described in previous sections of
this manual. NOT all controller firmware versions support on-line
operation. Check the ’Hardware and Software Requirements’ (Chapter 2)
to determine whether your controller allows on-line operation with
ACCOL Workbench.
On-line changes to ACCOL load structures occur in the ACCOL load
executing in the unit only; users must explicitly save the changes to the
ACCOL files on the PC hard disk before exiting your debugging session.
Otherwise, if the unit resets, and needs to be re-downloaded, the ACCOL
load on your hard disk WOULD NOT INCLUDE THE CHANGES YOU
MADE PREVIOUSLY, and so the changes would be lost. Furthermore,
you would be prevented from making additional on-line edits because
there would be a load mismatch error. On-line changes will also NOT be
reflected in any ACCOL load stored in FLASH memory.
1
On-line operation of ACCOL Workbench is NOT compatible with the EGM 3530 or RTU 3530.
ACCOL Workbench User Manual
21-1
Operating ACCOL Workbench in On-Line Mode
Activating the Downloader
Å
With Open BSI Communications active, click on the icon shown above, or click on
Actions Download. The Open BSI Downloader will be activated. For instructions on
using the Downloader, see the Open BSI Utilities Manual (document# D5081).
Starting Debug Mode
Debugging is performed on-line, therefore Open BSI communications must be active. In
addition, in order to use Debug Mode, the ACCOL load file which is currently executing
in the Network 3000-series controller must have the same internal version number as
the ACCOL source file residing on the PC hard disk. If this is NOT the case, the
ACCOL load file must be re-built and downloaded into the controller, in order for
debugging operations to commence. For information on building an ACCOL load file,
see Chapter 18. For information on downloading, see ‘Activating the Downloader’
earlier in this section, as well as the Open BSI Utilities Manual (document# D5081).
Å
In order to start debug mode, click on the Debug icon, shown above, or click on
Actions Debug.
The Select New Node dialog box will
appear. Use the list box to choose the
controller (node) which contains the
ACCOL load you want to debug. Click
on [OK] to access the node.
The Sign On dialog box will appear.
Enter the password, or both the
username and password (depending on
the security scheme you are using) and
click on the [OK] push button.
Once successfully signed on, you can
proceed to debug and edit the load as
described in the remaining portions of this
section.
Exiting Debug Mode
Å
To leave debug mode, and return to editing the load file, off-line, click on the icon,
shown above, or click on Actions Stop Debugging. If you have not saved your edits,
you will be prompted to do so.
Operating ACCOL Workbench in On-Line Mode
21-2
ACCOL Workbench User Manual
Determining the Editing Capabilities For The Current ACCOL Load
While operating ACCOL Workbench in
on-line mode, a section of the file can be
viewed by double-clicking on it.
On-line editing, however, is only
supported for certain specific aspects of
the load. These are: Signal values, Signal
inhibit/enable bits, Read-only array
values, Read-write array values, Format
codes, Archive titles and associated
signals, Module terminals and Calculator
equations. Information on editing each of
these is included later in this chapter.
To see how much free memory exists in
your ACCOL load for on-line editable
structures, and to determine which on-line
editing features are supported by the
revision of firmware running in the
controller, you can check the Online
Editing Capabilities dialog box.
Å
Å
To access this dialog box, click on: View
Node Information Edit Capabilities.
The top portion of the dialog box lists all of the on-line editing features supported by the
revision of firmware running in the controller. The bottom portion of the dialog box lists
the amount of free memory remaining for editing selected structures in the current
ACCOL load.
Click on the [OK] push button to exit the dialog box.
Summary of Debugging Techniques
There are different techniques available for debugging errors in an ACCOL load. Most
programmers make use of a combination of these techniques when troubleshooting a
load.
ACCOL Workbench User Manual
21-3
Operating ACCOL Workbench in On-Line Mode
Modifying Task Execution with Breakpoint, Abort, and Skip Flags
ACCOL Workbench supports the use of debugging flags which allow the execution of
the task to be modified by either skipping certain modules or sections of a task, or by
pausing execution, and allowing the programmer to execute the task slowly, one line at
a time. This assists the programmer in isolating potential problem areas of the task,
and allows other ACCOL structures affected by the task (arrays, signals, etc.) to be
examined at each step of execution. See ‘Using Debugging Flags in an ACCOL Task’
later in this section.
Checking For Error Codes in Error and Diagnostic Arrays
Some types of errors can be easily detected if you set up your ACCOL load so that you
can access error codes that the system provides for you.
The array designated by the system signal #ERARRAY stores any task execution error
codes which may be generated. A task execution code might be generated by an illegal
operation, such as, an attempt to divide by zero. For information on defining an error
array, see the ‘System Signals’ section of the ACCOL II Reference Manual (document#
D4044).
ACCOL also supports the use of a diagnostic array to detect failures in the controller’s
process I/O boards. This diagnostic array is designated by the system signal
#DIAG.002. For information on setting up this array, and for interpreting the
diagnostic codes, see the ‘System Signals’ section of the ACCOL II Reference Manual
(document# D4044).
Task execution error codes in the #ERARRAY must be viewed on-line, while the load is
executing. ACCOL Workbench includes an Error Array Window specifically for this
purpose which displays the array, along with a description of what the error means. It
is discussed under 'Viewing the Error Array Window' later in this chapter.
Data in the #DIAG.002 diagnostic array must also be viewed on-line, while the load is
executing. It can be viewed through the Open BSI DataView program, or by doubleclicking on the icon for the array during on-line operation. There is, however, no
dedicated window for viewing the diagnostic array.
Checking System Signals Which Report Error Information
Several types of errors conditions are reported via dedicated system signals. These
system signals include:
System Signal
#ERRCT.nnn
#LINE.nnn
#LINKx.nnn
#NODE.nnn
#OCTIME.ERROR
Type of Error Condition Reported
The number of errors for task nnn.
Communication line failures for line nnn.
LIU and RASCL communication link failures.
Slave node failures for node nnn.
Time discrepancies between master and slave nodes.
Operating ACCOL Workbench in On-Line Mode
21-4
ACCOL Workbench User Manual
#RCNT.nnn
#RDN..
#IPSTAT..
Task rate slippage errors for task nnn.
Redundancy status and errors.
IP communication & configuration errors.
Information on redundancy status and errors is included in the ‘Redundancy’ section of
the ACCOL II Reference Manual (document# D4044). Information on other system
signals is included in the ‘System Signals’ section of the same manual.
Error codes in system signals may only be viewed on-line, while the ACCOL load is
executing. This can be done via Open BSI DataView, or by the methods discussed later
under ‘Viewing and Changing Data On-Line’.
Checking Module Terminals and Modules Which Report Error Codes
Many ACCOL modules include STATUS or ERROR terminals for reporting error and
status codes. If such a terminal exists for a given module, it is suggested that the
programmer ‘wire’ a signal to that terminal to capture the error or status code.
In addition, there are four dedicated modules which report error and status information
on certain aspects of either the ACCOL load, or the Network 3000 controller. They are:
"
EAStatus Module - This module is used to provide information on
expanded addressing slave nodes on an Expanded Addressing Master
Port.
"
Nodestatus Module - This module provides information on slave nodes
connected to a Master Port, an Expanded Addressing Master Port, or for
transmitters connected to a GBBTI board.
"
Portstatus Module - This module provides information on the status of
communication ports.
"
RIOStats Module - This module provides information on remote I/O
nodes.
Each of these modules is discussed in the ACCOL II Reference Manual (document#
D4044).
Error codes may only be viewed on-line, while the ACCOL load is executing. This can
be done via Open BSI DataView, or by the methods discussed later under ‘Viewing and
Changing Data On-Line’
ACCOL Workbench User Manual
21-5
Operating ACCOL Workbench in On-Line Mode
2
Using Debugging Flags in an ACCOL Task
Debugging flags help the ACCOL programmer isolate where a problem exists in the
ACCOL task. Debugging flags allow the programmer to:
"
"
"
"
Skip particular modules or control statements.
Abort execution of sections of a task, from a particular point, onwards.
Stop execution of the task at a particular breakpoint.
Step through the task execution manually, one module or control
statement at time.
Each of these features assists the ACCOL programmer in seeing, in detail, what is
occurring in the ACCOL load, as it is executing. By stopping execution at certain
points, and then looking around at various signal or array values, it is possible to better
understand the interaction of various ACCOL modules, and identify errors in the
program’s logic. Knowing such information, allows the programmer to isolate problem
areas of the task. Once the programmer identifies the source of a particular problem,
changes may often be made on-line to correct it. See ‘Viewing and Changing Data OnLine’ and ‘Editing ACCOL Load Structures On-Line’, later in this section.
Information on accessing the ACCOL task, and using the debug flags is presented on
the pages that follow.
2
Debugging flags CANNOT be used in Task 0, because it is a non-executing task.
Operating ACCOL Workbench in On-Line Mode
21-6
ACCOL Workbench User Manual
Accessing the ACCOL Task
To commence debugging a particular task,
double-click on the icon for the task you
would like to debug. The Task Debug
window will appear on the screen. It is
divided into three sections:
Top Section:
Code for this task
Center Section:
Current signal values
in the controller
The Change Signal
Value dialog box
may be accessed
by clicking on the
signal value
Status Area
Bottom Section:
Tabs to choose which module
terminals should be displayed
in the center section.
Click on the signal name
to get detailed signal
information
The top section of the window displays actual code for this task. A scroll bar is provided
to move through the code, and bring other parts of the task into view. The programmer
can insert debugging flags on selected task lines, which modify how the task executes.
There are debugging flags to pause execution (breakpoint flag), to cancel execution
beyond a certain task line (abort flag), and to ignore certain modules or statements
(skip flag).
The bottom section of the window shows a series of tabs, each of which is labeled with a
task line number, and the module or control statement on that task line. If there are too
many task lines to show all tabs in the window, the scroll bar may be used to bring
other tabs into view.
The center section of the window displays signal values. Once a particular tab in the
bottom section is selected, the signals associated with that task line (i.e. module
terminals) are presented in the center section. By clicking on the signal value, the
programmer can change signal values, or inhibit/enable bits through the Change
Signal Value dialog box. Information on editing signals is discussed in the ‘Viewing and
Changing Data On-Line’ section.
ACCOL Workbench User Manual
21-7
Operating ACCOL Workbench in On-Line Mode
Setting a Breakpoint
A breakpoint is a debugging flag that is placed on a task line at which you would like
execution to pause. As the ACCOL load executes, it will pause immediately before the
breakpoint. This allows the ACCOL programmer to view the state of module terminals
immediately before the breakpoint, and immediately after the breakpoint. When the
execution pauses, the ACCOL load enters what is called step mode. Step Mode allows
the programmer to execute one task line at a time, by clicking on the Single Step icon.
(See ‘Using Step Mode’, later in this section.)
To set a breakpoint click directly on the numbered task line where the breakpoint
should be placed. Do NOT attempt to place a breakpoint within a module or within a
group of calculator equations. Breakpoints can only be placed on task lines.
With the task line highlighted, click on the Breakpoint icon, shown above.
Alternatively, you can click on the task line, then click on “Debug” in the menu bar, OR- press the right mouse button, and then choose “Set Breakpoint” from the menu.
A breakpoint flag, which looks like the breakpoint icon, will appear to the left of the
task line. Execution of the task will pause at the breakpoint, and automatically enter
Step Mode. The programmer can then use Step Mode to step through execution of the
task. See ‘Using Step Mode’ later in this section.
Breakpoint flag
causes execution
to pause
After reaching breakpoint, execution
automatically enters step mode
To advance to next task line,
click on Single Step icon
To remove the breakpoint, click on the line containing the breakpoint, then
click on the Clear Debug Flags icon, shown at left, -OR- click on “Debug” in
the menu bar (or press the right mouse button) and click on “Clear Flags” in
the menu. For more information on removing debug flags see ‘Viewing, Setting,
and Clearing Debug Flags’ later in this section.
Operating ACCOL Workbench in On-Line Mode
21-8
ACCOL Workbench User Manual
Setting An Abort
To set an abort in a task cancels execution of the line containing the abort flag, and any
task lines following the line containing the abort flag. Execution of the task resumes
from the beginning, at the next scheduled time, according to the task rate. This feature
is useful if there are modules or statements beyond a certain task line, which you want
to disable or ignore.
To set an abort, click on the numbered task line where the abort should occur. Do NOT
attempt to place an abort flag within a module or within a group of calculator
equations. Abort flags can only be placed on task lines.
With the task line highlighted, click on the Abort icon, in the menu bar. Alternatively,
you can set an abort by clicking on the task line, then clicking on “Debug” in the menu
bar (or click the right mouse button) and click on “Set Abort” in the menu.
Abort flag causes
this task line, and all
subsequent task lines
to be ignored
Modules on task line 70 and
above will NOT be executed
An Abort flag, which looks like the Abort icon, will appear to the left of the task line.
Execution of the task beyond the line containing the abort flag will be canceled.
To remove the Abort Flag, click on the line containing the flag, then click on
the Clear Debug Flags icon, shown at left, -OR- click on “Debug” in the menu
bar (or click the right mouse key) and click on “Clear Flags” in the menu. For
more information on removing debug flags see ‘Viewing, Setting, and Clearing
Debug Flags’ later in this section.
ACCOL Workbench User Manual
21-9
Operating ACCOL Workbench in On-Line Mode
Setting A Skip
Sometimes it may be desirable to disable the execution of certain modules or
statements in the task. This can be accomplished by setting a skip flag. When the task
executes, any module or control statement which is on a task line containing a Skip
Flag is ignored.
To set a skip, click on the numbered task line which should be ignored. Do NOT
attempt to place a skip flag within a module or within a group of calculator equations.
Skip flags can only be placed on task lines.
With the task line highlighted, click on the Skip icon, shown above. Alternatively, you
can set a skip by clicking on the task line, and then clicking on “Debug” in the menu
bar (or click the right mouse button) and then click on “Set Skip” in the menu.
A Skip flag, which looks like the Skip icon, will appear to the left of the task line.
Execution of that particular task line will be disabled.
Skip Flag
disables
execution
of this
module
To remove the Skip Flag, click on the line containing the flag, then click on the
Clear Debug Flags icon, shown at left, -OR- click on “Debug” in the menu bar
(or click the right mouse button), and click on “Clear Flags” in the menu. For
more information on removing debug flags see ‘Viewing, Setting, and Clearing
Debug Flags’ later in this section.
Operating ACCOL Workbench in On-Line Mode
21-10
ACCOL Workbench User Manual
Using Step Mode
Step Mode allows the ACCOL programmer to execute the ACCOL task manually, one
line at a time. This mode gives the programmer time to examine signal values and
modules before and after each task line is executed.
Step Mode is automatically activated anytime task execution reaches a
breakpoint flag. To execute the next sequential task line, click on the Single
Step icon, shown at left. The next task line, will execute, and then execution
will pause, again.
The next task line to be executed is always highlighted, as shown in the figure, above.
To return to normal execution (until this breakpoint, or another breakpoint is
reached) click on the Run Task icon, shown at left.
To enter Step Mode in a task which does not have any breakpoints defined,
click on the Step Mode icon, shown at left.
ACCOL Workbench User Manual
21-11
Operating ACCOL Workbench in On-Line Mode
Clearing All Debug Flags In a Task
Å
To remove all flags from the current task, click on Debug Clear Flags For All
Modules.
NOTE:
Because inadvertently leaving a debugging flag active could
negatively affect execution of the load, most users clear all
debugging flags when debugging is finished. It is possible, if
desired, however, to leave debugging flags active, even after
exiting Debug Mode, based on entries in the Configure
Workspace dialog box. See ‘Appendix D - Customizing the
User Environment’ for details.
Viewing, Setting, and Clearing Debug Flags
While debug flags can be viewed, set, and cleared in the Task Debug window, it is also
possible to perform operations on debug flags from outside of the task. This is
performed from the Debug Flags for Load dialog box.
Å
Å
To view which debug flags have been set in the load, click on View Node
Information Debug Flags.
The Debug Flags for Load dialog box displays a list of all debug flags currently set. The
“Task” field shows the task number containing the flag. The “Module” field shows the
task line where the flag has been set, and the “Type” field displays which kind of
debug flag has been set (abort, breakpoint, or skip).
Operating ACCOL Workbench in On-Line Mode
21-12
ACCOL Workbench User Manual
To remove a debug flag, click on the flag in the Debug Flags for Load dialog box, so it is
highlighted; then click on the [Clear] push button. The flag will be removed from the
load. To remove all debug flags from the load, click on the [Clear All] push button.
NOTE:
Because inadvertently leaving a debugging flag active could
negatively affect execution of the load, most users clear all
debugging flags when debugging is finished. It is possible, if
desired, however, to leave debugging flags active, even after
exiting Debug Mode, based on entries in the Configure
Workspace dialog box. See ‘Appendix D - Customizing the
User Environment’ for details.
To set debug flags from within the Debug Flags for Load dialog box, click on the [Add]
push button. Enter the task number in the “Task” field, the task line which should
have the debug flag in the “Module” field, and then select the “Type” of flag from the
list box, and click on the [OK] push button. The debug flag will be added.
ACCOL Workbench User Manual
21-13
Operating ACCOL Workbench in On-Line Mode
Viewing the Error Array Window
If the number of a valid read/write analog array has been entered on the #ERARRAY..
system signal, the array will be used to store task execution error codes. (For more
information on configuring this array, see the ’System Signals’ section of the ACCOL II
Reference Manual (document# D4044)).
During the debugging process, the ACCOL programmer can call up the Error Array
Window to view a description of the errors in the error array. The Error Array Window
may be accessed in on-line mode by clicking on Window Error Array.
Å
The "Task" column of the Error Array Window represents the Task number. A
description of the error appears in the "Error" column. The "Count" column represents
the error counter for this task, as reported via the #ERRCT.nnn. system signal. The
"Line Number" column indicates the line number in the Task which contains the
module in error; the actual module name appears in the "Module" column. The
"Expression Number" column is only used when a Calculator Module is in error; it
indicates the expression number within the Calculator which caused the error; if this is
NOT a Calculator Module, the "Expression Number" is not applicable.
NOTE: Only one error per task can be displayed at any one time. If more errors are
present, the next error will only be visible after the current error has been corrected.
In the Error Array Window, shown above, the ACCOL load has three tasks; and task 1
is the only task which has an error. The error is a floating point error in the first
expression of the Calculator Module on Task line 20.
Operating ACCOL Workbench in On-Line Mode
21-14
ACCOL Workbench User Manual
3
If an Error Array Tab has been configured , the same error information can be viewed
from within the Task Debug window for the current task by clicking on the "Error
Information" file tab, and, if necessary, dragging the window to uncover the error
information.
3
To configure an Error Array Tab, select the "Enable Error Array Tab in Task Debug" option in the
Online page of the Workspace Settings dialog box. For more information on this dialog box, see
Appendix D.
ACCOL Workbench User Manual
21-15
Operating ACCOL Workbench in On-Line Mode
Viewing and Changing Data On-Line
Any portion of the ACCOL load can be viewed on-line, simply by double-clicking on the
associated section. Only certain parts of the load, however, can be edited on-line.
On-line editing is the process of changing your ACCOL load, while it is executing in the
Network 3000 controller. On-line edits fall into one of two possible categories :
1) Those edits which only affect data in the controller (signal values, signal
inhibit/enable values, read/write array values). Such changes are reflected in
the running ACCOL load, but do not affect the structure of the ACCOL load
file. Re-downloading the controller will over-write any such changes.
2) Those edits which change the structure of the load file itself.
The first type of edit will be discussed here, the second type of edit will be discussed
later, in this section, under ‘Editing ACCOL Load Structures On-Line’.
Methods For Changing Data
There are several different windows which
allow data to be changed. These include
the Task Debug Window (discussed
previously), the Watch Window, the
Detailed Signal Window, the Data Array
Window, and the Signal Search Window.
In general, changes are performed by
clicking on the value to be changed, and
then specifying the new value in a dialog
box, such as the Change Signal Value
dialog box, or Change Value dialog box (in
the case of arrays).
These various windows and dialog boxes will be discussed in the pages which follow.
Operating ACCOL Workbench in On-Line Mode
21-16
ACCOL Workbench User Manual
Using the Watch Window
During the debugging process, the ACCOL programmer can save, in a window, a list of
signals, for which data will be collected regularly. This is called the Watch Window
and is useful because it allows the programmer to refer quickly to important signals,
instead of searching for them within the various tasks, each time they are needed.
Adding Signals to the Watch Window
To add a signal to the Watch
Window, first, you need to call up
the Signal Detail window for the
signal.
To do this click on the signal name,
in the center part of the task
window. Alternatively, you can
click on the signal in the upper
part of the window, and do one of
the following:
Click on the signal you want to add
to the Watch Window
1) Click on the Quick Watch icon
(the eyeglasses).
-or2) Click
on
Debug Quick
Watch.
-or3) Click the right mouse button
then click on “Quick Watch”
in the pop-up menu.
Å
Any of these methods will call up
4
the Signal Detail Window.
Now, click on the [Add to Watch]
push button to add the signal to
the Watch Window. A typical
example of a Watch Window is
shown on the next page.
Click here to add a signal to the
Watch Window
4
This window is discussed later under ‘Using the Signal Detail Window’.
ACCOL Workbench User Manual
21-17
Operating ACCOL Workbench in On-Line Mode
Another way to add signals to the Watch Window is to drag the signal name from the
Signals window into the Watch Window.
Changing Signal Values in the Watch Window
To change the value of a signal
in the Watch Window, click on
its value field, and use the
Change Signal Value dialog
box.
To toggle the status of a signal’s
inhibit / enable bit(s), click on
the field, and respond to the
message box.
Click here to add
additional signals
to the Watch
Window
Click here to
toggle a signal’s
inhibit/enable
status
Click here to
access the
Change Signal
Value dialog
box for this
signal
To call up the Signal Detail
Window for a signal visible in
the Watch Window, click on its
signal name.
Adding A Signal to the Watch Window By Selection:
It is possible to add a signal to the Watch Window by highlighting the signal within a
task, and pressing the right mouse button and selecting “Selection to Quickwatch”
from the pop-up menu.
Operating ACCOL Workbench in On-Line Mode
21-18
ACCOL Workbench User Manual
Adding/Deleting Watch Window Signals
Å
Additional signals may be added to the Watch Window by clicking on
Edit Insert, -OR- by clicking on the icon shown at left.
This will activate the Signal Properties
dialog box. Enter the name of the signal to
be added, and click on the [OK] push
button. Another way to add signals to the
Watch Window is to drag the signal name
from the Signals Window into the Watch
Window.
Å
In order to substitute or delete signals from the Watch Window, data refresh of the
window must be turned off first. To do this, click on Edit Refresh, so that the check
mark next to it goes away.
Å
Once data refresh is off, you can delete a signal from the Watch Window by
clicking on Edit Delete, -OR- click on the Delete icon, shown at left.
To substitute a different signal at a given position of the Watch List, click on the signal
to be replaced, then click on “Modify” in the pull down menu. Change the signal name
in the Signal Properties dialog box, then click on the [OK] push button.
In order to restart data collection for the window, turn refresh back on.
ACCOL Workbench User Manual
21-19
Operating ACCOL Workbench in On-Line Mode
Using the Change Signal Value Dialog Box
To change a signal’s value, click on the value field for the signal in any online/debugging window (such as a signal list window, a Signal Search window, a Watch
Window, or a Detailed Signal Window). The Change Signal Value dialog box will
appear.
The Change Signal Value dialog box allows the ACCOL programmer to change a
signal’s value or status, and also allows the user to toggle the state of signal
inhibit/enable bits, and the questionable data bit.
To change a signal value, enter the new
value in the “New Value” field. (If this is a
logical signal, use the list box control in this
field to toggle the state, or click on the
[Toggle] push button.)
If desired, signal inhibit/enable bits, and the
questionable data bit, can be altered using
the list box controls in those fields.
When finished making selections, click on
the [OK] push button to send the changes to
the controller.
Toggling Signal Inhibit/Enable Bits
If desired, the user can toggle the state of a signal’s manual inhibit/enable, control
5
inhibit/enable or alarm inhibit/enable bits.
To do this, click on the inhibit/enable bit
field in any on-line/debugging window,
(such as a signal list window, a Signal
Search window, a Watch Window, or a
Detailed Signal Window). A message
box will appear, asking for confirmation
that the inhibit/enable state should be
changed. Click on the [Yes] push button
to change the state -OR- the [No] push
button to cancel the change.
Signal inhibit/enable bits may also be changed from within the Change Signal Value
dialog box. See ‘Using the Change Signal Value Dialog Box’ for details.
5
Alarm inhibit/enable bits are only applicable for analog alarm signals or logical alarm signals.
Operating ACCOL Workbench in On-Line Mode
21-20
ACCOL Workbench User Manual
Conducting A Signal Search
If desired, the user can search the load for all signals which share certain common
characteristics, such as the same signal base name, or the same inhibit/enable status.
To perform such a search, click on Window New Search Window. For additional
details on signal searches, see the ‘Using DataView’ section of the Open BSI Utilities
Manual (document# D5081).
Å
Using the Signal Detail Window
The Signal Detail window displays several pieces of information about the signal
including its current value, the signal base name descriptive text, if any, as well as the
read and write priorities for the signal. Additional information is provided for alarm
signals.
Click here to add a signal to the
Watch Window
The [Add to Watch] push button
allows the signal to be added to the
Watch Window (see ‘Using the Watch
Window’.)
To change the signal’s value, activate
the Change Signal Value dialog box
by clicking on the current value. See
‘Using the Change Signal Value
Dialog Box’ for more information.
Click here to toggle the
inhibit/enable state of the
signal
Click here to activate the
Change Signal Value dialog
box
ACCOL Workbench User Manual
21-21
To toggle the state of inhibit/enable
bits, click on those fields. See
‘Toggling Signal Inhibit/Enable
Bits’.
Operating ACCOL Workbench in On-Line Mode
Changing Values in a Read/Write Data Array
To change one of more data values in a
Read/Write Data Array double-click on the icon
for the array you want to alter.
An array window will appear on the
screen.
Click on the array entry you want to
change, and enter the new value in the
Change Value dialog box.
Click on the [OK] push button to send the
new value to the controller.
Operating ACCOL Workbench in On-Line Mode
21-22
ACCOL Workbench User Manual
Changing the Floating Point Format of Data
Å
To change the floating point format of data presented in a window, click on
Format Floating Point. The Floating Point Format dialog box will appear from
which you may change the format of data. For information on using this dialog box, see
the ’Using DataView’ section of the Open BSI Utilities Manual (document# D5081).
Toggling the First Column of an Array Between Analog Data and Timestamp Data
In some arrays, the first column is reserved for the Julian date/time stamp. To convert
these time/date stamps to the numerical total used by the system to store the date and
time, and vice versa, click on Format View First Column as Date/Time.
Å
Keeping Column 1 Visible While Scrolling Through An Array
As you scroll through columns of the data array, the first column (which may contain
date/time stamps) may disappear from the window as higher numbered columns are
brought in to the window. To prevent this, click on Format Freeze First Column.
Å
ACCOL Workbench User Manual
21-23
Operating ACCOL Workbench in On-Line Mode
Editing ACCOL Load Structures On-Line
The previous pages discussed using ACCOL Workbench to change data values in the
the running ACCOL load. Changes to certain ACCOL structures may also be made online. This type of change involves editing existing module terminals, read-only array
values, signal list entries, titles and signals in an archive definition, Calculator
equations, or Format statements. These sorts of edits, when made on-line, affect not
just data, but the existing ACCOL structures in the load. Because of this, these edits
must also be saved to the copy of the ACCOL load file on the hard disk of the PC.
To perform edits on Formats, Read-Only Arrays, Signal
Lists, and Archives click once on the section of the load
to be edited, then choose Edit Change Online.
Editing is then performed in an Edit Code window (in
the case of Formats and Signal Lists), in an array
window (in the case of Read-Only Arrays), or in a dialog
box (in the case of Archives).
Å
To perform edits on module terminals or Calculator
equations, double-click on the task which holds them. In
the Task Debug window, click on the module name to be
edited, for example, the AVERAGER line, in the figure
at right. Choose Edit Change Online. Edits are
performed in an Edit Code window.
Å
No matter what type of section you have been editing, when editing has been
completed, changes must be explicitly sent to the controller. For all types, except the
Archive section, this is performed by clicking on Edit Commit Changes. For Archive
edits, use the [Commit] push button.
Å
A box will appear, briefly, on the screen showing
the transmission of changes to the controller.
If you attempt to exit a section you have edited,
without committing changes, a message box will
appear (as shown at right).
When the debugging session is finished, be sure to save changes to the load file on the
hard disk; otherwise it will be incompatible with the load running in the controller, and
any additional on-line editing will not be permitted, without first re-building the file,
and re-downloading it into the controller, thereby overwriting the previous changes.
Operating ACCOL Workbench in On-Line Mode
21-24
ACCOL Workbench User Manual
Changing Values in a Read-Only Data Array
To change one of more data values in a Read-Only Data Array click once on the icon for
the array you want to alter.
Å
Next, click on Edit Change Online. An array window will
appear on the screen.
Click on the array entry you want to
change, and enter the new value in the
Change Value dialog box. Click on the
[OK] push button. The changed array
entry will be highlighted in the window.
Å
When all changes are complete, click on
Edit Commit Changes. This will send
the changes to the load running in the
controller. Alternatively, you can abandon
the changes, instead of committing them,
by choosing Edit Cancel Changes.
Å
NOTE: Any array to be edited must already exist; you cannot create new arrays, or
change the dimensions (number of rows and columns) on-line. Changes such as these
must be performed in off-line mode.
ACCOL Workbench User Manual
21-25
Operating ACCOL Workbench in On-Line Mode
Editing Titles and Signals in an Archive Definition
To view the entries in an archive file,
simply double-click on the icon for the
archive. These entries CANNOT be
changed.
Å
However, to change one of more of the column titles or signals defined in an archive,
click once on the icon for the archive you want to edit, then click on Edit Change
Online.
The first page for the Archive Definition
will appear. You CANNOT change entries
on this page; click on the ’Column’ tab.
The Column page allows you to edit the
archive titles and associated signal names.
Choose the column you want to edit, then
enter a new title or signal name in the
“Title” or “Signal” fields, below, then
click on the [Modify] push button.
To send the changes to the controller, click
on
the
push
button.
[Commit]
Alternatively, click on the [Cancel] push
button to abandon the changes.
NOTE: Any archive to be edited must already exist; you cannot create a new archive, a
new signal name, or change the number of columns on-line. Changes such as these
must be performed in off-line mode.
Operating ACCOL Workbench in On-Line Mode
21-26
ACCOL Workbench User Manual
Editing A Format
To edit the structure of an existing format, click once on the icon for
the format you want to modify.
Å
Next, click on Edit Change Online. An
Edit Code window, containing the source
code for the format, will appear.
Make changes, as necessary. Workbench code-editing features (find, replace, cut, copy,
and paste) are accessible from icons, -OR- from the “Edit” pull down menu, -OR- by
clicking the right mouse button, and selecting items from the pop-up window.
Å
When changes are complete, click on Edit Commit Changes. This will send the
changes to the load running in the controller. Alternatively, you can abandon the
changes, instead of committing them, by choosing Edit Cancel Changes.
Å
NOTE: Any format being edited must already exist, and the structures it references
must already exist. You cannot create an all new format on-line, or reference nonexistent signals in the format. Changes such as these must be made off-line.
ACCOL Workbench User Manual
21-27
Operating ACCOL Workbench in On-Line Mode
Editing A Signal List
If you simply want to change the value of signals in the signal
list, or change their inhibit/enable bits, double-click on the icon
for the Signal List you want to edit, then click on the value or
inhibit bit you want to change, and make the necessary edits,
as described in ‘Using the Change Signal Value Dialog Box’ or
‘Toggling Signal Inhibit/Enable Bits’.
To remove, add, or change the signals in
the list, click once on the icon for the list
you want to edit, next, click on
Edit Change Online. An Edit Code
window, containing the source code for the
signal list, will appear.
Å
Make changes, as necessary. Workbench code-editing features (find, replace, cut, copy,
and paste) are accessible from icons, -OR- from the “Edit” pull down menu, -OR- by
clicking the right mouse button, and selecting items from the pop-up window. The ‘drag
and drop’ capability may be used to drag signals from the Signals window, into the
signal list.
Å
When changes are complete, click on Edit Commit Changes. This will send the
changes to the load running in the controller. Alternatively, you can abandon the
changes, instead of committing them, by choosing Edit Cancel Changes.
Å
NOTE: Any signal list being edited must already exist, and any signals added to it
must already exist in the ACCOL load.
Operating ACCOL Workbench in On-Line Mode
21-28
ACCOL Workbench User Manual
Editing Module Terminals and Calculator Equations in a Task
To edit an existing Calculator equation, or
to ‘re-wire’ a different signal to a terminal
in an existing module, double-click on the
icon for the task containing the module or
Calculator equation you want to modify.
Next, click on the numbered task line
containing the module you want to edit,
for example, the ANIN module name, as
shown at right. (NOTE: If you’re editing
an equation, DO NOT click on the
Calculator’s
individually
numbered
equation lines, click on the line containing
the word CALCULATOR .)
Å
Next, click on Edit Change Online. An
Edit Code window, containing the source
code for the selected module will appear.
Make changes, as necessary. Workbench
code-editing features (find, replace, cut,
copy, and paste) are accessible from icons OR- from the “Edit” pull down menu, -ORby clicking the right mouse button, and
selecting items from the pop-up window.
The ‘drag and drop’ feature may be used to
copy signals from the Signal Window into
the Edit Code window for the task.
Å
When changes are complete, click on Edit
Commit Changes. This will send the changes to
the load running in the controller. After exiting the
code window, the changed module will appear
highlighted in the task, with a pencil icon next to
it.
Å
Alternatively, you can abandon the changes,
instead of committing them, by choosing Edit
Cancel Changes.
NOTE: Any signals or data arrays referenced in the code must already exist in the
running ACCOL load. New signals or arrays CANNOT be created on-line. Constant
values on module terminals may NOT be changed on-line.
ACCOL Workbench User Manual
21-29
Operating ACCOL Workbench in On-Line Mode
Updating Initial Values In Your ACCOL Source File with Values From the
‘Tuned’ ACCOL Load
As you have made edits to signal values, through the debugging process, you may
decide that you want to update all the initial values in the ACCOL source file with the
current values in the running load. This can be performed using the ValScan program.
You can start the ValScan program from within an ACCOL task in debugging mode by
clicking on the icon, shown above, or by clicking on Actions Initial Val Scan. For
details on how to use the ValScan program, see Appendix E - Using Initial Value Scan Valscan.
Å
Saving Changes to the ACCOL Files on the Hard Disk
When all changes have been made, and sent to the controller using the “Commit
Changes” selection (or [Commit] push button for archives), and any other debugging
has been completed, the user can exit debug mode by clicking on Actions Stop
Debugging.
Å
Although debugging has been completed, the changes in the controller are NOT
reflected in the ACCOL files on the PC hard disk. It is important to save the on-line
changes to these files so that both the ACCOL files on the PC, and executing in the
controller match. Otherwise; additional on-line editing and debugging will not be
possible without re-downloading the unit.
Å
To save changes to the ACCOL files on the PC, click on the save file icon, -OR- click on
File Save. If you do NOT save changes to the file, you will receive the prompt shown
below, when you attempt to exit ACCOL Workbench.
IMPORTANT
Once you have saved your on-line edits, and exited ACCOL Workbench, if you
subsequently open the ACCOL source file, and then save the file (whether or not
you make any changes) you will NOT be allowed to make on-line edits again. This
is because the ACCOL source file’s version number is inconsistent with the
ACCOL load running the controller. In order to make on-line edits again, you
must re-compile the ACCOL load, and re-download it into the controller
Operating ACCOL Workbench in On-Line Mode
21-30
ACCOL Workbench User Manual
Appendix A
Upgrading ACCOL Source Files from Previous
Versions, or Using Files in different CPU Platforms
ACCOL Workbench users attempting to modify an ACCOL source file originally
created with DOS-based ACCOL tools must know the Target node which the new
load will be used in, and edit the *TARGET section accordingly, in an ASCII text
editor, prior to opening the file in ACCOL Workbench. This is also true if you
created the file using an earlier version of ACCOL Workbench, and are now
changing the Target node type from a Real Mode unit to a Protected Mode unit, or
from a Protected Mode unit to a Real Mode unit.
Upgrading Files That Will Go Into a GFC 3308-x, RTU 3305, EGM/RTU
3530, or a 186-based or 386EX Real Mode version of the DPC 3330,
DPC 3335, or RTU 3310:
If you have older ACCOL source (.ACC) files (created with DOS-based versions of
ACCOL Tools software) which you would like to modify in ACCOL Workbench,
certain edits will be necessary in order to upgrade the files.
In particular, certain entries in the *TARGET, and *SIGNALS section, may need to
be changed, or else they will cause errors either when ACCOL Workbench attempts
to parse the file, or during execution of a Build command.
IMPORTANT
ACCOL Object (.ACO) files created with DOS-based ACCOL Tools CANNOT be
reverse compiled by ACCOL Workbench. The old ACCOL reverse compiler (i.e.
REV5, REV4, or REV3, as appropriate) command must be used to generate an
ACCOL source file, in the old format, and then the file must be edited to remove
any unsupported structures. Users should retain their older version ACCOL
Tools software until all .ACO files have been converted to the .ACC format.
Instructions for removing unsupported structures are given below:
*TARGET Section
The *TARGET 3350/80/85 will be rejected by ACCOL Workbench. Use one of the
valid Real Mode target types.
*SIGNALS section
If present, any of the following system signals must be deleted from the source file.
ACCOL Workbench User Manual
A-1
Appendix A
#ERRCT.000.
#OCTIME..
#RDNERR..
#RDNLIM..
*COMMUNICATIONS section
If your ACCOL source file was originally created for an RDC 3350, UCS 3380, or
CFE 3385, and includes Auxiliary I/O Ports (AUX_1 and/or AUX_2) these port
definitions must be removed, and the ports must be re-defined as standard ports
(PORT_A through PORT_D) or, if they are supported in the desired target node
type, as built-in ports (BIP_1 or BIP_2).
*PROCESS-I/O section
Any process I/O board compatible with the target nodes supported by ACCOL
Workbench is supported. The following board types, however, were for the RDC
3350, UCS 3380, and CFE 3385 and so are NOT supported. If present, any of the
following board types must be deleted, and the boards must be re-defined with valid
entries:
MIO, DIO, AIO, LLB
For example, if an RDC 3350 unit had a DIO board (containing 48 digital inputs,
and 32 digital outputs), and its ACCOL source file is being modified for use in a
new 386EX Real Mode controller, the 48 digital inputs would have to be made up by
6 8DI boards, or 3 16DI boards, etc. and the 32 digital outputs would require 4 8DO
boards, or 2 16DO boards, etc. The DIGIN and DIGOUT Modules which reference
these boards would also need to be broken up into multiple modules.
*LOW-LEVEL section
The following Low-Level analog input types were for the RDC 3350 / UCS 3380/
CFE 3385. They are NOT supported in ACCOL Workbench, and must be removed,
and the input types re-defined:
100MV, 1V, 10V, 5V
*TASK section
See the ’Hardware and Software Requirements’ section of the ACCOL II Reference
Manual (document# D4044) for information on which modules are compatible with
the desired target node type.
Appendix A
A-2
ACCOL Workbench User Manual
Upgrading Files That Will Go Into A 386EX Protected Mode version of
the DPC 3330, DPC 3335, or RTU 3310:
If you have existing ACCOL source (.ACC) files (created with Version 5.x or earlier
ACCOL Tools software) which you would like to modify in ACCOL Workbench,
certain edits will be necessary in order to upgrade the files for use in a protected
mode 386EX controller.
In particular, certain entries in the *TARGET, *MEMORY, and *SIGNALS section,
may need to be changed, in an external text editor, prior to opening the file in
ACCOL Workbench. Failure to do this will cause errors either when ACCOL
Workbench attempts to parse the file, or during execution of a Build command.
IMPORTANT
ACCOL Object (.ACO) files created with ACCOL 5.x (or earlier) versions of
ACCOL Tools software CANNOT be reverse compiled by ACCOL Workbench.
The old ACCOL reverse compiler (i.e. REV5, REV4, or REV3, as appropriate)
command must be used to generate an ACCOL source file, in the old format,
and then the file must be edited to remove any unsupported structures. Users
should retain their older version ACCOL Tools software until all .ACO files
have been converted to the .ACC format.
Instructions for removing unsupported structures are given below:
*TARGET Section
Any target node type other than that shown below will cause ACCOL Workbench to
misinterpret this as a Real Mode ACCOL load. For Protected Mode units, you must
use the *TARGET statement shown below:
*TARGET 33XX-386EXPM
*MEMORY Section
If present, remove lines with any of the following keywords from the *MEMORY
section:
EXPANDED_MEM
RO_ARRAY_LOC
EQUATION_LOC
RW_ARRAY_LOC
AGA8_LOC
LIST_LOC
SIGNAL_LOC
ACCOL Workbench User Manual
A-3
Appendix A
In addition, the EVENTS keyword entry, if present, must be changed to
AUDIT_EVENTS.
*SIGNALS section
If present, any of the following system signals must be deleted from the source file.
#ERRCT.000.
#OCTIME..
#RDNERR..
#RDNLIM..
*COMMUNICATIONS section
If your ACCOL source file was originally created for an RDC 3350, UCS 3380, or
CFE 3385, and includes Auxiliary I/O Ports (AUX_1 and/or AUX_2) these port
definitions must be removed, and the ports must be re-defined as standard ports
(PORT_A through PORT_J) or as built-in ports (BIP_1 or BIP_2).
*PROCESS-I/O section
If present, any of the following board types must be deleted, and the boards must be
re-defined with valid entries:
1AI, 6DI, 6DO, MIO, DIO, AIO, LLB
For example, if an RDC 3350 unit had a DIO board (containing 48 digital inputs,
and 32 digital outputs), and its ACCOL source file is being modified for use in a
new 386EX Protected Mode controller, the 48 digital inputs would have to be made
up by 6 8DI boards, or 3 16DI boards, etc. and the 32 digital outputs would require
4 8DO boards, or 2 16DO boards, etc. The DIGIN and DIGOUT Modules which
reference these boards would also need to be broken up into multiple modules.
*LOW-LEVEL section
The following Low-Level analog input types are unsupported, and must be
removed, and the input types re-defined:
100MV, 1V, 10V, 5V
*TASK section
If present, any of the following modules must be deleted:
SMART, TCOUNT, SYS_3530
Appendix A
A-4
ACCOL Workbench User Manual
Appendix B
Listing of ACCOL Modules & Control Statements
______________________________________________________________________________
5 * AAT
FREQ_1
;ANALOG_SIGNAL
FREQ_2
;ANALOG_SIGNAL
COUNT_1
;ANALOG_SIGNAL
COUNT_2
;ANALOG_SIGNAL
LIST_1
;ANALOG_SIGNAL_OR_VALUE
LIST_2
;ANALOG_SIGNAL_OR_VALUE
LIST_3
;ANALOG_SIGNAL_OR_VALUE
STATUS_1
;ANALOG_SIGNAL
STATUS_2
;ANALOG_SIGNAL
STATUS_3
;ANALOG_SIGNAL
STATUS_4
;ANALOG_SIGNAL
______________________________________________________________________________
10 * ABORT TASK
______________________________________________________________________________
20 * AGA3
DIFF_PRESS
;ANALOG SIGNAL OR VALUE
STAT_PRESS
;ANALOG SIGNAL OR VALUE
ADJ_PRESS
;ANALOG SIGNAL OR VALUE
ORIF_DIAM
;ANALOG SIGNAL OR VALUE
PIPE_DIAM
;ANALOG SIGNAL OR VALUE
ORIF_CONST
;ANALOG SIGNAL OR VALUE
BASE_PRESS
;ANALOG SIGNAL OR VALUE
BASE_TEMP
;ANALOG SIGNAL OR VALUE
FLOW_TEMP
;ANALOG SIGNAL OR VALUE
FPV_IN
;ANALOG SIGNAL OR VALUE
POINT
;ANALOG SIGNAL OR VALUE
SPEC_GRAV
;ANALOG SIGNAL OR VALUE
TRACK
;ANALOG/LOGICAL SIGNAL OR VALUE
OUTPUT
;ANALOG SIGNAL
____________________________________________________________________________
30 * AGA3DENS
DIFF_PRESS
;ANALOG_SIGNAL_OR_VALUE
STAT_PRESS
;ANALOG_SIGNAL_OR_VALUE
FLOW_TEMP
;ANALOG_SIGNAL_OR_VALUE
TAP_LOC
;LOGICAL_SIGNAL
ORIF_DIAM
;ANALOG_SIGNAL_OR_VALUE
PIPE_DIAM
;ANALOG_SIGNAL_OR_VALUE
ORIF_COEF
;ANALOG_SIGNAL_OR_VALUE
PIPE_COEF
;ANALOG_SIGNAL_OR_VALUE
ORIF_RTEMP
;ANALOG_SIGNAL_OR_VALUE
PIPE_RTEMP
;ANALOG_SIGNAL_OR_VALUE
VISCOSITY
;ANALOG_SIGNAL_OR_VALUE
ISEN_COEF
;ANALOG_SIGNAL_OR_VALUE
FLOW_DENS
;ANALOG_SIGNAL_OR_VALUE
BASE_DENS
;ANALOG_SIGNAL_OR_VALUE
REL_DENS
;ANALOG_SIGNAL_OR_VALUE
TRACK
;ANALOG/LOGICAL_SIGNAL
MASS_FLOW
;ANALOG_SIGNAL
VOL_FLOW
;ANALOG_SIGNAL
BASE_FLOW
;ANALOG_SIGNAL
LIST
;ANALOG_SIGNAL_OR_VALUE
______________________________________________________________________________
ACCOL Workbench User Manual
B-1
Appendix B
40 * AGA3ITER
DIFF_PRESS
;ANALOG SIGNAL OR VALUE
STAT_PRESS
;ANALOG SIGNAL OR VALUE
TAP_LOC
;ANALOG SIGNAL OR VALUE
ADJ_PRESS
;ANALOG SIGNAL OR VALUE
ORIF_DIAM
;ANALOG SIGNAL OR VALUE
PIPE_DIAM
;ANALOG SIGNAL OR VALUE
THERM_COEF1
;ANALOG SIGNAL OR VALUE
THERM_COEF2
;ANALOG SIGNAL OR VALUE
BASE_PRESS
;ANALOG SIGNAL OR VALUE
BASE_TEMP
;ANALOG SIGNAL OR VALUE
FLOW_TEMP
;ANALOG SIGNAL OR VALUE
VISCOSITY
;ANALOG SIGNAL OR VALUE
SPEC_GRAV
;ANALOG SIGNAL OR VALUE
ISEN_COEF
;ANALOG SIGNAL OR VALUE
Z_FLOWING
;ANALOG SIGNAL
Z_BASE
;ANALOG SIGNAL
POINT
;ANALOG SIGNAL OR VALUE
TRACK
;ANALOG/LOGICAL SIGNAL OR VALUE
OUTPUT
;ANALOG SIGNAL
LIST
;ANALOG SIGNAL OR VALUE
INPUT
1
;ANALOG SIGNAL
____________________________________________________________________________
50 * AGA3TERM
DIFF_PRESS
;ANALOG SIGNAL OR VALUE
STAT_PRESS
;ANALOG SIGNAL OR VALUE
ADJ_PRESS
;ANALOG SIGNAL OR VALUE
ORIF_DIAM
;ANALOG SIGNAL OR VALUE
PIPE_DIAM
;ANALOG SIGNAL OR VALUE
ORIF_CONST
;ANALOG SIGNAL OR VALUE
BASE_PRESS
;ANALOG SIGNAL OR VALUE
BASE_TEMP
;ANALOG SIGNAL OR VALUE
FLOW_TEMP
;ANALOG SIGNAL OR VALUE
FPV_IN
;ANALOG SIGNAL OR VALUE
POINT
;ANALOG SIGNAL OR VALUE
SPEC_GRAV
;ANALOG SIGNAL OR VALUE
TRACK
;ANALOG/LOGICAL SIGNAL OR VALUE
OUTPUT
;ANALOG SIGNAL
LIST
;ANALOG SIGNAL OR VALUE
INPUT
1
;ANALOG SIGNAL
____________________________________________________________________________
60 * AGA5
VOLUME
;ANALOG SIGNAL
BASE_PRESS
;ANALOG SIGNAL OR VALUE
BASE_TEMP
;ANALOG SIGNAL OR VALUE
FPV_IN
;ANALOG SIGNAL OR VALUE
SPEC_GRAV
;ANALOG SIGNAL OR VALUE
VOL_%_CO2
;ANALOG SIGNAL OR VALUE
VOL_%_N2
;ANALOG SIGNAL OR VALUE
VOL_%_O2
;ANALOG SIGNAL OR VALUE
VOL_%_HE
;ANALOG SIGNAL OR VALUE
VOL_%_CO
;ANALOG SIGNAL OR VALUE
VOL_%_H2S
;ANALOG SIGNAL OR VALUE
VOL_%_H2O
;ANALOG SIGNAL OR VALUE
VOL_%_H2
;ANALOG SIGNAL OR VALUE
VOL_CONVERS
;ANALOG SIGNAL OR VALUE
ENERGY_CONV
;ANALOG SIGNAL OR VALUE
OUTPUT
;ANALOG SIGNAL
____________________________________________________________________________
Appendix B
B-2
ACCOL Workbench User Manual
70 * AGA7
FLOW_SWITCH
;LOGICAL SIGNAL
DENS_SWITCH
;LOGICAL SIGNAL
FLOW_TEMP
;ANALOG SIGNAL OR VALUE
FLOW_PRESS
;ANALOG SIGNAL OR VALUE
RATE
;ANALOG SIGNAL OR VALUE
BASE_TEMP
;ANALOG SIGNAL OR VALUE
BASE_PRESS
;ANALOG SIGNAL OR VALUE
FPV_IN
;ANALOG SIGNAL OR VALUE
ADJ_PRESS
;ANALOG SIGNAL OR VALUE
FLOW_DENS
;ANALOG SIGNAL OR VALUE
BASE_DENS
;ANALOG SIGNAL OR VALUE
SPEC_GRAV
;ANALOG SIGNAL OR VALUE
GRAV_TEMP
;ANALOG SIGNAL OR VALUE
GRAV_PRESS
;ANALOG SIGNAL OR VALUE
CALIB_FACTR
;ANALOG SIGNAL OR VALUE
SPAN
;ANALOG SIGNAL OR VALUE
OUTPUT
;ANALOG SIGNAL
____________________________________________________________________________
80 * AGA8
ENABLE
;LOGICAL SIGNAL
PRIORITY
;ANALOG SIGNAL OR VALUE
FLOW_TEMP
;ANALOG SIGNAL OR VALUE
STAT_PRESS
;ANALOG SIGNAL OR VALUE
BASE_TEMP
;ANALOG SIGNAL OR VALUE
BASE_PRESS
;ANALOG SIGNAL OR VALUE
LIST
;ANALOG SIGNAL OR VALUE
ARRAY
;ANALOG SIGNAL OR VALUE
COLUMN
;ANALOG SIGNAL OR VALUE
ERROR
;ANALOG SIGNAL
STATUS
;ANALOG SIGNAL
Z_FLOWING
;ANALOG SIGNAL
Z_BASE
;ANALOG SIGNAL
FPV
;ANALOG SIGNAL
____________________________________________________________________________
90 * AGA8DETAIL
ENABLE
;LOGICAL SIGNAL
PRIORITY
;ANALOG SIGNAL OR VALUE
FLOW_TEMP
;ANALOG SIGNAL OR VALUE
STAT_PRESS
;ANALOG SIGNAL OR VALUE
BASE_TEMP
;ANALOG SIGNAL OR VALUE
BASE_PRESS
;ANALOG SIGNAL OR VALUE
LIST
;ANALOG SIGNAL OR VALUE
ARRAY
;ANALOG SIGNAL OR VALUE
COLUMN
;ANALOG SIGNAL OR VALUE
ERROR
;ANALOG SIGNAL
STATUS
;ANALOG SIGNAL
Z_FLOWING
;ANALOG SIGNAL
Z_BASE
;ANALOG SIGNAL
FPV
;ANALOG SIGNAL
____________________________________________________________________________
ACCOL Workbench User Manual
B-3
Appendix B
100 * AGA8GROSS
ENABLE
;LOGICAL SIGNAL
PRIORITY
;ANALOG SIGNAL OR VALUE
FLOW_TEMP
;ANALOG SIGNAL OR VALUE
STAT_PRESS
;ANALOG SIGNAL OR VALUE
BASE_TEMP
;ANALOG SIGNAL OR VALUE
BASE_PRESS
;ANALOG SIGNAL OR VALUE
MODE
;ANALOG SIGNAL OR VALUE
HEAT_VALUE
;ANALOG SIGNAL OR VALUE
REF_T_HV
;ANALOG SIGNAL OR VALUE
REF_P_HV
;ANALOG SIGNAL OR VALUE
REL_DENS
;ANALOG SIGNAL OR VALUE
REF_T_RD
;ANALOG SIGNAL OR VALUE
REF_P_RD
;ANALOG SIGNAL OR VALUE
MOLE_%_N2
;ANALOG SIGNAL OR VALUE
MOLE_%_CO2
;ANALOG SIGNAL OR VALUE
MOLE_%_H2
;ANALOG SIGNAL OR VALUE
MOLE_%_CO
;ANALOG SIGNAL OR VALUE
ERROR
;ANALOG SIGNAL
STATUS
;ANALOG SIGNAL
Z_FLOWING
;ANALOG SIGNAL
Z_BASE
;ANALOG SIGNAL
FPV
;ANALOG SIGNAL
____________________________________________________________________________
110 * AGAT3
DIFF_PRESS
;ANALOG SIGNAL OR VALUE
STAT_PRESS
;ANALOG SIGNAL OR VALUE
ADJ_PRESS
;ANALOG SIGNAL OR VALUE
ORIF_DIAM
;ANALOG SIGNAL OR VALUE
PIPE_DIAM
;ANALOG SIGNAL OR VALUE
ORIF_CONST
;ANALOG SIGNAL OR VALUE
BASE_PRESS
;ANALOG SIGNAL OR VALUE
BASE_TEMP
;ANALOG SIGNAL OR VALUE
FLOW_TEMP
;ANALOG SIGNAL OR VALUE
FPV_IN
;ANALOG SIGNAL OR VALUE
POINT
;ANALOG SIGNAL OR VALUE
SPEC_GRAV
;ANALOG SIGNAL OR VALUE
TRACK
;ANALOG/LOGICAL SIGNAL OR VALUE
OUTPUT
;ANALOG SIGNAL
LIST
;ANALOG SIGNAL OR VALUE
INPUT
1
;ANALOG SIGNAL
____________________________________________________________________________
120 * ANIN
DEVICE
DEVICE ID
INITIAL
CHANNEL
INPUT
1
;ANALOG SIGNAL
ZERO
1
;ANALOG SIGNAL OR VALUE
SPAN
1
;ANALOG SIGNAL OR VALUE
____________________________________________________________________________
130 * ANOUT
DEVICE
DEVICE ID
INITIAL
CHANNEL
OUTPUT
1
;ANALOG SIGNAL OR VALUE
ZERO
1
;ANALOG SIGNAL OR VALUE
SPAN
1
;ANALOG SIGNAL OR VALUE
TRACK
1
;LOGICAL SIGNAL
RESET
1
;ANALOG SIGNAL
____________________________________________________________________________
140 * ARC_STORE
ARCHIVE
ANALOG SIGNAL OR VALUE
MODE
;ANALOG/LOGICAL SIGNAL OR VALUE
STATUS
ANALOG SIGNAL
____________________________________________________________________________
150 * AUDIT
MODE
;ANALOG SIGNAL OR VALUE
FULL_ALARM
;ANALOG/LOGICAL SIGNAL
LIST
;ANALOG SIGNAL OR VALUE
STATUS
;ANALOG SIGNAL
____________________________________________________________________________
Appendix B
B-4
ACCOL Workbench User Manual
160 * AVERAGER
INPUT
;ANALOG/LOGICAL SIGNAL OR VALUE
RESET
;LOGICAL SIGNAL
TRACK
;LOGICAL SIGNAL
SPAN
;ANALOG SIGNAL OR VALUE
OUTPUT_1
;ANALOG SIGNAL
OUTPUT_2
;ANALOG SIGNAL
TIME
;ANALOG SIGNAL
____________________________________________________________________________
170 * BREAK
____________________________________________________________________________
180 * C TASK
____________________________________________________________________________
190 * CALCULATOR EQUATION
____________________________________________________________________________
200 * CHARACTERIZE
MODE
;ANALOG SIGNAL OR VALUE
HEAT_VALUE
;ANALOG SIGNAL OR VALUE
SPEC_GRAV
;ANALOG SIGNAL OR VALUE
MOLE_%_CO2
;ANALOG SIGNAL OR VALUE
MOLE_%_N2
;ANALOG SIGNAL OR VALUE
MOLE_%_METH
;ANALOG SIGNAL OR VALUE
LIST
;ANALOG SIGNAL OR VALUE
ARRAY
;ANALOG SIGNAL OR VALUE
COLUMN
;ANALOG SIGNAL OR VALUE
ERROR
;ANALOG SIGNAL
STATUS
;ANALOG SIGNAL
____________________________________________________________________________
210 * CIM
POINT
;ANALOG SIGNAL OR VALUE
ENABLE
;LOGICAL SIGNAL
INLIST_1
;ANALOG SIGNAL OR VALUE
INLIST_2
;ANALOG SIGNAL OR VALUE
OUTLIST
;ANALOG SIGNAL OR VALUE
STATE
;ANALOG SIGNAL
STATUS_1
;ANALOG/LOGICAL SIGNAL
STATUS_2
;ANALOG/LOGICAL SIGNAL
____________________________________________________________________________
220 * CNGMASTER
PORT
;ANALOG SIGNAL OR VALUE
SELECT
;ANALOG/LOGICAL SIGNAL OR VALUE
LIST
;ANALOG SIGNAL OR VALUE
COMMAND
;ANALOG SIGNAL OR VALUE
POINT
;ANALOG SIGNAL OR VALUE
SETPOINT
;ANALOG SIGNAL OR VALUE
INLIST
;ANALOG SIGNAL OR VALUE
STATE
;ANALOG SIGNAL OR VALUE
BLOCK
;ANALOG SIGNAL OR VALUE
DONE
;ANALOG/LOGICAL SIGNAL
STATUS
;ANALOG SIGNAL
____________________________________________________________________________
230 * CNGSLAVE
STATION
;LOGICAL SIGNAL
OUTLIST_1
;ANALOG SIGNAL OR VALUE
OUTLIST_2
;ANALOG SIGNAL OR VALUE
BLOCK_1
;ANALOG SIGNAL OR VALUE
BLOCK_2
;ANALOG SIGNAL OR VALUE
INLIST_1
;ANALOG SIGNAL OR VALUE
INLIST_2
;ANALOG SIGNAL OR VALUE
RESET_1
;LOGICAL SIGNAL
RESET_2
;LOGICAL SIGNAL
DONE
;ANALOG/LOGICAL SIGNAL
STATUS
;ANALOG SIGNAL
____________________________________________________________________________
ACCOL Workbench User Manual
B-5
Appendix B
240 * COMMAND
COMMAND
;LOGICAL SIGNAL
OUTPUT
;LOGICAL SIGNAL
DELAY
;ANALOG SIGNAL OR VALUE
TRANSITION
;ANALOG SIGNAL OR VALUE
ON_LIM_SW
;LOGICAL SIGNAL
OFF_LIM_SW
;LOGICAL SIGNAL
STATUS
;LOGICAL SIGNAL
RUN_TIME
;ANALOG SIGNAL
RESET
;LOGICAL SIGNAL
____________________________________________________________________________
250 * COMPARATOR
MODE
;LOGICAL SIGNAL
INPUT
;ANALOG SIGNAL OR VALUE
SETPOINT
;ANALOG SIGNAL OR VALUE
DEADBAND
;ANALOG SIGNAL OR VALUE
OUTPUT_1
;ANALOG/LOGICAL SIGNAL
OUTPUT_2
;ANALOG/LOGICAL SIGNAL
OUTPUT_3
;ANALOG/LOGICAL SIGNAL
____________________________________________________________________________
260 * CUSTOM
MODE
;ANALOG SIGNAL OR VALUE
LIST
;ANALOG SIGNAL OR VALUE
STATUS
;ANALOG SIGNAL
____________________________________________________________________________
270 * DACCUMULATOR
MODE
;ANALOG SIGNAL OR VALUE
SCALE
;ANALOG SIGNAL OR VALUE
INPUT_HIGH
;ANALOG SIGNAL OR VALUE
INPUT_LOW
;ANALOG SIGNAL OR VALUE
OUTPUT_HIGH
;ANALOG SIGNAL
OUTPUT_LOW
;ANALOG SIGNAL
____________________________________________________________________________
280 * DEMUX
INPUT
;ANY SIGNAL OR VALUE
SELECT
;ANALOG/LOGICAL SIGNAL OR VALUE
OUTLIST
;ANALOG SIGNAL OR VALUE
____________________________________________________________________________
290 * DIFFERENTIATOR
INPUT
;ANALOG SIGNAL OR VALUE
RESET
;LOGICAL SIGNAL
SPAN
;ANALOG SIGNAL OR VALUE
OUTPUT
;ANALOG SIGNAL
____________________________________________________________________________
300 * DIGIN
DEVICE
DEVICE ID
INITIAL
CHANNEL
INPUT
1
;LOGICAL SIGNAL
____________________________________________________________________________
310 * DIGOUT
DEVICE
DEVICE ID
INITIAL
CHANNEL
OUTPUT
1
;LOGICAL SIGNAL
TRACK
1
;LOGICAL SIGNAL
RESET
1
;LOGICAL SIGNAL
____________________________________________________________________________
320 * EASTATUS
PORT
DEVICE ID
NODE_ARRAY
;ANALOG SIGNAL OR VALUE
LIST
;ANALOG SIGNAL OR VALUE
ARRAY
;ANALOG SIGNAL OR VALUE
STATUS
;ANALOG SIGNAL
____________________________________________________________________________
330 * EAUDIT
MODE
;ANALOG SIGNAL OR VALUE
FULL_ALARM
;ANALOG/LOGICAL SIGNAL
LIST
;ANALOG SIGNAL OR VALUE
STATUS
;ANALOG SIGNAL
OUTPUT_1
;ANALOG SIGNAL
OUTPUT_2
;ANALOG SIGNAL
Appendix B
B-6
ACCOL Workbench User Manual
____________________________________________________________________________
340 * EDEMUX
INPUT
;ANY SIGNAL OR VALUE
SELECT
;ANALOG/LOGICAL SIGNAL OR VALUE
OUTLIST
;ANALOG SIGNAL OR VALUE
OUTPUT
1
;ANY SIGNAL
____________________________________________________________________________
350 * EINTEGRATOR
INPUT
;ANALOG SIGNAL OR VALUE
RESET
;LOGICAL SIGNAL
ZERO
;ANALOG SIGNAL OR VALUE
SPAN
;ANALOG SIGNAL OR VALUE
OUTPUT
;ANALOG SIGNAL
____________________________________________________________________________
360 * ELSE
____________________________________________________________________________
370 * ELSEIF CONDITION
____________________________________________________________________________
380 * EMASTER
NODE_1
;ANALOG SIGNAL OR VALUE
POINT
;ANALOG SIGNAL OR VALUE
MODE
;ANALOG SIGNAL OR VALUE
INTYPE
;ANALOG SIGNAL OR VALUE
OUTTYPE
;ANALOG SIGNAL OR VALUE
INDEX
;ANALOG SIGNAL OR VALUE
INLIST
;ANALOG SIGNAL OR VALUE
OUTLIST
;ANALOG SIGNAL OR VALUE
STATUS_1
;ANALOG/LOGICAL SIGNAL
STATUS_2
;ANALOG SIGNAL
NODE_2
;ANALOG SIGNAL OR VALUE
ADDRESS
;STRING SIGNAL
____________________________________________________________________________
390 * EMUX
OUTPUT
;ANY SIGNAL
SELECT
;ANALOG/LOGICAL SIGNAL OR VALUE
INLIST
;ANALOG SIGNAL OR VALUE
INPUT
1
;ANY SIGNAL OR VALUE
____________________________________________________________________________
400 * ENCODE
SELECT
;ANALOG SIGNAL OR VALUE
LIST
;ANALOG SIGNAL OR VALUE
ARRAY
;ANALOG SIGNAL OR VALUE
TYPE
;LOGICAL SIGNAL
MODE
;LOGICAL SIGNAL
INDEX
;ANALOG SIGNAL OR VALUE
STATUS
;ANALOG SIGNAL
INPUT
1
;ANY SIGNAL
____________________________________________________________________________
410 * ENDFOR
____________________________________________________________________________
420 * ENDIF
____________________________________________________________________________
ACCOL Workbench User Manual
B-7
Appendix B
430 * ETOT/TRND
INPUT
;ANALOG/LOGICAL SIGNAL OR VALUE
START_HOUR
;ANALOG SIGNAL OR VALUE
START_MIN
;ANALOG SIGNAL OR VALUE
TIME
;ANALOG SIGNAL OR VALUE
HOUR_SPAN
;ANALOG SIGNAL OR VALUE
SHIFT_SPAN
;ANALOG SIGNAL OR VALUE
DAY_SPAN
;ANALOG SIGNAL OR VALUE
MONTH_SPAN
;ANALOG SIGNAL OR VALUE
PREV_HOUR
;ANALOG SIGNAL
PREV_SHIFT
;ANALOG SIGNAL
PREV_DAY
;ANALOG SIGNAL
PREV_MONTH
;ANALOG SIGNAL
CUR_T_HOUR
;ANALOG SIGNAL
CUR_T_SHIFT
;ANALOG SIGNAL
CUR_T_DAY
;ANALOG SIGNAL
CUR_T_MONTH
;ANALOG SIGNAL
DERIVATIVE
;ANALOG SIGNAL
TRACK
;LOGICAL SIGNAL
RESET
;ANALOG SIGNAL
____________________________________________________________________________
440 * EVP
LIQUIDTYPE
;ANALOG_SIGNAL_OR_VALUE
FLOW_TEMP
;ANALOG_SIGNAL_OR_VALUE
FLOW_PRESS
;ANALOG_SIGNAL_OR_VALUE
REL_DENS
;ANALOG_SIGNAL_OR_VALUE
ABS_DENS
;ANALOG_SIGNAL_OR_VALUE
THRESMULTI
;ANALOG_SIGNAL_OR_VALUE
METERPRESSDROP
;ANALOG_SIGNAL_OR_VALUE
VAPORPRESSMAX
;ANALOG_SIGNAL_OR_VALUE
VAPORPRESS100
;ANALOG_SIGNAL_OR_VALUE
COMPVAPORPRESS
;ANALOG_SIGNAL_OR_VALUE
COMPLIQSTATE
;ANALOG_SIGNAL_OR_VALUE
STATUS
;ANALOG_SIGNAL_OR_VALUE
____________________________________________________________________________
450 * FOR INITIAL, FINAL, STEP, TRACE
____________________________________________________________________________
460 * FPV
FLOW_TEMP
;ANALOG SIGNAL OR VALUE
STAT_PRESS
;ANALOG SIGNAL OR VALUE
SPEC_GRAV
;ANALOG SIGNAL OR VALUE
CO2_MOLE
;ANALOG SIGNAL OR VALUE
NMOLE
;ANALOG SIGNAL OR VALUE
OUTPUT
;ANALOG SIGNAL
__________________________________________________________________________
470 * FUNCTION
ARRAY
;ANALOG SIGNAL OR VALUE
ROW
;ANALOG SIGNAL OR VALUE
COLUMN
;ANALOG SIGNAL OR VALUE
OUTPUT
;ANALOG SIGNAL
____________________________________________________________________________
Appendix B
B-8
ACCOL Workbench User Manual
480 * GBBTI
DEVICE
DEVICE ID
CHANNEL
CHANNEL
MODE
;ANALOG SIGNAL
DGP
;ANALOG SIGNAL
DGPU
;ANALOG SIGNAL OR VALUE
DGPSUB
;ANALOG SIGNAL OR VALUE
SP
;ANALOG SIGNAL
SPU
;ANALOG SIGNAL OR VALUE
SPSUB
;ANALOG SIGNAL OR VALUE
RTDT
;ANALOG SIGNAL
RTDTU
;LOGICAL SIGNAL
RTDTSUB
;ANALOG SIGNAL OR VALUE
EST
;ANALOG SIGNAL
ESTU
;LOGICAL SIGNAL
ESTSUB
;ANALOG SIGNAL OR VALUE
TAG
;STRING SIGNAL OR VALUE
OUTPUT
;ANALOG SIGNAL OR VALUE
TRACK
;LOGICAL SIGNAL
ALARM
;LOGICAL SIGNAL
STATUS
;ANALOG SIGNAL
CFGSTAT
;STRING SIGNAL
ERRORCNT
;ANALOG SIGNAL
____________________________________________________________________________
490 * GOTO LINE
__________________________________________________________________________
500 * GPA8173
METERMASS
;ANALOG_SIGNAL_OR_VALUE
NUMMOLETYPE
;ANALOG_SIGNAL_OR_VALUE
STRUCTMODE
;ANALOG_SIGNAL_OR_VALUE
SPECIDSTRUCT
;ANALOG_SIGNAL_OR_VALUE
MOLEFRACTSTRUCT
;ANALOG_SIGNAL_OR_VALUE
CUSTCONSTARRY
;ANALOG_SIGNAL_OR_VALUE
UNITS
;ANALOG_SIGNAL_OR_VALUE
EQUIVVOLSTRUCT
;ANALOG_SIGNAL_OR_VALUE
EQUIVVOL
;ANALOG_SIGNAL_OR_VALUE
RERESOLVE
;LOGICAL_SIGNAL
STATUS
;ANALOG_SIGNAL_OR_VALUE
____________________________________________________________________________
510 * GSV
LIQUIDTYPE
;ANALOG_SIGNAL_OR_VALUE
LIQUIDVALID
;ANALOG_SIGNAL_OR_VALUE
BASE_DENS
;ANALOG_SIGNAL_OR_VALUE
TCMUSED
;LOGICAL_SIGNAL
PCMUSED
;LOGICAL_SIGNAL
FLOW_TEMP
;ANALOG_SIGNAL_OR_VALUE
FLOW_PRESS
;ANALOG_SIGNAL_OR_VALUE
EQVAPRPRESS
;ANALOG_SIGNAL_OR_VALUE
METERFACTOR
;ANALOG_SIGNAL_OR_VALUE
METERROLLOVER
;ANALOG_SIGNAL_OR_VALUE
CURMETERVAL
;ANALOG_SIGNAL_OR_VALUE
IVMULTI
;ANALOG_SIGNAL_OR_VALUE
SEDANDWATER
;ANALOG_SIGNAL_OR_VALUE
INIT
;LOGICAL_SIGNAL
UNIT
;ANALOG_SIGNAL_OR_VALUE
ACOEFF
;ANALOG_SIGNAL_OR_VALUE
BCOEFF
;ANALOG_SIGNAL_OR_VALUE
CTL
;ANALOG_SIGNAL_OR_VALUE
CPL
;ANALOG_SIGNAL_OR_VALUE
CCF
;ANALOG_SIGNAL_OR_VALUE
RHOOTHER
;ANALOG_SIGNAL_OR_VALUE
GSV
;ANALOG_SIGNAL_OR_VALUE
CSW
;ANALOG_SIGNAL_OR_VALUE
NSV
;ANALOG_SIGNAL_OR_VALUE
SWV
;ANALOG_SIGNAL_OR_VALUE
STATUS
;ANALOG_SIGNAL_OR_VALUE
____________________________________________________________________________
ACCOL Workbench User Manual
B-9
Appendix B
520 * HCBO
DEVICE
DEVICE ID
INITIAL
CHANNEL
DELAY
;ANALOG SIGNAL OR VALUE
TIMEOUT
;ANALOG SIGNAL OR VALUE
ERROR_CLEAR
;LOGICAL SIGNAL
RESTORE
;LOGICAL SIGNAL
POWERFAIL
;ANALOG SIGNAL OR VALUE
TRACK
1
;LOGICAL SIGNAL
PULSE
1
;ANALOG SIGNAL
____________________________________________________________________________
530 * HILOLIMITER
INPUT
;ANALOG SIGNAL OR VALUE
HIGH_LIMIT
;ANALOG SIGNAL OR VALUE
LOW_LIMIT
;ANALOG SIGNAL OR VALUE
OUTPUT_1
;ANALOG SIGNAL
OUTPUT_2
;LOGICAL SIGNAL
OUTPUT_3
;LOGICAL SIGNAL
____________________________________________________________________________
540 * HILOSELECT
OUTPUT_1
;ANALOG SIGNAL
OUTPUT_2
;ANALOG SIGNAL
SELECT_1
;ANALOG/LOGICAL SIGNAL
SELECT_2
;ANALOG/LOGICAL SIGNAL
INLIST
;ANALOG SIGNAL OR VALUE
INPUT
1
;ANALOG SIGNAL OR VALUE
___________________________________________________________________________
550 * HSANIN
DEVICE
DEVICE ID
INITIAL
CHANNEL
ARRAY
;ANALOG SIGNAL OR VALUE
ROW
;ANALOG SIGNAL OR VALUE
ZERO
;ANALOG SIGNAL OR VALUE
SPAN
;ANALOG SIGNAL OR VALUE
STROBE
;LOGICAL SIGNAL
FREQUENCY
;ANALOG SIGNAL OR VALUE
INDEX
;ANALOG SIGNAL OR VALUE
RESOLUTION
;ANALOG SIGNAL OR VALUE
STATUS
;ANALOG SIGNAL
DONE
;LOGICAL SIGNAL
RATE
;ANALOG SIGNAL
STATUS_1
;ANALOG SIGNAL
____________________________________________________________________________
560 * HSCOUNT
DEVICE
DEVICE ID
INITIAL
CHANNEL
COUNT
1
;ANALOG SIGNAL
COUNT_ZERO
1
;ANALOG SIGNAL OR VALUE
COUNT_SPAN
1
;ANALOG SIGNAL OR VALUE
RESET
1
;LOGICAL SIGNAL
FREQUENCY
1
;ANALOG SIGNAL
FREQ_ZERO
1
;ANALOG SIGNAL OR VALUE
FREQ_SPAN
1
;ANALOG SIGNAL OR VALUE
____________________________________________________________________________
Appendix B
B-10
ACCOL Workbench User Manual
570 * HWSTI
DEVICE
DEVICE ID
CHANNEL
CHANNEL
COMMAND
;ANALOG SIGNAL
DONE
;LOGICAL SIGNAL
STATUS
;ANALOG SIGNAL
PV
;ANALOG SIGNAL
STIEU
;ANALOG SIGNAL
SECVAR
;ANALOG SIGNAL
MISMATCH
;LOGICAL SIGNAL
CFGSTAT
;STRING SIGNAL
SENSRTYP
;ANALOG SIGNAL
DECONF
;ANALOG SIGNAL
DAMPING
;ANALOG SIGNAL
PVCHAR
;ANALOG SIGNAL
CJTACT
;LOGICAL SIGNAL
PIUOTDCF
;LOGICAL SIGNAL
STITAG
;STRING SIGNAL
FREQ6050
;LOGICAL SIGNAL
URV
;ANALOG SIGNAL
LRV
;ANALOG SIGNAL
URL
;ANALOG SIGNAL
LRL
;ANALOG SIGNAL
SERIALNO
;STRING SIGNAL
STISWVER
;STRING SIGNAL
SCRATCHPAD
;STRING SIGNAL
XMITSTAT
;STRING SIGNAL
COMERRS
;ANALOG SIGNAL
POWERFAIL
;ANALOG SIGNAL
____________________________________________________________________________
580 * IF CONDITION
____________________________________________________________________________
590 * INTEGRATOR
INPUT
;ANALOG SIGNAL OR VALUE
RESET
;LOGICAL SIGNAL
ZERO
;ANALOG SIGNAL OR VALUE
SPAN
;ANALOG SIGNAL OR VALUE
OUTPUT
;ANALOG SIGNAL
____________________________________________________________________________
600 * INTERNET_PROTOCOL
MODE
;ANALOG_SIGNAL_OR_VALUE
TYPE
;ANALOG_SIGNAL_OR_VALUE
STATUS
;ANALOG_SIGNAL
LIST
;ANALOG_SIGNAL
_____________________________________________________________________________
610 * IP_CLIENT
REMOTE
;STRING_SIGNAL_OR_VALUE
RESOLV_NAME
;ANALOG_SIGNAL
SERVR_ID
;ANALOG_SIGNAL_OR_VALUE
ACCESS_MODE
;ANALOG_SIGNAL
RESP_TMO
;ANALOG_SIGNAL_OR_VALUE
STRUCT_TYPE
;ANALOG_SIGNAL_OR_VALUE
SERVR_STRUCT_NO
;ANALOG_SIGNAL_OR_VALUE
SERVR_INDEX
;ANALOG_SIGNAL_OR_VALUE
ACCESS_TYPE
;ANALOG_SIGNAL_OR_VALUE
SERVR_SELECT
;ANALOG_SIGNAL_OR_VALUE
CLNT_STRCT_NO
;ANALOG_SIGNAL_OR_VALUE
CLNT_INDEX
;ANALOG_SIGNAL_OR_VALUE
CLNT_SELECT
;ANALOG_SIGNAL_OR_VALUE
CLNT_COUNT
;ANALOG_SIGNAL_OR_VALUE
STATUS_1
;ANALOG/LOGICAL_SIGNAL
STATUS_2
;ANALOG_SIGNAL
____________________________________________________________________________
ACCOL Workbench User Manual
B-11
Appendix B
620 * IP_SERVER
SERVR_ID
;ANALOG_SIGNAL_OR_VALUE
LIST_DB
;ANALOG_SIGNAL_OR_VALUE
AARRAY_DB
;ANALOG_SIGNAL_OR_VALUE
LARRAY_DB
;ANALOG_SIGNAL_OR_VALUE
ARCHIVE_DB
;ANALOG_SIGNAL_OR_VALUE
KNOWN_IP_NODES
;ANALOG_SIGNAL_OR_VALUE
RESOLV_NAME
;ANALOG_SIGNAL
STATUS_1
;ANALOG/LOGICAL_SIGNAL
STATUS_2
;ANALOG_SIGNAL
____________________________________________________________________________
630 * ISO5167
DIFF_PRESS
;ANALOG SIGNAL OR VALUE
STAT_PRESS
;ANALOG SIGNAL OR VALUE
ADJ_PRESS
;ANALOG SIGNAL OR VALUE
ORIF_DIAM
;ANALOG SIGNAL OR VALUE
PIPE_DIAM
;ANALOG SIGNAL OR VALUE
THERM_COEF1
;ANALOG SIGNAL OR VALUE
THERM_COEF2
;ANALOG SIGNAL OR VALUE
DEVICE
;ANALOG SIGNAL OR VALUE
DEVICE2
;ANALOG SIGNAL OR VALUE
FLOW_TEMP
;ANALOG SIGNAL OR VALUE
VISCOSITY
;ANALOG SIGNAL OR VALUE
ISEN_COEF
;ANALOG SIGNAL OR VALUE
DENSITY
;ANALOG SIGNAL OR VALUE
BASE_DENS
;ANALOG SIGNAL OR VALUE
STAT_P2
;ANALOG SIGNAL OR VALUE
POINT
;ANALOG SIGNAL OR VALUE
TRACK
;ANALOG/LOGICAL SIGNAL OR VALUE
OUTPUT
;ANALOG SIGNAL
LIST
;ANALOG SIGNAL OR VALUE
____________________________________________________________________________
640 * KEYBOARD
SELECT_1
;STRING SIGNAL
SELECT_2
;STRING SIGNAL
SELECT_3
;STRING SIGNAL
LIST
;ANALOG SIGNAL OR VALUE
TIME
;ANALOG SIGNAL OR VALUE
PASSWORD_RD
;ANALOG SIGNAL OR VALUE
PASSWORD_WT
;ANALOG SIGNAL OR VALUE
STATE
;LOGICAL ALARM SIGNAL
FAIL_STATE
;LOGICAL ALARM SIGNAL
STATUS
;ANALOG SIGNAL
INPUT
1
;ANALOG SIGNAL OR VALUE
____________________________________________________________________________
650 * LBBTI
DEVICE
DEVICE ID
CHANNEL
CHANNEL
MODE
;ANALOG SIGNAL
DGP
;ANALOG SIGNAL
DGPU
;ANALOG SIGNAL OR VALUE
DGPSUB
;ANALOG SIGNAL OR VALUE
SP
;ANALOG SIGNAL
SPU
;ANALOG SIGNAL OR VALUE
SPSUB
;ANALOG SIGNAL OR VALUE
RTDT
;ANALOG SIGNAL
RTDTU
;LOGICAL SIGNAL
RTDTSUB
;ANALOG SIGNAL OR VALUE
EST
;ANALOG SIGNAL
ESTU
;LOGICAL SIGNAL
ESTSUB
;ANALOG SIGNAL OR VALUE
TAG
;STRING SIGNAL OR VALUE
OUTPUT
;ANALOG SIGNAL OR VALUE
TRACK
;LOGICAL SIGNAL
ALARM
;LOGICAL SIGNAL
STATUS
;ANALOG SIGNAL
CFGSTAT
;STRING SIGNAL
ERRORCNT
;ANALOG SIGNAL
____________________________________________________________________________
Appendix B
B-12
ACCOL Workbench User Manual
660 * LCBO
DEVICE
DEVICE ID
POINT
CHANNEL
MODE
;ANALOG SIGNAL OR VALUE
COMMAND
;ANALOG SIGNAL
ENABLE
;LOGICAL SIGNAL
OUTPUT
;LOGICAL SIGNAL
TRACK
;LOGICAL SIGNAL
DELAY
;ANALOG SIGNAL OR VALUE
PULSE
;ANALOG SIGNAL
STATUS
;ANALOG SIGNAL
____________________________________________________________________________
670 * LEAD/LAG
INPUT
;ANALOG SIGNAL OR VALUE
DERIVATIVE
;ANALOG SIGNAL OR VALUE
INTEGRAL
;ANALOG SIGNAL OR VALUE
RESET
;LOGICAL SIGNAL
OUTPUT
;ANALOG SIGNAL
______________________________________________________________________
680 * LIQUID_DENSITY
MODE
;ANALOG_SIGNAL_OR_VALUE
INPUT_LIST
;ANALOG_SIGNAL_OR_VALUE
OUTPUT_LIST
;ANALOG_SIGNAL_OR_VALUE
STATUS
;ANALOG_SIGNAL_OR_VALUE
____________________________________________________________________________
690 * LLANIN
DEVICE
DEVICE ID
INITIAL
CHANNEL
INPUT
1
;ANALOG SIGNAL
ZERO
1
;ANALOG SIGNAL OR VALUE
SPAN
1
;ANALOG SIGNAL OR VALUE
____________________________________________________________________________
700 * LOGGER
PORT
;ANALOG SIGNAL OR VALUE
TIMEOUT_OUT
;ANALOG SIGNAL OR VALUE
TIMEOUT_INP
;ANALOG SIGNAL OR VALUE
MODE
;LOGICAL SIGNAL
FORMAT
;ANALOG SIGNAL OR VALUE
LIST
;ANALOG SIGNAL OR VALUE
DONE
;ANALOG/LOGICAL SIGNAL
STATUS
;ANALOG SIGNAL
SPARE TERM
;LOGICAL SIGNAL
____________________________________________________________________________
710 * LSCOUNT
DEVICE
DEVICE ID
INITIAL
CHANNEL
COUNT
1
;ANALOG SIGNAL
COUNT_ZERO
1
;ANALOG SIGNAL OR VALUE
COUNT_SPAN
1
;ANALOG SIGNAL OR VALUE
RESET
1
;LOGICAL SIGNAL
FREQUENCY
1
;ANALOG SIGNAL
FREQ_ZERO
1
;ANALOG SIGNAL OR VALUE
FREQ_SPAN
1
;ANALOG SIGNAL OR VALUE
____________________________________________________________________________
720 * MASTER
REMOTE
;ANALOG SIGNAL OR VALUE
POINT
;ANALOG SIGNAL OR VALUE
MODE
;ANALOG SIGNAL OR VALUE
INTYPE
;ANALOG SIGNAL OR VALUE
OUTTYPE
;ANALOG SIGNAL OR VALUE
INDEX
;ANALOG SIGNAL OR VALUE
INLIST
;ANALOG SIGNAL OR VALUE
OUTLIST
;ANALOG SIGNAL OR VALUE
STATUS_1
;ANALOG/LOGICAL SIGNAL
STATUS_2
;ANALOG SIGNAL
____________________________________________________________________________
730 * MUX
INLIST
;ANALOG SIGNAL OR VALUE
SELECT
;ANALOG/LOGICAL SIGNAL OR VALUE
OUTPUT
;ANY SIGNAL
ACCOL Workbench User Manual
B-13
Appendix B
____________________________________________________________________________
740 * NODESTATUS
NODE_1
;ANALOG SIGNAL OR VALUE
NODE_2
;ANALOG SIGNAL OR VALUE
LIST
;ANALOG SIGNAL OR VALUE
ARRAY
;ANALOG SIGNAL OR VALUE
ARY_ACCESS
;LOGICAL SIGNAL
ROW
;ANALOG SIGNAL OR VALUE
COLUMN
;ANALOG SIGNAL OR VALUE
RESET
;LOGICAL SIGNAL
STATUS
;ANALOG SIGNAL
____________________________________________________________________________
750 * PDM
DEVICE
DEVICE ID
INITIAL
CHANNEL
TYPE
;TYPE
TIME
;ANALOG SIGNAL OR VALUE
DEADBAND
;ANALOG SIGNAL OR VALUE
TRACK
;ANALOG SIGNAL OR VALUE
INPUT
1
;ANALOG SIGNAL
ZERO
1
;ANALOG SIGNAL OR VALUE
SPAN
1
;ANALOG SIGNAL OR VALUE
STATE
1
;LOGICAL SIGNAL
____________________________________________________________________________
760 * PDO
DEVICE
DEVICE ID
INITIAL
CHANNEL
RESOLUTION
RESOLUTION
MODE
1
;ANALOG SIGNAL OR VALUE
OUTPUT
1
;ANALOG SIGNAL OR VALUE
ENABLE
1
;LOGICAL SIGNAL
MIN_TIME
1
;ANALOG SIGNAL OR VALUE
MAX_TIME
1
;ANALOG SIGNAL OR VALUE
SPAN
1
;ANALOG SIGNAL OR VALUE
INPUT
1
;ANALOG SIGNAL OR VALUE
HIGH_LIMIT
1
;LOGICAL SIGNAL
LOW_LIMIT
1
;LOGICAL SIGNAL
TRACK
1
;LOGICAL SIGNAL
RESET
1
;ANALOG SIGNAL
____________________________________________________________________________
770 * PID3TERM
INPUT
;ANALOG SIGNAL OR VALUE
SETPOINT
;ANALOG SIGNAL OR VALUE
DEADBAND
;ANALOG SIGNAL OR VALUE
PROPORTION
;ANALOG SIGNAL OR VALUE
INTEGRAL
;ANALOG SIGNAL OR VALUE
DERIVATIVE
;ANALOG SIGNAL OR VALUE
RESET
;ANALOG SIGNAL OR VALUE
TRACK
;LOGICAL SIGNAL
OUTPUT
;ANALOG SIGNAL
ERROR
;ANALOG SIGNAL
____________________________________________________________________________
780 * PORTSTATUS
PORT
;ANALOG SIGNAL OR VALUE
MODE
;ANALOG SIGNAL
BAUD_RATE
;ANALOG SIGNAL OR VALUE
WORD_LENGTH
;ANALOG SIGNAL OR VALUE
STOP_BITS
;ANALOG SIGNAL OR VALUE
PARITY
;ANALOG SIGNAL OR VALUE
DUPLEX
;ANALOG SIGNAL OR VALUE
HANDSHAKE
;ANALOG SIGNAL OR VALUE
CUSTOM_1
;ANALOG SIGNAL OR VALUE
CUSTOM_2
;ANALOG SIGNAL OR VALUE
TIMEOUT
;ANALOG SIGNAL OR VALUE
LIST
;ANALOG SIGNAL OR VALUE
ARRAY
;ANALOG SIGNAL OR VALUE
COLUMN
;ANALOG SIGNAL OR VALUE
STATUS
;ANALOG SIGNAL
____________________________________________________________________________
Appendix B
B-14
ACCOL Workbench User Manual
790 * RANIN
DEVICE
PORT NODE
INITIAL
CHANNEL
STATUS
;ANALOG SIGNAL
INPUT
1
;ANALOG SIGNAL
ZERO
1
;ANALOG SIGNAL OR VALUE
SPAN
1
;ANALOG SIGNAL OR VALUE
____________________________________________________________________________
800 * RANOUT
DEVICE
PORT NODE
INITIAL
CHANNEL
STATUS
;ANALOG SIGNAL
OUTPUT
1
;ANALOG SIGNAL OR VALUE
ZERO
1
;ANALOG SIGNAL OR VALUE
SPAN
1
;ANALOG SIGNAL OR VALUE
TRACK
1
;LOGICAL SIGNAL
RESET
1
;ANALOG SIGNAL
____________________________________________________________________________
810 * RBE
STATUS
;ANALOG SIGNAL
MODE
;ANALOG SIGNAL OR VALUE
SCANRATE
;ANALOG SIGNAL
SCANSLICE
;ANALOG SIGNAL
SCANTIME
;ANALOG SIGNAL
FORMAT
;ANALOG SIGNAL
STOPXMIT
;ANALOG SIGNAL
TIMEOUT
;ANALOG SIGNAL
TOTAL_1
;ANALOG SIGNAL
TOTAL_2
;ANALOG SIGNAL
TOTAL_3
;ANALOG SIGNAL
TOTAL_4
;ANALOG SIGNAL
ACTIVE_1
;ANALOG SIGNAL
ACTIVE_2
;ANALOG SIGNAL
SEQ_NUM_1
;ANALOG SIGNAL
SEQ_NUM_2
;ANALOG SIGNAL
MESSAGE
;STRING SIGNAL
____________________________________________________________________________
820 * RDIGIN
DEVICE
PORT NODE
INITIAL
CHANNEL
STATUS
;ANALOG SIGNAL
INPUT
1
;LOGICAL SIGNAL
____________________________________________________________________________
830 * RDIGOUT
DEVICE
PORT NODE
INITIAL
CHANNEL
STATUS
;ANALOG SIGNAL
OUTPUT
1
;LOGICAL SIGNAL
____________________________________________________________________________
840 * REDUNDANCY
____________________________________________________________________________
850 * RESUME TASK
____________________________________________________________________________
860 * RHSCOUNT
DEVICE
PORT NODE
INITIAL
CHANNEL
STATUS
;ANALOG SIGNAL
COUNT
1
;ANALOG SIGNAL
COUNT_ZERO
1
;ANALOG SIGNAL OR VALUE
COUNT_SPAN
1
;ANALOG SIGNAL OR VALUE
RESET
1
;LOGICAL SIGNAL
FREQUENCY
1
;ANALOG SIGNAL
FREQ_ZERO
1
;ANALOG SIGNAL OR VALUE
FREQ_SPAN
1
;ANALOG SIGNAL OR VALUE
____________________________________________________________________________
870 * RIOSTATS
PORT
DEVICE ID
STATUS
1
;ANALOG SIGNAL
____________________________________________________________________________
ACCOL Workbench User Manual
B-15
Appendix B
880 * RLLANIN
DEVICE
PORT NODE
INITIAL
CHANNEL
STATUS
;ANALOG SIGNAL
INPUT
1
;ANALOG SIGNAL
ZERO
1
;ANALOG SIGNAL OR VALUE
SPAN
1
;ANALOG SIGNAL OR VALUE
____________________________________________________________________________
890 * RLSCOUNT
DEVICE
PORT NODE
INITIAL
CHANNEL
STATUS
;ANALOG SIGNAL
COUNT
1
;ANALOG SIGNAL
COUNT_ZERO
1
;ANALOG SIGNAL OR VALUE
COUNT_SPAN
1
;ANALOG SIGNAL OR VALUE
RESET
1
;LOGICAL SIGNAL
FREQUENCY
1
;ANALOG SIGNAL
FREQ_ZERO
1
;ANALOG SIGNAL OR VALUE
FREQ_SPAN
1
;ANALOG SIGNAL OR VALUE
____________________________________________________________________________
900 * RPDM
DEVICE
PORT NODE
INITIAL
CHANNEL
TYPE
;TYPE
TIME
;ANALOG SIGNAL OR VALUE
DEADBAND
;ANALOG SIGNAL OR VALUE
TRACK
;ANALOG SIGNAL OR VALUE
STATUS
;ANALOG SIGNAL
INPUT
1
;ANALOG SIGNAL
ZERO
1
;ANALOG SIGNAL OR VALUE
SPAN
1
;ANALOG SIGNAL OR VALUE
STATE
1
;LOGICAL SIGNAL
____________________________________________________________________________
910 * RPDO
DEVICE
PORT NODE
INITIAL
CHANNEL
RESOLUTION
RESOLUTION
STATUS
;ANALOG SIGNAL
MODE
1
;ANALOG SIGNAL OR VALUE
OUTPUT
1
;ANALOG SIGNAL OR VALUE
ENABLE
1
;LOGICAL SIGNAL
MIN_TIME
1
;ANALOG SIGNAL OR VALUE
MAX_TIME
1
;ANALOG SIGNAL OR VALUE
SPAN
1
;ANALOG SIGNAL OR VALUE
INPUT
1
;ANALOG SIGNAL OR VALUE
HIGH_LIMIT
1
;LOGICAL SIGNAL
LOW_LIMIT
1
;LOGICAL SIGNAL
TRACK
1
;LOGICAL SIGNAL
RESET
1
;ANALOG SIGNAL
____________________________________________________________________________
920 * RWAIT DI DEVICE, CHANNEL, TIMEOUT UNITS, FLAG
____________________________________________________________________________
930 * RWAIT DIH DEVICE, CHANNEL, TIMEOUT UNITS, FLAG
____________________________________________________________________________
940 * RWAIT DIL DEVICE, CHANNEL, TIMEOUT UNITS, FLAG
____________________________________________________________________________
950 * SCHEDULER
STROBE
;LOGICAL SIGNAL
STATE
;LOGICAL SIGNAL
RESET
;LOGICAL SIGNAL
MODE
;ANALOG SIGNAL OR VALUE
TRACK
;LOGICAL SIGNAL
UNAVAILABLE
1
;LOGICAL SIGNAL
FAIL_STATE
1
;LOGICAL SIGNAL
RANK
1
;ANALOG SIGNAL OR VALUE
OUTPUT
1
;LOGICAL SIGNAL
____________________________________________________________________________
Appendix B
B-16
ACCOL Workbench User Manual
960 * SEQUENCER
STROBE
;LOGICAL SIGNAL
STATE
;ANALOG SIGNAL
INPUT
1
;LOGICAL SIGNAL
OUTPUT
1
;LOGICAL SIGNAL
____________________________________________________________________________
970 * SLAVE
POINT
;ANALOG SIGNAL OR VALUE
ENABLE
;LOGICAL SIGNAL
INTYPE
;ANALOG SIGNAL OR VALUE
OUTTYPE
;ANALOG SIGNAL OR VALUE
INLIST
;ANALOG SIGNAL OR VALUE
OUTLIST
;ANALOG SIGNAL OR VALUE
STATUS_1
;ANALOG/LOGICAL SIGNAL
STATUS_2
;ANALOG SIGNAL
___________________________________________________________________________
980 * SMART
REMOTE
;ANALOG_SIGNAL_OR_VALUE
MODE
;ANALOG_SIGNAL_OR_VALUE
FORMAT
;ANALOG_SIGNAL_OR_VALUE
COUNT
;ANALOG_SIGNAL_OR_VALUE
INDEX
;ANALOG_SIGNAL_OR_VALUE
LIST
;ANALOG_SIGNAL_OR_VALUE
ADDRESS
;ANALOG_SIGNAL_OR_VALUE
STATUS_1
;ANALOG/LOGICAL_SIGNAL
STATUS_2
;ANALOG_SIGNAL
____________________________________________________________________________
990 * STEPPER
STROBE
;LOGICAL SIGNAL
HOLD_OFF
;LOGICAL SIGNAL
DIRECTION
;LOGICAL SIGNAL
INDEX
;ANALOG SIGNAL
RESET
;LOGICAL SIGNAL
RESET_INDEX
;ANALOG SIGNAL OR VALUE
TRACK
;LOGICAL SIGNAL
TRACK_INDEX
;ANALOG SIGNAL OR VALUE
STEP
;ANALOG SIGNAL
ARRAY
;ANALOG SIGNAL OR VALUE
TIME
;ANALOG SIGNAL
OUTPUT
1
;ANALOG/LOGICAL SIGNAL
____________________________________________________________________________
1000 * STORAGE
RESET
;LOGICAL SIGNAL
READ
;LOGICAL SIGNAL
WRITE
;LOGICAL SIGNAL
COLUMN
;LOGICAL SIGNAL
INDEX
;ANALOG SIGNAL
ARRAY
;ANALOG SIGNAL OR VALUE
TYPE
;LOGICAL SIGNAL
STATUS
;ANALOG SIGNAL
LIST
;ANALOG SIGNAL
INPUT
1
;ANALOG/LOGICAL SIGNAL
____________________________________________________________________________
1010 * SUSPEND
____________________________________________________________________________
1020 * SYS_3530
PARAM_LIST1
;ANALOG_SIGNAL_OR_VALUE
PARAM_LIST2
;ANALOG_SIGNAL_OR_VALUE
PARAM_LIST3
;ANALOG_SIGNAL_OR_VALUE
PARAM_LIST4
;ANALOG_SIGNAL_OR_VALUE
PARAM_LIST5
;ANALOG_SIGNAL_OR_VALUE
PARAM_LIST6
;ANALOG_SIGNAL_OR_VALUE
____________________________________________________________________________
ACCOL Workbench User Manual
B-17
Appendix B
1030 * TCHECK
INLIST
;ANALOG SIGNAL OR VALUE
OUTLIST
;ANALOG SIGNAL OR VALUE
STATUS
;ANALOG SIGNAL
DGPSUB
;ANALOG SIGNAL OR VALUE
SPSUB
;ANALOG SIGNAL OR VALUE
RTDTSUB
;ANALOG SIGNAL OR VALUE
ESTSUB
;ANALOG SIGNAL OR VALUE
ERRORCNT
;ANALOG SIGNAL OR VALUE
____________________________________________________________________________
1040 * TCOUNT
COUNT
;ANALOG_SIGNAL
COUNT_ZERO
;ANALOG_SIGNAL_OR_VALUE
COUNT_SPAN
;ANALOG_SIGNAL_OR_VALUE
RESET
;LOGICAL_SIGNAL
FREQUENCY
;ANALOG_SIGNAL
FREQ_ZERO
;ANALOG_SIGNAL_OR_VALUE
FREQ_SPAN
;ANALOG_SIGNAL_OR_VALUE
____________________________________________________________________________
1050 * TIMER
INPUT
;LOGICAL SIGNAL
SETPOINT
;ANALOG SIGNAL OR VALUE
RESET
;LOGICAL SIGNAL
TIME
;ANALOG SIGNAL
OUTPUT_1
;LOGICAL SIGNAL
OUTPUT_2
;LOGICAL SIGNAL
____________________________________________________________________________
1060 * TOT/TRND
INPUT
;ANALOG/LOGICAL SIGNAL OR VALUE
START_HOUR
;ANALOG SIGNAL OR VALUE
START_MIN
;ANALOG SIGNAL OR VALUE
TIME
;ANALOG SIGNAL OR VALUE
HOUR_SPAN
;ANALOG SIGNAL OR VALUE
SHIFT_SPAN
;ANALOG SIGNAL OR VALUE
DAY_SPAN
;ANALOG SIGNAL OR VALUE
MONTH_SPAN
;ANALOG SIGNAL OR VALUE
PREV_HOUR
;ANALOG SIGNAL
PREV_SHIFT
;ANALOG SIGNAL
PREV_DAY
;ANALOG SIGNAL
PREV_MONTH
;ANALOG SIGNAL
CUR_T_HOUR
;ANALOG SIGNAL
CUR_T_SHIFT
;ANALOG SIGNAL
CUR_T_DAY
;ANALOG SIGNAL
CUR_T_MONTH
;ANALOG SIGNAL
DERIVATIVE
;ANALOG SIGNAL
____________________________________________________________________________
1070 * VLIMITER
INPUT
;ANALOG SIGNAL OR VALUE
TRACK
;LOGICAL SIGNAL
RATE_UP
;ANALOG SIGNAL OR VALUE
RATE_DOWN
;ANALOG SIGNAL OR VALUE
OUTPUT_1
;ANALOG SIGNAL
OUTPUT_2
;LOGICAL SIGNAL
____________________________________________________________________________
1080 * VMUX
TRACK
;LOGICAL SIGNAL
RATE
;ANALOG SIGNAL OR VALUE
OUTPUT
;ANALOG SIGNAL
SELECT
;ANALOG/LOGICAL SIGNAL OR VALUE
INLIST
;ANALOG SIGNAL OR VALUE
INPUT
1
;ANALOG SIGNAL OR VALUE
____________________________________________________________________________
1090 * WAIT DELAY TIME UNITS
____________________________________________________________________________
1100 * WAIT DI DEVICE, CHANNEL, TIMEOUT UNITS, FLAG
____________________________________________________________________________
1110 * WAIT DIH DEVICE, CHANNEL, TIMEOUT UNITS, FLAG
____________________________________________________________________________
1120 * WAIT DIL DEVICE, CHANNEL, TIMEOUT UNITS, FLAG
____________________________________________________________________________
Appendix B
B-18
ACCOL Workbench User Manual
1130 * WAIT FOR CONDITION RESOLUTION, TIMEOUT UNITS, FLAG
____________________________________________________________________________
1140 * WAIT TIME TIME
____________________________________________________________________________
1150 * WATCHDOG
DEVICE
DEVICE ID
CHANNEL
CHANNEL
MODE
;WATCH DOG
ENABLE
;LOGICAL SIGNAL
MAX_TIME
;ANALOG SIGNAL OR VALUE
MIN_TIME
;ANALOG SIGNAL OR VALUE
FAIL_OPTION
;ANALOG SIGNAL OR VALUE
FAIL_STATE
;LOGICAL SIGNAL
STATUS
;LOGICAL SIGNAL
ERROR
;ANALOG SIGNAL
___________________________________________________________________________
1160 * XMTR_INTERFACE
DEVICE
;ANALOG_SIGNAL_OR_VALUE
CHANNEL
;ANALOG_SIGNAL_OR_VALUE
REMOTE
;ANALOG_SIGNAL_OR_VALUE
MODE
;ANALOG_SIGNAL_OR_VALUE
FORMAT
;ANALOG_SIGNAL
ADDRESS
;ANALOG_SIGNAL_OR_VALUE
COUNT
;ANALOG_SIGNAL
LIST
;ANALOG_SIGNAL
INDEX
;ANALOG_SIGNAL
STATUS_1
;ANALOG_SIGNAL
STATUS_2
;ANALOG_SIGNAL
____________________________________________________________________________
NOTE: Not all modules are supported in all target node types. See the ACCOL II
Reference Manual (document# D4044) for details on specific modules.
ACCOL Workbench User Manual
B-19
Appendix B
BLANK PAGE
Appendix C
Keyboard Shortcuts
ACCOL Workbench allows access to system functions by pointing and clicking with
the mouse on icons, or on menu bar and pull down/pop-up menu items. Mouse
wheel support is also included. Several ACCOL Workbench features and functions
are also accessible via keyboard shortcuts which mimic the point and click
operations. For example, help is available by pressing the [F1] key. To activate a
keyboard sequence, depress and hold down the first key shown in the table, then
depress the second key shown. (For readability, the two keys are shown separated
by a plus sign.)
In addition to the sequences shown, most menu selections may be activated by a
single character keystroke (shown underlined in the menu bar or pull down menu).
Menu Bar, Pull-Down Equivalent
Menu Sequence
Sequence
Keyboard Function
File->New
Ctrl + N
Open a new
source file.
File->Open...
Ctrl + O
Open an existing ACCOL
source file.
File->Open Text File…
Ctrl + T
Open an existing text
file.
File-> Save
Ctrl + S
Save changes to
ACCOL source file.
File->Reverse...
Ctrl + R
Reverse compile an ACO
file to generate an ACC
file.
Edit->Cut
Ctrl + X
Cut selected text to the
Clipboard.
Edit->Copy
Ctrl + C
Copy selected text to the
Clipboard.
Edit->Paste
Ctrl + V
Paste text
Clipboard.
Edit->Find...
Ctrl + F
Find text string.
Edit->Replace...
Ctrl + H
Replace text string.
ACCOL Workbench User Manual
C-1
ACCOL
from
this
the
Appendix C
Menu Bar, Pull-Down Equivalent
Menu Sequence
Sequence
Keyboard Function
Edit->Insert
Ins
Insert ACCOL structure.
Edit->Delete
Del
Delete selected text or
structure.
Edit->Delete to end of
line
Alt + K
Delete text from current
cursor position to the end
of current line.
Edit->Properties
Enter
Enter Edit Properties
Mode. This is equivalent
to double-clicking on a
section icon.
Edit->Goto
Ctrl + G
Go to a line of the file.
Edit->Undo
Ctrl + Z
Undo last action. May be
repeated to undo several
actions. (NOTE: Not all
actions can be undone.)
Actions->Build
F5
Compile and link the
ACC file to generate ACO
and ACL files.
Actions->Debug
F7
Enter debug mode.
Actions->Document
Ctrl + F5
Generate a documented
listing file of this ACC
file.
Actions->Download
F6
Download the selected
ACCOL load file.
Actions->Stop Build
Ctrl + Break
Cancel the compile and
link operation.
Actions->Stop Debugging
Ctrl + F7
Exit debug mode.
View->Next Error
F4
View the next error in
the window.
View->Previous Error
Ctrl + F4
View the previous error
in the window.
Ctrl + Home
Go to top of the file.
Appendix C
C-2
ACCOL Workbench User Manual
Menu Bar, Pull-Down Equivalent
Menu Sequence
Sequence
Ctrl + End
ACCOL Workbench User Manual
Keyboard Function
Go to the bottom of the
file.
C-3
Appendix C
BLANK PAGE
Appendix D
Customizing the User Environment
ACCOL Workbench’s appearance on the screen, and certain functions it performs,
may be customized to suit the needs of the ACCOL programmer.
Viewing Open BSI Setup Parameters (Modification not allowed in Open BSI 3.0 and newer)
Users can view, and in some cases, modify the setup parameters for the Open BSI
utilities by clicking on Setup Parameters. For descriptions of what the various
setup parameters mean, see the Open BSI Utilities Manual (document# D5081).
Å
Turning On/Off the Tool Bar
If a user chooses to use only the menu bar and pull down menus, instead of the tool
bar; the tool bar can be turned off. To do this, click on View Tool Bar. The tool
bar will disappear. To re-enable the tool bar, repeat the same procedure.
Å
Turning On/Off the Status Bar
Å
The status bar can be turned off. To do this, click on View Status Bar. The status
bar will disappear. To re-enable the status bar, repeat the same procedure.
Opening/Closing the Output Window
The Output Window displays the current progress of system commands, such as
’builds’. This can be opened or closed by clicking on Window Output. A check
mark next to "Output" indicates that the Output Window is currently being
displayed.
Å
ACCOL Workbench User Manual
D-1
Appendix D
Opening/Closing the Watch Window
The Watch Window displays the current value of a group of selected signals. This
can be opened or closed by clicking on Window Watch Window. A check mark
next to "Watch Window" indicates that the Watch Window is currently being
displayed.
Å
Re-Arranging the Windows on the Desktop
The "Window" menu bar item includes selections for tiling windows, cascading
windows, arranging icons, and choosing which window should be the currently
active window. See your Windows™ documentation for details on these options.
Using the Workspace Settings Dialog Box
Certain aspects of how ACCOL Workbench operates may be altered from the
Workspace Settings dialog box. To access this dialog box, click on Setup
Workspace. The dialog box consists of six separate pages, each of which is
accessible by clicking on the tab associated with that page. Each of these pages of
the dialog box are discussed in the sub-sections which follow.
Å
When changes for all pages are completed, click on the [OK] push button to save
changes, or the [Cancel] push button to abandon changes.
Setting File and Backup Parameters
The Files page of the Workspace
Settings dialog box has several options
which may be enabled/disabled by
clicking on the check box next to the
option:
Appendix D
D-2
ACCOL Workbench User Manual
Save before building
Enabling this option causes the ACCOL
source file to be saved, prior to starting a
"Build" operation to generate the ACO and
ACL files. This option is recommended.
Prompt before saving files
Enabling this option causes ACCOL
Workbench to prompt the user whether or
not an ACCOL source file should be saved
prior to beginning a "Build" operation.
Produce listing file
Enabling this option causes ACCOL
Workbench to generate a listing file (.LIS)
during a "Build" operation.
Produce cross reference file
Enabling this option causes ACCOL
Workbench
to
include
cross-reference
information in the LIS file.
Delete log file on save
While on-line editing of load structures is
occurring, ACCOL Workbench saves, in a log
file, a copy of sections of ACCOL source file
text as it appeared both ’before’ and ’after’
changes occur. This file has the extension
(.ELG). This file is useful if the ACCOL
programmer wants to review what on-line
changes have occurred. Choosing this option
automatically deletes this log file.
Add undefined signals
automatically after build
Backup file before saving
ACCOL Workbench User Manual
If you select this option, any undefined
signals will be added automatically to the
*SIGNALS section after you initiate a
“Build” command. NOTE: You do NOT have
control over the signal type definition when
you define signals via this automatic
method. ACCOL Workbench will attempt to
choose the signal type based on the context
in which you use the signal, but this may or
may not be correct for the intent of your
ACCOL load.
Enabling this option causes a backup file of
the ACC file (as it was before the current
changes are saved) to be created. The backup
file will have an underscore, and a three
digit number appended to the file base name,
and a file extension of (.ACC). When the save
operation occurs, changes will be present in
D-3
Appendix D
the current file (.ACC) and the file without
changes will be named basename_xxx.ACC.
For example, if a file is named
STATION1.ACC, its first backup file will be
named STATION1_001.ACC.
Create up to x backups
allows the user to specify the number of
backup files (discussed in the paragraph
above) which should be saved. Up to 999
backup files can be saved, provided that
there is sufficient disk space.
Backup subdirectory
specifies the name (not the path) of the subdirectory directly below the ACCOL directory
which will hold the backup files discussed in
the paragraph above. The default name for
this directory is BACKUP.
Setting the Line Numbers in ACCOL Tasks
By default, ACCOL Task line numbers start
at 10, and are incremented by 10 for each
new task line number. The reason for 9
extra lines of space is that it makes it easy
to add some additional modules or
statements
in-between
two
existing
modules, with a minimum amount of renumbering required.
These line numbering defaults can be
changed, however, in the Line Numbers
page of the Workspace Settings dialog box.
To access this page, click on the "Line
Numbers" tab.
If desired, enter a new "Starting Line Number" and or "Line Number
Increment" in those fields.
The new line numbering defaults will take effect the next time the "Resequence"
option is selected.
Appendix D
D-4
ACCOL Workbench User Manual
Specifying
Operation
Parameters
For
On-Line
Certain aspects of debugging, and online data editing are governed by
settings in the Online page of the
Workspace Settings dialog box. Access
this page by clicking on the "Online"
tab.
Save and restore debugging flags
between sessions
Preserve watch list across
online sessions
Clear debugging flags
when going offline
ACCOL Workbench User Manual
While in debug mode, debug flags (aborts,
skips, or breakpoints) may be set at various
task lines. If this option is selected, any
flags which are set when the programmer
exits debug mode will be saved in a file,
and re-applied the next time debug mode is
started. This allows a debugging session to
be started with all flags from the previous
debugging session. This option may cause
delays while ACCOL Workbench saves and
restores the debug flag states.
The Watch List allows the ACCOL
programmer to save, in a list, a group of
ACCOL signals, and then to view them, or
change their values, as part of the
debugging process. By default, this option
is selected so that the Watch List will be
saved, and available in subsequent
debugging sessions.
specifies if debugging flags should be
automatically cleared in the Network 3000
controller when the debugging session
ends. This is useful in situtations where
the ACCOL load should be left to run
without interference. If the "Save and
D-5
Appendix D
restore debugging flags between
sessions" option is selected, these flags
may be restored the next time debug mode
is started.
Enable Error Array Tab
in Task Debug
Directory to use for saving
online information
Retry online operations x
time before failing
specifies if an Error Information tab, for
calling
up
information
from
the
#ERARRAY for the current task, should
appear in the Task Debug window.
specifies the drive and directory where
debugging flags and the watch list should
be saved. By default, this is the Workbench
installation directory.
this value specifies the total number of
attempts ACCOL Workbench will make to
perform an on-line operation, before
declaring a communications failure. The
default for this value is 3.
Specifying Refresh Rates For On-Line Windows
The frequency at which data is updated
on the screen in certain on-line windows
can be specified from the Refresh Rates
page of the Workspace Settings dialog
box.
To access this dialog box, click on the
"Refresh Rates" tab.
Appendix D
D-6
ACCOL Workbench User Manual
Refresh of the following items may be modified, as follows:
Watch window
specifies how often entries for signals in the Watch
Window are updated.
Error Array Window
specifies how often entries in the Error Array
Window are updated.
Debugging flags
specifies how often the Task Debug window polls
the Network 3000-series controller for data from
the currently executing module. The default is 1
second.
Foreground terminals
specifies how often entries for signals in the
foreground (active) Task Debug window are
updated. If set to 0, the entries are only refreshed
when you step or change module pages.
Background terminals
specifies how often the entries for signals in
background (inactive) Task Debugging windows
are updated. If set to 0, the entries are not
refreshed.
Changing the Fonts Used in ACCOL Workbench Code Windows
If desired, you can alter the font used in
the ACCOL Workbench code windows by
clicking on the "Font Settings" tab.
The Default Font is the initial font used when you start an ACCOL Workbench
session. You can alter the default font by clicking on the [Change Default Font]
push button, and selecting a new font/style from the Font dialog box (shown below).
ACCOL Workbench User Manual
D-7
Appendix D
The Current Font refers to the font
which will be used for all windows in
this current ACCOL Workbench session.
If you want to change the font used in
the current session, click on the
[Change Current Font] push button,
and select the new font /style from the
Font dialog box. The change will take
effect immediately for the next code
window you open. If you want to use the
current font in all subsequent ACCOL
Workbench sessions, click on "Save
Current as Default".
Choosing Which Warning Messages Should Be Displayed
The types of warnings which
are displayed in ACCOL
Workbench can be limited
based
on
entries
made
through the Warnings page of
the Workspace Settings dialog
box.
NOTE: These warnings are
only generated when you open
up an ACC file, thereby
causing the file to be parsed.
For example, if you add
undefined, or unused signals
while editing, warnings will
not appear until you close the
file, and re-open it.
Display undefined signals
warning
When you type a signal directly into a module terminal or
task, which has not been first defined in the *SIGNALS
section, or defined via the signal Check-in feature, the
signal is considered to be undefined. If you select the
“Display undefined signals warning”, a list of the
undefined signals can be viewed in the Undefined /
Appendix D
D-8
ACCOL Workbench User Manual
Unused Signal Warning window. This
accessible by clicking on Windows
Undefined/Unused Signals.
window is
Show
Å
Display unused signal
warning
When you define a signal in the *SIGNALS section, but
you have NOT used the signal in a module or task, that
signal is considered to be unused. If you select the
“Display unused signal warning”, a list of the unused
signals can be viewed in the Undefined/Unused Signal
Warning window. This window is accessible by clicking on
Windows Show Undefined /Unused Signals.
Å
Display second section
warning
If, through the course of editing the ACCOL source file,
you inadvertently create a duplicate section; for example,
two *SIGNALS sections, a warning will be displayed if
this box is checked.
ACCOL Workbench User Manual
D-9
Appendix D
Using Filters To Limit Which Signals Are Displayed in the Signals Window
It is possible to use the Specify Signal Filter dialog box to limit which signals are
displayed. This dialog box appears whenever you double-click on the icon for the
Signals section. Alternatively, it may be called up while editing in the Signal
window, by clicking on the icon, shown, above, -OR- by clicking on View Set
Filter, -OR- by pressing the right mouse button, and choosing "Set Filter" from the
pop-up menu.
Å
In order to use the Specify Signal Filter dialog box, a mixture of 1 or more
characters or wildcards must be specified in each signal name field ("Base Name",
"Extension", and "Attribute", or you can select from a list of base names,
extensions, and attributes by clicking on the list control next to each field.
To limit the signals displayed to a certain type ("Analog", "Analog Alarm",
"Logical", "Logical Alarm", or "String") de-select any "Types" which should not
be displayed.
If system signals (distinguished from user-created signals by a pound sign ’#’ at the
beginning of the base name) should be displayed, select "Include system signals".
After clicking on [OK] the entries in the signal window will be limited only to those
signals which conform to the filtering defined in the dialog box.
There are two wildcard characters supported in this dialog box:
Appendix D
*
An asterisk, entered in any of the "Base Name", "Extension",
or "Attribute" fields will cause all characters to the right of the
asterisk (in this field) to be accepted by the filter.
?
A question mark, entered in any of the
"Base Name",
"Extension", and "Attribute" fields allows a single character in
that position to be accepted by the filter.
D-10
ACCOL Workbench User Manual
Here are some examples:
The entries in the Specify Signal Filter
dialog box, shown at right, will cause all
signals with a base name starting with the
characters "PUMP" to be displayed.
In this particular ACCOL load, there are 9 signals which start with "PUMP" in the
base name. With the specified filtering, only these signals will appear in the
window, as shown, below:
For the same ACCOL load the entries in
the Specify Signal Filter dialog box have
been changed, as shown at right, to
specify all signals with a base name that
starts with "PUMP" and which are
followed by any single character, which is
followed by the letter "C".
This causes the window to display only
two signals, as shown at right.
ACCOL Workbench User Manual
D-11
Appendix D
Sorting Signals Alphabetically in the Signals Window
When editing the *SIGNALS section, options are available for sorting the signals in
the window alphabetically by base name, extension, or attribute.
To sort the signals alphabetically by base name, click on this icon, -ORclick on View Sort By Basename, -OR- press the right mouse
button, and choose Sort By... By Basename from the pop-up menus.
Å
Å
Å
To sort the signals alphabetically by signal extension, click on this
icon, -OR- click on View Sort By Extension,-OR- press the right
mouse button, and choose Sort By... By Extension from the pop-up
menus.
Å
Å
Å
To sort the signals alphabetically by signal attribute, click on this icon OR- click on View Sort By Attribute, -OR- press the right mouse
button, and choose Sort By... By Attribute from the pop-up menus.
Å
Å
Å
Turning ON/OFF Signal Filtering
Signal filtering is turned ON/OFF by clicking on the icon, shown above, -OR- by
clicking on View Use Filter.
Å
Restoring A Backup File
If backups have been configured, previously, from the Files page of the Workspace
Settings dialog box, an earlier version of an ACCOL source file can be retrieved. To
do this, click on File Restore Backup. The Open dialog box will appear, listing
all backup files in the specified backup sub-directory. Choose the desired file, and
click on the [Open] push button. The three digit backup number that is part of the
base name will be removed, and the file will be copied into the directory used to
store active ACCOL source files. If this operation will overwrite an existing file in
that directory with the same name, thereby overwriting subsequent edits, the user
is prompted to confirm the restore operation.
Å
Appendix D
D-12
ACCOL Workbench User Manual
Appendix E
Using Initial Value Scan - ValScan
After you have debugged your ACCOL load, and your process has been properly
’tuned’, you may decide that you want to update the inital values for the signals in
your ACCOL source file (.ACC) with the current values of the signals in the tuned
ACCOL load. The Initial Value Scan utility, also called ValScan, allows this
updating. ValScan collects the current value of each signal in a running ACCOL
load, and copies it to the initial value field of the corresponding signal in the (.ACC)
file.
How ValScan Works
When started, ValScan requests all
current signal data from the Network
3000 controller. It uses this data to
update a copy of the existing (.ACC) file,
replacing the initial values in the file
with the current values obtained from
the ACCOL load running in the Network
3000 controller. This updated version of
the (.ACC) is temporarily stored in a file
with the same path and base name, and
a file extension of (.$$$).
The current (.ACC) file is then renamed
to (.BAK) in order to preserve the
previous version. The (.$$$) file is then
renamed to (.ACC).
( If you decide you want to revert to the
previous version, rename the (.BAK) file
to (.ACC).)
Starting ValScan
Open BSI communications must be active for ValScan to work. Click on
Start Programs OpenBSI Tools Utility Programs Value Scan. Scanning
must then be activated, in order to update the (.ACC) file.
Å
Å
ACCOL Workbench User Manual
Å
Å
E-1
Appendix E
NOTE: ValScan can also be started from within ACCOL Workbench while on-line
debugging of a task is in progress by clicking on Actions Initial Val Scan, or by
using the icon shown below. See ‘Updating Initial Values In Your ACCOL Source File
with Values From the ‘Tuned’ ACCOL Load’ in Chapter 21 for details.
Å
Initiating A Scan
Click on the ’Select Node’ icon, shown above, or click on File
New Node dialog box will appear.
ÅStart. The Select
Choose the node name. Another dialog box will appear. If you want to include
logical signals in the scan, check "Scan Logicals". If you want to include analog
signals which have an initial value of zero in the scan, check "Scan Zero Valued
Signals".
Type the password for the node in the "Password" field, and click on [Begin] to
sign-on to the node. The word ’Scanning’ will appear in yellow in the Status Bar,
and ValScan will update files as described previously. This process must be
repeated for each (.ACC) file you would like to update.
NOTE: Beginning with Open BSI Version 4.1, system signals are unaffected by the
Initial Value Scan utility.
Appendix E
E-2
ACCOL Workbench User Manual
Appendix F
*DEFINE and *INCLUDE Statements
ACCOL Workbench includes two special statements which can be used to simplify
ACCOL source file management. These statements can be placed anywhere inside
an ACCOL source file.
*DEFINE sets up an indexing scheme whereby every occurrence of an index
number in your ACC file will be replaced by user specified text. This is useful when
you have multiple ACCOL source files which are identical, except for certain signal
names; the signal names which vary from source file to source file need only be
changed once in each file - - within the *DEFINE statement.
*INCLUDE allows the contents of other files to be included in your ACC file. This is
especially useful for files that are maintained by one group but shared by many
users.
CAUTION
WE STRONGLY RECOMMEND THAT ANY EDITS YOU MAKE
USING *DEFINE, *DEFINE RESET or *INCLUDE be performed in
an ASCII text editor OUTSIDE OF ACCOL WORKBENCH, OR IN
WORKBENCH’S OWN ASCII TEXT EDITOR. You can then open the
file in ACCOL Workbench, and necessary file pre-processing can be
performed. Failure to follow this recommendation can cause
unforeseen problems.
Notes about Using *DEFINE and *INCLUDE:
•
Whenever you execute a “Build” command on an ACCOL source file which
utilizes a *DEFINE or *INCLUDE statement, a pre-processed ACCOL file with
the extension ACP will be created. This ACP file is identical to the ACCOL
source file except that all text substitutions and insertions from the *DEFINE
and *INCLUDE statements are reflected in the ACP file. These substitutions
and insertions are also reflected in the ACCOL load file.
•
After downloading such an ACCOL load file, any use of on-line debug mode will
call up the ACP file - - changes made to the ACP file are NOT reflected back in
the ACC file, and so are only temporary.
•
If you execute a “Reverse” command on an ACCOL object file which originally
included *DEFINE or *INCLUDE statements, those statements will NOT
appear in the resulting ACC file. Instead, the text substitutions and insertions
will appear in their place.
ACCOL Workbench User Manual
F-1
Appendix F
IMPORTANT
Once you include either the *DEFINE or *INCLUDE statement in
your ACCOL source file, that file CANNOT be edited in Edit
Properties Mode. Because of this, you CANNOT insert modules,
tasks, etc. unless you type them in manually in the code window. To
access the code window, double-click on “Code Section” when you
open the file. You can then edit the file manually.
Appendix F
F-2
ACCOL Workbench User Manual
Text Substitution Using *DEFINE
The *DEFINE statement operates similar to a macro in other programming
languages. It associates a user-specified string of text with an index number. Once
the *DEFINE is read by ACCOL Workbench during a “Build” operation, each
occurrence of the index number preceded by a question mark is replaced by the
user-specified string of text. This replacement process can be turned off for the
remaining lines of the source file by the *DEFINE RESET statement.
*DEFINE is a temporary substitution and does not change the ACC file.
Syntax Rules For Using *DEFINE
*DEFINE index1 string1 [index 2 string 2] [index3 string3]
:
*DEFINE RESET
where:
indexn
is an integer which serves as an index number used to
reference the substitute text. For example, wherever index1
is found in the text, string1 will be substituted. Index
numbers can range from 01 to 99. Each index number must
be two digits. Index numbers smaller than 10 must be
preceded by a 0. All index numbers, when used outside the
*DEFINE must be preceded by a question mark.
stringn
is the substitute text string.
In the example below, the *DEFINE statement associates index number 01 with the
text BASE1 and index number 02 with the text BASE2. Whenever ?01 and ?02 are
found in the file, the text BASE1 and BASE2 are substituted for the index
numbers.
Original ACC File
* DEFINE 01 BASE1 02 BASE2
* TASK1
10 * MUX
INLIST ?01.IN
SELECT ?02.SEL
OUTPUT ?01.OUT
During a “Build” operation
your file looks like this
* TASK1
10 * MUX
INLIST BASE1.IN
SELECT BASE2.SEL
OUTPUT BASE1.OUT
Since checking for the appropriate substitutions in each line takes significant
processing time, use *DEFINE RESET to stop substitution if these substitutions
are confined to one area of the source file.
ACCOL Workbench User Manual
F-3
Appendix F
Text Insertion Using *INCLUDE
*INCLUDE allows you to construct a source (ACC) file using other source files.
These other files remain as separate independent files.
Once *INCLUDE is encountered, the entire file referenced is inserted. Task line
numbers in the separate file can be altered by specifying an offset value. Like
*DEFINE, this does not permanently change your source file or the included file.
Files named in *INCLUDE statements cannot themselves contain *INCLUDE
statements.
Syntax Rules For Using *Include
*INCLUDE filename [task-line-offset]
where:
filename
is the full filename (including the extension) to be
inserted in the ACCOL source file.
[task-line-offset]
optionally specifies an increment to be added to
each task line number in filename as it is
inserted in the ACCOL source file. The default
task-line offset is 0, i.e. the task line numbers in
filename are used as is.
Creating An External Text File Using ACCOL Workbench’s ASCII Text Editor
It is possible to create an
external text file by clicking
on File New Text File.
(This option is only available
when you are not currently
editing an ACCOL task.)
Å
Choose a name for the text
file and click on the [Save]
push button. NOTE: We
recommend you use a file
extension of TXT.1
1 If you use a file extension of .ACC, when you open the file in ACCOL Workbench, it will attempt to
generate an entire ACC file with all required sections for it. This is a problem if you are not trying to
create an entire ACC file, but simply a small part to be inserted in an existing ACC file. For this reason,
we recommend you use .TXT, unless you are creating an all new ACC file from scratch.
Appendix F
F-4
ACCOL Workbench User Manual
Once you have named the
external text file, you can
edit it by double-clicking on
the “Notepad Section”.
This will open up a window
in which you can enter text.
Save the file when you are finished. To open it again, for re-editing, click on
File Open Text File.
Å
ACCOL Workbench User Manual
F-5
Appendix F
BLANK PAGE
Glossary
Abort Flag
when set in the Task Debug window causes the task line
containing the abort flag, and all subsequent lines of the
task to be ignored. Task execution will then resume from
the beginning until the Abort Flag (or another flag) is
reached.
ACCOL Load File
also known as the .ACL file, is created from an ACCOL
Object file. It is called the ACCOL Load file because it is
in a machine-readable format which is downloaded into
the Network 3000-series controller. Once downloaded, the
controller executes instructions in the ACCOL load file in
order to measure or control a plant or process.
ACCOL Object File
also known as the .ACO file, is created from an ACCOL
source file. The ACO file is used by ACCOL Workbench to
generate an ACCOL Load file.
ACCOL Source File
also known as the .ACC file, is created by the ACCOL
programmer using ACCOL Workbench, or by using any
ASCII text editor. The ACCOL source file defines the
modules, task, signals, and other ACCOL structures
which define the measurement and control instructions
for this particular application. The ACCOL source file,
when finished, is used to generate an ACCOL Object file,
and ACCOL Load file.
ACCOL Workbench
is a Windows-based set of software tools which allows you
to create an ACCOL source file, and to build an ACCOL
object file, and ACCOL load file from it.
Base Memory
is a term which applies to 186-based and 386EX Real
Mode controllers only. Each of these types of units has
64K of base memory which holds most ACCOL structures.
386EX Protected Mode units do NOT use the term base
memory.
Breakpoint
when set in a Task Debug window, causes execution to
stop on the task line immediately before the flag, and
causes Step Mode to be activated. The programmer can
then examine signals and other structures to see how
their current values are affected by execution of each
individual task line.
Debugging
a process in which the ACCOL programmer uses various
techniques to trouble-shoot errors in the ACCOL load.
G-1
Debugging Flags
are used in the Task Debug window. There are three
types: Abort, Breakpoint, and Skip.
Download
is the process of transferring an ACCOL load file into the
memory of a Network 3000-series controller. Downloading
is performed using the Open BSI Downloader.
Drag and Drop
the process of selecting an item, and then holding down
the mouse key until the item has been dragged to a new
position.
Expanded Memory
is extra memory, beyond the base memory, which is
installed in a 186 or 386EX Real Mode controller. This
memory is used to hold certain selected ACCOL
structures which may be shifted out of base memory, to
free up space in the base memory area. In addition, there
are certain structures which can only exist in expanded
memory. The term expanded memory does NOT apply to
386EX Protected Mode controllers.
Open BSI
stands for Open Bristol System Interface. Open BSI is a
set of software utility programs which facilitate data
collection and communications with a network of Bristol
Babcock Network 3000-series controllers. The utilities in
the standard Open BSI set include DataView, the
Downloader, and the Open BSI Setup Tool (for Open BSI
2.x users) or NetView (for Open BSI 3.x or newer users).
Password
consists of 1 to 6 letters or numbers (alpha-numeric
characters) excluding spaces and punctuation marks.
Passwords are defined in the *SECURITY-CODES
section of the ACCOL source file. There is one password
for each of the 6 possible security levels.
Reverse Compiling
is the process of taking an ACCOL Object file, and recreating an ACCOL source file from it. This is useful in
cases where the ACCOL source file has been lost or
corrupted.
Signal duplicating
is the process of taking an existing signal, and making a
new signal with the exact same characteristics.
Skip Flag
when set in the Task Debug window, causes the task line
on which it is placed to be ignored.
Step Mode
allows the programmer to execute a task slowly, during
debugging. Step Mode causes execution to pause after
each task line is executed. This allows the programmer
G-2
time to examine other signals and structures. The
programmer initiates execution of the next task line by
clicking on the Single Step icon. Step Mode is
automatically activated by any breakpoint, and may also
be activated manually by clicking on the Step Mode icon.
Watch Window
is a window which displays the current value of a group of
user specified signals. It is useful during the debugging
process.
G-3
BLANK PAGE
READER RESPONSE FORM
Please help us make our documentation more useful to you! If you have a complaint, a
suggestion, or a correction regarding this manual, please tell us by mailing this page with your
comments. It's the only way we know we're doing our job by giving you correct, complete, and
useful documentation.
DOCUMENT NUMBER: D4051
TITLE: ACCOL Workbench User Manual
ISSUE DATE: September, 2004
COMMENT/COMPLAINT:
______________________________________________________________________________
______________________________________________________________________________
______________________________________________________________________________
______________________________________________________________________________
______________________________________________________________________________
______________________________________________________________________________
______________________________________________________________________________
______________________________________________________________________________
______________________________________________________________________________
______________________________________________________________________________
______________________________________________________________________________
______________________________________________________________________________
______________________________________________________________________________
Mail this page to:
Bristol Babcock Inc.
1100 Buckingham Street
Watertown, CT 06795
Attn: Technical Publications Group, Dept. 610
&VMWXSP&EFGSGO
1100 Buckingham Street
Watertown, CT 06795
Phone: +1 (860) 945-2200
Fax: +1 (860) 945-2213
Website: www.bristolbabcock.com
U.S.A. Locations:
Northern Region
Bristol Babcock Inc.
1100 Buckingham Street
Watertown, CT 06795
Phone: +1 (860) 945-2381
Fax: +1 (860) 945-2525
[email protected]
Helicoid Instruments
1100 Buckingham Street
Watertown, CT 06795
Phone: +1 (860) 945-2218
Fax: +1 (860) 945-2213
[email protected]
Gulf Coast Region
Bristol Babcock Inc.
2000 Governor’s Circle
Suite F
Houston, TX 77092-8731
Phone: +1 (713) 685-6200
Fax: +1 (713) 681-7331
Western Region
Bristol Babcock Inc.
1609 South Grove Avenue
Suites 106 & 107
Ontario, CA 91761
Phone: +1 (909) 923-8488
Fax: +1 (909) 923-8988
Southeast Region
Bristol Babcock Inc.
317 S. North Lake Blvd.
Suite 1016
Altamonte Springs, FL 32701
Phone: +1 (407) 740-7084
Fax: +1 (407) 629-2106
[email protected]
[email protected]
[email protected]
Central Region
Bristol Babcock Inc.
300 North Coit Road
Suite 1300
Richardson, TX 75080
Phone: +1 (972) 238-8935
Fax: +1 (972) 238-8198
[email protected]
Rocky Mountain Region
Bristol Babcock Inc.
906 San Juan Blvd., Suite A
Farmington, NM 87401
Phone: +1 (505) 320-5046
Fax: +1 (505) 327-3273
Communications
Technology Group
Bristol Babcock Inc.
317 S. North Lake Blvd.
Suite 1016
Altamonte Springs, FL 32701
Phone: +1 (407) 629-9464
Fax: +1 (407) 629-2106
[email protected]
[email protected]
International Affiliates:
Canada
Bristol Babcock, Canada
234 Attwell Drive
Toronto, Ont. M9W 5B3
Canada
PH: 416-675-3820
FAX: 416-674-5129
[email protected]
Mexico
BBI, S.A. de C.V.
Homero No. 1343, 3er Piso
Col. Morales Polanco
11540 Mexico, D.F.
Mexico
PH: (52-55)-52-81-81-12
FAX: (52-55)-52-81-81-09
[email protected]
United Kingdom
Bristol Babcock Ltd.
Blackpole Road
Worcester, WR3 8YB
United Kingdom
PH: +44 (0) 1905 856950
FAX: +44 (0) 1905 856969
[email protected]
Asia Pacific
Bristol Babcock, Inc.
PO Box 1987
Bunbury, Western Australia
6231
PH: +61 (0) 8 9791 3654
FAX: +61 (0) 8 9791 3173
[email protected]
Victoria, Australia
PH: +61 (0) 3 9384 2171
FAX: +61 (0) 3 8660 2501
Calgary Office
Bristol Babcock, Canada
3812 Edmonton Trail N.E.
Calgary, Alberta T2E 5T6
Canada
PH: 403-265-4808
FAX: 403-233-2914
[email protected]
RC Rev: 05-Feb-04
Villahermosa Office
BBI, S.A. de C.V.
Av. Plomo No.2
Bodega No. 1 - Ciudad
Industrial
Villahermosa, Tabasco 86010
Mexico
PH: 52-993-353-3142
FAX: 52-993-353-3145
[email protected]
Middle East
Bristol Babcock Ltd.
Blackpole Road
Worcester, WR3 8YB
United Kingdom
PH: +44 (0) 1905 856950
FAX: +44 (0) 1905 856969
[email protected]