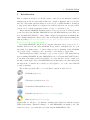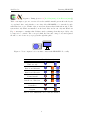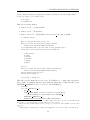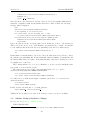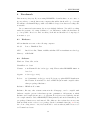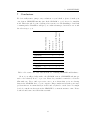
1
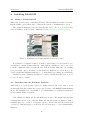
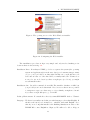
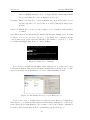
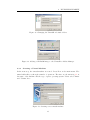
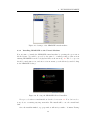
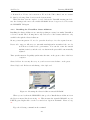
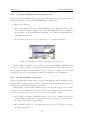
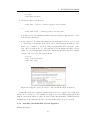
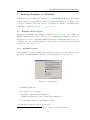
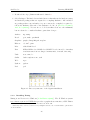
Running
LEARNIX
Axel Jacobs
<a dot jacobs at londonmet dot ac dot uk>
November 26, 2009
1
Axel Jacobs
Running LEARNIX
Contents
1 Introduction
5
2 Downloading LEARNIX
7
3 Running LEARNIX off the CD-ROM
9
3.1
Burning the CD-ROM . . . . . . . . . . . . . . . . . . . . . . . . . . . .
9
3.2
Booting from the CD . . . . . . . . . . . . . . . . . . . . . . . . . . . . .
9
3.2.1
Persistent Storage . . . . . . . . . . . . . . . . . . . . . . . . . .
4 Installing LEARNIX
11
12
4.1
Doing a Normal Install . . . . . . . . . . . . . . . . . . . . . . . . . . . .
12
4.2
Installing into the Windows Partition
. . . . . . . . . . . . . . . . . . .
12
4.3
Running LEARNIX in a Virtual Machine . . . . . . . . . . . . . . . . .
15
4.3.1
Installing VirtualBox . . . . . . . . . . . . . . . . . . . . . . . . .
16
4.3.2
Setting up a Virtual CD-ROM . . . . . . . . . . . . . . . . . . .
16
4.3.3
Creating a Virtual Machine . . . . . . . . . . . . . . . . . . . . .
17
4.3.4
Installing LEARNIX to the Virtual Machine . . . . . . . . . . .
19
4.3.5
Installing the VirtualBox Guest Additions . . . . . . . . . . . . .
20
4.3.6
Keeping VirtualBox up-to-date . . . . . . . . . . . . . . . . . . .
21
4.3.7
Accessing a USB drive from the Guest OS . . . . . . . . . . . . .
22
4.3.8
Accessing Folders on the Host . . . . . . . . . . . . . . . . . . . .
22
4.3.9
Installing the LEARNIX Virtual Appliance . . . . . . . . . . . .
23
4.4
Running LEARNIX from a USB Stick . . . . . . . . . . . . . . . . . . .
24
4.5
Sanitising LEARNIX . . . . . . . . . . . . . . . . . . . . . . . . . . . . .
24
5 Running Radiance on Windows
5.1
5.2
Running under Cygwin
25
. . . . . . . . . . . . . . . . . . . . . . . . . . .
25
5.1.1
Installing Cygwin . . . . . . . . . . . . . . . . . . . . . . . . . . .
25
5.1.2
Installing Xming . . . . . . . . . . . . . . . . . . . . . . . . . . .
26
5.1.3
Installing Radiance . . . . . . . . . . . . . . . . . . . . . . . . . .
27
Adeline, Desktop Radiance, Mingw . . . . . . . . . . . . . . . . . . . . .
30
6 Benchmark
31
6.1
Hardware . . . . . . . . . . . . . . . . . . . . . . . . . . . . . . . . . . .
31
6.2
Software . . . . . . . . . . . . . . . . . . . . . . . . . . . . . . . . . . . .
31
6.3
Results . . . . . . . . . . . . . . . . . . . . . . . . . . . . . . . . . . . . .
32
6.4
Discussion . . . . . . . . . . . . . . . . . . . . . . . . . . . . . . . . . . .
33
7 Conclusions
35
References
36
2
CONTENTS
Revision History
26 Nov 2009
• Added benchmark results
20 Nov 2009
• Draft document available for download on LEARNIX site
16 Nov 2009
• First draft
14 Nov 2009
• Put pen to paper
3
Axel Jacobs
Running LEARNIX
Disclaimer
This document is written with the intention of providing an overview of the various
methods available to Windows users to get the Radiance rendering system working on
their machine. Most of the advice is centred around the LEARNIX live CD-ROM, but
alternative methods are explored. Niche operating systems such as MacOS X or Solaris
are not covered.
Although step-by-step instructions are provided in various sections of this guide,
you absolutely MUST explore other documentation. This is not limited to a study of
the documentation available with the various software packages, but should also include
an exhaustive search for documentation on the Internet.
We take ABSOLUTELY NO WARRANTY WHATSOEVER for your computer
and the data stored on it. It might catch fire or suck you through a space-time portal
into a different dimension. Don’t say we didn’t warn you. As far as your data is
concerned, its integrity should be your number one concern at all times. As an educated,
tech-savvy computer user, of course you take regular backups of all your important (and
not-so-important data). So in case anything goes wrong, you know how to bring your
system back up and how to recover your files.
4
1
1
INTRODUCTION
Introduction
This document is intended for all who wish to learn about the Radiance synthetic
imaging system but are stuck with a Windows computer. Radiance has been around
since the early 1990s, and has always been developed on UNIX machines. Getting it
to play nicely with a Windows computer is not trivial, and there are several possible
options. None of them is straight-forward to set up or convenient to use.
This is why the LEARNIX distribution has been developed by the Low Energy Architecture Research Unit, LEARN. LEARNIX is a live CD-ROM which uses a modified version of Ubuntu GNU/LINUX to deliver a fully-configured environment from which the Radiance lighting simulation software can be run, as well as the ESP-r thermal building simulation package [Canonical Ltd.(2009), Lawrence Berkeley National Laboratory(2009),
Energy Systems Research Unit(2009)].
By default, LEARNIX only uses your computer’s hardware but does not need to be
installed. Instead, it is run off the CD-ROM. It is possible to install the CD onto your
hard disk. You might want to do this for improved speed (running off the CD-ROM
can be quite slow), or simply for the convenience of not having to juggle CDs.
This Getting Started Guide attempts to give you an overview of the many different
ways of running LEARNIX. Because LEARNIX is based on Ubuntu GNU/LINUX, there
is a wealth of information and help available out on the Internet. Please consult your
favourite search engine. The terms LEARNIX and Ubuntu will be used interchangeably
throughout the document. If a certain topic only applies to one or the other, this will
be stated explicitly.
The technologies that will be covered in this document are listed below:
CD-ROM (section 3)
USB memory stick (section 4.4)
Normal hard disk install (section 4.1)
VirtualBox (section 4.3 [Sun Microsystems(2009)])
Wubi (section 4.3 [Wubi(2009)])
Additionally, we will try to get Radiance running under Windows with the Cygwin
UNIX environment. This has nothing to do with LEARNIX, but might be the only
solution for those of you that have problems with the LEARNIX live CD.
5
Axel Jacobs
+
Running LEARNIX
Cygwin + Xming (section 5.1 [Red Hat(2009), Colin Harrison(2009)])
Table 1 attempts to give an overview of how the available install options affect the layout
of your hard drive, and whether or not they allow LEARNIX to be run side-by-side
with Windows or not. Think of the icons as an abstract hard disk and monitor: The
system has only Windows installed on the hard disk, and it can only run Windows.
Fig. 1 attempts to visualise this. If this sounds confusing, then this is probably only
because it’s too trivial. The concept behind the blue and orange boxes and squares
should become clearer as you progress through this guide.
Figure 1: Your computer before its first contact with LEARNIX. No, really.
Hard disk
System
Windows only
Run from CD-ROM
or
Run from USB stick
or
Normal install
or
Install onto Windows
or
VirtualBox
Cygwin
Table 1: How LEARNIX can be run and installed
6
2
2
DOWNLOADING LEARNIX
Downloading LEARNIX
Figure 2: Downloading LEARNIX
Fire off your web browser and go to the LEARNIX web site [Axel Jacobs(2009a)].
The Download section will take you to and FTP site on the same server [Axel Jacobs(2009b)]1 .
The LEARNIX CD-ROM is available as an ISO image which is usually just under 700MB
in size.
Although it is best to use a dedicated FTP client to download large files such as the
ISO image, you can simply use your web browser to get the file. This is shown in fig. 2.
While you’re at it, also get the .md5 file with the same base name.
We strongly recommend that you check if the download was successful by verifying
the integrity of the image. This is done with a checksum called MD5 hash. The small
file with the .md5 extension contains the MD5 of the file as it is on our server. If you
compute the same check sum on the downloaded .iso file, it should be identical. If it is
not, please download the .iso file again and repeat the check-summing.
Figure 3: Verifying the integrity of the download
There is a page on the OpenOffice.org web site which gives a nice overview of what
MD5 sums are about and how you verify them [Brouwer and Bryan(2009)]. We will use
the software they recommend, which is called digestIT 2004. After the installation, the
1
It is very likely that this URL will change in early 2010.
7
Axel Jacobs
Running LEARNIX
software is available in the Explorer file manager through the context menu. Simply
right-click over the LEARNIX .iso file and let it compute the checksum, like shown in
fig. 3. Then compare the result to what’s in the LEARNIX .iso.md5 file. The MD5
is a string of 32 digits and lower-case characters. It is either completely different or
absolutely identical to the LEARNIX MD5 string.
Figure 4: Calculating the MD5 hash
8
3
3
RUNNING LEARNIX OFF THE CD-ROM
Running LEARNIX off the CD-ROM
3.1
Burning the CD-ROM
When you burn the ISO image to a CD-R, it’s important to do this in RAW mode, also
referred to as Disk Image. Do not treat the ISO image like an ordinary file. This would
result in a process known as mastering, and would put the ISO image inside another
file, invisibly to you.
Figure 5: You must burn the CD-ROM as a Disk Image, not as Data.
3.2
Booting from the CD
To boot from your shiny new CD, shut down your computer if you are working under
Windows, but make sure the CD is in the drive. Power on your computer. With a bit
of luck, you will be greeted by the LEARNIX boot screen.
Figure 6: LEARNIX boot screen
If this does not happen, and your computer boots back into Windows instead,
9
Axel Jacobs
Running LEARNIX
then the BIOS of the computer is not set to boot from its CD drive. To change this
setting, you need to access the BIOS and change the boot order. This is done by
holding down a certain key on the keyboard while (or immediately after) the computer
is turned on. Unfortunately, there is no industry standard so that the key differs
between manufacturers and sometimes even between different models from the same
manufacturer. Here are some fairly common choices: ESC, F1, F2, F10, F12, DEL, INS.
The boot message (the text that appears on the screen immediately after the computer
is switched on) should indicate which key is assigned to entering the BIOS setup.
Some computers also have an additional Startup Menu which is independent of the
BIOS settings, allowing you to choose a temporary boot device. Again, there is no
generally accepted convention for this. When in doubt, please consult your computer’s
manual, or search on the Internet.
Figure 7: Selecting your keyboard layout
If you do succeed in booting from the CD, you will be greeted by the LEARNIX
boot screen. Please hit F3 and select a keyboard layout appropriate to your machine.
Ubuntu will also ask you select a language, but this option is disabled in LEARNIX.
Our students come from many different, mostly European countries, and supporting
different languages in class is simply not an options. We hope this isn’t too much of an
inconvenience.
There is one last thing that we would urge you to do before starting to use LEARNIX.
Instead of selecting the first option on the LEARNIX boot screen (Try LEARNIX without
any change to your computer), please select option 2 (Check CD for defects). This will
check the CD that you’ve just burnt for defects. Assuming that you have successfully
tested the MD5 test sum (see section 2), such defects could be caused by an incorrectly
burnt CD, scratches or fingerprints on the medium, or a flaky CD-ROM drive. Whatever
the reason, you should not run the CD unless this test is passed without errors.
10
3
3.2.1
RUNNING LEARNIX OFF THE CD-ROM
Persistent Storage
TODO: Write me.
11
Axel Jacobs
4
Running LEARNIX
Installing LEARNIX
4.1
Doing a Normal Install
This is the preferred way of installing Ubuntu. This installation is started from the
Install Ubuntu option which can be found in the System > Administration option.
The graphical installer is very user friendly and easy to use. A good step-by-step
guide is available on the Ubuntu community web site [Ubuntu Community(2009)].
Figure 8: Launching the Ubuntu installer from a live session
It is highly recommended that you make a full backup of your system before
attempting to install Ubuntu this way. Although the installer is easy to use, it is
possible to unintentionally over-write all data on the hard disk. Make sure you carefully
read every single option, and that you understand the implications of your choices. Be
double-careful with all things that have to do with partitions, resizing, and formatting.
Having said that, Ubuntu is actually a lot easier to install than Windows, so don’t
be put off. Just be careful.
4.2
Installing into the Windows Partition
This method is a very elegant solution for Windows users who don’t want to mess
around with their hard disks. It’s a great way of trying out LEARNIX with minimal
effort. The installation is very similar to a normal install, except that it is launched
from a running Windows system.
Under Windows, simply put the CD-ROM in your drive. The installer should start
automatically. If it does not, then the Windows Autorun feature is disabled. This is
normally quite a good idea, so don’t panic. Open or Browser the CD, the double-click
on wubi.exe. This should give you the welcome screen from fig. 9. Select ’Install inside
Windows’.
12
4
INSTALLING LEARNIX
Figure 9: The opening screen of the Wubi Windows installer
Figure 10: Configuring the Wubi installer
The installation procedure is kept very simple and only involved making a few
decisions that are shown in fig. 10:
Installation Drive: It is always a VERY good idea to separate the system (the operating
system and applications) from the user data (you documents, images, music
etc.), so you’ve probably done this, right? In this case, you should have a C:
drive and at least one other hard drive, normally named D:. Ubuntu does
not need to sit on C:, but if you have enough space (see below), you might
as well install it there.
Installation Size: I would recommend about 8GB. The installer defaults to 12GB, but
you probably won’t need that much. Note, however, that it is not possible
to assign more space at a later stage, so if you think you might need it and
if you have enough disk space, go for 12GB.
Desktop Environment: Not much choice here if you install LEARNIX. Stick to ’Ubuntu’.
Language: We haven’t actually tested this yet with languages other than English. It
should work, but if you don’t find it too awkward, stick with ’English’. Note
that if you are doing this install for the Building Simulation modules of the
LEARN MSc course, English is obligatory. We will not be able to help you
13
Axel Jacobs
Running LEARNIX
with non-English languages. Yes, you might call this cultural imperialism,
but you are taking the course in England, aren’t you?
Username: Enter your name here or pick something nice such as the name of your
favourite super-hero. No spaces, and we would recommend an all-lowercase
spelling.
Password: This should be secure yet easy enough for you to remember. And remember
you must.
Once this is all done, hit Install and the installer should start churning away. You will
be asked to reboot once it is done. Upon reboot, the Windows boot manager should
come up with a new option. Windows will still be the default, so you need to go down
so Ubuntu is highlighted like in fig. 11, and press Enter.
Figure 11: Windows boot manager
If you browse your disk with the Windows file manager now, you will notice a new
folder named ubuntu. This is where Ubuntu is installed and is shown in fig. 12. The
directory is as large as the Install Size you selected when installing Ubuntu.
Figure 12: The ubuntu directory on your Windows box.
If you decide to remove Ubuntu, please don’t just delete the directory. Ubuntu under
Windows is a good citizen and has registered itself with the authorities, so it shows up
in the Windows Program Manager. If you want to remove the software, uninstall it
from there. The ubuntu entry in the Program Manager is shown in fig. 13.
14
4
INSTALLING LEARNIX
Figure 13: Ubuntu in the Windows Programs Manager
4.3
Running LEARNIX in a Virtual Machine
Virtualisation allows you to run one or more operating systems on another operating
system. A very popular and free software package that does this is named VirtualBox,
which is now owned by Sun Microsystems [Sun Microsystems(2009)]. VirtualBox is
well-documented, and you are encouraged to compare the very short introduction in
this guide to the official User Manual [Sun(2009)].
In VirtualBox terminology, the existing operating system (OS) onto which the
VirtualBox software is installed is called the Host OS, and the one that is run in this
virtual machine is called the Guest OS. In your setup, the Host will most likely be
Windows or Mac OS X, and the guest is going to be LEARNIX.
VirtualBox comes in two flavours:
VirtualBox Standard Edition: This is the one we are going to use throughout this guide.
It’s for personal use and evaluation under the terms of the VirtualBox
Personal Use and Evaluation License.
VirtualBox Open Source Edition (OSE): This edition is released under the GNU General Public License, GPL, and comes with complete source code. It is
functionally equivalent to the full VirtualBox package, except for a few features that are primarily targeted at enterprise customers. One such feature
is USB support which allows you to pass USB devices such as thumb drives
from the host to the guest.
Before we go any further, let us take the opportunity to say a word or two about hardware
support. Running virtual machines (VM) on your computer is quite demanding on the
hardware. To make the execution of VMs faster, many modern processors support what
is known as hardware-accelerated virtualisation. Both Intel and AMD processors have
this feature. Intel calls it VT-x, and AMD named it AMD-V. We would not recommend
15
Axel Jacobs
Running LEARNIX
that you try VirtualBox on a machine that does not have this hardware virtualisation
built-in. It will more than likely be painfully slow2 . A number of cheap processors,
especially for portable computers do not offer this feature. Please check the manual of
your computer or browse the Internet to find you if your particular machine comes with
hardware virtualisation. You must find out the exact model number of your processor
because computers can come in different configurations even if they share the same
model number.
We recommend that you do not attempt to run a virtual machine if your system is
does not have at least a dual core processor with VT-x or AMD-V support and 2GB of
RAM. Even if hardware virtualisation is available, it might not be enabled in the BIOS.
Please see section 3.2 for a few tips on how to change BIOS settings.
4.3.1
Installing VirtualBox
Download the VirtualBox installer and run the setup. There are not many options, so
just stick to the defaults. After a short while, you will be greeted by the VirtualBox
welcome screen, as seen in fig. 14.
Figure 14: VirtualBox after installation
The only settings you might want to change in the Preferences is the default folders
for Hard Disks and Machines. The default setting is to put them somewhere under your
Documents and Setting, but we think its better to put them elsewhere. The screenshot
in fig. 15 shows you that we decided to save them under D:\VirtualBox. This keeps
it all nice and tidy. It also allows you to share the VMs with other users on the same
computer.
4.3.2
Setting up a Virtual CD-ROM
Now create a new virtual CD-ROM in the Media Manager. Point it to the ISO image
which you downloaded from the LEARNIX FTP server (see section 2). After this
operation, the Media Manager should look like the image in fig. 16.
2
TODO: Check this against benchmark results
16
4
INSTALLING LEARNIX
Figure 15: Changing the VirtualBox default folders
Figure 16: Adding a CD-ROM image to the VirtualBox Media Manager
4.3.3
Creating a Virtual Machine
In the next step, the virtual machine is created. Press New on the main menu. The
wizard will walk you through a number of questions. The first one, shown in fig. 17, is
the name of the machine and the type of guest operating system. Please select ’Linux’
and ’Ubuntu’ here.
Figure 17: Creating a new virtual machine
17
Axel Jacobs
Running LEARNIX
The remaining options are explained in the list below:
1. Boot Hard Disk (Primary Master): Create new hard disk
2. Storage Type: Selecting ’Dynamically expanding storage’ here is a really good
idea. Dynamically expanding means that the file holding the virtual hard disk
grows as required and only occupies as much space as needed, but not the whole
amount that you assigned to it in the next step.
3. Location: Give it a sensible name such as LEARNIX 2009-1, and make sure the
location is what you want. Please compare to fig. 15.
Size: We suggest you set this to about 8GB. There is no penalty in choosing a
larger size. The virtual hard disk file will only grow as large as required.
4. Base Memory Size: If you have enough physical RAM, give Ubuntu at bit more
than the suggested value. 1GB is good, but make sure that there is still enough
RAM left for the Windows host. Unlike the virtual hard disk, this value is
not dynamically assigned, but allocated immediately when you start the virtual
machine.
Figure 18: Setting up shared folders
Once the new virtual machine is created, click on the blue Storage label under the
Details tab, and point the virtual CD-ROM drive to the LEARNIX ISO image you set
up earlier on in the Media Manager. Now is also a good time to set up shared folders.
Such folders will be accessible from the guest OS, allowing you to share files between
host and guest. I decided to share D:\axel (which is where I keep my project files), and
to name this share ’axel’. The screenshot in fig. 18 demonstrates what this should look
like, although the actual names and folders are probably different on your setup.
Once the setup is complete, the virtual LEARNIX machine should look similar to
fig. 19.
18
4
INSTALLING LEARNIX
Figure 19: Settings of the LEARNIX virtual machine
4.3.4
Installing LEARNIX to the Virtual Machine
Now it’s time to launch the LEARNIX virtual machine by pressing the green arrow
labelled Start. You will be greeted by the same boot manager that you know from
running LEARNIX from the real physical CD, as shown in fig. 20. The boot process
should be much faster now, and after a few moments, you should find yourself looking
at the LEARNIX desktop.
Figure 20: Booting the LEARNIX CD in VirtualBox
Now proceed with a normal install, as described on section 4.1. You don’t need to
worry about overwriting any important files. The install will be onto the virtual hard
disk.
Once the install is finished, a pop-up window will as if you wish to ’Continue Testing’
19
Axel Jacobs
Running LEARNIX
or ’Restart Now’. Please don’t restart now. We need the VM to shut down, not restart.
Do this by selecting ’Shut down’ from the System menu.
When the shut down is complete, you are back at the VirtualBox main panel. Go
into the Settings, and remove the virtual CD-ROM. It is no longer needed. Now start
the LEARNIX VM again.
4.3.5
Installing the VirtualBox Guest Additions
Installing the Guest Addition is not strictly speaking necessary, but makes VirtualBox
a lot more useful. The following list is only a selection of the features which are only
available through the Guest Additions:
Mouse pointer integration: No need to press the host key to free the captured mouse.
Better video support: Allows you to run with extra high and non-standard video modes
as well as accelerated video performance. You can also resize the virtual
machine’s window, and the video resolution in the guest will be automatically
adjusted.
Time synchronisation: Regularly synchronises the time on the guest to that of the host
computer.
Shared folders: Access any directory on your host as a network share on the guest.
Shared clipboard: Bi-directional sharing of the clipboard.
Figure 21: Mounting the Guest Additions virtual CD-ROM
When you are back in the LEARNIX desktop, select ’Install Guest Additions’ from
the Devices menu, like shown in fig. 22. This mounts the virtual CD-ROM on your
LINUX guest. Right-click over the icon and select ’Open in Terminal’. Please see fig.
21.
Type the following command in the terminal:
20
4
INSTALLING LEARNIX
Figure 22: Installing the VirtualBox Guest Additions
$ sudo ./VBoxLinuxAdditions-x86.run
This command will take a moment to complete, and then prompt you to reboot. Please
do so. When the VM is back up, you should notice some usability improvements. Try, for
instance, full-screen mode: press the host key (default is the right CTRL key) together
with the F key. The LEARNIX system running inside the VM should now cover the
whole screen, and the LEARNIX desktop should have re-adjusted to those settings.
Nifty, isn’t it?
4.3.6
Keeping VirtualBox up-to-date
It’s important that the version number of the Guest Additions matches that of the
VirtualBox Host. If you update to a newer version of VirtualBox, then the Guest
Additions need to be re-installed on the Guest. Please refer to section 22.
In addition to re-installing the Guest Addition when a newer version of VirtualBox
is installed on the host, the Guest Additions need some maintenance whenever the
kernel of the Guest OS changes.
Once you’ve run LEARNIX/Ubuntu/LINUX for a while, you will receive notification
from the Update Manager letting you know that newer version of some of the installed
software are available. Obviously, this only happens if you are connected to the Internet.
You are strongly advised to install those updates. They are usually bug fixes that
iron out glitches with the software, or make your system otherwise more secure, stable
or usable. Some of those upgrades, but not all of them will require the Guest to be
re-started. If this is the case, the Update Manager will prompt you to do so.
If, as part of the upgrade, a newer version of the LINUX kernel is installed, chances
are the Guest Additions or at least some of the functionality they provide no longer
work. If this is the case, please type the following command into a terminal window:
$ sudo /etc/init.d/vboxdrv setup
You will need to reboot the VM for the changes to become effective.
21
Axel Jacobs
4.3.7
Running LEARNIX
Accessing a USB drive from the Guest OS
USB devices such as thumb drives can be passed through from the host (the physical
Windows machine) to the guest (LEARNIX). Here’s what you do:
1. Insert the USB drive
2. Select ’USB Devices’ from the virtual machine Device menu and click on the
device that you wish to mount on the guest. This is shown in fig. 23. If this is
the first time you are mounting that particular device, Windows will install some
VirtualBox drivers for it.
3. Double-click on the new icon on your desktop to open the file manager.
Figure 23: Passing a USB device through to the guest OS
All done. When you want to remove the device, close the file manager and right-click
over the icon on the desktop. Select Unmount. This will remove the USB device from
the guest OS and also from the Windows host, so it’s save to pull it out. Note that
USB device support is only available with the none-OSE version of VirtualBox.
4.3.8
Accessing Folders on the Host
The most useful improvement that you get by installing the Guest Additions is file
sharing with your Windows host. This is only possible from within the host OS. You
can not access files inside the VM from the host.
Getting this to work is a little difficult, but if you follow the steps below, it should
only take a couple of minutes. The shared folders on the Windows host have already
been set up. Please refer to section 4.3.3 if you need to remind yourself.
1. Decide where you want to link in the shared folder. Most commonly, folders from
other machines are mounted under the /mnt directory on the guest. We’ll create
the folder win_share for this example.
2. In a terminal window, go to the /mnt directory and create a new directory with
the name win_share:
22
4
INSTALLING LEARNIX
$ cd /mnt
$ sudo mkdir win_share
3. Mount the share from the host:
$ sudo mount -t vboxsf -o uid=1000,gid=1000 axel win_share
or
$ sudo mount.vboxsf -o uid=1000,gid=1000 axel win_share
You can now browse /mnt/win_share in the file manager, and should be able
read and write files there.
4. Scary, wasn’t it. To ensure this happens automatically from now on, you need
to edit the file /etc/fstab on the guest. It’s a critical system file that we don’t
want to get corrupted, so please do make a backup first. The screenshot of the
text editor is given in fig. 24. The last line is for mounting the share. Please
adjust for you particular share name (1st column) and mount point (2nd column),
but leave the rest of the line as it is shown.
$ cd /etc
$ sudo cp fstab fstab.bak
$ sudo gedit fstab
Figure 24: Using the gedit text editor to auto-mount the share at start up.
If this all sounds a bit complicated (which it is), then do not despair. Use a USB drive
instead. To be honest, we don’t actually encourage you to mess with system-critical files
such as /etc/fstab unless you have at least a basic understanding of LINUX system
administration. Do this (and all other exercises in this guide) at your own risk.
4.3.9
Installing the LEARNIX Virtual Appliance
TODO: Investigate
23
Axel Jacobs
4.4
Running LEARNIX
Running LEARNIX from a USB Stick
TODO: Write me (fig. 25)...
Figure 25: No caption here...
4.5
Sanitising LEARNIX
In order to gain the space necessary to put Radiance and ESP-r on the CD, we had to
remove quite a few packages from the original Ubuntu CD. We also took the liberty
of removing stuff that you definitely don’t want, such as games. Wouldn’t want to get
distracted in class, would you?
If you decided to install LEARNIX using one of the technologies outlined in this
document, and would like to have all packages from the original Ubuntu CD installed
as well, please run learnix sanitise.sh:
$ learnix_sanitise.sh
This script will re-install all packages that were on the original
Ubunut CD-ROM but had to be removed to create space for LEARNIX
software. Run this after installing LEARNIX to hard disk if you
feel the need to have all the original packages around.
Options:
-h
Help. Print this message.
-s
Simulate. Run this first to see what packages will be
installed.
-y
Yes. Install ALL packages without asking.
You obviously need to be connected to the Internet. The download will be about
200MB, and an additional 700MB of disk space will be occupied after the installation.
You need to use sudo to run with the -y option:
$ sudo learnix_sanitise.sh -y
24
5
5
RUNNING RADIANCE ON WINDOWS
Running Radiance on Windows
This chapter doesn’t really have anything to do with LEARNIX. However, the Cygwin
software allows you to run LINUX software on a Windows machine, so you might decide
to use it for Radiance. Please also have a look at Francesco Anselmo’s “A survival guide
to Radiance on Windows” [Francesco Anselmo(2008)].
5.1
Running under Cygwin
Cygwin is a Linux-like environment for Windows [Red Hat(2009)]. It consists of a
LINUX emulation layer and a collection of tools which provide Linux look and feel.
Cygwin is not a way to run native LINUX applications on Windows. They need to be
re-built from source. Luckily, Radiance is Open Source, so there is no problem with
getting hold of the source code.
5.1.1
Installing Cygwin
The installation of Cygwin is fairly easy. Grab the setup.exe from the Cygwin web site
and run it. An install wizard will guide you through the process (see fig. 26).
Figure 26: Cygwin setup
1. Install from Internet
2. Root Directory: C:\cygwin;
Install for: All Users (Recommended);
Default Text File Type: Unix / binary (Recommended)
3. Local Package Directory: D:\software\cygwin
4. Internet Connection: Direct Connection3
3
This depends on your network setup. Please consult your network administrator.
25
Axel Jacobs
Running LEARNIX
5. Download Site: ftp://linux.rz.ruhr-uni-bochum.de4
6. Select Packages: The list below is a little bit more than what is absolutely necessary,
and includes packages that are required for compiling Radiance. Also included
are packages that come in handy for your coursework, or might be required to
follow the Radiance Tutorial or the Radiance Cookbook [Axel Jacobs(2008b),
Axel Jacobs(2008a)]. You are free to boil down this selection to the minimum,
but are advised to consult a Radiance guru when doing so.
Archive:
zip, unzip
Devel:
gcc4, make, patchutils
Graphics: gnuplot, ImageMagick, netpbm
Editors:
ed, vim5 , gvim
Libs:
tcltk, libtiff-devel
X11:
libX11, libX11-devel, libGL-devel, libGLU-devel, font-adobe, font-alias,
font-bitstream, font-encodings, font-misc-misc, font-util, fontconfig
Utils:
stow, time, bc
Shells:
bash-completion, mc, tcsh
Web:
wget
Python:
python
Perl:
perl
Figure 27: Directory structure of the Cygwin installation
5.1.2
Installing Xming
Xming is an X server for Windows [Colin Harrison(2009)]. The X Window system
is a software system for UNIX that provides a graphical user interface, GUI. This is
4
Select one that is close to you. I could not find a site in the UK.
vim is my editor of choice, but is not very straight-forward to use. You will want to pick another
one from the list.
5
26
5
RUNNING RADIANCE ON WINDOWS
necessary for all graphical Radiance programs, the three most important once being
rvu, ximage and trad. You can run Radiance under Cygwin without Xming, but won’t
be able to use graphical commands which would be a major inconvenience.
Xming comes in two versions:
Public domain release: This one is free of charge and re-distributable. It’s what we are
going to use.
Website release: Offers additional enhancements such as OpenGL support. Access to
the website release is gained with a small donation (č10 is suggested). This
donation will support the development of the public domain release.
Grab the Xming and Xming-fonts installers from the web site and install them both.
The installation is very straight-forward.
Figure 28: The Xming server needs to be started before you can launch graphical LINUX
applications
You also need to add the following line to ~/.bash_profile:
export DISPLAY=localhost:0
Once the installation is finished, run XLaunch from the Windows Start menu. You can
run Xming in different modes. We suggest you set it to ’Multiple windows’. Make sure
the display number is set to 0. Select ’Start no client’ as session type. This will cause
Xming to quietly sit in the background until things are happening. It’s also a good
ideal to enable the integrated clipboard manager. After launch, Xming will minimise
itself to an icon as shown in fig. 28.
5.1.3
Installing Radiance
Pre-compiled versions of Radiance are available from Francesco Anselmo’s web site .
Unfortunately, at the time of writing (18 Nov 2009), the site was broken, so I could
not use his binaries. We hope that by the time you read this guide, the site is back
up. Dropping in the binaries is much easier than compiling Radiance on your machine.
Installation instructions should be available with the download.
If you prefer to compile Radiance yourself, for instance because you need to use the
very latest version, hop over to the Radiance Community web site and download the
sources [Radiance Community(2009)]. This can be done without a browser using wget:
27
Axel Jacobs
Running LEARNIX
Figure 29: Radiance’s rvu in Xming under Windows
$
$
$
$
$
$
$
$
cd ~
mkdir -p software/radiance
cd software/radiance
wget http://www.radiance-online.org/software/snapshots/radiance-HEAD.tgz
wget http://www.radiance-online.org/software/non-cvs/rad3R9supp.tar.gz6
tar xzf radiance-HEAD.tgz
tar xvf rad3R9supp.tar.gz
cd ray
If all went all right, this should have created the directory software/radiance/ray
under your home directory and moved you into this directory.
The Radiance installer defaults to /usr/local/bin as an install directory for the
binaries, and to /usr/local/lib/ray for library files. This is fine until you want to
remove the software or update to a newer version. This is where stow comes in: stow
puts all files under one sub-directory under /usr/local/stow, then links this whole tree
to /usr/local [Bob Glickstein and Guillaume Morin(2009)]. This keeps your system
tidy, and allows you to easily switch between versions. You don’t need to follow this
advice, but might want to give it a try.
To create the directory structure, please type:
$ mkdir -p /usr/local/stow/radiance-HEAD-20091118/lib/ray7
$ mkdir /usr/local/stow/radiance-HEAD-20091118/bin
$ mkdir /usr/local/stow/radiance-HEAD-20091118/man
Before the installer can be run, some modifications to the source code need to be made.
Radiance comes with its own version of the libtiff library. However, it would not
compile cleanly on my system, which is why we are going to tell Radiance to use the
Cygwin libtiff-devel library instead. I am going to refer to a ’block’ as a number of lines
that are separated from the previous and the following ’block’ by a blank line. This is
probably not the correct terminology, but will do the trick. Likewise, the ’name’ of the
’block’ is the first word on the first line of the ’block’. A ’word’ is is any combination of
6
The 4.0 release of Radiance is immanent (Nov 2009). Once the release has been made, this file
will probably be called rad4R0.tar.gz. Please check by hovering your mouse over the link in you web
browser. This is under section ’Download newer CVS snapshots from this server’
7
Replace 20091118 with the date that you downloaded Radiance
28
5
RUNNING RADIANCE ON WINDOWS
letters, characters and special characters that is separated from the neighbouring
’words’ by a space or by a line break.
$ cd src/px
$ vim Rmakefile8
Make the following changes:
1. Remove block ’../common/tiff.h:’
2. Remove block ’../lib/libtiff.a:’
3. Remove the word ’../lib/libtiff.h’ from blocks ’ra tiff:’ and ’normtiff:’.
$ ./makeall install
...
What is your preferred editor [vi]? vim
Where do you want the executables [/usr/local/bin]?
/usr/local/stow/radiance-HEAD-20091118/bin
Do you understand and accept the terms of this agreement [n]? y9
Please select your system type from the following list:
1)
2)
3)
4)
5)
6)
Sun Solaris
Linux
MacOS X
FreeBSD
Cygwin
Other
Choice? 5
Where do you want the library files [/usr/local/lib/ray]?
/usr/local/stow/radiance-HEAD-20091118/lib/ray
Install library files now [n]? y
Current rmake command is:
...
Do you want to change it? y
This will open the rmake file in your editor. For Radiance to compile under Cygwin, I
had to make one small modification after which the file should look like this (the option
-DEZXML NOMMAP needs to be added to the MACH line):
#!/bin/sh
exec make SPECIAL=ogl \10
OPT= -O2
MACH= -DEZXML_NOMMAP -Dfreebsd -L/usr/lib -L/usr/X11R6/lib
-I/usr/include/X11 -I/usr/X11R6/include -DNOSTEREO \
ARCH=IBMPC COMPAT=erf.o \
INSTDIR=/usr/local/stow/radiance-HEAD-20091118/bin \
8
Remember the footnote in section 5.1.1? This is where the editor comes in. You should at least
know how to open, edit, and save a text file with your editor of choice.
9
The license isn’t actually displayed due to a bug, so go and read it on the Radiance web site, then
agree here.
10
TODO: Figure out why inverted commas don’t display in code sections. Could be a font problem...
29
Axel Jacobs
Running LEARNIX
LIBDIR=/usr/local/stow/radiance-HEAD-20091118/lib/ray \
ESUFFIX=.exe \
CC=gcc $@ -f Rmakefile
Once the file is edited and saved, and the editor is closed, the installer immediately
starts the compilation without any further interaction. After a while, the following
message will be displayed:
Done.
Add /usr/local/stow/radiance-HEAD-20091118/bin
to the beginning of you execution path:
For C-shell users, put the following into ~/.cshrc
set path=( /usr/local/stow/radiance-HEAD-20091118/bin $path )
For Bourne shell users, put the following into $HOME/.profile
PATH=/usr/local/stow/radiance-HEAD-20091118/bin:$PATH
export PATH
Ignore the part about the execution path for now. If instead of ’Done.’, the message is
’There were some errors’, some of the Radiance programs did not compile. You should
be left with 133 files in the bin directory (including a sub-directory named dev):
$ ls /usr/local/stow/radiance-HEAD-20091118/bin |wc -l
133
If this number is much smaller, you need to find out what went wrong. Please contact
the radiance-general mailing list. If only a handful of files are missing, you might have all
the functionality that you require. Start using Radiance and have your fingers crossed.
You might never even notice.
Three things still need to be done for Radiance to work correctly: install the man
pages, run stow, and edit the profile.
The man pages are stored under ray/doc/man and need to be copied to
/usr/local/stow/radiance-HEAD-20091118/man.
$ cd ~/software/radiance/ray/doc/man
$ cp -R man? /usr/local/stow/radiance-HEAD-20091118/man
Secondly, run stow. This is just simple command, but needs to be executed from
/usr/local/stow:
$ cd /usr/local/stow
$ stow radiance-HEAD-2009111811
Lastly, add the following line to ~/.bash_profile:
export RAYPATH= .:/usr/local/lib/ray
TODO: Work out why trad doesn’t work. Is there a way to get rpiece working?
5.2
Adeline, Desktop Radiance, Mingw
Don’t do it. See [Francesco Anselmo(2008)].
TODO: Explain this!
11
To remove Radiance at a later stage, please run ’stow -D radiance-HEAD-20091181’
30
6
6
BENCHMARK
Benchmark
Time is money, they say. If you are using LEARNIX to learn Radiance on our course, or
if you teach it to yourself, almost any computer that still works should be good enough.
We still use a Pentium III laptop with a 750 MHz clock speed in class as a backup, and
it is usable.
In a commercial environment, the story is slightly different. You will be working
under the pressure of looming deadlines, so you will want to utilise the hardware as
good as possible. Read on to find out what you should and shouldn’t be doing if speed
is an issue to you.
6.1
Hardware
All benchmarks were run on the following computer:
Model:
Lenovo ThinkPad T61
CPU:
Intel Core2 Duo T7100, 1.8GHz, with Intel VT-x virtualisation technology
Memory:
4GB RAM
6.2
Software
Windows: Vista, SP2, 32-bit
VirtualBox: 3.1 beta1
Ubuntu:
9.10 “Karmic Koala” 32-bit (gcc 4.41); This is what LEARNIX 2009-1 is
based on.
Cygwin:
2.573.2.3 (gcc 4.3.2)
Fedora:
12 “Constantine” 32-bit (gcc 4.4.2); Fedora is a popular LINUX distribution
like Ubuntu. It is included to have a LINUX system with compiled rather
than pre-packaged Radiance.
Radiance: HEAD 18 Nov 2009
Radiance, like any other software written in the C language, can be compiled with
different compiler options for hardware-specific optimisation. All systems on which
Radiance was compiled from source code (Cygwin, Fedora) were tested with the -O2 and
-O3 compile switches. Under LEARNIX/Ubuntu (natively and under VirtualBox), the
pre-packaged binaries were used instead. The difference here is that the test were run
with and without the radiance-sse3 package. In the benchmark chart (fig. 30 below),
the colour coding refers to -O3/-O2, but should be read as without/with radiance-sse3
for Ubuntu-based tests.
31
Axel Jacobs
Running LEARNIX
In addition to testing with different optimisations, the effect of single-threaded vs.
multi-threaded rendering (SMP) was tested. On would expect that Radiance runs twice
as fast if twice as many processors or cores on the same processor can be utilised. See
below if this is indeed the case.
The test parcour is Mark Stock’s Radiance Benchmark Test [Stock(2009)]. After
the download, it’s as simple as extracting the archive and typing
$ make
For the SMP test that utilises all available cores (two in our case), the command is
$ NCPU=2; make smp
After the test is finished, the time taken to render the scene is displayed. The time is
given for user, system, and clock. User is the important one indicating the speed of the
rendering.
6.3
Results
The benchmark was set at 100% for the single-threaded result without radiance-sse3
under Ubuntu because this is what’s on LEARNIX. The raw numbers are given in table
2.
Instead of graphing the time taken to complete the test, the reciprocal of this time
is normalised to the single-threaded Ubuntu result. This is to get a bigger-is-better
Multi-threaded
Single-threaded
graph as shown in fig. 30.
Ubuntu
Single-threaded, -O3
Fedora
Single-threaded, -O2
VirtualBox+VTx
VirtualBox-VTx
Multi-threaded, -O3
Cygwin
Multi-threaded, -O2
Ubuntu
Fedora
VirtualBox+VTx
VirtualBox-VTx
Cygwin
0
50
100
150
200
250
Relative Performance [%]
Figure 30: Benchmark results on a dual-core machine
Do to the stochastic (random) nature of the raytracing engine in Radiance, the
number of rays may differ slightly between two runs. This variation could be accounted
for by plotting rays per second, but is ignored here.
32
6
BENCHMARK
System
Optimisation
Single-threaded
SMP
Ubuntu
–
3935
2354
SSE3
3562
2107
-O2
4364
2409
-O3
3459
1950
–
7268
3897
SSE3
6713
3580
–
7185
3891
1)
SSE3
6558
3570
1)
-O2
8066
–
2)
-O3
7630
–
2)
Fedora
VirtualBox, VT-x on
VirtualBox, VT-x off
Cygwin
Notes
Table 2: Benchmark times (seconds)
Notes:
1)
These results are dubious. The seconds shown are as reported by the time
command. Only one virtual processor was available which was fully utilised.
However, the user time is only half that of the elapsed (clock) time, and the
reported CPU usage was 49%. It is unclear if this is a bug or a feature with
VirtualBox. Values shown in the table were doubled for creation of the plot.
2)
No SMP results due to rpiece not working under Windows
6.4
Discussion
Compile options: Optimising the compilation by replacing the default -O2 compiler
option with -O3 or by installing the radiance-sse3 package in addition to
radiance leads to a speed improvement of around 10%. It appears that the
difference between the Ubuntu radiance and radiance-sse3 packages is not
just -O2 vs -O3 but rather (or additionally?) some different optimisation.12
Cygwin:
Radiance is only half as fast under Windows as it is under LINUX. The
SMP benchmark would not run. With multi-core processors becoming the
norm nowadays, this is a serious limitation if no work-around can be found.
The problem appears to be with Windows file locking which only allows one
application to write to a file, but further investigation is necessary.
VirtualBox: Single-threaded result with VT-x hardware virtualisation support enabled
and disabled show no significant difference. This comes as a bit of a surprise.
Note that it is necessary to enable hardware virtualisation for assigning
more than just one core or processor to the guest OS. Either way, LEARNIX
12
TODO: see how Bernd compiles Radiance in his Ubuntu packages
33
Axel Jacobs
Running LEARNIX
under VirtualBox on top of Windows Vista is around half as fast as native
LEARNIX, and is comparable in speed to Cygwin. If there is no solution to
the SMP issue with Cygwin, VirtualBox could at least allow all CPU cores
to be utilised by Radiance.
32-bit vs 64-bit: We can’t really tell from these results. We might add another test
comparing Radiance on Fedora 64-bit and compiled on Ubuntu 32-bit, but
even this is not an ideal comparison. Don’t hold your breath.
34
7
7
CONCLUSIONS
Conclusions
We don’t really want to jump to any conclusions on your behalf, so please do make your
own decision. LEARNIX runs fine just off the CD-ROM, so you don’t need to install it
at all. That’s the whole point of having a live system on a CD. Installing to hard disk
or running under VirtualBox will give you certain advantages, but if those are worth
Ease of Installation
Startup speed
Render speed
Concurrency with Windows
Access to Windows files
Functionality
the effort is up to you.
CD-ROM
+
–
+
–
+
+
USB stick
–
–
+
–
+
+
HD install
◦
◦
+
–
+
+
Wubi install
◦
◦
+
–
+
+
VirtualBox
–
◦
–
+
+
+
Cygwin
+/–
+
–
+
+
–
Mingw
?
+
?
+
+
–
Table 3: Pros and cons of the various methods of running LEARNIX and Radiance
Most of you will probably stick to the CD-ROM version of LEARNIX and just get
used to the relatively slow boot process. Please let yourselfs be reminded to treat the
CDs with care. Try to find a protective case to store them when you’re not leaving
them in the CD-ROM drive of your computer. Finger marks and scratches can cause
problem that are not immediately noticable and very hard to track down. You might
decided to run the media test from the LEARNIX boot menu from time to time. Please
download and burn a new CD if this test fails.
35
Axel Jacobs
Running LEARNIX
References
[Axel Jacobs(2008a)] Axel Jacobs. Radiance Cookbook, 2008a. URL http://luminance.
londonmet.ac.uk/learnix/docs/radiance_cookbook.pdf.
[Axel Jacobs(2009a)] Axel Jacobs. LEARNIX. Web site, Nov 2009a. URL http:
//luminance.londonmet.ac.uk/learnix.
[Axel Jacobs(2009b)] Axel Jacobs. LEARNIX. FTP site, Nov 2009b. URL ftp:
//luminance.londonmet.ac.uk.
[Axel Jacobs(2008b)] Axel Jacobs. Radiance Tutorial, 2008b. URL http://luminance.
londonmet.ac.uk/learnix/docs/radiance_tutorial.pdf.
[Bob Glickstein and Guillaume Morin(2009)] Bob Glickstein and Guillaume Morin.
GNU stow. Web page, Nov 2009. URL http://www.gnu.org/software/stow/.
[Brouwer and Bryan(2009)] Simon Brouwer and Ant Bryan.
Using MD5 Check-
sums. Web page, Nov 2009. URL http://www.openoffice.org/dev_docs/using_
md5sums.html.
[Canonical Ltd.(2009)] Canonical Ltd. Ubuntu GNU/LINUX. Web site, Nov 2009.
URL http://www.ubuntulinux.org.
[Colin Harrison(2009)] Colin Harrison. Xming. Web site, Nov 2009. URL http:
//www.straightrunning.com/XmingNotes.
[Energy Systems Research Unit(2009)] Energy Systems Research Unit. ESP-r. Web
site, Nov 2009. URL http://www.esru.strath.ac.uk/Programs/ESP-r.htm.
[Francesco Anselmo(2008)] Francesco Anselmo. A survival guide to Radiance on Windows. Presentation at the 7th International Radiance Workshop, Oct 2008.
[Lawrence Berkeley National Laboratory(2009)] Lawrence Berkeley National Laboratory. Radiance web site. Web site, Nov 2009. URL http://radsite.lbl.gov/
radiance.
[Radiance Community(2009)] Radiance Community. Radiance-Online. Web site, Nov
2009. URL http://www.radiance-online.org.
[Red Hat(2009)] Inc. Red Hat. Cygwin. Web site, Nov 2009. URL http://www.cygwin.
com.
[Stock(2009)] Mark J. Stock. Radiance Benchmark Test. Web page, Nov 2009. URL
http://markjstock.org/pages/rad_bench.html.
36
REFERENCES
[Sun Microsystems(2009)] Inc. Sun Microsystems. VirtualBox. Web site, Nov 2009.
URL http://www.virtualbox.org.
[Sun(2009)] Sun VirtualBox User Manual. Sun Microsystems, Inc., version 3.0.10
edition, 2009. URL http://www.virtualbox.org/wiki/Downloads.
[Ubuntu Community(2009)] Ubuntu
Guide.
Web page, Nov 2009.
Community.
Ubuntu
Graphical
Install
URL https://help.ubuntu.com/community/
GraphicalInstall.
[Wubi(2009)] Wubi. Wubi Ubuntu installer. Web site, Nov 2009. URL http://
wubi-installer.org.
37