1
The DisplayLink Open Source Software (libdlo) Guide
Revision 1.04
21st Apr 2009
Copyright (c) 2009, DisplayLink
All rights reserved.
Contents
Overview
About libdlo
The libdlo library layout
The libdlo library structure
What does libdlo provide?
Basic functions
Simple plotting operations
Multiple viewports
Operations across viewports
Transfering bitmaps to device
Overview
This document gives an overview of the DisplayLink Open Source Software (libdlo) package. It is aimed at engineers as a brief guide to finding
your way around libdlo package, porting, building and implementing code using it.
About libdlo
The libdlo library is a suite of software source code which was created with the following goals in mind:
Provide reference driver code for DisplayLink embedded products
Specifically targeted at low power, low memory embedded platforms
Designed to be portable, using standard tools (e.g. GCC toolchain)
Clear, self-documenting ANSI C source code (using Doxygen tool)
Includes some demonstrations of how to use libdlo
DisplayLink customers can use libdlo as a basis for developing demonstrations or products, or they can use it as a reference of how to interface
with a DisplayLink device in order to construct their own driver code. It is specifically designed to target embedded platforms.
There may be periodic published updates of libdlo and no guarantee is made that these will be backwards compatible with earlier releases,
although in most cases they will be.
The libdlo library layout
Upon decompressing libdlo package and unpacking the archive contents, you will find the following:
docs
contains documentation
lib
contains libdlo sources, and other third-party libraries
makefiles
submakefiles which form a part of the build
test
contains some test harness and demo code
other files
a selection of shell scripts and makefiles
The most important things to look at first are the contents of the 'docs' directory; this includes a READ_ME document (which doesn't contain
anything that isn't covered here) and a HowToBuild document.
This guide will not go into detail about the porting and building process as that is covered by the HowToBuild document but there are some high
level issues to be aware of:
You will require the GCC toolchain to be correctly installed and configured
The libdlo library is tested on Linux but can be ported to other platforms
On Linux, the test programs will need to be run as root in order to talk to udev.
The libdlo library may not build directly “out of the box” - you will possibly need to do some very simple configuration for your system first
The lib directory is where the source code to libdlo libraries lives. At present, this list only includes libusb (which is not supplied with libdlo but is
required in the build process) and libdlo - the libdlo library itself.
libdlo is the DisplayLink device driver reference source code - this only requires the libusb third party library.
You will find that the libdlo source code is documented using the open source Doxygen tool (not supplied) and for your convenience, we release
libdlo package with this documentation prebuilt:
lib/libdlo/docs/html/index.html
This HTML documentation forms a comprehensive guide to the libdlo source code, structures, APIs and interfaces. It is required reading material if
you want to either adapt libdlo or understand it better in order to implement your own driver code.
you want to either adapt libdlo or understand it better in order to implement your own driver code.
The libdlo library structure
libdlo is itself structured such that the source code is kept separate from any built binaries and binaries can be built for a number of target
platforms. The build process will take care of placing binaries and object files into the correct locations. What you will find in a new release is:
lib/libdlo/docs
Doxygen documentation for libdlo
lib/libdlo/imgs
used by Doxygen when generating documentation
lib/libdlo/include
the libdlo C header files
lib/libdlo/src
the libdlo C source files
lib/libdlo/other files
build scripts and other bits
The main header file is called:
lib/libdlo/include/libdlo.h
This defines the top-level API for the library such that any code using libdlo should only need to #include this one file in order to access all of the
main library features.
You may also find the dlo_defs.h header file useful in your own programs - this defines various useful things like ASSERT() and SWAP() macros
as well as others for error handling. Your code should not need to include any of the other header files as these implement lower-level APIs for
internal use by libdlo itself.
What does libdlo provide?
Driving a DisplayLink device basically reduces down to translating pixel graphics into an internal command format and then sending commands to
the device in order for it to update its display. There are a number of possible ways to achieve this and libdlo provides the following:
Enumerate and connect to attached DisplayLink devices
Set up display screen mode in device
Plot filled rectangles to a device
Copy a rectangle of pixels from one location to another within the device
Scrape a bitmap from host memory to a device (in various source pixel formats)
Basic functions
The basic usage of libdlo is to search for a device, claim it, perform your graphics operations for as long as required and finally release the device
when you are finished. This example code gives an idea of how that might look:
#include <stdio.h>
#include "libdlo.h"
#include "dlo_defs.h"
...
dlo_init_t ini_flags = { 0 };
dlo_final_t fin_flags = { 0 };
dlo_claim_t cnf_flags = { 0 };
dlo_retcode_t err;
dlo_dev_t uid = 0;
/* Initialise libdlo */
ERR_GOTO(dlo_init(ini_flags));
/* Look for a DisplayLink device to connect to */
uid = dlo_claim_first_device(cnf_flags, 0);
if (uid)
{
... /* we claimed a device */
/* Release the device when we're finished with it */
ERR_GOTO(dlo_release_device(uid));
}
/* Finalise libdlo */
ERR_GOTO(dlo_final(fin_flags));
return 0;
error:
/* The ERR_GOTO() macro jumps here if there was an error */
printf("Error %u '%s'\n", (int)err, dlo_strerror(err));
return 1;
The following test harness can be used as a basis for experimenting with the basics of claiming and releasing devices, as well as plotting and
scraping:
test/test1
Simple plotting operations
Once a device is claimed, the first things you will normally do are to set the screen mode and clear the screen. This can be done in a couple of
calls (for full information, see libdlo.h or the Doxygen documentation).
dlo_modedesc_t desc;
/* Select a mode */
desc.view.base = 0; /* Base address in device memory for this screen display */
desc.view.width = 1280;
desc.view.height = 1024; /* We can use zero as a wildcard here */
desc.view.bpp = 24; /* Can be a wildcard, meaning we don't mind what colour depth */
desc.refresh
= 0; /* Refresh rate in Hz. Can be a wildcard; any refresh rate */
ERR(dlo_set_mode(uid, &desc));
/* Clear the screen (to black) */
ERR(dlo_fill_rect(uid, NULL, NULL, DLO_RGB(0, 0, 0)));
Notice that the mode selection can take wildcards rather than forcing the caller to specify exactly which parameters are required. In the case
where there are multiple modes matching the specified wildcards, libdlo will select the mode with the highest matching parameter(s), e.g. the
highest refresh rate, colour depth or greatest vertical resolution.
Once a mode has been selected, it is useful to read back the mode information (especially in the case where wildcards were used) in order to
confirm the display characteristics. Here is an example of how to do this:
dlo_mode_t *info;
/* Read current mode information */
info = dlo_get_mode(uid);
NERR(info);
printf("Mode %ux%u @ %u Hz %u bpp base &%X\n",
info->view.width,
info->view.height,
info->refresh,
info->view.bpp,
(int)info->view.base);
There is one basic plotting primitive available through libdlo:
Plot a filled rectangle
Here are a couple of examples of its basic useage:
dlo_mode_t *mode_info;
dlo_view_t *view;
dlo_rect_t rec;
/* Read current mode information */
info = dlo_get_mode(uid);
NERR(info);
view = &(info->view);
/* Fill the current screen with black */
ERR(dlo_fill_rect(uid, NULL, NULL, DLO_RGB(0, 0, 0)));
/* Plot a white rectangle at 32,32 which is 120 pixels wide and 64 pixels high */
rec.origin.x = 32;
rec.origin.y = 32;
rec.width = 120;
rec.height = 64;
ERR(dlo_fill_rect(uid, view, &rec, DLO_RGB(0xFF, 0xFF, 0xFF)));
There is an additional graphics primitive, which can be used to clone areas of the screen or move them around:
dlo_mode_t *mode_info;
dlo_view_t *view;
dlo_rect_t rec;
dlo_dot_t dot;
/* Read current mode information */
info = dlo_get_mode(uid);
NERR(info);
view = &(info->view);
/* Copy a 300x150 rectangle from 100,100 to 450,200 */
rec.origin.x = 100;
rec.origin.y = 100;
rec.width = 300;
rec.height = 150;
dot.x
= 450;
dot.y
= 200;
ERR(dlo_copy_rect(uid, view, &rec, view, &dot));
All of the plot operations take co-ordinates in pixels relative to the origin of the a viewport in the device. The origin is conventionally in the top-left
of the screen with positive x extending right and positive y extending down.
The following test harness can be used as a basis for experimenting with the plotting primitives:
test/test1
Multiple viewports
A viewport describes the contents of a contiguous block of device memory (of which there is normally 16 MB available). It represents a rectangular
bitmap which may be large enough to use as a screen mode or it may be of any other non-zero size.
It is the responsibility of the caller to organise one or more viewports in the device memory and use the dlo_set_mode() call to determine which is
visible on the screen at any given time.
When a device is first claimed, the EDID data for any connected display will be read. If successful, then an initial screen mode is set up using the
native mode timings of the display. This will result in an initial viewport being defined at base address 0. Details of the initial viewport can be
discovered by the caller using the dlo_get_mode() call. If no initial mode was set up by libdlo, then the caller must do so by making an
appropriate call to dlo_set_mode().
Setting the screen mode does not result in the screen being cleared; the caller must make a call to dlo_fill_rect() to achieve this, as per earlier
examples.
Overlapping viewports should be avoided because they do not include the concept of a 'stride' (to get from one pixel to the pixel immediately
below). They must also have a base address which starts on a two byte boundary. Aside from these constraints, viewports can be arranged at any
locations within the device memory.
The caller should not assume anything about the format of the pixels stored in the device memory or how pixels are arranged within a given
viewport's address range. It is safe to assume that the pixels will require three bytes each (in a 24 bpp viewport) so a viewport which is 1280 x
1024 pixels in size, starting at base address 0x000000 in the device memory will end at address 1280*1024*3 = 0x3C0000.
Thus, the caller may set up two screen banks by maintaining two viewports of the same dimensions, one starting at base address 0x000000 (for
example) and another starting at base address 0x3C0000 (assuming they are 1280x1024 pixels in size). These two banks can be plotted to
independently of each other and displayed using the dlo_set_mode() call.
#define BPP_TO_BYTES(bpp) ((bpp + 7) / 8)
...
dlo_modedesc_t desc;
dlo_mode_t mode[2];
/* Read current mode information */
desc = dlo_get_mode(uid);
NERR(desc);
/* Our first viewport is the current display screen mode */
mode[0].view = desc->view;
/* Our second viewport is going to be in device memory just above the current screen */
mode[1].view
= mode[0].view;
mode[1].view.base = mode[0].view.base + (mode[1].view.width * mode[1].view.height * BPP_TO_BYTES(mode[1].view.bpp));
/* Clear the second viewport to blue */
ERR(dlo_fill_rect(uid, &mode[1].view, NULL, DLO_RGB(0, 0, 0xFF)));
/* Switch display screen mode to the second viewport */
ERR(dlo_set_mode(uid, &mode[1]));
Operations across viewports
It is possible to plot rectangles on viewports other than the current display screen mode using the dlo_fill_rect() call. It is also possible to copy
rectangles from one viewport onto another. Note: any areas which fall outside of a given viewport will be clipped and will not overflow onto any
adjacent viewport.
dlo_rect_t rec;
dlo_dot_t dot;
/* Clear the first viewport to red */
ERR(dlo_fill_rect(uid, &mode[0].view, NULL, DLO_RGB(0xFF, 0, 0)));
/* Clear the second viewport to blue */
ERR(dlo_fill_rect(uid, &mode[1].view, NULL, DLO_RGB(0, 0, 0xFF)));
/* Plot a green rectangle in the centre of the first viewport */
rec.origin.x = (mode[0].view.width >> 1) - 64;
rec.origin.y = (mode[0].view.height >> 1) - 64;
rec.width = 128;
rec.height = 128;
ERR(dlo_fill_rect(uid, &mode[0].view, &rec, DLO_RGB(0, 0xFF, 0)));
/* Copy a central section from the first viewport to the top-left of the second */
rec.origin.x -= 32;
rec.origin.y -= 32;
rec.width += 64;
rec.height += 64;
dot.x
= 0;
dot.y
= 0;
ERR(dlo_copy_rect(uid, &mode[0].view, &rec, &mode[1].view, &dot));
Transfering bitmaps to devices
A common use case for interacting with a DisplayLink device will include the requirement for copying a bitmap from host memory into the device
memory. This presents a number of complications, including the large number of possible pixel formats for the image in the host memory and the
fact that the bitmap to transfer might be a subset of a larger framebuffer.
The dlo_copy_host_bmp() function provides a general purpose interface for doing operations as described above. It can also perform some
basic transformations on the bitmap during the copy process (currently limited to a flip about the horizontal axis).
As with the other plot functions, this function takes the unique ID of a device and a destination viewport as parameters. It also takes the coordinates within that viewport at which to plot the bitmap into - these represent the origin (top-left pixel) of the where the bitmap will appear.
There is one other parameter which requires further explanation, the framebuffer (dlo_fbuf_t) structure pointer. This structure contains the
following information about the source bitmap in host memory:
width
The width (pixels) of the source bitmap
height
The height (pixels) of the source bitmap
fmt
The source bitmap's pixel format (see below)
base
A pointer to the first pixel (origin) in the bitmap
stride
The number of pixels to skip in order to reach the one directly below (see below)
Pixel formats
There are various pixel formats supported by libdlo, currently including:
8 bit per pixel 2_bbbggrrr
8 bit per pixel 2_rrrggbbb
16 bit per pixel 2_bbbbbggggggrrrrr
16 bit per pixel 2_rrrrrggggggbbbbb
16 bit per pixel 2_Sbbbbbgggggrrrrr (S is supremacy/transparancy bit)
16 bit per pixel 2_Srrrrrgggggbbbbb (S is supremacy/transparancy bit)
24 bit per pixel 0xbbggrr
24 bit per pixel 0xrrggbb
32 bit per pixel 0xaabbggrr
32 bit per pixel 0xaarrggbb
If the fmt member of the structure has a value greater than 1023, then the pixel format is assumed to be 8 bits per pixel using a palette in host
memory (the fmt value is a pointer to the first palette entry). The palette in this case must be a 256 entry array of dlo_col32_t colour numbers.
Framebuffer stride
In order to allow a bitmap to be copied from within a larger bitmap (or framebuffer), there is a member called stride. This tells libdlo how to get
from a pixel in one row of the bitmap to the pixel immediately below it. Thus:
ptr_to_pixel_below = ptr_to_pixel + (stride * BYTES_PER_PIXEL(fmt));
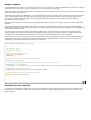
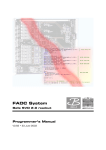
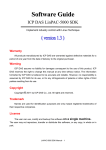
An illustrated example of how the stride is calculated before making the call to dlo_copy_host_bmp() is given below, with the green area
representing the bitmap that we want to copy to the device:
In the above example, the bitmap we want to copy is 2x3 pixels in size and lies within a larger bitmap which is 5x5 pixels in size. If the base address
of the larger bitmap is 0x10000000 and there are two bytes per pixel, then the dlo_fbuf_t structure might be initialised thus:
width = 2
height = 3
fmt
= dlo_pixfmt_rgb565
base
= 0x1000000C
stride = 5
As with the dlo_copy_rect() function, this call will clip the bitmap if the any of the destination rectangle lies outside of the viewport specified.
dlo_bmpflags_t flags = { 0 };
dlo_fbuf_t *fbuf;
dlo_view_t *view;
dlo_dot_t
dot;
...
/* Copy a screen-sized bitmap into the current display of the device */
fbuf.width = 1280;
fbuf.height = 1024;
fbuf.base = ... /* Adress of the bitmap in host memory */
fbuf.stride = fbuf.width;
fbuf.fmt = dlo_pixfmt_srgb1555;
dot.x
= 0;
dot.y
= 0;
ERR(dlo_copy_host_bmp(uid, flags, &fbuf, NULL, &dot));
/* Copy a section from the bitmap to the bottom-right corner of the display */
fbuf.width = 640;
fbuf.height = 512;
fbuf.base = ... /* Adress of first pixel to copy */
fbuf.stride = 1280;
dot.x
= 640;
dot.y
= 512;
ERR(dlo_copy_host_bmp(uid, flags, &fbuf, NULL, &dot));
The following test/demo program can be used to understand the bitmap copy call in much more detail; it gives an example of how to load a
Windows BMP format file into memory and scrape it to the device memory:
test/test1
This document is issued under license and must not be copied, reproduced or disclosed in part or whole outside the terms of the
license.
Copyright © 2009 DisplayLink