1
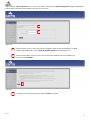
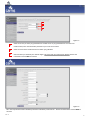
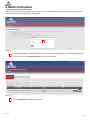
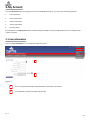
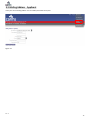
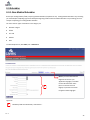
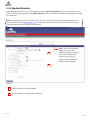
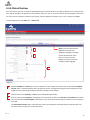
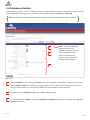
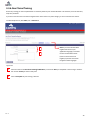
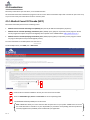
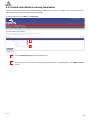
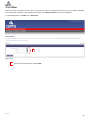
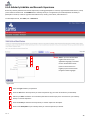
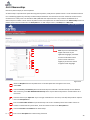
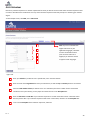
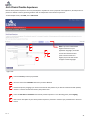
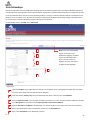
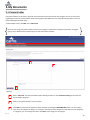
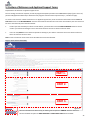
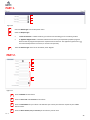
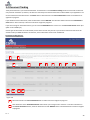
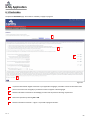
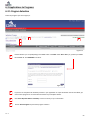
CaRMS Online User Manual We recommend you use a supported browser when accessing CaRMS Online. CaRMS supports the following browsers: For PC: Chrome (recommended for the best user experience) Firefox 14.0 or higher Internet Explorer 9* For MAC: Chrome (recommended for the best user experience) Safari 5.0 or higher *If you have upgraded to the newer Internet Explorer (IE) 10, you may experience some difficulties accessing CaRMS Online. Activating “Compatibility view” under “Tools” in the browser is recommended. IE8 also has limited functionality. If you are not using a supported browser, unexpected errors may occur. We apologize for any inconvenience, and recommend that you upgrade to a supported browser. v 1.1 Table of Contents: 1-Request for Registration 4 2-Match Participation 12 3-My Account 15 3.1-User Information 15 3.2-Contact Information 16 3.3-Address Information 17 3.4-Security Information 18 3.5-Payment History 19 4-My Information 4.1-Profile 20 20 4.1.1-Personal Information 20 4.1.2-Language Skills 22 4.2-Licensure 23 4.3-Achievements and Interests 24 4.4-Education 25 4.4.1-Non-Medical Education 25 4.4.2-Medical Education 26 4.4.3-Clinical Electives 27 4.4.4-Postgraduate Training/Internship 28 4.4.5-Residency Electives 29 4.4.6-Non Clinical Training 30 4.5-Examinations 31 4.5.1-Medical Council of Canada 31 4.5.2-United States Medical Licencing Examination 32 4.5.3-Language 33 4.5.4-Assessments 34 4.5.5-Other 36 v 1.1 2 4.6-Experience 37 4.6.1-Work 37 4.6.2-Scholarly Activities and Research 38 4.6.3-Observership 39 4.6.4-Volunteer 40 4.6.5-Clinical Practice 41 4.6.6-Fellowships 42 4.6.7-Publications/Presentations 43 5-My Documents 44 5.1-Personnal Letter 44 5.2-Letters of Reference 45 5.3-Attached Documents 48 5.4-Document Tracking 49 5.5-Request Translation 52 6-My Application 53 6.1-Declaration 53 6.2-Program Application 54 6.2.1-Program Selection 54 6.2.2-Document Assignment 57 v 1.1 3 1-Request for registration Current-year graduates of Canadian medical schools are automatically registered for the R-1 Match by their undergraduate office. All other applicants must complete a request for registration. To request registration for the R-1 Main Residency Match, visit carms.ca. Place your cursor over Residency Matches, where you will see a dropdown menu. Click on Request for Registration. 1 2 Figure 1.1 1. Place your cursor over Residency Matches. 2. Click Request for Registration v 1.1 4 Carefully review the detailed instructions before proceeding. Click on request registration. 1 Figure 1.2 1. Click on request registration. v 1.1 5 After clicking the request registration link on carms.ca, you will be redirected to the Request for Registration page in CaRMS Online. Please read the instructions carefully before moving on to the next step. 1 2 Figure 1.3 1. 2. Confirm whether you are a new or returning user. Applicants who have never participated in a CaRMS match or who participated in a match prior to the 2013 match are considered new users. Enter the email address you wish to use to communicate with CaRMS. Review the information you entered and click REGISTER. 1 Figure 1.4 1. Carefully review the information on the page. Click NEXT to continue. v 1.1 6 1 2 3 Figure 1.5 1. Select the country in which you graduated from medical school. If you graduated from more than one medical school, enter the information pertinent to your most recent school. 2. Select the name of the medical school from which you graduated. 3. Select the date you obtained your medical degree. This is the date you received your diploma. Review the information and cick NEXT to continue. Figure 1.6 Fill in the required information. Mandatory fields are indicated by a red asterisk *. Review the information and click NEXT to continue. v 1.1 7 Indicate whether you have previously participated in a CaRMS match. 1 2 Figure 1.7 1. If you have not previously participated in a CaRMS match, click no. Select which CaRMS service you wish to use. For example, if you wish to participate in the first iteration of the R-1 Match, select 2014 R-1 Match—First Iteration. 2. If you are an IMG and have taken the MCCEE, enter your MCC candidate code, and select the date you took the exam. If you have not taken the MCCEE, click the check box above the text fields. 1 2 Figure 1.8 v 1.1 1. If you have previously participated in a CaRMS match, select Yes. Enter the required information in the appropriate fields. Mandatory fields are indicated by a red asterisk *. If you were a previous applicant to the CaRMS match you will not be required to pay the verification fee. 2. Select which CaRMS service you wish to use. For example, if you wish to participate in the first iteration of the R-1 Match, select 2014 R-1 Match—First Iteration. 8 1 Figure 1.9 1. Carefully review CaRMS’ policy agreement statement. Select I Agree and click NEXT to continue. 1 2 Figure 1.10 1. Create a username for your CaRMS Online account. Usernames are not case sensitive. Do not use any special characters. 2. Create a password for your CaRMS Online account. Please note the password requirements. v 1.1 9 1 Figure 1.11 1. Type in your credit card number and the expiry date. Click PROCESS TRANSACTION to continue. 1 Figure 1.12 1. Print the Payment Details page and save it on your computer as proof of payment. v 1.1 10 1 Figure 1.13 1. To complete the registration process, click DONE. Once you have completed your request for registration you will receive your registration by email within three to four business days. Note: The request for registration is only the first step in the application process. Once you receive the registration link by email, you will need to log into CaRMS Online and pay the match participation fee to continue. v 1.1 11 2-Match Participation When you receive your access confirmation/token, click the link in the email. Read the instructions, follow the steps and pay the application fee to begin your application in CaRMS Online. 1 Figure 2.1 1. Select the language of your application: English, French, or both English and French. You will be able to modify this information later in the Personal Information section of your application. 1 Figure 2.2 1. Select PARTICIPATE to participate in the match. v 1.1 12 1 Figure 2.3 1. Carefully read the instructions and click NEXT to continue. 1 Figure 2.4 1. Carefully review the Applicant Contract. Check the box and click ACCEPT to continue. v 1.1 13 1 Figure 2.5 1. Enter your credit card number and expiry date. Click PROCESS TRANSACTION to continue. 1 Figure 2.6 1. Once you have participated in the match you can withdraw. If you wish to withdraw select WITHDRAW. If you wish to participate once you have withdrawn, you will have to send an email to [email protected] and request to be reinstated in the match. v 1.1 14 3-My Account From the My Account tab in the top right corner of your CaRMS Online account, you may access the following sections: User information Contact information Address information Security information Payment history The information in the My Account section will have already been filled out when you registered but you can modify this information at any time. 3.1-User Information Enter your User Information. You can modify this section at any time. 1 2 Figure 3.1 1. Fill in the requested information. Required fields are marked by a red asterisk *. 2. Your CaRMS ID is located at the bottom of this page. v 1.1 15 3.2-Contact Information Enter your Contact Information. Up-to-date contact information is required for the following purposes: CaRMS updates and communiqués Program interviews Resetting passwords You can modify this section at any time. 1 2 Figure 3.2 1. Enter your primary email address. 2. Provide your primary phone number. v 1.1 16 3.3-Mailing Address - Applicant Enter your current mailing address. You can modify this section at any time. Figure 3.3 v 1.1 17 3.4-Security Information Enter a username, password and security questions. 1 Figure 3.4 1. You can change your security questions and answers at any time. v 1.1 18 3.5-Payment History Your CaRMS payment history is found on this page. 1 Figure 3.5 1. To print an invoice, click PRINT. v 1.1 19 4-My Information 4.1-Profile 4.1.1-Personal Information 1 2 3 4 5 Figure 4.1 1. Confirm the language of your application. 2. Enter your date of birth using the calendar. 3. Indicate your gender. 4. Enter your social insurance number (SIN). CaRMS collects your SIN on behalf of programs, as it is required to work in Canada. It is only revealed to the program once you are matched. 5. Indicate your citizenship status. Please note that Canadian permanent residency status is the minimum requirement for applicants. v 1.1 20 1 2 3 4 5 6 7 8 9 Figure 4.2 NOTE: Certain fields are only required for certain applicant types. Fields that are not relevant to you or that cannot be edited will be greyed out. 1. 2. 3. Enter your MCC Candidate Code if you did not already do so during the registration process. Enter your Licentiate of the Medical Council of Canada (LMCC) number: You will receive this number after you pass the MCCQE2. If you are scheduled to take the exam, you can enter six zeroes (000000) as a temporary LMCC number. This will enable you to submit the exam section of your application. Enter your physiciansapply.ca ID (formerly PCRC). 4. Enter your Medical Identification Number of Canada (MINC) (www.minc-nimc.ca). The MINC is used to identify every medical practitioner and/or educator in Canada. It is nationally recognized and is issued by the Medical Council of Canada (MCC) and the Federation of Medical Regulatory Authorities of Canada (FMRAC). Most applicants will not have a MINC until they are licensed. 5. Enter your CEHPEA candidate code. 6. Enter your AIMG ID. All IMGs wishing to apply to Alberta programs must be registered with the Alberta International Medical Graduate Program (http://www.aimg.ca/index.php?m=2&page=1). 7. Enter your United States Medical Licensing Examination (USMLE) (www.usmle.org) / Educational Commission for Foreign Medical Graduates (ECFMG) (http://www.ecfmg.org) number. The USMLE is a three-step examination for medical licensure in the United States. The USMLE ID number is used to help verify whether applicants are in the US match. The ECFMG is for applicants from medical schools outside the US and Canada who have taken steps 1 and 2 of the USMLE. Certification by the ECFMG is the standard for evaluating IMGs’ qualifications before they enter the US graduate medical education system and provide supervised patient care. The ECFMG certificate is a requirement for IMGs to take step 3 of the USMLE and to obtain an unrestricted medical license in the US. Note: the USMLE does not grant exemption from the MCC examinations. 8. v 1.1 9. Enter your Association of American Medical Colleges (AAMC) (https://www.aamc.org) ID. The AAMC ID is an identification number for all medical students, medical residents, medical school faculty members and others with whom the AAMC has a relationship. Enter your National Residency Matching Process (NRMP) (http://www.nrmp.org/) ID. The NRMP ID is an identification number for applicants participating in the NRMP match. 21 4.1.2-Language Skills Record all languages that you can fluently speak and/or write. 1 2 3 Figure 4.3 1. The left hand column displays your chosen languages. To add a language to your list, choose one from the right hand column by clicking the + . 2. If a desired language is not listed in the right hand column, you can type it into the Other Language(s) field. 3. Click SAVE to save your list of languages. v 1.1 22 4.2-Licensure Enter information about your medical licensure. Canadian medical graduates (CMGs) will not usually have a medical license until they have completed their residency training and all MCC exams. Many international medical graduates (IMGs) will have a medical license. Note: Completing all MCC exams and obtaining your LMCC certificate does not necessarily mean that you have your license to practice medicine in Canada. 1 Note: If you have selected both English and French as your application languages, remember to enter all information twice (once in French and once in English) if you want this section to appear in both languages. 2 3 Figure 4.4 1. Enter information pertaining to your current Canadian medical licensure, if applicable. 2. Enter information pertaining the validity of your Canadian medical license. 3. Enter any information pertaining to licensing outside of Canada. v 1.1 23 4.3-Achievements & Interests Record your academic achievements (e.g. awards) and areas of interest. 1 Figure 4.5 1. To create multiple entries, click on + Add record. v 1.1 24 4.4-Education 4.4.1-Non-Medical Education Record your undergraduate, CÉGEP, and post graduate education (completed or not). Undergraduate education is any schooling you received after completing high school and before beginning medical school. Graduate education is any schooling you received after completing your undergraduate education. The most common types of education in this category are: Bachelor’s degree CÉGEP Pre-med Masters PHD To add multiple entries, click SAVE, then + Add record. 1 Note: If you have selected both English and French as your application languages, remember to enter all information twice (once in French and once in English) if you want this section to appear in both languages. Figure 4.6 1. Mandatory fields are indicated by a red asterisk *. v 1.1 25 4.4.2-Medical Education Record information pertinent to your medical degree. During the Request for Registration step, you were asked to enter the country, school and graduation date of your Medical Education. Enter any outstanding information. Required fields are marked by a red asterisk *. Note: If you attended more than one medical school, you must send an email containing the name of both schools, and your start dates at each to [email protected] to request that a second record be added. You must provide complete information for both medical schools on your application. 1 Note: If you have selected both English and French as your application languages, remember to enter all information twice (once in French and once in English) if you want this section to appear in both languages. 2 Figure 4.7 1. Enter information in the required fields. 2. Enter information in the optional fields, if desired. v 1.1 26 4.4.3-Clinical Electives Enter any electives you have, or will have completed during your medical education. An elective is defined as any rotation during your medical education training that was not mandatory. If you wish, you can also enter electives you will complete in the future. You may also enter mandatory rotations in this section, if desired. Mandatory rotations are, as a rule, covered in the MSPR. To add multiple entries, click SAVE, then + Add record. Note: If you have selected both English and French as your application languages, remember to enter all information twice (once in French and once in English) if you want this section to appear in both languages. 1 2 3 Figure 4.8 1. Enter the Discipline and Country in which you completed, or will complete, the elective. You can also add the Discipline sub-title. Note: if a specific discipline does not appear on the list, we suggest choosing the closest discipline from the dropdown menu and entering the official name of the discipline as the sub-title. 2. Enter the name of the University, and City of your medical education elective. 3. Enter the name of your Supervisor, the language of communication, as well as the Start date and End date of the elective. You may also add a simple Description of the elective. If you do not know who the supervisor will be for a future elective, enter TBD. The Total number of hours field is reserved for those who have completed a horizontal elective (an elective done over several months for a few hours on a part-time basis). v 1.1 27 4.4.4-Post Graduate Training/Internships Record any accredited postgraduate medical residency training in which you have participated. For the purposes of this application, postgraduate training is defined as any medical residency training undertaken after completing a medical degree, in a clinical setting, with supervised patient contact, that may lead to a general license and/or specific practice. To add multiple entries, click SAVE, then + Add record. Note: Some countries, like Egypt and India, require that a medical student complete a one year internship to receive a medical degree. In this case, that additional year may be added under Post Graduate Training/Internships. 1 2 Note: If you have selected both English and French as your application languages, remember to enter all information twice (once in French and once in English) if you want this section to appear in both languages. 3 4 Figure 4.9 1. 2. Enter the Discipline, Country, Institution, and City in which your training took place. Note: the list compiled contains all residency training disciplines as collected by the Royal College of Physicians and Surgeons of Canada. CaRMS does not control this list, nor can we modify it. Enter the name of your Supervisor during your residency training. If you do not remember his or her name, you can enter Not applicable (N/A). If you had multiple supervisors, enter the name of the supervisor with whom you had the most contact. 3. Enter the Start and End/Anticipated End Date of your residency training, regardless of whether or not your training was interrupted. 4. Indicate your current status within that program, and whether it was required as part of a medical degree. v 1.1 28 4.4.5-Residency Electives Record electives you have, or will have, completed during your residency training. An elective is defined as any rotation you have done during residency training that was not mandatory. To add multiple entries, click SAVE, then + Add record. Note: Most CMGs will not have done any residency training and will therefore not have any residency electives. 1 2 Note: If you have selected both English and French as your application languages, remember to enter all information twice (once in French and once in English) if you want this section to appear in both languages. 3 Figure 4.10 1. Enter the Discipline (of your residency) and Country in which you completed, or will complete, the elective. You can also add the Discipline sub-title. Not all residency disciplines appear in the list. We recommend choosing the closest discipline from the dropdown menu and entering the official name of the discipline in the sub-title field. 2. Enter the name of the University and City of your residency elective training. 3. Enter the name of your Supervisor, as well as the Start date and End date of your elective. You may also add a simple Description of the elective. v 1.1 29 4.4.6-Non Clinical Training Record any training you have completed that is not directly linked to your medical education. This includes, but is not limited to, CPR, ACLS, and BCLS. If you are unsure of where to record training because it does not fit in any other category, it can be entered in this section. To add multiple entries, click SAVE, then + Add record. 1 2 Note: If you have selected both English and French as your application languages, remember to enter all information twice (once in French and once in English) if you want this section to appear in both languages. Figure 4.11 1. Enter the name of the Non clinical training/certifications, as well as the Date you completed or the training or certification and the Country in which it took place. 2. Enter a Description of your training, if desired. v 1.1 30 4.5-Examinations Record any examinations you have taken, or are scheduled to take. All examination documents submitted to programs must be current. Some examinations expire after a number of years and it is up to you to ensure that your examination results are currently valid. 4.5.1-Medical Council Of Canada (MCC) Record the information pertinent to the following exams: Medical Council of Canada Evaluating exam (MCCEE) (Required by all IMGs and Osteopathic physicians) Medical Council of Canada Qualifying Examination part I (MCCQE part I) (May be required by certain programs. Please see the program descriptions and provincial eligibility criteria posted on the CaRMS website: https://www.carms.ca/ ) Medical Council of Canada Qualifying Examination part II (MCCQE part II) (May be required by certain programs. Please see program descriptions and provincial eligibility criteria) For more information on the MCC please visit: www.mcc.ca. To add multiple entries, click SAVE, then + Add record. 1 2 3 Figure 4.12 1. 2. 3. Check the box to authorize CaRMS to retrieve your exam score from the MCC. Enter the Examination type, Status and Date taken in the corresponding fields. Your Score will be filled by CaRMS prior to file review. Note: CaRMS will collect your scores from the MCC and post them on your profile. CaRMS does not receive the results documents. Therefore it is your responsibility to provide the corresponding document (statement of results/supplementary feedback) to be included with your application. v 1.1 31 4.5.2-United States Medical Licensing Examination Record any United States Medical Licensing Examination(s) (USMLE) you have taken. The USMLE is not a requirement for the match, but you may include your results with your application. To add multiple entries, click SAVE, then + Add record. 1 2 Figure 4.13 1. Select the Examination type from the dropdown menu. 2. Enter your score and provide the corresponding result documents by uploading them in the Attach Document section. v 1.1 32 4.5.3-Language Examinations Record any language examination(s) you have taken to indicate your proficiency in either English or French. It is important to note that if your language of instruction during medical school was not English or French, some provincial or program criteria may require you to take, and provide the results of, a language assessment exam. Please refer to the program descriptions and provincial criteria sections of the CaRMS website (http://www.carms.ca/eng/r1_eligibility_prov_e.shtml) for more information. To add multiple entries, click SAVE, then + Add record. 1 Figure 4.14 1. Select the Examination type from the dropdown menu. You will find the following examination types: Test of English as a Foreign Language (TOEFL) (the CaRMS institution code is 8309 and the department code is 99 or 00) http://www.ets.org/toefl International English Language Testing System (IELTS) http://www.ielts.ca/index.php Examen de l'Office québécois de la langue française http://www.oqlf.gouv.qc.ca/ The Test of English for International Communication (TOEIC) http://www.etsglobal.org/Fr/Eng/Tests-Preparation/The-TOEIC-Tests Test de Français International (TFI): http://www.etscanada.ca/fr/tfi/ Examens de compétence de la langue française http://piquredufrancais.ccdmd.qc.ca/examen.php v 1.1 33 4.5.4-Assessments Record any provincially–administered assessments. These may be required by certain programs and/or provinces. To add multiple entries, click SAVE, then + Add record. 1 Figure 4.15 1. Select the Assessment type from the drop down menu: Clinical Skills Assessment and Training (CSAT) http://www.cpsnl.ca/default.asp?com=Pages&id=111&m=365 The Clinician Assessment for Practice Program (CAPP) http://www.capprogram.ca/index.html Clinician Assessment and Professional Enhancement (CAPE) http://umanitoba.ca/faculties/medicine/education/cpd/assessment/cape.html Non-Registered Specialist Assessment Program (NRSAP) http://umanitoba.ca/faculties/medicine/education/imgp/specialistassessment.html Alberta IMG Program Assessment Process (AIMG) http://www.aimg.ca/ BC IMG Assessment Program (BCIMG) http://imgbc.med.ubc.ca/ CEHPEA - CE1 http://www.cehpea.ca/examinations/PGY1/NAC-OSCE.htm CEHPEA - CE2 http://www.cehpea.ca/examinations/PRA/exams_CE2.htm CEHPEA - SWE http://www.cehpea.ca/examinations/PRA/exams_SWE.htm Examen des sciences cliniques médicales du CMQ http://www.cmq.org/fr/ObtenirPermis/DiplomesInternationaux/Permis/1ReconnaissanceEquivalence.aspx National Assessment Collaboration (NAC) Objective Structured Clinical Examination (OSCE) http://www.mcc.ca/en/NAC/ v 1.1 34 If you have selected the NAC OSCE, specific instructions on how to release the score to CaRMS will appear. To add multiple entries, click SAVE, then + Add record. 1 2 3 4 Figure 4.16 1. Your Score will be filled in by CaRMS prior to file review. Note: CaRMS will collect your scores from the MCC and post them on your profile. CaRMS does not receive the results documents. Therefore it is your responsibility to provide the corresponding document (statement of results/supplementary feedback) to be included with your application. 2. Indicate whether you want the results to be shared with CaRMS, for both Pass and Fail results. 3. Carefully read this information. If you select the NAC OSCE, it is your responsibility to print, sign and send the release form to the MCC to authorize the disclosure of your results to CaRMS. 4. Check the box to authorize CaRMS to provide some personal information to the MCC for the purpose of retrieving your NAC OSCE score. It is your responsibility to provide your result documents to CaRMS so that they will be included with your application. You can either send the document to CaRMS by mail, or scan and upload it directly in your Attach Document section. v 1.1 35 4.5.5-Other Record any other examinations that do not fit in the previous sections. To provide proof that you have successfully completed these examinations, upload the corresponding document(s) in the Attach Document section of your application. To add multiple entries, click SAVE, then + Add record. 1 Figure 4.17 1 Fill in the required information and click SAVE. v 1.1 36 4.6-Experience 4.6.1-Work Experience Record any work experience that is not considered clinical practice, including work that was done prior to obtaining your medical degree. We encourage you to record work experience that is not necessarily linked to the medical field in this section. To add multiple entries, click SAVE, then + Add record. 1 2 3 Note: If you have selected both English and French as your application languages, remember to enter all information twice (once in French and once in English) if you want this section to appear in both languages. 4 Figure 4.18 1. Enter the Job Title. If you did not have a specific title, you can enter N/A and provide an explanation in the Description box. 2. Enter the Address, City and Country of your work experience. 3. Enter the Start date and End date of your work experience. You will not be able to enter a date that is later than the present date. If your work experience will end on a future date, mention it in the Description box. 4. Enter a short Description of your work experience, if desired. v 1.1 37 4.6.2-Scholarly Activities and Research Experience Record any scholarly activities and research experiences, including participation in research, organized clinical discussions, rounds, journal clubs and conferences. The ECFMG defines a scholarly activity as “an opportunity for residents/fellows and faculty to participate in research, as well as organized clinical discussions, rounds, journal clubs, and conferences.” To add multiple entries, click SAVE, then + Add record. 1 2 3 4 5 Note: If you have selected both English and French as your application languages, remember to enter all information twice (once in French and once in English) if you want this section to appear in both languages. Figure 4.19 1. 2. Select the Type of activity or experience. Enter the Title of the scholarly activity or research experience (e.g. the name of conference you attended). 3. Indicate your Role. This field is not a mandatory field and can be left empty if it is not relevant to your scholarly activity or research experience 4. Enter the Country in which the scholarly activity or research experience took place. 5. Enter a short Description of your scholarly activity or research experience, if desired. v 1.1 38 4.6.3-Observerships Record any observerships you have completed. An observership is a period of time spent observing clinical practice, usually with no patient contact. It is also sometimes referred to as a shadowing opportunity. Normally an observership lasts between one week and one month. It does not involve a service commitment or a salary and is non-accredited. Many IMGs will have experience that is very similar to the definition of an observership but includes a certain amount of patient contact. Such experience can still be entered in the Observership section but patient contact must be mentioned in the Description box. To add multiple entries, click SAVE, then + Add record. 1 Note: If you have selected both English and French as your application languages, remember to enter all information twice (once in French and once in English) if you want this section to appear in both languages. 2 3 4 5 6 Figure 4.20 1. 2. v 1.1 Select the Discipline from the dropdown menu. If the description does not appear in the menu, select Other. Enter the Country and University where the observership was conducted. If the observership was not affiliated with a university, select Not affiliated with university. Note: only list observerships done in Canada and the US in this section. 3. Enter the name of your Supervisor. If you no longer remember his or her name, enter N/A and provide an explanation in the Description box. 4. Enter the Total number of hours of your observership. This is not a mandatory field. If the number of hours exceeds the number that the system allows, enter the number of hours in the Description box. 5. Enter the Start date and End date of the observership. 6. Enter a short Description of the observership, if desired. 39 4.6.4-Volunteer Record any volunteer experience or relevant unpaid work for which you did not receive school credit. Volunteer experience does not have to be linked to the medical field. You may record volunteer experience that took place prior to obtaining your medical degree. To add multiple entries, click SAVE, then + Add record. 1 2 3 4 Note: If you have selected both English and French as your application languages, remember to enter all information twice (once in French and once in English) if you want this section to appear in both languages. 5 Figure 4.21 1. Enter your Job Title. If you did not have a specific title, enter ‘Volunteer worker’. 2. Enter the name of the Organization for which you volunteered, as well the City and Country where it was located. 3. Enter the Total number of hours, if desired. This is not a mandatory field. If the number of hours exceeds the number that the system allows, you may input the number of hours in the Description box. 4. Enter the Start date and End date of your volunteer experience. You will not be able to enter a date that is later than the present date. If your volunteer experience will end on a future date, mention it in the Description box. 5. Enter a short Description of the volunteer experience, if desired. v 1.1 40 4.6.5-Clinical Practice Experience Record clinical practice experience. This may include paid or unpaid work. For the purposes of this application, clinical practice experience is defined as actively practicing medicine with an independent license without supervision. To add multiple entries, click SAVE, then + Add record. 1 2 3 4 5 Note: If you have selected both English and French as your application languages, remember to enter all information twice (once in French and once in English) if you want this section to appear in both languages. Figure 4.22 1. Enter the Country in which you practiced. 2. Enter the name of the Institution with which you were affiliated. 3. Indicate the primary language you used to communicate with patients. If you did not communicate with patients, check the ‘I did not communicate directly with patients’ box. 4. Enter the Start date and End date of the clinical practice experience. If it is still taking place, check Ongoing. 5. Enter a short description of your clinical practice experience, if desired. Indicate if you practiced with a restricted licence. v 1.1 41 4.6.6-Fellowships Record any fellowships you have completed. Fellowships are non-accredited programs that are considered additional specialized training experience involving patient contact. Clinical Fellows must be able to provide evidence that they are recognized as specialists in the jurisdiction where they are currently practicing medicine. Training as a Clinical or Research Fellow in the Department of Medicine is not accredited nor is it approved as residency training towards certification by the Royal College. Fellowships tend to be more research-oriented. Fellowships (and Observerships) are not electives. To add multiple entries, click SAVE, then + Add record. 1 Note: If you have selected both English and French as your application languages, remember to enter all information twice (once in French and once in English) if you want this section to appear in both languages. 2 3 4 5 Figure 4.23 1. 2. v 1.1 Select the Discipline of your fellowship from the list in the dropdown menu. If the appropriate option does not appear in the list, select ‘Other’ and enter the name of the discipline. Enter the location (Country, City) where the fellowship took place. If desired, enter the Institution. 3. Enter the Supervisor name. If you no longer remember your supervisor’s name, write N/A and then explain the situation in the Description box. If desired, enter the Supervisor title and Supervisor institution. 4. Enter the Start date and End date of the fellowship. You will not be able to enter a date that is later then the present date. If the fellowship will end on a future date, mention it in the Description box. 5. Enter a short Description of your fellowship, if desired. 42 4.6.7- Publications/Presentations Record any presentations and/or publications. Once the information has been entered in this section, we recommend that you upload the corresponding abstract(s) in the Attach Document section. Posters may be included as supporting documents. Files should be smaller than 2MB and not exceed four pages. To add multiple entries, click SAVE, then + Add record. 1 2 3 Note: If you have selected both English and French as your application languages, remember to enter all information twice (once in French and once in English) if you want this section to appear in both languages. 4 5 Figure 4.24 1. Select the Publication type from the dropdown menu. If a specific publication/presentation type does not appear in the dropdown menu, select ‘Other’. Indicate whether the publication has been peer-reviewed. 2. Enter the full Title of the publication/presentation. 3. Enter the name(s) of the Authors of the publication/presentation. 4. Enter the name of the publication or the venue of the presentation. 5. Enter the Publication/Presentation date. If you choose to include the publication web link, please be advised that it may not be accessible by all programs and file reviewers. v 1.1 43 5-My Documents 5.1-Personal Letter Enter personal letters in this section. Please do not submit them as extra documents. Each program can have its own criteria regarding the content of personal letters. Please review program descriptions for more information (https://phx.e-carms.ca/ phoenix-web/pd/main?mitid=1161). To add multiple entries, click SAVE, then + Add record. Note: You may assign one personal letter to each of your programs. To determine the length of your letter, we suggest typing it into a Word document and pasting it into this section when complete. 1 2 3 Figure 5.1 1. Enter a Letter Title. The letter title will be used to identify the letter on your Document Tracking list. This title will not be visible to programs. 2. Write or copy/paste the letter into the text box. 3. Click SAVE once the letter is complete. Preview the letter by clicking the PREVIEW/PRINT button. You can modify a letter at any time before you assign it to a program. If you wish to make changes to a letter after you have assigned it to a program, you must unassign the letter, edit, SAVE, and re-assign it to the program. v 1.1 44 5.2-Letters of Reference and Applicant Support Forms Request letters of reference or applicant support forms. Prior to sending out reference requests, consult the program descriptions posted on the CaRMS website (https://phx.e-carms.ca/ phoenix-web/pd/main?mitid=1161) to determine each program’s reference letter requirements (i.e., number and type). To create a cover sheet for a letter of reference or an applicant support form, enter the referee’s information into the Letters of Reference section under MY DOCUMENTS. Save the information and finalize the cover sheet. Once finalized, the cover sheet can be sent to the referee by one of the two methods: Email: If you have included your referee’s email address, you will be able to click the SEND TO REFEREE button to send an email to your referee containing the cover sheet and instructions on how to submit a reference letter. Print: You may PRINT the cover sheet and provide a hardcopy to your referee. Instructions on how to submit a reference letter are found on the cover sheet. Note: a letter of reference cover sheet cannot be edited once it has been finalized. Steps to enter referee information: PART 1. PART 2. PART 3. Figure 5.2 Once the information has been saved, you will be given the option to FINALIZE. Once the document has been finalized the option to SEND TO REFEREE or PRINT COVER SHEET will be available. v 1.1 45 PART 1. 1 2 3 Figure 5.3 1. Select the Match Type from the drop down menu. 2. Select the Request Type: A Letter of reference is a letter written by your referee recommending you for a residency position. An Applicant Support Form is a checkbox evaluation form that may be requested by Québec programs. Please review the program descriptions for requirements and the form. The applicant support form is not sent automatically with the cover sheet; it must be sent separately. Select the Referee Type. Note: for the R-1 Match, select ‘Regular’. 3. PART 2. 1 2 3 4 Figure 5.4 1. Enter a Salutation for the referee. 2. Enter the First name and Last name of the referee. 3. Enter an Email address for your referee. This will allow you to send your reference request via your CaRMS Online account. 4. Enter the Street address, City and Country of the referee’s place of work. v 1.1 46 PART 3. 1 2 3 Figure 5.5 1. Enter the Requirement Type of your letter: A Specific letter is Intended for a specific program or discipline. If you select ‘Specific’, you must list the discipline for which the letter is intended. A Non specific letter is generic and suitable for any program. 2. Select the Language of Letter. Letters can be in either English or French. 3. Enter Request identification, if desired. It identifies to which program you plan to assign the letter. Letter of reference / Applicant Support Form Statuses Once your letter of reference or applicant support form has been requested, you can track its status on your Document Tracking page (see section 5.4). Reference letters will be listed with one of the following statuses: Submitted: The letter has been submitted online. Scanned: The letter was received by mail and the CaRMS Document Centre has scanned it into your account. Uploaded: The letter was sent to CaRMS for the referee via the transfer portal and the CaRMS Document Centre has uploaded the letter into your account. Created: The letter has been saved but not finalized. Printed: The cover sheet has been printed. Requested: You have sent a request (cover sheet) to your referee via email. Finalized: The cover page has been finalized but you have not sent it to your referee via email or printed the cover sheet. v 1.1 47 5.3-Attach Document Add documents to your application. In this section, you can: Upload PDF copies of your documents directly to your account. Create and print cover sheets for your documents. Flag a document for transfer from physiciansapply.ca (select documents only—medical school transcript, diploma, MCC exams). You can upload most of the documents required for your application. The only documents you cannot upload are your MSPR, medical school transcript and letters of reference. You can upload certified copies of all other types of documents. Note: All documents sent by mail require a cover sheet. Note: CMGs do not require a cover sheet for their MSPR or medical school transcript. 1 2 3 4 Figure 5.6 1 Enter a Title for your document. This title will be used to identify the document on your Document Tracking page. 2. Select the Type and Sub Type for your document. These labels will be used by programs to identify your documents. 3. Indicate the Language of the document. All documents must be in either French or English. 4. Select the Attachment method: v 1.1 Upload File: You can upload the document directly to your account. Scan at CaRMS (coversheet): You can create a coversheet, print it and send the document to the CaRMS Document Centre. Transfer document from physicianspply.ca: You can request a transfer from physiciansapply.ca. To complete the transfer, enter your MCC Candidate code and authorize the transfer by checking the box. Click TRANSFER to authorize the transfer of the document from your physiciansapply.ca account to CaRMS. The transfer will be processed within 10-15 business days. Figure 5.7 48 5.4-Document Tracking Track your documents in your document data bank. If a document is in the Document Tracking section it means that an electronic entry has been created for it; however, this does not necessarily mean that the document has been added to your application. You can check the status of the document in the Status column. All documents in the Current Documents section are available for assignment to programs. If you decide to archive a document, select the document and click ARCHIVE. The document will be moved to the Archived Documents section. Once archived, a document cannot be assigned to programs. If you wish to assign an archived document, you must click the RESTORE button to return it to the Current Documents section (this option is not available yet). Certain types of documents cannot be viewed, but this does not mean they are not in your account. Documents that cannot be viewed include your MSPR and letters of reference, as these documents must remain confidential. Document Tracking glossary: 1 2 3 11 12 4 13 5 6 7 8 9 10 15 Figure 5.8 1. 2. Documents found in the Current documents tab are active and can be assigned to programs. Place documents in the Archived Documents section when you no longer wish to use them. To archive a document in the Current Documents section, select the document and click ARCHIVE. Note: Archived documents cannot be assigned to programs. v 1.1 49 14 15 Figure 5.9 3. The document Type is used to identify your documents once file review begins. 4. Document is the subtype of your document. This field is not visible to programs. 5. The Title is not visible to programs. 6. The document ID is for identification purposes only. You can use the ID to find a document in Document tracking when you have several documents with the same Type and Title. 7. The Language of the document. 8. The Status of the document indicates whether it is present in your account. Options include: Submitted: A document has been submitted online. Scanned: A document received by mail and the CaRMS Document Centre has scanned it into your account. Uploaded: A document was uploaded to your account. Created: A reference request (cover sheet) has been saved but not finalized. Printed: A cover sheet has been printed. Requested: You have sent a reference request (cover sheet) to a referee. Finalized: A cover page has been finalized but you have not sent it to your referee via email or printed the cover sheet. 9. The Date indicates the date the document was last modified. 10. Click VIEW to see a document. This is a clear indicator that the document is in your account. Only MSPRs and letters of reference cannot be viewed. v 1.1 50 11. The EDIT button allows you to replace an existing document with a new uploaded file. The Title, Type and Language can be modified. Please note that you are not able to edit finalized reference requests. Figure 5.10 12. You can select a document and click PRINT COVER SHEET as many times as you wish. 13. Selecting a document and clicking ARCHIVE will automatically transfer that document to the Archived Documents tab. 14. You can restore a document that has been archived by clicking RESTORE. 15. You may permanently delete documents from your Document Tracking by clicking DELETE. Document deletion rules: Slots that do not contain a document can be deleted. Please note that there may be some exceptions to this rule; Certain document types cannot be deleted (when a document is stored in a slot): MSPR, Letter or References and Applicant Support Form, Assessments, Examinations and Medical School Transcript. Please note that there may be some exceptions to this rule; You are unable to delete documents being transferred by a third party (eg. Physiciansapply.ca, universities, referee…). Documents or document slots that are part of a translation request cannot be deleted; Documents or document slots that are assigned to a program cannot be deleted. Keep in mind that deletion rules may change over time. v 1.1 51 5.5-Translation Request Submit select documents for translation through CaRMS’ translation service. Only reference letters, MSPRs and medical school transcripts can be translated by CaRMS. Translation is only available from French to English or English to French. Please note that fees apply. 1 Figure 5.11 1. Once you have selected a document click SUBMIT FOR TRANSLATION to continue. 1 Figure 5.12 1. Review your selection and click CONFIRM to proceed with the request for translation. v 1.1 52 6-My Application 6.1-Declaration Complete the Declaration page. This section is mandatory to apply to programs. 1 2 3 4 Figure 6.1 1. If you have selected both English and French as your application languages, remember to enter all information twice (once in French and once in English) if you want this section to appear in both languages. 2. Read the information and check to acknowledge you have read the provincial licensing requirements. 3. Answer the questions by selecting YES or NO. 4. Read the information and check « I Agree » to proceed to program selection. v 1.1 53 6.2-Applications to Programs 6.2.1-Program Selection Select the programs you wish to apply to. 1 3 2 4 Figure 6.2 1. Indicate whether you are participating in the NRMP match. Click EDIT. Select YES or NO. If yes, provide your AAMC ID and NRMP ID. Click CONFIRM to continue. Figure 6.3 2. If you have not completed all mandatory sections in your application or if your Declaration has not been filled, you cannot select programs. A red notice bar will indicate any incomplete sections. 3. Click View « My Information » Summary to view a summary of your information. 4. Click on Select Programs to proceed to program selection. v 1.1 54 1 Figure 6.4 1. Click on Add Programs to add a program. Search for programs and add them to your list. 2 3 Figure 6.5 2. Search by School or Discipline. Note: You cannot search by school and program at the same time. 3. Select a school or discipline and click SEARCH to continue. 4 Figure 6.6 4. Click on the program to add it to your list. v 1.1 55 5 6 Figure 6.7 5. Remove a program from your list by clicking on the trash can icon on the right. 6. Click APPLY to apply to programs. The program will be added to the list of programs you have applied to. Applying to a program does not mean the program can see your application. You must submit your application to the program. Applications are only viewable to programs when file review opens on November 25th. Note: Four programs are included in your registration fee. You will be charged $28.50 + applicable taxes for each additional program to which you apply. If you withdraw your application from a program, you will be given a “credit” towards an alternative program selection. Note that this is not a refund and will not appear in your payment history. Figure 6.8 v 1.1 56 6.2.2-Document Assignment Assign documents to your application. You can modify your application until November 22 nd. You can assign and withdraw documents at any time before November 22nd. After file review begins (November 25th), you cannot withdraw documents submitted to programs. You may continue to assign documents to programs after file review begins; however all documents will be dated. 1 Figure 6.9 1. Three icons appear in the Actions column: Page icon allows you to assign documents to the program; Printer icon allows you to print your application; and Trash icon will allows you to withdraw your application to the program. Click on the page icon. 1 2 Figure 6.10 1. Indicate the Language of your application. The documents you assign to the program should reflect the language you have selected. 2. Click Assign documents to assign documents to the program. v 1.1 57 Review the list of documents you have in your Document Tracking section. Select the documents you wish to assign. Click on a document to automatically assign it to the program. Figure 6.11 1 2 3 Figure 6.12 1. Click on the trash icon on the right to delete the document. 2. Click on Preview my application to view your application. 3. Review your application and click on SUBMIT APPLICATION to submit. v 1.1 58 1 2 Figure 6.13 1. View the status of your application in the Status column. Note: Programs will only have access to your information when file review begins on November 25th. 2. Click on the trash icon to withdraw you application from a program once it has been submitted. Click on the page icon to add documents to your application. Note: After file review begins (November 25 th), you cannot withdraw documents submitted to programs. You may continue to assign documents to programs after file review begins; however all documents will be dated. v 1.1 59