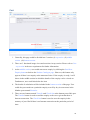
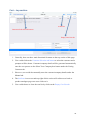
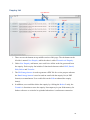
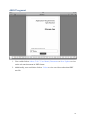
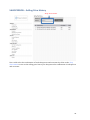
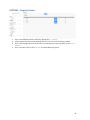
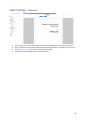
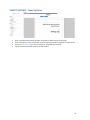
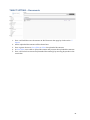
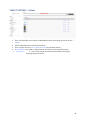
1
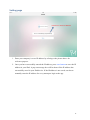
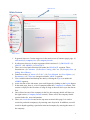
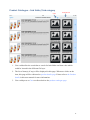
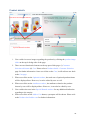
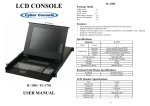
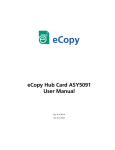
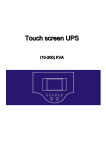
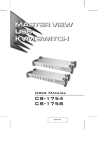
Tablet User Guide
DigiCat App
1/14/2015
1
Table of Contents
Audience ...................................................................................................................................................................... 3
Overview of the App................................................................................................................................................ 4
Signing In ..................................................................................................................................................................... 5
Setting page ................................................................................................................................................................ 6
Main Screen ................................................................................................................................................................ 7
Product Catalogue .................................................................................................................................................... 8
Product Catalogue – Sub folder/ Sub category ............................................................................................ 9
Product details ....................................................................................................................................................... 10
Product details – Customer Selection ........................................................................................................... 11
Product details – Add to Cart ........................................................................................................................... 12
Cart .............................................................................................................................................................................. 13
Cart – top section................................................................................................................................................... 14
Enquiry List ............................................................................................................................................................. 15
Selling Price History ............................................................................................................................................. 16
ABOUT segment ..................................................................................................................................................... 17
Sync ............................................................................................................................................................................. 18
LOGOUT segment .................................................................................................................................................. 19
2
Audience
This guide is intended only to those whom may concern.
3
Overview of the App
The app will be used by sales person who is generally involves in getting orders outside the
office. A sales person could process customer’s orders as soon as they are received. The
orders are uploaded to a Content Management System (CMS) directly via iPad.
4
Signing In
To launch the app, tap the application icon on home screen of your tablet device.
Setting button
1. Enter the ID anad password created by administrator to access to the main page by
clicking the Login button. However, before entering the ID and password, please
click on the setting button on the bottom-left edge of your iPad to enter the IP
address which corresponding to your company server IP address. Please refer to
setting page for further information.
2. Please press on the retrieve latest login text to get the latest login details from your
company’s server. Once it is done loading, you can enter your ID and password
now. This only could be done when you have entered your company’s server IP
address.
3. Please ensure that there is Internet connection to maintain a smooth conection
between this app and the server in order to retrieve the latest login details of user.
4. However, if it is not user’s first time login, user could just enter the ID and
password directly to go to the main page given that the user has already
downloaded the login details by clicking the the retrieve latest login text.
5
Setting page
Textbox to enter IP address
1. Enter your company’s server IP address by refering to the picture above for
reference purpose.
2. Once you have successfully entered the IP address, press save button to save the IP
address in your iPad. A pop out message box will be shown if the IP address has
succussfully saved in your iPad device. If the IP address is not saved, user has to
manually enter the IP address for every attempt to login to the app.
6
Search bar
Main Screen
Company details
Company list
Side menu
1. In general, there are 3 main categories in the main screen (Customer page) page: (i)
side menu (ii) company list (iii) company details.
2. In side menu, there are 4 major segments which consists of (i) iMANAGE (ii)
ABOUT (iii) ADMIN (iv) LOGOUT.
3. There are several main functions fall under the iMANAGE segment. These
functions are (i) Customer (ii) Product Catalog (iii) Cart (iv) Enquiry List (v)
Selling Price History.
4. Functions such as (i) About (ii) T & C (iii) User Manual (iv) New Update (v)
Documents (vi) Videos are categorized under ABOUT segment.
5. User could download and backup the data by clicking the Sync icon under the
ADMIN segment.
6. At the last line of the side menu, user could logout by clicking on the logout button.
7. In the main page, there is a list of company under the Company List section. This
section is empty for the first time of usage as long as the user don’t sync the data at
first.
8. Once clicked on one of the company in the list, the company details will show on
the right section ( Company Details section). Please scroll the company details
section further for more information.
9. There is a search bar located on the top most section in this page. It is used to
search for particular company(s) by entering some keywords. In addition, user uld
search in depth regarding a particular interested company by entering the name of
the company.
7
Product Catalogue
Cart icon
Search tab
Folder icon
1. All the products and items will be displayed here once the user has
downloaded/sync with the server to get the latest/updated version of products and
items list.
2. Each single image in this page represents a particular product or a particular item
which differentiated by the color tab below each image view. For yellow color tab,
the image represents a category whereas for blue color tab, the image represents a
product.
3. The folder icon only appears on the top-left edge of each image with yellow color
tab. By clicking the folder icon, it will redirect to its subseqent subfolder and
item(s). Please refer to Product Catalogue – Sub folder/ Sub category page in this
user manual for more information.
4. The search tab located at the top-right edge of the screen is for the purpose of filter
off any irrelevant product(s) / item(s) based on the keyword entered into the search
tab.
5. The blue color cart icon next to the search tab will redirect user to the Cart page if
user clicks on it.
8
Product Catalogue – Sub folder/ Sub category
Cart
Search bar
1. User could utilize the search bar to search for both folder and item value which
could be located in the different file layer.
2. The list of item(s) (if any) will be displayed in this page. When user clicks on the
item, this page will be redirected to product details page. Please refer to the Product
details in this user manual for more information.
3. User could press on Cart to redirect back to the product catalogue page.
9
Product details
Customer Selection tab button
cart
Optional textbox
Product image slider
Special Remark textbox
Attributes textbox
1. User could view more images regarding the products by clicking the product image
slider on the top-left edge side of the page.
2. There are two functional elements on the top part of this page: (i) Customer
Selection tab button (ii) Cart. Please refer to Product details- Customer Selection
page for further information. Once user clicks on the Cart, it will redirect user back
to the Cart page.
3. When user clicks on the Optional textbox, the total cost of optional products/items
will be displayed here. However, it can be edited by user as well.
4. When user clicks on the Attributes textbox, the attributes related to the product
chosen by user will be displayed here. However, it can also be edited by user.
5. User could write texts in the Special Remark textbox for any additional indication
regarding to the enquiry.
6. When user clicks on the Add to Cart button, a prompter will be shown. Please refer
to the Product detail-add to cart for further information.
10
Product details – Customer Selection
Listing Customer
tab button
Manual tab
button
Select Your Company Here
1. There are two functional tabs on top section of this prompter: (i) Listing Customer
(ii) Manul.
2. All the company/customer details will be automatically generated once user click
on Select Your Company Here.
3. However, user could also manually enter the company/customer details by clicking
on the Listing Customer tab button.
4. Once the information is ready, user could click on OK button to save the
information details and it will redirect user back to the Product details page for any
further action.
5. User could also clear the information by clicking the Clear button (only available
for manual tab button).
11
Product details – Add to Cart
+ and – buttons to adjust quantity
Buttons for discount
UOM
1. User could click on the + or – button to adjust the quantity required. The unit of
measurement (UOM) is set to UNIT by default.
2. All the price and discount details will be shown in this prompter.
3. However, user could also manually adjust the discount rate by selecting one of the
two buttons which located same row with the Discount textbox.
4. Once the information is ready, user could click on Add button to submit the enquiry
to the cart list.
12
Cart
Top section
Middle section
bottom section
1. Generally, this page could be divided into 3 section: (i) top section (ii) middle
section (iii) bottom section.
2. There are 3 functional image views and textviews in top section. Please refer to Cart
– top section in the user requirement for further information.
3. At the middle section, user could start a new enquiry by clicking the Start New
Enquiry button to back to the Product Catalogue page. However, this button only
appears if there is no enquiry at the moment of time. If the enquiry is ready, it will
shows in the middle section in which the details of the enquiry can be viewed on.
Furthermore, user could also delete the item
4. The details of calculation will be included in the bottom section of the page. User
could also put remark on a particular enquiry as well by key in some notes in the
blanket space named Remarks.
5. There are two buttons named Transfer and Check Out at the bottom part of this part.
The Transfer button is used to send the enquiry to the server given that there is
Internet connection. The Check Out button is used to save the enquiry in the
memory of your iPad if there is no Internet connection at the particular period of
time.
13
Cart – top section
briefcase
Customer Selection tab button
Empty Cart List tab
1. Generally, there are three main functional elements on the top section of this page.
2. User could click on the Customer Selection tab button to select the customer and a
prompter will be shown. Customer/company details will be generated automatically
once the user presses on the Select Your Company here button under the Listing
Customer tab.
3. However, user could also manually enter the customer/company details under the
Manual tab.
4. The briefcase icon on second top-right of this section will redirect user back to
product catalogue page once user clicks on it.
5. User could choose to clear the cart list by clicks on the Empty Cart List tab.
14
Enquiry List
Tab Buttons
Email
Enquiry list
PDF
Edit
Delete
Transfer
1. There are two tab buttons at top-middle section of this page. The tab button on the
left side is named New Enquiry while the other is called Transferred Enquiry.
2. Under New Enquiry tab button, user could view all the order list generated from
the enquiry. Each requiry list includes 5 functional elements called: PDF, Email,
Edit, Delete and Transfer.
3. The PDF image button is used to generate a PDF file for review purpose whereas
the Email image button is used to send an email with the enquiry list (in PDF
format) as an attachment. User could click on the Edit to admend the enquiry
item(s).
4. In addition, user could also delete the enquiry by clicking the Delete. Lastly, the
Transfer is functions to store the enquiry list temporary in your iPad memory for
further reference or waited to be uploaded when there is an Internet connection.
15
Selling Price History
Previous selling price history
Company list
1. There is a list of compay name on the left side of the page. Once user clicks on any
of these company name, the previos selling price history will be displayed on the
right side of the page.
2. In addition, user could also search for interested company by enter the company
name in the search bar.
16
ABOUT segment
1. User could click on About, T & C, User Manul, Documents or New Update to view
on the relevant document in PDF format.
2. Additionally, user could also click on Videos to view on videos rather than PDF
text file.
17
Sync
1. There are 5 categories in this page: (i) Update General Information (ii) Update
Customer List (iii) Update Product List (iv) Backup Last Selling Price (v) Restore
Last Selling Price.
2. In order, to update, backup or restore information, Internet connection is required.
3. These 5 categories could function independently. On the other hand, user could
update the category in which he/she thinks is necessary.
4. User could backup information by clicks on the Backup Last Selling Price and
restore the backup information by clicks on the Restore Last Selling Price.
5. The last sync and server last update date will be shown under every categories
except Restore Last Selling Price.
18
LOGOUT segment
1. User could logout this app by clicking on the Log out button and it will redirect
user back to the login page.
19
Tablet User Guide
DigiCat App
1/14/2015
20
Contents
Login ........................................................................................................................................................................... 21
Landing page ........................................................................................................................................................... 23
GENERAL- Product List ...................................................................................................................................... 23
GENERAL- Product List (cont.)........................................................................................................................ 24
GENERAL- Customer List ................................................................................................................................... 25
GENERAL- Product Import................................................................................................................................ 26
SALESPERSON – Enquiries................................................................................................................................ 27
SALESPERSON – Salesperson’s Customer .................................................................................................. 28
SALESPERSON – Selling Price History.......................................................................................................... 29
SETTING – Product Optional ............................................................................................................................ 30
SETTING – UOM ..................................................................................................................................................... 31
SETTING – User Control ..................................................................................................................................... 32
SETTING – Enquiry Status ................................................................................................................................. 33
TABLET SETTING – File Path Configuration.............................................................................................. 34
TABLET SETTING – About Us .......................................................................................................................... 35
TABLET SETTING – Terms & Conditions .................................................................................................... 36
TABLET SETTING – New Updates .................................................................................................................. 37
TABLET SETTING – User Guide....................................................................................................................... 38
TABLET SETTING – Documents ...................................................................................................................... 39
TABLET SETTING – Videos ............................................................................................................................... 40
SIGN OUT – Log out .............................................................................................................................................. 41
Login
Every user’s login page is the same.
21
Note: There is no registration page for this CMS as it has already been preset. This page is
best view in Internet Explorer version 10 and above.
Enter your username and password then click LOG IN.
22
Landing page
There is a welcome message on the right side of this page every time when user login.
One the left side of this page, there is a list functional pages. In general, these pages could be
categorized into 5 categories: (i) GENERAL (ii) SALESPERSON (iii) SETTING (IV) TABLET
SETTING (V) SIGN OUT
GENERAL- Product List
Page navigation
indicator
Search bar
Position buttons
Active button
View/Edit
1. User could click on the position buttons to re-arrange the sequence of each products.
2. By clicking the Active button, user could change the state of products from active to
inactive and vice versa.
3. User could click on the “+” button to add either category or product.
4. Besides, the Show Inactive Items button allows user to view on the inactive items.
5. The search bar at the top most part of this page is used to filter out any irrelevant
search result based on the keywords that user has entered into the search bar.
6. User could click on the View/Edit text to has a better insight regarding the product as
well as edit the information related to the products.
7. The page navigation indicator shows the current folder in which user navigating in.
23
GENERAL- Product List (cont.)
View text
Product information
1. After clicked on the View/Edit text, user will be redirected to this page where
the product infromation would be displayed here.
2. User could click on the View text to view the hierarchy of the folder.
Furthermore, user are allows to enter Category Name, Category Identifier as
well as upload image by clicks on the Upload button. All the changes could be
done when the Save Changes button is clicked.
24
GENERAL- Customer List
Active button
Edit text
1. All the customer details will be shown once the user clicks on the Customer List text
under the GENERAL category.
2. Besides, user could also set the status of customer by clicking on the Active button.
Additionally, if user wants to change/admend on customer’s details, he/she could
click on the Edit text next to Active button to do so.
3. The “+” button is functions as to add a new customer to the current customer list as
shown.
25
GENERAL- Product Import
Browse button
1. Click on the Download Template Excel File Here to download the sample Excel file for
reference as there are some formats required.
2. User should click on the Browse button to search for the intended Excel file to upload
to the server. Besides, user could as upload image file to the server as well. However,
there are two rules must be followed before images are successfully uploaded to the
server.
(i)
All the images must be allocated under a root folder in which doesn’t consists
of any other sub-folder.
(ii)
The folder contains images should be compress using .zip extension format.
3. After all the required information is ready, click on the save button.
26
SALESPERSON – Enquiries
Search function
1. All the information related to enquiries will be displayed in a list.
2. User could view in details/admend the information by clicks on the View/Edit text.
3. Moreover, user could utilize the search function to search for the interested enquiries
based on year, month, day or salesperson.
27
SALESPERSON – Salesperson’s Customer
Drop down menu
User could press on the drop down menu to select a salesperson to view on their customer list.
28
SALESPERSON – Selling Price History
Drop down menu
User could select the combination of both salesperson and customer by clicks on the drop
down menu to view on the selling price history for that particular combination of salesperson
and customer.
29
SETTING – Product Optional
Search bar
1. All the product optional list will be displayed in a list once the user has clicked on the
Product Optional.
2. Similar to other page, this page also included the Active button and View/Edit text for
user to click on. The Active button is used to set the status of product optional from
active to inactive and vice versa.
3. User could change the information about the product optional by clicking on the
View/Edit text.
4. The search bar on top is functions as to get the product optional which is
interested/intended by the user based on the keywords entered.
5. User could also add product optional by click on the “+” button.
30
SETTING – UOM
Active
button
Edit text
1. A list of unit of measurement (UOM) will be displayed once user clicks on the UOM
text.
2. The UOM in the list could be set to Inactive by clicking the Active and vice versa.
3. Click on the Edit text to admend the information about the relevant UOM.
4. Besides, user could also manually adding in UOM by click on the “+” button.
5. The search bar on top is functions as to get the UOM which is interested/intended by
the user based on the keywords entered.
31
SETTING – User Control
1.
2.
3.
4.
All users’ information regardless will be displayed in this page.
User could click on the View/Edit text to admend every individual information.
User’s information could be deleted by clicks on the Delete button.
User could add in new user by click on the “+” button.
32
SETTING – Enquiry Status
1. User could manually insert status by clicking the “+” button.
2. All the inserted status will be displayed here once user click on Enquiry Status.
3. User could change the activation status of each enquiry status by clicks on the Active
button.
4. User could also click on the Edit text for admendment purpose.
33
TABLET SETTING – File Path Configuration
Browse button
1. User could customize his/her company’s header, footer or logo by clicking the Browse
button.
2. The header, footer and logo will automatically appended to the enquiry document in
the app.
3. Furthermore, user could insert color code and currency as well. The title bar in the
app will change according to the color code inserted.
4. Press on the Save Changes button to ensure all the changes made are effective for
future usage.
5. All the latest update will be displayed on the top most section of the page.
34
TABLET SETTING – About Us
1.
2.
3.
4.
In this page, user could upload the document regarding his/her company’s profile.
User could preview the entire PDF document before decide to upload it to the server.
Press on Save button once the document is uploaded.
The document uploaded must be in PDF format.
35
TABLET SETTING – Terms & Conditions
1.
2.
3.
4.
User could upload the terms & conditions document in PDF format in this page.
User could preview the entire PDF document before decide to upload it to the server.
Press on Save button once the document is uploaded successfully.
The document uploaded must be in PDF format.
36
TABLET SETTING – New Updates
1.
2.
3.
4.
User could upload the New Updates document in PDF format in this page.
User could preview the entire PDF document before decide to upload it to the server.
Press on Save button once the document is uploaded successfully.
The document uploaded must be in PDF format.
37
TABLET SETTING – User Guide
1.
2.
3.
4.
User could upload the User Guide document in PDF format in this page.
User could preview the entire PDF document before decide to upload it to the server.
Press on Save button once the document is uploaded successfully.
The document uploaded must be in PDF format.
38
TABLET SETTING – Documents
1. User could add the extra documents in PDF format in this page by clicks on the “+”
button.
2. All the uploaded documents will be shown here.
3. User is given choices to View/Edit or delete the uploaded documents.
4. In View/Edit, user could re-upload document and preview the uploaded documents.
5. User could search on interested/intended document(s) by entering keywords in the
search bar.
39
TABLET SETTING – Videos
Search bar
1. User could add the extra videos in MP4/MOV format in this page by clicks on the “+”
button.
2. All the uploaded videos will be shown here.
3. User is given choices to View/Edit or delete the uploaded videos.
4. In View/Edit, user could re-upload videos and preview the uploaded videos.
5. User could search on interested/intended videos(s) by
1. search bar
entering keywords in the .
40
SIGN OUT – Log out
Once user clicks on the log out, it will be redirected back to the login back.
iManage Distributor Singapore
Square Fresco Solutions Pte Ltd ( http://www.squarefresco.com ) is one of the well-known
mobile application developer in Singapore and Square Fresco is our main distributor in
Singapore
iManage Distributor Singapore
Tiseno Integrated Solutions Sdn. Bhd. ( http://www.tiseno.com ) is one of the top mobile
application developer in Malaysia and Tiseno is our main distributor in Singapore
41