1
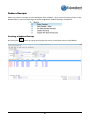
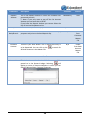
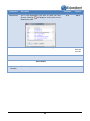
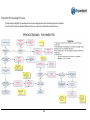
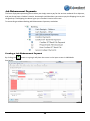
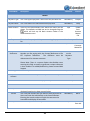
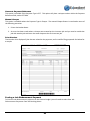
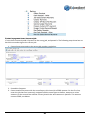
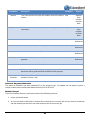
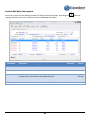
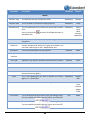
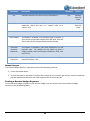
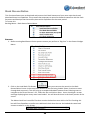
Volume 5 Expedient User Manual – Banking Module Gavin Millman & Associates (Aust) Pty Ltd 281 Buckley Street Essendon VIC 3040 Phone 03 9331 3944 • Web www.expedientsoftware.com.au Table of Contents Cash Receipt Process .....................................................................................................................................................3 Cash Receipt Scenarios ...................................................................................................................................................... 3 Debtors Receipts ................................................................................................................................................................ 5 Creating a Debtors Receipt ............................................................................................................................................. 5 Posting a Debtors Receipt .............................................................................................................................................. 8 Print a Bank Deposit Slip ................................................................................................................................................ 9 Reinstate a Cash Receipt – Debtors.............................................................................................................................. 10 Cash Receipts - Other ....................................................................................................................................................... 11 Creating a Cash Receipt – Other ................................................................................................................................... 11 Posting a Cash Receipt – Other .................................................................................................................................... 14 Payment Processing Process ........................................................................................................................................15 Job Disbursement Payments ............................................................................................................................................ 16 Creating a Job Disbursement Payment ........................................................................................................................ 16 Print Cheque ................................................................................................................................................................. 19 Generate Payment Reference ...................................................................................................................................... 20 Manual Cheque ............................................................................................................................................................ 20 Print Voucher................................................................................................................................................................ 20 Posting a Job Disbursement Payment .......................................................................................................................... 20 Posted a payment to an incorrect job .............................................................................................................................. 21 Creditor Payments ........................................................................................................................................................... 23 Creating Creditor Payments ......................................................................................................................................... 23 Generate Payment Reference ...................................................................................................................................... 25 Manual Cheque ............................................................................................................................................................ 25 Posting a Creditor Payment .......................................................................................................................................... 26 Creditor EFT Bank File Payment (AU only) ....................................................................................................................... 26 Creditor EFT Bank File Payment ................................................................................................................................... 27 Print Remittance ....................................................................................................................................................... 29 Prepare Bank File Download ........................................................................................................................................ 29 Post Creditor EFT Bank File ........................................................................................................................................... 30 General Ledger Payments ................................................................................................................................................ 31 Creating a General Ledger Payment ............................................................................................................................ 31 Manual Cheque ............................................................................................................................................................ 33 Posting a General Ledger Payment .............................................................................................................................. 33 Loading Customs EFT File................................................................................................................................................. 34 Prepare Customs EFT Payment ........................................................................................................................................ 34 Foreign Contra Payment/Receipt .................................................................................................................................36 EFT Payment .................................................................................................................................................................... 37 Bank Reconciliation .....................................................................................................................................................38 Process: ............................................................................................................................................................................ 38 Reconciliation (Tagging) Rules: ..................................................................................................................................... 42 Create Clean Up Record ............................................................................................................................................... 43 Bank Reconciliation Questions/Issues: ......................................................................................................................... 43 General Banking FAQ’s ................................................................................................................................................44 BANKING INTRODUCTION E Xpedient software contains the Banking Module. The Banking Function allows users to physically pay Creditors, and process Cash Receipts and Direct Cheques from Debtors. Cash Receipt Process The below diagram highlights the possible scenarios for processing Debtors Payments within the Expedient System. The Debtors and Banking Functions are used to perform these operations. Note: The red Text boxes are Expedient Menu items that you need to use to perform the various functions. Cash Receipt Scenarios 1. Customer Pays a Disbursement Invoice in Full. Can either a Local Currency or Foreign Currency. 2. Customer Part Pays an Invoice - Part Pay $50 for $100 invoice – Invoice will remain “open” 3. Customer Over Pays an Invoice - Mark $110 against $100 invoice (over pay $110) then on statement it read $10 overpaid on invoice) 4. Banking a Cheque without a Debtors Invoice being raised - Add cash receipt for chq amount with no invoice – money goes to On Acct. 5. You are Banking a Cheque without knowing what invoice the customer is paying - Add cash receipt for chq amount with no invoice – money goes to On Acct. 6. Customer Payed Invoice 2nd Time - Reinstate invoice (comes up with nil balance then enter 2nd amount. They are now in credit for that invoice) OR Put debtor amount on account (lose ability to break down Nil Cash Receipt * When you have invoice for $100 and credit note for $100 – want to cancel the two out OR * Invoice for $100 and on acct amount credit $100 3 4 Debtors Receipts When you receive a cheque or bank statement from a Debtor - (as a result of invoicing them via the Debtors Menu), you will need to go to the Banking Menu, Debtors Receipts. See Below: Creating a Debtors Receipt By clicking the button or typing A will place the cursor in the input screen in Add Mode. 5 Field Name Description Validation Default Mandatory Today Header Date Invoice Type Client Deposit Reference Deposit Amount Details Pay All Invoices? This is the date of the Cash Receipt This drop down box allows you to filter the invoices Optional that appear in the detail lines for invoice types of Disbursements, Finals or All This is the Customer Code in which you are adding Mandatory the Cash Receipt for Enter the Reference Number in which the customer Mandatory has presented you with Alphanumeric Blank CASH This is the Deposit Amount in which the customer has presented you with Note: If you only want to pay off the On Account Amount you can leave this as $0.00 If you leave the Cheque Amount you cannot Select the Pay all Invoices Dropdown to Yes. Enter the description of the payment received Mandatory 0.00 Optional Blank This allows you to pay all of the invoices for the Cheque Amount you have entered. For example if you enter a Cheque amount of $ 10,451.43 and you have 10 invoices to pay, selecting the Pay All Invoices to Yes will automatically pay the oldest invoices that total to that amount. If 2 of the oldest invoices happen to be that exact amount then the system will auto pay those 2 invoices. Selecting No will not perform any function, and will allow you to select the payment method in the detail lines. Optional No N/A On Acct Amount N/A Account Balance – On Acct Amount N/A Pulled from Customer Master File Note: The cheque amount must be greater than zero to select Y to Pay all invoices. On Account This is the amount in which the customer has On Account. i.e.: the amount of money in which we owe him. Display Purposes only Account Balance This is the amount in which the customer owes us, minus the On Account Amount. Customer Bank Branch All These are the bank details which are pulled from the Customers Master File. This is for display purposes and print on the bank deposit slip 6 Field Name Description Validation Default Our Bank Account This is the bank account in which you are paying the N/A Pulled from Bank Account Masterfile N/A Null N/A Defaults from Customer money into. You can click on the all Bank Accounts in the Master File to search for Detail Payment Method This allows users to either Part Pay the Invoice or Full Pay the Invoice. Selecting Full Payment will subtract the full invoice amount from the Cheque Amount entered above. Part Payment allows you to pay an invoice for which the customer has not sent you the full invoice amount and wishes to part pay the invoice. When selecting Part Payment, hit tab and the following box appears: Enter the amount you wish to pay off for the invoice. Exception Scenarios: If a customer has paid this invoice already then you be sure to go to Debtors – Reinstate Cash Receipts First. Once you have performed that, the invoice will appear in this screen as 0 balance, enter the duplicate amount. The customer will then be in credit for that invoice. If you have accidentally paid this invoice (i.e. doesn’t appear in this screen) then be sure to go to Debtors – Reinstate Cash Receipts First. Once you have performed that, the invoice will appear as already paid in this screen, put a minus amount in the amount column that matches the amount already accidently paid. Once posted this will re-adjust to customer has not paid invoice. Inv Type This is the Type of Invoice Disbursement or Final 7 Field Name Description Validation Default Invoice No This is invoice number for the client that has yet to be paid N/A Defaults from Customer This is the job number related to the invoice N/A Defaults from the Customer This is when the invoice was created N/A Defaults from Invoice Balance This is the amount still owing on the invoice N/A Defaults from Invoice Applied This is the amount you have applied during this transaction This is the unique reference number given when the original invoice was created N/A Null N/A Defaults from Invoice Pressing this button will show you the invoice in which you have highlighted and the breakdown of charges on the original Debtors Invoice. N/A Defaults from Invoice Job No Invoice Date Doc. No Show Cost Code Details Action Buttons Post Cash Receipt This button posts the current record. Posting a Debtors Receipt To Post the Cash Receipt to the General Ledger you will need to select Post Debtor Receipts from the Banking Menu. 8 When you enter in to the Posting Function you will be presented with the following screen: Print a Bank Deposit Slip Once the Cash Receipts have been posted then it is possible to print a Bank Deposit Slip to take to the bank. The below screen allows users to print the Deposits based on particular deposit dates. Once users have printed the Bank Deposit Slip for a certain day, users are able to clear this Deposit so others cannot reprint this. 9 Reinstate a Cash Receipt – Debtors Reinstating Cash Receipts is utilised under the following scenarios: 1. If you have accidentally paid an invoice for a client: You can perform this by going in to Banking Menu – Cash Receipts Debtors. Enter the same amount that was paid but as a negative amount. 2. If customer paid twice - You can perform this by going in to Banking Menu – Cash Receipts Debtors. Enter the same amount that was paid with a positive amount. The customer is now in credit. 3. If a cheque has bounced This option cannot be used with foreign currency invoices. 10 Cash Receipts - Other When you receive money from a non – invoice form (i.e.: rent, bank interest), you will need to go to the Banking Menu, Cash Receipts – Other. See Below: Creating a Cash Receipt – Other By clicking the Field Name button or typing A will place the cursor in the input screen in Add Mode. Description Validation Default Mandatory Today Header Date This is the date of the Cash Receipt Client This is the Customer Code in which you are adding the Mandatory Cash Receipt for Enter the Reference Number in which the customer has Mandatory presented you with Alphanumeric Deposit Reference 11 Blank CASH Field Name Description Validation Default Mandatory 0.00 Description This is the Deposit Amount in which the customer has presented you with Note: If you only want to pay off the On Account Amount you can leave this as $0.00 If you leave the Deposit Amount you cannot Select the Pay all Invoices Dropdown to Yes. Enter the description of the payment received Optional Blank Client Bank/Branch These are the customers’ bank details. This is for display purposes and print on the bank deposit slip. N/A Pulled from Customer Master File Our Bank Account These are your bank details. This is where the money is N/A Pulled from Bank Account Master File Deposit Amount to be deposited. You can click on the all Bank Accounts in the Master File to search for Detail Account No This is the Account Number in which the money will be posted to in the General Ledger. Selecting will display a screen of Account Numbers in which you can filter by Balance Sheet / Income / Expenses. 12 Field Name Description Department Description Amount Validation Default This is the Department you wish to place the Cash Receipt. Selecting will display a screen with a list of department code. N/A Blank This is the description of the Account No Charge N/A Defaults from the Acct No This is the amount you wish to post to the Cash Receipt N/A Blank Action Button Post Cash Receipts This button only posts the current record. 13 Posting a Cash Receipt – Other To Post the Cash Receipt to the General Ledger you will need to select Post Cash Receipts – Other from the Banking Menu. When you enter in to the Posting Function you will be presented with the following screen: 14 Payment Processing Process The below diagram highlights the possible scenarios for processing payments within the Banking function in Expedient. Note: The red Text boxes are Expedient Menu items that you need to use to perform the various functions. 15 Job Disbursement Payments This form of payment processing occurs when you simply want to pay for the services rendered for a shipment, and you do not have a Creditor’s Invoice. An example could be where you want to pay the Shipping Line to pick the goods up. The Shipping Line doesn’t give you a Creditor’s Invoice in this case. To access this go to Menu Banking Job Disbursement Payments, see below: Creating a Job Disbursement Payment By clicking the See below: button or typing A will place the cursor in the input screen in Add Mode. 16 Field Name Description Validation Default Header Payment Type This is the type of payment. Select from the pull down list. Mandatory Cheque Payment Date This is the date of the Job Disbursement payment Mandatory Today Bank Account These are the bank details from which the money will be drawn. This defaults to 1000, but can be changed using the which will look up the Bank Account Codes in the Administration menu N/A Pulled from Customs Master File Payee This is the Company in which you are creating the payment for This is the Payee’s ABN Mandatory Blank Optional From Customer Masterfile ABN Payment Reference Line Type Enter the Payment Reference. This may be the Cheque Conditional Number you are paying with, the Compay Reference or the on the EFT Payment Reference. The reference must be Payment alphanumeric for cheque payments Type Please Note: There is a system Option that disables users entering this field, an option to generate a unique reference is then enabled. To enable/disable this, please contact GMA Support Indicates if you want to Include or Exclude the GST Amount Blank Optional Blank Payment Amount This is the Amount that you wish to present to the Payee. Mandatory Blank Confirm This must be set to Yes for the payment to post Mandatory N N/A Blank Mandatory Blank N/A Defaults from Job Detail C/H Job No Dept Consol or Job Number. This is a no entry field and is displayed based on the data entered below This is the job number that you want to make payment for. Users can enter the Job Number or the Consol Number. Entering the consol number will split the costs over the house bills and display all house bills This is the Department of the job number 17 Field Name Validation Default This is the customer code for the job number N/A Defaults from the Job Enter the cost code the payment is for. Use the to zoom on all Cost Codes. When the cursor is in the Cost Code field, you have the ability to click on the Show Cost Code Details which then show all of the Costs associated with the Job. N/A Blank Account No This is the account no relating to the Cost Code. N/A Defaults from the Cost Code Description This is the description of the Cost N/A Defaults from the Cost Code Exc Amount This is the Amount that you wish to pay, excluding the GST. This is accessible only when the Cheque Line Type is set to N/A Blank This is the Amount that you wish to pay, including the GST. This is accessible only when the Cheque Line Type is set to Inc. GST. N/A Blank This indicates whether GST is applied to the Cost Code. N/A Defaults from the Cost Code Client Cost Code Description Excl GST. Inc Amount GST 18 Print Cheque This button is available if the Payment Type is Cheque. If your site has the AUTO_CHQS System Option Set, then Expedient will automatically generate the cheque number and print to the dedicated Cheque printer based on the user’s branch. This is set up in Menu, Administration – Company Details – Auto Cheque Number Sequence. See below screen shot. The Cheque Printer will be the name of the printer as it appears in the Operating system. Please contact the your IT Team, or GMA technical team for the name of the cheque printer. 19 Generate Payment Reference This option is available if the Payment Type is EFT. This option will place a unique number within the Payment Reference field, such as EFTJ164. Manual Cheque This option is available where the Payment Type is Cheque. The manual Cheque feature is used under some of the following scenarios: 1. Printer has broken down 2. An error has been made where a cheque was created on the incorrect job and you need to credit that job with another job and enter the same cheque as the first incorrect job. Print Voucher The Voucher Print displays all jobs that are related to the payment, and is used for filing purposed. See below for a sample: Posting a Job Disbursement Payment To Post the Job Disbursement payment to the General Ledger you will need to select Post Job Disbursement Payments from the Banking Menu. 20 Posted a payment to an incorrect job If users have incorrectly add a Payment to the wrong job, and posted it. The following steps show how to back this out and assign to the correct job: 1. Created a payment against the wrong job number, see below: 2. Posted the Payment 3. Create another Payment with the same Payee, this time with a ZERO amount. On the first line, enter the job that was incorrectly assigned with the same figure as before, except as a minus amount. On the second line add the correct job with the same amount in positive. This amount come to ZERO, see below: 21 4. Manual Payment – Enter the same Payment Reference number as the previous incorrect Payment. 5. POST 22 Creditor Payments This form of payment processing occurs when you want to process a payment from a Creditor’s Invoice. This will be used for the majority of Payment processing. To access this go to Menu Banking Creditor Payments, see below: Creating Creditor Payments By clicking the button or typing A will place the cursor in the input screen in Add Mode. 23 Field Name Description Validation Default This is the type of payment. Select from the pull down list Mandatory Cheque This is the date of the payment to the Creditor Mandatory Today Header Payment Type Date For Due Date Creditor Bank Account Payment Reference This date is used to search for the system for any Creditors N/A Invoice for that Creditor that is due based on that date and earlier. Today + 120 days This is the creditor for which you are processing the Mandatory Blank payment These are your bank details. This is where the money is to be N/A Pulled from Bank deposited. You can click on the to search for all Bank Account Accounts in the Master File Master File Enter the Reference for the payment you are creating to the Conditional Creditor. This may be the Cheque number, a Compay on the reference or an EFT Payment reference. Alphanumeric only. Payment Type Blank Pay All Invoices Indicates whether you wish to pay all of the invoices for the Optional Blank Creditor in this transaction. This will apply the full amount against the invoice Please Note: The system does not allow for monies to be stored on account against a Creditor. If an invoice is overpaid/underpaid the amount will be accrued against the invoice number. Detail Pay Method Inovice No Invoice Date This allows users to select if they wish to pay the invoice off Optional in Full or in Part. The Part Payment option will allow users to input the amount to be applied with the applied column. This is the Creditors invoice number that is due within the N/A Due Date period This is the Creditors invoice creation date that is due within N/A the Due Date period 24 Blank Defaults from Creditor and Due Date Defaults from Creditor and Due Date Field Name Description Validation Default Balance This is the amount left to pay the creditor from the Creditors N/A Invoice Defaults from Creditor and Due Date Applied This is the amount in which you wish to pay off in this N/A transaction Defaults from Creditor and Due Date Doc No This the reference for the payment in Expedient N/A System Generated Entered By This indicates who created the Payment N/A System Generated Entered On This indicates when the Payment was created N/A System Generated This is the Total Amount to be paid to the Creditor in this N/A payment System Generated Total Applied Action Buttons Send Remittance This button is available for all payment types. A remittance document will be produced with the details of the payment. Post Creditor Payments This button will be enabled and the current record will be posted if Confirm = YES. Generate Payment Reference This option is available if you have selected EFT as the payment type. On Update use this option to place a unique number within the Payment Reference field, such as EFTC111. Manual Cheque The manual Cheque feature is used under some of the following scenarios: 1. Printer has broken down 2. An error has been made where a cheque was created on the incorrect job and you need to credit that job with another job and enter the same cheque as the first incorrect job. 25 Posting a Creditor Payment To Post Creditor Payments to the General Ledger you will need to select Post Creditor Payments from the Banking Menu. Creditor EFT Bank File Payment (AU only) This menu provides the ability to set up EFT payments to a number of Creditors and then create a file which can be uploaded to your bank to process the payments 26 Creditor EFT Bank File Payment Access this screen from the Banking>Creditor EFT Bank File Payment folder. By clicking the typing A will place the cursor in the input screen in Add Mode. See below: Field Name Description button or Validation Default Mandatory Today Header Date For Due Date Creditor This is the date of the EFT payment to the Creditor This date is used to search for the system for any Invoice for that N/A Creditor that is due based on that date and earlier. This is the creditor for which you are processing the payment 27 Mandatory Today + 120 days Blank Field Name Bank Account Description Validation Default These are your bank details. This is where the money is to be Mandatory Pulled from Bank deposited. You can click on the to search for all Bank Accounts Account in the Master File. Expedient will check that the ABA Bank Code and Master APCA Number are entered in the Bank Account Details. File The file containing the EFT payments cannot be generated without these details. PLEASE NOTE the Bank Account name must exactly match the Bank Account name held by the Bank Automatic Pay Select from the pull down list to set all invoices listed to be paid in Optional full in one action EFT Payment Enter the EFT Payment Reference for the payment you are Optional Reference creating to the Creditor. On UPDATE in this screen the option ‘Generate Payment Reference’ can be used to insert an automatic payment reference. OK to Post? This indicates if the payment is ready to be posted. Mandatory No Blank No Please Note: The system does not allow for monies to be stored on account against a Creditor. If an invoice is overpaid/underpaid the amount will be accrued against the invoice number. Detail Pay Method This allows users to select if they wish to pay the invoice off in Full or in Part. The Part Payment option will allow users to input the amount to be applied with the applied column. 28 Optional Blank Field Name Description Validation Default Inovice No This is the Creditors invoice number that is due within the Due N/A Date period Defaults from Creditor and Due Date Invoice Date This is the Creditors invoice creation date that is due within the N/A Due Date period Defaults from Creditor and Due Date Balance This is the amount left to pay the creditor from the Creditors N/A Invoice Defaults from Creditor and Due Date Applied This is the amount in which you wish to pay off in this transaction N/A Defaults from Creditor and Due Date Doc No This the reference for the payment in Expedient N/A System Generated Entered By This indicates who created the Payment N/A System Generated Entered On This indicates when the Payment was created N/A System Generated EFT Amount This is the Total Amount to be paid to the Creditor in this EFT N/A payment System Generated PRINT REMITTANCE This button will create a remittance document showing the details of the payment. Prepare Bank File Download This option from the Creditor EFT Bank File Payment folder will prepare a bank file of the EFT Payments which will be emailed to a user and then uploaded to the bank. 29 The option opens a screen to input the bank account the EFT payments are to be made from and asks the user to assign and EFT Payment Reference. The users email address will automatically populate this screen but it can be updated to a preferred email address. This email will contain the Bank File for the EFT payments. Post Creditor EFT Bank File This option from the Creditor EFT Bank File Payment folder will post all EFT Bank File Payments where OK to Post? Is set to Yes in the Creditor EFT Bank File Payment screen. EFT Bank File Payments set to OK to Post will also be posted in the overnight Post process. Once posted the EFT Bank File Payment will be removed from the Creditor EFT Bank File Payment screen. 30 General Ledger Payments This form of payment processing occurs when you want to process a payment directly to the General Ledger. An example of this could be when you have taken Petty Cash out. To access this go to Menu Banking General Ledger Payments, see below: Creating a General Ledger Payment By clicking the button or typing A will place the cursor in the input screen in Add Mode. 31 Field Name Description Validation Default Header Payment Type This identifies the type of payment made Mandatory Cheque Payment Date This is the date of the General Ledger payment Mandatory Today Bank Account This is the Bank Account in which the money will be drawn Mandatory from. You can click on the the Master File Creditor to search for all Bank Accounts in Pulled from Bank Account Masterfile This is the creditor for which you are processing the Mandatory Cheque for This is the reference for the Payment. This may be the Conditional Cheque Number with which you paying the Creditor. You can enter CASH to pay in cash. Alphanumeric only. This is a brief description for the payment Optional Blank Payment Amount This is the amount you want to process Mandatory Blank Line Type Indicates if you want to Include or Exclude the GST Amount Optional Blank Confirm Yes Indicates this is OK to Post Optional Blank Payment Reference Description Blank Blank Detail G/L Code Dept This is the General Ledger Code in which you wish to Mandatory process the money against This is the Department you wish to process the money Mandatory against. i.e.: Head Office Blank Default 000 Description This is the Description of the General Ledger Code N/A Defaults from General Ledger Code Exc Amount This is the Amount that you wish to pay, excluding the GST. This is accessible only when the Line Type is set to Excl GST. N/A Blank Inc Amount This is the Amount that you wish to pay, including the GST. This is accessible only when the Line Type is set to Incl GST. N/A Blank 32 Field Name Description Validation Default GST Indicates where the line item has GST allocated to it. N/A Defaults from G/L Code C/O “Capital” Item / “Other”. This relates to your BAS statement, where the item is a “Capital” item or an “Other” item. N/A Defaults from G/L Code Action Buttons Print Cheque This button is available is the payment type is Cheque. If your site has pre-printed cheques from the bank, then this option will print the cheque details onto the cheque. Generate Payment Reference This option is available if you have selected EFT as the payment type. On Update use this option to place a unique number within the Payment Reference field, such as EFTC111. Post G/L Payments The button will be enabled and the current record will be posted if Confirm = YES. Manual Cheque The manual Cheque feature is used under some of the following scenarios: 1. Printer has broken down 2. An error has been made where a cheque was created on the incorrect job and you need to credit that job with another job and enter the same cheque as the first incorrect job. Posting a General Ledger Payment To Post General Ledger Payment to the General Ledger you will need to select Post General Ledger Payment from the Banking Menu. 33 Once you have posed the General Ledger Payment this will disappear from the General Ledger Payments Screen. Loading Customs EFT File Expedient allows users to load the EFT CSV file which is accessed via the ICS Customs Website. To do this, firstly download the CSV file, and save onto your local drive, either your desktop or your company shared drive. Then, from the Customs Clearance Menu, select Load EFT File. See below screen: Click on Browse to load the windows Open File Location Window. Select the CSV file, and then click Start Import. Prepare Customs EFT Payment NOTE: Duty and AQIS codes must be set up in General Ledger>Chart of Accounts to use this function. Once the Data is loaded from the Load EFT File Menu within the Customs Module, it is possible to then automatically add this data into the Disbursement Cheques screen in the Banking Module. To perform this, ensure the data is loaded as per Customs Module Manual, then in the Banking Menu, Click on Prepare Customs EFT Payment menu. Once this has been done, the below screen will appear. Ensure that the BSB and Account Number are yours and are correct: 34 Once this is loaded, then the data will appear in the below Job Disbursement Payment: 35 Foreign Contra Payment/Receipt This is used when you wish to process payments and receipts for the following scenarios: 1. Process Payments and Receipts for Overseas Agents 2. Process Payment from Debtors where they are paying in Foreign Currency for processing into the local currency bank account. 3. Function to take up ALL Debtors with the same Job number and same amount. 4. Function to take up ALL Creditors with the same Job number and same amount. “All Debtors Offset”: Retrieves ALL the Debtors Invoices (From the Enquiry Module) with the same Positive & Negative values for the same Job Number, which have been Posted and not Paid. NOTE: Please ensure that the Client Code DEBTOFFSET is setup in the Client Masterfile. “All Creditors Offset”: Retrieves ALL the Creditors Invoices (From the Enquiry Module) with the same Positive & Negative values for the same Job Number, which have been Posted and not Paid. NOTE: Please ensure that the Client Code CREDOFFSET is setup in the Client Masterfile. “Creditors On Compay”: Retrieves Posted Creditors Invoices (From the Enquiry Module) that have not been Paid, where the Payment Type = COMPAY. “Post Contra Payments / Receipts”: Posts the current record that is shown on the screen. This button will be enabled if ‘Confirm’ = YES. In ADD Mode, you can enter 1 Client Code in the Client field. If you need to include additional Clients then the user can select the “Enter Additional Client Codes” button. The following window will be shown, with Client Code that was entered in the Client field, showing on the first line. 36 The user can then proceed by adding multiple Client Codes to this window. NOTE: If multiple client codes have been added, the Print Menu of the Client Print Report will only show the Personnel details from the first client code that was entered in the Foreign Contra Payment / Receipts screen. EFT Payment If you are paying by EFT, or you require a unique number for later reference, then selecting EFT Payment simply places a unique number within the Cheque Number field, such as EFTF111. 37 Bank Reconciliation This function allows users to download and process their Bank Statements from most major banks and download them into Expedient. This process then attempts to reconcile the Bank statement with the Cash Payments and Receipts that have taken place within Expedient for the same period. To access this: Banking Menu – Bank Reconciliation Menu: Process: 1. Before starting Bank Reconciliation process ensure you perform a “Big Post” in the General Ledger Menu: 2. Click on the Load Bank File Button. Users must ensure the record on the Bank Reconciliation Screen is the same bank account to the file being loaded. (Next, Previous to move through bank accounts). This will bring up a standard Windows browse screen allowing users to navigate to the file on the user’s PC. Select the file and click on Open. Users should get a screen message displaying how many rows have loaded. You will also see them in the lower portion of the screen. The below check box is used for files that contain the bank account within the file. Checking this box will force Expedient to perform an additional check that the user has loaded the same back account to what is on the screen. 38 Expedient Software Supports: Please Note: ANZ Bank File Format - Expedient uses column 1 (transaction date), column 10 (amount) and column 11 (description). See below for file format: "17-Dec-2009","0123451234567","HFR","B","ABC SYDNEY ACCOU","AUD","","POSCR","POS2005201","1174.81","POS2005201 ANZ EFTPOS","17-Dec2010","3059%6016977351A238R2E","070","0000009010" 3. User must then check the Statement Balance in the File matches the “Statement Balance” field on the Screen 4. Users can now click on “Auto Rec Payments”. This will mark “Y” in the Tag field if the system finds a match. 5. Users can now click on “Auto Rec Receipts”. This will mark “Y” in the Tag field if the system finds a match. See below: 6. Once the above 2 processes have been performed, then proceed to Post the Bank Reconciliation. This is located on the Banking Menu Please Note: Users can now try to manually reconcile any untagged amounts by clicking on the zoom icon in the Tag field against each item. This zoom only shows transactions of the same type. For example, Debits if the statement amount is a Debit. If you need to cancel out multiple transactions against 1 bank statement amount you can select Zoom All at the bottom of the screen which will show all transactions regardless of debit or credit. 39 Locating Non-Matched Invoices (Optional) 7. The next step is to go back into the Bank Reconciliation Screen and select “Prepare Non-Matching Cash Receipts” Button. This extracts the unreconciled Bank Statement records for Receipts that weren’t matched during the Payments and Receipts process and adds that data to the holding screen for preparation of creating those as debtors cash receipts, see below. a. User then updates each line and enters the client code, they work this out by: i. Using the Search Invoice OR Customer Code Zoom Button at the bottom of the screen. The Search Invoice Button searches for any posted Invoices, allowing users to search for matches. AND/OR ii. Using the Query Posted Items Screen in the Bank Reconciliation Menu, using the Reference field to search for any customer that has a matching reference for instances where the customer has paid once for many invoices 40 8. Once the User has matched as many Debtors as they can, they hit the “Locate Invoice Matches” button. a. This button proceeds to search any invoice for that customer that matches the amount. If no match found then it will sum all of the invoices for that client and see if the amounts match (i.e.: 1 single payment from the customer) b. Once the locate has completed, the User then hits the “Create Cash Receipts” Button which will process those records as a Debtors Cash Receipts c. Once this has completed, the user then proceeds to Post the Debtors Cash Receipts in the Banking Menu d. The next step is to Auto Reconcile the Receipts again in the Bank Reconciliation Screen. e. The items that should be left are the unmatched Payments. The user needs to locate or create the Payment and then post the Payments as per the normal Payments Process in the Banking Menu b. The user then goes back into the Bank Reconciliation Screen and Selects Auto Reconcile Payments” again Final Checks -Ensure that the “Statement Balance” is the same as when loaded 41 Reconciliation (Tagging) Rules: 42 Create Clean Up Record Unreconciled items that appear in the “unreconciled report” can be removed using the Create Clean Up Record option from the Input Bank Reconciliation screen. On select of this option a pop up message will appear Selecting Yes will create a “Clean Up Date” line at the bottom of the reconciliation table. Select Update to enter the Tag column for this Clean Up Data row and use the following screen to log details of the clean up. On OK the unreconciled items will be removed from the Unreconciled report. Bank Reconciliation Questions/Issues: Q. How to reconcile two payments to one entry in system: A. Users need to make an entry for each entry that appears on the bank statement. Use the General Ledger Payments option to allocate to Contra / Suspense account. Q. I have performed the Bank Reconciliation; however there are amounts that do not balance? A. Ensure you have performed a Post Gen. Ledger all Months in the General Ledger Menu A. If you have performed a bank reconciliation with transactions in say, October, however the systems still thinks you are in September, then ensure you start a new period. 43 General Banking FAQ’s Q: A user has accidently paid off all three outstanding invoices for the same creditor instead of paying off just the one. The user has EFT’d payment for the 1 invoice only. What should I do now? A: Pay off the remaining amount of money either through EFT or Cheque. As the creditor now has been paid in full over 2 payments, the bank statement will now have 2 entries, however Expedient will only show 1 full payment. This is an issue for Bank Reconciliation. To fix this: 1. Banking/General Ledger Payments. 2. Add 2 payments under the GL Code of Contra, then minus the full amount paid as initially entered. 3. Then POST. The system will now show 2 payment entries which will match Bank Statement Q: I can’t delete a printed invoice A: Invoices cannot be deleted after they have been printed. To correct the printed invoice issue a Credit Note for the negative value of the invoice and journal off in Banking. Q: I overpaid the Creditor but entered and posted the correct amount in Expedient A: If this is an ongoing relationship with the Creditor you could add the extra amount to the General Ledger. 1. Put the negative amount in Contra 2. Add the additional Cheque amount for the overpayment using the original Cheque number Q: How to I write off bad debt but claim back the GST A: For example $20000 is to be written off with $2000 GST to be claimed back. Treat the $20000 as a bad debt so create a manual credit note for $20000 with GST = Yes. Q: I Printed the Bank Rec Report, how do I clear the In and Out entry out of the System? A: PICK any cheque or cash receipt you are reconciling manually. Instead of using the normal ZOOM to look up, choose the zoom on the last line of the screen then mark off the plusses and minus that agree. Q: How can I correct the date entered for a Cash Receipt? A: Enter a corresponding negative value for a cash receipt on the same date as the incorrect Cash Receipt. Then put a positive value cash receipt for the correct date. Q: Why is the Bank Reconciliation is out? A: a) A Journal may have been done instead of a Cheque b) Is the figure on the Bank Statement the same as on the Bank Reconciliation screen? If not was a day missed to download the statement? Are there a lot of cheques on the same day that are no presented? c) Was ‘Post General Ledger’ done first for all months before the Bank Reconciliation was done? If the Bank Reconciliation does not balance, i.e. the Statement Balance is not zero 1. Auto Reconcile Cheques 2. Manually Reconcile using Tag to find the value to set the difference to zero. Q: I did a Journal instead of a Cheque. How do I correct this? A: Go to G/L Cheques. Add a G/L Cheque to reverse the Journal amount on the suspense account. Then add a G/L Cheque for a negative amount. 44 Q: How can I re-open jobs incorrectly closed? A: Instead of using Job only Auto Profit, use Job Journal and using the same date as the original Journal. E.g. Job 1234567 1. DR 1234567 2300 VIS 100.00 2. CR 1234567 4300 VIS -100.00 Then reverse the amounts 1. CR 1234567 2300 VIS -100.00 2. CR 1234567 4300 VIS 100.00 Q. Client paid USD monies in advance. Have entered in system so it will appear as monies on account and I can deduct from up and coming shipments but will not accept. A: Expedient doesn't allow FXC monies to be stored on account. Main reason is that Expedient stores all monies in AUD and storing FXC $$ on account cause issues with correct money amount at time of Exchange rate. To get around this problem.... Create a job and charges for that customer for the same USD amount, and when it is ready to invoice you have this stored against the job and customer. 45