Download Measuring System QNix® 8500
Transcript
Non-destructive coating
thickness measurement
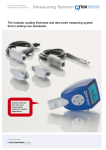
The modular coating thickness measuring system
that is setting new standards.
Coating thickness
measurement
probes for specific
applications
A quality product from
GmbH & Co. KG
QNix® 8500: The modular high precision
measuring system meeting highest demands.
Working closely with users from small
business, industry and services, we
developed the latest generation of the
modular gauge system QNix® 8500, one
of the best worldwide.
Simply place, measure and read.
Just as all the QNix® coating thickness
gauges, the modular QNix® 8500 system
too is an example of the extremely simple
yet safe operation allowing for rugged
and reliable everyday use for varying and
versatile applications.
Display
■ High resolution graphic display
■ All standard languages displayable
■ Back lit display
■ Flip-display by 180 degrees
Cross control key
■ Highly ergonomic keys
■ Simple menu navigation
■ 2 colour LEDs for displaying
measurements data transfer
and limit setting
Be it lacquer or corrosion protection on
metals, be it iron, aluminium, copper, zinc or
steel, simply changing the probes allows
for highly accurate non-descrutive measurements of non-magnetic layers on steel
and iron as well as all types of insolating
coatings on non-ferrous metals
As a pioneer of hand-held measuring
devices, our family business guarantees
our worldwide customers success using
our simply and safely operated innovative
products, systems and individual services
for the quality assurance of their coating
surface and restoration technology.
Values where the modular gauge system
QNix® 8500 is setting new standards.
Tell us your measuring problem and we show you a solution. As we develop our
gauges and measuring systems in cooperation with users around the world, we know
what “user-friendly” really means to our customers.
■
Simple, convenient, safe operation
No calibration*
■ Broad, versatile, individual range of application
■ Data storage and statistical analysis
■ Quality and accuracy during rugged long-term use
■
Germans finest.
We produce our gauges and systems using
modern facilities in Germany exclusively.
Many aspects of work are still done by
hand. We test our gauges with particular
care to ensure the best quality in their
worldwide application.
We also use high-quality materials such as
integrated rubies for our proven measuring
heads. Therefore, QNix® coating thickness
gauges have become a worldwide standard
of user-friendliness and excellent quality
“Made in Germany”.
Quality by excellence as proven by our
3 years warranty.
Documentation and statistics function
for optimum quality management.
Using the QNix® software and the USB
wireless interface adaptor, users can
transmit measurements wirelessly for reliable
and convenient documentation and analysis
with the computer.
All data can immediately be structured,
analysed or send to project partners
via internet
Modular plug system
■ Standard probes (Fe, NFe, Dual)
■ Wireless probes (Fe, NFe, Dual)
■ Pen-shaped probe (Fe)
■ Adaptor cable (for all probes)
* not valid for the pen-shaped probe and for specific applications
Wireless probe: QNix® 8500 sat.
This miniature wireless probe allows
simple safe and accurate one-hand
measurements even in difficult positions.
To determine exact lacquer and corrosion
protection measurements, the small dimensions of this wireless probe make new and
crucial areas accessible to measurement
where other gauges do not fit. Though, it is
such critical spots of coating that are often
concealed in difficult-access areas.
In addition, the wireless probe facilitates
taking measurements, for instance when
measuring wide spreading surfaces and
taking a vast number of measurements in
various measuring spots.
Gauge
■ Storage device, display and
charging station for the
QNix® 8500 sat wireless probe
The gauge, serving as storage device,
display and charging station, easily fits
into a pocket or can simply fastened to
the arm using the protective cover and
the wristband.
Application examples
■ Measurements at difficult-to-access and crucial spots, for instance during construction and
renovation of planes, ships and bridges as well as related security projects.
■ Control measurements on steel works in rough every day application with harsh and
changing conditions
■ Measurements of large surfaces in extreme heights, on scaffolding, façade lifts or ladders.
In such situations the low weight and wireless transmission of measurements is an advantage
Product advantages
■ Higher user safety and prevention of sources of errors
■ Wireless data transmission between gauge and PC
■ High efficiency accumulator allows up to 4000 measurements without recharging
■ Charging via gauge
■ Low weight of wireless probe (30 g)
■ Wireless transmission range form probe to gauge up to max. 20 meters
■ Unlimited wireless transmission worldwide via secure frequency band
■ Confirmation of transmission with LED signal
■ In combination with the QNix® software, the measurements can be documented
and printed using a PC
■ Selection of Dual, Fe and NFe wireless probes for various measuring ranges
Wireless probe
■ Thump-sized, weighing only 30 g
■ Stable and safe one-hand measurements
with safety cord
■ Range up to 20 meters
■ Up to 4000 measurements without
recharging
■ Confirmation of transmission with blue
LED signal
Magnetic-inductive pen-shaped probe MI Fe 500 μm.
The pen-shaped probe is perfectly suited for
quality controls where precision measurements on small parts or near edges are
required.
Only the correct coating thickness on small
parts such as screws or bolts ensures
proper adhesion force and corrosion
protection. The use of the optimized penshaped probe MI Fe 500 μm can significantly reduce interfering measurement effects
near edges. This allows measurements
much closer to edges and thus more
precise results on small parts.
This interchangeable probe also allows
for accurate measurements of thin, nonferromagnetic metal coatings such as
chromium, copper, zinc, etc and lacquer,
enamel or synthetic coatings on ferromagnetic substrates.
Application examples
■ Measurements of angles, washers, screws, bolts, nuts and friction-locked connections
■ Ensures reliable protective coatings on steel bolts and nuts as used in rotor mountings
for wind energy plants or bridges and window fasteners.
■ Measurements of PVD coatings such as TiN, TiCrN, CrN and TiAIN
Product advantages
■ Measurements taken manually or with stand equipment
■ Magnetic-inductive and (optional) Hall-effect measuring method combined in one gauge
■ Digital measuring electronics linked with probe to keep zero reference during probe change
■ Rugged probe thanks to stainless steel design
■ Easy adjustment thanks to probe’s pen-shape
User software
■ Wireless communication between PC and gauge
■ Read-out of gauge memory
■ Flexible analysis with Microsoft Excel
QNix® 8500 Basic/QNix® 8500 Premium:
A perfect system.
The modular measuring system QNix® 8500
offers two different gauge versions
(Basic and Premium). They particularly
differ in functionality and storage capacity
(see below).
Display of two coating thickness
measurements.
The “combined measurement” mode
allows the simultaneous measurement of
galvanizing and epoxy based coating on
steel substrate – in one single measurement
process. The gauge then displays the
coating of the zinc and the lacquer
layers as two separate values (minimum
thickness of the metallic non-ferrous interlayer (zinc): 50μm).
Calibration options for special
measurement conditions.
In addition to a (constant) factory calibration,
the measuring system QNix® 8500 offers two
calibration processes that are useful during
specific measuring tasks such as measurement on curvatures or small parts.
- A one-point calibration can optimize
the probe’s measuring accuracy with an
expected coating thickness
- A two point calibration can increases the
probe’s measuring accuracy in a certain
coating thickness range.
Reliable measurements also on
rough surfaces.
On rough surfaces, an average zero
reference can be calculated and stored
from a freely determinable amount of zero
reference measurements.
Menu structure
Measuring Mode
Average of defined coating thickness.
On coatings of highly varying thickness
or to comply with a certain inspection
standard, set the gauge to calculate and
display the valid thickness measurement
from a previously defined amount of single
measurements.
Measurement processing and
documentation using Excel.
Using the QNix® software the measurements
can be transmitted wirelessly into an
Excel spread sheet. This documents all
relevant statistical analysis required by a
quality assurance system.
Gauge version
Substrate selection
Fe-NFe
FE/NFe automated
Combined measurement
Measurements
Single measurements
Continuous measurement
BASIC
PREMIUM
up to 100
1
up to 13000*
200
1
100
Upper/lower limit
Average
Memory Capacity
* max. 2000 measurements
per batch
Amount of measurements
Amount of batches
Batch name – info – upper/lower limit
Statistics
Average/standard deviation/ maximum/minimum
- also for the relevant block/blocks
Calibration
Amount customized calibration (one-point/two-point)
Average zero reference
Settings
Display
Wireless: on/off
Display system info
Languages: up to 3 e.g. German, English, French
Signal: on/off
Date/time
Unit: µm/mil.
Resolution coars/normal/fine
Display light: auto/off
Orientation: standard/switched
Technical Data
Gauge
QNix ® 8500
Probe Type
Interchangeable
Units
µm/mil
Measurement Resolution
0.1 µm in the range below 100 µm, 1 µm in the range from 100 to 999 µm, 0.01 mm in the range from 1000 µm
Operation Temperature
0 to 50 °C
Storage Temperature
-10 °C to 60 °C
Interchangeable
probes/Probe type
8500 Fe
2000 µm
8500 Fe
5000 µm
8500 NFe
2000 µm
8500 Dual Fe/NFe
2000 µm
8500 Dual Fe / NFe
5000 µm / 2000 µm
Measurement Method
Magnetic:
Magnetic flux/
Hall effect Fe*
Magnetic:
Magnetic flux/
Hall effect Fe*
Magnetic:
Eddy current NFe*
Magnetic:
Magnetic flux/
Hall effect Fe*/
Eddy current NFe*
Magnetic:
Magnetic flux/
Hall effect Fe*/
Eddy current NFe*
According to Standard
DIN EN ISO 2808, DIN 50981,
ISO 2178, BS 5411 (11),
BS 3900-C5, ASTM B 499,
ASTM D 1186, ASTM D 7091
DIN EN ISO 2808, DIN 50981,
ISO 2178, BS 5411 (11),
BS 3900-C5, ASTM B 499,
ASTM D 1186, ASTM D 7091
DIN EN ISO 2808,
BS 3900-C5, ASTM D 7091,
DIN 50984, BS 5411 (3),
ISO 2360, ASTM D 1400
DIN EN ISO 2808, DIN 50981,
DIN 50984, ISO 2178,
BS 5411 (3 & 11),
BS 3900-C5, ASTM B 499,
ISO 2360, ASTM D 1400,
ASTM D 1186, ASTM D 7091
DIN EN ISO 2808, DIN 50981,
DIN 50984, ISO 2178,
BS 5411 (3 & 11),
BS 3900-C5, ASTM B 499,
ISO 2360, ASTM D 1400,
ASTM D 1186, ASTM D 7091
Measuring Range
0 – 2000 µm
0 – 5000 µm
0 – 2000 µm
Fe: 0 – 2000 µm
NFe: 0 – 2000 µm
Fe: 0 – 5000 µm,
NFe: 0 – 2000 µm
Measuring Interval
1500 ms
1500 ms
1500 ms
1500 ms
1500 ms
Measuring Accuracy
Regarding AutomationStandards
± (1 µm + 2% of the
reading)
± (1 µm + 2% of the
reading) in the range
of 0.0 to 2.0 mm
± 3.5 % of the reading
from 2.0 mm
± (1 µm + 2% of the
reading)
± (1 µm + 2% of the
reading)
± (1 µm + 2% of the
reading) in the range
of 0.0 to 2.0 mm
± 3.5 % of the reading
from 2.0 mm
Minimum Measuring
Surface
Diameter: 20 mm
respectively radius 10 mm
Diameter: 20 mm
respectively radius 10 mm
Diameter: 20 mm
respectively radius 10 mm
Diameter: 20 mm
respectively radius 10 mm
Diameter: 20 mm
respectively radius 10 mm
Minimum Radius
of Curvature
Convex: 5 mm,
Concave: 30 mm
Convex: 5 mm,
Concave: 30 mm
Convex: 5 mm,
Concave: 30 mm
Convex: 5 mm,
Concave: 30 mm
Convex: 5 mm,
Concave: 30 mm
Minimum Thickness
of Base Material
0.2 mm
0.2 mm
0.05 mm
Fe: 0.2 mm,
NFe: 0.05 mm
Fe: 0.2 mm,
NFe: 0.05 mm
Wireless Interface
No
No
No
No
No
Operation Temperature
0 to 50 °C
0 to 50 °C
0 to 50 °C
0 to 50 °C
0 to 50 °C
Storage Temperature
-10 to 60 °C
-10 to 60 °C
-10 to 60 °C
-10 to 60 °C
-10 to 60 °C
Power Supply
From gauge
From gauge
From gauge
From gauge
From gauge
Dimensions
(L x W x H in mm)
60 x 26 x 22
without extensions
60 x 26 x 22
without extensions
60 x 26 x 22
without extensions
60 x 26 x 22
without extensions
60 x 26 x 22
without extensions
Weight incl. Batteries
ca. 12 g
ca. 12 g
ca. 12 g
ca. 12 g
ca. 12 g
All interchangeable probes also available as wireless probes 8500 sat.
Wireless Probes QNix® sat
ISN Frequency Band
2.4 GHz
Radio Transmission Range
Max. 20 m
Power Supply
Lithium-Ion accumulator,
chargeable via
QNix® 8500 gauge
Accumulator Capacity
Max. 4000 measurements
Charging Time
approx. 5 hours
Dimensions
Weight
Fe*
8500 measuring probe MI Fe 500 µm
Measuring Method
Magnetic measuring method
Fe: magnetic induction
See (*Fe)
According to Standards
DIN EN ISO 2808,
DIN 50981, ISO 2178,
BS 5411 (11), BS 3900 – C5,
ASTM B499, ASTM D 1186,
ASTM D 7091
61 x 28 x 28 mm
Measuring Range
Fe 0.0 – 500 µm
ca. 30 g
Measuring Interval
1600 ms
Repeatability Regarding
Automation Standads
± (0.1 µm + 0,8% of the
reading)
Accuracy Regarding
Automation Standards
± (0.3 µm + 2% of the
reading) after calibration
Minimum Measuring
Surface
Diameter: 7.0 mm or
Measuring radius: 3.5 mm
Minimum Radius
of Curvature
Convex radius: 4 mm
Concave radius: 5 mm
Minimum Thickness
of Base Material
Fe: 0.4 mm
measurement of non-ferromagnetic and non-ferrimagnetic
Operation Temperature
0 to 50 °C
coatings on ferromagnetic substrate such as measurement
Storage Temperature
-10 to 60 °C
Power Supply
from gauge
Dimensions
(L x W x H)
Probe without
connecting cable
120 mm x 12 mm x 12 mm
Weight
ca. 95 g
on iron or steel substrate
NFe* Measurement of non-ferromagnetic and non-ferrimagnetic
and electrically non-conductive coatings on non-ferromagnetic
or non-ferrimagnetic and electrical conductive substrate such
as measurement on aluminium, zinc, copper, brass and certain
stainless steel substrates
Technical data subject to change without notice
Software
The QNix® 8500 measuring system is supplied with user-friendly PC
software providing various options for practical data analysis and
configuration of the gauge. The QNix® software enables the user to
read-out measurements from the gauge’s memory via the wireless
interface included in every model. The export into a spread sheet
program gives the user access to all possibilities that statistical analysis
and graphical presentation have to offer. This also provides new possibilities of documentation in quality assurance for expert opinions or
other applications. The simple and intuitive operation yields the desired
results quickly.
The software allows individual and extensive configuration of the gauge
itself. Almost all gauge settings can be managed from the PC.
At the same time, the QNix® software provides the base of customized
applications to effectively support your quality assurance system.
Advantages with benefits:
■ Wireless communication between PC and gauge
■ Read-out of gauge memory
■ Data export into a spread sheet program
■ Configuration of the gauge
■ Online measurement
■ Adjustment to customized analysis programs possible
Quality by excellence.
Worldwide, QNix® coating thickness gauges
have become a standard for excellent
quality “made in Germany”. Quality that
shows – in the simple, safe and convenient
operation and the reliability of long-term
functionality. All of our gauges and systems
are manufactured according to strict quality
standards exclusively in Germany.
They are tested for rugged and safe
application everywhere in the world.
Options:
All measuring probes of the QNix® 8500 measuring system are interchangeable.
QNix® interchangeable probes
■ Fe probe 2 mm
■ Fe probe 5 mm
■ NFe probe 2 mm
■ Dual probe Fe 2 mm/NFe 2 mm
■ Dual probe Fe 5 mm/NFe 2 mm
■ Dual Probe Fe 5 mm/NFe 5mm
QNix® sat wireless probes
■ Fe wireless probe 2 mm
■ Fe wireless probe 5 mm
■ NFe wireless probe 2 mm
■ Dual wireless probe Fe 2 mm/NFe 2 mm
■ Dual wireless probe Fe 5 mm/NFe 2 mm
■ Dual probe Fe 5 mm/NFe 5 mm
QNix® MI Fe 500 µm
■ Pen-shaped probe MI Fe 500 μm
■ Carrying case
■ 2 alignment rings
■ Circular steel reference plate D = 25 mm
■ Reference foils: ca. 6, 11, 24, 50 μm
■ Certificate
■ User manual
■ Measuring stand
■ Prism
■ Positioning angle
QNix® software
■ QNix® software for data transfer to and
analysis with EXCEL and for configuration
of the gauge
■ USB wireless interface adaptor for bidirectional data transfer between gauge
and PC
QNix® calibration foils
■ Calibration foils, reference plates,
also available as a complete set
* according
to our terms
of sale
Protective bag with arm fastener
GmbH & Co. KG
Germany:
Robert-Perthel-Strasse 2 · 50739 Köln
Phone +49 (0) 221-917455-0
Fax +49 (0) 221-171221
E-Mail [email protected]
www.automation.de
DB E 8500 08/12/1000. Subject to technical modification without notice. Errors and omissions excepted.
Standard scope of supply:
■ Gauge with optional measuring probe
■ 2 Mignon batteries 1.5V (AA) Alkaline
■ Adaptor cable for external probe
(not included with wireless probe)
■ User manual
■ Test certificate for optional measuring
probe
■ Soft pouch with belt clip
■ Carrying case for transport and storage
We serve the customer.
For more than four decades AUTOMATION
Dr. NIX GmbH & Co. KG have committed
themselves to support users worldwide in
creating and ensuring high quality coatings
and surfaces using our innovative devices,
systems and services. We help our
customers to increase their added value
by precisely measuring, checking and
documenting quality and productivity of
customer processes.


