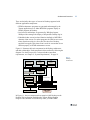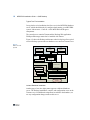
1
MFG/PRO Installation Guide
QAD Desktop
System Overview
Implementation
System Administration and Reference
78-0629A
QAD Desktop Version 2.7 and higher
MFG/PRO eB2 and eB2.1
January 2005
This document contains proprietary information that is protected by copyright and other
intellectual property laws. No part of this document may be reproduced, translated, or modified
without the prior written consent of QAD Inc. The information contained in this document is
subject to change without notice.
QAD Inc. provides this material as is and makes no warranty of any kind, expressed or
implied, including, but not limited to, the implied warranties of merchantability and fitness for a
particular purpose. QAD Inc. shall not be liable for errors contained herein or for incidental or
consequential damages (including lost profits) in connection with the furnishing, performance,
or use of this material whether based on warranty, contract, or other legal theory.
QAD and MFG/PRO are registered trademarks of QAD Inc. The QAD logo is a trademark of
QAD Inc.
Designations used by other companies to distinguish their products are often claimed as
trademarks. In this document, the product names appear in initial capital or all capital letters.
Contact the appropriate companies for more information regarding trademarks and
registration.
Copyright © 2005 by QAD Inc.
78-0629A
QAD Inc.
6450 Via Real
Carpinteria, California 93013
Phone (805) 684-6614
Fax (805) 684-1890
http://www.qad.com
Contents
About This Guide . . . . . . . . . . . . . . . . . . . . . . . . . . . . . . . . . . . . . . . . . . . 1
What Is in This Guide? . . . . . . . . . . . . . . . . . . . . . . . . . . . . . . . . . . . . . . . . . . . . .
Audience . . . . . . . . . . . . . . . . . . . . . . . . . . . . . . . . . . . . . . . . . . . . . . . . .
Installation Updates . . . . . . . . . . . . . . . . . . . . . . . . . . . . . . . . . . . . . . . . .
Related Documentation . . . . . . . . . . . . . . . . . . . . . . . . . . . . . . . . . . . . . . . . . . . .
Progress Documentation . . . . . . . . . . . . . . . . . . . . . . . . . . . . . . . . . . . . .
MFG/PRO Documentation . . . . . . . . . . . . . . . . . . . . . . . . . . . . . . . . . . .
Multiple Releases . . . . . . . . . . . . . . . . . . . . . . . . . . . . . . . . . . . . . . . . . . . . . . . . .
Conventions . . . . . . . . . . . . . . . . . . . . . . . . . . . . . . . . . . . . . . . . . . . . . . . . . . . . .
QAD Support Services . . . . . . . . . . . . . . . . . . . . . . . . . . . . . . . . . . . . . . . . . . . . .
2
2
3
4
4
4
5
5
5
Section 1 System Overview . . . . . . . . . . . . . . . . . . . . . . . . . 7
Chapter 1
Architectural Overview . . . . . . . . . . . . . . . . . . . . . . . . . . . 9
Introduction . . . . . . . . . . . . . . . . . . . . . . . . . . . . . . . . . . . . . . . . . . . . . . . . . . . .
Desktop Architecture . . . . . . . . . . . . . . . . . . . . . . . . . . . . . . . . . . . . . . . . . . . . .
Client Web Browser . . . . . . . . . . . . . . . . . . . . . . . . . . . . . . . . . . . . . . .
Tomcat Web Application Server . . . . . . . . . . . . . . . . . . . . . . . . . . . . . .
MFG/PRO and Progress Components . . . . . . . . . . . . . . . . . . . . . . . . . .
Telnet Server . . . . . . . . . . . . . . . . . . . . . . . . . . . . . . . . . . . . . . . . . . . . .
Support Programs . . . . . . . . . . . . . . . . . . . . . . . . . . . . . . . . . . . . . . . . .
QAD-Supplied Components . . . . . . . . . . . . . . . . . . . . . . . . . . . . . . . . .
10
10
12
13
13
14
15
16
iv
MFG/PRO Installation Guide — QAD Desktop
Planning an Installation . . . . . . . . . . . . . . . . . . . . . . . . . . . . . . . . . . . . . . . . . . . . 17
Deployment Options . . . . . . . . . . . . . . . . . . . . . . . . . . . . . . . . . . . . . . . 17
How to Use This Installation Guide . . . . . . . . . . . . . . . . . . . . . . . . . . . . 19
Installation Overview . . . . . . . . . . . . . . . . . . . . . . . . . . . . . . . . . . . . . . . 20
Installation Tools . . . . . . . . . . . . . . . . . . . . . . . . . . . . . . . . . . . . . . . . . . 20
Chapter 2
System Requirements . . . . . . . . . . . . . . . . . . . . . . . . . . . 23
Prerequisite Requirements . . . . . . . . . . . . . . . . . . . . . . . . . . . . . . . . . . . . . . . . . 24
Database Server . . . . . . . . . . . . . . . . . . . . . . . . . . . . . . . . . . . . . . . . . . . 24
Client Requirements . . . . . . . . . . . . . . . . . . . . . . . . . . . . . . . . . . . . . . . . . . . . . . 25
Operating Systems . . . . . . . . . . . . . . . . . . . . . . . . . . . . . . . . . . . . . . . . . 25
Minimum Client Hardware . . . . . . . . . . . . . . . . . . . . . . . . . . . . . . . . . . 25
Client Software . . . . . . . . . . . . . . . . . . . . . . . . . . . . . . . . . . . . . . . . . . . 25
Tomcat Server Requirements . . . . . . . . . . . . . . . . . . . . . . . . . . . . . . . . . . . . . . . 28
Operating Systems . . . . . . . . . . . . . . . . . . . . . . . . . . . . . . . . . . . . . . . . . 28
Software . . . . . . . . . . . . . . . . . . . . . . . . . . . . . . . . . . . . . . . . . . . . . . . . . 28
Hardware . . . . . . . . . . . . . . . . . . . . . . . . . . . . . . . . . . . . . . . . . . . . . . . . 28
Progress Server Requirements . . . . . . . . . . . . . . . . . . . . . . . . . . . . . . . . . . . . . . 29
Operating Systems . . . . . . . . . . . . . . . . . . . . . . . . . . . . . . . . . . . . . . . . . 29
Java Requirements . . . . . . . . . . . . . . . . . . . . . . . . . . . . . . . . . . . . . . . . . 29
Hardware . . . . . . . . . . . . . . . . . . . . . . . . . . . . . . . . . . . . . . . . . . . . . . . . 30
Progress Components . . . . . . . . . . . . . . . . . . . . . . . . . . . . . . . . . . . . . . . 30
Verify Progress Components . . . . . . . . . . . . . . . . . . . . . . . . . . . . . . . . . 30
Windows Telnet Server . . . . . . . . . . . . . . . . . . . . . . . . . . . . . . . . . . . . . . . . . . . . 31
Georgia SoftWorks Licensing . . . . . . . . . . . . . . . . . . . . . . . . . . . . . . . . 31
Section 2 Implementation . . . . . . . . . . . . . . . . . . . . . . . . . . 33
Chapter 3
Preparing the Desktop Environment . . . . . . . . . . . . . . . 35
Install the Java Development Kit . . . . . . . . . . . . . . . . . . . . . . . . . . . . . . . . . . . . 36
Overview . . . . . . . . . . . . . . . . . . . . . . . . . . . . . . . . . . . . . . . . . . . . . . . . 36
Installation . . . . . . . . . . . . . . . . . . . . . . . . . . . . . . . . . . . . . . . . . . . . . . . 36
Set JAVA_HOME Variable . . . . . . . . . . . . . . . . . . . . . . . . . . . . . . . . . . 36
Contents
Verify the J2SDK . . . . . . . . . . . . . . . . . . . . . . . . . . . . . . . . . . . . . . . . .
Install the Windows Telnet Server . . . . . . . . . . . . . . . . . . . . . . . . . . . . . . . . . . .
Install the Telnet Server . . . . . . . . . . . . . . . . . . . . . . . . . . . . . . . . . . . . .
Register the Georgia SoftWorks Software . . . . . . . . . . . . . . . . . . . . . .
Define Security Groups for Desktop Administration . . . . . . . . . . . . . . . . . . . . .
Desktop Administrative Group . . . . . . . . . . . . . . . . . . . . . . . . . . . . . . .
UI Design Group . . . . . . . . . . . . . . . . . . . . . . . . . . . . . . . . . . . . . . . . . .
Process Editor Group . . . . . . . . . . . . . . . . . . . . . . . . . . . . . . . . . . . . . . .
Chapter 4
Installing Desktop Single-Tier. . . . . . . . . . . . . . . . . . . . . 41
Single-Tier Installation Overview . . . . . . . . . . . . . . . . . . . . . . . . . . . . . . . . . . .
Install Desktop Components . . . . . . . . . . . . . . . . . . . . . . . . . . . . . . . . . . . . . . . .
Mount the CD-ROM (UNIX Only) . . . . . . . . . . . . . . . . . . . . . . . . . . . .
Launch Installation Script . . . . . . . . . . . . . . . . . . . . . . . . . . . . . . . . . . .
Install Tomcat and Desktop Web Application . . . . . . . . . . . . . . . . . . .
Install Desktop MFG/PRO Code . . . . . . . . . . . . . . . . . . . . . . . . . . . . . .
Set Up Windows Telnet Environment . . . . . . . . . . . . . . . . . . . . . . . . . .
Configure Desktop Components . . . . . . . . . . . . . . . . . . . . . . . . . . . . . . . . . . . .
Add Parameter Files (Optional) . . . . . . . . . . . . . . . . . . . . . . . . . . . . . . .
Verify and Update System Information . . . . . . . . . . . . . . . . . . . . . . . .
Build the Desktop System . . . . . . . . . . . . . . . . . . . . . . . . . . . . . . . . . . .
Generate WebSpeed Configuration Information . . . . . . . . . . . . . . . . . .
Generate Telnet Connection Scripts . . . . . . . . . . . . . . . . . . . . . . . . . . .
Print Desktop Information . . . . . . . . . . . . . . . . . . . . . . . . . . . . . . . . . . .
QAD Desktop Quick Start . . . . . . . . . . . . . . . . . . . . . . . . . . . . . . . . . . . . . . . . .
Chapter 5
37
37
37
38
39
39
40
40
42
43
43
44
46
48
49
50
51
52
54
57
59
61
62
Installing Desktop Multi-Tier . . . . . . . . . . . . . . . . . . . . . . 65
Multi-Tier Installation Overview . . . . . . . . . . . . . . . . . . . . . . . . . . . . . . . . . . . .
Plan the Installation . . . . . . . . . . . . . . . . . . . . . . . . . . . . . . . . . . . . . . . .
Configure Desktop Components . . . . . . . . . . . . . . . . . . . . . . . . . . . . . . . . . . . .
Mount the CD-ROM (UNIX Only) . . . . . . . . . . . . . . . . . . . . . . . . . . . .
Launch the Installation Script . . . . . . . . . . . . . . . . . . . . . . . . . . . . . . . .
Install Desktop MFG/PRO Code . . . . . . . . . . . . . . . . . . . . . . . . . . . . . .
Set Up Windows Telnet Environment . . . . . . . . . . . . . . . . . . . . . . . . . .
66
68
69
69
69
71
73
v
vi
MFG/PRO Installation Guide — QAD Desktop
Configure and Prepare Desktop Files . . . . . . . . . . . . . . . . . . . . . . . . . . . . . . . . . 74
Add Parameter Files (Optional) . . . . . . . . . . . . . . . . . . . . . . . . . . . . . . . 75
Verify and Update System Information . . . . . . . . . . . . . . . . . . . . . . . . . 76
Build the Desktop System . . . . . . . . . . . . . . . . . . . . . . . . . . . . . . . . . . . 78
Create Application Server JAR File . . . . . . . . . . . . . . . . . . . . . . . . . . . . 82
Create Connection and Configuration Files . . . . . . . . . . . . . . . . . . . . . . 83
Launch the Installation Script . . . . . . . . . . . . . . . . . . . . . . . . . . . . . . . . 84
Chapter 6
Configuring Desktop After Deployment . . . . . . . . . . . . 89
Post-Deployment Configuration . . . . . . . . . . . . . . . . . . . . . . . . . . . . . . . . . . . . . 90
Configure and Start WebSpeed . . . . . . . . . . . . . . . . . . . . . . . . . . . . . . . . . . . . . . 90
Update the WebSpeed Configuration File . . . . . . . . . . . . . . . . . . . . . . . 91
Verify WebSpeed on Tomcat Server . . . . . . . . . . . . . . . . . . . . . . . . . . . 91
Verify WebSpeed Servers . . . . . . . . . . . . . . . . . . . . . . . . . . . . . . . . . . . 92
Configure and Start Tomcat . . . . . . . . . . . . . . . . . . . . . . . . . . . . . . . . . . . . . . . . 93
Update Tomcat Port Numbers . . . . . . . . . . . . . . . . . . . . . . . . . . . . . . . . 93
Start Tomcat . . . . . . . . . . . . . . . . . . . . . . . . . . . . . . . . . . . . . . . . . . . . . . 94
Prepare Telnet UI Connection Scripts . . . . . . . . . . . . . . . . . . . . . . . . . . . . . . . . . 94
Specify Telnet Server Settings . . . . . . . . . . . . . . . . . . . . . . . . . . . . . . . . 95
Define the Log-In Sequence Script Lines . . . . . . . . . . . . . . . . . . . . . . . 96
Configure Telnet Connection Settings . . . . . . . . . . . . . . . . . . . . . . . . . 100
Chapter 7
Configuring Connection Manager . . . . . . . . . . . . . . . . 103
Overview . . . . . . . . . . . . . . . . . . . . . . . . . . . . . . . . . . . . . . . . . . . . . . . . . . . . . . 104
Desktop Administration . . . . . . . . . . . . . . . . . . . . . . . . . . . . . . . . . . . . . . . . . . 104
Plan and Size Connection Manager . . . . . . . . . . . . . . . . . . . . . . . . . . . . . . . . . 106
Minimum and Maximum Connections . . . . . . . . . . . . . . . . . . . . . . . . 107
Connection Sizing Guidelines . . . . . . . . . . . . . . . . . . . . . . . . . . . . . . . 108
Administer Connection Manager . . . . . . . . . . . . . . . . . . . . . . . . . . . . . . . . . . . 108
Use Connection Manager Menus . . . . . . . . . . . . . . . . . . . . . . . . . . . . . 108
Configure Connection Manager . . . . . . . . . . . . . . . . . . . . . . . . . . . . . . 110
Monitor Connections and Users . . . . . . . . . . . . . . . . . . . . . . . . . . . . . . 113
Troubleshoot Errors . . . . . . . . . . . . . . . . . . . . . . . . . . . . . . . . . . . . . . . . . . . . . 115
Error Handling . . . . . . . . . . . . . . . . . . . . . . . . . . . . . . . . . . . . . . . . . . . 117
Contents
Start a Desktop Client . . . . . . . . . . . . . . . . . . . . . . . . . . . . . . . . . . . . . . . . . . . .
Prerequisites . . . . . . . . . . . . . . . . . . . . . . . . . . . . . . . . . . . . . . . . . . . .
Setup . . . . . . . . . . . . . . . . . . . . . . . . . . . . . . . . . . . . . . . . . . . . . . . . . .
First-Time Startup . . . . . . . . . . . . . . . . . . . . . . . . . . . . . . . . . . . . . . . .
Desktop Java Plug-in Version Control . . . . . . . . . . . . . . . . . . . . . . . .
Chapter 8
120
120
121
121
122
Implementing Multiple Languages . . . . . . . . . . . . . . . . 125
Multiple-Language Overview . . . . . . . . . . . . . . . . . . . . . . . . . . . . . . . . . . . . . .
Supported Code Pages . . . . . . . . . . . . . . . . . . . . . . . . . . . . . . . . . . . . . . . . . . .
Use MFG/UTIL to Install Multiple Languages . . . . . . . . . . . . . . . . . . . . . . . .
Building Languages with Shared Code Pages . . . . . . . . . . . . . . . . . . .
Building Languages with Compatible Code Pages . . . . . . . . . . . . . . .
Configure Non-English Languages . . . . . . . . . . . . . . . . . . . . . . . . . . . . . . . . .
Update Fonts for Non-English Languages . . . . . . . . . . . . . . . . . . . . .
Translated Process Maps . . . . . . . . . . . . . . . . . . . . . . . . . . . . . . . . . . .
Language Reference . . . . . . . . . . . . . . . . . . . . . . . . . . . . . . . . . . . . . . . . . . . . .
Locale Data . . . . . . . . . . . . . . . . . . . . . . . . . . . . . . . . . . . . . . . . . . . . .
Encoding Data . . . . . . . . . . . . . . . . . . . . . . . . . . . . . . . . . . . . . . . . . . .
126
126
128
128
129
131
132
133
133
134
137
Section 3 System Administration and Reference. . . . . . 139
Chapter 9
Administering Desktop . . . . . . . . . . . . . . . . . . . . . . . . . 141
Common System Administration Tasks . . . . . . . . . . . . . . . . . . . . . . . . . . . . . .
Install a New Desktop Release . . . . . . . . . . . . . . . . . . . . . . . . . . . . . . . . . . . . .
Clear the Client Cache . . . . . . . . . . . . . . . . . . . . . . . . . . . . . . . . . . . . .
Install an MFG/PRO Service Pack . . . . . . . . . . . . . . . . . . . . . . . . . . . . . . . . . .
Administer Desktop Output . . . . . . . . . . . . . . . . . . . . . . . . . . . . . . . . . . . . . . .
Manage Menu Updates in Desktop . . . . . . . . . . . . . . . . . . . . . . . . . . . . . . . . .
Changing MFG/PRO Menus . . . . . . . . . . . . . . . . . . . . . . . . . . . . . . . .
Adding Browses . . . . . . . . . . . . . . . . . . . . . . . . . . . . . . . . . . . . . . . . .
Adding Lookup Browses . . . . . . . . . . . . . . . . . . . . . . . . . . . . . . . . . . .
Adding and Using Custom Programs . . . . . . . . . . . . . . . . . . . . . . . . .
Regenerating Desktop Components . . . . . . . . . . . . . . . . . . . . . . . . . .
142
142
144
144
145
146
146
147
147
147
148
vii
viii
MFG/PRO Installation Guide — QAD Desktop
Chapter 10 Reference . . . . . . . . . . . . . . . . . . . . . . . . . . . . . . . . . . . . 151
Installed Components . . . . . . . . . . . . . . . . . . . . . . . . . . . . . . . . . . . . . . . . . . . . 152
MFG/PRO Installation Directory . . . . . . . . . . . . . . . . . . . . . . . . . . . . . 152
Tomcat Servlet Container . . . . . . . . . . . . . . . . . . . . . . . . . . . . . . . . . . 152
Connection Parameters . . . . . . . . . . . . . . . . . . . . . . . . . . . . . . . . . . . . . . . . . . . 153
Local Host Connection Parameters . . . . . . . . . . . . . . . . . . . . . . . . . . . 154
Client/Server Connection Parameters . . . . . . . . . . . . . . . . . . . . . . . . . 154
Local Host Connection Parameter File Examples . . . . . . . . . . . . . . . . 156
Working with WebSpeed . . . . . . . . . . . . . . . . . . . . . . . . . . . . . . . . . . . . . . . . . 157
Install and Configure WebSpeed Messenger . . . . . . . . . . . . . . . . . . . . 157
WebSpeed Agent Sizing and Behavior . . . . . . . . . . . . . . . . . . . . . . . . 159
Security . . . . . . . . . . . . . . . . . . . . . . . . . . . . . . . . . . . . . . . . . . . . . . . . . . . . . . . 163
Securing Internet Communication . . . . . . . . . . . . . . . . . . . . . . . . . . . . 163
UNIX Telnet Environment Security Issues . . . . . . . . . . . . . . . . . . . . . 163
Configure Multiple Desktop Systems . . . . . . . . . . . . . . . . . . . . . . . . . . . . . . . . 166
Configuring Multiple Systems on the Same Server . . . . . . . . . . . . . . . 166
Configuring Desktop for Multiple MFG/PRO Releases . . . . . . . . . . . 168
Administration with Tomcat . . . . . . . . . . . . . . . . . . . . . . . . . . . . . . . . . . . . . . . 168
Install a New Tomcat Servlet Engine . . . . . . . . . . . . . . . . . . . . . . . . . 168
Manually Install Tomcat and Merge QAD Components . . . . . . . . . . . 169
Clear the Tomcat Server Cache . . . . . . . . . . . . . . . . . . . . . . . . . . . . . . 169
Tomcat Web Application Manager . . . . . . . . . . . . . . . . . . . . . . . . . . . 170
Use Diagnostic Tools . . . . . . . . . . . . . . . . . . . . . . . . . . . . . . . . . . . . . . . . . . . . 171
Configure Logging . . . . . . . . . . . . . . . . . . . . . . . . . . . . . . . . . . . . . . . . 171
Enable the Java Console . . . . . . . . . . . . . . . . . . . . . . . . . . . . . . . . . . . 172
Enable Performance Testing . . . . . . . . . . . . . . . . . . . . . . . . . . . . . . . . 173
Chapter 11 Deployment Tools . . . . . . . . . . . . . . . . . . . . . . . . . . . . . 175
Deployment Script Reference . . . . . . . . . . . . . . . . . . . . . . . . . . . . . . . . . . . . . . 176
Single-Tier Deployment Options . . . . . . . . . . . . . . . . . . . . . . . . . . . . . . . . . . . 176
Install Tomcat Files Menu . . . . . . . . . . . . . . . . . . . . . . . . . . . . . . . . . . 176
Install MFG/PRO – Progress Desktop Files Menu . . . . . . . . . . . . . . . 177
Multi-Tier Deployment Options . . . . . . . . . . . . . . . . . . . . . . . . . . . . . . . . . . . . 179
Install MFG/PRO – Progress Desktop Files Menu . . . . . . . . . . . . . . . 179
Contents
Post MFG/UTIL Desktop Build Jar Install . . . . . . . . . . . . . . . . . . . . .
MFG/UTIL Reference . . . . . . . . . . . . . . . . . . . . . . . . . . . . . . . . . . . . . . . . . . .
Configure Desktop Environment Parameters . . . . . . . . . . . . . . . . . . .
Verify and Build the Desktop System . . . . . . . . . . . . . . . . . . . . . . . . .
Generate WebSpeed Configuration File . . . . . . . . . . . . . . . . . . . . . . .
Generate Telnet Start Scripts . . . . . . . . . . . . . . . . . . . . . . . . . . . . . . . .
Add Parameter File Directories . . . . . . . . . . . . . . . . . . . . . . . . . . . . . .
180
181
181
188
193
194
195
Glossary . . . . . . . . . . . . . . . . . . . . . . . . . . . . . . . . . . . . . . . . . . . . . . . . 197
Index . . . . . . . . . . . . . . . . . . . . . . . . . . . . . . . . . . . . . . . . . . . . . . . . . . . 205
ix
x
MFG/PRO Installation Guide — QAD Desktop
About This Guide
What Is in This Guide?
2
Related Documentation
4
Multiple Releases
Conventions
5
5
QAD Support Services
5
2
MFG/PRO Installation Guide — QAD Desktop
What Is in This Guide?
Use this guide to install and configure QAD Desktop. The guide is
divided into three sections: System Overview, Implementation, and
System Administration and Reference.
¶ See “QAD
Desktop Quick
Start” on page 62.
Note If you have previous experience installing QAD Desktop in a
single-tier environment, you can go directly to the Quick Start section for
a summary of installation steps.
The Desktop planning section contains instructions on how to prepare for
the Desktop installation by planning the deployment and preparing these
prerequisite components:
• Java Development Kit
• Progress WebSpeed
• Windows telnet server
The implementation section includes instructions to:
• Install the Tomcat servlet engine.
• Install the QAD Desktop files.
• Configure single and multi-tier Desktop environments.
• Start up a Desktop client.
• Configure Connection Manager settings.
The reference section contains instructions for performing optional user
and system administration activities. It also contains reference
information to help you better understand the Desktop environment and a
glossary of Desktop terms.
Audience
These instructions are intended for a system administrator with
experience installing MFG/PRO, as well as configuring and managing
hardware and operating system software. This person also should have a
good understanding of networking concepts and administration, as well as
an understanding of concepts and technologies discussed in
“Introduction” on page 10.
About This Guide
If you do not have this expertise within your company, you should contact
your QAD Support representative for information on the installation and
customization offerings supplied by QAD’s Global Services.
Installation Updates
Check the QAD Web site to make sure you have the latest installation
errata, installation guides, and installation media.
http://support.qad.com/
Installation Errata
In addition to these instructions, you may receive a supplementary errata
sheet with changes and additional instructions. Download the most up-todate errata sheets from the QAD Web site. New information may have
been added to the errata since your product was shipped.
Installation Guides
To ensure a successful implementation, QAD installation guides are
periodically updated. To determine whether your installation guide has
been updated, refer to the QAD Web site. Compare the item number listed
on your installation guide with the number listed on the QAD Web site. If
your installation guide has been updated, download and use the most
recent version.
Installation Media
The QAD Desktop installation media is periodically updated with updates
and enhancements. To ensure you have the most up-to-date Desktop
installation media, compare the Desktop release on your installation
media with the latest release available, which is listed on the latest errata
sheet, posted on the QAD Web site.
3
4
MFG/PRO Installation Guide — QAD Desktop
Related Documentation
Progress Documentation
• For information on installing and configuring WebSpeed, see the
WebSpeed Installation and Configuration Guide.
Find the complete Progress documentation set online at:
http://www.progress.com/products/documentation/index.ssp
MFG/PRO Documentation
• For information on installing MFG/PRO or converting to a more
recent release, refer to the appropriate installation or conversion
guides for your system.
• For information on using MFG/PRO functions, refer to the User
Guides.
• For instructions on navigating the QAD Desktop, using the Process
Editor, defining simplified screens, and configuring other optional
Desktop settings, refer to User Guide: QAD Desktop.
For QAD customers with a Web account, the complete MFG/PRO
documentation is available for review or downloading at:
http://support.qad.com/
Register for a QAD Web account by accessing the Web site and clicking
the Accounts link at the top of the screen. Your customer ID number is
required. Access to certain areas is dependent on the type of agreement
you have with QAD.
Features of the Web site include an online solution database to help you
answer questions about setting up and using the product. Additionally, the
QAD Web site has information about training classes and other services
that can help you learn about MFG/PRO.
About This Guide
Multiple Releases
This guide can be used to install QAD Desktop Release 2.7 or higher on
MFG/PRO eB2 and MFG/PRO eB2.1. Most installation and
configuration steps are the same. Where needed, differences are pointed
out.
In cases where menu numbers have changed, the first reference is the
number in MFG/PRO eB2 followed by the menu reference in
MFG/PRO eB2.1, as in the following example:
User Maintenance (36.3.18; 36.3.1 in MFG/PRO eB2.1)
Conventions
This document uses the text or typographic conventions listed in the
following table.
If you see:
It means:
monospaced text
A command or file name.
italicized
monospaced text
A variable name for a value you enter as part of an operating
system command; for example, YourCDROMDir.
indented
command line
A long command that you enter as one line, although it
appears in the text as two lines.
Note
Alerts the reader to exceptions or special conditions.
Important
Alerts the reader to critical information.
Warning
Used in situations where you can overwrite or corrupt data,
unless you follow the instructions.
QAD Support Services
QAD Desktop has a wide variety of configuration possibilities, is highly
scalable, and can be customized easily. While this guide provides basic
installation and configuration information, it cannot consider all of the
possible computing environments and variations into which the Desktop
can be implemented.
To take full advantage of the Desktop’s flexibility and potential in your
specific environment, contact your QAD Support representative for
information on the installation and customization offerings supplied by
5
6
MFG/PRO Installation Guide — QAD Desktop
QAD Support Services. These offerings include performance
enhancements as well as technical and administration training.
Section 1
System Overview
This section provides information needed before you begin
implementing QAD Desktop in your environment.
Architectural Overview
System Requirements
9
23
8
MFG/PRO Installation Guide — QAD Desktop
Chapter 1
Architectural
Overview
This chapter provides an overview of the QAD Desktop architecture. It
describes the various components you will install and configure and
discusses issues you should understand as you begin to plan your
installation.
Introduction
10
Desktop Architecture
10
Planning an Installation
17
10
MFG/PRO Installation Guide — QAD Desktop
Introduction
The QAD Desktop interface lets users access the full functionality of
MFG/PRO within a Web browser. The easy-to-navigate graphical
interface optimizes usability in an intranet environment. At the same time,
it reduces system administration costs since individual users do not need
to install any MFG/PRO components on their personal computers. All
client components are managed by the browser.
QAD Desktop combines a variety of Web-based technologies:
• HTML/DHTML pages with multiple frames display the menu system
and MFG/PRO programs.
• Cascading style sheets (CSS) define colors, fonts, styles, and images.
• A Java applet runs persistently and manages interaction between the
user and lookups, browses, and embedded telnet programs.
• JavaScript dynamically generates HTML with applet tags.
• Perl scripts support a common gateway interface (CGI)-based search.
• Progress WebSpeed agents manage the interaction between the
MFG/PRO database and Java browses and lookups using HTTP.
• Java servlets and server pages (JSP) manage the interactions between
Desktop and the Progress character code using XML messaging
between the r-code and client.
• Cookies are used to store information about the user.
The following sections provide brief descriptions of the Desktop
components. These descriptions are intended to provide a framework for
understanding the Desktop architecture before you begin your
implementation. Specific details on different aspects of the Desktop
components can be found in the appropriate chapters of this guide.
Desktop Architecture
QAD Desktop lets users access all MFG/PRO functions through a Web
browser. Although all functions display in the browser, the underlying
technology used to support the display varies.
Architectural Overview
There are basically three types of screens in Desktop supported with
different application components:
• HTML maintenance programs are generated and managed by the
Tomcat application server. Most MFG/PRO programs display as
HTML programs in Desktop.
• Java browses and lookups are generated by WebSpeed agents.
WebSpeed also manages the display of help and the Desktop log-in.
• Embedded telnet screens look and function similarly to MFG/PRO
character client screens. For telnet programs, the Web browser runs a
telnet client that resides in a Java class file stored in a Desktopsupplied Java applet. This telnet client is used for screens that do not
function properly as HTML maintenance screens.
Figure 1.1 illustrates the basic components in the Desktop architecture
and their relationships. Each component is discussed briefly following the
diagram. For details on specific versions and other component
requirements, see Chapter 2, “System Requirements,” on page 23.
Fig. 1.1
Client Web Browser
Log-in, Browses,
Lookups, Help
HTML
Maintenance
Programs
Java Applet
Telnet
Maintenance
Programs
JRE
Tomcat
J2SDK
WebSpeed Messenger
(Multi-tier installations only)
Java Applet
Desktop Web App
Connection
Manager
WebSpeed Server
WebSpeed Broker
NameServer
Agent Processes
Telnet Processes
Telnet Server
Desktop Progress Code
MFG/PRO Application Code
Progress RDBMS
Progress AdminServer
MFG/PRO
Database
In Figure 1.1, the two components that comprise QAD Desktop are the
Desktop Web application installed under Tomcat and the Desktop
Progress code, installed in a subdirectory under your MFG/PRO
Desktop
Architecture
11
12
MFG/PRO Installation Guide — QAD Desktop
installation directory. These directories are placed in the proper locations
by the installation script and MFG/UTIL during the Desktop installation
and build process.
In the following directory structure example, DesktopSystemName
refers to the Desktop system name; your system name will be different,
and should reflect some aspect of the system, such as Test, Train, or
Production.
• MFGPROInstallDir\DesktopSystemName\com
• TomcatInstallDir\webapps\DesktopSystemName
¶ See “Installed
Components” on
page 152.
A list of top-level directories created beneath these directories and a
description of their content are found in Chapter 10.
Client Web Browser
Each Desktop client machine must have a browser to access Desktop.
Desktop can be used only with Microsoft Internet Explorer; other
browsers are not supported.
Other components used by the Web browser on the client include:
Java Runtime Environment. The Java Virtual Machine (JVM)
executes the platform-independent Java bytecode on a specific
operating system. Desktop clients require a more recent version of the
JVM than the browser default. Depending on the client machine
configuration, the Desktop client startup process may automatically
install a compatible Java Runtime Environment (JRE), which
includes the Sun-developed JVM called the Java Plug-in.
Desktop Java Applet. Desktop Java code is contained in the
multinet.jar Java archive (JAR) file. The applet manages the
communication between the browser and programs that display in the
telnet interface. It is installed as part of the Desktop Web application
under Tomcat.
JAR files are managed by the JRE and are automatically downloaded
when the version on the client is older than the version on the server. They
are also automatically downloaded the first time a client needs them;
special setup is not required. JAR files are located in the user’s Windows
profile directory in a subdirectory called java_plugin_AppletStore.
Architectural Overview
13
Tomcat Web Application Server
Desktop uses the Tomcat Servlet/JSP container to manage the
communication between Desktop client sessions and MFG/PRO through
the HTML interface. The Desktop media includes a customized version
of Tomcat, which is the recommended version to use. It is installed as part
of the installation script.
Desktop is installed as a Web application under Tomcat. After files are
installed, you must configure the Connection Manager with installationspecific settings to control and manage the pool of telnet sessions on the
telnet server.
Components of the Java Development Kit (JDK) are used by Tomcat to
enable communication between the client and the Tomcat servlet
container. You may need to download the JDK from the Sun
Microsystems Web site.
In a multi-tier environment when Tomcat is on a different host than the
WebSpeed server, you must install the WebSpeed Remote Messenger
under Tomcat to support communication with WebSpeed. If you use
multiple Tomcat servers, each should have the same version of Tomcat
and JDK installed.
MFG/PRO and Progress Components
Desktop provides the user interface for updating and viewing data in an
MFG/PRO database. The Progress components to support MFG/PRO and
the MFG/PRO database must exist in your environment before you begin
implementing Desktop. This guide assumes you have already installed
and configured them.
¶ For more
information, see
the MFG/PRO
installation guide
for your system.
In addition to the Progress software required for MFG/PRO, Desktop uses
the Progress NameServer, AdminServer, and WebSpeed server products
to support the Java lookups and browses, authenticate users during log-in,
and display online help.
During installation, some Desktop-specific components are added to your
MFG/PRO installation directory and later compiled using the Progress
compiler. A configuration file for the WebSpeed broker is also updated
¶ See “Working
with WebSpeed”
on page 157.
14
MFG/PRO Installation Guide — QAD Desktop
and tailored with installation-specific values. You must also determine the
number of WebSpeed agents required at your site to accommodate user
requests.
Telnet Server
Desktop uses a telnet server for two purposes:
• On the server, it is used to run a pool of telnet sessions that support
HTML maintenance programs, reports, and inquiries.
• It enables the client telnet interface for a limited subset of MFG/PRO
programs and any custom programs that do not conform to QAD
programming standards.
If you plan to use a UNIX machine for the telnet server, you can use the
default telnet service provided with the operating system.
If you plan to use a Windows machine for the telnet server, you must use
the Georgia SoftWorks telnet server software. This software is included
on the Desktop installation media.
The Georgia SoftWorks server is fully integrated with MFG/PRO telnet
session functionality and works seamlessly in the Desktop environment.
The server lets you monitor client sessions as well as detect and eliminate
abnormally terminated client sessions.
¶ See “Register the
Georgia
SoftWorks
Software” on
page 38.
As a QAD customer, you receive a 100-user server license when you
register your telnet server at no cost. Additionally, you are entitled to
60 days of free updates from Georgia SoftWorks beginning on the day
you register your software. After that, you are responsible for further
maintenance.
For more information, access the Georgia SoftWorks Web site for a copy
of their Windows Telnet Server Software User Manual:
http://www.georgiasoftworks.com
Architectural Overview
15
Support Programs
Desktop incorporates various Web-based technologies to support features
such as the Process Editor and the display of MFG/PRO programs in
HTML screens. These technologies are included with the product and are
transparent to the user. They are listed here to give credit to the opensource projects that created them.
• SAXON XSLT Processor from Michael Kay
http://saxon.sourceforge.net
• Struts, an open-source framework for building Web applications, part
of the Jakarta Project, sponsored by the Apache Software Foundation
http://jakarta.apache.org/struts/index.html
• Xerces for parsing and generating XML, from the Apache Software
Foundation
http://xml.apache.org/xerces2-j/index.html
• Batik, a Java-based toolkit for use with images in the Scalable Vector
Graphics (SVG) format, from the Apache Software Foundation
http://xml.apache.org/batik/
• JDOM, a Java-based solution for accessing, manipulating, and
outputting XML data from Java code from the JDOM Project
http://www.jdom.org/
• JFreeChart, a Java class library for generating charts
http://www.jfree.org/jfreechart/
• Log4j, a logging API for advanced logging options in Desktop, part
of the Jakarta Project, sponsored by the Apache Software Foundation
http://jakarta.apache.org/log4j/docs/index.html
• SecurityFilter, a Java Servlet Filter that offers the features of
container managed security, from SourceForge.net.
http://sourceforge.net/projects/securityfilter/
¶ See “Configure
Logging” on
page 171 for
details.
16
MFG/PRO Installation Guide — QAD Desktop
QAD-Supplied Components
The Desktop installation media contains various components needed to
successfully install, set up, configure, and use Desktop.
Table 1.1 lists the components included on the Desktop CD and gives a
summary of their purpose.
Table 1.1
Desktop
Components
Directory Component
Description
Desktop2_7ReleaseNotes. Information about updates included in this release.
html
install.exe
Windows setup executable
install.ksh
UNIX setup script
install.pl
Perl setup script called by install.ksh
license
Text of the QAD license agreement
version.dt2
Information about the version of QAD Desktop on
the media
\AIX
AIX operating system-specific configuration files
\HP-UX
HP-UX operating system-specific configuration files
\lib
Perl library files
\Linux
Linux operating system-specific configuration files
\OSF1
OSF1 (TRU64) operating system-specific
configuration files
\QAD
Perl scripts for use with installation
\SunOS
Sun operating system-specific configuration files and
WinZip utility
\Tools
Georgia SoftWorks telnet server software for
Windows, Perl, and UnZip source
\win32
WinZip for Windows and multi-processor server
executables
\zips\desktop.war
The Web archive file containing all Desktop
application files and directories
\zips\mfgutildt2.zip
MFG/UTIL code for MFG/PRO eB2
\zips\mfgutildt2_1.zip
MFG/UTIL code for MFG/PRO eB2.1
\zips\pro.zip
Modified MFG/PRO Progress files needed to use
Desktop
\zips\tomcat.zip
Tomcat Servlet/JSP Container
Architectural Overview
Planning an Installation
If you have experience installing a previous version of Desktop,
numerous significant changes have occurred to streamline the process
with Desktop 2.7. The most significant change is grouping all
components of Desktop as a single Web application under Tomcat; a
separate Web server is no longer required.
Review this installation guide prior to starting the install and carefully
follow the instructions. Do not attempt a Desktop installation in a
production environment until you have first installed and tested Desktop
in a test environment.
Deployment Options
The various components of MFG/PRO and Desktop can be deployed in
several configurations. You can install all of the components on a single
adequately sized server in a single-tier deployment or on multiple servers
in a multi-tier deployment. Both deployments offer advantages for
different MFG/PRO environments.
To support these deployment options, this guide documents two types of
Desktop installation in two separate chapters:
• A new single-tier installation on one central database server
¶ See page 41.
• A new multi-tier installation across two or more servers
¶ See page 65.
Important If you are upgrading from a pre-2.7 Desktop release, do not
install the new release into directories containing components of an
earlier release.
See “Install a New Desktop Release” on page 142 for an outline of issues
to consider during an upgrade. Also review the Desktop Release Notes
included on the installation media.
Multiple-Tier Installation
There are several ways to deploy Desktop in a multi-tier environment.
Each environment has different characteristics, which makes
documenting all possible combinations impossible. This section describes
two common scenarios.
17
18
MFG/PRO Installation Guide — QAD Desktop
Typical Two-Tier Installation
In a typical two-tier installation, the first server is the MFG/PRO database
server, which should already be configured and running your MFG/PRO
system. It hosts most—if not all—of the MFG/PRO and Progress
components.
The second server contains Tomcat and the Desktop Web application.
WebSpeed Messenger must also be installed with Tomcat.
Figure 1.2 shows the Desktop architecture when it is deployed in a typical
two-tier Desktop system with one database server and one Tomcat server.
Fig. 1.2
Basic Two-Tier
System
Client Web Browser
Log-in, Browses,
Lookups, Help
HTML
Maintenance
Programs
Telnet
Maintenance
Programs
Java Applet
Tomcat
Server
J2SDK
WebSpeed Messenger
JRE
Java Applet
Desktop Web App
Connection
Manager
Database Server
Telnet Processes
WebSpeed Server
WebSpeed Broker
Telnet Server
NameServer
Desktop MFG/PRO Code
Agent Processes
MFG/PRO Application Code
Progress RDBMS
Progress AdminServer
MFG/PRO
Database
Isolated Database Installation
Another type of two-tier deployment supports a dedicated database
server. The Desktop installation, compile, and configuration occur on the
Tomcat server. No additional components are added to the database, nor
are any configuration changes made to this server.
Architectural Overview
19
This two-tier deployment works well in regulated environments where
any change to the database server configuration requires additional
validation overhead. All Desktop and related components are installed
and configured on the Tomcat server. Communication between the
servers occurs using client networking.
Figure 1.3 shows a simplified picture of the component layout for this
Desktop deployment. A full Progress installation, including WebSpeed, is
required on the Tomcat server.
Fig. 1.3
Application Server
Telnet Server
Tomcat
Desktop Web App
Progress
Database Server
WebSpeed Broker
NameServer
Agent Processes
MFG/PRO Application Code
Connection
Manager
Progress AdminServer
J2SDK
Progress RDBMS
Desktop MFG/PRO Code
MFG/PRO Application Code
MFG/PRO
Database
In this arrangement, having the MFG/PRO code on the database server is
not required, but increases performance for intensive tasks such as MRP
and batch processing.
How to Use This Installation Guide
The entire installation process is documented in this guide. Each stage of
the deployment has a corresponding chapter or section in the book. The
installation guide walks you through the deployment of the Desktop
components, the generation of required script files, the entry and
validation of system data, the Desktop code compile, and the distribution
of configured code and scripts managed by these tools.
This guide shows the deployment and configuration steps as they would
most commonly be followed in a typical environment. In the chapters
where step-by-step instructions are provided, field descriptions and
detailed explanations are omitted to streamline the flow of information.
Isolated Database
Server Deployment
20
MFG/PRO Installation Guide — QAD Desktop
Cross-references are provided to other sections of the installation guide
where the detailed information can be found. If you require additional
details about any menu items, functions, or field descriptions, refer to the
pages indicated in the cross-references.
¶ See “QAD
Desktop Quick
Start” on page 62.
Note If you have previous experience installing QAD Desktop in a
single-tier environment, you can go directly to the Quick Start section for
a summary of installation steps.
Installation Overview
The Desktop installation consists of several sequential steps. Figure 1.4
shows a high-level work flow with each step.
Fig. 1.4
Desktop
Installation and
Configuration
Work Flow
Verify
Verifysystem
systemrequirements.
requirements.
Deploy
Deployconfigured
configuredDesktop
Desktopfiles
files
totothe
theapplication
applicationserver.
server.
Prepare
Preparethe
theDesktop
Desktopenvironment.
environment.
Update
Updatesystem
systemconfiguration
configurationfiles
files
for
forthe
theDesktop
Desktopcomponents.
components.
Deploy
Deploythe
theDesktop
Desktopcomponents
components
and
and scripts.
scripts.
Set
Setup
upand
andstart
startConnection
Connection
Manager.
Manager.
Use
UseMFG/UTIL
MFG/UTILtotobuild
buildthe
the
Desktop
Desktopsystem
systemand
andenvironment
environment
configuration
configurationfiles.
files.
Two-tier deployment only
Installation Tools
Three tools are used to deploy and configure Desktop:
Perl deployment scripts. Perl scripts manage the deployment stage of
the Desktop installation. This includes deployment of applications,
application code, HTML and archive files, and some script
components. The Perl scripts are launched from the installation media
or from the directory where the installation media image was copied.
Architectural Overview
MFG/UTIL. Refer to the MFG/PRO installation guide for your system
for navigation and interface information for MFG/UTIL.
MFG/UTIL is the standard QAD tool for completing MFG/PRO and
related application installations. Use it to compile Desktop code,
generate Desktop scripts, and manage files on the database server. In
multi-tier configurations, MFG/UTIL is used to customize and
package the Web application file for installation on the Tomcat server.
Configuration .ini files. These files facilitate the deployment and
configuration steps managed by MFG/UTIL. Each Desktop system
has a corresponding file. This file is automatically created and placed
in the log files directory you indicate during installation. This file
holds the configuration and deployment information used by the
Desktop deployment tools to configure and build the Desktop system.
It is subsequently updated with new information each time you run
any deployment or configuration activity. It must be accessible by
each deployment or configuration activity.
The file name is based on the name you specify for the system you are
configuring, followed by _dt2.ini. For example, if you use the
default deployment name, which is desktop, the configuration file
for your deployment is desktop_dt2.ini.
21
22
MFG/PRO Installation Guide — QAD Desktop
Chapter 2
System Requirements
A Desktop implementation requires planning for adequate system
resources. This chapter provides guidelines you can use to generate
estimates of the hardware and software requirements.
Prerequisite Requirements
Client Requirements
24
25
Tomcat Server Requirements
Progress Server Requirements
Windows Telnet Server
31
28
29
24
MFG/PRO Installation Guide — QAD Desktop
Prerequisite Requirements
Database Server
The database server requirements for Desktop are the same as the
requirements for the MFG/PRO version you are using. The following list
shows the minimum requirements for QAD Desktop. For complete
MFG/PRO requirements, refer to the MFG/PRO installation guide for
your system.
Tip
Progress
components should
be updated to the
latest patch level.
• The required Progress 9.1 software components for MFG/PRO,
including:
• Latest Progress version-specific patches
• Progress AdminServer 9.1
• Progress NameServer 9.1
¶ See “Install and
Configure
WebSpeed
Messenger” on
page 157.
• Progress WebSpeed 3.1
Note If you are completing a multi-tier deployment and do not have
WebSpeed installed on the Tomcat server, you can download and
install the free WebSpeed Messenger.
• MFG/PRO eB2 Service Pack 8 or higher or MFG/PRO eB2.1 Service
Pack 2 or higher (latest service pack recommended)
• Internet access
Verify MFG/PRO Components
If not already started, start your MFG/PRO database server and launch a
character client session. Log in and make sure the character client is
functioning.
Verify Language Compatibility
¶ See Chapter 8 on
page 125.
Desktop is configured to support a defined set of languages and
associated code pages, based on the underlying requirements of the
MFG/PRO database. The supported set has changed over time.
If you are installing Desktop into a non-US English environment, verify
that your database is using a currently supported code page as listed in
Table 8.1, “Supported Progress Code Pages,” on page 127.
System Requirements
Client Requirements
Operating Systems
The following operating systems are supported:
• Microsoft Windows 2000 and XP recommended
• Microsoft Windows 98, ME, and NT 4.0 supported
Minimum Client Hardware
These recommendations assume that the client machine will be used
solely for the Desktop environment. These recommendations do not take
into account any additional requirements for other client machine
applications.
• Memory (RAM):
• Windows NT, 2000 and XP: 128 MB minimum (256
recommended)
• Windows 98 and ME: 64 MB minimum (128 recommended)
• P400 or faster processor (P800 recommended)
• At least 150 MB of disk space, depending on the version of Java,
including 20 MB reserved for static HTML files being cached and
100 MB for other temporary Internet files
• Ability to display 65,536 or more colors
• Ability to display at least 1024 x 768 resolution
Note Display settings should be set to the small font size. Using large
fonts affects some Desktop display properties.
Client Software
Client Browser Requirements
• The latest 6.0 version of Microsoft Internet Explorer is
recommended.
• Microsoft Internet Explorer 5.5 with Service Pack 2 or later is
supported.
25
26
MFG/PRO Installation Guide — QAD Desktop
• Adobe Scalable Vector Graphics (SVG) plug-in 3.0 build 76 for
Desktop Process Editor or viewing process maps created with the
Process Editor. This component is copied to the Tomcat server during
the Desktop installation. It is downloaded by clients when needed.
Tip
JRE includes the
Java Plug-in.
• Java Runtime Environment (JRE): 1.4.2_06 is recommended, but
other 1.4 versions can be used.
If applications on the client machine require a specific version of the
Java Plug-in, see “Desktop Java Plug-in Version Control” on
page 122.
Important Depending on the languages supported by the Windows
operating system on the client PC, the typical install option for JRE may
not install components required to support international character sets. To
avoid this, the JRE must be installed by choosing the custom setup type
and selecting the additional language support option. To verify support for
non-European languages, check for the existence of the following file:
JavaInstallDir/jre/lib/charsets.jar
Client Browser Settings
With a few exceptions, Desktop assumes that default browser settings are
in use.
Note To reset default browser settings, choose Tools|Internet
Options|Advanced; then click Restore Defaults, followed by OK. This
may affect other applications on the client machine.
The following is a list of non-default browser settings required:
• Temporary internet files should be set to check for newer versions of
stored pages automatically.
To change this setting, select Tools|Internet Options|Temporary
internet files|Settings. In the Setting window, select Automatic and
click OK to make the change.
• Set disk space for temporary internet files to at least 100 MB.
To change this setting, select Tools|Internet Options|General, then
click Settings in the Temporary Internet Files frame.
System Requirements
• When using a proxy server, disable access to the proxy for internal IP
addresses. Desktop connects to the proxy server using the settings
defined for your browser.
The following is a partial list of required security defaults:
• You must have Run ActiveX controls and plug-ins enabled.
• Both cookie options must be enabled:
• Allow cookies that are stored on your computer
• Allow per-session cookies (not stored)
• In the miscellaneous security options, submit non-encrypted form
data must be enabled. This is used for submitting search strings.
• All three scripting options must be enabled: active scripting, allow
paste operations via script, scripting of Java applets.
Desktop uses colors and fonts to distinguish various screen elements such
as menus and input frames. Setting any of the accessibility options may
adversely affect screen appearance.
Important If your client PC is running Windows XP Service Pack 2, you
need additional settings to use the browse output to spreadsheet option.
In Windows XP SP2, you must add the Desktop launch point as a trusted
site in Internet Explorer. To do this, follow these steps on the client PC.
1
In Internet Explorer, choose Pop-Up Blocker|Pop-Up Blocker
Settings|Exception.
2
Add the QAD Desktop server’s domain name to the list of exceptions.
3
Choose Tools|Internet Options and click the Security tab.
4
Click Trusted Sites and then click the Sites button.
5
Add the Desktop server’s domain name to the list of trusted sites.
Ensure that Require server authentication (https:) for all sites in this
zone is clear (unchecked). Click OK.
6
On the Security tab, click the Custom Levels button. Scroll down to
the Downloads section, and enable:
• Automatic Prompting for File Download
• File Download
27
28
MFG/PRO Installation Guide — QAD Desktop
Tomcat Server Requirements
Operating Systems
Desktop clients communicate with the Tomcat server using network
protocols and do not require a specific operating system on the server.
Use the operating system that best suits your needs based on criteria such
as your experience or familiarity with the operating system, performance
needs, and available support.
Software
¶ See “Configure
the WebSpeed
Messenger” on
page 158.
• Progress WebSpeed Messenger executable for multi-tier deployments
• Java 2 SDK 1.4
Hardware
Minimum hardware requirements differ depending on your
implementation. The performance and scalability of Desktop is directly
related to proper server sizing. If you are unsure or inexperienced in
performance and capacity planning, obtain professional assistance before
purchasing any hardware.
CPU Requirements
The required number of central processing units (CPUs) and their speed
depends on the type of hardware and operating system you are
implementing. See the hardware vendor’s product documentation and the
operating system documentation for sizing guidelines.
System Requirements
29
Disk Space Requirements
The Tomcat server must have enough disk space for the Desktop
components listed in Table 2.1.
Table 2.1
Desktop Component
Disk Space
Tomcat installation files
10 MB
WebSpeed software
100 MB, less than 1 MB for WebSpeed Messenger
Desktop Web application
100 MB
Disk Space
Requirements
Progress Server Requirements
Operating Systems
Desktop clients communicate with the Progress servers using network
protocols and do not require that the machines on which these servers run
use a specific operating system.
Desktop supports the following platforms:
• Linux (recommended)
• Sun Solaris (SPARC)
• Compaq UNIX (Tru64)
• IBM AIX
• HP-UX
• Windows (Intel)
Java Requirements
Depending on your Progress server hardware and operating system
configuration, a version of the JDK may be installed as part of your
Progress installation, or you may be required to install Java before
installing Progress.
• If Progress installed its own Java version and your Progress server is
on the same machine as Tomcat, do not remove the Progress-installed
JDK. If you need to install a later JDK version for Tomcat, do so
without uninstalling the Progress version.
Tip
Contact your QAD
sales representative
for the latest
supported platforms
and versions.
30
MFG/PRO Installation Guide — QAD Desktop
¶ See “Install the
Java
Development
Kit” on page 36.
• If you must install Java before installing Progress, install the version
required by Desktop.
Hardware
¶ See the System
Requirements
chapter in the
MFG/PRO
installation guide
for your system.
The Progress servers execute the MFG/PRO code for the Desktop clients.
The machine on which these servers run should be sized in a manner
similar to a server running MFG/PRO for an equivalent number of
MFG/PRO character clients.
Progress Components
¶ See the Progress
installation and
configuration
documentation.
• Complete Progress 9.1 installation
Make sure that you performed a complete installation of the Progress
components by choosing the complete installation option.
• Progress NameServer Enterprise Edition, Version 9.1
• Progress AdminServer 9.1
¶ See “WebSpeed
Agent Sizing and
Behavior” on
page 159.
• Progress WebSpeed Transaction Server, Version 3.1, with sufficient
WebSpeed agent licenses to support expected transaction volume
If you are using a local host connection for Desktop, WebSpeed must
be installed on the MFG/PRO database server. For client/server
connections, you can install the WebSpeed software anywhere.
Important If your telnet server is on the same machine as your Progress
components, the 4GL code is also required.
Verify Progress Components
Depending on your operating system, validation steps and commands will
vary. The first step should be to validate that you have the needed
components using the showcfg command.
Use the following sequence of command-line entries to validate Progress
components:
Tip
Optionally use the
WSMAdmin to
validate WebSpeed
components.
• AdminServer
./proadsv -start
./proadsv -query
System Requirements
31
• NameServer
./nsman -name NS1 -start
./nsman -name NS1 -query
• WebSpeed
./wtbman -name wsbroker1 -start
./wtbman -name wsbroker1 -query
Tip
Databases must be
running to start
WebSpeed.
./wtbman -name wsbroker1 -stop
Windows Telnet Server
The Georgia SoftWorks Windows Telnet Server is required for Windows
telnet server implementations. This component is provided on the
Desktop installation media. Even so, download the latest version of the
software to obtain the most recent patches and functionality. Download
the software from the Georgia SoftWorks Web site:
¶ See “Install the
Windows Telnet
Server” on
page 37.
http://www.georgiasoftworks.com/
Refer to the Georgia SoftWorks documentation for software and system
sizing requirements.
Georgia SoftWorks Licensing
As a QAD customer, you receive a 100-user server license when you
register your telnet server at no cost. Additionally, you are entitled to
60 days of free updates from Georgia SoftWorks beginning on the day
you register your software.
Note To be entitled to future updates or upgrades after the initial 60-day
period, you must purchase a subscription plan directly from Georgia
SoftWorks. If you do not choose to purchase a subscription plan, you
must pay for any upgrades after the initial 60 days.
Contact Georgia SoftWorks directly for additional information at:
http://www.georgiasoftworks.com/
¶ For complete
installation and
registration
procedures, see
“Install the
Windows Telnet
Server” on
page 37.
32
MFG/PRO Installation Guide — QAD Desktop
Section 2
Implementation
This section provides instructions for implementing QAD Desktop in
your environment.
Preparing the Desktop Environment
Installing Desktop Single-Tier
Installing Desktop Multi-Tier
35
41
65
Configuring Desktop After Deployment
Configuring Connection Manager
103
Implementing Multiple Languages
125
89
34
MFG/PRO Installation Guide — QAD Desktop
Chapter 3
Preparing the Desktop
Environment
Use this chapter to set up your environment before installing the
Desktop software.
Install the Java Development Kit
36
Install the Windows Telnet Server
37
Define Security Groups for Desktop Administration
39
36
MFG/PRO Installation Guide — QAD Desktop
Install the Java Development Kit
Overview
If a JDK version prior to JDK 1.4 was installed when you installed
Progress and your Progress server and Tomcat are on the same machine,
do not uninstall this JDK version. Instead, install the latest version in the
default JDK installation directory. In most cases, the latest JDK version
should be installed with Progress.
Tip
Check your server
manufacturer’s
Web site for any
server-specific
custom or updated
J2SDK versions.
Download J2SDK for Tomcat from the Sun Microsystems Java Web site:
www.java.sun.com
The download time varies depending on your connection speed. The
J2SDK installation file is approximately 44 megabytes.
Installation
After you download the setup file, start the installation by launching it.
The installation process is automatic; accept all the default settings and
grant any authorization requests.
Set JAVA_HOME Variable
Desktop components such as Tomcat and Connection Manager require
that the JAVA_HOME variable be set correctly on your system. You can
set this with operating system commands, although it typically is set in
startup scripts.
In UNIX environments, use this command:
export JAVA_HOME=/pathtoj2sdk
In Windows environments, enter this command at the DOS prompt:
set java_home=c:\pathtoj2sdk
Note The installation configures the catalina.bat or catalina.sh
file to automatically set the JAVA_HOME variable based on your input.
Record the JAVA_HOME information; you will need to verify it in later
steps.
Preparing the Desktop Environment
Verify the J2SDK
At the UNIX or DOS prompt, enter:
java -version
The system should display information about the current Java version.
Make sure this is the correct version. If you receive an error message,
make sure your PATH environment variable is set correctly.
Install the Windows Telnet Server
To support telnet connections on Windows servers, you must install the
telnet server provided with Desktop. Optionally, check the Georgia
Softworks Web site for an updated version.
The Georgia Softworks Power Features Pack included in the general
release provides a session monitor, which is helpful for troubleshooting
telnet connection issues.
Install the Telnet Server
1
If you are using the QAD-provided version, copy the release-specific
.zip file from the /tools directory on the Desktop CD to a local
drive.
2
Unzip the .zip file to a work directory. Double-click setup.exe in
the work directory to begin installation.
3
At the Welcome window, click Continue.
4
Select Full Install and click Continue.
5
Enter the GSWTS installation directory and choose Continue. Make
sure to use the default \gs_uts installation directory. You can place
this directory on any local drive that can be accessed through the
network.
Note If you do not install GSWTS on the system drive—in most
cases the C: drive—make sure that you have full access to the drive
and to the GSWTS installation directory and subdirectories.
6
When GSWTS has been successfully installed, the Setup Succeeded
window displays and GSWTS is started automatically.
37
38
MFG/PRO Installation Guide — QAD Desktop
7
Double-click the Registration icon in the GSWTS program group.
Register the Georgia SoftWorks Software
To register GSWTS, you must provide a product ID to Georgia SoftWorks
so that a serial number can be generated for your product. This serial
number is necessary to complete the GSWTS registration. Use the
following instructions to register GSWTS.
Your serial number is based on the product ID, and combines elements
that identify server hardware and software components. If these
components are changed or upgraded, your GSWTS registration may no
longer operate. If this occurs, contact Georgia SoftWorks about
generating a new product ID and serial number.
Important If you need to reinstall or are planning to move your
installation to a different platform and you need to obtain new license
codes from Georgia SoftWorks, be sure to indicate that you have
registered previously. If you are a sales agent or a distributor, be sure to
note that information on the registration as well.
1
In the Georgia SoftWorks Product Registration window, enter your
customer information.
The information that displays in the Product Information section of
the registration window is automatically generated by the system.
2
Choose the Save to File button to save this information to a file, or
choose print. Then, follow the appropriate step to supply the product
ID to Georgia SoftWorks:
a
If you printed your registration information, FAX it to Georgia
SoftWorks at 706-265-1020. When your information is received,
a serial number is generated for your product and is sent to you by
FAX.
b
If you saved your registration information to a file, e-mail the file
to Georgia SoftWorks at the following address:
[email protected]
When your information is received, a serial number is generated
for your product and is sent to you by e-mail.
Preparing the Desktop Environment
3
39
When you receive your serial number, enter it in the appropriate field
in the registration information section and click Register.
Define Security Groups for Desktop
Administration
QAD Desktop Release 2.7 introduces a new security model for log-in.
The same security model has been applied for accessing the Desktop
Administration page, which provides direct access to setup, configuration,
and startup pages.
In the current implementation, three MFG/PRO user groups are granted
access to Desktop functions:
• A Desktop administrative user group that performs system
administration functions
• A UI design group that has access to creating simplified screens
• A group that has access to the Process Editor
Note Administrative functions are also supplied with Tomcat for setting
up users who are authorized to administer Tomcat. A link to the Tomcat
administrative function is provided on the Desktop Administration page.
Users clicking this link will be prompted for a user ID and password that
is authenticated through Tomcat functions; this is not the same as the
MFG/PRO user ID and password unless you set them up to be the same.
Desktop Administrative Group
Before users can access the administration page, they must supply a user
ID and password. The system then validates that the user is a member of
an MFG/PRO security group that has been designated as having authority
to manage the Desktop system. By default, this is qadadmin.
You should make sure that this user and group are correctly set up in a
character session of MFG/PRO before installing QAD Desktop. You will
be prompted to enter the Desktop administration group during
installation.
¶ See “Desktop
Administration”
on page 104.
40
MFG/PRO Installation Guide — QAD Desktop
Important A default user ID of mfg is suppled with MFG/PRO.
However, this user ID is not associated with any security group. If you are
using the default record, you must modify it before attempting to use the
Desktop administrative functions. If you are completing a non-US
English Desktop installation, you should also change the language and
country code associated with user mfg so that Desktop administrative
screens display in the correct language.
Setup varies slightly depending on which version of MFG/PRO you are
using:
• In MFG/PRO eB2, associate the group with one or more users in User
Maintenance (36.3.18).
• In MFG/PRO eB2.1, define the group and assign users in User Group
Maintenance (36.3.4). You can also associate predefined groups with
users in User Maintenance (36.3.1).
¶ See “MFG/PRO
Security Group
for Desktop
Administration”
on page 183.
The name of the Desktop administrator group is prompted for during the
Desktop configuration in MFG/UTIL. If you need to change this group
after installation, update the configuration file and rebuild Desktop.
UI Design Group
¶ See User Guide:
QAD Desktop for
details on
simplified
screens.
A separate UI design group for simplified screens is also defined in the
Desktop Administration page. This can be the same user group specified
during installation, but it does not have to be. Typically, the administrative
group for Desktop includes systems personnel, while the UI design group
for simplified screens includes users with in-depth knowledge of the
MFG/PRO application.
Process Editor Group
You can give a separate user group access to the Process Editor. This
group must be named pronav; you cannot change the name.
Chapter 4
Installing Desktop
Single-Tier
This chapter discusses how the Desktop components are deployed by
the installation script, then configured using MFG/UTIL in a single-tier
scenario.
Single-Tier Installation Overview
Install Desktop Components
43
Configure Desktop Components
QAD Desktop Quick Start
42
62
50
42
MFG/PRO Installation Guide — QAD Desktop
Single-Tier Installation Overview
Installing and configuring the Desktop files involves the following steps:
• Install Tomcat and Desktop Web Application
• Install Desktop MFG/PRO Code
• Set Up Windows Telnet Environment
• Verify and Update System Information
• Build the Desktop System
• Generate WebSpeed Configuration Information
• Generate Telnet Connection Scripts
• Print Desktop Information
Figure 4.1 summarizes the installation and configuration activities for a
single-tier Desktop environment. Each topic has a corresponding
installation section. Refer to that information for complete installation
instructions. You may also be advised to see other installation reference
material; make sure you have those materials before you begin that
component of the installation.
For details about installing and configuring Desktop in a multi-tier
environment, see Chapter 5, “Installing Desktop Multi-Tier,” on page 65.
¶ See “QAD
Desktop Quick
Start” on page 62.
Note If you have experience with Desktop installations and are installing
a single language, a Quick Start guide is provided at the end of the
chapter. This summarizes the key steps in the installation process with
cross-references to detailed explanations if they are needed.
Installing Desktop Single-Tier
43
Fig. 4.1
Prepare
Prepareand
andverify
verify
prerequisite
prerequisitecomponents.
components.
Install Desktop Components
Install
Installthe
theTomcat
Tomcatservlet
servlet
engine
engineand
andDesktop
DesktopWeb
Webapp.
app.
Install
InstallDesktop
DesktopMFG/PRO
MFG/PRO
code.
code.
Set
Setup
upWindows
Windowstelnet
telnet
environment.
environment.
= Optional
Single-Tier
Configuration
Work Flow
Configure Desktop Components
Verify
Verifyand
andupdate
updatesystem
system
information.
information.
Set
Setadvanced
advancedbuild
buildoptions.
options.
Build
Buildthe
theDesktop
Desktopsystem.
system.
Generate
GenerateWebSpeed
WebSpeed
configuration
configurationfile
fileand
andtelnet
telnet
connection
connectionscripts.
scripts.
Install Desktop Components
Mount the CD-ROM (UNIX Only)
1
Log on as a user that has write permission to the Tomcat and
MFG/PRO installation directories.
2
Mount the CD-ROM. Example commands are listed in Table 4.1.
Table 4.1
Hardware
Mount Command
Sun
volcheck cdrom
HP
/etc/mount -F cdfs /dev/dsk/YourCDDevice /cdrom
Digital
mount -r -o noversion -t cdfs
/dev/YourCDDevice /cdrom
AIX
smitty mountfs
Then select file system, directory, and file system type (cdrfs).
UNIX CD Drive
Mount Commands
44
MFG/PRO Installation Guide — QAD Desktop
Hardware
Mount Command
Linux
mount /dev/hdb /mnt/cdrom
Where /hdb could be hdc or hdd among other possibilities.
All others
Refer to your operating system documentation or vendor for
requirements to mount a CD-ROM. You may be able to type man
mount to determine the correct command.
Launch Installation Script
Use these steps to start the installation process.
1
Launch the installation script. For UNIX:
./install.ksh
For Windows, run install.exe from Run on the Start menu.
(Ensure you have administrative privileges, first.)
2
¶ See page 21 for
additional log file
details.
You are prompted to enter a log file directory location. Typically, you
should name the log file directory based on its associated MFG/PRO
or Desktop release.
Each Desktop system should have its own log file directory, used for
storing several log and support files. Later installation and
configuration processes look at this location for installation
information stored in an .ini file.
Important Do not delete this directory or manually modify any files
found here.
If the directory you specify does not exist, you are prompted to create
it. The default directory in UNIX is /home/mfg/mfgsvr; in
Windows, it is C:\mfgsvr.
Please enter a directory to write log files
Default is 'C:\mfgsvr'
->c:\mfgsvr
*** Note that each log directory applies to a single
MFG/PRO installation. Please see the Desktop install
guide for additional information.
Use c:\mfgsvr as log directory?
Default is 'y'
->y
Installing Desktop Single-Tier
3
45
When any application .ini files exist in this directory that
correspond to the version of QAD Desktop that you are installing,
they display as selection options.
In the following example, an .ini file already exists for a
configuration named Test. Choose option 2 to create a new
configuration.
*** Configuration file selection ***
Please choose one of the following:
1: Test_dt2.ini -> Test
2: Create new configuration
3: Cancel
<1-3>?
When no application .ini files exist, the following prompt displays:
No .ini was found in directory 'C:\mfgsvr'.
Do you want to start a new setup file (.ini)?
Default is 'y'
-> y
4
You must specify the name you want to use for your Desktop
configuration; this name is applied to the log and .ini files.
What is the application name for this Desktop 2 configuration?
Default is 'desktop'
->Desktop_Prod
Enter Yes to start a new application .ini file; then enter a name for
this Desktop configuration or accept the default. Application names
must be at least three characters, with no spaces.
5
Review and accept the license agreement.
Do you accept the terms of the preceding License Agreement?
If you choose no, the install will stop.
Default is 'n'
-> Y
6
Specify this is a single-tier Desktop system.
*** Configuration: Desktop_Prod ***
*** Please select type of install. ***
1: Single-Tier
2: Multi-Tier (n-tier)
<1-2>? 1
¶ See Chapter 5 for
multi-tier
instructions.
46
MFG/PRO Installation Guide — QAD Desktop
7
The main menu displays.
*** Configuration: Desktop_Prod ***
*** Main Menu ***
Please choose one of the following:
1: Install Tomcat Files Menu
2: Install MFG/PRO - Progress Desktop Files Menu
3: Select a Different Configuration
4: Exit
<1-4>?
Install Tomcat and Desktop Web Application
Complete this section to install the Tomcat servlet engine included on the
Desktop media and deploy the Desktop Web application file.
If you want to use a previously installed QAD-supplied Tomcat version,
enter the installation directory for that version when prompted. The
installation scripts validate that the existing installed version is
compatible with the Desktop release being installed.
• When the script validates the existing Tomcat installation, you are
prompted to install the Desktop Web application only.
• When the existing Tomcat installation is not compatible with the
Desktop release being installed, you are prompted to overwrite the
existing version with the version included on the Desktop installation
media.
¶ See page 176.
¶ See “Set
JAVA_HOME
Variable” on
page 36.
The following steps assume this is a new Tomcat installation. Steps for
the other scenarios vary slightly. Review the installation script prompts to
install only the components you need.
1
Shut down any existing Tomcat instances running on the server.
2
On the main menu, choose 1 to access the Tomcat installation menu.
Note If the JAVA_HOME variable is not set, you are prompted to set
it before continuing. If it is set, you are prompted to confirm.
3
On the Tomcat menu, choose 1 to install Tomcat.
*** Configuration: Desktop_Prod ***
*** Tomcat Menu ***
Please choose one of the following:
1: Install Tomcat Files
2: Uninstall Tomcat
3: Return to Main Menu
<1-3>? 1
Installing Desktop Single-Tier
4
Enter and verify the directory where you want to install Tomcat. To
avoid future configuration issues, install Tomcat in its own directory.
You can use an existing Tomcat installation as long as it meets the
Desktop criteria. To do this, specify the directory where Tomcat is
already installed.
Please enter the Tomcat installation directory.
No default value
->c:\tomcat
The directory 'c:\tomcat' does not exist.
create this directory?
Default is 'y'
-> y
5
Would you like to
Optionally enter a new Tomcat port number.
Please enter the Tomcat port number.
Default is '8080'
->
Important Manual updates are required when Tomcat does not use the
default 8080 port or if another application is already using port 8080.
These steps are detailed in Chapter 6.
The Tomcat installation files are extracted. The Tomcat setenv.sh
and setenv.bat scripts are also updated with Desktop-specific
environment information. You are prompted to press Enter as each
step completes.
Review the displayed installation messages for errors before
proceeding.
6
Enter 3 to exit to the main menu.
*** Tomcat Menu ***
Please choose one of the following:
1: Install Tomcat Files
2: Uninstall Tomcat
3: Return to Main Menu
<1-3>? 3
You now continue by installing the Desktop MFG/PRO code.
¶ See “Update
Tomcat Port
Numbers” on
page 93.
47
48
MFG/PRO Installation Guide — QAD Desktop
Install Desktop MFG/PRO Code
Complete this section to install Desktop-specific code for MFG/PRO and
updates to MFG/UTIL that are included on the Desktop media.
1
From the main menu, choose 2 to access the MFG/PRO – Progress
Desktop Files Menu.
Note You may be prompted to enter or confirm the JAVA_HOME
¶ See page 36.
directory.
2
Choose option 1 to begin installing the Desktop Progress files.
*** Configuration: Desktop_Prod ***
*** MFG/PRO - Progress Desktop Files Menu ***
1: Install MFG/PRO - Progress Desktop Files
2: Update Additional MFG/UTIL Installations
3: Telnet Setup (Windows Only)
4: Uninstall MFG/PRO - Progress Desktop Files
5: Return to Main Menu
<1-5>? 1
3
Enter the MFG/PRO character client installation directory.
In a typical MFG/PRO system, you install the character-client files in
the mfgpro directory.
Please specify the MFG/PRO Character Client directory.
No default value
->D:\mfgpro\eb2sp8_iso8859
¶ See “Define
Security Groups
for Desktop
Administration”
on page 39.
4
Enter the name of a user group in MFG/PRO that will be given
Desktop administration privileges.
Please enter the existing MFG/PRO security group that will
have the admin privileges in Desktop.
Default is 'qadadmin'
->
5
Enter and confirm the MFG/PRO code directory. This directory name
defaults to the Desktop system name being installed. For consistency
when installing multiple Desktop systems, accept the default values.
Please specify the MFG/PRO Desktop code directory.
The Desktop Progress code files will be extracted here.
Default is 'D:\mfgpro\eb2sp8_iso8859\Desktop_Prod'
-> D:\mfgpro\eb2sp8_iso8859\Desktop_Prod
The directory 'D:\mfgpro\Desktop_Prod' does not exist. Would
you like to create this directory?
Default is 'y'
-> y
Installing Desktop Single-Tier
49
The process is logged to the screen. Files are copied, permissions are
set correctly, and MFG/UTIL is updated with Desktop workflows.
You are prompted to press Enter as each step completes.
When the process completes, review the log for errors.
6
The next step depends on your operating system.
• In UNIX environments, choose option 5 to return to the main
menu. Continue your UNIX installation with “Configure Desktop
Components” on page 50.
• For Windows, choose option 3 to generate the telnet scripts as
detailed next in the “Set Up Windows Telnet Environment”
section.
Set Up Windows Telnet Environment
Use the following steps to copy files required for the Windows telnet
server and to generate the k_start.bat script. Make sure you are in the
MFG/PRO – Progress Desktop Files Menu.
1
Choose option 3 to set up your Windows telnet environment.
*** MFG/PRO - Progress Desktop Files Menu ***
Please choose one of the following:
1: Install MFG/PRO - Progress Desktop Files
2: Update Additional MFG/UTIL Installations
3: Telnet Setup (Windows Only)
4: Uninstall MFG/PRO - Progress Desktop Files
5: Return to Main Menu
<1-5>? 3
2
Verify the Georgia SoftWorks Windows Telnet Server (GSWTS)
installation.
The latest release of Georgia SoftWorks Windows NT/2000 Telnet
Server(GSWTS) should be installed before continuing.
Is Georgia SoftWorks Telnet Server installed? (answering 'n'
will return to the previoius menu).
Default is 'y'
-> y
¶ See “Install the
Windows Telnet
Server” on
page 37.
50
MFG/PRO Installation Guide — QAD Desktop
3
Enter the GSWTS installation directory and confirm whether to
overwrite existing files, if any. Back up any files before allowing
them to be overwritten.
Please enter the GSWTS installation directory, including the
drive letter.
Default is 'c:\gs_uts'
->
File 'C:\gs_uts\scripts\k_start.bat' exists.
overwrite this file?
Default is 'n'
-> y
4
Do you want to
You may be prompted to confirm the MFG/PRO character client
directory. The default value is the one you specified earlier.
Please specify the MFG/PRO Character Client directory.
Default is 'D:\mfgpro\eb2sp8_iso8859'
->
5
The system generates a k_start.bat file and places executable
files in several directories. Note the directories before you continue.
Creating a k_start.bat file in
D:\mfgpro\eb2sp8_iso8859\scripts
Thu Feb 5 16:48:57 2004: Created
D:\mfgpro\eb2sp8_iso8859\scripts\k_start.bat
Copying 'win32\imagecfg.exe' to
'D:\mfgpro\eb2sp8_iso8859\telnet\imagecfg.exe'
Copying 'win32\setMP.cmd' to
'D:\mfgpro\eb2sp8_iso8859\telnet\setMP.cmd'
Setup of Telnet files finished.
Press Enter to Continue
6
Press Enter to continue, return to the main menu, and exit the
installation script.
You are now ready to use MFG/UTIL to configure the deployed Desktop
files.
Configure Desktop Components
This section discusses the configuration activities you perform after
deploying the Desktop components. These steps are:
• Add Parameter Files (Optional)
• Verify and Update System Information
• Build the Desktop System
Installing Desktop Single-Tier
51
• Generate WebSpeed Configuration Information
• Generate Telnet Connection Scripts
• Print Desktop Information
During the installation activities, MFG/UTIL on the database server was
updated with the functions needed to configure a Desktop system. When
you launch MFG/UTIL, choose Desktop to view the Desktop-specific
menu options. Only the options used for a single-tier installation are
discussed in this section.
During Desktop configuration, you must specify the database set to use
with Desktop. If you have created .pf files manually without using
MFG/UTIL functions, you can import these files using the Import .pf
Files to Database Set function on the MFG/UTIL Configure menu.
Important The Connection Manager Login Maintenance function on the
Desktop menu cannot be used with Desktop 2.7.
Desktop 2.7 introduces encryption for the server password that is only
supported using the Connection Manager administrative page. Selecting
the Login Maintenance function from MFG/UTIL displays an error in
Desktop 2.7.
¶ See Chapter 7,
“Configuring
Connection
Manager,” on
page 103.
Fig. 4.2
MFG/UTIL
Desktop Menu
Options
Add Parameter Files (Optional)
By default, MFG/UTIL displays all available .pf files found in your
MFG/PRO and client installation directories in the Desktop configuration
screen. You can specify additional directories for MFG/UTIL to search
for other .pf files by using the Desktop|Edit Search Directories for
Desktop Configuration Lookups option on the MFG/UTIL menu.
52
MFG/PRO Installation Guide — QAD Desktop
¶ See “Add
Parameter File
Directories” on
page 195 for
details.
Use this option when you create custom .pf files for compiling Desktop
code that are located in directories other than those used to store the
standard MFG/PRO .pf files.
Verify and Update System Information
Complete this section to set Desktop build parameters.
1
Ensure the MFG/PRO databases are running; if not, start them.
2
Launch MFG/UTIL from the database server. Then choose
Desktop|Configure Desktop Environment Parameters.
Note In UNIX environments, you can also launch MFG/UTIL from
the installation script menu.
¶ See step 6 on
page 49.
3
If MFG/UTIL detects a new Desktop configuration, you are asked
whether this is a Progress database configuration. Choose No if the
new configuration is for an Oracle database; otherwise, choose Yes.
4
The Desktop 2 Configuration screen displays. MFG/UTIL examines
the system .ini files and provides the system names as selection
options. Select the name of the system you are configuring; then
choose Edit Config to review and update the build information.
Fig. 4.3
MFG/UTIL
Database Type
Prompt
Fig. 4.4
Desktop 2
Configuration
Selection
Installing Desktop Single-Tier
5
53
The configuration screen displays.
Fig. 4.5
Single-Tier
Configuration
Screen for Oracle
Oracle
specific
The screen differs slightly depending on the server operating system
and database type. The three fields marked as Oracle specific in
Figure 4.5 display for Oracle database environments;
ORASOPATHNAME is not used in Windows environments.
a
Choose the parameter file for your database in Database
Connection Parameter File with Path. Based on the parameter
file, default values are supplied for most of the configuration
fields on the screen.
54
MFG/PRO Installation Guide — QAD Desktop
¶ See “Desktop
Java Plug-in
Version Control”
on page 122 for
details.
b
Review all field values and update any missing information. For a
typical installation, defaults work without modification. Use the
field descriptions in “MFG/UTIL Reference” on page 181 to help
you review and update the field values.
c
If you are installing into an environment that includes service
pack files in separate directories, enter the correct directory in the
Service Pack Directory field.
d
Use a fully qualified server name for Tomcat Hostname.
e
Specify Yes to Use QAD Desktop Supplied Java Plugin to use the
version of the plug-in supplied on the Desktop CD (1.4.2_06).
6
Choose OK after entering and verifying existing information for all
fields.
7
When the Desktop 2 Configuration screen redisplays, exit to the main
menu.
Build the Desktop System
You can optionally generate build scripts without actually completing the
build at this time. This gives you more control over the build and can ease
system administration activities in environments with multiple Desktop
systems. You can create build scripts for all the Desktop systems without
running the build and then create a batch or cron job to run the build for
one or multiple Desktop systems at a later time when more system
resources are available or during scheduled downtimes.
¶ See step 7 on
page 57.
To generate the scripts only, choose the Advanced Build Options and
select the Create Build Script Only option.
Use the following steps to verify the system information and build the
Desktop system:
1
From the MFG/UTIL main menu, choose Desktop|Build Desktop.
2
In Desktop Configuration Name, choose the system to build.
Installing Desktop Single-Tier
55
Fig. 4.6
Select Desktop
Configuration to
Build
3
The fields are populated with values for the configuration you chose.
Verify the build information by reviewing each set of fields before
building your system.
¶ See page 181 for
field descriptions.
Validated for Build indicates if the system has passed all validations,
such as valid directories and languages. Errors and warnings display
if a validation is not passed.
If Validated for Build is not checked, you may still be able to build the
system, but the system being built may not function properly. You
should return to the data-entry frame to update the build information
as needed before building a non-validated system.
Fig. 4.7
Indicates if this
configuration
has passed all
validation
Build Desktop on
Oracle Database
56
MFG/PRO Installation Guide — QAD Desktop
When you are building Desktop for an Oracle database environment,
the confirmation screen displays the Oracle-specific settings. Verify
the Oracle Home, Oracle SID, and for UNIX environments, the
Oracle Shared Library Path values.
4
Once you verify the values on this screen, choose Web/WebSpeed
Info to review the build information for the Web server and
WebSpeed components.
5
After verifying the Web server and WebSpeed information, choose
Close. In the Desktop Build screen, choose Tomcat Info to review the
build information for Tomcat.
Fig. 4.8
Web Server and
WebSpeed
Information Fields
Fig. 4.9
Tomcat Server
Information Fields
Installing Desktop Single-Tier
6
After verifying the Tomcat information, choose Close to return to the
Build Desktop screen.
7
If you need to set advanced configuration options—typically, used
when building Oracle systems, rebuilding Desktop, upgrading to a
new release, creating build scripts without executing the build, or
building multi-language environments—choose Advanced.
Advanced build options are discussed in “Advanced Build Options”
on page 188.
57
Note If you are building a multiple-language Desktop system, make
sure you review the information in Chapter 8, “Implementing
Multiple Languages,” on page 125.
8
Choose Build and confirm you have reviewed the build information
to build the system. The build log displays as the build occurs.
Fig. 4.10
Confirm the Build
9
When the Desktop build completes, review the build log for errors.
You must correct any errors before you proceed. Choose Close.
Continue with the instructions in the next section to generate the Desktop
system-specific ubroker.properties file.
Generate WebSpeed Configuration Information
Part of the Desktop post-installation configuration process is to update the
WebSpeed configuration file, ubroker.properties, with information
for the Desktop-required brokers. That step requires you to manually
merge a MFG/UTIL-generated parameter file with the WebSpeed
configuration file.
¶ For details, see
“Configure and
Start WebSpeed”
on page 90.
58
MFG/PRO Installation Guide — QAD Desktop
To generate a file with the ubroker.properties information for your
Desktop systems, follow these steps:
1
Launch MFG/UTIL.
2
Choose Desktop|Generate Sample ubroker.properties File. The
Generate Sample ubroker.properties File frame displays.
3
Choose the system in Desktop Configuration Name.
4
Enter the port to use and the minimum and maximum port numbers.
5
Choose OK to build the sample definition for the system you selected.
Fig. 4.11
MFG/UTIL
Generate Sample
ubroker.properties
File
The system displays a message indicating where the file has been saved,
which is in your MFG/PRO installation directory. The file is named:
DesktopSystemName-ubroker.properties
The generated file contains the complete broker definition required by
Progress to launch and configure the brokers, such as:
• Universal unique identifier (UUID) for the broker, used by Progress
to uniquely identify the WebSpeed broker
• The port numbers to use
• Directories for the PROPATH
• Location of log files
Generate this script for each system you are setting up.
Installing Desktop Single-Tier
59
Generate Telnet Connection Scripts
Later steps in the Desktop configuration process require you to specify
telnet connection scripts:
• You specify a telnet log-in sequence in MFG/PRO for programs that
¶ See page 94.
display in Desktop’s integrated telnet display.
• You specify a telnet startup script for Connection Manager log-in
¶ See page 108.
using the Connection Manager administrative page.
Use MFG/UTIL to generate the required startup scripts now.
To generate the Connection Manager and telnet connection scripts,
complete the following steps:
1
Launch MFG/UTIL if it is not running.
2
Choose Desktop|Create Connection Manager and Telnet Scripts from
the main menu.
3
When the Generate Desktop 2 Scripts screen displays, select the
configuration you want to generate scripts for.
Fig. 4.12
MFG/UTIL
Create Connection
Manager and telnet
Scripts
4
Use the check boxes to avoid being prompted to overwrite existing
.pf files and scripts.
5
Choose OK to generate the scripts.
60
MFG/PRO Installation Guide — QAD Desktop
Using the configuration information for the system you selected,
MFG/UTIL generates two files in the Desktop installation directory. The
file names depend on the operating system specified in the configuration
settings screen:
• For UNIX servers, the connmgr.DBSetName and
telnet.DBSetName files are generated.
• For Windows servers, the connmgrDBSetName.bat and
telnetDBSetName.bat files are generated.
DBSetName refers to the database set name specified in the configuration
screen.
Depending on the release you are upgrading from, some files may be
backed up. If any .pf or telnet connection script files are found in the
MFGPROInstallDir or DesktopInstallDir and you choose not to
overwrite them, they are moved to an old_dtscripts directory.
Note In releases of Desktop prior to 2.6, scripts were created in
MFGPROInstallDir. They are now created in DesktopInstallDir.
This ensures that scripts are not overwritten when multiple Desktop
environments are being used, such as a test and production environment.
Important In some UNIX environments (HP-UX and AIX), you may
need to include additional parameters such as SHLIB_PATH and
LIBPATH in the generated files. For details, refer to your server operating
system documentation.
Desktop uses values defined in the Progress protermcap file referenced
by the PROTERMCAP environment variable in the Connection Manager
connection script generated in this step. The keys listed in Table 4.2 must
have their default setting or actions in Desktop may fail. If you have
modified any of these keys in the protermcap file, you must change the
PROTERMCAP environment variable to point to an unchanged file.
Installing Desktop Single-Tier
Table 4.2
UNIX
Windows
F16
Shift-F5
F17
Shift-F6
F18
Shift-F7
F19
Shift-F8
F20
Shift-F9
Print Desktop Information
You can use MFG/UTL to generate a text file containing the complete
configuration information, including PROPATH information, directory
locations, and port information for any of your Desktop systems. A
separate PROPATH is displayed for each of the following:
• Desktop Build PROPATH
• Telnet Client PROPATH
• Connection Manager PROPATH
• WebSpeed PROPATH
Optionally, you can send that information to your system printer. To use
this function, follow these steps:
1
Launch MFG/UTIL.
2
Choose Desktop|Print Desktop Configuration Information from the
main menu.
3
When the Print Desktop Configuration screen displays, select your
configuration name.
Function Keys
61
62
MFG/PRO Installation Guide — QAD Desktop
Fig. 4.13
MFG/UTIL Print
Desktop
Configuration
Information
4
Select Print to file to save a text file; otherwise, specify the printer to
use to print the configuration information.
The sample file is saved to the MFG/PRO installation directory.
Alternatively, enter a fully qualified directory name location and file
name to save the file there.
You are now ready to perform the Desktop setup and configuration steps
detailed in Chapter 6, “Configuring Desktop After Deployment,” on
page 89.
QAD Desktop Quick Start
If you are an advanced user with experience installing a single-tier,
single-language system, you can use this section to quickly move through
the installation steps. Cross-references are provided for each step where
additional details can be found if necessary.
¶ See page 43.
1
Log in as a user with write permissions to the Tomcat and MFG/PRO
installation directories.
2
Insert the Desktop CD-ROM into the drive and mount it on UNIX
systems.
3
On UNIX systems, go to the CD-ROM directory and run:
install.ksh
For Windows, run install.exe from Run on the Start Menu.
Installing Desktop Single-Tier
4
Follow the script prompts:
¶ See page 44.
a
Specify a log file directory.
b
Specify the name for your Desktop configuration.
¶ See page 45.
c
Review and accept the license agreement.
¶ See page 45.
d
Select 1 to specify a single-tier installation.
¶ See page 45.
5
When the main menu displays, choose 1 to install Tomcat files.
Choose 1 on the Tomcat menu to complete the installation. When
complete, exit to the main menu.
¶ See page 46.
6
Choose 2 from the main menu to install the MFG/PRO Desktop code.
When complete, return to the main menu.
¶ See page 48.
7
On UNIX systems, choose 3 on the MFG/PRO – Progress Desktop
Files Menu to launch MFG/UTIL.
On Windows systems, choose 3 on this menu to generate telnet
connection scripts. Then exit the installation menus and start
MFG/UTIL from the Windows Start menu.
¶ See page 49.
8
From MFG/UTIL, go to the Desktop menu and choose Configure
Desktop Environment Parameters. Edit your Desktop configuration.
¶ See page 52.
9
In the configuration parameters screen, review all field values and
update information as needed. Verify that you are using the correct
.pf file and database set name. Then choose OK.
¶ See page 53.
10 Select Build Desktop from the MFG/UTIL Desktop menu. Verify that
¶ See page 54.
all information is correct and choose Build.
Important Ensure the Validated for Build field is checked before
proceeding.
11 When the build completes, select Generate Sample ubroker.properties
¶ See page 57.
File from the Desktop menu. Use this file to create your WebSpeed
broker.
Later, you will copy the file to ubroker.properties.
¶ See page 91.
63
64
MFG/PRO Installation Guide — QAD Desktop
¶ See page 59.
12 From the Desktop menu, choose Create Connection Manager and
telnet scripts to generate two scripts:
• connmgr.DBSetName and telnet.DBSetName in UNIX
systems
• connmgrDBSetName.bat and telnetDBSetName.bat in
Windows systems
¶ See page 94.
13 Exit MFG/UTIL, log in to MFG/PRO, and set up User Option Telnet
Maintenance (36.20.10.3).
¶ See page 90 and
page 93.
14 Start your WebSpeed broker and Tomcat.
15 In a browser, go to:
http://TomcatServer/DesktopSystemName/admin/
Click Connection Manager and choose Update Configuration
Settings.
¶ See page 39.
Note You must be a member of the MFG/PRO user group specified
as administrators to use the administration page.
¶ See page 110.
16 Specify and save your Connection Manager settings. Then restart
Connection Manager and verify you have idle sessions.
17 From the Administration page, click Launch to log in to Desktop.
Chapter 5
Installing Desktop
Multi-Tier
This chapter discusses how the Desktop components are deployed by
the installation script, then configured using MFG/UTIL in a multi-tier
scenario.
Multi-Tier Installation Overview
66
Configure Desktop Components
69
Configure and Prepare Desktop Files
74
66
MFG/PRO Installation Guide — QAD Desktop
Multi-Tier Installation Overview
A multi-tier Desktop installation requires multiple setup and
configuration steps because Desktop components can be deployed to
multiple servers. The number of additional installation and configuration
tasks depends completely on network accessibility, bandwidth, server
location, and your Desktop and MFG/PRO architecture.
This chapter describes the steps required to complete a basic two-tier
installation as illustrated in Figure 1.2, “Basic Two-Tier System,” on page
18.
Other multi-tier deployment options are possible. If you are not using a
basic two-tier installation, ensure you understand the Desktop architecture
and requirements first.
¶ See “Configure
Multiple Desktop
Systems” on
page 166.
Note Additional factors must be considered when you plan to install
multiple Desktop systems on the same server or to set up Desktop systems
for multiple MFG/PRO versions running on the same server. These issues
are discussed in Chapter 10.
A multi-tier installation is facilitated by a shared directory that can be
accessed by both the Tomcat server and the database server. This
directory share is used to store the Desktop .ini file, which holds all the
configuration and installation information used by the Desktop
installation tools. Alternatively, a method to transfer this file and other
shared files is required.
¶ See page 69.
¶ See page 74
A basic two-tier installation follows these steps on the database server:
1
You install Desktop Progress files including files that update
MFG/UTIL with components required to configure and build the
Desktop environment.
2
You place components of the Tomcat Web application in a staging
area you specify to be configured later with MFG/UTIL.
3
In Windows environments, you deploy the k_start.bat telnet
script.
4
Once the database server files are installed, you start MFG/UTIL on
the database server to verify and update system information and run
the Desktop build.
Installing Desktop Multi-Tier
5
Use MFG/UTIL to customize Desktop Web application files and
create a JAR file for installation on the Tomcat server. You also use
MFG/UTIL to:
• Generate an entry for the WebSpeed server
ubroker.properties configuration file.
¶ See page 82.
¶ See page 57.
• Generate Connection Manager and MFG/PRO telnet connection
scripts.
• Generate a detailed system configuration listing.
These MFG/UTIL options are the same as for a single-tier
implementation. You follow the steps in Chapter 4 to complete these
tasks.
6
If the JAR file generated by MFG/UTIL is not in a shared directory,
transfer it to the Tomcat server.
On the Tomcat server, follow these steps:
1
Launch the installation script and extract the JAR contents.
2
Optionally install the QAD-supplied Tomcat if it is not already
installed.
3
Then continue with the steps in Chapter 6 and Chapter 7 before
launching Desktop.
Figure 5.1 depicts the typical multi-tier configuration flow and activities.
¶ See page 84.
67
68
MFG/PRO Installation Guide — QAD Desktop
Fig. 5.1
Multi-Tier
Configuration
Work Flow
Create
Createshare
sharefor
for.ini
.iniand
andJAR
JARfiles.
files.
Database Server
Deploy Desktop Components
Deploy
DeployProgress,
Progress,Desktop,
Desktop,
MFG/UTIL,
MFG/UTIL,and
andstaging
stagingfiles.
files.
Generate
Generatetelnet
telnetscripts
scripts
(Win32
(Win32only).
only).
Configure Desktop Components
Configure
ConfigureDesktop
Desktop22
environment
environmentparameters.
parameters.
Create
CreateDesktop
DesktopWeb
Web
application
applicationfile.
file.
Set
Setadvanced
advancedbuild
buildoptions.
options.
Generate
Generateconfiguration
configurationfiles
files
and
andconnection
connectionscripts.
scripts.
Build
BuildDesktop
Desktop2.2.
Optional
Deploy
DeployDesktop
DesktopWeb
Web
application
applicationon
onTomcat
Tomcat
server.
server.
Plan the Installation
Before you begin, plan where each distributed component will be
installed. Make sure that:
• The user account you plan to use on each server has administrator
access.
• The shared staging directory for the configuration .ini file is
accessible from all host machines and you have read/write access to it
from all servers, or that the file transfer mechanism you plan to use is
working properly for all servers.
¶ See page 157.
• If a full WebSpeed installation is not possible on the application
server, the free WebSpeed Messenger has been installed.
Installing Desktop Multi-Tier
69
Configure Desktop Components
Mount the CD-ROM (UNIX Only)
1
Log on as a user that has write permission to the Tomcat and
MFG/PRO installation directories.
2
Mount the CD-ROM. Example commands are listed in Table 5.1.
Table 5.1
Hardware
Mount Command
Sun
volcheck cdrom
HP
/etc/mount -F cdfs /dev/dsk/YourCDDevice /cdrom
Digital
mount -r -o noversion -t cdfs
/dev/YourCDDevice /cdrom
AIX
smitty mountfs
UNIX CD Drive
Mount Commands
Then select file system, directory, and file system type (cdrfs).
Linux
mount /dev/hdb /mnt/cdrom
Where /hdb could be hdc or hdd among other possibilities.
All others
Refer to your operating system documentation or vendor for
requirements to mount a CD-ROM. You may be able to type man
mount to determine the correct command.
Launch the Installation Script
Use these steps to start the installation process.
1
Launch the installation script. For UNIX:
./install.ksh
For Windows, run install.exe from Run on the Start Menu.
(Ensure you have administrative privileges, first.)
2
You are prompted to enter a log file directory location. Typically, you
should name the log file directory based on its associated MFG/PRO
or Desktop release.
Each Desktop system should have its own log file directory, used for
storing several log and support files. Later installation and
configuration processes look at this location for installation
information stored in an .ini file.
¶ See page 21 for
additional log file
details.
70
MFG/PRO Installation Guide — QAD Desktop
Important For a multi-tier installation, this directory should be on a
shared drive; otherwise, you must copy it later to the Tomcat server.
If the directory you specify does not exist, you are prompted to create
it. The default directory in UNIX is /home/mfg/mfgsvr; in
Windows, it is C:\mfgsvr.
Please enter a directory to write log files
Default is 'C:\mfgsvr'
->c:\mfgsvr
*** Note that each log directory applies to a single
MFG/PRO installation. Please see the Desktop install
guide for additional information.
Use c:\mfgsvr as log directory?
Default is 'y'
->y
3
When any application .ini files exist in this directory that
correspond to the version of QAD Desktop that you are installing,
they are displayed as selection options.
In the following example, an .ini file already exists for a
configuration named Test. Choose option 2 to create a new
configuration.
*** Configuration file selection ***
Please choose one of the following:
1: Test_dt2.ini -> Test
2: Create new configuration
3: Cancel
<1-3>?2
When no application .ini files exist, the following prompt displays:
No .ini was found in directory 'C:\mfgsvr\logfiles'.
Do you want to start a new setup file (.ini)?
Default is 'y'
-> y
4
You must specify the name you want to use for your Desktop
configuration; this name is applied to log and .ini files.
What is the application name for this Desktop 2 configuration?
Default is 'desktop'
->Desktop_Prod
Enter Yes to start a new application .ini file; then enter a name for
this Desktop configuration or accept the default. Application names
must be at least three characters, with no spaces. The name you
specify is used as the .ini file name.
Installing Desktop Multi-Tier
5
71
Review and accept the license agreement.
Do you accept the terms of the preceding License Agreement?
If you choose no, the install will stop.
Default is 'n'
-> Y
6
Specify this is a multi-tier Desktop system.
*** Configuration: Desktop_prod ***
*** Please select type of install. ***
1: Single-Tier
2: Multi-Tier (n-tier)
<1-2>? 2
7
¶ See Chapter 4 for
single-tier
instructions.
The main menu displays.
*** Configuration: Desktop_prod ***
*** Main Menu ***
Please choose one of the following:
1: Install MFG/PRO - Progress Desktop Files Menu
2: Post MFG/UTIL Desktop Build Jar Install
3: Select a Different Configuration
4: Exit
<1-4>?1
Install Desktop MFG/PRO Code
Complete this section to install Desktop-specific code for MFG/PRO and
updates to MFG/UTIL.
1
From the main menu, choose option 1 to access the MFG/PRO –
Progress Desktop files menu.
Note You may be prompted to enter or confirm the JAVA_HOME
directory.
2
On the MFG/PRO – Progress Desktop Files Menu, choose option 1 to
begin installing the Desktop Progress files.
*** Configuration: Desktop-Prod ***
*** MFG/PRO - Progress Desktop Files Menu ***
Please choose one of the following:
1: Install MFG/PRO - Progress Desktop Files
2: Update Additional MFG/UTIL Installations
3: Telnet Setup (Windows Only)
4: Uninstall MFG/PRO - Progress Desktop Files
5: Return to Main Menu
<1-5>? 1
¶ See page 36.
72
MFG/PRO Installation Guide — QAD Desktop
3
Enter the MFG/PRO character client installation directory. In a
typical MFG/PRO system, you install the character-client files in the
mfgpro directory.
Please specify the MFG/PRO Character Client directory.
No default value
->D:\mfgpro\eb2sp8_iso8859
¶ See “Define
Security Groups
for Desktop
Administration”
on page 39.
4
Enter the name of a user group in MFG/PRO that will be given
Desktop administration privileges.
Please enter the existing MFG/PRO security group that will
have the admin privileges in Desktop.
Default is 'qadadmin'
->
5
Enter and confirm the MFG/PRO Desktop code directory. This
directory name corresponds to the Desktop system name being
installed, which you specified in step 4 in the previous section. For
consistency when installing multiple Desktop systems, accept the
default values.
Please specify the MFG/PRO Desktop code directory.
The Desktop Progress code files will be extracted here.
Default is 'D:\mfgpro\eb2sp8_iso8859\Desktop-Prod'
-> D:\mfgpro\eb2sp8_iso8859\Desktop-Prod
The directory 'D:\mfgpro\eb2sp8_iso8859\Desktop-Prod' does
not exist. Would you like to create this directory?
Default is 'y'
-> y
The process is logged to the screen. Files are copied, permissions are
set correctly, and MFG/UTIL is updated with Desktop workflows.
You are prompted to press Enter as each step completes.
When the process completes, review the log for errors when the
installation is complete.
6
You are prompted to enter a directory location for staging files that
need to be configured by MFG/UTIL.
Since this installation is a MULTI_TIER installation, this
installation program will need to copy files off the CD to a
temporary staging area so that MFG/UTIL can modify the files.
Please enter a temporary directory with adequate free space.
Default is 'C:\mfgsvr\staging'
->
Several Progress files are copied to a staging directory. Review the
details that display.
Installing Desktop Multi-Tier
7
73
When the file staging process completes, you are returned to the
Progress Desktop Files menu. You are ready to configure and compile
the staged files to prepare them to be moved to the Tomcat server.
If this is a UNIX environment, launch MFG/UTIL directly from the
installation script or return to the main menu and exit the script. Start
MFG/UTIL manually and continue with “Configure and Prepare
Desktop Files” on page 74.
If this is a Windows environment, you should set up your Windows
telnet environment first.
Set Up Windows Telnet Environment
Use the following steps to copy files required for the Windows telnet
server and to generate the k_start.bat script. Make sure you are in the
MFG/PRO – Progress Desktop Files Menu.
1
Choose option 3 to set up your Windows telnet environment.
*** MFG/PRO - Progress Desktop Files Menu ***
Please choose one of the following:
1: Install MFG/PRO - Progress Desktop Files
2: Update Additional MFG/UTIL Installations
3: Telnet Setup (Windows Only)
4: Uninstall MFG/PRO - Progress Desktop Files
5: Return to Main Menu
<1-5>? 3
2
Verify the Georgia SoftWorks Windows Telnet Server (GSWTS)
installation.
The latest release of Georgia SoftWorks Windows NT/2000 Telnet
Server(GSWTS) should be installed before continuing.
Is Georgia SoftWorks Telnet Server installed? (answering 'n'
will return to the previoius menu).
Default is 'y'
-> y
¶ See “Install the
Windows Telnet
Server” on
page 37.
74
MFG/PRO Installation Guide — QAD Desktop
3
Enter the GSWTS installation directory and confirm whether to
overwrite existing files, if any. Back up any files before allowing
them to be overwritten.
Please enter the GSWTS installation directory, including the
drive letter.
Default is 'c:\gs_uts'
-> c:\gs_uts
File 'C:\gs_uts\scripts\k_start.bat' exists.
overwrite this file?
Default is 'n'
-> y
4
Do you want to
You may be prompted to confirm the MFG/PRO home directory. The
default value is the one you specified earlier
Please Enter/Confirm the MFG/PRO Home directory ( MFG_HOME ).
Default is 'D:\mfgpro\eb2Sp8_iso8859'
-> D:\mfgpro\eb2Sp8_iso8859
5
The system generates a k_start.bat file and places executable
files in several directories. Note the directories before you continue.
Creating a k_start.bat file in C:\gs_uts\scripts
Thu Feb 5 16:48:57 2004: Created
C:\gs_uts\scripts\k_start.bat
Copying 'win32\imagecfg.exe' to
'D:\mfgpro\eb2sp8_iso8859\telnet\imagecfg.exe'
Copying 'win32\setMP.cmd' to
'D:\mfgpro\eb2sp8_iso8859\telnet\setMP.cmd'
Setup of Telnet files finished.
Press Enter to Continue
6
Press Enter to continue, return to the main menu, and exit the
installation script.
You are now ready to use MFG/UTIL to configure the Desktop files.
Configure and Prepare Desktop Files
This section discusses the configuration activities you perform after
deploying the database components and staging the Tomcat server files.
These steps are:
• Add Parameter Files (Optional)
• Verify and Update System Information
• Build the Desktop System
Installing Desktop Multi-Tier
75
• Create Application Server JAR File
• Create Connection and Configuration Files
• Launch the Installation Script
During the earlier installation steps, MFG/UTIL on the database server
was updated with the functions needed to configure a Desktop system.
When you launch MFG/UTIL, choose Desktop to view the Desktopspecific menu options. Only the options used for multi-tier installation are
discussed in this section.
Important The Connection Manager Login Maintenance function on the
Desktop menu cannot be used with Desktop 2.7.
Desktop 2.7 introduces encryption for the server password that is only
supported using the Connection Manager administrative page. Selecting
the Login Maintenance function from MFG/UTIL displays an error in
Desktop 2.7.
¶ See Chapter 7,
“Configuring
Connection
Manager,” on
page 103.
Fig. 5.2
MFG/UTIL
Desktop Menu
Options
Add Parameter Files (Optional)
By default, MFG/UTIL displays all available .pf files found in your
MFG/PRO and client installation directories in the Desktop configuration
screen. You can specify additional directories for MFG/UTIL to search
for other .pf files by using the Desktop|Edit Search Directories for
Desktop Configuration Lookups option on the MFG/UTIL menu.
76
MFG/PRO Installation Guide — QAD Desktop
¶ See “Add
Parameter File
Directories” on
page 195 for
details.
Use this option when you create custom .pf files for compiling Desktop
code that are located in directories other than those used to store the
standard MFG/PRO .pf files.
Verify and Update System Information
Complete this section to set the Desktop build parameters.
1
Ensure the MFG/PRO databases are running; if not, start them.
2
Launch MFG/UTIL from the database server. Then choose
Desktop|Configure Desktop Environment Parameters.
Note In UNIX environments, you can also launch MFG/UTIL from
the installation script menu.
3
If MFG/UTIL detects a new Desktop configuration, you are asked
whether this is a Progress database configuration. Choose No if the
new configuration is for an Oracle database; otherwise, choose Yes.
4
The Desktop 2 Configuration screen displays. MFG/UTIL examines
the system .ini files and provides the system names as selection
options. Select the name of the system you are configuring; then
choose Edit Config to review and update the build information.
Fig. 5.3
MFG/UTIL
Database Type
Prompt
Fig. 5.4
Desktop 2
Configuration
Selection
Installing Desktop Multi-Tier
5
77
The configuration screen displays.
Fig. 5.5
Multi-Tier
Configuration
Screen for Oracle
Oracle
specific
The screen differs slightly depending on the server operating system
and database type. The three fields marked as Oracle specific in
Figure 5.5 display for Oracle database environments;
ORASOPATHNAME is not used in Windows environments.
a
Choose the parameter file for your database in Database
Connection Parameter File with Path. Based on the parameter
file, default values are supplied for most of the configuration
fields on the screen.
78
MFG/PRO Installation Guide — QAD Desktop
¶ See “Desktop
Java Plug-in
Version Control”
on page 122 for
details.
b
Review all field values and update any missing information. For a
typical installation, defaults work without modification. Use the
field descriptions in “MFG/UTIL Reference” on page 181 to help
review and update the field values.
c
If you are installing into an environment that includes service
pack files in separate directories, enter the correct directory in the
Service Pack Directory field.
d
Use a fully qualified server name for Tomcat Hostname.
e
Specify Yes to Use QAD Desktop Supplied Java Plugin to use the
version of the plug-in supplied on the Desktop CD (1.4.2_06).
6
Choose OK after entering and verifying existing information for all
fields.
7
When the Desktop 2 Configuration screen displays again, exit to the
main menu.
Build the Desktop System
You can optionally generate build scripts without actually completing the
build at this time. This gives you more control over the build and can ease
system administration activities in environments with multiple Desktop
systems. You can create build scripts for all the Desktop systems without
running the build and then create a batch or cron job to run the build for
one or multiple Desktop systems at a later time when more system
resources are available or during scheduled downtimes.
¶ See step 7 on
page 81.
To generate the scripts only, choose the Advanced Build Options and
select the Create Build Script Only option.
Use the following steps to verify the system information and build the
Desktop system:
1
From the MFG/UTIL main menu, choose Desktop|Build Desktop.
2
In Desktop Configuration Name, select the system to build.
Installing Desktop Multi-Tier
79
Fig. 5.6
Select Desktop
Configuration to
Build
3
The fields are populated with values for the configuration you chose.
Verify the build information by reviewing each set of fields before
building your system.
Validated for Build indicates if the system has passed all validations,
such as valid directories and languages. Errors and warnings display
if a validation is not passed.
If Validated for Build is not checked, you may still be able to build
the system, but the system being built may not function properly. You
should return to the data-entry frame to update the build information
as needed before building a non-validated system.
Fig. 5.7
Indicates if this
configuration
has passed all
validation
Build Desktop on
Oracle Database
80
MFG/PRO Installation Guide — QAD Desktop
When you are building Desktop for an Oracle database environment,
the confirmation screen displays the Oracle-specific settings. Verify
the Oracle Home, Oracle SID, and for UNIX environments, the
Oracle Shared Library Path values.
4
Once you verify the values on this screen, choose Web/WebSpeed
Info to review the build information for the Web server and
WebSpeed components.
5
After verifying the Web server and WebSpeed information, choose
Close. At the Desktop Build screen, choose Tomcat Info to review the
build information for Tomcat.
Fig. 5.8
Web Server and
WebSpeed
Information Fields
Fig. 5.9
Tomcat Server
Information Fields
Installing Desktop Multi-Tier
6
After verifying the Tomcat information, choose Close to return to the
Build Desktop screen.
7
If you need to set advanced configuration options—typically, used
when building Oracle systems, rebuilding Desktop, upgrading to a
new release, creating build scripts without executing the build, or
building multi-language environments—choose Advanced.
Advanced build options are discussed in “Advanced Build Options”
on page 188.
81
Note If you are building a multiple-language Desktop system, make
sure you review the information in Chapter 8, “Implementing
Multiple Languages,” on page 125.
8
Choose Build and confirm you have reviewed the build information
to build the system. The build log displays as the build occurs.
Fig. 5.10
Confirm the Build
9
When the Desktop build completes, review the build log for errors.
You must correct any errors before you proceed. Choose Close.
You are ready to create the archive file that will be used to deploy the
configured Web application on the Tomcat server.
82
MFG/PRO Installation Guide — QAD Desktop
Create Application Server JAR File
Use the following steps to build the archive file for the Tomcat server:
1
In MFG/UTIL, choose Desktop|Create Desktop Archive Files.
2
The Create Desktop Archive Files screen displays. Select your
configuration name. The stage directory specified previously
displays.
3
Specify the destination directory for the JAR file; then choose Build
JARs.
Fig. 5.11
Create Desktop
Archive Files
Fig. 5.12
Create Desktop
Archive Files
The destination directory must be an existing directory location. In
the example, D:\shared is a network share. This process takes
several minutes. The log files display on the screen.
Installing Desktop Multi-Tier
Fig. 5.13
Build JAR Log
4
When the process completes, review the log for errors. If the JAR file
was not generated directly to a network share, transfer it to a network
share or to a local drive on the Tomcat server.
You are now ready to create the connection and configuration files. These
files are required during later Connection Manager and WebSpeed
configuration steps.
Create Connection and Configuration Files
Before you deploy the JAR file on the Tomcat server, generate required
configuration and startup scripts. These steps are exactly the same as the
corresponding steps for a single-tier installation. That information is not
repeated here; refer to the following steps in Chapter 4.
• The entry for the WebSpeed ubroker.properties configuration
¶ See page 57.
file.
• The Connection Manager and telnet connection scripts. These files
are used by Connection Manager to connect to the MFG/PRO
database server and specified in MFG/PRO in User Telnet Options
Maintenance (36.20.10.3).
¶ See page 59.
83
84
MFG/PRO Installation Guide — QAD Desktop
• The system configuration listing. This includes complete
¶ See page 61.
configuration information for the Desktop system environment.
Launch the Installation Script
Use the following steps to launch the installation script and deploy the
Web application JAR file to the Tomcat server. Before you proceed, make
sure the .ini and JAR files are accessible from the Tomcat server or you
have copied them to a local directory on the Tomcat server.
1
On the Tomcat server, launch the installation script from the Desktop
installation media.
2
At the prompt, point to the .ini file for the multi-tier system that
was created when you installed and staged the Desktop components
on the database server (step 4 on page 70).
In the following example, the .Desktop-Prod_dt2.ini was
copied to the D:\shared Windows network share.
Please enter a directory to write log files
Default is 'C:\mfgsvr'
->D:\shared
3
At the configuration file selection prompt, select the configuration
file for your multi-tier system.
*** Configuration file selection ***
Please choose one of the following:
1: Desktop-Prod_dt2.ini -> Desktop-Prod
2: Create new configuration
3: Cancel
<1-3>? 1
4
¶ See “Set
JAVA_HOME
Variable” on
page 36.
On the main menu, choose the Post MFG/UTIL Desktop Build Jar
Install menu option.
Note You may be prompted to enter or confirm the JAVA_HOME
value.
Installing Desktop Multi-Tier
*** Configuration: Desktop-Prod ***
*** Main Menu ***
Please choose one of the following:
1:
2:
3:
4:
<1-4>? 2
Install MFG/PRO - Progress Desktop Files Menu
Post MFG/UTIL Desktop Build Jar Install
Select a Different Configuration
Exit
The JAVA_HOME environment variable for this machine is set to
'C:\j2sdk1.4.2'. Is this correct?
Default is 'y'
->
5
When prompted, enter the directory where the JAR file is located.
This should be your network share or the local Tomcat server
directory where you copied the JAR file. In this example, the file was
moved to the same network share where the .ini file was placed.
The default is the database directory where the files were originally
generated:
Please enter the location of the MFG/UTIL created JAR files.
Default is 'C:\mfgsvr\staging'
-> D:\shared
6
The JAR extract menu displays.
*** Configuration: Desktop-Prod ***
*** Jar Extract Menu ***
Please choose one of the following:
1: Desktop-Prod_webapp.jar
2: Return to Main Menu
<1-2>?
This menu displays the JAR files in the directory you specified. The file
name consists of the system name, followed by _webapp.jar. For
example, Desktop-Prod_webapp.jar contains the Web application
files for the Desktop-Prod system.
85
86
MFG/PRO Installation Guide — QAD Desktop
Deploy the Customized Web Application Files
Use the following steps to expand the Web application JAR file, which
contains the customized Web application files that reside on the Tomcat
server. Additionally, if Tomcat is not already installed on this server, this
step also installs the QAD-provided version.
1
From the JAR extract menu, choose the option to deploy the
_webapp.jar file for your system to the local Tomcat server
directories.
2
The system reviews your current configuration to see if the file can be
distributed to the local server. Review and confirm the system
configuration prompts. This includes verifying the server name and
whether it is a Tomcat server.
This machine's name is 'dr1.qad.com'.
Is dr1.qad.com a Tomcat server?
Default is 'y'
->
3
Enter and confirm the Tomcat directory. If Tomcat is not already
installed, it will be installed here. If a QAD-compatible version of
Tomcat is already installed, only the customized Web application file
is installed.
Please enter the Tomcat installation directory.
Default is 'c:\tomcat'
->
The directory 'c:\tomcat' does not exist.
create this directory?
Default is 'y'
->
4
Would you like to
Confirm the default Tomcat port or enter a new one.
Please enter the Tomcat port number.
Default is '8080'
->
¶ See “Update
Tomcat Port
Numbers” on
page 93.
Important Manual updates are required when Tomcat does not use the
default 8080 port or if another application is already using port 8080.
These steps are detailed in Chapter 6.
Installing Desktop Multi-Tier
5
You may be prompted to install Tomcat; confirm that Tomcat should
be installed.
It does not appear that Tomcat is installed at 'c:\tomcat'.
Do you want to install Tomcat to this directory now?
Answering 'n' will cancel the extraction of
'D:\shared\Desktop-Prod_webapp.jar'.
Default is 'y'
->
The installation scripts expand the JAR file and deploy the configured
files to the proper directories. Review the logs. At the conclusion of
the file expansion process, the JAR extract menu redisplays.
Installation activities on the Tomcat server are complete; you can now
exit the installation script. You are ready to perform the setup
activities detailed in Chapter 6, “Configuring Desktop After
Deployment,” on page 89.
87
88
MFG/PRO Installation Guide — QAD Desktop
Chapter 6
Configuring Desktop
After Deployment
Use this chapter to configure your environment after you install and
configure the Desktop files.
Post-Deployment Configuration
Configure and Start WebSpeed
Configure and Start Tomcat
90
90
93
Prepare Telnet UI Connection Scripts
94
90
MFG/PRO Installation Guide — QAD Desktop
Post-Deployment Configuration
Before you can launch Connection Manager, you must complete the
following tasks:
• Configure and Start WebSpeed
• Configure and Start Tomcat
• Prepare Telnet UI Connection Scripts
The following sections detail how to complete each of these steps.
Configure and Start WebSpeed
The WebSpeed server is used for the MFG/PRO log-in sequence, for user
validation, and for running browses and lookups. The WebSpeed
ubroker.properties file holds all the configuration information used
by WebSpeed.
You should have generated the ubroker.properties information for
your system using MFG/UTIL as part of configuring Desktop
components. If you have not already generated the configuration data for
your Desktop system, use the steps in “Generate WebSpeed
Configuration Information” on page 57 to do so now.
The only WebSpeed configuration task that remains is to copy the
updated sample contents into the WebSpeed ubroker.properties file.
Since MFG/UTIL has already recorded most of your system
configuration details, the generated sample file includes all the required
information in the required format. Typically you can simply copy the
entire sample settings directly into your system ubroker.properties
file.
Important Always back up configuration files before editing them.
Configuring Desktop After Deployment
Update the WebSpeed Configuration File
Use the following steps to update the WebSpeed ubroker.properties
configuration file by adding the MFG/UTIL-generated Desktop
configuration data to it.
1
If you have not already generated the configuration data for your
Desktop system, use the steps in “Generate WebSpeed Configuration
Information” on page 57 to do so now.
2
Make a backup copy of the ubroker.properties file found in the
properties subdirectory of your Progress installation directory.
Name it ubroker.orig.
3
Using a text editor, open the MFG/UTIL-generated
DesktopSystemName-ubroker.properties file in your
MFG/PRO installation directory.
4
Open the ubroker.properties file in the properties
subdirectory of your Progress installation directory.
5
Copy the text from the MFG/UTIL-generated file to the end of the
ubroker.properties file.
6
Close the MFG/UTIL-generated ubroker.properties.
7
Save the file and exit the text editor.
Verify WebSpeed on Tomcat Server
If you have completed a multi-tier installation, the WebSpeed
Messenger—cgiip.exe for Windows, wspd_cgi.ksh for UNIX—
must exist on the Tomcat application server in the following location:
TomcatHome/webapps/DesktopSystemName/WEB-INF/cgi/
Verify that it is currently installed. If it is not, refer to the instructions in
“Install and Configure WebSpeed Messenger” on page 157 for details
about installing it.
91
92
MFG/PRO Installation Guide — QAD Desktop
Verify WebSpeed Servers
Use these steps to verify the WebSpeed servers are active.
Tip
1
Review the log files
in the Progress
work directory for
diagnostic help.
Check to see if the AdminServer is running using the following
command:
ProgressHome/bin/proadsv -query
If the AdminServer is not already running, start it using the following
command:
ProgressHome/bin/proadsv -start
2
Start the NameServer process for your broker. These instructions use
the default NameServer, NS1:
nsman -name NS1 -start
You can check the status of the NameServer using the following
command:
nsman -name NS1 -query
3
Start the MFG/PRO database servers for the Production database set.
To start the database servers, use the database startup script for the
Production database set; for example, start.Production.
When you start a WebSpeed broker, the broker’s agents attempt to
connect to the databases specified in the Desktop .pf file. This
connection fails if the servers for the databases are not running.
4
Start the WebSpeed server instance.
ProgressHome/bin/wtbman -name BrokerName -start
5
Check the status of the WebSpeed server instance.
ProgressHome/bin/wtbman -name BrokerName -query
6
After you check the status, leave the instance running. If you need to
stop the server, use this command:
ProgressHome/bin/wtbman -name BrokerName -stop
¶ For additional
commands, see
the Progress
WebSpeed
Installation and
Configuration
Guide.
In addition to the wtbman management utility, you may also need to
refer to the log files for the WebSpeed server instance. These files are
located in the directory you specified in the agent and broker log file
entries (srvrLogFile= and brokerLogFile= respectively).
Configuring Desktop After Deployment
Configure and Start Tomcat
Updating port numbers is required only in these situations:
• You did not accept the default 8080 port when you installed the
Tomcat servlet engine.
• You have multiple Tomcat instances on the same server, which may
result in port conflicts.
• Other applications already use the default Tomcat port. For example,
Oracle 9i uses port 8080 as the default port for its Web server.
Update Tomcat Port Numbers
If you are using more than one Tomcat instance on a single server or have
other applications that use the default Tomcat ports such as 8080 or 8005,
you must update the ports in the Tomcat server.xml configuration file
so that each servlet engine is using unique ports. Each Tomcat instance
has it own configuration file.
Use these steps to update the server.xml configuration file for Tomcat
with the port you plan to use.
1
Using a text editor, open the server.xml file for editing. This file is
located in TomcatInstallDir/conf.
2
Look for the following parameter block and update the port reference
from port 8080 to the port you plan to use:
<!-- Define a non-SSL Coyote HTTP/1.1 Connector on port 8080 -->
<Connector port="8080"
maxThreads="150" minSpareThreads="25" maxSpareThreads="75"
enableLookups="false" redirectPort="8443" acceptCount="100"
debug="0" connectionTimeout="20000"
compression="on"
disableUploadTimeout="true" />
<!-- Note : To disable connection timeouts, set connectionTimeout
value to 0 -->
3
If you need to change the server port from the default 8005 value,
look for the following parameter block and update the port reference:
<Server port="8005" shutdown="SHUTDOWN" debug="0">
4
Save the file.
¶ See page 46.
93
94
MFG/PRO Installation Guide — QAD Desktop
Start Tomcat
To start Tomcat, launch the startup file in TomcatInstallDir/bin
directory:
• In Windows environments, use the startup.bat file.
• In UNIX environments, use startup.sh.
Note On UNIX systems, you may have to log in as root to start
Tomcat.
Prepare Telnet UI Connection Scripts
You can access maintenance and transaction programs in Desktop in two
ways.
• A few maintenance programs display in Desktop’s integrated telnet
interface.
• Most maintenance programs display with HTML screens. These
screens are generated through XML transformation from a pool of
telnet sessions.
A telnet connection script is used to identify the MFG/PRO database that
you want each type of program to run against. In general, the connection
script performs the following functions:
• Changes to the user’s home directory
• Provides connection parameters for the databases in the set
¶ See page 59.
You use MFG/UTIL to generate the two required telnet connection scripts
for each database set you configure. You then use Connection Manager to
specify the log-in script needed to create the telnet pool for HTML
programs. This is discussed in “Administer Connection Manager” on
page 108.
No additional configuration steps are required for Desktop to correctly
display HTML programs. Additional setup is required to configure the
system for the programs that display in Desktop’s integrated telnet
display. You do this setup in User Option Telnet Maintenance
(36.20.10.3).
Configuring Desktop After Deployment
This program lets you define unique settings for individual users or enter
an asterisk (*) in the User ID field to create a generic record of settings.
This generic record is automatically associated with every user in the
system that does not have a user-specific record.
In addition to settings, you use this program to specify the Windows
telnetDBSetName.bat or UNIX telnet.DBSetName connection
script that identifies the MFG/PRO database the Desktop telnet session
will run against. DBSetName refers to the database set name. This is the
connection script that was generated using MFG/UTIL during the
Desktop component configuration steps.
Most of the information you define in this program is the same regardless
of your telnet server’s operating system. The instructions indicate when
there are differences.
Configuring the settings in User Option Telnet Maintenance consists of
the following tasks:
• “Specify Telnet Server Settings” on page 95
• “Define the Log-In Sequence Script Lines” on page 96
• “Verify the Log-In Sequence” on page 100
• “Configure Telnet Connection Settings” on page 100
Specify Telnet Server Settings
Use the following instructions to configure telnet server settings:
1
Start an MFG/PRO session and access User Option Telnet
Maintenance (36.20.10.3).
2
In the User ID field, enter * to specify the generic record and press
Go.
3
Use the following table to complete the Telnet Options fields in User
Option Telnet Maintenance.
¶ See page 59.
95
96
MFG/PRO Installation Guide — QAD Desktop
Field
Description
Host
Enter the fully qualified machine name or IP address of the
telnet server. Desktop uses this information to establish the
telnet connection.
Host O/S
Enter UNIX for UNIX systems.
Enter NT for Windows systems.
Port
Enter the port number for the telnet server.
The default value is 23. This is the value you would normally
use.
Image
Leave this field blank; images do not apply to Desktop.
Script Timeout
Enter the number of seconds (1-999) the system will wait for
the telnet log-in script to execute.
If this value is exceeded, a time-out message displays and the
session closes.
Idle Timeout
4
Enter the number of seconds (1-999) the system will wait after
a telnet session begins for an MFG/PRO program to execute.
When you are ready, press Go to access the Script Lines frame.
Define the Log-In Sequence Script Lines
To log in to and begin a telnet session on the telnet server, you must
provide the Desktop Java applet with the telnet server log-in prompts and
responses to these prompts. Taken together, the prompts and responses
make up the telnet log-in sequence.
Note The last step in the sequence specifies the script you created in
MFG/UTIL.
You define the telnet log-in sequence in the Script Lines frame in User
Option Telnet Maintenance.
Each line in the log-in sequence is stored in the MFG/PRO administration
schema as a single chui_det record containing three values: pattern, value,
and status. Each of these values is represented by a field in the Script
Lines frame.
Configuring Desktop After Deployment
97
Table 6.1 provides a general description of the fields in the Script Lines
frame.
Table 6.1
Field
Description
Sequence
A number for the script line that indicates the order that the line
appears in the overall log-in sequence.
Script Pattern
Enter the prompt generated by the telnet server when a telnet log-in
occurs.
Important The values you enter in the Script Pattern field must be
identical to the prompts the telnet server displays when users attempt
to log in.
Script Value
Enter the response to the telnet log-in prompt defined in Script
Pattern.
Script Status
Optionally enter a description of the activity that the prompt and
response represent. For example, if the prompt is Login: and the
response is a user ID, enter Logging In to describe the activity.
If you have tracing enabled and the Java console is displayed, the
description in the Script Status field displays in the Java console on
the Desktop client when an error occurs during the execution of the
prompt and response. You can use these descriptions as an aid in
troubleshooting telnet session issues.
Sample Scripts
Review the following sample log-in scripts to become familiar with the
configuration process. Then create your log-in sequence based on your
environment. For reference purposes record your scripts in the table
provided. View the MFG/PRO field help for additional field-specific
details.
Note Windows log-in scripts typically include the log-in domain.
Domain names should adhere to the Internet Engineering Task Force
(IETF) published standards. For more information, refer to document
RFC1035 found at the following URL:
http://ietf.org/rfc/rfc1035.txt?number=1035
Script Lines Fields
98
MFG/PRO Installation Guide — QAD Desktop
Table 6.2 illustrates sample script lines for a Windows system.
Table 6.2
Sample Windows
Script Values
Script
Seq Pattern
Script Value
Script Status
Notes
1
login:
user1
Logging In
This ID must correspond to a
local user account on the
Windows server.
2
password:
pswd
Supply
Password
Enter the password assigned to
the user ID specified in step 1.
3
domain:
domain1
Supply Domain
Enter your Windows telnet
server’s domain, if required.
4
>
c:\telnet\user1
Start GTNTS as
user1
Enter the user- or groupspecific directory below the
telnet directory.
5
>
telnetProd.bat
Launching script This is the telnet script
to connect to
generated by MFG/UTIL.
Prod
Important In MFG/PRO eB2.1, the value entered in sequence 2 is
assumed to be a password and is not displayed on the screen. You are
prompted to re-enter it for verification purposes.
Table 6.3 illustrates sample script lines for a UNIX system. Record your
log-in script values in Table 6.4.
Table 6.3
Sample UNIX
Script Values
Script
Seq Pattern
Script
Value
Script Status
Notes
1
login:
user1
Logging In
This ID must correspond to a local user
account on the UNIX server.
2
password: pswd
Supply
Password
Enter the password assigned to the user
ID specified in step 1.
Configuring Desktop After Deployment
Script
Seq Pattern
Script
Value
Script Status
Notes
3
cd /qad/
eB2/
Accessing
DBServer Dir
Change directories to the MFG/PRO
database server administration
directory.
$
99
Depending on how you set up your
UNIX telnet environment, the response
you enter varies. For example, for
maximum security, you might enter a
command to change to a restricted shell
before changing to the directory
containing the telnet script. See “UNIX
Telnet Environment Security Issues” on
page 163.
4
$
./telnet.Prod Launching
Launch the telnet connection script. See
script to connect “Generate Telnet Connection Scripts”
to Prod
on page 59.
Use Table 6.4 to record your telnet server log-in information.
Table 6.4
Seq
Script Pattern
Script Value
Script Status
1
Telnet Log-In
Script Information
2
3
4
5
Your completed table for the telnet script should be similar to Table 6.5.
Table 6.5
Seq
Script Pattern
Script Value
Script Status
1
Login
UserID
Logging in
2
Password
UserPassword
Supply the password
3
$
cd /qad/eB2/
Accessing DBServer Dir
4
$
./telnet.Prod
Launching Prod telnet
connect script
Sample Telnet
Log-In Script
100
MFG/PRO Installation Guide — QAD Desktop
Verify the Log-In Sequence
To verify the log-in sequence, from a remote machine attempt to log in to
the telnet server using the log-in sequence you configured in MFG/PRO.
You should receive a blank telnet screen after the telnet connection script
is launched.
Configure Telnet Connection Settings
Once you configure and verify your telnet log-in sequence, access the
Telnet Connections frame and specify telnet connection settings. These
settings define the maximum and minimum number of telnet connections
available to the associated user.
Important These settings apply to both telnet and HTML maintenance
programs in Desktop.
1
Access the Telnet Connections frame.
2
Use the following field descriptions to complete the Telnet
Connections fields.
Maximum. This value specifies two different settings:
• The maximum number of concurrent embedded telnet screen
connections this user can have open per session.
• The maximum number of detached windows running HTML
programs allowed for the user. If a specific record does not exist
for a user with this setting defined, that user can continue opening
detached windows until the maximum number of sessions
allowed for the entire pool is reached.
This setting applies separately to HTML telnet sessions and standard
telnet sessions. For example, if Maximum Telnet Settings is 5, a user
can have 5 HTML maintenance programs running and 5 telnet
programs running in one Desktop session before an error displays.
Note The maximum number of concurrent browses is determined by
Max Web Connections in User Option Telnet Maintenance.
Configuring Desktop After Deployment
Valid values are:
• Unlimited: The associated user can have an unlimited number of
concurrent telnet connections open.
• Disabled: The associated user cannot log in to MFG/PRO through
Desktop. Until you create a log-in script to initiate telnet sessions
for this user, you cannot set this field to any value other than
Disabled.
• Any numerical value between 1 and 99.
Minimum. Enter a value between 0 and 9 to indicate the minimum
number of telnet connections to be available to the associated user at
all times.
Set this value to the number of telnet programs the user is likely to
run simultaneously. Specifying a value here can dramatically reduce
the wait time for these programs to display in Desktop. However,
setting this value too high depletes system resources.
QAD recommends that you set Minimum to 0 (zero) for most users,
including the generic user—defined with an asterisk (*). If users
access Desktop telnet maintenance programs extensively, set
Minimum to 2.
101
102
MFG/PRO Installation Guide — QAD Desktop
Chapter 7
Configuring
Connection Manager
This chapter provides configuration and administration information for
the Desktop Connection Manager. You should read this chapter before
you begin configuring Connection Manager.
Overview
104
Desktop Administration
104
Plan and Size Connection Manager
Administer Connection Manager
Troubleshoot Errors
Start a Desktop Client
115
120
106
108
104
MFG/PRO Installation Guide — QAD Desktop
Overview
The Desktop Connection Manager controls the pool of telnet sessions that
are used when users execute HTML-based maintenance programs,
reports, and inquiries.
You can access Connection Manager administration functions from the
Desktop Administration page:
• Some functions are directly associated with Connection Manager.
You can close, start, and reset Connection Manager; update
configuration settings; and view a log file of Connection Manager
actions.
• You can view and monitor the status of connections in the connection
pool.
• You can view and monitor the activity of users and close active user
sessions, if needed.
This chapter provides instructions on performing general startup, setup,
and system administration tasks for the Desktop Connection Manager.
The following topics are discussed:
• Starting Connection Manager with the Desktop Administration page
• Planning and sizing connections
• Administering Connection Manager with menu functions, including
setup and configuration and managing connections and users
• Troubleshooting errors
The last section in this chapter discusses starting a Desktop client and
logging in to Desktop.
Desktop Administration
After you have installed and built your Desktop system and completed the
post-deployment steps, you can begin using the Desktop Administration
page.
¶ See “Define
Security Groups
for Desktop
Administration”
on page 39.
Important You must be a member of the Desktop administration group
to access these functions.
Configuring Connection Manager
105
To start the Administration page, point your browser at:
http://TomcatServer/DesktopSystemName/admin/
You are prompted to enter your MFG/PRO user ID and password. You
must have a valid user ID defined in MFG/PRO User Maintenance
(36.3.18; 36.3.1 in eB2.1) and be a member of the Desktop
Administration user group to access this function.
Figure 7.1 shows the Desktop Administration page.
Fig. 7.1
Desktop
Administration
Page
The administrative page provides a direct access point to the setup,
configuration, and startup pages. This page is available only after building
the Desktop system. The following URL links are available on the
Administration page:
Tomcat Manager. This link launches the Tomcat Web Application
Manager, which is used to manage Web applications. It lets you list,
install, reload, deploy, and remove existing Web applications, without
having to shut down and restart the entire container.
¶ See page 170.
Note You must have the correct access set up using Tomcat
administrative functions to use this link.
Connection Manager. This link launches Connection Manager and
provides access to its administration and configuration pages.
¶ See page 110.
Process Admin. This link launches the Context Parameters page, used
¶ See User Guide:
QAD Desktop for
a description of
Process Admin
and Process
Editor.
to define parameters for the Desktop Process Editor.
106
MFG/PRO Installation Guide — QAD Desktop
Process Editor. This link launches the Desktop Process Editor in a
new window. Use this link to launch and test the Process Editor after
making parameter updates in the Process Admin pages.
Note Only users who are members of the pronav user group can
access the Process Editor.
¶ See User Guide:
QAD Desktop for
a description of
simplified
screens.
Simplified Screens. Use this link to access the administrative
functions for simplified screens. These functions enable or disable
simplified screens and specify the MFG/PRO security group that can
create UI templates. You can also reconcile any template conflicts.
QAD Downloads. Use this link to access the QAD Download Center.
This secure Web site provides access to new MFG/PRO service packs
and QAD Desktop releases as soon as they are available. This is an
optional service available only to QAD customers that have ordered
specific MFG/PRO products and QAD Desktop. Contact your QAD
sales representative for details.
Launch. This link launches Desktop. Use it after making any setup or
configuration updates from the Desktop Administration page.
WebSpeed Developer Console. Use this link to access the WebSpeed
Developer Console. The console is used to develop, diagnose, and
debug WebSpeed applications. While the console applies to any
application that uses WebSpeed, it is provided particularly to support
custom development for Lean Manufacturing workbench programs
on the Kanban menu.
Plan and Size Connection Manager
Most maintenance programs run in Desktop’s HTML interface. Some
custom programs—as well as a limited number of MFG/PRO
maintenance programs—run in Desktop’s integrated telnet character
mode.
¶ See page 94.
• Desktop telnet character screens are managed by settings in User
Option Telnet Maintenance (36.20.10.3).
• Desktop HTML screens are serviced by a pool of telnet sessions
managed by Connection Manager.
Configuring Connection Manager
Connection Manager controls a pool of telnet sessions available for users
when they execute HTML maintenance programs, reports, and inquiries.
These sessions are all started under one administrative user ID and
password, and are then available to any Desktop user.
Important The Connection Manager script requires a log-in ID. You
must create a separate, exclusive log-in ID for Connection Manager that
is used for no other purpose than creating a pool of sessions for Desktop
users. This approach ensures that Desktop sessions are correctly
accounted for by licensing functions.
Separate, exclusive log-in IDs should also be used for starting WebSpeed
brokers and for no other purpose. You can use the same exclusive log-in
ID starting the Desktop telnet sessions and WebSpeed brokers.
Minimum and Maximum Connections
When you configure Connection Manager, you must specify the
minimum and maximum number of sessions to be available.
During startup, Connection Manager opens the minimum number of
sessions. As sessions are used, it continues to open more sessions so that
the minimum number of open sessions is maintained. It opens sessions
until it reaches the value specified for maximum connections.
Example Minimum Connections is 5 and Maximum Connections is 50.
During startup, 5 sessions are opened. When three users log in to Desktop
and begin executing HTML maintenance programs, Connection Manager
starts 3 more sessions. This continues until 50 sessions are started. When
a request for session 51 occurs, an error displays.
You should determine the maximum number of sessions based on the
number of user licenses you have. If you want a large number of sessions
to be available on startup, you can set the minimum and maximum to the
same value.
107
108
MFG/PRO Installation Guide — QAD Desktop
Connection Sizing Guidelines
To save system resources and aid performance, you should always keep
the number of connections to a minimum. Add connections as needed by
increasing the value of maximum connections. In general, the faster your
server, the fewer idle sessions need to be opened initially. Slower servers
require more sessions.
Example Configure 3 sessions for a faster server with 10-15 users and 6
sessions for the same number of users for a slower server.
Administer Connection Manager
Connection Manager is composed of several administrative functions and
views that help you manage the pool of telnet connections used to run
Desktop. The initial Connection Manager page displays a menu with
three menu items: Functions, Connections, and Users.
Fig. 7.2
Connection
Manager Menus
Use Connection Manager Menus
Functions Menu
Close Connection Manager. Immediately terminates all active
Desktop connections. Any data being processed by active Desktop
sessions is lost. Any processes begun by active Desktop sessions are
terminated.
Configuring Connection Manager
109
Restart Connection Manager. Shuts down and restarts Connection
Manager. This option has the same effect as Close Connection
Manager, but also restarts it after complete shutdown.
Reset Failed Init Count. Resets the initialization failed counter. The
system maintains a count of the number of times Connection
Manager unsuccessfully attempts to start a session. When this counter
reaches the maximum number, as indicated in Maximum Failures on
the Connection Manager configuration page, it stops further
automatic attempts to start the session.
This number is automatically reset when a successful connection is
made.
Update Configuration Settings. Displays the Configuration Settings
Update Page, which is used to set up and configure the Connection
Manager options.
¶ See “Configure
Connection
Manager” on
page 110.
Connections Menu
The Connections menu contains links to four connection views. Use each
view to see what connection activity is occurring on the system. The
connection information that displays is a snapshot of current activity; use
the refresh link to refresh the view with the latest information.
¶ See “Monitoring
Connections” on
page 113.
All. Displays all connections.
Busy. Displays currently busy connections.
Idle. Displays currently idle connections.
Initializing. Displays currently initializing connections.
Users Menu
Choose Users to view a list of currently logged in users. Click a user ID to
see information related to that user.
¶ See “Monitoring
Users” on
page 114.
110
MFG/PRO Installation Guide — QAD Desktop
Configure Connection Manager
Use the following steps to launch the Connection Manager
Administration page and update configuration settings as needed:
1
Click Connection Manager in the Desktop Administration page.
2
Once Connection Manager is active, click Update Configuration
Settings in the Functions menu. The Configuration Settings Update
page displays.
3
On the displayed page, edit the values as needed for your
environment. Use the following field descriptions to enter the
appropriate settings.
Fig. 7.3
Configuration
Settings Update
Page
Host. Enter the machine name or IP address of the telnet server.
Desktop uses this information to establish the telnet connection. Enter
localhost for the current machine.
Port. Enter the port number for the telnet server. This is normally set
to 23.
Configuring Connection Manager
Startup Script. Specify the telnet server log-in prompts and the
111
¶ See page 59.
responses to these prompts, separated with the pipe symbol (|).
Connection Manager uses these to log in to the telnet server and start
the pool of sessions.
This field is used in conjunction with the Server Startup Password
field, which specifies the log-in password in encrypted form.
The standard order is:
loginPrompt|userid|passwordPrompt|$PASSWD|osPrompt|
startScript
For example:
login:|user1|Password:|$PASSWD|$|exec ./tomcat/
connmgr.Production
Note The user ID specified in this script should be a separate,
exclusive log-in ID reserved for the sole purpose of creating a pool of
sessions for Desktop users. This approach ensures that Desktop
sessions are correctly accounted for by licensing functions.
Server Startup Password. Enter the password for the telnet session
startup script. It is encrypted on entry. This is the operating system
password associated with the user ID used to create the pool of
sessions. The startup script substitutes the encrypted password for the
$PASSWD reference.
Minimum Connections. Enter the minimum number of open
connections that the system should maintain. During startup,
Connection Manager opens this number of connections. As
connections are used, it continues to open more so that this number of
open connections is maintained, until it reaches the value specified
for Maximum Connections.
Maximum Connections. Enter the maximum number of open
connections that the system should allow. Connection Manager will
not open any more connections than this.
Maximum Failures. Enter how many times Connection Manager
should attempt to restart an unsuccessful connection. This number is
reset when a successful connection is made. You can also reset it by
using the Reset Failed Init Count command on the Function menu.
¶ See page 107.
112
MFG/PRO Installation Guide — QAD Desktop
Connections Monitor Frequency. Enter, in milliseconds, the interval
for checking all connections. The default value is 180000 (3 minutes).
This monitors all connections in all states and closes those that have
timed out.
Wait Time for Idle Connection. When a connection is requested from
the Connection Manager, this timeout specifies the maximum wait for
the connection. The maximum number of connections may have been
reached, or new connections may be in the initializing state. The
default value is 20000 (20 seconds).
Connection Timeout. Enter, in milliseconds, how long an HTML
session can remain inactive before Connection Manager closes it. The
default value is 1800000 (30 minutes).
This setting determines how long a function started from an HTML
screen can remain suspended. For example, if Sales Order
Maintenance is left open on the third frame and connection timeout is
1800000, the system terminates the Sales Order Maintenance
program after thirty minutes, but the user still remains logged in to
Desktop.
Note The session timeout value defined in User Option Telnet
Maintenance (36.20.10.3) determines when a user is logged out of a
Desktop session.
Processing Timeout. Enter, in milliseconds, how long a session can
be in processing mode. Processing mode indicates a locked or busy
screen. The default value is 3600000 (60 minutes). Connection
Manager closes locked or busy connections that exceed this.
Initializing Timeout. Enter the interval, in milliseconds, for
Connection Manager to wait for a telnet session to successfully
initialize. The default value is 180000 (3 minutes).
Operating System Win32/NT. Set this to true if the Progress telnet
sessions are executing on a computer with a Windows operating
system. Otherwise, set this to false.
Wait Time. Enter a value (in milliseconds) that determines how often
an HTML session is checked while it is running a report. The default
value is 2000 (2 seconds).
Configuring Connection Manager
4
Review your settings and click Save to save any values you entered or
modified.
5
Click Restart Connection Manager in the Function menu. If prompted
to continue, click OK.
6
Once Connection Manager restarts, click Connections to monitor the
Desktop sessions.
Monitor Connections and Users
You can use the Connection Manager administration functions to monitor
the connection pool and to monitor users.
Monitoring Connections
Choose Connections to view the pool of active sessions. Each session has
one of the following statuses:
• Initializing. A session with this status is just starting and is not yet
available for use.
• Idle. These sessions are active and available for the next user request.
• Busy. These sessions are currently executing a user request.
• Pause. This session is waiting for a response from the user; for
example, the user may need to press the spacebar to continue.
• Processing. The session is actively updating the Progress database, so
that database records are locked.
• Force Disconnect. This is a temporary state that occurs when the
administrator closes an initializing session.
• Disconnected. This is a temporary state that occurs when idle sessions
are closed.
You can choose to view connections by status or view all connections. If
you choose the Busy status, any sessions that have the Pause or
Processing status also display. You must choose All to see sessions that
have Disconnect statuses. These statuses do not occur in normal
operations.
113
114
MFG/PRO Installation Guide — QAD Desktop
Figure 7.4 illustrates the screen for monitoring connections.
Fig. 7.4
Monitoring
Connections
Use Refresh to update the screen display. Click the Close link to close
unneeded sessions.
Monitoring Users
Choose Users to view a list of currently logged in users. Click a user ID to
see information related to that user. A screen like the one in Figure 7.5
displays.
Fig. 7.5
Monitoring Users
Use Refresh to update the screen display. Click the Close link to close a
user’s session. This might be needed if a user has locked a database record
and left their session running.
Configuring Connection Manager
115
Troubleshoot Errors
A variety of types of messages can be generated when running MFG/PRO
programs from Desktop. Application messages such as invalid user input
or an error creating a record are managed by MFG/PRO.
Another type of error is related to communication among the various
Desktop components. These errors may occur when a session is not
available or the telnet server does not respond.
When these types of errors occur, a Java Server Page (JSP) displays
system-generated error information. The error JSP displays three levels of
error details. Currently only the basic information level is implemented.
When a client generates an error, the general information page initially
displays. This includes an error number, description, and other general
information.
Fig. 7.6
Error Information
Page
When the client error page displays, a user has several options:
• Click the exit (x) icon to exit and start a new client session.
• Click the question mark (?) icon for additional information about the
error. Requesting help displays summary help information in a new
browser window.
• Click More Details to display more error details. The Information
Detail page displays additional information related to the error
generated. See Figure 7.7 for an example.
• Click Support Information for support-related details. See Figure 7.8
for an example of the message text.
116
MFG/PRO Installation Guide — QAD Desktop
Information Detail
Clicking More Details in the information page displays a page like the
one in Figure 7.7.
Fig. 7.7
Error Information
Detail Page
Support Information Detail
Figure 7.8 illustrates the type of information that is included in the
support information details.
Fig. 7.8
Desktop Client
Error Support
Information Detail
mailBody=
Page Title: Information
Mailed From: http://crsu04.qad.com:8080/desktop/error.jsp
Thu Apr 25 08:40:11 PDT 2002
Error No: ex006
Error Desc: Pool: hme
Error Loc: ConnectionPool.uponUpdateChange():
Thu Apr 25 08:40:11 PDT 2002
ConnectionException: Pool: hme
at
com.qad.MFGPROWrapper.pools.ConnectionPool.uponUpdateChange(ConnectionPool.java:
at com.qad.MFGPROWrapper.ProcessAgent.announceUpdateChange(ProcessAgent
at com.qad.MFGPROWrapper.ProcessAgent.runRequest(ProcessAgent.java:757)
at com.qad.MFGPROWrapper.adapter.HTMLAdapter.service(HTMLAdapter.java:2
at javax.servlet.http.HttpServlet.service(HttpServlet.java:853)
at org.apache.catalina.core.ApplicationFilterChain.internalDoFilter(Unk
at org.apache.catalina.core.ApplicationFilterChain.doFilter(Unknown Sou
at org.apache.catalina.core.StandardWrapperValve.invoke(Unknown Source)
at org.apache.catalina.core.StandardPipeline.invokeNext(Unknown Source)
at org.apache.catalina.core.StandardPipeline.invoke(Unknown Source)
at org.apache.catalina.core.ContainerBase.invoke(Unknown Source)
at org.apache.catalina.core.StandardContextValve.invoke(Unknown Source)
Configuring Connection Manager
117
Error Handling
The following tables list some common error messages you may
encounter when using Desktop. Use this information to help resolve any
errors you encounter. Only the most common errors and their causes are
listed.
Failure Exception Errors
This class of exception occurs when a utility type function fails, in
particular while processing XSL or XSLT documents.
Table 7.1
Failure Exception Error
Description
ex001 Error with processing
XSLT Document
XSLT translation occurs after the XML document
retrieved from the server has been successfully
parsed. This exception is generated when an error
occurs at the point of translation. The likely cause is
an invalid change made to the XSL document
(currently /xsl/screen.xsl).
ex002 Error with processing
XML Document
The XML document is retrieved from the Progress
server and then parsed. This error occurs when
parsing of the retrieved document fails. A possible
cause of this is an error in the creation of the XML
document. Another possible cause is if the server
connection fails while retrieving the XML document,
so that the complete document is not retrieved.
ex003 Error writing document to When the user is updating configuration settings
file
using the Connection Manager update page, the new
settings must be written to file. This exception is
generated when an error occurs writing to the file.
Failure Exception
Errors
118
MFG/PRO Installation Guide — QAD Desktop
Connection Exception Errors
This class of exception is related to the activities of creating, retrieving,
and resetting server sessions.
Table 7.2
Connection
Exception Errors
Connection Exception Error
Description
ex001 Unable to initialize
session
This exception occurs when a problem occurs
initializing the back-end sessions. Possible causes
would be that the maximum number of sessions has
been reached, or the back-end databases are not up.
There may also be a problem with the log-in script or
a step omitted. This can be tested by following the
log-in script section of config.xml and ensuring
all stages are correct.
Another possible issue is that the telnet session is
running in normal mode instead of MFGWrapper
mode. Ensure that the MFGPRO startup script
contains the -param mfgwrapper=true
statement.
ex002 Unable to get working
session
Each application running on the client corresponds to
a telnet session on the server. Each time a request is
made on the client, the server has to link up the
client’s request to the server session. This error
occurs when the system is unable to find the telnet
session. Possible cause is that the telnet session has
been shut down, perhaps as a result of an error, or it
may have been closed down by Connection Manager.
ex003 Failure initializing
Connection Manager
This error is generated when a problem occurs during
initialization of Connection Manager. One
responsibility of Connection Manager is to open
XML configuration files. This error can occur if there
is an invalid configuration file. To see a list of files,
look at config-files.xml in the
\webapps\DesktopSystemName\WEBINF\config directory.
ex004 Unable to get an idle
session
When a client requests a new program to be run, an
idle session is retrieved from Connection Manager.
Possible cause of this exception is that Connection
Manager has exceeded its maximum number of
connections. It may be possible that Connection
Manager is in the process of initializing new sessions
but they are unavailable at this time.
Configuring Connection Manager
Connection Exception Error
Description
ex005 Unable to get session
because pool has been
shutdown
This exception occurs when the user is attempting to
either create a new application or make a request on
an existing one and Connection Manager has been
shut down. In this case, all current connections are
invalid and Connection Manager has to be restarted.
ex006 User has exceeded max
session
A user has requested to run another application;
however, this user has exceeded the maximum
number of allowed connections.
119
Process Exception Errors
This class of exception occurs during interaction between the client and
server while sending and retrieving data and during the management of
that process.
Table 7.3
Process Exception Error
Description
ex001 Unable to initialize
session with program
This error occurs after a dedicated session has been
assigned to a client request. The client is attempting
to run a new program and the launch of that program
fails. This can occur if the user is not properly logged
in to Desktop.
ex002/ex003 Failure occurred
sending message to begin to
submit data
This exception occurs when data submission to the
server fails. An acknowledgement may fail due to the
trigger failing to fire. To find the root cause of this
exception, follow the process through a character
session and look for any unusual user interface
functions such as alert boxes, selection lists, or
browses.
ex004 Failure occurred sending
get frame message
This exception occurs when a request for the screen
XML times out. This could be due to the trigger not
firing (see ex003) or the XML failing to be received
by the XMLReceiverServlet. To attempt to debug
this further, enable tracing on Progress and
ProcessAgent.
ex005 Failure occurred sending
spacebar message
A pause event occurs within the MFG/PRO
application and the Desktop system is unable to
respond to this event. To attempt to debug this
further, enable tracing on Progress and ProcessAgent.
ex006 Failure occurred parsing
xml document
This exception incorporates the occurrence of
FailureException (ex002) but will aid to highlight the
cause of the exception.
Process Exception
Errors
120
MFG/PRO Installation Guide — QAD Desktop
Adapter Exception Errors
Each client request is filtered through a servlet. Adapter exceptions are
raised if an error occurs in this servlet.
Table 7.4
Adapter Exception
Errors
Adapter Exception Error
Description
ex001 Parameters not passed
correctly
This exception occurs if the servlet is unable to
interpret the parameters sent to it from the browser.
ex002 Unable to create xml
document from parameters
The servlet creates an XML document from the
parameters it is passed. This exception occurs if a
problem occurs parsing the XML document.
ex003 Connection Manager is
unavailable
The servlet requests Connection Manager to provide
the back-end session. If Connection Manager has not
been launched, then this exception is generated.
ex004 Error occurred initializing The Parameter Manager is responsible for reading
Parameter Manager
and parsing the configuration files used in Desktop.
Under normal circumstances, Connection Manager
will be launched prior to launching any new
applications and as part of its initialization it will
create the Parameter Manager. However, if the
connection pool is not initialized, then the servlet will
initialize the Parameter Manager. This error occurs if
there is an invalid configuration file. To see a list of
files opened by the Parameter Manager, look at
config-files.xml.
Start a Desktop Client
Prerequisites
¶ See “Desktop
Administration”
on page 104.
• Ensure that you have completed the Desktop administration tasks
outlined in this chapter and have configured and started Connection
Manager.
• Verify that Internet Explorer 5.5, Service Pack 2 or Internet Explorer
6.0 or above is installed. QAD recommends you use the latest 6.0
version available.
• Set the minimum 1024 x 768 display setting.
Configuring Connection Manager
Setup
Desktop client setup is an automated process. To update client machines,
simply point the client browser to the Desktop launch point and follow the
instructions, if any. The correct Java components are automatically
installed on the client machine.
First-Time Startup
When starting Desktop on a client machine for the first time, some
automated setup tasks may occur. Typically, this includes:
• Installing or upgrading the client version of JRE, which includes the
Java Plug-in
• Installing the Adobe SVG plug-in, required for the Process Editor
• Downloading the Desktop .jar file
A security warning displays. After the client chooses to accept files from
QAD, this warning does not display again.
Important Depending on the languages supported by the Windows
operating system on the client PC, the typical install option for JRE may
not install components required to support international character sets. To
avoid this, Java must be installed by choosing the custom setup type and
selecting the additional language support option. To verify support for
non-European languages, check for the existence of the following file:
JavaInstallDir/jre/lib/charsets.jar
The following steps are typically required the first time Desktop is run on
a client machine. These steps may vary depending on factors such as the
client machine Java Plug-in version and the browser version.
1
Point the browser to the following URL to launch Desktop:
http://TomcatServer/DesktopSystemName
2
When the Desktop window displays, click Login in the upper right
corner.
121
122
MFG/PRO Installation Guide — QAD Desktop
3
4
The JRE begins to download. The installation program runs
automatically.
a
Accept the license agreement.
b
Choose the typical setup type, unless this is for a non-European
installation; in this case, you may need to choose the custom type.
c
Enter an installation directory or accept the default.
d
Set Microsoft Internet Explorer as the default browser.
The Desktop .jar file is downloaded from the server.
When the Java Plug-in security warning displays asking if you want
to install and run the QAD Inc. signed applet, select Grant Always.
5
The MFG/PRO log-in screen displays. Log in to begin using QAD
Desktop.
Desktop Java Plug-in Version Control
Java Plug-in version 1.4.2_06 is supplied with Desktop. When the
Desktop system is built, you can choose whether client sessions should
use the QAD-supplied plug-in or one already installed on the client.
Desktop should run correctly with any 1.4 plug-in version, but the most
extensive certification has been done with the 1.4.2_06 version. QAD
recommends installing it.
If you choose to install the QAD-supplied plug-in, all client sessions use
plug-in 1.4.2_06. This ensures that no plug-in related issues occur with
Desktop processing. If other versions of Java exist on the client, they are
not replaced and can continue to be used by applications other than
Desktop.
When Use QAD Desktop Supplied Java Plug-in is set to Yes for the
Desktop system, the Desktop client startup routine automatically
downloads and installs version 1.4.2_06 if it does not exist on the client.
When this field is No, Desktop clients use the latest plug-in already
installed on the client machine. If no plug-in exists on the client or the
minimum plug-in version required by Desktop (1.4) is not found, the
QAD-supplied version is downloaded.
Configuring Connection Manager
You can set this value to No when you are sure that all clients using
Desktop already have a supported version of the Java Plug-in installed. In
this case, you can avoid requiring each client to download the 1.4.2_06
version.
To change this value at a later time, you must rebuild your Desktop
system.
123
124
MFG/PRO Installation Guide — QAD Desktop
Chapter 8
Implementing
Multiple Languages
This chapter includes information to help you install Desktop into a
multiple-language MFG/PRO environment.
Multiple-Language Overview
Supported Code Pages
126
126
Use MFG/UTIL to Install Multiple Languages
Configure Non-English Languages
Language Reference
133
131
128
126
MFG/PRO Installation Guide — QAD Desktop
Multiple-Language Overview
¶ For details on
setting up
multiple
languages, see the
MFG/PRO
installation guide
for your system.
MFG/PRO is available in a number of different language translations.
Each MFG/PRO language is identified by a two-letter language code. You
can use this code to associate different language displays with different
MFG/PRO users in a multiple-language environment.
Each user can then view interface elements in their own language.
Language affects the fields and menus for HTML screens, telnet screens,
browses, report output, and Desktop administrative functions such as
Connection Manager.
This chapter discusses topics you need to know for a successful multiplelanguage implementation, including the following:
• Code pages supported by Desktop
• Building multiple systems with MFG/UTIL
• Additional configuration tasks you may need to complete
• Background information about how Desktop stores settings that affect
language-related displays
Supported Code Pages
Progress manages the character set used for data storage through code
page settings that apply to the entire database. For any one database, only
a limited set of characters is available, as defined by the code page. This
means that some combinations of language data cannot be stored together.
Currently, the two supported multiple-language scenarios are:
1
All languages in the database share the same code page.
This is true for English, French, German, Spanish, and other
languages that share the ISO-8859-1 code page, or for Russian,
Ukranian, and Romanian that share the 1251 code page, as well as for
other shared code page sets.
2
The languages in the database have compatible code pages.
This scenario is only true of English with other code pages. Because
English is a subset of all other code pages, English can be combined,
for example, in a single database with Japanese, or with Polish and
Romanian, or with Turkish.
Implementing Multiple Languages
127
Installing languages with incompatible code pages in the same database is
not currently a standard MFG/PRO supported option.
Multiple-language display in Desktop is complicated by the various
technology layers involved in the Desktop architecture. Data stored in the
Progress database can be passed through Java, HTML, and XML
representations before being viewed by the user in a Web browser. In
some cases the data transformation also requires code page mapping.
To ensure that data can be passed correctly without corruption, QAD has
defined appropriate code page configurations based on the Progress code
page in use. This adds an additional constraint for Desktop installations.
Your database must use the Progress code page that QAD supports.
Table 8.1 lists the code page supported for each supported language.
If your database is using a code page other than the one specified in
Table 8.1, additional changes may be required to ensure that data displays
correctly. You should contact QAD Support for help with these changes.
If your database code page is the standard code page for your language,
you should be able to install Desktop using MFG/UTIL without any
changes.
Table 8.1
Language
MFG/PRO
Language Code
Database Code Page
Chinese (Traditional) TW
Big-5
Chinese (Simplified)
CH
Gb2312
Czech
CZ
1250
Danish
DA
ISO8859-1
Dutch
DU
ISO8859-1
Finnish
FI
ISO8859-1
French
FR
ISO8859-1
German
GE
ISO8859-1
Hungarian
HU
1250
Italian
IT
ISO8859-1
Japanese
JP
Shift-jis
Korean
KO
ksc5601
Lithuanian
LT
1257
Norwegian
NO
ISO8859-1
Supported Progress
Code Pages
128
MFG/PRO Installation Guide — QAD Desktop
Language
MFG/PRO
Language Code
Database Code Page
Polish
PL
1250
Portuguese
PO
ISO8859-1
Romanian
RO
1250
Russian
RU
1251
Spanish (Castilian)
CS
ISO8859-1
Spanish (Latin)
LS
ISO8859-1
Swedish
SW
ISO8859-1
Turkish
TU
1254
Ukranian
UA
1251
US English
US
ISO8859-1
Note To determine your database code page, enter the following
command in the Progress Editor:
message session:cpinternal
¶ See page 137.
Information for mapping code page values from Progress settings to those
used by different interface layers is maintained in a text file.
Use MFG/UTIL to Install Multiple
Languages
¶ See “Advanced
Build Options”
on page 188 for
details.
You can use the advanced build options in MFG/UTIL to build multiplelanguage versions of a Desktop system. To do this, you first generate the
Desktop system for your default language. Then you rerun the process
and choose the advanced build options to specify your second language.
Building Languages with Shared Code Pages
The process is straightforward when all languages share the same code
page as the database. This would be the case, for example, if you are
installing French, German, and English together. For this scenario, follow
these steps:
1
Launch MFG/UTIL and choose Desktop|Configure Desktop
Environment Parameters.
Implementing Multiple Languages
2
Specify the parameters for the first language you are going to build.
When you are building the system for languages with shared code
pages, you can build them in any order.
3
After specifying parameters, choose Desktop|Build Desktop. Review
the settings and complete the build for the first language.
4
Now choose Desktop|Build Desktop for the second language. Choose
the same Desktop system to build.
5
Choose Advanced in the Verify and Build screen. In the Advanced
Build Options screen, choose the second MFG/PRO language code
from the drop-down list. The other language-related fields should
default appropriately.
6
Choose Build to complete the process.
7
Repeat these steps for each additional language with the same code
page.
Building Languages with Compatible Code Pages
Because English is a subset of all other code pages, English can be
combined in a single database with any other language. In this scenario,
you should build Desktop for the languages that share the database code
page first; then build Desktop for English. Follow these steps:
1
Launch MFG/UTIL and choose Desktop|Configure Desktop
Environment Parameters. Build the languages with the same code
page as the database first.
2
After specifying parameters, choose Desktop|Build Desktop. Review
the settings and complete the build for the first language. Default
language settings should not need to be changed. In Figure 8.1, the
language being built is Ukranian.
129
130
MFG/PRO Installation Guide — QAD Desktop
Fig. 8.1
Advanced Build
Options for
Ukranian
Default values for
Ukranian
3
Now choose Desktop|Build Desktop for the English language.
Choose the same Desktop system to build.
4
Choose Advanced in the Verify and Build screen. In the Advanced
Build Options screen, choose US as the MFG/PRO language code
from the drop-down list. English values default to the other languagerelated fields and must be changed.
Fig. 8.2
Default Values for
English
Default values for
English must be
changed.
Implementing Multiple Languages
131
See “Advanced Build Options” on page 188 for details about the
significance of each of these fields.
5
Change the value of the marked fields to match values of the database
code page. In this example, these were default values for Ukranian.
Fig. 8.3
Building English
with a Ukranian
Database
Change to values
for Ukranian
code page.
6
Choose Build to complete the process.
Configure Non-English Languages
After installing the Desktop files, you may need to perform a few
additional configuration tasks, depending on your environment:
• Update fonts for non-English languages. Check your operating
system documentation for font requirements for the language you are
implementing.
• Update the Process Editor to access translated process maps.
• If you are not using the latest MFG/PRO service pack for your
system, you may need to update language-related data. See the
Desktop Release Notes for details about language-related changes.
132
MFG/PRO Installation Guide — QAD Desktop
• If your version of Progress was installed with a default language that
uses a different code page than your MFG/PRO database, make sure
you include the proper language-related parameters in the MFG/PRO
startup scripts. See the Progress documentation for details.
Important Depending on the languages supported by the Windows
operating system on the client PC, the typical install option for JRE may
not install components required to support international character sets. To
avoid this, the JRE must be installed by choosing the custom setup type
and selecting the additional language support option. To verify support for
non-European languages, check for the existence of the following file:
JavaInstallDir/jre/lib/charsets.jar
Update Fonts for Non-English Languages
The font.properties file may need to be updated to access localespecific fonts, such as the Japanese font, on an English environment
platform. A number of alternate font.properties files are provided
with the JRE, located by default in:
C:\Program Files\Java\JRE1.4.2_06\lib
¶ See Table 8.2 on
page 136 for a list
of language
codes.
These files are identified by locale-specific extensions such as ko for
Korean, ja for Japanese, and zh for Chinese.
The simplest way to make these fonts available on a client machine is to
back up the original font.properties file and rename the localespecific file to font.properties.
For example, to access Chinese fonts, rename:
font.properties.zh
To:
font.properties
For more information about the font.properties file and how to
modify it in an international environment, review the documentation on
the Sun Microsystems Java Web site:
http://java.sun.com
Implementing Multiple Languages
Translated Process Maps
During Desktop installation, all existing process maps remain in the
default /WEB-INF/pronav/xml directory. Whenever you configure a
Desktop environment for a new language, existing process maps located
in this directory are automatically translated to the new language. The
translated process maps are placed in a two-letter subdirectory in the
/WEB-INF/pronav/xml directory. Your environment’s two-letter ISO
language code is used as the directory name.
To use the translated process maps, update the XML Directory field in the
Process Admin|Context Parameters page after completing the Desktop
installation. Use these steps to make the required change:
1
Launch a Web browser and point to the Desktop Administration
HTML page. This page is typically found at:
TomcatServer/DesktopSystemName/admin/
2
Click the Process Admin link.
3
Click Context Parameters.
4
Edit the XML Directory value to point to the two-letter subdirectory
created during installation. You should only need to add /xx to the
existing value, where xx is a two-letter ISO language code.
5
Click Save.
6
Click the Refresh link to update the server.
Language Reference
This section includes background information on the way the system
manages the mapping of languages and code pages.
Information required to establish the user locale is retrieved from two
external data files: locale.dat and encoding.dat. Both files are
located in the ./mfgpro directory on the MFG/PRO release CD. After
installation, they are located in the root directory of the user-named
MFG/PRO installation directory.
The data in these files is used in conjunction with details about the user
defined in User Maintenance (36.3.18; 36.3.1 in eB2.1).
133
134
MFG/PRO Installation Guide — QAD Desktop
Locale Data
Information on language, country code, and optionally, the variant is
maintained in the locale.dat file, along with date and numeric formats.
The system uses this information to set the locale formatting (the date and
number formats) for an MFG/PRO user.
When a user logs in to MFG/PRO, the system validates the log-in
identifier in User Maintenance and determines the associated MFG/PRO
language and country code. It uses this information to access the
corresponding record in locale.dat.
The system uses the date and number format information and ISO
language code in locale.dat to set the user’s locale formats in all
MFG/PRO interfaces: character, Windows, and Desktop.
If locale information cannot be determined at log-in, US settings are used
by default.
Setting Different Locale Formats
Three values associated with a user determine locale formatting:
language, country code, and variant.
1
Define country codes and corresponding ISO country code values in
Country Code Maintenance (2.14.1):
a
Specify the MFG/PRO country code (up to three letters) in the
Country Code field.
b
Specify the corresponding ISO code in the Alternate Code field.
Most of the ISO country codes are already defined in Generalized
Codes Maintenance (36.2.13). If a code is not available in generalized
codes, you can add it. Valid ISO country codes can be found on the
following Web site:
http://www.chemie.fu-berlin.de/diverse/doc/ISO_3166.html
Implementing Multiple Languages
2
3
Create or update the user profile in User Maintenance (36.3.18;
36.3.1 in eB2.1).
a
Specify the user’s language in the Language field.
b
Specify the user’s country in the Country Code field. The system
uses the alternate code to determine the ISO country code value.
c
Optionally, specify a value in the Variant field.
Verify that the required locale entry is available in locale.dat file.
Open the locale.dat file and verify that an entry exists for the
language and country code assigned to the user.
4
135
If necessary, use any standard text editor to edit the file and add or
update entries, using the proper format; then save the file.
Locale Record Format
The format of records in locale.dat is as follows:
US,en,US,,mdy,American
Where:
• US is the MFG/PRO language code.
• en is the ISO language code.
• US is ISO country code.
• Optional variant is blank (indicated by ,,).
• mdy (month/day/year) is the date format.
• American is the numeric format (period as the decimal separator;
comma as the thousand separator).
Two number formats are defined in Progress: American and European.
Decimal and thousand separators are defined differently for each numeric
format type. Periods (.) and commas (,) are used to separate decimal
places and thousand places, depending on which format is specified. For
example, in the US format, a period separates decimal, while a comma
separates thousands as in 10,000.33. A user with the European numeric
format will see the number as 10.000,33.
¶ See “Locale
Record Format”
on page 135.
136
MFG/PRO Installation Guide — QAD Desktop
Language Codes and Country Codes
Table 8.2 lists MFG/PRO language codes and the ISO language and
country codes to which they map.
ISO language codes are lowercase and country codes are uppercase. Java
is case sensitive and expects the codes in the ISO format.
Table 8.2
MFG/PRO
Language Codes
Language
MFG/PRO
Language
Code
ISO
Language
Code
ISO
Country
Code
Country
Chinese (Traditional)
TW
zh
TW
Taiwan
Chinese (Simplified)
CH
zh
CN
China
Czech
CZ
cs
CZ
Czech Republic
Danish
DA
da
DK
Denmark
Dutch
DU
nl
NL
Netherlands
Finnish
FI
fi
FI
Finland
French
FR
fr
FR
France
German
GE
de
DE
Germany
Hebrew
HE
he
IL
Israel
Hungarian
HU
hu
HU
Hungary
Italian
IT
it
IT
Italy
Japanese
JP
ja
JP
Japan
Korean
KO
ko
KR
South Korea
Lithuanian
LT
lt
LT
Lithuania
Norwegian
NO
no
NO
Norway
Polish
PL
pl
PL
Poland
Portuguese
PO
pt
BR
Brazil
Romanian
RO
ro
RO
Romania
Russian
RU
ru
RU
Russian
Spanish (Castilian)
CS
es
ES
Spain
Spanish (Latin)
LS
es
MX
Mexico
Swedish
SW
sv
SE
Sweden
Turkish
TU
tr
TR
Turkey
Implementing Multiple Languages
Language
MFG/PRO
Language
Code
ISO
Language
Code
ISO
Country
Code
Country
Ukranian
UA
uk
UA
Ukraine
US English
US
en
US
GB
AU
United States
Great Britain
Australia
Encoding Data
The system gets information on encoding from the encoding.dat file
supplied with MFG/PRO. This file includes code page information for
Progress, Java, HTML/XML, and XSL. The code page values vary for
Windows and UNIX operating systems and are tailored by the installation
scripts.
The system uses encoding information to correctly display languagespecific characters in the user interface. Typically, system administrators
do not need to add or edit information in encoding.dat. All required
information is in the file.
Desktop also uses the dtencode.dat file supplied with the Desktop
media and located in com/mfgpro and com/qad/mfgpro. This file is
tailored by the MFG/UTIL scripts when necessary, and should not require
manual updates.
137
138
MFG/PRO Installation Guide — QAD Desktop
Section 3
System
Administration and
Reference
This section provides Desktop system administration and technical
reference information.
Administering Desktop
Reference
151
Deployment Tools
175
141
140
MFG/PRO Installation Guide — QAD Desktop
Chapter 9
Administering
Desktop
This chapter contains Desktop system administration and other
reference information.
Common System Administration Tasks
Install a New Desktop Release
142
Install an MFG/PRO Service Pack
Administer Desktop Output
142
144
145
Manage Menu Updates in Desktop
146
142
MFG/PRO Installation Guide — QAD Desktop
Common System Administration Tasks
This section provides information about common system administration
tasks you may need to perform for the Desktop environment.
Install a New Desktop Release
QAD highly recommends you deploy only the Desktop components
included with the latest QAD Desktop release. The latest release always
contains the most recent component versions, patches, and performance
improvements. Review Desktop2_ReleaseNotes.html on the
Desktop media to see if any updated Desktop system components have
been included.
Consider the following items before you begin installing a new Desktop
release:
• Desktop version component dependencies
Some Desktop releases cannot be installed directly into directories
that contain any components from a previous Desktop version. For
example, Desktop 2.7 cannot be installed into an earlier release
environment. Mixing previous version components with Desktop 2.7
may cause significant configuration problems. Instead, you must
install Desktop 2.7 into new directories that do not contain
components from a previous Desktop release.
Always check the Desktop release notes to see if this condition
applies to the Desktop release you plan to implement in an existing
Desktop environment.
• MFG/PRO menus and configuration settings
Running the Desktop build, required when installing a new Desktop
release, resets the HTML and telnet screen configuration to its
original settings.
• PROPATH issues
The Desktop installation process installs updated MFG/PRO code.
Depending on the Desktop release and the service pack you have
installed, your client, Desktop, and WebSpeed PROPATHs are
affected differently. The Desktop installation directory must be placed
at the front of all your system PROPATHs.
Administering Desktop
143
• Tomcat
The latest QAD-optimized Tomcat version is always included on the
Desktop media. Always install the new version. This can be done
manually or automatically using the Perl installation tools.
• Java
If the Java Plug-in is updated, initial client startup after setting up the
new Desktop might require additional time to allow for the new Java
download.
• SVG plug-in
The latest QAD-tested version is always included on the Desktop
media. Desktop Process Editor client machines will need to download
the new plug-in.
• Client and server cache
The server cache must be cleared after installing a new Desktop
release. You do not have to manually clear the client cache. When you
install a new Desktop release, new files are automatically cached by
the client. The old files are deleted automatically based on client
browser history settings.
• HTML page caching
After a release upgrade, client machine performance may be slightly
affected while new HTML pages are generated on the server and
cached locally on each client. This performance impact, if any, is
temporary, and only affects the initial client sessions while new pages
are being cached.
• Process maps
If you are upgrading an existing Desktop environment, existing
process maps are located in the OldDesktopSystemName /WEBINF/pronav/xml directory in the Tomcat webapps directory. If you
are using a Desktop release that requires a complete new installation,
such as Release 2.7, copy the existing process maps from the previous
system to the new system directory structure.
¶ See “Clear the
Tomcat Server
Cache” on
page 169.
144
MFG/PRO Installation Guide — QAD Desktop
Clear the Client Cache
Depending on your client machine configuration, a copy of all the Web
pages displayed is automatically stored on the local hard drive. This is
called the client cache. These files are normally deleted after a time
period, determined in a history setting for Internet Explorer.
After installing a new Desktop build, new Desktop client files are
generated and served to the client machines. Under normal operating
conditions, you do not need to manually clear the client cache each time a
new Desktop release is installed.
There are, however, times when you do need to manually clear the client
cache, especially when initially setting up a Desktop environment. These
are when:
• The Desktop menu system is modified and rebuilt.
• A browse is attached to or detached from a field.
• During initial Desktop system configuration, for testing and
troubleshooting purposes.
Use the following instructions to manually clear a client machine cache:
1
Start Internet Explorer on the client machine.
2
Choose Tools|Internet Options and click the General tab.
3
Click the Delete Files button in the Temporary Internet Files section.
Install an MFG/PRO Service Pack
Installing an MFG/PRO service pack can affect your Desktop system in
two ways:
• The service pack may include software fixes that correct issues in
Desktop since some Desktop issues are caused by problems in the
underlying MFG/PRO programs, not the Desktop programs.
• The service pack installation media may include a different version of
MFG/UTIL than the version of MFG/UTIL delivered with your
Desktop release.
Administering Desktop
The second possibility may result in an older version of MFG/UTIL being
installed over the one installed with QAD Desktop, which either removes
the Desktop menu or removes Desktop updates.
After installing a service pack that contains older Desktop-specific
MFG/UTIL updates, use the Desktop installation media to reinstall
MFG/UTIL. Use the following steps to reinstall this code:
1
Start the Desktop install and select the configuration that you have
already installed.
2
Select the Install MFG/PRO – Progress Desktop Files Menu option.
3
In the next menu, select Option 2, Update Additional MFG/UTIL
Installations.
4
Specify the directory where you want to update MFG/UTIL. This is
typically the same directory where you originally installed
MFG/UTIL.
Use the same process to update additional MFG/UTIL installs.
Administer Desktop Output
When Desktop clients output MFG/PRO browses to the screen, the
number of pages sent to the client is determined by the Max Pages setting
for the JavaUI printer in Printer Setup Maintenance (36.13.2).
By default, the Max Pages field for the JavaUI printer is set to zero,
unlimited. This may cause the Desktop client to run out of memory if too
many pages are output at once. You should set the Max Pages field to a
reasonable number of pages for your Desktop client machines.
HTML reports and inquiries can be directed to the screen using any
printer defined with Scroll Output set to Yes in Printer Setup
Maintenance. Users can direct output to Page; this device is supplied by
default with MFG/PRO and is defined with Max pages set to 200. You
may want to set up a special output device named Desktop to help users
select an appropriate device. Choosing Terminal for output of HTML
reports and inquiries is not recommended, since the output will not be
formatted properly.
145
146
MFG/PRO Installation Guide — QAD Desktop
Manage Menu Updates in Desktop
¶ See User Guide:
QAD Desktop for
details.
This section includes instructions for adding custom programs, browses,
and lookup browses to MFG/PRO. You must rebuild the menus and
search databases in order for the new options to display in Desktop.
Changing MFG/PRO Menus
The Desktop system must be configured dynamically so that it can reflect
the menu system in your MFG/PRO database. If you have moved
programs or made any other changes with either Menu System
Maintenance (36.4.4) or Menu Substitution Maintenance (36.20.6), these
changes are reflected in the Desktop menu system when it is built.
Menu substitution is managed differently in Desktop than in the other
MFG/PRO interfaces. In other interfaces, menu substitution affects the
display of:
• Browses (Off) or inquiries (On)
• Standard programs (Off) or custom programs (On)
During the build of the HTML menu system for Desktop, browses
(instead of inquiries) and standard programs (instead of custom ones) are
always placed on the menus.
¶ See “Clear the
Client Cache” on
page 144.
If you make menu or lookup changes after Desktop is initially installed,
you must rebuild the HTML menus and the search database to reflect
those changes. You must also clear the cache for all client and server
machines.
¶ See “Advanced
Build Options”
on page 188.
Use the Advanced Build Options available from the MFG/UTIL
Desktop|Build Desktop option to rebuild your menus whenever you make
changes in:
• Menu System Maintenance (36.4.4)
• Menu Substitution Maintenance (36.20.6)
• Drilldown/Lookup Maintenance (36.20.1)
• Program Information Maintenance (36.3.21.1)
Administering Desktop
Adding Browses
Use these steps to add a browse to the Desktop system:
1
Add the browse to MFG/PRO in Menu System Maintenance (36.4.4).
2
Add the program details in Program Information Maintenance
(36.3.21.1) with these settings:
• Set Web Logic Implemented to Yes.
• Set Type to Blank.
3
Rebuild the Desktop menus and search databases. See the detailed
steps in “Regenerating Desktop Components” on page 148.
Adding Lookup Browses
Use these steps to associate a lookup with a field for use in Desktop:
1
Associate the lookup with a program or field in Drilldown/Lookup
Maintenance (36.20.1).
2
Add the program details in Program Information Maintenance
(36.3.21.1) with these settings:
• Set Web Logic Implemented to Yes.
• Set Type to Blank.
3
You do not need to rebuild Desktop menus for lookups to be visible,
but you do need to clear the client and server cache to see your
changes.
Adding and Using Custom Programs
Use the following instructions to add custom programs to the Desktop
menu system. If created following QAD programming constructs, your
custom programs can be run in the Desktop HTML interface. If the QAD
147
148
MFG/PRO Installation Guide — QAD Desktop
programming constructs were not followed, your custom program may
not function properly in the Desktop HTML interface. Instead, run it in
the embedded telnet interface.
1
Make the custom program accessible to users.
Option 1: Set Program Execution to Yes in User Option Maintenance
(36.20.10.1). This allows users to use programs even if they are not
on the MFG/PRO menu structure.
Option 2: Add the custom program to the MFG/PRO menu using
Menu System Maintenance (36.4.4).
2
Add the program to Program Information Maintenance (36.3.21.1).
Use these settings to run custom programs in the HTML interface:
• Set Web Logic Implemented to No.
• Set Type to Desktop.
Use these settings to run the custom program in the embedded telnet
interface:
• Set Web Logic Implemented to No.
• Set Type to blank.
3
Rebuild the Desktop menus and search databases as detailed in the
following section.
Regenerating Desktop Components
Use these steps to regenerate the Desktop menu pages and the search
database after adding any custom programs and browses or making other
menu changes in MFG/PRO, such as adding program shortcuts in Menu
System Maintenance. You must regenerate the menus and search database
to see your menu and program changes and use new program name
shortcuts.
1
Launch MFG/UTIL. Choose Desktop|Build Desktop.
2
Select your Desktop system in Desktop Configuration Name.
3
Review the field values in the Verify and Build Desktop screen for
accuracy.
4
Choose Advanced.
Administering Desktop
5
149
Select the Create Search Database and Create Menu Pages options.
Note All other options should be deselected.
6
Click the Build button.
7
Clear the cache for all client machines.
¶ See page 144.
8
Clear the Tomcat server cache.
¶ See page 169.
Once the Desktop build completes, launch a Desktop client and test your
program and menu changes.
150
MFG/PRO Installation Guide — QAD Desktop
Chapter 10
Reference
This chapter provides additional reference. This information is provided
to give you a better understanding of the Desktop system and its
interaction with MFG/PRO.
Installed Components
152
Connection Parameters
153
Working with WebSpeed
157
Security
163
Configure Multiple Desktop Systems
Administration with Tomcat
Use Diagnostic Tools
171
168
166
152
MFG/PRO Installation Guide — QAD Desktop
Installed Components
This section provides a brief description of the directory structure created
or updated by the Desktop system-generation process.
If you want to look at information about the current release, release notes
are provided at the top level of the Desktop CD; they are not copied
during installation.
Note In the following listing, UNIX directory conventions are used. If
you installed on a Windows server, the relative paths are the same.
MFG/PRO Installation Directory
The installation creates a set of directories in the MFG/PRO installation
directory for Desktop files.
MFGPROInstallDir/DesktopSystemName/com/
- /mfgpro
- /configxml <files for simplified screens>
- /queries <files for HTML lookups>
- /qad/
- /kb <files used by lean workbenches>
- /mfgpro <release-specific MFG/PRO code>
- /nav
- /conf <contains template for config.properties>
- /data <directory for data files loaded during build>
- /html <HTML templates>
*.r <Desktop-specific Progress r-code>
Tomcat Servlet Container
The Desktop media includes the latest edition of the Tomcat engine; it is
recommended that you install and use this version. QAD Desktop is
installed as a Web application running under Tomcat.
The following directory and files are added as part of the Desktop Web
application under the Tomcat installation directory:
TomcatInstallDir/webapps/DesktopSystemName
- /admin <Desktop Administration pages>
- /applet <location of multinet.jar>
- /cache <stored versions of HTML pages, may need to be cleared>
- /client_setup <JRE and client install script>
- /css <Desktop and process flow style sheets>
- /doc <directory for online user guide files>
- /images <directory for graphic files>
- /java <contains the multinet.jar file>
Reference
153
-
/js <directory for JavaScript files>
/jsp <Java server pages>
/menus/xx <language-specific menu HTML>
/pronav <files for Process Editor>
/uiconfig <location of simplified screens>
/WEB-INF
- /conf <configuration files for Desktop components>
- /cgi <WebSpeed Messenger and other executables>
- /log <log files for Desktop>
- /XSL <XSL files>
Configuration Files
Two important configuration files in the /WEB-INF/conf directory are:
• connectionManagerConfig.xml, which stores configuration
values for Connection Manager
• process-config.xml, which stores configuration values for the
Process Editor
Language Directories for Menus
HTML menu files are generated and placed in the Tomcat Web
application directory in a two-letter language subdirectory of the /menus
directory during the build process: TomcatInstallDir/webapps/
DesktopSystemName/menus/xx. In this directory name, the two-letter
ISO language code is used.
¶ See “Language
Reference” on
page 133.
This code is derived from the locale.dat file.
If you build menus in a language other than English, two directories are
created: en (for US English) and one with the ISO version of the language
code you specify during the build. For example, if you install French files,
the directory would be fr.
Connection Parameters
Desktop clients connect to the MFG/PRO databases using the .pf file
you specify in MFG/UTIL when the Desktop system is being built. You
can choose to build Desktop using a .pf not located in the MFG/PRO
directories by specifying a location using the MFG/UTIL Desktop|Edit
Search Directories for Desktop Configuration Lookup menu option.
¶ See “Add
Parameter File
Directories” on
page 195.
154
MFG/PRO Installation Guide — QAD Desktop
Review this section if you plan to build customized Desktop parameter
files.
Local Host Connection Parameters
If the WebSpeed broker is on the same server as the MFG/PRO databases,
you can use local host or shared memory connections to access the
databases. This can improve Desktop performance by eliminating
network overhead between the processes and the databases.
To enable local host connections, Desktop parameter files must contain
the connection parameters described in Table 10.1.
Table 10.1
Local Host
Connection
Parameters
Parameter
Description
-db
The physical database name parameter. Follow this parameter with the
path and physical name of an MFG/PRO database.
-trig
The triggers parameter. Follow this parameter with the name of the
directory containing the database triggers for the main MFG/PRO
database. For MFG/PRO, this is the triggers subdirectory. The
parameter value is: -trig triggers. This parameter is used only
with main databases.
-ld
The logical database name parameter. Follow this parameter with the
logical name of an MFG/PRO database.
Oracle: This parameter is not typically used in Oracle environments.
Instead the database logical name is embedded into the schema holder
and the MFG/PRO code embeds the logical name at runtime.
Client/Server Connection Parameters
If the WebSpeed broker is on a different machine than the MFG/PRO
databases, you must use client/server connections to access the databases.
This can improve Desktop system performance by spreading the
MFG/PRO and Desktop resource requirements between two servers.
To enable the server processes to make client/server connections,
parameter files must contain the connection parameters described in
Table 10.2.
Reference
Table 10.2
Parameter
Description
-db
The physical database parameter name. Follow this parameter with the
physical name of the MFG/PRO database. You do not need to include
the path to the database file.
-trig
The triggers parameter. Follow this parameter with the name of the
directory containing the database triggers for the main MFG/PRO
database. For MFG/PRO, this is the triggers subdirectory. The
parameter value is: -trig triggers. This parameter is used only
with main databases.
-ld
The logical database name parameter. Follow this parameter with the
logical name of an MFG/PRO database. This parameter is used only
with support databases.
Oracle: This parameter is not typically used in Oracle environments.
Instead the database logical name is embedded into the schema holder
and the MFG/PRO code embeds the logical name at runtime.
-S
The database service name parameter. Follow this parameter with an
MFG/PRO database service name. You can use the Database Set
Maintenance utility in MFG/UTIL to find the service name for a
database.
-N
The network parameter. Follow this parameter with the network
protocol used to connect to the MFG/PRO databases. For MFG/PRO,
this is TCP/IP. The parameter value is: -N TCP.
-H
The host name parameter. Follow this parameter with the machine
name or IP address of the MFG/PRO database server. This guide uses
DBServer as an example in place of an actual machine name or IP
address.
Client/Server
Connection
Parameters
155
156
MFG/PRO Installation Guide — QAD Desktop
Local Host Connection Parameter File Examples
The following examples are edited versions of the Production.pf file
for both Progress and Oracle database environments.
Progress Database Environments
Example Local Host Connections: This example contains only the -db,
-ld, and -trig parameters. Remember when configuring local host
connections that you must include the full path and physical name of the
database after the -db parameter:
-db /qad/mfgpro/eB3/db/mfgprod.db -trig triggers
-db /qad/mfgpro/eB3/db/hlpprod.db -ld qadhelp
-db /qad/mfgpro/eB3/db/admprod.db -ld qadadm
-d mdy -yy 1920 -Bt 350 -c 30 -D 100 -mmax 8192 -nb 200-s 63
Example Client/Server Connections: This example contains the -H, -S,
and -N parameters:
-db mfgprod -ld qaddb -H uxsvr1 -S mfgprod-srv -N tcp -trig triggers
-db mfghelp -ld qadhelp -H uxsvr1 -S mfghelp-srv -N tcp
-db admin -ld qadadm -H uxsvr1 -S admin -srv -N tcp
-d mdy -yy 1920 -Bt 350 -c 30 -D 100 -mmax 8192 -nb 200 -s 63
Oracle Database Environment
¶ See “Connecting
the DataServer”
in the Progress
DataServer for
Oracle Guide.
Generally, to execute most database functions, the Progress open cursors
parameter (-c) should be 10% less than the Oracle value. If
OPEN_CURSORS is 512 in Oracle, then the Progress -c would be
approximately 460.
Example Oracle Database Connections:
-db SchemaHolder -ld qad -RO -znotrim -trig triggers
-db ORACLE_SID -ld qaddb -dt ORACLE -U qad@NetService
-P qad -c 255
-cpinternal iso8859-1 -cpstream iso8859-1 -cpcoll basic
-d mdy -yy 1920 -Bt 350 -D 100 -mmax 8192 -nb 200 -s 63
NetService refers to the system Net Service name, such as
OracleSID.
Reference
Working with WebSpeed
This section includes additional information about WebSpeed, including:
• How to install and configure WebSpeed Messenger
• How to determine the required number of WebSpeed agents
Install and Configure WebSpeed Messenger
If you do not have a full WebSpeed installation on the Tomcat server in a
multi-tier installation, you must download and install the WebSpeed
Messenger in the Tomcat cgi directory.
Prerequisites
• Web access
• Administrator access to Progress installation on the database server
Overview
The WebSpeed Messenger provides communication links between the
Tomcat server and the WebSpeed server when the Tomcat server resides
on a different server than the WebSpeed broker and agents.
Installation
Use the following steps to download and install the appropriate
WebSpeed Messenger files:
1
Download the WebSpeed Messenger executable from the Progress
Web site.
http://www.progress.com/esd/index.ssp
Make sure you download the executable for your specific server.
Additionally, download any related documentation.
2
Review the documentation provided on the download page for
additional installation or server requirements information.
157
158
MFG/PRO Installation Guide — QAD Desktop
3
Install the WebSpeed Messenger using the installation instructions
provided on the download page. Note the installation directory;
during the configuration steps, you edit and copy several files in this
directory.
Configure the WebSpeed Messenger
These steps assume you are configuring WebSpeed on a UNIX system. If
you are installing on a Windows server, these steps also apply; the relative
paths are the same. The only exception is that Windows requires the
cgiip.exe executable instead of the wspd_cgi.ksh executable.
UNIX Servers: If Tomcat is running on a UNIX server, go to the
\WebSpeedInstallDir\properties directory. Find
msngrs.properties, make a copy of this file, and rename the copy to
ubroker.properties.
1
Using a text editor, open the ubroker.properties file in
\WebSpeedInstallDir\properties.
2
Find the [NameServer.NS1] section and add the following
parameters:
location=remote
hostName=DataBaseServerName
3
Find the [WebSpeed.Messengers.CGIIP] section. Depending on
the OS where Tomcat is installed, add the following parameters; use
wspd_cgi.ksh for UNIX or cgiip.exe for Windows.
msngrExecFile=@{Startup\DLC}\bin\wspd_cgi.ksh
AllowMsngrCmds=1
Host=DataBaseServerName
Port=NameServerPortOnDBServer
registerNameServer=1
4
Verify your edits and save the file.
5
Copy the WebSpeed executable from the \dlc\bin directory on the
application server to the Tomcat cgi directory on the application
server.
• For UNIX servers, copy wspd_cgi.sh. In the target directory,
rename the file to wspd_cgi.ksh.
• For Windows servers, copy the cgiip.exe file.
Reference
The file should be placed in the following directory:
TomcatInstallDir/webapps/DesktopSystemName/WEB-INF/cgi/
6
Go to the ProgressInstallDir\properties subdirectory on the
database server. Using a text editor, open the ubroker.properties
file for editing. Find the [WebSpeed.Messengers.CGIIP] section
and add these two parameters:
UNIX server
msngrExecFile=@{Startup/DLC}/bin/wspd_cgi.ksh
AllowMsngrCmds=1
Windows server
msngrExecFile=@{Startup\DLC}\bin\cgiip.exe
AllowMsngrCmds=1
Verify the WebSpeed Messenger
Ping
Verify that the WebSpeed Messenger has been installed and configured
correctly. Launch a Web browser and enter this URL:
http://TomcatHost/cgi-bin/wspd_cgi.ksh/WService=BrokerName/ping
• TomcatHost is the Tomcat server host where the remote messenger
was installed.
• BrokerName is your WebSpeed broker name.
SpeedStart
Open SpeedStart from the WebSpeed Program Group and follow the
instructions to test the WebSpeed Messenger configuration.
WebSpeed Agent Sizing and Behavior
WebSpeed agents are used to extract information from the database for
any browses, inquiries, and reports that have the Web Logic Implemented
field set to Yes in Program Information Maintenance (36.3.21.1). Each
WebSpeed agent services one user request at a time.
159
160
MFG/PRO Installation Guide — QAD Desktop
Note By default, browses and lookups are Web-enabled; reports and
inquiries display with HTML screens. However, this can be changed by
resetting the Web Logic Implemented field in Program Information
Maintenance.
When calculating the number of WebSpeed agent licenses required for
your site, you should consider the following:
• The number of reports and large browses being run simultaneously
• The number of seconds of inactivity before an agent is automatically
released
• The number of simultaneous activities each end user is allowed
For most activities, the agent is used only briefly to retrieve the
information required to present or update the user interface.
Agent Usage for Reports and Inquiries
For reports and inquiries that have been changed to use WebSpeed (by
setting Web Logic Implemented to Yes), a WebSpeed agent is in use—
that is, it is servicing a user request—when it is extracting report or
inquiry data from the database. After delivering this data to the Web
server, the WebSpeed agent is free to service another request, even if
Desktop has not yet displayed all the data to the user.
Agent Usage for Browses and Lookups
¶ See User Guide:
QAD Desktop.
For browses and lookups, a WebSpeed agent is in use when it is
delivering the number of records specified as the Max Browse Records
setting in User Option Maintenance (36.20.10.1).
• If the browse request generates fewer records than Max Browse
Records, the records display in the browse and the agent is released
immediately.
Example If Max Browse Records is 100 and a browse query returns
80 records, MFG/PRO displays the 80 records and releases the agent.
When download size is small, this might require only a few seconds
per request. This means that a WebSpeed agent might be busy only a
fraction of the time a user has a browse data window open in Desktop.
Reference
• If the browse request generates more records than Max Browse
Records, the agent is sometimes held the entire time the browse data
window is open—that is, from the time the user requests the data to
the time the browse times out or is manually closed. A browse in this
condition is known as state-aware; other browses are considered
stateless.
A state-aware browse occurs when:
• The user sorts browse data by a field that is not indexed in the
database. Indexed fields are indicated by an asterisk (*) in the
Sort By field.
• The WebSpeed agent returns a group of data that ends with a non-
unique key.
• The browse takes an unusually long time to begin returning data
to the Web server.
When a browse is state-aware, it displays a time-out message in the
title bar—for example, Browse times out in 2 minutes.
Example Max Browse Records is 100 and the query returns 200
records; the browse data window displays approximately the first 100
records. It may actually display slightly more than 100 records,
depending on where an appropriate break in the active index is found.
When the user scrolls down to the bottom of the data window, the
browse requests the next 100 records for display.
When any of the conditions above are met, the agent becomes stateaware and is held until the browse is closed or times out. In this case,
the browse data window displays the following message to indicate
that the agent is being held:
Times Out in X Minutes (Port #).
161
162
MFG/PRO Installation Guide — QAD Desktop
Agent Usage Summary
Table 10.3 shows the approximate amount of time during which
WebSpeed agents are held for various combinations of Desktop activities
and agent states.
Table 10.3
Summary of
WebSpeed Agent
Usage
Activity
Agent State
Time Agent Held
Logging in to Desktop
Stateless
Less than one second
Building menu or Desktop
Stateless
Less than one second
Navigating down menu
Stateless
Less than one second
Starting browse
Stateless
Less than one second
Starting report
Stateless
Less than one second
Running report
Stateless
While report is
generating data
Running a browse for which the number of Stateless
records is less than the Download Size
Less than one second
Running a browse for which the number of Stateless
records exceeds the Download Size
Less than one second
Running a browse for which the number of State-aware
records exceeds the Download Size
While browse is
incomplete or until
timeout is reached
Mechanisms to Optimize Agent Usage
¶ See User Guide:
QAD Desktop for
details.
Several settings in Desktop can be used to assist in optimizing WebSpeed
agent usage. Define these settings in User Option Maintenance
(36.20.10.1) for individual MFG/PRO user IDs.
Max Web Connections. Use this setting to indicate the maximum
number of agents that can be simultaneously locked by a user. When
this amount is exceeded, an error message displays and the user
cannot run a new report or a browse until they have released agents.
Browse Timeout. Use this setting to indicate the maximum amount of
time an agent remains locked for the user before it is automatically
released and is available to other users.
Session Timeout. Use this setting to indicate the maximum number of
minutes that a Desktop session can be inactive for a user before the
system automatically logs them out.
Reference
Security
This section includes additional information about Desktop security
issues.
Securing Internet Communication
QAD recommends using encrypted Virtual Private Network (VPN)
connections when accessing Desktop over the Internet. VPN provides a
secure communication channel for Desktop sessions. This requires no
additional setup for Desktop and requires that the user is authenticated
and has authorization to log on to the network.
Using SSL (Secure Sockets Layer) is not recommended. SSL over VPN is
redundant and reduces Desktop performance. Additionally, the use of
SSL security has the following limitations with Desktop:
• SSL security does not secure Desktop telnet communications.
• SSL does not secure communications between the Tomcat server and
the MFG/PRO database server. If these servers are different machines
that communicate over a network, their communications may also be
compromised.
UNIX Telnet Environment Security Issues
To access a subset of MFG/PRO maintenance programs, Desktop uses
telnet to log on to the server where MFG/PRO is installed. Because
Desktop communicates via HTTP, the account log-in ID and password are
sent using unencrypted text. Since this may compromise system security,
you should configure the telnet environment with special server-side
security measures in mind.
A range of security options exists to solve the unencrypted log-in and
password problem. This section outlines two sample security setups: one
providing a maximum level of security and one providing less security
but more flexibility for Progress client session and home directory access.
In both setups, it is recommended that you use a restricted shell (rsh).
163
164
MFG/PRO Installation Guide — QAD Desktop
Restricted Shells
Restricted shells are restricted versions of the common UNIX Bourne
shell or Korn shell. In the Bourne shell, the restricted shell is run as rsh
(/usr/lib/rsh), while in the Korn Shell it is known as rksh (/usr/
bin/rksh). The restricted versions of these shells allow users to log in
with restricted access. They cannot:
• Use the cd command to change directories.
• Specify a path or command using /.
• Use redirection (>, >>).
• Set the value of $PATH.
Tip
The default shell
for a user is located
in the /etc/
passwd file.
Note A user’s path should not include /usr/bin. This lets the user run
another shell, thereby inheriting access to any commands that the child
shell allows.
Examples of Security Measures
Case 1: Maximum Security
One UNIX account with the following characteristics is used for all
Desktop telnet sessions:
• No write permissions to home directory. Temporary files are written
elsewhere.
• $PATH, $DLC, and $PROPATH environment variables are set in
.profile and inaccessible to the user.
• Startup command and/or scripts are run from .profile.
• Telnet disconnects immediately after the user exits the MFG/PRO
session.
Use the following instructions to set up Case 1:
1
Create the unique Desktop account for log-in to UNIX through telnet.
2
Make the default shell for this account the restricted shell.
3
Remove all write permissions for this user in their home directory.
Use the -T option in the remote script to specify an alternate
temporary directory.
Reference
4
Set up the .profile to set minimal environment variables.
5
Set up the .profile to run the script automatically.
Example .profile for Case 1:
/*Sample .profile for Desktop maintenance session, single Desktop
login*/
#set default for error (STOP) condition handling
stty intr ^C
#set environment variables
PATH=/dlc91:/dlc91/bin
DLC=${DLC - /dlc91}
PROEXE=${PROEXE - $DLC/bin/_progres}
export PATH DLC PROEXE
#Autorun remote script for Desktop Access and automatically exit
exec remote.script
exit
Case 2: Moderate Security
Users have their own unique log-in and password, but run the restricted
shell by default:
• Write permission to the home directory is possible, but not necessary.
• $PATH, $DLC, and $PROPATH environment variables are set in
.profile and inaccessible to the user.
• Users run a subset of UNIX commands, which you add to /usr/
rbin.
• Users can run MFG/PRO manually from a command line or script.
Use the following instructions to set up Case 2:
1
Create or modify accounts for Desktop users of MFG/PRO
maintenance programs by changing their default shell in the /etc/
passwd file to the restricted shell.
2
Create the directory /usr/rbin and copy the UNIX commands
necessary for these users. Make the /usr/bin directory read-only so
users cannot change path variables.
3
Set up a special .profile for Desktop maintenance program users.
4
Set the minimal environment variables, remembering to include /
usr/rbin.
165
166
MFG/PRO Installation Guide — QAD Desktop
5
Copy the Desktop telnet connection script to each user’s home
directory with read-only access.
6
Put any other necessary read-only script files in the home directory.
Example .profile for Case 2:
/*Sample .profile for Desktop session for individual logins
remote.script should be in home directory; executable by Desktop*/
#set default for error (STOP) condition handling
stty intr ^C
#set environment variables
PATH=/dlc91:/dlc91/bin:/usr/rbin#don’t forget /rbin directory
DLC=${DLC - /dlc91}
PROEXE=${PROEXE - $DLC/bin/_progres}
export PATH DLC PROEXE
Configure Multiple Desktop Systems
This section discusses issues you should be aware of when you:
• Configure multiple Desktop systems on one server.
• Configure multiple Desktop systems for more than one MFG/PRO
release.
Configuring Multiple Systems on the Same Server
Note If you want to provide Desktop clients with access to additional
database sets—for example, the Training database set—you cannot share
the same administration database between the sets.
If needed, you can create multiple Desktop systems on the same server.
However, some aspects of each Desktop system are set up individually.
Review the following example to understand these requirements. They
assume a Test, Production, and Train system were configured on a
Windows server. This setup on a UNIX server would use the same
relative paths.
¶ See page 168.
Note Special Desktop log file directory requirements exist if you are
configuring Desktop systems for multiple MFG/PRO releases.
Reference
When you use the Perl deployment script to set up these systems, several
directories are created and populated based on the unique Web application
names you defined:
• Test
• Production
• Train
Each system has a unique system directory in the Tomcat Web application
directory:
• c:\TomcatInstallDir\webapps\test
• c:\TomcatInstallDir\webapps\production
• c:\TomcatInstallDir\webapps\train
The setup process creates additional subdirectories for each system. It
creates \mfgpro for configuration files and MFG/PRO Progress
programs (.p files) and \qad for the compiled Desktop-specific r-code.
For example, for the test Desktop system these directories are:
• c:\mfgsvr\test\com\qad
• c:\mfgsvr\test\com\mfgpro
After running the setup process for the three environments, each system
also has a unique configuration .ini file stored in the log files directory
you specify. These examples assume you used the MFG/PRO installation
directory as the logs directory:
• c:\mfgsvr\test_dt2.ini
• c:\mfgsvr\production_dt2.ini
• c:\mfgsvr\train_dt2.ini
167
168
MFG/PRO Installation Guide — QAD Desktop
Configuring Desktop for Multiple MFG/PRO Releases
If your environment requires setting up Desktop systems for multiple
MFG/PRO versions running on the same server, the .ini and log files for
Desktop systems running on each MFG/PRO release must be in their own
MFG/PRO release-specific log files directory.
For example, if you have MFG/PRO eB2 Service Pack 8 and eB2.1
installed on a single server, a separate log file directory is required for
each MFG/PRO release. Do not store .ini files for different MFG/PRO
releases in the same Desktop log directory. You can store multiple .ini
files for the same MFG/PRO release in the same directory.
Administration with Tomcat
This section includes additional information on Tomcat, including:
• How to install a new version of Tomcat
• Clearing the Tomcat server cache
• Using the Tomcat Web Application Manager
Install a New Tomcat Servlet Engine
Note To find your current Tomcat version, review the release note
documents in the Tomcat root directory.
To install the new Tomcat version included on the Desktop media, launch
the deployment script and use the Tomcat installation menu option. You
can choose to install Tomcat in the same directory as an existing Tomcat
installation, or in a new directory. If you choose to install the new version
in an existing Tomcat installation directory and the deployment tools
detect the Tomcat versions are compatible, you can optionally merge the
existing Tomcat configuration files with the new Tomcat version.
Reference
Manually Install Tomcat and Merge QAD Components
Important To ensure system integrity, Desktop deployment tools should
be used to manage the Tomcat installation process. These details are
provided for information purposes only.
Use the following instructions to manually merge QAD-provided Tomcat
components with your Tomcat version:
1
2
Unzip the QAD-provided Tomcat version:
a
UNIX: Mount the Desktop installation CD.
b
Navigate to the \zips subdirectory on the Desktop installation
media.
c
Unzip the Tomcat.zip file to a temporary directory.
Merge the Tomcat components.
a
Go to the temporary directory where you installed the QADprovided Tomcat engine. Copy server.xml and tomcatusers.xml from the \conf subdirectory to the \conf
subdirectory of your Tomcat version. Overwrite existing files.
b
Merge the QAD-provided TempDir\bin\setenv.sh file with
the setenv.sh file in the TomcatInstallDir\bin. If your
Tomcat \bin directory does not contain a setenv.sh file, copy
the QAD-provided file to your TomcatInstallDir\bin
subdirectory.
c
Create a file named version.txt that references the QADcompatible Tomcat version number. The entry should look like
the following:
tomcat.version=5.0.27
Clear the Tomcat Server Cache
When the following events occur, you should clear the server cache to
ensure new information is properly displayed in Desktop:
• Before you install a new Desktop release over an existing one
Note It is recommended to complete installations in a new directory;
for some releases such as Desktop 2.7 this is a requirement.
169
170
MFG/PRO Installation Guide — QAD Desktop
• After you rebuild Desktop
• After you attach or detach a lookup from any field
Note In the following steps DesktopSystemName refers to your
Desktop system name.
To clear the cache, follow these steps:
1
Shut down Tomcat.
2
Go to the TomcatInstallDir/webapps/DesktopSystemName/
cache directory.
3
Delete all subdirectories and files located in this directory.
4
If you are installing a new Desktop release, complete the installation
steps.
5
Restart Tomcat.
Tomcat Web Application Manager
The Tomcat Web Application Manager is a Web application used to
manage Web applications on the Tomcat server. It lets you list, install,
reload, deploy, and remove existing Web applications, without having to
shut down and restart the entire container. This utility is a Web application
itself; Tomcat must be running in order to use it.
This installation guide does not include configuration or user
documentation for the Tomcat Web Application Manager. Refer to the
Tomcat how-to document for Tomcat documentation:
http://jakarta.apache.org/tomcat/tomcat-4.1-doc/manager-howto.html
Reference
Fig. 10.1
Tomcat Web
Application
Manager
Use Diagnostic Tools
This section includes information about a number of diagnostic
techniques and tools you can use with your Desktop environment. These
tools can be especially helpful when first installing and tuning the
application or upgrading to a new release of Desktop.
Details are included about:
• Setting logging parameters
• Enabling the Java Console
• Enabling performance timing
Configure Logging
Logging in Desktop is facilitated by the Apache Jakarta Project Log4j
infrastructure. This means that log statements are in the code; their output
can be configured in an external XML file. This file is called
logging.xml and is located in:
TomcatInstallDir/webapps/DesktopSystemName/WEB-INF/conf
171
172
MFG/PRO Installation Guide — QAD Desktop
All log information is written by default to the desktop.log file located
in:
TomcatInstallDir/webapps/DesktopSystemName/WEB-INF/logs/
It may be useful to move these files to backup storage, or to delete them,
once the records are no longer required.
Log4j is highly configurable, based on settings that can be modified in the
logging.xml file. Information on how to edit this file is beyond the
scope of this guide; further information can be found on the Log4j Web
site:
http://jakarta.apache.org/log4j/docs/index.html
One configurable setting of interest is the logging level. This can be set to
any of the following and can be useful in troubleshooting errors:
• Error – error messages only
• Warning – error and warning messages only
• Info – error, warning, and info messages only
• Debug – all messages
Enable the Java Console
¶ See “Enable Java
Console Tracing”
on page 187.
If you selected Enable Java Console Tracing when you configured your
Desktop system with MFG/UTIL, you must enable the Java console to
view the trace output. Follow these steps:
1
From the Windows Start button on the Desktop client machine, click
Start|Settings|Control Panel.
2
Double-click the icon for Java Plug-in.
3
When the Java Plug-in Control Panel displays, click Show Java
Console in the Basic tab.
Reference
Fig. 10.2
Java Plug-in
Control Panel
4
Click Apply to save your changes.
Enable Performance Testing
To help you troubleshoot Desktop performance related to your network,
you can activate a timer for Desktop maintenance programs. Use this
function to help you pinpoint network issues affecting the Desktop
environment by timing Desktop performance on multiple clients and
recording the performance timing.
To activate the performance timer function:
1
Using a text editor, open general.js for editing. This file is in the
js subdirectory of the Desktop installation directory.
2
Add the following new line at the top of the file and save the file:
var htmlTiming = "true";
173
174
MFG/PRO Installation Guide — QAD Desktop
Chapter 11
Deployment Tools
This chapter discusses the deployment script and MFG/UTIL features
not discussed in the step-by-step installation chapters. It includes
additional details for advanced functions and features.
Deployment Script Reference
176
Single-Tier Deployment Options
Multi-Tier Deployment Options
MFG/UTIL Reference
181
176
179
176
MFG/PRO Installation Guide — QAD Desktop
Deployment Script Reference
The Desktop component deployment scripts are written in Perl, which is a
cross-platform scripting language. It uses an Unzip utility to expand
compressed files and Java functions to create and expand JAR files for
configured Desktop component distribution. The source code used to
build the Perl and Unzip executables as well as the binaries for each of the
supported platforms is included in a set of platform-specific directories on
the CD.
This section gives a general overview of each menu option on the
deployment script. The deployment script main structure differs between
single and multi-tier configurations and for Windows and UNIX servers.
Single-Tier Deployment Options
Install Tomcat Files Menu
This option displays the Tomcat installation submenu to install the
Tomcat servlet engine and Desktop application files. You must execute
this menu option, even if you have already installed Tomcat on your
server. In this case, only Desktop-required application files are installed
into the proper Tomcat directories. To run this option, you must enter or
verify these values:
• Tomcat installation directory
• JAVA_HOME
• Tomcat port number
New Tomcat Installations
When you select this option, the system installs Tomcat in the specified
directory if no other Tomcat installation is present. Once the Tomcat
application files are installed, the script installs Desktop-specific Web
application files used by Tomcat.
Deployment Tools
177
Replacing an Existing Tomcat Installation
If you are deploying components on a server that already has Tomcat
installed, the script automatically detects if the existing Tomcat
installation is compatible with the Desktop release you are deploying. If
the installed Tomcat version is not compatible with Desktop, you are
prompted to back up the incompatible Tomcat installation and install the
version included on the Desktop installation media.
Using an Existing, Compatible Tomcat Installation
If you are deploying components on a server where a compatible Tomcat
version is already installed, the deployment script verifies that the
installed Tomcat version is compatible with the Desktop release being
configured. You are then prompted to install only the Desktop Web
application and configuration files. These files are required. The Web
application files are placed in the Tomcat
\webapps\DesktopSystemName subdirectory. Several Tomcat-specific
files are updated in other Tomcat directories.
Note Back up your Tomcat installation directory if you need to maintain
any customizations required for other Web applications.
Install MFG/PRO – Progress Desktop Files Menu
Use the options on this menu to install Progress files on the database
server or update any MFG/UTIL installations not located in the character
client directory. In Windows environments, an additional menu option is
used to set up your telnet environment and generate the telnet server
k_start.bat script. To complete the options on this menu, you must
enter or validate these values:
• Database server JAVA_HOME
• The Desktop administrative security group
• MFG/PRO character client installation directory
• Telnet server installation directory (Windows)
¶ See “Configure
and Start
Tomcat” on
page 93.
178
MFG/PRO Installation Guide — QAD Desktop
Install MFG/PRO – Progress Desktop Files
Use this option to install the complete set of MFG/PRO Progress files
required on the database server for Desktop. These files include updates
to MFG/UTIL and updated MFG/PRO code required for Desktop fixes
not included in the current MFG/PRO service packs. To use this option,
you must enter the character client installation directory. Based on this
value, the deployment script updates the MFG/UTIL and MFG/PROrelated code in the \xrc directory and places the Desktop code in a
Desktop system-named subdirectory under the character client
installation directory.
Update Additional MFG/UTIL Installations
This option is used in environments where either the character client is
installed in separate directories or you have multiple MFG/PRO
installations on the same server. This option lets you update multiple
MFG/UTIL installations with the Desktop configuration and build
options.
When you select this option, you enter the directory where the other
MFG/UTIL installation is located. The script validates whether the
indicated directory contains an MFG/PRO installation and its version.
That MFG/UTIL installation is then updated with the required changes. If
the MFG/PRO version cannot be detected from the version.mfg file,
you must specify what MFG/PRO version is being updated.
Telnet Setup (Windows Only)
This menu option does not appear when running the scripts on a UNIX
server.
You must use this menu option to set up your telnet environment and
generate the Windows-specific telnet script, k_start.bat. This file is
required for Windows systems. The script is used to automatically start a
telnet server session and to determine which items a user can access on
the host when launching an MFG/PRO program that executes in
Desktop’s integrated telnet interface. The generated file is placed in a
\telnet subdirectory in the MFG/PRO installation directory.
Deployment Tools
Uninstall MFG/PRO – Progress Desktop Files
Use this menu option to uninstall the Progress files installed by the
installation script for the Desktop system you select. Use this option when
you want to back out the Desktop directories for a system. The
\DesktopSystemName directory and all its contents are deleted from the
MFG/PRO character client directory.
Note This option does not remove the MFG/UTIL updates.
Multi-Tier Deployment Options
The main menu for multi-tier configurations has two significant menu
options. The first option—the Deploy the Progress files menu—is used on
the database server. The Post MFG/UTIL Desktop Build Jar Install menu
option is used on the Tomcat server. In order to use these menu options,
you need to know and confirm the database server JAVA_HOME.
Install MFG/PRO – Progress Desktop Files Menu
Use the options on this menu on the database server to:
• Deploy Desktop-specific code and MFG/PRO and MFG/UTIL
updates.
• Stage the HTML and cgi-bin files that MFG/UTIL will customize and
prepare for the Tomcat servers.
• Update any MFG/UTIL installations not located in the character
client directory.
• Generate the telnet server k_start.bat script in Windows
environments.
To complete the items on this menu, you must enter or validate these
values:
• MFG/PRO character client installation directory
• Telnet server installation directory (Windows)
179
180
MFG/PRO Installation Guide — QAD Desktop
Install MFG/PRO – Progress Desktop Files
This menu option installs the Desktop code and makes Desktop-specific
updates to MFG/PRO and MFG/UTIL. Additionally, it stages the HTML,
cgi-bin, and Tomcat code that MFG/UTIL will customize and package for
deployment as a Web application on the Tomcat server.
You must enter or confirm the following information to successfully
complete this option:
• The MFG/PRO character client installation directory
• The Desktop administrative security group
• The Desktop code directory, typically in the client installation
directory and named the same as your Desktop configuration
• A staging directory location with approximately 20 MB free space
Update Additional MFG/UTIL Installations
¶ See page 178.
This option is the same as the corresponding option for single-tier
deployments.
Telnet Setup (Windows Only)
¶ See “Telnet Setup
(Windows Only)”
on page 178.
This option is the same as the corresponding option for single-tier
Windows deployments.
Uninstall MFG/PRO – Progress Desktop Files
¶ See “Uninstall
MFG/PRO –
Progress Desktop
Files” on
page 179.
This option is the same as the corresponding single-tier menu item.
Post MFG/UTIL Desktop Build Jar Install
Run this menu option on the Tomcat server to deploy the MFG/UTILcreated Web application file. To deploy the JAR file with the configured
Tomcat files, you must enter or confirm the following information:
• Tomcat installation directory
• The JAVA_HOME value
• The port number used for Tomcat
Deployment Tools
Before you can use this option:
• The MFG/UTIL-created JAR file must be accessible from the Tomcat
server.
• The Desktop configuration .ini file for the multi-tier system being
configured must be accessible from the Tomcat server.
• A Java 1.4.x version must be installed on the Tomcat server.
MFG/UTIL Reference
This section includes additional field descriptions for all the Desktopspecific screens in MFG/UTIL. Use this information as reference to
verify the MFG/UTIL build information and to complete any additional
configuration and build activities.
Note Some fields and screens may not apply or display in your
environment depending on the database type and whether you are
completing a single or multi-tier deployment.
Configure Desktop Environment Parameters
This section discusses all of the fields that display when you choose the
Configure Desktop Environment Parameters option on the Desktop menu
in MFG/UTIL.
181
182
MFG/PRO Installation Guide — QAD Desktop
Desktop System Information
The first set of fields prompt for information related to your Desktop
system.
Fig. 11.1
Desktop System
Fields
Database Connection Parameter File with Path. This field displays
any parameter files found in the MFG/PRO and character client
installation directory.
¶ See“Add
Parameter File
Directories” on
page 195.
You can define additional search directories; files found in those
directories are also listed for selection.
MFG/PRO Language Code. Select the MFG/PRO language code
from the drop-down list that represents the language you want to use
for screen display, such as US for US English.
MFG/UTIL generates a list of language codes based on MFG/PRO
language installations detected in your environment.
¶ See “Language
Settings” on
page 191.
Other language settings are available in the Advanced Options of the
MFG/UTIL Build Desktop screen. For a single-language
implementation, you should not need to change any default values.
Desktop Install Directory. MFG/UTIL uses the value you specified
during installation that was saved to the configuration .ini file. The
system validates that the directory exists and whether the Desktop
code directories are located in it.
Deployment Tools
When an installation directory is not recorded in the Desktop .ini
file, MFG/UTIL searches for the Desktop code subdirectories in the
the known MFG/PRO installation directories and any additional
search directories you defined. When MFG/UTIL finds a Desktop
code directory, this field is populated with that value.
183
¶ See “Add
Parameter File
Directories” on
page 195.
Java Home for JAR build. This field displays only for a multi-tier
installation. It displays the database server JAVA_HOME, which is
used by MFG/UTIL to build archive files and run the Desktop build.
In multi-tier configurations, you will be prompted for JAVA_HOME
for the Tomcat server when installing Tomcat or deploying the
Desktop Webapp. The Tomcat server and database server
JAVA_HOME values will likely be different.
MFG/PRO Version. The MFG/PRO version listed in the
version.mfg file in the MFG/PRO installation directory defaults
here. eB2 displays for MFG/PRO eB2 and MFG/PRO eB2.1.
You can change this value, but MFG/UTIL validates that the version
specified is the same version found in the version.mfg file. If it is
not, a message displays and you are prompted to continue.
Note When a service pack level is found, it is ignored and has no
effect on this setting.
MFG/PRO Security Group for Desktop Administration. Specify the
security group previously defined in MFG/PRO that is associated
with users who should be given access to Desktop administrative
functions.
Database Set Name. This is the database set where Desktop will be
used. This value should correspond to the .pf file you choose for
building Desktop. The default value is the first database set
MFG/UTIL finds in the mfgutil.ini file.
Absolute Path to Oracle Install. This is the path to the Oracle
installation directory, also known as the ORACLE_HOME parameter.
Oracle System Identifier Name. Enter the Oracle System Identifier
(ORACLE_SID). This is the environment variable that the system
uses for the Oracle database and is typically the same as the Oracle
database name.
¶ See “Define
Security Groups
for Desktop
Administration”
on page 39.
184
MFG/PRO Installation Guide — QAD Desktop
ORASOPATHNAME. This Oracle environment variable is used in
UNIX environments only. This value can be used to point to the
ORACLE_HOME/lib/libclntsh.xx client library, where xx refers
to your Oracle version. Your specific Oracle version and system
configuration define whether this parameter must be set and the
specific setting. Refer to the Oracle documentation for details.
Service Pack Directory. Enter the service pack directory to include in
the Desktop PROPATH. The directory you enter is validated by
MFG/UTIL to ensure it contains the version.mfg file. Service
pack directories should always contain this file. If version.mfg
does not exist, a warning message is issued, but you are given the
option to continue with the directory specified.
Important Add custom and patched code directories to the end of the
value in PROPATH.
MFG/UTIL uses the service pack base install directory to compile the
Desktop code. This directory is also added to the Desktop PROPATH.
For the code compile executed during the Desktop build, MFG/UTIL
appends BaseSPDir and the BaseSPDir/xrc to the PROPATH after
DesktopInstallDir and before BaseMFGDir,BaseMFGDir/xrc.
• For telnet, the PROPATH is:
DesktopInstallDir,.,BaseSPDir,BaseSPDir/
bbi,BaseMFGDir,BaseMFGDir/bbi
• For the Connection Manager script, the PROPATH is:
DesktopInstallDir/com/mfgpro,.,BaseSPDir,BaseSPDir/
bbi,BaseMFGDir,BaseMFGDir/bbi
• For WebSpeed the PROPATH is:
DesktopInstallDir/com/
mfgpro,DesktopInstallDir,.,BaseSPDir,BaseSPDir/
bbi,BaseMFGDir,BaseMFGDir/bbi
Deployment Tools
PROPATH. Use this field to enter any additional values for the
PROPATH, such as an additional client code directory. Make sure that
all the proper MFG/PRO code and any directories containing service
pack code are included. The PROPATH for the build process requires
the following directories, in this order:
a
The Desktop installation directory.
b
The MFG/PRO installation directory. This is the directory where
the version.mfg file is found.
c
The /us/xrc directory in the MFG/PRO installation directory.
The default PROPATH value is generated dynamically using:
• The Desktop directory from the system configuration .ini file.
• The PROPATH for MFG/PRO from the mfgutil.ini file.
• The /us/xrc directory in the MFG/PRO installation directory is
appended to the PROPATH.
All directories specified in the PROPATH must exist.
Tomcat Configuration Fields
This set of fields prompts for details related to your Tomcat installation.
Fig. 11.2
Tomcat
Configuration
Fields
Tomcat Operating System. Specify the operating system for the
server where Tomcat will reside. This value defaults from
information in the configuration .ini file, if available.
Tomcat Host Name. Enter the fully qualified host name of the Tomcat
server.
Tomcat Port Number. This value is automatically populated with
8080. Change this value as needed.
185
186
MFG/PRO Installation Guide — QAD Desktop
¶ See “Update
Tomcat Port
Numbers” on
page 93.
Note If you do not accept the default value of 8080, you will need to
manually update the Tomcat server configuration file with the port
you plan to use.
Tomcat Stage Directory. For multi-tier deployments, this is the
staging directory where the Tomcat files were placed by the
installation script. These are the files MFG/UTIL will customize for
your Tomcat server.
Tomcat Directory. For single-tier deployments, enter the fully
qualified absolute path to the Tomcat installation directory.
Tomcat Webapp Name. This field is automatically populated with the
name of your Desktop configuration.
WebSpeed Information
This set of fields prompts for details used with your WebSpeed
configuration.
Fig. 11.3
WebSpeed
Configuration
Fields
WebSpeed Broker Name. Specify the name of the WebSpeed broker
you set up for Desktop. The broker name is defined in the
ubroker.properties file, located in the properties
subdirectory of the Progress installation directory. Typically, the
broker name is the same as the Desktop configuration name.
WebSpeed Executable Name. Enter the name of the WebSpeed
Messenger executable, located in the Tomcat executables directory.
On Windows, it is named cgiip.exe. On UNIX systems, use
wspd_cgi.ksh.
¶ See “Install and
Configure
WebSpeed
Messenger” on
page 157.
Note In a multi-tier installation, the WebSpeed Messenger
executable must be located in Tomcat’s cgi directory:
TomcatInstallDir/webapps/DesktopSystemName/WEB-INF/cgi/
Deployment Tools
187
Java and Search Default
This set of fields prompts for details used with the Java Plug-in and
Desktop search.
Fig. 11.4
Java and Search
Fields
Enable Java Console Tracing. Enter Yes or No to indicate if the
session trace messages should be sent to the Java Plug-in Console. To
view the messages, you must also enable the console.
Enabling trace may adversely affect performance because display
messages are continually sent to the Java console. If you enable trace
for debugging purposes, you must rebuild Desktop once you are
ready to disable this option.
Use QAD Desktop Supplied Java Plugin. Indicate how you want to
manage the Java Plug-in version for client sessions.
• Leave the default No setting to have Desktop clients use the latest
plug-in already installed on the client machine. If no plug-in
exists on the client or the minimum plug-in version required by
Desktop (1.4) is not found, the QAD-supplied version is
downloaded.
• Set this field to Yes when you want all clients to use the 1.4.2_06
plug-in version supplied on the Desktop installation media. If this
version is not available on the client, it is automatically
downloaded and installed. If other versions of Java exist on the
client, they are not replaced and can continue to be used by
applications other than Desktop.
You should set this value to No only when you are sure that all clients
using Desktop already have a supported version of the Java Plug-in
installed. In this case, you can avoid requiring each client to
download the 1.4.2_06 version.
To change this value at a later time, you must rebuild your Desktop
system.
¶ See “Enable the
Java Console” on
page 172.
188
MFG/PRO Installation Guide — QAD Desktop
Maximum Search Results. By default, the Search function in Desktop
returns 20 records at a time. You can change this value by specifying
a different number here.
Verify and Build the Desktop System
Before performing the Desktop build, verify the build parameters. To
begin, choose Desktop|Build Desktop on the MFG/UTIL main menu.
When the Build Desktop screen displays, choose the configuration to
build. The same screens that were used to enter system parameters
display, but with read-only values. Verify the values on all four screens
and then choose Build to proceed with the Desktop build. At the
completion of the Desktop build, a message displays the name and
directory location of the build log file.
Advanced Build Options
This section discusses the fields that display when you choose the Build
Desktop option on the Desktop menu in MFG/UTIL and access the
Desktop Advanced Build Options screen.
These options are used when configuring multi-language Desktop
environments, to rebuild specific Desktop components without rerunning
the entire build process, or to create build scripts without running the
actual build process. As with other MFG/UTIL screens, this one may
differ slightly depending on the Desktop configuration and database
environment you are working with.
Deployment Tools
189
Fig. 11.5
Advanced Build
Options
Displays for
Oracle database
environments
only
Desktop Configuration Name. This field displays the Desktop
configuration you are currently updating; it cannot be modified.
DB Connection -pf File. This is the database connection parameter file
that the build process will use to connect to the database to load
system data and compile the Desktop code. This file was selected
previously in the Desktop 2 Configuration screen. If the wrong .pf is
displayed here or you need to change it, you must exit this screen and
restart the process by choosing the MFG/UTIL Desktop|Configure
Desktop Environment Parameters menu option. Then select the
correct .pf in the Desktop 2 Configuration screen.
Note The database must be running for the compile and load to
complete, or your database parameters must include -1 to connect to
the database in single-user mode. The parameters must also contain
the appropriate -d mdy parameter.
Generate new config.properties file. This option should be selected
when a new Desktop system is to be built. However, once a Desktop
system has been built and you are rerunning a specific build
function—such as generating new menus because you changed
menus in MFG/PRO— you may want to deselect this option. This
option creates a new config.properties file and overwrites the
existing one. If the existing file contains any customizations, they will
be lost.
¶ See “Database
Connection
Parameter File
with Path” on
page 182.
190
MFG/PRO Installation Guide — QAD Desktop
Create Build Script Only. Select this option to generate build scripts
without running the build. These scripts can later be used to build the
Desktop system. This option helps ease system administration
activities in environments with multiple Desktop systems. By
creating build scripts for all the Desktop systems without running the
build, the system administrator can create a batch or cron job to run
the build for one or multiple Desktop systems at a later time when
more system resources are available, or during scheduled down times.
The generated build script is saved to the MFG/PRO installation
directory. The file name is the Desktop system name with the
standard system extension, such as Production.bat for Windows,
or Production.ksh for UNIX.
Build Options
Select the options you want to use to control this build. These options are
affected by values defined in the config.properties file.
¶ See “Changing
MFG/PRO
Menus” on
page 146.
Typically, you enable all build options the first time you build the system.
Later, you can change the config.properties file and rebuild with or
without all options selected. In some cases, you may not need all options.
For example, if you change your menu system, you can build only the
search database and menu pages to incorporate your changes.
Fig. 11.6
Build Options
Create config.js file. Enable this option to create the JavaScript code
that incorporates your environment values. This script is used to build
the menu system.
¶ See “Language
Directories for
Menus” on
page 153.
Create Menu Pages. Enable this option to create the HTML menu
pages for Desktop. This option updates the menus in the two-letter
language code subdirectory in the Tomcat Web applications directory:
TomcatInstallDir/webapps/DesktopSystemName/menus
Deployment Tools
191
Create Search Database. Enable this option to build the database
accessed by the Search option in Desktop. You can search by menu
label, menu number, short name, and execution file based on data
specified in Menu System Maintenance (36.4.4) and Menu
Substitution Maintenance (36.20.6).
Create labels.js file. Enable this option to create the JavaScript code
for displaying MFG/PRO labels that are used on the Desktop main
pages. Labels and their associated terms are stored in the label master
table in the database and maintained with Label Master
Maintenance (36.4.17.1). Labels are extracted and placed in
language-specific files based on the language specified for the
MFG/PRO language code prompt.
Load Data files. Enable this option to load terms and labels used in
Desktop from an external file into your MFG/PRO database. This
data needs to be loaded only once to update your MFG/PRO database.
If you are creating multiple Desktop systems for the same databases,
you can run each Desktop system build with this option enabled
without any negative effect.
Compile Desktop Progress Programs. Enable this option to compile
the Progress programs supplied with Desktop.
Language Settings
Language settings can be important if you are installing Desktop into an
MFG/PRO system that supports multiple languages. For a singlelanguage implementation, you typically do not need to change any of
these settings. Desktop is preconfigured with appropriate settings for each
supported language and these display by default, based on the
MFG/PRO language code you selected in the previous screen.
Each language has predefined values for ISO language code, Progress
startup parameters, and the Oracle NLS setting.
However, if you are installing multiple languages, you must execute the
advanced build options for each language to create language-specific
menus, search database, and other required support data. In this case, you
may need to modify the language settings for additional languages from
the default values to conform to your database settings.
¶ For additional
details, see the
section “Use
MFG/UTIL to
Install Multiple
Languages” on
page 128.
192
MFG/PRO Installation Guide — QAD Desktop
Fig. 11.7
Advanced Build
Options, Language
Settings
MFG/PRO Language Code. Select the MFG/PRO language code
from the drop-down list that represents the language you want to use
for screen display, such as US for US English. MFG/UTIL builds the
list of available languages based on the language directories you have
currently installed.
Note This language code is not necessarily the same as the ISO
standard language code used by Java.
ISO Language Code. This field displays the ISO language code
associated with the MFG/PRO language code in this screen. You
should not change this value. Desktop is preconfigured with the
correct mapping between supported MFG/PRO codes and ISO codes.
¶ See “Language
Directories for
Menus” on
page 153.
When menus are generated, the HTML files are placed in a directory
that is named based on this ISO language code. However, even when
a non-English language is specified, some files are created in the en
directory.
Language. This field displays the full language name associated with
the language code you selected. You should not change this value.
¶ For details on
these parameters,
see the Progress
Startup
Command and
Parameter
Reference.
–cpinternal. This Progress database startup parameter identifies the
code page that Progress uses in memory for graphical clients. This
should be the same as the code page that the operating system uses. If
a value is not specified, iso8859-1 is used by default. When you are
building a multiple-language system, you must change this value to
the code page associated with the database.
–cpstream. This Progress database startup parameter identifies the
code page used for stream I/O. Stream I/O includes character-based
terminals, data files, and code. When you are building a multiplelanguage system, you may need to change this value to the code page
associated with the database.
Deployment Tools
193
–cpcoll. This Progress database startup parameter identifies the
collation table to use with the code page identified by the
-cpinternal parameter. Progress uses the collation rules that you
specify to compare characters and sort records. When you are
building a multiple-language system, you must change this value to
the collation value associated with the database.
Oracle NLS Setting. This field sets the NLS_LANG parameter
required in the WebSpeed ubroker.properties file and telnet
startup scripts for the Oracle dataserver when Native Language
Support (NLS) is required for non-English and double-byte
languages.
Generate WebSpeed Configuration File
Use the Generate Sample ubroker.properties option to generate a text file
containing the parameters you need to add to the WebSpeed
ubroker.properties configuration file for your Desktop system.
Before you use this option, make sure the configuration information for
your Desktop system is updated and complete in the single or multi-tier
Desktop 2 Configuration window.
Important The generated parameter file includes the settings used in the
most typical environment. Depending on your specific server and
environment configuration, you may need to add other parameters to the
WebSpeed configuration file.
Fig. 11.8
Generate Sample
ubroker.properties
File
194
MFG/PRO Installation Guide — QAD Desktop
To create the file, follow these steps:
1
Choose Desktop|Generate Sample ubroker.properties File on the
MFG/UTIL main menu.
2
Select the proper Desktop configuration name.
3
Enter the port number to use; the default is 20000.
4
Enter the minimum and maximum port numbers. These values set the
srvrMinPort and srvrMaxPort values in ubroker.properties and
default to 20001 and 20100.
The sample file is generated and saved in the MFG/PRO installation
directory. A pop-up window indicates the exact directory where the file is
saved. The file name includes the Desktop system name, followed by
-ubroker.properties. For example, for the Production system, the
file name is Production-ubroker.properties.
Generate Telnet Start Scripts
Use this option to generate the telnet server startup scripts and an updated
parameter file for the Desktop system. The telnet scripts are used to start
the pool of Telnet connections for Connection Manager and to start a
telnet session when running MFG/PRO maintenance programs in the
embedded telnet interface. The generated parameter file includes any
additional Desktop required directories, and replaces the existing system
parameter file.
Important The generated scripts are set up for use in the most typical
environment. Depending on your specific server and environment
configuration, you may need to add other parameters to each script.
Deployment Tools
195
Fig. 11.9
Generate
Connection
Manager and Telnet
Server Scripts
1
Access this option by choosing Desktop|Create Connection Manager
and telnet scripts from the MFG/UTIL main menu.
2
Select the Desktop configuration in Desktop Configuration Name.
3
Use the check boxes to indicate whether to overwrite existing files.
Otherwise, you are prompted to back up and replace the existing
parameter file or telnet scripts.
4
To generate the scripts, choose OK.
Add Parameter File Directories
This option lets you specify additional directories that MFG/UTIL should
review to find .pf files that can be used to connect to an MFG/PRO
database when compiling the Desktop-specific code. Use this option
when you create custom .pf files for compiling Desktop code that are
located in directories other than the standard MFG/PRO .pf files.
Access this function by selecting Desktop|Edit Search Directories for
Desktop Configuration Lookups from the MFG/UTIL main menu. To add
a directory, enter its full path name in Directory to add and choose Add
Directory.
196
MFG/PRO Installation Guide — QAD Desktop
Fig. 11.10
Search Directories
for Desktop
Configuration
Lookups
You can add as many directories as you need. Any additional .pf files
located in these directories display in the Database Connection Parameter
File with Path field on the single or multi-tier Desktop 2 Configuration
screen.
Note If MFG/UTIL cannot find a directory specified here or if no .pf
files are located in a specified directory, an informational error displays
for each affected directory when you access the Configure Desktop
Environment Parameters screen.
Delete Directory. Use this option to delete the selected directory from
the list of directories to search. You cannot delete the default
directories.
Directory to add. Enter the fully qualified directory name to add to the
search list. Optionally, use the browse to locate the directory in the
file system and select it. After entering the directory, choose Add
Directory to add it.
Add Directory. Choose this option to add the directory entered in
Directory to add.
Glossary
Accelerator Keys. Keystroke equivalents to
mouse actions. For example, you can delete a
record in Desktop by choosing Delete from the
context menu or by pressing Ctrl+Shift+D.
Apache Software Foundation. A
membership-based, not-for-profit corporation
that exists to provide organizational, legal, and
financial support for the Apache open-source
software projects.
Applet. See Java Applet.
Array. A field or variable with multiple
elements, each element having the same data
type.
Bookmark. A saved link to a Web page that
has been added to a list. Bookmarks are found
on the Favorites menu in Internet Explorer.
Browse. An inquiry program that displays
records in a tabular format. Browse types in
Desktop include look-up and drill-down
browses. Drill-down browses can be specified
on the menu or associated with a field. Lookup browses are always associated with
individual fields for use in selecting entry
values. See also Drill-Down Browse and LookUp Browse.
Browser. An application used to view and
navigate the World Wide Web and other
Internet resources. Common browsers include
Microsoft Internet Explorer and Netscape
Navigator.
Bytecode. Compiled Java code containing
instructions to the Java virtual machine. The
virtual machine, in turn, interprets these
instructions so they can be performed by the
system. See also Java Virtual Machine (JVM).
Cascading Style Sheet (CSS). A Web page
derived from multiple sources with a defined
order of precedence to manage conflicts among
style element definitions. The cascading style
sheet, level 1 (CSS1) recommendation from
the W3C is implemented in the latest versions
of the Netscape and Microsoft Web browsers.
CGI. See Common Gateway Interface (CGI).
Character Interface. Sometimes abbreviated
as CUI or CHUI, an interface to MFG/PRO
that displays only keyboard characters on the
screen rather than icons and buttons. In
Desktop, telnet maintenance programs display
in the character interface, while browses,
reports, inquiries and HTML maintenance
programs display in a full graphical user
interface. Compare with Graphical User
Interface (GUI).
Comma-Separated Values (CSV). Sometimes
referred to as flat files, CSV files organize
values as a series of ASCII text lines where
each column value is separated by a comma
from the next column’s value and each row
starts a new line. Data in CSV files can be
conveyed as input to other table-oriented
applications such as Microsoft Excel.
198
MFG/PRO Installation Guide — QAD Desktop
Common Gateway Interface (CGI). A
standard way for a Web server to pass a Web
user’s request to an application program and to
receive data in response, which it then
forwards to the user. CGI is part of the Web’s
hypertext transfer protocol (HTTP). See also
HTTP (Hypertext Transfer Protocol).
Drill-Down Browse. A type of browse that is
available from a menu or associated with
individual fields. You can filter, graph, and
print from drill-down browses. In Desktop,
drill-down browses apply to fields in other
browses, inquiries, and reports. Compare with
Look-Up Browse.
Context Menu. A pop-up menu that displays
when you use a right mouse click. The choices
on the menu vary depending on where you
click; only actions valid in the current context
display.
Emulation. See Terminal Emulation.
Cookie. Information a Web site puts on your
hard disk so that it can retrieve information
about you at a later time. Typically, a cookie
records your preferences when using a
particular site.
CSS. See Cascading Style Sheet (CSS).
CSV. See Comma-Separated Values (CSV).
Data Encryption. See Encryption.
DHTML (Dynamic Hypertext Markup
Language). A combination of new HTML tags
and options that support more animated and
interactive Web pages. Much of dynamic
HTML is specified in HTML 4.0 with
Javascript and cascading style sheets. See also
HTML (Hypertext Markup Language).
Document Object Model (DOM). A
programming interface specification being
developed by the W3C that lets a programmer
create and modify HTML pages and XML
documents as program objects, rather than data
structures.
Download Size. In browses, this is the number
of records the browse window displays before
the client notifies the server to retrieve more
records.
Encryption. Conversion of data into a form
that cannot be easily intercepted by
unauthorized people.
Extensible Markup Language (XML). A
markup language that describes data. The
Desktop uses XML to create HTML screens.
Extensible Stylesheet Language (XSL). A
language for formatting an XML document; for
example, showing how the data described in
the XML document should be presented in a
Web page. XSLT shows how the XML
document should be reorganized into another
data structure (which could then be presented
by following an XSL style sheet).
Extensible Stylesheet Language
Transformation (XSLT). A standard way to
describe how to transform the structure of an
XML document into an XML document with a
different structure. The coding for the XSLT is
also referred to as a style sheet and can be
combined with an XSL style sheet or be used
independently.
Extranet. A private network designed to
securely share portions of business information
or operations with suppliers, partners,
customers, or other businesses. An extranet can
be viewed as part of a company’s intranet that
is extended to users outside the company. See
also Internet Server Application Programming
Interface (ISAPI).
Field Tips. Context-specific references to
fields consisting of the Progress field name.
Glossary
Georgia SoftWorks Windows Telnet Server
(GSWTS). The third-party telnet server
software supplied with the Desktop for
Windows NT servers.
Graphical User Interface (GUI). A user
interface that presents computer actions and
options as pictures, buttons, and icons. The
most common example of a graphical user
interface is Microsoft Windows. Compare with
Character Interface.
Graphics Interchange Format (GIF). A
graphics file format that is the industry
standard for Web and Internet use.
Grid. A screen design element that organizes
related data fields in a format similar to a
spreadsheet or table.
Group. See Servlet.
GUI. See Graphical User Interface (GUI).
HTML (Hypertext Markup Language). A tag-
based ASCII language used to create pages on
the World Wide Web. HTML uses codes
surrounding a block of text to indicate how it
should display. In HTML, you can also specify
that a block of text, or a word, is linked to
another file on the Internet.
HTTP (Hypertext Transfer Protocol). The set
of rules for exchanging text, graphic images,
sound, video, and other multimedia files on the
World Wide Web. See also Common Gateway
Interface (CGI).
Interface. See User Interface (UI).
International Organization for
Standardization. See ISO.
Internet. A system of linked computer
networks—international in scope—that
facilitates data communication services such as
remote log-in, file transfer, electronic mail, and
newsgroups. The Internet is a way of
connecting existing computer networks.
199
Internet Information Server (IIS). Web server
software from Microsoft Corporation that
supports a common gateway interface.
Internet Server Application Programming
Interface (ISAPI). A program-level means of
communicating with the Microsoft Internet
Explorer Web server.
Intranet. A private network inside a company
or organization that uses the same kinds of
software found on the public Internet.
ISO. ISO (International Organization for
Standardization), founded in 1946, is a
worldwide federation of national standards
bodies from some 100 countries. ISO is not an
abbreviation. It is a word, derived from the
Greek isos, meaning equal. The name ISO is
used around the world to denote the
organization.
ISS. See Internet Information Server (IIS).
JAR File. See Java Archive File (JAR).
Java 2 Platform, Enterprise Edition (J2EE).
A recent release of Java designed to support the
requirements of large-scale computing
systems. Features include Java servlets and
Java Server Pages (JSPs), which facilitate
dynamic Web-enabled data access and
manipulation.
Java. An object-oriented programming
language created by Sun Microsystems. Java is
a device-independent language. Programs
compiled in Java can be run on any computer.
Java programs can be run as free-standing
applications or as applets placed on a Web
page.
Java Applet. A small application program that
can be sent along with a Web page to a user.
Applets written in Java are served from a Web
site but executed on the client computer.
200
MFG/PRO Installation Guide — QAD Desktop
Java Archive File (JAR). A file that contains
the class, image, and sound components of a
Java applet gathered into a single file and
compressed for faster downloading to a Web
browser.
Java Bean. A
reusable program building
Java Virtual Machine (JVM). The part of the
Java runtime environment responsible for
interpreting bytecode. See also Bytecode.
JDK. See Java Development Kit (JDK).
JRE. See Java Runtime Environment (JRE).
block developed with a Beans Development
Kit (BDK) from Sun Microsystem.
JSP. See Java Server Page (JSP).
Java Class. In object-oriented programming, a
class is a template definition of the methods
and variables in a particular kind of object.
Look-Up Browse. A type of browse that is
only associated with individual program fields
for use in selecting entry values. Look-up
browses contain less detail than drill-down
browses and cannot be used to filter, graph, or
print data. Compare with Drill-Down Browse.
Java Development Kit (JDK). A software
development environment from Sun
Microsystems for writing applets and
applications in the Java programming
language.
Java Plug-in. Software provided by Sun
Microsystems that replaces the default virtual
machine associated with a Web browser. Using
the Java plug-in allows developers to deploy
Java applets that depend on the latest features
of the Java platform and be assured that their
applets will run reliably and consistently in
both Microsoft Internet Explorer and Netscape
Navigator.
Java Runtime Environment (JRE). A subset
of the Java Development Kit for end users and
developers who want to redistribute the Java
runtime environment. The Java runtime
environment consists of the Java virtual
machine (JVM), the Java core classes, and
supporting files.
Java Server Page (JSP). A technology for
controlling the content or appearance of Web
pages through the use of servlets, small
programs that are specified in the Web page
and run on the Web server to modify the page
before it is sent to the user who requested it.
JVM. See Java Virtual Machine (JVM).
Maintenance Programs. Programs used to
add, modify, and delete records and codes in
the MFG/PRO database. In Desktop, most
maintenance programs display as HTML
pages.
Menu Substitution. Replacing one program
with another on the MFG/PRO menu; for
example, replacing a standard program with a
customized version.
MFGX.net. The QAD portal, which is a
collaborative environment where members of
the manufacturing community can share
information and work together to achieve
overall competitiveness.
MIME (Multipurpose Internet Mail
Extension). A protocol for exchanging
different kinds of information on the Internet.
The MIME header is inserted at the beginning
of a Web transmission so that client programs
can select the appropriate associated
application.
Netscape Server Application Programming
Interface (NSAPI). A program-level means of
communicating with the Netscape Web server.
Glossary
Network. A series of points or nodes
interconnected by communication paths. The
Internet is a common example of a network.
See also Internet, Extranet, Internet Server
Application Programming Interface (ISAPI),
and Wide Area Network (WAN).
Network User Interface (NetUI). An earlier
version of the Web-enabled interface now
replaced by QAD Desktop. Some features of
NetUI are used by Desktop, such as security.
Node. In the Process Editor, nodes represent
steps in a process and can contain URL links to
other resources.
Perl. A script programming language
(Practical Extraction and Reporting Language)
that is similar in syntax to the C language and
that includes a number of popular UNIX
facilities. Perl is regarded as a good choice for
developing Common Gateway Interface (CGI)
programs because it has good text
manipulation facilities.
Platform. An underlying computer system on
which application programs run. Historically,
most application programs had to be written to
run on a particular platform. Products written
in Java, however, are cross-platform, meaning
they can be run anywhere the Java runtime
environment is installed.
Point. A unit of about 1/72 inch used to
measure type size.
PROPATH. An environment variable
containing the list of directories Progress
searches when looking for a program to
execute.
Relational Database Management System
(RDBMS). The Progress software that manages
and provides access to the MFG/PRO
databases.
201
RSA (Rivest-Shamir-Adleman). An Internet
encryption and authentication system that uses
an algorithm developed in 1977 by Ron Rivest,
Adi Shamir, and Leonard Adleman. The RSA
algorithm is included with Netscape Navigator
and Microsoft Explorer.
Scalable Vector Graphics (SVG) . An XML
technology for defining vector-based twodimensional graphics for the Web.
Script. A program or sequence of instructions
that is interpreted or carried out by another
program.
Secure Sockets Layer (SSL). A program
layer for managing the security of message
transmissions in a network. The program layer
exists between an application (such as a Web
browser or HTTP) and the Internet’s TCP/IP
layers. Sockets refers to the sockets method of
passing data back and forth between a client
and a server program in a network or between
program layers in the same computer.
Servlet. Programs similar to Java applets, that
run on the server rather than the client and are
used to run interactive Web applications.
Socket. A convention for connecting with and
exchanging data between two program
processes within the same computer or across a
network. A socket represents the end point in a
network connection. Sockets are created and
used with a set of programming requests or
function calls sometimes referred to as the
sockets application program interface (API).
The most common sockets API is the Berkeley
UNIX C language interface.
SSL. See Secure Sockets Layer (SSL).
State-Aware. Describes the condition of a
browse when a WebSpeed agent is in use
during the entire time it is open. This can
happen when the user sorts browse data by a
202
MFG/PRO Installation Guide — QAD Desktop
non-indexed field, the WebSpeed agent returns
a group of data that ends with a non-unique
key, or the browse takes an unusually long time
to begin returning data to the Web server.
SVG. See Scalable Vector Graphics (SVG).
TCP/IP. See Transmission Control Protocol/
Internet Protocol (TCP/IP).
Telnet. A user command and underlying TCP/
IP protocol that lets you access applications
and data on remote, or host, computers. See
also Transmission Control Protocol/Internet
Protocol (TCP/IP).
Terminal Emulation. Use of a personal
computer to interact with a computer with a
different operating system. The terminal
emulation program runs as a separate task with
its own window. The application interface
presented in this window is character-based or
text-only.
Thin-Client. In a thin-client model, the client
machine takes on only the user interface role.
No business logic processing is accomplished
on the client.
Tomcat. The servlet container used in the
official reference implementation for the Java
Servlet and Java Server Pages (JSP)
technologies. Tomcat is developed in an open
and participatory environment and released
under the Apache Software Foundation license.
Tool Tips. Context-specific descriptions that
display whenever your cursor is positioned
over a tool button in Desktop.
Transmission Control Protocol/Internet
Protocol (TCP/IP). The basic communication
language or protocol of the Internet. It can also
be used as a communications protocol for
intranets and extranets.
UI. See User Interface (UI).
Uniform Resource Locator (URL). A text
string that indicates the location of an intranet
or Internet resource.
Universal Unique Identifier (UUID). A
hexadecimal number including a time stamp
and a host identifier. Applications use uuids to
identify many kinds of entities.
User Interface (UI). The portion of an
application that is visible to the user and the
mechanism by which the end user interacts
with the application, enters information into
the application, and sees the results of the
interaction.
UUID. See Universal Unique Identifier
(UUID).
W3C. See World Wide Web Consortium
(W3C).
WAN. See Wide Area Network (WAN).
WAR. See Web Archive File (WAR).
Web Archive File (WAR). A compressed file
containing a Web application and its related
files. Assists in easily deploying an entire
application.
Web Browser. See Browser.
Web-Enabled. Refers to a program that has
code added to it so that it displays with a Javabased GUI in Desktop. User interface actions
in the Progress code are bypassed and rerouted
to the Java client.
Web Site. A related collection of Web files that
includes an introductory file called a home
page. From the home page, you can get to all
the other pages at that site.
WebSpeed. A product from Progress Software
consisting of two parts: a set of Web-centric
development tools and a transaction Web
server. The server manages high-volume
database transactions across multiple servers.
Glossary
Wide Area Network (WAN). Generally a
corporate private network that connects
computers between remote company sites.
Widget. In Java screen-design terms, identifies
a unique screen element. Widgets display
information or provide specific ways for users
to interact with application programs.
Wildcards. Characters or symbols used in
search or command functions in place of one or
more letters or numbers.
203
World Wide Web Consortium (W3C). An
international industry consortium that seeks to
promote standards for the evolution of the Web
and interoperability among Internet products
by producing specifications and reference
software.
XML. See Extensible Markup Language
(XML).
XSL. See Extensible Stylesheet Language
(XSL).
XSLT. See Extensible Stylesheet Language
Transformation (XSLT).
204
MFG/PRO Installation Guide — QAD Desktop
Index
Symbols
.ini file. See configuration .ini file
Numerics
36.20.10.3 94
A
accessibility options 27
ActiveX controls 27
Administration page 104
agent sizing for WebSpeed 160
B
broker, WebSpeed 186
C
cache 143
client 144
Tomcat server 169
CD
installing 43, 69
cgiip.exe 186
client installation 121
code pages 126
advanced build options 192
compatible 129
shared 128
compiling 191
config.js file 190
configuration .ini file
Connection Manager 103–114
configuration settings 110
errors 115
maximum sessions 107
monitoring sessions 113
monitoring users 114
cookies
browser setting 27
–cpcoll 193
–cpinternal 192
–cpstream 192
D
database server
dedicated deployment 18
Desktop
Administration 104
client installation 121
Download Center 106
E
errata sheet 3
errors
Connection Manager 115
F
fonts, non-English languages 132
G
Georgia SoftWorks (GSNTS) 14
installing 37
registering 38
group, user 39
I
installation
CD media 43, 69
Desktop media 16
items installed 152
installation tools 20
.ini files 21
MFG/UTIL 21
reference 181
Perl scripts 20, 176
internationalization
font.properties 132
206
MFG/PRO Installation Guide — QAD Desktop
ISO language and country codes 136
J
JAR files
create with MFG/UTIL 82
deploying 84
Java code
Desktop 12
Java console
enabling 172
Java Development Kit (JDK)
verifying 37
Java Plug-in
installing on client 121
versions used 122
Java Plug-in Control Panel
displaying console 172
Java Runtime Environment (JRE) 25
Java Virtual Machine (JVM) 12
java_home variable 36
JavaUI printer 145
L
labels.js file 191
language codes
for menus 192
non-English 153
language, non-English
font.properties 132
log files
WebSpeed 92
Log4j
logging levels 171
log-in scripts
telnet 94
M
management utilities
Desktop Administration page 104
Tomcat Web Application Manager 170
menu substitution 146
Menu Substitution Maintenance 146
Menu System Maintenance 146, 191
messenger executable 186
MFG/PRO character code directory
items installed in 152
MFG/PRO code
deploying multi-tier 71
deploying single-tier 48
MFG/PRO databases
client/server connection parameters 154
local host connection parameters 154
MFG/UTIL 181–196
build Desktop
multi-tier 78
single-tier 54
building languages 128
configure Desktop parameters
multi-tier 76
single-tier 52
create Desktop JAR files 82
generating scripts 59
multi-tier deployment 75
overview 21
printing Desktop information 61
single-tier deployment 51
mount commands 43, 69
multiple languages 125–137
advanced build options 191
code pages 126
compatibility 24
installing 128
process maps 133
multi-tier deployment 65–87
build Desktop 78
create JAR files 82
deploy JAR files 84
launch scripts 69
MFG/PRO code 71
MFG/UTIL 75
planning 18
N
NameServer
starting 92
O
Oracle
database connection parameters 156
Desktop build settings 56, 80
NLS setting 193
P
parameter file
client/server connection parameters 154
local host connection parameters 154
performance 173
Perl scripts
overview 20
reference 176
print Desktop information 61
Printer Setup Maintenance 145
Process Editor
user group 40
Index
process maps
migrating between releases 143
translated 133
PROPATH 185
Desktop system setting 185
Q
QAD Support Services 5
quick start 62
R
requirements
client 25
client browser 25
prerequisites 24
Web server 28
restricted shells 164
S
search
creating database 191
maximum results 188
security
restricted shells 164
telnet, UNIX 163
server
database 18
Service Pack
directory field 54
service pack
directory field 78
effect on Desktop 144
session timeout
Connection Manager 112
Show Java Console check box 172
simplified screen
link on Administration page 106
simplified screens
user group 40
single-tier deployment 41–64
build Desktop 54
generate connection scripts 59
launch scripts 44
MFG/PRO code 48
MFG/UTIL 51
telnet scripts 49, 73
Tomcat 46
WebSpeed configuration 57
single-tier installation
quick start 62
SpeedStart 159
Support Services 5
T
telnet scripts
generating 59
telnet server
Connection Manager settings 110
connection settings, configuring 100
log-in sequence, configuring 96
overview 14
registering on Windows 38
server settings, configuring 95
UNIX security, configuring 163
verifying on UNIX 100
Windows server settings, configuring 95
timeout
Connection Manager 112
Tomcat
deploy single-tier 46
host name 185
installing new version 168
port 185
starting 94
Webapp name 186
Tomcat installation directory
items installed in 152
Tomcat Web Application Manager 105, 170
troubleshooting
Connection Manager 115
performance 173
tools 171
two-tier Desktop deployment 18
U
ubroker.properties 58
two-tier deployment 158
UNIX telnet security 163
user groups 39
Desktop administrative 39, 48, 72
Process Editor 40
UI design 40
User Option Telnet Maintenance 94
log-in sequence 96
session timeout 112
telnet connections 100
telnet server settings 95
W
Web archive file (WAR) 16
Web browser
overview 12
WebSpeed
broker name 186
messenger executable 186
207
208
MFG/PRO Installation Guide — QAD Desktop
verify servers 92
WebSpeed Messenger
two-tier deployment 157
WebSpeed server
agent sizing 160
log files in ubroker.properties 92
Windows XP Service Pack 2 27
wspd_cgi.ksh 186