1
Progress
Results User’s Guide
for UNIX
©
2001 Progress Software Corporation. All rights reserved.
Progress® software products are copyrighted and all rights are reserved by Progress Software Corporation.
This manual is also copyrighted and all rights are reserved. This manual may not, in whole or in part, be
copied, photocopied, translated, or reduced to any electronic medium or machine-readable form without
prior consent, in writing, from Progress Software Corporation.
The information in this manual is subject to change without notice, and Progress Software Corporation
assumes no responsibility for any errors that may appear in this document.
The references in this manual to specific platforms supported are subject to change.
Progress, Progress Results, Provision and WebSpeed are registered trademarks of Progress Software
Corporation in the United States and other countries. Apptivity, AppServer, ProVision Plus, SmartObjects,
IntelliStream, and other Progress product names are trademarks of Progress Software Corporation.
SonicMQ is a trademark of Sonic Software Corporation in the United States and other countries.
Progress Software Corporation acknowledges the use of Raster Imaging Technology copyrighted by
Snowbound Software 1993-1997 and the IBM XML Parser for Java Edition.
©
IBM Corporation 1998-1999. All rights reserved. U.S. Government Users Restricted Rights — Use,
duplication or disclosure restricted by GSA ADP Schedule Contract with IBM Corp.
Progress is a registered trademark of Progress Software Corporation and is used by IBM Corporation in the
mark Progress/400 under license. Progress/400 AND 400® are trademarks of IBM Corporation and are used
by Progress Software Corporation under license.
Java and all Java-based marks are trademarks or registered trademarks of Sun Microsystems, Inc. in the
United States and other countries.
Any other trademarks and/or service marks contained herein are the property of their respective owners.
.
May 2001
Product Code: 4514
Item Number: 81082U;9.1C
Contents
Preface . . . . . . . . . . . . . . . . . . . . . . . . . . . . . . . . . . . . . . . . . . . . . . . . . . . . . . . . . . . . .
Purpose . . . . . . . . . . . . . . . . . . . . . . . . . . . . . . . . . . . . . . . . . . . . . . . . . . . . . . . . .
Audience . . . . . . . . . . . . . . . . . . . . . . . . . . . . . . . . . . . . . . . . . . . . . . . . . . . . . . . .
Organization of This Manual . . . . . . . . . . . . . . . . . . . . . . . . . . . . . . . . . . . . . . . . .
How to Use This Manual . . . . . . . . . . . . . . . . . . . . . . . . . . . . . . . . . . . . . . . . . . . .
Typographical Conventions . . . . . . . . . . . . . . . . . . . . . . . . . . . . . . . . . . . . . . . . . .
Syntax Notation . . . . . . . . . . . . . . . . . . . . . . . . . . . . . . . . . . . . . . . . . . . . . . . . . . .
Progress Messages . . . . . . . . . . . . . . . . . . . . . . . . . . . . . . . . . . . . . . . . . . . . . . . .
Other Useful Documentation . . . . . . . . . . . . . . . . . . . . . . . . . . . . . . . . . . . . . . . . .
Getting Started . . . . . . . . . . . . . . . . . . . . . . . . . . . . . . . . . . . . . . . . . . . .
Development Tools . . . . . . . . . . . . . . . . . . . . . . . . . . . . . . . . . . . . . . . . .
Reporting Tools . . . . . . . . . . . . . . . . . . . . . . . . . . . . . . . . . . . . . . . . . . . .
4GL . . . . . . . . . . . . . . . . . . . . . . . . . . . . . . . . . . . . . . . . . . . . . . . . . . . . .
Database . . . . . . . . . . . . . . . . . . . . . . . . . . . . . . . . . . . . . . . . . . . . . . . . .
DataServers. . . . . . . . . . . . . . . . . . . . . . . . . . . . . . . . . . . . . . . . . . . . . . .
SQL-89/Open Access . . . . . . . . . . . . . . . . . . . . . . . . . . . . . . . . . . . . . . .
SQL-92 . . . . . . . . . . . . . . . . . . . . . . . . . . . . . . . . . . . . . . . . . . . . . . . . . .
Deployment . . . . . . . . . . . . . . . . . . . . . . . . . . . . . . . . . . . . . . . . . . . . . . .
WebSpeed. . . . . . . . . . . . . . . . . . . . . . . . . . . . . . . . . . . . . . . . . . . . . . . .
Reference . . . . . . . . . . . . . . . . . . . . . . . . . . . . . . . . . . . . . . . . . . . . . . . .
xiii
xiii
xiii
xiv
xv
xvi
xvii
xx
xxii
xxii
xxiii
xxiv
xxv
xxv
xxvi
xxvi
xxvii
xxvii
xxviii
xxviii
1.
1–1
1–2
1–3
1–3
1–8
1–9
1–10
1–10
Results Overview . . . . . . . . . . . . . . . . . . . . . . . . . . . . . . . . . . . . . . . . . . . . . . . . .
1.1
Introduction . . . . . . . . . . . . . . . . . . . . . . . . . . . . . . . . . . . . . . . . . . . . . . .
1.2
Database Terms . . . . . . . . . . . . . . . . . . . . . . . . . . . . . . . . . . . . . . . . . . .
1.3
Database Basics . . . . . . . . . . . . . . . . . . . . . . . . . . . . . . . . . . . . . . . . . . .
1.3.1
Table Relationships . . . . . . . . . . . . . . . . . . . . . . . . . . . . . . . . .
1.4
An Overview of Results . . . . . . . . . . . . . . . . . . . . . . . . . . . . . . . . . . . . .
1.4.1
Query . . . . . . . . . . . . . . . . . . . . . . . . . . . . . . . . . . . . . . . . . . . .
1.4.2
Reports. . . . . . . . . . . . . . . . . . . . . . . . . . . . . . . . . . . . . . . . . . .
Contents
1.4.3
Labels . . . . . . . . . . . . . . . . . . . . . . . . . . . . . . . . . . . . . . . . . . . .
1.4.4
Data Export . . . . . . . . . . . . . . . . . . . . . . . . . . . . . . . . . . . . . . . .
1.4.5
User. . . . . . . . . . . . . . . . . . . . . . . . . . . . . . . . . . . . . . . . . . . . . .
1.4.6
Administration . . . . . . . . . . . . . . . . . . . . . . . . . . . . . . . . . . . . . .
1.4.7
Exit . . . . . . . . . . . . . . . . . . . . . . . . . . . . . . . . . . . . . . . . . . . . . .
Accessing Help . . . . . . . . . . . . . . . . . . . . . . . . . . . . . . . . . . . . . . . . . . . .
Summary . . . . . . . . . . . . . . . . . . . . . . . . . . . . . . . . . . . . . . . . . . . . . . . . .
1–10
1–10
1–11
1–11
1–11
1–12
1–13
2.
General Information . . . . . . . . . . . . . . . . . . . . . . . . . . . . . . . . . . . . . . . . . . . . . . .
2.1
Installing and Accessing Results . . . . . . . . . . . . . . . . . . . . . . . . . . . . . . .
2.1.1
The DLCRES Environment Variable . . . . . . . . . . . . . . . . . . . . .
2.1.2
The PROPATH Environment Variable . . . . . . . . . . . . . . . . . . .
2.1.3
Progress Startup Parameters . . . . . . . . . . . . . . . . . . . . . . . . . .
2.1.4
Starting Results. . . . . . . . . . . . . . . . . . . . . . . . . . . . . . . . . . . . .
2.2
Results Keystrokes . . . . . . . . . . . . . . . . . . . . . . . . . . . . . . . . . . . . . . . . .
2.3
Window Areas . . . . . . . . . . . . . . . . . . . . . . . . . . . . . . . . . . . . . . . . . . . . .
2.3.1
Menu Options . . . . . . . . . . . . . . . . . . . . . . . . . . . . . . . . . . . . . .
2.3.2
Information Window . . . . . . . . . . . . . . . . . . . . . . . . . . . . . . . . .
2.3.3
Layout Window . . . . . . . . . . . . . . . . . . . . . . . . . . . . . . . . . . . . .
2.3.4
Form Window . . . . . . . . . . . . . . . . . . . . . . . . . . . . . . . . . . . . . .
2.4
Vertical Menus, Horizontal Menus, and Selection Lists . . . . . . . . . . . . .
2.4.1
Vertical Menus . . . . . . . . . . . . . . . . . . . . . . . . . . . . . . . . . . . . .
2.4.2
Horizontal Menus . . . . . . . . . . . . . . . . . . . . . . . . . . . . . . . . . . .
2.4.3
Selection Lists . . . . . . . . . . . . . . . . . . . . . . . . . . . . . . . . . . . . . .
2.5
Where To Go From Here . . . . . . . . . . . . . . . . . . . . . . . . . . . . . . . . . . . . .
2–1
2–2
2–2
2–3
2–3
2–3
2–4
2–7
2–8
2–8
2–8
2–9
2–9
2–9
2–10
2–11
2–12
3.
A Tour Through Results . . . . . . . . . . . . . . . . . . . . . . . . . . . . . . . . . . . . . . . . . . .
3.1
Introduction . . . . . . . . . . . . . . . . . . . . . . . . . . . . . . . . . . . . . . . . . . . . . . .
3.2
Results Tour Preparations . . . . . . . . . . . . . . . . . . . . . . . . . . . . . . . . . . . .
3.2.1
Creating a Copy of the Sports Database . . . . . . . . . . . . . . . . .
3.2.2
Starting Results for the Tour . . . . . . . . . . . . . . . . . . . . . . . . . . .
3.2.3
Moving Between Results and Progress . . . . . . . . . . . . . . . . . .
3.3
The Query Module . . . . . . . . . . . . . . . . . . . . . . . . . . . . . . . . . . . . . . . . . .
3.3.1
Finding the Next, Prev, First, and Last Records . . . . . . . . . . .
3.3.2
Adding and Deleting a Record . . . . . . . . . . . . . . . . . . . . . . . . .
3.3.3
Browsing Through Records. . . . . . . . . . . . . . . . . . . . . . . . . . . .
3.3.4
Joining Files . . . . . . . . . . . . . . . . . . . . . . . . . . . . . . . . . . . . . . .
3.4
The Reports Module . . . . . . . . . . . . . . . . . . . . . . . . . . . . . . . . . . . . . . . .
3.4.1
Defining Files and Fields . . . . . . . . . . . . . . . . . . . . . . . . . . . . .
3.4.2
Running a Report . . . . . . . . . . . . . . . . . . . . . . . . . . . . . . . . . . .
3.4.3
Saving Your Report . . . . . . . . . . . . . . . . . . . . . . . . . . . . . . . . .
3.4.4
Getting a Report . . . . . . . . . . . . . . . . . . . . . . . . . . . . . . . . . . . .
3.4.5
Adding a Math Expression . . . . . . . . . . . . . . . . . . . . . . . . . . . .
3–1
3–2
3–2
3–3
3–3
3–7
3–7
3–11
3–12
3–14
3–17
3–20
3–21
3–25
3–27
3–28
3–29
1.5
1.6
iv
Contents
3.4.6
3.5
3.6
3.7
3.8
Hiding Repeating Values and Changing Field Formats and Labels 3–
34
3.4.7
Adding Break Groups, Totals, and Page Ejects . . . . . . . . . . .
3–37
3.4.8
Adding a WHERE Clause . . . . . . . . . . . . . . . . . . . . . . . . . . . .
3–42
3.4.9
Adding a Header to a Report . . . . . . . . . . . . . . . . . . . . . . . . .
3–48
3.4.10 Adjusting the Spacing in a Report . . . . . . . . . . . . . . . . . . . . . .
3–49
Tour of the Data Export Module . . . . . . . . . . . . . . . . . . . . . . . . . . . . . . .
3–51
3.5.1
Selecting a Data Export Type . . . . . . . . . . . . . . . . . . . . . . . . .
3–51
3.5.2
Removing a WHERE Clause . . . . . . . . . . . . . . . . . . . . . . . . . .
3–54
The Labels Module . . . . . . . . . . . . . . . . . . . . . . . . . . . . . . . . . . . . . . . . .
3–55
3.6.1
Adding Text to a Label . . . . . . . . . . . . . . . . . . . . . . . . . . . . . . .
3–59
3.6.2
Adjusting Settings . . . . . . . . . . . . . . . . . . . . . . . . . . . . . . . . .
3–61
Stopping Results . . . . . . . . . . . . . . . . . . . . . . . . . . . . . . . . . . . . . . . . . .
3–63
Summary . . . . . . . . . . . . . . . . . . . . . . . . . . . . . . . . . . . . . . . . . . . . . . . .
3–63
4.
Query Module . . . . . . . . . . . . . . . . . . . . . . . . . . . . . . . . . . . . . . . . . . . . . . . . . . .
4.1
Introduction . . . . . . . . . . . . . . . . . . . . . . . . . . . . . . . . . . . . . . . . . . . . . .
4.2
Query Module Main Menu . . . . . . . . . . . . . . . . . . . . . . . . . . . . . . . . . . .
4.3
Query Features . . . . . . . . . . . . . . . . . . . . . . . . . . . . . . . . . . . . . . . . . . .
4.3.1
Updating a Record . . . . . . . . . . . . . . . . . . . . . . . . . . . . . . . . . .
4.3.2
Copying a Record . . . . . . . . . . . . . . . . . . . . . . . . . . . . . . . . . .
4.3.3
Switching to Other Forms . . . . . . . . . . . . . . . . . . . . . . . . . . . .
4.3.4
Querying for Records . . . . . . . . . . . . . . . . . . . . . . . . . . . . . . . .
4.3.5
Using Expert Mode in WHERE Clauses . . . . . . . . . . . . . . . . .
4.3.6
Getting Information About the Current Set of Records
....
4.3.7
Moving to Another Module . . . . . . . . . . . . . . . . . . . . . . . . . . .
4.3.8
Finding the Total Number of Records in a File. . . . . . . . . . . . .
4.3.9
Changing the Order of Records . . . . . . . . . . . . . . . . . . . . . . .
4.3.10 The User Option . . . . . . . . . . . . . . . . . . . . . . . . . . . . . . . . . . .
4.4
Summary . . . . . . . . . . . . . . . . . . . . . . . . . . . . . . . . . . . . . . . . . . . . . . . .
4–1
4–3
4–4
4–8
4–8
4–8
4–8
4–9
4–11
4–14
4–14
4–15
4–16
4–17
4–17
5.
Reports Module . . . . . . . . . . . . . . . . . . . . . . . . . . . . . . . . . . . . . . . . . . . . . . . . . .
5.1
Introduction . . . . . . . . . . . . . . . . . . . . . . . . . . . . . . . . . . . . . . . . . . . . . .
5.2
Reports Module Main Menu . . . . . . . . . . . . . . . . . . . . . . . . . . . . . . . . . .
5.3
Report Markers . . . . . . . . . . . . . . . . . . . . . . . . . . . . . . . . . . . . . . . . . . .
5.4
Report Features . . . . . . . . . . . . . . . . . . . . . . . . . . . . . . . . . . . . . . . . . . .
5.4.1
Adding Fields to a Report . . . . . . . . . . . . . . . . . . . . . . . . . . . .
5.4.2
Deleting Fields from a Report . . . . . . . . . . . . . . . . . . . . . . . . .
5.4.3
Defining Array Fields for Reports . . . . . . . . . . . . . . . . . . . . . . .
5.4.4
Adding a Header or Footer to a Report . . . . . . . . . . . . . . . . . .
5.4.5
Adjusting Spacing in a Report
......................
5.4.6
Changing the Order of Records in a Report . . . . . . . . . . . . . .
5.4.7
Adding a Percent of Total to a Report . . . . . . . . . . . . . . . . . . .
5.4.8
Getting Information About the Current Report . . . . . . . . . . . .
5–1
5–3
5–3
5–8
5–9
5–9
5–10
5–10
5–12
5–14
5–15
5–16
5–18
v
Contents
5.4.9
Deleting a Report . . . . . . . . . . . . . . . . . . . . . . . . . . . . . . . . . . .
5.4.10 Adding a WHERE Clause with Ask Mode . . . . . . . . . . . . . . . . .
Creating Totals Only Reports
...............................
5.5.1
Defining Totals Only Reports . . . . . . . . . . . . . . . . . . . . . . . . . .
5.5.2
Summarizing a Non-numeric Field . . . . . . . . . . . . . . . . . . . . .
5.5.3
Expanding a Report Using the Totals Only Report . . . . . . . . .
Summary . . . . . . . . . . . . . . . . . . . . . . . . . . . . . . . . . . . . . . . . . . . . . . . . .
5–18
5–19
5–24
5–24
5–26
5–27
5–27
6.
Labels Module . . . . . . . . . . . . . . . . . . . . . . . . . . . . . . . . . . . . . . . . . . . . . . . . . . .
6.1
Introduction . . . . . . . . . . . . . . . . . . . . . . . . . . . . . . . . . . . . . . . . . . . . . . .
6.2
Labels Module Main Menu . . . . . . . . . . . . . . . . . . . . . . . . . . . . . . . . . . .
6.3
Labels Features . . . . . . . . . . . . . . . . . . . . . . . . . . . . . . . . . . . . . . . . . . . .
6.3.1
Saving Label Definitions . . . . . . . . . . . . . . . . . . . . . . . . . . . . . .
6.3.2
Getting Label Definitions . . . . . . . . . . . . . . . . . . . . . . . . . . . . .
6.3.3
Copying Label Definitions . . . . . . . . . . . . . . . . . . . . . . . . . . . .
6.3.4
Running Label Definitions . . . . . . . . . . . . . . . . . . . . . . . . . . . . .
6.3.5
Clearing and Deleting Label Definitions . . . . . . . . . . . . . . . . . .
6.3.6
Defining Labels Manually . . . . . . . . . . . . . . . . . . . . . . . . . . . . .
6.3.7
Adding Text to Labels . . . . . . . . . . . . . . . . . . . . . . . . . . . . . . . .
6.3.8
Adding Fields to Labels. . . . . . . . . . . . . . . . . . . . . . . . . . . . . . .
6.3.9
Adjusting Label Settings . . . . . . . . . . . . . . . . . . . . . . . . . . . . . .
6.4
Summary . . . . . . . . . . . . . . . . . . . . . . . . . . . . . . . . . . . . . . . . . . . . . . . . .
6–1
6–2
6–2
6–4
6–4
6–5
6–6
6–6
6–6
6–7
6–8
6–9
6–9
6–12
7.
Data Export Module . . . . . . . . . . . . . . . . . . . . . . . . . . . . . . . . . . . . . . . . . . . . . . .
7.1
Introduction . . . . . . . . . . . . . . . . . . . . . . . . . . . . . . . . . . . . . . . . . . . . . . .
7.2
Data Export Module Main Menu . . . . . . . . . . . . . . . . . . . . . . . . . . . . . . .
7.3
Layout Window Settings . . . . . . . . . . . . . . . . . . . . . . . . . . . . . . . . . . . . .
7.4
Data Export Features . . . . . . . . . . . . . . . . . . . . . . . . . . . . . . . . . . . . . . .
7.4.1
Adding Fields to a Data Export Report . . . . . . . . . . . . . . . . . . .
7.4.2
Exporting Reports in Progress Format . . . . . . . . . . . . . . . . . . .
7.4.3
Exporting Data in Non-Progress Format . . . . . . . . . . . . . . . . . .
7.4.4
Exporting Data in ASCII Format . . . . . . . . . . . . . . . . . . . . . . . .
7.4.5
Using Expert Mode to Change ASCII Settings . . . . . . . . . . . . .
7.5
Summary . . . . . . . . . . . . . . . . . . . . . . . . . . . . . . . . . . . . . . . . . . . . . . . . .
7–1
7–2
7–3
7–5
7–6
7–7
7–7
7–8
7–10
7–11
7–12
8.
Multiple Databases with Results . . . . . . . . . . . . . . . . . . . . . . . . . . . . . . . . . . . . .
8.1
Introduction . . . . . . . . . . . . . . . . . . . . . . . . . . . . . . . . . . . . . . . . . . . . . . .
8.2
Accessing Multiple Databases . . . . . . . . . . . . . . . . . . . . . . . . . . . . . . . .
8.3
Starting Results with Multiple Databases . . . . . . . . . . . . . . . . . . . . . . . .
8.3.1
Querying Multiple Databases . . . . . . . . . . . . . . . . . . . . . . . . . .
8.3.2
Joining File Information
............................
8.3.3
Adding Fields to a Report . . . . . . . . . . . . . . . . . . . . . . . . . . . . .
8.4
Summary . . . . . . . . . . . . . . . . . . . . . . . . . . . . . . . . . . . . . . . . . . . . . . . . .
8–1
8–2
8–2
8–2
8–3
8–4
8–7
8–8
5.5
5.6
vi
Contents
9.
Database Administration . . . . . . . . . . . . . . . . . . . . . . . . . . . . . . . . . . . . . . . . . .
9.1
General Administration . . . . . . . . . . . . . . . . . . . . . . . . . . . . . . . . . . . . . .
9.1.1
When to Edit the results.l File . . . . . . . . . . . . . . . . . . . . . . . . .
9.1.2
Description of the Initial Build. . . . . . . . . . . . . . . . . . . . . . . . . .
9.1.3
Default Forms . . . . . . . . . . . . . . . . . . . . . . . . . . . . . . . . . . . . .
9.1.4
Where Results Places the QC File. . . . . . . . . . . . . . . . . . . . . .
9.1.5
Logging Initial Build Information . . . . . . . . . . . . . . . . . . . . . . . .
9.1.6
Default Options . . . . . . . . . . . . . . . . . . . . . . . . . . . . . . . . . . . .
9.1.7
After the Initial Build . . . . . . . . . . . . . . . . . . . . . . . . . . . . . . . . .
9.2
The Administration Module . . . . . . . . . . . . . . . . . . . . . . . . . . . . . . . . . . .
9.2.1
The Files Options . . . . . . . . . . . . . . . . . . . . . . . . . . . . . . . . . . .
9.2.2
Form Definitions for Query . . . . . . . . . . . . . . . . . . . . . . . . . . .
9.2.3
Relations Between Files . . . . . . . . . . . . . . . . . . . . . . . . . . . . .
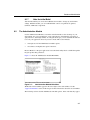
9.3
Security Options . . . . . . . . . . . . . . . . . . . . . . . . . . . . . . . . . . . . . . . . . . .
9.3.1
Contents of a User Directory . . . . . . . . . . . . . . . . . . . . . . . . . .
9.3.2
Exiting the Application . . . . . . . . . . . . . . . . . . . . . . . . . . . . . . .
9.3.3
Module Permissions . . . . . . . . . . . . . . . . . . . . . . . . . . . . . . . .
9.3.4
Query Permissions
...............................
9.3.5
Sign-on Program/Product Name . . . . . . . . . . . . . . . . . . . . . . .
9.4
The Configuration Options . . . . . . . . . . . . . . . . . . . . . . . . . . . . . . . . . . .
9.4.1
Language . . . . . . . . . . . . . . . . . . . . . . . . . . . . . . . . . . . . . . . . .
9.4.2
Printer Setup . . . . . . . . . . . . . . . . . . . . . . . . . . . . . . . . . . . . . .
9.4.3
Terminal Color Settings . . . . . . . . . . . . . . . . . . . . . . . . . . . . . .
9.5
Modules Options . . . . . . . . . . . . . . . . . . . . . . . . . . . . . . . . . . . . . . . . . .
9.5.1
Browse Program for Query . . . . . . . . . . . . . . . . . . . . . . . . . . .
9.5.2
Default Report Settings . . . . . . . . . . . . . . . . . . . . . . . . . . . . . .
9.5.3
User-defined Export Format. . . . . . . . . . . . . . . . . . . . . . . . . . .
9.5.4
Label Field Selection . . . . . . . . . . . . . . . . . . . . . . . . . . . . . . . .
9.5.5
User Option . . . . . . . . . . . . . . . . . . . . . . . . . . . . . . . . . . . . . . .
9.6
Summary . . . . . . . . . . . . . . . . . . . . . . . . . . . . . . . . . . . . . . . . . . . . . . . .
9–1
9–2
9–2
9–3
9–5
9–6
9–6
9–6
9–7
9–7
9–8
9–9
9–11
9–13
9–15
9–16
9–16
9–16
9–16
9–17
9–17
9–18
9–21
9–23
9–24
9–24
9–24
9–24
9–25
9–26
10.
Integrating Results into Existing Applications . . . . . . . . . . . . . . . . . . . . . . . . .
10.1
Introduction . . . . . . . . . . . . . . . . . . . . . . . . . . . . . . . . . . . . . . . . . . . . . .
10.2
Running Results from Your Own Progress Application . . . . . . . . . . . . .
10.3
Tailoring the Startup Logo . . . . . . . . . . . . . . . . . . . . . . . . . . . . . . . . . . .
10.4
Adding Your Own Menu Options to Results . . . . . . . . . . . . . . . . . . . . . .
10.5
Using Customized Help Messages . . . . . . . . . . . . . . . . . . . . . . . . . . . .
10.6
Using Shared Variables . . . . . . . . . . . . . . . . . . . . . . . . . . . . . . . . . . . .
10.6.1 Testing the Version Number . . . . . . . . . . . . . . . . . . . . . . . . . .
10.6.2 Determining the Originating Module . . . . . . . . . . . . . . . . . . .
10.6.3 Determining the Video Attributes . . . . . . . . . . . . . . . . . . . . . .
10.6.4 Determining the Name of the Originating Program . . . . . . . . .
10.6.5 Determining the Order Criteria Defined . . . . . . . . . . . . . . . . . .
10.6.6 Determining Files and Selection Criteria . . . . . . . . . . . . . . . . .
10–1
10–3
10–3
10–4
10–4
10–5
10–6
10–6
10–6
10–8
10–8
10–9
10–10
vii
Contents
10.6.7 Determining the Fields Selected for Reports . . . . . . . . . . . . . .
Using Results Dialog Box Procedures in Your Applications . . . . . . . . . .
10.7.1 Error Message Box . . . . . . . . . . . . . . . . . . . . . . . . . . . . . . . . . .
10.7.2 Logical Choice Box . . . . . . . . . . . . . . . . . . . . . . . . . . . . . . . . . .
Using the Generated Report, Labels, and Data Export Code . . . . . . . .
Designing Your Own Export Format . . . . . . . . . . . . . . . . . . . . . . . . . . . .
Designing Your Own Print Menu . . . . . . . . . . . . . . . . . . . . . . . . . . . . . . .
Designing a Browse Program for Query . . . . . . . . . . . . . . . . . . . . . . . . .
Deploying an Application: A Tailored Results Interface . . . . . . . . . . . . .
10.12.1 Configuration Information . . . . . . . . . . . . . . . . . . . . . . . . . . . . .
10.12.2 Query Form Information . . . . . . . . . . . . . . . . . . . . . . . . . . . . . .
10–12
10–17
10–17
10–17
10–18
10–19
10–22
10–24
10–24
10–24
10–25
A.
Startup and Shutdown Procedures . . . . . . . . . . . . . . . . . . . . . . . . . . . . . . . . . .
A.1
Running Results in Non-English Languages . . . . . . . . . . . . . . . . . . . . .
A.2
Starting Results from the Progress Procedure Editor . . . . . . . . . . . . . . .
A.3
Starting Results with One Database . . . . . . . . . . . . . . . . . . . . . . . . . . .
A.4
Starting Results with Multiple Databases . . . . . . . . . . . . . . . . . . . . . . . .
A.5
Starting a Server for the Database . . . . . . . . . . . . . . . . . . . . . . . . . . . . .
A.6
Shutting Down a Server for the Database . . . . . . . . . . . . . . . . . . . . . . . .
A.7
Stopping Results . . . . . . . . . . . . . . . . . . . . . . . . . . . . . . . . . . . . . . . . . . .
A–1
A–2
A–2
A–3
A–4
A–5
A–5
A–5
B.
Option Descriptions . . . . . . . . . . . . . . . . . . . . . . . . . . . . . . . . . . . . . . . . . . . . . . .
B.1
Menu Options . . . . . . . . . . . . . . . . . . . . . . . . . . . . . . . . . . . . . . . . . . . . .
B.2
Common Menu Options . . . . . . . . . . . . . . . . . . . . . . . . . . . . . . . . . . . . .
B.3
Menu Options for the Query Module . . . . . . . . . . . . . . . . . . . . . . . . . . .
B.4
Horizontal Menu Options for the Reports Module . . . . . . . . . . . . . . . . .
B.5
Horizontal Menu Options for the Labels Module . . . . . . . . . . . . . . . . . .
B.6
Horizontal Menu Options for the Data Export Module . . . . . . . . . . . . . . .
B–1
B–2
B–3
B–7
B–10
B–19
B–21
C.
Field Display Formats . . . . . . . . . . . . . . . . . . . . . . . . . . . . . . . . . . . . . . . . . . . . .
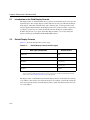
C.1
Introduction to the Field Display Formats . . . . . . . . . . . . . . . . . . . . . . . .
C.2
Default Display Formats . . . . . . . . . . . . . . . . . . . . . . . . . . . . . . . . . . . . .
C.3
Character Display Formats . . . . . . . . . . . . . . . . . . . . . . . . . . . . . . . . . . .
C.4
Numeric Display Formats . . . . . . . . . . . . . . . . . . . . . . . . . . . . . . . . . . . .
C.5
Logical Display Formats . . . . . . . . . . . . . . . . . . . . . . . . . . . . . . . . . . . . .
C.6
Date Display Formats . . . . . . . . . . . . . . . . . . . . . . . . . . . . . . . . . . . . . . .
C.7
How to Test and Override Default Display Formats . . . . . . . . . . . . . . . .
C–1
C–2
C–2
C–3
C–4
C–8
C–8
C–9
D.
Results Limits . . . . . . . . . . . . . . . . . . . . . . . . . . . . . . . . . . . . . . . . . . . . . . . . . . . .
D–1
E.
Files that Results Creates . . . . . . . . . . . . . . . . . . . . . . . . . . . . . . . . . . . . . . . . . .
E.1
The .qc File . . . . . . . . . . . . . . . . . . . . . . . . . . . . . . . . . . . . . . . . . . . . . . .
E.1.1
Primary Rule when Editing the .qc File . . . . . . . . . . . . . . . . . .
E–1
E–2
E–2
10.7
10.8
10.9
10.10
10.11
10.12
viii
Contents
E.1.2
Editing Forms and Joins . . . . . . . . . . . . . . . . . . . . . . . . . . . . .
E.1.3
Order of Options . . . . . . . . . . . . . . . . . . . . . . . . . . . . . . . . . . .
The .ql File . . . . . . . . . . . . . . . . . . . . . . . . . . . . . . . . . . . . . . . . . . . . . . .
The .qd File . . . . . . . . . . . . . . . . . . . . . . . . . . . . . . . . . . . . . . . . . . . . . .
E.3.1
Users Must Have Their Own Directories . . . . . . . . . . . . . . . . .
E.3.2
Important Lines in the .qd File . . . . . . . . . . . . . . . . . . . . . . . . .
Scratch Files . . . . . . . . . . . . . . . . . . . . . . . . . . . . . . . . . . . . . . . . . . . . .
E–2
E–3
E–3
E–3
E–4
E–4
E–5
F.
Order of Evaluation . . . . . . . . . . . . . . . . . . . . . . . . . . . . . . . . . . . . . . . . . . . . . . .
F.1
Using Expressions . . . . . . . . . . . . . . . . . . . . . . . . . . . . . . . . . . . . . . . . .
F.1.1
Evaluating Expressions . . . . . . . . . . . . . . . . . . . . . . . . . . . . . .
F–1
F–2
F–2
G.
Helpful Information . . . . . . . . . . . . . . . . . . . . . . . . . . . . . . . . . . . . . . . . . . . . . . .
G.1
Common Problems During Initial Build . . . . . . . . . . . . . . . . . . . . . . . . .
G.1.1
444 Error . . . . . . . . . . . . . . . . . . . . . . . . . . . . . . . . . . . . . . . . .
G.1.2
Too Many Joins . . . . . . . . . . . . . . . . . . . . . . . . . . . . . . . . . . . .
G.1.3
Limit on Query Forms: 63KB . . . . . . . . . . . . . . . . . . . . . . . . .
G.1.4
Missing .qc File with Multiple Databases . . . . . . . . . . . . . . . .
G.1.5
Building in Same Directory as Application . . . . . . . . . . . . . . .
G.1.6
Overwriting Customized Query Forms . . . . . . . . . . . . . . . . . .
G.2
When Query Forms Do Not Compile . . . . . . . . . . . . . . . . . . . . . . . . . . .
G.2.1
Missing Validation Files . . . . . . . . . . . . . . . . . . . . . . . . . . . . .
G.2.2
Shared Variable in Validation Expression . . . . . . . . . . . . . . . .
G.2.3
R-code Greater than 63KB . . . . . . . . . . . . . . . . . . . . . . . . . . .
G.2.4
Problems Running a Defined Report . . . . . . . . . . . . . . . . . . .
G.3
Language Errors . . . . . . . . . . . . . . . . . . . . . . . . . . . . . . . . . . . . . . . . . .
G.3.1
Progress Messages are Not in Correct Language . . . . . . . . .
G.3.2
Results Not Defaulting to Correct Language . . . . . . . . . . . . . .
G.3.3
Address Fields in Labels Module Default to Wrong
Language Version . . . . . . . . . . . . . . . . . . . . . . . . . . . . . . . . .
G–1
G–2
G–2
G–2
G–2
G–2
G–3
G–3
G–3
G–3
G–3
G–4
G–4
G–5
G–5
G–5
E.2
E.3
E.4
G–5
Glossary . . . . . . . . . . . . . . . . . . . . . . . . . . . . . . . . . . . . . . . . . . . . . . . . . . . . . . . . . Glossary–1
Index . . . . . . . . . . . . . . . . . . . . . . . . . . . . . . . . . . . . . . . . . . . . . . . . . . . . . . . . . . . .
Index–1
ix
Contents
Figures
Figure 1–1:
Figure 1–2:
Figure 1–3:
Figure 1–4:
Figure 1–5:
Figure 1–6:
Figure 2–1:
Figure 2–2:
Figure 2–3:
Figure 2–4:
Figure 3–1:
Figure 4–1:
Figure 4–2:
Figure 5–1:
Figure 6–1:
Figure 6–2:
Figure 7–1:
Figure 7–2:
Figure 9–1:
Figure 9–2:
Figure 9–3:
Figure 9–4:
Figure 9–5:
Figure 9–6:
Figure 9–7:
x
Paper and Electronic Filing System Comparison . . . . . . . . . . . . . . . . .
Structure of a Database . . . . . . . . . . . . . . . . . . . . . . . . . . . . . . . . . . . .
Simple and Compound Indexes . . . . . . . . . . . . . . . . . . . . . . . . . . . . . .
Relationship Between Customer and Order Records . . . . . . . . . . . . . .
Results Main Menu . . . . . . . . . . . . . . . . . . . . . . . . . . . . . . . . . . . . . . . .
A Help Window . . . . . . . . . . . . . . . . . . . . . . . . . . . . . . . . . . . . . . . . . . .
Areas of the Query Module Window . . . . . . . . . . . . . . . . . . . . . . . . . . .
Example of a Vertical Menu . . . . . . . . . . . . . . . . . . . . . . . . . . . . . . . . .
Example of a Horizontal Menu . . . . . . . . . . . . . . . . . . . . . . . . . . . . . . .
Example of a Selection List . . . . . . . . . . . . . . . . . . . . . . . . . . . . . . . . . .
Query Form . . . . . . . . . . . . . . . . . . . . . . . . . . . . . . . . . . . . . . . . . . . . . .
Layout of the Query Window . . . . . . . . . . . . . . . . . . . . . . . . . . . . . . . . .
Query Module Main Menu . . . . . . . . . . . . . . . . . . . . . . . . . . . . . . . . . . .
Horizontal Menu for the Reports Module . . . . . . . . . . . . . . . . . . . . . . .
Labels Module Main Menu . . . . . . . . . . . . . . . . . . . . . . . . . . . . . . . . . .
Omit Blank Lines Versus Show Blank Lines . . . . . . . . . . . . . . . . . . . . .
Export Module Main Menu . . . . . . . . . . . . . . . . . . . . . . . . . . . . . . . . . .
Sample of Progress Export Format . . . . . . . . . . . . . . . . . . . . . . . . . . . .
Administration Module Main Menu . . . . . . . . . . . . . . . . . . . . . . . . . . . .
Defining Forms for the Query Module . . . . . . . . . . . . . . . . . . . . . . . . . .
Selecting the Second File for a File Relation . . . . . . . . . . . . . . . . . . . .
Module Permissions Example . . . . . . . . . . . . . . . . . . . . . . . . . . . . . . . .
Query Option Permissions Example . . . . . . . . . . . . . . . . . . . . . . . . . . .
Terminal Color Settings Screen . . . . . . . . . . . . . . . . . . . . . . . . . . . . . .
Terminal Color Settings Example . . . . . . . . . . . . . . . . . . . . . . . . . . . . .
1–4
1–6
1–7
1–8
1–9
1–12
2–7
2–9
2–10
2–11
3–8
4–3
4–4
5–3
6–2
6–10
7–3
7–7
9–7
9–9
9–12
9–14
9–15
9–21
9–22
Contents
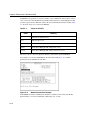
Tables
Table 2–1:
Table 2–2:
Table 3–1:
Table 3–2:
Table 3–3:
Table 4–1:
Table 4–2:
Table 5–1:
Table 9–1:
Table 10–1:
Table 10–2:
Table 10–3:
Table 10–4:
Table B–1:
Table C–1:
Table C–2:
Table C–3:
Table C–4:
Table C–5:
Table C–6:
Table C–7:
Table E–1:
Table F–1:
Table F–2:
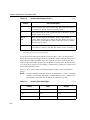
Results Function Key Defaults . . . . . . . . . . . . . . . . . . . . . . . . . . . . . . .
Other Editing Keys . . . . . . . . . . . . . . . . . . . . . . . . . . . . . . . . . . . . . . . .
Database Copy Command . . . . . . . . . . . . . . . . . . . . . . . . . . . . . . . . . .
Starting Results with the mysports Database . . . . . . . . . . . . . . . . . . .
Field Information for New Record . . . . . . . . . . . . . . . . . . . . . . . . . . . .
Query Module Main Menu Options . . . . . . . . . . . . . . . . . . . . . . . . . . .
List of Comparison Operators . . . . . . . . . . . . . . . . . . . . . . . . . . . . . . .
Report Layout Markers . . . . . . . . . . . . . . . . . . . . . . . . . . . . . . . . . . . .
Values for IDLISTs . . . . . . . . . . . . . . . . . . . . . . . . . . . . . . . . . . . . . . . .
Module Values . . . . . . . . . . . . . . . . . . . . . . . . . . . . . . . . . . . . . . . . . . .
Video Attribute Shared Variables . . . . . . . . . . . . . . . . . . . . . . . . . . . . .
Calculated Field Symbols . . . . . . . . . . . . . . . . . . . . . . . . . . . . . . . . . .
Totals Symbols . . . . . . . . . . . . . . . . . . . . . . . . . . . . . . . . . . . . . . . . . .
Key to Module Options . . . . . . . . . . . . . . . . . . . . . . . . . . . . . . . . . . . . .
Default Display Formats for Data Types . . . . . . . . . . . . . . . . . . . . . . .
Character Display Format Symbols . . . . . . . . . . . . . . . . . . . . . . . . . . .
Character Display Format Examples . . . . . . . . . . . . . . . . . . . . . . . . . .
Numeric Field Display Format . . . . . . . . . . . . . . . . . . . . . . . . . . . . . . .
Numeric Format Examples . . . . . . . . . . . . . . . . . . . . . . . . . . . . . . . . .
Logical Display Formats . . . . . . . . . . . . . . . . . . . . . . . . . . . . . . . . . . . .
Date Display Formats . . . . . . . . . . . . . . . . . . . . . . . . . . . . . . . . . . . . .
Formats for Filenames . . . . . . . . . . . . . . . . . . . . . . . . . . . . . . . . . . . . .
Precedence of Functions and Operators . . . . . . . . . . . . . . . . . . . . . . .
Examples of Expressions . . . . . . . . . . . . . . . . . . . . . . . . . . . . . . . . . . .
2–4
2–5
3–3
3–3
3–13
4–4
4–9
5–8
9–14
10–7
10–8
10–13
10–14
B–2
C–2
C–3
C–4
C–5
C–6
C–8
C–9
E–4
F–3
F–4
xi
Contents
Procedures
results.l . . . . . . . . . . . . . . . . . . . . . . . . . . . . . . . . . . . . . . . . . . . . . . . . . . . . . . . . . . . . . .
login.p . . . . . . . . . . . . . . . . . . . . . . . . . . . . . . . . . . . . . . . . . . . . . . . . . . . . . . . . . . . . . . .
login.p . . . . . . . . . . . . . . . . . . . . . . . . . . . . . . . . . . . . . . . . . . . . . . . . . . . . . . . . . . . . . . .
results.l . . . . . . . . . . . . . . . . . . . . . . . . . . . . . . . . . . . . . . . . . . . . . . . . . . . . . . . . . . . . . .
u-export.p . . . . . . . . . . . . . . . . . . . . . . . . . . . . . . . . . . . . . . . . . . . . . . . . . . . . . . . . . . . .
xii
9–3
9–17
9–17
9–18
10–20
Preface
Purpose
This guide introduces you to the character (text-mode) version of Progress Results. Results is
an interactive, menu-driven tool that lets you query, report, and maintain information stored in
Progress-supported databases.
Audience
This guide is an end-user manual that explains how to use the default Results application. If you
purchased Results through a third-party application vendor, the vendor might have modified
Results. These modifications might include adding or removing features, or even incorporating
Results into another application. If you have a modified Results application, your vendor might
modify the help system to reflect these changes or provide you with additional documentation.
Progress Results User’s Guide for UNIX
Organization of This Manual
Chapter 1, “Results Overview”
Describes the product in general terms, and summarizes the options on the Main Menu.
Chapter 2, “General Information”
Describes the hardware and software requirements for running the product on your system.
Explains how to install the product, log in and out, and how to use the function keys and
menus.
Chapter 3, “A Tour Through Results”
Provides a tour through the user options in the Results product. Describes many of the
features in the Query, Reports, Data Export, and Labels modules.
Chapter 4, “Query Module”
Describes different ways to retrieve information from a database using the Query module.
Chapter 5, “Reports Module”
Describes how to create reports, and provides examples.
Chapter 6, “Labels Module”
Describes and provides examples of how to generate mailing labels.
Chapter 7, “Data Export Module”
Describes how to export your data in formats useful to other software.
Chapter 8, “Multiple Databases with Results”
Describes the implications of using Results with more than one database open at the same
time.
Chapter 9, “Database Administration”
Defines how to perform database administration tasks such as defining relations among
files, establishing file security, and defining device interfaces such as printers and
terminals.
xiv
Preface
Chapter 10, “Integrating Results into Existing Applications”
Describes how application developers can integrate Results into existing applications.
Appendix A, “Startup and Shutdown Procedures”
Describes how to start and stop a Results session.
Appendix B, “Option Descriptions”
Describes the options that appear in the user modules of the Results package. For example,
it describes the options in the Query, Reports, Labels, and Data Export modules.
Appendix C, “Field Display Formats”
Describes how Results handles display formats for fields.
Appendix D, “Results Limits”
Lists Results’s internal limits, such as maximum number of files that can be joined, total
number of query forms, etc.
Appendix E, “Files that Results Creates”
Describes the file extensions used by Results.
Appendix F, “Order of Evaluation”
Describes how Results evaluate expressions in WHERE clauses.
Appendix G, “Helpful Information”
Describes and offers solutions to some common problems in database administration.
“Glossary”
How to Use This Manual
You need not read the entire manual in detail. A good strategy might be to skim through once
quickly, then go back and read for detail only those chapters relevant to your situation and
needs.
xv
Progress Results User’s Guide for UNIX
Typographical Conventions
This manual uses the following typographical conventions:
•
•
•
Bold typeface indicates:
–
Commands or characters that the user types
–
That a word carries particular weight or emphasis
Italic typeface indicates:
–
Progress variable information that the user supplies
–
New terms
–
Titles of complete publications
Monospaced typeface
indicates:
–
Code examples
–
System output
–
Operating system filenames and pathnames
The following typographical conventions are used to represent keystrokes:
•
Small capitals are used for Progress key functions and generic keyboard keys.
END-ERROR, GET, GO
ALT, CTRL, SPACEBAR, TAB
•
When you have to press a combination of keys, they are joined by a dash. You press and
hold down the first key, then press the second key.
CTRL-X
•
When you have to press and release one key, then press another key, the key names are
separated with a space.
ESCAPE H
ESCAPE CURSOR-LEFT
xvi
Preface
Syntax Notation
The syntax for each component follows a set of conventions:
•
Uppercase words are keywords. Although they are always shown in uppercase, you can
use either uppercase or lowercase when using them in a procedure.
In this example, ACCUM is a keyword:
SYNTAX
ACCUM aggregate expression
•
Italics identify options or arguments that you must supply. These options can be defined
as part of the syntax or in a separate syntax identified by the name in italics. In the
ACCUM function above, the aggregate and expression options are defined with the
syntax for the ACCUM function in the Progress Language Reference.
•
You must end all statements (except for DO, FOR, FUNCTION, PROCEDURE, and
REPEAT) with a period. DO, FOR, FUNCTION, PROCEDURE, and REPEAT
statements can end with either a period or a colon, as in this example:
FOR EACH Customer:
DISPLAY Name.
END.
•
Square brackets ([ ]) around an item indicate that the item, or a choice of one of the
enclosed items, is optional.
In this example, STREAM stream, UNLESS-HIDDEN, and NO-ERROR are optional:
SYNTAX
DISPLAY
[
STREAM stream
] [
UNLESS-HIDDEN
][
NO-ERROR
]
xvii
Progress Results User’s Guide for UNIX
In some instances, square brackets are not a syntax notation, but part of the language.
For example, this syntax for the INITIAL option uses brackets to bound an initial value
list for an array variable definition. In these cases, normal text brackets ( [ ] ) are used:
SYNTAX
INITIAL [ constant
[
, constant
] ...
]
NOTE: The ellipsis (...) indicates repetition, as shown in a following description.
•
Braces ({ }) around an item indicate that the item, or a choice of one of the enclosed
items, is required.
In this example, you must specify the items BY and expression and can optionally specify
the item DESCENDING, in that order:
SYNTAX
{
BY expression
[
DESCENDING
]}
In some cases, braces are not a syntax notation, but part of the language.
For example, a called external procedure must use braces when referencing arguments
passed by a calling procedure. In these cases, normal text braces ( { } ) are used:
SYNTAX
{ &argument-name }
•
A vertical bar (|) indicates a choice.
In this example, EACH, FIRST, and LAST are optional, but you can only choose one:
SYNTAX
PRESELECT
xviii
[
EACH
|
FIRST
|
LAST
]
record-phrase
Preface
In this example, you must select one of logical-name or alias:
SYNTAX
CONNECTED (
•
{
logical-name
|
}
alias
)
Ellipses (...) indicate that you can choose one or more of the preceding items. If a group
of items is enclosed in braces and followed by ellipses, you must choose one or more of
those items. If a group of items is enclosed in brackets and followed by ellipses, you can
optionally choose one or more of those items.
In this example, you must include two expressions, but you can optionally include more.
Note that each subsequent expression must be preceded by a comma:
SYNTAX
MAXIMUM ( expression , expression
[
, expression
] ...
)
In this example, you must specify MESSAGE, then at least one of expression or SKIP, but
any additional number of expression or SKIP is allowed:
SYNTAX
MESSAGE
{
expression
|
SKIP
[
(n)
] } ...
In this example, you must specify {include-file, then optionally any number of argument
or &argument-name = "argument-value", and then terminate with }:
SYNTAX
{ include-file
[
argument
|
&argument-name = "argument-value"
] ...
}
xix
Progress Results User’s Guide for UNIX
•
In some examples, the syntax is too long to place in one horizontal row. In such cases,
optional items appear individually bracketed in multiple rows in order, left-to-right and
top-to-bottom. This order generally applies, unless otherwise specified. Required items
also appear on multiple rows in the required order, left-to-right and top-to-bottom. In cases
where grouping and order might otherwise be ambiguous, braced (required) or bracketed
(optional) groups clarify the groupings.
In this example, WITH is followed by several optional items:
SYNTAX
WITH
[
[
[
ACCUM max-length
][
STREAM-IO ]
CENTERED
] [ expression DOWN ]
] [ SIDE-LABELS ]
n COLUMNS
In this example, ASSIGN requires one of two choices: either one or more of field, or one
of record. Other options available with either field or record are grouped with braces and
brackets. The open and close braces indicate the required order of options:
SYNTAX
ASSIGN
{
{[
FRAME frame ]
{ field [ = expression ] }
[ WHEN expression ]
} ...
| { record [ EXCEPT field ... ] }
}
Progress Messages
Progress displays several types of messages to inform you of routine and unusual occurrences:
xx
•
Execution messages inform you of errors encountered while Progress is running a
procedure (for example, if Progress cannot find a record with a specified index field
value).
•
Compile messages inform you of errors found while Progress is reading and analyzing a
procedure prior to running it (for example, if a procedure references a table name that is
not defined in the database).
Preface
•
Startup messages inform you of unusual conditions detected while Progress is getting
ready to execute (for example, if you entered an invalid startup parameter).
After displaying a message, Progress proceeds in one of several ways:
•
Continues execution, subject to the error-processing actions that you specify, or that are
assumed, as part of the procedure. This is the most common action taken following
execution messages.
•
Returns to the Progress Procedure Editor so that you can correct an error in a procedure.
This is the usual action taken following compiler messages.
•
Halts processing of a procedure and returns immediately to the Procedure Editor. This
does not happen often.
•
Terminates the current session.
Progress messages end with a message number in parentheses. In this example, the message
number is 200:
** Unknown table name table. (200)
You can use the Progress PRO command to start a single-user mode character Progress client
session and view a brief description of a message by providing its number. Follow these steps:
1 ♦ Start the Progress Procedure Editor:
install-dir/dlc/bin/pro
2 ♦ Press F3 to access the menu bar, then choose Help→Messages.
3 ♦ Type the message number, and press ENTER. Details about that message number appear.
4 ♦ Press F4 to close the message, press F3 to access the Procedure Editor menu, and choose
File→Exit.
xxi
Progress Results User’s Guide for UNIX
Other Useful Documentation
This section lists Progress Software Corporation documentation that you might find useful.
Unless otherwise specified, these manuals support both Windows and Character platforms and
are provided in electronic documentation format on CD-ROM.
Getting Started
Progress Electronic Documentation Installation and Configuration Guide (Hard copy only)
A booklet that describes how to install the Progress EDOC viewer and collection on UNIX
and Windows.
Progress Installation and Configuration Guide Version 9 for UNIX
A manual that describes how to install and set up Progress Version 9.1 for the UNIX
operating system.
Progress Installation and Configuration Guide Version 9 for Windows
A manual that describes how to install and set up Progress Version 9.1 for all supported
Windows and Citrix MetaFrame operating systems.
Progress Version 9 Product Update Bulletin
A guide that provides a brief description of each new feature of the release. The booklet
also explains where to find more detailed information in the documentation set about each
new feature.
Progress Application Development Environment — Getting Started (Windows only)
A practical guide to graphical application development within the Progress Application
Development Environment (ADE). This guide includes an overview of the ADE and its
tools, an overview of Progress SmartObject technology, and tutorials and exercises that
help you better understand SmartObject technology and how to use the ADE to develop
applications.
Progress Language Tutorial for Windows and Progress Language Tutorial for Character
Platform-specific tutorials designed for new Progress users. The tutorials use a
step-by-step approach to explore the Progress application development environment using
the 4GL.
xxii
Preface
Progress Master Glossary for Windows and Progress Master Glossary for Character (EDOC
only)
Platform-specific master glossaries for the Progress documentation set. These books are
in electronic format only.
Progress Master Index and Glossary for Windows and Progress Master Index and Glossary for
Character (Hard copy only)
Platform-specific master indexes and glossaries for the Progress hard-copy documentation
set.
Progress Startup Command and Parameter Reference
A reference manual that describes the Progress startup commands and parameters in
alphabetical order.
Welcome to Progress (Hard copy only)
A booklet that explains how Progress software and media are packaged. An icon-based
map groups the documentation by functionality, providing an overall view of the
documentation set. Welcome to Progress also provides descriptions of the various services
Progress Software Corporation offers.
Development Tools
Progress ADM 2 Guide
A guide to using the Application Development Model, Version 2 (ADM 2) application
architecture to develop Progress applications. It includes instructions for building and
using Progress SmartObjects.
Progress ADM 2 Reference
A reference for the Application Development Model, Version 2 (ADM 2) application. It
includes descriptions of ADM 2 functions and procedures.
Progress AppBuilder Developer’s Guide (Windows only)
A programmer’s guide to using the Progress AppBuilder visual layout editor. AppBuilder
is a Rapid Application Development (RAD) tool that can significantly reduce the time and
effort required to create Progress applications.
Progress Basic Database Tools (Character only; information for Windows is in online help)
A guide for the Progress Database Administration tools, such as the Data Dictionary.
xxiii
Progress Results User’s Guide for UNIX
Progress Basic Development Tools (Character only; information for Windows is in online help)
A guide for the Progress development toolset, including the Progress Procedure Editor and
the Application Compiler.
Progress Debugger Guide
A guide for the Progress Application Debugger. The Debugger helps you trace and correct
programming errors by allowing you to monitor and modify procedure execution as it
happens.
Progress Help Development Guide (Windows only)
A guide that describes how to develop and integrate an online help system for a Progress
application.
Progress Translation Manager Guide (Windows only)
A guide that describes how to use the Progress Translation Manager tool to manage the
entire process of translating the text phrases in Progress applications.
Progress Visual Translator Guide (Windows only)
A guide that describes how to use the Progress Visual Translator tool to translate text
phrases from procedures into one or more spoken languages.
Reporting Tools
Progress Report Builder Deployment Guide (Windows only)
An administration and development guide for generating Report Builder reports using the
Progress Report Engine.
Progress Report Builder Tutorial (Windows only)
A tutorial that provides step-by-step instructions for creating eight sample Report Builder
reports.
Progress Report Builder User’s Guide (Windows only)
A guide for generating reports with the Progress Report Builder.
Progress Results Administration and Development Guide (Windows only)
A guide for system administrators that describes how to set up and maintain the Results
product in a graphical environment. This guide also describes how to program, customize,
and package Results with your own products. In addition, it describes how to convert
character-based Results applications to graphical Results applications.
xxiv
Preface
4GL
Building Distributed Applications Using the Progress AppServer
A guide that provides comprehensive information about building and implementing
distributed applications using the Progress AppServer. Topics include basic product
information and terminology, design options and issues, setup and maintenance
considerations, 4GL programming details, and remote debugging.
Progress External Program
A guide to accessing non-Progress applications from Progress. This guide describes how
to use system clipboards, UNIX named pipes, Windows dynamic link libraries, Windows
dynamic data exchange, Windows ActiveX controls, and the Progress Host Language Call
Interface to communicate with non-Progress applications and extend Progress
functionality.
Progress Internationalization Guide
A guide to developing Progress applications for markets worldwide. The guide covers
both internationalization—writing an application so that it adapts readily to different
locales (languages, cultures, or regions)—and localization—adapting an application to
different locales.
Progress Language Reference
A three-volume reference set that contains extensive descriptions and examples for each
statement, phrase, function, operator, widget, attribute, method, and event in the Progress
language.
Progress Programming Handbook
A two-volume handbook that details advanced Progress programming techniques.
Database
Progress Database Design
A guide that uses a sample database and the Progress Data Dictionary to illustrate the
fundamental principles of relational database design. Topics include relationships,
normalization, indexing, and database triggers.
Progress Database Administration Guide and Reference
This guide describes Progress database administration concepts and procedures. The
procedures allow you to create and maintain your Progress databases and manage their
performance.
xxv
Progress Results User’s Guide for UNIX
DataServers
Progress DataServer Guides
These guides describe how to use the DataServers to access non-Progress databases. They
provide instructions for building the DataServer modules, a discussion of programming
considerations, and a tutorial. Each DataServer has its own guide, for example, the
Progress DataServer for ODBC Guide, the Progress DataServer for ORACLE Guide, or
the Progress/400 Product Guide.
MERANT ODBC Branded Driver Reference
The Enterprise DataServer for ODBC includes MERANT ODBC drivers for all the
supported data sources. For configuration information, see the MERANT documentation,
which is available as a PDF file in installation-path\odbc. To read this file you must
have the Adobe Acrobat Reader Version 3.1 or higher installed on your system. If you do
not have the Adobe Acrobat Reader, you can download it from the Adobe Web site at:
http://www.adobe.com/prodindex/acrobat/readstep.html.
SQL-89/Open Access
Progress Embedded SQL-89 Guide and Reference
A guide to Progress Embedded SQL-89 for C, including step-by-step instructions on
building ESQL-89 applications and reference information on all Embedded SQL-89
Preprocessor statements and supporting function calls. This guide also describes the
relationship between ESQL-89 and the ANSI standards upon which it is based.
Progress Open Client Developer’s Guide
A guide that describes how to write and deploy Java and ActiveX applications that run as
clients of the Progress AppServer. The guide includes information about how to expose
the AppServer as a set of Java classes or as an ActiveX server.
Progress SQL-89 Guide and Reference
A user guide and reference for programmers who use interactive Progress/SQL-89. It
includes information on all supported SQL-89 statements, SQL-89 Data Manipulation
Language components, SQL-89 Data Definition Language components, and supported
Progress functions.
xxvi
Preface
SQL-92
Progress Embedded SQL-92 Guide and Reference
A guide to Progress Embedded SQL-92 for C, including step-by-step instructions for
building ESQL-92 applications and reference information about all Embedded SQL-92
Preprocessor statements and supporting function calls. This guide also describes the
relationship between ESQL-92 and the ANSI standards upon which it is based.
Progress JDBC Driver Guide
A guide to the Java Database Connectivity (JDBC) interface and the Progress SQL-92
JDBC driver. It describes how to set up and use the driver and details the driver’s support
for the JDBC interface.
Progress ODBC Driver Guide
A guide to the ODBC interface and the Progress SQL-92 ODBC driver. It describes how
to set up and use the driver and details the driver’s support for the ODBC interface.
Progress SQL-92 Guide and Reference
A user guide and reference for programmers who use Progress SQL-92. It includes
information on all supported SQL-92 statements, SQL-92 Data Manipulation Language
components, SQL-92 Data Definition Language components, and Progress functions. The
guide describes how to use the Progress SQL-92 Java classes and how to create and use
Java stored procedures and triggers.
Deployment
Progress Client Deployment Guide
A guide that describes the client deployment process and application administration
concepts and procedures.
Progress Developer’s Toolkit
A guide to using the Developer’s Toolkit. This guide describes the advantages and
disadvantages of different strategies for deploying Progress applications and explains how
you can use the Toolkit to deploy applications with your selected strategy.
Progress Portability Guide
A guide that explains how to use the Progress toolset to build applications that are portable
across all supported operating systems, user interfaces, and databases, following the
Progress programming model.
xxvii
Progress Results User’s Guide for UNIX
WebSpeed
Getting Started with WebSpeed
Provides an introduction to the WebSpeed Workshop tools for creating Web applications.
It introduces you to all the components of the WebSpeed Workshop and takes you through
the process of creating your own Intranet application.
WebSpeed Developer’s Guide
Provides a complete overview of WebSpeed and the guidance necessary to develop and
deploy WebSpeed applications on the Web.
WebSpeed Installation and Configuration Guide
Provides instructions for installing WebSpeed on Windows and UNIX systems. It also
discusses designing WebSpeed environments, configuring WebSpeed Brokers,
WebSpeed Agents, and the NameServer, and connecting to a variety of data sources.
WebSpeed Product Update Bulletin
A booklet that provides a brief description of each new feature of the release. The booklet
also explains where to find more detailed information in the documentation set about each
new feature.
Welcome to WebSpeed! (Hard copy only)
A booklet that explains how WebSpeed software and media are packaged. Welcome to
WebSpeed! also provides descriptions of the various services Progress Software
Corporation offers.
Reference
Pocket Progress (Hard copy only)
A reference that lets you quickly look up information about the Progress language or
programming environment.
Pocket WebSpeed (Hard copy only)
A reference that lets you quickly look up information about the SpeedScript language or
the WebSpeed programming environment.
xxviii
1
Results Overview
This chapter describes the Results software package and how you can use it to access database
information. It also includes information on:
•
Database terminology.
•
The Results Main Menu options.
•
The Results HELP feature.
Progress Results User’s Guide for UNIX
1.1
Introduction
Results is an interactive, menu-driven software tool that serves the following users:
•
Users with little or no programming experience.
•
Advanced users and application developers.
Through menu options end users can query, maintain, and generate reports on database
information without writing any code. They can also create address labels.
Advanced users and application developers can easily incorporate additional features to tailor
Results to their specific application requirements. Database administrators can define and
control environment parameters for Results, and for specific Results users.
1–2
Results Overview
1.2
Database Terms
You do not have to know a lot about database structures to use Results, but it is helpful if you
are familiar with some database concepts and terminology. This section presents a brief
introduction to some important terms. The next section describes those terms in greater detail.
•
A database is a collection of tables related to a broad subject area.
•
A table is a collection of records related to a specific subject.
•
A record is a collection of related information called fields.
•
A field is a specific unit of information.
•
An index is a field or combination of fields used to rapidly retrieve a particular record in
a table. A primary index is the most frequently used index. Each table can have many
indexes but only one primary index.
•
Related tables are tables that use similar fields to join one table with another. By default,
Results relates two tables if one of the tables has a unique index and all fields in that unique
index appear in the other table.
Results presents your information, or data, in a logical manner that is similar to how you
organize paper files. For example, suppose you have many rooms filled with filing cabinets. To
find a piece of data, you need to know:
•
Which room.
•
Which filing cabinet.
•
Which folder or card.
•
Where to look in the folder or on the card.
When you use Results, the terms used are different, but the logical sequence of string and
searching for data is similar.
1.3
Database Basics
When setting up a paper filing system, you keep all related information about a subject in a
filing cabinet. For example, you might store information about customers in a file cabinet called
Customer. Inside this cabinet you would keep data about each individual customer in folders.
You might then store all related filing cabinets together in a common area or room.
1–3
Progress Results User’s Guide for UNIX
In Progress, you store data electronically. However, the logic of storage is similar to the paper
filing system. You store data about each individual customer in an electronic folder called a
record. Then you put all the related records into an electronic filing cabinet called a table.
Finally, you put all these tables in a database, which you can think of as an electronic area or
room.
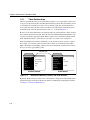
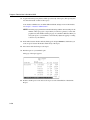
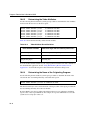
For example, if you are running a business called All Around Sports, you might have a sales and
inventory database that contains information about your customers, the kinds of products they
have ordered, the quantity they have ordered, and your overall product inventory. Figure 1–1
illustrates the relationship of the sales, order, and inventory paper filing system to a database.
Paper
Customer
Information
Folders
Tables
Customer
Database
Order
Order
Forms
Inventory
Sheets
Figure 1–1:
1–4
Customer
Paper and Electronic Filing System Comparison
Results Overview
Another way you can think of a database table is to view it as a paper table that you use to
organize and present data. A paper table is made up of rows and columns. The intersection of
each row and column contains one specific piece of data. Similarly, in a database table, each
row contains all the individual pieces of information about one member. A row in the database
table is called a record. In the paper filing system, each folder in a filing cabinet contains the
equivalent of a row or record. For example, the Customer filing cabinet contains one folder on
Second Skin Scuba and another for Off the Wall Sports. When All Around Sports creates its
database, the Customer table will contain one record for Second Skin Scuba and another for Off
the Wall Sports.
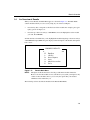
In a database table, each discrete piece of information also represents the intersection of a row
and column and is called a field. In addition to the data, each field in a record includes a
descriptive name, just like the column heading in a paper table. For example, the customer’s
name is one piece of information, and that information is stored in a field labeled Name in a
record. Each record in the Customer table has a Name field.
1–5
Progress Results User’s Guide for UNIX
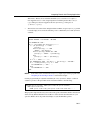
Figure 1–2 illustrates the structure of a database.
Database
Table
Table
...
Table
Record
Customer
...
Record
Field
Name
Figure 1–2:
Data
Name
Data
...
Structure of a Database
The last component of an electronic filing system is called an index. When you open the drawer
of a filing cabinet and thumb through the tabs on the folders, you’re using a kind of index.
What’s on the paper tab represents the information found in the folder. For example, you’d
expect the tabs in the customer filing cabinet to contain the name of the customer whose
information is in that folder. Similarly, an electronic index is a component defined for a specific
database table that serves as the basis for faster searching, sorting, or otherwise processing the
records in that table.
1–6
Results Overview
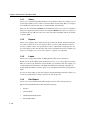
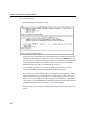
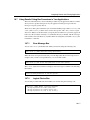
In a database, an index is a list that contains a value for each record in the table. When you define
an index, you choose the field or fields used to derive the index value for each record. For
example, if you choose the Name field as an index, then Progress creates an index for the
Customer table that consists of a list of customer names, just like the list of tabs in the paper
filing system.
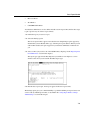
A simple index is based on the value of one field, while a compound index is based on two or
more fields. Figure 1–3 shows an example of a simple and a compound index.
Simple Index
Records Sorted
with This Index
02176
First
Jan
Last
Abel
Street
123 Main St
City
Grovewood
State
MA
Zip Code
37771
02176
01130
02176
Compound Index
Records Sorted
with This Index
Abel, Jan
First
Jan
Last
Abel
Street
123 Main St
City
Grovewood
State
MA
Zip Code
Figure 1–3:
Abel, Jan
Ball, Ed
Ball, Gene
02176
Simple and Compound Indexes
You can define several indexes per table but you can define only one primary index for a table.
For information on defining indexes, see the Progress Language Tutorial for Character.
1–7
Progress Results User’s Guide for UNIX
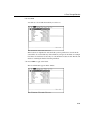
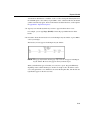
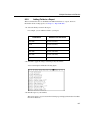
1.3.1
Table Relationships
The most powerful advantage an electronic filing system has over a paper filing system is that
it can process data based on the relationship between database tables. The relationship is based
on shared data. For example, let us take a look at a database table that contains information
about orders placed by customers. Each record in the order table might contain fields such as
the number of the order, the promised delivery date, etc., as shown in Figure 1–4.
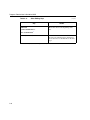
However, to relate the Order table to the Customer table, the order table must contain one field
that is already in the Customer table. Since the customer number field uniquely identifies each
customer, it is the most appropriate field. When a database uses common data (identical field
name with identical data) to relate tables to each other, it is called a relational database.
With relationships between tables established, you can perform extensive searchers or queries.
For example, you can query all the customers whose orders are promised before November
2001 or the number of outstanding orders by sales region. Imagine how tedious this search can
be if you are using a paper filing system.
Relationship
Customer No.
1
Customer No.
1
Name.
Second Skin...
Order No.
10
Street
79 Farrar Ave
Promised...
11/23/01
City
Yuma
Shipping Date
State
AZ
Terms
Net30
ZIP Code
85369
Shipped
Not Shipped
Customer Record
Figure 1–4:
Order Record
Relationship Between Customer and Order Records
By default, Results relates two tables if one of the tables has a unique index and all fields in that
unique index appear in the other table. For information on defining relationships between tables,
see Chapter 9, “Database Administration.”
1–8
Results Overview
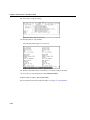
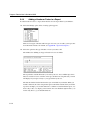
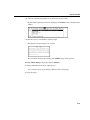
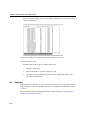
1.4
An Overview of Results
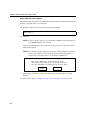
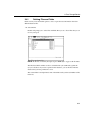
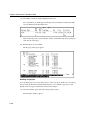
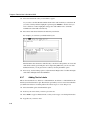
When you start Results, the Main Menu appears as shown in Figure 1–5. The Main Menu
contains modules which you can access by using any one of these techniques:
•
Press the key that corresponds to the first letter of the modules. For example, press q for
Query, press r for Report, etc.
•
Press the up or down arrow keys or SPACEBAR to move the highlight bar to the module
you want. Press RETURN.
To find out what each module lets you do, highlight the module using the up or down arrow keys
or SPACEBAR, then press HELP. Progress displays a brief description of the module and explains
how to use it.
PROGRESS RESULTS
Q.
R.
L.
D.
U.
A.
E.
Figure 1–5:
NOTE:
Query
Reports
Labels
Data Export
User
Administration
Exit
Results Main Menu
The figures in this manual show all of the possible menu modules in Results.
However, if all of the modules are not available for your system, you might see only
a subset of these modules. In fact, you see only the options that your database
administrator has enabled for you.
The following sections describe the modules in the Results Main Menu.
1–9
Progress Results User’s Guide for UNIX
1.4.1
Query
Allows you to examine and modify information in your database tables. For example, you can
use the Query module to select a subset of customers in the customer table. Thus, you can query
for all the Boston customers who have a customer number greater than 10.
Query also has a menu-driven WHERE clause builder that allows you to select record subsets
using more complicated selection criteria. For example, WHERE clauses allow you to query for
customers in the city of Boston or the state of Colorado whose maximum credit is greater than
or equal to $500.
1.4.2
Reports
Allows you to quickly generate single-section reports based on database information. Reports
can consist of data from one or more database tables, as well as calculated values and totals.
You have complete control over report headers, footers, column labels, and spacing. You can
also select subsets of data and control the order of the record information. Once you define your
report, you can display it on your screen or direct it to a printer or an output file.
1.4.3
Labels
Allows you to easily generate labels, including mailing labels, from your database.
Results can lay out the address labels automatically for you, or you can lay them out yourself.
There are several layout and format controls that help you customize labels. For example, you
can mix field and text information, omit blank lines, define the total height, adjust the left
margin, define the number of labels to print across, and adjust the horizontal spacing between
labels.
You can also select subsets of data and control the order in which labels print. For example, you
can choose to print labels for Arizona customers in order by zip code.
1.4.4
Data Export
Allows you to export information from the database for use in other software packages.
Export formats included in this module include the following:
1–10
•
Progress
•
Generic ASCII
•
ASCII with field-name header
•
Fixed-width ASCII
Results Overview
•
Comma-separated value
•
DIF, SYLK
•
WordStar
•
Microsoft Word
•
Microsoft Word for Windows
•
WordPerfect
•
CTOS/BTOS OfisWriter
If you prefer, you can define your own export formats tailored to your particular needs. You can
also select subsets of data and control the order of record information.
1.4.5
User
Transfers to a customized module. This module is hidden by default. If this module appears on
your menu, it means that a developer designed an application and added it to your package. If
you have it, see the documentation provided by the application developer for more information.
1.4.6
Administration
Gives database administrators more control over the interface users have within the Results
modules.
For example, you can establish table relations, define printer and terminal settings, establish
security definitions, and modify module interfaces.
1.4.7
Exit
Allows you to exit to the Progress Editor or the operating system prompt, depending on where
you started Results. See the “Stopping Results” section of Chapter 3, “A Tour Through Results”
for details.
1–11
Progress Results User’s Guide for UNIX
1.5
Accessing Help
Results provides online help for the modules in the Main Menu as well as for most of the options
within each module. To find out what a module or option does, highlight it and press HELP. (F2
or CTRL-W—see the “Results Keystrokes” section of Chapter 2, “General Information”.) A
window appears that describes the feature and provides suggestions about what to do next.
Figure 1–6 shows the help message you see when you highlight the Get option in the Reports
module and press HELP.
Figure 1–6:
A Help Window
Also, as you work, brief help messages appear at the bottom of each window to provide
information about your current cursor location and define the operations that you are
performing. For example, when you highlight the Next option in the Query module, you see this
message:
Next record.
1–12
Results Overview
1.6
Summary
This chapter introduced you to:
•
Basic database terminology.
•
The Results Main Menu.
•
The Help feature.
Chapter 2, “General Information,” discusses the basic system requirements for running Results,
as well as the keystrokes that have special meaning in Results.s
1–13
Progress Results User’s Guide for UNIX
1–14
2
General Information
This chapter provides the background information you need to install and run Results. This
chapter discusses:
•
Instructions for installing and accessing Results. These include environment variables and
startup parameters.
•
Information for copying the sports database and starting Results with a single database.
(For information about starting Results with multiple databases, see Appendix A, “Startup
and Shutdown Procedures.”)
•
Procedures for switching from Results to Progress.
•
Steps for logging in and out of Results.
•
Definitions of Results keystroke functions.
•
Descriptions of the window layouts and display interfaces in the user modules.
NOTE:
Results is a Progress application. The functionality of your Results interface depends
on the Progress product used to build it. For example, your version of Results may
not have the Add, Copy, Update, or Delete options in the Query module. See Chapter
9, “Database Administration” for more details about Results functionality.
Progress Results User’s Guide for UNIX
2.1
Installing and Accessing Results
Follow these steps to install and access Results.
1 ♦ Verify that you have the required hardware and software.
2 ♦ Install Results on your system. If you want to run Results in a non-English language,
install the RESLANG product when you install Results. For more information about
languages, see Chapter 9, “Database Administration” and Appendix A, “Startup and
Shutdown Procedures.”
NOTE: See the Results section in the Progress Installation and Configuration Guide
Version 9 for UNIX for instructions on how to install Results on your system.
Information about setting your path and Progress startup parameters follows in
this section.
3 ♦ Set the DLCRES environment variable to the pathname of the directory where you
installed Results.
4 ♦ Set your path for Results.
5 ♦ Set the Progress startup options.
6 ♦ Start Results.
If you are an end user, you might want your database administrator to perform the steps for you.
The following sections provide more information about each of these steps.
2.1.1
The DLCRES Environment Variable
Set the DLCRES environment variable to the pathname of the directory where Results is
installed.
•
Under Progress Version 6:
DLCRES=/dlcres; export DLCRES
PROPATH=$DLCRES:$PROPATH; export PROPATH
•
Under Progress Version 7 and later:
DLCRES=$DLC/tty/prores; export DLCRES
PROPATH=$DLCRES:$PROPATH; export PROPATH
2–2
General Information
2.1.2
The PROPATH Environment Variable
To run Results, the directory where you installed the Results code must be in your Progress
PROPATH environment variable.
For Results application help (applhelp.p) to run correctly, it is strongly recommended that
you enter your Results directory as the first entry in your PROPATH. In addition, you can
incorporate your own application help. For more information see Chapter 10, “Integrating
Results into Existing Applications.”
2.1.3
Progress Startup Parameters
If you want Results to default to European numeric format, use the European Numeric Format
(-E) startup parameter.
If you want Results to default to a particular date format, use the Date Format (-d) startup
parameter.
For more information about display formats, see Appendix C, “Field Display Formats.”
For more information about Progress startup parameters generally, see the Progress Startup
Command and Parameter Reference.
2.1.4
Starting Results
There are several ways you can start Results. For example, you can start Results with one or
more databases. The startup commands are different in each case.
To follow the tutorials and examples in Chapters 3 through 7, you must start Results with a
single copy of the sports database. Follow the procedures in the “Results Tour Preparations”
section of Chapter 3, “A Tour Through Results.”
The other methods for starting Results include:
•
Starting from Progress using the database you specify when you start Progress.
•
Starting with databases in multi-user modes.
Each method is described in Appendix A, “Startup and Shutdown Procedures.”
2–3
Progress Results User’s Guide for UNIX
2.2
Results Keystrokes
Results has several predefined function keys that let you perform useful operations with a single
keystroke or a combination of keystrokes. Table 2–1 lists the function keys that you use in
Results.
Table 2–1:
Results Function Key Defaults
Key
GO
(F1)
HELP (F2
Action
Runs the highlighted menu option or accepts an
entered field value.
or CTRL-W)1
MODE (F9
or CTRL-T or INS)1
Enters the Results Help system. To exit from Help
press END (F4, CTRL-E, or ESC).
Switches between insert and overstrike modes. In
insert mode, each character you type inserts itself
where the cursor is positioned. The cursor and the
character under it move one space to the right. In
overstrike mode, each character you type replaces
the character at the position of the cursor.
Overstrike is the default mode.
NOTE: In some lists, pressing this key toggles to
other information. For example, in lists of field
names, this key toggles between the field names
and the field descriptions.
END (F4
or CTRL-E or ESC)1
Exits from the window or operation without saving
entries or edits. If you are in the middle of a
database operation, such as updating a record, and
you press this key, the system will discard your
changes. If you press this key within a module’s
Main Menu, you must select the Exit option to exit
from the current module.
GET (F5
or CTRL-G)1
Invokes the expert mode in the WHERE clause
builder. In the Labels Editor and in expert mode,
this key allows you to insert a field at the cursor
position.
PUT (F6
or CTRL-P)1
Invokes the ask mode in the value of the WHERE
clause builder.
1
2–4
The CTRL keys listed are terminal specific and may not be the same for all terminals.
General Information
Table 2–2 lists other keys you use in Results. You will learn more about these keys and Results
windows as you work through the tutorial and examples in this guide.
Table 2–2:
Other Editing Keys
Key
(1 of 2)
Action
RETURN
Moves the cursor to the next field or next
line. Also selects and deselects items in the
scrolling lists.
BACK SPACE
Deletes a character to the left of the cursor
and moves the cursor to the position of the
deleted character.
↑ (CURSOR-UP)
Moves the cursor in the direction of the
arrow, one line at a time.
↓ (CURSOR-DOWN)
CURSOR-RIGHT
CURSOR-LEFT
Moves the cursor in the direction of the
arrow, one character position at a time.
DEL or DELETE
Deletes the character in the cursor position
and moves the characters to the right of the
cursor one position to the left.
TAB (CTRL-I)1
Moves the cursor to the next field or label. In
editing windows, moves the cursor to the
next tab stop (five spaces to the right).
(CTRL-U or SHIFT-TAB)1
BACKTAB
PAGE-UP
(F15)
PAGE-DOWN
(F16)
RIGHT-END
Moves the cursor to the previous field or
label. In editing windows, moves the cursor
to the previous tab stop (five spaces to the
left).
Moves the cursor to the previous page of
text.
Moves the cursor to the next page of text.
Moves the cursor to the end of the line.
(CTRL-CURSOR-RIGHT or
ESC CURSOR-RIGHT)1
2–5
Progress Results User’s Guide for UNIX
Table 2–2:
Other Editing Keys
Key
LEFT-END
(CTRL-CURSOR-LEFT or
(2 of 2)
Action
Moves the cursor to the beginning of the
line.
ESC CURSOR-LEFT)1
HOME (F7
1
2–6
or ESC H)
Moves the cursor to the last available line if
the cursor is on the first page, otherwise it
moves the cursor to the first line on the first
page.
The CTRL keys listed are terminal specific and may not be the same for all terminals.
General Information
2.3
Window Areas
The windows in the Reports, Labels, and Data Export modules are divided into three areas: the
horizontal menu, the information window, and the layout window. The window in the Query
module has two areas: the horizontal menu and the form window.
Figure 2–1 shows you these areas. More detailed descriptions of these areas follow.
Figure 2–1:
Areas of the Query Module Window
2–7
Progress Results User’s Guide for UNIX
2.3.1
Menu Options
There is a horizontal menu of options at the top of each window in the Query, Reports, Labels,
and Data Export modules. Certain options, such as Where and Order, appear on all the
horizontal menus (provided that they are active on your system). These options let you select
subsets of records and define the order of the records as described in Chapter 3, “A Tour
Through Results,” and Chapter 4, “Query Module.”
Note that even though the same horizontal menu options appear in the Reports, Labels, and Data
Export modules, some modules have different pull-down menu options. For example, in each
module, the Settings option has a pull-down menu. Thus, when you select Settings in the
Reports module, you get a pull-down menu that lets you define headers, footers, spacing, etc.
However, when you select Settings in the Data Export module, you get a pull-down menu that
lets you pick from a list of export formats.
The pull-down options that are unique to each module are fully described in Appendix B,
“Option Descriptions.”
2.3.2
Information Window
In the Reports, Labels, and Data Export modules, the information window displays information
about the database, files, selection criteria, and the order sequence of the records used in the
current definition.
2.3.3
Layout Window
In the Reports, Labels, and Data Export modules, the layout window displays layout
information about the current report, label, or data export definition. This window displays
different information in each module. (The Query module does not have a layout window.
Instead, it has a form window that displays record information.)
2–8
•
Reports Layout Window—Displays headers, footers, labels, and formats for the current
report in a way that resembles the final report layout. For example, you can see the width
of the report and how the columns line up under the labels. Sometimes it displays markers
that indicate the types of fields or features in the report. For example, a *d marker below
a field indicates that it is a date field. For more information about markers, see the “Report
Markers” section of Chapter 5, “Reports Module.”
•
Labels Layout Window—Displays the current print settings and label layout. This
window also contains a diagram that resembles a mailing label form. By adjusting the
settings you can easily adjust the printer settings, such as the number of characters to
indent, the number of lines to skip, the width of each label, etc. You can also adjust the
layout of the fields within the labels.
General Information
•
Data Export Window—Displays field and export format information. For example, it
shows the fields selected for export, the export type (ASCII, WordStar, WordPerfect,
Progress, etc.), and field delimiters.
2.3.4
Form Window
In the Query module, the form window displays database record information in forms.
2.4
Vertical Menus, Horizontal Menus, and Selection Lists
There are two types of menus in Results: vertical menus and horizontal menus. Results also has
selection lists. These appear in different locations and have different characteristics. The
following sections describe them in more detail.
NOTE:
Press ENDKEY to exit the current menu or action. You can use this key to back out of
pull-down menus and windows. However, within a module’s Main Menu, you must
choose Exit to back out of the module.
2.4.1
Vertical Menus
Results sometimes uses vertical menus to display menu options. The Results Main Menu,
shown in Figure 2–2, is an example of a vertical menu where options are lined up one above the
other.
PROGRESS RESULTS
Q.
R.
L.
D.
U.
A.
E.
Figure 2–2:
Query
Reports
Labels
Data Export
User
Administration
Exit
Example of a Vertical Menu
2–9
Progress Results User’s Guide for UNIX
You can use one of two techniques to choose an option from a vertical menu:
•
Press the SPACEBAR, TAB, or any cursor key to scroll through the menu or list and
highlight a selection. Press GO or RETURN to select the option.
•
Type the letter next to the option you want to select.
2.4.2
Horizontal Menus
Each user module in Results has a horizontal menu in which the options are lined up from left
to right at the top of the window. You use these options to decide how you want to work with
the data. For example, you can choose an option that imports a previously defined report into
the Reports module.
As you highlight a menu option, a description line at the bottom of the window provides
information about the option. For example, Figure 2–3 shows the horizontal menu for the Query
module and the description line for the Next option.
Figure 2–3:
Example of a Horizontal Menu
You can use one of two techniques to choose an option from a horizontal menu:
•
2–10
Press the SPACEBAR, TAB, or any cursor key to scroll through the menu or list and
highlight a selection. Press GO or RETURN to choose the option.
General Information
•
Type the first letter of the option you want to choose.
To leave the horizontal menu and return to the Main Menu, select the Exit option. If any report
information is in the window in the Reports, Labels, or Data Export modules, and you want to
exit the module, Results prompts you to confirm your exit.
2.4.3
Selection Lists
Sometimes Results displays a list of items that you can choose from. These lists look like
vertical menus, but are different. With vertical menus you choose a single item; with selection
lists you can choose one or more items. Figure 2–4 shows an example of a selection list.
Figure 2–4:
NOTE:
Example of a Selection List
Function key messages on your display might be different from what you see in the
examples, depending on what kind of machine you use to run Results. For example,
if you have a VT100 terminal, your screen messages will tell you to press PF4 instead
of F4.
You can use one of two techniques to choose an option or item from a selection list:
•
If the list is long, press ↓ or ↑ to move up or down one screen of information at a time.
When you have made your selections, press GO or RETURN.
•
Type the first few letters of the option you want to select. The highlight moves to the first
option or item that corresponds to the combination of characters you type. Press RETURN
to select the option or item.
2–11
Progress Results User’s Guide for UNIX
In lists where you can select only one item, the selection window closes after you press RETURN.
In lists where you can select more than one item, an asterisk (*) appears next to each selected
item. In lists where the selection order is significant, a number appears next to each selected
item.
To deselect an item, highlight it and press RETURN again. The asterisk or number disappears,
indicating that you deselected it. When you have made your selections, press GO to enter them
and exit the selection window.
2.5
Where To Go From Here
Now that you are familiar with the common features of the Results interface, you can turn to the
chapters that address your needs. For details about the contents of the chapters and appendixes
in this guide, see the “Organization of This Manual” section of the “Preface.”
2–12
3
A Tour Through Results
This chapter introduces you to some basic features in the Results modules, specifically the
Query, Reports, Labels, and Data Export modules. The tutorial steps describe how to access and
use these features. This chapter contains the following:
•
Steps to create a copy of the sports database and start Results to run the tour and try the
examples in Chapters 4 through 7.
•
A Query module section that describes how to find records, add and delete records, and
join related files.
•
A Reports module section that describes how to pick fields for the report, run and save the
report, and add headers. It also describes how to use the WHERE clause builder to select
groups of records to include in the report.
•
A Data Export module section that describes how to transfer information using the Module
option. It also describes how to export data to non-Progress format and how to delete
WHERE clauses.
•
A Labels module section that describes how to pick fields for the label, how to add fields
and text, and how to adjust the settings.
For more in depth information about these modules, see their respective chapters.
Progress Results User’s Guide for UNIX
3.1
Introduction
This tutorial takes you on a tour of the user modules in Results. It starts with the Query module,
then moves on to the Reports, Data Export, and Labels modules. The information you learn
builds from one section to the next, so follow the sections in the order presented.
You can stop the tour and exit Results at the end of any Query module section. In the tours
through the other modules, you can exit at the end of any section if you save your definitions.
When you want to start again, retrieve the saved definition and start where you ended your last
session.
To take this tour, start Results with a copy of the sports database called
following section for details.
3.2
mysports.
See the
Results Tour Preparations
To take the tour, you must first create a copy of the Results sports database and then start
Results. This section outlines the tasks you must perform and directs you to subsections for
further instructions.
1 ♦ Set up a directory specifically to practice using Results. This directory must be different
than the one where Results and Progress are installed. When you are done with the practice
session, you can delete the files and the directory. If you do not know how to create a
directory, see your database administrator.
Although more than one user can access information in the same database, users must have
their own directories to hold their generated reports, labels, and export formats.
2 ♦ If you want Results to default to a non-English language, edit the results.l file to set the
default language you want. For details on the results.l file, see the “Running Results in
Non-English Languages” section in Appendix A, “Startup and Shutdown Procedures.”
Also, you can set the PROMSGS environment variable to the language you want so
Progress messages appear in that language. For details on the PROMSGS environment
variable, see “Running Results in Non-English Languages” section of Appendix A,
“Startup and Shutdown Procedures,” and the Progress Installation and Configuration
Guide Version 9 for UNIX.
NOTE: A few messages and options in Results always appear in English, even when the
default language is not English. For example, in some cases, you must enter yes
to accept an option. This is normal and does not indicate a problem with Results.
3 ♦ Create a copy of the sports database. (See the next section for instructions.)
3–2
A Tour Through Results
4 ♦ Start Results with the copy of the sports database. (See the “Starting Results with a Copy
of the Sports Database” section in this chapter for instructions.)
3.2.1
Creating a Copy of the Sports Database
Go to the directory where you want to use Results. Enter the appropriate command at your
operating system prompt as shown in Table 3–1 and press RETURN. This command makes a
copy of the Progress sports database and names it mysports.
Table 3–1:
Database Copy Command
Operating
System
Commands
prodb mysports sports
UNIX
DOS
3.2.2
Starting Results for the Tour
This section describes the steps for running the tour of Results. You can also try the examples
in Chapters 4 through 7.
The following sections describe two ways to start Results. The first method starts Results from
your operating system using the mysports database. The second method starts Results from
Progress using the database you specify when you start Progress.
Starting Results with a Copy of the Sports Database
This section describes how to start Results using the mysports copy of the Progress sports
database.
1 ♦ Enter the appropriate command at your operating system prompt to start Results, as shown
in Table 3–2.
Table 3–2:
Operating
System
UNIX
Starting Results with the mysports Database
Commands
results mysports
DOS
3–3
Progress Results User’s Guide for UNIX
This command starts the database in single-user mode, which means that once you start
Results with this database no one else can access the database. If you want more than one
user to access this database at a time, you must first start a server for the database and use
the multi-user startup command for Results. For information on starting servers and using
Results in multi-user mode, see Appendix A, “Startup and Shutdown Procedures.”
When you run Results with a new database, Progress prompts you to perform an initial
build on the database.
NOTE: You should not get an initial build prompt if someone has already installed the
Results package and performed the initial build for you. If you do get this prompt,
see your database administrator.
2 ♦ Type y for YES to do an initial build.
The following prompt appears.
3 ♦ Press ENTER to accept the default value of AUTO to generate the procedures
automatically.
Results then uses its algorithms to determine default settings. If you want to use SEMI or
MANUAL, see your database administrator. See Chapter 9, “Database Administration,”
for details on the MANUAL, SEMI, and AUTO selections.
3–4
A Tour Through Results
A status screen appears that lists the names of the files as they load from the database into
Results:
When Results completes the initial build, the logo screen briefly appears, followed by the
Results Main Menu:
PROGRESS RESULTS
Q.
R.
L.
D.
U.
A.
E.
Query
Reports
Labels
Data Export
User
Administration
Exit
The Main Menu lets you access different modules. These modules are described in
Chapters 4 through 7.
NOTE: If the Main Menu does not appear in the language you want to use, you or your
database administrator can change the working language using the Language
option in the Administration module. For more information, see the “Language”
section of Chapter 9, “Database Administration.”
From this menu, you can start the Results tour, but before you do that, read through the
rest of this chapter. It describes how to exit Results and how to move between Results and
Progress. It also describes keystrokes you can use in Results as well as how to navigate
through menus.
3–5
Progress Results User’s Guide for UNIX
Starting Results from Progress
The following steps describe how to start Results from inside Progress. Results runs against the
database you specify when you start Progress.
1 ♦ Enter this command to access Results from the Progress Editor:
RUN results.p
2 ♦ Press GO.
NOTE: If you see an error message, see your database administrator. Results must be in
your PROPATH before you can run it.
When you run Results with a new database, Progress prompts you to perform an initial
build on the database.
NOTE: You should not get this prompt if someone has already run Results against the
database (for example, if someone installed and customized the application
software). If you get this prompt, see your database administrator.
The file "dbname.qc" was not found. This
means that you need to do an "Initial Build"
on this database. Do you want to do this now?
Yes
No
Here, dbname is the name of the Progress database you specified when you started
Progress.
3 ♦ Follow Step 3 in the “Starting Results with a Copy of the Sports Database” section.
3–6
A Tour Through Results
3.2.3
Moving Between Results and Progress
1 ♦ Press END at the Results Main Menu to access the Progress Editor from Results.
2 ♦ To return to the Main Menu from the Progress Editor, enter this command:
RUN results.p
3 ♦ Press GO.
A logo screen appears. Status messages also appear on the bottom of the screen as some
system information loads into Results. At the end of the process, the Results Main Menu
appears.
3.3
The Query Module
This section of the tour introduces you to some Query features which let you examine database
record information. You can stop and exit Results at anytime in this module. For more
information about the Query module, see Chapter 4, “Query Module.”
Follow these steps to select query forms.
1 ♦ Type q to select the Query module from the Main Menu, as shown in this figure:
3–7
Progress Results User’s Guide for UNIX
A list appears as shown in Figure 3–1. This list displays the Query forms you have
permission to view.
Figure 3–1:
Query Form
Results can list the query forms in one of three ways:
•
3–8
By Description. The marker in the lower-left corner of the window tells you that this
is a list of form descriptions. The counter in the lower right corner shows you how
many forms there are in the list. For example:
A Tour Through Results
•
By File Name. The same list shows the names of the files used to make the forms.
The database name appears in parentheses, so you know which database contains the
file. All of the files in the following example are in the mysports database because
that is the database you used to start Results for the tour. When you start with another
database or more than one database, you see other database names in parentheses.
•
By Program Name. Results automatically creates these program names using the
first eight characters of the database filename. If any of these names is already used
by other programs, it creates names like qryxxxxx.p for the programs, where xxxxx
represents a unique integer value. Thus, each query form has its own unique program
name so new query forms do not overwrite existing query forms that have the same
name.
2 ♦ Press MODE to toggle to each type of list.
3 ♦ Toggle back to the description form list. (In this tutorial, you work only with the
description list.)
There are two ways to select a form from the list:
•
Highlight the form with the ↑ and ↓ keys or TAB key and press RETURN or GO to
select the form.
3–9
Progress Results User’s Guide for UNIX
•
Type the first letter of the form. The highlight moves to the form. Press RETURN to
select the form.
If there is more than one form that begins with the same letter, the highlight bar
moves to the first occurrence of the letter. If you type a letter for a form not on the
list, the screen displays the letter in the box, but the highlight bar does not move. You
can then type a letter for a form that exists, and this letter replaces the one in the box.
4 ♦ Type c to highlight the Customer information form. This screen appears:
5 ♦ Press RETURN to select the Customer information form.
The first record in the customer file appears, as shown in this screen:
3–10
A Tour Through Results
This form shows you information about customer number 1 in the customer file of the
mysports database. Each customer record appears in this format. The next section
describes how to view other records.
There is a menu of options at the top of each form. There are two ways to select an option:
•
Highlight the option with the ← and → keys, SPACEBAR, or TAB key and press
RETURN or GO to select the form.
•
Type the first letter of the option. Results highlights the option and selects it.
NOTE: Your database administrator can set Results to default to the European numeric
format by setting the European Numeric Format (-E) startup option. If that startup
option is set, the numbers on your screen appear in European numeric format. For
more information about the -E startup option, see Appendix C, “Field Display
Formats.”
3.3.1
Finding the Next, Prev, First, and Last Records
This section shows you how to find the next, previous, first, and last records in the customer file
using the Next, Prev, First, and Last options. These options let you easily move through a set of
records.
Select Next to examine the next record in the customer file:
3–11
Progress Results User’s Guide for UNIX
You see customer number 2, because the records are in order by customer number.
If you select Prev (Previous), the screen displays the record for customer number 1 again. If you
choose Last, you see the last record in the file. When you select First, you see the first record in
the file.
If you have the Add, Update, Copy, and Delete options on your horizontal menu, continue with
the next section. If not, skip to the “Browsing Through Records” section.
3.3.2
Adding and Deleting a Record
This section describes how to add a record to a file and delete a record from it.
Adding a Record
1 ♦ Select Add.
A blank record appears so you can add values to create a record. The fields you can edit
are highlighted or underlined, depending on your monitor type. Notice that the Cust-Num
field contains the number 1005 as shown in the following screen. This number is created
automatically by Progress via the Sequence feature in the Data Dictionary. The default
initial value of the sequence has been set to 1000 and the incremental value to 5. That’s
why when you select Add, the number 1005 appears. If you select Add again to add
another record, the next number you see is 1010, and the next one is 1015, and so forth.
You can access the Dictionary to reset the initial and incremental values to different
values.
2 ♦ Accept the value 1005, and press RETURN to go to the next field.
3 ♦ Fill in the rest of the fields with the data in Table 3–3.
3–12
A Tour Through Results
Table 3–3:
Field Information for New Record
Field
Information
Name
Windbag Windsocks
Address
2 Flyhigh Road
City
Chicago
State1
IL
Postal-Code
60628
Contact
Ronald Scott
Phone
(312) 456-3769
Sales-Rep1
DKP
1
Results automatically verifies information you enter into these fields. If you try to enter an invalid value, you
get an error message.
Press TAB or any cursor key to move among fields. To edit a field, simply type over
existing information.
4 ♦ Press GO to add this record to the mysports database.
NOTE: If there is already a customer number 1005 in the database, this error message
appears:
** customer already exists with Cust num 1005. (132)
Results automatically verifies the information you enter. If it is invalid, Progress returns
an error message. (To find an available customer number, you can use the Browse option
described in the “Browsing Through Records” section.)
3–13
Progress Results User’s Guide for UNIX
Deleting a Record
Follow these steps to delete the current record, that is, customer 1005.
1 ♦ Verify that customer 1005 is the current record.
2 ♦ Select Delete.
A window appears that prompts you to verify whether you want to delete the current
record.
3 ♦ Select YES. Results deletes the record from the mysports database and removes it from
the screen. Results displays the last record in the customer file.
4 ♦ Select First.
3.3.3
Browsing Through Records
This section describes how to use the Browse option to display summary lists of record
information. It also shows you how to pick the fields that temporarily appear in the summary
list. (See Chapter 9, “Database Administration,” for information on how to permanently change
the default fields that appear in this list.)
1 ♦ Select Browse.
A partial list of the records in the customer file appears as shown in the following figure.
The list begins with the current record:
Browse displays a list of customer records with the default fields—Cust-Num, Country,
Name, and Postal-Code.
3–14
A Tour Through Results
The position marker at the bottom of the window tells you the position of the current
record relative to the list of records in the window. For example, when the window shows
the whole list, the position marker is All Shown. When you are at the top or bottom of the
list, the position marker is At Top and At Bottom respectively. When you are in the middle
of a list that is too long to fit in the window, the marker is empty.
Use the cursor keys to scroll through this list. You can use Browse to help you find a record
among a small number of records. For example, if you do not know the customer number
of Thundering Surf you can easily locate the record using the browse feature.
2 ♦ Move through the list until you find Thundering Surf Inc. (customer number 16) and select
it.
All the fields in the Thundering Surf Inc. record appear.
3 ♦ Select Browse again.
The summary list of the customers in the customer file appears again.
A message at the bottom of the window tells you to press GET if you want to set different
browse fields. (If you want different default fields, see your database administrator.)
4 ♦ Press GET. This list of fields appears:
:
The numbers next to the field names indicate fields that have been selected, in the order
that they appear in the browse list.
3–15
Progress Results User’s Guide for UNIX
To add a field to the browse list, you highlight it and press RETURN. To delete a selected
field, highlight it again and press RETURN.
Notice that there are 16 fields you can choose. They do not all fit in the window. Use the
cursor keys to scroll up and down the list to see these fields.
5 ♦ Select the Sales-Rep field and press RETURN.
A number 5 appears next to the field. This field will appear as the fifth field in the browse
list.
Note that if you select too many fields or a field too large to display across one line, the
list reverts back to the default selected fields.
6 ♦ Press GO to insert the Sales-Rep field into the browse list.
The modified browse list appears:
The Sales-Rep field is a temporary addition to the browse list. The browse list defaults
back to its original fields when you exit the Query module. If you want to change the
default fields for the list, see your database administrator.
7 ♦ Press END to exit Browse.
8 ♦ Select Total and the total number of records in the customer file appears at the bottom of
the window:
9 ♦ Press END to exit Total.
3–16
A Tour Through Results
3.3.4
Joining Files
In this section, you join the order file to the customer file so that you can see the orders for
Thundering Surf. For information on how to establish join relationships for files, see Chapter 9,
“Database Administration.”
1 ♦ Select Browse.
2 ♦ Select the Thundering Surf Inc. record (customer number 16).
3 ♦ Select Join.
A list of the files related to the customer record appears:
You can join files if they have one field or a number of fields in common.
4 ♦ Select Order to see the order records for customer 16.
The window in the figure below displays a subset of information—default fields from the
order file:
Note the following about the display:
•
There are fewer options on the horizontal menu (the View and Order options are
gone) when you are working within a subset of information.
•
The title at the top of the order form indicates that you are in a subset. Therefore, the
options that you select will display order information only for the current customer,
Thundering Surf.
3–17
Progress Results User’s Guide for UNIX
5 ♦ Select Browse to display a summary list of all orders for this customer:
6 ♦ Press END to exit browse.
7 ♦ Select Total to display the total number of orders for this customer.
This message appears at the bottom of the window:
8 ♦ Press END to exit Total.
To get more information about this order number 23, you join the order-line file to the
order file.
9 ♦ Select Join again.
10 ♦ Select Order-Line file.
The following window appears:
The order-line subset displays the first order-line for Thundering Surf’s order number 23.
Because you are in a subset, when you select Browse you see a summary list of order-lines
for order number 23. You can select Total to find the total number of order-line records
for this order.
3–18
A Tour Through Results
11 ♦ Select Total to find out how many order-lines there are for this order.
This message appears at the bottom of the window:
12 ♦ Press END to exit Total.
13 ♦ Select Browse to display a summary list of all order-lines for this order.
14 ♦ Press END to exit this list.
15 ♦ Select Exit twice to exit the order-line subset and the order subset.
This returns you to the original customer record.
16 ♦ Select Exit to return the Results Main Menu.
3–19
Progress Results User’s Guide for UNIX
3.4
The Reports Module
This section of the tour teaches you how to use options in the Reports module to create reports.
For example, you will learn how to define, save, and run reports. You will also learn how to
order reports and select specific groups of records to appear in the report. For more information
about the Report module, see Chapter 5, “Reports Module.”
You can leave the tour of the Reports module at the end of any section. However, before you
leave, save your definitions. That way you can retrieve the saved definition at a later date and
pick up where you last stopped.
The report you create in this exercise shows order information for each customer in the mysports
database.
To prepare for the Report tour, select the Report option on the Results Main Menu.
This window appears:
Since no files have been defined for the report yet, only a limited number of options in the
horizontal menu is given.
3–20
A Tour Through Results
3.4.1
Defining Files and Fields
In this section you use the Define option to create a report that uses information from four
different database files.
1 ♦ Select Define.
Results will prompt you to select files and fields. First you see a list of files that you can
use for your report:
NOTE: If the files are listed by description, press MODE (F9) to toggle to the file names.
The files listed in this window are those available when you start Results against the
database. If you start it against another database, you see the files from that
database that you have permission to view.
mysports
The counter in the lower right-hand corner of the window tells you the total number of files
in the list.
3–21
Progress Results User’s Guide for UNIX
2 ♦ Select the Customer file.
The window displays mysports.Customer next to the Files label. Because there are other
files joined (or related) to the customer file, a Select Related File window appears with a
listing of those files:
3 ♦ Select the Order file.
The window displays customer and order in the list of files, and displays an additional
window of files related to the order file:
4 ♦ Select the Order-Line file.
Another window appears displaying files related to the order-line files.
5 ♦ Select the Item file.
3–22
A Tour Through Results
6 ♦ Press END.
You will see a list of fields from which you can choose:
This list shows, in alphabetical order, the fields you have permission to view from the
selected files. You can include any of these fields in your report. Some fields, for example
Cust-num, are listed twice because they are contained in more than one file. The file and
database containing the field are listed in parentheses.
7 ♦ Press MODE to toggle to the labels.
The list of field labels appears in the window:
3–23
Progress Results User’s Guide for UNIX
These are the labels that appear in your report. Unlike field names, field labels can have
blank spaces in them. The fields are listed in alphabetical order by field name now. If a
field does not have a label, the field name appears as the label.
Note that because you chose to show fields as field labels, the display is now field labels.
The fields appear as labels until you toggle them back to field names.
8 ♦ Select the following fields, in the order shown:
Fields
Database file
Name
Customer
Order-num
Order
Line-num
Order-line
Item-Name
Item
Qty
Order-line
Price
Order-line
Results numbers the fields in the order in which you select them. They will appear in the
same order in your report.
If you select a field by mistake, highlight it again and press RETURN to deselect it. If you
select a field out of order, highlight it and type the order number next to it. Results
renumbers the other fields automatically.
3–24
A Tour Through Results
9 ♦ Press GO to lay out the fields in this report.
The Report Layout window shows the report layout and displays the formats for each field.
The information below the field names is the display format information. For example,
x(20) means that the names in the name field can be 20 characters wide >>>>9 means that
the Ord-num field is a number up to five digits long in a right justified format. When
displaying records, Results replaces the > with a blank if there is no digit in that position.
For example, if the customer number is 4, Results shows it as ‘ 4.’ (See Appendix C,
“Field Display Formats,” for more information about how fields are formatted for
display.) These are default values that appear in the window. You can change the formats
using the Settings option, but leave them for now.
The Report Width marker in the lower-right corner of the Report Layout window tells you
that this report is 76 characters wide. The maximum width for any report is 255 characters.
3.4.2
Running a Report
Follow these steps to run the current report:
1 ♦ Select Run.
A list of output devices appears:
3–25
Progress Results User’s Guide for UNIX
2 ♦ Select the TERMINAL option to preview the report on your screen.
Your database administrator can tailor this list. For example, when you select PRINTER,
you might see a list of the printers used in your department:
The first page of the report appears.
3 ♦ Press ↓ key, to display the next page of the report.
4 ♦ Press END to return to the Report Layout screen.
A message appears at the bottom of the screen that tells you the total number of records in
your report:
There are a few things you can do to this report to make it more meaningful. For example,
you can multiply the quantity and price fields together to find the cost per order-line. But
first, save the report.
3–26
A Tour Through Results
3.4.3
Saving Your Report
Follow these steps to use the Put option to save report definitions.
1 ♦ Select Put.
A window appears to let you save the current report:
If you had saved other reports, they would be listed here.
2 ♦ Press RETURN to save the report as a new report.
A window appears to let you enter a descriptive title for the report:
You can give the report any name that is meaningful to you. Name this report Order Line
Report.
3 ♦ Type Order Line Report and press RETURN.
4 ♦ Select Clear to clear the report from the screen.
A prompt appears to let you verify that you want to clear the report.
5 ♦ Select Yes.
If you did not save the report, the screen would clear and you would lose the report you
just defined.
NOTE: If you select Clear when there is no report information on the screen, a window
appears from which you can select saved report definitions to delete.
3–27
Progress Results User’s Guide for UNIX
3.4.4
Getting a Report
Follow these steps to use the Get option to retrieve a saved report.
1 ♦ Select Get.
You see a list that contains your new report’s title:
An asterisk (*) marks your report to show that you can load it. This means that it was
created using the database that is currently connected. (To see the name of the database,
press MODE (F9 or CTRL-T). Press MODE again to see the program names.)
If you had created other reports with different databases (instead of the current database),
they would have no asterisk. That means you cannot load them with your current
database(s). If you created a report with an earlier version of Results, a question mark (?)
marks the report to show that Results did not save the names of the databases used to create
the reports. (If you created them with the current databases, use the Get option to retrieve
them and the Put option to save the database names with the report names.)
At this screen, you can load a report from another directory (if you have permission), load
the report you defined, or press END to cancel the Get.
To successfully copy a report format from someone else’s directory, the report must have
been created using the database you are using. If it was created using more than one
database, you must have the same databases connected in the same order.
2 ♦ Select Order Line Report to load the report you defined and saved in the previous
subsection.
The Report Info and Report Layout windows for Order Line Report appear.
3–28
A Tour Through Results
3.4.5
Adding a Math Expression
This section explains how to add a math expression to determine the cost for each order line in
a customer’s order. To do this, you define the math expression to multiply the number of units
in each order line by the cost for each unit.
1 ♦ Select Define.
Since you have already defined files you plan to work with, the screen displays a list of
options you can choose from to expand your report:
2 ♦ Select Math Expressions.
Results displays a list of operations:
You can select any of these operations to create your math expression.
3–29
Progress Results User’s Guide for UNIX
3 ♦ Select Multiply.
A window opens that lists all the numeric fields in the active files:
Results prompts you to enter the first multiplier in your math expression. In this tutorial,
you multiply the number of units on hand by the cost for each unit.
4 ♦ Select the Qty field.
The list of numeric fields you can pick appears again. The expression begins to build in
the Expression window and Results prompts you to choose the next multiplier:
3–30
A Tour Through Results
5 ♦ Select the Price from Item database field.
The Price field appears in the Expression window and Results prompts you to continue
adding to this expression:
If you select Yes, you can continue to add to the expression using any of the math
operations (Add, Subtract, Multiply, Divide, or Raise to a Power) and Results
automatically groups them with parentheses. In this tutorial, you will multiply these two
selected fields.
6 ♦ Select No.
The screen clears to the Report layout window and another window, Formats and Labels,
appears. Here you can redefine the default label and format information for the new
numeric field created by the Math Expression:
This window contains the following:
•
File—Displays as Numeric Expr, because it is a generated field (not contained in any
database file).
3–31
Progress Results User’s Guide for UNIX
•
Field—Displays the name which Results automatically assigns to the field you are
creating. This field name will be in the list with the other field names once you add
the new field.
•
Expression—Displays the math expression you just built. In this case, an ellipse
(. . .) shows that Results truncated the expression to fit it in the window.
•
Type—Displays the data type of the field. In this case, the data is in decimal format.
•
Label—Displays the default text that appears above the column in the report. In this
case it is Math Value. You can change this to a more descriptive name for your
report.
•
Format—Shows the default display format. In this case, the format is
->>>>>>>9.99.
Next, you define a new label and a new format for this field. Leave the repeating value to
the default no.
7 ♦ Type Price/Line as the new label.
8 ♦ Type >,>>>,>>9.99 as the new format:
This format means that the field can have up to seven digits to the left of the decimal and
two digits to the right. It will also display in a right-justified format. Results does the
following to the fields format:
3–32
•
The greater than symbols (>) are space holders for digits. A blank space replaces the
> if there is no digit in that position.
•
The comma (,) acts as a place holder. This character displays literally in the value.
•
The 9 is replaced by a digit from 0 to 9. A zero replaces the 9 if there is no digit in
that position. Because two 9s follow the decimal point, Results displays only two
digits after the decimal point.
A Tour Through Results
•
The decimal point marks the location of the decimal point in the field. This character
displays literally in the value.
NOTE: If Results is set to default to the European numeric format (using the European
Numeric Format (-E) startup option), numbers on your screen appear in European
numeric format. In European numeric format, a comma (,) marks the decimal
location in fields and a period point (.) acts as a place holder. For example, with
your format set for European display, the format >,>>>,>>9.99 appears as
>.>>>.>>9,99. For more information about field formats and the -E startup
option, see Appendix C, “Field Display Formats.”
9 ♦ Press GO or RETURN.
The new field appears in the Report Layout window. Note that the report layout is too wide
to display on the screen. Use the > and < keys to scroll to the left and right of the Report
Layout window to see all the field format.
The *n marker tells you that this is a numeric expression field. In this case, it is a math
expression field:
10 ♦ Run the report to your terminal.
Again, use the > and < keys to scroll left and right across the page to see all the field values.
There are a couple of things you can do to make this report easier to read and more
meaningful. You can change the label and format of some of the fields so they fit within
the screen. You can also hide repeating values so you do not see the customer name or
order number more than once.
11 ♦ Press END to return to the Report Layout window.
3–33
Progress Results User’s Guide for UNIX
3.4.6
Hiding Repeating Values and Changing Field Formats
and Labels
This section describes how to:
•
Hide repeating values so that the report displays each customer name and each order
number once.
•
Change field formats.
•
Change field labels.
You can perform the above by using the Formats and Labels option on the Settings submenu.
1 ♦ Select Settings in the Report module.
2 ♦ Select Formats and Labels.
A list of the fields in the report appears:
This list shows the field labels in order as they appear in the report. Results lists the new
field by the label you assigned to it. You can press MODE (F9) to toggle to the field names.
Remember, the labels print in the reports, so you might recognize them more easily than
the field names.
It does not matter if you select the field from this label list or the field name list. They list
the same fields, just under different names.
3 ♦ Select the Name field.
The Formats and Labels window appears.
3–34
A Tour Through Results
In the following steps, you change the label and format of the field. You also hide the
repeating values.
You can hide repeating values for most types of fields, including calculated fields. You
cannot hide repeating values for a Totals field because all the values must appear in the
report so that Results can total them.
4 ♦ Type Customer Name in the Label field.
5 ♦ Change the value of the Hide Repeating Values option to yes, then press RETURN or GO.
The list of fields reappears, and you can select another field to edit.
If the fields are listed by label, you see the field label you just changed in the list. However,
the field names do not change because they are stored in the database. You can change the
label, not the field name. The label displays on the report; the field name is the name the
field is stored under in the database. Also, the labels in the Report Layout window do not
change until you leave the option.
6 ♦ Select the Order-num field, and enter Ord!Num as its label. Also, hide its repeating values
by entering yes in the Hide Repeating Values? field.
By entering the exclamation point (!) in this label, you stack the label on two lines. When
you run this report again, Ord will be on the top line, and Num will be below it on the next
line. If you want an exclamation point to show in your label, use two exclamation points
(!!).
7 ♦ Select the Line-num field, and change its label to Line!Num.
8 ♦ Select the Price field, and change its format to >>>9.99.
3–35
Progress Results User’s Guide for UNIX
9 ♦ When the list of fields to pick appears again, press END to return to the Report Layout
window.
An ampersand (&) marks each field where you set Hide Repeating Values to yes.
10 ♦ Run this report on your terminal.
The first page of the report appears:
In this report, you do not see repeating values for the Customer Name and Order-num
fields. This makes it easier to see where the information changes for each order number
and for each customer.
11 ♦ Press END to return to the Report Layout window.
3–36
A Tour Through Results
3.4.7
Adding Break Groups, Totals, and Page Ejects
This section explains how to define totals and subtotals to show the total cost for each customer
and the total for all customers. The total line for each customer creates a break group. A break
group divides a report into sections.
To add break groups to your report, you define order criteria for the lines in the report and add
totals and subtotals. For example, in this section you show the total cost of items ordered by each
customer. You also add page ejects which force the information for each customer you start on
its own page.
To create a break group in a report, you define the order criteria first, then define subtotals for
the group. So far, the lines in Order Line Report have been in their default order (by customer
number, even though customer number is not a field in the report). Now you put them in
alphabetical order by customer name.
Changing Order of Records
Follow these steps to change the order of your records.
1 ♦ Select Order in the Reports module.
A window opens that displays all the fields you can use to order the report. You can choose
as many as five fields to order your report. All fields from the active files are available,
except array fields (you cannot order records by array fields).
2 ♦ Select the Name field from the customer file. The number 1 appears next to the field.
3 ♦ Press GO.
Now you can put the records in ascending (increasing) or descending (decreasing) order
by the field you chose:
3–37
Progress Results User’s Guide for UNIX
4 ♦ Press RETURN or GO to accept the default (ascending order).
The order definition appears in the Report Info window:
The order definition indicates that the report is ordered by the Name field in the customer
file within the mysports database. Now when you run the report, the records are in
alphabetical order by customer name.
Adding Total Lines
In this section, you add a Total Line to show the total cost for all the orders for each customer.
This Total Line creates a break group, which breaks the report into sections by customer.
Follow these steps to add a Total Line to your report:
1 ♦ Select Define in the Reports module.
2 ♦ Select Totals and Subtotals.
A list of the fields in the report appears:
You can define totals for any of these fields.
3–38
A Tour Through Results
3 ♦ You can use the MODE key to view the listing of the fields on the report by label or by
name. If you are listing fields by label, select the Price/Line field. If you are listing fields
by name, select the qbf-007 field.
The following window appears:
The Summary Line option lets you define a summary line for the Price/Line field. You can
show the total, count, minimum, maximum, and average values for the Price/Line field.
For example, if you want a summary line at the end of the report to show the total cost of
orders for all customers, change the first no under Total to yes.
Because you defined sort order on a field, you can also define totals on it. For example,
you can show the total cost for orders for each customer.
4 ♦ Change the first no under Total to yes. (This no corresponds with the Summary Line.)
This adds a total for all the reports on the summary line at the bottom of the report.
5 ♦ Change the second no under Total to yes.
NOTE: If you want to delete a total line from the report definition, access this window
again and change the yes to no.
6 ♦ Press GO to make the changes to the report.
The list of fields in the report appears again so you can define a total on another field.
3–39
Progress Results User’s Guide for UNIX
7 ♦ Press END to exit the list without defining another total.
Two total markers (t1 and t6) appear in the Report Layout window to indicate that there
are totals defined for the Price/Line field.
The t1 marker represents a total on the first order-by; the t6 marker represents a grand total
at the bottom of the report.
8 ♦ Run this report on your terminal.
The first page of the report appears:
Defining a Page Eject
You can define page ejects on any field you use to order your report. In this case, you ordered
the report only by the Customer Name field. Therefore, you can define a page eject so that
Results starts a new page each time the customer name changes.
1 ♦ Select the Settings option, then select the Page Ejects option.
The Page Ejects window appears.
3–40
A Tour Through Results
2 ♦ Select mysports.Customer.Name to create a page eject each time the customer name
changes.
3 ♦ Run the report on your terminal.
Results displays the first page of your report:
This screen shows you the total cost for each order line for each customer.
By adding the total line for each customer, you created a break group. This new layout
makes it easier to determine the total cost for each customer. Because you added the page
break, each customer appears on its own page.
4 ♦ Return to the Reports module window and use Put to save this report and overwrite the
current Order Line Report.
To do this, select Order Line Report, then press RETURN instead of entering a new
description. When Results prompts you to overwrite the report, select Yes.
3–41
Progress Results User’s Guide for UNIX
3.4.8
Adding a WHERE Clause
This section explains how to create a WHERE clause to limit the records that appear in the
report. In this example, the WHERE clause limits records in the report to customers who have
Spike Smith (SLS) or Bubba Brawn (BBB) as their sales representative, and have a current
balance of more than $1,000. Thus, the report displays the records WHERE (Sales Rep = SLS
OR Sales Rep = BBB) AND Balance > 1000.
In this type of WHERE clause, you compare field values to a constant value to get the same set
of records every time you run the report. In another type of WHERE clause, using Ask mode,
you can enter a different value to compare each time. Thus, each time you run the report, Results
prompts you for a value.
For more information about WHERE clauses with Ask mode, see Chapter 5, “Reports Module.”
For examples on how to use the Expert mode to edit or build WHERE clauses, see Chapter 4,
“Query Module.”
In this example, you build a WHERE clause in the Order Line Report in the Reports module.
1 ♦ Get the Order Line Report.
2 ♦ Select Where in the Reports module.
Because there is more than one file in the list of files, a highlight bar appears that lets you
select the file you want to use to build the WHERE clause:
3–42
A Tour Through Results
3 ♦ Select the Customer file. Several windows appear that let you build the WHERE clause.
The first window lists the fields in the customer file:
If you are an experienced user, press GET to enter the Expert mode and type in the WHERE
clause expression. In this exercise, you can let the WHERE clause builder guide you. For
details on using the Expert mode to build a WHERE clause, see the appropriate section of
Chapter 4, “Query Module.”
4 ♦ Select the Sales-rep field.
The Comparisons window contains options for building onto your WHERE clause. The
beginning of the WHERE clause appears in the Expression window:
3–43
Progress Results User’s Guide for UNIX
Notice that Sales-rep is prefixed by mysports.customer. This means that the Sales-rep
record is in the customer file in the mysports database.
Also, the Comparisons window lists all the choices you can make to character fields.
However, sometimes this list contains fewer choices depending on the field you choose.
(For example, if you chose Credit-Limit, the Comparison window would only list
comparisons you can make to numbers since Max-credit is a numeric field value).
5 ♦ Select the Equal comparison.
If you select the wrong operator by mistake, press END to return to the Comparisons
window and select a different comparison.
The screen adds an equal ( = ) symbol to the WHERE clause, and prompts you to enter a
number to compare to Sales-rep:
If you press PUT, you can enter a prompt that appears when the report runs. For example,
you can have the screen prompt for a value to compare the sales representative field.
(Anyone running the report could decide what sales representative they want the WHERE
clause to select.) For more information on this prompt, see the section “Adding a WHERE
Clause with Ask Mode” in Chapter 5, “Reports Module.”
In this tutorial, you enter a value to compare to Sales-rep.
6 ♦ Type sls and press RETURN.
Results prompts you to enter more values for sales representative:
3–44
A Tour Through Results
If you select Yes, you can add more criteria to compare with sales representative. For
example, you can build a WHERE clause that selects records for customers that have SLS
OR BBB as the sales rep. (Then the record must meet one of these requirements for Results
to include it in your report)
Because you are using the Equal comparison, Results combines the criteria automatically
with an OR operator. (If you were using the Not Equal comparison, Results would
automatically combine the criteria using AND.) The Equal and Not Equal comparisons
represent special cases in the WHERE clause builder. If you use them and enter more than
one set of values for a field, Results automatically puts the clause within parentheses.
(Results evaluates expressions inside parentheses first.)
If you select No, you can leave the WHERE clause as it is or you can build on it using other
fields and criteria.
7 ♦ Select Yes.
The WHERE clause now contains an OR:
8 ♦ Type bbb and press RETURN.
Results prompts you to enter more values for sales representative.
9 ♦ Select No.
Results prompts you to choose whether you want to enter more selection criteria.
10 ♦ Select Yes.
Results prompts you to select how to combine the first part of the WHERE clause with the
next part:
3–45
Progress Results User’s Guide for UNIX
This window illustrates an important feature of the Where option. You can combine
multiple criteria using AND or OR to build larger WHERE clauses. When you use AND,
you select the records that are true for both sets of criteria. When you use OR, you select
the records that satisfy either criteria.
For example, you can build a WHERE clause that selects records for customers that have
BBB or SLS as their sales representative and also have a current balance of more than
$1,000.
11 ♦ Select AND.
The WHERE clause now contains an AND:
Because you are using the Equal comparison, Results automatically places parentheses
around parts of the WHERE clause so you can tell how to evaluate it. For example, Results
first evaluates criteria within parentheses and finds the records that meet that criteria. Then
it compares that set of records with the remaining criteria. In this case, it finds the records
that have either of these two sales representatives. Then from that set of records Results
finds the records that also meet the next (AND) criteria. For more information about
evaluating expressions, see Appendix F, “Order of Evaluation.”
If you want to use parentheses to group expressions when you use other types of criteria
(other than Equal or Not Equal), you must define or edit the WHERE clause using Expert
Mode. For more information about Expert Mode, see Chapter 4, “Query Module.”
12 ♦ Build the following WHERE clause information: Balance
make a mistake, press END to back out of the windows.
is Greater Than 1000. If you
When you are done with building the WHERE clause, Results prompts you to enter more
selection criteria.
3–46
A Tour Through Results
13 ♦ Select No.
Results clears the screen and displays the Report Info window. The WHERE clause
appears in this window:
The entire WHERE clause is too wide to fit on the screen. (If you want to see the entire
WHERE clause, select the Info option.)
14 ♦ Run the report on your terminal.
This report appears:
The records in the report are for customers whose sales representative is Spike Smith or
Bubba Brawn and have a current balance of more than $1,000.
15 ♦ Return to the Reports module window and save this report over the old definition of the
Order Line Report.
3–47
Progress Results User’s Guide for UNIX
3.4.9
Adding a Header to a Report
Follow these steps to add a header to a report.
1 ♦ Select Settings in the Report module.
2 ♦ Select Center Header from the Settings menu.
The screen displays the following windows:
The top window contains the header layout area. It is underlined or highlighted, depending
on your terminal.You can define up to three lines for a centered header; each line can be
up to 50 characters long. The text in your report appears exactly the way you type it into
the layout area.
The bottom window lists the functions that you can include in your header. When you
include one or more functions, Results displays the values the functions represent when
you run the report. You can substitute angle brackets (< >) for the curly braces ({}) around
the functions. Also, your database administrator can edit the results.l file to change the
default symbols for the VALUE function. That way, when you use the GET key and pick
a field from the list, the default symbols automatically appear. For more information about
the VALUE function, see Appendix B, “Option Descriptions.”
3 ♦ Place your cursor on the first line of the layout area. Then type Order Line Report and
press RETURN.
4 ♦ Type Page: {PAGE} in the second line of the layout area to insert the page number
function in the header.
3–48
A Tour Through Results
5 ♦ Press GO to insert the new centered header into the Report Layout window:
6 ♦ Run this report on your terminal.
The page number automatically replaces {PAGE} when you run this report.
To make this report easier to read, you can adjust the spacing. For example, you can adjust
the spacing between the header and the body of the report.
3.4.10
Adjusting the Spacing in a Report
Follow these steps to adjust the spacing in your report.
1 ♦ Select Settings option, then the Spacing option.
This window appears:
This window displays the current settings and the default settings for the report. The
current settings are underlined or highlighted, depending on your monitor type.
3–49
Progress Results User’s Guide for UNIX
2 ♦ Type 2 in the Line spacing field to double space the body of the report. (Line spacing does
not affect the header or labels of the report.)
Your database administrator can define different default settings. For more information,
see Chapter 9, “Database Administration.”
NOTE: The Lines per page field shows the default settings and the current settings for the
number of lines per page in a report when you send it to a printer (or some other
paged device). The number of lines per page on a terminal is different. When you
send your report to your terminal, it automatically adjusts the paging according
to the size of your terminal.
3 ♦ In the Lines between header and body field, type 1 and press RETURN to define that you
want one space between the header and the body of the report.
4 ♦ Press GO to make the changes to the report.
5 ♦ Run the report on your terminal again.
This page of the report appears:
6 ♦ Return to the Reports screen and save the report over the old definition of Order Line
Report.
3–50
A Tour Through Results
3.5
Tour of the Data Export Module
Use the Data Export module to format files so you can export them to other software packages.
For example, you can format them for use in word processing packages or spreadsheets.
In this tour you learn how to use the Data Export menu features so you can export record
information in various formats. Before you leave the Data Export module at the end of any
section, save your definitions. When you want to start again, retrieve the saved definition and
pick up where you ended your session.
3.5.1
Selecting a Data Export Type
1 ♦ Select Module on the Reports menu.
The Reports Info window appears:
The list displays all the modules you can transfer out to from the Reports module.This list
is different when you select the Module option from other modules. For example, if you
select the Module option when you are in the Query module, the list includes Reports and
the other available modules.
3–51
Progress Results User’s Guide for UNIX
2 ♦ Select Data Export.
Results brings up the Data Export module:
Notice that some of the information you defined in the Report module was automatically
transferred to this module. For example, the files you selected, the WHERE clause, and
the order criteria you defined in the Reports module are now in this module. Some of the
information from the Reports module didn’t transfer over (for example, field names,
hidden repeating values, and totals and subtotals do not appear).
You can define a data export report based on the file relation information you just
transferred. In addition, you can expand or delete the default information.
For example, you can use the submenu options of the Define option to add fields, counters,
and calculated fields just as you did in the Reports module. In fact, when you select the
Define option in the Data Export module, you see all the submenu options that you see
when you select it in the Reports module, except the Totals and Subtotals option. Instead
of that option, you see the Width/Format of Fields option. (For more information about the
Width/Format of Fields option, see Chapter 7, “Data Export Module.”
In this exercise, you will change the settings to put this report in the format for Microsoft
Word.
3–52
A Tour Through Results
3 ♦ Select the Settings option.
These options appear:
This list shows all the export formats you can select. (The last item on this list is a default
option that appears when you run Results against a copy of the sports database. By default,
its name is in the language used for the initial build. Your database administrator can
change its name or functionality through the Administration module.)
4 ♦ Select Microsoft Word.
The following settings appear in the Data Export Layout window:
This window shows the default Microsoft Word settings. For example, it shows the
characters that denote the end of a record. In this case, the default is cr lf (carriage return
line feed). It also shows that the fields are surrounded by double quotes and separated by
commas.
3–53
Progress Results User’s Guide for UNIX
5 ♦ Run this definition on your terminal.
The data appears in Microsoft Word export format:
This listing is different than if you ran it in Progress format. In this format, a comma
separates the fields in each record. In Progress format, a space separates each field and the
line of headers does not appear at the top of the report.
6 ♦ Press END to return the Data Export screen.
3.5.2
Removing a WHERE Clause
This section describes how to remove a WHERE clause from your export format. Follow the
first two steps if you need to remove a WHERE clause in the Reports and Labels modules.
1 ♦ Select the Where option.
2 ♦ Select the Customer file which has the WHERE clause.
Results then displays the WHERE clause builder windows.
3 ♦ Press END to delete the WHERE clause.
When the WHERE clause builder windows disappear, so does the WHERE clause in the
Data Export Info window. Now when you run the format, you get the full set of data in the
current format.
3–54
A Tour Through Results
4 ♦ Run this report on your terminal.
The full set of customer status data appears in default Microsoft Word format:
5 ♦ Return to the Data Export screen and save the current definition under any name you like.
6 ♦ Select the Clear option. This clears the current definitions from the screen.
For more information about the Data Export module, see Chapter 7, “Data Export Module.”
3.6
The Labels Module
This section of the tour shows you how to use some of the features in the Labels module to
create mailing labels. For more information about the Labels module, see Chapter 6, “Labels
Module.”
If you save your definitions, you can leave the tour of the Labels module at the end of any
section. When you want to start again, retrieve the saved definition and start where you last
ended your session.
In this exercise, you create a mailing label and add field and text information to it. Before you
start this tour, clear the Data Export definition from the screen.
1 ♦ Select the Module option.
2 ♦ Select the Labels module from the list.
3 ♦ Select Define from the horizontal menu.
3–55
Progress Results User’s Guide for UNIX
4 ♦ Select the Customer file. Press END to end your selection.
Results prompts you to accept the automatic selection of fields for the label. If you select
No, the screen leads you through a manual selection process to pick the fields for the label.
For more information on manual selection, see Chapter 6, “Labels Module.”
5 ♦ Select Yes.
Status messages appear rapidly at the bottom of the screen as Results searches for address
information in the active file. (If it can not find the files it needs in the first file, it looks in
the other active files.) The label area expands, and the default fields appear in the Label
Layout area:
This is the default address label for the customer file when you perform the initial build in
English against the mysports database. When you perform the initial build in another
language or against your own database, you may see different fields. See Chapter 9,
“Database Administration” for details on different language versions of Results.
Results prefixes the field names with the names of the database and files that contain them.
A tilde (~) appears on line four to indicate that the information was too long to fit on the
line and appears on the next line instead. When you run this label, the field information
from line five appends to the end of line four.
As mentioned earlier, this is the default layout for a label built from the mysports file. You
can add other fields to this layout by pressing GET. Once you exit the definition window
you can get back to edit it by selecting the Define option. Also, your database
administrator can determine the field names used when generating labels automatically.
For example, instead of mailing labels, it could automatically try to create packing labels.
See Chapter 9, “Database Administration” for details on changing the default fields for
labels.
Notice that Results numbers the lines of the label layout. Your label can be up to 66 lines
long. Use your cursor keys to scroll through the window.
3–56
A Tour Through Results
6 ♦ Press GO to accept these settings.
The label area returns to its original layout:
7 ♦ Run the labels on your terminal.
Again, the tilde ( ~ ) shows that the Postal-code field belongs on the line with the City and
State fields. In some cases, an ellipsis (. . .) shows that the fields are too wide to fit in this
screen. Again, these abbreviations do not appear in your labels or affect the way the labels
print.
The following page of labels appears:
Notice that there are no blank lines for the Address2 field because the default value for
Omit Blank Lines is yes.
You can add more fields and text to this label, as well as adjust the layout and number of
times each label prints.
3–57
Progress Results User’s Guide for UNIX
8 ♦ Return to the labels screen and select the Define option, then the Fields option.
The Label Layout window becomes active again.
The label definition fields are underlined or highlighted, depending on the monitor type.
Follow these steps to insert a field a few lines below the last text line.
9 ♦ Move the cursor to line 7.
The message at the bottom of the screen indicates that you can press GET to insert fields.
10 ♦ Press GET to display a list of fields you can insert:
This list contains all of the fields in the customer file. (The database and file containing
the field are listed in parentheses.) You can add any of these fields to your label. If you
want to add more fields to a line than can fit in the Label Layout window, put the field
names on two lines and type a tilde (~) at the end of the first line. When you run the labels,
the two lines print as one.
11 ♦ Select the Contact field.
The Label Layout window appears:
Instead of just printing the contact’s name at the bottom of the label, it is a good idea to
send it to the attention of the contact. (For example, “Attn: Jane Smith.”)
3–58
A Tour Through Results
3.6.1
Adding Text to a Label
Follow these steps to add text to a label layout.
1 ♦ Move the cursor to the first curly brace ( { ) in line 7.
2 ♦ Press MODE to toggle to the Insert mode, so that you will not type over existing
information.
The Insert mode indicator appears in the lower-right corner of the screen. Note that there
is no mode indicator for the Overstrike mode:
3 ♦ Type Attn: followed by two spaces, then press GO to insert the changes into the label
layout.
This places Attn: before the contact’s name on the label:
3–59
Progress Results User’s Guide for UNIX
4 ♦ Run the labels on your terminal.
The following labels appear on your screen:
You can add as much text to the labels as you want. Just be sure that you leave enough
room on each line for the field information. Text does not wrap onto the next line if you
include a field with a long format on a line with text.
Notice that even though you set the Omit Blank Lines option to yes, Results did not
remove the blank line between the address and the contact’s name. That is because that
option does not affect any blank lines you leave in the layout. It only omits lines where all
the field information for the line is missing. For example, it omits the line reserved for
Address2 information when the line is blank.
5 ♦ Return to the label creation screen when you finish examining the labels.
Suppose you want to print two copies of each label and print labels two across. The next section
describes how to do this.
3–60
A Tour Through Results
3.6.2
Adjusting Settings
This section describes how to print two copies of each label two across and omit blank lines
within each label through the Settings option.
1 ♦ Select the Settings option.
The fields you can adjust using the Settings option are highlighted (or underlined,
depending on your monitor):
In this tutorial, you adjust the Text to Text Spacing, the Copies of each, and the Number
of Labels Across. You leave the default setting as yes in the Omit Blank Lines field.
2 ♦ Press RETURN to accept the default setting for Omit Blank Lines.
3 ♦ Type 2 in the Copies of each field and press RETURN.
4 ♦ Type 40 in the Text to Text Spacing field.
This allows 40 spaces or characters from left to right on each label. Set the Text to Text
Spacing value wide enough for the number of labels you want to print across, otherwise
the next label across prints on top of the first label, instead of in the column next to it.
5 ♦ Type 2 in the Number of Labels Across option to specify that you want two columns of
labels.
3–61
Progress Results User’s Guide for UNIX
6 ♦ Press GO to accept the settings.
7 ♦ Run the labels on your terminal.
The following labels appear on your screen:
8 ♦ Return to the label creation screen when you are done looking at the labels.
9 ♦ Save this as a new label program called Customer Labels.
10 ♦ Select Exit to return to Results Main Menu.
For more information about the Labels module, see Chapter 6, “Labels Module.”
3–62
A Tour Through Results
3.7
Stopping Results
The following steps describe how to exit from Results to the Progress editor or to your operating
system.
1 ♦ Select Exit from the horizontal menu of any user module.
2 ♦ At the Results Main Menu, select Exit to return to the Progress editor or to your operating
system (depending on where you started Results).
This message appears:
3 ♦ Select Yes.
4 ♦ An option in the Administration module determines whether you exit to the Progress
Editor or quit to your operating system.
If you exit to the Progress Editor, you can use the editor to restart Results or exit to the
operating system.
5 ♦ Type quit and press GO to leave Progress and exit to your operating system.
6 ♦ If you want to restart Results from inside the Progress Procedure Editor enter this
command:
RUN results.p
7 ♦ Press GO.
3.8
Summary
This chapter provided a tour through Results and showed you how to use many of the features
in the Query, Reports, Labels, and Data Export modules. Some of the features in one module
appear in one or more of the other modules. For more information about these modules, see
Chapter 4, “Query Module,” Chapter 5, “Reports Module,” Chapter 6, “Labels Module,” and
Chapter 7, “Data Export Module.”
3–63
Progress Results User’s Guide for UNIX
3–64
4
Query Module
In Chapter 3, “A Tour Through Results,” you learned some basics of the Query module.
Specifically, you learned how to query and modify a database. This chapter provides more
information about the tasks you can perform in the Query module.
The following topics are discussed:
•
Menu options in the Query module.
•
Updating records and copying records.
•
Switching to other forms.
•
Using the Query option to select a subset of the records in a file.
•
Using the Where option to select a subset of the records in a file. Also, how to use Expert
Mode to build and edit WHERE clauses.
•
Displaying file relation information with the Info option.
•
Transferring to another module without returning to the Main Menu with the Module
option.
•
Displaying the number of records in a full set or subset of records with the Total option.
•
Changing the order that records appear in the window with the Order option.
Progress Results User’s Guide for UNIX
NOTE:
Several of the Query module options are described in the tour in Chapter 3, “A Tour
Through Results,” and they are not described in this chapter. The steps in this chapter
build upon what you learned in the tour of Results. You should complete or review
the tour before continuing with this chapter.
This chapter assumes that the Query module is available in your Results package. If it is not, see
your database administrator. For information on how to control permissions and options in the
Query module, see Chapter 9, “Database Administration.”
4–2
Query Module
4.1
Introduction
The Query module allows you to examine the contents of your Progress files, and any related
data, through a series of menu options. It also provides two options that let you select subsets of
records: the Query option and the Where option. The Query option enables you to enter as much
information as you want into a blank record, then it finds all the records that fit the criteria you
entered. Results automatically combines the selection criteria you enter with the AND operator.
For example, you can use the Query option to:
•
Find all customers in Massachusetts.
•
Find all customers who have a customer number greater than 10 AND credit limit greater
than $1,000.
The Where option enables you to build WHERE clauses to select record subsets. You can build
WHERE clauses for any type of selection; that is, you can combine selection criteria using the
AND or OR operator. For example, you can build WHERE clauses that:
•
Find all customers in Connecticut, New Hampshire, or Massachusetts that have credit
limits greater than $1,000.
Each query form can be generated automatically for all fields in a file, or generated from a
user-selected subset of the fields within a file.
When you select the Query module from the Main Menu, Results displays a list of forms that
you can work with. Press MODE to toggle between descriptions, filenames, and programs. You
can select forms from any of these lists. Once you select a form, for example, Customer
information, the first record in that file appears, as shown in Figure 4–1.
Figure 4–1:
Layout of the Query Window
4–3
Progress Results User’s Guide for UNIX
This window has several features. First, it displays record information, and the header at the top
of the query form describes the set of records you can examine. In this case, it is the full set of
customer records in the mysports database. Similarly, when you use the Browse option, you see
the full set of customer records. When you start the Query module or select a new form using
the View option, you always begin working with a full set of forms. When you use the Where
or Query options to select a subset of records, you begin working with a subset of forms and the
window header changes to Subset.
The window also shows horizontal menu options that let you work with other records in the
active file. A message at the bottom of the window describes the function of the option that you
have highlighted on the horizontal menu. The following sections describe the menu and other
Query options in more detail.
4.2
Query Module Main Menu
A horizontal menu appears at the top of each window throughout your query process as shown
in Figure 4–2.
Figure 4–2:
Query Module Main Menu
In some cases you see a subset of these options. For example, you might only see the options
you can pick when there is a subset of information in the current form.
Table 4–1 provides a brief description of each option in the Query module. For complete
descriptions, see Appendix B, “Option Descriptions.” If you do not have all the options listed
here, see your database administrator.
Table 4–1:
Query Module Main Menu Options
Menu Option
4–4
(1 of 4)
Description
Next
Finds the next record in the file or subset according to the current
active index and selection criteria. For example, if the records are
in order by customer number, the customer number is the current
index. In that case, Next finds the record with the next highest
customer number. If you are in a subset of a file, Next finds the
next record in the subset. (Use the Order option to change the way
the forms are ordered.)
Prev
Finds the previous record in a file or subset.
Query Module
Table 4–1:
Query Module Main Menu Options
Menu Option
(2 of 4)
Description
First
Finds the first record in a file or subset.
Last
Finds the last record in a file or subset.
Add1
Adds a new record to the file using the current form (if you have
permission). For example, you can add a new customer record if
the customer form is on your display. If you select this option
when you have two or more files joined, the Add window
provides default information that you can keep or modify.
Update1
Updates the currently displayed record (if you have permission).
For example, Update enables you to change the address for a
customer who has moved.
Copy1
Copies the currently displayed record to a new record (if you
have permission). Lets you copy the record displayed in the
window to create a new record, and then update the new record’s
contents.
Delete1
Deletes the currently displayed record (if you have permission).
View
Selects another query form to view. For example, if you are
looking at customer records, you can use View to select a
different kind of form to look at, such as sales order records.
Browse
Browses through a list of key field values in an overlay window.
This helps you find and select a record. To temporarily add other
fields to the browse list, press GET.
Join
Joins a related file and enables you to query the records related to
the active record. For example, you can join an order file to a
customer file to see the order records for a particular customer.
See Chapter 9, “Database Administration,” for details on how to
establish join relationships.
4–5
Progress Results User’s Guide for UNIX
Table 4–1:
Query Module Main Menu Options
Menu Option
Query
(3 of 4)
Description
Queries the current file using a query-by-example interface so
you can select a subset of the records that appear in the current
form.
In a query-by-example interface, you enter selection criteria into
an empty form. When the blank form appears, you can enter an
operator (for example, use > for greater than, >= for greater than
or equal to) and then the value for the query.
For example, when you are looking at a customer record form,
you can query on a customer number greater than 10. You can
also enter criteria on multiple fields; multiple criteria, are
automatically combined using AND. For example, a multiple
criteria could be: customer number is less than 10 AND state
equals Arizona.
4–6
Where
Builds a WHERE clause enabling you to select a subset of
records using selection criteria that is slightly more complex than
what you can specify with the Query option. For example, with
the Where option you can select a subset of records from the
customer file where the customer number is less than 10 or
greater than 40 and the unpaid balance is less than $100.
The Where option in this module works the same way as it does
in the Labels and Data Export modules, except that you do not
have to pick an active file and there is no Ask mode. For a
complete description of this option, see Appendix B, “Option
Descriptions.”
Total
Displays the total number of records available in the current
working file or subset. For example, if you are looking at order
records, you can use this option to tell you how many order
records there are. It may take a few moments before the total
appears at the bottom of the window if the file is large.
Order
Reorders the data in the current form using the ordering sequence
dictated by another Progress index. When you choose this option,
a list appears of all the fields (indexes) that you can use to reorder
the data in the active query form. For example, if customer
records are in order by customer number, you can change them to
be in order by zip code.
Query Module
Table 4–1:
Query Module Main Menu Options
Menu Option
(4 of 4)
Description
Module
Switches to any other Results module (except Data
Administration) without going back to the Main Menu. You can
also transport file, field, and WHERE clause criteria information
to other modules. For example, suppose you build a query to
select all customers in the West sales region. Then you decide
you want to print a report using that information. You use the
Module option to take the WHERE criteria over to the Report
module, then run a report based on the criteria. This saves time
because you do not have to rebuild the WHERE clause.
Info
Displays the database name, file name, any selection criteria you
used to define the current working set (or subset) of data, as well
as order definition for the records. For example, you may have
selected the Where option to define a subset of customer data, and
put the records in order by zip code. This option displays that
information.
User
Transfers to a customized option. This option is hidden by
default; you see it only if an application developer has included
an option program to perform an action. If you have this option,
see supplemental documentation provided by the application
developer that describes this function.
Exit
Exits the previous level. For example, you can exit from a subset
of records to the full set. From the full set of records, you can then
exit to the Results Main Menu.
1
These options are enabled for the mysports database so that you can try them. When you run Results against your
own Progress-supported database, these options might not appear on the menu. They are only included if your
database administrator has enabled them.
4–7
Progress Results User’s Guide for UNIX
4.3
Query Features
Chapter 3, “A Tour Through Results” gives you basic information for querying and modifying
a database. This chapter describes more features and options in the Query module.
If you have the Update and Copy options on your horizontal menu, continue with the next
section. If not, skip to the “Switching to Other Forms” section.
4.3.1
Updating a Record
Follow these steps to update records in a file.
1 ♦ Select the Update option. Depending on your monitor type, this highlights all of the fields
that you can update in the current record.
2 ♦ Update the fields you want to change.
3 ♦ Press GO to store the changes to the record in the database, or END to cancel any changes
mode.
4.3.2
Copying a Record
Follow these steps to copy a record.
1 ♦ Select the Copy option. This highlights all the fields in the current form. To make the new
record unique, change the value in the primary index field. If you do not change that
information, Results displays a message indicating that a record already exists with that
value.
2 ♦ Press GO when you finish entering information in all of the fields you want to change.
4.3.3
Switching to Other Forms
To switch to a different set of records in another Query form:
1 ♦ Select the View option.
A window of query forms that you can select to view appears. This list of query forms can
be listed by description, filename, or program name.
2 ♦ Select the form you want to view.
For example, you can switch from the customer form to the state form. A window with the
first record in that form appears.
4–8
Query Module
4.3.4
Querying for Records
This section describes how to use the Query option to generate a subset of records from a file.
This option lets you quickly build simple WHERE clauses, called queries, where you compare
one value for each field, and each comparison is joined by AND. (With the Where option, you
build WHERE clauses that can compare many values to one field, and you join comparisons
using AND or OR.)
For example, you can perform queries to select subsets of records:
•
Customers in California. In WHERE clauses, this means WHERE State = CA.
When you use the Query option, a record must meet each criteria for it to be in the subset.
Follow these steps to use the Query option to generate a subset of records from a file:
1 ♦ Select the Query option.
A form appears where there are no field values. The comparison line shows the
comparison for the field that has the cursor next to it.
In this example, the comparison line shows the default comparison for Cust-Num Equals
whatever value you enter. You can change the comparison by entering one of the symbols
in Table 4–2.
Table 4–2:
List of Comparison Operators
Symbol
(1 of 2)
Comparison Meaning
=
Equals, or begins (for character)
>
Greater than
<
Less than
<=
Less than or equal to
#
Not equal to
&
Begins (character only)
4–9
Progress Results User’s Guide for UNIX
Table 4–2:
Symbol
List of Comparison Operators
(2 of 2)
Comparison Meaning
?
Matches pattern (character only) (*= matches any number of
characters, .= matches any one character)
~
Next character entered literally
Use a tilde (~) when you want Results to interpret a comparison symbol as a character. For
example, use this symbol if you want to query for a customer with the name “Jack & Jill”.
Since the system usually interprets the ampersand (&) as meaning “Begins with”, enter the
tilde before the ampersand so Results interprets the ampersand as a character, not an
operator. In this example, you would type: Jack ~& Jill.
2 ♦ Press HELP to display a list similar to Table 4–2 on your screen, then press END or INSERT
LINE to clear it from your screen.
3 ♦ Move the cursor to the field you want to query. For example, if you want to find customers
whose names begin with b, move the cursor to the Name field and enter b.
The comparison line updates to the following.
If you want to reset all the Query criteria and start again, press INSERT LINE to remove all
the existing criteria, then enter the new criteria you want.
4 ♦ Enter the comparison operator you want, depending on the value you want to query. For
example, if you want to query for customer numbers greater than 25, type the greater than
(>) operator in the Cust-Num field.
The comparison line changes to include the operator you enter.
5 ♦ Enter the value you want to compare the field to and press RETURN.
Press GO to get the subset of records that are true for this comparison, or add a comparison
for another field. In this example, you add an additional comparison.
4–10
Query Module
6 ♦ Press RETURN until the cursor is in the field you want to add to the query.
When the cursor is in the correct field, use the default comparison (equals) or change it.
7 ♦ Type the value you want to compare with the field. You can continue to build the criteria,
or you can press GO to get the subset of records that meet the current criteria.
The first record that meets the criteria appears in a subset form. For example, if you query
for customers where the customer’s state equals Massachusetts and the customer number
is greater than 10, you would see this window.
The title at the top of the customer form tells you that this is a subset of the customer file.
Thus, when you do a browse of this set, you see the subset of records that meet the criteria.
In this case, you see the customers where customer number is greater than 10 and state
equals Massachusetts.
4.3.5
Using Expert Mode in WHERE Clauses
Unlike the Query option, the Where option lets you define more than one set of criteria for the
same field. That is, you can get a set of records that have a customer number less than 10 or
greater than 40.
This section provides guidelines for using Expert mode to build and edit WHERE clauses. If
you are an experienced Progress programmer, you might prefer to build WHERE clauses using
Expert mode. In Expert mode you enter selection criteria directly without having to go through
the set of selection lists. It also enables you to change the default order of evaluation by grouping
comparisons with parentheses. (For information about evaluating expressions, see Appendix F,
“Order of Evaluation.”)
You can use Expert mode to build or edit WHERE clauses in the Query, Reports, Data Exports,
and Labels modules. However, do not use Expert mode to define or edit WHERE clauses that
use Ask mode. For example, if you edit a WHERE clause that uses Ask mode, error messages
appear in the Expression window and you cannot continue without deleting the WHERE clause
or returning the WHERE clause to its original condition.
You can access Expert mode from anywhere within the WHERE clause builder windows by
pressing GET. If you want to edit an existing WHERE clause, you must enter Expert mode from
4–11
Progress Results User’s Guide for UNIX
the Choose a Field window. Otherwise, you overwrite the existing WHERE clause when you
start to build a new clause using the selection windows.
To use Expert mode to define or edit a WHERE clause, follow these steps:
1 ♦ Select the Where option from the Query Main Menu.
The windows that help you to build the WHERE clause appears. If you already have a
WHERE clause defined, it appears in the Expression window. You use Expert mode to
edit the WHERE clause. (You can also delete the WHERE clause or define a new WHERE
clause to override the existing one. For a description of how to delete a WHERE clause,
see Chapter 3, “A Tour Through Results” for instructions on how to overwrite one, simply
define a new WHERE clause.)
2 ♦ Press GET to access Expert mode.
The cursor jumps to the Expression window, to let you bypass the other windows and enter
a WHERE clause directly. For example, the following figure shows a previously defined
WHERE clause.
Now you can type or edit the WHERE clause criteria you want. You can add a field
without typing it in by pressing GET and selecting it from the list of available fields that
appears.
3 ♦ Press MODE to toggle to the Insert mode, so that you do not type over existing information.
4–12
Query Module
4 ♦ Edit the existing WHERE clause, or enter the one you want.
Results automatically enters the word WHERE in the clauses. If you enter it yourself, you
will get error messages in the Expert mode window when you try to run the WHERE
clause. You do not have to capitalize the field names or the operators, but you must prefix
each field name with the name of the database and file that contains it. (You do not have
to include the database name unless you started Results with more than one database. If
you did, specify the database that contains the field you enter. For more information about
using Results with multiple databases, see Chapter 8, “Multiple Databases with Results.”)
•
Press GET to access Expert Mode from anywhere within the WHERE clause builder
windows. Expert mode also lets you change the default order of evaluation by
grouping comparisons with parentheses.
You can use any Progress function in this clause. For example, you can define the
following WHERE clauses:
•
With only the customer file selected, enter this clause to select all customers without
orders.
NOT CAN-FIND(FIRST order OF customer)
•
With only the customer file selected, enter the following clause to select all
customers in New England:
LOOKUP(customer.st,"ME,NH,VT,RI,CT,MA") > 0
For information about Progress functions, see the Progress Language Reference manual.
For information about evaluating expressions, see Appendix F, “Order of Evaluation,” in
this manual.
5 ♦ Press GO to apply the WHERE clause.
If you try to run an invalid WHERE clause, you get an error message and the cursor returns
to the Expert Mode window. If you get an error message, edit the WHERE clause in the
window using the correct format. Because each line of the error messages begins with two
asterisks (**), Results ignores them when you run the edited WHERE clause. Therefore,
you do not have to delete them.
4–13
Progress Results User’s Guide for UNIX
4.3.6
Getting Information About the Current Set of Records
This section describes how to use the Info option on the Query menu to display information
about a file, relation, and WHERE clause criteria. For example, the Info option enables you to
recall the criteria you used to select the current set (or subset) of records.
Follow these steps to display the information for a previously defined WHERE clause.
1 ♦ Select the Info option.
A window listing file relations appears on the display. The following example shows the
type of information you might see when you have a WHERE clause defined and two files
are joined:
In this case, the window shows that there is a WHERE clause defined on the first file, and
the first file is joined to another file.
2 ♦ Press END to return to the Query window.
4.3.7
Moving to Another Module
This section describes how to use the Module option to move from one module to another within
Results. In the process, you transfer any query criteria, WHERE clause criteria, and join
information that you have already defined to the module you selected.
1 ♦ Select the Module option.
The list of modules to which you can transfer your query criteria appears:
4–14
Query Module
The list is different when you select the Module option from other modules. For example,
if you select the Module option when you are using the Reports module, the list does not
include reports. Instead, it includes Query and the other available modules.
2 ♦ The Reports module is already highlighted. Press RETURN to select it.
Notice that some of the information defined in the Query module has been transferred to
this module. For example, the file selection and WHERE clause defined in the Query
module are now in this module.
You can base a report on the file relation information that you just transferred to the
Reports module, or expand the report, or delete the default information. (For information
about creating reports, see Chapter 3, “A Tour Through Results” and Chapter 5, “Reports
Module.”)
4.3.8
Finding the Total Number of Records in a File
The Total option quickly counts the records in a full set or subset of records.
Simply select the Total option. A message appears at the bottom of the window.
This message tells you how many records there are in the current form. If you are looking at a
subset of records, it tells you how many records are in the subset.
4–15
Progress Results User’s Guide for UNIX
4.3.9
Changing the Order of Records
This section describes how to use the Order option to change the order of the records in the list.
For example, in the mysports database, customer records are usually in order by customer
number. To put the records in order according to another index field, follow these steps:
1 ♦ Select the Order option.
A window appears listing the possible indexes for the active file. For example, the
following figure shows the indexes for the customer file.
The fields in the window are the fields you can use to order the records. The fields listed
in parentheses are the fields that make up each index. The Country-Post index is made up
of two fields, Country and Postal-Code. Results orders the records by country and then by
postal codes. For information on defining indexes, see Chapter 9, “Database
Administration.”
2 ♦ Select the Country-Post index.
The window still shows the same record.
3 ♦ Select the Browse option.
The window displays the records ordered by country then by postal codes. You can use ↑
and ↓ to scroll up and down to look at other records.
4–16
Query Module
4.3.10
The User Option
If your horizontal menu contains a User option, it was added to Results by an application
developer. If User is on your menu, see information provided by the application developer for
details.
4.4
Summary
This chapter described how to use some of the features in the Query module to examine
database information. It supplements the Query module information described in Chapter 3, “A
Tour Through Results.” In this chapter you learned how to update and copy records, select sets
of records, and change the order of records.
4–17
Progress Results User’s Guide for UNIX
4–18
5
Reports Module
This chapter describes the features in the Reports module. It provides information on:
•
Menu options in the Reports module.
•
Markers that appear in the Report Layout window when you apply different features to
your reports.
•
Performing various report tasks, including:
•
–
Adding and deleting fields (including array fields) in reports.
–
Adding titles to reports and adjusting spacing.
–
Reordering records in reports and adding calculated fields.
–
Displaying information about the current report.
–
Adding a WHERE clause with Ask mode.
–
Creating Totals Only reports.
Deleting saved reports.
Progress Results User’s Guide for UNIX
NOTE:
Several of the Reports module options are described in Chapter 3, “A Tour Through
Results,” and are not described in this chapter. The steps in this chapter build upon
what you learned in Chapter 3. You should complete or review the tour before
continuing with this chapter.
This chapter assumes that the Reports module is available in your Results package. If it is not,
see your database administrator.
5–2
Reports Module
5.1
Introduction
Use the Reports module to quickly create single-section reports. Reports can consist of data
from one or more Atlas database files, as well as calculated values and totals.
Once you define a report, you can display it on your screen, send it to a printer, or send it to an
operating system file. If you attempt to load an existing report whose file structures have been
modified since the last time you ran the report, the Reports module notifies you and adjusts the
report as best it can. You can also modify your report layout through menu choices. You have
complete control over headers, footers, labels, and spacing.
The Reports module window is divided into three sections: horizontal menu, information
window, and layout window. The next section describes the options on the horizontal menu.
5.2
Reports Module Main Menu
Horizontal menu options appear at the top of each window throughout your reports process, as
shown in Figure 5–1.
Figure 5–1:
Horizontal Menu for the Reports Module
In some cases you see a subset of these options. For example, you only see the options that are
available when you do not have any files defined for a report in the Report Info window.
The following list provides brief descriptions of all the options and submenu options available
in the Reports module. For complete descriptions, see Appendix B, “Option Descriptions.” If
you do not have all of the options listed here, see your database administrator.
Get
Retrieves an existing report definition into the Reports writer. You can get a report
definition you have defined, or if you have permission, you can get a copy of a report
definition from someone else’s directory.
Put
Saves an existing file definition under a descriptive name.
Run
Runs the report as it is currently laid out in the Report Layout window. You can preview
the report on the screen, print it to a file, or route it directly to a printer.
5–3
Progress Results User’s Guide for UNIX
Define
Defines files and fields to include in the report.
Settings
Controls general report settings, such as headers and spacing. Settings has these options:
5–4
•
Formats and Labels
Changes field labels and formats for any field or defined column in the current report.
This option also enables you to hide repeating values for fields, including calculated
fields. However, you cannot hide repeating values for a Total field since all the
values must appear in the report for Results to total them.
•
Page Ejects
Starts a new page (inserts page breaks) for each new section of a report. For example,
you can use page eject to start a new page each time the customer name changes in
your report. Select the Page Ejects option and define a page eject on the Name field.
You can only define page ejects on fields you use in an order definition. Therefore,
you must define order criteria before you use this option to create page ejects.
•
Totals Only Report
Summarizes the report so it displays only summary information about groups of
records.
•
Formats and Labels
Changes field labels and formats for any field or defined column in the current report.
This option also enables you to hide repeating values for fields, including calculated
fields. However, you cannot hide repeating values for a Total field since all the
values must appear in the report for Results to total them.
•
Page Ejects
Starts a new page (inserts page breaks) for each new section of a report. For example,
you can use page eject to start a new page each time the customer name changes in
your report. Select the Page Ejects option and define a page eject on the Name field.
You can only define page ejects on fields you use in an order definition. Therefore,
you must define order criteria before you use this option to create page ejects.
•
Totals Only Report
Summarizes the report so it displays only summary information about groups of
records.
Reports Module
For example, if you create a report that lists customer records and puts the records in
order by sales region, you can define this report as a Totals Only Report that shows
a summary of sales regions. Thus, the report shows one line of information for each
sales region, and the line contains the total of all the record information in the region.
A dollar sign ($) marks the summary fields.
To use this option, you must have an order definition for the report. Once you enable
the Totals Only Report option, you pick the fields you want to summarize. When you
summarize character, date, or logical fields, the system counts them. For all fields
that are not summarized (not marked or Totals Only), the last record in that group
appears.
•
Spacing
Specifies spacing for the report. This option enables you to spread out information to
make it more readable.
This option enables you to set the following values:
—The width (in spaces) of the left margin.
—The number of spaces to insert between columns.
—The line to start on.
—The number of lines to allow on each page.
—The type of line spacing to use (in whole numbers).
—The number of lines to leave between the header and the body of the report.
—The number of lines to leave between the body of the report and the footer.
•
Left Header
Defines up to three lines of left header information. A header is text, function, and
field information that forms a title at the top of each page on a report.
•
Center Header
Specifies up to three lines of centered header information.
•
Right Header
Defines up to three lines of right header information.
5–5
Progress Results User’s Guide for UNIX
•
Left Footer
Specifies up to three lines of left footer information. A footer is text, such as a page
number, that appears at the bottom of the page on a report.
•
Center Footer
Inserts up to three lines of centered footer information. You can insert the same
values as in the Left Header option.
•
Right Footer
Inserts up to three lines of right footer information. You can insert the same values
as in the Left Header option.
NOTE: The special functions you can use in headers and footers are described in
Appendix B “Option Description.” Also, when you define three types of headers
(or footers) for a report, they print differently depending on the available header
space. If there is enough room to fit all three values across, they print three across.
Otherwise, the center header prints first, then the left and right headers appear on
the next two lines.
•
First-page-only Header
Defines a centered header that appears only on the first page of the report. If you have
defined another type of header, the first-page-only header appears after it. The
first-page-only header does not appear in the Report Layout window, but does appear
when you print or display the report.
•
Last-page-only Footer
Defines a centered footer that appears only on the last page of the report. If you have
defined another type of footer, the last-page-only footer appears before it on the last
page of the report. The last-page-only footer does not appear in the Report Layout
window, but does appear when you print or display the report.
Where
Builds a WHERE clause enabling you to select a subset of records based on specific
criteria. For example, you can select records where sales region equals central or east.
5–6
Reports Module
Order
Orders the information in the report by up to five fields. For example, you can define the
records to print in order by sales region and by customer number within each sales region.
You can use this option in conjunction with the Totals and Subtotals option to create totals
for break groups (sections). For example, if you order customer records by region, you can
provide a total line for each region. This total line divides the records for each region.
Clear
Clears the settings in the information and layout windows. Or, if there are no files or fields
defined in the report, Results displays a list of defined reports. You can delete as many
reports as you want.
Info
Displays more information about the current active report, such as the names of the current
active files, how they are related, and any WHERE clauses and order criteria defined for
the active report. It might also display the name of the report (if it has been saved), and
how long it took to run the report the last time (if it has been run).
User
Transfers to a customized option. You only see this option if an application developer has
included an option program to perform a task. If you have this option, see the
documentation provided by the application developer.
Module
Switches to any other Results module (except Data Administration) without returning to
the Main Menu.
5–7
Progress Results User’s Guide for UNIX
5.3
Report Markers
When you create reports, the fields you select appear in the Report Layout Window. Sometimes
Results puts markers under fields to indicate the features and types of fields you select for your
reports. For example, a *d marker below a field indicates that it is a date field. Use Table 5–1
as a reference when you create reports.
Table 5–1:
Report Layout Markers
Marker
*en
1
5–8
Identifies
Stacked (vertical) array, where n is the extent of the array
$
Summary field (used in Totals Only reports)
&
Hide repeating values field
*s
String expression field
*n
Numeric expression field
*c
Counter field
*p
Percent of total field
*r
Running total field
*d
Date field
tn
Total1
an
Average1
nn
Minimum1
xn
Maximum1
cn
Count1
In these markers, n is a number between 1 and 6 representing the level of the total (or subtotal). For example, a
1 represents a total on the first order-by, and a 6 represents a grand total at the bottom (summary) line.
Reports Module
A field can have as many of these symbols as you define for it, but they cannot all appear in the
Report Layout window. You only see the number of symbols that fit within the width of the
field. For example, a field could have 11 of the symbols defined for it and have a format that is
5 characters wide. In that case, you only see the first 5 symbols. The other symbols exist for the
field, but you do not see them.
5.4
Report Features
The tour of Results in Chapter 3, “A Tour Through Results,” gives you basic information for
creating Reports. For example, it describes how to define files and fields in reports. This chapter
describes more features and options in the Reports module.
5.4.1
Adding Fields to a Report
You should have the report you want to edit laid out in the window. Follow these steps:
1 ♦ Select the Get option to retrieve the report you want to edit.
2 ♦ Select the Define option.
Because you have already defined files in your report, the window displays the following
list of options:
F.
A.
T.
R.
P.
C.
M.
S.
N.
D.
Fields
Active Files
Totals and Subtotals
Running Total
Percent of Total
Counters
Math Expressions (+-*/)
String Expressions
Numeric Expressions
Date Expressions
3 ♦ Select the Fields option.
The list of fields reappears; the fields already in the report are still marked.
4 ♦ Highlight the field you want to add to the report.
5–9
Progress Results User’s Guide for UNIX
5 ♦ Press RETURN if you want the new field to be the last field in the report. Otherwise, type
the number that corresponds to the position where you want the field.
For example, if you want it to be the second field in the report, type a 2 next to it and press
RETURN. (If you typed the first letter of the field to highlight it, you have to select it, then
change its order number.) The number appears next to the field and the other selected
fields renumber automatically.
6 ♦ Add any other fields that you want to the report. When you are done, press GO.
The fields appear in the Report Layout window.
5.4.2
Deleting Fields from a Report
This section describes how to delete a field from an existing report. To follow these steps, you
should have the report you want to edit laid out in the window.
1 ♦ Select the Define option.
Because there are files already selected for the report you are working with, Results
displays a list of options you can choose.
2 ♦ Select the Fields option.
A scrolling list of fields reappear; the fields in the report are still marked.
3 ♦ Use your arrow keys to highlight the field you want to remove from the report and press
RETURN.
The number next to the field disappears and the remaining fields renumber automatically.
4 ♦ Delete any other fields that you want. When you are done, press GO.
5.4.3
Defining Array Fields for Reports
There is a special type of field you can define in your reports, called an array field. An array
field contains several elements of information within one field. Each element shares the same
field name and characteristics (length, type, etc.). In Results, array fields are followed by
brackets ([ ]). In this example, the Mnth-Quota[ ] field is an array field. This field contains the
sales information for each month in a year (months 1-12).
If you select an array for your report, Results can display the information in a stacked vertical
format or spread out horizontal format.
5–10
Reports Module
For example, if you select the Mnth-Quota[ ] field from the Salesrep file, this window appears:
The window indicates how you can stack your information or spread it out. If the array contains
text, you probably want to leave this line blank and press RETURN. This lets Results display the
information under the column header as a paragraph in your report.
However, the Mnth-Quota[ ] field contains information you want to display spread out. Enter
the number of each month you want on your report, separated with commas. For example, if you
want the monthly sales information for January through June, you would enter 1 through 6 with
commas, as shown in this figure.
This lets Results display those months next to each other in separate columns
(for example Mnth-Quota[1], Mnth-Quota[2], Mnth-Quota[3], etc.). However, you might want
to change the labels of the columns to give them more meaning. For example, you might want
to change the label for Mnth-Quota[1] to January. To do this, select the Formats and Labels
option under the Settings option. See the “Hiding Repeating Values and Changing Field
Formats and Labels” section in Chapter 3, “A Tour Through Results” for more information on
changing column labels.
5–11
Progress Results User’s Guide for UNIX
5.4.4
Adding a Header or Footer to a Report
To add a header or footer to a report, there must be an active report in the layout windows.
1 ♦ Select the Settings option. A list of setting options appears.
There are four types of headers and four types of footers you can add to your report. For
more information about each of them, see Appendix B, “Option Descriptions.”
2 ♦ Select the option for the type of header or footer you want to add.
The windows for defining each type of header or footer are similar:
The top window contains the header (or footer) layout area. You can define up to three
lines for a header or footer; each line can be up to 50 characters long. The text you enter
will display in your report exactly as you type it in the layout area.
The bottom window lists the functions that you can include in your header. When you
include a function, the values it represents replaces the function name when you run the
report. For example, you can add a function to count the records listed in the report, or to
show today’s date, or to display your user name. You can substitute angle brackets (< >)
for the curly braces ({}) around the functions.
5–12
Reports Module
Your database administrator can edit the results.l file to change the default symbols for
the VALUE option so that, when you press GET to select a field from the list, the default
symbols automatically appear. For more information about the functions, see descriptions
in Appendix B, “Option Descriptions.”
3 ♦ Type any text and add any functions you want to appear in the header or footer.
For example, you can type Page: {PAGE} to insert the page number function in the
header.
4 ♦ Press GO to insert the new header or footer in the Report Layout window, or press END to
cancel your changes.
The header (or footer) appears in the Report Layout window.
NOTE: First-page-only headers and last-page-only footers do not appear in the Report
Layout window. However, they appear when you run the report.
When you define three types of headers (or footers) for a report, they print differently
depending on the available header space. If there is enough room to fit all three values
across, they print three across. Otherwise, the center header prints first, then the left and
right headers appear on the next two lines.
5–13
Progress Results User’s Guide for UNIX
5.4.5
Adjusting Spacing in a Report
This section describes how to adjust spacing in your report. For example, you can use the
Spacing options to adjust the left margin, change the line spacing within the report, and
determine the number of lines between the header and body of the report.
1 ♦ Select the Settings option, then select the Spacing option.
The following window appears:
This window displays the current and default settings for reports. It also enables you to
adjust spacing within your report. For example, it enables you to set the number of
character spaces for the left margin and between each column. (Your database
administrator can define different default settings. For more information, see Chapter 9,
“Database Administration.”)
2 ♦ Move the cursor to the field you want to change.
3 ♦ Type the new value in the field.
For example, if you want to leave three spaces between each column of the report, enter 3
in the Spaces between columns field.
If you want to put a blank line between each line in your report to make it easier to read,
enter 2 in the Line spacing field. (Line spacing does not affect the header or labels of the
report.)
NOTE: The Lines per page field shows the default and current settings for the number of
lines per page a report has when you send it to a printer (or other paged device).
The number of lines per page on a terminal is different. When you send your
report to your terminal, it automatically adjusts the paging according to the size
of your terminal.
5–14
Reports Module
4 ♦ Press GO to make the changes to the report.
Notice that the Report Width changes if you changed the left margin or the number of
spaces between columns.
5.4.6
Changing the Order of Records in a Report
This section describes how to change the order of records in your report. You can order records
by as many as five fields.
1 ♦ Select the Order option.
A window appears that lists all of the fields in the active files. You can use any of these
fields to change the order of the records in the report.
Also, you can order records by more than one field. For example, you can put the records
in order by state, and by customer number within each state.
2 ♦ Select the first field you want to use to order the records.
As you select the fields for the report, Results numbers them in the order you select them.
If you select a field by mistake, highlight it again and press RETURN to deselect it. You can
also type a number next to the field, and the other selected fields will renumber
automatically.
3 ♦ Continue to select the fields in the sequence you want to order the records.
4 ♦ Press GO when you are done.
A window appears that lets you choose the order (ascending or descending) for each order
field:
5 ♦ Enter the type of order you want for each field.
For example, if you put character fields in descending order, they appear in the report in
reverse-alphabetical order.
5–15
Progress Results User’s Guide for UNIX
6 ♦ Press GO or RETURN to apply these changes.
The order definition appears in the Report Info window. For example, this figure shows a
sample order definition.
This order definition tells you that the lines in the report are in order first by sales region,
then by customer number within each region. (In each case, the field name is prefixed by
the name of the file and the database that contains it.)
5.4.7
Adding a Percent of Total to a Report
This section describes how to define a percent of total field in a report. For example, you can
add a field that displays the percent of total items represented by each line in the report.
1 ♦ Select the Define option, then select the Percent of Total option.
The window displays a list of all the numeric fields in the files you have selected. You can
use them for the Percent of Total field.
2 ♦ Select the field you want to use to define a percent of total.
A window appears that enables you to rename the label that will appear above the column
in the report. It also enables you to redefine the format for the field. Your window might
look like this:
5–16
Reports Module
This window contains these fields:
•
File—Displayed as Percent of Total because Results generated it. (It is not contained
in any database file.)
•
Field—The name Results automatically assigns to the field you are creating; this
field name will be in the list with the other field names once you add the new field.
•
Expression—Displays the field (and the database and file it came from) that is used
as a basis for the percent of total.
•
Type—The data type. In this case, the data type is in decimal format.
•
Label—Shows the default text that appears above the column in the report, which
is% Total by default in this case. You can change the label to a more descriptive
name for your report.
•
Format—Shows the default display format. In this case, the default format is
->>>9.9%. For more information about formats, see Appendix C, “Field Display
Formats.”
3 ♦ Enter a new label and format and hide repeating values.
4 ♦ Press GO to enter the new field into the Report Layout window.
The new field appears in the layout window, and a *p marker under the format indicates
that it is a percentage field.
5–17
Progress Results User’s Guide for UNIX
5.4.8
Getting Information About the Current Report
Follow these steps to display information about the current report in the Report Layout window.
1 ♦ Select the Info option.
A window opens that shows you information about the current report. For example:
This window shows a number of things:
•
The name of the report (if the report has been saved).
•
The amount of time it took run the last time (if it has been run).
•
The names of the files and any WHERE clause criteria.
•
The defined order criteria (if any).
•
The names of the fields in the report. Also, the labels, names, and formats for the
fields in the report.
2 ♦ Press END to return to the Reports Main Menu.
5.4.9
Deleting a Report
This section describes how to clear a report from the layout window. It also describes how to
delete a saved report.
Follow these steps to delete a report:
1 ♦ Select the Clear option.
If there is an active report in the reports windows, Results prompts you to verify that you
want to clear the current report definition from the window.
5–18
Reports Module
2 ♦ Select Yes to remove the report information from the window.
If you select Clear again, you can choose to delete any existing reports.
3 ♦ Select the Clear option again.
A list of all the reports in your directory appears. You can delete any of these reports.
4 ♦ Mark any reports that you want to delete. To mark a report, highlight it and press RETURN.
An asterisk appears next to the reports you selected. To unmark a report, select it again.
An asterisk appears next to the reports you selected.
5 ♦ Press GO to delete the marked reports, or press END to cancel.
5.4.10
Adding a WHERE Clause with Ask Mode
This section describes how to create a WHERE clause to limit the number of records that appear
in the report. This WHERE clause uses Ask mode so you can use the same WHERE clause to
get different subsets of records. For example, you can make Results prompt you for a value to
compare to the customer name each time you run a particular report. Thus, you can use the same
report definition to create different reports based on different criteria. The report displays the
records where the customer name is equal to the value you enter. This is called a WHERE clause
with Ask Mode (or prompting).
In another type of WHERE clause, you enter a constant value to compare with field values.
Thus, you get the same set of records every time you run the report. For more information about
using the WHERE clause builder to define WHERE clauses, see Chapter 3, “A Tour Through
Results.” For information about using Expert mode to define and edit WHERE clauses, see
Chapter 4, “Query Module.”
NOTE:
You cannot use Expert Mode to define or edit a WHERE clause that uses Ask mode.
If you try to, you receive error messages.
5–19
Progress Results User’s Guide for UNIX
Follow these steps to create WHERE clauses that use Ask mode:
1 ♦ Select the Where option.
If there is more than one file in the list of files, a highlight bar appears so you can select
the file you want to use to build the WHERE clause, as shown in the following figure:
2 ♦ Select the Customer file where you are defining a WHERE clause.
Several windows appear that help you build the WHERE clause. This figure shows the
fields in the customer file:
If you are an experienced user, you can press GET to enter Expert mode and type in the
WHERE clause expression yourself (unless you want to use Ask mode). In this exercise,
let the WHERE clause builder guide you.
5–20
Reports Module
3 ♦ Select the Name field.
If you select the wrong field, press END to return to the list to select another field.
Options appear in the Comparisons window, and the beginning of the WHERE clause
appears in the Expression window. This figure shows both:
In the Expression window, notice that the database name and the filename prefix the field
name. This information is very helpful when you are using multiple databases.
Also, the Comparisons window shows all the choices you can make with the field you
chose. Based on the field selected, this list can be abbreviated. For example, if you chose
Credit-Limit, a numeric field, the list only shows comparisons that you can make to
numbers.
5–21
Progress Results User’s Guide for UNIX
4 ♦ Select Equal in the Comparisons window.
If you select the wrong operator, press END to return to the Comparisons window, and
select another operator.
The comparison symbol (in this case, = ) is then added to the WHERE clause, and prompts
you to enter a value to compare to the field you chose, as shown in the following figure:
5 ♦ Press PUT to enter a prompt that will appear when users run the report.
For example, you can provide a prompt for a value to compare against the Name field.
Anyone running the report could decide what value they want the WHERE clause to
select.
A prompt window appears. You can use the default prompt, or you can enter your own
prompt (up to 76 characters).
6 ♦ Enter the following prompt as shown in the window and press RETURN or GO:
The WHERE clause in the Expression window displays more information. Results also
prompts you to enter more values for the field. Continue to build the WHERE clause or
exit the WHERE clause builder and run the report with the current WHERE clause.
7 ♦ Select No when Results prompts you to enter more values for the field.
5–22
Reports Module
8 ♦ Select No when Results prompts you to enter more selection criteria.
Results returns to the Reports window and displays the WHERE clause in the Report Info
window:
9 ♦ Run the report to your terminal to test the prompt.
The question you entered appears as a prompt:
The context line describes the meaning of the WHERE clause and its question.
10 ♦ Type lift line skiing at the prompt and press RETURN.
11 ♦ Select Terminal from the list of output devices.
You can run the report again, entering a different value at the prompt.
12 ♦ Save the report.
5–23
Progress Results User’s Guide for UNIX
5.5
Creating Totals Only Reports
This section describes how to create a totals only report. You can use the Totals Only Report
option to display summary information about groups of records.
To use the Totals Only Report option, you must have order criteria defined for the report. Then
you can summarize the report on the last field in the order list so that a new line appears each
time the order field value changes. For example, if you order your customer information by
state, then define the report as a totals only report, you receive one line of information for each
customer.
Each time the value changes, Results:
•
Creates a subtotal for each numeric field. For example, a subtotal for all numeric fields
appears each time the value of the last order field changes.
•
Displays the field value in the last record if the field is nonnumeric. For example, if you
include the customer name, you see the name of the last customer in each state.
•
Displays the total number of records in each group if you choose to summarize a
non-numeric field.
5.5.1
Defining Totals Only Reports
This section describes how to define a Totals only report. Follow these steps to combine records
within a group so that just a summary (total) line appears for each group.
1 ♦ Define a report, as described in Chapter 3, “A Tour Through Results.”
2 ♦ Specify the order for the records in the report. Be sure to place the field you want to use to
group records as the last field in the order definition.
5–24
Reports Module
3 ♦ Select the Settings option, then select the Totals Only Report option. (You cannot select
this option unless you have an order defined for the report.)
This window appears:
4 ♦ Select ENABLE to define this report as a totals only report.
A window similar to the following appears:
The window on the left describes how this option works for different types of field
information. The window on the right lists the fields in the reports. By default, Results—
marks non-indexed, numeric (integer and decimal) fields as summary fields. It does not
mark indexed fields because they are usually fields you do not summarize. For example,
some common indexed fields are Cust-num and phone number; these are fields you
normally do not summarize.
If you mark character, date, or logical fields as summary fields, the system counts them.
For example, if you mark the State field and there are two states in the group, Results
places a 2 in the State field.
5–25
Progress Results User’s Guide for UNIX
5 ♦ Select or deselect fields so that the fields you want to summarize are marked, or use the
default settings.
6 ♦ Press GO to apply the settings.
A few changes appear in the Reports window. For example, you might see this window:
The dollar symbols ($) show you the fields that are marked as summary fields, and the
Totals Only indicator tells you this report is a totals only report.
7 ♦ Run the report to your terminal and check the output to ensure that you get the results you
expect.
5.5.2
Summarizing a Non-numeric Field
When you mark character, date, or logical fields as summary fields, the system counts them. For
example, since there are two customers in Florida, Results places a 2 in the Name field.
Mark the non-numeric fields you want to summarize with an asterisk (*) using the Totals Only
Report option and press GO.
When a field is non-numeric, it cannot be added to another field. Instead, Results counts them.
5–26
Reports Module
5.5.3
Expanding a Report Using the Totals Only Report
This figure shows an expanded report you can create using the Totals Only Report option and
other options.
In the above report, a summary total line appears for each state in each sales region. It also
shows the overall totals for the unpaid balance, maximum credit, and year-to-date sales
columns. The following features were used:
5.6
•
Hide repeating values for the Sales rep field.
•
Totals Only defined so that the report shows the total values for each state in each region.
•
Totals and subtotals defined for numeric fields.
•
Page ejects when sales regions change.
Summary
This chapter described many of the features you can use to create and enhance your reports. It
described how to add and delete fields in reports, add titles and adjust spacing, and change the
order of records in reports. It also described how to add calculated fields, delete saved reports,
add a WHERE clause that uses Ask mode, and create a totals only report.
5–27
Progress Results User’s Guide for UNIX
5–28
6
Labels Module
This chapter describes features in the Labels module. It provides information on:
•
Menu options in the Labels module.
•
Adding new information and adjusting settings in your labels. For example, this chapter
describes:
–
Saving, copying, running, and deleting label definitions.
–
Adding text and fields to labels.
–
Adjusting format and print settings.
NOTE:
Several of the Labels module options are described in the tour in Chapter 3, “A Tour
Through Results,” and are not described in this chapter. The steps in this chapter
build upon what you learned in the tour of Results. You should complete or review
the tour before continuing with this chapter.
This chapter assumes that the Labels module is available in your Results package. If it is not,
see your database administrator.
Progress Results User’s Guide for UNIX
6.1
Introduction
You use the Labels module to generate your own mailing labels and other types of labels.
You can have labels automatically laid out for you, or you can lay them out yourself. You also
can control the label output. For example, you can mix field and text information, omit blank
lines, define the total label height, adjust the left margin, define the number of labels to print
across a page, and adjust the horizontal spacing between labels. You can also have labels print
in a specific order. For example, you can create a label format to leave room for pre-printed
company logos then print the labels in order by sales region.
The Labels module window is divided into three sections: horizontal menu, information
window, and layout window. This chapter describes the horizontal menu options. For details on
the information and layout windows, see Chapter 3, “A Tour Through Results.”
6.2
Labels Module Main Menu
Horizontal menu options appear at the top of each window throughout the Labels module, as
shown in Figure 6–1.
Figure 6–1:
Labels Module Main Menu
In some cases you see a subset of these options. For example, you only see the options you can
pick when you do not have any files defined for a label in the Label Info window.
The following list provides brief descriptions of all the menu options and suboptions available
in the Labels module. The Get, Put, Run, Where, Order, and Clear options work the same way
as they do in the Data Exports and Reports modules. For complete descriptions, see Appendix
B, “Option Descriptions.” If you do not have all of the options listed in this chapter, see your
database administrator.
Get
Retrieves an existing label definition into the Labels window. You can get a label
definition you have defined, or if you have permission, you can get a copy of a label
definition from someone else’s directory.
Put
Saves the current label definition.
6–2
Labels Module
Run
Prints labels as they are currently laid out in the Label Layout window. You can preview
the labels on the display, print them to a file, or route them directly to a printer.
Define
Defines the files and fields for label information. You can select fields from a list, or you
can have Results select the fields automatically.
Settings
Controls general output settings for your labels.
Where
Builds a WHERE clause to select a subset of labels. You need to define an active file
(using the Define option) before you can define the WHERE clause criteria.
Order
Orders labels by up to five fields. For example, you can define the labels to print
numerically by customer number.
Clear
Resets the settings back to their default values. Or, if there are no files or fields defined in
the window, Results displays a list of defined labels; you can delete as many as you want.
Info
Displays more information about the active label definition, such as the names of the
current active files, how they are related, and any WHERE clause and order criteria
defined. It might also display the name of the label definition (if it has been saved), and
how long it took to run the labels the last time (if it has been run).
Module
Switches to a different module without going back to the Main Menu. You can also
transport file, field, and WHERE clause criteria information to other modules.
6–3
Progress Results User’s Guide for UNIX
User
This option is hidden by default. It enables you to transfer to a customized option. You
only see this option if a Progress developer has included an option program to perform an
action. If you see it on your screen, see documentation provided by the application
developer.
Exit
Exits from the Labels module to the Main Menu.
6.3
Labels Features
The tour of Results in Chapter 3, “A Tour Through Results,” gives you basic information for
creating labels using the Labels module. It describes how to create mailing labels automatically,
then add text and fields. This chapter describes more features and options in the Labels module.
6.3.1
Saving Label Definitions
Use the following steps to save the current label definition in the Label Layout window. You
use the same steps to save definitions in the Reports and Data Export modules.
1 ♦ Select the Put option.
A window appears in which you can save it as a new label. Press MODE to toggle to a list
of databases used to create these labels and to see the program names for these labels. (The
program names are the names listed in your directory.)
There are several things you can do with this list. You can:
6–4
•
Save the label definition as a new label. To do this, select the <<save as new label>>
option, then enter a name for the label.
•
Overwrite an existing label definition with the current one. To do this, select the label
you want to overwrite, then enter a name for the label. Results prompts you to verify
that you want to overwrite an existing label.
•
Exit and do not save the label.
•
If the label has been saved, you can enter a new name or use the existing name. If
you enter a new name, Results keeps the old copy and saves the new copy of the
labels. (You can keep the old label copy or delete it as described in the “Clearing and
Deleting Label Definitions” section in this chapter.)
Labels Module
6.3.2
Getting Label Definitions
This section describes how to use the Get option to retrieve a label that you saved. It also
describes how to get a copy of a label definition from someone else’s directory (if you have
permission). You use the same steps to get definitions in the Reports and Data Export modules.
1 ♦ Select the Get option.
If there is any data in the information or layout windows, Results prompts you to clear the
current windows. If you have not saved that information, it will be lost if you select Yes.
If the window is clear, a window appears that enables you to load existing labels. You can
load and run any of the labels marked with an asterisk (*). The asterisk means that the label
was created using the currently connected databases. (To see the name of the databases,
press MODE. Press MODE again to see the program names.)
If you created your labels with an earlier version of Results, a question mark (?) marks the
labels to show that Results did not save the names of the databases used to create the labels.
(If you created them with the current database(s), retrieve them to save the database names
with the label names.)
At this window, you can load a label program from another directory (if you have
permission), load the label you defined, or press END to cancel the Get operation.
To successfully copy a label format from someone else’s directory, the label must have
been created using the database you are using. (If it was created using more than one
database, you must have the same databases connected in the same order.) You copy the
format of the label, not the content. Therefore, if you don’t have permission to access all
of the fields that the label definitions needs, that field information does not appear in the
label.
2 ♦ Select the label definition that you want to load.
The information and layout for that definition appear in the windows on the display. You
can run or edit this label definition.
6–5
Progress Results User’s Guide for UNIX
6.3.3
Copying Label Definitions
Use the following steps to copy label definitions that are in your directory. You use the same
steps to copy definitions in the Reports and Data Export modules.
1 ♦ Retrieve the label definition.
2 ♦ Save it under a new name.
You now have a renamed copy of the label definition you selected.
6.3.4
Running Label Definitions
Follow these steps to print labels to your terminal display, printer, or operating system file.
1 ♦ Select the Run option.
If there is no label definition in the window, a window lists the saved labels in your
directory. You can load and run any of the labels marked with an asterisk (*). The asterisk
means that the label was created using the currently connected databases. (To see the name
of the databases, press MODE. Press MODE again to see the program names.)
A list of output devices you can select appears. Your database administrator can tailor this
list so that, for example, you can see a list of the printers used in your department.
2 ♦ Select the output device you want, then press RETURN.
If you selected TERMINAL, the first page of labels appears on your display. Use your
cursor keys to scroll through the list.
If you selected a file or printer output device, the label definitions are directed to it.
6.3.5
Clearing and Deleting Label Definitions
This section describes how to clear label layouts from the window. It also describes how to
delete saved labels from your directory. You can use the same steps to clear and delete
definitions in the Reports and Data Export modules.
1 ♦ Select the Clear option.
If there is still label information or label layouts in the window, Results prompts you to
verify that you want to clear the current label definition from the window.
6–6
Labels Module
2 ♦ Select option to remove the label information from the window.
The window clears all label definitions. If you select Clear again, you can delete any saved
labels in your directory.
3 ♦ Select the Clear option again.
A list appears that shows all the label definitions in your directory. You can delete any of
these labels.
4 ♦ Mark the labels you want to delete. To mark a label, highlight it and press RETURN. Results
places an asterisk (*) next to the label name. To unmark a label definition, select it again.
5 ♦ To delete the marked labels, press GO, or press END to cancel.
6.3.6
Defining Labels Manually
This section describes how to define a label using only menu-driven features to pick fields and
insert text into a label layout. The examples in this section show inventory labels that list the
item number, unit cost, description, and unit weight for the items you have on hand.
1 ♦ Select the Define option and select the files you want to use to define the labels.
Results prompts you to have fields selected automatically.
If you select Yes, Results automatically tries to build address labels. By default, it looks
for address label fields (Name, Address, Address2, etc.). Field names included in the
automatic layout are defined through the Administration module by your database
administrator. Your database administrator can change the automatic label layout and alter
the defaults to lay out any type of label based on any group of field names.
If you select No, Results leads you through a process to manually select the fields for the
label.
2 ♦ Select the No option.
A list of all the fields in the active files appears. You can select any of these fields for your
labels. To select a field, highlight it and press RETURN.
6–7
Progress Results User’s Guide for UNIX
3 ♦ Select the fields in the order you want them to appear.
As you select each field, Results numbers them in the order in which you select them. If
you select a field by mistake, highlight it again and press RETURN to deselect it. If you
select a field out of order, highlight it and type the order number next to it. Results
renumbers the other fields automatically.
4 ♦ Press GO to insert these fields into the Label Layout window.
For example, you can insert your fields in this layout:
The field names have the names of the files they come from as their prefixes. You can add
other fields to this by positioning the cursor and pressing GET. Once you exit out of the
definition window you can get back in to edit it by selecting the Define option.
5 ♦ If necessary, use the Settings option to adjust the Total Height value. Consider the height
of the label and height of the label definition.
6.3.7
Adding Text to Labels
This section describes how to add text to a label definition. To add text to a label definition, the
Label Layout window must be open. The window opens when you create a new label and when
you define new fields for an existing label. Follow these steps to re-create this process.
1 ♦ Select the Define option, then the Fields option.
2 ♦ Position your cursor where you want to place the text.
3 ♦ Press MODE to toggle to the Insert mode, so that you do not type over existing information.
4 ♦ Type the text you want to enter.
6–8
Labels Module
5 ♦ Press GO to apply the changes. Or, press GET to insert a field or END to undo the changes.
6 ♦ If necessary, use the Settings option to adjust the Total Height value for the labels.
6.3.8
Adding Fields to Labels
This section describes how to add fields to a label definition. To add fields to a label definition,
the Label Layout window must be open. The window opens when you create a new label and
when you define new fields for an existing label. Follow these steps to re-create this process.
1 ♦ Select the Define option, then the Fields option.
2 ♦ Position your cursor where you want to place the text.
3 ♦ Press GET to display a list of fields you can insert.
4 ♦ Select the field you want to insert.
5 ♦ Repeat steps 3 and 4 to add more fields, then press GO to apply the changes, or press END
to cancel.
6.3.9
Adjusting Label Settings
This section describes how to adjust the settings in your label layout. For example, it describes
how to print multiple copies of each label, print labels two across, and omit blank lines within
each label. You define these settings with the Settings option.
Follow these steps to adjust your label settings:
1 ♦ Select Settings option.
Depending on your monitor type, Results may highlight or underline the fields you can
adjust.
2 ♦ Adjust the settings, then press GO to apply them. The following sections describe each of
the Settings options.
6–9
Progress Results User’s Guide for UNIX
Omitting Blank Lines
By default, Results omits blank lines when it finds blank field information. In Figure 6–2, the
address labels on the left omit blank lines, while the labels on the right do not.
Blank Lines Omitted
Blank Lines Shown
Second Skin Scuba
79 Farrar Ave
Yuma, AZ 85369
Second Skin Scuba
79 Farrar Ave
Yuma, AZ 85369
Match Point Tennis
66 Homer Ave
Como, TX 75431
Off The Wall
20 Leedsville Ave
Export, PA 15632
Figure 6–2:
Match Point Tennis
66 Homer Ave
Como, TX 75431
Off The Wall
20 Leedsville Ave
Export, PA 15632
Omit Blank Lines Versus Show Blank Lines
When you leave the Omit Blank Lines option set to yes, it does not affect any blank lines you
leave in the layout. Instead, it only omits lines where all field information for the line is missing.
For example, it omits the line reserved for Address2 information when the line is blank (there
is no secondary address).
If you want the label to show blank lines, move the cursor to the Omit Blank Lines field and
type n to change the setting to no.
Printing Multiple Copies
By default, Results prints one copy of each label. You can change this setting to print multiple
copies of each label simultaneously.
To change the number of copies of each label, move the cursor to the Copies of Each field and
type a quantity.
6–10
Labels Module
Changing the Total Height
By default, labels have a total height of six lines. You can adjust the height to suit your needs.
(The maximum height of any label is 66 lines.)
For example, you can adjust the Total Height option to match the actual height of the labels on
which you want to print the information. Also, if you define more than six lines in your label
layout, you must adjust the total height of the label to be more than six. If you do not, Results
prompts you to choose whether you want to print the abbreviated version of the labels. (If you
do, any lines beyond the total height do not print.)
To change the total height of labels, move the cursor to the Total Height field and type the height
you want.
Changing the Top Margin
By default, Results sets the top margin of each label to zero lines. You can change this setting
to move the text on each label down from the top edge. For example, if your labels have your
company logo preprinted on them, you can use this option to move the customer address down
the label by several lines so it does not print over your logo.
To change the top margin of each label, move the cursor to the Top Margin field and type the
value you want.
Changing the Text to Text Spacing
By default, Results sets the text to text spacing for labels to zero character spaces. However,
when you print more than one label across a page, you must set the Text to Text Spacing value
wide enough to leave space between the columns of labels. If you do not do this, the next label
across prints on top of the first label instead of in the next column.
To change the number of spaces from the start of the far left to the far right of each label, move
the cursor to the Text to Text Spacing field and type the quantity you want.
Changing the Left Margin Indent
By default, Results sets the left margin indent to zero spaces. You can change this setting so you
can leave space on the left side of the page of labels. This setting only affects the spacing on the
left side of the page, not the text-to-text spacing.
To change the number of character spaces at the left margin, move the cursor to the Left Margin
Indent field and type the quantity you want.
6–11
Progress Results User’s Guide for UNIX
Changing the Number of Labels Across
By default, Results prints one column of labels. You can change this setting to print multiple
columns of labels across the page. When you print more than one column of labels, you must
adjust the text-to-text space setting so that labels do not print on top of each other.
To change the number of columns of labels, move the cursor to the Number of Labels Across
field and type the number of columns that you want.
6.4
Summary
This chapter described many of the features you can use to create and enhance your labels. It
described how to save, retrieve, copy, run, and delete label definitions. It also described how to
define labels manually, add text and fields, and adjust print settings.
6–12
7
Data Export Module
This chapter describes the features in the Data Export module. It provides you with information
on:
•
Menu options in the Data Export module.
•
Adding fields to a Data Export report.
•
Exporting reports in Progress format.
•
Exporting data in non-Progress format.
•
Exporting data in ASCII format.
•
Using Expert mode to change ASCII settings.
NOTE:
Several of the Data Export module options that are described in Chapter 3, “A Tour
Through Results,” are not described in this chapter. The steps in this chapter build
upon what you learned in the tour of Results. You should complete or review the tour
before continuing with this chapter.
This chapter assumes that the Data Export module is available in your Results package. If it is
not, see your database administrator.
Progress Results User’s Guide for UNIX
7.1
Introduction
The main purpose of Results is to enable you to easily access database information. Because
you might also need to export database information to another software package, the Data
Export module provides this interface.
Use the Data Export module to:
•
Create data files for use in word processors with form letters.
•
Export data files into graphics packages for presentation graphics.
•
Export data files into spreadsheets.
Export formats in this module include:
•
Progress generic ASCII format
•
ASCII with field-name header
•
Fixed-width ASCII (SDF)
•
Comma-separated value (CSV)
•
DIF
•
SYLK
•
WordStar
•
Microsoft Word
•
Microsoft Word for Windows
•
WordPerfect
•
CTOS/BTOS OfisWriter
You can also tailor export formats for your particular needs.
7–2
Data Export Module
7.2
Data Export Module Main Menu
Horizontal menu options appear at the top of each screen in the Data Export module, as shown
in Figure 7–1.
Figure 7–1:
Export Module Main Menu
In some cases you see a subset of these options. For example, you only see the options that are
available when you do not have any files defined in the Data Export Info window.
The following list provides brief descriptions of all the horizontal menu options and submenu
options available in the Data Export module. The Get, Put, Run, Where, and Clear options work
the same way as they do in the Labels and Reports modules. For complete descriptions of all
options, see Appendix B, “Option Descriptions.” If you do not have all of the options listed here,
see your database administrator.
Get
Retrieves an existing data export definition into the Data Export window. You can get a
data export definition you have saved, or if you have permission, you can get a copy of a
definition from someone else’s directory.
Put
Saves the Data Export definition. You save your definition using a description (up to 48
characters long) rather than an actual operating system filename. Thus, you can give
meaning to the file description and the definition is automatically saved with an
appropriate name for your operating system.
Run
Exports the selected fields using the chosen format on the layout screen. You can preview
the export data on the screen, print them to a file, or route them directly to a printing
device.
Define
Defines the files and fields included in the report.
This option has most of the same suboptions as in the Reports module.
7–3
Progress Results User’s Guide for UNIX
Settings
Determines the export format. When you select this option, you see a list of the following
possible export formats:
•
Progress
•
Generic ASCII format
•
ASCII with field-name header
•
Fixed-width ASCII (SDF)
•
Comma-separated value (CSV)
•
DIF
•
SYLK
•
WordStar
•
Microsoft Word
•
Microsoft Word for Windows
•
WordPerfect
•
CTOS/BTOS OfisWriter
•
User-Sample Export
•
The User-Sample Export option appears by default when you start Results with a
copy of the Progress sports database. If you start with another type of database, you
only see this option if your database administrator enabled it for you.
Where
Builds a WHERE clause that selects a subset of records. (For example, you can select
records where the sales region equals East.)
Order
Orders the data export information for up to five fields. For example, you can define the
records to print in order by sales region and by customer number within each sales region.
7–4
Data Export Module
Clear
Resets the settings to their default values. Or, if there are no files or fields defined on the
screen, the screen displays a list of defined data export formats; you can delete as many as
you want.
Info
Displays more information about the active definition, such as the names of the active
files, how they are related, and any WHERE and order criteria defined. It can also display
the name of the definition (if it has been saved) and how long it took to run the last time
(if it has been run).
Module
Switches to a different module without going back to the Main Menu. You can also
transport file, field, order, and WHERE clause criteria information to other modules.
User
Enables you to transfer to a customized option. This option is hidden by default. You see
this option only if a Progress developer has enabled it to perform an action. If so, see the
documentation provided by the application developer that supports this function.
Exit
Exits from the Data Export module to the Results Main Menu.
7.3
Layout Window Settings
The Data Export Layout window runs across the lower half of the screen and displays field and
export format information, including:
•
The fields selected for export.
•
A description of the export format.
•
The export type (ASCII, WordStar, WordPerfect, Progress, etc.).
•
A yes or no value that indicates if Results will export the field name as the first line of the
export.
7–5
Progress Results User’s Guide for UNIX
7.4
•
The initialization string at the start of a record. The initialization string is the set of
characters that precedes the record data on each line of the export file. For example, an
asterisk (*) may mark the beginning of a line. (See the Settings option description in
Appendix B, “Option Descriptions,” for more details.)
•
The record termination string. The record termination string is the set of characters that
can indicate the end of each record in an export file. (See the Settings option description
in Appendix B, “Option Descriptions” for details.)
•
The field delimiter string. The field delimiter string is the set of characters marking the
beginning and end of each field value.
•
The field separator string. The field separator string is the set of characters that separates
each field value within a record.
Data Export Features
The tour of Results in Chapter 3, “A Tour Through Results,” gives you basic information for
exporting data using the Data Export module. For example, it describes how to export a report
in a non-Progress format and describes how to delete a WHERE clause. This chapter describes
more features and options in the Data Export module.
Note that most of the Define submenu options in this module are the same as they are in the
Reports module. However, there are two differences:
7–6
•
Where you use the Reports module you define Totals and Subtotals, you use a Data Export
submenu option to change the width and format of fields in fixed-width ASCII export
definition. This option lets you change the width and format of any field or defined column
in the current Data Export Layout window. You can select this option only when the
Export Type is set to fixed-width ASCII (SDF).
•
When you define new fields, you can redefine the format only for the new fields. (In the
Reports module, you can also redefine the label and specify whether you want Results to
hide its repeating values.)
Data Export Module
7.4.1
Adding Fields to a Data Export Report
Use the same method to add fields to a Data Export definition that you used in the Reports
module. For more information, see the “Adding Fields to a Report” section in Chapter 5,
“Reports Module.”
7.4.2
Exporting Reports in Progress Format
This section describes how to export data in Progress export format. By default, Results puts
export data in Progress format. Figure 7–2 shows an example of records in the Progress export
format.
Figure 7–2:
Sample of Progress Export Format
This format consists of one record per line, with the beginning and end of each character field
denoted by double quotes (") and a space separating each field.
You can select the export type you want before or after you select the fields for the report. You
can select fields using the Define option, or you can transfer them from the Reports module
using the Module option. In this example, you select the fields in the Data Export module.
1 ♦ Define the report you want to export.
For example, select the files, then the fields you want to export. Then define any order
criteria and calculated fields that you want to include. Also, define WHERE clause criteria
if you want a subset of records. (For information on selecting files and fields, defining
order and WHERE criteria, or defining calculated fields, see Chapter 3, “A Tour Through
Results.”)
2 ♦ Press GO to insert the fields in the layout.
The files and the file relation information appear in the Data Export Info window, and the
fields appear in the Data Export Layout window.
7–7
Progress Results User’s Guide for UNIX
This window also shows all of the fields you selected in the order you selected them.
Notice that the fields are prefixed by the name of the database and file they come from.
The default export type, Progress, appears in the Export Type field:
The Layout window also shows the Progress export settings. It shows that each record
ends with a carriage return and a line feed. It also shows that character fields are
surrounded by double quotes and separated by single spaces.
3 ♦ Run the data export report by selecting the Run option, and then select any output device.
Your report appears in the Progress export format.
7.4.3
Exporting Data in Non-Progress Format
By default, Results puts export data in the Progress format. These are the non-Progress export
formats that are supplied with Results:
7–8
•
Generic ASCII format
•
ASCII with Field-name header
•
Fixed-width ASCII (SDF)
•
Comma-separated value (CSV)
•
DIF
•
SYLK
Data Export Module
•
Microsoft Word
•
WordPerfect
•
CTOS/BTOS OfisWriter
Your database administrator can also define and add a custom export format. Follow these steps
to put a report in any one of these export formats.
1 ♦ Define the report you want to export.
2 ♦ Select the Settings option.
The list of export formats appears. Note that the User-Sample Export option appears by
default when you start Results with a copy of the Progress sports database. When you start
with another database, this option appears if your database administrator enabled it for
you.
3 ♦ Select a format. (If you select one of the ASCII formats, skip Step 3 in the“Exporting Data
in ASCII Format” section in this chapter.)
The export type appears in the Data Export Layout window. You might see a screen
similar to this one if you selected the WordStar export type:
4 ♦ Run the data export report. Your report appears in the new export format.
The Settings option gives you as much flexibility as possible in defining an export format. You
can also edit any ASCII export format, as described in the “Using Expert Mode to Change
ASCII Settings” section in this chapter.
7–9
Progress Results User’s Guide for UNIX
7.4.4
Exporting Data in ASCII Format
This section describes how to export data in an ASCII format.
The ASCII export format consists of one record per line. Each line begins with an asterisk (*).
Double exclamation points (!!) mark the beginning and end of each field, and a comma (,)
separates each field.
Follow these steps to export data in ASCII format:
1 ♦ Define the report you want to export.
2 ♦ Select the Settings option. A list of possible export formats appears.
3 ♦ Select an ASCII format.
This window appears:
This window shows the default ASCII settings. For example, the first line of the format
grid shows that no characters are defined to mark the beginning of a record. The second
line shows the characters that mark the end of a record. In this case, the default is cr lf
(meaning carriage return line feed). The second and third lines define that the fields are
surrounded by double quotes (") and separated by commas (,).
Use this window to override the defaults. For example, you can change the settings so that
an asterisk (*) marks the start of each record, and the exclamation points (!!) delimit the
fields.
4 ♦ Enter new settings then press GO to accept the settings and exit the Settings option.
The settings appear in the Data Export Layout window.
5 ♦ Run the report on your terminal.
7–10
Data Export Module
The data appears in the new ASCII format. In this format, commas separate the fields in
each record. (In Results format, a space separates each field.)
6 ♦ Save the export format.
NOTE:
7.4.5
When you set the export type to Fixed-width ASCII (SDF), you can use the
Width/Format of Fields option (under the Define option) to change the width and
format of any field or defined column in the current Data Export Layout window.
You can select this option only when the export type is set to Fixed-width ASCII
(SDF). The width and field format defines how Results exports the field data. For
example, it defines the width of a character field or the number of decimal places in
a numeric expression. For information on field display formats, see Appendix C,
“Field Display Formats.”
Using Expert Mode to Change ASCII Settings
This section describes how to define data export settings using Expert mode. For example, you
might need to tailor the export settings because the settings you need are not available in one of
the Settings options.
1 ♦ Select the Settings option.
2 ♦ When the list of export formats appears, select any of the ASCII options.
The format grid appears again.
3 ♦ Press GET to toggle to Expert mode.
A table of ASCII symbols appears:
7–11
Progress Results User’s Guide for UNIX
This table shows the symbols for the lower 27 (nonprintable) ASCII characters. If you use
the numbers, they are interpreted literally. Instead, use the symbols from this table. For
example, the lf characters stand for line feed.
You can enter symbols or press END to return to the Data Export screen.
4 ♦ Press END to return to the Data Export screen.
7.5
Summary
This chapter briefly described the horizontal menu options in the Data Export module. It also
described how to add fields to a data export format, export reports in Progress and non-Progress
formats, and use Expert mode to change ASCII settings.
7–12
8
Multiple Databases with Results
This chapter provides information on:
•
Using multiple databases with Results.
•
Accessing data in multiple databases.
•
Relating files in different databases.
•
Querying multiple databases.
•
Joining file information.
NOTE:
You should complete or review the tutorial in Chapter 3, “A Tour Through Results.”
The Query module and the Reports module sections are particularly important to
understanding this chapter.
The examples in Chapters 3 through 7 use Results with one database. The examples in this
chapter use Results with two databases.
Progress Results User’s Guide for UNIX
8.1
Introduction
In Results you can simultaneously access information from several databases. For example, you
can run queries on two different databases on the same screen. You can also include field
information from more than one database in your reports, labels, or data exports.
If you define and save a report, label, or data export that uses data in more than one database,
you must connect the same databases in the same order to access that definition.
8.2
Accessing Multiple Databases
This section describes how to use Results with more than one database.
Follow these steps to start Results with two databases.
1 ♦ Create two copies of the sports database. Name one sports1, and the other sports2.
2 ♦ To start Results from your operating system, type the appropriate command at your
operating system prompt.
When you first start Results with new databases, you need to perform an initial build, as
you do with a single database. The commands are listed in the “Starting Results with
Multiple Databases” section in Appendix A, “Startup and Shutdown Procedures.”
8.3
Starting Results with Multiple Databases
There are several ways to start Results with more than one database. See the “Starting Results
with Multiple Databases” section in Appendix A, “Startup and Shutdown Procedures.” To
follow the examples in this chapter, you must start Results with sports1 and sports2.
Appendix A contains information on starting Results using database(s) in single user or
multi-user mode.
By default, Results creates relations between files in the databases you use when you start it. In
this chapter, you use the default relations to join files to related files. To establish other file
relations, see Chapter 9, “Database Administration” or see your database administrator.
8–2
Multiple Databases with Results
8.3.1
Querying Multiple Databases
This section describes how to use the Query module to look at information in two or more
databases at one time.
When you select the Query option from the Results Main Menu, a list of the Query forms for
your connected databases appears. The forms can be listed by description, filename, or program
name. Press the MODE key to toggle among the lists.
The lists you see when you start with sports1 and sports2 are:
•
By Description. The marker in the lower-left corner of the window tells you that this
is a list of form descriptions. The counter in the lower right corner shows you how
many forms there are in the list.
•
By File Name. The same list shows the names of the files used to make the forms.
The database name appears in parentheses, so you know which database contains the
file. All of these files are in the sports database. When you start with another database
or more than one database, you see other database names in parentheses.
8–3
Progress Results User’s Guide for UNIX
•
8.3.2
By Program Name. Results automatically creates these program names using the
first eight characters of the database filename. If any of these names is already used
by other programs, it creates names like qryxxxxx.p for the programs, where xxxxx
represents a unique integer value. Thus, each query form has its own unique program
name so new query forms do not overwrite existing query forms that have the same
name.
Joining File Information
This section describes how to join files from two different databases.
You can join a file to any file that is related to it from any database. When you select the Join
option, you see a list of the related files you can join to your file.
NOTE:
For information on establishing join relationships for files, see Chapter 9, “Database
Administration.”
Follow these steps to join files from two different databases:
1 ♦ Select the query form for one of the files you want to join.
2 ♦ Select the Join option.
Suppose you want to see the orders for Second Skin Scuba, and you know this information
is contained in the order file in the sports1 database. After you select Join, you see a list of
the files related to the customer file.
8–4
Multiple Databases with Results
For example, the following window shows files you can join to the customer file:
3 ♦ Select a related form.
The first record related to the customer file appears:
Notice that the title at the top of the order form tells you that this is a subset of the records
in the related file. When you do a browse of this set, you see the subset of records from the
file. In this example they are a subset of records in the order file in the sports1 database,
so a browse shows the subset of records from the order file in the sports1 database. In this
case, you only see the orders for customer number 1.
Suppose you want to join to another file. For example, you want to see the order-line
information for this order. You need to join to the order-line file.
4 ♦ Select the Join option.
A window appears with a list of the files that you can join to the order file.
8–5
Progress Results User’s Guide for UNIX
5 ♦ If you join the order-line file from the sports1 database, you see this screen:
The order-line window displays the first order-line for Lift Line Skiing’s order number 6. Notice
that window headlines indicate whether you are looking at a full set of records or a subset.
When you are looking at a subset and you select the Browse option, you see a list of order-lines
for order number 6 only. You can select the Browse option to display a summary list of all
order-lines for this order, or you can select the Total option to find the total number of order-line
records for this order.
Remember, browse lists often show summary information about the records in the set. That is,
they show some of the fields in the record. In this case, the browse list shows all the fields in the
order-lines for Lift Line Skiing’s order number 6.
If you want to create a report based on file information in these forms, you can exit the Query
module, enter the Reports module through the Main Menu, and select the files and fields for
your report. However, it is easier to use the Module option to transfer the selections to the
Reports module.
8–6
Multiple Databases with Results
8.3.3
Adding Fields to a Report
This section describes how to add fields from different databases to a report. For more
information about creating reports, see Chapter 5, “Reports Module.”
1 ♦ Select the fields you want in the report.
For example, you can add these fields to your report:
Field Names
Database and Filenames
Cust-num
(sports2.customer)
Name
(sports2.customer)
Order-num
(sports1.order)
Line-num
(sports1.order-line)
Item-num
(sports1.order-line)
Qty
(sports1.order-line)
2 ♦ Press GO to apply the changes to the Report Layout window.
Your screen might look like the following figure:
3 ♦ Run this report to your terminal.
The report appears on your screen. The following report displays information from three
files in two databases.
8–7
Progress Results User’s Guide for UNIX
This report does not display the source files, fields, and databases. Use the Info option to
change the information.
4 ♦ Return to the Reports screen and save this report under a new name.
5 ♦ Select the Info option.
The Report Info window appears, with this information:
8.4
•
The name of the report.
•
The amount of time it took the last time it was run.
•
The names of the files and fields used in the report, including the names of the
databases and field formats.
Summary
In this chapter you learned how to access data in more than one database, query information in
multiple databases, join files from different databases, and add fields from different databases
to a report.
For more information about starting Results with more than one database, see Appendix A,
“Startup and Shutdown Procedures.”
8–8
9
Database Administration
This chapter is written for the Results database administrator. It is divided into two sections:
•
•
General administration, which discusses:
–
Editing the results.l file.
–
The initial build process.
The Administration module, which helps you control how Results functions. This section
discusses:
–
Creating and editing Query forms and relations between files.
–
Establishing permissions for query forms and Results options.
–
Changing the default settings.
–
Substituting your own functionality for the Browse option and adding your own
application with the User option.
–
Including your own sign-on logo and adding a unique data export format.
NOTE:
This chapter refers to many topics that are described in the tour of Results in Chapter
3, “A Tour Through Results.” If you have not gone through the tour, turn to Chapter
3 and review that information before you continue with this chapter.
Progress Results User’s Guide for UNIX
9.1
General Administration
This section describes general administration information, including details on how to edit the
results.l file. It also describes the initial build process, how Results builds default forms and
logs initial build information, and the default options that appear when you perform an initial
build.
For additional administrative information, see Appendix G, “Helpful Information.”
9.1.1
When to Edit the results.l File
The results.l file defines the default language and the default delimiters for functions and
address labels in Results. You edit the results.l file to:
•
Change the default language.
•
Change the default delimiters for functions and address label fields.
The default language is English. If you change the default language, you see screens and
messages in another language (for example, German or French) when you perform an initial
build for a database.
You can use the Language option in the Administration menu to reset the language after the
initial build. However, some defaults do not change when you switch languages with the
Language option. For example, you must use the options in the Administration menu to change
the default address field settings in the Labels module and the name of the User-Sample Export
option in the Data Export module. For more information about editing the default language, see
the “Language” section in this chapter.
NOTE:
When you set Results to run in a non-English language, set the PROMSGS
environment variable to the same language so that Progress messages appear in that
language.
By default Results uses curly braces ( { and } ) to delimit functions in report headers and footers.
It also uses braces to delimit the fields in address (and other) labels. Because seven-bit character
sets use the curly braces for special characters, you can use angle brackets (< >) instead. You
can change these default settings by editing the results.l file before you perform the initial
build.
For example, you can change the curly braces to angle brackets (< >). Under certain conditions,
you can use other unmatched symbols. (You cannot use two slashes ( / / ) because they are the
same symbol.) You can use square brackets ( [ ] ) as long as there are no arrays. You cannot
use parentheses ( ( ) ) because they interfere with the label-write code.
9–2
Database Administration
You can edit the following lines in your results.l file before you use the initial build to change
the default delimiters:
results.l
left-delim= "{"
right-delim= "}"
9.1.2
Description of the Initial Build
When you first run Results against a database, you see the following message:
The file "dbname.qc" was not found. This
means that you need to do an "Initial Build"
on this database. Do you want to do this now?
Yes
No
In this message, dbname is the name of the database you are using to start Results. If you are
starting Results with more than one database, dbname is the name of the first database you
specify.
The initial build creates a file called dbname.qc that contains the Results default settings (for
example, file relationships, form interfaces for the query module, and output destinations.)
Results cannot run without the query configuration (QC) file. Therefore, if you are running
Results for the first time against a database or group of databases, you must perform the initial
build to create this file.
The QC file is named for the first database connected, so remember the order of the databases
when you start Results with more than one database. For example, if you perform an initial build
on the databases dbname1 and dbname2 (in that order), the .qc file for these databases together
is called dbname1.qc. If you start Results with dbname2 and dbname1 (in that order), you see a
message that the dbname2.qc file was not found. If you start Results with only the dbname1
database, you see a message that dbname2 is needed but not connected. If you want to start with
only dbname1 you must do the following:
•
Start with a copy of an empty database followed by dbname1.
•
Delete the existing dbname1.qc file and perform an initial build on dbname1.
9–3
Progress Results User’s Guide for UNIX
NOTE:
You can start Results with more databases than you used to build the .qc file.
However, if you enter the Administration module and then exit, Results rewrites the
.qc file. Then that QC file requires the additional databases when you start Results
with it again.
If you want to start Results with database1 and another database, connect the other database
first. For example, if you already have a database1.qc file, you can start Results with database3
and database1 (in that order). The QC file for the initial build for these databases is called
database3.qc.
After you select Yes from the initial build prompt, you see this screen:
PROGRESS RESULTS
There are three ways to build query forms for PROGRESS
RESULTS. At any time after RESULTS builds the query forms,
you can manually tailor them.
MANUAL
You want to manually define each query form.
SEMI
After you pick a subset of files from the
connected databases, RESULTS generates query forms
only for the selected files.
AUTO
RESULTS generates all query forms automatically.
If you select AUTO, Results automatically creates query forms for each of the files in the
connected database(s).
If you select SEMI, Results builds query forms for the files you select from a list. After you
select the files, Results builds the default forms.
NOTE:
For more information about the AUTO and SEMI options, see the “Default Forms”
section in this chapter.
If you select MANUAL, you can define your own form for each query interface through a series
of screen prompts. When you choose MANUAL, the Form Definitions for Query submenu
appears. Follow the same process to define query forms when you choose MANUAL as you
follow when you choose the Form Definitions for Query option from the Administration Main
Menu. The “Form Definitions for Query” section in this chapter describes how to define and
modify query forms.
Once you select an option, a status screen lists the names of the files as they load from the
database into Results. The program names in this screen are created using the first eight
characters of the filename. If a program is already used by another procedure, Results assigns
the name qryxxxxx.p, where xxxxx represents a unique integer value.
9–4
Database Administration
Even when you define forms manually, Results automatically sets all other defaults, for
example, file relations, printer settings, terminal colors, and permission. If your database
contains many files that do not require query forms, the MANUAL option saves you time
because you only build the query forms you need.
During the initial build, and during subsequent form definitions for the Query module, Results
automatically places the procedure files, include files, and form definition (.f) files in the current
working directory. You can later move them anywhere in the PROPATH. For more information
about PROPATH, see the Progress Installation and Configuration Guide Version 9 for UNIX.
9.1.3
Default Forms
If you select the AUTO build option or the SEMI build option, Results automatically determines
all defaults. However, after the initial build completes, you can change defaults using the
Administration module. This section describes how Results determines default settings.
Results assumes a screen size of 80 characters wide by 24 lines high, with 17 of the 24 lines
available to users. When you build your query interface form, it must fit within these
constraints.
If you select AUTO during an initial build, Results builds an interface according to the
following rules:
•
Results drops any field with a display format greater than 76 characters. (Results uses two
spaces for attribute characters and two for the box (frame edge), so it interprets any field
wider than 76 characters as wider than 80 (that is, 76 + 4). Therefore, any field interpreted
as greater than 80 characters wide is dropped.)
•
If all the fields do not fit in the format, Results sorts them in descending order by size. Size
is determined according to this formula:
field width + label width [+ extent of array]
After determining the size of the fields, Results drops the largest field with the highest
order value (as taken from the Progress Data Dictionary). For example, if your last two
fields have an order value of 60 and 70, and field 60 contains 35 characters while field 70
contains 15 characters, Results drops the field with the order value 60. If this field is an
array element, it drops the whole array.
To see if Results dropped any fields while building a form, look in the query log (QL) file. (See
the “Logging Initial Build Information” section in this chapter for more information about this
file.)
9–5
Progress Results User’s Guide for UNIX
For each query form, Results creates a procedure file that contains the actual query procedure,
an include file called by the procedure, and a form definition file for the query. It places these
files in the current directory, but you can move them anywhere in the PROPATH.
By default, the output filenames are filename.p, filename.i, and filename.f, where filename is the
first eight characters of the filename. If there is a procedure anywhere in the PROPATH with
the same name, the new output file takes the name qryxxxxx.p, qryxxxxx.i, and qryxxxxx.f, where
xxxxx represents an integer value that is unique to the PROPATH. When renaming occurs, the
change is logged to the QL file. The “Logging Initial Build Information” section describes the
QL file.
9.1.4
Where Results Places the QC File
Results tries to create the QC file in the same directory that contains the database (dbname.db).
However, if the database is on another machine, Results might not be able to reach that
directory. In that case, Results places the QC file in the current working directory. Once Results
creates a QC file, you can move it anywhere in your PROPATH.
When you start Results it looks for the .qc file in the current working directory. If it can not find
it there, it looks in the PROPATH for the .qc file.
9.1.5
Logging Initial Build Information
During the initial build on any database, Results logs all activity into a dbname.ql file, where
dbname is the name of the database. This information can consist of compiler errors,
compilation times, and names of the files that Results used to build query interfaces. The QL
file is in the same directory as the QC file.
9.1.6
Default Options
During the initial build, Results disables the Add, Copy, Delete, and Update options in the
Query module and disables the User option throughout the entire package. Results enables these
options by default when you run it against the Progress sports database so that you can use them
in the tour and examples in this book.
You must enable these options if you want users to have them when they start Results with a
database other than the Progress sports database. You can enable and disable options using the
Query Permissions option on the Administration menu.
9–6
Database Administration
9.1.7
After the Initial Build
After the initial build, you can use the Administration module to change any environment
settings. With this module, you can establish further control over permissions, printers,
terminals, and Results components.
9.2
The Administration Module
Use the Administration Module to customize and tailor Results to take advantage of your
environment. You can set permissions, assign output devices, determine the appearance of
query interfaces, and change defaults. As a Progress developer, you can customize this end-user
tool to fit your application and to fit your user’s needs. This section includes:
•
Descriptions of all the Administration module options.
•
Procedures to manipulate the option’s functions.
Because Results is a Progress application, it uses the functionality that is available through the
Progress product that generates it.
Figure 9–1 shows the Administration module Main Menu.
Figure 9–1:
Administration Module Main Menu
The Results version number appears in the lower-right corner of the window. See the
“Application Rebuild” section, in this chapter for more information about the version number.
The following sections describe Administration module options, in the order that they appear.
9–7
Progress Results User’s Guide for UNIX
9.2.1
The Files Options
There are three files options: Application Rebuild, Form Definitions for Query, and Relations
Between Files. Use these options to rebuild the Results application interface, build customized
forms for query interfaces, and establish relationships between files.
Application Rebuild
Use the Application Rebuild option to easily port your query interface forms from one
environment to another. This option builds and compiles the new query interface and
re-establishes all the system defaults, including any default overrides previously established,
such as form fields and menu permissions, etc.
Use this option when you update your Results application to a new version. For example, when
you first start a new version of Results, it checks the version in the QC file and warns you to
perform an application rebuild to regenerate your interface to take advantage of any new
features or changes.
If the first digit of the version number changes, the internal processes of the Results system have
changed. You must review any user modules you have programmed and perform an application
rebuild. If the second digit changes, you must rebuild the query forms, and might need to revise
the user modules and procedures. Again, you need to perform an application rebuild. Finally, if
the letter changes, all user programs should run unchanged. However, to take advantage of any
new features or changes that may have been added, perform an application rebuild.
If you add or change a field in a database file, a message appears when you start Results that
prompts you to perform an application rebuild. If you add a field or file and want it to edit or
create the corresponding query form, use the Form Definition for Query option.
See the “Description of the Initial Build” section in this chapter for more information about the
Results QC file.
9–8
Database Administration
9.2.2
Form Definitions for Query
Use the Form Definitions for Query option to define and modify query forms. When you select
the option, the screen in Figure 9–2 appears.
Figure 9–2:
Defining Forms for the Query Module
Use this option if you want a file or field added after the initial build to appear in the query forms
you built.
You must select Add New Query Form or Choose Query Form to Edit before you can specify
update information. After you add or edit a query form and press END to exit, Results prompts
you to compile the changed form now, or to perform an application rebuild later.
These are the options under the Form Definitions for Query option:
Add New Query Form. Select this option, then select the file you want to use to build a query
interface. The list contains only the files you can read, that is, you have CAN-READ
permissions established in the Progress Data Dictionary. An asterisk (*) marks any file that has
query interfaces built on it.
Once you select a file, you must enter the following information or accept the default
information:
•
Query program filename—This is the name of the Progress procedure that Results
generates from the file definitions you supply. If you add a new query procedure and give
it a name that already exists, you receive a warning that Results will overwrite the existing
procedure. You can change the program name at this prompt.
•
Form physical filename—This is the name of the operating system file that contains the
form definition for the query interface.
9–9
Progress Results User’s Guide for UNIX
If you have a program form you want to use, enter it here. If a form with this name already
exists, you can use the fields from this form. Results parses the existing form code and presents
a list of the fields from that form.
If you do not want to use an existing form, enter a new filename. Results prompts you to
generate a new form. If you select YES, you see a list of all the fields from that file that you
have CAN-READ permissions for, as established in the Progress Data Dictionary. You select
the fields according to the criteria described in this section (entering YES or NO at the prompts).
From this list, you determine the fields you want to display, update, or query. You also
determine the fields you want in the browse list. In the forms list, the fields appear along the left
side of the window. There are five columns to the right of the field names. The first four columns
are: Disp? (display), Upd? (update), Qry? (query), and Brow? (browse). Each column has a yes
or no value. The fifth column is Seq (sequence); it takes a numeric value.
Display—Determines if the field appears in the query form. Enter YES if you want it in
the form. If you enter NO, the field and its label do not appear in the query form. You must
answer YES if you want to enable the update or query option or give the field a sequence
value.
Update—Determines whether the field can be updated. If you enter No, the field becomes
read-only.
Query—Determines if the Query option is enabled on this field during a dynamic lookup.
Browse—Determines if the field appears in a browse list.
Sequence—Determines the order in which fields appear in the form.
–
Frame name for 4GL code. If you use your own Progress form and you named a
frame in the form definition, you must enter that frame name here. For information
about designing Progress forms, see the Progress Programming Handbook.
–
Description. A line of text that describes the information contained in the query
form. This description is what the user sees when selecting from the query form list.
Choose Query Form to Edit. Presents a list of existing forms. After you choose a form to edit,
you can set the General Form Characteristics.
General Form Characteristics. Use this option to change the frame name that your Progress
form references and the description of the form that appears in the Query Form List when the
user selects the Query option.
Which Fields on Form. Use this option to select the fields to display on the query interface, the
fields that can be updated or queried, the fields that appear on the browse list, and the order in
9–10
Database Administration
which the fields appear. When you select this option, the fields appear that you selected with the
Choose Query Form to Edit or the Add New Query Form option.
Results uses two form types: default and user. Results uses the default form type for the query
interface unless you use the Manual option to build your interface with Results, add a new form
through the Administration module, or enter the name of an existing form. In those cases,
Results uses the user form. Thus, you can reference the form from the query interface (the .f file
from the Form physical filename option) to define other query interfaces. When you choose the
Add New Query Form option and use the fields from an existing form definition (filename.f) to
define your new query interface, by default the query form you define is the user type. When
forms have the user type, your changes do not affect the actual form definition; they only change
the way the fields appear on the query interface.
If the generated form is too large to fit on a 24 by 80 screen, you see a warning message. (The
message tells you the size of the form.) You can continue and build the form, but you receive a
run-time error from Progress if you try to run it on a 24 by 80 screen. However, you can run it
on a screen large enough for the form.
Permissions. Use this option to limit access to any query form. See the “Security Options”
section in this chapter for information about setting permissions.
Delete Current Query Form. Use this option to remove query forms from the list of available
forms. Results deletes the procedure, include, and object files related to the query form you
delete. It also deletes the form definition file if Results created it (the default). However, it will
not delete the definition file if you created it. If you want to delete a file you created, you must
delete it yourself.
9.2.3
Relations Between Files
Use the Relations Between Files option in the Administration to join files that are not related
automatically. Files are automatically related if they have indexed fields with the same name
and at least one of the indexes is unique. This option enables you to establish relationships
between files not sharing field names. For more information about relations between files, see
the Progress Language Tutorial for Character or the Progress Language Tutorial for Windows.
When you start Results for the first time, the system uses the Progress “OF” operator to join files
that have common field names. It also determines which files contain fields with the same
names, and whether indexes exist with duplicate fields as leading components.
When you select this option, you see a list that names all of the files in the connected databases.
After you select the first file in the relationship, another list of filenames appears and you can
select the second file in the relation.
For example, if you select the customer file in the mysports database, the screen shown in Figure
9–3 appears.
9–11
Progress Results User’s Guide for UNIX
Figure 9–3:
Selecting the Second File for a File Relation
In this example, an asterisk (*) marks each file that has a defined relation with the customer file.
You can select other files to relate to the customer file, or you can remove any relation. (To mark
any file, highlight it and press RETURN.) Default relations use OF criteria. You can define
nondefault relations using WHERE criteria.
You can add as many as 20 lines of WHERE or OF clause information in this window. Use any
of the keys described in Chapter 2, “General Information,” to edit the information in this
window. For example, you can press GET to display a list of available fields that you can use to
build the relation. Once you add the relationship, the reverse relation appears automatically.
NOTE:
To define a relation between files that do not have a common field, you must relate
each of the files to a file that has at least one field in common with each of them.
To delete a relation between two related files, select the related file in the list, then delete the
WHERE or OF clause. To delete the relation, delete the OF clause from the window. The next
time you view the file relation list, files will no longer be marked with an asterisk.
When you exit from the Administration module, Results updates the QC configuration file. The
next time you choose the Join option in the Query, Reports, Labels, or Data Export modules,
you will see the new relationships along with the existing relationships.
9–12
Database Administration
9.3
Security Options
The Administration module has five security options:
•
Contents of a User Directory
•
How to Exit Application
•
Module Permissions
•
Query Permissions
•
Sign-on Program/Product Name
Use Contents of a User Directory option to look at the contents of a user’s directory, the Module
Permissions and Query Permissions to establish security for your application, and the How to
Exit Application and Sign-on Program/Product Name options to change the Results exiting and
startup interface. With the security options, you can establish permissions for each Results
module and for each option in the Query module. You set permissions for specific files and
fields using the Progress Data Dictionary. (For more information, see the Progress Database
Administration Guide and Reference.)
This section describes how to change the sign-on program and determines what appears when
the user exits Results (operating system, Progress, etc.). Later in this chapter, the “Sign-on
Program/Product Name” section describes how to modify your login.p file when you have
security enabled for your database.
You can set permissions on many different levels. For example, you can control the access one
user or a group of users have to modules, menu options, query forms, and printers. You set
permissions using IDLISTs.
9–13
Progress Results User’s Guide for UNIX
An IDLIST is an expression (a constant, variable, or any combination of these) whose value is
a list of one or more user identifications (user IDs). If the expression contains multiple user IDs,
you must separate the user IDs with commas. Do not insert blanks between the user IDs. Table
9–1 shows the values you can use in the IDLIST.
Table 9–1:
Values for IDLISTs
Value
Meaning
*
All users are allowed access.
user
This user has access.
!user
This user does not have access.
string
Users whose ID begin with “string” have access.
!string*
Users whose ID begin with “string” do not have access.
The string value is a character expression that the system checks against the IDLIST.
For example, you can enter an IDLIST into the form shown in Figure 9–4 to establish
permissions for the Administration module.
Figure 9–4:
Module Permissions Example
In the IDLIST shown, the Administration module is available for users with a user ID that
begins with mis, or for users with the ID of bill, kathy, tony, or irene.
9–14
Database Administration
If you want to prevent access to the Update option in the Query module, you might enter the
following IDLIST in the Query Permissions window as shown in Figure 9–5.
Figure 9–5:
Query Option Permissions Example
In the example, the IDLIST prevents all users whose user ID begins with acct from updating
information in the Query module, unless the user ID is acctmngr. All other user IDs can use the
Update option.
9.3.1
Contents of a User Directory
Each Results user has a unique userid.qd file. The userid.qd file holds the information about the
physical filenames that map to the user’s descriptions for the Reports, Exports, and Labels
modules. Although more than one user can access information in the same database, users must
have their own directories to hold their generated reports, labels, and export formats.
NOTE:
When you do not use the User ID (-U) startup option on DOS or OS/2, the file is
named results.qd, by default.
If Results cannot find the QD file in the PROPATH, it creates one in the current directory. Each
user has their own QD file because if two users try to change the same QD file at the same time
the file can be corrupted.
The Contents of a User Directory option enables you to view the contents of any user’s
directory. To select a user, enter the full pathname of the user’s QD file and press RETURN or
GO. The contents of the user’s directory appears in the following categories: data export
formats, label formats, and report definitions. The name of the database used to create the data
export formats, labels, and reports appears after the name you gave it. For more information
about the QD file, see Appendix E, “Files that Results Creates.”
9–15
Progress Results User’s Guide for UNIX
9.3.2
Exiting the Application
Use the How to Exit Application option to determine how users leave the Results Main Menu.
You determine whether users quit to the operating system or return to a calling procedure when
they select the Exit option from the Results Main Menu.
If you select the RETURN option, users return to a calling procedure or to the Progress
Procedure Editor (if they started Results from the Editor).
If you select the QUIT option, users quit to the operating system, regardless of how they
accessed Results.
9.3.3
Module Permissions
Use this option to define permissions (by user ID) for each module. When you select this option,
a window appears that lets you select any Results module. After you select a module, you enter
the IDLIST that determines who can and cannot run that Results module.
9.3.4
Query Permissions
Use this option to hide specified menu options from users in the Query module. Permissions are
dynamic and based on user IDs. That is, if you prevent a user from using a menu option, the
option does not appear on the user’s screen.
When you select this option, Results displays a list of the menu options available in the Query
module. If you want to change an option’s permission, select it from the list. After you select an
option, a four-line update form appears inside the information window in which you enter a list
of user IDs.
9.3.5
Sign-on Program/Product Name
Use this option to name the sign-on logo that appears when you start Results. Also use it to add
login procedures and change the title on the Results Main Menu.
The sign-on program runs before Results starts. The default program, u-logo.p, displays the
Results logo first. You can tailor it to include your own logo, remove the logo, add login
procedures, or define shared variables you want to use in User programs.
You can also change the Progress Results title on the Main Menu.
If you want to add password security to Results, you can replace u-logo.p with a program that
calls login.p to prompt for user ID and password where necessary (similar to the way
prostart.p calls login.p when you start a Progress 4GL session). Results provides a program,
called u-login.p, that calls login.p.
9–16
Database Administration
When you exit the Administration module, Results performs the startup phase again. If you have
a login procedure (such as u-login.p) installed, you see the prompt for user ID and password
again. If you use the unmodified login.p that comes with Progress, you can bypass security by
pressing END.
Therefore, to protect your package from unauthorized access, do not leave your workstation
unattended with the login screen on your monitor. Anyone who presses the END key at this point
has full access to the Results system, including the Administration module.
Alternatively, you can enhance the default login.p file so that it does not allow users to use END
to bypass login security. For example, you change this line in your login.p file:
login.p
DO ON ENDKEY UNDO, RETURN: /* return if they hit endkey*/
to:
login.p
DO ON ENDKEY UNDO, RETRY: /* retry if they hit endkey*?
You can access this file from the Progress Procedure Editor.
9.4
The Configuration Options
The Language, Printer Setup, and Terminal Color Settings options on the Configuration menu
let you establish the language, printer, and terminal device settings for your application.
9.4.1
Language
One copy of Results can run in many different languages if the RESLANG product is installed
with Results. Use the Language option to select the language version of Results for the current
QC file. Then every time you start Results using this QC file, you see screens and messages in
the language you choose (for example, German or French).
When Results starts, it searches the results.l file to find the language it should use. If there is
no QC file built for the current database (or databases), it uses the default language specified in
the results.l file for all system messages. If there is a QC file for the current database, Results
uses the language specified.
9–17
Progress Results User’s Guide for UNIX
You can edit your results.l file before you use the initial build to build the QC file with the
default language you want. For example, you can change the following line in your results.l
file:
results.l
#edit the following line to set the default language for RESULTS
language= ’eng’
You can access this file from the Progress Procedure Editor.
You can change the default option from eng (English) to any of the languages available on your
system. The languages available on your system are listed in the results.l file. They also
appear in a list on the screen when you select the Language option from the Administration
module Main Menu. Multiple languages are only available if you installed the RESLANG
product.
There are multiple versions for some languages (French and Greek) because these languages
need to support different character sets. For example, French supports seven-bit and eight-bit
character sets and Greek supports 928 and 437 code page versions. Be sure to select the
appropriate language version.
9.4.2
Printer Setup
Use the Printer Setup option to define output devices, such as TERMINAL, FILE, and
PRINTER. You also use it to add new printer definitions. This section describes the menu
choices listed in the Printer Setup option.
Add New Output Device.
Use this to define a new output device. When you choose it, it prompts you for this information:
Desc for listing—This is the prompt to select an output device. This is for display only.
Device name—This is the logical system name of the output device. For example, the
usual default system printer name for Windows is prn or lpt1 and UNIX is lp or lpr. If you
are using the default printer, you enter those names here. If you are defining a terminal
device, type in a terminal type from your Progress PROTERMCAP file, or leave it blank
to use your current terminal settings.
Maximum Width—The maximum number of characters that the output device can print
horizontally. Use this option to print reports wider than 80 characters. Reports will wrap
if you output them to devices that are not wide enough to show all their information.
9–18
Database Administration
Type—The type of output device, as selected from the Device Types list on the screen.
You can enter one of the following:
•
term— This does an output to terminal paged. Use if the device you are adding is a
terminal.
If wy60tw is a valid terminal type listed in your PROTERMCAP file, you can display
output in the tall and wide format. For example, the text appears smaller and more columns
of text fit on the width of one page. To setup a WYSE60 terminal for tall and wide format,
enter wy60tw as the device name, and 132 as the maximum width.
•
to—Use to send information directly to an output device, without sending it through
a spooler or filter. For example, use this for DOS printer devices like LPT2 or LPT3
or to print directly to a UNIX device (bypassing a spooler).
•
thru—Use if you want your operating system to manage the information through a
spooler or filter. This option is only supported when you run Results on an OS/2 or
UNIX operating system.
Users enter the device name just as they would from the command line. For example, if
you enter cat my-report | lpr -Plw, then use lpr -Plw as the device name. If you use lp -s
-dlabel2 <report-x, then use lp -s -dlabel2 as the device name.
view—Use if you want to send the output of a report, label or export definition to a file,
and then automatically have an operating system access that file and display it on the
screen. The operating system program is usually an editor or a listing program that lets you
to scroll through the file. (You specify the program in the Device Name field). For
example, you might use one of the following: the public domain utility list on DOS or view
on UNIX. (These operating system programs are examples only. Use the appropriate
commands for your system.)
If you need to run a program to print a file, you can use view instead of thru. For example,
if you are on DOS and you want to print using the DOS spooler, you could use PRINT as
the device-name.
CAUTION: PRINT must be run once before Progress is started to install the resident portion,
since PRINT is part TSR and part command.
•
file—Use to prompt for the output destination filename. This option sends output to
a text file. It also appends the output to an existing file. If the file already exists,
Results prompts you to append to the file. If you do not append it, Results overwrites
the file.
9–19
Progress Results User’s Guide for UNIX
The default text filename is report.txt in the Reports module, label.txt in the Labels
module, and export.txt in the Data Export module.
•
page—Use for enhanced output to a terminal where you can navigate around the
screen using next page, prev page, and arrow keys. You can also scroll left and right
to view wide reports. The output report appears on the screen with a box around it.
This option uses quoter, therefore the standard quoter utility must be in your PROPATH
to use this option.
•
prog—Use to call a user’s program (u-print.p, for example). This passes the name
of the generated program (report, data export, or label definition) and enables your
program to determine the output destination. (Results includes the source code for a
sample program called u-print.p.)
If you want to define your own printer menu, define only one output device and give it the
type prog and set the device name to the name of the user print menu. When users select
the Run option, your printer menu program runs and users do not see the default scrolling
list of printer devices. See Chapter 10, “Integrating Results into Existing Applications,”
for more details about defining your own print menu.
Choose Device to Edit
When you select this choice, a list of the currently defined output devices appears. After you
select one of these, Results prompts you for the same information as in Add New Output Device
field—the description, the logical name of the device, the width of the output in characters, and
the device type as defined by the list on the screen. The existing values for the output device you
selected appear as defaults.
General Device Characteristics
If you select this, Results prompts you for the same information as in Add New Output Device
field—the description, the logical name of the device, the width of the output in characters, and
the device type as defined by the list on the screen. For more information, see the“Add New
Output Device.” section in this chapter.
Control Sequences
Use this option to set printer control sequences. The Initialization field enables you to send a set
of control sequences to the output device ahead of your information. Thus, you can control the
format of your document. For example, you can change your document position from portrait
to landscape, set margins, and add header and footer space. See your printer documentation to
determine the control sequences you can use. The remainder of the fields in this option: Normal
Print, Compressed, Bold ON, and Bold OFF, are reserved for future versions of Results.
9–20
Database Administration
Printer Permissions
Select Printer Permissions after you use Add New Output Device or Choose Device To Edit to
select the output device for which you want to set permissions. You set permissions by creating
an IDLIST as described in the “Security Options” section in this chapter.
Delete Current Device
Use this option to delete any of the previously defined output devices.
9.4.3
Terminal Color Settings
Use the Terminal Color Settings option to define default color settings for different terminal
types. When you select this option, a screen similar to the one shown in Figure 9–6 appears.
Figure 9–6:
Terminal Color Settings Screen
By default, your screen shows the terminal type you are using to run Results. When you press
the default settings for the terminal type appear in two columns. You can change the
settings in the left column. The right column displays the settings you saw when you entered
this window, so you can compare them with your new settings. To quickly reset your settings
on the left to match the right, press RECALL.
RETURN,
9–21
Progress Results User’s Guide for UNIX
Use this screen to define the display format for Results menus, dialog boxes, and lists. Once you
specify a terminal type, you can specify the attributes for each of these parts of the screens. For
regular terminal devices (noncolor), you can use the NORMAL, MESSAGES, and INPUT
settings:
•
NORMAL sets the format as light letters on a dark background.
•
MESSAGES sets the format as reverse video (dark letters on a light background).
•
INPUT sets the format as underlined field prompts.
For example, Figure 9–7 specifies that menus on a WY60 terminal appear in reverse video, with
highlighted text in normal video. It also indicates that an underline highlights text in dialog
boxes.
Figure 9–7:
Terminal Color Settings Example
Press RECALL to reset these settings to their previous settings.
For monitors and terminals that support color (PC monitors, for example), you can specify
foreground and background colors. The format is foreground color/background color. For
example, if you enter black/red for the menu’s Normal setting, menu boxes appear as black
letters on red background.
9–22
Database Administration
These are the foreground and background colors you can use:
9.5
Black
Blue
Green
Cyan
Red
Magenta
Brown
Gray
Yellow
White
Dark-Gray
Light-Blue
Light-Green
Light-Cyan
Light-Red
Light-Magenta
Light-Brown
–
Modules Options
There are five Modules options:
•
Browse Program for Query
•
Default Report Settings
•
User-Defined Export Format
•
Label Field Selection
•
User Option
9–23
Progress Results User’s Guide for UNIX
9.5.1
Browse Program for Query
Use this option to incorporate your own functionality for the Browse option in the Query
module. To do so, you create an include file in Progress and enter its name in this option.
The default Browse procedure is u-browse.i. This default include file also lets you use the
default functionality of the Browse option in your own application. Additionally, it enables you
to use your own browse program in Results. For more information about integrating the Results
package into existing software packages, see Chapter 10, “Integrating Results into Existing
Applications.”
9.5.2
Default Report Settings
Default Report Settings defines default settings and headers for reports. Use this option to
establish the number of lines per page for default reports definitions, or defaults for headers or
footers for reports. For example, you can create a default format that puts your company’s name
at the top of the page, and a page number and date at the bottom of the page.
9.5.3
User-defined Export Format
Use this option to add a user-designed data export program to the Data Export Settings option.
The name of the default procedure is u-export.p. You can edit this procedure or include your
own. For more information about integrating the Results package into existing software
packages, see Chapter 10, “Integrating Results into Existing Applications.”
9.5.4
Label Field Selection
Use the Label Field Selection option to see the address fields Results looks for by default, and
to define the lookup algorithm for default fields on address labels. You can define different
default label types by naming fields other than address fields.
For example, after you pick the active files in the Labels module, Results prompts you to lay out
the labels automatically.
Based on the Progress CAN-DO permissions, you enter a list of field names that Results
searches for in the user-selected file and put them in the label. You can use wildcard characters
(* or !, for example) as search strings.
9–24
Database Administration
When you select this option, ten entries appear that can have associated defaults. You can enter
field name defaults for:
•
Name
•
Addr1
•
Addr2
•
Addr3
•
City
•
State
•
Zip
•
Zip+4 (extended zip code)
•
C-S-Z (a field with the combined city, state, and zip code information)
•
Cntry (country)
When you finish updating the information, the QBF configuration file is updated to reflect any
changes.
By default, each language version of Results has different default address fields settings. These
are set when you perform an initial build against a database. For example, if your default
language is set to German when you perform the initial build, Results has the German default
address field settings. If you use the Language option to change to a different language, the
German fields remain the default fields. To change the fields after the initial build, select the
Label Field Selection option.
9.5.5
User Option
Use this option to define the program the User option calls from each module. You create a user
program with the Progress 4GL to perform a specific task. The default user option is
u-option.p. You can edit this option or include your own. For more information on integrating
the Results package into existing software packages, see Chapter 10, “Integrating Results into
Existing Applications.”
9–25
Progress Results User’s Guide for UNIX
9.6
Summary
This chapter provided general database administration information, as well as descriptions of
all the options in the Administration module’s Main Menu.
9–26
10
Integrating Results into Existing
Applications
This chapter is intended for application developers. It provides information for integrating the
Results product into other applications to provide the end user with a toolset that closely
matches the look and feel of their own application.
This chapter also provides information about:
•
Understanding the User module.
•
Running Results from your own application.
•
Tailoring the startup logo.
•
Adding your own menu options to Results.
•
Using customized help messages.
•
Using shared variables to pass information between Results and your application.
•
Using Results dialog box procedures in your applications.
•
Using the code Results generates for reports, labels, and data exports.
•
Designing your own export format.
•
Designing your browse program for Query.
•
Deploying applications that include a tailored Results interface.
Progress Results User’s Guide for UNIX
NOTE:
10–2
You should complete or review the tutorial in Chapter 3, “A Tour Through Results.”
The Query module and the Reports module sections are particularly important to
understanding this chapter.
Integrating Results into Existing Applications
10.1
Introduction
Results includes a special User option that appears on the Results Main Menu and the horizontal
menus within Results modules when there is a user program defined for Results.
The user uses the User option to transfer into a customized application program that you
provide. Follow these steps to install your own program.
1 ♦ Put your program anywhere in the PROPATH.
2 ♦ Enter its name in the User Option choice on the Administration Main Menu.
After you perform these steps, Results runs your program whenever users select the User option
from any Results menu. If you want to include more than one user program, you can have the
User option call a menu that includes them.
By default, Results includes a sample User program called u-option.p that lets the user escape
to the operating system. To get back to Results, they perform the operating system escape.
When Results runs against a copy of the Results sports database, it automatically installs the
program in the User Option. When it runs against any other database, you (or the
database administrator) must enter its name in the User Option choice on the Administration
module Main Menu.
u-option.p
For example, you can call a word processor or spreadsheet package from the Results Main
Menu or, you might want to pass the records the user has selected for reports to a statistical
analysis routine or other customer program you wrote in the Progress 4GL. These are just two
examples of how you can use the User option.
10.2
Running Results from Your Own Progress Application
You can provide your users with several ways to start Results. For example, you might want
your users to start Results from the operating system, from the Progress Procedure Editor, or
from an option provided by your application software.
The name of the main procedure for the Results product is results.p
Results starts immediately when you run this procedure from inside your application or from
the Progress Procedure Editor.
10–3
Progress Results User’s Guide for UNIX
10.3
Tailoring the Startup Logo
When you customize the Results product, you might want to tailor the startup logo to reflect the
name of your application or company. You integrate that logo using the Administration module.
You can also initialize shared variables required by your own procedures, run a login procedure,
display logos, etc.
For example, the default startup logo is u-logo.p. You can replace it with a login procedure that
runs u-login.p. The u-login.p procedure prompts the user for their login name and password,
and checks the values they enter and compares them to those stored in the appropriate database
files. (The source code for u-logo.p and u-login.p are included with Results.) See Chapter 9,
“Database Administration” for information about the Sign-on Program/Product Name option.
10.4
Adding Your Own Menu Options to Results
Besides controlling how the user starts up the product, you can also add options to Results to
tailor the product to your own environment. That is, you can use the entry points included in
Results to attach Progress procedures, and look at the current query context the user has defined
(what fields are selected, what files, what selection criteria, etc.). The “Using Shared Variables”
section in this chapter provides details about these entry points.
10–4
Integrating Results into Existing Applications
10.5
Using Customized Help Messages
When users press HELP, Results calls a procedure called applhelp.p. Most applications have
their own applhelp.p that contains help instructions for their own products. This is the source
code for Results help:
/* applhelp.p - PROGRESS RESULTS applhelp.p */
DEFINE SHARED VARIABLE qbf-direct AS CHARACTER NO-UNDO.
DEFINE SHARED VARIABLE qbf-module AS CHARACTER NO-UNDO.
DEFINE VARIABLE qbf-c AS CHARACTER INITIAL ? NO-UNDO.
IF qbf-module = "f" THEN qbf-c = SEARCH("ft.r").
IF qbf-c <> ? THEN DO: /* FAST TRACK help */
RUN VALUE(qbf-direct + "s-prefix.p") (qbf-c,OUTPUT qbf-c).
RUN VALUE(qbf-c + "applhelp.p").
RETURN.
END.
IF LENGTH(qbf-module) > 0 THEN DO: /* RESULTS help */
RUN VALUE(qbf-direct + "s-help.p").
RETURN.
END.
/* Put your own help routine here */
If you place this routine at the top of your application help, you enable online help to work
correctly for Results as well as your application’s help system.
You must invoke the help supplied with Results when the qbf-module variable shown in the
source code contains text. The “Determining the Originating Module” section in this chapter
describes the qbf-module variable.
10–5
Progress Results User’s Guide for UNIX
10.6
Using Shared Variables
The following sections describe shared variables that you can define in your Progress
procedures. When you call your procedure from Results, these shared variables let you look at
the context the user is currently using.
10.6.1
Testing the Version Number
Use the following shared variable in your Progress procedures to see the Results version number
your users are running.
DEFINE SHARED VARIABLE qbf-vers AS CHARACTER NO-UNDO.
The shared variable qbf-vers contains the product version number. The product version
number consists of two digits separated by a decimal point, and followed by a letter. For
example, 1.2A could be a version number.
Check the version number to verify that the environment you used to develop your programs
matches the version of Results the user is running. For more information about version numbers
and their meanings, see the “Application Rebuild” section in Chapter 9, “Database
Administration.”
If the versions do not match, programming interface changes between Results versions could
cause erratic behavior. For example, error messages similar to the following might appear when
users try to run the User program: “Shared variable name has not yet been created,” or “Conflict
in extent, data type, or undo status for shared variable name,” where name is the name of a
shared variable. Such an error can keep the user program from executing, and can possibly
terminate the session. To avoid this, you have to rebuild your application. See the “Application
Rebuild” section in Chapter 9, “Database Administration.”
10.6.2
Determining the Originating Module
Use the following shared variable in your Progress procedures to determine which Results
module the user was in when they selected the User option. Use this information to return the
user to the originating module or another module after running your add-on (User) module.
DEFINE SHARED VARIABLE qbf-module AS CHARACTER NO-UNDO.
The qbf-module variable holds one of the values listed in Table 10–1.
10–6
Integrating Results into Existing Applications
Table 10–1:
Module Values
Character
Meaning
?
The User module was selected from the Main Menu or a submenu.
q
The User module was selected from the Query module.
r
The User module was selected from the Reports module.
l
The User module was selected from the Labels module.
d
The User module was selected from the Data Export module.
If the User option is selected from a submenu (in any module), the value of qbf-module is a
question mark (?), just as if it was chosen from the Main Menu.
Once the User module finishes processing, you can change the setting for qbf-module to return
to another module. If you do not change the qbf-module value, the system automatically returns
to the module where the user originally called the User option.
This code shows how you can use this feature in your program. This code puts the user in the
customer form in the Query module if they selected the User program from the Main Menu.
/* This program places the user into the */
/* customer form from the sports database. */
IF qbf-module =
ASSIGN
qbf-module
qbf-file[1]
qbf-db[2]
qbf-where[1]
qbf-of[1]
qbf-file[2]
qbf-db[2]
? THEN
=
=
=
=
=
=
=
/* called from the main menu */
"q"
"customer"
"sports"
""
""
""
"".
RETURN.
NOTE:
Do not change the qbf-file shared variable contents set within the Query module
when there is a query form already on the screen. Doing so can lead to unexpected
results.
10–7
Progress Results User’s Guide for UNIX
10.6.3
Determining the Video Attributes
Use the following shared variables in your Progress procedures to determine the video attributes
in effect when the user chooses the User option:
DEFINE
DEFINE
DEFINE
DEFINE
DEFINE
DEFINE
SHARED
SHARED
SHARED
SHARED
SHARED
SHARED
VARIABLE
VARIABLE
VARIABLE
VARIABLE
VARIABLE
VARIABLE
qbf-dhi
qbf-dlo
qbf-mhi
qbf-mlo
qbf-phi
qbf-plo
AS
AS
AS
AS
AS
AS
CHARACTER
CHARACTER
CHARACTER
CHARACTER
CHARACTER
CHARACTER
NO-UNDO.
NO-UNDO.
NO-UNDO.
NO-UNDO.
NO-UNDO.
NO-UNDO.
Table 10–2 shows the functionality of these shared variables.
Table 10–2:
Video Attribute Shared Variables
These Shared Variables
Determine High and Low Intensity Colors For...
qbf-dhi and qbf-dlo
The s-error.p and s-box.p dialog boxes
qbf-mhi and qbf-mlo
Menus
qbf-phi and qbf-plo
Scrolling lists
You can use these shared variables so your own programs include the same video attributes as
the current Results application. See the “Using Results Dialog Box Procedures in Your
Applications” section in this chapter for more information about these dialog boxes.
10.6.4
Determining the Name of the Originating Program
Use the following shared variable in your Progress procedures to determine the name of the
selection the user was running when they selected the User option.
DEFINE SHARED VARIABLE qbf-name AS CHARACTER NO-UNDO.
The shared variable qbf-name contains the name of the report, label, or the export procedure the
user was running when they chose the User module.
Note that Results saves the procedure name whenever the user saves and names a definition
(report, label, or data export definition). For example, if a report is defined but not saved, the
system does not assign qbf-names to it.
10–8
Integrating Results into Existing Applications
10.6.5
Determining the Order Criteria Defined
Use the following shared variable in your Progress procedures to determine the defined order
criteria inside Results:
DEFINE SHARED VARIABLE qbf-order AS CHARACTER EXTENT 5 NO-UNDO.
This shared variable has these characteristics:
•
The shared variable qbf-order contains BY clauses.
•
Each element contains one of the order-by fields.
•
Results sets each unused array entry to the empty string (“”) and places it at the end of the
array so that no gaps appear in qbf-order array.
•
Each element has the form “database.file-name.field-name [ DESC].” In this case, an
optional blank space and the letters DESC are included after the name to indicate that the
order field is descending. If the field is an array field, the field name is followed by a
number square brackets (for example, [#], where # is the array element selected for
ordering).
•
The values contained in the qbf-order variable are always database fields or calculated
fields.
•
The following example is typical of the code that generates the order-by clause:
c = "".
DO i = 1 TO 5 WHILE qbf-order[i] <> "":
c = c + " BY " + qbf-order[i].
END.
IF c <> "" THEN PUT UNFORMATTED SKIP "BREAK" c.
NOTE:
This code is used in the u-export.p sample export format program in the “Designing
Your Own Export Format” section in this chapter.
When you run this program, it outputs the appropriate ordering for the report, export, or label
program that was defined in Results.
10–9
Progress Results User’s Guide for UNIX
10.6.6
Determining Files and Selection Criteria
Use the following shared variables in your Progress procedures to determine the files and
selection criteria defined when the user selects the User module.
DEFINE
DEFINE
DEFINE
DEFINE
SHARED
SHARED
SHARED
SHARED
VARIABLE
VARIABLE
VARIABLE
VARIABLE
qbf-db
qbf-file
qbf-where
qbf-of
AS
AS
AS
AS
CHARACTER
CHARACTER
CHARACTER
CHARACTER
EXTENT
EXTENT
EXTENT
EXTENT
5
5
5
5
NO-UNDO.
NO-UNDO.
NO-UNDO.
NO-UNDO.
When using these shared variables:
•
Results currently supports up to five joins between files in all modules.
•
Results sets each unused array entry to contain an empty string (“”) and places it at the end
of the array so that no gaps appear in the qbf-file and qbf-db arrays. For example,
qbf-file[1] = “customer” qbf-file[2] = “” qbf-file[3] = “order” cannot process
because there is an unused entry (shown as "") between array entries one and three.
Instead, the array contains qbf-file[1] = “customer” qbf-file[2] = “order”, where
the unused entry appears at the end of the array.
•
The WHERE clauses contained in the qbf-where variable can be blank or contain the
WHERE expression. The value contained within each array element does not begin with
the keyword “WHERE.” If the qbf-where element is blank, it means that there is no
WHERE criteria for the corresponding file. (However, there might be a corresponding
relation in qbf-of.)
The qbf-where[ ] variable might also contain the questions for Ask mode. (These are the
prompts users see when they run a WHERE clause that uses Ask mode. They prompt users
for a value at runtime.) If INDEX(qbf-where[],"~{~{") is greater than 0, then you must
do additional processing before you can use the WHERE clause.
For example, Results stores the run-time ask information in the WHERE clause between
double sets of curly braces ({{ and }}. To use the WHERE clause, everything from {{ to
}} inclusive must be replaced with a literal value.
Between these braces, Results stores several fields: the data type (followed by a comma),
the field name (followed by a comma), a relational operator (followed by a colon), and the
user question. For example, qbf-where[1] for the customer file might contain this code:
sports.customer.St = {{character,sports.customer.St,
Equal:Enter state for report}}
10–10
Integrating Results into Existing Applications
This means, “Extract all records where the field sports.customer.St is equal to a
user-supplied character value, and prompt the user with the question Enter state for
report. Then place the user-supplied value into qbf-where[ ] in the place of
{{character....report}}.
•
The OF clause stores the relation. It begins with OF or WHERE, except for qbf-of [1], which
is usually empty. You can use the following code to combine the qbf-of and qbf-where
variables:
DEFINE VARIABLE c AS CHARACTER NO-UNDO.
DEFINE VARIABLE i AS INTEGER
NO-UNDO.
PUT UNFORMATTED ’FOR ’.
DO i = 1 TO 5 WHILE qbf-file[qbf-i] <> "":
c = (IF qbf-where[i] = "" THEN
qbf-of[i]
ELSE IF qbf-of[i] = "" THEN
"WHERE " + qbf-where[i]
ELSE IF qbf-of[i] BEGINS "OF" THEN
qbf-of[i] + " WHERE " + qbf-where[i]
ELSE
qbf-of[i] + " AND " + qbf-where[i]
).
IF c <> "" THEN c = " " + c.
PUT UNFORMATTED ’EACH ’ qbf-db[i] ’.’ qbf-file[i] c ’ NO-LOCK’.
IF i < 5 AND qbf-file[i + 1] <> "" THEN
PUT UNFORMATTED ’,’ SKIP ’ ’.
ELSE
PUT UNFORMATTED ’:’ SKIP.
END.
NOTE:
Code similar to this is used in the u-export.p sample export format program in the
“Designing Your Own Export Format” section in this chapter.
Use this program listing in conjunction with the qbf-file, qbf-where, and qbf-of shared
variables to produce a Progress 4GL selection statement similar to the following.
FOR EACH sports.customer, EACH sports.order OF sports.customer,
EACH sports.order-line
WHERE sports.order.order_num =sports.order-line.order-num . . .
This program is important because you use these entry points to determine the files and selection
criteria already defined when the User module was selected. Note that when there is a join
operation, Results shows all parent relationships, not just the immediate parents.
10–11
Progress Results User’s Guide for UNIX
10.6.7
Determining the Fields Selected for Reports
Use the following shared variables in your Progress procedures to determine the selected fields
in the report or export session. These variables also enable your program to access any
calculated fields end users define.
DEFINE
DEFINE
DEFINE
DEFINE
DEFINE
DEFINE
DEFINE
DEFINE
DEFINE
SHARED
SHARED
SHARED
SHARED
SHARED
SHARED
SHARED
SHARED
SHARED
VARIABLE
VARIABLE
VARIABLE
VARIABLE
VARIABLE
VARIABLE
VARIABLE
VARIABLE
VARIABLE
qbf-rc#
qbf-rcn
qbf-rcc
qbf-rca
qbf-rcl
qbf-rcf
qbf-rcw
qbf-rct
qbf-dtype
AS
AS
AS
AS
AS
AS
AS
AS
AS
INTEGER
CHARACTER
CHARACTER
CHARACTER
CHARACTER
CHARACTER
INTEGER
INTEGER
CHARACTER
EXTENT
EXTENT
EXTENT
EXTENT
EXTENT
EXTENT
EXTENT
64
64
64
64
64
64
64
NO-UNDO.
NO-UNDO.
NO-UNDO.
NO-UNDO.
NO-UNDO.
NO-UNDO.
NO-UNDO.
NO-UNDO.
NO-UNDO.
These shared variables have the following characteristics:
10–12
•
The qbf-rc# variable represents the number of report columns in use.
•
The qbf-rcn[ ] variable is an array of column names or other information. It contains one
element for each report column. The contents of this field vary depending on qbf-rcc[ ].
If qbf-rcc[ ] begins with e or is blank, then this is the field name. Otherwise, it is a
calculated variable name of the form qbf-###, where ### represents a three-digit number.
Also, depending on the value of qbf-rcc[ ], it might have other contents (see the
description for qbf-rcc for details). However, using the ENTRY(1,qbf-rcn[ ]) function
always returns the column name.
•
The qbf-rcc[ ] value is an array used for calculated fields and stacked arrays. (Stacked
arrays display the information in a vertical format.) If the first character is blank, this is
not a calculated field or a stacked array.
Integrating Results into Existing Applications
Table 10–3 describes the calculated field for each symbol.
Table 10–3:
Calculated Field Symbols
Character
Meaning
r
Running total. ENTRY(2,qbf-rcn[ ]) contains the field for which the
total is defined.
p
Percent of total. ENTRY(2,qbf-rcn[ ]) contains the field for which
the percent is defined.
c
Counter. INTEGER(ENTRY(2,qbf-rcn[ ])) is starting point,
INTEGER(ENTRY(3,qbf-rcn[ ])) is increment.
e
Stacked array. The e is followed by the extent of the array (for
example, e12 for customer.mnth-sales[ ]).
s
String calculated column. This refers to the data type of a calculated
column. It is not necessarily the same as the data type of the menu
option. For example, if you select string, you can pick the numeric
string length and get the n symbol in the layout.
n
Numeric calculated column. As with the s symbol, this refers to the
data type of a calculated column and is not always the same as the
data type of the menu option.
l
Logical calculated column. As with the s symbol, this refers to the
data type of a calculated column and is not always the same as the
data type of the menu option.
d
Date calculated column. As with the s symbol, this refers to the data
type of a calculated column and is not always the same as the data
type of the menu option.
For calculated field types s, n, l and d, ENTRY(1,qbf-rcn[ ]) is the column name and
SUBSTRING(qbf-rcn,INDEX(qbf-rcn[ ],",") + 1) contains the expression. You cannot
use ENTRY(2,...) to get the expression, since it may have embedded commas.
•
The qbf-rca[ ] value is an array that contains totals information. If it contains just an
ampersand (&), the field hides repeating values. Otherwise, it contains a string. If the last
character in the string is a dollar sign ($), then it is a totals-only string. The rest of the
contents of the field contains a series of one or more pairs of characters, where each pair
is a letter followed by a number. The letters can be any of the following: t, c, a, n, or x.
10–13
Progress Results User’s Guide for UNIX
The digits can be any number from 1 through 6, inclusive. Table 10–4 lists the values that
each of these characters represents.
Table 10–4:
Totals Symbols
Character
10–14
Meaning
t
Total
c
Count
a
Average
n
Minimum
x
Maximum
1
Accumulate at first order-by
2
Accumulate at second order-by
3
Accumulate at third order-by
4
Accumulate at fourth order-by
5
Accumulate at fifty order-by
6
Put grand total at bottom line (summary line.)
•
The qbf-rcl[ ] value is an array of column labels. Stacked column labels are supported.
In stacked column labels, an exclamation point (!) breaks column labels into more than one
level. If there are more than two levels, Results just shows only two levels on the Report
Layout screen. However, they generate properly when users run the reports.
•
The qbf-rcf[ ] value is an array of formats for report columns. All Data Dictionary
formats are supported. See Appendix C, “Field Display Formats,” for information on
dictionary formats.
•
The qbf-rcw[ ] value is an array of column widths within the Report module. Use this in
conjunction with qbf-r-attr[1] (left margin) and qbf-r-attr[3] (between column
spacing) to do the report layout. This takes into account format, label widths, and stacked
labels.
Integrating Results into Existing Applications
•
The qbf-rct[ ] value is an array of numbers that corresponds to the data types stored in
the shared variable qbf-dtype. You can use this as an index into qbf-dtype to translate to
the actual Progress data types for each column in the report. For example, 1 represents
character data type, 2 represents date, etc.
•
The qbf-dtype value is a comma-separated list of data types set to “character,date,
logical,integer,decimal,raw,recid”. This variable is set by Results, and qbf-rct is a pointer
to one of the types.
Use these shared variables to determine the fields users selected in their report or export session,
and to access any calculated fields defined in the report.
10–15
Progress Results User’s Guide for UNIX
This is a sample code that lists the subtotal attributes for fields in a report:
/* This sample code lists the subtotal attributes */
/* assigned to each field in the report definition.*/
DEFINE SHARED VARIABLE qbf-rc# AS INTEGER
NO-UNDO.
DEFINE SHARED VARIABLE qbf-rcn AS CHARACTER EXTENT 64 NO-UNDO.
DEFINE SHARED VARIABLE qbf-rca AS CHARACTER EXTENT 64 NO-UNDO.
DEFINE SHARED VARIABLE qbf-order AS CHARACTER EXTENT 5 NO-UNDO.
DEFINE VARIABLE a AS CHARACTER NO-UNDO.
DEFINE VARIABLE b AS CHARACTER NO-UNDO.
DEFINE VARIABLE c AS CHARACTER NO-UNDO.
DEFINE VARIABLE i AS INTEGER NO-UNDO.
DEFINE VARIABLE j AS INTEGER NO-UNDO.
FORM WITH DOWN NO-ATTR-SPACE.
/* loop through all fields */
DO i = 1 TO qbf-rc#:
/* Loop through each possible value (1 to 5 for subtotal */
/* levels, 6 for summary line at end of report).
*/
DO j = 1 TO 6:
/* ’a’ and ’c’ are scrap variables that make the */
/* assignment to ’b’ below easier to follow. */
ASSIGN
a = qbf-rca[i]
c = STRING(j)
b = (IF INDEX(a,"a" + c) > 0 THEN ’ SUB-AVERAGE’ ELSE ’’)
+ (IF INDEX(a,"n" + c) > 0 THEN ’ SUB-MINIMUM’ ELSE ’’)
+ (IF INDEX(a,"x" + c) > 0 THEN ’ SUB-MAXIMUM’ ELSE ’’)
+ (IF INDEX(a,"c" + c) > 0 THEN ’ SUB-COUNT’ ELSE ’’)
+ (IF INDEX(a,"t" + c) > 0 THEN ’ SUB-TOTAL’ ELSE ’’).
This section searches for attributes using the symbols in Table 10–4 and builds the aggregate
expression.
You can use this code as an example when you write your own code. The comments in this code
will help guide you.
10–16
Integrating Results into Existing Applications
10.7
Using Results Dialog Box Procedures in Your Applications
This section describes how to use two Results procedures in your applications. The two routines
show you how to produce dialog boxes in your applications. Dialog boxes provide error
messages or logical (yes/no) choices.
There are two dialog box routines that you can run from within your procedures: s-error.p and
s-box.p. The s-error.p routine creates an error message box, and s-box.p creates a logical
choice box. When you call the routines, you specify the text and choices you want to appear. In
both cases, the box adjusts vertically to accommodate the text you include, and the text wraps
from one line to the next. However, anywhere in the text string that you include a carat (^), the
text breaks to a new line.
10.7.1
Error Message Box
You can call s-error.p in Results from within your user file using the following code:
RUN s-error.p ("Some character string expression").
Where the character expression is the text you want displayed in the error message box. For
example, after you run a test for permissions, you can call this routine:
RUN s-error.p ("You do not have permission to run this option).
The s-error.p function creates the box, displays an error message box similar to the following,
then returns:
You do not have permission to run this option.
10.7.2
Logical Choice Box
You call this procedure in Results from within your user file using the following code:
RUN s-box.p (INPUT-OUTPUT logicalvariablename,
"String expression for first (true) box",
"String expression for second (false) box",
"String expression for text at top of box").
10–17
Progress Results User’s Guide for UNIX
Where the character expression is the text you want displayed in the error message box. For
example, after you define a logical variable, you can call this procedure. Include the name of
the logical variable in the procedure. Also, include text strings for the first choice, the second
choice, and the text that appears at the top of the box. For example:
RUN s-box.p (INPUT-OUTPUT qbf-l,
?, ?, "Do you want to over-write the existing report?").
If you use a question mark (?) as the character string for the first box and second box, the boxes
default to yes and no values. You can include text strings, such as ENABLE and DISABLE or
ON and OFF.
For example, this code produces the logical choice box shown below.
Do you want to over-write
the existing report?
Yes
No
The initial value of the first parameter to INPUT-OUTPUT sets the default choice. For example, if
the value of the first parameter to INPUT-OUTPUT is true, the highlight bar rests on the left option
(the true value). If the first parameter to INPUT-OUTPUT is false, the highlight bar rests on the
right option (the false value).
10.8
Using the Generated Report, Labels, and Data Export Code
This section describes how to use report, label, and data export programs generated by Results
as stand-alone procedures.
In some situations, you might want to include some existing standard reports, label programs,
and data export capabilities in your application without including all of the Results system. You
can use Results to build these items yourself, then apply the following method to run them as
standalone programs.
When you run a report, label, or data export definition, Results generates a Progress 4GL
procedure. When you save these definitions in Results, you enter descriptions to identify them.
(These are just descriptions, not the filenames used to store the reports as source files in the
operating system.)
10–18
Integrating Results into Existing Applications
Build and test a sample/text report, label, etc. Once you have saved it, you can use the Contents
of a User Directory option in the Administration module to look up the actual filename Results
used to save your work.
For this example, assume you have generated a report program that Results saved in the
operating system as rep00001.p. If you look at the rep00001.p file, you see that Results
generated the Progress 4GL source code to run your report.
To run the 4GL source by itself, however, you first have to define the output destination. For
example, you can define the output destination as lpr:
DEFINE NEW SHARED VARIABLE qbf-total AS INTEGER INITIAL 0 NO-UNDO.
OUTPUT THROUGH lpr PAGED.
RUN rep00001.p.
Many reports require you to use a PAGED output destination. For example, if the header within
your source contains a field, use a PAGED output destination.
NOTE:
Results cannot run any report, label, or data export program as a stand-alone
procedure if it uses Ask mode in the WHERE clause builder.
For all modules, the shared variable qbf-total returns the number of labels printed or records
exported or reported.
10.9
Designing Your Own Export Format
Although Results offers very flexible data export formats, you might need an export format that
Results does not currently offer. Therefore, you can design one and include it as a menu select
under the Data Export Settings option. You can include your own export format by enabling it
through the User-Defined Export Format option in the Administration module.
The source file for a sample user-defined export format is included with Results. You see this
as an option when you start with one or more copies of the sports database. (The databases you
start with are copies of the sports database.)
10–19
Progress Results User’s Guide for UNIX
The following code is a copy of the u-export.p source code.
u-export.p
/* u-export.p - sample export format program */
/* this program exports data in the following fashion:
a) numeric fields are output as regular numbers.
b) dates are written in yyyymmdd format.
c) strings are surrounded by quote marks.
d) logicals are written as ’true’ or ’false’.
e) fields are separated by commas.
f) lines are terminated by LF or CRLF, depending on opsys.*/
/* necessary shared definitions */
DEFINE SHARED VARIABLE qbf-where AS CHARACTER EXTENT 5 NO-UNDO.
DEFINE SHARED VARIABLE qbf-db
AS CHARACTER EXTENT 5 NO-UNDO.
DEFINE SHARED VARIABLE qbf-file AS CHARACTER EXTENT 5 NO-UNDO.
DEFINE SHARED VARIABLE qbf-of
AS CHARACTER EXTENT 5 NO-UNDO.
DEFINE SHARED VARIABLE qbf-order AS CHARACTER EXTENT 5 NO-UNDO.
DEFINE SHARED VARIABLE qbf-rc#
AS INTEGER
NO-UNDO.
DEFINE SHARED VARIABLE qbf-rcn
AS CHARACTER EXTENT 64 NO-UNDO.
DEFINE SHARED VARIABLE qbf-rct
AS INTEGER
EXTENT 64 NO-UNDO.
/* this stream is already opened for us */
DEFINE SHARED STREAM
qbf-io.
DEFINE VARIABLE qbf-c AS CHARACTER NO-UNDO.
DEFINE VARIABLE qbf-i AS INTEGER
NO-UNDO.
/* write out definition for shared variable */
PUT STREAM qbf-io UNFORMATTED
’DEFINE SHARED VARIABLE qbf-total AS INTEGER NO-UNDO.’ SKIP
’qbf-total = 0.’ SKIP.
/* write out for-each statement */
PUT STREAM qbf-io UNFORMATTED ’FOR ’.
DO qbf-i = 1 TO 5 WHILE qbf-file[qbf-i] <> "":
qbf-c = (IF qbf-where[qbf-i] = "" THEN
qbf-of[qbf-i]
ELSE IF qbf-of[qbf-i] = "" THEN
"WHERE " + qbf-where[qbf-i]
ELSE IF qbf-of[qbf-i] BEGINS "OF" THEN
qbf-of[qbf-i] + " WHERE " + qbf-where[qbf-i]
ELSE
qbf-of[qbf-i] + " AND " + qbf-where[qbf-i]
).
IF qbf-c <> "" THEN qbf-c = " " + qbf-c.
PUT STREAM qbf-io UNFORMATTED
’EACH ’ (IF qbf-db[qbf-i] = "" THEN "" ELSE qbf-db[qbf-i] + ".")
qbf-file[qbf-i] qbf-c ’ NO-LOCK’.
IF qbf-i < 5 AND qbf-file[qbf-i + 1] <> "" THEN
PUT STREAM qbf-io UNFORMATTED ’,’ SKIP ’ ’.
END.
10–20
Integrating Results into Existing Applications
These shared variables are described in the “Using Shared Variables” section in this chapter.
/* this builds the by-clause part of the for-each */
qbf-c = ’’.
DO qbf-i = 1 TO 5 WHILE qbf-order[qbf-i] <> "":
qbf-c = qbf-c + ’ BY ’ + qbf-order[qbf-i].
END.
IF qbf-c <> "" THEN PUT STREAM qbf-io UNFORMATTED SKIP qbf-c.PUT STREAM qbf-io
UNFORMATTED SKIP
’ qbf-total = 1 TO qbf-total + 1:’ SKIP
’ PUT UNFORMATTED’./* output the field list */
DO qbf-i = 1 TO qbf-rc#: /* count_chosen */IF qbf-rct[qbf-i] = 1 THEN /*
character */
qbf-c = ’"~~"" ’ + qbf-rcn[qbf-i] + ’ "~~""’.
ELSE
IF qbf-rct[qbf-i] = 2 THEN /* date */
qbf-c = ’STRING(DAY(’ + qbf-rcn[qbf-i] + ’) + 100 * MONTH(’
+ qbf-rcn[qbf-i] + ’) + 10000 * YEAR(’ + qbf-rcn[qbf-i]
+ ’),"99999999")’.
ELSE
IF qbf-rct[qbf-i] = 3 THEN /* logical */
qbf-c = ’TRIM(STRING(’ + qbf-rcn[qbf-i] + ’,"true/false"))’.
ELSE
qbf-c = qbf-rcn[qbf-i]. PUT STREAM qbf-io UNFORMATTED SKIP
’
’ qbf-c ’ ’ (IF qbf-i = qbf-rc# THEN ’SKIP’ ELSE ’","’).
END./* end the program */
PUT STREAM qbf-io UNFORMATTED
’.’ SKIP
’END.’ SKIP
’RETURN.’ SKIP.
RETURN.
You can edit this u-browse.p program or define your own then enable it through the
User-Defined Export Format option in the Administration module.
10–21
Progress Results User’s Guide for UNIX
10.10 Designing Your Own Print Menu
You can design and include your own print menu to replace the print menu in Results. To
include your own print menu, in the Administration module you must delete all print devices
except one and give it the type prog. Then set the device name to the name of the user print
menu. When users select the Run option, your printer menu program runs and the user sees the
default scrolling list of printer devices.
Results generates the procedure (usually _qbf.p), then does the following:
RUN VALUE(device-name) (INPUT program-to-run).
A user program might be something simple, like:
DEFINE INPUT PARAMETER program-to-run AS CHARACTER NO-UNDO.
DEFINE VARIABLE elapsed-time AS INTEGER NO-UNDO.
elapsed-time = ETIME(TRUE).
OUTPUT TO PRINTER NO-ECHO.
RUN VALUE(program-to-run).
OUTPUT CLOSE.
HIDE MESSAGE NO-PAUSE.
MESSAGE "Actual elapsed time =" ETIME / 1000 "seconds".
RETURN.
Or it could be more complicated, like the u-print.p program that is supplied with Results.
10–22
Integrating Results into Existing Applications
For example, your printer menu program might look like this:
DEFINE INPUT PARAMETER
DEFINE SHARED VARIABLE
DEFINE
VARIABLE
DEFINE
VARIABLE
program-to-run AS CHARACTER
qbf-module
AS CHARACTER
thru-name
AS CHARACTER
menu AS CHARACTER EXTENT 7
NO-UNDO.
NO-UNDO.
NO-UNDO.
NO-UNDO.
/* If called from Labels module, */
/* then go straight to labels spooler. */
IF qbf-module = "l" THEN DO:
OUTPUT THROUGH "lpr -Plabel2" NO-ECHO PAGE-SIZE 0.
RUN VALUE(program-to-run).
OUTPUT CLOSE.
RETURN.
END.
/* Select which printer from the menu */
PAUSE 0.
DISPLAY
"1. Letter Quality Printer"
@ menu[1] SKIP
"2. Laser Printer - portrait" @ menu[2] SKIP
"3. Laser Printer - landscape" @ menu[3] SKIP
"4. Color Laser Printer"
@ menu[4] SKIP
"5. Dot-Matrix Printer"
@ menu[5] SKIP
"6. Line Printer"
@ menu[6] SKIP
"7. Local Draft Printer"
@ menu[7] SKIP
WITH FRAME print-menu NO-LABELS ROW 4 CENTERED.
DO ON ENDKEY UNDO,LEAVE:
CHOOSE FIELD menu AUTO-RETURN WITH FRAME print-menu.
HIDE FRAME print-menu.
/* Now set the spooler name. For this installation, */
/* each user has a local printer named "pr_" plus the */
/* first three letters of their userid.
*/
thru-name = ENTRY(FRAME-INDEX,
"lq,laser,laser,color,draft,draft,pr_" + SUBSTRING(USERID,1,3)).
/* Start the output. If the user selected the laser */
/* printer, select portrait or landscape mode.
*/
OUTPUT THROUGH VALUE("lpr -P" + thru-name) NO-ECHO.
IF FRAME-INDEX = 2 THEN PUT CONTROL "esc-to-go-portrait".
IF FRAME-INDEX = 3 THEN PUT CONTROL "esc-to-go-landscape".
RUN VALUE(program-to-run).
OUTPUT CLOSE.
END.
HIDE FRAME print-menu.
RETURN.
10–23
Progress Results User’s Guide for UNIX
10.11 Designing a Browse Program for Query
The default browse procedure, u-browse.i, is included with Results. This include file lets you
use the default functionality of the Browse option in your own application.
It also lets you to use your own browse program in the Query module. For example, you create
an include file in Progress and reference it in the Browse Program for Query in the
Administration module.
For information on implementing your own browse procedure for the Query module, see the
source code for u-browse.i. It contains comments that explain the necessary parameters.
10.12 Deploying an Application: A Tailored Results Interface
You might want to customize the Results user interface for your application and deploy it to
several different sites.
The portion of Results that you can customize can be divided into two areas: the configuration
information and the Query form information. To ship a customized version of Results, you need
to include items that fall under both of these categories with your application software.
NOTE:
10.12.1
For information on how to tailor the Results modules, see Chapter 9, “Database
Administration.”
Configuration Information
Each time you start Results, it looks for a file called databasename.qc. It should be located in
the same directory as the database files. This query configuration (QC) file contains all the
system information that describes query defaults, permissions, printer configurations, mailing
label defaults, file relationships, etc.
The default information in this file is determined the first time you run Results against the
database. This builds the Query module interface. The user can choose to have a default
interface generated for them, or take more control and select the order of the displayed fields.
In either case, Results generates a file called databasename.ql. This query log (QL) file
contains information on the Query interfaces that were built and what fields, if any, were left
off the form because they did not fit.
You can modify all of the default system configuration information, as well as the Query
interfaces, using the Results Administration module. Any changes you make appear in the QC
file.
10–24
Integrating Results into Existing Applications
When you deploy your application to your users, you must include your own customized
configuration file with the rest of your database files. If the system cannot find your file, it
generates a default configuration file and you loose all your customized system setup data. You
do not have to include the file because it just contains information about the initial build.
10.12.2
Query Form Information
If you permit users access to the Query module in Results, you must include a procedure for
each Query interface.
Each Query procedure consists of three files:
1.
A procedure file that passes parameters to a Progress include file to generate the entire
query form interface.
2.
A form file definition that contains the forms layout for that query interface.
3.
An include file that contains assignment information for each particular query interface.
When you compile the procedure file, it references the form and include files. The compiler
produces a single executable file, called the object file. The object file is a stand-alone file that
does not require the .p, .i, or .f file information to run. You only need the .p, .i, and .f files if you
then use the Application Rebuild and Form Definition for Query options.
The machine (the development platform) you used when you developed your application and
the Results interface determines how you perform queries.
•
If the target platform for the application is the same as your development platform you
used to compile your application and the Results interface, you only have to include the
compiled object file portion of the query procedures.
•
If the target platform for the application is different (a different CPU or different operating
system) than the development platform, you have to include the .p, .f, and .i portions of the
query interfaces, and recompile them on the target platform. Use the Application Rebuild
option to recompile it.
10–25
Progress Results User’s Guide for UNIX
10–26
A
Startup and Shutdown Procedures
There are several ways to start Results depending on how many databases you want to use and
how many users you want to access each database. For example, you can start Progress with one
database or more than one database, in single-user mode or multi-user mode. Each method is
described in this chapter.
This appendix describes how to start Results:
•
From the Progress Procedure editor.
•
With one database in single-user mode or multi-user mode.
•
With multiple databases in single-user or multi-user modes. (This section includes the
startup method required to follow the examples in Chapter 8, “Multiple Databases with
Results.”)
Choose the startup method that is appropriate for you.
Progress Results User’s Guide for UNIX
A.1
Running Results in Non-English Languages
If you want to run Results in a language other than English, there are two things you should do
before you perform the initial build against a database:
1 ♦ Set the PROMSGS environment variable to the language you want to use. This sets the
Progress messages to the language you want. Note that you must have the PROLANG
product installed to use PROMSGS. For more information about PROLANG and
PROMSGS, see the Progress Installation and Configuration Guide Version 9 for UNIX.
2 ♦ Edit the results.l file to set the default language you want Results to use. (You can
switch to other languages within Results using the Language option in the Administration
module.) Note that you must have the RESLANG product installed if you want to use a
non-English version of Results. For more information about RESLANG, see the Progress
Installation and Configuration Guide Version 9 for UNIX. For details on the results.l
file, see the “Language” section in Chapter 9, “Database Administration.”
A.2
Starting Results from the Progress Procedure Editor
The following steps describe how to start Results from inside Progress. When you start Results
from the Progress Editor, it starts with the databases and modes you specify when you start
Progress.
NOTE:
Results must be in your PROPATH before you can run it. Check with your database
administrator if you are not sure. If it is not, error messages appear after step 2.
1 ♦ To access Results from the Progress Procedure Editor, enter the following procedure:
RUN results.p
Enter PROGRESS procedure. Press F1 to run.
2 ♦ Press GO.
If you have not performed an initial build on the first database you specified when you started
Progress, the system displays a message that there is no .qc file for that database. In that case,
you need to perform an initial build. For information about the initial build process, see the
“Description of the Initial Build” section in Chapter 9, “Database Administration.”
A–2
Startup and Shutdown Procedures
NOTE:
A.3
You should not see this message if someone has already run Results against the
database (for example, if someone installed and customized the application
software). If you do, see your database administrator.
Starting Results with One Database
This section describes how to start Results from your operating system using a single Progress
Atlas database in single-user and in multi-user mode.
•
When you start Results with a database in single-user mode, no one else can access the
database you are using.
•
When you start Results with a database in multi-user mode, more than one user can access
the same database. To start a database in multi-user mode, you must first start a server for
the database, as described in the “Starting a Server for the Database” section in this
appendix. Type the appropriate multi-user startup command at your operating system
prompt.
To start Results from your operating system, type the appropriate command at your operating
system prompt, where dbname is the name of your Progress Atlas database.
The following command starts Results in single-user mode:
results dbname
The following command starts Results in multi-user mode:
mresults dbname
If you have not performed an initial build on this database, the system displays a message that
there is no .qc file for the database you specified. In that case, you need to perform an initial
build. For information about the initial build process, see the “Description of the Initial Build”
section in Chapter 9, “Database Administration.”
NOTE:
You should not get an initial build prompt if someone has already installed the
Results package for you. If you do, see your database administrator.
Be sure to shut down the server process when you are done and ready to turn off the computer.
See the section in this appendix called “Shutting Down a Server for the Database,” for more
information.
A–3
Progress Results User’s Guide for UNIX
A.4
Starting Results with Multiple Databases
This section describes how to start Results from your operating system using more than one
Progress Atlas database in single-user and multi-user modes. For more information about the
issues involved with using multiple databases, see the Progress Programming Handbook.
There are two things you should know about multiple databases:
•
Before you can start databases in multi-user mode, you must start servers for them. To start
servers for the databases, see the “Starting a Server for the Database” section in this
appendix. This section describes how to use multi-user startup commands for Results.
•
When you finish using databases in multi-user mode, and before you turn off the
computer, you must shut down the server process for each database. See the “Shutting
Down a Server for the Database” section in this appendix for information about shutting
down servers.
To start Results from your operating system, type the appropriate command at your operating
system prompt, where dbname1 and dbname2 are the names of your Progress Atlas databases.
The following command starts Results in single-user mode:
results dbname1 -db dbname2 -1
The following command starts Results in multi-user mode:
mresults dbname1 -db dbname2
For example, if you are starting Results to run the tutorials in Chapter 8, “Multiple Databases
with Results,” substitute sports1 and sports2 for dbname1 and dbname2, respectively.
You specify the first database in your command just as you do for a single database, but you
need to include the Progress Physical Database Name (-db) connection parameter before all
subsequent databases. By default, the first database starts in single-user mode and all subsequent
databases start in multi-user mode. To start them in single-user mode, include the Single User
(-1) connection parameter after the database name.
If you have not performed an initial build on the first database you specify, the system displays
a message that there is no .qc file for that database. In that case, you need to perform an initial
build. For information about the initial build process, see the “Description of the Initial Build”
section in Chapter 9, “Database Administration.”
A–4
Startup and Shutdown Procedures
A.5
Starting a Server for the Database
Before you can start a database in multi-user mode, you must use the Progress PROSERVE
command to start a multi-user server for the database (dbname is the name of the database you
want to use in multi-user mode):
proserve dbname [options]
After you start the server of a database, you can use the multi-user startup command to start a
multi-user session using that database.
A.6
Shutting Down a Server for the Database
When you finish using the database in multi-user mode, and before you turn off the computer,
you must shut down the server process. Before you shut down the server, each user using the
database should exit Results and Progress (dbname is the name of the database the server is
running against).
proshut dbname [-H
A.7
host-name ] [-S
server-name ]
Stopping Results
The following steps describe how to exit from Results to the Progress Procedure Editor or to
your operating system.
1 ♦ Select the Exit command from a Results horizontal menu to return to the Results Main
Menu. The Exit command appears on the horizontal menu in all the user modules. (To exit
the Administration module, press the END key.)
2 ♦ Type e (Exit) at the Results Main Menu to return to the Progress Procedure Editor or to
your operating system (depending on how you started Results).
The following prompt appears:
Are you sure that you want to
exit "PROGRESS RESULTS" now?
Yes
No
A–5
Progress Results User’s Guide for UNIX
3 ♦ Select the Yes option.
If you return to your operating system, skip step 4.
There is an option in the Administration module that determines if you exit to the Progress
Procedure Editor or quit to your operating system.
If you exit to the Progress Editor, you can use the Editor to restart Results or exit to the
operating system.
4 ♦ Enter the following command to exit Progress and quit to your operating system:
quit
Then press the GO key. Progress returns to your operating system.
A–6
B
Option Descriptions
This appendix contains descriptions of the menu and submenu options for the Results Query,
Reports, Labels, and Data Export modules.
Progress Results User’s Guide for UNIX
B.1
Menu Options
Table B–1 lists the menu options described in this appendix. The menu options shown in bold
work the same way in all modules, and are described in the “Common Menu Options” section
in this appendix. The options that are unique (or whose submenu options are unique) to a
particular module are described in this appendix in the appropriate module section.
Table B–1:
Key to Module Options
Query
B–2
(1 of 2)
Reports
Labels
Data Exports
Next
Get
Get
Get
Prev
Put
Put
Put
First
Run
Run
Run
Last
Define
Define
Define
Add
Settings
Settings
Settings
Update
Where
Where
Where
Copy
Order
Order
Order
Delete
Clear
Clear
Clear
View
Module
Module
Module
Browse
Info
Info
Info
Join
User
User
User
Query
Exit
Exit
Exit
Where
–
–
–
Total
–
–
–
Order
–
–
–
Module
–
–
–
Info
–
–
–
Option Descriptions
Table B–1:
Key to Module Options
Query
B.2
(2 of 2)
Reports
Labels
Data Exports
User
–
–
–
Exit
–
–
–
Common Menu Options‘
The following list describes the menu options that work the same in two or more modules. In
these descriptions, a definition is a report, label, or data export definition, depending on the
selected module.
Get
Gets an existing definition. You can get a definition you defined and saved, or if you have
permission, you can get a copy of a definition from someone else’s directory.
This option opens a scrolling window displaying descriptions of all the layouts you have
saved. You can press the MODE key (F9 or CTRL-T) to toggle the list from the descriptions,
to the originating database names, to the program names.
An asterisk (*) marks the definitions you can load with the connected database(s). (If you
created your definitions with Results for Version 5 of Progress, a question mark (?) marks
the definitions to show that Results did not save the names of the database(s) used to create
the definitions.) A counter in the lower-right corner of the window displays the number of
definitions in your directory. When you select a definition, the system updates the
information in the windows to reflect the proper settings.
The Get option also checks the files accessed in the definition to determine if anything has
changed since you last ran it. If such a change has taken place, Get warns you and modifies
the definition as best it can to reflect the changes.
B–3
Progress Results User’s Guide for UNIX
Put
Saves the current definition under a descriptive name.
You have the option of saving the definition under an already saved name or under a new
name. You save your definition using a description (up to 48 characters long) rather than
an actual operating system filename. In this way, you can give meaning to the file
description and the definition is automatically saved under an acceptable name for your
operating system. See Chapter 9, “Database Administration,” for details on how Results
stores your reports in the operating system directory.
Run
Runs the definition as it is currently laid out in the Layout screen. You can preview it on
the screen, print it to a file, or route it directly to a printing device. This option produces
different results depending on if there is information defined or displayed on the screen:
Case 1:When no information is in the layout screen, a window with a list of existing
definitions (if any) appears and prompts you to choose one to load and run. You can also
load a copy from another directory, if you have permission. (See the Get option for
details.) Once you select a report, a list of run destinations appears. See Case 2 for details.
Case 2:When there is information in the layout screen, a window opens for you to select
the definition’s destination. (For example, it can list TERMINAL, FILE, PRINTER.)
When you select TERMINAL, Results runs the information on your screen.
Where
Builds a WHERE clause enabling you to select a subset of records. You need to have at
least one active file before you can define a WHERE clause criteria. (In the Query module,
you need a form on the screen. In the other user modules, use the Define option to select
active files. See the description of the Define option for details.)
The Where option in the Reports, Data Exports, and Label modules works the same way
as it does in the Query module, with a few important exceptions. For example, in the Query
module you do not have to select active files, and there is no Ask Mode. See the “Menu
Options for the Query Module” section in this appendix for details on these exceptions.
The WHERE clause builder windows appear on the screen. The first one, Choose a Field,
is a scrolling list that prompts you to select a field to start the WHERE clause expression.
This list contains the field names of all the fields in the active file. You can toggle between
field names and field labels by pressing the MODE key (F9 or CTRL-T).
B–4
Option Descriptions
Once you choose a field, a scrolling window appears that displays all of the allowable
operators for the field type. (Operators can include: Equal, Not Equal, Begins, etc.) Select
an operator, and then enter a value to compare with the field.
In all modules except Query, you can invoke Ask Mode by pressing PUT (F6 or CTRL-P)
and entering a prompt that will display when you run the report.
You can continue to add values to compare or enter additional selection criteria on other
fields.You can join comparisons using the AND or the OR operators.
When you finish building the WHERE clause, a message appears prompting if you want
to enter more selection criteria. If you select No, you exit from the WHERE clause builder.
To see the records that meet the criteria, select the Run option. If you are working with
more than one active file, you can select the Where option again and build a WHERE
clause for each file, if you want. When you run the report, the subset of records you get
are true for all of the WHERE clauses. (That is, they act as if they are joined by an AND
operator.)
If you choose the same file again, you have three options. You can build a new WHERE
clause, you can delete the WHERE clause, or you can edit the WHERE clause using
Expert Mode (unless the WHERE clause uses Ask Mode). To perform any of these
processes, select the Where option again. If you have WHERE clauses defined for more
than one active file, highlight the WHERE clause you want to work with.
To build a new WHERE clause, enter the new criteria when the windows appear. The new
criteria will overwrite the existing criteria. Repeat the process for each WHERE clause
you want to overwrite.
To edit a WHERE clause, press GET (F5 or CTRL-G) to enter Expert Mode before you
select any fields. (If you select fields first, you delete the existing WHERE clause.)
Repeat the process for each WHERE clause you want to edit. You can access Expert Mode
from anywhere within the WHERE clause builder windows by pressing GET (F5 or
CTRL-G). Expert Mode enables you to enter selection criteria directly, without having to
go through the set of scrolling lists you normally use to build a WHERE clause. Expert
Mode also enables you to change the default order of evaluation by grouping comparisons
with parentheses. See Appendix F, “Order of Evaluation,” for more information about
evaluating expressions in WHERE clauses. Make sure you use field names instead of
labels when you define WHERE clauses in Expert Mode.
To delete the WHERE clause definition, press END (F4 or CTRL-E) when the WHERE
clause builder windows appear. Repeat the process for each WHERE clause you want to
delete.
B–5
Progress Results User’s Guide for UNIX
Order
Orders the information in the report by up to five fields.
This option works the same way in the Reports, Labels, and Data Export modules. (In
Reports, it has an additional feature that you can use in conjunction with the Totals and
Subtotals option to create totals for break groups (sections). For more information about
that, see the Order option description in Chapter 5, “Reports Module.”)
When you select this option, a scrolling list appears that shows all the non-array fields
from the active files. (You cannot order records by array fields.) When you select a field
to order on, the screen marks it with a number to represent its place in the ordering
sequence. When you select a field that is already marked, the screen unmarks it and
resequences the other number markers automatically. You can order the information by a
field not in the layout.
When you finish selecting the fields you want and press GO (F1 or CTRL-X), another
window pops up with the selected fields in it. (The field names are prefixed by filenames;
this shows what file the field comes from.) In this window you define whether each field
will be in ascending (increasing) or descending (decreasing) order.
Clear
Clears the settings in the information and layout windows and return to the default settings.
If there are settings on the screen, a dialogue box appears that prompts you to confirm if
you really want to delete the current settings. You must clear any existing settings from
the screen before you can create a new definition.
If there are no settings on the screen, this option enables you to delete any existing
definitions. If you select Clear when there are no settings on the screen (but there are
definitions saved), a window appears with a list of definitions you can delete. You mark
the reports you want to delete by highlighting them and pressing RETURN. You can
unmark a definition by selecting it again.
Info
Displays the database name, filename, any selection criteria you used to define the current
working set (or subset) of data, as well as order definition for the records.
Module
Switches to a different Results module without going back to the Main Menu. It also
enables you to transport file, field, order, and WHERE clause criteria information to other
modules.
B–6
Option Descriptions
User
Transfers to a customized option. You only see this option if an application developer has
included an optional program to perform an action. This option is hidden by default. If you
have this option, see supplemental documentation provided by the application developer
that describes this function.
Exit Results
Exits the previous level. For example, from the Full Set of records, this option enables you
to exit to the Results Main Menu. From a Subset, it exits to the Full Set.
B.3
Menu Options for the Query Module
Next
Finds the next record in the file or subset according to the current active index and
selection criteria.
Prev
Finds the previous record in a file or subset.
First
Finds the first record in a file or subset. For example, if the records are in order by
customer number, the First option finds the record with the lowest customer number. If
you are in a subset of a file, First finds the first record in the subset. (You can change the
order records are listed in by using the Order option.)
Last
Finds the last record in a file or subset.
Add
Adds a new record to the file using the current form (if you have permission). If you select
this option when you have two or more files joined, you see default information that you
can keep or change in the add window. The information entered is automatically verified,
and an error message appears if there is a problem.
B–7
Progress Results User’s Guide for UNIX
Update
Updates the currently displayed record (if you have permission). The information entered
is automatically verified, and an error message appears if there is a problem.
Copy
Copies the currently displayed record to a new record (if you have permission). Enables
you to copy the record displayed on the screen to create a new record, and then update the
new record’s contents. The information entered is automatically verified, and an error
message appears if there is a problem.
Delete
Deletes the currently displayed record (if you have permission). A prompt appears that you
can respond to if you want to delete the record.
View
Selects a different query form to view.
Browse
Browses through a scrolling list of key field values in an overlay window.
You can temporarily add other fields to appear in the Browse list by pressing GET (F5 or
When the list of fields appears, select (or deselect) fields to tailor the list. The
Browse list defaults back to its original settings when you select too many fields or a field
too large to display across one line. The Browse list also defaults back to the original
settings when you exit the Query module. To permanently change the default fields, see
your database administrator or see Chapter 9, “Database Administration,” for information
on controlling fields in the Browse window.
CTRL-G).
The Browse list appears in a window that has a position marker at the bottom to tell you
how much of the list is shown. The markers are: All Shown, At Top (when the top is
shown), and At Bottom (when the bottom is shown). The marker remains empty if the top
and bottom of the list are not shown.
When you choose this option after selecting a subset of information using the Join, Where,
or Query options, Browse only displays summary information about the records in the
subset you are working with.
B–8
Option Descriptions
Join
Joins to a related file and enables you to query the records related to the current active
record.
When you select this option, a window pops up with a list of the files that you can join to
the current file. See Chapter 9, “Database Administration,” for details on how to establish
join relationships.
Query
Queries the current file using a Query-By-Example interface.
Choosing this option places you in a blank copy of the current screen form, where you may
enter an operator (for example, use > for greater than, >= for greater than or equal to, and
so on) and then the value for the query. (Select this option then press the HELP key (F2 or
CTRL-W) to see a complete list of comparisons.)
Once you press GO (F1 or CTRL-X), the software applies the selection criteria to the current
active file, and places you in the main Query screen, using the subset of data you selected.
The list of fields you can enter Query criteria on are controllable through the
Administration module. If you choose the Query option while already using a subset, the
existing Query criteria appear, and you can edit them. If you want to reset all the Query
criteria and start again, press INSERT LINE to remove all the existing criteria, then enter the
criteria you want.
Where
Builds a WHERE clause enabling you to select a subset of records using selection criteria
that is more complex than you can specify with the Query option.
The Where option in the Query module works the same way as it does in the other
modules, with a few important exceptions. For example:
•
You can only have one active file, so you do not have to select an active file.
•
There is no Ask Mode.
•
After you build the WHERE clause, the subset of records appears automatically. You
do not have to run a report to see a subset of records.
For a complete description of the Where option, see the description in the “Common Menu
Options” section in this appendix.
B–9
Progress Results User’s Guide for UNIX
Total
Displays the total number of records available in the current working file or subset.
Order
Reorders the data currently being displayed using the ordering sequence dictated by
another Progress index. When you choose this option, a list appears of all the fields
(indexes) you can use to reorder the data in the active query form.
B.4
Horizontal Menu Options for the Reports Module
Define
Selects files and fields for the report. This option produces different results depending on
if there is any report definition information displayed in the Report Info or Report Layout
windows.
Case 1: If you select this option when there are no files selected on the screen, this option
presents a scrolling list of files you can choose. When you choose a file, the screen
displays a list of related files you can join to the current file. (You can make a maximum
of four joins.) If you do not want to join to another file, press END (F4 or CTRL-E).
Once you select the active files, the files you select appear in the Report Info window, and
the screen displays a list of all the fields in the selected files. You can select any of these
fields by highlighting them and pressing RETURN. The fields automatically number in the
order you select them. If you select a field by mistake, you can unmark it by selecting it
again. If you want to resequence the selected fields, or insert a new field into the middle
of the numbered list, highlight the field you want (or want to move) and type the order
number next to it. The remaining numbers adjust automatically.
When you finish selecting fields, press GO (F1 or CTRL-X) to insert the fields into the
layout window. The files you selected appear in a list in the Info window, and the fields
you selected appear with their labels and formats in the layout window. If you select a
stacked array field, an *en marker beneath the field format shows that it is a stacked array
field, where n is a number representing the extent of the array.
Case 2: If there is information defined in the Info or Layout windows (for example, there
are active files and fields in the report) a window appears with a list of options. These
options enable you to define the following for a report:
B–10
Option Descriptions
Fields
This option enables you to select or change the fields that appear in the report. When you
select this option, a list of field names from all selected files appears. If you have any
expressions or calculated fields defined, these also appear in the list. For reports, you can
pick any number of fields, as long as they fit within a width of 255 spaces. (In the Data
Export module, you can select an unlimited number of fields.) Select and deselect fields
from this list the same way you select and deselect them in Case 1.
Once you select all the fields you want for the report and press GO (F1 or CTRL-X), the
fields appear in the Layout window. In the Reports module, the window shows labels and
formats. Also, the total number of characters (widthwise) that the current field list requires
appears in the lower right edge of the Report Layout window. If you select more fields than
can fit in the layout window, a “more >>” message appears at the side of the window and
the following message appears at the bottom of the screen:
Use < and > to scroll report left and right
You can scroll left and right within the layout window using the greater than and less than
(< and >) keys. As you scroll right, the a “<< more” message appears on the left side of
the window to indicate that there are more fields to the left.
Active Files
Changes the file(s) in the report. When you select this option, you see a scrolling list of
files that you have permission to view.
Once you select the primary file, a list of related files (such as order of customer) appears.
The list can be expanded by the database administrator through the Administration
module.
NOTE: If you have files defined for your report and then use this option to change the
selected files, you lose the current field selections. However, you can select
additional files or reorder your existing files without losing your report
definition.
B–11
Progress Results User’s Guide for UNIX
Totals and Subtotals
Enables you to insert totals, counts, minimums, maximums, and averages for any fields in
the report.
When you select this option, a list of fields currently defined for the report appears. You
select a field and a window opens that enables you to define total and subtotal information.
This option enables you to determine what aggregate values to accumulate in a summary
line for each field (Total, Count, Min, Max, Avg). For each value you choose, a summary
line appears at the bottom of the report under the column. The summary line displays the
specified aggregate value for the column.
When you select an aggregate value, a character symbol appears beneath the field area in
the report layout window to mark its inclusion. For example, when you pick Total for a
field, a “t” character appears in the report layout beneath the field area. Other character
symbols used: “a” for average, “n” for minimum, “x” for maximum, and “c” for count.
If you select this option after you define a sort order (using the Order option), you can
provide totals for break groups (sections).
Running Total
Inserts a column in the report that displays the running total of any numeric field or
expression. A running total increments for each line of data. So, the value displayed in that
column on any line of the report equals the sum of the field value for that line and all
previous lines in the column.
When you select this option, you see a list of all of the fields in the current active files that
have numeric values. In the Reports module, you also see any defined numeric
expressions.
In the Reports module, when you select a field for a running total, a window opens that
enables you to redefine the default label and format for the running total. By default, the
label is Running Total and the default format is the same as the format for the totaled field.
In the Data Export module, you can redefine the format only. For information on formats,
see Appendix C, “Field Display Formats.”
When you insert a running total, it appears in the layout window. When you see this field
in the layout window, it is not prefixed with names of a database and file. They do not
appear with the field name because it is a calculated field defined for the report. Calculated
fields are not from a database file. In the Reports module, an *r marker appears beneath
the column definition to show that this is a running total field.
B–12
Option Descriptions
Percent of Total
Inserts a column in the report that displays a percent of total value for a numeric field or
expression. This percent of total value represents the percent of the total values in the
column that this line in the column represents.
This option works the same way as Running Totals, except that the default label is Percent
of Total and the *p marker shows that this is a percent of total field. This field has a
standard display format of ->>>9.9%. For information on formats, see Appendix C, “Field
Display Formats.”
Counters
Inserts a column in the report to display a running counter. Counters are useful for line
numbering and running record count.
When you select this option a window appears that enables you to define the starting
number for the counter, and the number to add for each record. This option inserts the
column into the Layout window the same way as Running Totals, except that in the
Reports module the default label is Counter and the *c marker shows that this is a counter
field.
Math Expressions (+ -*/)
Defines a math expression and adds it as a column in the report.
Once you select this option, a window shows the operations you can perform:
•
Add
•
Subtract
•
Multiply
•
Divide
•
Raise to a Power
This is a menu-driven process that enables you to select the elements to build a simple or
complex math expression. To build a short expression, select an operation and the
appropriate field(s) or number(s). To build a long expression, just keep adding options and
values to the expression by entering Yes to continue.
B–13
Progress Results User’s Guide for UNIX
Results automatically enters parentheses in long expressions. It assumes a left to right
evaluation. For example, if you use the menus to enter the following expression: 4 + 5 * 6
+ 7, Results uses parenthesis to make it
( ( 4 + 5 ) * 6 ) + 7. Or, if you enter 2 * 4 + 3 / 6, it becomes ((2 * 4) + 3) / 6. See Appendix
F, “Order of Evaluation,” for more information about evaluating expressions.
This option inserts the column into the Layout window the same way as Running Totals,
except that in the Reports module the default label is Math Value and the marker *n shows
that this is a numeric expression field.
String Expressions
Defines a string calculation and adds the expression as a column in the report. Once
you select this option, a window appears with the operations you can perform:
•
Constant or Field
•
Substring
•
Combine Two Strings
•
Combine Three Strings
•
Combine Four Strings
•
Lesser of Two Strings
•
Greater of Two Strings
•
Length of String
•
User ID
•
Current Time
You select the elements to build the string expression from a list. For string expressions
that involve more than one element, the process enables you to select the first element in
the expression, then the operator, then the second element. For example, you might want
Results to combine fields and make them one string on your report to save space. So, you
can select the Combine Two Strings option from the list and the two fields that you want
to combine. This option inserts the column into the Layout window the same way as
Running Totals, except that in the Reports module the default label is String Value and the
*s marker shows that this is a string expression field.
B–14
Option Descriptions
Numeric Expressions
Defines a numeric expression and inserts it as a column in the report. When you select this
option, a window displays a list of operations you can perform:
•
Constant or Field
•
Smaller of Two Numbers
•
Greater of Two Numbers
•
Remainder
•
Absolute Value
•
Round
•
Truncate
•
Square Root
•
Display as Time
You select the elements to build the numeric expression from a list. For numeric
expressions that involve more than one element, the process enables you to select each
element separately.
This option inserts the column into the Layout window the same way as Running Totals,
except that in the Reports module the default label is Numeric Value and the *n marker
shows that this is a numeric expression field.
Date Expressions
Defines a date calculation and inserts it as a column in the report.
When you select this option, a window presents a list of all the date expressions you can
define:
•
Current Date
•
Add Days to Date Value
•
Subtract Days from Date Value
•
Difference between Two Dates
•
Earlier of Two Dates
B–15
Progress Results User’s Guide for UNIX
•
Later of Two Dates
•
Day of Month
•
Month of Year
•
Name of Month
•
Year Value
•
Day of Week
•
Name of Weekday
You select the elements to build the date expression from a list. For date expressions
involving more than one element (for example, the difference between two dates), the
process enables you to select each element separately.
This option inserts the column into the Layout window the same way as Running Totals,
except that in the default label is Date Value and the *d marker shows that this is a date
expression field.
Settings
Controls general report settings such as headers and spacing. When you choose this option,
the screen presents a menu with the following options:
Formats and Labels
Enables you to change field labels and formats for any field or defined column in the
current report. The field labels are the titles that appear above the column in the report. The
formats define how the field data appears on the screen; for example, whether a dollar sign
($) prefixes a dollar amount, or how many decimal places appear. For information on
formats, see Appendix C, “Field Display Formats.”
This option also enables you to hide repeating values. An ampersand (&) marks each field
where you defined Hide Repeating Values.
You can hide repeating values for most different types of fields, including calculated
fields. But, you cannot hide repeating values for a totals field since all the values must
appear in the report in order for Results to total them.
If you want a label to have more than one line (stacked), separate each line of the label
with an exclamation point (!). If you want an exclamation point to show in your label, use
two exclamation points together (!!).
B–16
Option Descriptions
Page Eject
Enables you to start a new page for each new section of a report. You can only use this
option when you have an order definition for the records in your report. Just select the Page
Ejects option and define a page eject on an order-by field. The page ejects on a change of
value in the order-by field.
Totals Only Report
Enables you to collapse the report so that the report displays only summary information
about groups of records.
You must have an order definition for the report before you can run this option. (If you try
to run this option when there is no order defined for the report, Results displays a message
that reminds you to define order criteria for the report.) When you select this option, a
window appears so you can enable the Totals Only feature. When you select the ENABLE
option, a list appears that contains the fields you selected for the report. You can mark the
fields you want to summarize with an asterisk (*). By default, Results marks numeric,
non-indexed fields as summary fields. (Numeric fields are integer and decimal fields.) It
does not mark indexed fields because they are usually fields you do not summarize.
If you mark character, date, or logical fields as summary fields, the system counts them.
For all fields that are not marked for Totals Only, the values in the last record for that group
appears.
Spacing
Specifies how many spaces wide to make the left margin, how many spaces to insert
between columns, what line to start on, how many lines to allow on each page, what type
of line spacing to use, how many lines to leave between the header and the body of the
report, and how many lines to leave between the body of the report and the footer. The
window lists the option, the current setting, and the default setting.
This option enables you to spread information out to make it more readable.
Left Header
Defines up to three lines of left header information. A header is text, such as a title, that
appears at the top of the page on a report.
You type text information into a window. You can insert values such as PAGE, TODAY,
TIME, USER, etc. into the header section if you delimit them with curly brace ({and})
characters. You can include the following functions: {COUNT}, {TODAY}, {PAGE},
{TIME}, {NOW}, {USER}, and {VALUE}.
B–17
Progress Results User’s Guide for UNIX
The {VALUE} variable enables you to include field information in headers and footers.
Use the format: {VALUE database.file.field; format}. Or, you can press the GET key (F5
or CTRL-G) to pull up a list of fields to insert in the header. When you select one of the
fields in the list, Results automatically puts it in the VALUE format for you. For example,
you could use the following function in a header:
{VALUE mysports.customer.Sales-region; x(20)}
This places the sales region for the first record on the page in the header. For example,
Central appears in the header if the first customer record on the page is in the Central sales
region.
You can substitute angle brackets (< >) to replace the curly braces ({}) around any
function. Also, your database administrator can edit the results.l file to change the
default symbols for the VALUE option. That way, when you use the GET key and pick a
field from the list, the default symbols automatically appear.
NOTE: Always enter the numeric format for the VALUE function in American format,
even when Results is set to default to the European numeric format (using the
European Numeric Format (-E) startup option). In American format, a decimal
point (.) marks the decimal location in fields and a comma (,) acts as a place
holder. If you enter a European numeric format for the VALUE function, an error
message appears. When you run the report with Results set to default to European
numeric format, Results automatically converts the American format for VALUE
to European numeric format. For more information about the -E startup option,
see Appendix C, “Field Display Formats.”
Center Header
Specifies up to three lines of centered header information.
Right Header
Defines up to three lines of right header information.
Left Footer
Specifies up to three lines of left footer information. A footer is text, such as a page
number, that appears at the bottom of the page on a report.
Center Footer
Inserts up to three lines of centered footer information.
B–18
Option Descriptions
Right Footer
Inserts up to three lines of right footer information.
NOTE: When you define three types of headers (or footers) for a report, they print in
different ways depending on the available header space. If there is enough room
to fit all three values across, they print three across. Otherwise, the center header
prints first, then the left and right headers appear on the next two lines.
First-page-only Header
Defines a header that appears only on the first page of the report. This type of header is
centered near the top of the page. If you have another type of header defined, the
First-page-only header appears after it.
Last-page-only Footer
Defines a footer that appears only on the last page of the report. This type of footer is
centered near the bottom of the page. If you have another type of footer defined, the
Last-page-only footer appears before it on the last page of the report. The Last-page-only
footer does not appear in the Report Layout window, but does appear when you print or
display the report.
B.5
Horizontal Menu Options for the Labels Module
Define
Defines the files and fields to use for label information. When you select this option, the
results you see differ depending on if there are fields defined in the Label Layout windows.
If there are no files defined in the Label Info window, the screen prompts you to select a
file from a scrolling list of available files. Once you select the file, there are three ways
you can lay out the fields for the labels: 1) automatically, 2) menu driven, or 3) manually.
If no fields are defined in the Label Layout window, a window prompts if you want Results
to select the fields for the labels automatically. If you enter Yes, see Method 1. If you enter
No, see Method 2 to select the fields yourself.
If fields are defined in the Label Layout window when you select this option, you can edit
the mailing label text and fields as described in Method 3.
Method 1: If you have the label laid out automatically, you see the fields laid out in the
Label Layout Window. (The system places the filename next to each field to indicate the
file that each one came from.) You can edit the default layout once it appears on the screen
B–19
Progress Results User’s Guide for UNIX
by adding fields or text. Press GET (F5 or CTRL-G) to get a list of fields to insert. Field
names included in the automatic layout are set up in the Administration module.
Method 2: If you follow the menu driven process to lay out the labels, you choose the fields
from a list. Again, you can add fields or text after the labels are laid out. Then you can press
GET (F5 or CTRL-G) to display a scrolling list of available fields to insert.
Method 3: To bypass the list press END (F4 or CTRL-E) in the field list. Then you can press
GET (F5 or CTRL-G) to display a list of available fields to insert. If you are an experienced
user, you can enter field names, text, and calculations yourself. Just be sure to delimit field
names with the “{” and “}” (or “<” and “>”) characters within the label layout; you can
enter text directly, without delimiters.
Settings
Controls general output settings for your labels.
Choosing this option highlights the printer setting options in the Label Layout window. By
selecting this option, you can assign values to the settings:
Omit Blank Lines
Lets you specify if you want to omit blank lines in labels or not. This option does not affect
the total height of the label. It also does not affect any blank lines you leave in the layout.
For example, if you leave a blank line at the top of the label, the line is always blank and
not omitted. It only omits lines where there are field definitions in the layout window, but
there are no field values in the record.
Copies of Each
Defines the number of copies of that you want of each label.
Total Height (in Lines)
Determines the total number of lines that each label has from top to bottom.
Top Margin (in Lines)
Defines the number of lines that Results should skip before printing the next label.
B–20
Option Descriptions
Text-to-text Spacing
Specifies the number of characters wide that you want each label to print. Use this field
when printing multiple labels across the page.
If you are printing more than one label across and you do not set the Text-to-Text Spacing
value wide enough for one label, the next label across overlaps the first label.
Left Margin Indent
Defines the number of characters the system should indent from the left edge of the label
before printing the first left-hand label.
Number of Labels Across
Specifies the number of labels across to print.
B.6
Horizontal Menu Options for the Data Export Module
Define
Defines the files and fields to export.
The Define option in this module works the same way as it does in the Reports module.
For example, you select files and fields the same way. Also, the Define option has the same
submenu options in both modules, with one exception: the With/Format of Fields option
(described in this section). For a complete description of the Define option and its
submenu options, see the Define descriptions in “Horizontal Menu Options for the Reports
Module” section in this appendix.
When you use the Define option to create a new field (math, date, or string expression, for
example), you can redefine the format for the field. (In the Reports module, you can also
redefine the label and specify if you want Results to hide its repeating values.)
Width/Format of Fields
Enables you to change the width and format of any field or defined column in the current
Data Export Layout window. You can only select this option when the Export Type is set
to Fixed-width ASCII (SDF).
The width and field format defines how Results exports the field data. For example, it
defines the width of a character field or the number of decimal places in a numeric
expression. For information on formats, see Appendix C, “Field Display Formats.”
B–21
Progress Results User’s Guide for UNIX
Settings
Determines the export format. When you select this menu entry, you see a scrolling list of
the following possible export formats: Progress, Generic ASCII format, ASCII with
Field-name header, Fixed-width ASCII (SDF), Comma-separated value (CSV), DIF,
SYLK, WordStar, Microsoft Word, Microsoft Word for Windows, WordPerfect,
CTOS/BTOS OfisWriter, and User-Sample Export.
NOTE: The User-Sample Export option appears by default when you start Results with
a copy of the Progress sports database. When you start with another type of
database, you see this option if your database administrator enabled it for you.
When you select any of the options except the ASCII choices, you set the Export Type line
in the Export Layout window.
When you select any of the ASCII options, a form pops up for you to fill. The form enables
you to define the initialization string at the start of a record, the record termination string,
the field delimiter string, and the field separator string for particular export requirements.
These values can be entered using several different methods:
B–22
•
Enter a literal character surrounded by single quotes. For example, ‘x’ where x is a
literal character.
•
Enter ^x, where x is a control key value, to represent a control character. In this case,
entering the carat (^) character before the control key character enables the Data
Export module to interpret the sequence correctly. For example, ^i represents a tab.
•
Enter ##h, where ## represents one or two hexadecimal digits followed by the letter
“h” character to denote a hexadecimal value. For example, OCh or OCH represents
form feed.
•
Enter ###, where ### is a one-, two-, or three-digit decimal value. For example, 27
represents an escape value.
•
Enter a symbol from the Expert Mode table (seen when you press GET (F5 or CTRL-G)
within the settings window). The pop up window displays a list of two character
symbols, each symbol represents numbers 0 through 31 in the ASCII table.
C
Field Display Formats
This appendix provides users with information about how Results handles display formats for
fields. It includes details on:
•
Default display formats.
•
Character display formats.
•
Numeric display formats.
•
Logical display formats.
•
Date display formats.
•
Time display formats.
•
How to override default display formats.
•
How to test display formats.
For information about how Progress handles display formats, see the Progress Programming
Handbook, the Progress Language Tutorial for Character, or the Progress Language Tutorial
for Windows.
Progress Results User’s Guide for UNIX
C.1
Introduction to the Field Display Formats
The display format of a field determines the way the data in that field is shown on screens and
in printed reports. For example, display formats indicate how many spaces Results should put
in the display, and if there should be dollar signs, decimal points, or other special characters.
Progress supplies Results with the default display formats for any field, variable, or expression
you display or print. You can override the default formats in the Reports and Data Export
modules using the Settings option. (In the Data Export module, you can only change the
formats of fields exported in Fixed-width ASCII (SDF) format.)
C.2
Default Display Formats
Table C–1 shows the default formats for data types.
Table C–1:
Default Display Formats for Data Types
Data Type of Expression
Default Format
Character
x(8)
Date
99/99/99
Decimal
->>,>>9.99 1
Integer
->,>>>,>>9 1
Logical
yes/no
1
If you use the European Numeric Format (-E) startup option, the default format for decimal numbers is
->>.>>9,99 and the default format for integers is >>.>>>.>>99. For more information about European numeric
formats, see the “Numeric Display Formats” section in this appendix.
The display format of a field indicates how Results displays the data in that field. it has nothing
to do with the actual data that is stored in the database. For example, a name field could be 40
characters long in the database, but if the display format is x(20), only the first twenty characters
out of forty display.
C–2
Field Display Formats
C.3
Character Display Formats
If the default display format for a character field is x(8), this means that any characters after the
first eight are dropped if you do not supply an explicit format. The “x” represents an
alphanumeric character position, and the “8" represents the number of characters Results should
display. You can override this format in the Settings option in the Reports and Data Export
modules.
You can use several different symbols to define a character format: X, N, A, ! and 9. You can
also add characters to the display, such as parentheses around an area code in a phone number.
Table C–2 defines the symbols you can use to define character field display formats.
Table C–2:
Character Display Format Symbols
Symbol
Use or Explanation
X
Represents any character.
N
Represents a digit or a letter. A blank (space) is not allowed.
A
Represents a letter. A blank is not allowed.
!
Represents a letter that is converted to uppercase during input. A blank is not
allowed.
9
Represents a digit. A blank is not allowed.
(n)
Represents a number indicating how many times to repeat the previous format
character. For example, !(5) is the same as !!!!! and represents five characters
that are to display in uppercase.
fillchar
Represents a “fill” display. You can use any character or characters you want
to fill a display. For example, if you display the value abc with a format of
x(3)***, the displayed value is abc***.
To use X, N, A, !, or 9 as a fill character, you must precede that character with two tildes (~~).
To use a left parenthesis (() as a fill character after a non-fill character, you must precede it with
one tilde (~). (For example, if the field value is 123 and you enter a format of ~~x999, the
displayed value is x123.)
C–3
Progress Results User’s Guide for UNIX
Results does not store fill characters in the database; they are supplied when the field is
formatted for display. This permits a field to be displayed with different fill characters in
different contexts.
Table C–3 shows some examples of how to display a character value using different formats.
Table C–3:
Character Display Format Examples
Format
Display
xxxxxxxx
These are characters
These ar
x(9)
These are characters
These are
x ( 20 )
These are characters
These are characters
xxx
These are characters
The
AAA-9999
abcd1234
abc-1234
! ! ! -9999
abcd1234
ABC-12341
(999) 999-9999
6176635000
(617) 663-5000
!!
ma
MA
1
C.4
Value in Field
If you enter the characters abc1234 into a field defined with the format !!!-9999, then Results
displays ABC-1234 on the screen and stores ABC1234 in the field. The hyphen is a fill character that
appears only when the data is displayed in this particular format.
Numeric Display Formats
As with character data, the format you specify for a numeric value determines how Results
displays that value, but not how it stores that value.
When specifying a numeric data format, you must use at least one of the following characters:
9, z, *, or >. You can use many different symbols to describe the display format of decimal and
integer fields: ( + > , 9 z * . < DR CR and DB. For example, the default display format for a
decimal field is ->>,>>9.99 and the default display format for an integer field is ->,>>>,>>9.
If you use the European Numeric Format (-E) startup option, numbers on your screen appear in
European numeric format. So, the default format for decimal numbers is ->>.>>9,99 and the
default format for integers is ->>.>>>.>>99. That is because when you use the -E startup option,
Results uses a comma (,) to mark the decimal location in fields and periods (.) to mark
thousands. When you use the -E startup option, European format is just the way Results displays
C–4
Field Display Formats
the data, not the way Progress uses the data. Therefore, when you enter literal Progress
expressions in the Expert Mode in any Results module or in a VALUE function in report
headers or footers, use a period (.) to represent the decimal point.
NOTE:
When you use the VALUE function in report headers and footers, always use
American format. (If you enter a European numeric format for the VALUE function,
an error message appears.) When you use the GET key to pick and define a VALUE
function in report headers and footers, it always automatically appears in American
format.
Table C–4 defines the symbols you can use to define numeric field display formats. It shows the
American use of these symbols, but if you use the -E startup option, you see their European uses.
Table C–4:
Symbol
Numeric Field Display Format
(1 of 2)
Use of Description
()
Parentheses display if the number is negative. If you use one parenthesis
(left or right), you must use the other.
string1
A string made up of any characters except plus (+), minus (-), greater than
(>), less than (<), comma (,), digits (0-9), letter z (z or Z), asterisk (*) or
period (.).
+
A plus sign puts a plus sign in front of the number if the number is positive,
and a negative sign if the number is negative. You can use only one plus
or minus sign, or DR, CR, or DB, or one set of parentheses in a numeric
data format. The position of the plus sign in the number format can also
hold a digit if the number is positive.
-
A dash puts a minus sign in front of the number if the number is negative,
and puts a blank in front of the number if the number is positive.
>
A greater than sign is replaced with a digit if that digit is not a leading zero.
If the digit is a leading zero, the screen replaces > with a blank.
,
A comma displays as a comma unless it is preceded by a > sign or a Z. If
the comma is preceded by > and the > is replaced with a leading zero, the
comma is replaced with a null. If the comma is preceded by Z and the Z is
replaced by a blank, the comma is replaced with a blank. 1
9
The number 9 is replaced by a digit.
A period represents a decimal point in American format. 1
Z
The letter Z is replaced with a digit. If the digit is a leading zero, Z
suppresses that digit, putting a blank in its place.
C–5
Progress Results User’s Guide for UNIX
Table C–4:
Numeric Field Display Format
Symbol
(2 of 2)
Use of Description
*
The asterisk character is replaced with a digit. If the digit being replaced
is a leading zero, that zero is replaced with an asterisk.
<
The less than symbol is used in conjunction with > to implement “floating
decimal” format. See Table C–5.
DR,CR,
DB
These characters display if the number is negative. If the number is
positive, blanks appear in place of these characters. Results does not treat
these characters as sign indicators when you specify string2; it considers
them to be part of string2.
string2
A string made up of any characters except plus (+), minus/hyphen (-),
greater than (>), comma (,), any digit (0-9), letter z (z or Z), or asterisk (*).
1
If you use the European Numeric Format (-E) startup option, a comma (,) marks the decimal location in fields
and a decimal point (.) acts as a place-notation marker.
Use the greater than and less than symbols (< and >) together to cause a “floating decimal”
display. In a floating decimal display, there are a set number of digits, and the decimal point can
appear anywhere within the number. Up to ten < symbols can follow a decimal point. The <
symbols must be balanced by an equal or greater number of > symbols to the left of the decimal.
A < is replaced by a digit if its corresponding > is eliminated by a leading zero (and the stored
value has the required precision).
Table C–5 shows some examples of how Results displays numeric values using different
formats.
NOTE:
If you use the European Numeric Format (-E) startup option, a comma (,) marks the
decimal location in fields and periods (.) mark thousands. Table C–5 illustrates the
US/Canadian format, where the meaning of those markers is reversed.
Table C–5:
Numeric Format Examples
Format
C–6
(1 of 2)
Value
Display
9999
123
0123
9,999
1234
1,234
$zzz9
123
$123
Field Display Formats
Table C–5:
Numeric Format Examples
Format
(2 of 2)
Value
Display
$>>>9
123
$1231
$- >, >>9.99
1234
$1,234.00
$>, >>9.99
1234
$1,234.00
#-zzz9.999
-12.34
#- 12.340
Tot= >>9Units
12
Tot=12Units
$>, >>9.99
-12.34
?????????2
$>, >>9.99
1234567
?????????3
>>, >99.99<4
12,345.6789
12,345.68
>>, >99.99<<<
1,234.5678
1,234.568
>>, >99.99<<<
123.45
123.45
>>, >99.99<<<
12.45678
12.45678
1
This display value is right-justified if it has a column label. It is left-justified if it has a side label.
2
In this example, there is a negative sign in the value -12.34, but the display format of $>,>>9.99 does not
accommodate that sign. The result is a string of question marks.
3
In this example, the value 1234567 is simply too large to fit in the display format of $>,>>9.99. The result is a
string of question marks.
4
This is an example of the “floating decimal” display format. The < symbols must follow the decimal point and
be balanced by an equal or greater number of > symbols.
C–7
Progress Results User’s Guide for UNIX
C.5
Logical Display Formats
Logical fields or variables can contain a true or false value. You can define any strings to
represent them. Logical fields default to a yes/no format. You can change this default to any
string value, such as red/black, customer/prospect, or commercial/private. For example, you
might define a logical variable with an on/off format. In this example, on represents the true
value and off represents the false value.
If input is coming from a file, and you have defined a format for a logical field or variable that
is something other than true/false or yes/no, you can still use true/false or yes/no as input to that
logical field or variable.
Table C–6 contains some examples of how Results displays a logical value with different
formats.
Table C–6:
Logical Display Formats
FORMAT
FALSE
yes/no
yes
no
Yes/no
Yes
no
true/false
true
false
shipped/waiting
shipped
waiting
NOTE:
C.6
TRUE
If you define your own logical values, a false value cannot begin with “y” or “t,” and
a true value cannot begin with “n” or “f.”
Date Display Formats
Date formats specify a two-digit month and a two-digit day. Date formats can specify a year in
this century with two digits or four digits, while years in another century require four digits. You
can use a slash (/) or a hyphen () as a separator. The default date format is mm/dd/yy and is
shown as 99/99/99.
Results determines where to put the month, day, and year, values based on any Date Format (-d)
startup option you might have used. This startup option lets you specify a date format for your
application.
You set the date display format with the -d option. However, this is just the display format. It is
not the way Progress stores the data. It stores dates in the default format (month/day/year).
C–8
Field Display Formats
Therefore, when you enter date values in Progress expressions in Expert mode in any Results
module, enter them in the month/day/year format.
Table C–7 shows some examples of how Results displays a date value using different formats.
When you want the user to enter a date in a report, it is best to use the default date display format.
Table C–7:
Date Display Formats
FORMAT
VALUE
DISPLAY
99/99/99
3/10/1990
03/10/90
99/99/9999
3/10/2090
03/10/2090
99-99-99
3/10/1990
03-10-90
99-99-99
3/10/2090
????????1
999999
3/10/1990
031090
999999
03/10/90
031090
99999999
03/10/1990
03101990
1
In this example, the value of 3/10/2090 is too large to fit into the display format. The year part of the display
format is 99 while the value being displayed is 2090, which requires a year format of 9999.
If you enter a single digit as the year in a date field, Results uses the current decade with the
single digit.
C.7
How to Test and Override Default Display Formats
The formats you define in Results are local to Results. To change the formats in the database,
you must use the Progress Data Dictionary.
To test different display formats, create and run a report and observe the results. If you want to
change the format of fields in reports, select the Settings option in the Reports module and select
the Formats and Labels option. This option enables you to change formats and labels in reports.
Change the formats for a couple of fields and run the report again. If you like the results better,
save the report.
In the Data Export module, you can change the format of fields in Fixed-width ASCII (SDF)
format reports using the Width and Format of Fields option.
C–9
Progress Results User’s Guide for UNIX
C–10
D
Results Limits
This appendix lists the limits that exist within Results. The limits are:
•
Maximum number of files that can be joined together = 5.
•
Maximum number of join relationships you can store = 1024.
•
Maximum number of fields in a WHERE clause = 48.
•
Maximum number of query forms = 512 for each .qc file, regardless of how many an
individual user can see.
•
Maximum number of files in a scrolling file list = 512.
•
Maximum number of fields in a scrolling field list = 1024.
(The total number of fields includes the fields in files plus any calculated fields and fields
in joins.) Note that if you join five files and each has 200 fields, then the scrolling field list
is equal to their sum (1000) plus the number of calculated fields and fields in joins.
•
Maximum number of lines in a mailing label = 66.
•
Maximum number of directory entries each user can have (including labels, reports, and
data export formats) = 250.
•
Maximum number of printing devices for the system as a whole = 64.
•
Maximum number of fields you can use to order records = 5.
•
Maximum number of fields on a query form = 64.
Progress Results User’s Guide for UNIX
D–2
•
Maximum number of indexes (in Query module) on fields = unlimited.
•
Maximum number of fields in a report or data export format = 64.
•
Maximum number of terminal types and color settings = 50.
E
Files that Results Creates
This appendix describes the file extensions for all of the files associated with the Results system.
Progress Results User’s Guide for UNIX
E.1
The .qc File
The .qc file is the configuration file that contains the list of permissions, printers, joins, etc. By
default, Results tries to create the .qc file in the same directory that contains the database
(dbname.db). However, if the database is on another machine, Results might not be able to reach
that directory. In that case, Results places the .qc file in the current directory. Once Results
creates the .qc file, you can move it anywhere in your PROPATH. However, you must move
the .ql file to the same directory. (For information about the .ql file, see the “The .ql File”
section in this appendix.)
When you start Results, it first looks for the .qc file in the current directory. If it cannot find it
there, it looks for it in the PROPATH. Because it takes time to read the .qc file, Results has a
feature called fast load. This feature consists of several files called resxxxxx.r, where x is an
integer.
These compiled routines automatically load all of the configuration information at startup. The
files load information so Results does not have to read the entire .qc file each time a user starts
it. They are automatically created when you first build the query interface (at start up) and each
time you leave the Administration module.
You can place the .qc file and the fast load routines anywhere in your PROPATH.
E.1.1
Primary Rule when Editing the .qc File
If you must edit a .qc file, back up the original .qc file first. After that, delete the “fastload=”
line, and delete the actual fastload files resxxxxx.r.
Reading the entire .qc file takes quite a long time. Therefore, to speed things up, Results creates
resxxxxx.r files that contain ASSIGN statements to directly load the shared variables. As soon
as it reaches the fastload line, it runs these programs and ignores everything from this point on
in the .qc file.
To restore the fastload line, simply enter the Administration module and then exit it. Results
rewrites the .qc file, fixing any sequence numbers and adding the fastload line. It also rebuilds
the resxxxxx.r files to match the .qc file.
If the checksum is different, or the version does not match, Results skips the fastload line and
loads the entire .qc file. The .qc file uses a separate checksum value for each database on the
database#= lines.
E.1.2
Editing Forms and Joins
If you edit the join#= lines or form#= lines, do not worry about the numbering because Results
ignores the numbers. However, keep the lists in alphabetical order.
E–2
Files that Results Creates
E.1.3
Order of Options
Do not change the order of options before the fastload line However, after the fastload line, it
does not matter whether forms come before views, or permissions, or printers, as long as each
group is together. Entering the Administration module and leaving it rewrites the .qc file..
Chapter 9, “Database Administration,” and Chapter 10, “Integrating Results into Existing
Applications,” contain more information about the .qc file.
E.2
The .ql File
The .ql file is the query log file. During the initial system generation, this file logs the files that
have query interfaces built for them, as well as any problems encountered during the build.
Results creates it in the same directory that contains the .qc file. If you move the .qc file to
another directory, you must move the .ql file to the same directory.
For each query interface, there are three files: the .p file containing the generated query
procedure, the .i file containing the include file called by the .p procedure, and the .f file
containing the form information.
Chapter 9, “Database Administration,” and Chapter 10, “Integrating Results into Existing
Applications,” contain more information about the .ql file.
E.3
The .qd File
The .qd file is the query directory file. The name of the .qd file is the first eight characters of the
USERID plus the .qd extension. If the USERID is blank then the name is results.qd. Results
takes the USERID from LDBNAME(1), which is the first connected database.
The .qd file contains the directory that maps the descriptions of reports, labels, and export
programs to their filenames. To look at this file, use the Contents of a User Directory option on
the Administration module’s Main Menu. Each user has their own reports, labels, and export
files.
E–3
Progress Results User’s Guide for UNIX
The filenames have the format repxxxxx.p, lblxxxxx.p, and expxxxxx.p, where xxxxx represents
a unique integer value. For example, the filenames have the formats shown in Table E–1.
Table E–1:
Formats for Filenames
Reports
Labels
Data Exports
rep00001.p
lbl00001.p
exp00001.p
rep00002.p
lbl00002.p
exp00002.p
rep00003.p
lbl00003.p
exp00003.p
etc.
etc.
etc.
If Results cannot find a .qd file in a user’s PROPATH, it creates one in the current directory. It
also stores all saved reports, exports, and labels files in the same directory that holds the .qd file.
If you move the .qd file, you must move the report, label, and export files with it. They must be
in the same directory.
E.3.1
Users Must Have Their Own Directories
Since the reports, labels, and exports do not contain user-specific characters in their filenames,
each user must have a separate file system directory. Also, each Results session creates
temporary files (_qbf*.p and _qbf*.d). These are also placed in the current directory, and if
several users share a directory the files overwrite each other. There is an exception to this. For
CTOS Results, all temporary files are placed in the directory denoted by [Scr]<$>, which is the
system scratch, or temporary directory.
E.3.2
Important Lines in the .qd File
The important lines in the .qd file are the config, version, and the export, label, and report lines.
These can be edited. Do not worry about the numbering. As long as the first report#= line
describes rep00001.p, and the second describes rep00002.p, it does not matter what the number
is that goes before the “=”.
The version must be 1.3C or later. Results is version-sensitive and contains special code to read
in any files based on their version. Changing the version arbitrarily in this file can cause Results
to act unpredictably.
Chapter 9, “Database Administration,” contains more information about the .qd file.
E–4
Files that Results Creates
E.4
Scratch Files
Results creates various scratch files that it uses to temporarily store generated procedures and
data. (All scratch files begin with the prefix _qbf. For example, _qbf2.p is an example of a
scratch file.)
As you exit Results, it automatically deletes these files. But if your system crashes, they could
remain on your disk. You automatically delete these scratch files by starting Results in that
directory then exiting. Or, you can delete them manually.
E–5
Progress Results User’s Guide for UNIX
E–6
F
Order of Evaluation
This appendix describes how to evaluate expressions. For example, it describes how to evaluate
complex WHERE clauses and how grouping parts of an expression with parentheses affects the
evaluation.
Progress Results User’s Guide for UNIX
F.1
Using Expressions
You use expressions in the Expert Mode of WHERE clauses. Expressions are used in many
Progress statements and functions. If the value of one or more of the components of an
expression is an unknown value (?), the result of the expression is usually an unknown value.
NOTE:
When you use expressions to perform mathematical calculations, and the result of
operations involving integers is larger than the largest value of an integer (+ 2
billion), Progress might end abnormally.
F.1.1
Evaluating Expressions
When evaluating expressions, Results uses precedence in determining the result. Consider the
following expression:
3*5+2
The result of this expression is different depending on the order that you process the
multiplication and addition operators. For example, 3 * (5 + 2) is 21 but (3 * 5) + 2 is 17.
If an expression contains two operators of equal precedence, Results evaluates the expression
from left to right. If the operators are not of equal precedence, Results evaluates the operator of
higher precedence first. For example, Results evaluates AND before it evaluates OR. Also, you
can use parentheses to change the default order used to evaluate an expression.
F–2
Order of Evaluation
Table F–1 shows the precedence, or order of processing, of functions and operators.
Table F–1:
Precedence of Functions and Operators
Name of Operator
Precedence
- UNARY NEGATIVE
+ UNARY POSITIVE
7 (highest)
MODULO
/ DIVISION
* MULTIPLICATION
6
- DATE SUBTRACTION
- SUBTRACTION
+ DATE ADDITION
+ CONCATENATION
+ ADDITION
5
MATCHES
LT OR <
LE OR < =
GT OR >
GE OR > =
EQ OR =
NE < >
BEGINS
4
NOT
3
AND
2
OR
1 (lowest)
Rules
When using an operator, you must leave a space to the left and to the right of that operator. For
example, here is a valid use of an operator:
x+y
Whereas, this is an invalid use of an operator:
x+y
F–3
Progress Results User’s Guide for UNIX
Examples
Table F–2 provides examples to help illustrate how Results evaluates expressions.
Table F–2:
Examples of Expressions
Expression
F–4
Evaluation
2*7+2
By default, Results performs the
multiplication first, then the addition.
Therefore, it interprets this expression as
being equal to 16.
(2 * 7) + 2
Results performs the operation inside the
parentheses first. Therefore, it interprets this
expression as being equal to16.
2 * (7 + 2)
Results performs the operation inside the
parentheses first. Therefore, it interprets this
expression as being equal to 18.
(St = “MA” OR St = “CA”)
AND Cust-num > 10
Results evaluates the expression inside the
parentheses first. Therefore, this expression
finds records in Massachusetts or California
whose customer number is greater than 10.
Name BEGINS “p” OR
Name BEGINS “l” AND
State = “MA”
Results evaluates the AND before the OR.
Therefore, this expression finds the records
where the name begins with l that are in
Massachusetts and groups them with all the
records where the name begins with p. To
find the records in Massachusetts where the
names begin with l or p, you must use Expert
Mode to group the expression with
parentheses. For example: (Name BEGINS
“p” OR Name BEGINS “l”) AND State =
“MA”.
G
Helpful Information
This appendix contains helpful information for database administrators.
Progress Results User’s Guide for UNIX
G.1
Common Problems During Initial Build
This section describes some problems you might encounter during the initial build process. It
also includes the solutions to these problems. For more information about the initial build
process, see Chapter 9, “Database Administration.”
G.1.1
444 Error
You might see the following error message during the initial build process:
"** Attempt to expand record beyond the maximum allowed size."
There are too many files for Results to handle or there are too many joins. Since program
variables are stored in a record, just like database fields, the total each for undo and no-undo
variables defined in any given program is limited to 32K.
As a workaround, mark some files as HIDDEN to skip them during the initial build. After the
build completes, you can reset the hidden flag and manually add any missing query forms or
join relationships in the Administration module.
G.1.2
Too Many Joins
Too many joins occur when the database has a lot of fields in the schema with the same name.
Sometimes the join list becomes unbalanced, with some file related to every other file.
As a workaround, edit the .qc file with an ASCII editor and delete the unwanted “join###=”
lines.
G.1.3
Limit on Query Forms: 63KB
If Progress tries to compile a query form, and the resulting r-code exceeds 63KB, the client fails
with a fatal error. There is no way to trap this error. Results attempts to recover using the
checkpoint file it writes, but it continues to fail at the same point. To work around this, mark the
offending file as HIDDEN, and then continue the Initial Build.
See the “R-code Greater than 63KB” section in this appendix for more information.
G.1.4
Missing .qc File with Multiple Databases
Results names the .qc file for the first database connected. If you start Results with the databases
connected in a different order, Results does not recognize the .qc file. Therefore, always connect
the database that the .qc file is named after as the first database.
For more information about the initial build process, see Chapter 9, “Database Administration.”
For more information about the .qc file, see Appendix E, “Files that Results Creates.”
G–2
Helpful Information
G.1.5
Building in Same Directory as Application
This should not overwrite anything, because if a file already exists, Results automatically
chooses a new name for its generated code. Still, it is best to perform the Initial Build in a clean
directory.
It is not possible to start Results in one directory and have it perform the Initial Build writing
into another directory. Initial Build writes to the current directory only. Application Rebuild, on
the other hand, rebuilds files wherever it finds them in the PROPATH.
G.1.6
Overwriting Customized Query Forms
When you modify query forms, modify the query form program (.p) so the Application Rebuild
process does not overwrite your edited form with the default form. Specifically, change the line:
form-type= "default"
to
form-type= "user"
This prevents Results from overwriting the query form during the Application Rebuild.
G.2
When Query Forms Do Not Compile
This section describes some common causes of query form compilation failures.
G.2.1
Missing Validation Files
Be sure that .v validation files, as referenced in the dictionary, are available (in the PROPATH)
when Results is building.
G.2.2
Shared Variable in Validation Expression
Avoid using shared variables in validation expressions. Since there is no easy way to place the
“DEFINE SHARED VARIABLE” declaration into the query procedure, these types of
validation expressions cause problems.
If there are shared variables in the validation expressions, edit the validation expression. Note
that you can manually edit the .p file, but an Application Rebuild might undo it.
NOTE:
The use of the INPUT() function in the validation phase causes compile errors
because there is no user input.
G–3
Progress Results User’s Guide for UNIX
G.2.3
R-code Greater than 63KB
The r-code can be greater than 63KB for many reasons:
•
Progress makes r-code big if there are a lot of fields in the file (whether the fields are
referenced or not).
•
Long validation expressions.
•
Long help messages or validation messages.
•
In decimal items with Query enabled expand to a complicated expression to support “.” or
“,” as the decimal character.
•
Complicated forms or long labels.
•
Long formats.
To shrink the r-code:
•
Eliminate all Browse fields. (Enter no in the Brow? column in Which Fields on Form in
the Form Definitions for Query menu.)
•
Eliminate all Add/Update/Copy fields. (Enter no in the Upd? column in Which Fields on
Form in the Form Definitions for Query menu.)
•
Eliminate all Query fields, and use the Where option instead. (Enter no in the Qry? column
in Which Fields on Form in the Form Definitions for Query menu.)
•
Consider using one form for Query and a different one for Add/Update/Copy.
G.2.4
Problems Running a Defined Report
If there are problems running a defined report, check the permissions on the current directory
because this problem occurs when the user does not have write permissions on the current
directory.
To test this, have the user get into the Progress Procedure Editor. Type in something, and then
attempt to PUT that to the current directory. Then, clear the buffer and GET it. If it does not
work, the user has a permissions problem writing to the current directory.
G–4
Helpful Information
G.3
Language Errors
This section describes some common causes of problems when you run Results in non-English
languages.
G.3.1
Progress Messages are Not in Correct Language
Set the PROMSGS environment variable to the language you want to use. This sets the Progress
messages to the language you want. Note that you must have the PROLANG product installed
to use PROMSGS. For more information about PROLANG and PROMSGS, see the Progress
Installation and Configuration Guide Version 9 for UNIX.
G.3.2
Results Not Defaulting to Correct Language
The default language is the language that is set in the results.l file when you perform the
initial build. Note that you must have the RESLANG product installed if you want to use a
non-English version of Results. For more information about RESLANG, refer to the Progress
Installation and Configuration Guide Version 9 for UNIX. For details on the results.l file, see
the “Language” section in Chapter 9, “Database Administration.”
G.3.3
Address Fields in Labels Module Default to Wrong
Language Version
The default address look-up fields correspond to the language version of Results that is used
when you perform the initial build. You can edit those defaults through options in the
Administration module.
G–5
Progress Results User’s Guide for UNIX
G–6
Glossary
Active Field
A field you can modify or enter information in, or a currently selected field. In Results, an
active field is underlined or highlighted, depending on your terminal type.
Active File
The file that is currently in use.
Application
A set of programming language instructions that accomplish a specific task.
Array
A field or variable containing multiple elements. Each element in an array has the same
data type.
Array Extent
The number of elements contained in the array.
Ascending
An increasing order of fields. Numeric or alphabetical order. For example, names in
ascending order are listed alphabetically.
ASCII Character
A seven-bit code representing upper and lower case letters, numbers, symbols, and
punctuation marks. ASCII is an acronym for the American Standard Code for Information
Interchange.
Break Group
A section in a report. For example, all records for customers in a particular sales region.
Progress Results User’s Guide for UNIX
Calculated Field
A field you create within a Results module using a math function. For example, a percent
of total field.
Character Data Type
A property of a field or variable that determines that only character data can be stored in
it. Characters cannot be arithmetically manipulated.
Column Label
A label displayed above a column of data (field values).
Command
An instruction to the system.
Comparison Expression
A combination of constants, variables, operators, and parentheses used to compare values.
Constant
A value that does not change.
Data Dictionary
A menu-driven utility in Progress used to maintain the structure of a database. In
lowercase, data dictionary is a synonym for schema; that is, it refers to the actual database
structure definitions. Typically in Progress, Data Dictionary refers to the Progress
program, while the terms schema and data definitions are used to refer to the database
structure.
Data Format
The display layout of the data in a field. Different types of data have different data formats.
(See Appendix C for more information.) See also Display format.
Data Integrity
Certainty of data accuracy or validity.
Data Type
The type of data contained in a field. There are several types of data: decimal, integer,
logical, character, and date.
Database
A collection of files that relate to a broad subject area.
Glossary–2
Glossary
Database Administrator
An individual responsible for maintaining a database management system. This person is
authorized to grant and revoke access to the system and select options for users.
Date Data Type
A property of a field or variable that determines that the stored data is a date. For example,
a date data type might contain a date and time from 1/1/32768 B.C. through 12/31/32767
A.D.
Decimal Data Type
A property of a field or variable that determines the stored data is a decimal.
Descending
A decreasing order of field values. For example, numbers listed from the largest to the
smallest.
Deployment
The process necessary to port applications developed with one system to another system.
Developer
The person who creates an application for the end-user. The developer is typically a
programmer.
Device
See Output device.
Directory
A structure that organizes files and possibly other directories.
Display Format
The way data appears on screens and in printed reports. Results automatically supplies a
default display format for each data type, but you can change it. You specify display
formats through the Data Dictionary, or with the Formats and Labels option.
Edit area
The area between the two horizontal lines in the Progress screen where you enter and edit
Progress code.
Editor
See Progress Procedure Editor.
Glossary–3
Progress Results User’s Guide for UNIX
End-user
The person who uses the application.
Expert Mode
A feature available in some windows that enables you to override a menu-driven process
and enter information directly. For example, there is an Expert Mode in the WHERE
clause builder.
Expression
A combination of constants, variables, operations, and parentheses used to perform a
calculation. An expression can consist of anything from a single constant or variable to a
complicated arrangement of operators and functions that produce a value in a single
program statement.
Extent
See Array extent.
Field
A specific item of information. A record typically contains several related fields.
Field Delimiter String
The set of data export characters used to denote the beginning and end of each field value.
Field Separator String
The set of data export characters that separate each field value within a record.
File
A collection of records containing similar information. For example, a customer file is a
collection of customer information records.
Footer
Information located at the bottom of each page of a report. A footer typically contains a
page number.
Form
A screen layout used in the Query module to display record information.
Format
See Display format.
Function Keys
Special keys that perform certain actions. For example, the GO key (F1 or CTRL-X).
Glossary–4
Glossary
Header
Text, such as a page number, title, or date, placed on the top of each page of a report.
Horizontal Menu
A strip menu of options you can select from a horizontal line that runs across the screen.
The options are lined up next to each other.
Include File
A separate file containing Progress code that you can add or call from within Results
(u-browse.i, for example).
Index
A field or combination of fields used to rapidly retrieve a particular record in a file.
Initialization String
A set of data export characters that precede the record data on each line of a data export
file. For example, an asterisk (*) might indicate the beginning of a line.
The value for the field when it was created.
Insert Mode
One of two text entry modes in Results. In insert mode, each character you type is inserted
in the position where the cursor is located. The cursor and the character under it move one
space to the right. The MODE (F9 or CTRL-T) key enables you to toggle between the text
entry modes. See also Overstrike Mode.
Integer Data Type
A property of a field or variable that determines the data that can be stored there can be an
integer. In Progress, an integer can be a positive or negative whole number, within the
range of -2,147,483,648 through 2,147,483,647.
Integer Field
A field having an integer data type.
Integrity
Accuracy or completeness of data.
Label
Text that appears with a field on a report or form that describes the field. Also a mailing
label.
Glossary–5
Progress Results User’s Guide for UNIX
Logical Data Type
Can be one of two values consisting of yes/no, true/false, or any other logical value pairs
that you define.
Menu
A list of options that perform various actions, such as run a report or display another menu.
See also Horizontal menu and Vertical menu.
Menu Option
One choice in a menu listing. A menu option can display another menu, produce a report,
answer a query, or exit from the application. See also Menu.
Message Area of Screen
An area at the bottom of the screen where system messages and help messages appear.
Operating System
Software that controls and manages the execution of computer programs and services.
Operator
A symbol or word used to make comparisons or perform calculations. For example, LESS
THAN (<), EQUALS (=), GREATER THAN (>), or MINUS (-).
Output Destination
See Output device.
Output Device
The output destination of a report, label, or data export definition. For example, an output
device can be a terminal, a printer, or a disk file.
Overstrike Mode
One of two text entry modes in Results. In Overstrike Mode, each character you type
replaces the character at the position of the cursor. Overstrike Mode is the default. The
MODE (F9 or CTRL-T) key enables you to toggle between the text entry modes. See also
Insert Mode.
Parsing
A process that breaks the command string into its elements to examine and interpret it.
Pathname
Specifies the complete name of a directory or file by starting at the root directory or disk
volume and tracing the hierarchy of the file.
Glossary–6
Glossary
Procedure
The steps taken to perform a task. A series of programming language commands and
statements that perform a desired data processing task. The procedures referred to in this
book contain Progress commands and statements.
Progress Command
The command you use to start Progress.
Progress Procedure Editor
An editing tool that enables you to create and edit Progress procedures. You can also
compile and test Progress procedures from the Progress editor, or escape to the operating
system.
Progress Session
A Progress session begins when you start Progress and ends when you exit Progress.
PROPATH
A Progress environment variable that defines a list of directories that Progress searches by
default. Progress uses the PROPATH value to determine the path to use when searching
for the procedure file you name.
Qualification
A search criteria that limits the data displayed on a report or in a query from a database.
Typically, a qualification consists of a field name, a comparison operator, and a field name
or constant. For example, a request for records where the state begins with m is a qualifier.
In complex qualifications, logical operators are used to join several qualifications.
Query
To access specific information in a database.
Query-by-example
To select specific database records by entering selection criteria into an empty form.
Record
A collection of items of information. A file typically contains many records that contain
similar information.
Record Termination String
The set of data export characters that indicates the end of each record in an export file.
Glossary–7
Progress Results User’s Guide for UNIX
Related Files
Files that share some information. Two or more files that use similar fields to join one file
with another.
Relational Operator
A symbol such as = (equal to), < (less than), or > (greater than) that is used to compare two
values. It specifies a condition that can be either true or false.
Report
An organized display of data. The Results Reports module enables you to create and edit
reports that display and summarize the data from one or many files in a database. Reports
can contain text, fields, variables, and aggregates.
Startup Command
A command that starts a software package. For example, the commands that start Progress
and Results.
Submenu
A menu that you access through another menu. See also Menu.
Summary List
A Browse list that shows some, but not necessarily all, of the fields in the record.
User File
A file that stores user IDs, passwords, and user names in each database.
User ID
User identification stored in the _User file of the Data Dictionary. At start up, a user ID is
used in conjunction with a password to ensure that only known users can start the
application. At runtime, the application can check the user ID established at startup to
determine that only authorized users can run individual procedures. In Progress, a user ID
is a 32-character string. Like filenames, user IDs must begin with a character from a-z (or
A-Z). The name can consist of alphabetic characters, digits, and the characters #,$,%,&, -,
and _. User IDs are not case-sensitive; they can be uppercase, lowercase, or any
combination of these. A user ID can be blank, or written as the string “ ”, but it cannot be
defined this way through the Data Dictionary.
Glossary–8
Glossary
Vertical Menu
A series of options you can select from a vertical list that runs down the screen. The
Results Main Menu is an example of a vertical menu. See also Menu.
WHERE Clause
A phrase that enables you to qualify or limit a set of information. For example, you can
build a WHERE clause to show information for customers WHERE the customer number
is greater than ten. (The WHERE clause builder is available in the Query, Reports, Labels,
and Data Export modules.)
Glossary–9
Progress Results User’s Guide for UNIX
Glossary–10
Index
Symbols
! in field labels 3–35, B–16
.qd file extension 9–15
.ql file extension 9–5, 10–24
< > function delimiter 3–48, 5–12, B–18
$ summary field marker 5–8
See Totals Only reports
? (unknown database name) 6–5
& (hide repeating values) report marker 5–8
? in Report Info list 3–28
& marker for hiding repeating values 3–36
{ } function delimiter 3–48, 5–12, B–18
* (available report) 6–6
~ operator 4–10
* in Report Info list 3–28
*c (counter) report marker 5–8
A
*d (date) report marker 5–8
a (average) report marker 5–8, B–12
*e (stacked array) report marker 5–8
Active fields B–10
selecting B–11
*n (numeric expression) report marker 5–8,
B–14
*p (percent of total) report marker 5–8
*r (running total) report marker 5–8
*s (string expression) report marker 5–8
.f file extension 9–5, 9–6
Active files
selecting 3–21, B–11
Active report 5–7
Add option 3–12
described 4–5, B–7
.i files E–3
Adding
fields to data export formats 7–7
records 3–12
.qc file extension 9–3, 9–12
All Shown position marker. See Position
Progress Results User’s Guide for UNIX
marker
AND operator 3–46
Browse Program for Query option 9–24
Browse, user defined 9–24
Application Rebuild option 9–8
Application, deploying. See Deploying
Array fields, defined 5–10
ASCII data export formats 7–10 to 7–12
ASCII, data export options B–22
Ask mode
Expert mode 5–19
invoking in WHERE clause builder 2–4
shared variables 10–10
WHERE clause 5–19
At Bottom position marker. See Position
marker
C
c (count) report marker 5–8, B–12
*c (counter) B–13
Character data types, display format C–3
Clear option, described 5–7, B–6
Clearing labels 6–6
Code, generated by Results 10–18
Color settings. See Terminal color settings
Column labels, stacked 3–35, 10–14, B–16
At Top position marker. See Position marker
Columns, maximum in reports D–2
Audience xiii
Combining files from different databases.
See Join option
Average report marker (a) B–12
Combining files. See Join option
B
Commands, shutdown servers A–5
Blank lines, omitting in labels 6–10
Comparison operators, listed 4–9
Bold typeface, as typographical convention
xvi
Configuration file. See .qc file
Break groups
creating 3–37, 3–38
creating totals 5–7
defined 3–37, B–12
example 3–41
Connection parameters
multiple databases A–4
See also Startup options
Control sequences for output devices 9–20
Browse list 9–10
changing temporarily 3–15
Copy option 4–8
described 4–5, B–8
Browse option 3–14
adding fields 3–15
maximum number 3–16
described 4–5, B–8
Copying labels 6–6
Index–2
Configuration options 9–17
Copying sports database. See
Demonstration Database
Index
Copying, records. See Records
COUNT function B–18
Count, marker (c) B–12
Counters
defining B–13
marker (*n) B–13
Creating ASCII data export formats 7–10
Creating data export formats 7–7
Creating reports 3–21
Creating, mysports database. See
Demonstration Database
Database
copy commands 3–3
defined 1–3
structure 1–3
Database security. See Sign-on
Date
data type, default format C–8
display formats C–8
alternative C–9
European C–9
expressions
defining B–15
types B–15
marker (*d) B–16
Date Format (-d) startup parameter 2–3
D
-db (Database Name) connection parameter
A–4
*d (date) B–16
dbname.qc file 9–3
-d startup parameter 2–3
dbname.ql file 9–6
Data Export
accepting defaults 3–53
Decimal data types, display format C–4
Data export
menu options B–21
Data export formats, user-defined 10–19
Data Export module 3–51
adding fields 7–7
creating non-Progress formats 7–8
defining ASCII formats 7–10
defining formats 7–7
defining settings 7–4
deleting formats 7–5
features 7–6
introduced 7–2
layout settings 7–5
menu options 7–3
Progress format 7–7
running reports 7–8
settings 7–7, 7–8, 7–11
using Expert mode in defining formats
7–11
Default Report Settings option 9–24
Defaults
display formats C–5
European C–5
Define option, described 5–4, 7–3, B–10
Defining non-Progress data export formats
7–8
Defining reports 3–21
Delete option 3–14
described 4–5, B–8
Deleting a WHERE clause 3–54
Deleting data export formats 7–5
Deleting label definitions 6–3
Deleting labels 6–6
Index–3
Progress Results User’s Guide for UNIX
Deleting records 3–14
Deleting reports 3–27
Deleting totals and subtotals from reports
3–39
Deploying, application with customized
interface 10–24
Directory entries, maximum D–1
Display formats
character data types C–3
date C–8
decimal and integer data types C–4
defaults C–2
data types C–2
European C–2
overriding C–9
European numeric 3–11, 3–33
logical data types C–8
numeric C–4
European B–18, C–5
testing C–9
European Numeric Format (-E) startup
parameter 2–3, 3–11, 3–33
Evaluating expressions F–2
Exit option 3–19
described 4–7, B–7
Exiting Results 3–63, A–5
multi-user mode, stopping servers A–5
Expert mode
date format C–9
error messages 4–13
European numbers format C–5
in WHERE clauses, examples 4–13
invoking in WHERE clause builder 2–4
using in WHERE clauses 4–11
using to change ASCII data export
settings 7–11
WHERE clauses
described B–5
Export formats
maximum per user D–1
DLCRES, environment variable 2–2
Export types 7–5
fixed-width ASCII (SDF) 7–6
E
Expressions
evaluating F–2
-E startup parameter 2–3, 3–11, 3–33
Editing keys 2–5
F
Environment variables
DLCRES 2–2
PROPATH 2–3
.f file E–3
Equal comparison 3–45
Error messages
displaying descriptions xx
in Expert mode 4–13
Fast load E–2
files E–2
Field delimiter string 7–6
ASCII 7–10
Progress 7–7
Field formats, changing in a report 3–34
Establishing auto-select fields 9–24
Field labels, changing 3–34
European date format. See Date
European numeric format C–5
numeric format B–18
Index–4
Field separator 7–6
ASCII 7–10
Index
Field width, defining for data export fields
7–11
Field, defined 1–3
Fields
adding to labels 6–9
adding to reports 5–9
changing formats 3–32, 3–34, 3–35
defaults in labels. See Labels
deleting from reports 5–10
maximum for ordering records D–1
maximum on query form D–1
scrolling lists, maximum D–1
selected for reports, finding 10–12
selecting B–11
selecting for query forms 9–10
width, defining for export fields B–21
File, defined 1–3
Files
active B–11
deleting relations 9–12
joins, maximum D–1
moving E–2, E–4
relations between 9–11
scrolling file list, maximum D–1
Formats
defaults B–12
defining
data exports B–21
report fields B–16
defining for report fields 5–4
display
character C–3
date C–8
logical C–8
numeric C–4, C–5
See also Display formats
testing C–9
display defaults
data types C–2
overriding C–9
Formats and labels, defining, reports B–16
Forms
See also Query forms
switching 4–8
Function delimiters 3–48, 5–12
< > B–18
{ } B–18
Function keys 2–4
Fill characters, display formats C–3
Functions
headers B–18
in headers 3–48, 5–12
First option 3–11
described 4–5, B–7
G
Files options 9–8
Fixed width
adjusting B–21
Fixed width ASCII (SDF) export type,
adjusting width 7–11
Fixed-width ASCII (SDF) export type 7–6
Footers
adding to reports 5–12
creating 5–6
defining B–18
last page only 5–6, B–19
Form files. See .f file
Get option 3–28
described 5–3, B–3
using 6–5
Getting label definitions 6–5
Getting saved reports 3–28
H
Headers
adding to reports 3–48, 5–12
creating 5–5
Index–5
Progress Results User’s Guide for UNIX
defining B–17
first page only 5–6, B–19
using functions 3–48, 5–12, B–18
Italic typeface, as typographical convention
xvi
Help
accessing 1–12
integrating customized messages 10–5
keys 2–4
Progress messages xx
J
Hide repeating values
marker (&) B–16
Join relationships, maximum D–1
& (hide repeating values) B–16
K
Horizontal menus 2–8, 2–10
Join option 3–17
described 4–5, B–9
for multiple databases 8–4
How to Exit Application option 9–16
Keys
editing 2–5
functions 2–4
I
Keystrokes xvi
IDLIST 9–13
L
Include files. See .i file
Label Field Selection option 9–24
Index
defined 1–3
primary, defined 1–3
Indexes, maximum on fields D–2
Info option
described 4–7, 5–7, B–6
using 4–14, 5–18
Initial build, defined 9–3
Initialization string 7–6
ASCII 7–10
Insert mode 2–4
Installing Results 2–2
INTEGER data type, display format C–4
Integrating Results with Progress
applications 10–3
Interface, Results, customizing 10–24
Index–6
Label reports, maximum per user D–1
Labels
adding fields 6–9
adding text 3–59, 6–8
adjusting height 6–11
adjusting left margin 6–11
adjusting number of columns 6–12
adjusting text to text spacing 6–11
adjusting top margin 6–11
clearing layouts from screen 6–6
copying 6–6
creating manually 6–7
defining in reports 5–4
defining, reports B–16
deleting 6–3, 6–6
establishing auto-select fields 9–24
mailing, maximum lines D–1
omitting blank lines 6–10
printing 6–6
printing multiple copies 6–10
rules for adding text 3–60
saving 6–4
Index
stacked columns 3–35, B–16
Labels module 3–55
described 6–2
features 6–4
menu options 6–2, B–19
Landscape 9–20
Language option 9–17
Language setup, for non-English languages
9–2
Languages, RESLANG product A–2, G–5
Last option 3–11
described 4–5, B–7
Limits, Results D–1
Listing records. See Browse option
Logging out A–5
Logical, data types, display formats C–8
login.p procedure, editing for security 9–16
Logo, sign-on. See Sign-on
Logo, startup 10–4
M
Mailing labels 6–2
Main menu 1–9
Manual, organization of xiv
Manual, syntax notation xvii
Margins, adjusting in labels 6–11
Markers
& (hide repeating values) B–16
*c (counter) B–13
*d (date) B–16
*e (stacked array) B–10
*n (numeric expression) B–14, B–15
*p (percent of total) B–13
*r (running total) B–12
*s (string expression) B–14
a (average) B–12
c (count) B–12
n (minimum) B–12
t (total) B–12
x (maximum) B–12
Math expressions
adding to reports 3–29
defining B–13
Maximum
export formats per user D–1
fields for ordering records D–1
fields in a scrolling list D–1
fields on query form D–1
files in a scrolling list D–1
indexes on fields D–2
label reports per user D–1
lines in mailing labels D–1
marker (x) B–12
number of columns D–2
number of files joined D–1
number of joins on a system D–1
printing devices on a system D–1
query forms on a system D–1
reports per user D–1
Menu options B–2
common across Results B–3
Menus
horizontal 2–9
vertical 2–9
Messages, displaying descriptions xx
Microsoft Word, default settings 3–53
Minimum, marker (n) B–12
Mode key 2–4
Module option
described 4–7, 5–7, B–6
using 4–14
Monospaced typeface, as typographical
convention xvi
Index–7
Progress Results User’s Guide for UNIX
Moving files E–2, E–4
Order of evaluation 3–45, 3–46, F–2
Multiple databases
accessing 8–2
Order of operations F–2
Multi-user mode A–3
Order of records in reports 3–37
Mysports database, creating. See
Demonstration Database
Order option
described 4–6, 5–7, B–6, B–10
Reports module 3–37
using 4–16, 5–15
N
Originating module, determining 10–6
n (minimum) report marker 5–8, B–12
Originating program, determining name
10–8
*n (numeric expression) B–15
Next option 3–11
described 4–4, B–7
Overstrike mode 2–4
P
Not Equal comparison 3–45
NOW function B–18
Numeric
display formats C–4
default C–5
European B–18, C–5
expressions
defining B–15
marker (*n) B–14, B–15
types B–15
Numeric display formats, European 3–11,
3–33
O
*p (percent of total) B–13
.p file E–3
Page breaks. See Page ejects
Page ejects 5–4, B–17
creating 3–40
PAGE function B–18
Page spacing 3–49
adjusting in reports 5–14
defaults in reports 5–14
in reports 5–5
Page spacing in reports, defaults 3–50
-1 (Single User) A–4
Page spacing, adjusting
reports B–17
Operators. See Comparisons
Parentheses () F–2
Options
adding to Results menus 10–4
Main Menu 1–9
Percent of total
defining B–13
marker (*p) B–13
OR operator 3–45
Percent of Total, adding to reports 5–16
Order criteria
determining in User module 10–9
Permissions
for queries 9–16
Index–8
Index
for Results modules 9–16
Permissions, file, for query forms 9–11
Porting applications 9–8
Portrait 9–20
Position marker 3–15
Prev option 3–11
described 4–4, B–7
Primary indexes, defined 1–3
Print menu, user-defined 10–22
Printer Setup option 9–18
Printing
devices, maximum per system D–1
wide reports 9–18
Printing labels 6–6
Procedure files. See .p file
Procedures, Results, using in applications
10–17
Q
qbf-dhi variable 10–8
qbf-file variable 10–10
qbf-module variable 10–5, 10–6
qbf-name variable 10–8
qbf-of variable 10–10
qbf-order variable 10–9
qbf-rc# variable 10–12
qbf-rca variable 10–12
qbf-rcf, shared variable 10–12
qbf-rcl variable 10–12
qbf-rcn variable 10–12
qbf-rct variable 10–12
qbf-rcw variable 10–12
qbf-vers variable 10–6
prodb command 3–3
qbf-where variable 10–10
Progress data export format 7–7
.qc file E–2
Progress, editor A–6
.qd file E–3
Progress/CREATE command 3–3
.ql file E–3
PROMSGS environment variable 9–2
qryxxxxx.f file 9–6
PROPATH and query definition files 9–5,
9–6
qryxxxxx.i file 9–6
PROPATH environment variable 2–3
protermcap file 9–18
Put option, described 5–3, B–4
qryxxxxx.p file 9–6
Query directory file. See .qd file
Query forms 9–4
maximum total D–1
Query log file. See .ql file
Query module
features 4–8
Index–9
Progress Results User’s Guide for UNIX
forms 4–3
introduced 4–3
menu options 4–4, B–7
tutorial 3–7
Query option
described 4–6, B–9
steps for using 4–9
Query, defined 4–9
Query-by-example 4–6
R
*r (running total) B–10, B–12
Record termination string 7–6
Record, defined 1–3
Records
adding 3–12
copying 4–8
deleting 3–12
updating 4–8
adjusting spacing 3–49, 5–14
changing order of records 5–15
clearing from layout screen 5–18
defaults 3–50, 5–14
defining 3–21
defining totals 3–38
deleting 3–27, 5–18
deleting fields 5–10
maximum per user D–1
replacing old version with new 3–41
running 3–25
saving 3–27
totals only 5–24
summarizing non-numeric fields 5–26
wider than screen B–11
Reports module 3–20
described 5–3
menu options 5–3, B–10
RESLANG product A–2, G–5
Relations, defaults for multiple databases
8–2
Results
installing 2–2
limits D–1
Main menu 1–9
non-English languages A–2
overview 1–9
setting results.l A–2
starting
Progress editor A–2
using one database A–3
starting with multiple copies of demo
database 8–2
starting with the mysports database 3–3
Relationships, table, defined 1–8
results.l file 9–2, 9–17
Repeating values
hiding in reports 3–34
rules for hiding 3–35
results.p A–2
Report markers
described 5–8
listed 5–8
resxxxxx.r files E–2
Related tables, defined 1–3
Relations Between Files option 9–11
Relations between files, deleting 9–12
Reports
adding fields 5–9
adding headers 3–48
adding percent of total 5–16
Index–10
results.p file 3–6, 3–7, 10–3
Run option
described 5–3, B–4
Running data export reports 7–8
Running reports 3–25
Index
Running totals
defining B–12
marker (*r) B–12
in reports 3–49, 3–50, 5–5, 5–14, B–17
Sports database, copying 3–3
Stacked arrays, marker (*e) B–10
S
*s (string expression) B–14
Saving label definitions 6–4
Saving reports 3–27
Scratch files. See .qd file
Screen areas 2–7
Security and exiting Administration module
9–16
Stacked column labels
See !
See also Column labels
Starting Results
multi-user mode A–3
starting servers A–5
Progress editor A–2
using one database A–3
with multiple copies of demo database
8–2
with the mysports database 3–3
Shared variables 10–6
Startup commands A–4
BTOS/CTOS
one copy of demo database, single user
A–3
single database, single-user mode A–3
two copies of demo database A–4
DOS
one copy of demo database, single user
A–3
single database, single-user mode A–3
two copies of demo database A–4
OS/2
one copy of demo database, single user
A–3
single database, single-user mode A–3
single-user mode A–3
UNIX
one copy of demo database, single user
A–3
single database, single-user mode A–3
two copies of demo database A–4
VMS
one copy of demo database, single user
A–3
single database, single-user mode A–3
two copies of demo database A–4
Sign-on program 9–16
Startup logo 10–4
Spacing
in labels 3–61, 6–9
Startup options
Database Name (-db) A–4
Security options 9–13
Selection criteria, determining with shared
variables 10–10
Selection lists 2–9, 2–11
Servers
commands, shut down A–5
starting A–5
stopping A–5
Settings
Data Export formats 7–8
Data Export module 7–10, 7–11
defining
data export B–22
reports B–16
Settings option, described 5–4
Setup
language 9–17
printer 9–18
Index–11
Progress Results User’s Guide for UNIX
European Numeric Format (-E) B–18,
C–4, C–6
Single User (-1) A–4
TODAY function B–18
Toggle key 2–4
Startup parameters
Date Format (-d) 2–3
European Numeric Format (-E) 2–3,
3–11, 3–33
User ID (-U) 9–15
Totals in reports 3–19, 3–38
defining B–12
deleting 3–39
described 4–6, B–10
using 4–15
Stopping Results 3–63, A–5
Totals only reports 5–4, B–17
creating 5–24
marker ($) 5–5
summarizing non-numeric fields 5–26
String expressions
defining B–14
marker (*s) B–14
Totals, marker (t) B–12
Subset information. See Info option
Tutorial, introduced 3–2
Subsets, selecting See Query option
Typographical conventions xvi
Summary reports. See Totals Only reports
Switching modules. See Module option
Syntax notation xvii
T
U
-U startup parameter 9–15
u-browse.i file 9–24, 10–24
u-export.p file 9–24, 10–20
t (total) report marker 5–8, B–12
u-login.p file 10–4
Table relationships, defined 1–8
u-logo.p file 10–4
Tables
related 1–3
relationships 1–8
Terminal
color settings 9–21, D–2
types 9–19, D–2
u-option.p file 9–25, 10–3
Update option 4–8
described 4–5, B–8
Updating records. See Records
Termination string. See Record termination
string
Upgrading Results and the Application
Rebuild option 9–8
Terminology, database 1–3
User directory, contents 9–15
Text to text spacing, adjusting in labels 6–11
USER function B–18
Tilde. See ~
User ID (-U) startup parameter 9–15
TIME function B–18
User module, configuring 10–24
Index–12
Index
User option 9–25
described 4–7, 4–17, 5–7, B–7
User Sample Export option 7–9
User-defined Export Format option 9–24
userid.qd file 9–15
Expert mode
in WHERE clauses 4–13
V
VALUE function B–18
Version number, testing for 10–6
Vertical menus 2–9
techniques for choosing 2–10
Video attributes, determining 10–8
View option
described 4–5, B–8
See also Records
W
WHERE clause
adding 3–42, 5–19
Ask mode 5–19
deleting B–5
described 5–6, 7–4, B–4
editing 4–12
examples of Expert mode 4–13
Expert mode B–5
order of evaluation 3–45, 3–46
removing 3–54
using Expert mode 4–11
WHERE clause builder
invoking ask mode 2–4
invoking expert mode 2–4
Where option, described 4–6, B–9
Wide reports, printing 9–18
Width/format, defining, export fields B–21
X
x (maximum) report marker 5–8, B–12
Index–13
Progress Results User’s Guide for UNIX
Index–14