1
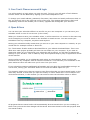
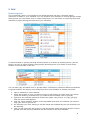
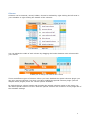
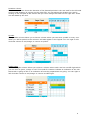
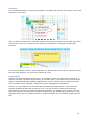
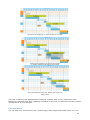
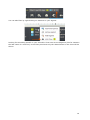
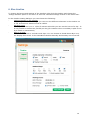
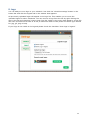
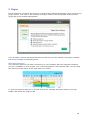
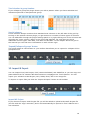
User’s manual
1. Introduction
3 2. Installation & Requirements
3 3. Your Tom’s Planner account & login
4 4. Open & Save
4 5. Grid
Rows and groups Columns Periods Symbols Comments Dependencies Filter and search 6 6 7 10 10 11 11 12 6. Blue timeline
15 7. Legend
16 8. Logo
17 9. Plugins
Reference date line Total duration in group headers Special columns ‘Expand/Collapse all groups’ button 18 18 19 19 19 10. Import & Export
Import MS Project Import Excel (or any other spreadsheet application) Import tables from Word documents or Internet Pages Import CSV files Import/Export JSON Export to MS Project Export to Excel and CSV Export to PDF and Image file 19 19 20 21 21 21 22 22 22 11. Sharing and collaboration
23 12. Include in presentations or reports
25 13. Printing
26 14. Ipad & Iphone
26 15. Frequently Asked Question (FAQ)
29 Appendix A. Settings for saving schedules locally in Firefox on the PC
30 Appendix B. Settings for saving local schedules in Firefox on the Mac
32 Appendix C Trouble shooting
34 1. Introduction Tom's Planner enables you to create and share project schedules (Gantt Charts). Tom's
Planner can be used to schedule projects, events and manage assets or resources.
2. Installation & Requirements Tom's Planner is an online application and works in your browser. Just open a browser like
Internet Explorer, Google Chrome, Safari or Firefox and go to www.tomsplanner.com.
On the homepage click the ‘log in' button and a new browser window will open which will load
the tool automatically.
Tom's Planner will work in almost any major modern browser with JavaScript enabled on any
modern Mac, PC (Windows or Linux), iPad or iPhone. Tom’s Planner is not compatible with
Android (yet).
During development Tom's Planner is continuously tested on: Windows 7, Ubuntu and the
most recent version of Mac OS X using the browsers: Internet Explorer 8+ and the latest
versions of Google chrome, Safari and FireFox.
The minimum requirements in terms of processor speed and memory are hard to determine.
We are pretty sure that every computer younger than 5 years will run Tom's Planner without
any problems.
3
3. Your Tom’s Planner account & login You will be asked to login when you open the tool. To log in you will need a Tom's Planner
account which can be obtained by signing up at www.tomsplanner.com.
To change your email address, password, first name, last name and email preferences click on
the 'my account' link in the right top corner of the tool. The window that opens is fairly self
explanatory and will also enable you to cancel, upgrade and downgrade your account.
4. Open & Save You can save your schedule offline in a text file on your own computer or you can save your
schedule online on one of our servers (in the cloud).
When you choose to save your schedule online, it will be saved on our servers in the same way
as for example your email is saved on the Hotmail or Gmail servers. You can access your
schedules from any computer, anywhere and anytime.
Saving your schedule locally means that you save it on your own computer or network, as you
would with for example a Word or Excel file.
Tip: The browser Firefox tends to download files to your default download folder. This is not
ideal since each project probably will have its own folder on your computer. If you want to
determine where on your hard disk your schedules will be saved, you will have to adjust two
settings in your browser. This is relatively easy and explained step by step in appendix A and B
of this manual.
Saving online enables you to collaborate with others on the schedule, share it online and
access it from any computer with an internet connection. You'll have all your schedules in one
place and auto-save will make sure you'll never lose your work.
If your schedule contains confidential information and you don't feel comfortable storing it on
our servers, storing your schedules offline is the best and safest option for you.
The situation might occur that you want to save files online that you have stored locally or the
other way around. In that case you open the locally or online saved file in Tom's Planner and
click the save button, in this window you can select to save the schedule online or offline.
All projects that are saved online will automatically be auto-saved when you are working on
them. Every minute the last changes will be saved. Auto-save doesn't work with projects that
are stored locally!
4
When you want to open a schedule click on the ‘my schedule' button in the toolbar. The 'My
schedules' window will open.
Your online schedules will be listed on the left side. You can select one by double clicking or
selecting and then clicking the 'open' button at the bottom of the window.
If you want to remove an online schedule, click on the 'my schedules' button in the tool bar,
select the project and click on the 'delete' button. Be sure to save this project offline first.
If you want to open a local schedule, click the tab 'local schedules'. Here you can upload
schedules from your computer.
To change the name of an online saved schedule, you have two options: you can change the
name in the settings menu on the right side of the window or choose a different name when
saving the schedule.
On the right top corner of the ‘my schedules’ window detailed information is displayed about
the selected schedule. You can see who the owner is, when it was last modified and who
modified it. You can also add notes or details to the schedule file.
You can save your schedule at any time by just entering ctrl+s on a PC or cmd+s on a Mac on
your keyboard.
If you are working with big schedules and the tool becomes slow or a bit unresponsive try to
switch to the most recent version of the Firefox browser. Our experience is that Firefox
delivers the best experience. With really big schedules the difference is clearly notable.
5
5. Grid Rows and groups The (horizontal) rows in Tom's Planner are called activities but they could also signify
resources or assets in your schedule. You can organize your activities in several groups. Inside
these groups you can indent rows to create sub groups. You can insert or remove groups and
activities by right clicking the left area of your schedule.
To sort activities or groups just drag and drop them up or down by selecting them (use the
shift or ctrl key to select multiple rows/groups) and drag them up or down by their draghandler on the left side of the row.
You can also copy and paste rows or groups within a schedule or between different schedules.
A typical workflow for copying rows and groups from one schedule to another would be:
1. open a schedule in Tom's Planner
2. select the groups or rows you want to copy by left clicking on them with your mouse
(keep the shift key pressed when you want to select multiple rows or groups)
3. right click the selected items and choose the option 'copy row(s)' or 'copy group(s)'
from the menu that appears
4. click the 'open schedule' button in the top toolbar and open the schedule you want to
copy your rows or groups to.
5. the schedule you were working in will be closed and replaced by the new schedule you
are opening.
6. now you can right click any group or row and choose paste row/group and the rows or
groups from the previous schedule will be inserted in the new schedule.
6
Columns Columns can be inserted, moved, hidden, showed or deleted by right clicking the left area in
your schedule or right clicking the header of the columns:
You can adjust the width of each column by dragging the border between two columns with
your mouse.
Dragging the border between two columns
enables you to change the width of each column
There are different types of columns. When you have disabled the special columns plugin you
can only use text columns, but when you have enabled the special columns plugin (see the
chapter about plugins) there are various options available.
By right clicking a column header and choosing the special columns option in the menu you
can insert special columns. Be sure that the ‘special’ columns are turned on in the plugin tab of
the schedule settings
7
right click the column header to turn
insert specific special columns
turn on special columns through the plugin settings
of your schedule
Text column
When you start with a new schedule it contains three text columns. These columns can be
renamed and used in whatever way you like. For example in this image below the first column
is named ‘project stage’ and is used to describe the nature of the activity, the second column
is named ‘recources’ and is used to indicate who is doing the activity and the third and final
column is named ‘completion’ and is used to indicate whether an activity is finished or not.
The label of each column can be edited. Just left click on it. You can also move columns to the
left or right and hide them through the richtclick menu of each column.
Start & End date column
The start date column shows the start date of the first period or symbol in the row. The end
date column shows the start date of the first period or symbol in the row. You can change the
start or end date by just clicking on the date itself.
8
Duration column
The duration column shows the duration of the planned periods in the row itself on the left side
and the total duration of a group on the right side. You can adjust the duration per row by
clicking on the left part of this column but you can’t change the totals on the right side. These
are calculated by the tool.
duration column
Symbol
The symbols column allows you to have a column where you can set a symbol on every row.
When you add a symbol to the column it will also appear in the legend. You can right or left
click this column to set/change or remove a symbol.
symbol column
Traffic lights
The Traffic lights column allows you to have a column where each row has a traffic light which
you can turn to green, orange or red. This could for instance indicate an indication of the risk
that a task is going to fail or an indication of how the preparations are going. You can right or
left click this column to set/change or remove a traffic light.
traffic light column
9
Periods The colored bars in the rows are called periods in Tom's Planner. You can add periods to your
schedule by right clicking on the grid and choosing the option 'insert new period'. If you
already have periods listed in your legend you can drag & drop them directly into your
schedule. With drag & drop you can change their start time/date (position horizontally in the
grid) and the duration (width) of the period. If you right click a period you will be offered the
option to change the color of your period and add a label to it. The colors you use will
automatically be added to the legend.
add a label or change the color of a period
If you want to move more than one period at a time you can select multiple periods at once by
holding the shift key down and clicking the individual periods in the grid. You can also select
multiple periods by dragging your mouse over the grid.
If you keep the ctrl key down on your keyboard when you start dragging a period (or symbol)
to another location in the grid the tool will automatically make a copy of the period you were
trying to drag and drag the new period to the new location.
Symbols Symbols can be used to mark certain points in time like a milestone in a project. You can
choose from a wide variety of symbols. To insert them right click the grid and choose the
option 'insert new symbol'. If you already have symbols listed in your legend you can drag &
drop them directly into your schedule. You can move symbols around the grid by drag and
dropping them with your mouse. If you keep the ctrl key down on your keyboard when you
start dragging a symbol (or period) to another location in the grid the tool will automatically
make a copy of the symbol you were trying to drag and move that new symbol to the desired
location.
10
Comments You can add comments to periods and symbols. Just right click a period and choose 'insert new
comment' in the menu.
After you have inserted a new comment a small red triangle will appear in the right top corner
of the period. Hover you mouse over the period or clicking this red triangle will open the
comment.
period with a comment
To remove a comment from a period right click the period and choose 'remove comment' from
the menu that appears. You can't print comments (yet).
Dependencies Activities can be dependent on each other. An example: activity 'B' starts when activity 'A' is
finished. If activity 'A' takes longer activity 'B' will start later. Tom's Planner does not have an
option to add automatically updating dependencies to your schedule as you might know this
from (the often overly complex) mainstream project management applications.
However in Tom's Planner you can manually set temporary dependencies. This is done by
selecting multiple periods and symbols at once. You can do this by keeping the shift key
pressed when you click on various periods and symbols or by dragging your mouse over the
grid. After selecting multiple periods and/or symbols they are temporarily linked and you can
drag them all at once to a different position. A typical update of your schedule would look like
this:
11
the first blue task takes two more days so we extend
the period by dragging it's right border to the right
select all the following periods and symbols
by simply dragging the mouse over them
move the selected items two days to the right with
drag & drop
This way of working with dependencies keeps the interface easy to use, saves time when
setting up a schedule and when updating a schedule it will keep you actively involved in all the
consequences of your changes.
Filter and search You can filter your schedule on texts, symbol types, date ranges and period colors. You can
12
start filtering your Gantt chart by clicking on the ‘filter / search’ button in the top toolbar.
A window will open allowing you to enter texts and click on period colors, symbols and date
ranges. The chart will be filtered on these selections. For example if you only click on the green
and blue periods only rows with a green or blue activity will be shown:
In the top title bar of the chart a summary of the active filter will be visible:
When you make changes to the chart (for instance change the color of a period) you will
always be able to see the changes you made (even if they don’t comply with the filter). To
reapply a filter click on the reapply button in the filter panel or on the refresh icon in the filter
summary in the title bar of the tool.
13
You can also filter by right clicking on elements in your legend:
Looking for something specific in your schedule? Just enter a text fragment (like for instance
the last name of a resource) in the filter panel and only the related items in the chart will be
shown.
14
6. Blue timeline To change the layout and settings of the timeline right click the timeline and choose the
'change timeline' option in the menu or click the ‘schedule settings' button in the button bar.
In the timeline setting dialogue you can choose the following:
Visible elements in the timeline
Depending on the schedule type you can turn the different elements in the timeline on
or off. At least one element must be visible.
Working hours
When you have an hour or 15/10/5 minutes schedule you can set the hours of a day . It
is not possible to define two periods per day (for instance when a workday is split in two
by a break or intermission).
Days in a week
You can also include or exclude week days. You can choose to shade these days or to
not display them at all. In the standard schedule Saturday and Sunday are turned off.
15
7. Legend You can turn the legend on or off in the schedules settings (which can be accessed through the
toolbar). When you add periods or symbols to your schedule, they will automatically be added
to the legend. You can assign your own label to each color or symbol. You can also add or
remove colors and symbols by right clicking the legend as follows:
insert and remove periods in a legend
insert and remove symbols in a legend
insert and remove project data in a legend
You can rearrange the order of the elements in the legend with drag & drop. You can also drag
elements from the legend into your schedule.
16
8. Logo You can add your own logo to your schedule. Just click the ‘schedule settings' button in the
button bar and click the legend tab in the window that appears.
All previously uploaded logos will appear in the logo list. This enables you to reuse the
uploaded logos for other schedules. You can remove a logo from the list by right clicking the
logo in the list and choosing 'remove logo from list' option in the menu that appears. A logo file
can have a maximum file size of 50 kb, a maximum width of 185 pixels and its file type should
be: jpg, gif, png or bmp.
If your logo is not visible in the legend please check the checkbox 'show logo in legend’.
17
9. Plugins If Tom’s Planner is to basic and you are in need of some advanced features? Have a look at the
plugin section. Just click on the ‘settings & plugins’ button in the top toolbar and select the
plugin tab in the window that appears.
You can add or remove advanced features yourself. For now the number of plugins is limited
but we are working on extending them.
Reference date line The reference date line is a black vertical line in your schedule that can represent whatever
you like. A deadline in your project, your current progress or some special date. You can drag
the date line to the left or to the right with your mouse.
To turn the reference date on or off just click on the ‘settings & plugins’ button in the top
toolbar and select the ‘plugins’ tab.
18
Total duration in group headers If you collapse a group this plugin shows you with a pattern where you have activities and
milestones planned in that particualr group.
Special columns A new schedule always contains three standard text columns on the left side of the grid. By
turning on the special columns plugin you get access to a number of other types of columns.
You can add them through the plugin settings panel or by right clicking one of the columns and
choosing the ‘insert column’ option in the menu that appears. For now there are three
additional column types: start date, end date and duration. In the chapter about the grid in
this manual you can find more information on each column type.
‘Expand/Collapse all groups’ button This plugin adds an extra button to your toolbar that allows you to expand or collapse all the
groups at once.
10. Import & Export You can import Excel, MS Project, CSV (comma delimited) and JSON files or you can copy and
paste tables from for instance Word documents or webpages into Tom’s Planner. You can
export your schedule to MS Project, CSV, JSON, Excel, PDF or an image file.
To import or export files just click the ‘Import & Export’ button on the toolbar.
Import MS Project If you choose to import a MS Project file you will be asked to upload a Microsoft Project file
(the file with the ‘mpp’ extension) and it will automatically be opened in Tom’s Planner as a
new schedule.
19
Import Excel (or any other spreadsheet application) Importing Excel data is a simple three step process:
Step 1: Copy the contents of your excel document into Tom’s Planner.
copy the contents of cells in Excel
paste the contents of excel cells into Tom’s Planner
Step 2: After you have pasted the data into Tom’s Planner you will be asked if you want to
create a new schedule with the imported data or if you would like to add it as a new group to
your existing schedule.
Step 3: In the third step you can match the different columns in your spreadsheet with the
columns in your Tom’s Planner schedule. Tom’s Planner will make a best but do review these
settings.
make sure that every column will be imported correctly
20
Import tables from Word documents or Internet Pages This works in exactly the same way as importing data from Excel (see previous page). The
only difference is that you copy the data from for instance a Word document and not from an
Excel spreadsheet:
copy the contents of a table in Word
Results might vary from table to table and depends on the way the tables are formatted by the
author. If you run into any problems be sure to contact us at [email protected].
Import CSV files Importing CSV files is the same as importing Excel files. However you will be able to upload
your CSV file directly instead of having to copy/paste the file contents into the tool.
Import/Export JSON JSON is the format in which the schedules are stored in the database. These files contain all
the possible information in your schedule. You can use these files best if you want to make a
back up or when you are a developer and want to integrate Tom’s Planner with other
applications. More information on the JSON structure can be found here:
https://tomsplanner.com/documentation/export-import-json.pdf
21
Export to MS Project Your schedule will be exported to a xml file which can be opened in MS Project.
Export to Excel and CSV More information on the results of the export to Excel and CSV can be found here:
https://tomsplanner.com/documentation/export-to-excel-csv.pdf
Export to PDF and Image file More details on the export to PDF and Image files can be found on page 26 in the chapter on
printing.
22
11. Sharing and collaboration There are different ways in which you can share & collaborate on projects.
Collaborate
As the owner of a project schedule, you can invite others to collaborate on it. To invite others
open the ‘My schedules’ window and click on the schedule you would like to share so you can
click on the ‘invite others’ link on the right hand side.
A new window will open.
Here you enter the name of the person you want to invite, select the rights you want to apply
('can edit' or 'can view') and then click 'create invitation'. A new window will open with a link.
Copy the link to an email window and send the invite through email. This link is personal and
ensures you that you are the only one who is able to invite others and have control over who is
able to edit and view the schedule.
23
If you want to adjust the rights you have given to someone, you can do so in the settings of
the schedule by checking the select box behind the team members name. If you select 'none',
that person is no longer able to view and/or edit the project. In the top of the settings window
in 'My schedules' you can also see who has last modified the project.
Publish
If you want to publish your schedule online and share it with more people than just your team
members click the ‘publish your schedule’ link on the right hand side of the ‘my schedules’
window.
A new window will open.
Personify the url by adding for example the name of the schedule. You can also add a
password to the published version, which means that only by entering the password first, can
the project schedule be viewed.
The schedule will be published 'read only'. So if someone takes a look at the published
schedule he/she will not be able to make changes to it. It will how ever be automatically
24
updated when you make changes to the original schedule. If you want to un publish or change
the publish settings just click the ‘edit publish settings’ in the my schedules panel. This link will
appear after you published the schedule.
Embed
You can also choose to embed the schedule in a website or blog. This works the same as for
example a YouTube video. To embed the project schedule in your website, intranet, blog or
any other Internet environment, you click on the 'embed your schedule' link. Optionally you
can set a password.
12. Include in presentations or reports You can export your schedule to an image by simply clicking the 'Import & Export' button in
the toolbar, choosing the ‘Image file’ option and including the image directly into your report
or presentation. You can also send this image by email to others.
25
13. Printing To get a printer friendly version of your schedule, click the 'print schedule' button in the
toolbar.
A print dialogue will appear in your screen that allows you to adjust the print settings of your
schedule.
You can select which print method you prefer: PDF or through an image file. Click the print
button and a new browser window will open which will load a PDF file containing the printer
friendly version of your schedule. Loading of this PDF file might take a while but should not
take longer than 60 seconds. To open the PDF file you will need Adobe’s PDF reader which you
can download here for free.
14. Ipad & Iphone Tom’s Planner is compatible with the iPhone and iPad. There is no need to download a app.
Just open Safari on your device and go to www.tomsplanner.com and you are good to go.
There are some small differences between the PC version and iPhone/iPad version though:
26
1. To access the menus you now need to do a long click instead of a right click. For instance if
you want to change the color of a period just press with your finger on the screen for at least
one second at the location of the period and a context menu will appear.
2.On the iPad & iPhone you can zoom in and out using the pinch gesture or by double tapping
the screen.
Pinch to zoom in and out
3. You can’t upload files on an iPad or iPhone so importing ms project and csv files will not
work.
4.Be sure to be totally zoomed out when you are trying to drag select multiple elements in
your schedule otherwise your swipe gestures will scroll the schedule instead.
Dragselect multiple elements
5. After exporting your schedue to an image this image will be opened in Safari. If want to add
this image to your image collection on your iPad/iPhone so you can download it to your
computer just click the image for at least one second and choose the ‘’ option
One finaly note: although Tom’s Planner works fine on the iPhone we personally believe that
the screen is too small to do any serious work on your schedules. You should consider the
iPhone compatibilty mainly as a good way to consult your schedules on the go. If you want to
27
make changes to it we advise you to use a device with a bigger screen.
28
15. Frequently Asked Question (FAQ) How can change the way dates and times are displayed?
Click on the ‘my account’ link in the right top corner of the tool. At the bottom of the window
that opens you can change the date and time settings.
How can I plan weeks/months/hours/minutes instead of days?
Change the timeline type. Just right click the blue timeline and choose the ‘timeline settings’ in
the menu that will appear. Also see the chapter about the blue timeline in this manual.
How can I change the font size?
You can’t yet. We are sorry. We are aware that the used font size is fairly small. It has been a
choice between making the schedules as compact as possible to enable the best overview of
your project and usability. We do get questions on how to increase the font size on regular
basis so we are aware of the problem. It’s on the To Do list to enable the setting of the font
size. We found that the text is significantly better readable on Apple’s macs and laptops.
How can I transfer my account to someone else?
You can change the email address that is being used to login yourself. Just click on the ‘my
account’ link in the right top corner of the tool after you have logged in and change the email
address. To change the payment information please send an email to [email protected].
We will stop the autorenewal of the account and when the account is about to expire the new
user will be promted to make a first payment and enter their payment information.
How can I transfer schedules to another account
If for instance someone else becomes the project manager of one of your projects you can
transfer your schedule to the Tom’s Planner account of the new project manager. To do this
just click on the ‘my schedules’ button in the toolbar and select the schedule. Then click on the
change link in the owner section and follow the instructions.
29
Appendix A. Settings for saving schedules locally in Firefox on the PC step 1:
First open the Firefox settings panel.
step 2:
Then make sure you are on the 'Main' tab and check the option 'Always ask me where to save
files':
30
step 3:
Finally switch to the 'Applications' tab and search for the 'text document' item in the list. When
there is a 'text document' item, mark this item by selecting the 'save file' option in the select
box.
When there is no 'text document' item, just try to save a Tom's Planner file and check the
option: 'do this automatically for files like this from now on' in the save dialogue.
31
Appendix B. Settings for saving local schedules in Firefox on the Mac step 1:
First open the Firefox settings panel.
step 2:
Then make sure you are on the 'Main' tab and check the option 'Always ask me where to save
files':
32
step 3:
Switch to the 'Applications' tab and search for the 'text document' item in the list. When there
is a 'text document' item, mark this item by selecting the 'save file' option in the select box.
When there is no 'text document' item, just try to save a Tom's Planner file and check the
option: 'do this automatically for files like this from now on' in the save dialogue.
33
Appendix C Trouble shooting 1. The timeline doesn't align with the grid in the chart area
When your timeline and chart area don't align you are probably zoomed in or out in the
browser. It will look like this:
To go back to the normal view in Firefox click ctrl & 0 or go to 'view' in the browser menu, then
click 'zoom' and choose 'reset'. In Internet Explore just click ctrl & - or ctrl & + depending on if
you are zoomed in our out. This should solve your problem.
2. In Firefox the timeline isn't displayed correctly
If your timeline isn't displayed correctly this probably has to do with the font size of the
browser.
You can adjust this by choosing 'tools' in the menu of the browser, than choose 'options'. In
the popup menu go to 'content' and select under 'Fonts & Colors' 'advanced options'. Here you
have to adjust the minimum font size to none:
34
3. The right click menu is blocked by another browser window in Firefox
If you can't access the right click menu because a browser menu is blocking it you'll probably
have to adjust the configuration of the browser.
Go to the address bar in the browser and type: about:config and click enter. This warning will
appear:
Click through it to the configuration window:
35
In the 'filter' bar enter the following: ‘dom.event.contextmenu.enabled’. In the
‘dom.event.contextmenu.enabled’ row at the right end it will say: false. Double click the word
false and it will now say: true. This should solve your problem.
36