1
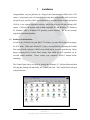
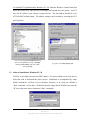
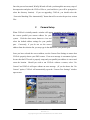
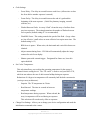
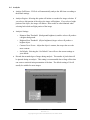
FLIGrab
Preliminary Edition
Version 1.0
for Windows 95, Windows 98, Windows 2000 and Windows NT
Finger Lakes Instrumentation
8031 Parker Hill Road
Dansville, NY 14437
716-335-2506
www.fli-cam.com
FLIGrab User’s Manual
Revision 1.1
Copyright Finger Lakes Instrumentation, December 2000
1
Installation
Congratulations on your purchase of a Finger Lakes Instrumentation IMG series CCD
camera. It represents years of research in achieving the lowest possible noise levels from
any given array, and also reflects our commitment to continuous improvement and quality.
FLIGrab is our camera acquisition software, which can be used with any existing IMG
camera. FLIGrab will operate with an IBM compatible PC and Windows 95, Windows
98, Windows 2000 or Windows NT operating system installed. We do not currently
support the Macintosh platform.
1.1
Hardware Considerations
In order to use FLIGrab with your IMG CCD camera, you must first setup your computer
for ECP mode. With most desktop PC’s, this is accomplished by adjusting the Parallel
Port settings in the computer’s BIOS setup which can be accessed upon boot-up. Many
laptop computers have Control Panel options from which the ECP operation can be
accessed and/or modified.
Please consult your computer’s owner’s manual before
continuing.
The Control Panel can be accessed by opening the Windows 95 / 98 Start Menu and then
selecting the Settings tab and finally, the Control Panel tab. The Control Panel will open
as depicted below.
FLIGrab User’s Manual
Revision 1.1
Copyright Finger Lakes Instrumentation, December 2000
To confirm ECP operation under Windows 95 / 98: Open the Windows Control Panel and
select the System icon, open the Device Manager and expand the Ports option. An ECP
port will be visible if your system is setup correctly. The Port address should be set to
0378, the IMG default setting. The address settings can be reached by selecting the ECP
port Properties.
You can open the System Properties dialog
box by clicking Start, pointing to Settings,
clicking Control Panel, and then doubleclicking System.
1.2
A properly setup ECP printer port
Software Installation: Windows 95 / 98
FLIGrab is provided with each new IMG camera. It is also available on our web site for
those that wish to download the latest version. Installation is accomplished by either
double clicking the FLIGrab icon in Windows Explorer, or by using the Window’s
“Run” command. (If you have a Widows keyboard, simply hit the Windows key and the
“R” key at the same time to initiate the “Run” command.)
FLIGrab User’s Manual
Revision 1.1
Copyright Finger Lakes Instrumentation, December 2000
Once the process has started, WinZip Wizard will take you through the necessary steps of
decompression and place the FLIGrab files to your hard drive (you will be prompted to
select the directory location). If you are upgrading FLIGrab, you should select the
“Overwrite Matching Files Automatically” button that will overwrite the previous version
files.
2
Camera Setup
When FLIGrab is initially started a window will appear, prompting you to select or type
the correct parallel port camera address for your
system. Click the down arrow button to view and
select the default address settings for your parallel
port.
Conversely, if you do not see the correct
address from the selection list, you may type in the address for your parallel port.
Once you have selected the correct address, test the Camera Port Settings to ensure that
FLIGrab properly detects your IMG camera. If an error message is encountered, please
be sure that the ECP mode is properly setup and your parallel port address is correct and
retest the location. Should you wish to run FLIGrab without a camera, select “No
Camera” and FLIGrab will open without an error message. (If you do choose the “No
Camera” option, FLIGrab will automatically open the “Camera Port Settings” window
upon restart.
FLIGrab User’s Manual
Revision 1.1
Copyright Finger Lakes Instrumentation, December 2000
3
FLIGrab User Interface
FLIGrab is a Windows based program designed to require a minimum amount of typing
for operation, eliminating the need to recall or type lengthy DOS based commands. As
with other Windows programs, the menu structure of FLIGrab will change depending
upon circumstances and in this case, whether or not a file is opened, an IMG CCD
camera is present, etc.
Mouse cursor CCD coordinates
Current mouse cursor pixel value
Mouse cursor image coordinates
3.1
Camera status
Menu Bar
View magnification
The upper most portion of the screen contains the pullImage Resolution
down menus, which include File, Grab, View, Analyze,
Window and Help. Each menu item selection further comprises functions that are
similar in nature to one another. (For example, the Advanced Grab Settings window is
accessed under the Grab menu.)
FLIGrab User’s Manual
Revision 1.1
Copyright Finger Lakes Instrumentation, December 2000
3.2
Status Bar
The Status Bar is located on the lowest-most portion of FLIGrab. It provides
information about FLIGrab activities and is continuously updated. When an IMG
camera is connected and initialized, the Status Bar will display the camera
temperature, connection status, and exposure status. Conversely, when an image is
open, the image size, view zoom ratio, pixel value and location will be indicated on
the Status Bar.
3.3
Shortcut Keys
Frequently employed menu choices can also be reached by using shortcut keys. Each
shortcut key can be found to the right of each command as seen in the menu.
Additionally, a list of shortcut keys can be found by selecting the Help menu. For
example, holding down the “Ctrl” key and then hitting the “G” will open the Grab
Window. You may find that once learned, these shortcuts increase productivity and
speed of operation on the most frequently performed functions.
• Ctrl + G = Grab
• Ctrl + O = Open
• Ctrl + S = Save
• Alt + F4 = Exit
Shortcut keys can be
found to the right of
each command, as
seen in the menu.
FLIGrab User’s Manual
Revision 1.1
Copyright Finger Lakes Instrumentation, December 2000
4
4.1
FLIGrab Software Functions
File:
•
Open: This command loads an IMG, *FITS or other file format from disk into
memory where it can be displayed or processed. When the Open window is
displayed, you will be able to select files by moving through the directory structure.
The shortcut key is Ctrl + O.
•
Close: Closes the currently opened image window by removing it from memory. If
the image has changed, you will be prompted to save your changes before the
window closes. The shortcut key is Ctrl + F4.
•
Save: Saves the currently opened image to disk. The same file name that was used to
open the file will be used with the Save command. The shortcut key is Ctrl + S.
•
Save As: Allows you to save the currently opened image in a different file format or
with a different name.
•
Recent File: The most recently opened files are displayed, allowing you to preview
and select files that have been recently accessed.
•
Exit: Exits FLIGrab. The short-cut key is Alt + F4.
* Many professional astronomical image-processing programs support the FITS format (Flexible Image Transport System). The
format is described in "Implementation of the Flexible Image Transport System (FITS)" published by NOST, NASA/OSSA
Office of Standards and Technology, NASA Goddard Space Flight Center, Greenbelt, MD.
4.2
Grab:
•
Grab Frame: The Grab command is used to take an exposure or begin a sequence of
exposures using the Save Filename Format String command.
When you first begin using FLIGrab, you may wish to begin by simply acquiring
exposures one at a time. However, there are several other exposure options that are
available under the “Advanced Grab Settings” command. These options will allow
for automated grabs, predetermined file name suffixes and more. If a single
exposure is desired and the exposure time is correct - simply hit the “Enter” key and
an exposure will begin. The exposure status will be displayed on the Status Bar.
The short-cut key is Ctrl + G.
FLIGrab User’s Manual
Revision 1.1
Copyright Finger Lakes Instrumentation, December 2000
• Advanced Grab Settings:
-
Save Filename Format String:
%N = number of places for sequential save (3 = .001, etc)
%T = time specific save (th = hour, tm = minute, ts = second)
%D = date (dm = month, dd = day, dy = year)
Dark Frame Filename Suffix: drk = 001drk.img, dk = 001dk.img
•
•
•
-
Default Save Format FTS or IMG: Select whether to save your exposures as
an IMG or FITS file format.
-
Save File Path: Determines where saved files will be stored
-
Use format string for regular save checkbox: When enabled, FLIGrab will
use the Save Filename Format String during a “Save” or “Save as”.
FLIGrab User’s Manual
Revision 1.1
Copyright Finger Lakes Instrumentation, December 2000
•
•
Grab Settings:
-
Focus Delay: The delay in seconds between each focus. (Allows time to alter
the focus before another exposure is started.)
-
Frame Delay: The delay in seconds between the end of a grab and the
beginning of the next exposure. (Useful for planetary imaging, asteroid
searches, etc.)
-
Flushes Between Grabs: An array “flush” cleans the array of artifacts from
previous exposures. The setting determines the number of flushes between
each exposure (default setting of 3 is recommended).
-
Flush BIN factor: This setting controls the speed of the flush. (Large values
are less effective / small values are more effective but require more time. The
default setting is 15.)
-
BIN factor is square: When active, the horizontal and vertical bin factors are
identical.
-
Adjust contrast during focus : FLIGrab will automatically adjust the image
contrast for each focus display.
-
Shutter opens with external trigger: Designated for future use, leave this
option disabled.
Set Cooler Temperature:
This selection allows you to adjust the operating temperature for the camera’s
thermal electric cooling device. The “TE cooler” is used to cool your IMG CCD,
which in turn reduces the rate of dark current buildup during an exposure.
Reductions of 6 degrees in temperature will commonly half the dark current noise
(varies per array architecture).
•
-
Setpoint: The TE temperature in Celsius.
-
Read Interval: The time in seconds in-between
temperature readings.
-
Read temperature during exposure: When selected, the
array’s temperature will be read during an exposure.
This selection will not adversely effect an exposure.
Change Port Settings: Allows you to change your device configuration and sends the
initialization command to the camera.
FLIGrab User’s Manual
Revision 1.1
Copyright Finger Lakes Instrumentation, December 2000
4.3
View:
•
Zoom In: Incrementally zoom into an image (800% maximum).
•
Zoom Out : Incrementally zoom out of an image (12% minimum).
•
Zoom Fit: Automatically adjusts an image to fit the current window size.
•
Statistics: Select or deselect this option to view the Image Statistics (right mouse
click to select displayed items).
•
Histogram: Select or deselect this option to view an adjustable
Histogram for the opened image. You can move the histogram
pointers to adjust an image’s screen display settings.
•
Toolbar: Select or deselect this option to view the Toolbar.
•
Status Bar: Select or deselect this option to view the Status Bar.
A histogram is a graphical portrayal of the
number of pixels at each brightness level in an
image.
Histogram
The dark portions of
an image are graphed
in the left part of the
histogram, the midtones are shown in the
middle and an
image’s highlights are
depicted on the right.
FLIGrab User’s Manual
Revision 1.1
Copyright Finger Lakes Instrumentation, December 2000
4.4
Analysis:
•
Analyze Full Frame: FLIGrab will automatically analyze the full frame according to
the default settings.
•
Analyze Region: Selecting this option will initiate a crosshair for image selection. If
you select a dark portion of the object, the image will brighten. If you select a bright
portion of the object, the image will darken. Best results are often obtained when
selecting both a dark and light portion of the image.
•
Analysis Settings:
•
⇒
Dimmest Data Threshold: (Background brightness) smaller values will produce
a brighter background.
⇒
Brightest Data Threshold: (Object brightness) larger values will produce a
brighter object.
⇒
Contrast Curve Power: Adjust the object’s contrast; the steeper the curve the
more contrast.
⇒
Set Default : Selecting the “Set Default” icon will save the current settings as
your default.
Discard data around edges of image during analysis: The number of pixels that will
be ignored during an analysis. This setting is recommended due to fringe effects that
can create a statistical misrepresentation of the data. The default setting of 10 will
usually be suitable for most images.
Brightest Data Threshold set to 0.001
FLIGrab User’s Manual
Revision 1.1
Copyright Finger Lakes Instrumentation, December 2000
Brightest Data Threshold set to 0.01 (default)
Brightest Data Threshold set to 0.05
4.5
Window:
•
Cascade: Display windows stacked and cascading from the top left to the bottom
right of the screen.
⇒
Ensure all the windows that you want displayed are open; closed or minimized
windows will not be displayed.
•
Tile: Display opened windows edge to edge.
•
Arrange Icons : You can point to Arrange Icons on the View menu to sort the items
by name, size, date, and type, depending on the view.
FLIGrab User’s Manual
Revision 1.1
Copyright Finger Lakes Instrumentation, December 2000
4.6
Help:
•
Help Topics: Displays the FLIGrab shortcut keys.
•
About FLIGrab: Displays the FLIGrab version, FLI address and web site
information.
FLIGrab User’s Manual
Revision 1.1
Copyright Finger Lakes Instrumentation, December 2000