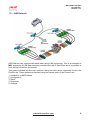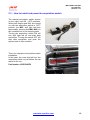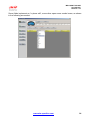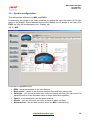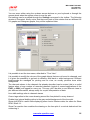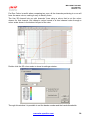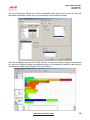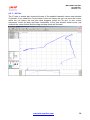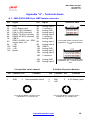
1
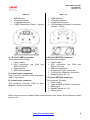
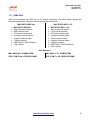
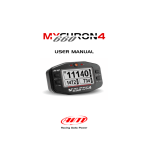
MXL QM/EVO3QM
User Manual
MXL QM & EVO3 QM
User Manual
Release 1.02
Dear MXL / EVO3 QM Owner
AIM has created technical instruments specifically for the exciting world of jr. dragsters:
AIM MyChron3 660 is considered today the most powerful data logger designed for this
kind of vehicles.
Our expertise in the dragster environment now lead to offer a new set of Products
designed for drag racing, like the MXL QM dash logger and EVO3 QM data logger.
Professional tools to meet drag heroes needs!
www.aim-sportline.com
1
MXL QM & EVO3 QM
User Manual
Release 1.02
SUMMARY
Chapter 1 – AIM QM World ................................................................................................ 3 1.1 – QM Products Family........................................................................................................................... 3 1.2 – QMs Kits .............................................................................................................................................. 5 1.3 – Optional ............................................................................................................................................... 6 1.4 – EVO3 displays .................................................................................................................................... 7 1.5 – AIM Network........................................................................................................................................ 8 Chapter 2 – Installation of QM Products .......................................................................... 9 2.1 – Gauge-Data logger ............................................................................................................................. 9 2.2 – How to connect to your ECU............................................................................................................. 9 2.3 – How to install and power the acquisition switch .......................................................................... 10 2.4 – Sensors ............................................................................................................................................. 11 Chapter 3 – Configuration of QM Products ................................................................... 12 3.1 – Select configuration ......................................................................................................................... 13 3.2 – Channels ........................................................................................................................................... 15 3.3 – System configuration....................................................................................................................... 16 3.3.1 – MXL ............................................................................................................................................. 16 3.3.2 – EVO3 .......................................................................................................................................... 17 3.4 – Display ............................................................................................................................................... 17 3.4.1 - TG dash ....................................................................................................................................... 18 3.4.2 – M3 dash ...................................................................................................................................... 18 3.4.3 – Formula Steering Wheel ............................................................................................................. 19 3.5 – CAN Lambda Configurator .............................................................................................................. 20 Chapter 4 – Race! ............................................................................................................ 23 Chapter 5 – Download ..................................................................................................... 24 5.1 – QMAn ................................................................................................................................................. 24 5.2 – DragOn .............................................................................................................................................. 25 5.2.1 – Download window ....................................................................................................................... 26 Chapter 6 – Analysis........................................................................................................ 28 6.1 – Test/Run manager ............................................................................................................................ 28 6.2 - Analysis View .................................................................................................................................... 31 6.2.1 – Time Plot ..................................................................................................................................... 32 6.2.2 – Histogram.................................................................................................................................... 37 6.2.3 – XY Plot ........................................................................................................................................ 39 6.2.4 – C hannel info .............................................................................................................................. 41 6.2.5 – How to set the time slip info ........................................................................................................ 42 6.2.6 – How to set weather station data ................................................................................................. 43 6.3 – Test Loaded View ............................................................................................................................. 44 6.3.1 – Run Info ...................................................................................................................................... 45 6.3.2 – Time Slip ..................................................................................................................................... 46 6.3.3 – Tachometer ................................................................................................................................. 46 6.3.4 – Weather ...................................................................................................................................... 47 Appendix “A” – Technical draws ................................................................................... 48 A.1 – MXL/EVO3 QM Pista: AMP female connector ............................................................................... 48 A.2 – MXL QM Pro: 22 Pins Deutsch connector ..................................................................................... 49 A.3 – EVO3 QM Pro: 22 Pins Deutsch connector ................................................................................... 49 A.4 – MXL/EVO3 QM Pro: 37 Pins Deutsch connector .......................................................................... 50 www.aim-sportline.com
2
MXL QM & EVO3 QM
User Manual
Release 1.02
0
7
Chapter 1 – AIM QM World
1.1 – QM Products Family
MXL QM has been engineered to help you increase your dragster consistency and overall
performance. MXL QM is a high tech digital dash for your vehicle with plenty of channels
and capable of the easiest connection to the most important ECUs on the marketplace.
QMs are specifically designed for Full Scale Dragsters, basing on eighth mile and quarter
mile.
QMs store runs starting with a manual switch - following NHRA rules - and can log RPM,
up to 4 speed inputs, up to 12 analog channels and extended channels from an ECU
interface (via CAN bus or RS232). All the setup is easily performed through the AIM
DragOn software.
A whole racing week-end data can also be reviewed directly on the wide backlighted
display, for immediate evaluation of the most important measures at the time slip times.
QMs can be interfaced (via Proprietary CAN bus) with virtually infinite AIM LCU-One
lambda controllers.
There is virtually no limit to the sensors that can be connected to QMs: engine rpm
sensors, clutch rpm sensors, driveshaft rpm sensors, speed sensors, EGT (kthermocouples), thermo resistors, pressure transducers for oil, water and brake,
potentiometers, accelerometers, gyrometers.
All data are logged into the internal 8-16 MB flash memory (depending on QM version) and
can be downloaded to the PC through USB connection or a powerful DataKey, both via
the QMConnect software. AIM QMAn powerful software lets you create your personal
Elapsed Time database and analize performance data.
Both DragOn and QMAn software are available also on website www.aim-sportline.com
website.
If you want to stay up to date with latest releases, please refer to our download section.
After downloading, double click the file and follow Prompted instructions.
Your QM Pista/Pro records both your and your vehicle’s performances in detail. We
present the QM in two versions:
www.aim-sportline.com
3
MXL QM & EVO3 QM
User Manual
Release 1.02
QM Pro 05
QM Pista
•
•
•
•
8MB Memory
8 Analog channels
1 Digital speed input
2 AMP Connectors (12pins – 16pins)
A – B: 12+16 AMP connectors
•
•
•
•
16MB Memory
12 Analog channels
4 Digital speed inputs
2 Professional Autosport Connectors
(22pins – 37pins)
A: 22 pins DEUTSCH connector
These connectors Provide:
• Power supply
• ECU connection (via
RS232 Protocol)
• Analog inputs
• USB communication
This connector Provides:
• Power supply
CAN and
• ECU connection (via CAN and
RS232 Protocol)
• USB communication
• “External shift light” connection
• “CAN for Exp. Modules” connection
C: 4 pins binder connection
• Speed Channel #3 - #4
This connector Provides “Data Acquisition
B: 37 pins DEUTSCH connector
Switch” connection
D: 5 pins binder connector
This connector Provides “CAN for Exp.
Modules” channel connection
This connector Provides:
• Power supply
• “Data Acquisition Switch” connection
• RPM signal
• Speed Channel #1 - #2
• Analog inputs
Both of them have non-volatile Flash internal memory that keeps stored data even when
power is off.
www.aim-sportline.com
4
MXL QM & EVO3 QM
User Manual
Release 1.02
8
1.2 – QMs Kits
AIM has developed two QM kits to fit various situations; the table below shows the
standard equipment in each kit as well as optional equipment.
MXL/EVO3 QM Pro 05
MXL/EVO3 QM Pista
•
•
•
•
•
•
•
•
•
MXL/EVO3 QM Pista
Start acquisition switch
AMP harness with
4 Thermocouple inputs
4 analog channel inputs
1 speed channel input
1 Speed sensor
USB Cable + QM Softwares
This manual
•
•
•
•
•
•
•
•
•
•
MXL/EVO3 QM Pro 05
Start acquisition switch
37 pins harness with
8 Thermocouple inputs
2 speed channel inputs
22 pins harness with
2 speed channel inputs
2 Speed sensors
USB Cable + QM Softwares
This manual
Part Numbers
MXL QM Pista: X16MXLCQM
MXL QM Pro 05: X16MXLPQM
EVO 3 QM Pista: X20EVO3CQMO
EVO 3 QM Pro 05: X20EVO3PQMO
www.aim-sportline.com
5
MXL QM & EVO3 QM
User Manual
Release 1.02
9
1.3 – Optional
LCU One
LCU-One uses a wide band Bosch LSU 4.9 sensor
and measures Lambda values from 0.65 to 1.6.
This allows a much more accurate monitoring,
which leads to a better setup of your engine and, in
particular, of your injection.
Data Hub
AIM developed Data Hub, the new CAN
connection multiplier that works as an interface
between AIM Logger (MXL QM/EVO3 QM) and its
peripheral equipments.
Each Hub connects the logger with four
peripherals: i.e. LCU lambda controller, and one
or more TC Hub (thermocouples multiplier).
You can of course use more Data Hub in series to
have all connections you want. Data Hub takes all
the information you need to your logger with only
one cable, minimizing wires overall.
TC Hub
TC Hub is the new thermocouples multiplier.
Each TC Hub allows you to connect via CAN bus
four additional thermocouples to your QM logger:
you can of course use more TC Hub to have all
desired temperature sensors at your disposal.
With TC Hub you can keep regularly under control
exhaust gas temperature (EGT) of each cylinder in
addition to water, oil and cylinder head temperature
(CHT).
Moreover, thanks to TC Hub, wires overall is
reduced to the minimum.
External shift light
Used to worn the racer on the upshift needs.
www.aim-sportline.com
6
MXL QM & EVO3 QM
User Manual
Release 1.02
19
1.4 – EVO3 displays
These are the available displays for the EVO3 units.
TG dash
M3 dash
Formula Steering Wheel
www.aim-sportline.com
7
MXL QM & EVO3 QM
User Manual
Release 1.02
20
1.5 – AIM Network
AIM Products can communicate each other using CAN technology. This is an example of
MXL supporting 8 LCU One Lambda controllers through 3 Data Hubs but it is possible to
have as many solutions as needed.
This guide is divided into five main sections, facing the main issues commonly found in the
Product use. These issues are exposed using the natural order of the Product use.
1. Installation of QM Products
2. Configuration
3. Race!
4. Download
5. Analysis
www.aim-sportline.com
8
MXL QM & EVO3 QM
User Manual
Release 1.02
1
Chapter 2 – Installation of QM Products
We're going to guide you into the installation of our Products. Please mind that a complete
installation of a QM Products requires specific knowledge of vehicle electronics.
10
2.1 – Gauge-Data logger
This section guides you into the major issues that you’ll be facing while installing the
gauge or the data logger.
Before installing, please define your installation final user between Mechanic or Driver.
Nothing will change except your MXL and acquisition switch onboard location. Drivers
typically use MXL as a replacement of stock dash while Mechanics place MXL in an easily
viewable and reachable point. This info does not apply to EVO3 because there’s no
display.
Either MXL or EVO3 must be kept away from heat sources and vehicle’s fluids, like any
other race electronics instrumentation.
As told before, MXL and EVO3 can be installed almost everywhere on the vehicle but, in
order to avoid electromagnetic noise, keep it away from coil and all ignition system
components working in high voltage mode. High voltage noise is a common Problem of all
electronic instrumentations.
11
2.2 – How to connect to your ECU
AIM Products like your QM Pista/Pro can be interfaced to most racing Engine Control Unit
(ECU) using a RS232 serial cable or a CAN cable in order to collect data out coming from
the ECU itself. To know if your ECU is supported by QM Pista/Pro and for further
information about QM – ECU connection, please refer to our website.
As long as ECU manufacturers update their Products constantly, refer to our website for
latest information and refer to your ECU’s manual to ensure that pin connection is correctly
set.
ECU communication is made of few wires (two/three) to be connected, follow specific ECU
documentation that can be found on our website.
Using ECU communication you will be able to acquire a wide range of data without
installing any additional sensors.
www.aim-sportline.com
9
MXL QM & EVO3 QM
User Manual
Release 1.02
21
2.3 – How to install and power the acquisition switch
The manual acquisition switch (shown
on the right) has ON / OFF positions.
When both engine and MXL are turned
on, with the acquisition switch in “OFF”
position, the MXL shift light led blink
sequentially, warning that MXL QM is in
idle condition but is not acquiring data.
Turning the acquisition switch ON will
turn shift light led off and start data
acquisition. Turning the switch OFF will
stop data acquisition and push the
system back to idle condition.
This is an example of acquisition switch
installation.
In this case, the crew chief will turn the
acquisition switch on just before the car
starts for the run.
Part Number: X05DCHGF0
www.aim-sportline.com
10
MXL QM & EVO3 QM
User Manual
Release 1.02
12
2.4 – Sensors
This section gives you info about of all the sensors that can be connected to our data
loggers.
•
•
•
•
•
•
•
•
•
engine rpm sensors
clutch rpm sensors
driveshaft rpm sensors
speed sensors
EGT (k-thermocouples)
Thermo resistors
pressure transducers for oil, water, fuel and brake
potentiometers
accelerometers
Warning: please remember to ground system/sensors with the battery in order to
avoid system/sensors failures
www.aim-sportline.com
11
MXL QM & EVO3 QM
User Manual
Release 1.02
2
Chapter 3 – Configuration of QM Products
The configuration is done through our DragOn software. The configuration software is rich
of features as our Products are among the most powerful loggers in the world, plenty of
different possibilities.
Our advise is to practice our software before starting using its advanced configuration
possibilities.
To run DragOn or QMAn software you may either:
• Double click the aside desktop icons
● Click one of the shortcuts: Start \ Program \ AIM Racing Data Power \ Dragster \
DragOn or Start \ Program \ AIM Racing Data Power \ Dragster \ QMAn
The following screenshot shows you DragOn software layout.
The left software toolbar includes several command buttons that will be explained in the
following pages.
The center-right part of the window features a tab with an item for every QM Product: MXL
QM, MXL QM Pro, EVO3 QM, EVO3 QM Pro. All the tabs will feature mostly the same
possibilities for all QM Products. The correct picture of every gauge will be displayed as
soon as you select the tab.
DragOn software features a configuration database, particularly useful to drivers and Proinstallers: as a driver, you will be able to keep 2 (or more) configurations for every kind of
race (qualify, shoot-outs, eliminations). On the other side, Pro-installers may find it useful
to trace customer’s configurations for troubleshooting purposes.
www.aim-sportline.com
12
MXL QM & EVO3 QM
User Manual
Release 1.02
Every configuration in the PC database can be sent to the data logger to Program its use
(transmit), and it is possible to check the configuration of a data logger copying it from the
data logger to the database on your PC (receive).
To transmit configurations:
Connect your instrument to the USB port of your PC using the included USB cable and
turn your logger on.
Click the “Transmit” button. This operation will DELETE all your stored runs on logger’s
memory, so please ensure to download your data before transmitting configurations.
To receive configurations:
Connect your instrument to the USB port of your PC by using the included USB cable and
turn your logger on.
Click “Receive”. Your configuration database will be incremented by one. The last
configuration (at the bottom) is the one you just received.
The lower part of the software features another tab control, each items of which will be
explained now. The differences within these items among the QM Products will be
evidenced.
13
3.1 – Select configuration
As already explained our software features a configuration database to trace all your
possible data acquisition layouts. In the “Select configuration” tab you can create, delete or
modify configurations’ basic settings.
The commands available for configuration management are:
•
•
•
•
•
New – Create a new configuration layout
Delete – Delete an existing configuration
Clone – Copy an existing configuration
Import – Import a configuration from File to Database (e. with the aim of moving it
from another PC to your Database)
Export – Export a configuration from Database to File (e. with the aim of moving it
from your Database to another PC)
The columns in the configuration grid are:
• N – the creation number of the configuration
• Installation Name – a name that keeps the configuration easily identifyable
• ECU Manufacturer – if you connect our Product to an ECU, choose the ECU
manufacturer name, otherwise select None
• ECU Model – the model of the ECU
• Vehicle Name – useful for installers who want to track where a configuration is
used
• Created – creation date of the configuration
• Tot. Lambda – how many LCU-One the system is connected to
www.aim-sportline.com
13
MXL QM & EVO3 QM
User Manual
Release 1.02
Some fields implement an “in place edit”, some other open some combo boxes, as shown
in the following screenshot.
www.aim-sportline.com
14
MXL QM & EVO3 QM
User Manual
Release 1.02
22
3.2 – Channels
You have to instruct the data logger in order for it to know what are the sensors it's getting
information from, channel by channel.
As shown in the screenshot, for every channel the following fields are shown:
• Channel identifier – this identifier cannot be changed as it is meant to match the
channels’ names on logger’s hardware.
• Enabled\Disable – to satisfy every driver’s needs, you can select the channels
you’re interested to acquire data from. Enabled means it will be sampled, disabled
will not be logged.
• Channel name – every channel has a pre-defined name that can be customized (e.
Water T for water temperature).
• Sampling frequency – how many samples per second the logger will do for the
channel.
• Sensor type – the sensor installed (or that you are going to install) on the related
channel, every sensor has its own features, so the logger must be Programmed to
know what is connected in order to sample the correct information
• Measure unit – The measure unit of the installed sensor
• Low Scale / High Scale – The minimum and maximum value that will be viewed in
graphical form during Analysis Process.
Note about sampling frequency: higher is the total sampling frequency, higher is the
memory consume rate. A frequency of 100Hz on a channel means that the value is being
sampled 100 times for second. A default sampling frequency value (depending on sensor’s
type) is present, please consider your needs before changing it. This may impact on the
quantity of runs you can store into your MXL.
QMs can acquire up to 2000Hz of total sampling (max 500Hz per channel, depending on
channel’s type: for example, due to their limits, thermocouples cannot sample more than
100Hz).
Some channels need additional information to Properly sample the information. It is the
case of the speed channel shown at the top of the list in the above screenshot.
www.aim-sportline.com
15
MXL QM & EVO3 QM
User Manual
Release 1.02
23
3.3 – System configuration
This tab behaves differently for MXL and EVO3.
Programming the gauge is the main operation for getting the right information at the right
place on the display. All the features bound to the display are not shown in the case of an
EVO3, as they will be displayed in the “Display” tab.
30
3.3.1 – MXL
In this tab it is possible to set:
• RPM – some parameters on the rpm channel.
• Gear sensor – where is the channel sampled from and how many gears.
• Shift light – you can set at which rpm every led couple will flash (you can insert 0 to
disable the led or insert the same value to make them flash together).
• Speed – some parameters on the speed channel.
• Alarms – you can choose if and when to have an alarm led flash.
• Welcome text – the text that is shown when the MXL is switched on.
www.aim-sportline.com
16
MXL QM & EVO3 QM
User Manual
Release 1.02
33
3.3.2 – EVO3
In this tab it is possible to set:
• RPM – some parameters on the rpm channel.
• Gear sensor – where is the channel sampled from and how many gears.
• Reference speed – some parameters on the speed channel.
14
3.4 – Display
This tab is shown only in EVO3 configuration. It is used to state which is the display
connected (choose none if you don’t have a display) and to set all the display parameters.
Available displays will be described from the smallest to the most complete one.
www.aim-sportline.com
17
MXL QM & EVO3 QM
User Manual
Release 1.02
34
3.4.1 - TG dash
As in the following screenshot no parameter can be set for this display. You just have to
tell the system you’re using a TG dash but selecting it.
31
3.4.2 – M3 dash
In this tab it is possible to set:
• Shift light – you can set at which rpm every led couple will flash (you can insert 0 to
disable the led or insert the same value to make them flash together).
• Alarms – you can choose if and when to have an alarm led flash.
www.aim-sportline.com
18
MXL QM & EVO3 QM
User Manual
Release 1.02
35
3.4.3 – Formula Steering Wheel
In this tab it is possible to set:
• Shift light – you can set at which rpm every led couple will flash (you can insert 0 to
disable the led or insert the same value to make them flash together).
• Alarms – you can choose if and when to have an alarm led flash.
www.aim-sportline.com
19
MXL QM & EVO3 QM
User Manual
Release 1.02
24
3.5 – CAN Lambda Configurator
As shown in the AIM Network picture, you can Program the logger to sample the signal of
up to 12 lambdas using different LCU-One lambda controllers. For every information on
LCU-One we kindly remind you to visit our website www.aim-sportline.com.
Some versions of the LCU-One can be used in connection to the AIM network and (via
analog voltage output) to the ECU.
By default, with a brand new configuration, the following screenshot will appear, to remind
you that the logger is Programmed not to communicate with any lambda.
You have two possibilities:
• Add Lambda – this will add a new sub tab control, shown in what follows, including
a general purpose tab and a tab for every LCU-One connected
• Delete Lambda – this will decrease the sub tab control items
www.aim-sportline.com
20
MXL QM & EVO3 QM
User Manual
Release 1.02
The following screenshot shows you the general purpose tab, named “Lambda controller
configuration”.
The LCU-One correctly measures the lambda value (1 is Stoichiometric, below 1 mixture
is rich, above 1 is lean), if you’re used to look at the AFR value you’ll need to enter the
correct multiplier (different fuels have different multipliers).
To Program the LCU-One output (if you don’t need that output just leave it as is by default)
you just have to enter the two points for the linear conversion:
• 1.95V for lambda at 0.65
• 4.80V for lambda at 1.60
This means for example that with lambda half the way from 0.65 and 1.60, the output
voltage will be half the way between 1.95V and 4.80V.
Many people using dyno benches Program it as follows:
• 0.65V for lambda at 0.65
• 1.60V for lambda at 1.60
in order to measure the lambda value directly with a voltmeter.
You can define even the voltages for two LCU-One working conditions:
• warmup: this tipically occurs while the engine has just been revved
• error: this tipically occurs with something wrong in the wirings
Choosing “high impedance” no analog output os defined in these cases.
www.aim-sportline.com
21
MXL QM & EVO3 QM
User Manual
Release 1.02
The following screenshot shows the LCU-One tab.
Every LCU-One you connect is seen as a set of four additional channels, you will normally
choose one of the first two channels (lambda or AFR) and, in case you want to check the
sensor usage, you will enable one or both the other two.
Lambda temperature is measured right where the sensing part of the Probe is, and can
ensure it is Properly working within the correct range. Lambda diagnosis can be used to
check if the measure is in error, but this doesn’t happen if everything is OK in the wirings.
www.aim-sportline.com
22
MXL QM & EVO3 QM
User Manual
Release 1.02
3
Chapter 4 – Race!
Now you’re ready to race! After the burnout, before the staging phase, turn your data
acquisition switch on. Your MXL QM will not start data recording while the data acquisition
is switched off. When race’s over, turn off the acquisition switch, connect the USB cable to
your MXL and download data to your PC as explained in the following chapter. Then you
will analyze your performance in detail through the QMAn software.
www.aim-sportline.com
23
MXL QM & EVO3 QM
User Manual
Release 1.02
4
Chapter 5 – Download
The download Procedure will allow you to transfer acquired racing data to your PC for later
analysis. Data download is possible by running both QMAn or DragOn software.
15
5.1 – QMAn
• Connect your MXL QM to your PC by using the USB cable. The MXL must be
turned on.
• Run QMAn software
• Click the “Download” button on the toolbar.
The following window appears (download window will be described after):
Select the runs you want to download by flagging the related checkbox then click the
“Download selected” button. The cyan row indicate that the run is new and hasn’t be
downloaded yet.
www.aim-sportline.com
24
MXL QM & EVO3 QM
User Manual
Release 1.02
25
5.2 – DragOn
• Connect your MXL QM to your PC by using the USB cable. The MXL must be
turned on.
• Run DragOn software
• Click the “Download” button on the left bar.
The following screen appears:
Select the runs you want to download by flagging the related checkbox then click the
“Download selected” button. The cyan row indicate that the run is new and hasn’t be
downloaded yet. After the download click “Go to QMAn” on the top of the left bar to switch
to analysis software.
www.aim-sportline.com
25
MXL QM & EVO3 QM
User Manual
Release 1.02
36
5.2.1 – Download window
The download window could be preceded by the following small window stating that the
software is waiting for a logger to be connected. As soon as one is connected the main
download window will be Prompted.
Please kindly notice that the normal Procedure is:
• connect a logger;
• switch the logger on;
• perform download operation through the following window, in which you can see
some command buttons and a list of runs available for download. Normally all the
runs available are selected for download, you can choose to download only some of
them and the command buttons named Select All and Deselect All are there to
help you in this Process.
The choose folder button lets you customize the download file location.
The DRK File name button lets you tailor the naming of all the downloaded drk files.
If you flag the checkbox named “Erase all data from logger at the end of the download” the
memory of the gauge will be completely emptied, so you will not flag it if you want to
download from the same gauge on multiple PCs.
Download selected button will start the download Procedure while the Cancel button will
exit this window without downloading anything.
www.aim-sportline.com
26
MXL QM & EVO3 QM
User Manual
Release 1.02
For every drk file you’re creating the following window is automatically Prompted. Here you
can set the names of track, driver, championship and vehicle. After one download these
names are automatically inserted by the software, recognizing the gauge that is connected
to the PC, so you may decide to flag the checkbox “Use following settings for all the drk
files that are going to be generated”.
www.aim-sportline.com
27
MXL QM & EVO3 QM
User Manual
Release 1.02
5
Chapter 6 – Analysis
Analysis is fundamental to set up your vehicle. You will analyze your racing data using the
included QMAn software. This chapter describes how to use QMAn in order to obtain the
maximum amount of information from the test file. This software has been designed
focusing our attention on usability and ease of use, minimizing the number of clicks it takes
for you to get the information you need, and get it quickly.
16
6.1 – Test/Run manager
Once you run QMAn, the following screenshot will appear. It features a toolbar, a left and
a right part. The right part shows you the runs you already downloaded to your PC. The
left part lets you refine the list of runs displayed on the right part.
Available commands are:
•
•
•
•
•
•
•
•
•
•
•
Download – as already explained this opens the download window.
Configuration – it runs the DragOn software.
Preferences – opens a window in which software preferences can be set.
Load – loads the selected run/s for analysis (it is enabled only if non of the selected
runs are loaded).
Unload – unloads the selected runs (it is enabled only if all the selected runs are
already loaded).
Properties – opens a window that lets you modify some run file Properties.
Import – lets you add some run files to your run database from an external file.
Export – lets you export some run files from your run database (e. with the aim to
move them to another PC).
Remove – removes a run from the database.
Hide – hides a run from the database.
E-Mail – lets you send some runs by e-mail.
www.aim-sportline.com
28
MXL QM & EVO3 QM
User Manual
Release 1.02
Because of the large number of runs that you will acquire during your racing time, we give
you the possibility to choose and group runs following your preferred and customizable
Criteria or Selection (Time, Racer, Track, Championship, Vehicle).
As shown in the previous screenshot, the “Test/Run manager” layer is divided into 2
separate parts: on the left it is shown the track name (left click on the track name to select
the desired one) while on the right there’s a list of all the runs which belong to that track.
In order to load a run for analysis, you may
• double click on the desired one;
• select one run and click the “LOAD” button in the upper toolbar;
• select the desired run, right click and choose the “LOAD” command in the context
menu.
QMAn has been designed to share data easily. If you need to share test or run file data,
you may send the file via e-mail by just clicking one button. Go to “Test/Run Manager”
layer and select the test you wish to send among the available one. The selected file will
become red-highlighted.
Now, before sending the DRK file, please ensure that your PC is connected to Internet
and, then, press button “E-mail” (located inside the button toolbar). By default, the
recipient’s address will be an AIM email address, just change it with the recipient you want
send .drk files to.
In case you need assistance from AIM, just select the “Send files by e-mail to AIM” option.
We will receive just the test file and logger information. No personal data will be sent to us.
Please remember to write in the e-mail text the reason you’re sending data for, we’ll reply
you as soon as possible.
NOTE: it is reminded that you may not send a file if it is loaded. In this case, please unload
it and, then, send it via e-mail.
www.aim-sportline.com
29
MXL QM & EVO3 QM
User Manual
Release 1.02
If you want set software preferences, please close all open tests and select
“Preferences” from the top toolbar. The following picture will appear.
Please choose the correct run length and vehicle type, as many features in the software
were specifically developed for different lengths and vehicles.
You can also have a slight customization of software printouts inserting your name, some
team information and your team logo.
www.aim-sportline.com
30
MXL QM & EVO3 QM
User Manual
Release 1.02
26
6.2 - Analysis View
Once a run has been loaded, it will be Prompted the “Analysis View” window, shown in the
screenshots that follow along this chapter. There are up to 8 Analysis View available, any
of them is customizable independently from others, hence enabling you to have different
analysis templates always available. The default name for each view is “Time View”, it can
be changed through the plot settings command, as explained later.
Again the view has a toolbar, a left part and a right part, showing new information, both the
left and the right part are divided in sub windows, described in what follows.
The left part of the toolbar is the same already described. Available commands in this view
are:
•
•
•
•
•
•
•
Channels – to modify run channels Properties.
Settings – to modify plot settings Properties.
Plot type – to choose which kind of plot you want to display.
Zoom In – to move the analysis to a shorter time window.
Zoom Out – to move the analysis to a longer time window.
Displacement – to change channels displacement on the plot.
Prediction – to plot, when available, an ET prediction, useful for bracket racing.
Three different types of plot graph are available: Time, XY and Histogram; clicking on the
Plot type toolbar button you can switch between each other.
We’ll be immediately explaining the Time Plot graph, to follow later with XY and Histogram.
What is similar in the three graphs will be explained only for the Time Plot one. As a matter
of fact the left part, including the channels list, the time slip, the weather information and
the 3D settings is in common between the three graphs. The same can be said on the
bottom part with the run history.
www.aim-sportline.com
31
MXL QM & EVO3 QM
User Manual
Release 1.02
37
6.2.1 – Time Plot
The “Time plot” feature allows the user to plot a logged channel versus time. Left click
inside the graph to show a vertical cursor. Along the horizontal axes it will be shown the
time and distance (calculated from the start line) value corresponding to that position. At
the top right part of the graph the value tags of the shown measures are displayed. The
background of the plot is greyscale coloured in order to evidence the time slip times.
At the top of the window it is possible to see a tab control with the leftmost tab named “Run
Compare”, and a tab for every loaded run. Selecting any runs tab the view will show only
the data of that particular run, selecting the Run Compare tab you’ll be able to see at the
same time the data of up to 2 runs.
The user may choose the channel to be plot on the graph left-clicking on the channel
name inside the “channels list” window (located in the upper left corner of the “Time plot”
window).
Moreover, the measurements displayed inside the “available measurements” toolbar are
linked to the cursor movement, showing the current value corresponding to the selected
track position.
In order to plot the scale together with the input channel, please enable the checkbox
aside the desired channel inside the “channels list” toolbar.
www.aim-sportline.com
32
MXL QM & EVO3 QM
User Manual
Release 1.02
Clicking on the Displacement toolbar button it is possible to choose how to display the
channels into the plot, you’ll use the small button with numbers in the channels list window
to decide where to place every channels. In the following screenshot an example in which
we placed RPM and shaft speed at the top and two temperatures at the bottom.
www.aim-sportline.com
33
MXL QM & EVO3 QM
User Manual
Release 1.02
Clicking the small coloured button close to every channel name it is possible to choose the
plot colour of the channels itself. The click on the colour button Prompts the following
window.
In the lower part of the “Time plot” window it is displayed the “Run toolbar”, which is a
graph showing the complete time history of the loaded run.
User may drag and drop the black square drawn inside the “Run toolbar”: the graph
displayed inside the “Time plot” window will move together with the dragged window. The
black square evidences what shown in detail in the upper part of the plot.
When in Run Compare mode the run history bar displays two separate black squares, one
for every run. Users normally drag them together, as stated by the Tie command check
button in the right part of the run history. Unchecking the Tie button you’ll be able to fine
align runs that eventually are not correctly recognized by the software.
The width of the data window can be modified, you may click the 2 buttons located inside
the buttons toolbar. QMAn allows the user to choose among 7 predefined zooms: 2
seconds window, 4, 6, 8, 10, 14 and 20 seconds. For instance, if you were looking a graph
inside a 10 seconds window and you click the “Zoom in” button, the “Time plot” will change
to an 8-seconds window.
www.aim-sportline.com
34
MXL QM & EVO3 QM
User Manual
Release 1.02
You can zoom either using the up-down arrows buttons on your keyboard or through the
mouse wheel when the mouse cursor is over the plot.
Plot settings can be modified through the Settings command in the toolbar. The following
window is Prompted. Kindly notice that there are parts of this window that are different for
XY graphs and Histogram graphs, they will be explained later.
It is possible to set the view name, defaulted to “Time View”.
It is possible to modify the colours of the graph objects that are not bound to channels, and
it is given the possibility to go back to defaults, with black or white background. Different
backgrounds are managed for printing and for view, as usually printouts have white
background.
The channels shown in the channels list already described can be sorted, this is a useful
feature when a huge number of recorded channels (typical of several applications of the
EVO3 or MXL) are logged for every run. This way you’ll be able to use different views to
plot different information, always ready for a quick interpretation of data.
Line width settings refer to channels traces.
Cursor tags refers to the cursor drawing around the line plotted for every channel.
Enable time interval bolding refers to the gray scaled background of the time plot.
Show shift RPM is useful while displaying some Junior Drasters data, the same for Show
RPM / Shaft 1:1.
Show Car reaction time enables the drawing on the time plot of a vertical dashed red line
evidencing it.
www.aim-sportline.com
35
MXL QM & EVO3 QM
User Manual
Release 1.02
Per Run Colour is useful when comparing two runs, all the channels pertaining to a run will
have the same colour, making it easy to identify them.
The Use 3D channel lets you plot channels’ lines using a colour that is not the colour
chosen for that channel, but instead a colour bound to a third channel value through a
colour scale shown in the bottom left part of the view.
Double click the 3D colour scale to show its settings window.
Through this window it is possible to set the bands number and the bands thresholds.
www.aim-sportline.com
36
MXL QM & EVO3 QM
User Manual
Release 1.02
38
6.2.2 – Histogram
While showing a histogram plot you’ll be able to see how long a channel remains within a
certain band. In the following screenshot the RPM histogram, that lets you understand
which are the most used RPM in the run, allowing you a better engine tuning.
Kindly notice that while moving the mouse cursors over a bar on the plot a tag will show
you the value of the bar.
www.aim-sportline.com
37
MXL QM & EVO3 QM
User Manual
Release 1.02
The next screenshot shows you that the parameters that can be set for this plot are the
histogram computation base (time or percentage) and the beans number.
Even the histogram plot can show a 3D channel. In this case, within a single horizontal bar
you can see multiple sub bars with different colours, the amplitude of each sub bar lets you
understand a distributed histogram of the 3D channel.
www.aim-sportline.com
38
MXL QM & EVO3 QM
User Manual
Release 1.02
39
6.2.3 – XY Plot
The XY plot or scatter plot shows the traces of the enabled channels versus one selected
X channel. If you check the Cursor button in the run history bar you can move the cursor
within the run history bar and see what happens inside the XY plot. In this “cursor
movement” mode the drag and drop functionality of the time window doesn’t work: just
unckeck the cursor button and the drag and drop mode will be back.
www.aim-sportline.com
39
MXL QM & EVO3 QM
User Manual
Release 1.02
The next screenshot shows you that the settable parameters of the XY plot are the
horizontal axis channel and the drawing mode: lines, dots or circles (and their dimensions).
The XY plot lets you show a 3D channel as well as the other two plots.
www.aim-sportline.com
40
MXL QM & EVO3 QM
User Manual
Release 1.02
40
6.2.4 – C hannel info
There are a number of parameters that can be modified for each channel, you may right
click on the channel name inside the “Available measurements” toolbar or click the
“Channels” button inside the buttons toolbar. The “Set Channels” window (shown here) will
be displayed.
If you change the plotting scale you’ll generate a redraw of the graphs as soon as you
close this settings window. Changing the plotting scale value will allow you to modify the
graph’s higher and lower limit.
If you enable an alarm and Properly set its threshold you’ll see a red coloured background
for the channel values (only in case the alarm is hit) in the channels list window.
The other parameters affect the channel value and behave differently sensor by sensor,
normally nothing has to be changed in these values.
www.aim-sportline.com
41
MXL QM & EVO3 QM
User Manual
Release 1.02
41
6.2.5 – How to set the time slip info
Once the time slip have been handed to the racer. QMAn has been designed to allow you
to insert useful data (reaction time, 60’ – 330’ – 1/8th – 1000’ and 1/4th time, 330’ – 660’
and 1320’ speed) inside the test file in order to recall them when needed.
In case you selected a shorter run length in software preferences (already described) the
higher distances settings (say 1320 time and speed, …) will not be shown.
These settings affect the gray scaled backgrounds of the time plot.
www.aim-sportline.com
42
MXL QM & EVO3 QM
User Manual
Release 1.02
42
6.2.6 – How to set weather station data
The user is allowed to set the weather conditions, in order to be able to correlate the test
performances (reaction time, linear acceleration, engine’s setup) even to the atmospheric
conditions.
If you wish to set weather parameters, please press the “…” button aside of the “Weather”
toolbar (left column) or double click the Weather window.
www.aim-sportline.com
43
MXL QM & EVO3 QM
User Manual
Release 1.02
27
6.3 – Test Loaded View
This view shows a report form of all the information bound to every run loaded for analysis.
If you red-highlight a line of a run you can click on one of the toolbar buttons to open the
settings window already shown and that will be rapidly summarized in the following lines.
The view has a toolbar and a bottom part containing the report itself.
The left part of the toolbar is the same already described. Available commands in this view
are:
•
•
•
•
Run Info – to modify run settings.
Time Slip – to modify time slip settings.
Tachometer – to modify tachometer settings.
Weather – to modify weather settings.
The reports easily self describes: the first column includes the descriptions, then you’ll see
one column for each run you load.
www.aim-sportline.com
44
MXL QM & EVO3 QM
User Manual
Release 1.02
43
6.3.1 – Run Info
This window lets you enter general information on the performed run.
www.aim-sportline.com
45
MXL QM & EVO3 QM
User Manual
Release 1.02
44
6.3.2 – Time Slip
You can store all the information bound to the time slip, that, as already explained, affect
the time plot.
32
6.3.3 – Tachometer
You can store all the readings of the tachometer that matter most, even at launch.
www.aim-sportline.com
46
MXL QM & EVO3 QM
User Manual
Release 1.02
45
6.3.4 – Weather
You can remember all the important information coming from a weather station.
www.aim-sportline.com
47
MXL QM & EVO3 QM
User Manual
Release 1.02
6
17
Appendix “A” – Technical draws
A.1 – MXL/EVO3 QM Pista: AMP female connector
Pin
Signal
Pin
Signal
1A
2A
3A
4A
5A
6A
7A
GND
9-15V Battery input
CAN 1- (ECU interface)
CAN 1+ (ECU interface)
RS232 TX (ECU interface)
RS232 RX (ECU interface)
USB DRPM 150-400V coil - RPM
square wave >8V
+ VB
GND
+ VB
Speed
1B
2B
3B
4B
5B
6B
7B
Analog input 4
V reference
Analog GND
Analog input 3
Analog input 2
V reference
Analog GND
8B
Analog input 1
9B
10B
11B
12B
13B
Analog input 8
USB D+
Analog GND
Analog input 7
Analog input 6
14B
V reference
15B
16B
Analog GND
Analog input 5
8A
9A
10A
11A
12A
Connector draw
C-Acquisition switch channel
Pin
1
2
Function Pin
Reserved 3
GND
4
Function
Reserved
Start acquisition switch
4
1
3
2
3
2
1
12 11 10 9
8
7
6
5
4
12 Pins AMP female connector pinout
(Labelled as “A”) – Contacts insertion
view
8
7
6
5
4
3
2
1
16 15 14 13 12 11 10 9
16 Pins AMP female connector pinout
(Labelled as “B”) – Contacts insertion
view
D-CAN for Expansion Modules
Pin
Function Pin
1
2
3
CAN 0+
GND
+VB
Function
4
5
CAN 09-15V Battery input
1
5
2
4
3
4 Pins female Binder connector pinout
(Labelled as “C”): external view
5 Pins female Binder connector pinout
(Labelled as “D”): outside view
www.aim-sportline.com
48
MXL QM & EVO3 QM
User Manual
Release 1.02
28
A.2 – MXL QM Pro: 22 Pins Deutsch connector
Kindly notice there are some differences from EVO3 wirings, evidenced in red.
Pin Signal
Pin Signal
1
+ VB (50 mA max)
12
2
GND
13
5
CAN
0+
modules)
CAN
0modules)
Speed 3
6
Speed 4
17
7
8
9
10
USB D+
USB DGND
+ VB (50 mA max)
18
19
20
21
11
GND
22
3
4
18
(Ext.
exp.
(Ext.
exp.
GND
+ VB for Ext. exp.
modules (350 mA max)
14
MEM
15
VIEW
16
Ext. Gear Flash
RS232
RX
(ECU
interface)
RS232 TX (ECU interface)
GND
CAN 1+ (ECU interface)
CAN 1- (ECU interface)
9-15 V Battery input or
Gear Flash power supply
(no fuse)
Connector Draw
1 14
13
3 15 21 12
4 16 22 20 11
5 17 18 19 10
6
9
7 8
2
22 pins Deutsch male
connector pinout (Labelled
as “A”): contacts insertion
view
A.3 – EVO3 QM Pro: 22 Pins Deutsch connector
Kindly notice there are some differences from MXL wirings, evidenced in red.
Pin Signal
Pin Signal
1
+ VB (50 mA max)
12
2
GND
13
5
CAN
0modules)
CAN
0+
modules)
Speed 3
6
Speed 4
17
7
8
9
10
USB D+
USB DGND
+ VB (50 mA max)
18
19
20
21
11
GND
22
3
4
GND
+ VB for Ext. exp.
modules (350 mA max)
(Ext.
exp.
14
Ext. Gear Flash
(Ext.
exp.
15
Input 1
16
Input 2
RS232
RX
(ECU
interface)
RS232 TX (ECU interface)
GND
CAN 1+ (ECU interface)
CAN 1- (ECU interface)
9-15 V Battery input or
Gear Flash power supply
(no fuse)
www.aim-sportline.com
Connector Draw
1 14
13
3 15 21 12
4 16 22 20 11
5 17 18 19 10
6
9
7 8
2
22 pins Deutsch male
connector pinout (Labelled
as “A”): contacts insertion
view
49
MXL QM & EVO3 QM
User Manual
Release 1.02
29
A.4 – MXL/EVO3 QM Pro: 37 Pins Deutsch connector
Pin Signal
Pin Signal
1
9-15 V Battery input
20
2
3
4
Analog input 1 (0-5V max)
Analog input 2 (0-5V max)
Analog GND
21
22
23
5
6
7
8
9
10
11
12
13
14
15
16
17
18
19
Analog GND
V Reference (5V – 30 mA)
V Reference (5V – 30 mA)
Analog input 3 (0-5V max)
Analog input 4 (0-5V max)
Analog input 6 (0-5V max)
Analog GND
RPM Square Wave 4-8 V
RPM Coil – Sq. Wave >8 V
+ VB (50 mA max)
GND (Battery input)
+ VB (*)
+ VB (50 mA max)
GND
Analog input 11 (0-5V max)
24
25
26
27
28
29
30
31
32
33
34
35
36
37
Analog input 12 (0-5V
max)
V Reference (5V – 30 mA)
V Reference (5V – 30 mA)
Analog input 10 (0-5V
max)
V Reference (5V – 30 mA)
Analog input 9 (0-5V max)
Analog input 8 (0-5V max)
Analog GND
GND
+ VB (*)
Speed 2
Analog GND
Analog input 5 (0-5V max)
Analog input 7 (0-5V max)
V Reference (5V – 30 mA)
Analog GND
Speed 1
Start acquisition switch
Connector Draw
2 1 18 17
19 30 16
4 20 31 3629 15
21 32 37 28
5
35 14
22 3334 27
6 23
26 13
7 24 25 12
8 9 1011
3
37 pins Deutsch male
connector pinout (Labelled
as “B”): contacts insertion
view
(*) The total power consumption sum of pin 16 and pin 29 must not exceed 50 mA (max
current sink).
Analog input 1-12 Voltage = 0-5V max , V Reference = 5V 30 mA
www.aim-sportline.com
50