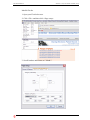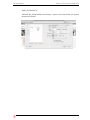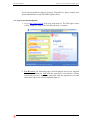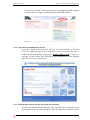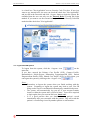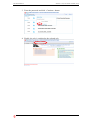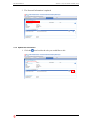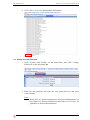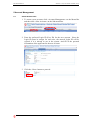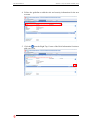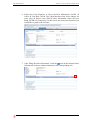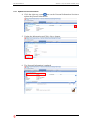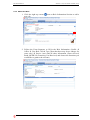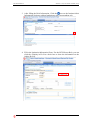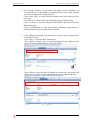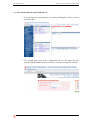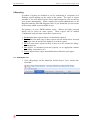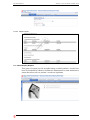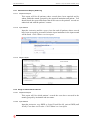
1
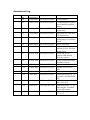
Public Private Interface (PPI) System User Manual for General Users Revision 1.15 Prepared by: ISS / IS6 Team Information Technology Division 10 Jun 2011 Amendment Log Ref. Version No. Date of Amendment Prepared by Description New document. UI Enhancement of Quick Access and Next patient button. UI Enhancement of Logon Page Add Notes in Create New Account Section Allow users to select the issuing party of a Security Token Online activation Address Searching function in User Account Management Direct link access between ePR and PPI (PCP & Cataract) System Requirement and Installation Guide Minor Consent Patient Rename of eHCVS to eHS Change eHealth Logo Updated Sections 2.2, 3.5, 3.6 and 5.1 for HD PPP & PEP Updated Sections 2.2, 3.5, and 3.6 for SCP Updated Sections 7.1 for removing the “on behalf of” for ePR enquire Updated Section 3.4, 3.7 , 4.1, 5 1.0 1.1 21 Apr 2006 19 Dec 2006 IS1 team, ITD, HA IS1 team, ITD, HA 1.2 26 Feb 2007 IS1 team, ITD, HA 1.3 17 Sep 2008 IS1 team, ITD, HA 1.4 23 Sep 2008 IS1 team, ITD, HA 1.5 1.6 24 Oct 2008 4 Feb 2009 IS1 team, ITD, HA IS1 team, ITD, HA 1.7 29 June 2009 IS6 team, ITD, HA 1.8 30 June 2009 IS6 team, ITD, HA 1.9 1.10 8 Jul 209 26 Aug 2009 IS6 team, ITD, HA IS6 team, ITD, HA 1.11 1.12 7 Oct 2009 2 Mar 2010 IS6 team, ITD, HA IS6 team, ITD, HA 1.13 6 Jul 2010 AI3 team, ITD, HA 1.14 28 Jul 2010 AI3 team, ITD, HA 1.15 10 Jun 2011 AI3 team, ITD, HA PPI USER MANUAL VERSION 1.15 (LAST SAVED 10 JUN, 2011) Table of Contents 1. INTRODUCTION ................................................................................................................................ 5 1.1 1.2 2. ABOUT THIS MANUAL .................................................................................................................... 5 WHERE TO GET HELP .................................................................................................................... 5 SYSTEM REQUIREMENT AND INSTALLATION GUIDE ......................................................... 6 2.1 HARDWARE REQUIREMENT ........................................................................................................... 6 2.2 SOFTWARE REQUIREMENT ............................................................................................................ 6 2.3 SYSTEM CONFIGURATION .............................................................................................................. 7 2.3.1 Printing .................................................................................................................................... 7 3. SECURITY INFORMATION AND GUIDE TO USER LOGIN................................................... 11 3.1 3.1.1 3.1.2 3.1.3 3.1.4 3.2 3.2.1 3.2.2 3.2.3 3.2.4 3.3 3.4 3.4.1 3.4.2 3.4.3 3.4.4 3.4.5 3.5 3.6 3.7 4. GENERAL SECURITY INFORMATION ............................................................................................. 11 Access Control ....................................................................................................................... 11 User Account ......................................................................................................................... 11 Activity Logging ..................................................................................................................... 11 Patient Consent...................................................................................................................... 11 SYSTEM REQUIREMENTS ON PASSWORD MAINTENANCE ............................................................. 12 General Guidelines ................................................................................................................ 12 Mandatory requirement on Password format ........................................................................ 12 Password Changes ................................................................................................................ 12 Password notification ............................................................................................................ 13 SECURITY TOKEN DEVICE ........................................................................................................... 13 LOGIN TO THE PPI-EPR SYSTEM ................................................................................................. 14 Login for the First Time ......................................................................................................... 16 Login successful ..................................................................................................................... 18 Login with Replacement Security Token (For users with security token) .............................. 20 Login Failure and Automatic Lock-out ................................................................................. 21 Login through internal site (For users with security token) .................................................. 21 LOGOUT PPI-EPR SYSTEM .......................................................................................................... 22 RETURN TO MAIN MENU ............................................................................................................ 23 SWITCH ROLE .............................................................................................................................. 23 UPDATE OWN PROFILE AND PASSWORD............................................................................... 25 4.1 UPDATE OWN PROFILE ................................................................................................................ 25 4.1.1 Update Personal Information ................................................................................................ 25 4.1.2 Update Role Information ....................................................................................................... 26 4.2 CHANGE YOUR OWN PASSWORD ................................................................................................ 28 5. ACCOUNT MANAGEMENT .......................................................................................................... 29 5.1 5.2 5.2.1 5.2.2 5.2.3 5.2.4 5.2.5 5.2.6 5.3 5.4 5.5 5.6 6. CREATE NEW ACCOUNT .............................................................................................................. 29 AMEND ACCOUNT DETAILS......................................................................................................... 37 Update Personal Information ................................................................................................ 38 Add a New Role ..................................................................................................................... 39 Edit a role .............................................................................................................................. 42 Delete a role (more than one role) ........................................................................................ 43 Delete a role (only one role) .................................................................................................. 45 Update Security Information ................................................................................................. 47 DELETE ACCOUNT....................................................................................................................... 48 SUSPEND ACCOUNT..................................................................................................................... 50 RE-ACTIVATE ACCOUNT.............................................................................................................. 52 RESET PASSWORD ....................................................................................................................... 53 PATIENT ENROLLMENT AND PATIENT PROFILE MAINTENANCE ................................ 54 6.1 PATIENT ENROLLMENT................................................................................................................ 54 6.1.1 View Patient Details .............................................................................................................. 54 6.1.2 Enroll New Patient ................................................................................................................ 55 PAGE 3 OF 78 PPI USER MANUAL 6.1.3 6.1.4 7. VERSION 1.15 (LAST SAVED 10 JUN, 2011) Print Patient’s Access Key ..................................................................................................... 57 Update Patient’s personal information ................................................................................. 58 PATIENT DATA ENQUIRY ............................................................................................................ 61 7.1 OPEN A PATIENT‟S RECORD ......................................................................................................... 61 7.2 VIEW PATIENT DATA ................................................................................................................... 64 7.2.1 Patient’s basic demographic data ......................................................................................... 64 7.2.2 Navigation Tree ..................................................................................................................... 64 7.2.3 Buttons and Function Controls.............................................................................................. 65 7.3 CLOSE CURRENT RECORD / OPEN NEXT RECORD ....................................................................... 69 8. REPORTING ..................................................................................................................................... 70 8.1 8.2 8.2.1 8.2.2 8.2.3 8.2.4 8.2.5 8.3 8.3.1 8.3.2 8.4 8.4.1 VIEW REPORT LIST ...................................................................................................................... 70 PATIENT ENROLLMENT REPORTS ................................................................................................ 71 List of Unvetted Patients ........................................................................................................ 71 List of Expired Access Key..................................................................................................... 72 List of Patient PMI Address Changed ................................................................................... 73 List of Pending PMI Address Change.................................................................................... 74 Patient Enrollment List .......................................................................................................... 74 PATIENT ENQUIRY REPORTS........................................................................................................ 75 Patient Record Enquiry Audit Log ........................................................................................ 76 Usage of Patient Record Access ............................................................................................ 76 USER ACCOUNT REPORT ............................................................................................................. 77 User Account List .................................................................................................................. 77 PAGE 4 OF 78 PPI USER MANUAL VERSION 1.15 (LAST SAVED 10 JUN, 2011) 1.Introduction The Public Private Interface / electronic Patient Record Sharing Pilot System (PPI-ePR) is a web-based application aiming at improving the sharing of patient‟s clinical information between public and private healthcare providers to facilitate a seamless and better quality healthcare environment for patients upon patient‟s consent. The Hospital Authority (HA), being the largest healthcare provider in Hong Kong, has collected clinical data on patients under its care through its integrated clinical information system over the past years and established a patient-centered, lifelong longitudinal clinical data repository, namely the electronic-Patient Record (ePR). A pilot for this collaborative project is to be launched by 1Q 2006, in which HA will share the ePR of patients who are under the care of selected private healthcare providers upon patients‟ consent. Through this pilot run, it aims to establish & assess the logistics involved, and to determine the key success criteria and identify critical components for the provision of a communitywide health information portal in the future. 1.1 About this manual This manual aims at providing users with a quick and working reference of the PPI-ePR system and includes the following 4 sections: 1. System Requirement & Installation Guide This section describes the hardware & software requirement and the setup procedure before accessing the PPI-ePR system. 2. Security Information and Guide to User Login This section describes the security features of the system and how to use security token to login to the PPI-ePR system. 3. Guide to use the functions provided by PPI-ePR This section describes the various functions provided by the PPI-ePR system. 1.2 Where to Get Help If you require help with the use of the PPI-ePR system, please contact the system administrator of your hospital. If you do not have a system administrator, please contact the Hospital Authority PPI-ePR Program Office on 2300-6654, or via email to the following addresses: Internet: [email protected] Intranet: HO PPI-ePR Program Office ([email protected]) HOSPITAL AUTHORITY - INFORMATION TECHNOLOGY DEPARTMENT PAGE 5 OF 78 PPI USER MANUAL VERSION 1.15 (LAST SAVED 10 JUN, 2011) 2.System Requirement and Installation Guide The minimum hardware and software requirement for your computer system to access the PPI system is described below. 2.1 Hardware Requirement IBM Compatible PC (Pentium and above) with a minimum of 256 MB RAM, or Intel-based Mac (either desktop or laptop) with a minimum of 1GB RAM Broadband Internet access 2.2 Software Requirement For Microsoft Windows: Microsoft Windows 2000 with SP4 or above OR Windows XP with SP1 or above OR Windows Vista One of the following web browser installed: o Microsoft Internet Explorer version 6 with SP1 or above Microsoft Internet Explorer version 7 o Mozilla Firefox 3.x Adobe Acrobat Reader Version 5.0 or above. You can download a free copy of the current version of Adobe Acrobat Reader at http://www.adobe.com/ For Mac: MacOS X 10.4 (Tiger) or 10.5 (Leopard) Web browser: Safari 3.x Adobe Acrobat Reader for Mac version 8 or above. You can download a free copy of the current version of Adobe Acrobat Reader at http://www.adobe.com/ Note that Primary Care Profile (PCP) can only run on Internet Explorer version 6/7 under current implementation. Browser-Applications support matrix: Internet Explorer Firefox 3.x 6/7 ePR Primary Care Profile (PCP) Cataract Profile Haemodialysis Public-Private Partnership Programme (HD PPP) Patient Empowerment Profile (PEP) HOSPITAL AUTHORITY - INFORMATION TECHNOLOGY DEPARTMENT Safari Mac 3.x on PAGE 6 OF 78 PPI USER MANUAL VERSION 1.15 (LAST SAVED 10 JUN, 2011) Shared Care Profile (SCP) (IE7 only) 2.3 System Configuration Before you access the PPI system, you should configure your computer as specified below. 2.3.1 Printing If you need to print reports or letters through the system, please set up your Internet Explorer as follows: 1. Open your Internet Explorer. 2. Click <File>, and then <Page Setup>. 3. Clear the contents in the <Header> and <Footer> sections and set margin to zero as shown below: 4. Clear the contents in the <Header> and <Footer> sections as below. HOSPITAL AUTHORITY - INFORMATION TECHNOLOGY DEPARTMENT PAGE 7 OF 78 PPI USER MANUAL VERSION 1.15 (LAST SAVED 10 JUN, 2011) 5. Click <OK> button to save the changes. HOSPITAL AUTHORITY - INFORMATION TECHNOLOGY DEPARTMENT PAGE 8 OF 78 PPI USER MANUAL VERSION 1.15 (LAST SAVED 10 JUN, 2011) Mozilla Firefox 1. Open your Firefox browser 2. Click <File> and then click <Page setup> 3. Set all headers and footers to "-blank-": HOSPITAL AUTHORITY - INFORMATION TECHNOLOGY DEPARTMENT PAGE 9 OF 78 PPI USER MANUAL VERSION 1.15 (LAST SAVED 10 JUN, 2011) Safari (for MacOS X) Uncheck the <Print headers and footers> option every time when you print a document in Safari. HOSPITAL AUTHORITY - INFORMATION TECHNOLOGY DEPARTMENT PAGE 10 OF 78 PPI USER MANUAL VERSION 1.15 (LAST SAVED 10 JUN, 2011) 3.Security Information and Guide to User Login 3.1 General Security Information 3.1.1 Access Control Access to the different functions in the PPI-ePR system is granted based on the job duties of each user. If you think that your type and level of access in the PPI-ePR system do not match your responsibilities, please contact your PPIePR system administrator or the Hospital Authority PPI-ePR Program Office. 3.1.2 User Account You are assigned a unique User ID (Login ID) when granted access to the PPIePR system for your sole and personal use only. For HA users, you are required to login to the system using the correct User ID and Password. For non-HA users, a Security Token is also provided and you are required to login to the system using the correct User ID, Password and the Security Code as displayed on the Security Token at the time of logging in. Access to the system is restricted to authorised users only and you must not share your User ID, Password and Token to others. Please refer to the „IT Security Guide for the PPI-ePR Project‟ for good security practices. A copy of which has been distributed to you when your account was created or you can download a copy from the PPI-ePR web site. 3.1.3 Activity Logging The PPI-ePR system logs every user activity (e.g. accessing patient‟s clinical data, create an account) in the system automatically for audit purposes. The logged information includes the access date/time, User ID, type of transaction, the record and data fields accessed, and if any data is changed, the before and after image of the change. This logging allows the system administrator to trace every action within the system to the individual user and you will be personally responsible for the actions logged with your User ID. You should use the PPI-ePR system to perform your duties in relation to patient care and related purposes only according to the Terms and Conditions of this website. Regular audit reports on individual users‟ activities in the PPIePR system will be generated for monitoring by the system administrators at the Hospital Authority and each participating Private Hospitals. 3.1.4 Patient Consent You are allowed to access the patients‟ records only when the patient has consented. Apart from the system logging, the PPI-ePR system will generate a SMS message to the patient‟s mobile phone every time a patient‟s record is opened in the PPI-ePR system. The message contains the time and name of the user accessing his / her record so that the patient can report any unauthorised access to the Hospital Authority immediately. HOSPITAL AUTHORITY - INFORMATION TECHNOLOGY DEPARTMENT PAGE 11 OF 78 PPI USER MANUAL VERSION 1.15 (LAST SAVED 10 JUN, 2011) 3.2 System requirements on Password Maintenance 3.2.1 General Guidelines Passwords are the principal means of authenticating the user and validating a user‟s authority to access the system. You are advised to adopt the following guidelines to protect your password so as to protect your own user account. 1. Keep passwords confidential. Do not disclose your password to others to prevent unauthorised access using your account. 2. Avoid keeping a paper record of passwords. 3. Change passwords whenever there is any indication of possible system or password compromise. 4. Change passwords at regular intervals (about 30 days) and avoid reusing or "cycling" old passwords 5. Avoid basing passwords on any of the following: months of the year, days of the week or any other aspect of the date family names, initials or car registration numbers the organisation names, identifiers or references telephone numbers (or similar all-numeric groups) User ID, user name, group id or other system identifier more than two identical characters words that can be found in dictionaries 3.2.2 Mandatory requirement on Password format The system will automatically check the format of your password when you create a new password. Passwords of the following format will be rejected : with length less than 8 characters with the user‟s User ID or HKID embedded in the password with 3 or more consecutive identical characters in the password with the word „password‟ embedded same password as your previous password 3.2.3 Password Changes The system requires you to change your password upon successful login under the following circumstances : login for the first time login after your password has been reset login after your password has not been changed for a period of times HOSPITAL AUTHORITY - INFORMATION TECHNOLOGY DEPARTMENT PAGE 12 OF 78 PPI USER MANUAL VERSION 1.15 (LAST SAVED 10 JUN, 2011) The following page will be displayed when the system requires you to change your password. You must change your password successfully before you can proceed to other functions when this page is displayed. When you change your password, please note the mandatory requirement on the format of the password as described in section 3.2.2. In addition, you can change your password any time via the Update Own Profile function in the PPI-ePR. 3.2.4 Password notification When your account is created or when your password is reset, an e-mail from [email protected] will be sent to you to advise you of your password. It is therefore very important that you should keep your updated e-mail address recorded in the PPI-ePR system. Your User ID will be sent to you in a separate e-mail. You should memorise your User ID and password on receipt of the e-mails and destroy them immediately. If you forget your password, you have to call your system administrator or the PPI-ePR Program Office to reset your password. Since the password is system generated and no one knows your password, it is impossible to revert your password to a previous password. 3.3 Security Token Device A Security Token Device as shown below will be assigned to each user who has to access the PPI-ePR via the internet. This device is not required for Hospital Authority users who only access the system within the HA network. Internet users must have this token with him/her at the time of logging into the PPI-ePR system. The system requires internet users to enter the 6 digit code as displayed on the LCD screen of the Security Token device at logging in, e.g. 032848 as shown above. The Security Code will expire within a short period of time and a new code will be displayed. You must input the Security Code as displayed on the Token at the time of logging in. HOSPITAL AUTHORITY - INFORMATION TECHNOLOGY DEPARTMENT PAGE 13 OF 78 PPI USER MANUAL VERSION 1.15 (LAST SAVED 10 JUN, 2011) If you find any problem with your Security Token Device, please contact your system administrator or the PPI-ePR Program Office. 3.4 Login to the PPI-ePR System 1. Go to http://ppi.ha.org.hk with your web browser. The PPI logon screen will be displayed. Enter your User ID and click <Continue>. 2. For HA users, the following page will be displayed and you are required to enter your Password. Note that the password is case-sensitive. Please ensure that you have input your password with the appropriate case and check that Caps Lock is not accidentally kept on. HOSPITAL AUTHORITY - INFORMATION TECHNOLOGY DEPARTMENT PAGE 14 OF 78 PPI USER MANUAL VERSION 1.15 (LAST SAVED 10 JUN, 2011) 3. For non-HA users or users accessing the system via the internet, the following page will be displayed. You are required to input both the Password and the Security Code from your Security Token Device. Notes : the password is case-sensitive. Please ensure that you have input your password with the appropriate case and check that Caps Lock is not accidentally kept on. if you are unsure of what is the Security Code, please refer to paragraph 3.3 above on Security Token Device. 4. Press the <Logon> button to proceed. HOSPITAL AUTHORITY - INFORMATION TECHNOLOGY DEPARTMENT PAGE 15 OF 78 PPI USER MANUAL VERSION 1.15 (LAST SAVED 10 JUN, 2011) 3.4.1 Login for the First Time 1. For non-HA users or users accessing the system via the internet, the following page will be displayed. You are required to input both the first 4 digit no. of your HKID (e.g. HKID:Z123456(7), input "1234") and the registered phone no to activate the account. If you have input an incorrect HKID and / or registered phone no, the following page will be displayed. Please be aware that after a number of incorrect attempts to log on, we will disable online access by your User Account. Please contact your PPI-ePR system administrator or the Program Office to re-activate your account HOSPITAL AUTHORITY - INFORMATION TECHNOLOGY DEPARTMENT PAGE 16 OF 78 PPI USER MANUAL VERSION 1.15 (LAST SAVED 10 JUN, 2011) 2. The first time when you login successfully to the system, a „Notice and Disclaimer for HA PPI-ePR Sharing Pilot Project‟ will be displayed. 3. Please read through this important notice regarding the use of the PPI-ePR system and its site. The <Accept> and <Reject> button will be enabled when you scroll to the end of the notice. 4. If you do not agree with the disclaimer, click the <Reject> button. You will be logged out of the system and return to the login page. HOSPITAL AUTHORITY - INFORMATION TECHNOLOGY DEPARTMENT PAGE 17 OF 78 PPI USER MANUAL VERSION 1.15 (LAST SAVED 10 JUN, 2011) 5. If you agree with the disclaimer, click the <Accept> button. You will be asked to change your password. Input the new password twice and click the <Submit> button to confirm. You can click <Reset> to clear all entries. 3.4.2 Login successful 1. On successful login, and successful change of password (when required), the following page will be displayed. HOSPITAL AUTHORITY - INFORMATION TECHNOLOGY DEPARTMENT PAGE 18 OF 78 PPI USER MANUAL VERSION 1.15 (LAST SAVED 10 JUN, 2011) 2. Information on your last logon, including date, time and status (success/failure) will be displayed. You should check this information every time after you logon into the system to ensure that no unauthorised login attempts have been made using your User ID. If in doubt, you should contact your System Administrator or the Program Office for assistance. 3. Functions which are available to you are displayed on the <Menu Bar>. There are a total of 6 groups of functions offered by the system: Patient Data Enquiry Patient Enrolment Reporting Account Management Update Own Profile If you found that the functions displayed on your <Menu Bar> do not match your job duties, please contact your PPI-ePR system administrator or the Program Officer for support. HOSPITAL AUTHORITY - INFORMATION TECHNOLOGY DEPARTMENT PAGE 19 OF 78 PPI USER MANUAL VERSION 1.15 (LAST SAVED 10 JUN, 2011) 3.4.3 Login with Replacement Security Token (For users with security token) 1. For non-HA users or users accessing the system via the internet with replacement security token, the following login page will be displayed. 2. If you have input a security code generated by replacement security token device, the following page will be displayed. You are required to input both the first 4 digit no. of your HKID (e.g. HKID:Z123456(7), input "1234") and the registered phone no to activate the account. Notes : If the input security code was generated by original security token, you can login successfully with normal flow. The replacement security token will only activate after new security code has been input. 3. On successful login, the following page will be displayed with message HOSPITAL AUTHORITY - INFORMATION TECHNOLOGY DEPARTMENT PAGE 20 OF 78 PPI USER MANUAL VERSION 1.15 (LAST SAVED 10 JUN, 2011) "New token activated". The activate process is completed and the original security token is no longer valid for login into PPI-ePR System. 3.4.4 Login Failure and Automatic Lock-out If you have input an incorrect User ID and / or Password and / or Security Code, the following Page will be displayed. Please be aware that after a number of incorrect attempts to log on, we disable online access by your User Account. Please contact your PPI-ePR system administrator or the Program Office to re-activate your account. 3.4.5 Login through internal site (For users with security token) If you have both Internal and External roles, you still can use internal site for accessing the account. After entering the User ID and click <Continue>, there HOSPITAL AUTHORITY - INFORMATION TECHNOLOGY DEPARTMENT PAGE 21 OF 78 PPI USER MANUAL VERSION 1.15 (LAST SAVED 10 JUN, 2011) is a check box "Not Applicable" next to Security Code Text box. If user just want to use internal roles, the user can check the check box "Not Applicable" and just fill in the Password and click <Logon> button to login the system. Be reminded that the user can only use the Internal Roles by using this login method. If you want to use the external roles, just fill in the Security Code and unchecked the check box "Not Applicable". 3.5 Logout PPI-ePR System To logout from the system, click the <Logout> icon on the menu bar. If you have entered the Primary Care Profile (PCP), Cataract Profile, Haemodialysis Public-Private Partnership Programme(HD PPP), Patient Empowerment Profile (PEP), Shared Care Profile (SCP) or ePR system, you can logout the system by clicking at the <Logoff> icon . Notes: Remember to logout the system when you finish working with the system. Forgetting to logout the system may lead to your User ID being used to retrieve confidential information by unauthorised person. The system will automatically log you off if your account remains inactive within the system after a period of time. You will be required to login again after your session has been „timed-out‟. It is a good practice that you should close a patient‟s record immediately after your encounter with the patient. This will avoid the patient‟s record being viewed by another patient or staff member. HOSPITAL AUTHORITY - INFORMATION TECHNOLOGY DEPARTMENT PAGE 22 OF 78 PPI USER MANUAL VERSION 1.15 (LAST SAVED 10 JUN, 2011) 3.6 Return To Main Menu To return to the main page from any functions within the system, click the <Home> icon on the menu bar. If you have entered the Primary Care Profile (PCP), Cataract Profile, Haemodialysis Public-Private Partnership Programme(HD PPP), Patient Empowerment Profile (PEP), Shared Care Profile (SCP) or ePR system, you can return to the main page by clicking at the <Close> icon . 3.7 Switch Role By using the switch role function, the user can switch the log-in role to the selected role. 1. You can see the current role on the left hand side of the header menu bar. Click the <Switch Role> button on the menu bar. 2. Click on the link of the role that you would like to change. You can check the "Default" check boxes next to the roles for setting the default role. Once the default role is set, the system will automatically log in the default role when logging in the system HOSPITAL AUTHORITY - INFORMATION TECHNOLOGY DEPARTMENT PAGE 23 OF 78 PPI USER MANUAL VERSION 1.15 (LAST SAVED 10 JUN, 2011) 3. Enter the password and click <Continue> button. 4. Finally, the role is switched to the selected role. HOSPITAL AUTHORITY - INFORMATION TECHNOLOGY DEPARTMENT PAGE 24 OF 78 PPI USER MANUAL VERSION 1.15 (LAST SAVED 10 JUN, 2011) 4.Update Own Profile and Password 4.1 Update Own Profile All users have permission to update their own information. Follow the steps below to update your own profile. 1. Click <Update Own Profile> on the Menu Bar, then click <Update Own Profile> on Sub-menu Bar. 4.1.1 Update Personal Information 1. Click the right top corner icon on the Personal Information Section to update the personal information. 2. Update the Information and Click <Save> button. HOSPITAL AUTHORITY - INFORMATION TECHNOLOGY DEPARTMENT PAGE 25 OF 78 PPI USER MANUAL VERSION 1.15 (LAST SAVED 10 JUN, 2011) 3. The Personal Information is updated. 4.1.2 Update Role Information 1. Click the icon besides the role you would like to edit HOSPITAL AUTHORITY - INFORMATION TECHNOLOGY DEPARTMENT PAGE 26 OF 78 PPI USER MANUAL VERSION 1.15 (LAST SAVED 10 JUN, 2011) 2. Update the Role Information. You can add or update the Institute Information by clicking the <add> or <edit> button in the Institute/clinic Information Section. 3. Fill in the Institution Information Form. Click <Confirm> button to save the changes. Click <Delete> button to delete the institutes. Click <Back> button to decline the changes. HOSPITAL AUTHORITY - INFORMATION TECHNOLOGY DEPARTMENT PAGE 27 OF 78 PPI USER MANUAL VERSION 1.15 (LAST SAVED 10 JUN, 2011) 4. Click <Save> to save the updated Role Information. 4.2 Change Your Own Password 1. Click <Update Own Profile> on the Menu Bar, then click <Change Password> on the Sub-menu Bar 2. Enter the old password and enter the new password twice and press <Save> button. Notes Please refer to „System requirements on Password Maintenance‟ in the Chapter on „Security Information and Guide to User Login‟ for guidelines on Password maintenance. HOSPITAL AUTHORITY - INFORMATION TECHNOLOGY DEPARTMENT PAGE 28 OF 78 PPI USER MANUAL VERSION 1.15 (LAST SAVED 10 JUN, 2011) 5.Account Management 5.1 Create New Account 1. To create a new account, click <Account Management> on the Menu Bar and then click <New Account> on the Sub-menu Bar. 2. Enter the preferred Login ID (User ID) for the new account. Since the Login ID must be unique for each user, the entered Login ID will be rejected if it is already in use in the system. And fill in the personal information of the applicant for the new account. 3. Click the <Next> button to proceed. HOSPITAL AUTHORITY - INFORMATION TECHNOLOGY DEPARTMENT PAGE 29 OF 78 PPI USER MANUAL VERSION 1.15 (LAST SAVED 10 JUN, 2011) 4. Follow the guideline to add the role and security information for the new account. 5. Click the icon the Right Top Corner of the Role Information Section to add a new role. HOSPITAL AUTHORITY - INFORMATION TECHNOLOGY DEPARTMENT PAGE 30 OF 78 PPI USER MANUAL VERSION 1.15 (LAST SAVED 10 JUN, 2011) 6. Follow the Form Sequence to fill in the Role Information. (Profile Office User Role Sub Type [Note that there may be no subtype for some role] Service Area) and all other information (Form received, Rank, MCHK No, Practicing Cert Received, and choose the functions you would like to grant to the account) 7. After filling the Role Information, Click the icon on the Institute/clinic Information Section to add an Institution to the corresponding role. HOSPITAL AUTHORITY - INFORMATION TECHNOLOGY DEPARTMENT PAGE 31 OF 78 PPI USER MANUAL VERSION 1.15 (LAST SAVED 10 JUN, 2011) 8. Fill in the Institution Information Form. For the HCP-Doctor Role, you can click the <Display in Dr List> check box to show the information on the Online Dr List. 9. For entering of address, you can either enter address in free text form, or in structured form. To enter address in structured form, click at the button <Addr. Search> to invoke the address searching function. Click at the button <Addr. Edit> to cancel structured address and enter address in free text form. Click <Back> to return to the Role Information page without saving. Click <Confirm> to store the Institution Information and back to the Role Information page. Click <Confirm & Add> to store the Institution Information and redirect to the blank Institution form to add another Institute. HOSPITAL AUTHORITY - INFORMATION TECHNOLOGY DEPARTMENT PAGE 32 OF 78 PPI USER MANUAL VERSION 1.15 (LAST SAVED 10 JUN, 2011) 10. After Adding the Institute, the information is shown on the institute/clinic information section. Click <Save> to save the Role Information. Click <Back> to return to the Account Management Page without saving. [Note: Even the Added Institutes will not be saved.] 11. Click the icon on the Right Top Corner of the Security Information Section to update the Security Information. HOSPITAL AUTHORITY - INFORMATION TECHNOLOGY DEPARTMENT PAGE 33 OF 78 PPI USER MANUAL VERSION 1.15 (LAST SAVED 10 JUN, 2011) 12. Choose the Access Method (Internet/Intranet) and the Authentication Mean (Password/ Password + Security Token). [Note: Depends on the roles created, different Access Method and Authentication Mean are shown] Fill in the Token Information when selecting the Security Token as the Authentication Mean. [Note: Only one token is required for each user] Enter the Security Token Information as appropriate. Currently, it is required for non-HA user accounts. a. For Security Token issued by PPI, select the radio button PPI in the Security Token Issued By field, and enter the Security Token Serial Number. b. If the user has already enrolled in the Hong Kong Government‟s eHealth System (eHS) and would like to use the same security token issued by eHS to access both PPI-ePR and eHS, select the radio button eHS in the Security Token Issued By field. After that, it will take several seconds for the system to try retrieving the Security Token Serial Number from eHS. If the Security Token Serial Number can be retrieved, the field Security Token Serial Number will be filled in, otherwise it will be left empty. Users can also click the Refresh button to try retrieving the Security Token Serial Number again. Users can proceed to finish the account creating process even if the Security Token Serial Number cannot be retrieved currently. For those Security Token Serial Numbers that cannot be retrieved currently, there will be an automatic process to try retrieving the Security Token Serial Number again each day. Once the Security Token Serial Number is retrieved successfully, the user account will be activated with email notification sent to users automatically. Click <Save> to save the Security Information. Click <Back> to return to the Account Management Page without saving HOSPITAL AUTHORITY - INFORMATION TECHNOLOGY DEPARTMENT PAGE 34 OF 78 PPI USER MANUAL VERSION 1.15 (LAST SAVED 10 JUN, 2011) 13. Print the pop-up token receipt form and ask the user to sign it and return. 14. Click <Activate> to activate the account. HOSPITAL AUTHORITY - INFORMATION TECHNOLOGY DEPARTMENT PAGE 35 OF 78 PPI USER MANUAL VERSION 1.15 (LAST SAVED 10 JUN, 2011) 15. After activating the account, the account status is changed from "Not Activate" to "Active" and the account is created 16. Please remember that you should submit the relevant document to respective System Administrators / Project Programme Office within 2 months after account creation. Otherwise, the role or account will be autosuspended HOSPITAL AUTHORITY - INFORMATION TECHNOLOGY DEPARTMENT PAGE 36 OF 78 PPI USER MANUAL 5.2 VERSION 1.15 (LAST SAVED 10 JUN, 2011) Amend Account Details 1. To amend the information of an existing account, click <Account Management> on the Menu Bar and then click <Update Profile> on the Sub-menu Bar. 2. Enter the Login ID and HKID number of the account to be amended. Then, click <Next> button. 3. Account Summary Information is displayed by three sections (Personal Information, Role Information and Security Information). You can perform different actions by clicking different buttons. HOSPITAL AUTHORITY - INFORMATION TECHNOLOGY DEPARTMENT PAGE 37 OF 78 PPI USER MANUAL VERSION 1.15 (LAST SAVED 10 JUN, 2011) 5.2.1 Update Personal Information 4. Click the right top corner icon on the Personal Information Section to update the personal information. 5. Update the Information and Click <Save> button. 6. The Personal Information is updated. HOSPITAL AUTHORITY - INFORMATION TECHNOLOGY DEPARTMENT PAGE 38 OF 78 PPI USER MANUAL VERSION 1.15 (LAST SAVED 10 JUN, 2011) 5.2.2 Add a New Role 1. Click the right top corner new role icon on Role Information Section to add a 2. Follow the Form Sequence to fill in the Role Information. (Profile Office User Role Sub Type [Note that there may be no subtype for some role] Service Area) and all other information (Form received, Rank, MCHK No, Practicing Cert Received, and choose the functions you would like to grant to the account) HOSPITAL AUTHORITY - INFORMATION TECHNOLOGY DEPARTMENT PAGE 39 OF 78 PPI USER MANUAL VERSION 1.15 (LAST SAVED 10 JUN, 2011) 3. After filling the Role Information, Click the icon on the Institute/clinic Information Section to add an Institution to the corresponding role. 4. Fill in the Institution Information Form. For the HCP-Doctor Role, you can click the <Display in Dr List> check box to show the information on the Online Dr List. HOSPITAL AUTHORITY - INFORMATION TECHNOLOGY DEPARTMENT PAGE 40 OF 78 PPI USER MANUAL VERSION 1.15 (LAST SAVED 10 JUN, 2011) 5. For entering of address, you can either enter address in free text form, or in structured form. To enter address in structured form, click <Addr. Search> to invoke the address searching function. Click <Addr. Edit> to cancel structured address and enter address in free text form. Click <Back> to return to the Role Information page without saving. Click <Confirm> to store the Institution Information and back to the Role Information page. Click <Confirm&Add> to store the Institution Information and redirect to the blank Institution form to add another Institute. 6. After Adding the Institute, the information is shown on the institute/clinic information section. Click <Save> to save the Role Information. Click <Back> to return to the Account Management Page without saving. [Note: Even the Added Institutes will not be saved.] [Note: When it is the first time for adding an external role, the system will remind you to edit the security information to assign a token to the user.] HOSPITAL AUTHORITY - INFORMATION TECHNOLOGY DEPARTMENT PAGE 41 OF 78 PPI USER MANUAL VERSION 1.15 (LAST SAVED 10 JUN, 2011) 5.2.3 Edit a role 5. Click the icon besides the role you would like to edit 6. Update the Role Information. You can add or update the Institute Information by clicking the <add> or <edit> button in the Institute/clinic Information Section. 7. Click <Save> to save the updated Role Information. HOSPITAL AUTHORITY - INFORMATION TECHNOLOGY DEPARTMENT PAGE 42 OF 78 PPI USER MANUAL VERSION 1.15 (LAST SAVED 10 JUN, 2011) 5.2.4 Delete a role (more than one role) 1. Click the icon besides the role you would like to delete 2. Click <Delete> to delete the role. HOSPITAL AUTHORITY - INFORMATION TECHNOLOGY DEPARTMENT PAGE 43 OF 78 PPI USER MANUAL VERSION 1.15 (LAST SAVED 10 JUN, 2011) 3. A pop-up box to confirm you whether delete the ole or not. Click <Yes> to proceed Click <No> to decline 4. The role is deleted. HOSPITAL AUTHORITY - INFORMATION TECHNOLOGY DEPARTMENT PAGE 44 OF 78 PPI USER MANUAL VERSION 1.15 (LAST SAVED 10 JUN, 2011) 5.2.5 Delete a role (only one role) 1. Click the icon besides the role you would like to delete 2. Click <Delete> to delete the role HOSPITAL AUTHORITY - INFORMATION TECHNOLOGY DEPARTMENT PAGE 45 OF 78 PPI USER MANUAL VERSION 1.15 (LAST SAVED 10 JUN, 2011) 3. A pop-up box to confirm you whether delete the ole or not. Click <Yes> to proceed to delete the account (See Section 5.3) Click <No> to proceed to delete the role Click <Close> to decline the role deletion 4. After clicking <No>, the role is deleted HOSPITAL AUTHORITY - INFORMATION TECHNOLOGY DEPARTMENT PAGE 46 OF 78 PPI USER MANUAL VERSION 1.15 (LAST SAVED 10 JUN, 2011) 5.2.6 Update Security Information 1. Click the icon on the Right Top Corner of the Security Information Section to update the Security Information. 2. Choose the Access Method (Internet/Intranet) and the Authentication Mean (Password/ Password + Security Token). [Note: Depends on the roles created, different Access Method and Authentication Mean are shown] 3. Fill in the Token Information when selecting the Security Token as the Authentication Mean. Click <Save> to save the Security Information. Click <Back> to return to the Account Management Page without saving HOSPITAL AUTHORITY - INFORMATION TECHNOLOGY DEPARTMENT PAGE 47 OF 78 PPI USER MANUAL VERSION 1.15 (LAST SAVED 10 JUN, 2011) 5.3 Delete Account 1. To delete an existing account, click <Account Management> on the Menu Bar and <Delete> on the Sub-menu bar. 2. Enter the Login ID (User ID) or HKID number of the account to be deleted. Click the <Next> button to proceed. 3. The details of the selected account will be displayed for verification. Click the <Confirm> button to delete the account or <Cancel> to cancel your action. Please note that this action is irreversible. Once the account is deleted, the user will not be able to access the PPI-ePR system. If the user requires access again, you will have to re-create the account. HOSPITAL AUTHORITY - INFORMATION TECHNOLOGY DEPARTMENT PAGE 48 OF 78 PPI USER MANUAL VERSION 1.15 (LAST SAVED 10 JUN, 2011) 4. The following will be displayed when the account is deleted. HOSPITAL AUTHORITY - INFORMATION TECHNOLOGY DEPARTMENT PAGE 49 OF 78 PPI USER MANUAL VERSION 1.15 (LAST SAVED 10 JUN, 2011) 5.4 Suspend Account 1. To suspend an existing account, click <Account Management> on the Menu Bar and <Suspend> on the Sub-menu Bar. 2. Enter the Login ID (User ID) or HKID number of the account to be suspended. Click the <Next> button to proceed. 3. The following information will be displayed for verification. Click the <Confirm> button to proceed and <Cancel> button to cancel your action. Once the account is suspended, the user will not be able to access the PPIePR system until his/her account is re-activated. HOSPITAL AUTHORITY - INFORMATION TECHNOLOGY DEPARTMENT PAGE 50 OF 78 PPI USER MANUAL VERSION 1.15 (LAST SAVED 10 JUN, 2011) 4. The following page will be displayed when the account is suspended. HOSPITAL AUTHORITY - INFORMATION TECHNOLOGY DEPARTMENT PAGE 51 OF 78 PPI USER MANUAL 5.5 VERSION 1.15 (LAST SAVED 10 JUN, 2011) Re-activate Account 1. To reactivate a suspended account, click <Account Management> on the Menu Bar and <Reactivate> on the Sub-menu Bar. 2. Enter the Login ID (User ID) or HKID number of the account to be reactivated. Click the <Next> button to proceed. 3. The following information will be displayed for verification. Click the <Confirm> button to proceed and <Cancel> button to cancel your action. Once a suspended account is reactivated, the user can gain access to the PPI-ePR system immediately. 4. The following page will be displayed when the account is reactivated. HOSPITAL AUTHORITY - INFORMATION TECHNOLOGY DEPARTMENT PAGE 52 OF 78 PPI USER MANUAL 5.6 VERSION 1.15 (LAST SAVED 10 JUN, 2011) Reset Password By resetting the user‟s password, a new password will be generated and the user‟s existing password will be invalidated. The user will be informed of the new password via e-mail and he/she is required to use the new password at the next login. 1. To reset a user‟s password, click <Account Management> on the Menu Bar and then click <Reset Password> on the Sub-menu Bar. 2. Enter the Login ID (User ID) or HKID number of the account which password need to be reset. 3. The following information will be displayed for verification. Click the <Confirm> button to proceed and <Cancel> button to cancel your action. Once a new password is regenerated, the existing password will be invalidated immediately. HOSPITAL AUTHORITY - INFORMATION TECHNOLOGY DEPARTMENT PAGE 53 OF 78 PPI USER MANUAL VERSION 1.15 (LAST SAVED 10 JUN, 2011) 4. The following page will be displayed when the user‟s password is regenerated. An e-mail will be sent to the user according to his/her registered e-mail address informing him/her of the new password. The system will not display the new password to anyone. User must be advised to safe-keep his password to avoid unauthorised access to the system using his/her account. 6. Patient Enrollment and Patient Profile Maintenance 6.1 Patient Enrollment 6.1.1 View Patient Details 1. Click <Patient Enrollment> on the Menu Bar. The <View Detail> function will be selected by default. Click <View Detail> on the Submenu Bar if you need to return to this function while working under other Patient Enrollment functions. 2. Enter the patient‟s HKID Number and Check Digit. Click <Next> to continue. HOSPITAL AUTHORITY - INFORMATION TECHNOLOGY DEPARTMENT PAGE 54 OF 78 PPI USER MANUAL VERSION 1.15 (LAST SAVED 10 JUN, 2011) 3. The patient‟s personal data will be displayed on the screen if the patient has already enrolled in the program. Click <Back> to return to the previous screen. 6.1.2 Enroll New Patient 1. Click <Patient Enrollment> on the Menu Bar. Click <Enroll New Patient> on the Sub-menu Bar. HOSPITAL AUTHORITY - INFORMATION TECHNOLOGY DEPARTMENT PAGE 55 OF 78 PPI USER MANUAL VERSION 1.15 (LAST SAVED 10 JUN, 2011) 2. Enter the patient‟s HKID, Sex, Name and Date of Birth and click the <Next> button. 3. If the system finds a complete match of an existing HA patient with the four pieces of data entered, the following Patient Enrolment page will be displayed. Complete the details on the patient. Fields with an asterisk (*) must be completed and cannot be left blank. 4. Important Notes on Patient’s Address You must compare the <HKPMI Address> displayed on the screen with the patient‟s reported address on the consent form. If the patient reports a different address from the one displayed, please input the reported address in the slot provided for <Address on Consent Form>. Please advise the patient that his/her registered address with the Hospital Authority (HKPMI address) will be used for all official correspondence from the HA to the patient regarding the PPI-ePR system. If the patient intends to use the address on the consent form as his/her correspondence address, he/she should provide address proof for this address and authorises the HA to update his/her registered address with the HA. HOSPITAL AUTHORITY - INFORMATION TECHNOLOGY DEPARTMENT PAGE 56 OF 78 PPI USER MANUAL VERSION 1.15 (LAST SAVED 10 JUN, 2011) 5. Click <Save> to confirm enrollment and <Back> to cancel. 6. The following screen will be displayed upon successful enrollment. The patient will receive an „Access Key‟ via a SMS message to his/her mobile phone. A letter of confirmation with detail information on the PPI-ePR system will be posted to the patient‟s registered address with the HA. 6.1.3 Print Patient’s Access Key Under normal circumstances, the Access Key will be sent to the patient‟s mobile phone immediately via a SMS message. It is therefore unnecessary to print or view the Patient‟s Access Key via the system. However, under very exceptional circumstances when the key is urgently required and the patient cannot receive the SMS message on the spot, you can print the patient‟s Access Key with the patient’s consent by following the steps below. As the Access Key is a major security control to safe-guard the patient‟s personal data, you must print the patient‟s Access Key only when it is absolutely necessary. 1. Click the icon on the right hand side of the screen. 2. The following page will be displayed. You are required to input your User ID and Password again to ensure that you did not click on the Print Access Key icon by accident and to avoid future repudiation on your intention to print. Click <Submit> to continue or <Reset> to clear the entered data. HOSPITAL AUTHORITY - INFORMATION TECHNOLOGY DEPARTMENT PAGE 57 OF 78 PPI USER MANUAL VERSION 1.15 (LAST SAVED 10 JUN, 2011) 3. The patient‟s Access Key will be displayed. Click <Print> to print the patient‟s Access Key. 6.1.4 Update Patient’s personal information 1. Click <Patient Enrolment>, then click <Update Patient Profile>. 2. Enter the patient‟s HKID No, Sex, Name & Date of Birth and click the <Next> button. 3. If the entered information is correct, the following page will be displayed and you can update the patient‟s information as required. HOSPITAL AUTHORITY - INFORMATION TECHNOLOGY DEPARTMENT PAGE 58 OF 78 PPI USER MANUAL VERSION 1.15 (LAST SAVED 10 JUN, 2011) With the minor consent case patients, the following page will be displayed and click <Yes> to extend the minor consent case. New Access Key will be sent to the patient‟s mobile phone immediately via a SMS message. Click <Save> to save changes or <Back> to return to the previous screen without saving. 4. The following screen will be displayed upon successful update of the changes. If required, you can follow the same steps as described in paragraph 6.1.3 to print the Patient‟s Access Key. HOSPITAL AUTHORITY - INFORMATION TECHNOLOGY DEPARTMENT PAGE 59 OF 78 PPI USER MANUAL HOSPITAL AUTHORITY - INFORMATION TECHNOLOGY DEPARTMENT VERSION 1.15 (LAST SAVED 10 JUN, 2011) PAGE 60 OF 78 PPI USER MANUAL VERSION 1.15 (LAST SAVED 10 JUN, 2011) 7.Patient Data Enquiry 7.1 Open a patient’s record This function allows you to enquire on the patient‟s electronic medical record kept by the Hospital Authority. It is assumed that you have a need to access the patient‟s record for patient care and that you have obtained the patient‟s consent before you access the patient‟s data in PPI-ePR. When you „opened‟ a patient‟s record in PPI-ePR, the system will log your action with your user id, the patient‟s HKID number and the access date and time for audit purposes. A SMS message will also be sent to the patient‟s mobile phone to notify him/her that his/her patient record is being accessed with the following details: Sender : 852930572292 For Medical Practitioner Content (English Version) : Dr Chan Tai Man is retrieving your electronic clinical record (3/3/2006 10:16). For enquiry, contact Hospital Authority at 23006654. Content (Chinese Version) : Dr Chan Tai Man 現正查閱你的電子病歷 (3/3/2006 10:16)。如 有查詢, 請致電醫管局: 23006654 。 For non Medical Practitioner Content (English Version) : Health care professional is retrieving your electronic clinical record (3/3/2006 10:16). For enquiry, contact Hospital Authority at 23006654. Content (Chinese Version) : 醫療人員現正查閱你的電子病歷 (3/3/2006 10:16)。如有查詢, 請致電醫管局: 23006654 。 1. There is a section, labelled as <Quick Access HA's ePR Patient Record>, in the main page for you to access patient's data. HOSPITAL AUTHORITY - INFORMATION TECHNOLOGY DEPARTMENT PAGE 61 OF 78 PPI USER MANUAL VERSION 1.15 (LAST SAVED 10 JUN, 2011) 2. Ask the patient for his / her HKID number and Access Key. When the patient registered for the PPI-ePR program, the Access Key is sent to the patient‟s mobile phone with Sender‟s name of PPI. A confirmation letter with the patient‟s Access Key would also have been sent to the patient after enrolment. Any subsequent changes to the Access Key will be sent to the patient‟s mobile phone number again via SMS message but a confirmation letter will not be sent. You can assist the patient to check the Access Key by checking the Message Inbox of the patient‟s mobile phone with the following details : Sender : 852930572292 Content (English Version) : Access Key: XXXXXXXX Content (Chinese Version) : 保安編碼: XXXXXXXX Input the XXXXXXXX shown in the SMS message whenever the Patient‟s Access Key is required by the system. HOSPITAL AUTHORITY - INFORMATION TECHNOLOGY DEPARTMENT PAGE 62 OF 78 PPI USER MANUAL VERSION 1.15 (LAST SAVED 10 JUN, 2011) 3. Enter the patient‟s HKID number, Access Key and click the <Submit> button to proceed. 4. If the entered patient‟s HKID Number and Access Key are correct, the summary page of the patient‟s electronic medical record will be displayed. HOSPITAL AUTHORITY - INFORMATION TECHNOLOGY DEPARTMENT PAGE 63 OF 78 PPI USER MANUAL VERSION 1.15 (LAST SAVED 10 JUN, 2011) 7.2 View Patient data 7.2.1 Patient’s basic demographic data The patient‟s basic demographic data are displayed at all times on the top part of the ePR screen. On entry to each patient‟s record, you must check the patient‟s demographic data to ensure that the correct patient‟s record has been retrieved so that the correct clinical information is used for the patient‟s care. If you found any discrepancy in the patient‟s demographic data with your record, please check that you have selected the correct patient by checking the HKID number and confirm with the patient on the correctness of these demographic data. If you found that the demographic data displayed by the system is incorrect, please encourage the patient to inform any of the Hospital Authority‟s hospitals or clinics. If you found that you have opened the wrong patient‟s record, please close this patient‟s records immediately. You should also log the incident for auditing purpose and for patient enquiry because a SMS message on the record retrieval would have been sent to the patient. 7.2.2 Navigation Tree On the leftmost part of the ePR screen, there is a tree view to depict the overall structure of the clinical data for the selected patient. Since different patients receive different medical treatments in the Hospital Authority, the „Navigation Tree‟ may also appear differently for different patients. You can „navigate‟ through the patient‟s electronic record by clicking on the hyperlink for each subject data appearing on the tree view. HOSPITAL AUTHORITY - INFORMATION TECHNOLOGY DEPARTMENT PAGE 64 OF 78 PPI USER MANUAL VERSION 1.15 (LAST SAVED 10 JUN, 2011) 7.2.3 Buttons and Function Controls The following are the various types of „buttons and controls‟ used in the ePR system to facilitate your on-line viewing of the patient‟s electronic records. 7.2.3.1 Sort 7.2.3.2 <Details> button HOSPITAL AUTHORITY - INFORMATION TECHNOLOGY DEPARTMENT PAGE 65 OF 78 PPI USER MANUAL 7.2.3.3 Folder VERSION 1.15 (LAST SAVED 10 JUN, 2011) and Hyperlink 7.2.3.4 <Legend> button 7.2.3.5 <Zoom> button HOSPITAL AUTHORITY - INFORMATION TECHNOLOGY DEPARTMENT PAGE 66 OF 78 PPI USER MANUAL VERSION 1.15 (LAST SAVED 10 JUN, 2011) 7.2.3.6 <Return> button 7.2.3.7 Multiple records display Some report types provide multiple records‟ view on one page. Highlight the case to view detailed report on the selected case. 7.2.3.8 Search criteria 7.2.3.9 Document Types Different types of report documents exist in the ePR, including textual reports, and PDF documents. Different icons are used to represent different document types and the presentation formats are also different. HOSPITAL AUTHORITY - INFORMATION TECHNOLOGY DEPARTMENT PAGE 67 OF 78 PPI USER MANUAL VERSION 1.15 (LAST SAVED 10 JUN, 2011) (a) Textual reports (b) PDF documents HOSPITAL AUTHORITY - INFORMATION TECHNOLOGY DEPARTMENT PAGE 68 OF 78 PPI USER MANUAL VERSION 1.15 (LAST SAVED 10 JUN, 2011) 7.3 Close Current Record / Open Next Record 1. You can close the current patient‟s records by clicking the <Close> icon on the Menu Bar. 2. The system main page will be displayed and you can input the next patient‟s HKID number and Access Key to view the next patient‟s details. HOSPITAL AUTHORITY - INFORMATION TECHNOLOGY DEPARTMENT PAGE 69 OF 78 PPI USER MANUAL VERSION 1.15 (LAST SAVED 10 JUN, 2011) 8.Reporting A number of reports are available to you for monitoring of exceptions or to facilitate regular auditing on the usage of the system. The types of reports available to you will depend on the access rights assigned to your account by your system administrator. Please contact your system administrator or the Hospital Authority PPI-ePR Program Office if you found that you need some of the reports which are not available to you. The patient‟s or user‟s HKID number, name, address and other personal details will be listed on some reports. These reports will be marked „Confidential‟ and you must secure these reports areas: 1. Do not print these reports unless it is absolutely required. 2. Do not leave the hard copy of these reports in areas which can be accessed by people who do not have the rights to view these reports. 3. Do lock away these reports securely if they are to be retained for filing / record purposes 4. Do dispose of unwanted print-outs properly in an appropriate manner (shredding, incineration, etc). 5. Never dispose these reports into rubbish bins with other waste paper. 8.1 View Report List 1. Click <Reporting> on the Menu Bar and the Report Types on the Submenu Bar. HOSPITAL AUTHORITY - INFORMATION TECHNOLOGY DEPARTMENT PAGE 70 OF 78 PPI USER MANUAL VERSION 1.15 (LAST SAVED 10 JUN, 2011) 2. A list of reports belonging to the selected group will be displayed. Click on the Report Name to view the report. 3. The selected report will be displayed. Click on the <Print Report> button to print the report. 8.2 Patient Enrollment Reports This group of reports relate to patient enrollment status to facilitate follow up actions required. 8.2.1 List of Unvetted Patients 8.2.1.1 Purpose of report This <List of Unvetted Patients> provides the list of patients who have enrolled in the PPI-ePR program but the Program Office has not completed vetting of their enrollment. The Patient‟s Access Key will remain as a temporary key until the patient‟s enrollment status become „Vetted‟. HOSPITAL AUTHORITY - INFORMATION TECHNOLOGY DEPARTMENT PAGE 71 OF 78 PPI USER MANUAL VERSION 1.15 (LAST SAVED 10 JUN, 2011) 8.2.1.2 Input Criteria Input the number of days after enrollment and all patients who have enrolled for the input number of days will be listed. Click <Show> to view report. 8.2.1.3 Report Layout 8.2.2 List of Expired Access Key 8.2.2.1 Purpose of report The <List of Expired Access Key> lists the patients whose Access Keys have expired. 8.2.2.2 Input Criteria Input the report from date and all patients whose keys have expired in the period between the input date and today will be listed. Click <Show> to view report. HOSPITAL AUTHORITY - INFORMATION TECHNOLOGY DEPARTMENT PAGE 72 OF 78 PPI USER MANUAL VERSION 1.15 (LAST SAVED 10 JUN, 2011) 8.2.2.3 Report Layout 8.2.3 List of Patient PMI Address Changed 8.2.3.1 Purpose of report This report will list the patients whose addresses recorded in the Hong Kong Patient Master Index (PMI) has changed after enrollment. This may be because the patient‟s address reported at the time of enrollment does not match that of the patient‟s PMI record or the patient‟s has moved since enrollment. In both situations, the patient‟s address must be checked to ensure the correct address will be used for on-going correspondence with the patient. 8.2.3.2 Input Criteria Input the report from date and all patients whose PMI addresses have been changed within the period between the input date and today will be listed. Click <Show> to view report. 8.2.3.3 Report Layout HOSPITAL AUTHORITY - INFORMATION TECHNOLOGY DEPARTMENT PAGE 73 OF 78 PPI USER MANUAL VERSION 1.15 (LAST SAVED 10 JUN, 2011) 8.2.4 List of Pending PMI Address Change 8.2.4.1 Purpose of report This report will list the patients whose addresses reported at the time of enrollment do not match that recorded in the PMI but the PMI addresses have not been updated. 8.2.4.2 Input Criteria Input the enrollment date and all patients who enrolled on the day but with unmatched reported and PMI addresses will be listed. Click <Show> to view report. 8.2.4.3 Report Layout 8.2.5 Patient Enrollment List 8.2.5.1 Purpose of report This report will list all patients enrolled in the PPI-ePR program, grouped by the institutions which carried out the enrollment and the vetting statuses of the patients. 8.2.5.2 Input Criteria Input the institution which enrolled the patients and the report from date and all patients who were enrolled by the selected institutions and enrolled between the period from the input date to today will be listed. Click <Show> to view report. HOSPITAL AUTHORITY - INFORMATION TECHNOLOGY DEPARTMENT PAGE 74 OF 78 PPI USER MANUAL VERSION 1.15 (LAST SAVED 10 JUN, 2011) 8.2.5.3 Report Layout 8.3 Patient Enquiry Reports This group of reports provide an audit listing on which patients‟ records have been accessed and by whom to facilitate the administrator at each institution to ensure that all accesses to patients‟ records are legitimate. HOSPITAL AUTHORITY - INFORMATION TECHNOLOGY DEPARTMENT PAGE 75 OF 78 PPI USER MANUAL VERSION 1.15 (LAST SAVED 10 JUN, 2011) 8.3.1 Patient Record Enquiry Audit Log 8.3.1.1 Purpose of report This report will list all patients whose records have been enquired and by whom within the month, grouped by the enquired institution and patient. You should check the report and ensure that all accesses to the patients‟ records are authorised and with the patients‟ consent. 8.3.1.2 Input Criteria Input the institution and the report from date and all patients whose records have been accessed by personnel from the input institution in the input month will be listed. Click <Show> to view report. 8.3.1.3 Report Layout 8.3.2 Usage of Patient Record Access 8.3.2.1 Purpose of report This report will list which patients‟ records the users have accessed in the month, grouped by institution and user name. 8.3.2.2 Input Criteria Input the institution, user HKID or Login ID (null for all), patient HKID (null for all), From date and To date. Click <Show> to view report. HOSPITAL AUTHORITY - INFORMATION TECHNOLOGY DEPARTMENT PAGE 76 OF 78 PPI USER MANUAL VERSION 1.15 (LAST SAVED 10 JUN, 2011) 8.3.2.3 Report Layout 8.4 User Account Report 8.4.1 User Account List 8.4.1.1 Purpose of report This report provides a listing to system administrators to take stock of the user accounts created, the account owners, associated security token provided and the status of these accounts. 8.4.1.2 Input Criteria Input the institution where the user accounts were created. Click <Show> to view report. HOSPITAL AUTHORITY - INFORMATION TECHNOLOGY DEPARTMENT PAGE 77 OF 78 PPI USER MANUAL VERSION 1.15 (LAST SAVED 10 JUN, 2011) 8.4.1.3 Report Layout HOSPITAL AUTHORITY - INFORMATION TECHNOLOGY DEPARTMENT PAGE 78 OF 78