1
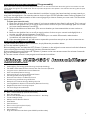
Ous?INSTRUCTION MANUAL FOR:
Proudly Designed
& Engineered
in Australia
AUSTRALIAN STANDARDS APPROVED
REMOTE CONTROL ENGINE IMMOBILISER
•
•
•
N517
This product complies with AS/NZS 4601:1999.
This product is to be installed in accordance with the methods & principles detailed in AS 3749.2
The RES is suitable for all petrol and diesel engine vehicles with 12V negative earth batteries.
Date of Manufacture:
(Software Version: RES08SB F:\Current_Instructions\Standard Car Alarms\RES4601V2_Y2.doc)
*Press & Hold for 3
seconds to open boot,
or press once to cancel
headlight timer circuit.
Press to Arm/Disarm
your Immobiliser, or press
& hold for 3 seconds to
activate the panic feature.
.
* Only available on vehicles already fitted with
an electric (push button) boot release & if the
optional headlight timer circuit has been fitted.
TO ARM YOUR IMMOBILISER (& lock your vehicle if central locking is connected)
The immobiliser is activated by pressing the LEFT (Button 1) button on the remote control transmitter.
The blinkers will flash once and (if fitted) the siren will beep once. If central locking is connected, your doors
will lock. The dash LED-light will stay on for 20 seconds then flash, THE IMMOBILISER IS NOW ON.
…
Press Button 1
Blinkers will flash Once
LED COMES ON……….and after 20 seconds starts to flash.
TO DISARM YOUR IMMOBILISER (& unlock your vehicle if central locking is connected)
To deactivate the immobiliser, press the LEFT (Button 1) button. The blinkers will flash twice and (if fitted)
the siren will beep twice. The LED will stop flashing. If central locking is connected, your doors will unlock.
THE IMMOBILISER IS NOW OFF.
…
Press Button 1
Blinkers will flash Twice
LED Switches OFF
AUTO IMMOBILISE (PASSIVE ARMING) FEATURE
The immobiliser will always automatically activate 38 seconds after the ignition is turned off no matter what.
The dash mounted LED will come on constantly to confirm the system has entered auto immobilise mode. The
vehicle can not be started now unless the remote is pressed first. When disarming, if you do not switch the
ignition on within 38 seconds, the immobiliser will also enter auto immobilise mode again. Customers with
central locking: Make sure you watch the indicators flash once when you arm the system. You may wish to
discuss with your installer fitting an optional siren (not expensive), so you can hear when you have locked your
car. Otherwise, if you take longer than 38 seconds to exit your car & press the remote thinking you are locking
it, in fact you will actually be just turning the immobiliser off temporarily & leaving your car unlocked. You must
in this instance press your remote a second time to lock your vehicle.
1
AUTOMATIC RE-ARM & RELOCK FEATURE (Programmable)
This feature prevents accidental disarming by the owner ie. the owner turns the immobiliser off but is then distracted
and forgets that they have deactivated the system. If a door is not opened within 60 seconds from when the system
is turned off by the remote, the system will fully re-arm & re-lock the vehicle.
Note: The immobiliser will enter auto immobilise mode after 38 seconds (the LED will come on constantly to indicate
the vehicle is immobilised). At the 60 second mark, the system will fully arm & the doors will lock – the blinkers will
flash once & the siren (if fitted) will beep once & the LED will start flashing.
EMERGENCY PANIC / CAR FINDER FUNCTION
The panic / car finder feature is activated by pressing & holding the LEFT (Button 1) button on the remote control
transmitter for 3 seconds. This causes the indicators to flash (ie same as hazard lights). If an optional siren is fitted, it
will also sound. To cancel “panic”, press button 1 on the transmitter for 1 second. NOTE: Panic does not work when
the ignition is on by requirement of Australian Law (EPA-Environmental Protection Agency).
DOOR AJAR WARNING FEATURE (Programmable)
If the vehicles doors are not properly closed when you try to activate your immobiliser system, the blinkers will flash for
3 seconds to alert you that the vehicle is not secure.
BOOT RELEASE (Optional connection by installer at extra cost)
This immobiliser is fitted with remote boot release capability for vehicles with existing electric boot release. This
feature enables the user to unlock the boot by pressing the RIGHT (Button 2) button for 3 seconds. The boot will
unlock. The immobiliser will not disarm. The negative (i.e boot) and door trigger alarm inputs will be temporarily
disabled until both the boot & doors are closed again. NOTE: For safety reasons the remote boot release will not work
when the ignition is on. Note: You can also program the boot to release as soon as you press the green button.
TIMED HEADLIGHT DELAY FEATURE (Optional connection by installer at extra cost)
You can have your car headlights turn on automatically for 15 seconds when you arm the immobiliser by remote
control. This may allow you for instance to see your way to your front door, or out of a dark carpark. You can turn the
lights off before the 15 second period ends by pressing the green button on your remote.
PERIMETER NIGHT LIGHT FEATURE (Programmable)
When this feature is on, the indicators will stay on constantly for 20 seconds on disarm, or until the ignition is turned
on. This allows for illumination around the vehicle at night.
DOME LIGHT EXTENSION FEATURE (Programmable)
The dome (interior) light comes on automatically when the system is disarmed via remote, enabling the owner to verify
the vehicle is safe inside. The light stays on for 15 seconds, or until the ignition is turned on. The dome (interior) light
also comes on automatically when the ignition is turned off, enabling the owner to quickly gather belongings before
exiting the car. The light stays on for 15 seconds, or until the system is armed via remote, or until the ignition is turned
on again. NOTE: If you activate the Automatic Rearm & Relock Feature, this feature will be disabled.
2
DOOR LOCK ON IGNITION FEATURE (Programmable)
If you have central locking connected, when this feature is on the doors will lock when the ignition is turned to on, and
unlock when the ignition is turned to off. This is to prevent anyone but occupants in the vehicle from being able to open
the doors.
OVERRIDE PROCEDURE
This feature enables the owner to override their immobiliser in case they have lost their remote controls or
they have damaged them. You have the secure choice of over 63,000 possible codes. Refer to Register 2 of
the Programmable Feature section of this manual (page 8) on how to choose your own code. This should be
done upon installation.
To enter your override code:
1. Open your driver’s door & leave it open. If you have an optional siren fitted, it will sound. This is normal.
2. Now turn the ignition from on to off an equal number of times to your first code digit (this is a number
you have chosen between 3 and 255).
3. Wait for the blinkers to flash once. (This occurs whether you have entered the correct number or
not).
4. Now turn the ignition from on to off an equal number of times to your second code digit (this is a
number you have chosen between 3 and 255).
5. The immobiliser will now disarm. You must start your car within 38 seconds, otherwise the
immobiliser will automatically rearm.
6. If you turn the ignition off, you will have to repeat this procedure every time you wish to start the car.
LEARNING NEW TRANSMITTERS
To add a new transmitter to your immobiliser, simply follow the procedure below:
A. Turn the vehicle’s ignition on.
B. Immediately press and hold the LEFT (Button 1) button on the original remote control until the indicators
start to flash (approximately 4 seconds) and then release the button.
C. Immediately press and hold the LEFT (Button 1) button on the new remote control for at least 4 seconds.
D. Turn the vehicle’s ignition off.
E. The new remote control is now programmed into the immobiliser.
STANDARD SYSTEM FEATURES
• All Microprocessor Controlled
• Code Hopping Technology (Anti-Scanning, Anti-Code Grabbing)
• Two SSR™ Solid State Remote Controls with Two Function Operation
• Long Life Lithium Cell Remote Control Batteries
• Auto Immobilise (Passive Arming)
• Automatic Re-arm in case of Accidental Disarm
• Ultra-Bright Red Flashing LED Light
• Personal Panic Button via Remote Control
• Visual Arming and Disarming via Blinkers
• Safety Circuit Prevents Arming While Ignition On
• Learning Mode for Optional Transmitters (Remote Controls)
• Negative Pulse Central Locking Outputs
• Two Point Engine Immobilisation
SELECTABLE SYSTEM FEATURES (Can be turned on or off)
• Arm / Disarm Beeps (if optional siren fitted)
• Door Ajar Warning
• Electric Boot Release Output via Remote Control – No Delay
• Timed Headlight Delay
• Multiple Vehicle Remote Control
• Valet Mode
• Central Closure
• Door Lock on Ignition (Anti Hi-jack)
• Perimeter Night Light
• Alarm Memory
•
Programmable Override Code (over 63000 possible codes)
3
RHINO RES4601 PROGRAMMABLE FEATURES
Your Rhino Security system incorporates the latest in high security & convenience features. It is possible to customise
your security system so that it suits your requirements perfectly. Detailed below is the full list of programmable
features that can either be turned on or turned off.
We have set, at the factory, the most common configuration chosen and these settings are listed in the REGISTER
Settings listed below. Once the desired features have been selected, the selection is permanently retained in memory,
even if power is removed.
To turn on or turn off any feature use the following procedure: eg to activate door lock on ignition.
1. Find the REGISTER (1or 2) in which the feature is located. (eg door lock on ign is located in REGISTER 1).
2. Set the vehicle up as described to access REGISTER 1, (all doors closed, turning ignition on last).
3. After turning the ignition to on, immediately press the left (button 1) remote control button an equal number of
times to the selected feature’s code number (eg 3 times for door lock on ignition). Each press of the remote will be
confirmed by a flash of the blinkers & the dash LED. If a siren is connected, it will give a confirmation beep.
4. Turn the ignition to off.
5. The system will then confirm which features are activated via visual readout. If a feature is enabled the
LED & indicators will flash out its code corresponding to the number shown in the column “Press Remote This
Many Times”. The indicators in this example will flash once for arming beep on, then twice for disarm beep on, and
then three times for door lock on ignition now being on.
How to Change REGISTER 1:
Vehicle Set Up:
ALL DOORS CLOSED AND THE IGNITION TURNED ON LAST
Remote Key action : TURN ON / OFF FEATURES VIA THE LEFT BUTTON ON THE REMOTE
FEATURE
Arming Beep
Press
Remote
This Many
Times
1
FACTORY
SETTING
DESCRIPTION
ON
1 Beep on Arm (If optional siren fitted – contact your Rhino
Dealer for more information).
2 Beeps on Disarm (If siren fitted).
When this feature is on, the doors will lock when the ignition is
turned to on, and unlock when the ignition is turned to off.
When this feature is on, the door ajar warning feature is
removed (the siren – if fitted & indicators will not beep & flash
for 3 sec. if a door is not closed properly).
When this feature is on, the indicators will stay on constantly for
20 seconds on disarm, or until the ignition is turned on. This
allows for illumination around the vehicle at night.
When this feature is on, the boot release button (right) will only
require to be pressed once rather than held down for 3
seconds to open an electric boot.
When this feature is on, the –ARM wire changes to become
“Negative on Alarm” instead.
The dome (interior) light comes on automatically when the
system is disarmed via remote, enabling the owner to verify the
vehicle is safe inside. The light stays on for 15 seconds, or until
the ignition is turned on. The dome (interior) light also comes on
automatically when the ignition is turned off, enabling the owner
to quickly gather belongings before exiting the car. The light
stays on for 15 seconds, or until the system is armed via
remote, or until the ignition is turned on again.
For use when optional siren is fitted. After pressing the remote
10 times to enter this mode, turn the ignition off. Your Rhino
Immobiliser / Alarm offers a unique memory that stores the
ten last reasons why the alarm was triggered. This memory
cannot be erased.
Disarm Beep
Door Lock on Ignition
(AntiHijack)
No Door Ajar Warning
2
3
ON
OFF
4
OFF
Perimeter Night Light
5
OFF
Instant Boot Release
6
OFF
Negative on Alarm
7
OFF
Dome Light Extension
(Interior lights on when ignition off,
interior lights on when system
disarmed via remote). Note: This
feature can not be turned on if
Auto-Rearm & Relock is activated.
See register 2.
8
OFF
10
SELECT
to replay
memory.
PAT™ Past Alarm Trigger
Memory
4 Beep, 4 Flashes - Power Fail Alarm
5 Beep, 5 Flashes - Ignition Alarm
7 Beep, 7 Flashes - Door Alarms
8 Beep, 8 Flashes - Hood Alarm
If two previous alarms were recorded ie door alarm and ignition
alarm, the LED will flash and the siren will beep 7 times for door
alarm, then no noise for 1 second then beep 5 times for ignition
alarm. The last memory heard is the most recent alarm
sector triggered. Turn the ignition to on to exit this mode.
9
How to Change REGISTER 2:
Vehicle Set Up:
DRIVER’S DOOR OPEN, AND THE IGNITION TURNED ON LAST
Remote Key action : TURN ON / OFF FEATURES VIA THE LEFT BUTTON ON THE REMOTE
Press
Remote
This Many
Times
1
FACTORY
SETTING
DESCRIPTION
OFF
RIGHT Button Used To
Arm/Disarm This Vehicle
Third Button Used To
Arm/Disarm This Vehicle
Automatic Rearm & Relock
2
OFF
3
OFF
4
OFF
Timed Negative on Arm
(Headlight Timer – 15 sec)
5
OFF
Selectable Blinker Flash
6
OFF
Extended Lock Pulse (Central
Closure)
7
OFF
Extended UnLock Pulse
8
OFF
9
10
OFF
(3) (4)
When activated, this feature allows your remote keys to
control two separate vehicles – the right button controls one
vehicle, the left button controls this vehicle. Simply “teach” the
remotes from this system into the other vehicle as detailed in
section “learning new transmitters” and then see next feature
below.
If this is the “other” vehicle as described above, turn this
feature on to allow the right button to control this vehicle.
Contact your Rhino Dealer if this feature is required. Optional
3 Button remote available.
This feature prevents accidental system disarming & will
relock the doors if a door is not opened within 60 seconds.
See page 2 for full function description. If you activate this
feature, dome light extension will be turned off automatically.
Installers must wire up the door circuit to function.
When on, this feature chages the –ARM wire from being a
constant negative on arm to a timed 15 second negative on
arm wire. This will allow you to connect this wire via a relay
(see diagram on page 5) to your headlight circuit, so that
when you arm your immobiliser, your headlights will turn on
for 15 seconds to illuminate your path, and then automatically
switch off. (You can press the right (button 2) button on your
rermote to turn the lights off before the 15 second period).
You can still connect window lift modules to this wire, as long
as it takes no longer than 15 seconds to wind up the windows
in the car. Note: If you have turned the “negative on alarm”
feature on in register 1, when you turn on this feature,
“negative on alarm” in register 1 will automatically be reset
back to the off position.
When on, this feature enables the blinkers to flash when the
system is triggered..
When on, the lock output becomes a 15 second negative
pulse instead of 0.5 seconds. This feature is for certain
vehicles with vacuum central locking or those with a central
closure wire (some BMW, Mercedes) ie doors lock, electric
windows wind up, sunroof closes automatically.
When on, the unlock output becomes a 15 second negative
pulse instead of 0.5 seconds. This feature is for certain
vehicles with vacuum central locking.
Not Used
This feature enables the owner to set their own individual code
to override their immobiliser in case they have lost their
remote controls or they are have stopped working. You have
the secure choice of over 63,000 possible codes. To set a
new code:
1. After pressing the remote 10 times to enter this
mode, turn the ignition off. The blinkers will flash once
to confirm you have entered the override code entry
mode.
2. Now turn the ignition from on to off anywhere from 3
to 255 times i.e. 11 times
3. Wait for the blinkers to flash once.
4. Now turn the ignition from on to off anywhere from 3
to 255 times i.e. 36 times
5. Wait for the blinkers to flash once.
6. You have changed the override code from the factory
setting of (3)(4) to (11)(36).
7. Make sure you remember the new override number!
Do not record it anywhere where a would-be thief
may find it in your car.
FEATURE
RIGHT Button Used For Another
Vehicle
Not Used
Override Code
10