1
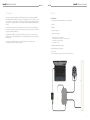
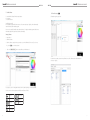
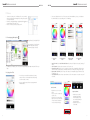
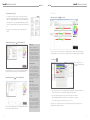
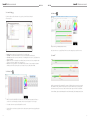
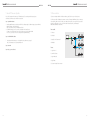
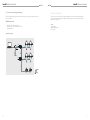
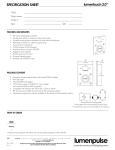
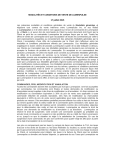
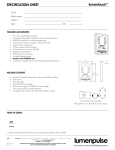
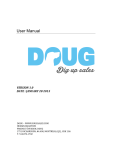
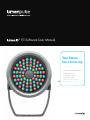
V3 Software User Manual
Your fixture
has a lot to say.
›› Hello my name is Lumenbeam™ Grande
›› My DMX address is 125
›› My temperature is 32° C
›› My personality is 16-bit
›› Remaining hours till L70: 102,567
›› My serial number is 06500005
lumenID™ software user manual
Table of Contents
I Introduction ...................................................................................................................................... 4
II Set-Up ............................................................................................................................................. 5
1.1 Install Software ......................................................................................................................... 6
1.2 Fixture Discovery ...................................................................................................................... 7
III Features........................................................................................................................................... 8
2.1 Fixture Mapping With Map View ................................................................................................ 8
2.2 Lighting Control Tools ................................................................................................................ 9
2.3 Quick Properties View ............................................................................................................... 10
2.4 Advanced Properties View ......................................................................................................... 10-11
IV Sensors............................................................................................................................................ 11
3.1 Patch View .............................................................................................................................. 11
3.2 Lumenlive Player ....................................................................................................................... 12
3.3 DMX Live View ......................................................................................................................... 12
3.4 Dashboard .............................................................................................................................. 13
3.5 Lumenlife™ ............................................................................................................................... 13
V LumenID™ Firmware Update ............................................................................................................... 14
VI Demonstration ................................................................................................................................. 15
4.1 Connection for Commissioning and Monitoring............................................................................... 16
VII Customer Support ............................................................................................................................ 17
LUMENPULSE, LUMENID and other trademarks indicated in this document are either trademarks of Lumenpulse Lighting Inc. or their respective owners.
All rights reserved. No parts of this work may be reproduced in any form or by any means - graphic, electronic, or mechanical, including photocopying,
recording, taping, or information storage and retrieval systems - without the written permission of the publisher. While every precaution has been taken in the
preparation of this document, the publisher and the author assume no responsibility for errors or omissions, or for damages resulting from the use of information
contained in this document or from the use of programs and source code that may accompany it. In no event shall the publisher and the author be liable for any
loss of profit or any other commercial damage caused or alleged to have been caused directly or indirectly by this document.
Copyright © 2015 Lumenpulse Lighting Inc., all rights reserved.
3
lumenID™ software user manual
lumenID™ software user manual
I Introduction
II Set-Up
Thank you for using Lumenpulse™ and the LumenID™ (LID). Lumenpulse offers a wide variety of architectural LED fixtures
with DMX/RDM controllable capabilities for White and Color Changing fixtures. The LID is a tool that offers you, the end
user, the capability to control, test and demonstrate these fixtures directly from your computer. Additionally, the LumenID is
designed as a tool to assign DMX addresses to an entire installation of Lumenpulse DMX/RDM enabled fixtures quickly
and easily.
List of Materials
1. Lumenpulse LumenID Open DMX USB Box (LID device with latest firmware) 2. USB cable
Paired with Lumenpulse’s lumenID™ V3 (LID V3) software, RDM provides a simple, efficient way to manage lighting systems and devices. With RDM, important system information is always just a click away, ensuring that you can easily and
freely discover, address and program devices.
3. DMX cable
DMX/RDM provides a number of benefits for stakeholders throughout the construction, commissioning and property
management stages, including: simplified fixture discovery; remote DMX addressing; improved error reporting; and easy
firmware updates.
Minimum system requirements:
•
•
•
•
In this manual you will find detailed instructions to help you understand and use your LID as a part of every
Lumenpulse sample demonstration or architectural installation.
4. PC/ laptop (not supplied)
Windows XP, Windows 7 or Windows 8
1024 x 768 screen resolution (1280 x 1024 recommended)
512MB memory (1GB recommended)
Clock frequency : 1Ghz
5. DMX/RDM enabled CBX (order separately)
6. RDM-enabled luminaire (order separately)
7. LID V3 software
(Refer to the Lumenpulse website for the LID V3 software, downloaded for free).
7.
2.
6.
4.
6.
1.
5.
3
4
5
lumenID™ software user manual
lumenID™ software user manual
1.1 Install Software
1.2 Fixture Discovery
1.Download LID V3 software from the Lumenpulse website
2.Run setup.exe
3.Follow the instructions
Software Running a Discovery Action
Install LID V3 program file:
Run the installation program and follow the instructions. The recommended set-up is “Typical”, which will automatically
launch the LID device driver installation program.
Note: in order to successfully install the device drivers in Windows 7 or higher, the installation program should be run as
Administrator (right-click the set-up file and select Run as Administrator).
Starting Software
• Plug in LID to PC
• Start LID V3 software
• When the software is opened, the Discovery window is open on the left-hand side of the screen. If you do not see
this, click on
to open the Discovery Panel.
• Click on the
button to discover fixtures over the RDM network.
The Launch Discovery button, located on the top left-hand corner of the software window will be disabled when
discovery is in progress.
For any questions, refer to “Getting Started” instructions from the software by clicking on the Getting Started tab.
Use the icons in the toolbar to jump between the different control features of LID V3.
Discovery
DMX Live View
Map View
Dashboard
Patch View
Refresh
Properties
Lumenlive Player
6
7
lumenID™ software user manual
lumenID™ software user manual
III Features
• Create zones by clicking on the “+ Add” button. These zones can then be
named, resized, and have their background colors changed to user-specific
colors using the Map View.
• Next the user can highlight and drag, or highlight and click the
button to
associate the fixtures/devices with a zone.
• Next close the Discovery window by clicking on the “X”.
• Users can use “Target Selection” to choose if they want to control either individual zones, devices, or to broadcast to
the entire DMX Universe or a selected range in the 1-512 DMX range.
2.1 Fixture Mapping With Map View
• Image formats: JPG, PNG, BMP, TIFF, GIF
• Recommended size: 1024 x 768 pixels
(minimum image width: 400 pixels,
minimum image height: 300 pixels)
1. Simple Color
Picker
• To add Plan View of installation, click on the click on the Background Image toolbar button and select the file from your
folder.
2.2 Lighting Control Tools
• From here the user can test all discovered devices by selecting
either the “All Zones” or the “Broadcast” buttons and selecting a
color from the Quick Color Picker.
2. Advanced Color
Picker
3. Dynamic White
Color Picker
4. Custom Palette
Picker
• Simple Color Picker (1) and Quick White Shade Selection (1) can be used for high-level color picking / sampling of
outputs.
• Quick Color Bank (1-4) can be used as a comparison tool for up to 4 colors.
• Advanced Color Picker (2) allows you to move around the color picker and see the actual RGB or HSI values being
output to the fixtures. Using the sliders you can anticipate what the color will change to by sliding to the left or right.
• Dynamic White Color Picker (3) allows for easy selection between color temperatures ranging for 2200K to 6500K,
for DWH fixtures only.
• Custom Palette Picker (4) allows the user to save and rename colors for either comparison or to use later on as part of
the show file.
• Note: upon initial discovery, all devices are pre-programmed to
DMX start address 1.
Quick Color Bank:
• Right-click to save color to Custom
Palette.
• Lock colors you like to compare up to
4 specific colors.
• Unlock the color to continue playing.
• Output Color shows across the bottom
so that you can easily compare current colors with desired changes.
8
Output Visualization:
• Enables the user to quickly
understand what the output
will be depending on if they
are controlling RGB, DWH, or
static white products.
• Right-click to save color to
Custom Palette.
9
lumenID™ software user manual
lumenID™ software user manual
2.3 Quick Properties View
IV Sensors
• The “Quick Properties” tab allows the user to view the high-level information
about a device, change particular parameters of the device like Name, DMX
Address, Personality, DMX Address Direction, Dimming Curve and Startup Color.
Advanced Properties View
- Sensors Tab
• Other parameters are “view only” including Manufacturer Name, Device Model
Description, Serial Number, DMX Footprint, Fixture Resolution and Software Version
ID.
• This properties viewer is available at any time on the right-hand side of the
software.
2.4 Advanced Properties View
- Fixture Information Tab
Addressing:
DMX512 is a communication protocol
which is standard in the lighting industry for
controlling RGB and dimmable fixtures. The
DMX signal is streamed from a controller,
like the Lumentouch 2.0 or Lumencue, to
every light fixture in an installation. If you
want to individually control a single light fixture out of a group, then that fixture must be
given a separate identity. In DMX512, this
separate identity is called a DMX address.
The “Sensors Tab” is where you can find all the Sensor Feedback information. Fixture PSU Voltage, Fixture Temperature,
and PSU Temperature can be monitored live. Here you are able to adjust your Low/High Warning levels for RDM Alerts.
3.1 Patch View
Note: upon initial discovery, all
devices are pre-programmed to DMX
start address 1.
Control Resolution:
The Advanced Properties view is used to see all of the available RDM Parameters
together. The above image is an example of the “Fixture Information Tab”.
Advanced Properties View
- Fixture Configuration Tab
Lumenpulse fixtures offer different resolutions of control, allowing a user to specify
a fixture to be controlled as a whole (per
fixture – 1FX), or to have finer resolution
within a fixture. For our linear fixture, you
can choose to control each linear foot
independently (per foot – 1FT) while our
Lumenbeam XLarge fixture allows individual
control of each of the 3 LED boards (per
board – 1BD).
DMX Footprint:
Here is the “Fixture Configuration Tab,” which includes DMX Address, DMX Footprint, Personality Setting, and Slot Information.
10
A DMX footprint refers to how many
DMX512 channels a fixture will require
in order to achieve full control of a fixture.
For example, a Lumendome RGB fixture is
a single pixel, using a separate DMX512
channel for each color – Red, Green and
Blue.
• R = 1
• G= 2
• B = 3
Therefore, we can state that the DMX footprint for a Lumendome RGB fixture is 3.
Likewise, a 48” long Lumenfacade RGBW,
with per foot resolution, will use 4 DMX512
channels (Red, Green, Blue, and White)
for each 12” portion of the fixture. We can
therefore determine that the DMX footprint of
the fixture is 16, or 4 channels per foot.
• By using the Patch View, the user can see what DMX addresses a particular fixture is taking up in the DMX Universe.
This can be viewed also by zone to see where fixtures are addressed in the DMX Universe.
• The user can drag and drop a fixture wherever they would like in the Patch screen and LID will
automatically update the DMX Address of the fixture once you drop the fixture on a new address.
• The colors of the fixure groups are set by their association to a control zone.
Note: Make sure to set your fixture properties prior to patching. Adjustment of the fixture personality may shorten or
expand DMX channel capacity of each fixture.
11
lumenID™ software user manual
3.2 Lumenlive Player
lumenID™ software user manual
3.4 Dashboard
The LumenLive Player is used for demonstration shows, quick tests, channel checks and other quickeffect viewing needs.
Simple monitoring of individual products and zones.
It consists of the following shows:
• Dimming: Ability to adjust the time of a Dim Up and Down of a white Light Output.
• Color Wash: Can be customized with different colors using a color picker, durations and fade speeds.
• Color Chase: Simple node chase with customized node color and background color. Node size, speed, fades and rest
times are all adjustable.
• Step Test: Allows a user to step through their system fixture by fixture, like a channel check. Users can adjust the number
of channels to step at a time, duration of step, intensity and loop.
• Auto Test: This is a simple test pattern to see the individual channels of a fixture. The user can adjust the step duration
and fade speed as the effect steps through the 5 present outputs for Red, Green, Blue, White and Black.
Note: Select either a zone or a group of fixtures from the list to view the average value you would like to monitor.
3.5 Lumenlife™
3.3 DMX Live View
Lumenlife is a patented method for estimating the life expectancy of a fixture by taking into account the environmental
factors that influence lifetime, rather than merely the past hours of operation. With Lumenlife, we can better estimate
when a luminaire reaches L70 and even issue alerts as the luminaire starts to approach the end of its useful lifetime.
For more information, please consult the Lumenpulse Terms and Conditions at http://www.lumenpulse.com/en/terms.
• DMX Live View acts like a DMX Sniffer on the data line. You can look at the values being output by the software or
controller on the network and visually see what values and color levels are being output on the control signal.
• This enables a technician to try and view faulty data from a controller.
• Using the Log function a technician can go back and see the values output at a given time that was logged during their
testing session.
12
13
lumenID™ software user manual
lumenID™ software user manual
V LumenID Firmware Update
VI Demonstration
Note: LID V3 operates with the latest version of LID hardware only. If you are having trouble discovering please
double-check your firmware version and follow the steps below.
If you have not already installed the LID software and drivers, please follow the steps in the Set-Up section.
Step 1: Update LID Hardware
• LumenID updated firmware is provided as part of the LID V3 software package. For additional support, please install Enttec’s
DMX PRO Manager – download link below:
http://www.enttec.com/?main_menu=Products&pn=79003
• Run DMX Pro Manager, connect to your device, and update it to the latest firmware
The status screen will read the latest revision and you will have green checks for DMX and RDM
All set – note: you can also use this tool for sending and receiving DMX aka testing
The LID is a powerful tool for table-top demonstrations or mockups of Lumenpulse DMX fixtures. It allows instant access
to basic dimming, RGB colors and color fades, or the ability to dial in specific colors using the full Color spectrum. To
prepare for a demonstration, you only need the LID controller and cable assemblies, and a Lumenpulse
DMX/RDM-enabled fixture to demonstrate.
Parts needed:
1. LID device
Step 2: Install LATEST LID Software
2. USB cable
c
• Download and install the latest version – download link below, installation steps on page 7
http://www.lumenpulse.com/en/product/46/lumenid
3. Laptop/PC with software install
Step 3: Restart PC
Step 4: Enjoy your new software!
100-277V
4. DMX cable
RDM-enabled
controller
100-277V
Process:
1. Plug in LID to PC
2. Start LID V3 software
3. Plug in DMX cable
Standard DMX
fixture
Standard DMX
fixture
4. Plug in fixtures
5. Use LumenLive Player for demonstration
14
15
lumenID™ software user manual
lumenID™ software user manual
4.1 Connection for Commissioning and Monitoring
VII Customer Support
Before you begin addressing your fixtures, you must make sure that you are connected to your fixtures correctly. Refer to
page 5 for instructions.
If, at any time, you encounter problems or have questions regarding your use of LID or any Lumenpulse products, please
do not hesitate to contact Lumenpulse customer support. We are dedicated to customer service and seeing every Lumenpulse project turn out a success.
DMX/RDM Protocol Limits
Contact
Customer Support
[email protected]
877.937.3003
• Data length: 1000’ between boosted devices
• Number of devices connected to a CBX: 32 per output
• Cascading CBX limit: 4
Typical Control Layout
100-277V
RDM-enabled
Controller
100-277V
Standard DMX
fixture
16
Standard DMX
fixture
DMX/RDM
DMX
USB
100-277V
17
Corporate Headquarters
US Headquarters
1751 Richardson
Suite 1505
Montreal, QC
Canada H3K 1G6
268 Summer Street
2nd Floor
Boston, MA
USA 02210
1.877.937.3003
T 514.937.3003
F 514.937.6289
1.877.937.3003
T 617.307.5700
F 617.350.9912
EMEA Headquarters
SE Asia Headquarters
The Leathermarket
11/13 Weston Street
Unit no 13.3.2
London
UK SE1 3ER
25 Tagore Lane
#03-10
Singapore Godown
Singapore 787602
T +44 (0) 2031 765370
F +44 (0) 2031 765377
T +65 6305 7680
Lumenpulse AlphaLED
France Headquarters
4th Avenue, The Village
Trafford Park, Manchester
UK M17 1DB
19 Vivienne Street
Paris 75002
France
T +44 (0) 161 872 6868
F +44 (0) 161 872 6869
T +33 (0) 9 82 52 97 11
© Lumenpulse™
Printed in Canada
[email protected]
www.lumenpulse.com
2015 / 10
# 118979