1
Volume
7
Expedient User Manual – NZ Customs Module
(Imports/Exports)
Gavin Millman & Associates Pty Ltd
281 Buckley Street
Essendon VIC 3040
P: 03 9331 3944 • W: www.expedientsoftware.com.au
Table of Contents
Customs and Forwarding Registration ...........................................................................................................................2
Job Registration Screen...................................................................................................................................................... 3
Command Keys ............................................................................................................................................................... 3
Creating a Job ................................................................................................................................................................. 4
Container Details - Load File...................................................................................................................................... 15
Link Consol.................................................................................................................................................................... 16
Link Consol/Link Orders ................................................................................................................................................ 16
Configuring Pop-up Notes ............................................................................................................................................ 16
Auto-Delivery Date Update .......................................................................................................................................... 17
Adding Job Notes .......................................................................................................................................................... 17
Documents Available .................................................................................................................................................... 18
Multiple Job Note Creation .......................................................................................................................................... 19
Printing Work Sheets .................................................................................................................................................... 23
Printing Billing Sheets ................................................................................................................................................... 23
Delivery Dockets ........................................................................................................................................................... 23
Printing Delivery Dockets for a Consol ...................................................................................................................... 24
Printing Delivery Dockets for a Job ........................................................................................................................... 24
Update Required Date ............................................................................................................................................... 28
Load Required Dates File........................................................................................................................................ 30
Update Delivery Date ................................................................................................................................................... 31
Load Delivery Dates File ............................................................................................................................................ 32
Attaching Documents ................................................................................................................................................... 33
Proof of Delivery Upload .............................................................................................................................................. 33
Print Labels ................................................................................................................................................................... 34
Copy Job ....................................................................................................................................................................... 34
Container Search .......................................................................................................................................................... 34
Document Screen ......................................................................................................................................................... 35
Create Documents to Transport Event ......................................................................................................................... 36
Customer Notes ............................................................................................................................................................ 37
Notifications ................................................................................................................................................................. 37
FCL Time Slot ............................................................................................................................................................. 38
Container Weight Declaration ................................................................................................................................... 40
Editing Notifications ..................................................................................................................................................... 41
Changing Wording ........................................................................................................................................................ 42
Job Financials ................................................................................................................................................................ 43
Deleting a Job ............................................................................................................................................................... 44
Add/View Client Reference numbers ........................................................................................................................... 44
Find Jobs by Client Reference Number......................................................................................................................... 45
Events ........................................................................................................................................................................... 45
Multiple Job Event Creation ......................................................................................................................................... 46
Missing Documents Notifications ................................................................................................................................. 48
Deleting a Job ............................................................................................................................................................... 49
Container Management System (CMS) – Delivery and Returns....................................................................................... 50
Forwarding ...................................................................................................................................................................... 51
Creating a Consol .......................................................................................................................................................... 51
Arrival Notice/Delivery Order ....................................................................................................................................... 54
eBACCA ..................................................................................................................................................................... 58
Forwarding Reports ...................................................................................................................................................... 59
Master Forwarding Report ........................................................................................................................................ 59
No. hbls year by year ................................................................................................................................................. 59
Generic Consol CSV ................................................................................................................................................... 59
Generic Job CSV ......................................................................................................................................................... 59
Customs ........................................................................................................................................................................... 60
Job Registration, Supplier Invoice and Customs Entry Process .................................................................................... 60
Creating a Pre-Job Supplier’s Invoice ........................................................................................................................... 61
Load File Feature .......................................................................................................................................................... 61
Creating a Supplier Invoice ........................................................................................................................................... 63
Entering Customs Quantities ........................................................................................................................................ 71
Default Unspecified Customer Quantities ................................................................................................................. 71
Classify Parts ................................................................................................................................................................. 72
Bulk Classification using the Unclassified Items report ............................................................................................. 76
Load File Feature .......................................................................................................................................................... 77
Email File Feature ......................................................................................................................................................... 78
Inter Country Transfer .................................................................................................................................................. 79
Load Import Invoice File ............................................................................................................................................... 79
Load Supplier Invoices by Shipment ............................................................................................................................. 81
Copy Supplier Invoice ................................................................................................................................................... 83
Auto Invoice Admin ...................................................................................................................................................... 83
Creating TLF’s ............................................................................................................................................................... 84
Creating Parts ............................................................................................................................................................... 85
Load Parts from a File ................................................................................................................................................... 85
Manual Parts Add ......................................................................................................................................................... 86
Archiving Parts .......................................................................................................................................................... 89
Creating Customs Entry ................................................................................................................................................ 91
Customs Entry Header Tab ........................................................................................................................................ 91
Customs Entry Lines Tab ........................................................................................................................................... 95
Customs Entry Submission Process .............................................................................................................................. 96
Prepare Entry ............................................................................................................................................................ 96
Prepare and Submit Entry ......................................................................................................................................... 97
Possible Entry Statuses .............................................................................................................................................. 98
Withdraw/Cancel Entry ............................................................................................................................................. 99
View EDI History ...................................................................................................................................................... 100
Set Override ............................................................................................................................................................ 100
Header Codes .......................................................................................................................................................... 100
ECI Consignments .................................................................................................................................................... 101
Load EDI ............................................................................................................................................................... 102
Load File ............................................................................................................................................................... 102
ECI Entry .................................................................................................................................................................. 102
EBACCA Application................................................................................................................................................. 104
MPI Information ...................................................................................................................................................... 105
Events ...................................................................................................................................................................... 105
Comments ............................................................................................................................................................... 105
Print Entry ............................................................................................................................................................... 106
Print C4 Form .......................................................................................................................................................... 107
Print Delivery Order ................................................................................................................................................ 108
Auto Print Declaration ............................................................................................................................................. 108
Auto Email Declaration/Delivery Order................................................................................................................... 109
Autoforward Documents ......................................................................................................................................... 109
Print Comms Report ................................................................................................................................................ 109
Creating a Landed Costing .......................................................................................................................................... 110
Jobs Reports ............................................................................................................................................................... 113
Generic Jobs CSV ..................................................................................................................................................... 113
No. Jobs by Dept...................................................................................................................................................... 114
Invoice in Line Order ............................................................................................................................................... 114
Parts Reports .............................................................................................................................................................. 115
TLF Reports ................................................................................................................................................................. 115
Charges – (Accounting Module only) ............................................................................................................................. 116
Preparing Charges ...................................................................................................................................................... 116
Manually Enter Charges .......................................................................................................................................... 117
Auto Rating with Exact Match (Prepare Charges) ................................................................................................... 118
Auto Rating without exact match............................................................................................................................ 118
Charges Screen ........................................................................................................................................................... 121
Prepare Invoice ........................................................................................................................................................... 125
View Invoice ............................................................................................................................................................... 126
Posted Invoices ........................................................................................................................................................... 126
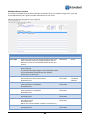
INTRODUCTION
E
Xpedient software contains the Customs Clearance / Tariff Classification and the Import
Forwarding Module. The Customs Function allows users to register shipments, lodge Customs
Entries, set up TLF, manage parts and prepare charges for customers.
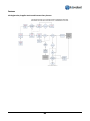
Customs and Forwarding Registration
Expedient utilises a job number, which is the unique number given to shipments within
Expedient. This is the first step in creating and lodging Customs Entries. From the Job Registration
screen, users are able to register a Job, Create Supplier Invoice, and Create & Lodge Customs
Entries. Users can also prepare charges and create a Debtors Invoice (only applicable for
Accounting Module Customers)
2
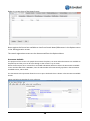
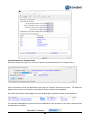
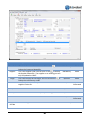
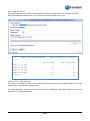
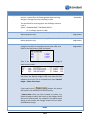
Job Registration Screen
Command Keys
Most toolbar buttons can be accessed by a Keyboard Short Cut. See below for Short Cut
Commands:
Icon
Shortcut Key
A
U
D
F
B
P
N
J
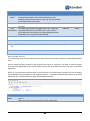
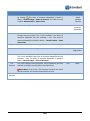
3
Icon
Shortcut Key
C
Ctrl-Tab
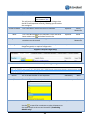
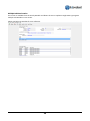
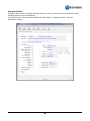
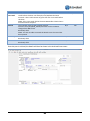
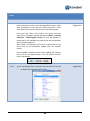
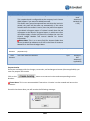
Creating a Job
When it is time for you to create a customs shipment, from the Main Menu select Customs
Clearance/Tariff Class, Job Registration function
By clicking the
button or typing A will place the cursor in the input screen in Add Mode.
4
See below:
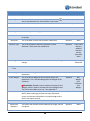
Field Name
Job Type
Description
Validation
This is the type of Job in which you are creating. You can Mandatory
perform a lookup on this field by clicking: If a Job Type
does not exist and you require a new one to be added,
then please contact your manager or GMA Support
5
Default
Blank
Field Name
Dept
Description
Validation
This is the Department that is assigned to the Job. This is a Mandatory
3 letter code e.g. AIS
[Branch]
[Import/Export]
[Mode of Transport]
Default
User’s
Branch or
Customer
Code
Responsible
Office
The branch is based off one of 2 rules:
1. The Branch in which is associated with the user
adding the job.
OR
2. The Responsible Office branch assigned to the
customer code within the Customer Masterfile.
The department code will initially default to the
user’s branch, but after the customer code is
entered if there is a valid Branch in the Responsible
Branch field then the screen will change the
department based on that value.
Please Note: Option 2 is configured at Installation. To
have this reconfigured please contact Expedient Software
Sales or Support.
House Bill
Master Bill
Extn. Code
The Department cannot be updated if there are invoices or
journals for the Job to post or that have already been
posted.
This is the House Bill of the shipment
This is the Master Bill of the shipment
This is the external reference for the job in your global
system. This may not be relevant at your site. You can
update this field if your site permits it
6
Optional
Blank
Optional
Optional
Blank
System
Generated
Field Name
Description
Validation
Cust Code
This is the Consignee. Once you enter data into this field, Mandatory
two pop-up windows will appear (if this has been activated
for this customer). They are the Customs Notes and the
Job Registration Notes against this Consignee. You can
perform a lookup on this field by clicking:
Default
Blank
Please Note: if The Customer’s Credit Limit has been
exceeded OR the Credit Limit is less than 0 in the Customer
Masterfile, an additional popup message will appear
informing the user that the customer has Exceeded their
credit
A customer must be set to Active in the Customer
Masterfile to create a job.
Business Units
Extn. Code 2
Agn. Cln.
If Business Units exist against the Cust Code, then the
Business Units field will be shown.
The Zoom attached to this field directs the user to the list
of Business Units that have been added to the Customer
Code.
This is a secondary reference for this job in your global
system. This may not be relevant at your site and the field
may be hidden. You can update this field if your site
permits it
This field will only appear if the Customer has been set up
as an Interstate Agent in the Customer Masterfile i.e. the
Customer is acting as an agent for their customers to
perform the Customs Clearance. Select the Customer’s
customer. You can perform a lookup on the field by
clicking
.
7
Conditional
Blank
Optional
System
Generated
Optional
Blank
Field Name
Description
Validation
Default
This is the Supplier of the goods being shipped. This is
linked to the consignee. You can perform a lookup on this
field by clicking:
Or you can perform a quick one letter search by typing in
the first letter of the Supplier,
Mandatory
Blank
Cust Ref
and the supplier use the
button to list all
suppliers regardless of client. Selecting a supplier from the
‘search all’ list will create new relationship between the
selected supplier and the client.
This is the Consignee’s Reference information
Optional
Blank
Job Class
This is the job class of the shipment. Select the drop down
Optional
Blank
Vessel
selections.
If a Job Class does not exist and
you require a new one to be added, then please contact
your manager or GMA Support
This field cannot be entered for Sea job types.
N/A
N/A
Supplier
e.g.: D<tab> will display the look up screen with all
supplier’s starting with the letter “D”
The Supplier Masterfile can be access to view or update
information using the
button. If the supplier you want is not listed because there
is no existing relationship in Expedient between the client
Airline
This is the Airline code. Type in the 2 character airline
code or use
to zoom on the Airline Codes Masterfile.
Optional
Blank
Vessel Name
This is the vessel name. Type in the vessel name or use
to zoom on the NZ Customs Craft Names.
Optional
NZ Customs
Craft Names
N/A
N/A
Lloyds
This field cannot be entered for Sea job types.
Voy ID
This is the voyage ID of the vessel and its current voyage.
Optional
Vessels
Master File
Flt No
Optional
NZ Customs
Craft Names
Tranship
This is the flight number. Type in the flight number or use
to zoom on the NZ Customs Craft Names. Selecting a
flight number from the NZ Customs Craft Names will
populate the Airline field with the first two characters of
the flight number
This is a description of the Transhipment vessel
Optional
Blank
Load Port
This is the Port of Loading of the vessel
Optional
Blank
8
Field Name
Description
Validation
Default
Place Rect
This is the place in which the vessel is received. This is
usually the same as the Load Port
Optional
Blank
First Port
This is the first port of call of the vessel.
Optional
Vessels
Masterfile
Disc Port
This is the Port in which the feeder vessel will be
discharged at.
This is the final destination of the vessel
Optional
Blank
Optional
Blank
Bill Cut Date
This is the Date of Valuation or Bill Cut Date.
Optional
Blank
First Arrival
This is the date the vessel arrives at the First Port
Optional
First Arrival
from Vessels
Masterfile
Dest Port
ETA Disch
This is the Date the vessel is estimated to arrive at the
Discharge Port. This is used by Customs to determine the
rate of duty (if applicable). This is followed by the ETA
Discharge Time field
Mandatory
Vessel
Masterfile
based on
Disch Port
ETA Dest
This is the Date the vessel is estimated to arrive at the
Destination Port. This is followed by the ETA Destination
Time field. This can be populated by FSU Airline messages.
Optional
Vessel
Masterfile
based on
Dest Port
ATA Dest
This is the Date the vessel actually arrives at the
Destination Port. This is followed by the ATA Destination
Time field. This can be populated by FSU Airline messages.
Optional
Vessel
Masterfile
based on
Dest Port
This is the description of the goods being shipped. This is
set to one line of goods within the Customs Module
This is the number of packages being shipped
Optional
Blank
Optional
Blank
This is the type of packages being shipped. You can
perform a lookup on this field by clicking:
If a Package
Type does not exist and you require a new one to be
added, then please contact your manager or GMA Support
This is the weight of the goods being shipped
Optional
Blank
Goods
No.Pkgs
Pkg. Type
Weight
Weight Type
Volume
Volume Type
Optional
Blank
This is the type of weight measurement.
Optional
KG
This is the Volume of the Goods
Optional
Blank
This is the type of Volume
Optional
M3
9
Field Name
Description
Validation
Default
Optional
Blank
OWENC
This is the Bill Type of the Shipment. Possible Selections
are:
Original
Way Bill
Express
Non Negotiable
Copy
Select the drop down for these selections:
Frt P/C
This describes whether the Freight is Prepaid or Collect
Optional
Blank
Shipping Co
This field will appear where the import is sea freight. This
is the Shipping Company associated with the job. If the job
is linked to a Consol with a Shipping Company the field
cannot be updated. Otherwise the field is blank and can
be updated
Optional
Conditional.
Populated
from the
Consol if
the Consol
has a
Shipping
Company
Customs Value
This is the Value that Customs will use to define the value
of duty paid (if applicable)
This is the Currency in which the house bill has been cut
under
This is the Forwarder who is managing this shipment.
Please Note: If the forwarder is your company and you
have the Expedient Forwarding Package then ensure that
this is set to OWN COMPANY in the Customer Master File.
Optional
Blank
Optional
Blank
Mandatory
Blank
Optional
Blank
Mandatory
Blank
HB Currency
Forwarder
Bond / Depot
Broker
This will ensure that when you Prepare the Charges that
the Bill To will populate correctly, allowing you to Invoice
the consignee
The label for this field will show Unpack, Bond Depot or
Terminal depending on the Job Class and the zooms will
also list the appropriate entity.
This is the Customs Broker who is managing this shipment.
This can be set to default to a specific code for each
customer, which will auto-populate when adding a job.
This is set up in the Customer Masterfile in the Importer
Tab within the Customs Broker Field:
Please Note: If the Broker is your company, then please
make sure that this Code is set to OWN COMPANY in the
10
or
Customer
Masterfile
Importer
Tab
Field Name
Description
Validation
Default
Optional
Vessel
Masterfile
Optional
Blank
Optional
Vessel
Masterfile
Customer Master File.
This will ensure that when you Prepare the Charges that
the Bill To will populate correctly, allowing you to Invoice
the consignee
Vessel Available This is the date in which the Vessel is Available
INCO
Storage Available
This is the INCOTERM for the housebill. Enter the three
letter code or use
and select from the list
This is the date in which the storage commences from
containers on the vessels
DG/Refrigeration This signifies whether the shipment contains any
dangerous goods, or requires refrigeration
Suppliers Tab (Sea Freight Only)
Optional
Blank
This is the Bill Number on the Shipment.
Mandatory
Blank
This is the Type of Container, values include:
Mandatory
Blank
Optional
Blank
Containers Tab (Sea Freight Only)
Bill No
F/L
Container No
This is the Container Number on the Shipment.
Use the to search for containers on other shipments on
the same consol as the current house bill. (Forwarding
Module only)
11
Field Name
Seal No
Cont Type
Description
This is the Seal Number of the Container Number
Pieces
This is the NZ Customs Container Type code. Use the
search the Masterfile for valid Container Type codes.
This is the number of pieces within the container
Dehire
This is the date in which the container is de-hired
Validation
Default
Optional
Blank
to Conditional
Blank
Mandatory
Blank
Optional
Blank
Mandatory
Blank
Pack Type
This is the type of Package(s)
Available
This is the date in which the container becomes available
for pickup
This is the date in which the container is delivered
Optional
Blank
Optional
Blank
This is the method in which the container is to be
delivered. Select from the available list
Optional
From Client
Delivery
Address
Details if
stored,
otherwise
blank
Storage
This is the date in which the container commences storage
charges
Optional
Vessel
Masterfile
Required Date /
Time
This is the date and time in which the container is required
Optional
Blank
Net Weight
This is the Net Weight of the Container after any
deductions
This is the Gross Weight of the Container before any
deductions. This is the Net Weight plus the Weight of the
Container.
Optional
Blank
Optional
Net
Weight
plus
Container
Tare
Weight
Optional
Blank
Optional
Blank
Delivered
Delivery Type
Gross Weight
Volume
Marks and
Numbers
Please Note: Expedient stores maximum Container Tare
Weights which is used to calculate the Gross Weight Value.
This can be overridden by a user. See Appendix A
This is the Volume of the Container.
NOTE: When creating a job from the Input Shipments
screen, the Volume information is carried through to this
field in the Import Sea Job.
Mark and Numbers Tab
The marks and numbers used to identify the cargo, not the
consignee.
12
Field Name
Description
Validation
Default
Various Dates Tab
Lodgment Date
Date of
Clearance
Del. Docket
Printed
Depot Date
Delivery Date
Date Owner EFT
Date Duty Paid
EDI Manifest
Received Date
Landed Cost
Sales Person
Field 1
Field 2
Field 3
Deliver To
This is the Date of Lodgement. This is a no-entry field used
for display purposes only. This date is populated when a
user lodges this job within the Nature 10/20 screen
N/A
This is the Date of Clearance. This is a no-entry field used
N/A
for display purposes only. This date is populated when
Customs send back the Clearance Date as a result of the
Nature 10/20 lodgement
This is the date in which the first delivery docket was
N/A
printed. This is a no-entry field used for display purposes
only. See “Printing Delivery Docket” section in this
document.
This is the Date available from the Depot. This is updated
Optional
in this screen by users
This is the Date in which delivery has taken place. This is
Optional
updated in this screen by users
This is the Date the EFT was processed for Duty payable to
Optional
Customs. This is a no-entry field and used for display
purposes only
This is the actual date the duty was paid to Customs. This is Optional
a no-entry field and used for display purposes only
This field will appear if the EDI Manifest module is used.
N/A
This is the date and time the job details where received in
a manifest from the Overseas Agent
This indicates whether the client requires a Landed
Optional
Costing. This is populated from the Customer Masterfile,
Land Cost indicator in the Importer tab
This is the person responsible for the sales account with
Optional
this client. This is automatically populated from the
Customer Masterfile, Debtor tab. Use
to search for a
difference Sales Person.
This is available to store information relevant to this client Optional
and can be used in User Defined Auto Reports
This is available to store information relevant to this client Optional
and can be used in User Defined Auto Reports
This is available to store information relevant to this client Optional
and can be used in User Defined Auto Reports
Delivery Details Tab (used for Delivery Docket Print information)
This is the Delivery Code of the Shipment. This information
is automatically populated in Add Mode. The data based
off the Clients’ Delivery Addresses found in the Customer
Master File under the Administration Menu. This screen
13
Optional
Customs
Entry
screen
Customs
Entry
screen
Printing a
delivery
docket
Blank
Blank
Blank
Blank
System
Generated
Customer
Masterfile
Customer
Masterfile
Blank
Blank
Blank
Customer
Masterfile
Field Name
Deliv Job Note
Carrier
Carrier Job Note
Dehire Depot
Carrier
Instructions
Description
can hold multiple addresses. Ensure that one address is set
as default. The AQIS classification for the delivery
postcode will be displayed.
This is an additional line of Note. Please note that the
Clients’ Delivery Address Screen also has 5 lines of Special
Instructions that Print on the Delivery Docket. This job
note will print next to the address, that is specific to this
shipment
This is the Carrier Code of the Shipment. This information
is automatically populated in Add Mode if a Delivery
Address exists for the Customer.
This information is based off the Clients’ Carrier found in
the Customer Master File under the Administration
Menu. This screen can hold different carriers for AIR/ FCL,
LCL, Parcel Post.
The AQIS classification for the postcode is displayed
alongside.
This is a Carrier Job Note, specific to this shipment
This is where the container will be returned too after it has
been unpacked.
This outlines General instructions for the Carrier that will
appear on the FCL Time Slot Request Report (Only CSV &
XLS Format).
14
Validation
Default
Optional
Blank
Optional
Customer
Masterfile
Optional
Blank
Optional
Blank
Optional
Blank
CONTAINER DETAILS - LOAD FILE
You are able to load a CSV file from your desktop directly into the Container Details tab, as long as the data
conforms to the required format documented below.
To use this feature: Register the Import Sea Job and click on the
button that appears at the
bottom of the Container Details tab. You can then browse to the required .CSV file and click on the Open
button. The load process will advise you if the load was successful. Click on Exit to see the containers loaded
into the screen. If there is an error in the file, e.g. there is missing information which is mandatory, you will
get a message explaining the problem.
NZ - The file format must be:
A comma separated values (.csv) file (easily created in Microsoft Excel)
The data must be in the following order:
Column
Description
Validation
A
Bill Number
Mandatory
Field
Format
General
B
Mandatory
General
C
Load Type
accepted codes
F – FCL
L – LCL
B – Bulk
E – Empty
P - Pallet
Container Number
Mandatory
General
D
E
F
G
H
Seal
Type
Size
Pieces
Pack Type
Optional
Mandatory
Mandatory
Optional
Optional
General
General
General
General
General
A file example:
BILL NUMBER
1,F,ABCD1234567,12345,15,20,23,BC
15
E.g.
Link Consol
This facility is available from the Link menu in the Job Registration screen. The consol number field can be
manually entered and saved into an existing job.
Link Consol/Link Orders
This facility links orders to consols and is used in Order Tracking.
Configuring Pop-up Notes
Expedient allows users to configure what type of notes to pop up at a customer level. The following
pop up notes can be configured via the Customer Masterfile (Configuration Tab):
Delivery Notes – each time a user clicks on the Delivery Tab in Add/Update mode the Customer’s
Delivery Notes will pop up
Job Registration Notes – each time a user adds/updates a Job, the Customer’s Job Registration
Notes will pop up
Customs Notes – each time a user adds/updates a Job and Broker Code is the Own Company, the
Customer’s Customs Notes will pop up
Customs Supplier Notes – each time a user adds/updates a Job, the Customers’ Suppliers
Customs Notes will pop up
Forwarding Supplier Notes – each time a user adds/updates a Job, the Customers’ Suppliers
Forwarding Notes will pop up
16
Accounting Module only:
Prepare Charges – each time a user prepares charges, the Customer’s Invoice Notes will pop up
Auto-Delivery Date Update
On the occasion whereby you are not performing the delivery for customers, but you want to complete
the job to force a delivery date to be populated. This would occur on occasions you have KPI set up with
your customers, or you have the Expedient Customer Web Portal. The above configuration screen allows
users to set the number of Days after clearance where the delivery date is to be populated.
Adding Job Notes
Once you have created a job, you can add various Notes to the Job. This is available once a job is selected
or created and resides in the Options, Job Notes/References. These are made up of:
Job Notes – Prints on the Job Sheet, and pops up when users create or update a Job and the Broker
Code is your own company and is set to yes for this Customer in the Customer Masterfile.
Accounting Notes – For Information Only
Delivery Notes – Prints on the Job Sheet, Billing Sheet and Delivery Dockets
Miscellaneous - For Information Only
Forwarding - Pops up when users create or update a Job and the Forwarder Code is your own
company and is set to yes for this Customer in the Customer Masterfile
17
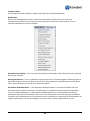
Below is a screen shot of the Notes Screen:
Notes against the Consol are available to view from Consol Notes/References in the Options menu
in the Job Registration screen.
The consol registration screen can also be accessed from the Options Menu.
Documents Available
The purpose of this screen is for people that answer the phone, can enter when documents are available to
be picked up and the print can be sent through to the runner’s tray to action.
When the Air Import Job is created for a House Bill and Master Bill that matches the Documents Available
screen and the ONC field = ORIGINAL, then the Job Number will automatically populate in the Documents
Available Screen; Job No field.
The ‘Document Pick Up’ Button allows the user to print the details that is shown in the Document Available
Screen.
Please see below screenshot for your reference.
18
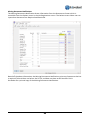
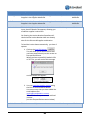
Multiple Job Note Creation
This screen is available from the Sundry Module and allows the user to update a Single Note Type against
multiple Job Numbers in one action.
Please see below screenshot for your reference.
19
Field Name
Note Type
Job Type
Job Mode
Posted?
Posted Date
Posted By
Doc No.
Created Date
Load by
Transport
Details
Load by
Container
Details
Manual Entry
Description
Job Note Details Group
Select Note Type; Accounting, Delivery, Job, Miscellaneous,
Forwarding, Notification, WIP, Check In/Out. When Posted,
the notes will then show on the specific tab in the Notes.
NOTE: The Note Type defaults to ‘Job Note’ in ADD Mode.
Select Air or Sea.
This section criteria is not applicable for Manual Entry.
Select Import or Export.
This selection criteria is not applicable for Manual Entry.
Indicates if the record has been Posted.
Yes and No values.
Read-Only field.
NOTE: You cannot UPDATE or DELETE a Posted Entry.
The Date the record was Posted.
Read-Only field.
The UserID that Posted the record.
Read-Only field.
Internal Reference Number.
Generated when the record is Saved.
Read-Only field.
Date the record was created.
Auto-populates in ADD Mode.
Read-Only field.
Load Method for Job Numbers
Option to retrieve/load the Job Numbers using the Transport
Details from the Import/Export Jobs.
When this method is selected it will show the details in the
Transport Details Group.
NOTE: ONLY looks at data in the last 180days that match the
criteria entered.
Option to retrieve/load the Job Numbers using the Container
Number that has been attached to the Import/Export Jobs.
When this method is selected it will show the details in the
Container Details Group.
NOTE: If Air Import or Air Export has been selected then this
Load Method is not applicable.
This allows the user to add the Job Numbers manually in the
Job Number Details Group.
NOTE: The Job Type and Job Mode are not applicable for this
Load Method.
20
Validation
Default
Mandatory
Blank
Mandatory
Blank
Mandatory
Blank
System
Generated
N/A
System
Generated
System
Generated
System
Generated
N/A
N/A
System
Generated
Unique
Document
Number
Current
Date
Mandatory
N/A
Mandatory
N/A
Mandatory
N/A
Field Name
Vessel / Airline
Voyage ID /
Flight No
ETA Dest / ETD
1
Dest. Port /
Orig. Port
Container No.
Notes
Description
Transport Details Group (ONLY looks at data in the last
180days) ALL fields in this Group MUST be populated for the
Job Numbers to be retrieved/loaded that match the criteria
entered. If there are Job Numbers where these fields are
blank then they will not be shown.
NOTE: Once the Job Numbers are retrieved, the system still
allows you to manually add Job Numbers of any Job Type &
Job Mode.
The Vessel or Airline field will be shown depending on the
Job Type selected.
Vessel – Vessel Code field from the Sea Import/Export Job
Screen.
Airline – Airline Code 1 / Airline fields from the Air
Import/Export Job Screen.
NOTE: The condition of the Vessel Code field depends if
Customs Module is turned on or off. Vessel Code field looks
at VESSEL CODE ZOOM. Vessel Description field looks at
CRAFT ZOOM.
The Voyage ID or Flight No field will be shown depending on
the Job Type selected.
Voyage ID – Voy ID / Voyage ID fields from the Sea
Import/Export Job Screen.
Flight No – Flight No 1 / Flt No fields from the Air
Import/Export Job Screen.
The ETA Dest or ETD 1 field will be shown depending on the
Job Type & Job Mode selected.
ETA Dest – ETA Dest field from the Air Import Job Screen.
ETD 1 – ETD 1 field from the Air Export Job Screen.
The Dest. Port or Orig. Port field will be shown depending on
the Job Mode selected.
Dest. Port – Dest Port / Destn Port from the Sea/Air Import
Job Screen.
Orig. Port – Origin Code Port from the Sea/Air Export Job
Screen.
Container Details Group
NOTE: Once the Job Numbers are retrieved, the system still
allows you to manually add Job Numbers of any Job Type &
Job Mode.
This is the Container Number that is attached to the Sea
Import/Export Job in the Container Details Tab.
Manual Entry
This Load Method allows the user to add the Job Numbers
Manually.
Notes Group
Enter in appropriate Notes.
Once the record is posted, the notes will then be updated on
the specific Note Tab (depending on Note Type selected) of
the Notes screen, against the Job Numbers that were
entered in the Job Number Details Group.
55 characters permitted per line.
Unlimited number of lines.
21
Validation
Default
Mandatory
Blank
Mandatory
Blank
Mandatory
Blank
Mandatory
Blank
Mandatory
Blank
Mandatory
Blank
Field Name
Job Number
Client Code
Client Name
Post Job Note
Duplicate Job
Note
OK Button
Description
Job Number Details Group
The Job Number can be auto-populated via the Transport
Details or Container Details Load Methods. The Job can also
be manually entered if the Manual Entry Load Method is
selected. The Notes entered will apply against these Job
Numbers listed.
NOTE: You can amend the Job Numbers added via the
Insert, Append and Delete buttons shown at the foot of the
screen, when the Job Number line is selected.
Once the record has been saved, you can double click on the
row and it will direct the user to the Job Number selected.
Auto-populated when the Job Number is entered.
Read-Only field.
Auto-populated when the Job Number is entered.
Read-Only field.
Action Buttons/Links
When this button is selected, it will then apply the Note to
the Job Numbers listed in the Job Number Details Group.
It will change the indicator in the ‘Posted?’ Field from No to
Yes. The record will still exist in this screen as a view only.
The user can view the Entry added via the Job Notes window
in the Import Job screen.
NOTE: You cannot UPDATE or DELETE a Posted Entry.
The system allows you to copy a Posted and Non-Posted
record.
If you Copy a Posted record then it will update the record
with a new Doc No and set the ‘Posted?’ indicator
(Positioned in the Options Menu)
When the OK button is selected, you have the option to Post
the entry each time the record is Saved. The following
message will be shown:
“Do you wish to post this job note now?”
If YES, then the record will be Posted and the ‘Posted?’ field
will show YES, along with the Posted Date, Posted Time and
Posted By fields being populated.
If NO, then the record will be Saved but NOT Posted and the
‘Posted?’ field will show NO.
22
Validation
Default
Mandatory
Blank
Mandatory
Retrieved
from
associated
Job
Retrieved
from
associated
Job
Mandatory
Printing Work Sheets
Once you have completed the Job Registration Creation process, and all of the data is saved that
you require, you can now print the various Work Sheets, these are:
Job Sheet – Available via Options, and a Button on the toolbar in the Job Registration
screen
o Sea
o Air
o Parcel Post
o Miscellaneous
Private Doc’s Cover Sheet - Available via Options
Private Bar Code Sheet via Options
Printing Billing Sheets
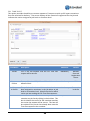
Printing Charge Sheets is available via the Options. The Charge Codes and Descriptions are initially
configured and maintained by Super Users. To Set up Charge Codes, go to Menu/Administration/Company
Details/Billing Sheet Maintenance. Charge Sheets and Charge Code are set up by:
Acc. Type (Disbursements/Finals)
Charge Code
Mode (Export/Import)
Type (Air, FCL, LCL)
Print Order
See below screen shot:
You can re-print any of the Work Sheets at any time as long as a job displayed in the Job
Registration Screen.
Delivery Dockets
Delivery Dockets can be printed from the Consol where the Consol is for FAK or from the Job Registration
screen.
23
PRINTING DELIVERY DO CKETS FOR A CONSOL
If the Consol is for Job Class FAK a Delivery Docket can be sent direct from the Consol to the Cartage
company. The option is available from the Notifications menu and from the
button.
toolbar
This screen will list all the containers associated with the Jobs on the FAK consol. Enter the Transport
Company the document is to be sent to or use
to find the Carrier code.
The Docket will print the Unpack Depot as the Delivery Address and the Terminal as the Pick Up Address.
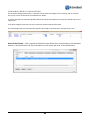
PRINTING DELIVERY DO CKETS FOR A JOB
To print a delivery docket, users must ensure the Delivery Details information is completed in the Delivery
Details Tab, see below:
The above Delivery Address is stored at the Job level.
Container Numbers must also be entered for Sea Freight Shipments in order to print a Delivery Docket. This
is available via the Docket Button. When users select this, the below screen will appear:
The below screen allows users to input various information for the Delivery Docket.
24
Enter any information that is relevant to your job:
Field Name
Job No
Date of
Actual
Delivery
Description
Enter the Job Number if using this from the Customs Clearance
Menu. If you are running this program from the Registration
Screen then the Job Number will be auto-populated.
This is the date of delivery of the Goods, this is usually the same
as the date you are printing the Delivery Docket.
Please Note: Date of Actual Delivery Date is then populated in
the Various Information Tab in the Delivery Date field:
25
Validation
Mandatory
Default
Blank / Job
Registration
Optional
Blank
Field Name
Date of
Actual
Delivery
Time of
Actual
Delivery
Dehire Date
Quarantine
Instruction
Container
Numbers
Print
Supplier
Details?
Description
This is the Date the goods are actually delivered
Validation
Optional
Default
Blank
This is the Time of the delivery
Optional
Blank
This is the date in which the Empty Container is to be returned
to the empty depot. This Date is then inserted into the
Container Details tab Dehire Date field against each container
This is the AQIS Instructions
Optional
Blank
Optional
Blank
These are the Container Numbers to be printed on the Delivery
Docket from the Job. This is a no entry field and for display
purposes only.
Selecting No will not print any Supplier Information on the
Delivery Docket
Mandatory
Yes
Mandatory
Yes
26
Data Drawn from:
Job Registration –
Delivery Details Tab –
Carrier Instructions or Container Details
Address Button
Data Drawn from: Job Registration –
Delivery Details Tab – Deliver To, or Container
Details Address Button
Data Drawn from:
Job Registration –
Delivery Details Tab –
Delivery Job Note
Data Drawn from:
Job Registration –
Delivery Details Tab –
Carrier Job Note
27
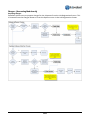
UPDATE REQUIRED DATE
Expedient allows users to batch update Jobs in which Required Date and Times can be added. The
below screens allows many jobs to be updated at the same time.
Required Dates and Times can be supplied for LCL, FCL and FCX jobs. Individual containers can be
selected using the zoom button in the Container column.
Field Name
Date
Description
Validation
Default
This is the date the mass update is actioned
Mandatory
Today
Doc No
This is a reference number for the mass update
N/A
System
Generated
Posted
This indicates whether the mass update has happened
N/A
System
Generated
Mandatory
Blank
N/A
From Job
Registration
Optional
Blank
N/A
Blank
N/A
Blank
Job Number This is the job number to be updated
Client
Container
This is the client for the selected job
Required
Date
Use the
to select from the containers registered for the
job. Alternatively leave the container field blank to update all
the containers for the job
This is the client’s required date for the job or selected
container to be delivered
Required
Time
This is the client’s required time for the job or selected
container to be delivered
28
Field Name
Posted
Description
This indicates whether the mass update has happened
Validation
Default
N/A
System
Generated
Once the user inputs the jobs and the Required Date and Time, Expedient will ask the following:
If the user answers yes then Expedient will immediately update the jobs and return the following:
If a job record is locked Expedient will not be able to update the job. This will display a “No” In the
Posted column.
Once successfully completed the process updates the Required Date and Time in the Job
Registration screen, Container Details tab
29
If the job is FCL or FCX the Required Date and Time will be updated in Container Management.
Load Required
Dates File
The toolbar button, Load Required Dates file, in the Update Required Dates
screen allows upload of a file containing Required Date and Time information.
This can be used to provide the required date for LCL or FCL or FCX jobs. The
file must be in the following format with the columns in the order indicated.
1.
2.
3.
4.
Job Number (mandatory)
Container Number (optional)
Required Date (mandatory)
Required Time (Optional)
Sample File
Expedient will check that the mandatory columns are present in the file. Expedient will also check
that the job number provided is a valid job number.
30
The details of the file will be uploaded into the Update Required Dates Screen and can be further
updated here before posting and updating the listed jobs.
Update Delivery Date
Expedient allows users to batch update Jobs in which delivery dates are required. The below
screens allows many jobs to be updated at the same time.
Delivery Dates can be supplied for Air, LCL and FCL jobs. Individual containers can be selected to
provide a Delivery Date using the zoom button in the Container column.
Once the user inputs the jobs and the Delivery Dates and the Signatory, then Expedient will ask the
following:
If the user answers yes then Expedient will immediately update the job and return the following:
If a job record is locked Expedient will not be able to update the job. If a job record is locked
Expedient will not be able to update the job. This will display a “No” In the Posted column. Once
successfully completed the process updates the Delivery Date in the Job Registration screen. See
below:
31
Any containers on the job will have the Delivery Date and Time inserted in the Container Details tab
and if the job is FCL the Delivery Date, Time and Signatory will be updated in Container
Management.
A CDD, Container Delivery Date, event will be created against each container and when the final
container is delivered a DDEL, Date Delivered, event will be created for the whole job indicated the
job has been fully delivered.
A ‘DOD’ event will be created for each job listed in the Update Delivery Screen. The event can be
found in the Job Registration screen from the Options menu.
LOAD DELIVERY DATES FILE
The toolbar button, Load Delivery Dates file, in the Update Delivery Date screen allows upload of a
file containing delivery date, time and signatory information. This can be used to provide the
delivery date for air cargo, LCL or FCL or FCX jobs. The file must be in the following format with the
columns in the order indicated.
5.
6.
7.
8.
9.
Job Number (mandatory)
Container Number (optional)
Delivery Date (mandatory)
Delivery Time (Optional)
Signatory (Optional)
Sample File
Expedient will check that the mandatory columns are present in the file. Expedient will also check
that the job number provided is a valid job number.
32
The details of the file will be uploaded into the Update Delivery Screen and can be further updated
here before posting and updating the listed jobs.
Attaching Documents
Expedient allows users to attach any document type including Emails via the Doc’s button on the
Job Registration Screen:
Once a user clicks on the Doc’s button a Windows Explorer window will display and default to the
PRIVATE Directory for that Job, see below screen shot:
Documents in the above directory are not viewable by Customers via the Web Portal. If there are
documents that users wish Customers to view via the Web Portal, place all documents in the above
public Sub-Directory
Proof of Delivery Upload
Expedient will load pdf Proof of Delivery (POD) from a designated folder that an external party has
sent the documents to. Expedient will process the documents according to the filename and send
the POD pdf to the Public Documents folder for the relevant job. Please contact Expedient
Software if you would like to use this facility.
The filename for the POD pdf file must conform to the following format
JobPOD_<order
number>-<containerkey>_<Container
Number>_<timestamp>
Number>_<Expedient
Job
The format for the timestamp must be YYYYMMDDHHMMSS
On receipt of the pdf file to the specified folder the system will check that a job exists matching the
job number and the container number in the filename. If the job number and container number
33
are found the file will be saved to the Public Documents folder for the Job and a POD event is
created in the Job for the container.
If there is problem matching either the job number or container number Expedient will send a
message to designated recipients to advise of the problem allocating the file. The file will be placed
in a designated ‘Rejected’ folder so that the file can be checked and attached to the correct
Expedient Job Documents folder manually.
Print Labels
This option is available from the More Options menu in the Job Registration screen.
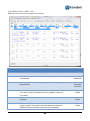
Copy Job
Once users have completed the Job Registration Creation process, the copy job function can be
utilised. This is selected via the Options Toolbar – More Options – Copy Job. This copies all of the
job information to a new Job Number, excluding any Notes, Container, Attachments, and Charges,
except where the Job Type is LCL/FAK then the F/L, Container Number, Type, Seal Number, Cont
Type and size will be copied to the new job.
This function will also notify the user if they would like to copy the Consol No over at the same
time.
Container Search
There will be occasions whereby users will need to find a job with a specific container. From the Job
Registration Screen, select Options – Find Jobs by Container. This will then pop up a screen, see
below:
If the container number returns more than 1 job then the Registration Screen will display (1 of XX)
at the bottom of the screen.
34
Document Screen
This screen allows users to select which Documents are required and of those documents which
have been received, see below screen. This information is reported in the below notifications
section and there is also an Automated Report in the Automatic Reports Module that can be set up
to remind users/customers that documents have not yet been received. See Report Codes:
MISSDOCS01, 02 and 03.
The Date and User fields are automatically populated with the User and today’s date when
Documents are ticked as Received or comments are added.
When the final required document is ticked as received the All Docs Rec’d tickbox and Date will be
populated. If another document is subsequently ticked as required the All Docs Rec’d tickbox and
Date will be cleared.
The Required and Received tick boxes for the Packing Declaration will be automatically ticked if the
ETA Destination date for the Job is within the validity range for the Annual Packing Declaration
Documents, LAP and FAP, for your client and their Supplier.
The Documents that are always required for Sea and Air jobs can be selected to always be ticked as
required in the Administration>Company Details Menu>Required Docs Configuration screen. The
ability for the Documents Screen to automatically pop up when Jobs are Added or Update, or for
Brokerage Jobs only can also be set in this screen.
35
Create Documents to Transport Event
Where the import Job Type is FCL or FCX this option create the Documents to Transport Event.
Enter the details of when the Documents were sent to Transport and who sent them. The fields will
default to the current user and the current date and time and they can be updated.
On OK the event will be created against the Job, displaying the container number as the reference.
The Container Management system will also be updated for each container on the job to show the Date
the Documents were sent
36
Customer Notes
Use this option to view and add or update notes held in the Customer Masterfile.
Notifications
Within the Job Registration Screen under the Notifications Toolbar there are a series of
notifications that inform various parties about shipment information. See below for a list of
standard notifications that are available:
Document Check Sheet – This is an internal document that displays which Documents are required
but not yet received.
Missing Documents – This is a notification that can be sent to customers/agents informing them of
which documents have not yet been received. This draws data from the Documents Screen above.
This is also available to be set up as an Automatic Report.
Documents Available Notice – The Documents Available Notice is to notify the Broker that you
have Documents ready for collection. The document is available from the import job registration
screen, through Notifications -> Documents Available Notification. This document will list any
documents that you have marked as ‘Received’ in the Documents Screen for that job. The default
recipients for the document are any personnel set up in the broker’s masterfile for all documents or
Import notifications. This can be changed, in the print menu, before the document is sent.
37
FCL TIME SLOT
This option provides the ability to create a request to Transport to pick up full import containers
from the terminal for delivery. The screen displays all the containers registered for the job and
indicates the carrier assigned at job level or container level.
Field Name
Description
Validation
Default
Job No
This is the Job Number that the FCL Time Slot
request will be sent for
Mandatory
Defaults
from Job
Registration
Screen
Request
Format
Format Selection: PDF, XLS or CSV which can be
edited in Excel.
Mandatory
PDF
Send Request This pull down list shows all the carriers that have
to Carrier
been assigned to containers in the job either at job
level or at container level. Select from the list which
carrier you are sending the FCL Time Slot request to
Send?
Select to send the FCL Time Slot Request for the
container on the line by clicking in the tick box. This
box is ticked if the carrier for the container matches
the carrier the request will be sent to. This box will
be unticked if the carrier has already been sent the
Time Slot request for the container
Mandatory
First carrier
in the list
Optional
Conditional
38
Field Name
Container
Number
Description
Validation
Default
This is the container registered to the Job
Mandatory
Defaults
from Job
Registration
Screen
Carrier
Customer Code for the Carrier assigned to the
container at either the job level in the Delivery
Details tab or at container level in the Container
Delivery Details screen
Optional
Defaults
from Job
Registration
Delivery
Details or
Container
Delivery
Details
Request Last
Sent
This indicates the date the FCL Time Slot Request
was last sent. If this column is blank the FCL Time
Slot Request has not been sent to a carrier.
Add text here to appear in the PDF version of the
FCL Time Slot Request
This button allows all the containers with a carrier
than matches the selected Request Carrier to be
ticked in one action. This button can also deselect
all in one action
Optional
System
Generated
Optional
Blank
N/A
N/A
Notes
Toggle All
Sample CSV Format (FCL Time Slot Request)
The CSV report includes container type, vessel, availability date information, the delivery address and Carrier
Instructions for each container.
Sample XLS Format (FCL Time Slot Request)
The Report in XLS format is the same details that are shown in the CSV format. It is just a different format.
39
CONTAINER WEIGHT DECLARATION
The Container Weight Declaration is a document that states the weight of the container and its contents.
This screen can be accessed via the ‘Notifications’ Menu.
It will pre-populate the Container Number details that have been added in the Container Details Tab on the
Import Job.
If the Gross Weight exists then the Print check box will be automatically ticked.
The Tare Weight does not automatically populate and needs to be entered in manually by the user.
General Notification – This is a general notification that allows users to input data in the Job Notes
Section in the Notification Tab. Any information in this screen will print on the Notification.
40
Editing Notifications
Expedient allows users to modify the data that prints out on each of the forms, along with what
wording appears on the notifications.
The below screen is accessed via the Administration Menu – Company Details – Generic
Notifications Regist.
41
Changing Wording
The PREAMBLE and POSTAMPLE information can be modified in Menu Administration – Company
Details Menu – Input Terms Printouts. See the below example of the Customs Vessel Change Pre-Ample
data. And the actual Vessel Notification Print out.
42
Job Financials
The Job Financial Screen, available from the Job Financials menu, allows users to view all financial
transactions of a job. The screen displays Billing Information, Creditors Invoices, Direct Cheques,
and Journal (Profit) information.
Once you have selected a Job you will be presented with the following screen. See below:
Total
Profit on
the Job
Money paid out
of your account
to a 3rd party for
that Account
This is the Journal
Amount (either
Profit or Loss) for
that account
Paid + Journal
43
This is the
amount that was
billed to the 3rd
Party
This should be
zero for
billable items
The Job Financial Screen allows users to view the following additional information:
Billing Information (Invoices)
Cheque Costs (Direct Cheques)
Creditor Costs (Creditor Invoices)
Journals
Notes
Deleting a Job
This is not a function that users can perform. The GMA recommendation is to alter the customer
code to DELJOB (ensure this code is set up in the Customer Masterfile)
Add/View Client Reference numbers
This option allows the addition and update of client reference numbers to a Job. This is available from
the Options menu in the Job Registration screen.
Any client reference numbers entered in this screen can be searched for in next option, Find Jobs by
Client Reference Number.
44
Find Jobs by Client Reference Number
Use this option to search by Client Reference Number. The client reference must have been added
against a job number in the Add/View Client Reference Numbers screen.
The Cust Code field is optional. If you have only the client reference number this option can be used as a
quick way to search during a client enquiry.
Events
This option provides the history of job in date descending order. The list of events is available from the
Options menu and from the toolbar button.
45
Multiple Job Event Creation
This screen is available from the Sundry Module and allows the user to update a Single Event Type and
associated Reference No. against multiple Job Numbers in one action.
Please see below screenshot for your reference.
Field Name
Event Type
Reference No.
Doc No.
Created Date
Created Time
Created By
Posted?
Posted Date
Description
Job Event Details Group
Select the zoom to access the list of Event Types. The
Event selected, will then be applied against the Job
Number listed in the Job Number Details Group once
Posted.
Enter a Reference Number that is associated with the
Event selected.
This will then be applied against the Job Number listed
in the Job Number Details Group once Posted.
Accept max. 20 characters.
Internal Reference Number.
Generated when the record is Saved.
Read-Only field.
Date the record was created.
Auto-populates in ADD Mode.
Read-Only field.
Time the record was created.
Auto-populates in ADD Mode.
Read-Only field.
UserID who created the record.
Read-Only field.
Indicates if the record has been Posted.
Yes and No values.
Read-Only field.
NOTE: You cannot UPDATE or DELETE a Posted Entry.
The Date the record was Posted.
Read-Only field.
46
Validation
Default
Mandatory
Blank
Optional
Blank
System
Generated
Unique
Document
Number
Current Date
System
Generated
System
Generated
Current Time
System
Generated
System
Generated
N/A
System
Generated
N/A
N/A
Field Name
Posted Time
Posted By
Job Number
Client Code
Client Name
Post Job
Event
OK Button
Description
The Time the record was Posted.
Read-Only field.
The UserID that Posted the record.
Read-Only field.
Job Number Details Group
Manually enter the Job Number that you want to
apply the Event Type too.
NOTE: You can amend the Job Numbers added via the
Insert, Append and Delete buttons shown at the foot
of the screen.
NOTE: Once the record has been saved, you can
double click on the row and it will direct the user to
the Job No selected.
Auto-populated when the Job Number is entered.
Read-Only field.
Validation
System
Generated
System
Generated
Default
N/A
Mandatory
Blank
Mandatory
Auto-populated when the Job Number is entered.
Read-Only field.
Mandatory
Retrieved
from
associated
Job
Retrieved
from
associated
Job
Action Buttons
When this button is selected, it will then apply the
Event to the Job Numbers listed in the Job Number
Details Group.
It will change the indicator in the ‘Posted?’ Field from
No to Yes. The record will still exist in this screen as a
view only.
The user can view the Entry added via the View/Add
Events window in the Import Job screen.
NOTE: You cannot UPDATE or DELETE a Posted Entry.
When the OK button is selected, you have the option
to Post the entry each time the record is Saved. The
following message will be shown:
“Do you wish to post this job event now?”
If YES, then the record will be Posted and the
‘Posted?’ field will show YES, along with the Posted
Date, Posted Time and Posted By fields being
populated.
If NO, then the record will be Saved but NOT Posted
and the ‘Posted?’ field will show NO.
47
N/A
Missing Documents Notifications
The Missing Documents Notification draws information from the Documents Screen which is
accessible from the Options menu in the Job Registration screen. The below screen allows users to
input what documents are Required and Received:
Based off the above information, the Missing Documents Notification prints any Document that has
a required Tick and does not have a Rec’d Tick, and does not have an All Docs Rec’d tick.
See below for a printed copy of the Missing Documents Notification:
48
Deleting a Job
This is not a function that users can perform.
49
Container Management System (CMS) – Delivery and Returns
The below process diagram highlights the intended FCL Container Delivery and Returns
Double Clicking on a Container record on the Job Registration Screen will open up the Container
Record in the CMS Screen
50
Forwarding
Expedient utilises “One Job”, using the same job number reference for both the Customs and
Forwarding Service. The Job Registration Screen is used for both Customs and Forwarding
Functions.
Creating a Consol
From the Main Menu select Sea/Air Import Forwarding.
By clicking the
button or typing A will place the cursor in the input screen in Add Mode.
51
Field Name
Consol No
Department
Description
This is the internal unique reference given to a
consolidation
This is the Department that is assigned to the Consol. This
is a 3 letter code e.g. VIS
Validation
N/A
Default
N/A
Mandatory
User’s
Branch or
Customer
Code
Responsible
Office
Mandatory
Copy if the
Consol was
generated
by EDI,
otherwise
Blank
[Branch]
[Import/Export]
[Mode of Transport]
The branch is based off one of 2 rules:
The Branch in which is associated with the user adding
the consol.
OR
The Responsible Office branch assigned to the customer
code within the Customer Masterfile. The department
code will initially default to the user’s branch, but after
the customer code is entered if there is a valid Branch in
the Responsible Branch field then the screen will change
the department based on that value.
Bill Type
Please Note: Option 2 must be activated by a GMA staff
Member.
This is the Bill of Lading Type. See below for options:
Job Class
This is the Class of Shipment. See below for options.
Information in this field will default to the same value
when adding a job from the consol screen
Mandatory
Blank
Master Bill
O/S Agent
This is the master bill number
This is the O/S Agent that is exporting the consolidation.
Mandatory
Mandatory
Blank
Blank
Agent Ref
Shipping Co
Please note: if the pop up notes configuration has been
set up in the Customer Masterfile and there is
information in the notes screen, then the notes will pop
up automatically
This is the O/S Agent’s Reference
This is the Shipping Company
Optional
Optional
Blank
Blank
52
Field Name
Master Curr
Rate
Principal’s Agent
ID
Description
This is the Master Currency of the Bill
This is the Bank Rate of the OS Currency.
This is the Customs ID for the Shipping Line. This is sent to
Customs for Cargo Reporting Purposes.
Validation
Mandatory
Mandatory
Mandatory
Frt P/C
Mandatory
Co-Loader
Sub Master
Vessel Code
Origin Port
Disch Port
Identify if the Freight is Prepaid at Origin or Collect at
Destination
If the shipment is being co-loaded by another forwarder
This is the Sub Master Bill
This is the Vessel Code of the Vessel
This is the 5 letter ISO Origin Port Code
This is the 5 letter ISO Discharge Port Code
Destin Port
This is the 5 letter ISO Destination Port Code
Mandatory
Terminal/Bond
Code
SEA Consols: This is the Terminal the vessel will arrive at.
AIR: This is the Bonded Warehouse that will store the air
consol on arrival.
Optional
Voyage No
Ocean Cut
ETA Disch
This is the Vessel Voyage ID of the Vessel
This is the Date that the Ocean Bill was cut
This is the estimated date of arrival at the Discharge Port.
This is followed by the time.
Optional
Mandatory
Mandatory
ETA Dest
This is the estimated date of arrival at the Destination
Port. This is followed by the time. This can be populated
by FSU Airline messages.
This is the actual date of arrival at the Destination Port.
This is followed by the time. This can be populated by
FSU Airline messages.
This is the Depot where the unpacking happens
This is the Date that the EDI file was received.
Please Note: This is only available if the Manifest EDI
Module is turned on.
Mandatory
Blank
Blank
Blank
Blank
Same as
Destination
Port if the
Consol was
imported
from EDI,
otherwise
Blank
This defaults
to match
the
Discharge
Port
Blank.
Populated
by 1-Stop
Vessel
updates
Blank
Blank
Same as ETA
Dest if the
Consol was
imported
from EDI,
otherwise
Blank
Blank
Optional
Blank
Optional
Optional
Blank
Blank
ATA Dest
Unpack Depot
EDI Rcv Date
53
Optional
Optional
Optional
Mandatory
Mandatory
Default
Blank
Blank
Customer
Masterfile
for the
Shipping
Line
PREPAID
Field Name
No. Pkgs
Weight
Volume
No. 20’
No. 40’
Description
This is the Number of Packages across the consolidation.
This will appear red if this value doesn’t total the number
of packages against the jobs.
This is the Total Weight of the consolidation. This will
appear red if this value doesn’t total the number of
packages against the jobs.
This is the Total Volume of the consolidation. This will
appear red if this value doesn’t total the number of
packages against the jobs.
This is the total number of 20 foot containers
This is the total number of 40 foot containers
Validation
Optional
Default
Blank
Mandatory
Blank
Mandatory
Blank
Optional
Optional
Blank
Blank
Arrival Notice/Delivery Order
The options are located under the Notifications Toolbar. The Arrival Notice gives the user the option to
print the charges.
54
Please note: Charges that are printed come from the Charges Screen within the Job Registration and
must be a Forwarding Charge. This charge type is set in the General Ledger Code. If a charge exists that is
incorrect, see your manager who can change this.
55
Documents that can be generated & sent from the consol are:
•
•
•
•
•
•
•
•
Pre Alert
ETA Change Notification
Arrival Notice
Carrier Movement Advice
Transhipment Notification (Sea Only).
Customs Container X-ray Notification (Sea Only).
Original Bill Lodgement (Sea only).
Container Manifest (Sea Only).
Below is the screen that you will see when generating notifications from the consol.
1. Pre Alert Notification.
When sending the Pre Alert from the consol level, through Notifications -> Pre Alert, a screen will pop up
showing the jobs attached to the consol. The Pre Alert document will always go to the consignee in each
attached job, and email addresses will default from any personnel set up in the customers masterfile to
receive import notifications or all documents. You have the option to untick the ‘send’ columns & send
the document to yourself. If both ‘send’ & ‘send to self’ is unticked the document will not send. Where
no personnel are set up in the customers masterfile, the document will default to send to you. Events will
be logged on the consol and job level. The job event will also list any email addresses that the document
was sent to.
2. ETA Change Notification.
When sending the ETA Change Notification at consol level through Notifications -> ETA Change, a screen
will pop up showing all jobs attached to that consol. The ETA Change document will always go to the
consignee in each attached job, and email addresses will default from any personnel set up in the
customers masterfile to receive import notifications or all documents. You have the option to untick the
‘send’ column & send the document to yourself. If both ‘send’ & ‘send to self’ is unticked, the document
will not send. Where no personnel are set up in the customers masterfile, the document will default to
send to you. Events will be logged on the consol and job level. The job event will also list any email
addresses that the document was sent to.
56
3.
Arrival Notice Notification.
When sending the Arrival Notice notification at consol level through Notifications-> Arrival Notice, the
screen will pop up showing all jobs attached to that consol. The Arrival Notice document will always go to
the broker personnel set up to receive import notifications or all documents, unless the broker is your
own company, then the document will default to be sent to the consignee personnel set up to receive
import notifications or all documents. You have the option to change the broker code to the consignee
code in this screen if you wish to send the arrival notice to the consignee instead of the broker, or untick
the ‘send’ columns & tick the ‘send to self’ column, to only send the document to yourself. If both ‘send’
& ‘send to self’ is unticked, the document will not send. Where no personnel are set up in the customers
masterfile, the document will default to send to you. You have the option in this screen to change the
‘Print Charges’ to Yes if you want the Arrival Notice to show any listed Freight Forwarding charges from
the charges screen in the job. Events will be logged on the consol and job level. The job event will also list
any email addresses that the document was sent to.
4.
Carrier Movement Advice.
The Carrier Movement Advice document can be sent from the consol level and include multiple jobs
from that consol. When you select Notifications -> Carrier Movement Advice, you are able to enter the
Depot & Transport details & also select the jobs from the consol that will move together between
depots. By unselecting jobs in the print column will remove the jobs that are listed in the Carrier
Movement Advice document when the document is generated. Events are logged at the consol level
when this document is produced. The consol event will also list any email addresses the document was
sent to.
57
5.
Transhipment Notification (Sea Only).
When sending the Transhipment Notification at consol level through Notifications-> Transhipment
Notification, the screen will pop up showing all jobs attached to that consol. The Transhipment
Notification document will always go to the broker personnel set up to receive import notifications or all
documents, unless the broker is your own company, then the document will default to be sent to the
consignee personnel set up to receive import notifications or all documents. You have the option to
change the broker code to the consignee code in this screen if you wish to send the transhipment
notification to the consignee instead of the broker, or untick the ‘send’ columns & tick the ‘send to self’
column, to only send the document to yourself. If both ‘send’ & ‘send to self’ are unticked the document
will not send. Where no personnel are set up in the customers masterfile, the document will default to
send to you. Events will be logged on the consol and job level. The Job event will also list any email
addresses that the document was sent to.
6.
Customs Container X-ray (Sea Only).
When sending the Customs Container X-Ray document from the consol level, through Notifications ->
Customs Container X-Ray, you will be prompted to select the containers that are X-ray held, followed by
another screen which will pop up showing the jobs attached to the selected containers. The Customs
Container X-Ray document will always go to the consignee in each attached job, and email addresses will
default from any personnel set up in the customers masterfile to receive import notifications or all
documents. You have the option to untick the ‘send’ columns & send the document to yourself. If both
‘send’ & ‘send to self’ are unticked the document will not send. Where no personnel are set up in the
customers masterfile, the document will default to send to you. Events will be logged on the consol and
job level. The job event will also list any email addresses that the document was sent to.
7.
Original Bill Lodgement (Sea only).
The Original Bill Lodgement Document can accompany your Original Bill of lading when you are lodging
this with the carrier. The document is available from the consol toolbar, through Print -> Print Original Bill
Lodgement.
8.
Container Manifest (Sea Only).
The Container Manifest document can be used if you have multiple containers on a consol but you wish
to print a manifest for only one container. When generating the container manifest document from the
consol level, through Print -> Print Container Manifest, you will be prompted to select the container(s)
that you want to include in the manifest. Use ‘Toggle All’ to unselect all containers & then select the
container(s) that you wish to print the manifest for. Events are logged at the consol level when this
document is produced. The consol event will also list any email addresses that the document was sent
to.
9. EBACCA
This option is available for FAK and AIR Consols only. This will option will present the user with the
Electronic BACC Application screen. The MPI Account Name will be the Users Branch. The Exporter
will be the Overseas Agent in the Consol and the Importer will be the Users Branch details.
58
Forwarding Reports
MASTER FORWARDING REPORT
This report allows users to choose up to 9 different reports. These reports are listed below:
Jobs by O/S Agent - Detail
Jobs List by Client – Detail
Consol by O/S Agent
No. HBLs Year by Year
Volume – Consignee Order
Volume – Country Order
Volume – Shipping Line Order
Volume – Shipping Line Summary
Jobs Summary by O/S Agent – Import
Jobs Summary by O/S Agent – Export
Jobs Summary by Carrier – Import
Jobs Summary by Carrier – Export
NO. HBLS YEAR BY YEA R
This report shows the number of House Bills (Import & Export) that have been created over a specific period
of time and then looks back over the years at that specific date range.
For Example; if you enter in 01/02/2015 to 01/03/2015 – it will look at that date period in 2014, 2013, 2012,
2011, etc.
GENERIC CONSOL CSV
This report allows users to output consol level data into a spreadsheet. This report consists of over
40 fields.
If your site has the Accounting Module then it also includes the amount of money billed and the
total profit on each consol. The profit includes both Customs and Forwarding related accounts.
GENERIC JOB CSV
This report allows users to output job level data into a spreadsheet. This report consists of over 40
fields.
If your site has the Accounting Module then it also includes the amount of money billed and the
total profit on each job. The profit includes both Customs and Forwarding related accounts.
59
Customs
Job Registration, Supplier Invoice and Customs Entry Process
60
Creating a Pre-Job Supplier’s Invoice
If you have not yet created a job but have the related Supplier Invoice, you can create a Pre-Job
Supplier’s Invoice. This is accessed via menu: Customs Clearance/Tariff Class – Pre-Job Supplier
Invoice
By clicking the
below:
button or typing A will place the cursor in the input screen in Add Mode. See
Once a job is created for the relevant customer, it is then possible to perform a zoom on the Invoice
Number field in the Supplier Invoice Screen to look up the Pre Job Supplier Invoice.
Load File Feature
You are able to load a CSV file or a text file from your desktop directly into the Pre-Job Supplier’s
Invoice screen and Supplier’s Invoice screen, as long as the data conforms to the required format
selected in the Suppliers Invoice Load screen.
The format for the CSV file is configured in this screen.
Select a pre-existing template for the load file or create a new template. The templates must
include all the mandatory columns, which are indicated with a ‘*’ in the name.
61
The columns can be in any order.
Field Name
File
Location
Column
Field
Templates
Description
User the Browse button to locate the file in your system
Validation
Mandatory
Default
Blank
This indicates where the column is found in the file. Select
from the pull down list.
This is the information contained in the column. Select a
column from the pull down list. ‘*’ indicates that the
column must be included in the file template.
This is the list of available templates. If you want to set up
a new template enter the name of the new template in the
Mandatory
Blank
Mandatory
Blank
Mandatory
Default
field below and
unwanted templates.
. Use
to remove
You can then browse to the required CSV file and click on the
button. The file will then
be read into the screen line by line. If the program detects an error you will get a message
explaining the problem, however no further lines of the file will be processed after this error (i.e.
there are 10 invoice lines in the file, but the system detects a problem on line 5, only the first 4 lines
will be loaded). If errors are detected you will probably want to cancel the invoice you are adding,
fix the errors in the file, and then start the load process again.
62
The Import Log will display a summary of the details loaded. Use
depth information.
to see more in
RULES:
The Country of Origin, if provided, must be in two digit ISO format (i.e.: CN for China) - PREFERENCE
RULE, if provided, must be the same codes as used by New Zealand Customs.
The file must contain one invoice line per file line.
Quantity and Amount fields must contain only numbers or decimal point (no dollar signs).
The file must contain only ONE Pre-Job Supplier’s Invoice.
Each Invoice line must be in the same currency.
Case is not important; the system will convert all values to Upper Case.
Creating a Supplier Invoice
After you have created a job, you can create a Supplier Invoice. This can be performed in 2 ways.
The first method is directly from the Job Registration Screen. From this screen ensure you have the
job you want to link the Supplier Invoice to. Click on the Suppliers Invoice Button on the Toolbar
from this screen, see below:
The second method is via menu: Customs Clearance/Tariff Class - Suppliers Invoice. This option is
also available from the Options menu in the Job Registration screen.
By clicking the
below:
button or typing A will place the cursor in the input screen in Add Mode. See
63
Must be Equal
Please Note: If you access this via the Customs Clearance Menu then you will need to input the
Job Number in yourself, otherwise if this screen is accessed via the Job registration screen, the job
number and associated information is automatically populated in Add Mode.
Field Name
Description
Validation
Default
Summary Tab
Job No
This is the Job Number in which you wish to create Mandatory Defaults from Job
the Supplier Invoice for
Registration
Screen
Client
This is the client you wish to create the Supplier Mandatory Defaults from Job
Invoice for
Registration
Screen
Goods
This is the goods description from the Job Mandatory Defaults from Job
Registration screen
Registration
Screen
Supplier
This is the Supplier. You can click on
to look
up the related suppliers for that Customer Code
64
Mandatory
Blank
Field Name
Description
Validation
Default
Origin
This is the Origin Country stored against the
Supplier in the Supplier Masterfile
Optional
Supplier
Masterfile
Preference
This is the Preference Rule stored against the
Supplier in the Supplier Masterfile
Optional
Supplier
Masterfile
Invoice No
This is the Supplier Invoice Number. Once this is
input, then the Details Tab appears, allowing you
to add the supplier invoice lines.
Mandatory
Blank
On Entering the Invoice Number Expedient will
check that the Invoice Number does not already
exist for the Client and Supplier combination.
To load the invoice data automatically, you have 2
options:
1. Click on the Load File button:
This will allow you to load a CSV file that
you have saved, directly into this screen to
the specified format.
When you have successfully loaded a CSV
or TXT File, you will receive this message
and the Details Tab appears
2. You can email the Supplier Invoice using
the CSV file format defined below.
You must ensure that you have added the
email address first:
impinv@<yourdomain>.com.au
This will then allow you to email and load
invoices.
(see the file specification section below)
Serial No
This is the external shipment number.
65
Mandatory
Blank
Field Name
Valuation
Method
Description
Validation
This is the Method of Valuation. You can click on
Mandatory
Default
Blank
to look up the related Valuation Methods
Currency
Entry the Currency in which you received the Mandatory Blank
Supplier Invoice in.
Exchange Rate This is the exchange rate used at the time of the
Mandatory
Blank
Supplier Invoice received
(if not NZD)
Inv. Ref
This is the exchange rate used at the time of the
Supplier Invoice received
Mandatory
(if not NZD)
Blank
Invoice Date
This is the date the Supplier Invoice was created
Mandatory
(if not NZD)
Blank
Lodge Date
This is the Date of Lodgment to Customs
N/A
Today
N/A
actual number
of lines
Invoice Information
No. Invoice Lines This counts the number of Invoice lines, either
entered in the Details Tab manually, or from the
CSV/TXT File you have loaded via the Load File
button. This is a no entry field and for display
purposes only
Invoice Amt
Enter the Total Invoice Dollar Amount. This must
equal the Entered Amount to balance the Supplier
Invoice
Entered Amt
This totals the dollar amount entered in the Details
Tab. This must equal the Inv Amount. This is a no
entry field and for display purposes only. If these
are not equal you will receive the below message.
You can still save the Supplier Invoice.
Invoice Qty
Enter the Total Invoice Quantity
Mandatory
N/A
Blank
actual amounts
entered
Optional
Blank
Entered Qty
Enter the Total Invoice Qty of pieces. This must
equal the Entered Qty to balance the Supplier
Invoice
Mandatory
Blank
Freight
Enter whether the freight amount is included in
the lines or separated but in total.
Enter the Amount in Freight
Mandatory
Included in Line
Freight Amount
Insurance
Plus
Minus
Optional
Enter whether the insurance amount is included in
the lines or separated but in total.
Enter the Total Plus Amount
Optional
Included In Line
Optional
Blank
Enter the Total Minus Amount
Optional
Blank
66
Field Name
Description
Difference
This is the difference between the Invoice Amount
and the Entered Amount
N/A
System
Generated
Cost Uplift
This is the total Cost Uplift value in the Invoice
currency for all the Supplier Invoice lines. This is
automatically recalculated when changes are
made in the Line tab.
This indicates if there are parts in the invoice that
have not been classified or have TLFs that are no
longer valid
This indicates if there are parts in the invoice that
have no customs quantities entered
N/A
System
Generated
N/A
System
Generated
N/A
System
Generated
Is your site requires this ability Expedient can check
and advise if there are any parts in the Supplier
Invoice that require an Import Permit and no
Permit Information is included in the Supplier
Invoice. If you would like this check please contact
Expedient Software
This indicates if there are parts in the invoice that
have no customs dumping values entered
N/A
System
Generated
N/A
System
Generated
This represents whether the Supplier Invoice was
downloaded via email or using the load file button
Details Tab
N/A
Blank
Unclassified
Items
Unspecified
Quantities
Missing Permits
Unspecified
Dumping Values
Downloaded?
Validation
67
Default
Field Name
Part No
Description
Validation
This is the Part Number that appears on the
Invoice. This will be automatically populated if the
Load File button was successful.
N/A
Default
Blank
You can also click on the
button to list all Parts
on file
(see Menu Customs Clearance – Parts for
Masterfile)
for that Client and Supplier combination. See
below zoom screen:
Select one of the parts that you want to add to the
Supplier Invoice Line.
If your site includes a check on Import Permits Part
Numbers will be highlighted in red where the Tariff
requires an Import Permit but no Code Information
has been entered for the Part.
Inv. Quantity
Customs Qty
Customs UQ
Supp. Customs
Qty
Please Note: The Re Query Button allows you to
perform another search for any parts for that
Customer (excludes the Supplier from this
selection). Clicking OK will search for all parts for
that Customer regardless of Supplier.
This is the Quantity of the part that appears on the
invoice line.
This is the Quantity reported to Customs for the part
and may be entered manually by activating the
button. This value may
also be calculated automatically by Expedient using
the Quantity Factor from the Parts Masterfile and the
Invoice Quantity value. This value cannot be entered
if Customs do not specify a Customs Quantity if
required for the tariff.
This is the unit of measurement that may be
specified by Customs for the tariff.
This is the supplementary quantity value which may
be required by Customs for the tariff. This value can
be entered manually by activating the
68
Mandatory
Blank
Mandatory
Calculated.
Customs Qty =
Invoice
Quantity x
Quantity Factor
from Parts
Masterfile
Optional
TLF Masterfile
Optional
Blank
Field Name
Supp. Customs
UQ
Unit Price
Amount
TLF
Description
Validation
button
This is the supplementary unit of measurement
which may be required by Customs for the tariff
This is the unit price for the item. This column is
hidden by default. Right click on the column
headings to select Unit Price to appear.
This is the total line amount for the part that appears
on the invoice line.
This is the TLF for the Part Number. This is a no entry
field. This information is drawn from the Parts
Masterfile, TLF information. If the part does not have
an associated TLF then this field will display *****
Default
Optional
TLF Masterfile
Optional
Blank
Mandatory
Calculated
from Quantity
x Unit Price if
both are
entered.
Mandatory
Parts / TLF
Masterfile
Mandatory
Parts
Masterfile or
Summary Tab
Country and
Preference
See below
If the Part is unclassified you
can still save the invoice. Once you have done this
you can click on the Classify Button
This will
allow you to classify the part with the correct TLF
Code. See Classifying Parts Section in this document
for more information.
An Unclassified Items report is available from the
More Options menu in the Job Registration screen.
Country /
Preference
Duty Rate
P.O. Number
If the Part has a TLF that is no longer valid the TLF
code will show in RED. Classify the Part or update
the Part Masterfile with a valid TLF.
This information is pulled from the Parts Masterfile.
If there is no country or Preference held for the Part
these fields will default to the Origin Country and
Preference in the Summary Tab. These fields are no
entry, however if you wish to alter these values for
this Supplier Invoice then click on the
Button.
This is the rate as advised nightly by NZ Customs.
This rate cannot be manually updated.
This is the Purchase Order Number against the part
number. This is used for printing of various
69
N/A
Mandatory
From NZ
Customs
Blank
Field Name
Description
Validation
Default
documents, such as the Landed Costing. This field is
no entry, however if you wish to enter a value then
click on the
below.
Button. See
Dump Value
This is the value advised by NZ Customs and cannot
be manually updated
N/A
From NZ
Customs
Cost Uplift
This column can be updated using the General Edit
Button. This column is hidden by default.
N/A
Parts
Masterfile or
Supplier
Masterfile
This column is calculated automatically after entry of
the Cost Uplift value if this is provided. This column
can be updated using the General Edit Button. This
column is hidden by default.
N/A
Parts
Masterfile or
Supplier
Masterfile
This number identifies which Entry submission the
invoice line was part of. This column is hidden by
default.
N/A
Generated on
creation of
entry
N/A
System
Generated
N/A
System
Generated
N/A
Unique Codes
Information
from the Part
and or TLF
depending on
the site
configuration
for storing
Codes
Information
Cost Uplift (%)
Sub No
Entry Line
This number identifies which line in the Customs
Entry the Supplier Invoice line is associated with. This
column is hidden by default.
Code String
This column shows how the Codes information for
the invoice line is generated. This column is hidden
by default.
Code
This table shows the Codes Information associated
Information
with the Part and the TLF in the Supplier Invoice Line.
(for the
The Codes Information is an amalgamation of the
highlighted Part Codes information held at Part and/or TLF level
Number)
(depending on the site configuration for storing
Codes) plus any additional Codes held for the Invoice
Line. The information can be add, edited and deleted
against the invoice line. For example if the Part in the
Parts Masterfile does not have a Permit but it is
required for this invoice the Permit information can
be added against the invoice line in this screen when
the part line is highlighted.
Action Buttons
Customs Entry
Docs
Directs the user to the Customs Entry Screen.
This allows the user to attach supporting documents
that relate to the Supplier’s Invoice.
70
Entering Customs Quantities
Once you have saved the Supplier Invoice, if you have added parts whereby the Classification
requires extra measurements added to the Parts, for example Kilograms, Square Metres add the
details using the
toolbar button in the Supplier Invoice screen. Clicking on this
button will search the TLF and if it doesn’t require a number or blank then it will allow you to enter
the quantities.
The screen will list all the parts in the Supplier Invoice that requires additional Customs Quantities
The Stat-Quantity column can be entered to provide the Customs values. If a Quantity Factor has been
stored for the part during classification or in the Parts Masterfile the column will calculate the Customs
Quantity
Customs Quantity = Part Invoice Amount x Quantity Factor
This value can be updated.
Expedient can calculate the Quantity Factor from the Enter Customs Quantity
Quantity Factor = Customs Quantity / Quantity
On OK in the Customs Quantity screen Expedient can save the Quantity Factor to the Parts Masterfile, if a
Quantity Factor does not already exist, to be used when the Part appears on a new Supplier Invoice.
If your site would like this ability please send a request through Support Tracker.
DEFAULT UNSPECIFIED CUSTOMER QUANTITIES
This option is available from the Options menu after pressing the
tool bar button in the
Supplier Invoice screen. The option will copy across the value in the Invoice Quantity column to
the Customs Quantity column for the following conditions
1. The Customs Unit of Measurement is not ‘NMB’ and the existing Customs Quantity is
either zero or blank or,
71
2. The Customs Unit of Measurement is ’NMB’ and the Customs Quantity is blank
The Customs Quantity window from the
updated with the new Customs Quantity values
toolbar button will be immediately
Classify Parts
If you have added parts to the Supplier Invoice that have not been classified before then you can
click on the Classify Button once you have added the Supplier Invoice. This will then direct you to
the below screen. Please note the [1/2] at the bottom of the screen indicates this is the first part of
two parts that need to be classified. Use Update to classify the part.
Field Name
Description
Validation
Default
Client Code
This is the Customer Code and Name that is pulled from the Mandatory
Supplier Invoice Screen
Supplier
Invoice
Screen
Supplier
This is the Supplier Code and Name that is pulled from the Mandatory
Supplier Invoice Screen. This can be updated using the pull
down option to ‘Default Supplier’ if the part is supplied by
many suppliers.
This is the Supplier Part Number, that is pulled from the Mandatory
Supplier Invoice Screen
Supplier
Invoice
Screen
Supplier
Part No
72
Supplier
Invoice
Screen
Field Name
Description
Part
Description
This is the Description of the Part. If this part is not yet Mandatory
classified, then ‘UNCLASSIFIED PART’ will appear. On Update
this will clear and the correct Part Description can be added.
Client Part
No
Validation
Use the
to search for Parts already stored for the
Customer and Supplier combination or Requery in the zoom
screen to find all Parts for the Customer regardless of
Supplier. Please note only the first 300 results will be shown.
Filter on a word or part number to improve the search
results.
This is the Client’s Part Number. This is what the customer Mandatory
recognises. This prints on Landed Costing
Origin
This is the origin country for the Part.
LastJob
This is the last job number the Part was used on
Stand/LastC This the Customs Value Amount
Group
Last Used
This is the Product Group for the Part
This is the date the Part Number was last used
73
Default
Blank
Default to
Supplier
Part No on
tab through
if no Client
Part No is
entered.
Optional
Origin of
the Part
from the
Supplier
Invoice line
if the Part is
not
duplicated
with a
different
Origin
country
N/A
System
generated
Numeric
Value.
Optional
Blank
Optional
Blank
N/A
System
Generated
Field Name
TLF
Description
This is the Tariff List Code. Use
to lookup the TLF
Masterfile (Menu - Customs Clearance / CMR TLF
Maintenance). This screen allows you to search on any
number of fields for TLFs associated with the Client Code in
the invoice. See below:
Validation
Default
Mandatory
Blank
N/A
N/A
N/A
N/A
N/A
System
Generated
Select the TLF, or Click on the Re Query button to search for
all TLFs regardless of the Client code. Please note only the
first 300 results will be returned in a search. Use filters on
words and codes to return better results.
Lookup All
Tariff
UQ
‘INVALID’ will display besides the TLF field if the TLF is no
longer valid or if the Part was allocated a TLF that no longer
exists in the TLF Masterfile.
This is a zoom on all TLFs regardless of Client Code. Filter on
words and codes to return useful search results. Please note
only the first 300 results will be shown.
This is a view only of the NZ Customs Tariff Code associated
with the TLF
This is a view only of the Unit of Quantity as advised by NZ
Customs each night for the Tariff code
Concession
This is a view only of the Concession code as advised by NZ
Customs each night for the Tariff code
N/A
System
Generated
SUQ
This is a view only of the Secondary Unit of Quantity as
advised by NZ Customs each night for the Tariff code
N/A
System
Generated
Description
This is a view only of the full description of the TLF Code
selected in the previous column
N/A
TLF
Maintenan
nce
74
Field Name
Description
Duty Rates
These are a view only of the Duty Rates advised by NZ
Customs each night for the Tariff Code
This indicates the date of the last auto-rating for this Part
Auto Rated
Net Weight
KGS
Gross
Weight KGS
Cost Uplift
(%)
Cubic
Volume
Package
Type
SKU Alt Cli
Part
Quantity
Factor
Validation
Default
N/A
NZ Customs
N/A
System
Generated
Numeric.
Optional
Numeric.
Optional
Numeric.
Optional
Blank
Blank
This is the type of package for the part
Numeric.
Optional
Optional
This is the alternative Client Part reference
Optional
Blank
Optional
Blank
Optional
Code
Information
entered for
the Invoice
Line
N/A
System
Generated
N/A
System
Generated
Optional
Blank
N/A
Today
This is the value for the net weight of the part in kilograms
This is the value for the gross weight of the part in kilograms
This is the Cost Uplift percentage associated with the Part.
This will populate the Supplier Invoice and the Customs Entry
line when the Part is used.
This is the value for the volume of the part
This is the volume factor for the part and is used to calculate
the Customs Quantity when the part is included in a Supplier
Invoice, e.g. this may indicate the number of litres in each
bottle.
Code
If your site has elected to save Codes information at Part
Information Level the information can be entered in the Classify screen.
Select a Type, Code and Description from the pull down
options. Enter additional Data if required. Codes entered in
this screen will populate the Supplier Invoice line. Conversely
Codes information added to the Supplier Invoice line for the
unclassified part will automatically populate the Classification
screen. Delete any Codes information if this is not required
to be stored permanently against the Part.
Classified By This shows the username of the user who classified the part
Classified
On
This indicates when the part was classified
Approved
By
This shows the username of the user who approved the
classification
Approved
On
This indicates when the part classification was approved
Blank
Blank
Blank
Once you have entered the relevant information click OK to classify all the parts where a Client Part,
Description and TLF Code have been entered.
75
If the Part appears several times in the invoice with the same Origin Country and Codes information
the Part, once classified, will update all the Invoices lines for the same part.
Once you have classified all parts, the system will display the following, and return you to the
Supplier Invoice Screen.
Use the Browse button to view, and output to CSV, all unclassified parts on the invoice in one
screen.
BULK CLASSIFICATION USING THE UNCLASSIFIED ITEMS REPORT
Expedient provides a quick method of quickly classified unclassified parts. Use the Unclassified
Parts option in the Reports menu in the Supplier Invoice screen.
When output as a CSV this report is in the same format required to loads Parts into Expedient.
Add the missing details to the spreadsheet. Then use Down Load Data Files>Load Parts File to load
the updated file back into Expedient to classify the parts in one action.
76
Load File Feature
You are able to load a CSV file or a text file from your desktop directly into the Supplier Invoice
screen. To use this feature: Add the Supplier Invoice and then enter the job no. Once you are in
the Invoice No field you can click on the
screen.
button that appears on the lower area of the
The format for the CSV file is configured in this screen.
Select a pre-existing template for the load file or create a new template. The templates must
include all the mandatory columns, which are indicated with a ‘*’ in the name.
The columns can be in any order.
Field Name
Description
Validation
Default
File
Location
User the Browse button to locate the file in your system
Mandatory
Blank
Column
This indicates where the column is found in the file. Select
from the pull down list.
Mandatory
Blank
Field
This is the information contained in the column. Select a
column from the pull down list. ‘*’ indicates that the column
must be included in the file template.
Mandatory
Blank
77
Field Name
Description
Validation
Default
Templates
This is the list of available templates. If you want to set up a
new template enter the name of the new template in the field
Mandatory
Default
below and
unwanted templates.
. Use
to remove
You can then browse to the required CSV file and click on the
button. The file will then
be read into the screen line by line. If the program detects an error you will get a message
explaining the problem, however no further lines of the file will be processed after this error (i.e.
there are 10 invoice lines in the file, but the system detects a problem on line 5, only the first 4 lines
will be loaded). If errors are detected you will probably want to cancel the invoice you are adding,
fix the errors in the file, and then start the load process again.
The Import Log will display a summary of the details loaded. Use
depth information.
to see more in
RULES:
The Country of Origin, if provided, must be in two digit ISO format (i.e.: CN for China) PREFERENCE, if provided, must be the same codes as used by New Zealand Customs.
The file must contain one invoice line per file line.
Quantity and Amount fields must contain only numbers or decimal point (no dollar signs).
The file must contain only ONE Supplier Invoice.
Each Invoice line must be in the same currency.
Case is not important; the system will convert all values to Upper Case.
Email File Feature
You can email the Supplier Invoice using the CSV file format.
Firstly ensure you have an email address setup to accept these files: impinv@<yourdomain>.com.au
The file needs to be CSV format, NOT Excel, txt, doc, etc. Only the specified fields can be used.
The order must be:
Column
Description
Validation
A
B
C
D
E
F
G
H
Client Code
Invoice Number
Part number
Part Description
Qty
Line Amount
Country
Preference
Mandatory
Mandatory
Mandatory
Mandatory
Mandatory
Mandatory
Optional
Optional
I
Order Number
Optional
The file needs to be CSV format, NOT Excel, txt, or doc. Only the specified fields can be used.
78
Columns A to F are mandatory. If something is not valid, the user will get an email from the system
detailing what line produced the error and which column was at fault. Please allow up to 30
minutes for file to process. An email will be sent to the sender after the file has been successfully
completed or if there were errors in loading the data.
Please allow up to 30 minutes for file to process. An email will be sent after load to the sender.
WARNING MESSAGE
The following warning message is shown when the same Customer/Supplier and Invoice Number is used on
a different Job.
Inter Country Transfer
Expedient can be set to transfer supplier invoices between Australia and New Zealand sites of your
company.
The AU site will send a Shipper Invoice to NZ site when an EDN Entry is submitted and the
destination country is NZ. The NZ site can use the
in the invoice number field to find
the Invoice for matching House Bill. The invoice will be identified as a transferred invoice by
source ‘C’.
The NZ site will send a Shipper Invoice to AU site when an Export Customs Entry is
submitted and the destination country is AU. The AU site can use the
in the invoice
number field to find the Invoice for matching House Bill. The invoice will be identified as a
transferred invoice by source ‘C’.
Load Import Invoice File
This option provides the ability to load multiple supplier invoices for the same client from a single CSV
file.
79
The format for the CSV file is configured in this screen. Select a pre-existing template for the load file or
create a new template. The templates must include all the mandatory columns, which are indicated with
a ‘*’ in the name. The columns can be in any order.
Field Name
Data File
Location
Column
Field
Templates
Description
User the Browse button to locate the file in your system
Validation
Mandatory
Default
Blank
This indicates where the column is found in the file. Select from
the pull down list.
This is the information contained in the column. Select a column
from the pull down list. ‘*’ indicates that the column must be
included in the file template.
This is the list of available templates. If you want to set up a
new template enter the name of the new template in the field
Mandatory
Blank
Mandatory
Blank
Mandatory
Default
below and
unwanted templates.
. Use
to remove
You can then browse to the required CSV file and click on the
button. The file will then be
read into the screen line by line. If the program detects an error you will get a message explaining the
problem, however no further lines of the file will be processed after this error (i.e. there are 10 invoice
lines in the file, but the system detects a problem on line 5, only the first 4 lines will be loaded). If errors
are detected you will probably want to cancel the invoice you are adding, fix the errors in the file, and
then start the load process again.
80
The Import Log will display a summary of the details loaded. Use
information.
to see more in depth
RULES:
The Country of Origin, if provided, must be in two digit ISO format (i.e.: CN for China) - PREFERENCE, if
provided, must be the same codes as used by New Zealand Customs.
The file must contain one invoice line per file line.
Quantity and Amount fields must contain only numbers or decimal point (no dollar signs).
Each Invoice line must be in the same currency.
Case is not important; the system will convert all values to Upper Case.
Load Supplier Invoices by Shipment
This option provides the ability to attach a batch of Supplier Invoices to a job. The batch of Supplier
Invoices can be loaded to the Job from the Job Registration screen and viewed in the Supplier Invoice
screen. This option is available from the More Options menu in Customs Job Registration.
This option links one or more batches of Supplier Invoices to a Job. The batches of Supplier Invoices are
identified by Shipment Number.
81
On Add click
in the Shipment Reference field to view the available Supplier Invoice batches.
Hit ‘Enter’ in this screen to list all available batches or search on specific details.
Select the Shipment reference for the batch of Supplier Invoices you want to associate with the Job and
OK.
Select one or many batches for the job.
To attach the batches of Supplier Invoices to the job go to Options and Load Invoice or use the toolbar
button
.
You will be advised if the load was successful or if invoices within the batch that you have attached have
already been posted and cannot be loaded to the job.
Once successfully loaded you can view the Supplier Invoices in the Supplier Invoice screen.
A new column showing the Shipment number has been added to the Downloaded Invoice list visible
when
is selected in the Invoice Number field in the Supplier Invoice screen.
82
Copy Supplier Invoice
This function allows users to copy a Suppliers Invoice from one job to another job no.
Users can only copy the suppliers invoice to a job for the same Customer code and the invoice
number must not already exist against the new job no.
Auto Invoice Admin
This function allows users to maintain contacts for invoices that are automatically imported. This
option is available in the Sundry folder in Down Load Data Files and in the
Administration>Corporate Interface>Inbound folder.
Select the client code and set up the invoice type, contact type, contact names and email addresses
at the contact and within your company. These contacts will be automatically sent an email alerts
when invoices are imported from the selected company.
83
Creating TLF’s
TLF’s are used as short codes, storing information such as Tariff, Stat, and Treatment Code. This allows
users to save time in data entry and when changing TLF information. This is accessed via the Main Menu
select Customs Clearance/Tariff Class, TLF Maintenance function
Field Name
TLF
Tariff
Alt Tariff
Unit
S Unit
Description
Validation
Default
This is the Tariff Line File. This is a unique number. The code Mandatory
must be letters or numbers, with no spaced or special
characters. This cannot be updated after the TLF has been
created.
The eight-digit tariff classification applicable to the goods Optional
being entered, as specified in Schedule 3 of the Australian
Customs Tariff.
This is the Alternative Tariff Code
Optional
Blank
This is the statistical unit
Optional
Blank
This is the Supplementary unit
Optional
Blank
84
Blank
Blank
Field Name
Levy
Type
TLF Type
Concession
Import
Permit
Required
Description
Validation
Default
This is the Levy Amount. Incorrect Levy Amounts will be
changed to the advised Customs Amount on clicking OK except
where an Anti -dumping Levy type is selected, e.g. ANTI, ANTM
and ANTP.
This is the type of Levy
Optional
Blank
Optional
Blank
This is the TLF Code Type
Optional
Blank
This is the Concession Code
Optional
Blank
N/A
NZ
Customs
Mandatory
Blank
This indicates that NZ Customs require an Import Permit with
the Entry Submission. This indicator is updated direct from NZ
Customs
Description
This is the TLF Description
Duty Rates
These are the schemes and rates as notified by NZ Customs for N/A
the Tariff selected for the TLF
Code
Information
This is the Code information held against the TLF if your site
choses to store Codes and Permit against TLF as well as, or
instead of Parts.
This is the user who added the TLF or last updated the TLF
Amended
Date
This is the date the TLF was added or last updated.
NZ
Customs
Optional
Blank
N/A
System
Generated
N/A
System
Generated
Creating Parts
There are 2 ways to add parts, manually or via a download feature.
Load Parts from a File
If you have a Parts File, you can upload this file via menu Down Load Data Files>Load Parts File or
from the Supplier Invoice Options, and from the Pre-Job Supplier Invoice Options menu.
The format for the CSV file is configured in this screen.
Select the pre-existing for the load file or create a new template. The templates must include all
the mandatory columns, which are indicated with a ‘*’ in the name.
The columns can be in any order. The file does not require column headings in the first row.
The Import Log will display a summary of the details loaded. Use
depth information.
85
to see more in
Field Name
Data File
Location
Column No
Field
Templates
Description
User the Browse button to locate the file in your system
Validation
Mandatory
Default
Blank
This indicates where the column is found in the file. Select from
the pull down list.
This is the information contained in the column. Select a column
from the pull down list. ‘*’ indicates that the column must be
included in the file template.
This is the list of available templates. If you want to set up a
new template enter the name of the new template in the field
Mandatory
Blank
Mandatory
Blank
Mandatory
Default
below and
unwanted templates.
. Use
to remove
Manual Parts Add
Manually adding Parts to the Expedient System is performed via menu Customs Clearance/Tariff
Class – Parts Masterfile. By clicking the
screen in Add Mode. See below:
button or typing A will place the cursor in the input
86
Field Name
Description
Client Code
This is the Customer Code. You can click on the
lookup the Customer Masterfile.
Supplier
Origin
Last Job
to
This is the Supplier Code. You can click on the
to lookup
the Supplier Masterfile. The supplier on an existing part can
only be updated to ‘#DEF’.
This is the Country of Part Origin. You can click on the
lookup the valid country codes
This is the job number the part was last included on a
supplier invoice for.
Stand/LastC This is the value of the last Customs Amount
Group
This indicates the Product Group the part belongs to
Last Used
This is the date the Part number was last used
Supplier
Part No
This is the Supplier’s Part Number
87
to
Validation
Default
Mandatory
Blank
Mandatory
Blank
Optional
Blank
N/A
System
Generated
Optional
Blank
Optional
Blank
N/A
System
Generated
Mandatory
Blank
Field Name
Description
Validation
Default
Part
Description
This is the description of the part. Use the
to see a list of
part descriptions previously used for the client and supplier.
Selecting a row in this list will set the TLF for the Part to
match the selected row.
This is the Client’s Part Number. This prints on Landed
Costing
Mandatory
Blank
Mandatory
Blank
Mandatory
Blank
N/A
TLF
Maintenance
Client Part
No
Tariff Information
TLF
Tariff
This is the TLF that you wish to associate with this part.
All other fields in this section relate to the TLF. See the TLF
Screen for further details on each field
‘INVALID’ will show next to the TLF field if the TLF is no
longer valid or if the part is allocated to a TLF that no longer
exists in the TLF Masterfile
This is the Tariff the TLF is associated with
UQ
This is the Unit of Quantity for the Tariff
N/A
TLF
Maintenance
Concession
This is the concession code for the Tariff
N/A
TLF
Maintenance
Description
This is the text description of the TLF
N/A
TLF
Maintenance
Net Weight
KGS
This is the net weight in Kilograms stored for the Part
Optional
Blank
Gross
This is the gross weight in Kilograms stored for the Part
Weight KGS
Optional
Blank
Cost Uplift
(%)
This is the Cost Uplift percentage associated with the Part.
This will populate the Supplier Invoice and the Customs
Entry line when the Part is used.
This is the cubic volume stored for the Part
Numeric.
Optional
Blank
Optional
Blank
This is the type of packing used for the Part
Optional
Blank
This is the alternative reference for the part the client may
use
Optional
Blank
Cubic
Volume
Package
Type
SKU Alt Cli
Part
88
Field Name
Description
Quantity
Factor
This is the volume factor for the part and is used to
automatically calculate the Customs Quantities in the
Supplier Invoice when the Part is used, e.g. this may indicate
the number of litres per bottle.
Duty Rates These are the various duty rates advised by NX Customs for
the tariff
Code
This table shows details held against the Part. Select the
Information Type and Code from the pull down lists in the columns.
Enter additional information in the Data Required column
dependant on the Type and Code selected.
Classified by This is the user who classified this part
On
Approved
By
On
Validation
Default
Optional
Blank
N/A
NZ Customs
Optional
Blank
Optional
Blank
This is the date the part was classified
Optional
Blank
This is the user who approved the classification of the part
Optional
Blank
N/A
Today
This is the date the part was approved
ARCHIVING PARTS
The following screens can be used to archive parts that have not been used for an extended period of
time.
Once a record has been entered in the Archive Parts screen, a cron job is run daily to move the parts
from the Parts Masterfile to the Archived Parts screen; this Archived Parts screen is a copy of the Parts
Masterfile.
NOTE: If a part has been archived then it will not show in the Parts Zoom, however you can manually
enter the archived part number in the Suppliers Invoice – it will then automatically be back in the Parts
Masterfile. (This scenario does not apply to the Shippers Invoice)
Field Name
Customer
Code
Description
Enter in the Client Code that you want to archive the parts
against.
NOTE: This code is the Client Code in the Parts Masterfile.
89
Validation Default
Mandatory
Field Name
Date Part
Last Used
Posted
Added By
Date
Description
The date entered in this field, archives parts that have been ‘Last
Used’ before this date. For Example; If 01/01/2015 has been
entered – then it will retrieve any part that was ‘Last Used’ before
this date.
NOTE: If the ‘Last Used’ field in the Parts Masterfile is blank then it
will also archive the parts.
This indicates if the record has been posted.
Once the cron job (ARCH_PARTS) has been run this indicator
changes from NO to YES.
Read Only field.
NOTE: You are not able to amend the details once the record has
been posted.
This is the name of the user that added the record.
Read Only field.
This is the date that the record was added.
Read Only field.
Validation Default
Mandatory
N/A
N/A
N/A
Once the part is archived, the details will then be shown in the Archived Parts screen.
90
NO
Creating Customs Entry
The Nature 10/20 can be created from the Job Registration Screen (via Nature 10/20 Button) or via
Menu Customs Clearance / Tariff Class – Nature 10/20. This option is also available from the
Option menu in the Job Registration screen. If the Customs Entry toolbar button is used from the
Import Job Registration screen Expedient will check if an ECI Entry already exists for the Job.
CUSTOMS ENTRY HEADER TAB
91
Field
Name
Description
Validation
Default
Mandatory
Job
Registration
Mandatory
Job
Registration
Entry Header
Job No
This is the Job Number. This automatically populates if you
have entered this screen via the Job Registration screen. If you
have accessed this screen via the Customs Clearance / Tariff
Class. Menu then you will need to enter a valid Job Number.
Once you have input a job number, the system will then
search for any Supplier Invoices that exist in Menu – Customs
Clearance – CMR Supplier Invoice for that Job Number. If
found then it will load all of the Invoices for that Job Number
(even multiple supplier’s).
Please Note: All supplier(s) must have a valid CCID for the
Entry Lines to be successfully loaded from The Supplier
Invoice.
If have added a Supplier Invoice whilst adding the Customs
Entry, click on the Repost button. This will perform another
search. See button:
Entry
Type
This is the Nature Type. This automatically sets a value based
on the Job Number that is selected. You can also click on the
to display the following Nature Types:
92
Field
Name
Description
Validation
Default
Entry
Type
After the Nature Type has been selected. A Pop Up Message
displays, see below:
Mandatory
Consolidate
d
Supplier
Code
Consolidated: Selecting this groups the like TLF’s, Origin and
Preference onto a single line on the Customs Entry
Non-Consolidated: Selecting this keeps each line separated on
the Customs Entry
This is the ABN/CCID of the Customer that you have clearing
the goods for
Mandatory
Customer
Masterfile
This is the Supplier that is supplying the goods on the
shipment that need to be cleared. You can click on the
to
display a list of Suppliers for that Customer. The Supplier’s
Masterfile is found in Menu Administration – Supplier’s
Masterfile.
If this Supplier does not exist then you can add the Supplier
from the Look up screen.
Mandatory
Blank
This is the date the entry was Submitted
Mandatory
System
Generated
Owner
Code
This is the Customers Customs ID from the Customer
Masterfile
Mandatory
Customer
Masterfile
Supplier
Code
This is the Supplier Code from the Supplier’s Masterfile
Optional
Supplier
Masterfile
Please Note: If the ABN/CCID is not recognised by Customs
Australia then the Entry will not be able to be lodged from
Expedient
Supplier
Entry
Date
93
Field
Name
Description
Delivery This is the Delivery Authority code. When you select the Zoom
Authority it displays a list of delivery codes.
Disc Port
This is the Discharge Port from the Job Registration screen.
The port will be updated when the job registration screen is
updated except where the Entry has Submission Status ‘Being
Submitted’ or where the Entry screen is in Update mode for
the Job.
Validation
Default
Optional
Blank
N/A
From Job
Registration
N/A
From Job
Registration
Mandatory
Blank
If the entry has been submitted, the status is changed as
follows:
o from Successful to Successful /Modified
o from Queued to Not Submitted
o from Awaiting Clearance to Awaiting - Modified.
Weight
This is the weight from the Job Registration screen. The
weight will be updated when the job registration screen is
updated except where the Entry has Submission Status ‘Being
Submitted’ or where the Entry screen is in Update mode for
the Job.
If the entry has been submitted, the status is changed as
follows:
o from Successful to Successful /Modified
o from Queued to Not Submitted
o from Awaiting Clearance to Awaiting - Modified.
Header
Codes
This defines whether the entry contains any permit authorities
or Other Information Codes
Controlle
d Area
This is the customs controlled area code
Optional
Blank
Value
Custom
NZD
This the Invoice Total of the Goods
Optional
Blank
FOB
Freight
This is the Value of the good Free on Board
Optional
Blank
Optional
Blank
FOB
This is the total amount of Marine Insurance. Enter a flat value
Insurance or a percentage value.
94
CUSTOMS ENTRY LINES TAB
Below are the Lines of the Customs Entry Screen:
Field Name
Description
Validation
Default
Entry Lines
#
This indicates how the Customs Entry has been
consolidated.
N/A
System
Generated
Tariff
The eight-digit tariff classification applicable to the goods Mandatory
being entered
TLF
Masterfile
from Part
Qty
This is the Quantity of the Parts on the Supplier Invoice Conditional
This value is used to Calculate the Levy payable if required
by Customs.
This is the Unit Quantity of the Quantity for Customs Conditional
purposes.
Supplier
Invoice
This is the Supplementary Quantity of the Parts on the
Supplier Invoice. This Code is used to indicate that there are
additional Levies required to be paid for the commodity.
Supplier
Invoice
Uq
SQty
95
Optional
Supplier
Invoice
Field Name
Description
Validation
Default
SUq
This is the Supplementary Unit Quantity of the Conditional
Supplementary Quantity for Customs purposes.
Supplier
Invoice
Price
This is the Price of the Parts on the Supplier Invoice
Supplier
Invoice
TLF
Optional
This is TLF linked to the Supplier Invoice Part. This record is Conditional
used to fill the Tariff Header detail for the line.
TLF
Masterfile
from Part
Levy1
This is the First Levy Code for the Tariff line. This Code is
used to indicate that there are additional Levies required to
be paid for the commodity.
Optional
TLF
Masterfile
from Part
Levy2
Second Levy Code for the Tariff line. This Code is used to
indicate that there are additional Levies required to be paid
for the commodity.
Optional
TLF
Masterfile
from Part
Exp
This is the country of export
Optional
TLF
Masterfile
from Part
Org
This is the Country of Origin
Mandatory
Supplier’s
Masterfile
Rel
Relationship between the Client / Supplier
Mandatory
Prf
This is the Preference indicator
Mandatory
Concession
Enter a concession if applicable
Optional
Codes
This indicates that there are additional Codes applicable to
the Tariff line. Set this to Yes if you require entering
Authorities, Prohibited Good details, or Other Information
codes for Customs.
Conditional
Blank
TLF
Masterfile
from Part
Customs Entry Submission Process
PREPARE ENTRY
This option prepares the Entry for submission to Customs and required to be run prior to the
Customs Entry print process.
Items include:
Validation that Mandatory fields are entered.
Validation that the Date of Discharge is not more than 90 days before date of Lodgement
Validation that the TLFs are valid
Tariff Duties / Levies are calculated. *
96
GST is calculated.
Validation that the exchange rate is current for the date of submission or queuing of the
entry. If the exchange rates are not valid the user will be prompted to update exchange
rates for all invoices associated with the entry. If selected to update the user must then reprepare the entry and submit.
Note: The Fee is not calculated at this time. The Fees paid/payable are calculated when the Customs
Entry has returned from Customs. *
* The resulting total value is displayed in the Additional Information area of the Customs Entry screen.
PREPARE AND SUBMIT ENTRY
This option lodges the Entry with Customs. This function also is prompted on successful
preparation of the Entry.
The Entry preparation process will activate in the event that the system determines the entry is not
current. This is determined from the Submission status having the following values:
N – Not Submitted;
M- Successful – Modified or;
W – Awaiting – Modified.
In the event the arrival date is too far in the future, as determined by Customs, this process will give
the user the below options:
If the user selects “Queue”, then the below screen will display, allowing for the user to choose what
day to send the Customs Entry to Customs:
A message will appear displaying the queue date based on the earliest date Customs will accept the
Entry. Users can then change the Queue Date if they wish.
This system will display the date the Entry will be submitted to Customs in the Submission Status.
97
The Submission Status will display the Communication status to/from Customs.
Possible values are:
Code
N
B
F
I
S
M
P
R
C
A
W
Q
Description
Not Submitted
*Being Submitted
FAILED
FAILED Replacement
Successful
Successful - Modified
Prepared
Re-Prepared
Cancelled
Awaiting Clearance
Awaiting - Modified
Queued – {DD/MM/YYYY}
In addition to the Submission status there are two Customs Response Status return from Customs.
POSSIBLE ENTRY STATU SES
Code
801
802
803
804
805
806
807
809
810
814
815
816
819
822
825
826
830
831
832
833
834
Description
Entry rejected
Entry routed to Inspections Evaluation - Please await requirements
Entry routed to Inspections Planner - Please Arrange Exam
Entry routed to Document Verification - Documents required as specified
Entry held, instructions as specified
Permits require sighting - Documents required as specified
Trust Delivery already given, method of payment as specified
Delivery Order sent to recipient, method of payment as specified
Delivery Order sent to recipient, method of payment as specified - Please note
warnings, correct if necessary
Entry cancelled
Entry restored
Deposit may be uplifted, method of payment as specified
Delivery Order Herewith, method of Payment as specified
Entry Cleared, cash to pay prior to delivery
Delivery Order Herewith, method of payment as specified - Entry routed to
Document Audit
Entry cleared, cash to pay prior to delivery - Entry routed to Document Audit
Adjustment accepted
Entry adjusted by Customs, reasons as specified
Refund Approved, amount as specified
Short payment due, amount and due date as specified
Import goods cleared, container can moved from Customs Controlled Area
98
Colour Code
RED
YELLOW
YELLOW
YELLOW
RED
YELLOW
GREEN
GREEN
GREEN
GREY
YELLOW
YELLOW
GREEN
GREEN
GREEN
GREEN
GREEN
YELLOW
GREEN
YELLOW
GREEN
835
836
837
838
839
840
845
846
454
456
830
914
929
932
935
940
962
963
964
965
Delivery Order Herewith, method of payment as specified - Please note warnings,
correct if necessary
Entry cleared, cash to pay prior to delivery - Please note warnings, correct if
necessary
Adjustment has placed entry in error state
Delivery Order sent to recipient, method of payment as specified - Entry routed to
Document Audit
Entry routed for Audit - Please provide documents as specified
Entry Rejected, reasons as specified
Transaction Accepted
Export goods cleared, container can moved from Customs Controlled Area
Credit Advice(i.e. Refund)
Debit Advice(i.e. Short Payment)
Export Entry
Excise Entry
Import Entry
Delivery Order
Customs Invoice
Delivery on Payment
Inspections/Audit Requirements
Error Report
Packaging Details
Confirmation of Adjustment
GREEN
GREEN
RED
GREEN
YELLOW
RED
GREEN
GREEN
YELLOW
RED
GREEN
GREEN
RED
RED
YELLOW
YELLOW
Please note Entry Status 815 – Entry Restored is ignored by Expedient if the preceding Entry Status was 819 –
Delivery Order.
WITHDRAW/CANCEL ENTRY
This option will send the Cancellation message to Customs. Please note the Customs Entry cannot be
deleted in Expedient if the Submission Status is Successful. If the entry has been successfully submitted
the entry must be Withdrawn if changes need to be made to the entry.
99
VIEW EDI HISTORY
This is a history of the files submitted and received from Customs. This also allows you to view the Errors
for all Submissions and view the raw message.
Please see below screenshot for your reference.
SET OVERRIDE
This allows users override a Customs entry. The purpose of this function is to Force a Successful
return status. This function only prevents the Failure of the entry in the event of a known
calculation issue or other known missing item.
This override does not force the Customs system into generating a Delivery Order and will cause the
Entry to route to the Customs Audit department for further investigation.
HEADER CODES
This allows users to enter Authority or Other Information Item codes at the Customs Header level.
The system will display the existence of this entered data by setting the Header Codes value to Yes.
100
ECI CONSIGNMENTS
This option provides a screen to enter the ECI Consignees of low value shipments. Use the Options menu
in the Customs Job Registration screen.
The screen lists the details previously entered. Use the
amend the information.
101
button to access the screen below and
Load EDI
This option within the ECI Consignments screen checks if any files have been
received from your client for the job that contains ECI Consignment information.
The received files are listed. Double click on the required file to upload the data.
Load File
This option within the ECI Consignment screen provides a browse of the users’
computer so that CSV files received by email can be uploaded into Expedient.
Please note the file must be a CSV and must contain the following information in the order below to
allow update.
1. House Bill / Consignment Number
2. Port
3. Country
4. Number Pieces
5. Pack Type
6. Goods Description
7. Gross Weight
8. FOB Value
9. Address 1
10. Address 2
11. Contact
ECI ENTRY
Summary details of single or multiple exempt-entry consignments can be sent to NZ Customs. This
option is available from the Import Job Registration screen. Expedient will check if a Customs Entry
already exists for the Job.
If there are no consignments for the job information for the ECI entry will be populated from the Job.
On adding a new ECI Entry for Sea Import Jobs Expedient can alert the User to the NZ Customs charge
102
Field Name
Job No
Description
This is the Job Number. This will automatically populate
from Job Registration
No. of
This is the number of consignments attached to the job
Consignments`
Validation
Default
N/A
From Job
Registration
N/A
From Job
Status
This is the current status of the ECI Entry
N/A
System
Generated
Entry
This indicates the type of entry
N/A
System
Generated
This is the Entry Number advised by NZ Customs
N/A
From NZ
Customs
Optional
Today
Entry No
Entry Date
This is the date of the entry
Document
Type
This is the most recent response from NZ Customs
N/A
From NZ
Customs
Entry Status
This is the current status of the entry
N/A
From NZ
Customs
103
Field Name
Description
Validation
Default
Client Code
This is the code and the Customer name from Job
Registration
Mandatory
From Job
Registration
Port of
Loading
This is the port of Loading/Origin populated from Job
Registration
Mandatory
From Job
Registration
Discharge Port This is the first port of entry into New Zealand populated
from Job Registration
Mandatory
From Job
Registration
This is the house bill reference
Mandatory
From Job
Registration
This is the number of Units followed by the unit of
measurement. Visible if there are no consignment
details.
This is the weight followed by the unit of measurement.
Visible if there are no consignment details.
Mandatory
From Job
Registration
Mandatory
From Job
Registration
NZD FOB
Value
This is the Declared Value for Customs. Visible if there
are no consignment details.
Mandatory
From Job
Registration
Supplier
Information
This is the name and address for the Supplier. This will
be populated from Import Job Registration.
Mandatory
From Job
Registration
Consignee
Information
This is the name and address for the Consignee. This is Conditional
Conditional
visible and will be populated from Import Job
on ECI
on ECI
Registration if there are no ECI Consignment details
Consignment Consignment
Details
Details
House Bill
Units
Weight
Use button
to submit an ECI entry to NZ Customs. The system will check all mandatory
information has been provided in the ECI Entry screen and from the Job Registration screen before
submitting the entry. A list of errors will be provided where information is missing.
Use the Communications menu in the ECI Entry screen to track submitted entries and to see detailed
information on errors received back from NZ Customs. Different option s for sending new ECI entries,
resending, updating entries or withdrawing ECI entries will be available depending on the current status
of the entry with NZ Customs.
EBACCA APPLICATION
This will option will present the user with the MPI/eBACCa entry screen. This option is not available
where the job type is Parcel Post.
The MPI account number will be populated from the Customer if a MPI number has been provided
in the Customer Masterfile, otherwise the Branch MPI account number will be inserted from the
Branch Masterfile if this has been entered.
104
MPI INFORMATION
This will option will present the user with the MPI Information entry screen. The MPI account
number will be populated from the Customer if a MPI number has been provided in the Customer
Masterfile, otherwise the Branch MPI account number will be inserted from the Branch Masterfile if
this has been entered.
To send the eBACCA application with attached documents take the following steps:
1. Register your Customs CASPER code with ECN (B2B) and provide them with a return email
address. Contact Expedient Software to confirm the correct return email address for
eBACCA responses from MPI.
2. On completion of the MPI Information screen use Option ‘Send MPI file to yourself’. This
option will open the Print Menu and show the User email address in blind copy. Attach any
accompanying documents in this screen to the eBACCA email. Expedient will send an XML
file to the eBACCA address along with any attachments and send a copy to the User.
Expedient will show the following message.
3. MPI will receive your application. Their response will be shown within Expedient and an
email alert will be send to the original eBACCA submitter advising the status of the
application.
EVENTS
This will option provides a list of the events against the job. This is the same window of Events
accessed from the Job Registration screen.
COMMENTS
This allows the user to supply a small comment for Customs in the entry. This screen is
automatically presented to the user when the Entry is being Overridden or Withdrawn.
105
PRINT ENTRY
This option allows users to print the Customs Entry. This Entry print can be printed prior to sending
to Customs to allow the user to validate.
106
PRINT C4 FORM
This option allows users to print the NZ Customs format C4 Form for the Entry.
107
PRINT DELIVERY ORDER
This option allows users to print the Customs Delivery Order. This option is only available to the
user when the Entry show a Document Type of 932 – Delivery Order and the Entry has a Submission
Status of “S” – Successful.
AUTO PRINT DECLARATION
When the Customs Entry Number from Customs is received by Expedient, the system can automatically print
the Entry to your local Branch Printer. This printer must be set up in the Branch Masterfile.
The number of Prints is defined by:
1. The Customer Masterfile / Importer Tab
108
AUTO EMAIL DECLARATION/DELIVERY ORDER
When the Customs Entry Number from Customs is received by Expedient, the system can automatically
email the Client.
The documents will be automatically forwarded to the client provided;
1. Your site has been set up by Expedient Software with the automatic email function and,
2. The document flags have been set for the client in the Customer Masterfile and,
3. There is at least one Personnel contact at the Client set to receive the appropriate Document
Distribution Group.
Refer to the Administration User Manual for guidance on setting up the Importer Tab in the Customer
Masterfile for the Client and the Personnel contacts to receive the emails.
AUTOFORWARD DOCUMENT S
When the Customs Entry Number from Customs is received by Expedient, or when the Delivery Order
arrives, the system can automatically forward the document to an external system. Please refer to the
Administration User Manual for further information.
PRINT COMMS REPORT
This option allows users to print the Customs Communications report. This report shows all the
Communication transactions from Customs.
109
Creating a Landed Costing
After you have created a Supplier Invoice and job (and preferably prepared charges) users can
create and print a Landed Costing. Users have the option of creating a Multiple Currency/Supplier
Landed Costing or a Single Supplier/Currency Landed Costing.
This can be performed in the Options – More Options – Landed Costing in the Job Registration
Screen, or from the Customs Clearance Main Menu, Landed Costing folder, Landed Costing or
Legacy Single Supplier Costing, Single Suppliers/Currencies
By clicking the
below:
Field Name
Client
button or typing A will place the cursor in the input screen in Add Mode. See
Description
This is the Client Code and Name. This is a no entry and is
for display purposes only
110
Validation
Default
N/A
From Job
Registration
Field Name
Job No
Description
Validation
Default
This is the Job Number. This will automatically populate if Mandatory From Job
you can entered this screen via the Job Registration. This
Registration
field is followed by the Department Code for the Job
or Blank if
from Menu
Extn Code
This field will appear if your site using External Codes. This
field will show the External Code for the Client
N/A
From Job
Registration
Unit Cost Uplift
This is the Unit Cost Uplift percentage to be applied to the
Landed Costing
This is the Value for Duty
Optional
Blank
Optional
From the
Customs
Entry
Currency
This is the Currency on the Supplier Invoice
Optional
From the
Supplier
Invoice
+/- Inv. Adj
This is the percentage invoice adjustment
Optional
Blank
Exch Rate
This is the Exchange Rate at the time of the Supplier
Invoice
Optional
From the
Supplier
Invoice
This is the New Zealand Dollar Value
Optional
From the
Supplier
Invoice
Duty Paid
This is the amount of Duty Paid on the Customs Entry
Optional
From the
Customs
Entry
Duty Calc
This is the amount of Duty Calculated on the Customs
Entry
Optional
From the
Customs
Entry
Levy Paid
This is the amount of Levy Paid for the Landed Costing.
This value can be updated.
Optional
From the
Customs
Entry
Levy Calc
This the value of the Levy from the Customs Entry
N/A
From the
Customs
Entry
Difference
Duty Calc minus Duty Paid
N/A
System
Generated
VFD
$NZD Value
111
Field Name
Landing
Charges
Description
Enter the Landing Charges as you wish them to appear on
the Landed Costing. Charges Include:
O’seas Freight
Port Chgs/IDF
Delivery Order
Customs Entry
EDI Fee
Additional Line
Forestry
Courier
Cartage
ITF
Other
Validation
Default
Optional
Blank
Invoice Value
Line Total
This is the total of all of the line items on the
Supplier Invoice, as entered by users
N/A
From
Supplier
Invoice
Invoice Value
Cost Uplift
This is the calculation of all of the Cost Uplift
values on the Supplier Invoice as calculated by the
system.
N/A
From
Supplier
Invoice
Invoice Value
Line Calc
This is the calculation of all of the line items on the
Supplier Invoice as calculated by the system.
N/A
From
Supplier
Invoice
Invoice Value
Inv Freight
This is the total of all the Invoice Freight values
from the Supplier Invoice lines as calculated by the
system
N/A
From
Supplier
Invoice
Invoice Value
Difference
Line Total minus Line Calc
N/A
System
Generated
Weight/Volume
Line Total
This is the total of all of the weight items on the
Supplier Invoice, as entered by users
N/A
From
Supplier
Invoice
Weight/Volume
Line Calc
This is the total of all of the weight items on the
Supplier Invoice, as calculated by the system
N/A
From
Supplier
Invoice
Weight Line Total minus Weight Line Calc
N/A
From
Supplier
Invoice
Difference
112
Field Name
No Lines
Description
This is the number of Supplier Invoice Lines
Validation
Default
N/A
From
Supplier
Invoice
Jobs Reports
GENERIC JOBS CSV
This report allows users to output job level data into a spreadsheet. This report consists of over 40
fields.
If your site has the Accounting Module then it also includes the amount of money billed and the
total profit on each job. The profit includes both Customs and Forwarding related accounts.
113
NO. JOBS BY DEPT
This report displays the number of jobs registered and the number of entries between a certain
date period based on department. This report can output in either PDF or CSV.
INVOICE IN LINE ORDE R
This report is available as a PDF or CSV output and can be run from the Job Report folder or from the
Options menu in the Supplier Invoice screen.
The report provides a listing of all the lines on the invoice including Part, Description, Quantity, Unit Cost,
Amount, TLF, Tariff and Duty Rate.
114
Parts Reports
This below menu displays the different Parts Reports:
TLF Reports
This below menu displays the different TLF Reports:
115
Charges – (Accounting Module only)
Preparing Charges
Expedient allows users to prepare charges for the shipment from the Job Registration Screen. This
is accessed from the Charges Button or from the Options menu in the Job Registration Screen.
116
There are 3 ways to prepare charges.
MANUALLY ENTER CHARGES
To use this option the user can simply click on the update button. This will allow the user to input
charges manually. There is an option in Expedient to include Default Company Tariff Charge Codes
based on Job Type, and Job Class. The company tariff is maintained in the Rates Module,
Forwarding Rates, Rate Account Codes screen. See the Rates Module User Manual for more
information. See below:
Once the user clicks the Update button, based on the Rate Account Codes Screen, the default
Charge Codes populate.
117
AUTO RATING WITH EXACT MATCH (PREPARE CHARGES)
Once the Rates has been set up for Customs/Forwarding, the Prepare Charges button will prepopulate with the same number of charges lines as set up in the Rates Master file, and the correct
Amount based on the Rates Master file setup for Customs and/or Forwarding.
See below. Once the user clicks Prepare Charges, Expedient will Check which charges to Auto- Rate,
in this case just Customs, then will find an exact match and populate the Customs Rates.
As per the below screen shot, there are 3 charges, the first one AA is a straight profit item (4000
series numbers) hence the Expected Cost is 0. The other 2 lines display the same amounts in Local
Amount and Expected Cost. This is up to the user to update the correct Expected Cost.
AUTO RATING WITHOUT EXACT MATCH
If a user does not have an exact Ratings match, but wishes to use a “Generic” rate that has been set
up, then it is possible to perform a search of the Rates Masterfile.
Once the User clicks on the Prepare Charges, if Expedient can’t find an exact Rates match, the
system will display all Approved Import Rates for that Customer.
118
The user can select one displayed on the screen, OR REQUERY the Rates Masterfile from any of the
below fields.
The above search returns the below results.
119
Click OK to perform the Auto-Rating
120
Charges Screen
Variance indicator on
Exchange Rates – only
used when entering
charges in O/S
Currency but billing in
AUD
Tick if
wanting to
invoice in
Foreign
Currency.
Can create
up to 3
Foreign
Currency
Invoices
Either a
Customs
Charge or
Forwarding
Charge.
Only available
if Rates
Module Active
Toggle between
Customs/Forwarding
/All Charges
Can only be
modified if charge
code has FXC
indicator set to YES
in General Ledger
Chart of Accounts
Masterfile
121
Recommended
for send only 1
invoice to
customer
Based on USD
Exchange Rate
and Exchange
Variance of 1%.
Only applicable
if invoicing in
AUD
Creates Final
Invoice and
Displays
Previous
Invoice
Costs/Paid
Out
Optional – Profit
Take up at time of
Billing. Unable to
be modified for
Charge Codes set
to No Markup =
Yes in Chart of
Accounts
Masterfile
Field Name
Bill To
Description
Validation
Default
This is who you are billing.
Mandatory
Job
When charges are being prepared for the first time for a
Registration
job, the bill to code is populated based on the following
rules:
If the Broker Code on the Job Registration screen is
null then the system populates “Bill To” Code as
the Customer Code.
OTHERWISE
If your company is the Broker for the Job then the
“Bill To” field will be populated with the client
“Customs Bill to Code” (in Customer Master File
Importer Tab). This will generally be the same
code as the customer code.
If this field is null then the Bill to will default to the
client.
OTHERWISE
If your company is not the Broker for the Job then
the “Bill To” field will be populated with the client
“Forwarding Bill to Code” (in Customer Master File
Importer Tab). This will generally be the broker.
Please Note: The below message indicates that you are
acting as the Customs Broker but not the Forwarder,
hence you need to include only the Customs charges when
billing the Customer.
Expedient lookups the code in both the Forwarder and
Broker Code field in the Job Registration screen.
If the Broker Code Field is set to Own Company in the
Customer Master File, (that is, you are the company) then
Cust. Charges Req’d but Not Created will appear, the same
rule applies for the Forwarder.
See below for the Own Company flag in the Customer
Masterfile:
The below example shows that the forwarding charges are
not required. The Forwarder Code in the Registration is
not your company (that is, Own Company is not set). The
Broker Code however is your company.
122
Field Name
Exchange Var
Job No
Description
Validation
This is the Exchange Variance indicator. This allows users
to Enter a variance on the Exchange Rate when entering
charges in Foreign Currency but billing in AUD.
N/A
Default
Customer
Masterfile
The calculation for invoicing when the Exchange Variance
is set is:
AUD $ = (FOREIGN AMT / EXCHANGE RATE) *
(1 + Exchange Variance / 100)
This is the Job Number. This is a no entry field and used for Mandatory
Job
display purposes only.
Registration
House
This is the House Bill. This is a no entry field and used for
display purposes only.
Mandatory
Job
Registration
Job Currencies
The Expedient System allows users to invoice in up to 3
Foreign Currencies. For example you may enter USD, and
EURO in the Job Currency Field, see below:
Mandatory
Job
Registration
Then in the charge lines, ensure at least one charge of
each currency exists.
Please Note: To be able to change the Currency on the
line items, the General Ledger Code must have the FXC
Indicator set to Yes. This is accessed from menu General
Ledger – Chart of Accounts.
If you now hit the
Button, the system
will create 2 new invoices, 1 for each currency.
Please Note: Once you have created an invoice, any
further changes to either the invoice or the charges screen
will not be synchronised. For example if you add an extra
charge to the invoice the Charges screen will not reflect
the additional charge.
Detail
123
Field Name
Code
Description
FXC
Type
PP/Coll
Curr
FXC
Amount
Local
Amount
Description
Validation
Default
This is the Charge Code. You can perform a look up on this field Mandatory
by clicking:
The chart of Accounts Masterfile is found in
Menu – General Ledger – Chart of Accounts. The Code is set up
in Menu Administration – Alpha Codes
Blank (if
Rates
Module
inactive)
This is the Charge Code Description
N/A
Chart of
Accounts
Masterfile
This indicates whether you wish to invoice the customer as a
Foreign Currency Invoice. This is only available if the Chart of
Accounts Masterfile has FXC Indicator = Yes. The chart of
Accounts Masterfile is found in Menu – General Ledger – Chart
of Accounts
This indicates whether the charge is for Customs of Forwarding
N/A
Blank
N/A
Blank
Indication whether the charge is Prepaid / Collect
N/A
Job
Registration
This is the Currency in which you wish to enter the Amount for.
This is only available if the Chart of Accounts Masterfile has FXC
Indicator = Yes. The chart of Accounts Masterfile is found in
Menu – General Ledger – Chart of Accounts.
This is the Foreign Currency Amount. This is available if you have
selected a Foreign Currency Code in the above field.
N/A
Blank
N/A
Blank
N/A
Blank
Please Note: If you enter a FXC Amount in and do not check
the FXC Indicator, the invoice created will be in AUD.
This is the Local Currency Amount.
124
Field Name
Exp Cost
Description
The Expected cost of the Creditors charge amount.
Validation
Default
N/A
Blank /
Local
Amount (if
No Mark Up
= YES)
This is optional and is configurable at the company level. Contact
GMA Support if you want this added/removed.
This allows users input the expected cost and when the invoice is
posted, the profit will be taken up automatically. If this value
matches with the creditor’s invoice, then the job will not appear
in the Work in Progress report. If it doesn’t match then the job
will appear on the Work in Progress Report, in which case users
will need to apply a further job journal to re-adjust the cost. See
General Ledger Module Job Journal Manual for further
information
Please Note: This is a no entry field for Account Codes that
have a No Mark Up Indicator set to YES in the Chart of Accounts
Masterfile in the General Ledger Menu
GST
Amount
This is the amount of GST. This is a no entry field and for display
purposes only
N/A
Amount
Total
Amount
This is the Total Line amount.
N/A
Amount +
GST
Amount (if
applicable)
Prepare Invoice
Once you are happy with the charges, currencies, and exchange variances (where applicable) you
now can prepare the Invoice
Click on the
Number.
button to create an Invoice and corresponding Invoice
Please Note: This is not recommended if more that 1 invoice is to be created and sent to the
customer.
Once this has been done you will receive the following message:
125
View Invoice
Once you have created the Invoice Number then you can view the invoice
in
order to modify or print it. This screen can also be accessed via Main Menu – Debtors – Input
Invoices
Posted Invoices
To see what charges (if any) have already been billed for this job users can click on the
button.
126