1
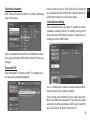
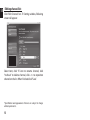
DVB-T
STICK LT
USB DVB-T dongle for
receiving aerial TV channels
MT4171
User Manual
EN Index
Index������������������������������������������������������������������������������������������������2
Introduction����������������������������������������������������������������������������������2
Package content��������������������������������������������������������������������������2
System Requirements����������������������������������������������������������������2
Device installation�����������������������������������������������������������������������3
Software installation������������������������������������������������������������������3
Using the device��������������������������������������������������������������������������5
Main TV window��������������������������������������������������������������������������7
Using EPG (Electronic Program Guide)��������������������������������8
Favorites channels����������������������������������������������������������������������9
Recorded TV����������������������������������������������������������������������������������9
Schedule recording��������������������������������������������������������������������9
Teletext������������������������������������������������������������������������������������������10
Timeshift feature�����������������������������������������������������������������������10
Record function�������������������������������������������������������������������������10
Settings tab���������������������������������������������������������������������������������11
Editing channel list ������������������������������������������������������������������12
2
Introduction
Thank you for buying this cutting edge DVB-T tuner. So many features in super small size device – timeshift,
schedule recording, and many more. Please take a moment and read this manual before using the device.
Package content
■DVB-T stick
■Small antenna
■Quick guide
System Requirements
■Windows XP/Vista/7
■Processor Pentium 4 or higher
■1GB RAM
■Free USB 2.0 port
■DirectX 9.0C or higher
■Internet connection
Device installation
Download software from http://www.media-tech.eu/
products/dvb-t-stick/MT4171, then unpack archive
on your desktop. First run driver installation “Driver/
DrvInstall.exe”.
Now you can plug DVB-T stick into USB port of your PC
computer. Windows will recognize new hardware and
install it automatically.
Software installation
Run “Application/setup.exe”, when following window
appear select installation language and click “OK”.
When following window will appear click “Next”
When driver is sucessfully installed click „Finish”.
3
EN
EN
When following window will appear click “Yes”
When following window will appear enter user name
and software license key and click “Next”.
Now select destination folder or simply accept suggested path and click “Next”.
Installation in progress...
When software is sucessfully installed click „Finish”.
Note! License key is sticked on the quick guide.
4
Using the device
Click “Start” to run scanning process. EN
Plug antenna into DVB-T stick. It is recommended to expose antenna outside
or use external TV antenna. Next plug DVB-T stick into
USB port. Now start application, double click “TotalMedia” icon on windows desktop. Following screen will be
shown:
Scanning in progress...
Select and click “TV”. Click “Yes” to scan for channels.
5
EN
When scanning is finished a message box will appear
(found channels depend on TV signal strength and
country). Click “OK”.
Click “Yes “ to confirm.
Now you can watch TV. Following screen will appear:
Now click “Save” to save channel list.
6
Main TV window
1
EN
2
6 7 8
3
9
10
11
12 13 14 15 16
4
5
1.
2.
3.
4.
Back to main menu window
Back to previous window
Hide application to task bar
Switch between window/full
screen mode
5. Close application
6. Timeshift/pause button
7. Stop button
8. Record button
9. FastRewind/FastForward button
10. Previous/Next button
11. Volume control
12. Channel Up/Down button
13. Enable/disable favorite channels
14. Aspect ratio: choose between 4:3,
16:9 or auto
15. Audio: choose between available
audio soundtracks
16. Snapshot button: press to save
actual frame to JPEG or BMP file
17. Signal strength of current channel
17
7
EN Using EPG (Electronic Program Guide)
Click “EPG” button on Main TV window, following
screen will appear:
Click < > buttons to navigate between days, use ∧∨
buttons to scroll up/down channel list. Click on selected item to show detailed info. Following screen will
appear:
8
You can click “Record” to add this program to schedule
recording list. To exit click “Cancel” button or “Back” button.
Schedule record program is marked with red dot as
shown below:
Favorites channels
Click “Channels” button on Main TV window, following
screen will appear:
Click on item to select it. Click “Burn to Disc” button to
save selected item on CD/DVD disc. Double click on selected item to watch it in full screen mode.
Schedule recording
Click “Schedule” button on Main TV window to access
schedule recording feature. To modify existing entry
select item and click “Modify” button. To enter new recording task click “Add” button.
Click on selected item and then click “Add to Favorites”,
press again to deselect. When finished click “OK” to save
changes.
Recorded TV
Click “Recorded TV” button on Main TV window to access previously recorded programs. Use ∧∨ scroll buttons to enter channel number and frequency of task (once, weekly, monthly).
Enter starting date and hour of task, enter stop time. Mark “Shut down the computer” if you want to enable
automatic shutdown procedure. Click “Save” to confirm
task, click “Cancel” or “Back” button to exit.
9
EN
Teletext
EN
Click “Teletext” button on Main TV window to access
teletext feature. Use ∧∨ scroll buttons to navigate or
enter page number using remote control numeric keypad. When you watching another channel and schedule recording is about to start a message box will pop-up to
allow switching to schedule program and start record
process. Click “Yes” to allow.
Timeshift feature
Click “Pause” button on Main TV window to pause
watched program. Image will freeze and program will
be buffered to temporary file on HDD. To resume click
again “Pause” button.
Record function
10
Click “Record” button on Main TV window to start recording program. In the right upper corner “REC” will
blink. When you try to switch to another channel a
warning message box will appear as shown:
Click “Reset TV signal” to start new scanning for channels process.
Click “Yes” to stop recording and switch to another
channel, otherwise click “No”.
Settings tab
Click “Settings” button on Main TV window to enter
settings menu. A warning message box will appear
stating that changing some of settings may effect on
scheduled or recorded programs in progress. Click “Yes”
to continue.
Select your country from list and click “Next”.
Next you can start new scanning for channels, click
“Start”.
11
EN
EN
Editing channel list
Click “Edit Channels” on TV Setting window, following
screen will appear:
Select item, click “A” icon to rename channel, click
“trashcan” to delete channel, click ∧∨ to reposition
channel on the list. When finished click “Save”.
*Specification and appearance of device are subject to change
without prior notice.
12