1
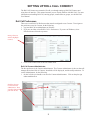
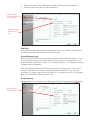
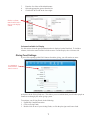
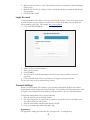
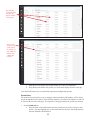
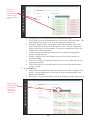
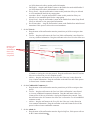
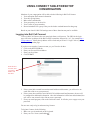
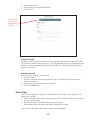
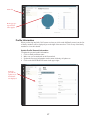
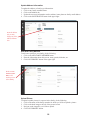
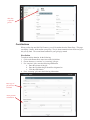
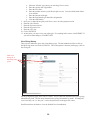
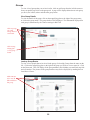
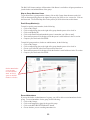
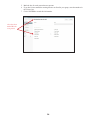
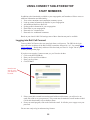
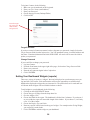
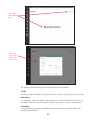
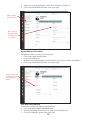
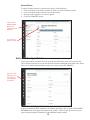
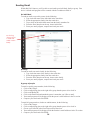
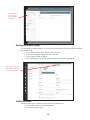
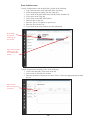
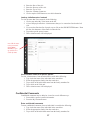
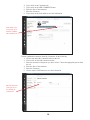
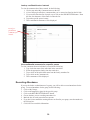
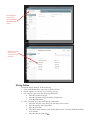
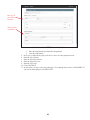
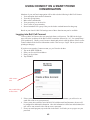
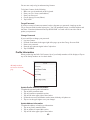
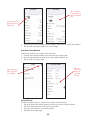
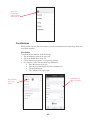
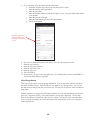
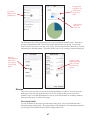
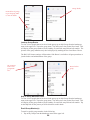
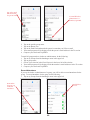
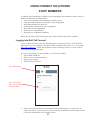
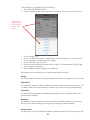
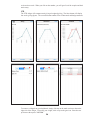
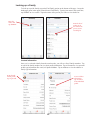
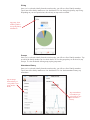
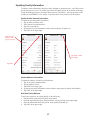
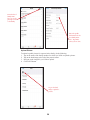
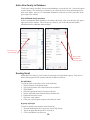
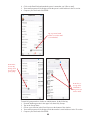
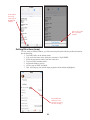
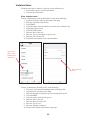
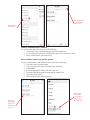
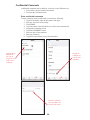
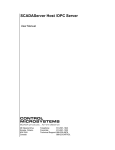
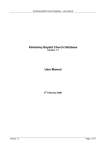
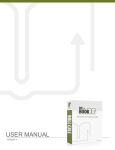
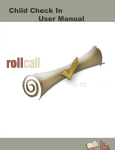
Table of Contents
SETTING UP ROLL CALL CONNECT
Roll Call Preferences....................................................................................................................3
Profile Settings..............................................................................................................................5
Group Settings..............................................................................................................................5
Giving Fund Settings....................................................................................................................7
Login Account...............................................................................................................................8
Connect Settings...........................................................................................................................8
USING CONNECT TABLET/DESKTOP - CONGREGATION
Logging into Roll Call Connect..................................................................................................15
Home Page..................................................................................................................................16
Profile Information......................................................................................................................17
Contributions..............................................................................................................................19
Groups.........................................................................................................................................22
USING CONNECT TABLET/DESKTOP - STAFF MEMBERS
Logging into Roll Call Connect..................................................................................................25
Setting Your Dashboard Widgets (reports).................................................................................26
Looking up a Family...................................................................................................................29
Updating Family Information.....................................................................................................31
Add a New Family to Database..................................................................................................33
Sending Email.............................................................................................................................34
Getting Directions (map)............................................................................................................35
Visitation Notes...........................................................................................................................35
Confidential Comments..............................................................................................................37
Recording Attendance.................................................................................................................39
Giving Online..............................................................................................................................40
USING CONNECT ON A SMART PHONE - CONGREGATION
Logging into Roll Call Connect..................................................................................................42
Profile Information......................................................................................................................43
Contributions..............................................................................................................................45
Groups.........................................................................................................................................47
USING CONNECT ON A PHONE - STAFF MEMBERS
Logging into Roll Call Connect..................................................................................................51
Setting Your Dashboard Widgets (reports).................................................................................52
Looking up a Family...................................................................................................................55
Updating Family Information.....................................................................................................57
Add a New Family to Database..................................................................................................59
Sending Email.............................................................................................................................59
Getting Directions (map)............................................................................................................61
Visitation Notes...........................................................................................................................62
Confidential Comments..............................................................................................................64
Recording Attendance.................................................................................................................65
Giving Online..............................................................................................................................67
SETTING UP ROLL CALL CONNECT
The Roll Call Connect user manual will walk you through setting up Roll Call Connect and
using the web interface. This manual assumes you are already familiar with Roll Call. For more
information on installing Roll Call, entering people, contributions or groups, see the Roll Call
User Manual
Roll Call Preferences
There are several Roll Call Preferences that must be configured to use Connect. To navigate to
the preferences area for Connect, do the following:
1. Log into Roll Call as Administrator or Director.
2. If you are on a Mac, select ROLLCALL> Preferences. If you are on Windows, select
Edit>Preferences from the top menu.
From preferences
window, highlight
Connect.
3. Click on the Connect link of the left sidebar menu.
Roll Call Connect Administrator
The first preference is the Connect Administrator. The Connect Administrator is the user that will
manage the look and feel of Connect, what fields will be displayed, and the staff permissions. To
set the Administrators, do the following:
1. On the left side you should see an area for Connect Administrators. Click on the plus sign
underneath that area.
Click the plus sign
to add a Connect
administrator. Then
enter last name and
pick from the list.
3
2. Enter the Last Name of the Administrator. Pick the appropriate person from the list.
3. Click OK in the lower right to save this information.
Mark if you only
want staff members
to use Connect.
Inidcate how many
months to keep
logs.
Staff Only
If you only want staff members, not the congregation, to have access to Roll Call information,
you’ll need to mark the Staff checkbox to set this preference.
Access/Gateway Logs
Roll Call will record in the access logs each time a person logs into Roll Call Connect. It is up
to you to decide how long you wish to maintain those logs. If you leave this preference as 0,
access information will never be deleted. If you set this preference to 2 for example, it will keep
2 months of access information.
Roll Call will also track the people that access the gateway for online giving. It is up to your
church to decide how long you wish to maintain this access information. If you leave this
preference as 0, gateway logs will never be deleted. If you set this preference to 3, for example,
Roll Call will maintain 3 months of gateway logs.
Giving Gateway
The next preference is necessary if you will be using Online Giving through Roll Call Connect.
Enter giving gateway information.
4
To set up this gateway information, do the following:
1. On the right side of the preference window you’ll notice the fields for the Giving Gateway
information. Use the drop down to select your churches Online Giving Provider.
2. Enter your Gateway Username.
3. Enter the Gateway Password.
4. Enter the Gateway API Key provided to your church.
5. If you will be using the merchant account sandbox to test things out, click on the Sandbox
checkbox. Make sure to uncheck this, when you want to go live.
6. Click OK to save this information.
Profile Settings
There are several key pieces of information that will need to be set in the People profile screen.
If a person is on staff at the church, you will want to check the box for Staff. This will give them
access to additional functionality in Roll Call Connect.
1. Log into Roll Call as Administrator or Director.
2. Expand the People menu.
3. Click on Search Profiles.
4. Enter the Last Name of a staff member and double click on their record.
Mark the box for
staff, for staff members that will be
using Connect.
5. Mark the checkbox for Staff.
6. The system will ask if you want to make this person a Connect Administrator. Answer yes or
no.
7. Click SAVE & CLOSE to save this information.
The other piece of vital information in a person’s record is their personal email address. The
email address will be used as the username for anyone to log into Connect. Confirm that personal
email addresses are present and valid for all folks that wish to use Connect. Also, make sure there
are not 2 or more people that use the same email address.
Group Settings
If you’d like group information to be available in Connect, there are some settings in the Group
screen that must be configured. To configure a group, do the following:
1. Log into Roll Call as Administrator or Director.
5
From within the
Group, click on
the Connect tab
for group specific
settings.
2.
3.
4.
5.
Expand the Groups menu.
Click on Search menu item underneath Groups.
Double click on the specific group you wish to configure.
Click on the Connect tab.
Each group setting is outlined below.
Display Group
If you would like the group to be displayed in Connect, mark the box for Display Group in Roll
Call Connect.
Show Attendance for Leaders
By default, the only Connect user that can view and record group attendance is the group
administrator. If you would like the group leader to also be able to view and record attendance
for the group, mark the box for Show Attendance for Leaders.
Show Roster For
Choose who you would like to be able to view the entire group roster. Use the drop down to
choose Members or Leaders Only.
Group Administrators
Group administrators can view group rosters and also record attendance for the groups they
administer. To add a group administrator do the following:
1.
Log into Roll Call as Administrator or Director.
2.
Expand the Groups menu.
3.
Click on Search menu item.
4.
Double click on the specific group you wish to configure.
5.
Click on the Connect tab.
6.
Click on the plus sign under the Group Administrator area.
6
7.
8.
9.
Enter the Last Name of the Administrator.
Select the appropriate person from the list.
Click SAVE & CLOSE in the lower right.
Click on a column
name from left side to
move it to the display
column.
Columns Available for Display
Use this area to select the group information that is displayed on the Detail tab. To include a
column, click on the name from the left side to move it to the Display these Columns side.
Giving Fund Settings
If you will be opening up Roll Call Connect for online giving, you will need to set some
At a minimum
the Fund name
must be entered.
preferences in the Giving Fund area. This allows you to set which funds you will allow people to
contribute to through your online giving system.
To configure your Giving Funds, do the following:
1. Expand the Contributions menu.
2. Click on Giving Funds.
3. Double click on one of your existing Funds, or click the plus sign to add a new fund.
7
4. Mark the box for Connect, if you’d like donors to be able to contribute to that fund through
online giving.
5. Mark the box for Include in Budget, if this is a fund that should be counted toward the total
giving amount.
6. Click SAVE & CLOSE.
Login Account
To begin using Roll Call Connect, you must create a Login Account. To access the login screen,
open the browser on your computer or mobile device. Enter the IP address of your Roll Call
Server machine as the URL. For example, http://your-ip-address.
1. Click on the NEW USER tab.
Enter your Personal Email address.
Enter your Last Name.
Click SUBMIT.
You will receive an email at the address entered in step 2, that will allow you to set a
password.
6. Click on the link in the email. It will take you to a page to set your password.
You are now ready to log in and start using Connect. 2.
3.
4.
5.
Connect Settings
Before you open up Roll Call Connect to your staff and congregation, the Roll Call Connect
Administrator should configure the Connect Settings. These settings will affect appearance of the
web pages, what information will be displayed and who will have access to what information.
To begin the configuration process, do the following:
1. Open the browser on your desktop or tablet.
2. Get to the login screen, by entering the ip address of your Roll Call Server machine, as the
web address (URL) in your browser.
3. Enter the email address and password then tap LOGIN.
4. Click on the hamburger menu in the upper right.
Appearance
The appearance settings will affect how the web pages look. To configure this:
8
Click on
hamburger
menu to
get settings
menu.
Use the drop
down to
choose your
colors.
1. Choose Appearance from the menu.
2. In Theme area:
a. Use the drop down to choose the color you’d like as the Main Header. The Main
Header is the bar across the top of the web page.
b. Use the drop down to choose the color for your Highlight Color. The highlight color
is the color used to highlight a menu or line item.
c. Use the drop down to choose the color for the Link Color. Any hyper-links on the
web page will be in the Link Color.
3. In the Logo section, click or tap the SELECT FILE button to import your organization’s logo.
The graphic should be 200 pixels X 75 pixels. To remove a previously used logo, click or tag
the REMOVE LOGO button.
4. In the Colors section there will be 6 default colors defined. These colors will be used for the
graphs displayed throughout Roll Call Connect.
a. To remove any of these colors, tap or click the trash can icon.
9
b. To add a new color, click on the link “Add Colors”, then use the drop down box to
select the color.
Click the SAVE COLORS button once you have marked the Appearance settings.
Configuration
The configuration section allows you to choose what information will be available for your
connect users. To modify this information:
1. In the User Options section:
a. Mark the Show My Giving checkbox, to allow the user to view their giving history in
Connect.
b. Mark the Show My Groups checkbox, to allow the users to view their group
involvements in Connect. Please note that only groups that have the preference to
“Display in Connect” will be available for the user to see.
c. Mark the Show My Attendance checkbox to allow the users to view their attendance
Choose the
information or
sections that you’d
like available for
your connect
users.
data.
d. Mark the box to Allow Add People to allow users to add family members to their
family.
e. Mark the box to Allow Add Photos to allow the user to upload a picture to their
profile.
2. In the Online Giving section:
a. Mark the box to Allow Online giving if you are accepting online gifts through Roll
Call Connect.
b. If you are accepting online contributions, enter the words you’d like displayed on the
button in the Online Giving Label. The default is “Donate Now”.
c. If you are accepting online contributions, enter the words you’d like on the button in
the Mobile Giving Label (for smart phones). The default is “Donate”
3. In the Profile Fields section:
a. Mark the box for Display each field you’d like displayed on the Profile page.
b. Mark the box for Editable for each field you’d like the user to be able to change.
c. Mark the box for Required for each field that you’d like to be mandatory.
d. Drag and drop the field to the position you’d like them displayed on the web page.
4. In the Address Fields section:
a. Mark the box for Display each field you’d like displayed on the Profile page.
b. Mark the box for Editable for each field you’d like the user to be able to change.
10
For each field,
check if the field
should be displayed, editable
and required.
As you scroll
down the page,
you’ll come to
the address section. Mark the
fields as view,
editable and
required.
c. Mark the box for Required for each field that you’d like to be mandatory.
d. Drag and drop the field to the position you’d like them displayed on the web page.
Click the SAVE button once you marked the appropriate configuration options.
Permissions
The permissions section allows you to configure what information staff members will be able to
access through Roll Call Connect. The individuals marked in your Roll Call database as staff will
be listed on the left side of the page. The right side of the page contains the specific permissions.
1. On the Dashboard tab:
a. Drag the name of the staff member onto the permission you’d like to assign to that
person. You may highlight one or more staff members at a time, then drag and drop
onto the Enabled or Disabled box.
11
Drag one or
more staff
members names
onto the widget
they are allowed
to use.
b. All Widgets gives the staff member access to all dashboard reports.
c. Giving Widget gives the staff member access to the weekly giving totals report. This
graph displays all giving by week. It can be configured by fund as well.
d. Attendance Widget gives the staff member access to the attendance report. This
report outlines the headcount for all attendance by week. It can be configured to
display only group or service attendance. It can also be configured to display only
attendance for certain departments.
e. Combined Widget gives the staff member access to a report which graphs both
attendance and giving data.
f. Birthdays Widget gives the staff member access to a list of folks who have an
upcoming birthday.
g. Anniversaries Widget gives the staff member access to a list of folks who have an
upcoming anniversary.
h. YTD Giving Widget gives the staff member access to a report that outlines actual
giving vs. budget.
2. On the Profiles tab:
a. Drag the name of the staff member onto the permission you’d like to assign to that
person. You may highlight one or more staff at a time, then drag and drop to the
Enabled or Disabled box.
b. Edit Profiles – drag the staff members name to the Enabled box under Edit Profiles if
From the profile
tab, drag the staff
person’s name
onto the priveleges they are
assigned to.
12
c.
d.
e.
f.
g.
you’d like them to be able to update profile information.
Add Profiles – drag the staff member’s name to the Enable box under Add Profiles if
you’d like them to be able to add members to a family.
Giving Detail – drag the staff member’s name to this permission if they are allowed
to view contribution detail for the congregation.
Attendance Detail – drag the staff member’s name to this permission if they are
allowed to view attendance detail for the congregation.
Group Detail – drag the staff member’s name to the Enabled box under Group Detail
if they are allowed to view group detail information.
Record Attendance – drag the staff member’s name to the Enabled box under Record
Attendance if this person is allowed to record attendance.
3. On the Visits tab:
a. Drag the name of the staff member onto the permission you’d like to assign to that
person.
b. Can See – drag the staff name to the None box if this staff member is not allowed to
view any visitation information. Drag the staff name to the Own Visits box if the user
From the visits
tab, drag the
staff members
name to the
actions they
can perform.
is limited to viewing the visits they entered. Drag the staff name to the All Visits box
if the user is allowed to view all visitation records.
c. Abilities – drag the staff name to the View Only box if the user is only allowed to
view visitation information. Drag the staff name to the Add Visits box if this person
is allowed enter visitation comments.
4. On the Confidential Comments tab:
a. Drag the name of the staff member onto the permission you’d like to assign to that
person.
b. Can See – drag the staff name to the None box if this staff member is not allowed
to view any confidential comment information. Drag the staff name to the Own
Comments box if the user is limited to viewing the comments they entered. Drag
the staff name to the All Comments box if the user is allowed to view all confidential
comment records.
c. Abilities – drag the staff name to the View Only box if the user is only allowed to
view comment information. Drag the staff name to the Add Comments box if this
person is allowed enter confidential comments.
5. On the Admin tab:
a. Drag the name of the staff member onto the Regular Staff box, if this person will not
be the Connect Administrator.
13
b. Drag the name of the staff member onto the Connect Administrator box, if this person
will be the Roll Call Connect Administrator. The Administrator is the only use that
can set the permissions, configuration and appearance of Roll Call.
14
USING CONNECT TABLET/DESKTOP
CONGREGATION
Members of your congregation will be able to do the following in Roll Call Connect
1. View and update their contact information.
2. View their giving history.
3. Make online contributions.
4. View groups they are involved in.
5. View a roster of group members.
6. Record attendance for a group if they are the leader or administrator for that group.
Based on your church’s Roll Call settings some of these functions may not be available.
Logging into Roll Call Connect
To access Roll Call Connect, the user must login from a web browser. The URL for the login
page will be the ip-address of the Roll Call Server machine followed by “/co”, for example http://
your-ip-address/co. Ideally that ip address will be fixed and you’ll have a “Login” link on your
website pointing to that page.
If you have not created a Connect account yet, you’ll need to do that:
1. Click on the NEW USER tab.
2. Enter your Personal Email address.
3. Enter your Last Name.
4. Click SUBMIT.
From the New
User tab, enter
your email
address and
last name.
5. If the system finds a match between that email address and last name, you will receive an
email with a link to set your password.
6. If the system does not find a record in Roll Call with that email and last name, the user will
be prompted for additional information. After this information is filled out and submitted, the
user will be sent an email with a link to create a password.
7. From your email program, click on the link in the email. It will take you to a page to set your
password.
You are now ready to log in and start using Connect.
To log into Connect, do the following:
1. Make sure you are anchored on the Login tab.
2. Enter your User Name (email address).
15
3. Enter your Password.
4. Choose the App Format (Desktop/Tablet).
5. Click LOGIN.
From the login
tab, enter your
username and
password.
Forgot Password
If you have created a Connect username, but have forgotten your password, simply click on the
Forgot Password link from the login screen. You’ll be prompted to enter your email address and
last name. Enter that information and click SEND LINK. An email will be sent with a link to
update your password.
Change Password
If you would like to change your password:
1. Log into Connect.
2. From the Gear button in the upper right of the page, click on the Change Password link.
3. Enter a new password.
4. Enter the new password again in the Confirm box.
5. Click CONFIRM button.
Home Page
Once you have logged into Connect, you’ll be anchored on the “Home” page. This page will
display up to 3 graphs:
1. The giving pie chart will outline total giving for this year. Each slice of the pie will represent
giving to a specific fund.
2. The giving bar chart will outline your total giving by month.
3. The attendance chart will outline your family’s attendance by month.
Click on any of the points in the charts to view the detail information.
16
Menu bar.
Home page giving and attendance graphs.
Profile Information
When you first log into Roll Call Connect or when you click on the MyFamily menu icon, the list
of family members will be displayed just to the right of the menu bar. Click on any of the family
members to view their details.
Update Profile/ General Information
To update the personal profile information:
1. Click on family members name.
2. Make sure you are anchored on the Personal tab.
3. Update the necessary information such as name, birthday, cell phone etc.
4. Click on the SAVE PROFILE button in the upper right.
From the
personal tab,
update any of
the information displayed.
17
Update Address Information
To update the address or family type information:
1. Click on any family members name.
2. Click on the Address tab.
3. Update the necessary information such as address, home phone or family email address.
4. Click on the SAVE PROFILE button in the upper right.
From the address
tab, you may
change any of the
address information.
Add New Family Member
To add a new person to your family, do the following:
1. Click on the ADD FAMILY MEMBER button.
2. Enter the information about this person, name, gender, birthdate, etc.
3. Click SAVE PROFILE button in the upper right.
Click on ADD
FAMILY MEMBER to add
another person
to this family.
Upload Picture
To upload a profile picture for a person in the family, do the following:
1. Click on the name of the family member for which you’d like to upload a picture.
2. Click on the head image to the left of the person’s name.
3. Navigate to the image file you’d like to upload.
4. Click SAVE PROFILE button.
18
Click here
to upload a
picture.
Contributions
When you first log onto Roll Call Connect, you will be anchored on the Home Page. This page
can display 2 charts, which outline your giving. The pie chart summarizes how much was given
this year by fund. The second chart summarizes your giving by month.
Give Online
To make an online donation, do the following:
1. Click on the Donate Now menu icon on the left sidebar.
2. Choose between a “one time” or “recurring” gift type
3. For “one time” gifts, enter the following information.
a. Enter the Amount of the gift.
b. Enter the Fund that the gift should be designated to.
c. Click the ADD button.
4. For a “recurring” gift, enter the following information
Enter type of
gift, amount,
and fund.
Enter payment
information.
19
Select the Schedule type (when you want the gift to re-occur).
Enter the specific date if applicable.
Enter the Start Date.
Enter the number of times you’d like this gift to occur. Leave this field blank if there
is no end date.
e. Enter the Amount of the gift.
f. Enter the Fund that the gift should be designated to.
g. Click the ADD button.
5. Once you’ve added all the gifts you’d like to, move on to the payment section.
6. Enter the Card Number.
7. Enter the Expiration Month.
8. Enter the Expiration Year.
9. Enter the CSV code.
10. Click CONTINUE.
11. At this point, you may review your online gift. If everything looks correct, click SUBMIT. If
you need to make changes, click EDIT GIFT.
a.
b.
c.
d.
View Giving History
There are two methods to get to the giving history page. The first method would be to click on
the MyGiving menu icon on the left side bar. The second option is from the profile page, click on
the Giving tab.
Click on the
Giving tab, or
My Giving menu
option.
On the giving history page, there will be 2 charts. The pie chart will summarize this year’s giving
information by fund. The bar chart summarizes the giving information by month. To change the
view from “this year” to “last year”, use the drop down box in the upper left corner.
Scroll down below the charts to view the detailed list of contributions.
20
Print a Contribution Statement
To print a giving statement for “this year” or “last year”, do the following:
1. Click on MyGiving menu on the left sidebar.
2. Choose the applicable timeframe (this year or last year).
3. Click on the PDF STATEMENT button.
4. A pdf file will be downloaded to your computer.
5. Open that file, and print it.
Click to print
giving statement.
Giving details
listed below summary charts.
Sample giving
statement.
21
Groups
To view a list of groups that you are involved in, click on myGroups from the left side menu or
from your profile page click on the groups tab. A page will be displayed that shows each group
you are in, the leaders, where and when the group meets.
View Group Details
To view the details of the group, click on the magnifying glass to the right of the group name,
or click on the group name. The group details will be displayed. The information displayed for
each group is determined by the Connect settings in Roll Call.
Click on groups
tab or My
Groups menu to
view details.
Click on magnifying glass
to view group
details.
Look up Group Roster
To view a list of people that are involved in the group, click on My Groups from the menu on the
left. Click on the magnifying glass to the right of the group you’d like to view a roster for. Click
on the Roster tab. This will display all the group members, their birthday, an email link, map link
and cell number. The pictures of the group members may also be displayed by marking the box
Load Roster Photos.
Click on Roster
tab to view all
folks enrolled in
this group.
22
The Roll Call Connect settings will determine if the Roster is available to all group members or
just the leaders and administrators of the group.
Map to Group Members Home
To get directions to a group member’s home, click on My Groups from the menu on the left.
Click on the magnifying glass to the right of the group you’d like to view a roster for. Click on
the Roster tab. Click on the Map link for the person you’d like directions to their home.
Email Group Member(s)
To email a specific group member, do the following:
1. Click on My Groups.
2. Click on magnifying glass to the right of the group that the person is involved in.
3. Click on the Roster tab.
4. Click on the Email link underneath the person’s name that you’d like to email.
5. Your email program will be displayed with the person’s email address in the To section.
6. Compose your email and click SEND.
To email all group members, leaders or administrators, do the following:
1. Click on My Groups.
2. Click on magnifying glass to the right of the group that the person is involved in.
3. Choose your selection in the Email Options drop down box.
4. Your email program will be displayed with the member’s email addresses in the To section.
5. Compose your email and click SEND.
Click on Email under
a person’s name
to send individual
email. Or choose
option to email all
members or leaders.
Record Attendance
If you are the leader or administrator of a group, you will be able to record attendance for the
group. To record attendance for the group, do the following:
1. Click on My Groups.
2. Click on the magnifying glass for the specific group.
3. Click on the RECORD ATTENDANCE button.
4. Choose the date you are recording attendance for.
23
5. Mark the box for each person that was present.
6. If you had visitors attend the meeting that are not listed in your group, enter that number in
the Visitors box.
7. Click CONFIRM to record this information.
Select date, then
mark folks who
were present.
24
USING CONNECT TABLET/DESKTOP
STAFF MEMBERS
In addition to the functionality available to your congregation, staff members will have access to
additional information and functionality:
1. View various attendance and contribution summary reports.
2. Look up contact information for families in your congregation.
3. Add additional families to Roll Call.
4. Update profile information for your congregation.
5. Email folks in your congregation.
6. Enter and view visitation notes.
7. Enter and view confidential comments.
Based on your church’s Roll Call settings some of these functions may not be available.
Logging into Roll Call Connect
To access Roll Call Connect, the user must login from a web browser. The URL for the login
page will be the ip-address of the Roll Call Server machine followed by “/co”, for example http://
your-ip-address/co . Ideally that ip address will be fixed and you’ll have a “Login” link on your
website pointing to that page.
If you have not created a Connect account yet, you’ll need to do that:
1. Click on the NEW USER tab.
2. Enter your Personal Email address.
3. Enter your Last Name.
4. Click SUBMIT.
From the New
User tab, enter
your email and
last name.
5. If the system finds a match between that email address and last name, you will receive an
email with a link to set your password. This person must be marked as a staff member in Roll
Call for this functionality to be available to them.
6. From your email program, click on the link in the email. It will take you to a page to set your
password.
You are now ready to log in and start using Connect.
25
To log into Connect, do the following:
1. Make sure you are anchored on the Login tab.
2. Enter your User Name (email address).
3. Enter your Password.
4. Choose the App Format (Desktop/Tablet).
5. Click LOGIN.
From the Login
tab, enter your
email address
and password.
Forgot Password
If you have created a Connect username, but have forgotten you password, simply click on the
Forgot Password link from the login screen. You’ll be prompted to enter your email address and
last name. Enter that information and click SEND LINK. An email will be sent with a link to
update your password.
Change Password
If you would like to change your password:
1. Log into Connect.
2. From the Gear button in the upper right of the page, click on the Change Password link.
3. Enter a new password.
4. Enter the new password again in the Confirm box.
5. Click CONFIRM.
Setting Your Dashboard Widgets (reports)
There are a variety of reports or “widgets” that can be displayed on your home page once you
log into Roll Call Connect. Each staff member will have the opportunity to customize their
dashboard to display the widgets they are interested in. The permissions set for each staff user
will dictate which widgets will be available for them to choose.
To add widgets to your dashboard, do the following:
1. Click/tap on the ADD WIDGET button.
2. Choose the type of Widget from the drop down list.
3. Give the widget a Title.
4. Choose the Width for the report. The dashboard is divided into 3 columns. If you choose 3
as your width, the report will extend the length of the window. If you choose 1, it will only
cover 1/3 of the window.
5. Choose the Display Type and Color.
6. Enter any specific criteria based on the type of widget. For example on the Giving Widget,
you can specify certain funds.
7. Click CONFIRM to add the widget to your dashboard.
26
Tap or click on
ADD WIDGET
button.
Choose the
type of widget,
name it, and
choose criteria.
The following are the different types of widgets/reports that are available:
Giving
The Giving widget will display weekly giving totals for all funds, or giving for one specific fund.
Attendance
The Attendance widget will display weekly head count or people count totals for the week. You
can further define it for a specific campus, attendance type (service or group) and department.
Combined
The Combined widget graphs both attendance and giving data. You can further define it for a
specific campus and fund.
27
Examples of
the Giving,
Attendance and
Combined
widgets.
Birthdays
The Birthday widget will display how many people have a birthday today, this week and next.
When you click on that number, you will get a list of the people and their birthday.
Anniversaries
The Anniversary widget will display the number of families that have an anniversary today, this
week and next week. When you click on the number, you will get a list of the couples and their
anniversary.
YTD
The YTD widget will compare actual giving to budgeted giving. The first column will display
last weeks giving figures. The second column contains Year to Date totals and budget amounts.
Examples of
the Birthday,
Anniversay and
YTD widgets.
To remove a widget from your dashboard, simply click/tap on the trash can icon to the on the
right side of the widget. To modify your widget, click or tap on the gear icon. Enter the new
preferences then press CONFIRM.
28
Looking up a Family
To look up a specific family, start typing their last name in the search box, found underneath your
user name in the upper left portion of the window. As you start typing several letters, the system
will display a list of families whose last name starts with those characters. Click on the specific
family in the list to view their detailed information.
Enter the first few
characters of the last
name to get search
results.
Tap on the name in the
results list to view their
information.
Contact information
Once you’ve selected a family from the search results, you will see a list of family members
on the left side of the window. Click or tap on one of the family members to view their profile
information. The first page will have personal profile information on it, for example, birthday,
personal email and cell phone number. To view the address information or home phone number,
tap or click on the Address tab.
Families home page
with list of family
members.
29
Tap on family
members name to
get to their profile
page.
Tap on address tab
to view address/
family information.
Group Involvements
Once you’ve selected a family from the search results, you will see a list of family members on
the left side of the window. Click or tap on one of the family members to view their details. To
view the groups they are involved in, click or tap the Groups tab. To view the details of that
group, tap the magnifying glass to the right of the group name.
Click on groups
tab to view this
person’s group
involvements.
Giving History
Once you’ve selected a family from the search results, you will see a list of family members on
the left side of the window. Click or tap on one of the family members to view their details. To
view their giving history, click or tap on the Giving tab. Depending on your user permissions,
this tab may or may not be available.
30
From the giving
tab, you can view
summary graphs or
scroll down to view
details.
Attendance History
Once you’ve selected a family from the search results, you will see a list of family members on
the left side of the window. Click or tap on one of the family members to view their details. To
view their attendance history, click or tap the Attendance tab.
From the attendance tab, you
can view attendance history.
Updating Family Information
To update contact information, add a new family member or upload a picture, you’ll first need to
pull up the person’s record. To do that, type in the first few characters of their last name in the
search box. Click or tap on their name from the search results list. A list of family members will
be displayed. Click or tap the specific family members name from the list.
Update Profile/ General Information
To update the personal profile information:
1. Click on family members name.
2. Make sure you are anchored on the Personal tab.
31
3. Update the necessary information such as name, birthday, cell phone etc.
4. Click on the SAVE PROFILE button in the upper right.
Click on family
members name.
Place cursor in
appropriate field
and make necessary changes.
Update Address Information
To update the address or family type information:
1. Click on any family members name.
2. Click on the Address tab.
3. Update the necessary information such as address, home phone or family email address.
4. Click on the SAVE PROFILE button in the upper right.
Click on Address tab
to make changes to
any address information.
Add New Family Member
To add a new person to the family, do the following:
1. Click on the ADD FAMILY MEMBER button.
2. Enter the information about this person, name, gender, birthdate, etc.
3. Click SAVE PROFILE button in the upper right.
32
Upload Picture
To upload a profile picture for a person in the family, do the following:
1. Click on the name of the family member for which you’d like to upload a picture.
2. Click on the head image to the left of the person’s name.
3. Navigate to the image file you’d like to upload.
4. Click SAVE PROFILE button.
Click on ADD
FAMILY MEMBER to add
additional family
members.
Tap on image to
upload a picture.
Add a New Family to Database
To add a new family into Roll Call, click or tap on the Add Family menu icon on the left side.
This will bring up a form for you to enter the basic contact information for the head of the family.
Once you’ve entered that information, make sure to click or tap SAVE PROFILE.
Tap on the Add
Family menu to
begin adding a
new family into
the database.
Add additional family members
If there are additional family members to be added to the family, click or tap the ADD FAMILY
MEMBER button in the upper left portion of the window. This will open up a form for you to
enter the personal profile information for the additional family member.
33
Sending Email
Within Roll Call Connect, you’ll be able to send email to an individual, family or group. Your
device’s default mail program will be returned with the To addresses filled in.
An individual
To send an email to a specific person, do the following:
1. Type in the last name of the individual in the search box.
2. Select the appropriate family from the results box.
3. Tap or click on the individuals name from the family members list.
4. From the Email drop box at the top, choose individual.
5. From your email program, compose and send your email.
Use the drop
down to choose
to email individual or entire
family.
A family
To send an email to an entire family, do the following:
1. Type in the last name of the family in the search box.
2. Select the appropriate family from the results box.
3. From the Email drop box at the top, choose entire family.
4. From your email program, compose and send your email.
A group of people
To email a specific group member, do the following:
1. Click on My Groups.
2. Click on magnifying glass to the right of the group that the person is involved in.
3. Click on the Roster tab.
4. Click on the Email link underneath the person’s name that you’d like to email.
5. Your email program will be displayed with the person’s email address in the To section.
6. Compose your email and click SEND.
To email all group members, leaders or administrators, do the following:
1. Click on My Groups.
2. Click on magnifying glass to the right of the group that the person is involved in.
3. Choose your selection in the Email Options drop down box.
4. Your email program will be displayed with the member’s email addresses in the To section.
5. Compose your email and click SEND.
34
From within a
group, choose
who you’d like
to email.
Getting Directions (map)
To view a map of families address, you’ll first need to pull up that families profile information.
Do the following:
1. Type in the last name of the family in the search box.
2. Select the appropriate family from the results box.
3. Click or tap on VIEW ON MAP.
4. This will bring up your default maps program with the address highlighted.
Tap view on map to see
this family’s address in
your map program.
Visitation Notes
Visitation notes may be added or viewed in several different ways:
1. From within a person’s profile information.
2. From the My Visits menu.
35
Enter visitation notes
To enter visitation notes, from an individual’s record do the following:
1. Type in the last name of the individual in the search box.
2. Select the appropriate family from the results box.
3. Tap or click on the individuals name from the family members list.
4. Tap or click on the Visits tab.
5. Tap or click on the ADD VISIT button.
6. Enter the Date of the visit.
7. Enter the Type of visit (phone, in person, etc)
8. Enter the Notes for the visit.
9. Tap or click on the check mark to save this information.
From within
the person’s
record, tap on
the visit tab.
Tap or click on ADD
VISIT to enter the
new visitation information.
To enter visitation notes from My Visits, do the following:
1. Click or tap on the My Visits menu on the left.
2. You are now on the Add Visit window.
3. Enter the last name of the person you have visited. Choose the appropriate person from
the list.
Enter the Last
Name of the person
you visited.
36
4.
5.
6.
7.
8.
Enter the Date of the visit.
Enter the Duration of the visit.
Enter the Type of visit.
Enter the visitation Comments.
Click or tap the SAVE button to save this information.
Look up visitation notes I entered
To view the notes that I have entered, do the following:
1. Click or tap on the My Visits menu on the left.
2. A list of the people who have visitation notes that you’ve entered are listed on the left
side.
3. If you need to filter that list of people, tap or click on the SHOW FILTER button. Enter
the first few characters of the name to reduce the list.
4. Tap on the specific person’s name.
5. Their visitation notes will be displayed.
List of all the visitations you entered.
Click SHOW
FILTER to open
up search box to
search by name.
View visitation notes for a specific person
To view visitation notes, from an individual’s record do the following:
1. Type in the last name of the individual in the search box.
2. Select the appropriate family from the results box.
3. Tap or click on the individuals name from the family members list.
4. Tap or click on the Visits tab.
5. Their visitation notes will be displayed.
Confidential Comments
Confidential comments may be added or viewed in several different ways:
1. From within a person’s profile information.
2. From the My Comments menu.
Enter confidential comments
To enter confidential comments, from an individual’s record do the following:
1. Type in the last name of the individual in the search box.
2. Select the appropriate family from the results box.
3. Tap or click on the individuals name from the family members list.
37
4.
5.
6.
7.
8.
Tap or click on the Comments tab.
Tap or click on the ADD COMMENT button.
Enter the Date of the comment.
Enter the Comments.
Tap or click on the check mark to save this information.
From within a person’s record, tap or
click the Confidential Comments tab.
To enter confidential comments from My Comments, do the following:
1. Click or tap on the My Comments menu on the left.
2. You are now on the Add Comment window.
3. Enter the last name of the person you have visited. Choose the appropriate person from
the list.
4. Enter the Date of the comment.
5. Enter the Comments.
6. Click or tap the SAVE button to save this information.
Enter the last name
of the person you
are entering the
comment for.
38
Look up confidential notes I entered
To view the comments that I have entered, do the following:
1. Click or tap on the My Comments menu on the left.
2. A list of the people who have comments that you’ve entered are listed on the left side.
3. If you need to filter that list of people, tap or click on the SHOW FILTER button. Enter
the first few characters of the name to reduce the list.
4. Tap on the specific person’s name.
5. Their confidential comments will be displayed.
List of people that have
comments you
entered.
View confidential comments for a specific person
To view comments from an individual’s record do the following:
1. Type in the last name of the individual in the search box.
2. Select the appropriate family from the results box.
3. Tap or click on the individuals name from the family members list.
4. Tap or click on the Comments tab.
5. Their comments will be displayed.
Recording Attendance
If you are the leader or administrator of a group, you will be able to record attendance for the
group. To record attendance for the group, do the following:
1. Click on My Groups.
2. Click on the magnifying glass for the specific group.
3. Click on the RECORD ATTENDANCE button.
4. Choose the date you are recording attendance for.
5. Mark the box for each person that was present.
6. If you had visitors attend the meeting that are not listed in your group, enter that number in
the Visitors box.
7. Click SAVE to record this information.
39
From within the
group, click or
tap the RECORD
ATTENDANCE
button.
Mark the box next
to the name of
each person who
attended.
Giving Online
To make an online donation, do the following:
1. Click on the Donate Now menu icon on the left sidebar.
2. Choose between a “one time” or “recurring” gift type
3. For “one time” gifts, enter the following information.
a. Enter the Amount of the gift.
b. Enter the Fund that the gift should be designated to
c. Click the ADD button
4. For a “recurring” gift, enter the following information
a. Select the Schedule type (when you want the gift to re-occur).
b. Enter the specific date if applicable.
c. Enter the Start Date.
d. Enter the number of times you’d like this gift to occur. Leave this field blank if there
is no end date.
e. Enter the Amount of the gift.
40
Enter type of
gift, amount,
and fund.
Enter payment
information.
f. Enter the Fund that the gift should be designated to.
g. Click the ADD button.
5. Once you’ve added all the gifts you’d like to, move on to the payment section.
6. Enter the Card Number.
7. Enter the Expiration Month.
8. Enter the Expiration Year.
9. Enter the CSV Code.
10. Click CONTINUE.
11. At this point, you may review your online gift. If everything looks correct, click SUBMIT. If
you need to make changes, click EDIT GIFT.
41
USING CONNECT ON A SMART PHONE
CONGREGATION
Members of your staff and congregation will be able to do the following in Roll Call Connect
1. View and update their contact information.
2. View their giving history.
3. Make online contributions.
4. View groups they are involved in.
5. View a roster of group members.
6. Record attendance for a group if they are the leader or administrator for that group.
Based on your church’s Roll Call settings some of these functions may not be available.
Logging into Roll Call Connect
To access Roll Call Connect, the user must login from a web browser. The URL for the login
page will be the ip-address of the Roll Call Server machine followed by “/co”, for example http://
your-ip-address/co. Ideally you will create a domain and point it to that ip address. Please see the
Connect Admin Guide for more information on this. Then set up a “Login” link on your website
pointing to that page.
If you have not created a Connect account yet, you’ll need to do that:
1. Tap on the NEW USER tab.
2. Enter your Personal Email address.
3. Enter your Last Name.
4. Tap SUBMIT.
Click on New
User.
Enter email address
and last name.
5. If the system finds a match between that email address and last name, you will receive an
email with a link to set your password.
6. If the system does not find a record in Roll Call with that email and last name, the user will
be prompted for additional information. After this information is filled out and submitted, the
user will be sent an email with a link to create a password.
7. From your email program, tap on the link in the email. It will take you to a page to set your
password.
42
You are now ready to log in and start using Connect.
To log into Connect, do the following:
1. Make sure you are anchored on the Login tab.
2. Enter your User Name (email address).
3. Enter your Password.
4. Choose the App Format (Phone).
5. Tap LOGIN.
Forgot Password
If you have created a Connect username, but have forgotten you password, simply tap on the
Forgot Password link from the login screen. You’ll be prompted to enter your email address and
last name. Enter that information and Tap SEND LINK. An email will be sent with a link to
update your password.
Change Password
If you would like to change your password:
1. Log into Connect.
2. From the Gear button in the upper right of the page, tap on the Change Password link.
3. Enter a new password.
4. Enter the new password again in the Confirm box.
5. Tap CONFIRM.
Profile Information
When you first log into Roll Call Connect a list of your family members will be displayed. Tap on
any of the family members to view their details.
All family members
are listed on the home
page.
Update Profile/ General Information
To update the personal profile information:
1. Tap on family members name.
2. Tap on Personal to expand this section.
3. Tap on Edit in the upper right of the window.
4. Update the necessary information such as name, birthday, cell phone etc.
5. Tap save in the upper right to save your changes.
Update Address Information
To update the address or family type information:
1. Tap on any family members name.
2. Tap on Address to expand this section.
3. Tap on Edit in the upper right of the window.
43
Tap on Address
to expand and update that information.
Tap on Personal to
update any of that
information.
4. Update the necessary information such as address, home phone or family email address.
5. Tap on SAVE in the upper right to save your changes.
Add New Family Member
To add a new person to your family, do the following:
1. From the list of family members, tap on the plus sign in upper right.
2. Enter the information about this person, name, gender, birthdate, etc.
3. Tap on SAVE in the upper right.
Enter the
profile information for
this family
member.
Tap on plus sign to
add a new person
to this family.
Upload Picture
To upload a profile picture for a person in the family, do the following:
1. Tap on the name of the family member for which you’d like to upload a picture.
2. Tap on the head image to the left of the person’s name.
3. Navigate to the image file you’d like to upload.
4. Tap SAVE in the upper right.
44
Tap on the
head image to
pull in a picture
of this person.
Contributions
When you first log onto Roll Call Connect, you will be anchored on the Home Page which lists
your family members.
Give Online
To make an online donation, do the following:
1. Tap on hamburger menu in the upper left
2. Tap on the Donate Now menu itm.
3. Choose between a “one time” or “recurring” gift type
4. For “one time” gifts, enter the following information.
a. Enter the Amount of the gift.
b. Enter the Fund that the gift should be designated to.
c. Tap the ADD button.
d. Tap Continue in the upper right.
Mark either one
time or recurring
gift.
Tap on Donate
Now to give
online.
45
5. For a “recurring” gift, enter the following information
a. Select the Schedule type (when you want the gift to re-occur).
b. Enter the specific date if applicable.
c. Enter the Start Date.
d. Enter the number of times you’d like this gift to occur. Leave this field blank if there
is no end date.
e. Enter the Amount of the gift.
f. Enter the Fund that the gift should be designated to.
g. Tap the ADD button.
Enter how often and
when you’d like your
recurring contribution
to “hit”.
6. Once you’ve added all the gifts you’d like to, move on to the payment section.
7. Enter the Card Number.
8. Enter the Expiration Month.
9. Enter the Expiration Year.
10. Enter the CSV code.
11. Tap CONTINUE.
12. At this point, you may review your online gift. If everything looks correct, tap SUBMIT. If
you need to make changes, Tap EDIT.
View Giving History
There are several ways to view the giving information. You can tap on the Summary link above
the family members names. That will take you to a graph of your giving history. You can use
the drop down to change from this year to last year. You can also click on the icons for different
chart types.
Another option for viewing giving information would be to click on the hamburger menu in the
upper left. Tap on My Giving. A pie chart with this years giving is displayed. Use the drop
down to switch between This Year and Last Year’s giving. You can also click on the bar chart
icon to view the information in a bar chart format or tap on the details icon to view a listing of
each individual gift.
46
The graph that
is displayed. To
view last years,
use the drop
down.
Tap on My
Giving to view
giving history.
Change graph
type with
these icons.
The final option for viewing giving history is to tap on the family members name. Then tap on
Giving to expand that section. You will see the pie chart for this years giving. Use the drop
down to choose last year, to view last years giving. You may tap on the bar chart icon to view the
information in a bar chart format. Tap on the details icon to view a listing of each individual gift.
Tap on a a
family member’s
name. Then
tap on giving
to view giving
history.
From the giving
display, tap details
icon to view listing of all contributions.
Groups
There are several ways that you can access group information in Connect. You can tap on the
hamburger menu, then tap on My Groups to view a list of groups that you are involved in.
Another way to access that information is to tap on your name from the list of family members,
then tap on Groups to view the list of groups.
View Group Details
To view the details of the group, tap on the name of the group. You will be anchored on the
information page for that group. The group details will be displayed. The information displayed
for each group is determined by the Connect settings in Roll Call.
47
Group details/
From the list of groups,
tap on the group name
to view the details.
Look up Group Roster
To view a list of people that are involved in the group, tap on My Groups from the hamburger
menu in the upper left. Tap on the group name. Tap on the roster icon (looks like a head). This
will display all the group members, their birthday, an email link, map link and cell number. The
pictures of the group members may also be displayed by marking the box Load Roster Photos.
The Roll Call Connect settings will determine if the Roster is available to all group members or
just the leaders and administrators of the group.
Tap on Roster
icon to view
group members.
Roster for this
group.
Map to Group Members Home
To view a list of people that are involved in the group, tap on My Groups from the hamburger
menu in the upper left. Tap on the group name. Tap on the roster icon (looks like a head). This
will display all the group members, their birthday, an email link, map link and cell number. Tap
on the Map link for the person you’d like directions to their home.
Email Group Member(s)
To email a specific group member, do the following:
1. Tap on My Groups from the hamburger menu in the upper left.
48
Tap on the email
link underneath
the person’s name.
To email all leaders,
administrators or
members, tap Email.
2.
3.
4.
5.
6.
Tap on the specific group name.
Tap on the Roster icon.
Tap on the Email link underneath the person’s name that you’d like to email.
Your email program will be displayed with the person’s email address in the To section.
Compose your email and Tap SEND.
To email all group members, leaders or administrators, do the following:
1. Tap on my Groups from the hamburger menu in the upper left.
2. Tap on group name.
3. Choose your selection in the Email Options in the lower left of the window.
4. Your email program will be displayed with the member’s email addresses in the To section.
5. Compose your email and Tap SEND.
Record Attendance
If you are the leader or administrator of a group, you will be able to record attendance for the
group. To record attendance for the group, do the following:
1. Tap on my Groups from the hamburger menu in the upper left.
From within
the group, tap
on Record
Attendance.
Mark all those
present.
49
2.
3.
4.
5.
6.
Tap on group name.
Tap on the RECORD ATTENDANCE in the lower right.
Choose the date you are recording attendance for.
Mark each person that was present.
If you had visitors attend the meeting that are not listed in your group, enter that number in
the Visitors box.
7. Tap CONFIRM to record the attendance data.
50
USING CONNECT ON A PHONE
STAFF MEMBERS
In addition to the functionality available to your congregation, staff members will have access to
additional information and functionality:
1. View various attendance and contribution summary reports.
2. Look up contact information for families in your congregation.
3. Add additional families to Roll Call.
4. Update profile information for your congregation.
5. Email folks in your congregation.
6. Enter and view visitation notes.
7. Enter and view confidential comments.
Based on your church’s Roll Call settings some of these functions may not be available.
Logging into Roll Call Connect
To access Roll Call Connect, the user must login from your phone’s browser. The URL for the
login page will be the ip-address of the Roll Call Server machine followed by “/co”, for example
http://your-ip-address/co . Ideally that ip address will be fixed and you’ll have a “Login” link on
your website pointing to that page.
If you have not created a Connect account yet, you’ll need to do that:
1. Tap the NEW USER tab.
2. Enter your Personal Email address.
3. Enter your Last Name.
4. Tap CREATE ACCOUNT.
Tap on NEW USER.
Enter email and last
name, then tap CREATE ACCOUNT.
5. If the system finds a match between that email address and last name, you will receive an
email with a link to set your password. This person must be marked as a staff member in Roll
Call for this functionality to be available to them.
51
6. From your email program, click on the link in the email. It will take you to a page to set your
password.
You are now ready to log in and start using Connect.
To log into Connect, do the following:
1. Make sure you are anchored on the Login tab.
2. Enter your User Name (email address).
3. Enter your Password.
4. Choose the App Format (Phone).
5. Click LOGIN.
Tap LOGIN.
Enter email address
and password, then tap
LOGIN.
Forgot Password
If you have created a Connect username, but have forgotten you password, simply click on the
Forgot Password link from the login screen. You’ll be prompted to enter your email address and
last name. Enter that information and click SEND LINK. An email will be sent with a link to
update your password.
Change Password
If you would like to change your password:
1. Log into Connect.
2. From the hamburger menu in the upper left, tap on the Change Password option.
3. Enter a new password.
4. Enter the new password again in the Confirm box.
5. Tap CONFIRM.
Setting Your Dashboard Widgets (reports)
There are a variety of reports or “widgets” that can be displayed on your home page once you
log into Roll Call Connect. Each staff member will have the opportunity to customize their
dashboard to display the widgets they are interested in. The permissions set for each staff user
will dictate which widgets will be available for them to choose.
52
To add widgets to your dashboard, do the following:
1. Tap on the ADD WIDGET button.
2. On the configuration page, tape in the Widget field, choose the type of report from the list.
Tap the in the
widge field, then
choose from the
list that is displayed.
3. Give the widget a Title.
4. Choose the Width for the report. You will have a choice to display 4, 8 or 12 weeks for the
Giving, Attendance, Combined and YTD widgets.
5. Choose the Display Type and Color.
6. Enter any specific criteria based on the type of widget. For example on the Giving Widget,
you can specify certain funds.
7. Tap CONFIRM to add the widget to your dashboard.
The following are the different types of widgets/reports that are available:
Giving
The Giving widget will display weekly giving totals for all funds, or giving for one specific fund.
Attendance
The Attendance widget will display weekly head count or people count totals for the week. You
can further define it for a specific campus, attendance type (service or group) and department.
Combined
The Combined widget graphs both attendance and giving data. You can further define it for a
specific campus and fund.
Birthdays
The Birthday widget will display how many people have a birthday today, this week and next.
When you click on that number, you will get a list of the people and their birthday.
Anniversaries
The Anniversary widget will display the number of families that have an anniversary today, this
53
week and next week. When you click on the number, you will get a list of the couples and their
anniversary.
YTD
The YTD widget will compare actual giving to budgeted giving. The first column will display
last weeks giving figures. The second column contains Year to Date totals and budget amounts.
To remove a widget from your dashboard, simply click/tap on the trash can icon to the on the
right side of the widget. To modify your widget, click or tap on the gear icon. Enter the new
preferences then press CONFIRM.
54
Looking up a Family
To look up a specific family, tap on the Find Family option on the bottom of the page. Or tap the
hamburger menu in the upper left and choose Find Family. Type the last name in the search box,
tap SUBMIT to view results. Tap on the name of the person you’d like to view details for.
Enter last
name, then
tap SUBMIT.
From the list of
results tap on
the name of the
person you are
searching for.
Contact information
Once you’ve selected a family from the search results, you will see a list of family members. Tap
on one of the family members to view their profile information. Tap on Personal to view personal
profile type information like email, cell phone birthdate. Tap on Address to view the address or
family type information
From the individuals profile,
tap on personal.
To view address
information,
tap on address
from individuals
profile.
55
Giving
Once you’ve selected a family from the search results, you will see a list of family members.
Tap on one of the family members to view their details. To view their giving history, tap Giving.
Depending on your user permissions, this tab may or may not be available.
Tap giving, from
within a profile to
view giving history
information.
Groups
Once you’ve selected a family from the search results, you will see a list of family members. Tap
on one of the family members to view their details. To view the groups they are involved in, tap
Groups. To view the details of that group, tap the group name.
Attendance History
Once you’ve selected a family from the search results, you will see a list of family members.
Tap on one of the family members to view their details. To view their attendance history, tap
Attendance.
Tap on Groups
from within a person’s profile to view
group involvements.
Tap on Attendance
from wtihin a person’s profile to view
their attendance
history.
56
Updating Family Information
To update contact information, add a new family member or upload a picture, you’ll first need to
pull up the person’s record. To do that, tap on the Find Family option on the bottom of the page.
Or tap the hamburger menu in the upper left and choose Find Family. Type the last name in the
search box, tap SUBMIT to view results. Tap on the name of the person you’d like update.
Update Profile/ General Information
To update the personal profile information:
1. Tap on family members name.
2. Tap Personal to expand that area.
3. Tap Edit on the top bar.
4. Update the necessary information such as name, birthday, cell phone etc.
5. Tap SAVE in the upper right.
From the individuals profile,
tap on personal.
Tap SAVE to make
the changes.
Tap EDIT.
Update Address Information
To update the address or family type information:
1. Tap on any family members name.
2. Tap the Address section.
3. Tap EDIT in the upper right.
4. Update the necessary information such as address, home phone or family email address.
5. Tap SAVE in the upper right.
Add New Family Member
To add a new person to an existing family, do the following:
1. Find the family using the Find Family menu option.
2. From the page that lists all the family members, tap the plus sign in the upper right.
3. Enter the information about this person, name, gender, birthdate, etc.
4. Tap SAVE in the upper right.
57
From the list of
family members, tap on the
plus sign to add
to the family.
Enter the profile
information for the
new family members. Tap SAVE
when you are done.
Upload Picture
To upload a profile picture for a person in the family, do the following:
1. Tap on the name of the family member for which you’d like to upload a picture.
2. Tap on the head image to the left of the person’s name.
3. Navigate to the image file you’d like to upload.
4. Click SAVE button.
Tap on the head
image to upload a
picture.
58
Add a New Family to Database
To add a new family into Roll Call, tap on the hamburger icon on the left side. Choose the option
to Add a Family. This will bring up a form for you to enter the basic contact information for the
head of the family. Once you’ve entered that information, make sure to click or tap SAVE in the
upper right of the window.
Add additional family members
If there are additional family members to be added to the family, click or tap the plus sign upper
right portion of the window. This will open up a form for you to enter the personal profile
information for the additional family member.
From menu, tap
on Add Family.
Enter profile
information,
then tap SAVE.
Sending Email
Within Roll Call Connect, you’ll be able to send email to an individual or group. Your device’s
default mail program will be returned with the To addresses filled in.
An Individual
To send an email to a specific person, do the following:
1. Tap Find Family on the bottom menu.
2. Type in the last name of the individual in the search box.
3. Tap SUBMIT.
4. Select the appropriate family from the results box.
5. Tap the individuals name from the family members list.
6. Expand the Personal section.
7. Tap on the email address.
8. From your email program, compose and send your email.
A group of people
To email a specific group member, do the following:
1. From the hamburger menu in upper left, choose My Groups.
2. Tap on the group that the person is involved in.
3. Click on the Roster icon at the top.
59
4. Click on the Email link underneath the person’s name that you’d like to email.
5. Your email program will be displayed with the person’s email address in the To section.
6. Compose your email and click SEND.
Tap on personal email
address to send an email
to an individual.
From menu,
choose My
Groups, then
choose appropriate group.
From the roster, tap on the
email link of
the person you
wish to email.
To email all group members, leaders or administrators, do the following:
1. From the hamburger menu in the upper left, choose My Groups.
2. Tap on the Group Name.
3. Choose your selection in the Email Options at the bottom of the window.
4. Your email program will be displayed with the member’s email addresses in the To section.
5. Compose your email and click SEND.
60
From within
the group
roster, tap on
EMAIL OPTIONS.
Choose who you’d
like to send the
email to.
Getting Directions (map)
To view a map of families address, you’ll first need to pull up that families profile information.
Do the following:
1. Tap Find Family on the bottom menu.
2. Type in the last name of the family the search box. Tap SUBMIT.
3. Select the appropriate family from the results box.
4. Tap on a family members name.
5. Expand the Address section.
6. Click or tap on VIEW ON MAP.
7. This will bring up your default maps program with the address highlighted.
From wtihin the
address area of a
person’s record, tap
on View on Map.
61
Visitation Notes
Visitation notes may be added or viewed in several different ways:
1. From within a person’s profile information.
2. From the My Visits menu.
Enter visitation notes
To enter visitation notes, from an individual’s record do the following:
1. Tap the Find Family menu at the bottom of the page.
2. Enter the Last Name of the family.
3. Tap SUBMIT.
4. Tap on the name of the individual you need to enter visitation notes.
5. Expand the Visits section.
6. Tap ADD VISIT button.
7. Enter the Date of the visit.
8. Enter the Type of visit (phone, in person, etc).
9. Enter the Notes for the visit.
10. Tap SAVE at the bottom to save the information.
Tap on Add
Visit to enter
additional visitation notes.
Enter visitaiton
notes.
To enter visitation notes from My Visits, do the following:
1. Tap on my Visits from the hamburger menu in the upper left.
2. Tap on the plus sign in the upper right.
3. Enter the last name of the person you are entering the notes for.
4. Tap on SUBMIT.
5. Tap on the name of the specific person.
6. Enter the Date of the visit.
7. Enter the Duration of the visit.
8. Enter the Type of visit.
9. Enter the visitation Comments.
10. Tap the SAVE button at the bottom of the page.
62
Tap on plus sign
to add another
visit record.
Tap My Visits
from menu.
Look up visitation notes I entered
To view the notes that I have entered, do the following:
1. Choose My Visits from the hamburger menu in the upper left.
2. A list of the people who have visitation notes that you’ve entered are listed.
3. Their visitation notes will be displayed.
View visitation notes for a specific person
To view visitation notes, from an individual’s record do the following:
1. Tap Find Family from the bottom.
2. Type in the last name of the individual in the search box.
3. Tap SUBMIT.
4. Select the appropriate family from the results box.
5. Tap on the individuals name from the family members list.
6. Tap on the Visits section.
7. Their visitation notes will be displayed.
From within
their profile
record, tap on
visits to view
all visitations.
After tapping on My
Visits, they
will be listed
by person.
63
Confidential Comments
Confidential comments may be added or viewed in several different ways:
1. From within a person’s profile information.
2. From the My Comments menu.
Enter confidential comments
To enter comments, from an individual’s record do the following:
1. Tap the Find Family menu at the bottom of the page.
2. Enter the Last Name of the family.
3. Tap SUBMIT.
4. Tap on the name of the individual you need to enter comments for.
5. Expand the Comments section.
6. Tap ADD COMMENT button.
7. Enter the Date of the comment.
8. Enter the Comments.
9. Tap SAVE at the bottom to save the information.
From the list of
family members, tap on
the person you
wish to view
comments.
Expand the
comments section, tap Add
Comment.
Enter the comments,
then tap SAVE at the
bottom of the screen.
64
To enter comments from My Comments, do the following:
1. Tap on My Comments from the hamburger menu in the upper left.
2. Tap on the plus sign in the upper right.
3. Enter the Last Name of the person you are entering the notes for.
4. Tap on SUBMIT.
5. Tap on the name of the specific person from the results list.
6. Enter the Date of the comment.
7. Enter the Comments.
8. Tap the SAVE button at the bottom of the page.
All comments
that I entered are
listed.
Tap on My Comments
from the menu.
Look up confidential comments I entered
To view the comments that I have entered, do the following:
1. Choose My Comments from the hamburger menu in the upper left.
2. A list of the people who have comments that you’ve entered are listed.
3. Tap to view the comments related to them.
View confidential comments for a specific person
To view confidential comments, from an individual’s record do the following:
1. Tap Find Family from the bottom.
2. Type in the last name of the individual in the search box.
3. Tap SUBMIT.
4. Select the appropriate family from the results box.
5. Tap on the individuals name from the family members list.
6. Tap on the Comments section.
7. Their Comments will be displayed.
Recording Attendance
If you are the leader or administrator of a group, you will be able to record attendance for the
group. To record attendance for the group, do the following:
1. Click on My Groups.
2. Tap on the group you wish to record attendance for.
65
From the
menu, tap on
My Groups.
Tap on the group
you’d like to record attendance
for.
3.
4.
5.
6.
Tap Record Attendance at the bottom.
Choose the date you are recording attendance for.
Mark each person that was present.
If you had visitors attend the meeting that are not listed in your group, enter that number in
the Visitors box.
7. Tap CONFIRM in the upper right to save the attendance.
Mark those that
are/were present.
Tap Record
Attendance
in the bottom
section.
66
Giving Online
To make an online donation, do the following:
1. Click on the Donate Now menu icon on the left sidebar.
2. Choose between a “one time” or “recurring” gift type
3. For “one time” gifts, enter the following information.
a. Enter the Amount of the gift.
b. Enter the Fund that the gift should be designated to
c. Click the ADD button
If you are using
Bluefin, your
donors will see
an options for
One-Time or
Recurring gift.
If you are using
Paypal, recurring
is not an option.
Enter the amount
and designated
fund. Tap ADD.
4. For a “recurring” gift, enter the following information
a. Select the Schedule type (when you want the gift to re-occur).
b. Enter the specific date if applicable.
c. Enter the Start Date.
For recurring
gifts, choose
your schedule.
67
d. Enter the number of times you’d like this gift to occur. Leave this field blank if there
is no end date.
e. Enter the Amount of the gift.
f. Enter the Fund that the gift should be designated to.
g. Click the ADD button.
5. Once you’ve added all the gifts you’d like to, move on to the payment section.
6. Enter the Card Number.
7. Enter the Expiration Month.
8. Enter the Expiration Year.
9. Enter the CSV code.
10. Click CONTINUE.
11. At this point, you may review your online gift. If everything looks correct, click SUBMIT. If
you need to make changes, click EDIT GIFT.
Enter credit
card information, then tap
Continue.
Review the gift
information.
Tap Continue.
Confirmation page is displayed. Tap Done to leave
this page.
68