1
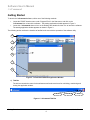
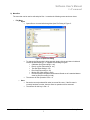
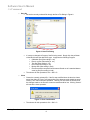
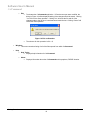
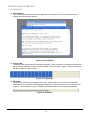
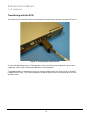
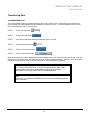
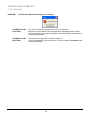
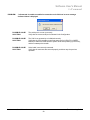
S OFTWARE
V ERSION 1.0
Software User's Manual
CalCommand
Table of Contents
Product Description....................................................................................... 1
System Requirements ................................................................................... 2
Warnings and Precautions............................................................................ 2
Setup ............................................................................................................... 3
What’s Included.............................................................................................. 4
Connecting the Base Unit to a PC ................................................................ 5
Getting Started ............................................................................................... 6
Operation ...................................................................................................... 13
Using the Data .............................................................................................. 23
Troubleshooting Guide................................................................................ 24
Additional Help Information ........................................................................ 30
CalCommand User’s Manual
Table of Contents
i
Software User's Manual
CalCommand
Product Description
The FORCE America® Incorporated CalCommand, a software package for the Microsoft® Windows® platform,
assists in the communications of the Datavator Data Retrieval Unit (Datavator) and SSC5100 Spreader Control
(5100) with a personal computer (PC).
Data Transfer
CalCommand provides the following data transfer features:
• Synchronize data files with the press of a button.
• Download standard data files and upload them to the reporting database for use with ReportCommand
software.
• Download legacy event data files for use with ForceReport or utilize the comma-separated text files with
spreadsheet software.
• Download standard or event data error files to capture any inconsistent data recorded on the 5100
spreader control.
• Download Datavator errors to help with troubleshooting.
• Transfer 5100 calibration settings to retrieve and restore settings for backup and sharing using a PC.
Firmware Transfer
CalCommand provides the following firmware transfer features:
• Upgrade the Datavator firmware with the latest version.
• Upload 5100 spreader firmware files to store on the Datavator and later perform 5100 upgrades.
• Upgrade the 5100 spreader firmware with the latest version.
File Management
CalCommand provides the following file management features:
• Open, view, modify, save, and close small text files.
• Calibration settings editor.
• Print calibration files or text files containing data and/or error information.
CalCommand User’s Manual
Product Description
1
Software User's Manual
CalCommand
System Requirements
The CalCommand software must be installed and operated on an IBM-compatible PC with the following system
specifications:
• Microsoft® Windows® 98, Windows® NT 4.0, Windows® 2000, Windows® Me, or Windows® XP
• 64 MB RAM or greater recommended
• CD-ROM drive
• Super VGA monitor or better
• 250 MB of disk space for the following components
o CalCommand
o Dot NET Framework version 1.1 redistributable
o Microsoft SQL Destop Engine
• Available RS-232 COM port or USB port with RS-232 COM port adapter
Note:
FORCE America recommends that the FORCE America P/N 54593A001, RS-232
COM port adaptor, be used to connect the USB port of your PC to your FORCE
America Datavator base unit.
Warnings and Precautions
•
•
To prevent fire or shock hazard do not expose the Datavator to rain or moisture.
To prevent damage to the Datavator, connect the wall adapter to a standard 110/120V outlet only.
System Requirements
CalCommand User’s Manual
2
Software User's Manual
CalCommand
Setup
Installation and Uninstallation
To install the FORCE America CalCommand program:
Windows 98/2000/NT/Me/XP
STEP 1
Close all applications on the PC.
STEP 2
Insert the CalCommand CD into the CD tray on the PC and close the tray.
STEP 3
A website should open automatically containing a link to the CalCommand program, in which
case proceed to step 8. If it does not, then follow steps 4 – 7.
STEP 4
Open ‘My Computer’ from the desktop or ‘Windows Explorer’ from the ‘Start’ menu.
STEP 5
Locate the CD drive in My Computer. (Typically D: for computers with one hard drive).
STEP 6
Browse the CD drive and locate the file “index.html”.
STEP 7
Double-click on the file to open the website.
STEP 8
Click on the link to the “CalCommand Installer”.
STEP 9
Follow the on-screen instructions to complete the installation.
To uninstall the FORCE America CalCommand program:
Windows 98/2000/NT/Me/XP
STEP 1
Close all applications on the PC.
STEP 2
Open ‘Control Panel’ from the ‘Start’ menu.
STEP 3
Double-click ‘Add/Remove Programs’ and the ‘Add/Remove Programs Properties’ dialog
appears.
STEP 4
Select ‘CalCommand’ from the list under the ‘Install/Uninstall’ tab.
STEP 5
Click the ‘Add/Remove’ button to remove ‘CalCommand’.
STEP 6
Click ‘Yes’ to verify the removal of ‘CalCommand’.
STEP 7
After uninstallation has completed, restart the PC when prompted.
STEP 8
Uninstallation is complete.
CalCommand User’s Manual
Setup
3
Software User's Manual
CalCommand
What’s Included
D
A
C
B
The 9897A001 Datavator Base Unit Kit includes this manual and the following items:
A.
B.
C.
D.
9895A001 Datavator Base Unit
9898A001 Datavator Utility Software
54505A001 Serial Cable, 9-pin, male-to-female
54506A001 Power Supply Adapter, 12VDC, 1A
What’s Included
CalCommand User’s Manual
4
Software User's Manual
CalCommand
Connecting the Base Unit to a PC
Figure 1: Connecting the Wall Adapter from the
Serial Cable to the Base Unit
Figure 2: Connecting the Serial Cable to the PC
STEP 1
Turn off the PC.
STEP 2
Connect the serial cable to the Datavator base unit.
STEP 3
Connect the opposite end of the serial cable to the computer’s serial port or communication port
(com port) and secure it as necessary. (See the computer documentation for details)
STEP 4
Plug the wall adapter into the base unit.
Plug the wall adapter into an electrical outlet [~120V AC]. (It is recommended to connect the wall adapter through
a surge protector to avoid damage to the Datavator Data Retrieval Unit.)
CalCommand User’s Manual
Connecting the Base Unit to a PC
5
Software User's Manual
CalCommand
Getting Started
To launch the CalCommand software, utilize one of the following methods:
•
Locate the FORCE America menu under “Program Files” in the Start menu, and click on the
CalCommand icon to launch the software. The starting application window appears in Figure 3.
Locate the CalCommand shortcut icon on the Desktop and double-click the icon to launch the software.
The starting application window appears as shown in Figure 3.
•
The following section outlines the interface to familiarize the user with the operation of the software utility.
1
2
3
4
5
6
Figure 3: CalCommand Software Application Window
1) Title Bar
The title bar contains the name for the software as well as shortcut icons for minimizing, maximizing and
closing the application window.
Minimize
Maximize
Close
Figure 4: CalCommand Title Bar
Getting Started
CalCommand User’s Manual
6
Software User's Manual
CalCommand
2) Menu Bar
The menu bar can be used to edit and print files. It contains the following menus and menu items:
•
File Menu
o Open
Opens files to view and edit through the Open File Dialog in Figure 5.
Figure 5: Open File Dialog
To change the file type that is being opened, simply click the pull down circled and
choose the desired file type. It supports the following file types:
• Calibration files (files ending in .cal)
• Event Log files (files ending in .evt)
• Text files (files ending in .txt)
• Error files (files ending in .err)
• Backup files (files ending in .bak)
• Files that contain corrupted lines that were filtered out of a standard data or
event log file (files ending in .bad)
The shortcut for this operation is Ctrl + O.
o
Save
Saves the currently selected file under its current file name. If the file name it
currently has does not exist, then the Save As operation will be executed.
The shortcut for this key is Ctrl + S.
CalCommand User’s Manual
Getting Started
7
Software User's Manual
CalCommand
o
Save As
Saves the currently selected file through the Save File Dialog in Figure 6.
Figure 6: Save File Dialog
It is easy to change the file type of the file being saved. Simply click the pull down
circled and choose the desired file type. It supports the following file types:
• Calibration files (files ending in .cal)
• Event Log files (files ending in .evt)
• Text files (files ending in .txt)
• Error files (files ending in .err)
• Backup files (files ending in .bak)
• Files that contain corrupted lines that were filtered out of a standard data or
event log file (files ending in .bad)
The shortcut for this operation is Ctrl + Shift + S.
o
Close
Closes the currently selected file. If the file was modified since the last time it was
saved, the dialog in Figure 7 will open asking if the changes made should be saved.
Clicking “Yes” will run the Save operation. Clicking “No” will close the file and all of
the changes made to the file since it was last saved would be lost. Clicking “Cancel”
will cancel the close operation.
Figure 7: Close Confirmation
The shortcut for this operation is Ctrl + Shift + C.
Getting Started
CalCommand User’s Manual
8
Software User's Manual
CalCommand
o
Print
Prints the currently selected file through the Print Dialog in Figure 8. Simply select
the desired printer from the pull down menu circled. If needed, please consult the
desired printer’s manual to configure its properties.
Figure 8: Print Dialog
The shortcut for this operation is Ctrl + P.
o
Print Preview
Shows an image of how the currently selected file looks after being printed. Figure 9
is an example of using print preview.
Figure 9: Print Preview Dialog
The shortcut for this operation is Ctrl + Shift + P.
CalCommand User’s Manual
Getting Started
9
Software User's Manual
CalCommand
o
Exit
Terminates the CalCommand application. If files that are open were modified, the
dialog in Figure 10 will be displayed asking if the changes should be saved. Clicking
“Yes” will run the Save operation. Clicking “No” will close the file and all of the
changes made to the file since it was last saved would be lost. Clicking “Cancel” will
cancel the close operation.
Figure 10: Exit confirmation
The shortcut for this operation is Ctrl + Q.
•
Windows
o This menu contains a listing of all of the files opened from within CalCommand.
•
Help
o
o
Help Topics
Displays help information for CalCommand.
About
Displays information about the CalCommand and its proprietor, FORCE America.
Getting Started
CalCommand User’s Manual
10
Software User's Manual
CalCommand
3) Toolbar
The toolbar pictured below consists of several icons which link to the 5100, Datavator, Configuration, or
Printer main menus of the program. Menus are accessed by clicking on the desired icon. The currently
selected menu (In Figure 11 the 5100 menu is currently selected) is highlighted in blue.
Figure 11: CalCommand Tool Bar
The icons are listed in order (left to right) and explained briefly below:
•
•
•
•
•
•
5100
o
All communications with the 5100 including:
Saving and loading calibration settings.
Reading and writing driver keys.
Upgrading firmware.
Datavator
o All communications with the Datavator including:
Uploading and downloading calibration settings.
Transferring 5100 Firmware.
Upgrading the Datavator.
Event Log and Standard Data transfer.
Datavator Automatic Synchronization.
Config
o All configurable settings including:
Selecting the Serial Port
Clearing the CalCommand error logs.
File Folder Locations
Printer
o Emulates a serial printer at a user-specified baud rate.
As the data is put onto the serial port by an external device (like a 5100 spreader
control or Datavator) it is printed on the screen. This data can be edited and/or
saved similar to other files.
Help
o Opens the CalCommand Help file.
FORCE America Website
o Opens the current FORCE America software download website.
CalCommand User’s Manual
Getting Started
11
Software User's Manual
CalCommand
4) Active Window
This window contains files opened by the application. The screenshot in Figure 12 shows the active
window after a file has been opened.
Figure 12: Active Window
5) Progress Bar
The progress bar displays transfer information graphically. When a transfer is occurring the progress bar
will grow across the screen until the transfer is finished. The screenshot in Figure 13 shows the progress
bar about halfway through a transfer.
Figure 13: Progress Bar
6) Status Bar
The status bar communicates messages to the user. When selected, icons and menu items display
explanations of their operation. Messages also appear during operation alerting the user of actions and
progress. The screenshot in Figure 14 displays the status bar with its welcome greeting displayed.
Figure 14: Status Bar
Getting Started
CalCommand User’s Manual
12
Software User's Manual
CalCommand
Operation
Transferring with the Datavator
The Datavator must be placed on the base station to transfer files or firmware, as shown in Figure 15:
Figure 15: Datavator Mounted on the Base Station
After placing the Datavator on the base station a startup screen is displayed (cursor begins to blink in the upper
left corner of the display or a Matrix Orbital splash screen is displayed). The word INITIALIZING then appears,
followed by the screen shown in Figure 16.
DA T A V A TOR
RE V
x . x
mm / y y
z z % MEMOR Y U S E D
b b b b k B A V A I L A B L E
Figure 16 : Datavator Startup Screen
Where: ‘x.x’ is the firmware version for the Datavator.
mm/yy is the month and year of the version release.
zz is the percentage of storage memory used.
bbbb is the amount of free memory in kilobytes (kB).
The message CONNECTING follows the startup screen. The Datavator waits for the PC to establish
communication, and to begin the download. If the PC program does not establish communication within 5
minutes, the CONNECTING message will disappear, and the display will go blank. This mode is the Datavator
sleep mode. In this mode, the PC program can still “wake up” the Datavator and initiate a transfer. The display
does not have to be on for communication to begin.
CalCommand User’s Manual
Operation
13
Software User's Manual
CalCommand
Transferring with the 5100
The 5100 must be connected to the PC via a serial port to transfer files or firmware, as shown in Figure 17:
Figure 17: Connecting the 5100 to the PC
To save and load calibrations on a 5100 spreader control, the 5100 must be configured to save or load
calibrations. Refer to the 5100 Operation Manual for more information.
To upgrade firmware or read/write driver keys on a 5100 spreader control, the 5100 must be in “RUN PC
LOADER PROG” mode. This is accomplished by holding the spinner knob in while powering on the 5100
spreader control.
Operation
CalCommand User’s Manual
14
Software User's Manual
CalCommand
Transferring Data
SYNCHRONIZING DATA
The synchronization feature increases productivity and is very simple to use. It allows the user to transfer all of
the event data logs, standard data logs, and Datavator log files in one click. It will also update the time currently
set on the Datavator to the PC’s current time.
STEP 1
Click the Config button.
STEP 2
Click the General button.
STEP 3
Verify that the Datavator Autosynchronization option is clicked.
STEP 4
Click the Datavator button.
STEP 5
Click the File Transfers button.
STEP 6
Click the Synchronize button.
While downloading, the transfer progress bar relays information about the current file being transferred. After the
Datavator time is synchronized, the status box will read “Synchronization complete”. After that, each file transfer
will cause the status box to read “No files to download” or “File downloaded successfully.”
Note:
Event data is downloaded to the “C:\Force Spreader Data\Raw Data” folder,
Standard data is uploaded to the database, and Datavator log files are
downloaded to the “Logs” folder in the CalCommand directory.
Note:
Please refer to CONNECTION ERRORS section in the troubleshooting guide for
more information.
CalCommand User’s Manual
Operation
15
Software User's Manual
CalCommand
DOWNLOADING DATA LOGS
If only one of the types of log files stored on the Datavator needs to be transferred, then the Data Logging menu
can be used. Just click on the button that corresponds to the desired data logs.
STEP 1
Click the Datavator button.
STEP 2
Click the Data Logging button.
STEP 3
Select the type of Data log to download:
While downloading, a transfer progress bar relays information about the current file being transferred. The status
box and progress bar convey information about the transfer progress and the operation currently being executed.
If data files were transferred, the status box will display “Files downloaded successfully.” If there were no data
files transferred, the status box will display “No files downloaded.”
Note:
Event data is downloaded to the “C:\Force Spreader Data\Raw Data” folder,
Standard data is uploaded to the database, and Datavator log files are
downloaded to the “Logs” folder in the CalCommand directory.
Note:
Please refer to the CONNECTION ERRORS section in the troubleshooting guide
for more information.
Operation
CalCommand User’s Manual
16
Software User's Manual
CalCommand
UPGRADING 5100 FIRMWARE
FORCE America will periodically release updated firmware for the 5100 spreader control. These updates contain
new features and enhancements over previously released firmware. CalCommand is capable of upgrading the
5100 spreader control. The newest firmware is can be located by clicking on the FORCE America website icon..
STEP 1
Click the 5100 button.
STEP 2
Click the Firmware button.
STEP 3
Click the Upgrade 5100 button.
STEP 4
Select a file by clicking on the file. The file name then appears in the “File name” text box.
STEP 5
Click the “Open” button to continue or click the “Cancel” button to abort the upgrade.
While uploading, the transfer progress bar relays information about the current file being transferred. The status
box and progress bar convey information about the transfer progress and the operation currently being executed.
If the file was transferred correctly, the status box will indicate that the file was transferred successfully. If there
was an error in the transmission, the status box will indicate that the file was not transferred successfully.
Note:
The 5100 must be placed into “RUN PC LOADER” mode in order to upgrade the
firmware. For more information, please see Manual M0005, the 5100 Spreader
Upgrade Manual.
Note:
Please refer to CONNECTION ERRORS section in the troubleshooting guide for
more information.
CalCommand User’s Manual
Operation
17
Software User's Manual
CalCommand
Transferring Calibration Settings
UPLOADING 5100 CALIBRATION SETTINGS
CalCommand can transfer calibration files to and from a Datavator. The Datavator can then be used to calibrate
any number of 5100 spreader controls in a fraction of the time it takes to calibrate one by hand. To upload a
calibration file to the Datavator, simply follow these steps:
STEP 1
Click the Datavator button.
STEP 2
Click the Calibration Settings button.
STEP 3
Click the Upload Calibrations button.
STEP 4
Select a file by clicking on the file. The file name then appears in the “File name” text box.
STEP 5
Click the “Open” button to continue or click the “Cancel” button to abort the upgrade.
STEP 6
If the file already exists on the Datavator the confirmation dialog in Figure 18 is displayed.
Figure 18: Calibration File Exists
STEP 7
Click ‘Yes’ to overwrite the existing calibration settings file on the Datavator, or click ‘No’ to cancel the
current calibration settings transfer.
Note:
Any calibration settings overwritten on the Datavator cannot be restored. A
possible alternative is to rename the calibration settings file before transferring.
While uploading, a transfer progress bar relays information about the current file being transferred. The status
box and progress bar convey information about the transfer progress and the operation currently being executed.
If the file was transferred correctly, the status box will indicate that the file was transferred successfully. If there
was an error in the transmission, the status box will indicate that the file was not transferred successfully.
Note:
Please refer to CALIBRATION SETTING TRANSFER ERRORS section in the
troubleshooting guide for more information.
Operation
CalCommand User’s Manual
18
Software User's Manual
CalCommand
DOWNLOADING 5100 CALIBRATION SETTINGS
Calibrating a 5100 spreader control can be a complicated and arduous task. CalCommand can transfer
calibration files to and from a Datavator. The Datavator can then be used to calibrate any number of 5100
spreader controls in a fraction of the time it takes to calibrate one by hand. To download all of the calibration files
that are currently stored on a Datavator, simply follow these steps:
STEP 1
Click the Datavator button.
STEP 2
Click the Calibration Settings button.
STEP 3
Click the Download Calibrations button.
While downloading, a transfer progress bar relays information about the current file being transferred. The status
box and progress bar convey information about the transfer progress and the operation currently being executed.
If the files were transferred correctly, the status box will indicate that the files were transferred successfully. If
there was an error in the transmission, the status box will indicate that some of the files were not transferred
successfully.
Note:
Please refer to CONNECTION ERRORS section in the troubleshooting guide for
more information.
CalCommand User’s Manual
Operation
19
Software User's Manual
CalCommand
SAVING CALIBRATION FILES FROM THE 5100
CalCommand can save the calibration settings of a currently calibrated 5100 spreader control and then load
those calibrations onto other 5100 spreader controls, reducing the time spent calibrating. CalCommand makes it
simple and easy to save calibration settings from a 5100 spreader control. Follow these simple steps to save
calibration settings:
STEP 1
Setup the 5100 so that it is ready to save a calibration file. Refer to the 5100 Calibration Manual for
more information.
STEP 2
Click the 5100 button.
STEP 3
Click the Calibration Settings button.
STEP 4
Click the Save Calibration Files button.
While saving, a transfer progress bar relays information about the current file being transferred. The status box
and progress bar convey information about the transfer progress and the operation currently being executed. If
the file was transferred correctly, the status box will indicate that the file was transferred successfully. If there was
an error in the transmission, the status bar will indicate that the file was not transferred successfully.
After the calibration file is saved, it is immediately opened inside of CalCommand.
Note:
Please refer to CONNECTION ERRORS section in the troubleshooting guide for
more information.
Operation
CalCommand User’s Manual
20
Software User's Manual
CalCommand
LOADING CALIBRATION FILES TO THE 5100
Calibrating a 5100 spreader control can be a complicated and arduous task. CalCommand can save the
calibration settings of a currently calibrated 5100 spreader control and then load those calibrations onto other
5100 spreader controls, reducing the time spent calibrating. CalCommand makes it simple and easy to load
calibration settings to a 5100 spreader control. Follow these simple steps to load calibration settings:
STEP 1
Setup the 5100 so that it is ready to load a calibration file. Refer to the 5100 Calibration Manual for
more information.
STEP 2
Click the 5100 button.
STEP 3
Click the Calibration Settings button.
STEP 4
Click the Load Calibration Files button.
STEP 5
Select a file by clicking on the file. The file name then appears in the “File name” text box.
STEP 6
Click the “Open” button to continue or click the “Cancel” button to abort the upgrade.
While loading, a transfer progress bar relays information about the current file being transferred. The status box
and progress bar convey information about the transfer progress and the operation currently being executed. If
the file was transferred correctly, the status box will indicate that the file was transferred successfully. If there was
an error in the transmission, the status box will indicate that the file was not transferred successfully.
Note:
Please refer to CALIBRATION SETTING TRANSFER ERRORS section in the
troubleshooting guide for more information.
CalCommand User’s Manual
Operation
21
Software User's Manual
CalCommand
VIEW/EDIT CALIBRATION FILES
Calibration files can also be viewed and edited using CalCommand. This is very useful when creating many
different calibration files that are very similar. Simply create a template file and then change the template for the
specific truck that the calibration file is going to be loaded on (i.e. be changing the vehicle ID). Follow these
simple steps to view and edit a calibration file.
STEP 1
Setup the 5100 so that it is ready to load a calibration file. Refer to the 5100 Calibration Manual for
more information.
STEP 2
Click the 5100 button.
STEP 3
Click the Calibration Settings button.
STEP 4
Click the View/Edit Calibration Files button.
STEP 5
Select a file by clicking on the file. The file name then appears in the “File name” text box.
STEP 6
Click the “Open” button to continue or click the “Cancel” button to abort.
A window will open with the calibration file information aligned in a datagrid. Use this window to edit the values.
Note:
Do not forget to save changes made to the calibration settings. Closing a
calibration settings file without saving may result in lost work.
Note:
When editing a field in a calibration file, a small pencil icon ( ) will appear to
show that the field is in an “edit” state. A field must leave the “edit” state for its
new value to be saved. To commit a change, simply press ENTER, TAB, or click
a different field in the calibration file.
Operation
CalCommand User’s Manual
22
Software User's Manual
CalCommand
Using the Data
After the data has been saved to the PC, there are several ways to utilize it. Event data is organized in a commadelimited format, whereas standard data is automatically placed in the database. This allows the event data to be
imported into a spreadsheet program or to use specialized data formatting software to prepare reports. The
standard data contained within the database can be used with the ReportCommand report generator. See a
FORCE America Sales Representative for more information on current FORCE America report-generating
software solutions.
CalCommand User’s Manual
Using the Data
23
Software User's Manual
CalCommand
Troubleshooting Guide
The following provides an interpretation of the CalCommand error and warning messages. If any of these
messages appear, please follow the steps provided to eliminate or continue past the error message.
DATAVATOR UPGRADE ERRORS
PROBLEM:
File size and file name does not match that of a valid firmware file and an error message as
indicated below is displayed.
POSSIBLE CAUSE:
SOLUTION:
PROBLEM:
An invalid firmware file was selected.
Select a valid FORCE America firmware file when performing an upgrade.
Download all Datavator firmware files from the FORCE America website icon or
obtain it from a FORCE America Resource CD.
The status box reads “Error: Datavator Upgrade Failure”:
POSSIBLE CAUSE:
SOLUTION:
The Datavator was powered down during the transfer.
Reboot the Datavator, acknowledge any error message by pressing the
appropriate function key, and then reattempt the transfer.
POSSIBLE CAUSE:
SOLUTION:
Serial cable is not securely connected.
Verify that all connectors are secured properly and retry the transfer.
POSSIBLE CAUSE:
SOLUTION:
Datavator is not aligned properly on the base unit.
Remove the Datavator from the base unit and place the Datavator back on the
base unit making sure to align it properly.
Troubleshooting Guide
CalCommand User’s Manual
24
Software User's Manual
CalCommand
5100 FIRMWARE TRANSFER ERRORS
PROBLEM:
File size or file name does not match that of a valid 5100 firmware file and an error message
as indicated below is displayed.
POSSIBLE CAUSE:
SOLUTION:
PROBLEM:
An invalid firmware file was selected.
Select a valid FORCE America firmware file when performing an upgrade.
Download all 5100 firmware files from the FORCE America website icon or obtain
it from a FORCE America Resource CD.
The status box displays “Error: 5100 firmware transfer failure”
POSSIBLE CAUSE:
SOLUTION:
The firmware file has already been stored to the Datavator.
Check the display on the Datavator for a detailed explanation of the failure.
POSSIBLE CAUSE:
SOLUTION:
The Datavator was powered down during the transfer.
Reboot the Datavator, acknowledge any error message by pressing the
appropriate function key, and then reattempt the transfer.
POSSIBLE CAUSE:
SOLUTION:
Serial cable is not securely connected.
Verify that all connectors are secured properly and retry the transfer.
POSSIBLE CAUSE:
SOLUTION:
Datavator is not aligned properly on the base unit.
Remove the Datavator from the base unit and place the Datavator back on the
base unit making sure to align it properly.
PROBLEM:
The error message indicated below appears
POSSIBLE CAUSE:
SOLUTION:
The Datavator is out of memory.
Verify this by watching the Datavator as it starts up. It will indicate how much
memory is being used. If this number is over 95%, then clear some unused files
from the Datavator.
CalCommand User’s Manual
Troubleshooting Guide
25
Software User's Manual
CalCommand
CALIBRATION SETTING TRANSFER ERRORS
PROBLEM:
File size or file name does not match that of a valid 5100 calibrations file and an error
message as indicated below is displayed
POSSIBLE CAUSE:
SOLUTION:
PROBLEM:
An invalid 5100 calibration settings file was selected.
Select a valid FORCE America 5100 calibration settings file when uploading 5100
calibration settings files.
The status box displays “Error: Calibration settings upload failure” or “Error: Calibration
settings download failure”
POSSIBLE CAUSE:
SOLUTION:
The Datavator was powered down during the transfer.
Reboot the Datavator, acknowledge any error message by pressing the
appropriate function key, and then reattempt the transfer.
POSSIBLE CAUSE:
SOLUTION:
Serial cable is not securely connected.
Verify that all connectors are secured properly and retry the transfer.
POSSIBLE CAUSE:
SOLUTION:
Datavator is not aligned properly on the base unit.
Remove the Datavator from the base unit and place the Datavator back on the
base unit making sure to align it properly.
Troubleshooting Guide
CalCommand User’s Manual
26
Software User's Manual
CalCommand
CONNECTION ERRORS
PROBLEM:
CalCommand is unable to establish a connection to the Datavator and an error message
indicated below is displayed:
POSSIBLE CAUSE:
SOLUTION:
PROBLEM:
The Datavator contains an incompatible firmware version.
Upgrade the Datavator to the latest firmware version. Contact a FORCE America
Sales Representative to find out more information about upgrading the Datavator.
CalCommand is unable to establish a connection to the Datavator and an error message
indicated below is displayed:
POSSIBLE CAUSE:
SOLUTION:
The serial port is not set up correctly.
Verify that the correct serial port is selected in the Configuration.
POSSIBLE CAUSE:
SOLUTION:
The Datavator is not powered up or initialized correctly.
Remove the Datavator from the base unit and place the Datavator back on the
base unit making sure to align it properly.
POSSIBLE CAUSE:
SOLUTION:
The timing between the PC and the Datavator is out of sync.
Close the CalCommand application and power down the Datavator. Reopen the
utility and power up the Datavator, and then retry the previous operation.
POSSIBLE CAUSE:
SOLUTION:
Serial cable is not securely connected.
Verify that all connectors are secured properly, and then retry the previous
operation.
CalCommand User’s Manual
Troubleshooting Guide
27
Software User's Manual
CalCommand
PROBLEM:
CalCommand displays the following error message:
POSSIBLE CAUSE:
SOLUTION:
The user is currently transferring files to or from the Datavator.
Wait until all other transfers have completed before attempting another transfer.
Exit the application and reopen the application if all transfers have completed and
the warning still appears.
POSSIBLE CAUSE:
SOLUTION:
Another device or application is using the serial port.
Close any applications using the serial port. Close and restart CalCommand, and
reattempt the transfer.
Troubleshooting Guide
CalCommand User’s Manual
28
Software User's Manual
CalCommand
PROBLEM:
CalCommand is unable to establish a connection to the 5100 and an error message
indicated below is displayed
POSSIBLE CAUSE:
SOLUTION:
The serial port is not set up correctly.
Verify that the correct serial port is selected in the Configuration.
POSSIBLE CAUSE:
SOLUTION:
The 5100 is not powered up or initialized correctly.
Verify that the 5100 spreader control has power and is in RUN PC LOADER
MODE (to enable this mode hold the spinner knob while powering up the 5100),
and then reattempt the transfer.
POSSIBLE CAUSE:
SOLUTION:
Serial cable is not securely connected.
Verify that all connectors are secured properly, and then retry the previous
operation.
CalCommand User’s Manual
Troubleshooting Guide
29
Software User's Manual
CalCommand
Additional Help Information
For additional help consult the help document provided with CalCommand. To view the help document select
“Help Topics” in the “Help Menu” of CalCommand. Consult a FORCE America Sales Representative for
additional information on using the CalCommand software
CalCommand User’s Manual
Troubleshooting Guide
30
Document Number: M0083-B
Released:
2/8/07
Copyright © 2007 FORCE America Inc.