1
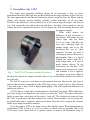
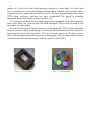
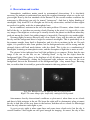
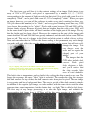
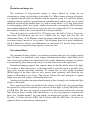
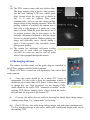
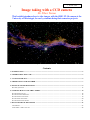
v. 16, Feb. 4, 09
1
Image taking with a CCD camera
Dr. Tibor Torma
This booklet introduces how to take images with the SBIG ST-10 camera at the
University of Mississippi, for use by students doing their semester projects.
The Cirrus Nebula by Lea Nodar and Ricki Harrel in Oct. 2007
Contents
1. INTRODUCTION ..................................................................................................................................................................... 2
2. GENERALITIES: WHY CCD? .............................................................................................................................................. 3
3. A TOUR OF THE SKY ............................................................................................................................................................ 5
4. OBSERVATIONS AND WEATHER ..................................................................................................................................... 7
5. BASICS OF IMAGE PROCESSING ..................................................................................................................................... 9
REVIEW QUESTIONS .................................................................................................................................................................. 13
6. LEARNING HOW TO USE THE CAMERA ..................................................................................................................... 14
● THE IMAGING MATH............................................................................................................................................................... 14
● THE IMAGING HARDWARE ..................................................................................................................................................... 18
● THE IMAGING SOFTWARE ...................................................................................................................................................... 19
● THE AIMING SOFTWARE ......................................................................................................................................................... 20
● THE IMAGING PROCEDURE..................................................................................................................................................... 21
7. REAL-LIFE IMAGE PROCESSING .................................................................................................................................. 23
THE REPORT............................................................................................................................................................................... 27
NGC 6946: A SPIRAL GALAXY ................................................................................................................................................. 28
2
1. Introduction
Students in some of the introductory astronomy courses at Ole Miss will be doing a
semester project, which introduces the elements of modern observational astronomy. In
their first semester, students will learn how to use reasonably modern equipment to extract
information from the faint light of celestial objects.
Each semester project will involve (i) a general familiarization with the sky, the
constellations, and the planets, (ii) a tour of the sky with a 12-inch telescope and learning
the use of a Meade telescope, (iii) studying image processing on a computer, (iv) learning
the use of an astronomical camera and its control software, (v) taking one set of long
exposure images of a deep-sky object, (vi) processing these images and writing a 2-3-page
essay detailing the procedure and also reviewing information on the chosen object.
Note that students with previous experience may skip some of the items below.
The workload in the project is estimated as follows:
• (i) and (ii) should constitute two regular laboratories, which are done anyway
independently of the project.
• Item (iii), an image processing exercise, should be done as a regular laboratory. In
case this proves impossible, students will be asked to come in and do this exercise in the
laboratory. Help will be provided on an individual basis if the students request it. [2 hours if
not part of lab, during the day]
• Students will be asked to attend one session of learning the use of the camera and its
control software. Two students should be present at a time, working with an instructor.
[2 hours, preferably at night.]
• Students will do one long picture-taking session. [5 hours, at night]
• Image processing is a long process that requires much computer work. [5 hours,
during the day]
The total amount of workload is (all the above hours added) 12-14 hours, out of which
5-7 hours need to be done at night. Considering that this workload is stretched out for the
15 weeks long semester, it averages 1 hour/week, a reasonable amount of time to replace
homework in astronomy 103/104.
3
2. Generalities: why CCD?
The single most important challenge facing all of astronomy is how to extract
information from the little light that reaches Earth from the huge distances in the Universe.
We must appreciate the fact that all interesting objects except the Sun, the Moon, and the
planets (star clusters, gaseous nebulae, galaxies, comets, asteroids) are all very faint,
invisible to the naked eye, and very hard to see at all, even in large telescopes. Our first job
is to look around the sky with a telescope and draw a baseline of how much we can see
without the aid of sophisticated devices. A few objects may look interesting, but most will
not impress anyone.
What really makes the
difference in real astronomy is
the detector. The human eye can
collect light only for about
0.1 sec at a time. After that, our
eyes start collecting light for
another image, and so on. We
developed this sort of “short
exposure” because we need to
see things in motion. However, a
photographic film or a digital
camera can collect light for a
much longer time, so it can see
much fainter objects. In our
observatory we can take 15-60
minute long exposures at a time,
and combine a few to improve
Fig. 1. The ST10 CCD camera with the filter wheel.
the images even more. Most of
the deep-sky objects are simply invisible when we try to find them visually in the field of
the telescope.
The last 20 years saw a revolution in astronomical detectors. By now the only type of
detector that survived competition is the CCD chip (charge-coupled device). This detector
is the same type as those used in digital photography, only with significant differences in
quality and services.
A CCD chip is a small slab of semiconductor, divided up into pixels. When light hits a
pixel, the energy of the light kicks one electron over into the “well”. The chip is exposed to
light for some time, and at the end the chip is “read off”. The electrons are removed from
the “well” in each pixel, and their numbers are counted. These numbers, one for each pixel,
are downloaded onto a computer, which stores them. Upon the user’s request, the software
builds up an image from these numbers.
Up to this point a CCD is the same as any other digital camera. What distinguishes an
astronomical CCD is that it is cooled (to remove as much noise as possible), that it has
16 bit image depth (twice that of a regular camera, to increase the dynamical range of
4
images), it is black and white (which increases sensitivity to faint light), it is stable and
linear (so it does not lose electrons during exposure time as a regular camera would), and in
is general of better quality (fewer defective pixels). All these together make astronomical
CCD’s more expensive, and their use more complicated. The payoff is obtaining
spectacular images that cannot be made any other way.
Color pictures are made with a computer from three components, each taken separately
with a color filter, red, green and blue (the RGB technique). These filters are built in into
the camera on a filter wheel.
By now all telescopes in optical astronomy are equipped with CCD’s for detecting light.
They are used for simple picture taking, for measuring the brightness and color of stars, for
registering spectra of stars and galaxies. They are so much superior to all other ways to
detect and record light, from the human eye to photography, that we cannot understand any
of the modern astronomical techniques without experience with CCD’s.
Fig. 2. A CCD chip
Fig. 3. A filter wheel
5
3. A tour of the sky
The only way to really appreciate the achievement that the use of CCD’s represents is to
look at the sky first the way everyone did until ten years ago. In the past, we first became
familiar with the constellations, learned how the Moon and the four bright planets looked.
We learned that we needed to train our eyes to see in the dark, go to the darkest locations
away from streetlights, use the largest telescopes we could, but we still had to use a lot of
imagination to see tiny specks or faint glows of galaxies or star clusters. In a laboratory
setting, stuck on a well-lit university campus, we cannot hope to be impressed by the usual
“wonders of the sky”. Light pollution makes all but impossible to see any of the interesting
astronomical objects, and it hurts our image taking as much as our visual observations.
Nevertheless, it is still a good idea though to draw a baseline, look up at the sky, use
visually the same type of telescope we have available for image taking, and look around to
get an idea. In the process, we will learn how to start up the telescope and how to aim it at a
celestial object. Predictably, we will not be very impressed with the view, unless we have a
chance to do this in a really dark place, far away from all streetlights.
All celestial objects, with the exception of the Moon and perhaps Saturn, hide their
details from the eyes of the observer: they are either faint, or their details are tiny and hard
to make out, or both. It always takes training, effort, and knowledge to actually see all that
there is in the telescope. A cursory look for a few seconds will show ten percent of all
detail, if that, and results in disappointment.
Other than properly setting up the telescope, there are three issues that are the
observer’s “responsibility”: 1. proper dark adaptation, 2. proper focusing, 3. proper visual
effort. Each of these is non-trivial.
1. Dark adaptation
The human pupil slowly opens up in darkness. A fully dark adapted eye lets in about 10
times more light; but it takes 10-20 minutes of walking around in the dark to achieve that.
Do not expect to see any faint objects in the telescope until you have spent those quarter of
hours outside! And just one look at a flashlight or a car’s headlights sets the clock back and
you are “blind” for another quarter of an hour. Or, you lose another ten minutes if someone
just turns on the light inside the lab and you look at the open door from outside … . (You
must be also careful not to shine a flashlight into anyone else’s eyes either.)
We switch off as many streetlights as we can. We can’t get rid of them all; whenever
you look into the telescope, some lights will still shine into your eyes. Shield your eyes with
your palm, and ask another person to stand in the way of any disturbing light bulb. It does
make a lot of difference!
2. Focusing
It actually takes training to look properly into a telescope, believe it or not!
Experience shows that people often tend to place their eyes at a distance from the
eyepiece. If one does so, much of the light will not reach the eye, and the field of vision will
be narrowed down. Always make sure that your eyebrows actually touch the eyepiece! This
is especially hard on people with glasses; one simply cannot place an eye close enough with
6
the glasses getting in the way. Get rid of them: always take off your glasses for telescopic
observation, and use the telescope’s focuser to correct your vision!
The eyepiece of a telescope is adjustable. Each person needs a different adjustment. No
one will be able to do this “focusing” for you, because we all have different eyes.
So, what are the three things you do, before anything else, before you really look? Take
off your glasses; put your eyes right on the eyepiece; and grab the focuser wheel.
You cannot focus the telescope on a deep-sky object. The only way to do it right is to
pick a star in the field. Watch it, and make it as tiny a blob as you can by adjusting the
focuser wheel. Only after proper focusing are you ready to really start looking.
3. Visual effort
Probably the most important element of astronomical observation is how carefully and
with how much effort the observer wants to see small and faint details. There is no
replacement for the will to see and for the time spent staring at your object. For the cursory
observer, even after proper focusing, Jupiter looks nothing but a patch of orange glow in a
telescope. Only after a minute or so of staring will you start discerning the actual shape of
the planet; it will take more time to start noticing the surface details. It may take a few
minutes of actual staring at the planet, repeated several times, until further detail finally
stops gradually emerging. Take your time! You will need such patience even more for faint
deep-sky objects, which you may not even notice at first sight. It is rewarding though, after
training your eyes and repeatedly trying to come up with more and more detail, to compare
what you end up seeing to what you saw for the first glance!
There is a partial shortcut that makes it easier to perceive the details. Ask an
experienced observer, what there is to see on your object. Many times, when you know
what to look for, you will find it easier to actually notice the elusive details.
---
---
---
---
Students will do an introductory laboratory called the “Tour of the Sky”, in which they
will become familiar with some of the constellations, and experience how the various types
of deep sky objects look in a small telescope. This lab can be done only in perfect weather
conditions; even then campus lights severely limit visibility. You will need to use your
imagination as well as all visual effort to make out these deep sky objects; and only a few
will be any sort of impressive. However, your experience will serve as a baseline to
appreciate your own achievements in CCD imaging.
7
4. Observations and weather
Atmospheric conditions matter much in astronomical observations. It is absolutely
necessary for students to understand how much the weather determines what we can do on a
given night. Even by the low standards of the Eastern US, the overall weather conditions for
astronomy in Mississippi can only be termed “outrageous”. And that is before thinking of
streetlights. Only about 30% of all nights are fit for any observation, and half of those nights
are useless for quality work due to atmospheric haze.
In our conditions, moisture in the air is the main problem. Of course, when clouds cover
half of the sky, or just there are moving clouds blowing in the wind, it is impossible to take
any images. One might use a telescope to visually observe the planets or the Moon when they
peek out among the clouds, but guiding images is impossible. One needs to try another night.
On many nights, however, there are only a few clouds, if any, still few stars are visible in
the sky and the background haze is bright in scattered streetlights. This is particularly so in
the summer months, from April to September, and it is due to moisture in the air. On such
nights, it is possible to take some pictures, but the background noise will be strong, and the
pictured objects will look much fainter, with few detail. This is due to a combination of
streetlights scattering on atmospheric water, and the absorption of light due to water as well.
The picture below indicates how bad light pollution is on campus. Notice that the true
image is the one on the left; we are “sweating blood” to dig out the object from the
background light. (This galaxy is the brightest of all, all others are even more immersed in
streetlights.) Unfortunately, cutting the background with software can only cut the even
background, but not the fluctuations of the background light – they remain large. Knowing
this, we realize that it is actually a great achievement to take any pictures at all!
Left: The Whirlpool Galaxy and the true sky background.
Right: The same image after artificially cutting the background.
Astronomers classify observational conditions as photometric when there are no clouds
and there is little moisture in the air. We know the night will be photometric when at sunset
the sky is dark blue all the way down to the horizon, and there are no clouds. In Mississippi
there are only about ten such nights a year.
A spectroscopic night is when some haze and some cirrus clouds exist, but the sky is
overall cloudless. Such nights are still good enough for imaging. At sunset, the sky is blue
8
but not dark blue; grey toward the horizon; and the setting Sun is yellow but it does not
vanish behind clouds long before setting. Some moving clouds are not a problem, these
usually dissolve before dark. One in five nights is such in Mississippi.
The majority of nights is, however, useless. At sunset, the sky is grey, even if the Sun is
(sort of) visible; there is obvious haze. After dark a few stars peek out faintly but faint stars
do not show. Such weather is quite disappointing, because it gives the impression that some
success is possible, but any real work becomes painfully difficult.
And, of course, there are those nights, half the time, when the sky is cloudy, or it is
raining.
Another aspect of astronomical observations is lunation. When the Moon is bright, its
light makes it all but impossible to observe faint objects. Starting from a day or two before
first quarter, for two weeks the Moon is too bright; and think of it, that takes out half of the
time.
When we add together all these constraints, and take out the nights when there is a
campus event such as a game, it is obvious that the most precious commodity for an
astronomer in Mississippi is a clear night. We cannot afford to skip a good night because we
are tired, or because it falls on a weekend or a night we’d rather spend with a friend. We must
use the first chance we have because we may not get another one.
9
5. Basics of image processing
When an astronomical CCD camera is used to record light, it always comes in the form
of a digital image on a computer. The purpose may be making measurements of the
position, size, color, or something else of an object, or simply producing pretty pictures. As
compared to regular digital photography, there is a price we pay for improved sensitivity
and dynamics, and for the reduced noise: raw images usually look uneven, dirty, still
contain a lot of noise, and their huge image depth virtually suppresses contrast on the
computer screen. Against all appearances, these dismal-looking images are actually not
worse at all than regular camera pictures! The reason is that the “mess” on these images is
bad only in comparison to the extremely faint target. A regular digital camera would simply
cut off all the noise and mess, but
it would completely remove our
target as well!
It takes a significant effort to
remove all this noise and mess,
and to get the images in a
“pretty” shape. It is advisable to
Fig. 4: Compare an original
become familiar with this process
to a processed image
before taking your own images. The experience is
rewarding, the resulting pictures are really pretty, and in the process you learn the
technicalities that will help you to make the correct decisions during image taking.
Figure 5: The buildup of pixel counts during exposure. Larger numbers indicate a whiter pixel on the image.
In the first laboratory exercise, you will be using software called CCDOPS to manipulate
images. This same software can handle the camera and the telescope in the dome. It can
align, scale, clean up, add, and manipulate images in many ways.
10
The first issue you will face it is the contrast settings of an image. Each image is an
array of 2184 × 1472 pixels, each pixel is represented by a number 0, 1, 2, …, 65535,
corresponding to the amount of light recorded on that pixel. So a pixel with count 0 on it is
completely “black”, and a pixel with count 65,535 is completely “white”. When you open
an image, however, you can tell the software to make every pixel counting less than, say,
200 (you choose this number) to be “black”, and every pixel counting more than, say, 2000
(you choose this number) to be “white”. Pixels with counts between 200 and 2000 will be
various shades of gray. Because all pixels that are brighter than the white point, 2000, will
be the same shade of pure white, all detail vanishes on the bright part of the image. We say
that the bright part has been clipped. However, the contrast on the part of the image with
counts between 200 and 2000 has been greatly enhanced, and the noise below count 200 has
been cut off. This sort of a change in the black and white points is called a linear scaling.
Note and remember that in CCDOPS this linear scaling is not permanent, any such change
you make will only affect the way the image is presented on the screen, but will not really
change the image. You
can always reset the
scale and see again the
clipped part of your
image!
The images that the
CCD takes include dark
current. Each pixel
leaks electrons a little,
Fig. 6: Clipping. The pixels in the middle of the nebula are around 3000.
and you’ll notice that
In image on the left, the white point is set at 2000, which causes much clipping.
In the image on the right, the white point is set at 4000.
the chip records light
even in total darkness.
This leak is due to temperature, and we battle it by cooling the chip as much as we can. The
longer the exposure, the more “false” light is recorded. The warmer the chip, the stronger
this dark current. On top of that, the dark current varies from pixel to pixel! The raw image
is very grainy and has a background haze. The way to get rid of this dark current is simple:
in addition to the regular light image, we take another, with the same device and the same
exposure time, same temperature, but the shutter shut – no light. This is called a dark frame.
The first step of any image processing is to take the light image, and subtract the
corresponding dark frame from it. CCDOPS will do this upon pressing of a few buttons.
-
=
Fig. 7: Subtracting a dark removes the noisy dark current.
11
The various parts of the resulting dark-subtracted images are not equally bright. There
are many optical surfaces in a telescope system, and dust can settle on each one. The linear
scaling will enhance tiny contrasts. It will bring out all little dust shadows and unevenness
of sensitivity. Some regions or just some pixels in the picture are darker than others. We
must find a way to compensate for these differences.
The procedure is called flat fielding. Again with the exact same device, we take pictures
of an even surface, such as a chunk of the clear blue sky, during the day. These pictures,
called flat frames, are supposed to be even, flat, without details on them, but in reality they
will show the same shadows and unevenness as our pictures. So we divide the pictures by
the corresponding flat frames. CCDOPS will also do this upon pressing of a few buttons.
/
=
Fig. 8: Dividing by a flat frame removes uneven shadows. On the raw picture far left, notice the darker
background top right, as well as the blob bottom right of the image. Flat fielding divides it off.
The dark subtracted and flat-fielded images may still contain a few bright or dark single
pixels, which can be corrected by the appropriate filters called “kill warm/dark pixels”. This
advanced step is very useful when long exposures are taken.
Your images are now ready to use. It is conceivable however, that some images may
need a very long exposure, which cannot (for practical reasons) be done at one go. In these
cases more images are taken and they are added together to form one. Also, images are
taken with various color filters, and these images can be assembled into one color picture.
However, it is almost certain that the telescope could not maintain the exact same aim while
all these images were taken. They will be offset (shifted) from each other, so they cannot be
simply added together. You need to align the images first.
Red
Green
Blue
composed into a
color image
The image alignment routine is quite awkward in CCDOPS. We have another, more
sophisticated, program called CCDSOFT, which can align a whole set of images at the same
time with subpixel accuracy. All you need is to mark the same star on all images and click
the “align centroid” tab.
12
Now you are ready to add images of the same color together. Effectively you will
produce a longer exposure image out of a few shorter exposure ones. You will observe how
the object emerges from the noise in the process.
At this stage you’ll have images in each of the three colors, red, green and blue (RGB).
It is advisable to apply some form of sharpening at this stage on each of the three color
components. The best software we have for this purpose is CCDSHARP, which uses the shape
of the blurred stars to restore the original sharp image: the pictured object will be blurred
the same way on the image as the stars are. One should be careful with sharpening though:
too much of it quickly increases noise and inserts nonexistent objects into the image.
CCDOPS can also compose the colors together at your command. To do this correctly,
however, you will need to specify the black and white points in all the color components.
To do this takes much experimentation, because incorrect cutoffs will upset the color
balance, leave too much (and colored) background haze, or remove too much of the object
at least in one color, or clip whole areas of the object. It goes by trial and error. Many of
them. But after many trials, you can come up with a very pretty picture indeed!
In real life Adobe Photoshop CS is more effective in doing color composition than
CCDOPS. It can compose colors without losing image depth. It can do nonlinear image
scaling (they call it curve), which is a very useful device to enhance the object’s contrast
without too much clipping. It can save images in formats that non-astronomers also
understand (e.g. TIFF) or formats suitable for the Web (JPG). The final touch in images is
always done in Photoshop. With a proper plug-in (called Liberator) installed, Photoshop
understands FITS images, and CCDOPS is able to save files in 16-bit FITS format.
13
Review questions
It is now time to make sure that the reader understands and remembers the important
points of astronomical imaging. The following questions will serve as a guide for studying.
It is best if you know the answers to these questions; if not, you must return to the
appropriate pages and read off the answer from the text there.
1. Why are most objects a less than impressive view in the telescope?
2. What is needed to make those images great-looking? Note: the answer is not simply
“to have a CCD camera”.
3. How does a CCD camera work?
4. In what form is an image stored in a computer?
5. How do we take color images with a CCD camera?
6. How do you expect a raw, unprocessed image of a galaxy would look like?
7. What does it mean that a pixel is clipped on an image? Give an example in terms of
three numbers: pixel reading, white point, black point.
8. Point out a clipped pixel on an image.
9. What three sources cause noise on an image?
10. How is a “dark frame” taken, and what does “dark subtraction” mean? What sort of
improvement does dark subtraction provide?
11. What is the mechanism of reducing noise through cooling?
12. How is a “flat frame” taken, and what does “flat fielding” mean? What sort of
improvement does flat fielding provide?
13. What do you do when you need a 1-hour exposure to make your object visible in the
picture but the telescope can only follow the stars precisely for 20 minutes?
14. When you have three images, one in each color of blue, red and green, you do not
add the pixels readings on each with software. Why not?
15. Write down the five most important steps of image processing in the proper order.
(aligning, adding images of the same color, flat fielding, dark subtraction, color
composition). What happens if you do these steps in the wrong order?
At this point we suggest that the reader does the image processing laboratory.
14
6. Learning how to use the camera
● The imaging math
In recent years the price of CCD cameras dropped dramatically. Before that, only the
leading research laboratories could afford them, but now even serious amateur astronomers
can buy and learn to use CCD’s.
SBIG (Santa Barbara Research group, a private company) emerged as the industry
leader in the only-a-few-thousand-dollar category CCD market. Their ST-10 model (the one
we have at Ole Miss, see Fig. 1) presently costs $8,000 and uses one of the most sensitive
chips on the market. The image size is 2184 × 1472 pixels, which is in total 3.2 megapixels.
Most importantly for astronomy, it has a built-in cooler that may cool it more than 30°C
below ambient temperature (the temperature of the air around it).
The biggest enemy of astronomical images is noise. A noisy image appears grainy, and
the noise covers the fine details of faint objects. There are three main sources of noise in
images: (i) light pollution, (ii) dark current, and (iii) readout noise.
A CCD chip will collect some electrons even in the absence of light, because of the
thermal motion of electrons in it. This is called dark current. The image will not be
completely black even if there is no starlight, and the longer the exposure, the more “haze”
accumulates on the image. As we have seen it, this background can be subtracted with
image processing software if we take two images: one with the shutter open (light frame)
and one with the shutter shut (dark frame). The computer is instructed to take the difference
light frame minus dark frame, and we are rid of the dark current! However, the dark current
is not quite steady: it fluctuates a little, and these fluctuations constitute noise, which cannot
be removed at all. In other words, the dark current on the light image is not exactly identical
to the dark current on the dark frame, and the difference stays in the image as noise.
The noise due to this fluctuation of the dark current can only be reduced by cooling the
CCD chip. There is great reduction in noise from cooling: every time the chip is cooled 7oC
the noise is cut in half. We should cool the camera as much as we can. The ability to cool
the camera 35 oC below air temperature cuts the noise 16 times, which is a very great
improvement over regular digital cameras. In practice, noise will seriously hurt images if
the chip is warmer than -25 oC (but -30 oC to -35 oC is preferable when narrowband filters
are used). This is achieved by double cooling: icy water is pumped into the camera to keep
it under 10 oC, then the thermoelectric cooling can cool off another 35 oC below that.
Each individual pixel on an image is represented by a number, the number of electrons
collected from that pixel. No electron means no light, completely black. Many electrons
mean a lot of light, a bright pixel. A full image is represented by 2184 × 1472 of these
numbers. Each pixel can only hold only so many electrons (full well capacity), and if there
is more light hitting a pixel, it cannot produce a larger number of electrons. Worse, some of
the extra electrons will spill over into neighboring pixels, resulting in a large blob for a star.
In practice any pixel holding more than 40,000 electrons is full, the pixel is said to be
15
clipped. It is good practice (whenever doable) to avoid collecting more electrons than that in
any one pixel, and one can do that by limiting the exposure time. However, when we want
to image a faint nebula close to a bright star, we won’t even see the nebula before the star is
already clipped. We must be satisfied with some sort of compromise.
One way to handle this situation is to take repeated shorter exposure images, and then
add them together by software. The adding procedure is quite easy. However, each separate
image introduces extra readout noise (normally ± 7-8 counts), and when we add too many
images, the readout noise adds up. It is rarely beneficial to add together more than ten
images.
At this point image depth becomes important. The count on each pixel is 0, 1, 2, 3, …, a
whole number. The maximum count in a pixel is determined by the image depth. On 8-bit
images, the digital camera standard, the counts go from zero to 255 (=28-1). This allows
only 256 shades of gray. On such images all stars are clipped long before any deep-sky
objects stick out of the noise. The ST10 camera has 16-bit image depth, the counts can go
from zero to 65,535 (=216-1). This allows us a very large number of shades of gray, and we
can see details that would be normally lost with a regular camera. You don’t see the
difference between an 8-bit and a 16-bit image directly, but when you increase the contrast
by software, additional detail becomes visible on 16-bit images.
Strictly speaking, the maximum count on an individual camera pixel is only 40,000, so
the image depth is only 14 bit. The camera is only 14 bits deep, but the software can handle
16-bit images. The extra 2 bits come in useful when several images are added together.
Telescope systems can rarely be kept free of dust. The large image depth brings out all
the tiny variations in contrast, so effects of dust shadows, slight pixel-to-pixel variations in
sensitivity are brought out and emphasized on the final image. Unprocessed images appear
full of “dirt”, bright and dark spots, the edges are dark. These must be removed by the
procedure of flat fielding. We take an image of the clear sky, or some other evenly
illuminated object, to obtain a flat, a supposedly even picture with nothing but the
disturbing “dirt” on it. The light frame is then divided by the flat frame, using software, and
the resulting image will be free of the spots and the varying darkness towards the edges.
The camera takes black-and-white images. Color cameras lose much light, and are not
well suited for astronomical imaging. In order to obtain color pictures, we need to place
color filters in front of the camera and take images in three different colors (usually red,
green and blue, RGB). The individual filtered images are processed separately and a color
image is composed at the end.
As all this discussion indicates, the raw images need quite a complex procedure to turn
them into pleasing pictures with as little noise and other disturbances as possible. This
image processing takes up more than half of the time and effort that goes into obtaining
pictures, but it can be done at a convenient time in a convenient place with a computer.
16
Resolution and image size
The resolution of long-exposure images is always limited by seeing. In our
circumstances, seeing on good nights is just under 2 as. When camera systems are designed,
it is important that the pixel size matches with the expected seeing. It is called the Nyquist
sampling criterion (actually a general theorem in mathematical statistics): the size of a pixel
should be one-half of the smallest detail (i.e. half of seeing, about 1 as). Using larger pixels
is undersampling, which loses detail; smaller pixels mean oversampling, which increases
noise without additional detail. In our setup, the pixel size is adjusted to 0.79 as (remember
this number!), which is the correct match at best seeing conditions.
Given this pixel size and the 2184 × 1472 image size, the field is 20 am × 30 am size;
that means the half-moon just fits on it. Objects that are larger than this (like the
Andromeda Galaxy, or the Pleiades) cannot be imaged with this system. A few objects can
be pictured using a mosaic of a few panels. This technique however is quite complicated,
and it is difficult to achieve even illumination on each panel of a mosaic. Large mosaics
usually involve an impossibly large amount of exposure time.
Narrowband filters
The spectrum of many nebulae is an emission spectrum with only a few bright spectral
lines. For these, it is beneficial to take images with narrowband filters, which filter out all
other colors and so enhance the nebula with all its usually filamentary structure; in galaxies
a narrowband Hα filter enhances the red glow of molecular clouds in the spiral arms.
Narrowband imaging requires long exposure times as the filter blocks most of the light.
It is sensitive to dark current noise, so the chip should be cooled as much as possible. Also,
stars colors become impossibly unnatural. To counter that, we take regular broadband
(RGB) images of the same object as well, process them separately, then blend the two
images in Photoshop as two layers. This process follows the same principles as regular
image processing, but requires considerably more care.
Another great benefit from narrowband imaging is that it strongly cuts background light
relative to the nebula.
Three narrowband filters are installed in the camera: a red Hα filter, the color matching
the spectral line where most nebulae give out most of their light; a green [OIII] filter and a
red [SII] filter. The latter are centered on spectral lines where many nebulae have emission
lines; however there is usually little light in these, so a very long exposure is required with
these. As a “ballpark number” for some nebula, one might expect to take a ½ hour with the
Hα filter, 2-3 hours with the [OIII], and 6-10 hours with the [SII] filter. Of course, we
cannot do this as an introductory student project.
17
Optional mathematical treatment of dark subtraction and flat fielding
1. The reading on each pixel is N = D + S × L, with dark current D, sensitivity S, and
light L. Both D and S fluctuate from pixel to pixel.
2. A dark frame has no light, L = 0, so Ndarkframe = D.
3. A flat frame is evenly illuminated, L = 1, hence Nflatframe = S.
4. Now to restore the reading due to true light only in the image, we must first dark
subtract, to find Ndark subtracted= N - Ndarkframe = (D + S × L) – D = S × L ; then flat field (i.e.
divide by a flat frame), to find Nds’d+flatfileded = Ndark subtracted / Nflatframe = (S × L) / S = L.
5. If we do it in the wrong order, flat field first, then dark subtract, we find the wrong
pixel reading N / Nflatframe - Ndarkframe = (D + S ×L) / S –D = L + (1/S-1) × D ≠ L; some of the
dark current remains on the picture, together with its noisy fluctuation.
This discussion also illuminates the importance of the linearity of the CCD chip. When
the chip is approaching saturation, in our camera at S × L > 40,000, the sensitivity in fact
declines and the reading will be less than S × L would indicate. Brighter parts of the images
will not be as bright as they should be; contrast is lost. Over S × L > 65,535 the pixel
reading stops growing altogether and the image becomes completely clipped.
18
● The imaging hardware
Fig. 9: The 12-inch Meade telescope.
Fig. 10: The camera head.
There is one 12-inch Meade SchmidtCassegrain telescope (with a built-in focal
reducer f = 1800 mm, f/5.9) reserved for work
with the CCD (see Fig. 9). This telescope is
acceptable optical quality, and it is mounted
on a state-of-the-art quality permanent
equatorial mount on the pier in the little dome
of Kennon Observatory. A great advantage of
using a permanent setup for the telescope is
that the right ascension axis is very carefully
aligned with the North Pole. The telescope
will track the stars much more precisely than a
telescope on a tripod. In addition, the shaking
from people walking around and from wind
gusts is reduced.
The standard setup is shown in Figs. 9-10.
The elements added to the telescope are a
focuser, a filter wheel, and the camera.
(i) The focuser can move the camera
assembly in and out. It is crucial to
have the chip in the exactly correct
position (focusing), preferably with a
precision of ± 0.05 mm. (Each 0.01 mm
of defocus makes stars into a blur of
diameter 0.2 as, cf. pixel size 0.78 as)
The telescope’s original focuser is too
crude for such precise focusing. The
focuser has a built-in electric motor to
move the assembly. A hand control’s +
and – buttons move it in or out, and the
position is indicated on a screen with the
precision of ± 0.01 mm. The focuser can
move the assembly a total of 13.00 mm.
(ii) The CFW10 filter wheel (see Fig. 3)
contains color filters. In order to take
color images, we need separate ones in
each of three colors (RGB – red, green,
and blue) and compose the final color
picture by computer.
19
(iii) The ST10 camera comes with two built-in chips.
The large imaging chip is used to take pictures,
and the little tracking CCD (also called guide
chip), located above the large one as shown in
Fig. 11, is used for guiding. They work
simultaneously, and you can take many tracking
images during a long imaging exposure. When the
guiding software is activated, the camera uses a
little chip to take images of a guide star a few
times a second. When the guide star moves out of
its original position (due to inaccuracies in the
tracking), the mount is adjusted to shift the image
back to its original position. Without guiding, the
image will noticeably move already during a
short, 1-2 min exposure! Any reasonable picture
taking needs guiding.
(iv) The camera has additional cold-water cooling,
which can be used when air temperature is
over 50 F. Ice cubes are used to cool off water,
which is then pumped through the camera.
Fig. 11: The imaging chip and the
guiding chip work simultaneously
● The imaging software
The camera, the filter wheel, and the guide chip are controlled by
the CCDOPS software installed on the computer.
Many of CCDOPS’s controls are self-explanatory, but some of them
need comment:
(i)
Setup: the cooler should be set at about 30oC below air
temperature. For the cooler to keep the temperature reliably, it
should not run at more than ~80% power. Unless there is reason
to change this, use “high resolution” for the imaging CCD,
which should be the active CCD, “automatic resolution” for the
tracking CCD. Before shutting down, always switch the cooler
first and wait for its power to go down to 0%.
Fig. 12: The focuser is
hand-controlled
(ii)
Focusing: this utility does not really do focusing but simply keeps taking images,
without saving them. Use “planet mode” for focusing.
(iii)
Dual CCD view: this utility keeps taking images with both chips simultaneously.
Use it to aim the telescope at your object, and to pick a sufficiently bright guide star on
the tracking CCD.
20
(iv)
Grab: this is how you take individual images. You can select if you also want
dark frames taken and automatically subtracted, or else to take only dark frames.
Autograb will take multiple images automatically, but you must be sure to change the
name and location of your image files, because otherwise CCDOPS will overwrite
previous images!
(v)
Filter: the filter tab will change filters.
(vi)
Self-guide: this is how you take long exposure images. You must make sure that
the guide star is located on the same part of the guide chip every time you start a new
exposure, otherwise the images will not match each other. The tracking exposure
should be as short as possible (t=0.1 sec is ideal but even t=10-30 sec might work).
Wander should end up less than 1 as. A good guide star should be at best 7-8 mg, but
11 mg still might work.
Self-guide will work only if it is calibrated. Every time the camera head is turned,
this calibration needs to be repeated (get a star on the guide chip and use the Calibrate
panel). Whenever the telescope crosses the meridian, the guide x-direction must be
flipped in the Autoguide Parameters (otherwise the mount will do the wrong
correction).
(vii) Rotation of the camera head: this should not be done very often. After rotation,
new focusing and a new set of flat frames is a must, so you cannot do it twice on one
night. TheSky’s “virtual sky” needs to be rotated to match the new orientation of the
camera. The autoguider must be recalibrated after turning the camera.
● The aiming software
The position of the telescope will be controlled by the software program called TheSky,
which is a program similar to the familiar SkyGazer, only with many more capabilities. It
shows the sky with the telescope’s position indicated. TheSky is a complicated program,
but for simple image taking purposes we will need only a few of its extensive controls.
(i)
The zoom in and out controls on the toolbar, indicated with a + and - signs. Note
that CTRL-T and CTRL-B will zoom quickly to “telescopic” and “binocular” views,
with small and large fields respectively; the “home” button gives the widest view.
(ii) The FIND utility on the toolbar (or press letter F). You may type in the name of the
object you are looking for.
(iii) Click on a star to bring up the OBJECT panel, with many of its data. In the bottom
there are buttons for centering the object on the screen and for slewing the
telescope to it. Note that, once the link to the telescope has been established, you
can center only objects that fit on the screen simultaneously with the telescope’s
aim. (Zoom out if you need a larger field.)
(iv) To establish a link with the telescope use the TELESCOPE menu. You’ll need to
home the telescope to make sure its pointing is accurate. (It is automatic; only
21
click “yes” when asked.) Use the TELESCOPE tab in the OBJECT panel to PARK the
telescope before you switch it off.
(v) There is a button for rotating the image. Note that the shape and size of the
imaging and tracking CCD’s are indicated in red. Notice that every time you go
across (or, rather, around) the meridian, the image flips upside down. You’ll need
to rotate the view by 180º to match it with the camera images.
(vi) The meridian is indicated as a red dashed line. Once the telescope is linked, it
becomes a red band. The telescope cannot cross this line without hitting the peer,
but it will stop tracking through it automatically. (In practice, you’ll have to stop
taking images of that object for the day when this happens.) If you try to slew
through the meridian, the telescope will go around it through the North Pole. All
image taking should end (or start after) the object transits the meridian.
There are a few additional useful controls that you might need to use; you can learn
their use when you actually need them: TELESCPE → MOTION CONTROLS, VIEW → STELLAR
OPTIONS and DISPLAY EXPLORER, TOOLS → MOSAIC, DATA → COMETS AND MINOR PLANETS and
EXTENDED MINOR PLANETS.
You will certainly use DATA → TIME for the planning of your session; you’ll set the time
to the planned observation. You’ll need to know exactly what to do and when, otherwise
you waste your valuable telescope time.
● The imaging procedure
Planning the session
Careful and detailed planning is very important. During observation there is little time
to lose; a session without a plan will be almost surely fail.
The plan, as a minimum, should include the following: name, brightness and size of the
object; approximate coordinates and constellation in which it is located; the object’s transit
time and its altitude at transit; the planned beginning and end of the observing session; the
hour angle and altitude of the object at the beginning and at the end of the observation; the
planned exposure times with each filter used; the necessary orientation of the camera.
All these data can be read off TheSky ahead of time. It is important to have the object as
high up as possible; and you cannot image it both before and after transit. Pick a few hours
before or after transit. Make sure you have enough time set aside for setting up and reaiming between exposures.
Setting up the telescopes is the responsibility of the instructor, but students are expected
to fully participate in the process.
The slit and the windows of the dome must be open around sunset. Except for very cold
weather, ice cubes are added to the cooling water. The computer, the telescope, and the
CCD are powered up. A new folder is created in the “Raw Images” folder for all the day’s
images. A copy of an old “Note” file is placed in it, with the appropriate changes in names,
dates, etc. We will assume that flats (which need to be taken just before sunset) have been
taken care of, and the camera has been already turned at the necessary angle.
22
Start up CCDOPS; on the SETUP tab, set the temperature 30oC below ambient temperature
and start the cooling. Start up TheSky, establish the link to the telescope; home the mount.
Choose a wide view, and slew the telescope to a bright star in the general area of the target.
In CCDOPS, set the red filter and start FOCUSING in FULL LOW resolution mode with
t = 0.3 sec, and slew the telescope to a nearby ~ 5mg star. Start FOCUSING in PLANET MODE,
with t = 0.3 sec and use the manual focuser to achieve focus with the largest possible
maximum pixel reading. (If the star is too dim or too bright, you might want to change the
exposure time: you need a maximum pixel reading between 500 and 20,000). Expect that
focusing will probably take ~ 15 minutes; it is a tedious but crucially important step.
Now start DUAL CCD VIEW, with longer exposure time so that your object will show up.
Usually t = 5-10 sec will suffice, except for very dim objects. Slew to your object. Aim
exactly at your object, so that your guide star is in the tracking chip. Record (draw) the
position of the guide star in the tracking image and save the view.
Grab one t = 15 sec exposure of your object in each of the three colors, and decide on
exposure times. You’ll need to make sure that none of the images is clipped (i.e. the
maximum pixel reading does not exceed 40,000), unless this is necessary as a compromise.
Keep in mind that a few multiple exposures can be added, and that exposures longer than
30 min often break down before completion.
It is time to start taking the real pictures. Set the color filter, and use the SELF-GUIDE
button (SlfG/SG on the toolbar) to start guided imaging. You’ll need to set the tracking
exposure; use the shortest time that still makes the guide star clearly visible to get guiding
corrections as often as possible. Ideal but rarely possible is t ~ 0.1 sec; we often use
t ~ 1 sec; it is possible to use even t ~ 30 sec if really needed. The longer the exposure the
more is the remaining wander (which should be under ~ 1 pixel worth), and the more the
chance of losing the image before completion due to occasional tracking errors.
After each exposure you’ll need to take a new DUAL CCD VIEW and get the guide star back
to the same place as on the first image; and the color filter might need to be changed. Note
that the tracking exposure may need to be different when you change the filter.
It is good practice to take all exposures equally long (and take multiple exposures). The
guiding utility does not subtract dark frames, so you will see very little on the raw images.
Unless you have the right darks in the dark library (check!), take dark frames after you are
finished. Use autograb to take ~ 40 darks for later averaging. (Don’t forget to change the
name and the location of the files!) Darks need to be taken with the exact same temperature,
exposure time, etc. as the light frames – make sure you take them for each image.
If you decide to leave while the camera is still taking the darks, make sure you PARK the
telescope, switch off the telescope’s power (but not the camera’s), put on the lens cap, cover
the scope, close the slit, quit TheSky but not CCDOPS and make sure someone closes off
completely when all is finished. To switch off the camera, set the temperature regulator OFF
first, and wait for the cooler power to reach 0%. Then shut down the computer as well.
Don’t forget to turn the streetlights back on!
The duedate for processing preliminary images is one week, and two weeks for the final
images. Doing it all right means to end up with some very pretty pictures!
23
7. Real-life image processing
The basic steps of image processing have already been explained in the section entitled
“Introduction to image processing”. Here, we will outline the procedure again (but will not
repeat all the details), and add a few steps that make your job more successful or easier. In
any real-life situation, it will be necessary to align a number of pictures with each other, and
often to sharpen the images using special software. The color composition routines of
CCDOPS and CCDSOFT are very primitive, we must use Adobe Photoshop for quality work.
I. Image processing work is meant to be done under close supervision of an instructor. In
practice, students do a few steps at a time, then ask their instructor to see what they are
doing, and get advice. As each further step relies on the careful and correct execution of
the previous steps. ‘Skipping’ such constant evaluation will probably result in having to
redo earlier steps, and all that follows those, again. It usually takes three-four or more
trials to get the pictures into acceptable shape.
II. Keeping the work well organized is very important. By the end of the process more than
a hundred different files may be generated; it will be almost impossible to remember
what each file contains. It is important to keep the images that were produced in the
intermediate stages, both for evaluation as well as to return to them when a further step
goes wrong. Experience shows that it is a good idea to keep files in each step in a
different folder; an example of the resulting set of folders is shown in the following table.
Notice the numbering; it helps to indicate the order of the steps taken.
An example of a well-organized set of folders
Folder Names
00_OriginalsUsed
01_DarkSubtracted
02_FlatFielded
03_PixelsFixed
04_Aligned
05_Combined
06_Sharpened
07_ColorComposition
08_Finalized
Subfolder Names
LightImages; FlatsUsed; DarksUsed
Red; Green; Blue; Hα;
III. Students will do their image processing on the computers in the astronomy lab in Lewis
Hall. You need to run an emulation of Windows XP on these Mac computers. The raw
images are located on the AstroX server; a shortcut in the shape of a little camera, named
“CCD”, has been placed on the Windows desktop of the lab computers, which points to the
raw files. They are found in the “CCD/Originals and comments/ST10/…” folders,
together with the “Note” file that contains some more information. There is a dark library
under “CCD/DarkLibrary (Processed)”. It will take some detective work to find the
24
appropriate flats. Recall that the flats must have been taken with the same color filter as
the light images; and the camera must not have been rotated in the time between. The
only way to be sure of that is to look up the “Notes” files, which indicate the camera
orientations for each night.
IV. The original files on the server cannot be changed, nor can students save anything in
this area (it is write protected). The correct place to put your files is the assigned work
area on the server. The “STUDENTS WORK HERE” shortcut opens the area on the server. (You
will see the path “\\Phys252.phy.olemiss.edu\astro\Student_Work” as the ADDRESS.) It is
advisable to put all your files there instead of some location directly on the computer,
because only when you work directly on the server will you be able to access your files
from a different computer. So start your work by creating a folder there with your and
your partner’s names (such as JaneDoe_JohnDoe), and copying all the original files you
might want to use into your folder.
V. Keep in mind that you should never double click on any picture (CCDOPS, CCDSOFT,
and PHOTOSHOP will be all mixed up if you do.) When you want to open an image, start
the software first, and then use the FILE→OPEN menu, or drag the file icon over the
software’s window.
VI. Your first step should be to make an inventory of all the images taken of your object.
You’ll have to open all the “Note” files, including those that were taken at different times
in the semester from your date, to see who else took images of the same object, and to
decide on which flat frames were taken with the same orientation as your images. Make a
table of all relevant files for yourself, and copy all these files into your folder. You may
want to rename some of these files (to avoid duplicate names), carefully recording the
changes.
VII.
You will start with the standard basic processing of each image. Locate the
appropriate dark frames and flat frames to be used for your images. Unless you are using
darks from the library (recall that you need darks with the exposure time and temperature
matching the light frames’), use CCDOPS to median-average multiple dark frames. Inspect
your flat frames, and do not use those whose brightest parts have a pixel reading over
40,000 – these are overexposed and incorrect. Then each individual light frame must be
dark-subtracted, then flat-framed; then use hot and cold pixel removal; you can use either
CCDOPS or CCDSOFT for this. A routine of CCDOPS called “Remove blooming streaks”
comes in handy when there are overexposed stars on the image. Save each step under a
new name and keep order, so you can return to an erroneous step and correct it. The
resulting frames should look good with appropriate contrast settings.
VIII.
The next step is aligning. Put a copy of all your images that will go into one
picture (multiple images, and different colors all together) in a new folder and call it
something like “Aligned”. Now open each of the images in your “Aligned” folder in
CCDSOFT. Use the “pin” to mark the centroid of the same star on each image. Then use
ALIGN CENTROIDS. You will see that the images are shifted for the star to match on each.
Save the images.
25
IX. Now co-add the multiple exposures of the same color (if any) either in CCDOPS or in
CCDSOFT. When the same exposure time was used for all images, you want to use
CCDSOFT’s “Combine a folder of images” feature with the “average” setting instead of
simply adding. This will help avoid clipping stars when the pixel reading in their centers
exceeds 65,000. (Recall that clipped stars will lose their color in the final image!)
X. Depending on the quality of the images at this stage you should consider sharpening
(works when there isn’t much noise; use CCDSHARP, which is a slow but very powerful
piece of software), or blurring (needed when there is too much noise; try the “Median
Filter” in CCDOPS). You may have to use the “Remove image gradient” tool in CCDOPS
when there is too much uneven background light.
These steps are fairly standard, and provide you with a set of aligned images, one for each
color, in .fit file format (the standard picture format in astronomy). You will do the
remaining work in Photoshop. Before the transition to PHOTOSHOP will make sure all your
images are as good as can be; it is a real pain to have to come back later and make changes.
XI. For the conversion to PHOTOSHOP, open each of the three-color image components. The
LIBERATOR plug-in, which is installed on these computers, starts automatically. It gives
you a panel for each image on which you must very carefully adjust the black and white
points. The correctness of these numbers is crucial; you may end up with an incorrect
choice and have to come back to this stage to redo it. You must chose the back point so
that, even in 100% view, only a small percentage of the pixels is black-clipped (shown in
blue by LIBERATOR), and that none but a few pixels are white clipped (shown green by
LIBERATOR). These black and white point settings are now final, they cannot be undone in
PHOTOSHOP as they can in CCDOPS. Once open, immediately save these images in
PHOTOSHOP format (.psd)
The rest of the image processing is not specific to astronomy, and if you like you can do it
on any computer with PHOTOSHOP CS installed on it. For that, you need to put the image files
on a jump-drive, and take it with you (attaching to an email does not work; the files are too
large for that.
XII.
Use the Merge Channels utility to produce a color image (the tab is hidden:
you’ll find it if you open the Channels palette and click on the little triangle in the top
right corner). Use the RGB mode and check if the correct files are used for each color.
XIII.
At this point much of the detail that is actually present on the images is still
hidden; your deep-sky object may not even be visible yet. To “dig out” objects from the
usually very large background you will need to create adjustment layers. In PHOTOSHOP,
use “Layers → New Adjustment Layer → Curves”, and change the curves. Take care of
using only linear scaling in each color channel to balance the overall color as well as to
equalize the color of the remaining background. (Linear scaling means straight curves;
nonlinear scaling invariably produces ugly colors.) Use nonlinear scaling only in the
26
RGB channel to bring out the faint parts of deep-sky objects, while keeping the bright
stars still colorful. It will take much experimentation to get the best set of curves – this is
a trial and error procedure. You will probably have to use several adjustment layers for
the best combination. Expect to spend a few hours and many botched trials before you
really get a good image – but this is the stage when your image will become really
spectacular!
XIV.
A final touch on the picture will be to crop the edges where the various
individual images got shifted off. A good trick is to add an adjustment layer with a very
strong curve, which greatly enhances the background and shows which part of the image
is “useless”. After cropping this adjustment layer can be simply made invisible.
XV.
Once you are satisfied with your image, save it in PHOTOSHOP format, and also
“For the Web” (i.e. in 24-bit png). It may be a good idea at this stage, while saving in png
format, to rescale your image and reduce it to manageable file size. The original images
are somewhat oversampled; the pixel size is 0.79 as/pixel. Experience shows that a
1 as/pixel scale preserves all the detail, so a rescaling of the image size by 79% would
produce that, while cutting the file size to almost half. Still, watch out to make sure that
your final .png image is not too large – a 1 Mbyte file is already very hard to handle!
You’ll be able to preview the image on the panels while saving.
XVI.
Some groups will have images taken with narrow-band filters. These need to be
combined with the RGB images using PHOTOSHOP’s channel mixing and layer
composition capabilities. The best procedure differs much from case to case, depending
on which channels contains interesting information and what structures are present.
If you get stuck on one of these steps, call and ask your instructor. You may be sure you
will get help!
27
The report
Students are asked, within two weeks after all raw images are taken and darks and flats
are available, to write and turn in a two-three page report. In case they obtained images of
more than one object, they are expected to do the processing of each, and write a separate
report on each.
On the following two pages we provide an example. It is a fake: it was created as a
sample only. The actual authors of the image were Sarah Ralph, Danny Warren, Elizabeth
Joseph, and Brianna Pettijohn.
The first page should be a brief presentation of the picture. It is meant for posting on a
wall. It should have a good quality picture inserted (use .png format), provide the basic
information on how the images were taken, on the setup we used, what the object is, and
explain very briefly what the visible details of the image are.
The second page explains what galaxies are in general, and how this objects fits into
their general classification, followed by more detail about what is visible in the picture. A
general evaluation of the image follows, mentioning any unusual image processing steps,
explaining what is good and what is not perfect on the image. A quick explanation for the
cause of each imperfectness is given, in view of guiding future efforts of improvement.
Whenever there is something unusual about the imaged object, it is mentioned and the
source of information is quoted.
Notice that all the numbers in the report were either taken from the “Notes” files, which
detail the data of the setup, or else read off from some of the images the authors took.
Once you have the finished report, please place a copy, in Word .doc format, together
with a copy of your finalized image(s) in .png format, in a folder called “Report”, at top
level inside the folder bearing your name on the lab computer. It will be used for grading.
Of course, feel free to take a copy of your image, to print it, use it for postcards, whatever
you like. Don’t hesitate to put your name as “author” on the print!
Caution
It might be tempting to cut-and-past information from the internet. Doing so,
however, constitutes plagiarism, and must be avoided. The text must be the students’
own text, in their own words. It is absolutely essential to avoid writing down anything
that you do not understand. It is very easy for a grader to spot it when that happens,
and it works steeply against the student!
28
NGC 6946: a spiral galaxy
Located in the constellation of Cygnus, NGC 6946 is a 9-g face-on spiral galaxy. In a 12inch telescope under very dark skies we may barely catch the glow of its center, if that;
otherwise it is completely invisible to the visual observer (too faint). Our trials of observing
it in Kennon Observatory, under campus lights, were completely unsuccessful.
Authors: John Doe, Jane Doe, students in ASTR 103 at Ole Miss.
Exposure time: a total of 6 hours, R-G-B_Hα filters, on Nov. 8 and 14, 2007.
Setup used: Meade 12” CST with Astro-Physics FR at f/5.9, SBIG ST-10 camera with a
CFW-10 filter wheel, Astrodon R-G-B-Hα filters; on a Paramount ME mount.
Original pixel size: 0.78 as, image size: 20 am × 30 am, North is up.
This galaxy is 18 million light-years from us. It is Sc type, its spiral arms are somewhat
more open than our galaxy’s, at there is no hint of a central bar.
The spiral arms are largely illuminated by bright, young, blue supergiant stars, and look
blue on the image. Notice the many red patches inside the spiral arms: these are large
molecular clouds (enhanced by our technique of inserting Hα-filtered images). They are the
locations of vigorous present-day star formation. The many stars on the picture are, in fact,
in the foreground: they are part of our galaxy.
29
Galaxies are the main building blocks of the Universe. They are congregates of hundreds
of billion stars; the whole universe is built of billions of these galaxies. However, in the
night sky, they are all very faint. It is almost impossible to detect the spiral arms of any
galaxy by visual observation. All we can see in a telescope is, at best, the faint glow of the
central region (called the bulge).
This galaxy is quite spectacular in long exposure images, because of perspective: we see it
almost exactly face-on. Galaxies are of three main morphological types: spirals, ellipticals,
and irregulars. This one is a spectacular example of an Sc-type, with widely open spiral
arms. It contains an unusual amount of interstellar matter in its spiral arms, with many huge
molecular clouds, which are sites of present-day star formation. These fluoresce in a few
spectral lines, Hα foremost. In order to make these HII regions stick out, we took 1.5 ours
worth of Hα exposures, and (with Photoshop) mixed the Hα images into the red channel.
This procedure gave the stars a somewhat unreal color, but it greatly enhanced the
HII regions.
Notice that the starlight that makes up the spiral arms is blue in color. The spiral arms are
the youngest, short-lived parts of a galaxy; their light is appropriately due to short-lived
stars – massive, blue, and bright – which never have the chance to leave the spiral arms,
living such short lives. This particular galaxy has an unusually small percentage of nonspiral-arm disk stars, which would be yellow on average, filling up the disk between the
arms. The yellow glow is visible on our image only close to the center (in the bulge). This is
an indication that this galaxy is undergoing a particularly vigorous phase of star formation
in the spiral arms, because the older stars are missing.
The limiting magnitude on this image is about 19mg. Stars are large on the image, their
diameter is about 5 as. We do not know the reason for this large star size (short exposures
gave about 2.5 as), but we suspect that the culprit is dome seeing, which can be improved
by fixing the thermal balance of the dome.
The main source of noise on the images is due to the fluctuation of the background, due to
streetlights. While some small improvement could be achieved by longer exposures, and a
somewhat more careful mixing-in of the Hα images, it seems impossible to make much
headway without relocating to a dark site.