1
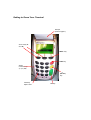
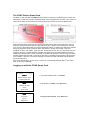
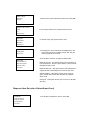
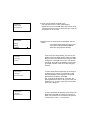
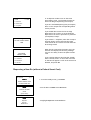
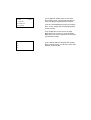
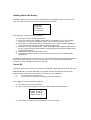
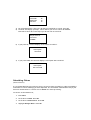
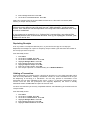
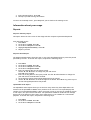
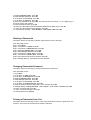
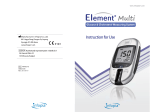
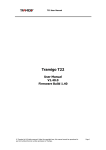
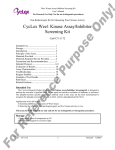
User Guide for CDAP Smart Card
Electronic Claims Submission
Table of Contents
GETTING TO KNOW YOUR TERMINAL ......................................................................................................... 2
CLAIMS AND PATIENT SERVICES ................................................................................................................. 3
The CDAP Pharmacist Smart Card ........................................................................................................ 3
The CDAP Patient Smart Card .............................................................................................................. 4
Logging on with the CDAP Smart Card ................................................................................................. 4
Dispense New Rx (with a Patient Smart Card)....................................................................................... 5
Dispensing a New Rx (without a Patient Smart Card) ........................................................................... 7
Dispense Open Rx..................................................................................................................................10
Viewing Patient Rx History ...................................................................................................................11
Cancel Rx ..............................................................................................................................................11
Submitting Claims .................................................................................................................................12
Reprinting Receipts ...............................................................................................................................13
Voiding a Transaction ...........................................................................................................................13
INFORMATION ABOUT YOUR USAGE ...........................................................................................................14
Reports...................................................................................................................................................14
Reading Messages from CDAP .............................................................................................................15
MANAGING IDS AND PASSWORDS ..............................................................................................................15
Changing the Manager Password .........................................................................................................15
Adding a Pharmacist .............................................................................................................................15
Deleting a Pharmacist ...........................................................................................................................16
Changing Pharmacist Password ...........................................................................................................16
Printing a Pharmacist User List ............................................................................................................16
Unblocking a Pharmacist ......................................................................................................................17
TERMINAL MAINTENANCE .........................................................................................................................17
Changing the Paper Roll .......................................................................................................................17
Other Technical Support .......................................................................................................................17
Getting to Know Your Terminal
Receipt
(thermal paper)
Arrow keys (▼
and ▲)
MENU key
STOP key
Alphanumeric keys
(1-9, 0, 00)
C
(Delete)
key
Feed key
Paper feed
OK key
Claims and Patient Services
The CDAP Pharmacist Smart Card
The Pharmacist card is a card issued to a pharmacist and it is ONLY to be used by the
pharmacist to whom the card was issued. It is clearly distinguishable from the patient’s card as
it is a plain white card which contains the pharmacist’s name and pharmacist user id just below
the integrated smart card chip. See picture below:
When inserting this card into the terminal, the pharmacist must ensure that they insert it chip
first into the terminal with the chip side facing up. The pharmacist must take note that he/she
cannot simply take his/her card and insert it into any terminal that has the CDAP application
installed on it. In order for the pharmacist to use a valid card, he/she MUST be registered on
the terminal in which he/she wants to use it! Once registered, the pharmacist can login
successfully!
A pharmacist also has to be valid for his/her login to be successful as well. When the
pharmacist’s card is first issued, and as long as he is registered on the terminal, a first use
validation is done. This means, when the user inserts the card for the very first time into the
terminal, the pharmacist would be asked to validate the card online. By pressing OK, the
terminal would begin dialing to the remote computer to validate the card. As long as a return
message states that the card is valid, then the logon is allowed to proceed. If however, the
return message is Invalid, the card is blocked and the user is automatically blocked on the
terminal as well. This would have the effect of the user not being allowed to perform a manual
login! It should be noted that a pharmacist goes through an automatic validation every thirty
(30) days. A pharmacist can also be made inactive in which case he/she would not be able to
use the card and it would be made invalid as well as blocked on the terminal he/she were using
the card on.
The CDAP Patient Smart Card
The Patient card is a card used ONLY by the patient to whom the card was issued. Unlike the
pharmacist’s card, this card has artwork printed in the background of the card. Also, there is a
notice at the back of the card printed. See pictures of the front and reverse sides below:
When inserting these cards into the terminal the pharmacist must ensure that they insert it
chip first into the terminal with the chip side facing up. A patient can take his/her card and
carry it to any pharmacist that can issue a CDAP Prescription. A patient also has to be valid for
his/her prescription to be honoured. When the patient’s card is first issued, a first use
validation is done. This means, when the user inserts the card for the very first time into the
terminal, the user would be asked to validate the card online. By pressing OK, the terminal
would begin dialing to the remote computer to validate the patient’s card. As long as a return
message states that the card is valid, then the logon is allowed to proceed and a prescription
can be made. If however, the return message is Invalid, the card is blocked and the patient
cannot use the card.
Every time the patient’s card is used, a counter is incremented and upon the 8th use of the
card, it has to be validated.
Logging on with the CDAP Smart Card
14-06-2006
10.00
READY
1: From the Ready screen, press Menu
SWIPE / INSERT CARD
or PRESS MENU KEY
MENU
2: Scroll down to CDAP. Press OK button.
PREPAID AIRTIME
CDAP
System Setup
CDAP
Prescription
Reports
Maintenance
3: Highlight Prescription. Press OK button.
USER LOGON
Enter User
4: Please insert your Pharmacist smart card. Press OK.
Number
_
SMART CARD LOGON
JSmith
5: Once your ID has been verified, Remove Card.
100
Remove Card
DISPENSE
Enter Patient
6: Please insert your patient smart card.
ID Number:
8765432109
ID: 8765432109
JOHN SMITH
2 Open Rxs
7: The patient’s name and ID will be displayed on the
screen along with the number of open Rxs that are
currently stored on the card.
8: Scroll down to select an option and Press Ok.
DISPENSE
Dispense New Rx
Dispense Open Rx
View Rx History
Cancel Rx
Dispense New Rx – this option allows you to Dispense a
new prescription. This new prescription is also saved on
the patient smart card.
Dispense Open Rx – this option allows you to dispense a
repeat Rx that has already been stored on the card.
View Rx History – this option allows you to view all
open, closed and inactive Rxs stored on the patient
smart card.
Cancel Rx – this option allows you to cancel an Rx that
you have
Dispense New Rx (with a Patient Smart Card)
DISPENSE
Dispense New Rx
Dispense Open Rx
View Rx History
Cancel Rx
1: Scroll down to Dispense new Rx. Press OK.
2: Enter the Rx Number located in the
top right hand corner of the CDAP Patient
Registration form. Press OK. Note that the terminal
would not allow the user to proceed if the value for
Rx Number is ‘0’ or blank.
DISPENSE
Enter C-DAP
Prescription Nr:
_
Glicalizade
80mg
80mg
Tablets
ADD LINE
Enter Drug
Number:
_
<Drug Name>
<Strength>
Prescribed Amnt:
_
V
3: The first item in the drug list is displayed. You can
Either:
• Scroll down ▼ through the list to find
the required drug and Press OK OR
• Enter the drug number directly.
If you enter the drug number, this screen will
appear. Enter the drug number from the CDAP
drug list that corresponds to the drug you want
to dispense. Press OK. The screen will display
that drug. Press OK to go ahead or simply type
in another number if this is not the drug you
wanted.
4: Enter the Prescribed quantity of the drug to
be dispensed. If the Rx is a repeat Rx, enter
the total amount prescribed over the period
specified by the doctor. Press OK.
[Eg. If the Rx is 30 tablets for 3 months, the
prescribed amount will be 90.] If you enter the
amount as ‘0’, or blank, then you will be taken
back to the drug list.
<Drug Name>
<Strength>
Dispense Amnt:
_
5: Enter the Dispense quantity of the drug to be
dispensed. Press OK. If nothing is entered i.e.
blank, the terminal will continue to prompt for
a value until a value >= 0 is entered.
1 ITEM
0 = View
1 = Add Line
6: To dispense another item on the same
prescription, Press 1 and repeat the steps to
select the drug and quantity (from step 8).
2 = Delete Line
If you are finished dispensing this prescription,
Press 3. The receipt and corresponding labels
will be printed.
3 = Complete
If you would like to view the list of drugs
dispensed so far, Press 0. A list of the drugs
dispensed so far will be printed on a proforma
(incomplete) receipt. .
Storing Rx
Do not remove smart
card
If you select 3 = Complete, after the receipt is
printed, the Rx will be stored to the smart
card. Please do not remove the card while the
Rx is being stored.
When the Rx is stored to the smart card, the
terminal will display the following message.
You can now safely remove the patient smart
card.
Rx Stored
Remove Card
SELECT ITEM
If you need to delete a drug that has already
been entered, Press 2. A list of the line items
on that Rx will appear. Scroll to the item to be
deleted, and press OK.
01 : Cliclazide
02 : Bextaxolol
03 : Atenolol
Dispensing a New Rx (without a Patient Smart Card)
14-06-2006
10.00
READY
1: From the Ready screen, press Menu
SWIPE / INSERT CARD
or PRESS MENU KEY
MENU
2: Scroll down to CDAP. Press OK button.
PREPAID AIRTIME
CDAP
System Setup
CDAP
Dispense
Reports
Maintenance
3: Highlight Dispense. Press OK button.
USER LOGON
Enter User
4: Enter your Pharmacist ID. Press OK.
Number
_
USER LOGON
Number: 121
Name:
5: Enter your password. Press OK.
RMARSHALL
Password: *****
6. Enter the number of the ID provided by the client.
Press OK button.
DISPENSE
Enter Patient
ID Number:
7: Enter the form number from the CDAP prescription.
Press OK button.
DISPENSE
Enter C-DAP
Prescription Nr:
_
Insulin
Liquid
ADD LINE
Enter Drug
Number:
_
<Drug Name>
<Strength>
Enter Dispense Amnt:
v
8: The first item in the drug list is displayed.
You can either:
• Scroll down ▼ through the list to find
the required drug and Press OK OR
• Enter the drug number directly.
If you enter the drug number, this screen will
appear. Enter the drug number from the CDAP
drug list that corresponds to the drug you want
to dispense. Press OK. The screen will display
that drug. Press OK to go ahead or simply type
in another number if this is not the drug you
wanted.
9: Enter the quantity of drug to be dispensed.
Press OK. Unlike the Smart Card procedure,
you are only allowed to enter a Dispense
Amount and NOT a Prescribed Amount.
1 ITEM
1 = Add Line
0 = View
10: To dispense another item on the same
prescription, Press 1 and repeat the steps to
select the drug and quantity (from step 8).
2 = Delete Line
3 = Complete
If you are finished dispensing this prescription,
Press 3. The receipt and corresponding labels
will be printed.
If you would like to view the list of drugs
dispensed so far, Press 0. A list of the drugs
dispensed so far will be printed on a proforma
(incomplete) receipt. .
SELECT ITEM
01:
02:
03:
If you need to delete a drug that has already
been entered, Press 2. Scroll to the item to be
deleted, and press OK.
Dispense Open Rx
An open Rx is a prescription that contains repeat medication, that is – it has existing drugs to
be dispensed after a first time dispense. For example, if you dispense a prescription with
prescribed amount as 30 but the dispense amount is 15, this means that there are still 15
tablets of the drug to be dispensed. This constitutes an open Rx.
DISPENSE
1: Scroll down to Dispense Open Rx. Press OK.
Dispense New Rx
Dispense Open Rx
View Rx History
Cancel Rx
OPEN Rxs
123456
765456
01/12/07
02/09/07
Rx: 123456
Insulin
..
Metformin
..
3
10
2: Scroll down to the Rx that you would like to
Dispense. Press Ok.
3: The terminal will display the drug items in the Rx
and their respective balances. Scroll down to the drug
that you would like to dispense and press Ok.
Insulin
Dispense Amnt:
1 ITEM
1 = Add/Edit Line
2 = Complete
0 = Overview
4: Enter the quantity that you would like to dispense.
Press Ok. Please note that if you enter a quantity
greater than the balance, the terminal will prompt
you to enter the dispense amount again.
5: To dispense another item on the same prescription,
Press 1 and repeat the steps to select the drug and
quantity (from step 3).
If you are finished dispensing this prescription, Press
3. The receipt and corresponding labels will be
printed.
Metformin
500mg
Dispense 2/10
OK for more
If you would like to view the list of drugs dispensed
so far, Press 0. A list of the drugs dispensed so far
will be displayed on the terminal. Scroll down to view
all drugs or Press OK.
Viewing Patient Rx History
This option allows you to view a history of the patient’s prescriptions that are stored on the
card. The smart card will allow you to view up to 16 previous Rxs.
Rx HISTORY
1=Open Rxs
2=Closed Rxs
3=Inactive Rxs
After logging on to the terminal [see page 2],
1) Scroll down to View Rx History. Press Ok.
2) Press the number of the category of Rxs that you would like view. To view all Open
Rxs, press 1. To view all Closed Rxs, press 2. To view all Inactive Rxs, press 3.
3) Scroll down to select the Rx that you would like to view. The Rx number is displayed
along with the date that the Rx was first dispensed. Press Ok.
4) Scroll down to view all drug items in the Rx. Press OK to print a detailed report of the
Rx. The receipt prints the total quantity of the drug prescribed and the amount left to
be dispensed (balance)
5) Press Stop to revert to the Rx History menu.
6) The above procedures works in the same way for all three menus in the Rx History
menu option.
It should be noted that the card can store up to 16 past prescriptions on the patient smart card. If
th
there are 16 open prescriptions and you want to store a 17 Rx, the terminal will ask you to
overwrite or cancel existing prescriptions on the card.
Cancel Rx
This option allows you to cancel an Rx that has already been dispensed and stored to the card.
Please note that is you have dispensed a prescription that has already been stored on the
patient’s smart card, there are two steps to cancelling an Rx. You have to
i)
cancel the Rx on the smart card
ii)
cancel the Rx on the terminal [voiding a claim-see page 10]
After logging on to the terminal [see page 2],
1) Scroll down to Cancel Rx. Press Ok.
2) A list of Rx numbers together with their creation date would be displayed
PRESCRIPTIONS
333000 07/05/26
136547 07/04/20
147852 07/04/17
3) Scroll down to the Rx that you would like to cancel. Press Ok.
RX: 333000
Gliclazide
Metformin
Atenolol
40
10
15
4) Rx will be displayed. If this is the Rx that you would like to cancel. Press Ok.
5) Terminal will display a prompt, ‘Cancel Rx? Do you want to Cancel Rx ######?’
Press Ok to cancel Rx. Press Stop if you do not wish to cancel Rx.
Cancel Rx?
Do you want to
cancel Rx
333000?
6) If you press Ok, terminal displays ‘Prescription Cancelled.’
Prescription
Cancelled
7) If you press STOP, the terminal displays ‘Prescription Not Cancelled’
Prescription
Not cancelled
Submitting Claims
(Server Connect)
It is recommended that you perform a Server Connect at least once daily in order to upload the
information on items and drugs you have dispensed. The information submitted this way is your
claim for reimbursement. It will be sent to NIPDEC for claims processing.
To connect to the CDAP server,
1. Press Menu
2. Scroll down to CDAP. Press OK.
3. Scroll down to Maintenance. Press OK.
4. Highlight Manager Menu. Press OK.
5. Enter Manager Password. Press OK.
6. Scroll down to Connect Server. Press OK.
Wait a few minutes while the terminal dials the host server. After each connection (Host
session), a receipt will be printed.
If you are not sure if the connection was successful, you can repeat the server
connect as many times as you wish until you see “data uploading” on the terminal
screen. Your claims will not be duplicated—once they have been submitted once, they
are not re-submitted.
If you cannot get a connection (e.g. if phone line is not working), your data will be
uploaded the next time a connection succeeds. Even if you unplug your terminal, your
claims will not be lost.
Reprinting Receipts
If for any reason a receipt has failed to print, or you need a new copy of a receipt you
dispensed, the manager can reprint a receipt by receipt number (you must have the number of
the receipt you want to reprint).
From the Ready Screen:
1.
2.
3.
4.
5.
6.
7.
8.
Press Menu
Scroll down to CDAP. Press OK.
Scroll down to Maintenance. Press OK.
Highlight Manager Menu. Press OK.
Enter Manager Password. Press OK.
Highlight Reprint receipt. Press OK.
Enter the receipt number. Press OK.
The receipt is printed. It is labeled clearly as a “REPRINT RECEIPT”.
Voiding a Transaction
As was mentioned in a previous section, canceling an Rx occurs in a two stage procedure which
must be strictly adhered to. Voiding a transaction cancels an entire transaction and not just
the dispensing of one drug in a transaction. You can only perform a cancellation if the
transaction has not been uploaded to the server. That is, if you have performed a server
connect since the time the prescription was originally dispensed, the claim is already
submitted. Please call 800-CDAP to report the claim as void.
To cancel a transaction you recently completed and have not submitted, you need to know the
receipt number.
From the Ready Screen:
1.
2.
3.
4.
5.
6.
Press Menu
Scroll down to CDAP. Press OK.
Scroll down to Maintenance. Press OK.
Highlight Manager Menu. Press OK.
Enter Manager Password. Press OK.
Highlight Void Transaction. Press OK.
7. Enter Receipt Number. Press OK.
8. Receipt is printed showing cancellation.
To return to the Ready screen, press Stop until you are back at the starting screen.
Information about your usage
Reports
Dispense Summary Report
This option allows the user to see all the drugs and their respective quantities dispensed.
From the Ready Screen
1. Press Menu
2. Scroll down to CDAP. Press Ok.
3. Scroll down to Reports. Press Ok
4. Highlight Dispense Summary. Press Ok.
5. Report is printed.
Dispense Detail Report
The Dispense Detail Report allows the user to view each drug dispensed for a particular period
specified by the user. To access this report, complete the following steps:
1.
2.
3.
4.
5.
Press Menu
Scroll down to CDAP. Press Ok.
Scroll down to Reports. Press Ok.
Scroll down to Dispense Detail.
Enter the starting date for the report period.
Use the ▲ and ▼ buttons to change the year and month.
Press Ok when finished.
6. Enter the ending date for the report period. Use the ▼ and ▲ buttons to change the
year and month. Press Ok when finished.
7. Screen displays report showing drugs dispensed for the period.
8. Use the ▼ and ▲ buttons to scroll through list of details. Press Ok at any point to print
out list of drugs dispensed for that period.
Uploadable Items Report
The Uploadable Items report allows you to see how many items they have dispensed on the
terminal will be uploaded to NIPDEC when you do a Server Connect. This report displays the
number of line items dispensed daily. When you perform a Server Connect to upload the claims
in this report, the report will have 0 items. The pharmacist should be mindful of the message
that prints at the bottom of this report which states that it is not suitable for reconciliation
purposes. To access this report, complete the following steps:
1. Press Menu
2. Scroll down to CDAP. Press Ok.
3. Scroll down to Reports. Press Ok.
4. Scroll down to Uploadable Items.
5. Press OK and an Uploadable Items report will be printed with that heading
Reading Messages from CDAP
(View Messages)
From time to time, Nipdec may wish to inform you of important changes to the programme or
your application. The View Emails option allows you to print out these messages and can also
confirm to Nipdec that you have received the message.
From the Ready screen:
Press Menu
Scroll down to CDAP. Press OK.
Scroll down to Reports. Press OK.
Scroll down to View Messages. Press OK.
The message or messages are displayed. Scroll down to select one message. Unread
messages are marked with a question mark. Press OK.
6. The message is printed out and display on the screen. To reply (confirm you received
the message), press 1.
1.
2.
3.
4.
5.
Managing IDs and passwords
Changing the Manager Password
It is strongly recommended that you change the manager password from the default as soon as
you receive your terminal. The manager ID has access to the passwords of the pharmacist IDs
and as such must be handled only by the pharmacy owner or designated pharmacist. Protect
this ID by changing it. An important point to note is that the Manager password MUST be 5
digits long. The terminal will not accept a password that is less than or greater than 5 digits
long.
From the Ready Screen
1. Press Menu
2. Scroll down to CDAP. Press Ok.
3. Scroll down to Maintenance. Press Ok.
4. Highlight Manager Menu. Press Ok.
5. Enter Manager Password. Press Ok.
6. Scroll down to Change Manager Pin. Press Ok
7. Enter new password. Press Ok.
8. Enter password again. Press Ok.
9. Message displayed ‘New Manager Password Updated.’
To Return to the Ready Screen, press Stop until you see the starting display again.
Adding a Pharmacist
This option allows the manager to add a new pharmacist to the terminal.
From the Ready Screen
1. Press Menu
2. Scroll down to CDAP. Press Ok.
3. Scroll down to Maintenance. Press Ok.
4. Highlight Manager Menu. Press Ok.
5. Enter Manager Password. Press Ok.
6. Scroll down to User Setup. Press Ok
7. Scroll down to Add User. Press Ok.
8. Enter New Pharmacist ID. Press Ok. The pharmacist can be either 1, 2 or 3 digits long. It
cannot be longer than 3 digits.
9. Enter Pharmacist Name. Press Ok.
10. Enter New Pharmacist Password (Password MUST be 5 digits long). Press Ok.
11. Enter New Pharmacist Password again. Press Ok.
12. Confirmation message – <User Number> <User Name> Add? Press Ok.
Deleting a Pharmacist
This option allows the manager to delete a pharmacist from the terminal
From the Ready Screen
Step 1: Press Menu
Step 2: Scroll down to CDAP. Press Ok.
Step 3: Scroll down to Maintenance. Press Ok.
Step 4: Highlight Manager Menu. Press Ok.
Step 5: Enter Manager Password. Press Ok.
Step 6: Scroll down to User Setup. Press Ok
Step 7: Scroll down to Delete User. Press Ok.
Step 8: Enter Pharmacist ID to be deleted. Press Ok.
Step 9: Message display – pharmacist has been deleted.
Changing Pharmacist Password
This option allows the manager to change a pharmacist’s password
From the Ready Screen
1. Press Menu
2. Scroll down to CDAP. Press Ok.
3. Scroll down to Maintenance. Press Ok.
4. Highlight Manager Menu. Press Ok.
5. Enter Manager Password. Press Ok.
6. Scroll down to User Setup. Press Ok
7. Scroll down to Change User Pin. Press Ok.
8. Enter Pharmacist ID whose Password is to be changed. Press Ok.
9. Message display: Change Password <user number> <user name> Continue? Press Ok.
10. Enter new Password. Press Ok.
11. Enter new Password again. Press Ok.
12. Password has been updated.
Printing a Pharmacist User List
This option allows the manager to print a list of the pharmacists who are registered on the
terminal. This list prints the pharmacist number and name.
From the Ready Screen
1. Press Menu
2. Scroll down to CDAP. Press Ok.
3. Scroll down to Maintenance. Press Ok.
4. Highlight Manager Menu. Press Ok.
5. Enter Manager Password. Press Ok.
6. Scroll down to User Setup. Press Ok
7. Scroll down to User List. Press Ok.
8. User List is printed with Pharmacist Number and Pharmacist Name
Unblocking a Pharmacist
This option allows the manager to unblock a pharmacist. A pharmacist can become blocked if
they have entered an invalid password more than 5 times.
From the Ready Screen
1. Press Menu
2. Scroll down to CDAP. Press Ok.
3. Scroll down to Maintenance. Press Ok.
4. Highlight Manager Menu. Press Ok.
5. Enter Manager Password. Press Ok.
6. Scroll down to User Setup. Press Ok
7. Scroll down to Unblock User. Press Ok.
8. Enter Pharmacist Number who needs to be unblocked. Press Ok.
9. Message display: Unblock User <usernumber> <username> Continue? Press Ok.
10. User is Unblocked.
Terminal Maintenance
Changing the Paper Roll
Step 1: Lift the paper clip to release the flap
Step 2: Remove the old paper roll
Step 3: Insert new paper roll and pull paper until enough is visible. Ensure that the paper rolls
from the bottom of the roll through to the output.
Step 4: Close the flap unlit you hear a ‘click’ sound
Step 5: Press the paper feed key (bottom left button) to feed paper
Other Technical Support
Need Help ???
The NIPDEC support line is available for all of your support needs. Before calling for technical
questions, it is recommended that you check the following:
•
•
•
Your power connection. Is the terminal plugged in properly and is this outlet
functioning currently?
Your phone line. Is the phone line plugged in fully and is the phone line free? (i.e.,
not being used by another machine, e.g. fax or Linx machine).
Your printer cable plugged in fully to the terminal
•
Your printer is plugged in properly and is this outlet functioning currently?
Please feel free to call the NIPDEC help line at
800-CDAP