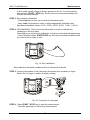
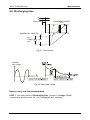
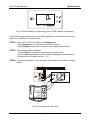
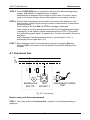
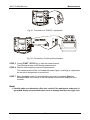
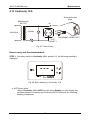
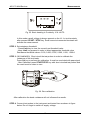
1
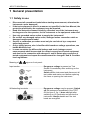
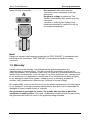
MultiServicer
MI 2170
User Manual
Version: 1.8 - HW2; Code No. 20 750 505
Distributor:
Producer:
METREL d.d.
Ljubljanska 77
SI-1354 Horjul
E-mail: [email protected]
http://www.metrel.si
Mark on your equipment certifies that this equipment meets the requirements of the
EU (European Union) concerning safety and interference causing equipment
regulations
© 2002…2007 Metrel
No part of this publication may be reproduced or utilised in any form or by any means
without permission in writing from METREL.
2
MI 2170 MultiServicer
Table of contents
1
General presentation --------------------------------------------------------------------------------5
1.1 Safety in use ----------------------------------------------------------------------------------------5
1.2 Warranty ---------------------------------------------------------------------------------------------6
1.3 List of measurements carried out by the instrument --------------------------------------7
1.4 List of applicable standards ---------------------------------------------------------------------7
1.4.1 Measurements according to EN 60204-1 -----------------------------------------------8
1.4.2 Measurements according to EN 60439-1 -----------------------------------------------9
1.4.3 Measurements according to VDE 701 and VDE 702 ------------------------------ 10
2
Description of the instrument ------------------------------------------------------------------ 11
3
Technical specifications ------------------------------------------------------------------------- 12
3.1 Withstanding 2500 V ---------------------------------------------------------------------------- 12
3.2 Withstanding 1000 V ---------------------------------------------------------------------------- 12
3.3 Insulation resistance 500 V = ----------------------------------------------------------------- 13
3.4 Voltage drop--------------------------------------------------------------------------------------- 13
3.5 Continuity 10 A ----------------------------------------------------------------------------------- 14
3.6 Discharging time --------------------------------------------------------------------------------- 14
3.7 Functional test ------------------------------------------------------------------------------------ 14
3.8 Differential Leakage ----------------------------------------------------------------------------- 15
3.9 Touch Leakage ----------------------------------------------------------------------------------- 15
3.10 Substitute Leakage ------------------------------------------------------------------------------ 15
3.11 Insulation resistance 500 V = ----------------------------------------------------------------- 16
3.12 Continuity 200 mA ------------------------------------------------------------------------------- 16
3.13 Continuity 10 A ----------------------------------------------------------------------------------- 16
3.14 General --------------------------------------------------------------------------------------------- 17
4
Measurements--------------------------------------------------------------------------------------- 18
4.1 Withstanding 2500 V ---------------------------------------------------------------------------- 18
4.2 Withstanding 1000 V ---------------------------------------------------------------------------- 21
4.3 Insulation 500 V ---------------------------------------------------------------------------------- 23
4.4 Voltage drop--------------------------------------------------------------------------------------- 25
4.5 Continuity 10 A ----------------------------------------------------------------------------------- 28
4.6 Discharging time --------------------------------------------------------------------------------- 31
4.7 Functional test ------------------------------------------------------------------------------------ 33
4.8 Differential Leakage current ------------------------------------------------------------------- 35
4.9 Touch Leakage current------------------------------------------------------------------------- 37
4.10 Substitute Leakage current -------------------------------------------------------------------- 40
4.11 Insulation 500 V ---------------------------------------------------------------------------------- 42
4.12 Continuity 200 mA ------------------------------------------------------------------------------- 44
4.13 Continuity 10 A ----------------------------------------------------------------------------------- 47
5
Operation---------------------------------------------------------------------------------------------- 50
5.1 Storing of measurement results -------------------------------------------------------------- 50
5.2 How to store a measurement ----------------------------------------------------------------- 51
5.3 How to recall a measurement----------------------------------------------------------------- 51
5.4 How to delete last measurement into a group -------------------------------------------- 53
5.5 How to clear all measurement into one group -------------------------------------------- 53
5.6 How to delete all measurement (in all groups) ------------------------------------------- 53
5.7 RS 232 Communication ------------------------------------------------------------------------ 54
3
MI 2170 MultiServicer
Table of contents
6
Maintenance------------------------------------------------------------------------------------------ 55
6.1 Meteorological check --------------------------------------------------------------------------- 55
6.2 After sales service ------------------------------------------------------------------------------- 55
6.3 Replacing the fuses ----------------------------------------------------------------------------- 55
7
PATLink PRO software package -------------------------------------------------------------- 56
7.1 Installing PATLink PRO ------------------------------------------------------------------------ 56
7.2 General --------------------------------------------------------------------------------------------- 56
7.3 Downloading data-------------------------------------------------------------------------------- 58
7.4 Viewing data -------------------------------------------------------------------------------------- 59
7.5 Creating reports ---------------------------------------------------------------------------------- 60
7.6 Printing and exporting reports ---------------------------------------------------------------- 62
8
To order------------------------------------------------------------------------------------------------ 63
8.1 Standard set:-------------------------------------------------------------------------------------- 63
8.2 Optional:-------------------------------------------------------------------------------------------- 63
4
MI 2170 MultiServicer
General presentation
1 General presentation
1.1 Safety in use
•
•
•
•
•
•
•
•
Disconnect all unused test leads before starting measurement; otherwise the
instrument can be damaged!
If the test equipment is used in a manner not specified in the User Manual, the
protection provided by the equipment may be imparied.
Read this instruction manual carefully, otherwise use of the instrument may
be dangerous for the operator, for the instrument or for equipment under test!
Use only grounded mains outlets to supply the instrument!
Do not use any damaged mains outlet, damaged mains connection cable or
damaged measurement leads!
Service or calibration procedure must only be carried out by a competent
authorized person!
Only a skilled person, who is familiar with hazardous voltage operations, can
handle MultiServicer!
In some countries the differential leakage and touch leakage current
measurements shall be executed for normal connection of tested equipment
and also for the connection with changed L and N. Rotate plug connector of
tested equipment and repeat the measurement for changed L and N. Consider
local regulations.
Meaning of
,
signs on front panel:
Input section .............................................. Dangerous voltage is present on Test
Socket 2 immediately after switching on the
230V~50Hz
instrument.
16A
Switch off the instrument and disconnect all
test cables and mains cord before replacing
F1
F2
the fuses or opening the instrument
T 16A
250V
T 3.15A
250V
Withstanding terminals .............................. Dangerous voltage may be present. Switch
off the instrument immediately if the TEST
ON led (pos.5, fig.1.) does not light after
1000V~
switching
on HV generator and service the
2500V~
instrument. Always handle as if the test
leads are energized.
5
MI 2170 MultiServicer
General presentation
Other sections of terminals ....................... Disconnect all other items from the
instrument except equipment under test
during test.
Dangerous voltage is present on Test
Max 600V
Socket 2 immediately after switching on the
Hi
instrument.
CAT III 300V
Insulation, Continuity and Voltage Drop
measurements shall be carried out only on
de-energized equipment.
Test
Socket
1
Test
Socket
2
230V
16A
50Hz
Note!
Dangerous voltage is permanently present on the TEST SOCKET 2 immediately after
switching-on the instrument. TEST SOCKET 2 is connected in parallel to mains
connector.
1.2 Warranty
Unless notified to the contrary, our instruments are guaranteed against any
manufacturing or material defect. They do not bear the specification known as the
safety specification. Our guarantee, which may not under any circumstances exceed the
amount of the invoiced price, is for the repair of our faulty equipment only, carriage paid
to our workshops. It is applicable for normal use of our instruments and does not apply
to any damage or destruction caused, notably by error in mounting, mechanical
accident, faulty maintenance, defective use, overload or excess voltage.
Our responsibility is strictly limited to the pure and simple replacement of the faulty parts
of our equipment, the buyer expressly renounces any attempt to find us responsible for
damages or losses caused directly or indirectly.
Our guarantee is applicable for twelve (12) months after the date at which the
equipment is made available. The repair, modification or replacement of a part during
the guarantee period will not result in this guarantee being extended.
6
MI 2170 MultiServicer
General presentation
1.3 List of measurements carried out by the instrument
MEASUREMENT
Withstanding voltage test 2500 VAC
Withstanding voltage test 1000 VAC
Insulation resistance test 500 VDC
Voltage drop test 10 A
Continuity test 10 A
Discharge time measurement
Functional test
Differential leakage
Touch Leakage
Substitute Leakage
Insulation resistance test 500 V
Continuity 200 mA
Continuity 10 A
OUTPUT TERMINALS
Sockets on yellow section
Sockets on yellow section
Hi - Lo sockets
Hi - Lo sockets
Hi - Lo sockets
Hi - Lo sockets
Test Socket 2
Test Socket 2
Test Socket 2 (PE), Lo socket
Test Socket 1
Test Socket 1
Test Socket 1 (PE), Hi socket
Test Socket 1 (PE), Hi socket
1.4 List of applicable standards
MultiServicer is designed in accordance to the following standards:
- EN 61010-1
- EN 50081-1
- EN 61000-6-1
(safety)
(electromagnetic compatibility)
(electromagnetic compatibility)
7
MI 2170 MultiServicer
General presentation
1.4.1 Measurements according to EN 60204-1
Testing of machines
Function
switch
position
Test
Limits
1. Verification that the electrical equipment is in
compliance with the technical documentation
4
Depends on conductors
material, length and cross
section.
3. Insulation resistance test
3
> 1 MΩ
4. Voltage Tests
2
1 s - No break down
5. Protection against residual voltages
5
2. Test of continuity of the protective bonding
circuit
6. Functional test
7. Retesting in case of changes or modifications
8
≤ 60 V in 5 s
≤ 60 V in 1 s (plugs)
MI 2170 MultiServicer
General presentation
1.4.2 Measurements according to EN 60439-1
Testing of Low-voltage switchgear and controlgear assemblies
Function
switch
position
Test
Limits
Type tests
1. Verification of temperature –rise limits
1 and 2
2. Verification of the dielectric properties
5 s – No break down
3. Verification of the short-circuit withstand
strength
4. Verification of the effectiveness of the
4
protective circuit
≤ 0,1 Ω
5. Verification of clearances and creepage
distances
6. Verification of mechanical operation
7. Verification of the degree of protection
Routine tests
1. Inspection of the assembly including
inspection of wiring and electrical operation
test
1 and 2
2. Verification of the dielectric properties
3. Protection against residual voltages
1 s – No break down
5
≤ 120 V in 5 s
3
> 1000 Ω/V
4. Checking of protective measures and of the
electrical continuity of the protective circuit
5. Verification of insulation resistance
9
MI 2170 MultiServicer
General presentation
1.4.3 Measurements according to VDE 701 and VDE 702
Testing of electrical appliances
Function
switch
position
Test
Limits
1. Visual Check
2. Test of continuity of the protective
11 and 12
bonding circuit
≤ 0,3 Ω
≤1Ω
> 0,25 MΩ
> 0,3 MΩ (VDE 701)
10
3. Insulation resistance test
> 0,5 MΩ (VDE 702)
> 1,0 MΩ (VDE 701)
> 2,0 MΩ
≤ 3,5 mA
7
4. Differential leakage current
≤ 1 mA/kW (P > 3,5 kW)
(VDE 701)
≤ 7 mA (VDE 701)
≤ 15 mA (P > 6 kW) (VDE
701)
8
5. Touch leakage current
≤ 0,25 mA (VDE 701-240
(Entwurf – 0.5 mA))
≤ 0,5 mA
≤ 0,5 mA (VDE 701)
≤ 3,5 mA (VDE 701)
9
6. Substitute leakage current
≤ 1 mA/kW (P > 3,5 kW)
(VDE 701)
≤ 7 mA
≤ 15 mA (P > 6 kW)
7. Functional test
6
8. Voltage Tests
2
10
3 s - No break down
MI 2170 MultiServicer
Description of the instrument
2 Description of the instrument
230V~50Hz
16A
F1
1000V~
2500V~
F2
T 16A
250V
Max 600V
T 3.15A
250V
Hi
F3
CAT III 300V
I
O
Clr
Cal
Save/Rcl
Test
Socket
1
Display Limit
Withstanding
2500V
RS232C
Withstanding
1000V
Insulation
500V
START
Discharging
Time
Continuity
10A
1
12
2
Continuity
200mA
11
3
10
Insulation
500V
4
9
Substitute
Leakage
5
8
6
7
Touch
Leakage
Esc
STOP
Functional
Test
Test
Socket
2
230V
16A
50Hz
Differential
Leakage
Fig. 1. Front panel layout
Legend:
1. POWER ON/OFF switch with indication lamp
2. T 3.15 A 250 V fuses protect instrument power supply
3. T16 A 250 V 6.3x 32 fuses protect from test socket overloading
4. Mains supply
5. Test ON warning lamp
6. LCD custom display
7. Measurement result status (pass signal , fail signal )
8. Withstanding test terminals
9. General (Hi - Lo) test terminals
10. Test socket 1
11. Test socket 2
12. ROTARY SWITCH to select desired function
13. START/STOP key
14. FUNCTIONAL keys
15. RS 232 connector
11
Lo
MI 2170 MultiServicer
Technical specifications
3 Technical specifications
3.1 Withstanding 2500 V
Test voltage readout
Range (kV)
0.00 - 3.00
Resolution (kV)
0.01
Accuracy
±(5 % of reading + 5 digit)
Resolution (mA)
0.1
Accuracy
±(5 % of reading + 5 digit)
Withstanding current readout
Range (mA)*
0.0 - 99.9
* Displayed apparent current
Output voltage / power: 2500 V / 250 W at Umains 230 V, grounded
Trip out current: 2, 5, 10, 20, 50, 100 mA (accuracy ±10 %)
Trip out time: < 30 ms
Voltage shape: sinusoidal
Timer: OFF (START / STOP button must be pressed for operation; ‘bep - bep’ is
activated every 1 s to determine test ON)
Output: socket on yellow section
3.2 Withstanding 1000 V
Test voltage readout
Displayed voltage (kV)
0.00 - 1.50
Resolution (kV)
0.01
Accuracy
±(5 % of reading + 5 digit)
Resolution (mA)
0.1
1
Accuracy
±(5 % of reading + 5 digit)
±(5 % of reading + 5 digit)
Withstanding current readout
Displayed current (mA)*
0.0 - 109.9
110 - 500
* Displayed apparent current
Output voltage / power: 1000 V / 500 W at Umains 230 V, grounded
Trip out current: 5, 10, 20, 50, 100, 500 mA (accuracy ±10 %)
Trip out time: <30 ms
Voltage shape: sinusoidal
Displayed current: apparent
Timer: OFF (START / STOP button must be pressed for operation; sound signal
‘bep - bep’ is activated every 1 s to determine test ON)
Output: socket on yellow section
12
MI 2170 MultiServicer
Technical specifications
3.3 Insulation resistance 500 V =
Insulation resistance readout
Range (MΩ)
0 - 19.99
Accuracy
±(5 % of reading + 5 digit)
Resolution (MΩ)
0.01
Nominal voltage: 500V (+30% / -0%)
Short circuit current: 1.4 mA max.
Measuring current: min 1mA at 500 kΩ
Settable limits: 0.23, 0.25, 0.50, 1.00, 2.00, 5.00 MΩ
Auto discharging after test
Timer: ON, 15 seconds
Output Hi / red – Lo / black 4 mm safety sockets
3.4 Voltage drop
Voltage drop readout
Range ΔU (V)
0.00 – 11.99
Resolution (V)
0.01
Accuracy
±(5 % of reading + 5 digit)
Max. output voltage: <12 V∼ at Umains 240 V
Test current: > 10 A at R <330 mΩ, Umains 230 V (standard test lead)
> 10 A at R <200 mΩ, Umains 230 V (optional continuity extension 10 m)
Threshold values of voltage drop versus wire section:
Wire section
(mm 2 )
Threshold voltage
drop (V)
0.5
0.75
1
1.5
2.5
4
≥6
5
5
3.3
2.6
1.9
1.4
1.0
Timer: ON, 10 seconds
Output: Hi / red – Lo / black 4 mm safety sockets
13
MI 2170 MultiServicer
Technical specifications
3.5 Continuity 10 A
Continuity Resistance readout
Range (Ω)
0.000 –1.999
Resolution (Ω)
0.001
Accuracy (after calibration)
±(5 % of reading + 5 digit)
Max. output voltage: <12 V∼ at Umains 240 V
Test current: > 10 A at R <330 mΩ, Umains 230 V..(standard test lead)
> 10 A at R <200 mΩ, Umains 230 V (optional continuity extension 10 m)
Threshold values: 0.100, 0.200, 0.300, 0.500, 1.000, 1.500 Ω
Timer: ON, 10 seconds
Output Hi / red – Lo / black 4 mm safety sockets
3.6 Discharging time
Discharging time readout
Range (s)
0.0 – 9.9
Resolution (s)
0.1
Accuracy
±(5 % of reading + 3 digit)
2 wires system, triggered on DC voltage falling slope
Max. working voltage:
600 V peak
Min. working voltage:
85, 170 V peak
Threshold values:
1 s, 5 s
Safe voltage level:
60 V, 120 V
Internal resistance of input:
48 MΩ
Output Hi / red – Lo / black 4 mm safety sockets
3.7 Functional test
Current readout
Range (A)
0.00 – 15.99
Resolution (A)
0.01
Accuracy
±(5 % of reading + 3 digit)
Threshold values: 0.5, 1.00, 2.00, 5.00, 10.00, 15.00 A
Timer: ON, 10 seconds
Output: Test Socket 2
14
MI 2170 MultiServicer
Technical specifications
3.8 Differential Leakage
Differential leakage current readout
Range (mA)
0.00 – 19.99
Resolution (mA)
0.01
Accuracy
±(5 % of reading + 5 digit)
Threshold limits: 0.25, 0.50, 1.00, 3.50, 5.00, 10.00 mA
Timer: ON, 10 seconds
Output: Test Socket 2
3.9 Touch Leakage
Touch leakage current readout
Range (mA)
0.00 – 1.99
Resolution (mA)
0.01
Accuracy
±(5 % of reading + 5 digit)
Threshold values: 0.25, 0.50, 0.75, 1.00, 1.25, 1.50 mA
Timer: ON, 10 seconds
Output: Test Socket 2 + Lo safety terminal
RAmeter: 1.8 kΩ
3.10 Substitute Leakage
Substitute leakage current readout
Range (mA)
0.00 – 19.99
Resolution (mA)
0.01
Accuracy
±(5 % of reading + 5 digit)
Short circuit current: < 30 mA
Open circuit voltage: 40 V
IEA displayed current is calculated to 230 V
Threshold values: 0.25, 0.50, 1.00, 3.50, 7.00, 15.00 mA
Timer: ON, 10 seconds
Output: Test Socket 1
15
MI 2170 MultiServicer
Technical specifications
3.11 Insulation resistance 500 V =
Insulation resistance readout
Range (MΩ)
0 - 19.99
Accuracy
±(5 % of reading + 5 digit)
Resolution (MΩ)
0.01
Nominal voltage: 500 V (+30 % / -0%)
Short circuit current: 1.4 mA max.
Measuring current: min 1 mA at 500 kΩ
Threshold values: 0.23, 0.25, 0.50, 1.00, 2.00, 5.00 MΩ
Auto discharging after test
Timer: ON, 15 seconds
Output: Hi / red – Lo / black (4 mm safety sockets)
3.12 Continuity 200 mA
Continuity Resistance readout
Range (Ω)
0.00 – 19.99
Resolution (Ω)
0.01
Accuracy (after calibration)
±(5 % of reading + 5 digit)
Max. output voltage: <12 V∼ at Umains 240 V
Test current: > 200 mA up to 10 Ω, Umains 230 V
Threshold values: 0.20, 0.30, 0.50, 1.00, 5.00, 12.0 Ω
Timer: ON, 10 seconds
Output: Test Socket 1 (PE) + Hi / red (4 mm safety socket)
3.13 Continuity 10 A
Continuity Resistance readout
Range (Ω)
0.000 –1.999
Resolution (Ω)
0.001
Accuracy (after calibration)
±(5 % of reading + 5 digit)
Max. output voltage: <12 V∼ at Umains 240 V
Test current: > 10 A at R <330 mΩ, Umains 230 V..(standard test lead)
> 10 A at R <200 mΩ, Umains 230 V (optional continuity extension 10m)
Threshold values: 0.100, 0.200, 0.300, 0.500, 1.000, 1.500 Ω
Timer: ON, 10 seconds
Output: Test Socket 1 (PE) + Hi / red (4 mm safety socket)
16
MI 2170 MultiServicer
Technical specifications
3.14 General
Mains voltage ............................ 230 V (+6 % - 10 %) / 50 Hz
Max. power consumption........... 600 VA (without load on TEST SOCKET)
Input current max. ..................... 16 A
Display....................................... Custom LCD, Pass / Fail LED indication
RS232 interface......................... 1 start bit, 8 data bits, 1 stop bit,
Baud rate 2400
Memories................................... 62 groups per 62 memory locations
Measurement circuitry protection:
F1 T 16 A / 250 V
6.3 × 32mm (test socket protection)
F2 T 16A / 250 V
6.3 × 32 mm (test socket protection)
F3 T 3.15 A / 250 V
5 × 20 mm (general protect. of the instrument)
F4 T 20 A / 500 V
10.3 × 38 mm (Hi socket protection)
Case.......................................... shock proof plastic / portable
Dimensions (mm) (w × h × d) .... 335 x 160 x 335
Mass (without accessories) ....... 9.5 kg
Pollution degree ........................ 2
Degree of protection (at closed cover) IP 54
Overvoltage category ................ Cat III / 300 V
Protection classification ............. I
Working temp. range ................. 0 0C ÷ 40 0C
Ref. temp. range........................ 5 0C ÷ 35 0C
Ref. humidity range ................... 40 % ÷ 80 % RH
Storage temp. range.................. -10 0C ÷ 60 0C
Max. working humidity ............... 85 % RH (0 0C ÷ 40 0C)
Max. storage humidity ............... 90 % RH (-10 0C ÷ 40 0C)
80 % RH (40 0C ÷ 60 0C)
17
MI 2170 MultiServicer
Measurements
4 Measurements
General notes:
Disconnect all unused test leads before starting measurement, otherwise the
instrument can be damaged!
If instrument is not grounded “Ert” (earth) message is displayed. Disconnect
mains supply and connect it to grounded outlet.
For all measurements except leakage current and discharging time, if an external
voltage is present on the test terminals then the following message will be
displayed:
U_1 if external voltage (> 30 V) is present on test terminals Hi – Lo terminals
U_2 if external voltage (> 145 V) is present on Withstanding test terminals
I_2 if current (> 15 mA) is present on Test socket 2
Measurement will not be done if external voltage is present
4.1 Withstanding 2500 V
Warning !
• Disconnect all unused test leads before starting measurement, otherwise the
•
•
•
•
•
•
•
•
instrument can be damaged!
Only a skilled person, who is familiar with hazardous voltage operations, can
perform this measurement!
Check instrument and test leads for any sign of damage or abnormality
before connecting them to the instrument. DO NOT use test probes in case
of any damage or abnormality!
Always handle with the instrument and connected accessories as the
Withstanding test sockets and leads are under the hazardous voltage!
Never touch exposed probe tip, connections equipment under test or any
other energized part during the measurements. Make sure that NOBODY can
contact them either!
Connect test probes only for measurement of withstanding, and disconnect
them immediately after the test!
DO NOT touch any part of test probe in front of the barrier (keep your fingers
behind the finger guards on the probe) – possible danger of electric shock!
Always use lowest possible trip-out current.
If GND test probe is not connected, instrument doesn’t start the
measurement. Sign “Pro” is displayed.
18
MI 2170 MultiServicer
Measurements
• Instructions for using the test tip:
- push the button to unlock the sleeve and touch tested object with test tip
(keep the button pushed while the sleeve is not retracted upon few
millimeters at least, than release it and retrieve the thumb behind the
barrier).
- after the measurement retract the test tip from tested object and sleeve
comes automatically over the tip.
- the sleeve locks itself automatically when it fully recovers the tip.
MultiServicer MI 2170
230V/50Hz
EQUIPMENT UNDER
TEST
2500V
V
RLOAD
START / STOP
A
i
Fig. 2. Test circuitry
How to carry out the measurement
STEP 1. Set rotary switch to Withstanding 2500 V - position 1, the following heading is
displayed:
Fig. 3. Basic heading in Withstanding 2500 V
19
MI 2170 MultiServicer
Measurements
STEP 2. Set tripping out current:
- Press Limit key to view the existing value of tripping out current,
- Keep Limit key pressed in order to select appropriate tripping out current
value.
Tripping out current values: 2, 5, 10, 20, 50, 100 mA.
If the set tripping out current is higher than 10 mA it is necessary to set it for
every measurement (after the measurement limit is automatically set to
10 mA). To avoid that safety function, press button “Limit” during switching ON
the instrument.
If there is a test current higher than the preset limit, then the measurement will
be automatically concluded with fail signal .
STEP 3. Connect test probes to the instrument and tested item as shown in figure
below. Do not forget to switch off supply voltage.
Fig. 4. Connection of test leads
STEP 4. Keep START / STOP key pressed to start high voltage generator and carry
out the test using test probes. 2500 V appears after 3 seconds 1000 V is
present. Voltage is displayed during this time.
Test ON signal lamp is ON and sound signal is beeping during measurement.
STEP 5. Release START / STOP key to stop high voltage generator.
The measurement will be concluded with pass signal .
STEP 6. Save displayed result for documentation purpose by pressing Save key.
Message MEM and number of the last saved record will be displayed for a
moment. Use Display key to switch between test current and voltage value
results on display.
Note!
• Take care when using HV test probes - hazardous voltage!
• If there is a test current higher than preset limit one, then HV generator trips
automatically after reaching that value, preset limit value is displayed as a
result in this instance.
20
MI 2170 MultiServicer
Measurements
4.2 Withstanding 1000 V
Warning!
• Disconnect all unused test leads before starting measurement; otherwise
•
•
•
•
•
•
•
•
•
the instrument can be damaged!
Only a skilled person, who is familiar with hazardous voltage operations, can
perform this measurement!
Check instrument and test leads for any sign of damage or abnormality
before connecting them to the instrument. DO NOT use test probes in case
of any damage or abnormality!
Always handle with the instrument and connected accessories as the
Withstanding test sockets and leads are under the hazardous voltage!
Never touch exposed probe tip, connections equipment under test or any
other energized part during the measurements. Make sure that NOBODY can
contact them either!
Connect test probes only for measurement of withstanding, and disconnect
them immediately after the test!
DO NOT touch any part of test probe in front of the barrier (keep your fingers
behind the finger guards on the probe) – possible danger of electric shock!
Always use lowest possible trip-out current
If GND test probe is not connected, instrument doesn’t start the
measurement. Sign “Pro” is displayed.
Instructions for using the test tip:
- push the button to unlock the sleeve and touch tested object with test tip
(keep the button pushed while the sleeve is not retracted upon few
millimeters at least, than release it and retrieve the thumb behind the
barrier).
- after the measurement retract the test tip from tested object and sleeve
comes automatically over the tip.
- the sleeve locks itself automatically when it fully recovers the tip.
MultiServicer MI 2170
230V/50Hz
EQUIPMENT UNDER
TEST
1000V
V
RLOAD
START / STOP
A
Fig. 5. Test circuitry
21
i
MI 2170 MultiServicer
Measurements
How to carry out the measurement
STEP 1. Set rotary switch to Withstanding 1000 V - position 2, the following heading
is displayed:
Fig. 6. Basic heading in Withstanding 1000 V
STEP 2. Set tripping out current:
- Press Limit key to view the currently set value of tripping out current,
- Keep Limit key pressed in order to select appropriate tripping out current
value.
Tripping out current values: 2, 5, 10, 20, 50, 100, 500 mA.
If the set tripping out current is higher than 10 mA it is necessary to set it for
every measurement (after the measurement limit is automatically set to 10
mA). To avoid that safety function, press button “Limit” during switching ON
the instrument.
If there is a test current higher than the preset limit one, then the measurement
will be automatically concluded with fail signal .
STEP 3. Connect test probes to the instrument and tested item as shown in figure
below. Do not forget to switch off supply voltage.
Fig. 7. Connection of test leads
22
MI 2170 MultiServicer
Measurements
STEP 4. Keep START / STOP key pressed to start high voltage generator and carry
out the test using test probes.
Test ON signal lamp is ON and sound signal is beeping during measurement.
STEP 5. Release START / STOP key to stop high voltage generator.
The measurement will be concluded with pass signal .
STEP 6. Save displayed result for documentation purpose by pressing Save key.
Message MEM and number of the last saved record will be displayed for a
moment.
Use Display key to switch between test current and voltage value results on
display.
Note!
• Take care when using HV test probes - hazardous voltage!
• If there is a test current higher than preset limit one, then HV generator trips
automatically after reaching that value, preset limit value is displayed as a
result in this instance.
4.3 Insulation 500 V
MultiServicer MI 2170
+
G
V
Hi
+
500V
Lo
A
EQUIPMENT UNDER
TEST
Rins
Iins
Fig. 8. Test circuitry
How to carry out the measurement
STEP 1. Set rotary switch to Insulation 500 V - position 3, the following heading is
displayed:
23
MI 2170 MultiServicer
Measurements
Fig. 9. Basic heading in Insulation 500 V
STEP 2. Set Insulation resistance threshold:
- Press Limit key to view the currently set threshold value,
- Keep pressed Limit key in order to select appropriate threshold value.
Resistance threshold values: 0.23, 0.25, 0.50, 1.00, 2.00, 5.00, MΩ
STEP 3. Connect test probes to the instrument and tested item as shown in figure
below. Do not forget to switch off supply voltage.
Fig. 10. Connection of test leads
STEP 4. Press START / STOP key to start the measurement.
Test ON signal lamp is ON during measurement.
STEP 5. Wait for timer to elapse or press START / STOP key again to stop the
measurement.
The measurement will be concluded with pass signal or fail signal dependant
on test result comparison to preset limit.
STEP 6. Save displayed result for documentation purpose by pressing Save key.
Note!
• Do not disconnect the equipment under test from instrument before it is
discharged.
24
MI 2170 MultiServicer
Measurements
4.4 Voltage drop
MultiServicer MI 2170
EQUIPMENT UNDER
TEST
Hi
iTEST
230V/50Hz
V
<12V/50Hz
ΔU
RLOAD
Lo
A
Fig. 11. Test circuitry
How to carry out the measurement
STEP 1. Set rotary switch to Voltage drop / Continuity 10 A - position 4.
STEP 2. Select Voltage drop function using Display key, the following heading is
displayed: (the display key switches between Voltage drop, Voltage dropAUTO, Continuity and Continuity-AUTO functions)
Fig. 12. Basic heading in Voltage Drop
• AUTO start option
-Select Voltage drop-AUTO function using Display key, the following heading
is displayed:
25
MI 2170 MultiServicer
Measurements
Fig. 13. Basic heading in Voltage Drop-AUTO
In this mode a small voltage is always present on the Hi - Lo test terminals
after START / STOP key is pressed. Small current at connected terminals will
activate the measurement.
STEP 3. Set voltage threshold:
- Press Limit key to view the currently set value
- Keep pressed Limit key in order to select appropriate threshold value
Voltage threshold values: 1.00, 1.40, 1.90, 2.60, 3.30, 5.00 V
STEP 4. (RECOMENDED) Short circuit the test probes in order to calibrate the
resistance of the test leads.
Press Cal key to perform the calibration. It must be concluded with pass signal
. After Calibration press START / STOP key with short circuited test probes
and the result must be close to zero.
Fig. 14. Zero calibration
After calibration the leads resistance will not influence the results.
26
MI 2170 MultiServicer
Measurements
STEP 6. Connect test probes to the instrument and tested item as shown in figure
below. Do not forget to switch off supply voltage.
Fig. 15. Connection of test leads
STEP 6. Press START / STOP key to start the measurement.
Test ON signal lamp is ON during measurement.
STEP 7. Wait for timer to elapse to stop the measurement.
The measurement will be concluded with pass signal or fail signal dependant
on test result comparison to preset limit.
•
AUTO start option
- you can start a new measurement by disconnecting and then connecting Hi
or Lo test probe after timer elapse,
-after timer elapse an instrument will wait for another test, the displayed result
is the worse case measured result. When saving results, the displayed result
is the worse measured result after last saving.
- if that measurement is not needed promptly again, it is advisable to
disconnect probes (to avoid unnecessary loading of sense circuit).
STEP 8. Save displayed result for documentation purpose by pressing Save key.
Message MEM and number of the last saved record will be displayed for a
moment.
Note!
• Parallel paths can adversely affect test results if equipment under test is
grounded during measurement (test result is always lower than the correct
one).
• Do not disconnect test probes before timer elapse to avoid sparking effect.
• Only last displayed result is saved in AUTO start option.
27
MI 2170 MultiServicer
Measurements
4.5 Continuity 10 A
MultiServicer MI 2170
Hi
EQUIPMENT UNDER
TEST
iTEST
230V/50Hz
V
<12V/50Hz
ΔU
RLOAD
Lo
A
Fig. 16. Test circuitry
How to carry out the measurement
STEP 1. Set rotary switch to Voltage drop / Continuity 10 A - position 4.
STEP 2. Select Continuity 10 A function using Display key, the following heading is
displayed: (the display key switches between Voltage drop, Voltage dropAUTO, Continuity and Continuity-AUTO functions)
Fig. 17. Basic heading in Continuity 10 A
• AUTO start option
-Select Continuity 10 A -AUTO function using Display key, the following
heading is displayed:
Fig. 18. Basic heading in Continuity 10 A –AUTO
28
MI 2170 MultiServicer
Measurements
In this mode a small voltage is always present on the Hi - Lo test terminals
after pressed START / STOP key. Small current at connected terminals will
activate the measurement.
STEP 3. Set resistance threshold:
- Press Limit key to view the currently set threshold value
- Keep Limit key pressed in order to select appropriate threshold value
Resistance threshold values: 0.100, 0.200, 0.300, 0.500, 1.000, 1.500 Ω
STEP 4. (RECOMENDED) Short circuit the test probes in order to calibrate the
resistance of the test leads.
Press Cal key to perform the calibration. It must be concluded with pass signal
. After Calibration press START/STOP key with short circuited test probes and
the result must be close to zero.
Fig. 19. Zero calibration
After calibration the leads resistance will not influence the results.
STEP 5. Connect test probes to the instrument and tested item as shown in figure
below. Do not forget to switch off supply voltage.
Fig. 20. Connection of test leads
STEP 6. Press START / STOP key to start the measurement.
- Test ON signal lamp is ON during measurement.
29
MI 2170 MultiServicer
Measurements
STEP 7. Wait for timer elapse to stop the measurement.
The measurement will be concluded with pass signal or fail signal dependant
on test result comparison to preset limit.
•
AUTO start option
- you can start a new measurement by disconnecting and then connecting Hi
or Lo test probe after timer elapse,
-after timer elapse the instrument will wait for another test, the displayed result
is the worse case measured result. When saving results, the displayed result
is the worse measured result after last saving.
- if that measurement is not needed promptly again, it is advisable to
disconnect probes (to avoid unnecessary loading of sense circuit).
STEP 8. Save displayed result for documentation purpose by pressing Save key.
Message MEM and number of the last saved record will be displayed for a
moment.
Note!
• Parallel paths can adversely affect test results if equipment under test is
grounded during measurement (test result is always lower than the correct
one).
• Do not disconnect test probes before timer elapse to avoid sparking effect.
• Only last displayed result is saved in AUTO start option.
30
MI 2170 MultiServicer
Measurements
4.6 Discharging time
L
N
disconnect
MultiServicer MI 2170
rest
voltage
test
V
EQUIPMENT UNDER
TEST
Hi
TEST
Lo
Fig. 21. Test circuitry
expected
Line voltage
Fig. 22. Measured voltage
How to carry out the measurement
STEP 1. Set rotary switch to Discharging time - position 5. Voltage (TRMS)
connected to the instrument (Hi - Lo) is displayed after a second:
31
MI 2170 MultiServicer
Measurements
Fig. 23. Basic heading in Discharging time (TRMS voltage is displayed)
To activate voltage measurement after Discharging time measurement turn rotary
switch out of position 5 and then return.
STEP 2. Select 60 V or 120 V function using Display key
- Press Display key to view the currently set function
- Keep Display key pressed in order to select appropriate function
STEP 3. Set Discharge time threshold:
- Press Limit key to view the currently set threshold value
- Keep Limit key pressed in order to select appropriate threshold value
Discharge time threshold values: 1, 5 s.
STEP 4. Connect test probes to the instrument and tested item as shown in figure
below.
C
Fig. 24. Connection of test cable
32
MI 2170 MultiServicer
Measurements
STEP 5 Press START/STOP key to prepare the instrument for disconnecting mains
voltage, rdY (READY) is displayed after 1s approx.
LoU message is displayed if the voltage on input mains is incorrect (check
input circuit, mains voltage, disconnecting device is not properly used etc.).
STEP 6. Activate disconnecting device and wait for the result to be displayed. If the
disconnection voltage is high enough to make a measurement, measurement
will be performed.
If the voltage is OK then StA (STARTED) message is displayed.
If the voltage is not high enough then the result 0.0s with blinking pass signal
is displayed, in this instance repeat measurement from STEP 4. If the result
0.0s with blinking pass signal is repeated 5 to 10 times, the result 0.0s can be
accepted.
out is displayed if the disconnecting device is not activated in 10 s , or
discharging time is higher then 10 s.
STEP 7. Save displayed result for documentation purpose by pressing Save key.
Message MEM and number of the last saved record will be displayed for a
moment.
4.7 Functional test
F2
F1
L
N
PE
A
MultiServicer
TEST
MI 2170
SOCKET 2
EQUIPMENT UNDER
TEST
Fig. 25. Test circuitry
How to carry out the measurement
STEP 1. Set rotary switch to Functional test - position 6, the following heading is
displayed:
33
MI 2170 MultiServicer
Measurements
Fig. 26. Basic heading in Functional Test
STEP 2. Set current threshold:
- Press Limit key to view the currently set threshold value
- Keep Limit key pressed in order to select appropriate threshold value
Current threshold values: 0.5, 1.00, 2.00, 5.00, 10.00, 15.00 A.
STEP 3. Connect tested item to the instrument as shown in figure below.
Fig. 27. Connection of CLASS I equipment
Fig. 28. Connection of CLASS II equipment
34
MI 2170 MultiServicer
Measurements
STEP 4. Press START/STOP key to start the measurement.
Test ON signal lamp is ON during the measurement
STEP 5. Wait for timer elapse, or press START/STOP key again to stop the
measurement. The measurement will be concluded with pass signal or fail
signal dependant on test result comparison to preset limit.
STEP 6. Save displayed result for documentation purpose by pressing Save key.
Message MEM and number of the last saved record will be displayed for a
moment.
Note!
• Dangerous voltage is present on the TEST SOCKET 2 immediately after
switching-on the instrument. TEST SOCKET 2 is connected in parallel to
mains plug.
• Check L and N are not short circuited on your tested item before
measurement.
4.8 Differential Leakage current
F2
F1
L
N
PE
I N IL
I Δ = IL - IN
MultiServicer
MI 2170
TEST
SOCKET 2
Fig. 29. Test circuitry
35
EQUIPMENT UNDER
TEST
MI 2170 MultiServicer
Measurements
How to carry out the measurement
STEP 1 Set rotary switch to Differential current - position 7, the following heading is
displayed:
Fig. 30. Basic heading in Differential Leakage
STEP 2. Set Differential leakage current threshold:
- Press Limit key to view the currently set threshold value
- Keep Limit key pressed in order to select appropriate threshold value
Differential leakage current threshold values: 0.25, 0.50, 1.00, 3.50, 5.00,
10.00 mA.
STEP 3. Connect tested item to the instrument as shown in figure below.
Fig. 31. Connection of CLASS I equipment
Fig. 32. Connection of CLASS II equipment
36
MI 2170 MultiServicer
Measurements
STEP 4. Press START / STOP key to start the measurement.
Test ON signal lamp is ON during the measurement.
STEP 5. Wait for timer elapse, or press START / STOP key again to stop the
measurement. The measurement will be concluded with pass signal or fail
signal dependant on test result comparison to preset limit.
STEP 6. Save displayed result for documentation purpose by pressing Save key.
Message MEM and number of the last saved record will be displayed for a
moment.
Note!
• Dangerous voltage is present on the TEST SOCKET 2 immediately after
switching-on the instrument. TEST SOCKET 2 is connected in parallel to
mains plug.
• Check, that L and N are not short circuited on your tested item before
measurement.
MultiServicer MI 2170
4.9 Touch Leakage current
Touch leakage
Lo
cca 2K
separated metal
part
TEST
SOCKET 2
Fig. 33. Test circuitry
How to carry out the measurement
STEP 1. Set rotary switch to Touch Leakage - position 8, the following heading is
displayed:
37
MI 2170 MultiServicer
Measurements
Fig. 34. Basic heading in Touch Leakage
STEP 2. Set Touch leakage current threshold:
- Press Limit key to view the currently set threshold value
- Keep Limit key pressed in order to select appropriate threshold value
Touch leakage current threshold values: 0.50, 0.75, 1.00, 1.25, 1.50 mA.
STEP 3. Connect tested item to the instrument and test probe to tested item as shown
in figure below. Do not forget to switch off supply voltage when testing hardwired equipment.
Fig. 35. Connection of CLASS I equipment
Fig. 36. Connection of CLASS II equipment
38
MI 2170 MultiServicer
Measurements
Fig. 37. Connection of hard-wired equipment
STEP 4. Press START / STOP key to start the measurement.
Test ON signal lamp is ON during the measurement
STEP 5. Wait for timer elapse, or press START / STOP key again to stop the
measurement. The measurement will be concluded with pass signal or fail
signal dependant on test result comparison to preset limit.
STEP 6. Save displayed result for documentation purpose by pressing Save key.
Message MEM and number of the last saved record will be displayed for a
moment.
Note!
• Dangerous voltage is present on the TEST SOCKET 2 immediately after
switching-on the instrument. TEST SOCKET 2 is connected in parallel to
mains plug.
• Check, that L and N are not short circuited on your tested item before
measurement.
39
MI 2170 MultiServicer
Measurements
4.10 Substitute Leakage current
MultiServicer
MI 2170
230V/50Hz
V
40V/50Hz
TEST
SOCKET 1
A
OBJECT UNDER
TEST
Fig. 38. Test circuitry
How to carry out the measurement
STEP 1. Set rotary switch to Substitute Leakage - position 9, the following heading is
displayed:
Fig. 39. Basic heading in Substitute Leakage
STEP 2. Set Substitute leakage current threshold:
- Press Limit key to view the currently set threshold value
- Keep Limit key pressed in order to select appropriate threshold value
Substitute leakage current threshold values: 0.25, 0.50, 1.00, 3.50, 7.00,
15.00 mA
STEP 3. Connect tested item to the instrument as shown in figure below. Do not forget
to switch off supply voltage when testing hard-wired equipment.
40
MI 2170 MultiServicer
Measurements
Fig. 40. Connection of CLASS I equipment
ISOLATED
Fig. 41. Connection of CLASS II equipment
Fig. 42. Connection of hard-wired equipment
STEP 4. Press START / STOP key to start the measurement.
Test ON signal lamp is ON during the measurement.
41
MI 2170 MultiServicer
Measurements
STEP 5. Wait for timer elapse, or press START / STOP key again to stop the
measurement. The measurement will be concluded with pass signal or fail
signal dependant on test result comparison to preset limit.
STEP 6. Save displayed result for documentation purpose by pressing Save key.
Message MEM and number of the last saved record will be displayed for a
moment.
4.11 Insulation 500 V
MultiServicer MI 2170
+
+
V
G
-
A
500V
TEST
SOCKET 1
EQUIPMENT UNDER
TEST
Fig. 43. Test circuitry
How to carry out the measurement
STEP 1. Set rotary switch to Insulation 500 V - position 10, the following heading is
displayed:
Fig. 44. Basic heading in Insulation 500 V
STEP 2. Set Insulation resistance threshold:
- Press Limit key to view the currently set threshold value,
- Keep Limit key pressed in order to select appropriate threshold value.
Resistance threshold values: 0.23, 0.25, 0.50, 1.00, 2.00, 5.00 MΩ
42
MI 2170 MultiServicer
Measurements
STEP 3. Connect tested item to the instrument as shown in figure below. Do not forget
to switch off supply voltage when testing hard-wired equipment.
Fig. 45. Connection of CLASS I equipment
Fig. 46. Connection of CLASS II equipment
Fig. 47. Connection of hard-wired equipment
43
MI 2170 MultiServicer
Measurements
STEP 4. Press START / STOP key to start the measurement.
Test ON signal lamp is ON during measurement.
STEP 5. Wait for timer elapse or press START / STOP key again to stop the
measurement.
The measurement will be concluded with pass signal or fail signal dependant
on test result comparison to preset limit.
STEP 6. Save displayed result for documentation purpose by pressing Save key.
Message MEM and number of the last saved record will be displayed for a
moment.
Note!
• Do not disconnect the equipment under test from instrument until it is
discharged.
4.12 Continuity 200 mA
Grounded metal
parts
MultiServicer
MI 2170
230V/50Hz
Hi
6V/50Hz
V
TEST
SOCKET 1
A
EQUIPMENT UNDER TEST
Fig. 48. Test circuitry
How to carry out the measurement
STEP 1. Set rotary switch to CONTINUITY 200 mA position 11, the following heading
is displayed:
44
MI 2170 MultiServicer
Measurements
Fig. 49. Basic heading in Continuity 200 mA
STEP 2. Set resistance threshold
- Press Limit key to view the currently set threshold value
- Keep Limit key pressed in order to select appropriate threshold value
-Resistance threshold values: 0.20, 0.30, 0.50, 1.00, 5.00, 12.0 Ω
STEP 3. (RECOMENDED) Short circuit the test probes in order to calibrate the
resistance of the test leads.
Press Cal key to perform the calibration. It must be concluded with pass
signal . After Calibration press START / STOP key with short- circuited test
probes and the result must be close to zero.
Fig. 50. Zero calibration
After calibration the leads resistance will not influence the results.
STEP 4. Connect test probes to the instrument and tested item as shown in figure
below. Do not forget to switch off supply voltage when testing hard-wired
equipment.
45
MI 2170 MultiServicer
Measurements
Fig. 51. Connection of CLASS I equipment
Fig. 52. Connection of hard-wired equipment
STEP 5. Press START / STOP key to start the measurement.
Test ON signal lamp is ON during measurement.
STEP 6. Wait for timer elapse to stop the measurement.
The measurement will be concluded with pass signal or fail signal dependant
on test result comparison to preset limit.
STEP 7. Save displayed result for documentation purpose by pressing Save key.
Message MEM and number of the last saved record will be displayed for a
moment.
Note!
• Parallel paths can adversely affect test results if the equipment under test is
grounded during measurement (test result is always less than the right one).
46
MI 2170 MultiServicer
Measurements
4.13 Continuity 10 A
Grounded metal
parts
MultiServicer
MI 2170
230V/50Hz
Hi
6V/50Hz
V
TEST
SOCKET 1
A
EQUIPMENT UNDER TEST
Fig. 53. Test circuitry
How to carry out the measurement
STEP 1. Set rotary switch to Continuity 10 A - position 12, the following heading is
displayed:
Fig. 54. Basic heading in Continuity 10 A
• AUTO start option
-Select Continuity 10 A -AUTO function using Display key (the display key
switches between Continuity and Continuity-AUTO functions), the following
heading is displayed:
47
MI 2170 MultiServicer
Measurements
Fig. 55. Basic heading in Continuity 10 A -AUTO
In this mode a small voltage is always present on the Hi - Lo test terminals
after pressed START / STOP key. Small current at connected terminals will
activate the measurement.
STEP 2. Set resistance threshold:
- Press Limit key to view the currently set threshold value
- Keep Limit key pressed in order to select appropriate threshold value
Resistance threshold values: 0.100, 0.200, 0.300, 0.500, 1.000, 1.500 Ω
STEP 3. (RECOMENDED) Short circuit the test probes in order to calibrate the
resistance of the test leads.
Press Cal key to perform the calibration. It must be concluded with pass signal
. After Calibration press START/STOP key with short circuited test probes and
the result must be close to zero.
Fig. 56. Zero calibration
After calibration the leads resistance will not influence the results.
STEP 4. Connect test probes to the instrument and tested item as shown in figure
below. Do not forget to switch off supply voltage.
48
MI 2170 MultiServicer
Measurements
Fig. 57. Connection of CLASS I equipment
Fig. 58. Connection of hard-wired equipment
STEP 5. Press START / STOP key to start the measurement.
- Test ON signal lamp is ON during measurement.
STEP 6. Wait for timer elapse to stop the measurement.
The measurement will be concluded with pass signal or fail signal dependant
on test result comparison to preset limit.
•
AUTO start option
- you can start a new measurement by disconnecting and then connecting Hi
or Lo test probe after timer elapse,
-after timer elapse the instrument will wait for another test, the displayed result
is the worse case measured result. When saving results, the displayed result
is the worse measured result after last saving.
- if that measurement is not needed promptly again, it is advisable to
disconnect probes (to avoid unnecessary loading of sense circuit).
STEP 7. Save displayed result for documentation purpose by pressing Save key.
Message MEM and number of the last saved record will be displayed for a
moment.
Note!
• Parallel paths can adversely affect test results if equipment under test is
grounded during measurement (test result is always lower than the correct
one).
• Do not disconnect test probes before timer elapse to avoid sparking effect.
• Only last displayed result is saved in AUTO start option.
49
MI 2170 MultiServicer
Operation
5 Operation
5.1 Storing of measurement results
The Multiservicer memory organization is divided into two levels.
The first level enables simple separation between 62 individual groups (machines).
Up to 62 measurements can be stored into any selected group, as shown on figure 59.
Group (machine) 1
Measurement 1
Measurement 2
Measurement 3
...
...
Measurement 62
Group (machine) 2
Measurement 1
Measurement 2
Measurement 3
...
...
Measurement 62
.........
.........
.........
Group (machine) 62
Measurement 1
Measurement 2
Measurement 3
...
...
Measurement 62
Fig. 59. Multiserviser memory organisation
50
MI 2170 MultiServicer
Operation
5.2 How to store a measurement
STEP 1. After performing the measurement to be stored press Save/ Rcl key.
The group with latest stored result is offered. Any of the 62 groups can be
selected with Up/Down keys.
MEM
Fig. 60. Offered group for saving result
STEP 2. After setting the group is press Save/ Rcl key again.
The successive number of the stored measurement is displayed for 0.5
seconds, than the result is stored and the instrument returns into normal
operating mode. A successfull store is confirmed with a short buzzer beep.
Notes
A measurment result can be stored only once.
5.3 How to recall a measurement
STEP 1. In any instrument mode exept immediately after a performed measurement
key press Save/ Rcl key. “rCL” is displayed for a while to confirm this action.
Group (number) with latest stored result is offered.
Any of the 62 groups can be selected with Up /Down keys.
MEM
MEM
Fig. 61. Entering the recalling mode, offered group for recalling results
STEP 2. After the group is set press Save/ Rcl key again:
o The successive number of the last stored measurement is displayed for
0.5 seconds ( “r” + “successive number”),
o The measurement code is displayed for 0.5 seconds (“t” +
“measurement code”),
o The result is displayed.
51
MI 2170 MultiServicer
Operation
STEP 3. Other stored result into selected group can be recalled with Up/Down keys, in
a circular manner.
If using the Up key:
o the next measurement (or first stored measurement) is displayed for 0.5
seconds (“r” + “successive number”),
o The measurement code is displayed for 0.5 seconds (“t” +
“measurement code”),
o The result is displayed.
If using the Down key:
o the previous measurement (or last stored measurement) is displayed for
0.5 seconds (“r” + “successive number”),
o The measurement code is displayed for 0.5 seconds (“t” +
“measurement code”),
o The result is displayed.
o STEP 4.
If pressing the Save/ Rcl again (while measuring results are displayed) the
instrument returns to group selection mode (see Step 1)
Recalling mode can be always exited with the Start/Stop key.
The measurement codes help to show the user which measurement is recalled:
Table of measurement codes
Withstanding voltage test 2500V
t1
Withstanding voltage test 1000V
t2
Insulation resistance test, performed through Hi / Lo ports
t3
Voltage drop test
td4
Continuity 10A test, performed through Hi/ Lo ports
tC4
Discharging time test
t5
Functional test
t6
Differential leakage test
t7
Touch leakage test
t8
Substitute leakage test
t9
Insulation resistance test, performed through Test socket 1
t10
Continuity 200mA test
t11
Continuity 10A test, performed through Test socket 1 and Hi port
t12
Notes
In case there is no measurement stored in the selected group “r0” and “no” are
displayed for 0.5 seconds.
52
MI 2170 MultiServicer
Operation
5.4 How to delete last measurement into a group
Last saved result into a group can be deleted. This option is usefull if one wants to
delete the latest stored result.
STEP 1. Recall last stored measurement result in a group (the result with highest
successive number). For more information refer to previous chapter “How to
recall a measurement “.
STEP 2. After the measurement to be deleted is recalled press Clr key. “Clr / rEc”
starts to blink. To confirm the delete press Clr key again. To cancel the delete
press Start/Stop key.
5.5 How to clear all measurement into one group
The instrument enables to delete all stored results into one group at the same time.
STEP 1. Select the group with measurements to be deleted. For more information refer
to previous chapter “How to recall a measurement “, step 1.
STEP 2. After the group is selected press Clr key. “Clr / GrP” starts to blink. To
confirm the delete press Clr key again. To cancel the delete press Start/Stop
key.
Notes
The deleting procedure can be exited anytime with the Start/Stop key.
5.6 How to delete all measurement (in all groups)
The instrument enables to delete all stored results into all groups at the same time.
STEP 1. .Press Save/Rcl key whilst switching ON the instrument. “Clr / All” starts to
blink. To confirm the delete press Clr key again. To cancel the delete press
Start/Stop key.
53
MI 2170 MultiServicer
Operation
5.7 RS 232 Communication
To transfer the stored data to PC, RS 232 communication feature must be used.
Fig. 62. RS 232 communication cable
Note!
• Use original RS 232 communication cable only.
RS232 Communication cable
Fig. 63. Connection of MultiServicer to PC (9 or 25 pin connector)
How to transfer saved data to PC
STEP 1.
STEP 2.
STEP 3.
Connect MultiServicer to PC as shown in fig. 62 using appropriate RS 232
communication cable.
Open PATlink program on your PC.
Choose Download data option in PATlink window.
54
MI 2170 MultiServicer
Maintenance
6 Maintenance
6.1 Meteorological check
It is essential that all measuring instruments be regularly calibrated.
For occasional daily use, we recommend an annual calibration to be carried out.
When the instrument is used continuously every day, we recommend that calibration be
carried out every 6 months.
6.2 After sales service
Repairs under or out of guarantee: Please return the products to your distributor.
6.3 Replacing the fuses
If there is any instrument malfunction, send the instrument to an appropriate service
centre for all four fuses to be checked.
See the purpose of each fuse in paragraph 3.14.
Use original fuses only as declared in paragraph 3.14!
Properly trained service personnel only can do it!
.......... Disconnect all test cables and mains cord before opening the instrument.
......... Hazardous voltage may be present inside the instrument.
Properly trained service personnel should only carry out operation.
Fuse F4 is placed inside the instrument on the front panel.
55
MI 2170 MultiServicer
PATLink PRO software package
7 PATLink PRO software package
7.1 Installing PATLink PRO
•
•
•
•
•
PATLink PRO software is 32-bit application for Win 2000, XP and Vista platforms.
It is recommended that you close all programs before installing PATLink PRO.
Run the installation application from the CD (setup.exe). The wizard will guide you
through the process.
Microsoft .NET Framework 2.0 and Microsoft SQL Server Express are required to
run PATLink PRO. If those applications are not already available on the computer,
setup will install them.
You may need administrative rights to perform this installation.
WARNING:
Copyright law and international treaties protect this program.
Unauthorized reproduction or distribution of this program, or any portion of it, may
result in severe civil and criminal penalties, and will be prosecuted to the maximum
possible under law.
7.2 General
PATLink PRO software is used for:
• downloading memorized data,
• manual adding of measuring results,
• viewing and editing memorized data,
• creating reports of measurements,
• printing reports of measurements.
The main screen is the start point for all actions. It provides access to all functions by
clicking on 'toolbar' buttons or selecting entries from application’s main menu.
Downloaded data is stored in the database, which is automatically loaded when the
application starts.
56
MI 2170 MultiServicer
PATLink PRO software package
Fig. 64. Main screen
The main screen consists of main menu, toolbar, tree or table project browser (left
pane), machine data (top right pane) and test results (bottom right pane).
File: This menu allows you to save data, export them to text or Microsoft Excel
compatible format and toggle between current and archived data.
Edit: Standard Windows Edit menu.
View: Allows you to show/hide right panes and toggle between tree browser and table
browser.
Instrument: This menu entry enables you download data from the instrument.
General Data: This menu is used for managing lists of data that can be assigned to
projects: users, validators, customers.
Tools: Allows you to set application preferences and create reports.
Help: This menu contains detailed information about this software package.
57
MI 2170 MultiServicer
PATLink PRO software package
7.3 Downloading data
Before downloading data from the instrument:
•
•
•
•
•
connect MultiServicer to PC according to capture 5.7
select Instrument → Get Results menu entry to display the download dialog
select instrument type (Multiservicer) and baud rate (2400) or choose auto
detection
press Start/Stop button on Multiservicer to exit data recall view
press Start button on the download dialog
Fig. 65. Data download dialog
After downloading has been successfully finished, click Close button. A new project is
created in the project browser tree. The newly downloaded data is stored into a new
building inside that project.
58
MI 2170 MultiServicer
PATLink PRO software package
7.4 Viewing data
To view the downloaded data select the newly created project, the new building inside
that project and the machine you wish to view data for. Results can be edited or
deleted.
Machines can be moved to different projects/building by dragging and dropping the
machine node to the desired position in the tree browser. Additional projects and
building can be created using toolbar buttons or context menu entries.
Older results can be archived. This improves application performance, as the archived
results are not loaded when starting the application. If you want to see the archived
machines, choose Load archive data from the File menu. To display the current results
again, choose Load current data.
PATLink PRO enables you to quick search the entries in the project tree. You can also
define a filter to limit the entries shown.
Fig. 66. Machine results
It is also possible to manually add ZLOOP results, subresults and parameters to the result
set.
59
MI 2170 MultiServicer
PATLink PRO software package
Fig. 67. Adding ZLOOP measurement
7.5 Creating reports
To create a report, select the machines in the tree project browser. Selection is done
with a combination of mouse clicks and the use of CTRL or SHIFT modifiers. Instead of
selecting machines you can also select project or buildings. By selecting a project or a
building all the machines in that object will be used in report.
PATLink PRO offers two types of reports:
•
•
Lite report: the report consists of machine measurement results
Pro report: enables you to add additional info to reports: customer name,
validator name, operator name, comments, testing instrument info...
Report can be created by selecting entries in project browser context menu, Tools main
menu or by clicking the toolbar button.
After you have chosen the desired command, the print preview (lite report) or report
dialog (pro report) is shown. The report dialog is used for entering additional information
as well as editing the results. Clicking the Print button shows the preview.
60
MI 2170 MultiServicer
PATLink PRO software package
Print preview enables you to see the report exactly as it will appear on the paper. The
preview toolbar offers several commands for navigating, searching and zooming.
61
MI 2170 MultiServicer
PATLink PRO software package
Fig. 68. Pro report
7.6 Printing and exporting reports
To print a report, click on Print button in the print preview toolbar. You can also export
the report into various formats (including Adobe Acrobat PDF and Microsoft Word) that
can be used as an electronic backup copy.
62
MI 2170 MultiServicer
To order
8 To order
8.1 Standard set:
Order No. MI 2170
Test lead 2 m, black
Test lead 2 m, red
Test tip, black
Test tip, red
Crocodile clip, black
Crocodile clip, red
HV test lead
RS 232 cable
PC SW package PATlink LITE
8.2 Optional:
ISO/SUB adapter
HARD adapter
Continuity extension 10m
PC Software PATlink PRO
Order No.
Order No.
Order No.
Order No.
63
A 1095
A 1096
S 2012
A 1203
MI 2170 MultiServicer
To order
64