1
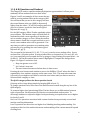
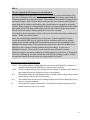
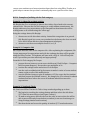
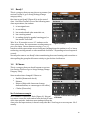
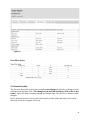
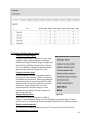
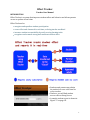
Effort Tracker Teacher User Manual INTRODUCTION Effort Tracker is a system that improves student effort and behavior and allows parents access to updates in real-‐time. Effort Tracker also: • energizes and equalizes student participation • scores effort and classwork in real-‐time, reducing teacher workload • increases student accountability by easily scoring learning tasks • recognizes and rewards strong and consistent student effort • Students and parents may obtain the student’s access code from his or her teacher. • Teachers, you will Cind student access codes at Setup/Access. • A sample student report is shown in Figure 17 on page 18. 1 Table of Contents Section 1 EFFORT TRACKER CATEGORIES, Pages: 4 - 14 Effort Tracker has four categories for scoring student effort and one category for recognizing student effort. The Cive categories are explained in the following sections: 1.1 Q & R (Questions and Readers) 1.2 Category On Task 1.3 Ready? 1.4 U Choose 1.5 Recognition 5-8 9-11 12 12 13-14 Section 2 DATA REPORTS Pages: 15 - 22 This section explains how Effort Tracker data is organized. In addition to organizing data by class, student, and effort category, you may organize data further by assigning a Title to some learning events. Also in this section – suggestions on how to incorporate Effort Tracker data into your electronic grade book. 2.1 The Overview Tab and entering Effort Tracker data into your electronic grade book 2.2 Checking/changing individual student data 2.3 Assigning a title to a learning event 2.4 Effort Awards 2.5 Effort Achievers 2.6 Scores by date 15-17 18 19 19-20 20-21 21-22 Section 3 SETUP Pages: 23 - 25 Choose Setup when you want to add or delete students, classes, or change Time periods. Other program choices are found at Setup/Settings. There are default settings in place to allow you to get started quickly after signing up for Effort Tracker. After you become an experienced user, you may wish to change some of the default settings. 3.1 Setup menu items 3.2 Checking/changing individual student data 23-24 24-25 2 Quick Reference 11 1 2 10 3 9 4 5 8 6 7 Item # Function 1 Lists current class/subject. Touch this button to get back to your list of classes/subjects. 2 This row shows the choice buttons for the five Categories. On-task is currently selected. 3 The highlighted student will be scored when you make a selection from the scorepad (#7). 4 Numbers after student names represent their assigned seat (group 7 seat 1). 5 Pressing the reset button will produce a random list of all students in the current class. 6 When you are done scoring students, touch the save button to send the data to the “cloud”. 7 The scorepad showing your scoring options. Your selection will appear on the right side (see #10) and highlighter will drop down to the next student. To change your scorepad options, go to Setup/Settings/Scorepad values (do this from a laptop or desktop computer). 8 Selecting filldown will give the previous score to the remaining unscored students. 9 Use to keep track of how often students are absent when their turn occurs. 10 Pending or saved scores are shown here. To change a score before saving, touch the studentʼs name and the highlighter will relocate to that student. 11 The settings button. Touch to see choices available for the current category 3 Getting Started After you sign in you will see the welcome page. Select Effort Tracker. Figure 1 The second screen lists your classes along with Sign out, Reports, and Setup. Choose a class to get started (or the Demo class to practice). Use a laptop or desktop computer to view or make changes to Data Reports or Setup. Section 1 EFFORT TRACKER CATEGORIES To get stated using Effort Tracker, you will need to: a) name your Cirst Time period, b) enter your classes or subjects, and c) enter your students and assign them to one or more classes or subjects. This process is explained further through the screens you will view after signing up to subscribe to Effort Tracker. After signing in to your E4Effort account, click on Effort Tracker and your list of classes or subjects will appear (Figure 1). Select a class or subject and a screen similar to Figure 2 will appear. There are four categories for scoring student effort or class work and one for recognizing student performance. We will begin with the opportunity-‐ equalizing category, Q&R. Figure 2 (Q & R) 4 1.1 Q & R (Questions and Readers) This category is used to equalize student participation opportunities. It allows you to randomly call on students and score their effort. Figures 2 and 3 are examples of the screens that are used for scoring student effort in the category Q&R. You will know that you are in this category because the second button at the top (Q&R) is depressed/ lighter than the others. To exit this category and view your list of classes, touch the class button (Quick Reference #1 on pg. 3). For the Q&R category, Effort Tracker randomly orders your students. This random order will hold until all students have had a turn regardless of whether you exit to another category or class. When the student whose name is listed last is scored and their score is saved, a new random order will be generated. If at any time you wish to generate a new random order, you may do so by pressing the reset button (Quick Reference #5, pg. 3). Figure 3 (Q & R) The scorepad at the bottom (9.5, 9, 8.5, 7.5, 6, etc.) is used to score student effort. Scores are based on a 10-‐point system. Scoring student effort or classwork at 9.5 is an A, 8.5, a B, etc. (you can adjust your scorepad choices by going to: Setup/Settings/Scorepad values – see Section 3). Call on the student whose name is highlighted. Compare the changes from Figure 2 to Figure 3 and notice that: • Katy was given a score of 9.5 • It’s Carlene’s turn next • The save button becomes red when there is data to save Pressing the save button sends student scores to the E4Effort “Cloud” where the data is organized by class, student, category, and in some cases, Title. This may take some time (seconds) so you might as well wait to touch the save button until you want to move to either another category or class. The Q & R category allows for three question Levels (You may wish to keep things simple by keeping Q&R at Level 1) To change question levels, select one of the three buttons located along the top bar of the Q&R category. To promote higher-‐level questioning, Effort Tracker allows you to differentiate between types of questions. Each question level has its own randomized student order. To encourage students to respond to higher-‐level questioning, scorepad values are set higher for Levels 2 and 3. Use Level 1 for questions associated with content that has been previously covered and involves recalling information. Level 2 questions are those that use higher-‐level thinking involving understanding. For questions at this level the student shows an understanding of the content material beyond recalling facts. 5 Level 3 questions are also higher-‐level questions involving application, analysis, synthesis, or evaluation. For example, where did the energy that is contained in a hamburger come from? What can you infer or predict from the trend shown in this graph? (See: types of questions based on bloom’s taxonomy.) Suggested Scoring for Q & R: Level 1, Questions 10/9.5 The student answers the question correctly (some users prefer to use 9.5 as their highest score option) 9 The student’s answer is very close to the correct answer or the student states the question correctly and later answers correctly when given a second opportunity. (See BOX 1, #6). 8.5–6 The student’s response/effort/attentiveness is judged to be in the “B” range. (Score a 7.5 for “C” range, 6.0 for “D” range.) 4 The student’s response is unrelated to the question or the student cannot answer or repeat the question in a timely manner. 0 The student has been inattentive and disruptive to the class or to nearby students. X Use to skip the student for whatever reason (if the student is absent, use the absent button or don’t score at all). BOX 1: Tips for using the Q & R Category for Questions: 1. All hands are down (see the book Teach Like a Champion, technique #22 Cold Call, for the author’s recommendations on using a hands-‐down approach to student participation). 2. State the question – either with or without visual aids such as pictures, graphs, diagrams, PowerPoint slides, or handouts, 3. Ask if anyone needs the question repeated or further clariCication, 4. Allow students some time to process the question before calling on the student whose name is highlighted by the Effort Tracker. 5. Depending on a student’s past performance, you may want to offer a hint or some direction. 6. If a student is unable to answer the question but can repeat the question give him a high score of 8.5 -‐ 9.5. When another student does respond to the question correctly, go back to the student or students who could not answer and ask them to respond. If they are correct this time, raise their score (Teach Like a Champion, technique # 1 No Opt Out). See example dialogue in BOX 2. 6 BOX 2: Example dialogue (this example assumes the teacher’s highest scoring option is 9.5) Teacher: “No hands! This is a review question – if your name comes up give me one of the three raw materials needed for photosynthesis. Wait… “Josh?” Josh: “One of the three raw materials needed for photosynthesis is water. [score as 9.5] Teacher, “Correct, Katy give another?” Katy: “Sunlight” [score as 9.5 or 9 if you require the student to give a full-‐sentence answer like Josh did.] Teacher: “Correct, Bruce?” Bruce: “I don’t recall the 3rd raw material needed for photosynthesis” [score 8.5-‐9.5] Teacher: “Stephanie?” Stephanie: “I don’t know? Teacher: “you don’t know what?” Stephanie: “I don’t know the question” [score as a 4 or lower] Teacher: “I’ll take hands now.” The answer is given. The Teacher then goes back to Bruce and Stephanie, if they are now able to give a full-‐sentence answer incorporating carbon dioxide, raise Bruce’s score by a half a point and Stephanie’s to a 5 or 6. Suggested Scoring for Level 2 and Level 3 Questions The default highest scorepad value for Level 2 and Level 3 questions is 10.5. The intent is to provide extra-‐credit incentive for students to participate in higher-‐level questioning. Any student who makes a genuine effort to answer a higher-‐level question should not be scored below a 9.5. Use the “X” (skip) for a student who is not able to respond to a higher-‐level question. This will not raise or lower their overall effort score but will remove them from the queue. The idea is to give multiple students higher-‐level questions – one chance and move on – don’t focus on one student too long. 10.5 The student answers the question correctly 10 The student’s answer is very close to the correct answer or the answer is correct after a hint is given 9.5 The student’s answer is very close after a hint is given 6–4 The student is off task – cannot repeat the question 0 The student has been inattentive and disruptive to the class or to nearby students. X Use to skip student’s turn without beneCit or penalty. It’s much more common to use the X while in Question Level 2 or 3 to allow other students an opportunity at higher-‐level questioning. If you decide not to score or use “X” on a student whose name is highlighted, their name will rise to the top of the selection list after scores are saved 7 BOX 3 Tips for using the Q & R Category to select Readers: (Refer to chapter ten of the book Teach Like a Champion. for more detailed tips.) The goal when reading aloud in class is to have one student as the primary reader and the remaining students as secondary readers. The primary reader should be changed often and unpredictably. Effort Tracker helps in this goal because students cannot predict when they will be asked to read and therefore should be more engaged as secondary readers. Effort scoring for reading should be based on a) how quickly the reader begins after called on, b) if the new reader begins from the place where the previous reader left off, and c) the reader’s delivey (keep the focus on the content). The transition from one primary reader to the next should be done with a minimum of words. “Thank you, next is Jordan.” Match the reading length and difCiculty to the reader. Even though Effort Tracker selects the student order for you, you may wish to sometimes pass over to another student if you feel the reading level for a particular section is too demanding for the highlighted student. Return to the passed-‐over student later when the reading is less difCicult or when asking a content question about the reading. To pass over a highlighted student, just touch the screen near the name of another student. Another strategy to use when reading more challenging text (referred to as “bridging in Teach like a Champion) is to have the teacher read between primary readers “to keep the narrative thread alive and create more opportunities to model.” Suggested Scoring for Q & R: Readers 10/9.5 The student begins reading right after their name is called and/or answers a content question (taken from the section just read) correctly. 9/8.5 There is a slight delay by the student after their name is called or their answer to the content question is slightly incorrect or incomplete. 8/7 The student claims to have momentarily lost track of where the previous reader left off and you believe this to be accurate. 4–0 The student does not know the reading location and has been disruptive to the class or to nearby students. X Use to skip the student for whatever reason (if the student is absent, use the absent button or don’t score at all). 8 1.2 On Task Utilizing Effort Tracker’s On Task category can reduce your correcting workload, increase student accountability, and aid in overall class management. See example scenarios in Box 4 below. The settings button (located on center bar) for On Task allows you to (see Figure 4): A. Title the learning event or classify the leaning event as general B. Raise or lower the normal 10-‐point scoring scale C. List student names in an ordered or random mode Figure 4, Pressing the settings button (circled) will lead to the screen at right where you may choose to change the: title, scale multiplier, or student order A. Title the learning event or classify the leaning event as general You may choose to assign On Task scores under a general designation or as a Titled Event. Titled Events are listed in a separate table in Data Reports (see section B below). Whether On Task scores are given a title or classiCied as general, the data becomes part of the student’s On Task percentage. Teachers choose to assign a title to a learning activity when they plan to score all students and want to be able to trace On Task scoring to a particular learning event or activity. Click on the settings button to reveal the list of options for the On Task category (see Figure 4). Figure 5, Title setting options To create a New Title, select New from the top bar (Figure 4). This can be done from a smart phone, 9 iPod, iPad, laptop, or desktop computer. A new screen will appear (Figure 6) that allows you to: 1) type in the title, 2) choose the score multiplier, and 3) assign the title to one or more classes/ subjects. B. Raise or lower the normal 10-point scoring scale From time to time you may want to raise or lower the 10-‐point scoring scale to more closely match the time or effort required of a learning task. Scores in each of the Effort Categories are based on a 10-‐point system. For the category On Task, you have the option of raising or lowering the value of a scoring event by using one of the Figure 6, New button following multipliers: ¼, ½, 2, 3, 4, or 5. Multiplying the 10-‐point system by each multiplier gives a possible point range of from 2.5 to 50. For example, setting the multiplier at 3x and giving a student a score of 7.5 will register in Data Reports as a score of 22.5 out of 30 (7.5 x 3 = 22.5 and 10 x 3 = 30). It is possible to weigh one Effort Category higher or lower than another; this is discussed below in Section 3, or by going to: Setup/Settings/Category scoring weights. C. List student names in an ordered or random mode Figure 7, shows your choices after pressing the settings button and then choose order. The choices are: By Assigned Seat Location: One of the Settings in Setup allows you to code each student’s seat location. These are the numbers that appear after the students name in many of the Cigures (e.g. Figure 4). Students have a two-‐digit seat number. The number 23 is read as: group 2 seat 3. Some teachers Cind it enough just to give each student a single digit to represent their group number. Ordering the students by Seat location makes sense if you plan to score all students and don’t want to zigzag around the room from one random listing to the next. Alphabetical by Last or First name: The alphabetical mode may be helpful when students are not in assigned seats (e.g. at the computer lab, see Box 4 example 2 below). Figure 7, Choose Order options Random: You may wish to use the random mode when you only have time to score a portion of the class. Letting Effort Tracker select which students you will visit with and score helps to assure that all students (eventually) receive individual attention from you. Ask the class if they have any initial questions about the assignment because once they start working the plan is to let Effort Tracker select who to check-‐in with. (Of 10 course some students need more attention than others but using Effort Tracker as a guide helps to ensure that you don’t continually skip over a portion of the class.) BOX 4: Examples of utilizing the On-Task category Example 1: video clip or short activity Ms. Brophy has 5 or so minutes to show a short video clip related to the current content topic. She uses the On Task category to credit student attentiveness. Ms. Brophy announces her expectations to the class and lets them know she will be scoring some or all of them using the “effort app”. Using the settings button, Ms Brophy: • • chooses not to title this short activity. Instead she categorizes it as general. (Ms. Brophy’s goal is to score every student but she knows she does not need to for this to be an effective class management technique.) chooses to set the score multiplier low at ¼ or ½ X Example 2: Computer Lab Mr. Cooper takes his class to the computer lab. After explaining the assignment, Mr. Cooper announces his expectations and tells the students that they will be graded using the Effort Tracker. “All students will start with a 95%-‐A. You will keep this score if you utilize your time efCiciently and appropriately.” From the On Task category Mr Cooper: • • • • presses the new button to create a new titled event (CLab EcoRpts – Computer Lab Ecosystem Reports). He sets the score multiplier at 2x touches the settings button and selects CLab EcoRpts sets the order as alphabetical by Cirst name to make it easier to locate student names on the screen of his mobile device uses the Pill down button to give all students a 9.5 (he scores the Cirst student and then presses the Pilldown button). He changes the 9.5 to absent for absent students and later lowers the scores of students who did not meet his expectations. Example 3: Notebook Check Ms. Lewis uses Effort Tracker On Task to keep notebook grading up-‐to-‐date. • • • She begins by touching the settings button and then selects the title Notes 5/17 from her menu choices (see Figure 5 above) To make scoring more efCicient, she sets the order at seat so that she will be able to move efCiciently from student to student (to set seat locations go to: Setup/Settings/student seat locations). She then checks and scores the quality of student 5/17 notebook entries. 11 1.3 Ready? This is a category that you may choose to rename (see section 3 below or go to Setup/Settings/Change category titles). One time to use Ready? (Figure 8) is at the start of class. Use Effort Tracker to score the following start-‐ class expectations, the student: 1. is in assigned seat 2. 3. 4. 5. is not talking has notebook and other materials out, has a writing utensil is reading the daily agenda, learning goal, or has started “bell work” Take 10 to 30 seconds to score 3-‐7 students as the Figure 8, Ready? class quiets down. Do not announce student names as you score them. Choose between scoring a 7 or a 5 based on which expectations are not being met (talking drops the student to a 5 or lower, not having a writing utensil or other materials could be a 7 depending on how frequent it occurs). You may also want to use Ready? when transitioning from one learning task to another or when pulling the group back from an activity to give further clariCication. 1.4 U Choose This is a category that you should rename or not use (see Section 3 below or go to Setup/Settings/Change Category Titles). Some teachers have changed U Choose to: • • • • HmWrk (Homework check) Debates Helpers (Help with classroom cleanup, demonstrations, or a messenger to the ofCice) C Rules (Class rules) Mr. Christiansen example Figure 9, U Choose was changed Mr C renames U Choose as C Rules (Figure 9). His goal to C Rules is to enter a score for each student near the end of some of his class periods. And since most students follow the class rules and expectations, it doesn’t really take Mr. C that long to score everyone. Mr. C usually: 12 mentally notes the Cirst name scores the Cirst student as 9.5 presses the Pilldown button scrolls back to the Cirst name scrolls down making appropriate score and absent adjustments • presses the save button If a student’s parent or approved adult is monitoring the student’s effort scores (through www.e4effort.com/access) C Rules is an easy way to communicate individual student behavior. • • • • • 1.5 Recognition Figure 10, Recognition #1 Under the Recognition program, students receive bonus points for having strong academic effort and complying with class rules and procedures. Students may obtain bonus points in two ways: by earning Effort Awards, and by being an Effort Achiever. Effort Awards are based on the student’s previous Cive scores, whereas Effort Achiever averages all of the student’s scores — it’s an honor roll for effort. Bonus points are automatically calculated and displayed in several locations in Data Reports and also on the student’s e4effort.com/access web page. Effort Awards Effort Awards should be given out near the end of each class/subject to 2 to 4 students (depending on class size). Student names are randomly listed along with a percentage. The percentage shows the average of the student’s last Cive effort scores (see Figure 10). You (or you and the class) may decide that to be eligible for an Effort Award the effort % must be greater than or equal to X (perhaps 87%) AND the student must have complied with all class rules and procedures during the most recent class period. (The cut-‐off percentage may be as Cirm or as soft as you like. You may choose to lower it for certain students who struggle to reach 87% or to comply with all of the rules for an entire period). Figure 11, Recognition #2 Compare Figure 10 with Figure 11 and notice that the teacher scored Polly as a yes, Dan – no, Noemi – yes, and Greg – yes. When you touch the save button, these scores are sent to the Effort Tracker’s Data section where bonus points 13 are tabulated. Under the default setting, a student receives 5 bonus points if he or she earns an Effort Award every time they are eligible (equivalent to 5% of their effort grade). This 5% represents the 5% that is held back by setting the maximum scorepad values at 9.5 instead of 10 for all categories (except Level 2 and Level 3 of Q & R). Effort Award sample calculations are shown below in section 2.4, Cigure 19. To change the default bonus settings or turn Effort Awards off, go to Setup/ Settings/Recognition bonus program Figure 12, Effort Award; A template for EA tickets is available on the E4Effort Website. Announcing the Effort Awards: You may choose to announce the EA winners with or without accompanying Effort Award (see Figure 12). Just make sure to give the winners their recognition – as simple as hearing their names announced. Some schools use a “Green” Ticket system to recognize good behavior by students and when a certain number is reached the students plan a homeroom event -‐ Effort Awards could be utilized in a similar way. Effort Achievers Another avenue to bonus points is through the Effort Achievers program. This program is analogous to an honor roll for effort rather than academic achievement. Effort Tracker checks the student’s overall percentage* to determine if it falls within one of three Effort Achiever levels. The default Effort Achiever bonuses are set as: • Achiever Level 3: bonus = 6 when student’s overall percentage is ≥ 92% • Achiever Level 2: bonus = 4 when student’s overall percentage is ≥ 88 and ≤ 91% • Achiever Level 1: bonus = 2 when student’s overall percentage is ≥ 85 and ≤ 87% To change the default bonus settings or turn Effort Achievers off, go to Setup/Settings/ Recognition bonus program * Overall percentage = (On-‐task points x scoring weight) + (Q &R points x scoring weight) + (Ready? points x scoring weight) + (U Choose points x scoring weight) divided by (maximum on-‐task points possible x scoring weight) + (maximum Q &R points possible x scoring weight) + (maximum Ready? points x scoring weight) + ( maximum U Choose points possible x scoring weight). 14 Section 2 DATA REPORTS The purpose of section 2 is to explain how the data you generate using Effort Tracker is organized and how to incorporate selected portions of the data into your electronic gradebook.. This section will also show you where to go to change past student scores. Data Reports is best viewed from a laptop or desktop computer. After selecting the Data Reports tab, choose a class or subject (Figure 13). Once you do this, the Data Reports screen will appear (Figure 14). Data Reports has Cive tabs to choose from: Overview, Titled Events, Effort Awards, Effort Achievers, and Scores by Date. 2.1 The Overview Tab and entering Effort Tracker data into your electronic grade book Since students and parents can access Effort Tracker data in real-‐time, you need not feel the pressure of having Effort Tracker data up-‐to-‐ date in your electronic gradebook. Just let students and parents know how often you plan to update the parts of the gradebook that are utilizing Effort Tracker data. Encourage students and parents to frequently visit the student’s access page (www.e4effort.com/ access) to view the student’s real-‐time scores. Figure 13 Note: student Access codes are located at: Setup/ Access. Figure 14 15 Whenever you save data from an Effort Category, the scores are instantly sent to the E4Effort website where the new data is combined with previous data to compute updated by-‐category and overall percentages. The Overview tab (Figure 14) provides a table which shows the current student averages in each of the four Effort Categories (On task, Q&R, Ready?, and U Choose). Effort Tracker was designed with the idea that teachers would primarily utilize the Overall % or Overall % + bonus for the Effort Tracker portion of the student’s grade in the teacher’s electronic gradebook. Some teachers may also choose to include some of their Titled events directly into their electronic gradebook. (See Section 2.3 and Figure 18, below.) To include Effort Tracker data in your electronic gradebook, take the following steps:2 1. Setup a category in you electronic gradebook titled Effort (depending on how you utilize Effort Tracker, you might name this category Effort and classwork, or Effort, classwork, and homework.) 2. Assign a weight to the Effort category (5-‐50% depending on whether you are using Effort Tracker for just Effort scoring or Effort and classwork, etc.). Mr. Jones uses the following categories and weights: Effort & classwork: 30%, Selected Assignments: 15%, Homework: 15%, Tests and Quizzes: 40%. Mr. Jones uses the gradebook category Selected Assignments for classwork that he collects and/or wants to list as its own assignment in his electronic gradebook. 3. Under the category that you set up in step 1, create a 100-‐point assignment titled Effort Tracker (or any other title you like, Figure 15). 4. After one or two weeks of collecting data, enter the percentages shown in the Overall percentage column into the Effort Tracker assignment of your electronic gradebook. 5. Weekly or biweekly, change the date on the Effort Tracker assignment created in step 3 and enter the updated Overall percentages. (See Figures 15 and 16 – newest assignments appear on the left.) note: As you collect more and more data, the incremental impact of changed student effort (up or down) decreases. Consequently, some teachers choose to create new Effort Tracker Time periods more frequently than once per term. To start scoring over you will have to start a new Time Period - go to Setup/Time Periods (discussed in section 3.1 below). 6. Make sure to enter the Overall percentage + bonus at the end of an Effort Tracker Time period (e.g. at the end a quarter). 16 Figure 15 Effort Tracker data from Data Reports/Overview tab was entered into the electronic gradebook on 9/30/2011. Figure 16 The date of the assignment Effort Tracker in the electronic gradebook was changed to 10/14/2011 and updated student Effort Tracker percentages were entered. 17 2.2 Checking/changing individual student data You may review and change the scores of any individual student by clicking on the student’s name. This may be done from any of the Data Reports’ tables except Effort Achievers. Figure 17 shows a sample student report. This is the same report the student or parent would see after entering the student’s access code at www.e4effort.com/access. The student report has four sections: • Overall Effort averages scores in all Effort Categories to give an Overall % • Effort Award Ledger shows the dates for which the student was up for an Effort Award and whether or not it was given (Y = Yes, N= No) • Current Bonus Status shows the student’s current bonus total from the Effort Award and Effort Achiever programs. • Scores by Date lists effort scores from most recent to oldest. This is one location where you may change a student’s score. Score changes are saved automatically when you move to a new page -‐ don’t look for a save button. Select the edit tab to: • edit the student’s name • remove or add students from/to a class or subject Figure 17 18 2.3 Assigning a title to a learning event The option of assigning a Title to a student assignment or activity is available in the category On-Task. As mentioned earlier, teachers choose to assign a title to a learning activity when they plan to score all students and want to be able to track scoring of a particular learning event or date. For an example of the Titled Events table refer to Figure 18: • Titled Events appear by order of when they were created, • Scores are editable from this tab, • You may wish to print the table if you plan to enter one or more titles into your electronic gradebook. Figure 18 2.4 Effort Awards The Effort Awards table (Figure 19) allows you to review the award and bonus status of a class or individual student. If you Cind an error that you need to correct, click on the student’s name to open their individual record. How are Effort Award bonus points calculated? A student receives the maximum bonus if he or she earns an Effort Award every time they are eligible (their name is selected by the highlighter at the top of the Recognition category list). All scoring and bonus points start over each time you begin a new Time period (Section 3, Setup). 19 Figure 19 Figure 19 sample calculations: Halle earns 4 of 4 possible Effort Awards so he receives the maximum bonus of 3%. George earns 3 of 4 Effort Awards so his bonus = 3÷4 x 3 = 2.25 -‐ rounded to the nearest whole number = 2%. Hillary earns 2 of 3, Effort Awards so her bonus = 2÷3 x 3 = 2% (Hillary still needs a turn for round four of Recognition). To change the Effort Award bonus amount, see section 3.2 below or go to Setup/Settings/ Recognition bonus program. 2.5 Effort Achievers The Effort Achievers table in Figure 20 lists sample students whose overall percentage falls within the range of one of the three Achiever Levels as well as how many bonus points each level is worth. Figure 21 shows an example Class Effort Index (CEI). Use this index to show classes how their effort level changes over time or to compare them to other classes that you teach. Aim for a class goal of a CEI above 2.0. The CEI = Effort Value ÷ class size where Effort Value = 3x(# of students at achiever level 3) + 2x(# of students at achiever level 2) + (# of students at achiever level 1) 20 Figure 20 Class Effort Index Figure 21 2.6 Scores by date The Scores by date table is good place to make score changes if you have to change several students from the same class. (For changes to an individual student, click on his or her name.) Figure 22 shows column headings and sample data. Use the Score column to make changes. Data is entered into the Scores by date table based on when (date and time) it was saved – the most recent saves appear at the top. 21 Figure 22 22 Section 3 SETUP Spend some time exploring the menu choices in Setup and Setup/Settings. Figure 23, Setup menu 3.1 Setup menu items Time Periods You set your Cirst Time period when you signed up for Effort Tracker. When you want to start scoring over (e.g. at the end of a quarter) go to Setup/Time periods and select the New Time period button. When you create a new Time period you will be able to select which previously-‐created classes/subjects you wish to bring along to the new Time period. Classes/Subjects From here you may create a new class/subject or edit an existing one. Students Add Students to one or more of your classes, or move a student from one class to another. Click the tab of the class you wish to make changes to, or work from the All classes tab (See Figure 24). Access Student Access codes are listed here. Each student and parent will need their student’s assigned access code in order to view Effort Tracker data that is updated in real-‐time. To provide the codes you may choose to: 1) cut and paste access codes into emails that you send to your students and their parents, or 2) print, cut out, and distribute, paper strips of paper that contain each student’s name, access code, and the Access web address. Titled events Edit previous Titled Events or create a new one. 23 Figure 24 3.2 Setup/Settings menu items Category scoring weights Category weights may be adjusted so that some categories have a greater impact on students’ Overall percentage. Default category weights are: On-‐task 50%, Q&R 40%, Ready? 10%, U Choose 0%. If you decide to change the default settings make sure the sum of all categories is 100. Category selection pools Choose between a normal or expanded student list (pool) for each category. Under normal pool all students are listed once. When generating the student list under an expanded pool, 25% of the students will be listed twice and the rest will be listed once. Some teachers like to use the expanded pool for the Q&R category so that students are less likely to become complacent after being called on. Figure 25 Change category titles One of Effort Tracker’s categories is called U Choose. It was included to allow users the Clexibility to customize Effort Tracker (see Section 1.4). Ready? may also be renamed and utilized for a different purpose. Display student names as The options for displaying names are: First L, First, Last, Last F, and Last, First. Recognition bonus program 24 (For a description of the Recognition Bonus Program, see section 1.5 above.) • The calculation of bonus points from Effort Awards and the Effort Achiever program can be turned on or off from the Setup/Settings/Recognition bonus program location. • The default bonus settings are: 3% for Effort Awards and 6%, 4%, and 2% for Achiever levels 3, 2, and 1 respectively. The default setting for Effort Awards are set lower since Effort Awards measures recent effort whereas the Effort Achiever program measures effort over the entire Time Period. See Cigure 26. • The percentage range for each Achiever Level can be changed by moving the slider to the desired value. The default settings assume that the teacher is using the 10 score-‐value infrequently. If you score 10s often you should raise Achiever Level 3 to at least 95% (increase the other levels by the same amount). Figure 26 Scorepad values (Quick Reference #7) Set the category scorepads with the values and placement that make the most sense to you. • Note: The default scorepad-‐value settings have placed closer values above and below instead of across. This was done because accidentally choosing the wrong value is usually an up/down, rather than a side-‐to-‐side, error. With the default placement, if you make a mistake while trying to score a 9.5, the mistake is a 9. If however, the placement style has higher values on top, the same mistake would result in a 6 scored instead of a 9.5 Student seat locations (Quick Reference #4) It is helpful to have a number code next to the student’s name to help you locate the student when their name is highlighted during Q&R and other categories. Also, seat location numbers are needed when scoring by seat location as described in Section 1.2 part C above. 25