1
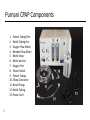
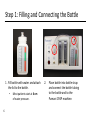
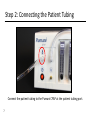
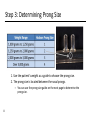
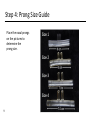
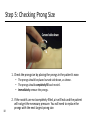
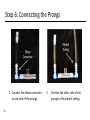
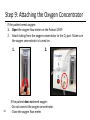
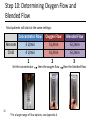
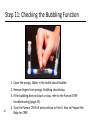
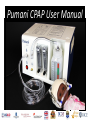
Pumani CPAP User Manual
Introduction
Respiratory failure is a leading cause of neonatal mortality in the developing
world. Bubble continuous positive airway pressure (bCPAP) is a safe, effective
intervention for infants with respiratory distress and is widely used in developed
countries.
The Pumani bCPAP is a low-cost, easy-to-use, easy-to-repair device to treat
infants in respiratory distress, and it has been designed specifically to operate in lowresource settings. Clinical results show that use of the Pumani bCPAP can significantly
reduce neonatal mortality in low-resource settings.
The Pumani bCPAP has been developed at the Rice 360⁰: Institute for Global
Health Technologies at Rice University in Houston, TX, in partnership with Queen
Elizabeth Central Hospital and the College of Medicine in Blantyre, Malawi; the Malawi
Ministry of Health; Baylor College of Medicine and Texas Children’s Hospital in
Houston, TX; and 3rd Stone Design in San Rafael, CA.
Table of Contents
Part I: How to Assemble the Pumani CPAP
Pumani CPAP Components
Assembly Instructions
Part II: How to Prepare the Baby for CPAP
Part III: How to Attach the Baby to the Pumani CPAP
Prong & Hat Components
Attachment Instructions
Part IV: How to Monitor the Baby
Part V: Disinfection Instructions
Part VI: Troubleshooting
Pumani CPAP Troubleshooting
Prong Troubleshooting
Part VII: Pumani CPAP Repair Instructions
Appendix A: Setting the Flows for a Specific Percent O2
4
5
6-16
17
20
21
22-27
28
32
34
35
36
37
48
Part I: How to Assemble the Pumani CPAP
4
Pumani CPAP Components
1. Patient Tubing Port
2. Bottle Tubing Port
3. Oxygen Flow Meter
4. Blended Flow Meter
5. Bottle Strap
6. Bottle and Lid
7. Oxygen Port
8. Power Switch
9. Patient Tubing
10. Elbow Connector
11. Nasal Prongs
12. Bottle Tubing
13. Power Cord
5
9
Step 1: Filling and Connecting the Bottle
1. Fill bottle with water and attach
the lid to the bottle.
•
6
Most patients start at 6 cm
of water pressure.
2.
Place bottle into bottle strap
and connect the bottle tubing
to the bottle and to the
Pumani CPAP machine.
Step 2: Connecting the Patient Tubing
Connect the patient tubing to the Pumani CPAP at the patient tubing port.
7
Step 3: Determining Prong Size
1. Use the patient’s weight as a guide to choose the prong size.
2. The prong size is located between the nasal prongs.
– You can use the prong size guide on the next page to determine the
prong size.
8
Step 4: Prong Size Guide
Place the nasal prongs
on the pictures to
determine the
prong size.
9
Step 5: Checking Prong Size
1. Check the prong size by placing the prongs in the patient’s nose.
• The prongs should be placed curved-side down, as shown.
• The prongs should completely fill each nostril.
• Immediately remove the prongs.
10
2. If the nostrils are not completely filled, air will leak and the patient
will not get the necessary pressure. You will need to replace the
prongs with the next largest prong size.
Step 6: Connecting the Prongs
Straight
Connector
1. Connect the elbow connector
to one side of the prongs.
11
2.
Connect the other side of the
prongs to the patient tubing.
Step 7: Checking the Pumani CPAP Assembly
Make sure all of the
CPAP components are
properly assembled:
1.
2.
3.
4.
12
Patient Tubing
Bottle Tubing
Bottle and Lid
Prongs
Step 8: Turning the Pumani CPAP On
1. Connect the power cord to the
back of the Pumani CPAP and
to an electrical outlet.
13
2. Turn on the Pumani CPAP
power switch. A red light
should be lit when the
Pumani CPAP is on.
Step 9: Attaching the Oxygen Concentrator
If the patient needs oxygen:
1. Open the oxygen flow meter on the Pumani CPAP.
2. Attach tubing from the oxygen concentrator to the O2 port. Make sure
the oxygen concentrator is turned on.
1.
14
2.
If the patient does not need oxygen:
- Do not connect the oxygen concentrator.
- Close the oxygen flow meter.
Step 10: Determining Oxygen Flow and
Blended Flow
Most patients will start at the same settings:
Concentrator Flow
Neonate
3 L/min
Child
4 L/min
1
Set the concentrator
Oxygen Flow
3 L/min
4 L/min
2
then the oxygen flow
15
*For a larger range of flow options, see Appendix A.
Blended Flow
6 L/min
6 L/min
3
then the blended flow
Step 11: Checking the Bubbling Function
16
1. Cover the prongs. Water in the bottle should bubble.
2. Remove fingers from prongs. Bubbling should stop.
3. If the bubbling does not start or stop, refer to the Pumani CPAP
troubleshooting (page 35).
4. Turn the Pumani CPAP off and continue to Part II: How to Prepare the
Baby for CPAP.
Part II: How to Prepare the Baby for CPAP
17
Step 1: Suctioning the Nose & Mouth
1. Measure from the nose to the ear
and halfway back to determine
suction depth of the nose.
• For example: if the distance is 6 cm,
the depth should be 9 cm (6+3 = 9).
2. Briefly remove the O2 tube from
the nose. Put a drop of saline in
one nostril, insert the tube to the
determined depth, then cover the
suction port as you pull out the
suction tube.
3. Repeat in the other nostril.
4. Place the O2 tube back into the
nose.
5. Suction the mouth.
18
Step 2: Inserting the OG Tube
1.
2.
3.
4.
19
Measure from the mouth to the ear, and then to the bottom of the sternum.
Make note of the measurement.
Insert the OG tube in the mouth to this depth.
Check that the OG tube is in the stomach by placing the end of the tubing in
water. If it does not bubble, it is in the correct place. (You can also aspirate
the OG tube with a syringe to check for stomach contents.)
5. Tape the OG tube to the chin.
6. Note: if the abdomen is distended, consider aspirating the tube with a
syringe.
Part III: How to Attach the Baby to the
Pumani CPAP
20
Prongs & Hat Components
These are the items you need to attach the prongs to the baby:
21
Step 1: Making the Hat
22
Hat Size
Stockinette
Length
Stockinette
Width
Small
61 cm (24 in)
2 inch
Medium
66 cm (26 in)
3 inch
Large
71 cm (28 in)
4 inch
1. Select hat size based on size of the
patient’s head.
2. Measure length and cut stockinette.
3. Twist stockinette in the middle.
4. Pull one half of the stockinette over
the other half.
5. Fold bottom edge 3 times to make a
5-cm brim.
Step 2: Placing the Hat on the Patient
1. Place hat on the patient.
• Make sure that the hat fits tightly to prevent the prongs from moving.
• The back of the hat should be low, near the baby’s neck.
• Hat may need to be replaced at least every 24 hours to keep a tight fit on
the baby’s head.
23
Step 3: Inserting the Prongs
1.
2.
3.
4.
Turn on the Pumani CPAP.
Make sure the flows are still set
correctly.
Add saline drops in the nose.
Place the prongs into the nose.
• There should be a ¼ cm space
between the prongs and the nose.
• Do not use creams or ointments,
as these can cause breakdown of
the tissue and block the prongs.
24
Step 4: Attaching the Safety Pins
1. Hold the prongs on the hat (you can mark on the hat where the pins
should be placed). Make sure the prongs stay in the nose.
2. Important: place fingers under the brim of the hat to maintain space
between the hat and the head when placing the safety pins.
3. Insert two safety pins through each side of the hat.
25
• Keep the sharp end of the pin away from the patient’s face.
• Do not put the pins all the way through to the baby’s head.
• The pins should never be in contact with the patient.
Step 5: Attaching the Prongs
1. Hold the tubing between the pins.
2. Wrap the elastic over one pin, across the tubing, and over the other pin.
3. Wrap the other elastic over the 2 pins on the other side of the hat.
26
Step 6: Check the Prongs
This is how the prongs should appear once they are attached:
Hat
Patient Tubing
Safety Pins
Elastic
¼ cm space
between the prongs
and the nose
Prongs
27
Part IV: How to Monitor the Baby
28
Checking the Respiratory Rate
1. Once the patient is settled on the Pumani CPAP, the respiratory rate
should be measured.
2. To measure the respiratory rate:
• Uncover the patient’s abdomen so you
can view the chest.
• Press the respiratory rate timer to start
the 60-second count.
• As soon as you press the timer, begin
counting the patient’s breaths.
• The timer will beep once after 30
seconds – do not stop counting. When
the timer beeps twice, stop counting.
• Record the respiratory rate.
29
Checking the Oxygen Saturation
1. Once the patient is settled on the Pumani CPAP, the oxygen saturation
should be checked with a pulse oximeter.
2. Place the pulse ox probe on the patient.
• For smaller babies, wrap the probe around the palm of the baby’s hand
• For larger babies, place the finger probe on the patient’s finger
3. Turn the pulse oximeter on.
4. Watch the waveform for 1-2 minutes until it looks constant.
Good Waveform:
Bad Waveform:
30
5. Record the oxygen saturation and heart rate.
6. If the oxygen saturation is <90%, increase the oxygen flow rate by 1 L/min.
Patient Monitoring Checklist
31
What to Check For
Response
Is the power on?
If the power is NOT on:
─ Remove the prongs immediately
─ Place the patient on oxygen
─ If possible, take the Pumani CPAP to a ward with power
─ Document how long the patient was off CPAP and how
long the patient was on oxygen
Are the nostrils moist?
If the patient’s nostrils are not moist:
─ Place saline drops in the patient’s nostrils
Are the prongs in the
patient’s nose?
If the prongs are not in the patient’s nose:
─ Re-insert the prongs into the patient’s nose
─ You may need to reposition the hat, pins, or elastics to
keep the prongs in place
Is the hat tight on the
patient’s head?
If the hat is not tight on the patient’s head:
─ Remove the hat and replace the hat with a new hat
Part V: Disinfection Instructions
32
Instructions for Disinfection
After each use:
1. Place patient on 2 L of oxygen, turn off the Pumani CPAP, and place
elastics and pins in the storage cabinet.
2. Throw away the hat and OG tube.
3. Disconnect bottle tubing, patient tubing, prongs, and bottle.
4. Throw away the water in the bottle.
5. Soak the bottle tubing, patient tubing, prongs, bottle, and lid in a
0.5% bleach solution for 10 minutes (or follow your hospital’s
standard disinfection procedures). Bleaching time should not exceed
one hour.
6. Rinse all bleached components under clean water, hang tubing to
dry, and leave bottle and prongs out to dry.
7. Clean oxygen concentrator filter (on the back of the concentrator)
by removing debris and thoroughly rinsing under water.
33
Part VI: Troubleshooting
34
Pumani CPAP Troubleshooting
Problem
The Pumani CPAP
does not turn on.
Water does not
bubble when I
cover the prongs
with my fingers.
Water bubbles
when the prongs
are uncovered.
There is no O2
flow.
35
Possible Cause
Solution
The Pumani CPAP does not have power.
Check to see that the Pumani CPAP is plugged
in and that the outlet is switched on.
The switch is not in the “on” position.
Turn switch to “on” position. A red light
should be lit when the Pumani CPAP is on.
The bottle tubing and patient tubing are
not correctly connected.
Correctly connect tubing. Connectors should
snap into place.
The blended flow is not high enough.
Slightly increase the blended flow until the
water starts to bubble.
The bottle tubing or patient tubing is
pinched or blocked.
Check for and resolve any pinches or blocks.
The blended flow is too high.
Slightly decrease the blended flow until the
water stops bubbling.
The oxygen tubing is improperly
connected.
Fix concentrator tubing connections.
The concentrator is improperly
connected.
Make sure the concentrator is plugged in,
turned on, and the nozzle is completely
attached.
Prong Troubleshooting
Problem
Possible Cause
Water does not The prongs are too small.
bubble when the
The prongs are positioned incorrectly.
prongs are
placed in the
Air is leaking out of the mouth.
airway.
The prongs do
not stay in the
nose.
The patient does
not tolerate the
prongs.
36
Solution
Replace the prongs with a larger size.
Reposition the prongs.
Gently close the baby’s mouth for a few
moments to encourage nose breathing.
The prongs are too small.
Replace the prongs with a larger size.
The hat is stretched out or too large.
Replace the hat with a new or smaller hat.
The pins are improperly aligned.
Realign the pins.
The tubing on the hat is improperly
positioned.
Reposition the tubing on the hat.
The prongs are too small or are pinching
on the patient’s septum.
Replace the prongs with a larger size.
The prongs are pushing up against the
septum.
Increase space between the prongs and
the septum. Consider replacing the prongs
with a larger size.
The patient has not settled.
After the prongs are placed, wait for the
patient to settle. This may take a few
minutes.
Part VII: Pumani CPAP Repair Instructions
37
Opening the Pumani CPAP
Unscrew and remove the 6 screws around the top of the CPAP using
an Allen wrench. Remove the bottle tube. Pull the lid of the CPAP
away from the machine.
38
Spare Kit Bag Contents
The Spare Kit Bag, found
on the back left wall of the
Pumani CPAP, contains:
1.
2.
3.
4.
5.
6.
7.
8.
39
Spare kit bag
Two packages of
diaphragm sets
(4 diaphragms total)
One small black zip tie
One white zip tie
Bottle tubing
Two screws
Two bottle tubing
connectors
Pumani Unit Service Log
Pump Troubleshooting
1. With the lid removed, reattach the bottle tubing.
Turn on the Pumani CPAP and set the flow as close
to 10 L/min as possible.
2. Inside of the Pumani CPAP, check that the tubing is
attached to all pump outlets and that the outlets
are intact (not broken).
• If the tubing is not attached, reattach it.
• If the tubing and the white connector have
come off the pump, reglue the connector to
the pump outlet.
• If the pump outlet has broken off, replace the
pump.
3. Pinch the tubing to block air flow from each of the
two pumps, one at a time.
• If the flow decreases by half when the flow
from one pump is blocked, the blocked pump
is operating properly.
• If the flow does not change when the flow
from one pump is blocked, the pump is
broken. Go to Repair Step 1.
40
Tubing correctly attached to the pump outlet.
Pump Repair Step 1
Unscrew and remove the 4 screws surrounding
the pumps using a Phillips head screwdriver.
41
You should have 4
tubes, 4 screws,
and 4 washers.
Pump Repair Step 2
Turn the pump upside down. Unscrew the 4 screws on the
bottom of the pump using a flathead screwdriver.
42
Pump Repair Step 3
Separate the mounting bracket from the pump base.
43
Pump Repair Step 4
Separate the pump base from the pump housing.
44
Pump Repair Step 5
Once the pump is open, check the following:
What to check for
Response
Apply glue under the
Is the center screw
screw head, and tighten
loose?
the center screw.
Are the
diaphragms
damaged?
Are the gaskets
loose or broken?
45
Inspect the diaphragms,
and replace any
diaphragms which appear
broken or worn.
If gasket is loose, push the
gasket back into the hole.
If the leg holding the
gasket breaks, replace the
pump.
Pump Repair Step 6
To replace a broken diaphragm, remove
the nut securing the broken diaphragm to
the lever arm and rotate the lever arm
away from the diaphragm.
46
Do NOT remove the center screw.
Pump Repair Step 7
Record work done:
Remove the broken diaphragm and replace it with a new diaphragm.
Record all work done in the Pumani Unit Service Log (in the spare parts kit)
and on the maintenance label on the back of the machine.
47
To reassemble the pump, repeat steps 1-6 in reverse order.
Appendix A: Setting the Flows for a Specific
Percent Oxygen Delivered to Patient
1. Find the column with the
chosen blended flow rate to
deliver to the patient, known as
the Blended Flow Rate (L/min).
2. Find the row with the chosen
Percent Oxygen Delivered to
Patient (%).
3. The table value where the
chosen column and row meet is
your Oxygen Flow Rate
(L/min).
An Example Setting is shown in the
table to the right:
A patient requires a Blended
Flow Rate of 8 L/min and an
Oxygen Concentration of 50%.
Therefore, an Oxygen Flow
Rate of 3.5 L/min should be
delivered to the patient.
48
Oxygen Flow Rate
(L/min)
Percent
Oxygen
Delivered to
Patient (%)
5
6
7
8
9
10
40%
1.5
1.5
2
2.5
2.5
3
50%
2
2.5
3
3.5
3.5
4.5
60%
2.5
3
4
4.5
5
5.5
Oxygen Flow Rate
(L/min)
Percent
Oxygen
Delivered to
Patient (%)
Blended Flow Rate (L/min)
Blended Flow Rate (L/min)
5
6
7
8
9
10
40%
1.5
1.5
2
2.5
2.5
3
50%
2
2.5
3
3.5
3.5
4.5
60%
2.5
3
4
4.5
5
5.5
For questions concerning the Pumani bCPAP
Clinical Evaluation and Implementation in
Malawi:
For questions concerning the Pumani bCPAP
Development as part of the Rice 360⁰: Institute
for Global Health Technologies:
For questions concerning the Pumani bCPAP
Design and Manufacture in partnership with
3rd Stone Design:
College of Medicine, University of Malawi
Rice 360⁰: Institute for Global Health
Technologies
3rd Stone Design, LLC
Private Bag 360
Blantyre 3
Malawi
6500 Main St., MS636
30 Castro Ave
San Rafael, CA 94901
Houston, TX 77005
+1 (415) 454-3005
Clinical inquiries: contact local ARI coordinator
or K. Kawaza 0992217282
Technical inquiries: Shannon O’Neill (+265
994174276) & MK Quinn (+265 996458336)
+1 (713) 348-4549
[email protected]
[email protected]
www.3rdstonedesign.com
www.rice360.rice.edu
This manual is made possible through the generous support of the Saving Lives at Birth partners: the United States Agency for International
Development (USAID), the Government of Norway, the Bill & Melinda Gates Foundation, Grand Challenges Canada, and UK Aid.
It was prepared by William Marsh Rice University and does not necessarily reflect the views of the Saving Lives at Birth Partners.
DCO 038 3-378 (Pumani CPAP User Manual) – Rev B