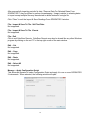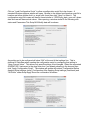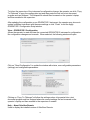
1
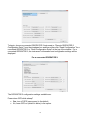
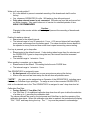
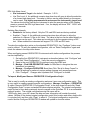
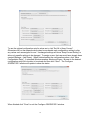
ODORATOR 2TM OdorSeerTM, OdorSeer Remote User’s Manual All Models Proprietary Notice The contents of this instruction manual are proprietary to Heath Consultants Incorporated. Reproduction of this manual, in whole or in part, is prohibited without the express written consent of Heath Consultants Incorporated. Heath Consultants Incorporated operates under a continual product improvement program and reserves the right to make improvements and/or changes without prior notification. This manual supersedes all previous manuals for this instrument. COPYRIGHT 2015, HEATH CONSULTANTS INCORPORATED OdorSeer User’s Manual, ODORATOR 2, HPN: 104189 Rev. B Operator’s Manual, ODORATOR 2, HPN: 104147 Rev. B ODORATOR 2, Complete, HPN: 104175 ODORATOR 2 OdorSeer, OdorSeer Remote User’s Manual All Models Caution: Use of OdorSeer requires one or more administrator (admin) accounts to be initially setup in the software. It is highly recommended more than one admin account be setup in order to prevent access denial to the database if one of the admin account password(s) be lost or forgotten. In the event an admin password(s) is misplaced, contact the factory for possible recovery. Heath Consultants Incorporated 9030 Monroe Road Houston, TX 77061 Tel: 713-844-1300 www.heathus.com Heath…Safety, Leadership, Innovation, Performance Then, Now and Tomorrow TABLE OF CONTENTS Introduction …………………………………………………………….……………………… List of CD Folders and Contents …………….…………………………………….………… Warnings and Cautions …………………………………………………………………….… 1 1 2 CHAPTER ONE Installing OdorSeer / OdorSeer Remote …………………..……………….………………... PC Requirements …………….……………………………………....…………..….…… PC Administrative Privileges ………………………….…………………………….….. OdorSeer Administration ………………………………………………………..………. Installation Procedure ………………………………………..………………………….. 3 3 3 3 3 CHAPTER TWO Using OdorSeer ..……………………………………………………………………………….. Initial Setup ….…………………………………………………………………………….... OdorSeer Function Menus Structure ……………………………………………….……. Detailed Function Menus Description ……………………………………………….…… File ……………………………………………………………………………….……. Edit………………………………………………………………………………….….. Manage ………………….………………………………………………………….…. View ………………………………………………………………………………….… Window ………………………………………………………………………………... Help …………..………………………………………………………………….……. 5 5 7 8 9 15 15 24 26 27 Using OdorSeer Remote …………………………………………….…………………………. OdorSeer Remote Functions Menus Structure ……………….……….……………….. Detailed Function Menus Description …………………………….…..…………….…… File ………………………………..………………………………………….….……. Edit…………………………………………………………..……………….…….….. Manage ……………….………………………………….………………….…….…. View ……………………………………………………….………………….…….… Help …………….…………………………………………………………….………. 27 27 28 28 30 30 32 32 CHAPTER THREE Troubleshooting Chart ………………………………………………………………………….. Parts List …………………………………………………………………………………………. 33 33 CHAPTER FOUR Warranty and Warranty Repair ………………………………………………………..……… Return Procedure (RMA) …………………………………………………………….……….. Sales, Customer Service and Instrument Repair Locations ………………………………. Notes …………………………………………………………………………………….……… 34 35 36 37 Introduction OdorSeer and OdorSeer Remote V 1.1.0 are advanced Windows PC software which are a key part of the ODORATOR 2 Odorization Survey Audit System. OdorSeer supports custom configuration of the instrument and via its database provides powerful readings mapping, data analysis and reporting tools. All odor level readings stored in the OdorSeer database are automatically corrected for accuracy, linearity, actual pressure and actual temperature in the instrument – eliminating lookup charts. OdorSeer Remote supports remote instrument configuration and secure exporting of instrument readings and breadcrumb data from the field to the central office located OdorSeer database. Connectivity is via USB 2.0. Bluetooth hardware is included in the instrument and will be supported in an upcoming OdorSeer / OdorSeer Remote release. Multiple instruments and users are supported in the OdorSeer database and data analysis is only a few clicks away. For clarification, an operator is someone who operates the ODORATOR 2 instrument. A user is someone who uses the OdorSeer / OdorSeer Remote software. Supported features of OdorSeer are: • • • • • • • • Management of administrative users Management of instrument operators Custom instrument configuration Management of instrument data Custom colorization of reading values when mapped Interactive readings and map using Bing (no license required, internet connection required) Export readings into CSV file format Export of maps into JPG and KML file formats Supported features of OdorSeer Remote are: • • • Remote instrument configuration Remote access of instrument data Export of instrument readings and breadcrumb trail data into secure files List of CD Folders and Contents 1. 2. 3. 4. FTDI USB OdorSeer OdorSeer Remote Manuals - 5. Product Literature - USB drivers executable file OdorSeer software OdorSeer Remote software Operator’s and OdorSeer / OdorSeer Remote User’s Manuals Heath Consultants Incorporated products literature 1 Warnings and Cautions Caution: Use of OdorSeer requires one or more administrator (admin) accounts to be initially setup in the software. It is highly recommended more than one admin account be setup in order to prevent access denial to the database if one of the admin account password(s) be lost or forgotten. In the event an admin password(s) is misplaced, contact the factory for possible recovery. Prior to use, the operator should read all warnings, cautions and instructions for operation contained in this manual and the ODORATOR 2 Operator’s Manual. It is the sole responsibility of the product purchaser / owner to ensure: (1) all operators of the ODORATOR 2 read, understand and comply with the precautions and instructions for operation and maintenance requirements contained in the manuals; (2) the ODORATOR 2 is only used in a proper and safe manner; and (3) while using the ODORATOR 2, operators are not inhaling or sniffing dangerous materials that could cause injury or death. WARNING: THE ODORATOR 2 IS PENDING CERTIFICATION TO BE SAFE FOR USE IN CLASS 1, DIVISION 2, GROUP D HAZARDOUS AREAS. PERFORM ANY AND ALL MAINTENANCE IN A LOCATION KNOWN TO BE NON-HAZARDOUS. TO REDUCE THE RISK OF IGNITION OF A FLAMMABLE OR EXPLOSIVE ATMOSPHERE, THE BATTERY PACK MUST BE CHANGED OR CHARGED ONLY IN A LOCATION KNOWN TO BE NONHAZARDOUS. NO ATTEMPT SHOULD BE MADE TO REPAIR THE INSTRUMENT BY THE OPERATOR. SHOULD THE INSTRUMENT NOT WORK PROPERLY OR INDICATE AN ERROR OR WARNING, REFER TO THE TROUBLESHOOTING SECTION OF THE USER’S MANUAL. SUBSTITUTION OF COMPONENTS MAY IMPAIR SAFETY. NO OPERATOR SERVICEABLE COMPONENTS ARE CONTAINED WITHIN THE INSTRUMENT. ONLY USE BATTERY PACK HPN 101311-0. TO REDUCE THE RISK OF IGNITION OF A FLAMMABLE OR EXPLOSIVE ATMOSPHERE, A USB CABLE MUST ONLY BE CONNECTED IN A LOCATION KNOWN TO BE NON-HAZARDOUS. 2 CHAPTER ONE Installing OdorSeer / OdorSeer Remote V. 1.1.0 This chapter discusses the steps to install OdorSeer / OdorSeer Remote on a Windows PC. The software and associated files are located on the ODORATOR 2 CD. PC Requirements: 1. Windows XP 32 bit SP3 through 8.1 64 bit operating system (XP and Vista 64 bit operating systems are not supported). The latest service pack(s) should be installed. 2. A USB 2.0 port. USB 3.0 is backwards compatible to USB 2.0 and may be used. 3. Bluetooth 2.0 or higher is optional as the software at this time doesn’t support usage. 4. Internet access. 5. Optical CD drive. PC Administrative Privileges: 1. To install the USB drivers and OdorSeer / OdorSeer Remote software onto the PC the installer must have PC administrative privileges. 2. PC administrative privileges are not required to use OdorSeer / OdorSeer Remote. OdorSeer Administration Caution: Use of OdorSeer requires one or more administrator (admin) accounts to be initially setup in the software. It is highly recommended more than one admin account be setup in order to prevent access denial to the database if one of the admin account password(s) be lost or forgotten. In the event an admin password(s) is misplaced, contact the factory for possible recovery. Installation Procedure (the ODORATOR 2 instrument must not be connected to the PC): For both the central office PC and the operator’s field laptop: 1. Insert the CD into the optical drive. 2. Open the FTDI USB folder. 3. Right click on the .exe file and then click on “Run as administrator”. Two USB drivers will install. For the central office PC: 4. Navigate to and open the OdorSeer folder. 5. Double click on “setup.exe” to begin installing OdorSeer onto the PC. 6. The installer will launch. Click “Next” on the welcome window to continue. **Note** Depending on the version of Windows and service pack used the software may 3 need to update or add necessary components such as .NET Framework 4.0. If so, allow those additions as they are required to support the installation. 7. Click on the “I Agree” bullet in the license window and then click “Next”. 8. Click on the “Everyone” or “Just Me” bullet as appropriate in the folder window and then click “Next”. 9. Click “Next” in the confirm window to start the installation. 10. Click “Close” in the complete window to finish the installation. A desktop shortcut will be created: OdorSeer For the operator’s field laptop: 11. Navigate to and open the OdorSeer Remote folder. 12. Double click on “setup.exe” to begin installing OdorSeer Remote onto the laptop. 13. The installer will launch. Click “Next” on the welcome window to continue. **Note** Depending on the version of Windows and service pack used the software may need to update or add necessary components such as .NET Framework 4.0. If so, allow those additions as they are required to support the installation. 14. Click on the “I Agree” bullet in the license window and then click “Next”. 15. Click on the “Everyone” or “Just Me” bullet as appropriate in the folder window and then click “Next”. 16. Click “Next” in the confirm window to start the installation. 17. Click “Close” in the complete window to finish the installation. A desktop shortcut will be created: OdorSeer Remote 4 CHAPTER TWO Using OdorSeer Initial Setup An ODORATOR 2 instrument is not required for initial setup but is recommended. When first used OdorSeer presents the welcome window. Caution: Use of OdorSeer requires one or more administrator (admin) accounts to be initially setup in the software. It is highly recommended more than one admin account be setup in order to prevent access denial to the database if one of the admin account password(s) be lost or forgotten. In the event an admin password(s) is misplaced, contact the factory for possible recovery. . There are four accounts types supported in terms of security and privileges: 1. None – The default account type with no OdorSeer logon privileges. 2. Operator – Assigned to the ODORATOR 2 users. An operator can import and view data only. 3. Supervisor – Has the privileges to perform all tasks but can’t view, add or edit users. 4. Administrator – Has all privileges and can perform all tasks. 5 The Admin user account(s) must be setup first. The admin user ID is factory set to 9999 and both user Admin and the admin user ID can’t be changed or deleted. It is highly recommended to add additional Administrator user accounts. See Manage – Add Users for detailed information on setting up accounts. When running OdorSeer after the admin and possibly other accounts have been setup, a login screen will be presented as follows: If no ODORATOR 2 instrument is connected when logging in the following window will be displayed as notice: Typically an ODORATOR 2 instrument will be connected when logging in. After logging in 6 OdorSeer identifies the connected ODORATOR 2 and displays a window similar to the following: This confirms OdorSeer is connected to the ODORATOR 2. Your S/N and COM port number will differ. OdorSeer Function Menus Structure There are six major function menus supported by OdorSeer. They are accessible at the top left of the main window. Each major function menu includes sub-menus. The OdorSeer menu structure is as follows: File → → → → → → → → → → → → → → Import → Readings → Periodic Fix Data → Self Test Data → Events Import & Save To File → Readings → Periodic Fix Data → Self Test Data → Events Export Print Exit Cut Copy Paste Select All Find USB ODORATOR 2 units Configure ODORATOR 2 Add or Edit RDL Display Thresholds Add Users View & Edit Users Switch User → Readings → Edit Manage View 7 Window Help → → → → → → Readings and Map ODORATOR 2 Info Self Test Data Event Logs List of active windows About OdorSeer **NOTE** The ODORATOR 2 is factory configured with breadcrumb trail recording set to “NO” or off. It is HIGHLY RECOMMENDED to enable recording of the breadcrumb trail prior to performing odor levels and intensity testing. See Manage – Configure ODORATOR 2 – Wake up & Record Position for details. **NOTE** The ODORATOR 2 is factory configured with no users assigned to an ODORATOR 2. It is HIGHLY RECOMMENDED to create at least one Operator account and assign an Operator to every ODORATOR 2 instrument. Multiple users can be supported using customized configuration files. See Manage – Add Users and Manage – Configure ODORATOR 2 for details. Detailed Function Menus Description An ODORATOR 2 instrument is needed to be turned on and connected to the PC for most of the functions to be operational. Historical data can be viewed and mapped without an instrument attached. It is possible to connect to multiple ODORATOR 2s, one at a time, without restarting OdorSeer. Refer to Manage – Find USB ODORATOR 2 units. After successfully logging in, the main OdorSeer window will be displayed: Once logged in the user name and account type will be displayed at the bottom of the main 8 window. There is no logout function. To logout, close or exit OdorSeer. Detailed functions descriptions are now discussed: File – Import – Readings This function supports importing readings data from a connected ODORATOR 2 or a secure readings data file from a remote instrument. When selected, the following window will be displayed: For a connected ODORATOR 2: Prior to importing the readings an optional selection is to choose to delete the readings from the ODORATOR 2 after successfully importing into OdorSeer. This option is not available for importing a Readings File. Deleting after import from a connected instrument is recommended to minimize the import time because if the readings are not deleted the import process will take more time identifying the new readings from the old ones. The SD memory card in the instrument will practically never fill up so running out of memory is not an issue. Click on the box to “Remove from ODORATOR 2 after successful import”. Should a different ODORATOR 2 be connected than the one connected when OdorSeer was first started, that new instrument should be selected in the drop down box. The chosen instrument’s serial number and respective COM port should be displayed in the field. 9 Now click on “Import Readings” to begin importing new readings data. Status messages and an import progress bar will report on the activity. When complete the import progress bar will be solid green and the status message will indicate the number of new readings recorded. Click “Close” when importing has completed. For an ODORATOR 2 Readings File: Click on “ODORATOR 2 Readings File” to select this method. This method is used to import a secure readings file from a remote instrument. The readings file has to be previously stored or saved on the OdorSeer PC or in an accessible network location. The following window will be shown: Click on “Load Remote Readings File” to allow a readings file to be chosen. A standard Windows explorer window will open. Browse to the desired reading file’s location and either double click it or single click it and then click “Open” to select it. The readings file will have a suffix of .odr and be named “OD2Readings_serial number_date.odr” where the serial number 10 and date will contain the actual values. A verification window will open to confirm the reading file selection. If confirmed, click “Yes”. A window will open and after the green progress bar finishes the number of readings recorded and the number of duplicates will be indicated. Click “Close” to exit the window. The readings data are now in the OdorSeer database. File – Import – Periodic Fix Data This function supports importing periodic fix (breadcrumb trail) data, if recorded, from a connected ODORATOR 2 or a secure periodic fix data file. When selected, the following window will be displayed: 11 For a connected ODORATOR 2: Select the connected ODORATOR 2 instrument if different than the one shown in the drop down box and then click “List Available Dates”. This gives you the choice of which breadcrumb trail to import. When the available dates are displayed click on the date of choice in the window. The window will look similar to the following: Now click “Import & Display Fix Data for Selected Date →”. Fix data for the chosen date will now be shown in the right side of the window. To generate a KML file for mapping, the desired fix data must first be selected. There are several choices available: 1. Manually click on each desired row of data to highlight it blue. Hold down the Shift key and click an end row to select a block of rows or hold down the Control key and click on individual rows as desired. 2. Select Edit – Select All on the main window to highlight all rows. 3. Manually click on a starting row and while holding down the shift key click on the last row desired to select a block of fix data rows. 4. To further aid fix data row selection an optional box to “Highlight fixes within a chosen number of minutes of a reading” is available. This is a very valuable tool to select only those fix data rows associated with odor level readings. This situation will arise when odor level test locations are located within structures which block the reception of GPS signals. Showing periodic fix data or the breadcrumb trail leading up to and away from a blocked GPS location will provide proof that the respective odor level reading was taken on location. Select the desired time interval from the drop down selections, click on the box to enable highlighting and then click on “Select Highlighted Table Rows”. To select a Placemark Color on the map click on the colored square, click on the desired color and then click “OK”. 12 Create a KML file by clicking on “Export Selected Table Rows to KML”. A “Save” dialog window will open where the desired folder and file name are selected and entered. The KML file will be generated, named and stored as selected. When satisfied with KML file generation the selected fix data can be deleted from the ODORATOR 2 by clicking on “Remove Data For Selected Dates From ODORATOR 2”. Click “Close” to exit the Import Periodic Fix Data window. For an ODORATOR 2 Periodic Fix File: Click on “ODORATOR 2 Periodic Fix File” in the drop down box to select this method. This method is used to import a secure periodic fix file from a remote instrument. The periodic fix file has to be previously stored or saved on the OdorSeer PC or in an accessible network location. Click on “Load Remote Readings File” to allow a periodic fix file to be chosen. A standard Windows explorer window will open. Browse to the desired periodic fix file’s location and either double click it or single click it and then click “Open” to select it. The periodic fix file will have a suffix of odf and be named “OD2FixData_serial number_datetodate.odr” where the serial number and dates will contain the actual values. The Import Periodic Fix Data main window will update with the data. The status of the file load will be indicated in the top left of the main window. Data operations from this point on are the same as for a connected ODORATOR 2 as described previously. Close the Import Periodic Fix Data window when finished. File – Import – Self Test Data Not supported. 13 File – Import – Events Not supported. File – Import & Save to File – Readings This mirrors the same function found in OdorSeer Remote and is only for a connected ODORATOR 2 instrument. The procedure is the same as File – Import – Readings until “Import Readings” is clicked. At this point a standard Windows explorer window will open. Browse to the desired reading file’s location to be stored and then click “Save”. A window will open and after the green progress bar finishes the number of readings imported, saved file location and file name will be indicated. Click “Close” to exit the Import & Save Readings From ODORATOR 2 window. File – Import & Save to File – Periodic Fix Data This mirrors the same function found in OdorSeer Remote and is only for a connected ODORATOR 2 instrument. The procedure is the same as File – Import – Periodic Fix Data until “Import & Save Fix Data For Selected Date” is clicked. At this point a standard Windows explorer window will open. Browse to the desired periodic fix file’s location to be stored and then click “Save”. A window will open and after the green progress bar finishes the file name and status will be indicated. 14 Click “Close” to exit the Import & Save Periodic Fix Data window. File – Import & Save to File – Self Test Data Not supported. File – Import & Save to File – Events Not supported. File – Export Alternate method of exporting odor level readings and / or periodic fix data to a file as when using File – Import – Readings or File – Import – Periodic Fix. When active or available Export will be bold. When inactive or not available Export will be ghosted. File – Print Not supported. File – Exit Used to exit OdorSeer. OdorSeer may also be closed like any other Windows program by clicking on the red “X” in the top right corner of the main window. Edit – Cut Not supported. Edit – Copy Not supported Edit – Paste Not supported. Edit – Select All Used in conjunction with other functions to select all data for further processing. Manage – Find USB ODORATOR 2 units Used to identify and connect to the ODORATOR 2 when not initially connected. Useful when connecting to multiple ODORATOR 2s individually without closing OdorSeer as each one must be identified by OdorSeer prior to performing any functions. Manage – Configure ODORATOR 2 Used to configure a connected ODORATOR 2 instrument or to create a Remote ODORATOR 2 Configuration Script. Configuration values can be manually set or a Remote ODORATOR 2 Configuration Script can be read in and modified to then be saved as a Remote ODORATOR 2 Configuration Script. When selected, a window will be displayed for selecting the configuration type and for manually setting the values. 15 To begin, choose a connected ODORATOR 2 instrument or “Remote ODORATOR 2 Configuration Script” from the dropdown box and then either click “Read Configuration” for a connected ODORATOR 2 or “Read Configuration Script” at the top of the window. For a connected ODORATOR 2, the instrument’s information and configuration settings will be displayed: For a connected ODORATOR 2: The ODORATOR 2 configuration settings available are: Power down GPS while asleep? • Yes, turn off GPS (save power) is the default. • No, leave GPS on (obtain fix faster) is the option. 16 Wake up & record position? • No, is the default to prevent unwanted recording of the breadcrumb trail from the factory. • Yes, whenever ODORATOR 2 is idle. Will wake-up from idle and record. • Only when external power is not connected. Will wake-up from Idle and record but not while charging. Very useful when out of service for extended periods of time. HIGHLY RECOMMENDED! Caution: Charging in the service vehicle while driving will prevent the recording of breadcrumb trail data. Position fix wake-up interval • One minute is the default interval. • The interval range is from 30 seconds to 1 hour. A 30 second interval will use slightly more power on average from the battery pack. The value should be chosen based on the operator’s survey route and how much time is spent commuting versus testing. If no key is pressed, go to sleep after • Five minutes is the default interval. If odor testing takes longer than five minutes and the ODORATOR 2 goes to sleep during the test, the interval should be increased accordingly. • The interval range is 1 minute to 1 hour. When reading is complete, go to sleep after • Five minutes is the default. This setting limits the auto PURGE time. • The interval range is 1 minute to 1 hour. This ODORATOR 2 is assigned to user • No Assignment is the default as no user accounts are setup at the factory. • After a user account has been setup the list will show all possible users. **NOTE** Any user can be assigned as an Operator of the ODORATOR 2, including users that have no OdorSeer logon privileges. To assign a user to the connected ODORATOR 2, click on the desired user in the “This ODORATOR 2 is assigned to user” drop down box list. Calibration Due Date • Factory Default (1 Year After Cal) • Use This Date An additional calendar drop down box will open to allow the selection of a date up to 1 year after the calibration date. The chosen date will be used by the instrument and OdorSeer to alert the operator of the calibration due status. When the calibration due date is reached, the instrument will display “CAL” “DUE” and beep during boot-up. The “ * “ key must be pressed to acknowledge. 17 RDL High Alarm Level • Use Instrument Target is the default. Example: 1.00 %. • Use This Level An additional numeric drop down box will open to allow the selection of a chosen high alarm level. The value in the box can be edited directly or the arrows can be used. It is highly recommended to not exceed the instrument’s target level. The chosen level will be used by the instrument to alert the operator when a RDL reading meets or exceeds the RDL high alarm level. If so, the display will show “RDL” “HIGH” and beep for 5 seconds. Relative Odor Intensity • Disabled is the factory default. Only the TDL and RDL tests are factory enabled. • Enabled – Target An additional numeric drop down box will open to allow the selection of a chosen % Gas in Air Value. The value in the box can be edited directly or the arrows can be used. This value can be referred to by the operator during a ROI test. When enabled the instrument will support TDL, RDL and ROI tests. To make the configuration active on the attached ODORATOR 2, the “Configure” button must now be clicked. To verify the updated configuration, click on “Read Configuration” again and check the values in the drop down boxes. When configuring several ODORATOR 2 instruments with similar configurations the process can be simplified by: 1. Set up the first ODORATOR 2 instrument as described above, click “Configure” and then click “Read Configuration”. Verify the correct configuration. 2. Swap in the next ODORATOR 2 instrument using the USB2 port. 3. Manage – Find USB ODORATOR 2 units for OdorSeer to recognize the new instrument is connected. 4. Manage – Configure ODORATOR 2 and then Click “Set all to Keep Current” to retain all settings or make only unique setting changes such as assigned user. 5. Click “Configure”. Changes aren’t updated until “Configure” is clicked. To Import, Modify and Save an ODORATOR 2 Configuration Script This is used to modify an existing configuration and save it as a new configuration script. This is very useful in creating operator specific configurations. Manage - Configure – ODORATOR 2, select “Remote ODORATOR 2 Configuration Script” in the drop down box and click “Read Configuration Script” to open a standard Windows explorer window. The original configuration script file has to have been previously stored or saved on the OdorSeer PC or in an accessible network location. The original configuration script file name will be “OD2Config_date_user.ods” where the date and user information will contain the actual values. Browse to the desired original configuration script file’s location and either double click it or single click it and then click “Open” to select it. The original configuration script will be read in and the Configure ODORATOR 2 window will update to show the status. 18 To use the original configuration script’s values as is, click “Set All to Keep Current”. Otherwise click on the respective drop down boxes beside each configuration setting to alter any values such as assigned to user. Unchanged settings will show “Keep Current Setting” to allow only specific settings to be changed. To assign a user, that user must have already been created (Manage – Add Users). When finished setting the configuration values, click “Save Configuration Script”. A standard Windows explorer window will open. Browse to the desired configuration script file’s location to be stored and then click “Save”. The Configure ODORATOR 2 window will update to show the status. When finished click “Close” to exit the Configure ODORATOR 2 window. 19 Manage – Add or Edit RDL Display Thresholds Used to colorize RDL reading ranges on the map for quick visual analysis. As many ranges and respective colors as practically needed may be chosen. All colors and ranges are configurable and editable. The lowest range numerically is the Default range (a zero baseline). Each additional range will include the end of the next lower range up to the defined range threshold value. To setup RDL display thresholds: 1. Click on “Add Threshold”. The first new range will define where the Default range stops and how wide the new range will be. Similarly, the second new range will define where the first new range stops and how wide the second new range will be. A Edit Threshold Definition window will open to setup the range size and color as shown: 2. The ranges may be expressed in % of Target units, the default, or in % Gas units. For an ODORATOR 2 calibrated to 1.00 %, the % of Target units are probably the easiest units to use in defining the total range. Select the desired units. 3. Click in the Threshold field and edit the value to the desired value for that range. 4. Click on the “Threshold Color (click to change)” field to open up a color box window as shown: 20 5. Click on a Basic color or on the “Define Custom Colors” to further select the color to use for the new range. When done, click “OK”. 6. When the new range parameters have been set click on “Save & Add New” to continue adding more ranges, “Save & Close” to finish or “Cancel & Close” to abort the function without making the changes. 7. When finished, a typical Reading Display Thresholds window will look similar to the one below: 8. Click on “Close” to close the Reading Display Thresholds window. The Reading Display Thresholds can be edited and customized for different users, regions and ODORATOR 2 calibrations. The result of setting up Reading Display Thresholds on a map will look similar to: Your actual map area, colors, ranges and reading values will be different. 21 Manage – Add Users Used to add or modify user accounts. A user account must be setup prior to assigning that user as an operator and to a ODORATOR 2 instrument. The following window will be displayed: The Login Name, Password and Password Hint must be entered. The LCD Display Name should be entered for an operator. Each field has its own usage properties. ODORATOR 2 User ID – Can only be an integer (number) between 0 and 32767. Zero is reserved for no user and 9999 is reserved for the Admin user. When setting up multiple users the User ID will automatically increment by one after clicking “Save & Add New”. **NOTE** Each user must have a different User ID than every other user. OdorSeer Role – May be None, Operator, Supervisor or Administrator. Company ID – Accepts alphanumeric (letters and numbers) characters and is intended to be the employee’s company ID. The Company ID should not match the User ID. Last Name, First Name – Letters only. LCD Display Name – Also used to configure the ODORATOR 2 instrument. Up to six letters can be entered. When an operator is assigned to an ODORATOR 2 instrument their User ID and LCD Display Name will be displayed during boot-up. **NOTE** Some lower case and upper case letters cannot be displayed on the ODORATOR 2’s LCD. For these letters the opposite case will be displayed. For example, if you include a lower case ‘a’ in a user’s name the upper case ‘A’ will be displayed. Email Address – Intended to be the employee’s company email address. 22 Phone – Intended to be the employee’s company or cell phone number. *Login Name – The user’s login name must be entered in this field. It is not case sensitive and it can’t be a duplicate of any other user’s login name in the OdorSeer database. Password, Confirm Password – Accepts any printable character, including spaces and special characters. The maximum number of characters is 50 and the minimum number is zero, although not using a password is not recommended. Password hint – Enter text as a password reminder. The password can’t be used in the password hint field. Inactive User box – Check to deactivate but not delete the users account. Delete This User – When a prior user’s account is selected it can be deleted from the database but only if there are no prior readings imported into the database. If so, the account can only be made inactive. When all the fields and changes have been entered and selected there are three possible actions to choose from: 1. Save & Add New. Click on this button when more than one user account will be setup. 2. Save & Close. Click on this button when only one user account will be setup or modified. 3. Cancel & Close. Click on this button to abort the function. Manage – View & Edit Users Used to manage the user accounts. When selected a table will be displayed showing all the user accounts. Click on “Edit” for the chosen user and a window similar to Manage – Add Users will open for editing. The user’s Password, Confirm Password and Hint can be changed with “Edit” and “Reset Password”. **NOTE** If “Reset Password” is clicked for a user, then the password has to be changed or “Cancel & Close” used to exit the window with no changes made. Manage – Switch User Used to allow different users to use OdorSeer. This is useful when an Administrator or Supervisor wants to train an Operator in using OdorSeer. 23 View – Readings Used to display imported odor level readings for analysis and exporting for reporting. When selected, a window similar to the following will be displayed: To export readings into either CSV, TXT or KML formatted files, the desired readings must first be selected. There are several choices available: 1. Manually click on each desired row of data to highlight it blue. Hold down the Shift key and click an end row to select a block of rows or hold down the Control key and click on individual rows as desired. 2. Select Edit – Select All on the main window to highlight all rows. 3. Manually click on a starting row and while holding down the shift key click on the last row desired to select a block of fix data rows. When the desired odor level readings rows have been selected click File – Export to open a “Save As” dialog window. Browse to the desired folder, edit the file name if desired and select the file type in the “Save as type” drop down box. Click “Save” to generate and save the file as desired. View – Readings and Map Used to display imported odor level readings for analysis and an auto scaled map showing odor level readings in previously colorized ranges. This is a very powerful tool for quickly analyzing readings across a geographic area. When selected, a window similar to the following will be displayed: 24 **NOTE** Internet access is required to download a map. Two windows will appear side by side, readings on the left and the auto scaled map on the right. Either window can be resized by dragging the edges sideways. The two windows can also be maximized. The default map view is Street View. To select Aerial Overlay, click on the “Aerial Overlay” box to change the view. The colorized readings in the map are interactive with the readings in the left window. Click on a reading row to highlight that reading on the map. Similarly, click on a map reading to highlight that reading in the left window. Hold the mouse cursor over a map reading to also display data specific to that reading. The map can be panned and zoomed as desired. When the desired map is displayed it can be exported into a JPG image file by clicking on the “Save Map Image” button. A “Save As” dialog window will open. Browse to the desired folder and edit the file name if desired. Click “Save” to generate and save the JPG file. The map image can be manipulated per the following: 1. 2. 3. 4. 5. Each reading in the table that has valid GPS coordinates will correspond to a colored icon on the map. When the Readings and Map window first opens the map boundaries encompass all readings downloaded so that all of the readings in the table will be visible when the window is opened. You can zoom in on the map by double-clicking, and zoom back out to the default scale by shift-double-clicking. If you have a mouse with a scroll wheel you can hover the cursor over the map and use the scroll wheel to zoom smoothly in and out. To use the scroll wheel to scroll up and down in the table instead of zooming on the map, hover the cursor over the table instead of over the map. Once a row in 25 6. 7. 8. 9. 10. 11. 12. the table is selected, and as long as the cursor is positioned over the table you can use the up and down arrow keys to move around in the table to select a row. Clicking in the table selects a row representing a single reading. Only one row at a time can be selected. To pan the map, simply click on its surface and drag in the direction you want to go while holding down the left mouse button. When a row of data is selected in the table, the map marker that corresponds to the data row is highlighted (doubles in size with a thick black border). The map is panned to put this marker at map center. Unless you hold down the shift key when you click on the table row, the “zoom level” (i.e. effective viewing altitude) remains the same. If you hold down the shift key while clicking on a table row, then the map marker for the selected row is centered and the map zooms automatically to a “close” altitude (i.e. high resolution view). Ctrl-click on the selected table row to deselect all rows and un-highlight all markers on the map. Click on a map marker and the corresponding row of data in the table will be selected. If the selected data row is not visible (i.e. is below or above the portion of data on the screen) then the table is automatically scrolled so the selected row is visible. Hover your cursor over a map marker to see a “tool tip” containing the ODORATOR 2 serial number, date the reading was acquired, TDL, RDL and optionally ROI readings. You can have multiple Readings and Readings and Map windows open at the same time in any combination that you find useful. Additional comments on generating reports using maps: 1. 2. Multiple KML files can be overlayed using Google Earth such that odor level readings and the breadcrumb trail can both be displayed, saved and printed. KML files can be converted into other map image files such as Shapefile used by ESRI ArcGIS. On-line and standalone programs are available for such conversions. Other conversions are supported by similar tools. View – ODORATOR 2 Info Not supported. View – Self Test Data Not supported. View – Event Logs Not supported. Window Used to select a function window when several windows have been opened. It’s possible that several readings and map windows could be open while analyzing data. Use Window to quickly select a window from all open windows. 26 Help – About OdorSeer Used to display the installed version of OdorSeer. Exiting OdorSeer When finished, click “File” - “Exit” or click on the upper red “X” in the main window to close OdorSeer. Using OdorSeer Remote OdorSeer Remote is used by the instrument operator to both import data from the instrument to be remotely transferred to OdorSeer and to import / export configuration scripts. OdorSeer Remote only works with files. There is no database involved, like that for OdorSeer, and since there is no database there are no users, logins or passwords involved. Anyone with the proper knowledge can use OdorSeer Remote. There are 3 kinds of files used with OdorSeer Remote: 1. Readings files in .odr format. 2. Periodic Fix Data files in .odf format. 3. Configuration Script files in .ods format. All 3 file types are compressed, encrypted and only readable by OdorSeer and OdorSeer Remote. A typical usage case for OdorSeer Remote begins with the remote field operator of the ODORATOR 2 instrument. A supervisor at the central office using OdorSeer decides to generate a unique configuration script file (such as for a new or additional operator) and emails the new file to the remote operator. The remote operator, after having received and saved the configuration script to their laptop, uses OdorSeer Remote to read in the new configuration script file and re-configure their ODORATOR 2 instrument. To confirm and verify the configuration change, the remote operator uses VIEW to copy the new configuration to the laptop’s clipboard, pastes the text into Notepad or similar app, saves the file and emails it back to their supervisor. The remote operator then takes the newly configured ODORATOR 2 instrument into the field and performs odor level tests and possibly relative odor intensity tests while the breadcrumb trail is recorded in the background. Per the remote operator’s company policy, the remote operator uses OdorSeer Remote to import readings and periodic fix data into files that are then emailed back to their supervisor at the central office who uses OdorSeer to import the readings and periodic fix data into the OdorSeer database for analysis, mapping and report generation. OdorSeer Remote Function Menus Structure There are five major function menus supported by OdorSeer Remote. They are accessible at the top left of the main window. Each major function menu includes sub-menus. The OdorSeer Remote menu structure is as follows: 27 File Edit Manage View Help → → → → → → → → → Import & Save To File → Readings → Periodic Fix Data → Self Test Data → Events Exit Cut Copy Paste Select All Apply Configuration Script ODORATOR 2 Configuration About OdorSeerRemote Detailed Function Menus Description An ODORATOR 2 instrument is needed to be turned on and connected to the laptop for the functions to be operational. After starting OdorSeer Remote, the following window will be shown: “Remote” will be shown in the lower left corner. Detailed functions descriptions are now discussed: File – Import & Save To File - Readings The following window will appear when selected: 28 Usage is similar to that for using OdorSeer File – Import – Readings. After importing the readings data a standard Windows explorer window will open. Browse to the desired reading file’s location to be stored and then click “Save”. A window will open and after the green progress bar finishes the number of readings imported and saved file name path will be indicated. Click “Close” to exit the Import & Save Readings From ODORATOR 2 window. File – Import & Save To File - Periodic Fix Data A window will appear when selected, “List Available Dates” is clicked and the respective date chosen. Only one file may be chosen at a time. Usage is a simplified version of File – Import – Periodic Fix Data in OdorSeer as data isn’t displayed. Click on “Import & Save Fix Data For Selected Data”. A standard Windows explorer window will open. Browse to the desired reading file’s location to be stored and then click “Save”. A window will open and after the green progress bar finishes the status of the save will be indicated. 29 After successfully importing periodic fix data, “Remove Data For Selected Dates From ODORATOR 2” may be clicked to perform housekeeping. Usage is similar to selecting dates to import except multiple files may be selected to delete instead of a single file. Click “Close” to exit the Import & Save Readings From ODORATOR 2 window. File – Import & Save To File - Self Test Data Not supported. File – Import & Save To File -Events Not supported. File – Exit Click to exit OdorSeer Remote. OdorSeer Remote may also be closed like any other Windows program by clicking on the red “X” in the top right corner of the main window. Edit – Cut Not supported. Edit – Copy Not supported. Edit – Paste Not supported. Edit – Select All Not supported. Manage – Apply Configuration Script This allows an operator to load a Configuration Script and apply it to one or more ODORATOR 2 instruments. When selected, the following window will open: 30 Click on “Load Configuration Script” to allow a configuration script file to be chosen. A standard Windows explorer window will open. Browse to the desired configuration script file’s location and either double click it or single click it and then click “Open” to select it. The configuration script file’s name will have a format similar to “OD2Config_date_user.ods” where date and user will have actual values. After opening, a window similar to the following with status and Parameters This Script Will Modify data will be shown: Any setting not to be configured will show “N/A” at the end of that settings line. This is obtained in OdorSeer when creating the configuration script by configuring that setting to “Keep Current Value”. This allows only specific settings to be changed. Select the connected ODORATOR 2 instrument in the drop down box if not already showing in the box and then click “Apply Configuration Script”. The window will update with status, Configuration Before Applying Script settings (write), Configuration After Applying Script settings (read back) and “No Errors” under Script Apply Errors as confirmation as shown. 31 To inform the supervisor of the instrument’s configuration change, the operator can click “Copy To Clipboard” to copy the configuration text and then paste the text into a text document program such as Notepad. The Notepad file should then be saved on the operator’s laptop and then emailed to the supervisor. After updating the configuration on an ODORATOR 2 instrument, the operator may choose to update a different instrument with the same settings or click “Close” to exit the Apply ODORATOR 2 Configuration Script window. View – ODORATOR 2 Configuration Allows the operator to read and view the connected ODORATOR 2 instrument’s configuration. No configuration changes can be made. When selected, the following window will open: Click on “Read Configuration” to update the window with status, non-configurable parameters (settings) and configurable parameters. Clicking on “Copy To Clipboard” will allow the settings values to be pasted into a text document program such as Notepad where the current settings file can be saved on the operator’s laptop and then emailed to the supervisor if needed. Help – About OdorSeerRemote Used to display the installed version of OdorSeer Remote. 32 CHAPTER THREE Troubleshooting Chart Problem “LO BAT” appears on the LCD Probable Cause Weak batteries ODORATOR 2 not recognized by a PC. No map image appears. No internet access No periodic fix data Wake Up set to No No response from OdorSeer The ODORATOR 2 is sleeping Remedy Charge or replace battery pack Swap USB cable Manage – Find USB units Internet access Set Wake Up to Yes Turn the ODORATOR 2 on Swap USB cable Manage – Find USB units No data imported The RMA process may be found on page 26 of this manual. Parts List The following list specifies ODORATOR 2 parts and accessories that are available from the factory or regional offices. HPN 104175 104147 104189 22112110 104145 103607-0 0716725 0111004 0104146 101311-0 102555-1 104288 102458-0 ODORATOR 2, complete User’s manual, ODORATOR 2 OdorSeer manual, ODORATOR 2 Tubing (available in various lengths), Tygon Quick-connect, male with barb Label, “Warning” ODORATOR 2 Regulator, external, low pressure, 250 PSI max. Regulator, external, high pressure, 3000 PSI max. CD, ODORATOR 2 Battery pack, 11.1V, 4.8 Ah Battery charger, standalone Mesh bag, ODORATOR 2 Inverter, DC to AC, 150W 33 CHAPTER FOUR Warranty and Warranty Repair All instruments and products manufactured by Heath Consultants Incorporated are warranted to be free from defects in material and workmanship for one (1) year from the date of shipment. Furthermore, the warranty on authorized repairs in the Houston Factory Service Center (FSC) and other regions is ninety (90) days materials and thirty (30) days labor. This repair warranty does not extend any other applicable warranties. Our warranty covers only failures due to defects in materials or workmanship which occur during normal use. It does not cover failure due to damage which occurs in shipment, unless due to improper packing, or failures which result from accident, misuse, abuse, neglect, mishandling, misapplication, alteration, modification, or service by anyone other than a Heath warranty repair location. Batteries and damage from battery leakage and all expendable items such as filters and tubing are excluded from this warranty. Heath’s responsibility is expressly limited to repair or replacement of any defective part, provided the product is returned to an authorized warranty repair location, shipped prepaid, and adequately insured. Return shipping charges and insurance will be paid by Heath warranty expense. We do not assume liability for indirect or consequential damage or loss of any nature in connection with the use of any Heath product. There are no other warranties expressed, implied, or written except as listed above. Heath warrants only that the parts manufactured by it will be as specified and free of defects. H eath makes no other warranties or representations of any kind whatsoever, express or implied, and any and all implied warranties including any warranty of merchantability and fitness for a particular purpose or use are hereby disclaimed. 34 Return Procedure (RMA) The following steps will expedite the repair of your instrument: 1. Contact Heath Factory Service at 800-432-8487 to request a repair form. The form is available on-line at http://heathus.com/info-center/repair-forms/ . 2. Package carefully using the original shipping carton and cushions if available and return all components including the repair form. The repair form requests information such as complete shipping and billing addresses, instrument or product name, model number and serial numbers. Also included will be a brief description of the problem you are experiencing and the person and phone number to be contacted for additional information and approvals. An RMA number will be assigned to the return. CORPORATE HEADQUARTERS 9030 Monroe Road Houston, Texas 77061 Phone: 713-844-1300 Fax: 713-844-1309 www.heathus.com FACTORY SERVICE 9030 Monroe Road Houston, Texas 77061 Phone: 713-844-1350 Fax: 713-844-1384 www.heathus.com [email protected] 35 SALES, CUSTOMER SERVICE, AND INSTRUMENT REPAIR National Toll Free # 1-800-HEATH-US (1-800-432-8487) REGIONAL SALES, CUSTOMER SERVICE, AND INSTRUMENT REPAIR Eastern Region Heath Consultants Incorporated 575 Park Way Monongahela, PA 15063 Phone: 724-242-3145 Fax: 724-872-3206 Southwest Region Heath Consultants Incorporated 9030 Monroe Road Houston, TX 77061 Phone: 713-844-1300 Fax: 713-844-1309 Western Region Heath Consultants Incorporated 30 Main Avenue, Unit 3 Sacramento, CA 95838 Phone: 916-921-5198 Fax: 916-921-5437 36 Notes: ___________________________________________________________________________ ___________________________________________________________________________ ___________________________________________________________________________ ___________________________________________________________________________ ___________________________________________________________________________ ___________________________________________________________________________ ___________________________________________________________________________ ___________________________________________________________________________ ___________________________________________________________________________ ___________________________________________________________________________ ___________________________________________________________________________ ___________________________________________________________________________ ___________________________________________________________________________ ___________________________________________________________________________ ___________________________________________________________________________ ___________________________________________________________________________ ___________________________________________________________________________ ___________________________________________________________________________ ___________________________________________________________________________ ___________________________________________________________________________ ___________________________________________________________________________ 37 Heath Consultants Incorporated 9030 Monroe Road Houston, TX 77061 Tel: 713-844-1300 www.heathus.com Heath…Safety, Leadership, Innovation, Performance Then, Now and Tomorrow