1
123LiveHelp v4.1 User Manual TOPCMM SOFTWARE CORP
123 Live Help Software
User Manual
Version 4.1
Topcmm
2009-3-9
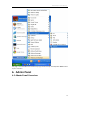
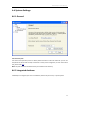
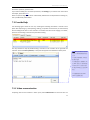
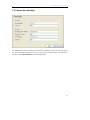
1 123LiveHelp v4.1 User Manual 1. Introduction....................................................................................................................... 4 2. Requirements .................................................................................................................... 4 2.1 Server Requirements ....................................................................................................... 4 2.1.1 Supporting platforms................................................................................................ 4 2.1.2 Hardware requirements ........................................................................................... 5 2.1.3 Java Virtual Machine (JVM) requirements ............................................................... 5 2.1.4 Port requirements .................................................................................................... 5 2.2 Client Requirements ........................................................................................................ 5 3. Installation......................................................................................................................... 5 3.1 For Windows Users.......................................................................................................... 5 3.2 For Linux Users ................................................................................................................ 8 3.3 Other UNIX Operating System....................................................................................... 12 4. Integration....................................................................................................................... 13 4.1 Generate Embedded Code............................................................................................. 13 4.2 Chang Path Information ................................................................................................ 16 5. User Interface .................................................................................................................. 17 6. Admin Panel .................................................................................................................... 19 6.1 Admin Panel Overview .................................................................................................. 19 6.2 Access Admin Panel....................................................................................................... 20 6.3 Monitoring..................................................................................................................... 21 6.4 Report System ............................................................................................................... 23 6.5 Chat Settings.................................................................................................................. 24 6.6 System Settings ............................................................................................................. 25 6.6.1 General ................................................................................................................... 25 6.6.2 Integrated database ............................................................................................... 25 6.7 Module Settings............................................................................................................. 26 6.7.1 MSN module........................................................................................................... 26 6.8 Department Management............................................................................................. 28 6.8.2 Delete a department .............................................................................................. 29 6.9 Account Management ................................................................................................... 30 2 123LiveHelp v4.1 User Manual 6.9.1 Add an account....................................................................................................... 31 6.9.2 Modify an account.................................................................................................. 32 6.9.3 Remove an account ................................................................................................ 32 6.10 Search .......................................................................................................................... 33 6.10.1 Basic search .......................................................................................................... 33 6.10.2 Advanced search .................................................................................................. 35 6.11 Ban and Unban ............................................................................................................ 35 6.12 Advertisement Settings ............................................................................................... 36 6.12.1 HTML advertisement ............................................................................................ 36 6.12.2 Scrolling AD........................................................................................................... 39 7. Operator Panel ................................................................................................................ 41 7.1Overview......................................................................................................................... 41 7.2 Access Operator Panel................................................................................................... 42 7.3 Provide Help .................................................................................................................. 43 7.3.1 Video communication ............................................................................................ 43 7.3.2 Change your font .................................................................................................... 45 7.3.3 User information panel .......................................................................................... 47 7.4 Connection Settings....................................................................................................... 49 7.5 Alert Settings ................................................................................................................. 50 7.6 Auto‐invite Configuration.............................................................................................. 52 7.7 Canned Message ........................................................................................................... 53 7.8 Search ............................................................................................................................ 54 7.9 Offline Message............................................................................................................. 55 8. Customer Panel ............................................................................................................... 56 9. Configuration................................................................................................................... 63 9.1 Client Configuration....................................................................................................... 63 9.2 Server Configuration...................................................................................................... 65 3 123LiveHelp v4.1 User Manual 1. Introduction 123 Live Help Server Software is a full‐fledged solution for your sales rep. or supporters to communicate with website visitors one‐on‐one or to promote online sales. Besides shortening sales cycle and increasing customers’ satisfaction and confidence, it may also increase agent productivity and reduce service costs. In one word: 123LiveHelp will make your web site more live and more interactive. 2. Requirements 2.1 Server Requirements 2.1.1 Supporting platforms Windows 95/98/NT/ME/2000/2003/XP/Vista Solaris/Sparc 2.6, 7,8,9 Solaris/Intel 2.6,7,8,9 Compaq Tru64 IRIX HP‐UX 10.20, 11 AIX 4.3.x Linux Redhat 6.2, 7.1, 7.2, 7.3, 9 Linux Caldera Turbo Linux Mac OS Classic 8.1 ‐ 9.X Mac OS X 10.0 ‐ 10.1 Mac OS X Server 4 123LiveHelp v4.1 User Manual 2.1.2 Hardware requirements 123 Live Help Server Software is compatible with most server hardware. The minimum hardware requirements are as follows: 586/200 MHz or faster processor 64 MB of RAM or more 100 MB free hard disk space or more Dedicated PII/400 MHz with 256 MB RAM is eligible to handle 500 or more concurrent users. Adding extra RAM and processors will improve the performance of 123LiveHelp. 2.1.3 Java Virtual Machine (JVM) requirements Sun™ Java© 1.5 or above is required to run 123LiveHelp. We recommend J2SE v 1.5 or later. For the current version of JDK, please visit http://java.sun.com/ . 2.1.4 Port requirements This software needs at least two free ports, and the port number should be lower than 65535 and cannot be used by other applications. Default ports: 8969, 8968 1: 8969: The main port of 123LiveHelp server, all the three chat clients (admin, operator and customer panel) connect to this port. 2: 8988: The port for the HTTP server of 123LiveHelp server. Why HTTP server is needed? Because under certain network environments, the connection via proxy will make the main port 8969 unavailable (in that case, HTTP server will be useful. In addition, when a user needs to check the logs, HTTP server is also required. 2.2 Client Requirements NET Framework 2.0 is required to run Operator Panel and Admin Panel. 123LiveHelp.exe or 123LiveHelp (Client).exe will detect the version of your.Net Framework in setup. If it is needed, it will download from Microsoft's website and install them automatically. At least 800*600 displays resolution. On the customer’s side, Flash Player 7 is required. 3. Installation 3.1 For Windows Users 5 123LiveHelp v4.1 User Manual Download the installer file from the page below. http://www.123livehelp.com/download.html
The package including JRE should be downloaded if you don't have JRE installed before. Install 123LiveHelp on Windows Double‐click "123livehelp.exe" to start the installation and it will take a few minutes to finish the process. Since Microsoft .NET Framework 2.0 and Java JDK 1.5 are required to run 123 Live Help, so if you don't have these applications installed before, 123 Live Help will automatically download and install them for you, and if you need to do it by your own, please follow the links below. Microsoft .NET Framework 2.0: http://download.microsoft.com/download/a/a/c/aac39226‐8825‐44ce‐90e3 6 123LiveHelp v4.1 User Manual bf8203e74006/dotnetfx.exe Java JDK 1.5: http://javadl.sun.com/webapps/download/AutoDL?BundleId=18675&/jre‐1_5_0_15‐windows‐i5
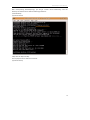
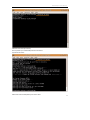
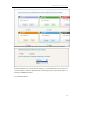
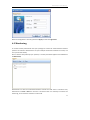
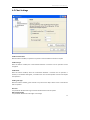
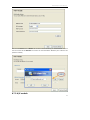
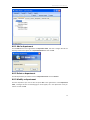
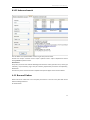
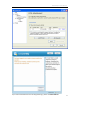
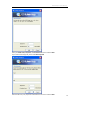
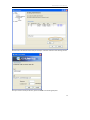
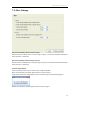
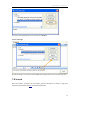
86‐p.exe NT service When 123 Live Help Server Software installation is finished, 123LiveHelp Server will take several seconds to start as a Windows NT service. And, as a Windows NT service, 123 Live Help server will be loaded and started automatically when your computer starts. Start 123 Live Help This can be done by starting the server in service mode or in console mode. A) Start in service mode: Start‐>Programs‐>123 Live Help Server 4.1‐> Server‐>Start 123 Live Help Server. If the chat server has already been started before or there is a problem with the server configuration, an error message will be prompted. To learn about the detailed error information, please start it in console mode. b) Start in console mode Start‐>Programs‐>123 Live Help Server 4.1> Server ‐>Start 123 Live Help Server (Console Mode). 7 123LiveHelp v4.1 User Manual Console mode will be more helpful to view detailed error information, so it is only needed when there is a problem during starting 123LivesHelp server. When the problem is fixed, it is recommended to stop the chat server and start it again in service mode. Stop 123 Live Help server If you are in service mode, you can stop your 123 Live Help in this way: Start‐>Programs‐>123 Live Help Server 4.1‐>Server‐>Stop 123live Help Server. If you are in console mode, you may stop your 123 Live Help by manually closing the pop‐up MS‐DOS window. Restart 123 Live Help Server If you are in service mode, you can restart your 123 Live Help server in this way: Start‐>Programs‐>123 Live Help Server 4.1‐>Server‐>Restart 123 Live Help Server. If you are in console mode, please close MS‐DOS window first, and restart 123 Live Help server in the following way: Start‐>Programs‐>123 Live Help 4.1 ‐>Server‐> Start 123 Live Help Server (Console Mode) Note: After configuring the server parameter manually, you should restart the chat server to take the changes into effect. 3.2 For Linux Users 1.Get the free Linux package of 123LiveHelp at here: http://www.123livehelp.com/download.html Download installer file: 123livehelp.tar.gz You may also download with this command: $ wget http://www.123livehelp.com/download/123livehelp.tar.gz 8 123LiveHelp v4.1 User Manual 2. Decompress the installer file. You may use the command below to uncompress the installer file: $ tar zxf 123livehelp.tar.gz 删除的内容: 3. Start 123 Live Help manually 9 123LiveHelp v4.1 User Manual After uncompressing 123livehelp.tar.gz, you will get a folder named 123livehelp, enter this directory and start the server with the following commands: $ cd 123livehelp $ ./lhserver.sh start 4 Stop 123 Live Help manually You may stop the server with this command: $ ./lhserver.sh stop 10 123LiveHelp v4.1 User Manual 5 Restart 123 Live Help manually You may restart your 123Livehelp with this commend: $ ./lhserver.sh restart 6 Auto‐start 123 Live Help when your server starts 11 123LiveHelp v4.1 User Manual Step 1: Modify lhserver.sh, find the LHSERVER_HOME section, and define the directory of lhserver.sh. For example, if you uncompressed the 123livehelp.tar.gz into /usr/local/123livehelp, make sure lhserver.sh is in the directory of /usr/local/123livehelp, and then delete the two “#” before the two rows below in lherver.sh to make them effective: LHSERVER_HOME=/usr/local/123lhserver export LHSERVER_HOME Step 2: Modify this file: /etc/rc.local, add one row: /usr/local/123lhserver/lhserver.sh Just replace "/usr/local/123lhserver/” with your LHSERVER_HOME value. 3.3 Other UNIX Operating System 3.3.1 Install JRE 1.5 or above (we recommend JRE 1.5) For other Unix OS server, you must install a JRE 1.4.2 or above first, we recommend JRE 1.5, you may download it here: http://java.sun.com/j2se/1.5.0/download.jsp 3.3.2 Download the installer file at here. http://www.123livehelp.com/download.html Download 123 Live Help 4.1 for other OS: 123livehelp_s.tar.gz 3.3.3 Decompress downloaded file. You may use the following command to uncompress the downloaded file. $ gzip ‐d 123livehelp_s.tar.gz $ tar xvf 123livehelp_s.tar 3.3.4 Set JRE Environment variable Run the java application, please set JAVA_HOME env variable and PATH env variable. For example, if JRE is installed in: /usr/local/java/jre , you should set like the following list: JAVA_HOME=/usr/local/java/jre;export JAVA_HOME PATH=$PATH:/usr/local/java/jre/bin;export PATH 3.3.5 Start 123 Live Help After setting the JAVA_HOME you may start the server with the following command: (Remember to put all code below in one single line). $ java –classpath CLASSPATH:lib/lhserver.jar: jar:lib/log4j.jar:lib/ jdom.jar:lib/xerces.jar com.topcmm.jchat.LHServer & 12 123LiveHelp v4.1 User Manual 4. Integration This section will guide you to integrate 123LiveHelp’s client end with your website. 4.1 Generate Embedded Code This section will generate the embedded code that will be inserted into the webpage of your website. You can get the code in Generator Code Panel according to the instructions below: 4.1.1 Choose Design You can define the sign which indicates whether operator is online or not, it may be a status button or a text link, if you choose No Button, the system will disable the customers to ask for help before he is invited. You may design the images by your own or let us to it for you. 4.1.2 This step mainly aims to define the invitation interface and the department that can use the function. 13 123LiveHelp v4.1 User Manual You can select the proactive chat invitation theme from the collection to fit your website. Define the department to link to the chat invitation, only the department that is chosen can use chat invitation. Select the proactive chat invitation popup way as your prefer. When it is finished, press Next to continue. 4.1.3 Advanced Options 14 123LiveHelp v4.1 User Manual This panel mainly aims to define the department or operator that will see the invitation when a customer clicks on the help icon defined in the first step, chat window's style and size. When you choose A Particular Department or A Particular Operator, the corresponding department list would appear at the right side of drop‐down list. When you choose A Particular Operator, the corresponding operator list will appear at the right side of drop‐down list. When all of the settings are finished, click Next to continue, if you feel the need to change the setting in the last step, click Previous to modify. 15 123LiveHelp v4.1 User Manual 4.1.4 Get HTML code 4.2 Chang Path Information You may insert the embedded code that been generated in the code generator panel in your webpage, but if the traffic is large, using 8988 port to retrieve these 2 files may crash down your server, so it is recommended to copy to files to the web directory and retrieve them at port 80. For example, if we copy the files to the root directory of your website, say it is www.mydomain.com, then the src of the files in JavaScript should be: 16 123LiveHelp v4.1 User Manual And there is another parameter that should be modified, so your server will know where to load the live_status.js. When you finish the setting and modification, please restart your 123LiveHelp server and refresh your page and you’ll see that the online/offline indicator images will shift according to your operator’s online/offline status. 5. User Interface There are three user interfaces in 123 Live Help: Admin Panel, Operator Panel and Customer Panel. Different interface has different functions and serves for different user group. 17 123LiveHelp v4.1 User Manual Admin has overall privileges to supervise all departments/chat rooms, staff and clients. Operator manages specific room(s) and offer service to customers; operator is monitored by administrator. Customer, the end customer, seeks help from operator and has the least power over the system. Customer Panel can be accessed from Welcome Page which can be activated when installation is finished by checking this box: Server has been installed and started, start a client to test. Welcome Page also can be opened manually in this way: Start Menu: Start‐> Programs‐> 123 Live Help Server4.1> Welcome. As shown in the figure below: 18 123LiveHelp v4.1 User Manual The page is recommended to be viewed only by yourself and only show Operator Status button to your customers. 6. Admin Panel 6.1 Admin Panel Overview 19 123LiveHelp v4.1 User Manual 6.2 Access Admin Panel Click 123LiveHelp icon in desktop, and log in as an administrator. Select Admin in Role list, enter your User name, Password and click Login. If you need to log in admin panel on a remote machine, the following parameters need to be configured. 20 123LiveHelp v4.1 User Manual When the configuration is finished, please click Apply to enter the Login Panel. 6.3 Monitoring In monitor window, administrator has super privileges to monitor all communications between operator and customer. Administrator can open multiple conversation windows to monitor, but can’t join the chat directly. Once a customer was picked up by an operator, a monitor panel would appear at the left‐bottom of Admin Panel, Administrator can view the conversation between customer and staff. If this is a malicious user, administrator can Kick or Ban this user here. If he doesn't think it is necessary to continue the monitoring, he can close this customer’s monitor tab. 21 123LiveHelp v4.1 User Manual At the right side of the monitor panel is an information panel showing the customer’s information such as User ID, Question, IP, Time Zone, Language, etc. You can view the customer’s past chat in History tab. Click an item in History list, the complete information will appear in Record tab. If an administrator feels the need to view the conversation about a specific topic, enter the topic in Search textbox, and the related conversation records will appear in Record tab. Administrator may view the customer’s nickname, login time, operator’s name and his department information, etc at here. 22 123LiveHelp v4.1 User Manual 6.4 Report System The report system in 123flashchat aims to provide a convenient way for administrator to learn the working performance of his staff.
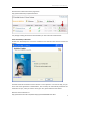
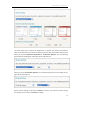
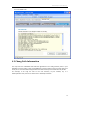
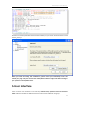
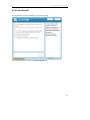
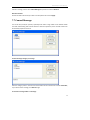
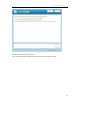
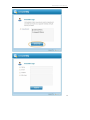
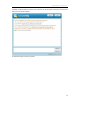
You may set the filter condition, such as Operators, Columns and Date, and click Generate to generate the report. 23 123LiveHelp v4.1 User Manual 6.5 Chat Settings Enable Proactive Chat With this feature enabled, an operator may invite a customer before he sends his request. Enable Encrypt With this feature enabled, the communication between a customer and an operator will be encrypted. Enable Rank With this feature enabled, when the conversation between a customer and an operator is finished, a rate window will appear, a customer then can rate the operator to show how helpful the operator is. Enable guest login With this feature enabled, guest customer may use 123 Live Help's client end to communicate with an operator. Kick time This parameter decides how long a customer will be kicked out of the system. Max message length This parameter decides the max length of a message. 24 123LiveHelp v4.1 User Manual 6.6 System Settings 6.6.1 General Live status file path The status of the operator (online or offline) will be recorded in a file live‐status‐file: you can set the path of this file for later review, and the file is mainly used in Integration, to learn more about this, please click here. Note: the path of the file should be within your website’s root directory. 6.6.2 Integrated database 123livehelp can integrate your own user database, like that of your forum, or portal system. 25 123LiveHelp v4.1 User Manual The modes of IntegratedOtherDatabase are: None ‐ not using any integrated database to authenticate a user, can only login as guest. MySQL ‐ using MySQL database. Oracle ‐ using oracle database. ODBC ‐ using ODBC DSN to connect to a database Common ‐ using all kinds of database, advanced setting URL ‐ using web URL to authorize user's login information. Choose the integration method you need and click Configure, you may configure the relevant information in the integration panel that appears later. 6.7 Module Settings 6.7.1 MSN module You can add a MSN account here as MSNbot. 26 123LiveHelp v4.1 User Manual Then click the Add button in Monitor list to add a monitor account, you should add this account into the contact list of MSN Bot to monitor the communications between your customer and operator remotely. 6.7.2 A/V module 27 123LiveHelp v4.1 User Manual 1. 123Livehelp embedded a video server, and if the video performance you need is not very high, you may use this one, the URI address is rtmp://{ip:1235/123livehelp 1) the IP here cannot be “localhost” or”127.0.0.1”, or your customer can not connect to the video server from other machine. 2) The status of port 1235 should be opened in the firewall’s configuration. 3) After configuration, restart your 123LiveHelp, you will see the Publish Video button. 2. If your need high video performance, you may use Flash Media Server or Red5. With flashcom‐audio‐video module enabled and macromedia flash communication server installed, you can use webcam and voice chat features. URI: the URI of you 123livehelp server Enable audio video module: With this module enabled, an operator may use webcam and his microphone set to communicate with customer, to learn more about this feature, please click here. 6.8 Department Management Here is a screenshot of the department management panel. As you can see, departments can be added, modified or deleted at here. 28 123LiveHelp v4.1 User Manual 6.8.1 Add a department Click the Add button at the right‐bottom of Department Panel, and then a dialogue box like the following below would appear, fill in Department Name field and click OK. s 6.8.2 Delete a department Click the department you need to remove in Department Panel and click Remove. 6.8.3 Modify a department Click the department you need to edit and press Edit at the right‐bottom of the Department Panel, a dialogue box like the following figure would appear, fill in the department name you need to use and click OK. 29 123LiveHelp v4.1 User Manual Notes: Admin to customer You may need to create multiple departments to allocate visitors for operator to serve them better, for example, “Pre‐Sales” and “Post‐sales Technical Support”. Admin to operator Once again we’d emphasize, don’t forget to designate new operator to specific department(s) first or the new operator can’t see any visitors at all! One department can have multiple operator members and one operator can manage multiple departments. Like the diagram shows before. Admin to customer You may need to create multiple departments to allocate visitors for operator to serve them better, for example, “Pre‐Sales” and “Post‐sales Technical Support”. Admin to operator Once again we’d emphasize, don’t forget to designate a new operator to specific department(s) first or the new operator can’t see any visitors at all! One department can have multiple operator members and one operator can manage multiple departments. Like the diagram shows before. 6.9 Account Management Administrator can view, add, edit and delete administrator and operator account at here. 30 123LiveHelp v4.1 User Manual 6.9.1 Add an account Click Add button at the right‐bottom of the panel to add an account: Fill in the required fields and click OK. Note: After adding admin account, you don’t need to designate him to a department, because administrator has super privilege over all available departments. But, adding an operator accounts is different, please bear in mind to designate him to specific department(s) at first. Or 31 123LiveHelp v4.1 User Manual he can see no visitor even if he’s successfully logged in the Operator Panel. 6.9.2 Modify an account Select a user from Account Panel and click Edit. In this mode, the user name filed is uneditable, fill in other required fields and click OK. 6.9.3 Remove an account Select a user from Account Panel and click the Remove button at the right‐bottom of the panel. 32 123LiveHelp v4.1 User Manual Before really deleting a user, a reconfirm dialogue will appear to ask for reconfirmation. 6.10 Search 6.10.1 Basic search Just leave all the options as default or null in search panel to perform basic search, you will get the chat records of current day in current department. 33 123LiveHelp v4.1 User Manual 34 123LiveHelp v4.1 User Manual 6.10.2 Advanced search You can define more options before “search” to get more precise results. Choose time and/or “customer name” and/or “operator name” and/or “department” before clicking Search to perform search. Search result Every entry of search result includes following items:Customer name, Operator name, country (of customer), IP (of customer), Login Time (of customer), Department (if customer and Operator), Details Link. Click an entry in the result list and the complete transcript will appear in the text area below. 6.11 Ban and Unban Admin can ban or unban user’s IP in this panel, and there is a ban list in this panel with all the banned IP being listed here. As shown below: 35 123LiveHelp v4.1 User Manual You can enter the IP you need to ban and click Submit at the bottom of this panel, then the IP will appear in the Ban List, if you need to remove this IP, clicking Remove in the Action field will help you to do the work. 6.12 Advertisement Settings 6.12.1 HTML advertisement You may define you own advertisement at here and they will be shown at the right‐section of the client panel. 36 123LiveHelp v4.1 User Manual If you need to add advertisement including HTML tags, please click Add HTML AD. 37 123LiveHelp v4.1 User Manual Enter your HTML code, Sequence and Duration time at here and click Add. If you need to add Image AD, please click Add image AD. Enter the AD’s text, link, sequence and duration time at here and click Add. 38 123LiveHelp v4.1 User Manual 6.12.2 Scrolling AD Scrolling AD will be shown at the bottom of the customer panel: If you need add such an AD, please click Add scrolling AD first. 39 123LiveHelp v4.1 User Manual And then fill in the AD test and the link you need your customer redirect to after clicking the text. And if you need to modify an AD item, please click Edit in the Scrolling AD panel. 40 123LiveHelp v4.1 User Manual 7. Operator Panel Operator Panel is the work platform of operators to manage chat and offer live help and support to website visitors/ customers. 7.1Overview
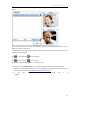
41 123LiveHelp v4.1 User Manual 7.2 Access Operator Panel Click the 123LiveHelp icon on desktop and login as an operator. Default test accounts: Username: operatora; password: test 42 123LiveHelp v4.1 User Manual Username: operatorb; password: test : If you need to modify your connection parameters, click Settings, if you need to learn more about the subject, please click here. When an operator logs in, he will be automatically redirected to the department he belongs to, this is predefined by administrator. 7.3 Provide Help The following figure shows the user list, including the following information: customer name (when does he/she log in), status (waiting, chatting, or operator lost connection, or disconnected). And the background colors of the customers are divided into three levels ranging from white, yellow to red according to the time they have been waiting. You may initialize live help by double‐clicking a username in the customer list or right‐click the customer and choose Pick up the chat, a chat panel will appear at the left‐bottom of the panel: 批注 [HP1]: 需要截取带视频的聊
天窗。如果发布视频的按钮没有
出来 1 是否购买视频模块,如果没有,
给出购买连接 2 如果确定购买了视频模块,确
定 admin 是否打开了视频的功能
3 如果 op 和 cu 互相看不到视
频,
确定 admin 配置了正确的 fms
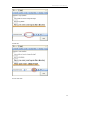
地址 2 3 有链接链到文档的 admin panel 设置视频的部分 7.3.1 Video communication Comparing with the chat window in admin panel, extra Publish Video and font‐size tools are 43 123LiveHelp v4.1 User Manual added. When an operator feels the need to chat with a customer via webcam, he may click on this button to initialize a video‐chat: If you need to turn on/off your video/audio, please put your cursor on the video screen and the following icons will appear: Click
to turn off video, Click
to turn on video, to turn off audio; to turn on audio. An operator may click Stop Video to turn off video‐chat. If you cannot see the Publish Video icon, the problem may result from the following factors: 1. Whether the A/V module is bought, if it is not, please go to this page to learn more about the payment of the module: http://www.123livehelp.com/buy.html 2. If the A/V module is bought please make sure it is enabled.
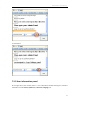
44 123LiveHelp v4.1 User Manual 3. If operator and customer cannot see each other in the webcam, please make sure the URI is correct. 7.3.2 Change your font With the tool bar, an operator may change his text's font, size, etc to suit his needs. To change the font: To change the font‐size: 45 123LiveHelp v4.1 User Manual To bold text: To enter italic text: 46 123LiveHelp v4.1 User Manual To unlined text: 7.3.3 User information panel At the right side of the monitor panel is a user information window showing the customer’s information such as User ID, Question, IP, Time Zone, Language, etc. 47 123LiveHelp v4.1 User Manual You can view the customer’s past chat in History tab. Click an item in History list, the complete information would appear in Record tab. If an operator feels the need to view the conversation about a specific topic, enter the keyword in Keyword textbox and click Search, the related conversation records would appear in Record tab. 48 123LiveHelp v4.1 User Manual 7.4 Connection Settings This window mainly aims to configure the connection parameters of your 123 Live Help server, you may modify these parameters to suit your needs or just use default value. If a parameter is misentered, press Restore Defaults to use the default value. 49 123LiveHelp v4.1 User Manual 7.5 Alert Settings Play sound notification when a customer logs in With this feature enabled, when a customer logs in system, a sound alert would be delivered to inform operator or administer. Play sound notification when customers log out With this feature enabled, when a customer logs out system, a sound alert would be delivered to inform operator or administer. Customer login indicator There are three options for you to choose: None, Image and Bubble. None: there would be no indicator appears when a customer logs in. Image: there would be an image appears when a customer logs in like the following figure: Bubble, there would be a bubble appears when a customer logs in: 50 123LiveHelp v4.1 User Manual Customer logout indicator There are three options you can choose: None, Image and Bubble. None: there will be no indicator appears when a customer logs out. Image: there will be an image appears when a customer logs out: Bubble, there will be a bubble appears when a customer logs in: Play sound notification when a new message arrives Provided this feature is enabled, when a new message arrives, the system would play a sound alert Customer message indicator There are three options for you to choose: None, Image and Bubble. None: there will be no indicator appears when new a message arrives. Image: there will be an image appears when a new message arrives: Bubble, there will be a bubble appears when a new message arrives: 51 123LiveHelp v4.1 User Manual 7.6 Autoinvite Configuration Enable auto invite With this feature enabled, when a customer visits your webpage, an auto‐invite message would be delivered. The visitors won't have to click any chat button on the webpage, they will instead be greeted by some friendly notification that the operator is ready to chat with them to offer assistance. The best of this is the invitation won't be blocked by pop‐up killer. Auto invite delay time You can set the time the system should wait before deliver an auto‐invite message to the customer, the delay time ranged from 0 to 60 seconds. Enable random invite message With this feature enabled, a randomly‐generated message would be delivered. If you need to add your own message here, enter your message in the text area below and click Add, if you need to 52 123LiveHelp v4.1 User Manual remove a message, select it from Invite Message drop‐down list and click Remove. Date time formats Choose the date time format you need in the drop‐down list and click Apply. 7.7 Canned Message This can be very handy for operator, especially when there is large traffic on the website. When one staff needs dealing with several customers with same questions, these canned answers can be extremely helpful to save time. To add a message category or message Enter the category name in the text area at the bottom of the canned form and click Add Folder, if you need to add a message, click Add Message. To remove a message folder or a message 53 123LiveHelp v4.1 User Manual Click on the corresponding entry first, and then click Remove. To send a message Click the message in the tree list and press Send, the message will be sent to the text input area. 7.8 Search With this function, operators can conveniently get the information he needs in large help information base, please click here for detailed information. 54 123LiveHelp v4.1 User Manual 7.9 Offline Message If a customer needs to learn about a particular product while supporter or sales is offline, he can send a offline message from the client end, and when an operator in this department logs in 123 Live Help, the Message button will become this: It indicates that a customer sent a message when operator is offline. An operator can click on this button to open the Offline Customer Message window: Unread message would be shown in bold font; click on the message and its corresponding content would appear in the text area below. 55 123LiveHelp v4.1 User Manual Reply an email: Right‐click an email and choose Reply, it will invoke your default email client. Mark as read: Right‐click an email and choose Mark as read, this will un‐bold the font in message list to indicate that the message has been read by an operator. Mark as unread: Right‐click an email and choose Mark as unread, this bold the text in message list to indicate that the message has not been read by an operator. Delete: Right‐click an email and choose Delete, this will delete a message in message list. 8. Customer Panel The use of customer chat client is fairly easy and straight. 8.1 Choose a department: 56 123LiveHelp v4.1 User Manual Before logging in, the customer will be required to enter his name, question and choose a department first so that the staff can classify the customer’s intentions proactively. 8.2 Click Submit to wait in queue. 57 123LiveHelp v4.1 User Manual 8.3 Wait for the answer of an operator. 8.4 If no staff is available, customer may click mail to leave an offline message 58 123LiveHelp v4.1 User Manual 59 123LiveHelp v4.1 User Manual 8.6 When a staff accepts the request, the customer will be informed of the good news and the text input area will be enabled. 8.7 Operator begins answering question. 60 123LiveHelp v4.1 User Manual 8.8 Rate an operator Once the conversation is finished, the customer can rate how helpful an operator is, from one star to five stars, in a stretchable rating panel. Click the small arrow at the right of the conversation window to stretch the rating panel. 61 123LiveHelp v4.1 User Manual One operator may transfer the chat to another operator. If operator A transferred one customer to operator B, the customer will get a notification and be aware of the process, too. 8.9 If a customer needs to send the support log to an email, he may press Mail. 62 123LiveHelp v4.1 User Manual 9. Configuration 9.1 Client Configuration The configuration for the live help chat clients are: config.xml It is located at <123LiveHelp4.1 installed directory>/html/ config.xml This file controls the basic configuration of the Admin Panel, Staff Panel and Customer Chat Client. You can modify the parameters referring to the table below: (Among them, some are just for client.swf which only serves the end customer.) Init Parameter/ Client APIs This is used to make client.swf to get some initialization parameter by URL. e.g.: http://localhost/client.swf?init_user=user&init_password=password 63 123LiveHelp v4.1 User Manual There are many initial parameters used in 123livehelp4.1 in order to integrate 123livehelp swf files with web page more conveniently. 1)init_user & 2)init_password These two parameters are used for member auto‐login 123livehelp. To client.swf, these two ones are not so important comparing with 123flashchat since 123livehelp is just for online sale and most customers are guest users instead of member users. 3)init_nickname This parameter is very important for customer login. Without it, customer will use a default name just like "guest_xx",and it will make staff or admin a headache. 4)init_room We now use the conception "department" instead of "room" in 123livehelp.But in order to be compatible with the old version, init_room is still used and it means initial department in fact. 5)init_key This is for swf identification. In order to identify that whether the swf is a legal file, it needs to send the key to server when beginning to connect to 123livehelp server. 6)init_root This is the root path to 123livehelp client. We can load or call the 123livehlp files which includes swf, xml,language and other files through this path. 7)init_url This is the URL which customer is visiting. And this parameter will be sent to staff as one user information item in the user info panel. 8)init_question Customer can send a question to staff before logging in 123livhelp for asking help. 9)init_logo This is the file name of logo in client.swf. If you set this parameter, the logo file which maybe a jpg or a swf must be already placed in the 123livehelp root directory. 10)init_group This is the group name. In a 123livehelp host or server, there are several groups, and with some clients in each group. Any client who needs to get service from 123livehelp server should join in a group or the server may refuse its connection. The default value for this parameter is "default" which can also be set in config.xml. 11)init_host & 12)init_port These two parameters can let swf connects to server through the host address and the port specified by these two ones. 64 123LiveHelp v4.1 User Manual 13)init_secondaryHost & 14)init_secondaryPort These two ones are used after the first connection by init_host and init_port is failed. 15)init_lang This is used for configuring 123livehelp language. There are only two kinds of language now, "en" for English, "zh‐CN" for simplified Chinese. More language will be realized later. 16) init_color There are five kinds of color for user selecting: red, green, blue, violet, black, and the default one is blue. 17)init_dc when staff invites a webpage visitor, it will send parameter "init_dc = 1" to client.swf, and staff will receive the "dc" attribute which just display a star in front of username in the user list. With init_dc, parameter "init_room" will not work for auto‐entering department any more. In another word, init_dc can disable the function of auto‐entering department. Without it, init_room will still work for auto‐entering department in deed. 18)init_staff This parameter will be passed from dc to clien.swf then to server with attribute "staff", so server can only send this invited customer to the appointed staff. Parameter Description init_host To initialize the server’s host name(IP address or DNS name) init_port To initialize the server’s port. init_user To initialize the user’s name. init_password To initialize the user’s password. init_url To initialize the login URL of the client. The staff side will know the user open the client in which URL. init_video To enable or disable the video of the client Value: True/false 9.2 Server Configuration By default, all configurations for the chat server are controlled by two files: lhserver.xml, which is located at: <123livehelp installed directory> /etc/lhserver.xml default.xml, which is located at: <123livehelp installed directory> /etc/group/default.xml Windows users can also access both files from start menu. lhserver.xml 65 123LiveHelp v4.1 User Manual How to edit it? In Windows, you may open lhserver.xml in notepad to edit it. If you now open it with IE browser, you may check source code by right‐click to edit it directly. In UNIX, you may use VI editor to edit lhserver.xml. After modifying this configuration file, please open it in a browser to test. If syntax error messages pop up, please configure it again before launching the chat room. After modifying this file, you have to restart the chat server to make it effective. There are three parts of configurations in lhserver.xml, <Connection> Configuration <Global> Configuration <Mail‐stmp‐server> Configuration 1) Connection Configuration Two servers In the Connection Section, you can set two servers and listen to two ports. In the Connection Section, you can set two servers and listen to two ports. primary‐server secondary‐server There are four reasons as to why there is a second server port option. They are listed below: Any version before Flash Player 7 only allows access on a high port (1024‐65535) due to security reasons, while a low port is forbidden. If you are okay with high port you will not need to set secondary‐server. However if you need to set port lower than 1024, you will need a secondary‐server. If the port of your primary‐server is lower than 1024 like 80, then only users with Flash Player 7 or newer versions will be able to access the chat while users with flash player 6 can’t. In this case a secondary‐server will be necessary. The port for the secondary server should be greater than 1024, which will allow users with an earlier version of Flash Player to access chat. If you are going to set a high port for your primary‐server, then usually you will not need a secondary‐server. You will be able to leave the option as default: enable=“off”. Using two servers with two ports is just a temporary solution while some users are still using Flash players earlier than version 7. When Flash player 7 or higher version becomes mainstream, we will take off the secondary‐server for future versions of 123 Flash Chat. To help understanding, please study two tables below: Table1 Parameter
High port (1024-51127)
Low port (<1024)
>=Flash player 7
Primary server
secondary server
66 123LiveHelp v4.1 User Manual Table2 Parameter
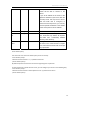
High port (1024-51127)
Low port (<1024)
>=Flash player 7
Primary server
(unnecessary)
To modify the Parameters, please refer to the table below: Parameter Type Default Value Description port Number 8969 The server port must be identical with the port value in config.xml. ip String * Set the Server address. A default “*” means the live help server will bind to all IP addresses of your server. The host value in config.xml can be a random IP address or any domain name which points to this IP address. Either way, clients will be able to connect to the server. If you set IP address of the server to the specific IP address of your server, then the live help server will only bind to this IP. This will mean that in config.xml, to connect the live help server, you can only use this specific IP address or the domain name which points to this IP address. http‐server: To modify the Parameters, please refer to the table below: Parameter
Type
Default Value
port
Number
8988
Description
The server port must be identical with the
port value in client.xml.
ip
String
*
Set the Server address.
A default “*” means the chat server will
bind to all IP addresses of your server.
The host value in config.xml can be a
random IP address or any domain name
67 123LiveHelp v4.1 User Manual which points to this IP address. Either way,
clients will be able to connect to the
server.
If you set IP address of the server to the
specific IP address of your server, then the
live help server will only bind to this IP.
This will mean that in config.xml, to
connect the live help server, you can only
use this specific IP address or the domain
name which points to this IP address.
enable
String
On
documentRo
String
html
ot
Enable or disable the http server
The directory out of which you will serve
your documents. By default, all requests
are taken from <123livehelp installed
directory>/html directory.
maxUPLoad
Size
Number
1024
Setting the max file can be uploaded to
the server, if the value less than or equals
to 0, this means the server will not accept
any upload files.
Cross‐domain‐policy The chat server uses the cross‐domain‐policy to ensure security. <cross‐domain‐policy> <allow‐access‐from domain="*" /></allow‐access‐from> </cross‐domain‐policy> By default it permits access to the connection originating from any domain. To limit access from a specific domain name, you can configure your server in the following way: <cross‐domain‐policy> <allow‐access‐from domain="www.mydomain.com" /></allow‐access‐from> </cross‐domain‐policy> 68