1
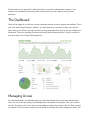
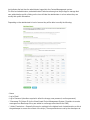
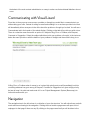
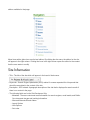
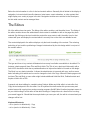
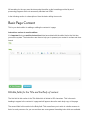
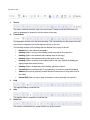
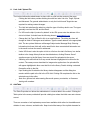
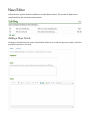
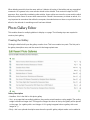
Catalyst Content Management
System 4.x User Guide
Introduction
This user manual is available to provide the basics for the average editor of a site. Some of the editors
that have been built for your site may not be included in this manual, but the information found here
will give you the knowledge to be able to use almost everything we have built for you.
Getting Started
The first thing you will be doing when you want to start making edits to the content of your site is to log
in to the Catalyst CMS. In a similar fashion to many CM systems you can find your login point at a
specific area designated on your domain. This address is always at http://www.yourdomain.com/
admin.
Upon the loading of this page you will be
asked to provide a unique username and
password which we usually set for you
during site development. This username is
always your email address as your email
address is always unique. Some rules to
remember for secure passwords:
1. a password should be at least 8
characters long
2. a password should contain letters,
numbers and characters
3. a password should have both capital
and lowercase letters
The longer and more random a password appears to be the more secure it is. While this is important
for security, we do realize that it can be difficult to remember. We suggest that you make note of your
password and keep a copy of it in a secure place should you need to reference it again. Another way
to create a secure password is to think of something personal and geekify the spelling of it by using
numbers in the place of letters, letters in the place of numbers, or symbols to represent letters or
numbers.
We have done a very good job of making Catalyst a very secure administration system for your
website, but remember that security can be compromised if you don’t help by using a secure
password.
The Dashboard
Once you’ve logged in you will see a screen containing a series of charts, graphs and statistics. This is
your site’s basic Google Analytics statistics. At a quick glance you can see how busy your site has
been, where your visits are coming from and how long people generally stay on your site reading your
information. There isn’t anything to interact with among these charts and stats, it is just a service we
provide as part of the Catalyst CMS experience.
Managing Access
As a site administrator you will likely need to provide others with access to the site’s administrative
tools. You can do this by clicking on the Manage tab in the header of the display. This area contains
two lists. The first is a list of the 10 most recent updates made to the content of the site. Each row has
six columns. The first column contains an icon linking to the editor where that change was made. The
second column indicates the type of content that was changed. The third column shows the title or ID
number of the content that was changed. The fourth column indicates to which site the content
belonged (some web sites have several sub-sites associated to them to allow for multiple
administrators to the content without having to allow the administrators full access to everything in the
overall site). The fifth column shows which administrative user made the last change. And the last
column indicates the date that the modification was made.
The second list is a list of the site administrators. This list has five columns. The first column is an icon
linking to that administrator’s profile. The second column is the administrator’s name, the third is the
username of that administrator (we use the administrator’s email address for two reasons; one it
makes the username unique; and two it gives the admin system a way to send the administrator a new
password if he / she has forgotten). The fourth column indicates if the administrator is active and the
last indicates the last time the administrator logged into the Content Management system.
For Site level administrators, and administrators who have been given the privilege to manage their
own administrative profile, clicking on the icon will take the administrator to a form where they can
modify their profile information.
Depending on the administrator’s level of access they will be able to modify the following:
• Name
• Log in Email
• Log in Password (checkbox required to effect the change, new password, confirm password)
• * Basecamp ID (Unique ID for the Visual Lizard Project Management System. Checkbox to receive
messages from Basecamp if they are added to a message associated to the CMS)
• * Admin Permissions - Generally this area is restricted to the highest level of administration as this is
the gatekeeper to access the content of the site(s). These permissions are set by the developers at
the behest of the main content administrator as a way to make sure that accidental deletions do not
occur.
Communicating with Visual Lizard
From time to time you may come across a problem or thought you would like to communicate to us
while making your edits. Instead of writing an email and sending it to us we have provided a tool that
will immediately inform everyone in the office about the problem or thought you’ve had. You will see a
Communicate tab in the header of the admin display. Clicking on that tab will provide you with a form.
There is a selection menu there with an option of 2 subjects: Bug, Error or Problem, and Request,
Comment or Suggestion. Select the subject which best suits your problem or thought. In the text area
below the menu provide us with the details of your problem or thought and then send it along to us.
A Bug, Error or Problem when it comes to us is given high priority and we will immediately look into
correcting whatever has gone wrong. A Request, Comment or Suggestion isn’t given a high priority,
but we do keep it in mind and make note of it in our Project Management System (Basecamp) for
further discussion with you.
Navigation
The navigation tree in the left column is a reflection of your site structure. You will notice there are both
words and icons showing in the navigation. Clicking the icon beside a page name will open a list of
subpages for that page if there are any. By clicking on the page name itself you will be taken to the
editors available for that page.
Menu items with a globe icon are site level editors. By clicking the site name, the editors for the site
will appear in the right column. Clicking the icons in the right column opens the editor for the content
that the user wants to modify.
Site Information
• Title - The title of the site which will appear in the head of the browser.
• Keywords - Search Engine Optimization (SEO) related. A comma separated list of keywords that
should be associated to the content of the site.
• Description - SEO related. A paragraph description of the site that is displayed in search results if
there is no content in the page.
• The following fields are for the Site Developers Only
• Metadata - These are structured meta information for search engines, social media, and Dublin
Core document storage and tracking information.
• Alias and Alternate Domain Name
• Layout Options
• View Options
• Sort order
Below the site information is a list of site level module editors. Generally this is limited to the display of
navigation, but can include items like banners, latest news, events calendars, or other content that
might display on a variety of pages in the site. Navigation modules are restricted to the Developers,
but site wide content can be managed here.
The Editors
All of the editors have two parts. The listing of the editor modules, and the editor forms. The listing of
the editor modules shows the administrator what content is available to edit on the page they have
selected. By clicking on the icon beside the content the user wants to edit, the editor form for that
content will open and display the content which is currently live on the site in an editable format.
The content displayed in the editors displays only the basic formatting of the content. The colouring
and sizing of text, and the positioning of images is determined by the site design which is not part of
the content editors.
The type and form of any content will determine how many form fields are available to be edited. For
instance a basic page will have Title and Body fields. The Title is just a plain text field usually with a
limit of 255 characters which has a predetermined set of styles associated to it based on the design.
The Body is a very basic text editor. It allows the administrator to type and edit copy, and has some
basic formatting tools which can be used to change the look of the copy. Where the basic page would
just have Title and Body, a news editor might include additional fields like Brief, Publication date and
maybe a field to link a URL.
A general rule about editing for a website using Catalyst. Make any initial edits in a text editor first.
Copy the text and paste it into the editor. Use of keyboard shortcuts makes this process easy and
avoids issues with copying from word processing programs like MS Word. Another important reason to
do your initial writing in a text editor is that while working in Catalyst there is a time limit to how long
you remain logged in. Should that time expire before you save your edit, the edit is not saved and your
changes will be lost.
Keyboard Shortcuts
• ctrl+c (cmd+c for Macintosh) - Copy
• ctrl+v (cmd+v for Macintosh) - Paste
All formatting for the copy must be done using the editor as the formatting provided by word
processing programs does not necessarily translate into HTML.
In the following section is a description of how the basic editing form works.
Basic Page Content
This is your basic editor for adding or editing the content of a page.
Instructions on how to use the editors
It is important that you read the instructions listed associated with the editor blocks the first time
you use the system. The instructions are there to help you to present your content in a clean and clear
format.
Editable fields for the Title and the Body of content.
The first field in this section is the Title field which is limited to 255 characters. This is the main
heading to appear in the content of a page and will appear above the main body copy of the page.
The second field in this section is the Body field. This area allows you to write in a similar manner to
that of a word processor. As you can see there are some general formatting tools which are available
for you to use.
1.
Source
This button switches the editor view to an html format. Familiarity with the HTML and CSS
mark-up languages is essential to use the editors in this way.
2.
Format Menu
All paragraphs must be set to the Normal setting. This automatically puts the proper html code
around your paragraphs so that they appear properly on the site.
The following settings are the settings that are defined in the styles of the site.
◦
Normal (this is the standard paragraph.)
◦
Heading 2 (this is the top level heading usually reserved for the page title.)
◦
Heading 3 (this is the standard main heading style for the copy.)
◦
Heading 4 (this is the standard sub-heading style for the copy.)
◦
Heading 5 (this is a tertiary level heading style for the copy. typically a heading just
slightly larger than plain bold text.)
◦
Heading 6 (this is a quaternary level heading. generally unused.)
◦
Formatted (this is used primarily for programming, not used for general formatting)
◦
Address (this style is generally unused and can be taken care of using other tools in
the editor)
◦
3.
Normal (DIV) (this is a way to wrap an element in a box. generally not required.)
Bold
This applies Bolding to selected text
4.
Italic
This applies Italics or emphasis to selected text
5.
Bullet List
This creates a bulleted list in a similar fashion to a word processor
6.
Number List
This creates a numbered list in a similar fashion to a word processor
7.
Indent
This shifts the paragraph one tab point in (generally unused)
8.
Outdent
This shifts the paragraph one tab point out (generally unused)
9.
Blockquote
This element allows for copy to be set apart from the standard formatting in order to highlight it
as being important. The styling of the blockquote for the public view will have a specific look
based on the site design. In the editors this display is simplified to provide a visual cue of its
difference without affecting the design aspect.
10. Add / Upload Image
The Image Properties tool allows the administrator to place an image into the content of the
page.
◦
Clicking the image button provides a dialog box with four tabs: Image Info, Link,
Upload, and Advanced. For general administrator use only the Image Info tab is
required for making content changes.
◦
Image Info is the only tab that is necessary for uploading images or selecting images
from the site’s image library to display within the content.
◦
Clicking “Browse Server” supplies access to the image library directories and images.
◦
The pop-up window contains a library of images that can include a series of
subdirectories of more images. From this library an image can be chosen to display in
the content.
◦
Also there is the ability to upload images to this library. Images uploaded will be
highlighted in blue when the upload is complete.
◦
Note: As a general rule when naming files avoid spaces, punctuation, or filenames
starting with numbers. Images should be sized to the required dimensions prior to
upload in order to optimize page load times.
11. Link - Add / Upload File
The Link tool allows the administrator to place a link to a file into the content of the page.
◦
Clicking the link button provides a dialog box with four tabs: Link Info, Target, Upload,
and Advanced. For general administrator us only the Link Info and Target tabs are
required for making content changes.
◦
The Link Info tab allows the admin to select the type of link they wish to use. The types
generally used are the URL and the Email.
◦
For URL use the http:// protocol by default. In the URL space enter the address of the
site to be linked. It should have the following format: www.example.com
◦
Change the Link Type to Email to link to an email address. The dialog box form will
change its fields for linking an email address. Type the email address in the appropriate
field. The two optional fields are a Message Subject and a Message Body. Entering
information into these fields will set the email link to have some default information set
in the email to whom the email is addressed.
◦
Under URL there is also the option to link to a file from the site’s file library. In a similar
fashion to the Image Library that was described above, clicking “Browse Server”
supplies access to the file library. Here are stored files uploaded to the server.
◦
Selecting a file will link that file to any words that were highlighted to be linked in the
content. The same process described for images also applies here. An uploaded file
will appear highlighted in blue once that file is in the library. Double clicking a selected
file applies a link to that file.
◦
Upon making the file selection the library window disappears and the dialog box
remains with the path to the file in the URL field. Clicking OK completes the link to the
selected copy in the editor.
◦
Note: As a general rule when naming files avoid spaces, punctuation, or filenames
starting with numbers.
12. Add Table
The Table Properties tool allows the administrator to create a table in the content. Clicking the
Table option in the menu provided will provide a dialog box where the initial rows and columns
are set.
There are a number of self explanatory menu items available which allow for the addition and
deletion of rows, columns, and table cells. Keep in mind that many of the stylistic elements for
tables are set elsewhere so the look of the table in the editors will not match the look to be
seen on the site. The editor display is just there to provide structure, not design.
13. Headrule
This button adds a horizontal line into the copy. This is used as a content separator. Depending
on the individual site this may have different functionality like the separation of content into
columns. That particular functionality will be discussed during a tutorial session specific to your
website.
Once edits have been completed, click the Save Changes button below the editor. This saves the
latest updates live to the site. The Cancel icon will discard any changes made and return to the list
view of the module.
News Editor
A News Archive system allows the addition of multiple News Articles. This module is slightly more
complicated than the standard content module.
Adding a News Article
Clicking on the Add New icon opens a blank News Article form. As with the previous module, follow the
provided instructions in the form.
• Headline - this is the title of the Article. Limit 255 characters.
• Brief - this is a short description of what the article is about. Limit 255 characters. Writers should be
encouraged to write something here as this will help with SEO.
• Body - this is the same type of editor seen under the content section and the same rules apply here.
• Comments - this is an optional feature and is generally used more in a blogging capacity. If this
option is active for the module, there is a checkbox that indicates if the article will have comments
active. If the article is to allow comments, a timeframe for the allowance of comments to be applied
to the article must be set. Generally this should be set to an approximate one month to be sure that
comments are relevant and in context. Once the comment expiry date has passed a note will appear
below the article on the public side of the site indicating that comments are closed. Any comments
that have been applied to an article will appear on the public side. Administrators have the ability to
edit and delete comments. Censorship of comments is sometimes necessary to prevent heated
topics of conversation from becoming personal attacks, or to provide some language restrictions
should the audience of the site include underage viewers.
• Settings - Assign the date of the article. This allows the administrator to determine whether or not to
publish an article immediately, back-date and article, or assign an article to be published on a future
date.
Click the Save Changes button to finish adding a News Article. The Cancel icon will discard any
changes and return to the list view.
Editing an Existing News Article
Clicking the icon beside an article to be edited opens the Edit News form. The form comes pre-filled
with the content of that news article and a list of all of the associated comments. The list of comments
can be edited for content. Any changes made are published live by clicking the Save Changes button.
Deleting a News Article
WARNING: Deleting items is permanent.
When deleting an article from the news archive, it deletes all copies of that article and any associated
comments. As a general rule, news articles should not be deleted. That content is helpful for SEO
purposes. Also, especially considering older articles, these articles are stored in a news archive which
allows the public viewer to access older news articles. Should it be necessary to delete an article, it is
very important to remember that unlike the computer, the website does not have a recycle bin that can
allow for the retrieval of something once it has been deleted.
Photo Gallery Editor
This module allows for multiple galleries to display on a page. The following steps are required to
create a photo gallery.
Creating the Gallery
Clicking the Add link will open the gallery creation form. This form contains two parts. The first part is
the gallery description area, and the second is the image upload area.
Gallery Description
• Headline - this is the title for this photo gallery
• Sort - on a page that has multiple galleries, they can be sorted based on sorting weight. The sorting
weight is based on integer size. The larger the integer the closer to the top the gallery will be placed
on the page. (ie. a gallery with a sort integer of 10 is going to appear before a gallery with a sort
integer of 1)
• Body - this is an optional descriptive area where the specific gallery subject matter can be added in
order to give context to the images that are uploaded in the second part of the form.
Image Uploads
For a gallery to be populated with images, the images are uploaded one at a time. The reasons for
individual uploads over a mass upload of images are twofold. First, each image has other information
associated to it which cannot be managed with a mass upload. Second, standard web functionality
doesn’t easily allow large numbers of files and large file sizes to be uploaded quickly. There are other
programs that are much more efficient at mass file uploads, but they do not work well with the
intended functionality of a photo gallery.
In future versions of this module we may find a way to work around this limitation, but until then this
format works pretty well. The first step is to click on the icon on the right hand side of the intended
working gallery in the list view. This will reveal the list of images belonging to the gallery of images to
be worked in.
• Image Selection - the image to be uploaded is selected from the administrator?s computer via the
Browse button (Choose File on a Mac). The labelling for the image upload will indicate the width an
image will appear in the site. By setting a specific width, the image being uploaded can have a
varying height without being cropped.
NOTE: Depending on the customization for the associated site, the Catalyst photo gallery module
will perform some auto-sizing and cropping to the images when they are uploaded. In order to
achieve this, the images must be larger than the final size that will appear in the gallery. As a general
rule, it is possible to resize smaller without losing image quality. Resizing larger is not possible
without losing quality.
• Caption - each image has a caption field associated to it, allowing for description or image credits
for the photo.
• Sort - as above, the sort field allows for the sorting of images based on sorting integer weight. This
provides the admin with control over which images appear in which order within the gallery should it
be necessary to feature some images over others.
Adding multiple images is not currently an option with the functionality required for a gallery. Because
each image upload also has to create a thumbnail version of the image as well as adding titles and
captions for the images each image must be added individually.
Editing a Photo Gallery
Click on the view icon beside the Gallery title you wish to edit. This opens the Edit Existing gallery
form. This form is similar to the Add Gallery form except that it is pre-filled with the current content for
that gallery. Any changes made are applied by clicking the Save Changes button.
Deleting a Photo Gallery
WARNING: Deleting items is permanent.
Deleting an image from a gallery is as simple as clicking the remove icon for the photo to be removed.
Clicking the Save Changes button will save the gallery with its new settings and removing the
indicated image. It is important to remember that by deleting a whole gallery, all of the images
associated to that gallery are also deleted.
Contact Form Editor
Editing a Contact Form
When a contact module is initially applied to a page it has a default set of contact fields. The editor
allows the administrator to customize these fields. The contact form can pass almost any kind of
information that would be required from a contact form. Editing any part of the form can be done by
clicking on the envelope icon beside the contact name.
The first part of the contact form editor is the recipient(s) of the contact form emails. This allows for
multiple email addresses. To add another recipient, click the Add icon below the list of email
addresses. The default address is always [email protected]. This should be assigned properly
before the site goes live.
The second part of the contact form editor is the information that the form is meant to collect. By
default the form has three pieces of information it will collect. Name, Email Address and Question or
Comment. These fields by default are required in order for the form to be activated on the public side.
Events Editor
The Events Editor allows the addition of multiple Event postings. The following steps must be followed
to successfully post an event to the site.
Adding an Event
Clicking the Add button will open the Add Event form. As with the previous module, follow the provided
instructions in the form.
• Headline - this is the title of the Event. Limit 255 characters.
• Sort - on a page that has multiple events, they can be sorted based on date (which is pre-set
automatically, sorting from the current date first and descending to past dates) with a sorting override
(which is determined by the site administrator allowing for the promotion of events). By using integer
values, a number weight can be assigned to promote the event within the list. The higher the
number, the higher it will appear in a list of events. Sorting is recommended if there are multiple
events on a given day or if a featured event is upcoming. If an event does not need sorting the sort
field should be left in its default state.
• Brief - this is a short description of the particular event. Limit 255 characters. Writers should be
encouraged to write something interesting about the event here as this will help with SEO.
• Body - this is the same type of editor seen under the content section and all of the same rules apply
here once again.
• Date / Time - Multiple dates can be added to an event (day, month, year, time)
Editing an Event
Click on the view icon beside the Event title you wish to edit. This opens the Edit Current Event form.
This form is similar to the Add Event form except that it is pre-filled with the current content for that
event. Any changes made are applied by clicking the Save Changes button.
Deleting an Event
WARNING: Deleting items is permanent.
Deleting an event from a module is as simple as clicking the deleted icon for an event to be removed.
It is important to remember that by deleting the entire event, all the information associated with it will
be deleted.
Contact Visual Lizard
If you are looking for support for your Catalyst Content Management System please use the following
contact information.
Visual Lizard Inc.
102 - 110 Princess St.
Winnipeg, MB, Canada
R3B 1K7
Ph: (204) 957-5520
Fx: (204) 957-5519
Tf: (888) 237-9559
Email: [email protected]