1
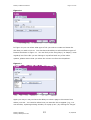
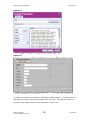
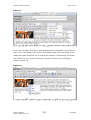
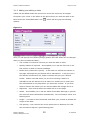
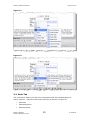
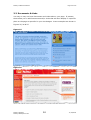
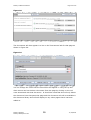
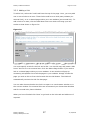
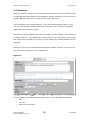
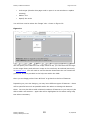
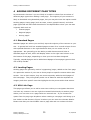
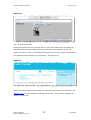
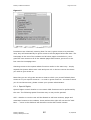
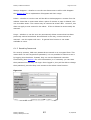
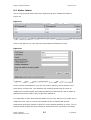
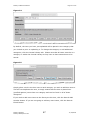
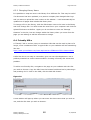
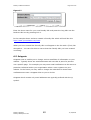
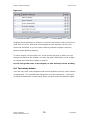
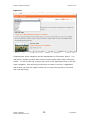
Nemisys CMS User Manual Page 1 of 57 NEMISYS CMS USER MANUAL Version number: 1.0 Author: Nemisys Support Saved: 10/08/2009 15:13 Nemisys Enterprises Ltd PO Box 259 Ware SG12 0US Tel: 0844 706 9665 Email: [email protected] Web site http://www.nemisys.uk.com © Nemisys Enterprises Ltd 2009 Copyright on the whole and every part of this document is owned by Nemisys Enterprises Ltd. No reproduction of the whole or any part of this document is to be made without the authority of Nemisys Enterprises Ltd. Nemisys Support Nemisys Enterprises LTD 1 11/08/2009 Nemisys CMS User Manual Page 2 of 57 1 CONTENTS 1 Contents............................................................................................... 2 2 Introduction .......................................................................................... 4 3 2.1 Page titles...................................................................................... 6 2.2 Page type ...................................................................................... 7 2.3 Order ............................................................................................ 7 editing your content ............................................................................... 8 3.1 Using the editor .............................................................................. 9 3.1.1 Adding and editing text ............................................................. 11 3.1.2 Adding and editing hyperlinks .................................................... 11 3.1.3 Adding and editing anchors........................................................ 14 3.1.4 Adding and editing images within the text ................................... 15 3.1.5 Adding and editing a table ......................................................... 20 3.2 Meta Tab ..................................................................................... 22 3.2.1 Meta title................................................................................. 23 3.2.2 Description .............................................................................. 23 3.2.3 Keywords ................................................................................ 23 Documents & Links ....................................................................... 24 3.3 4 24 3.3.1 Adding a document ................................................................... 25 3.3.2 Adding a link............................................................................ 27 3.4 Features ...................................................................................... 28 3.5 Video........................................................................................... 30 3.6 View Item On Site ......................................................................... 30 Adding different page types .................................................................. 31 4.1 Standard Pages ............................................................................ 31 4.2 Landing Pages .............................................................................. 31 4.3 URL Link Page .............................................................................. 31 Listing Pages ................................................................................ 32 4.4 32 4.4.1 5 Your Homepage................................................................................... 39 5.1 6 News & Events Listings.............................................................. 33 Quicklinks .................................................................................... 39 System Admin..................................................................................... 41 6.1 Admin Users................................................................................. 41 6.1.1 Special Rights .......................................................................... 42 6.1.2 Resetting Passwords ................................................................. 43 6.2 Visitor Admin................................................................................ 44 6.3 Manage Libraries........................................................................... 45 Nemisys Support Nemisys Enterprises LTD 2 11/08/2009 Nemisys CMS User Manual 7 Page 3 of 57 6.3.1 Adding Library Items................................................................. 46 6.3.2 Changing Library Items ............................................................. 48 6.4 Friendly URLs ............................................................................... 48 6.5 Snippets ...................................................................................... 49 6.6 Taxonomy Admin .......................................................................... 50 blogs & Forums ................................................................................... 53 7.1 Forums ........................................................................................ 53 7.1.1 7.2 Managing messages and topics .................................................. 54 Blogs........................................................................................... 56 Nemisys Support Nemisys Enterprises LTD 3 11/08/2009 Nemisys CMS User Manual Page 4 of 57 2 INTRODUCTION Welcome and thank you for choosing Nemisys. We hope that the following guide will help you to get started and get the most out of your new Content Management System (CMS) and website. We aim to make this as straightforward as possible for you to use but if you have any questions that aren’t covered here then please contact [email protected] and a member of our Support team will contact you. The first thing that you will need to do is login to your CMS. The CMS is accessed via ‘www.yourwebsite.com/admin’ which will present you with a login screen similar to the one shown in Figure 1. Figure 1 You will need to enter the email and password given to you by your site administrator. If you are the site administrator and do not yet have a login please contact [email protected]. If you have been given a login but have forgotten your password, use the forgotten password functionality by typing in your email address and clicking where indicated by the red arrow in Figure 1. Once logged in you will see a welcome screen similar to the one shown in Fig 2. It should be noted that you may not have everything that is mentioned as you progress through this manual and some things may work slightly differently to Nemisys Support Nemisys Enterprises LTD 4 11/08/2009 Nemisys CMS User Manual Page 5 of 57 the things discussed here. However, everything is built on the same core platform so you should find that things translate well. Figure 2 You will probably be keen to get straight on and start adding pages so we will go through this first. Please note that in order to add pages to your site you will need to have the ‘Add’ privilege. If you can see the ‘Add child item’ icon highlighted in yellow on Figure 3 then you have this privilege. If you can’t then contact your system administrator to get this added. In order to add a page you will need to click on the ‘Add child item’ icon to the right of ‘Homepage’ as highlighted in yellow in Figure 3. This will add a page to the top level navigation. If you wish to add a page as a sub page of another page elsewhere in the site you will need to click the icon the left of homepage which will expand the menu to show other pages, then click the ‘Add child item’ icon alongside the page you wish to create a sub page of. Figure 3 This will bring up a box as shown in Figure 4 where you can give the new page a title and choose what type of page you want to add. Nemisys Support Nemisys Enterprises LTD 5 11/08/2009 Nemisys CMS User Manual Page 6 of 57 Figure 4 2.1 Page titles First you will need to enter the page title(s). There are two types of title – “Short Title” and “Page Title”. The page title is the title that will appear on the page itself, the short title (if added) will appear in the left hand navigation and breadcrumb trail. An example of a breadcrumb trail is shown highlighted in yellow in Figure 5. Figure 5 This means that you can add a longer page title to the page but create a shorter one for navigational purposes. The page title is compulsory but the short title is only really required if you are using a long page title. If you do not add a short title, the page title will be used in the navigation and breadcrumb trail. Nemisys Support Nemisys Enterprises LTD 6 11/08/2009 Nemisys CMS User Manual Page 7 of 57 2.2 Page type Next you will need to decide which type of page you want to add from the dropdown. The default is likely to be ‘Standard page’ and this page is likely to be the one you use for the majority of your content but it is important that you consider what the content and purpose of the new page will be and from there choose which type of page you want to add. The different types of pages are outlined in more detail in Section 4. For now, let’s assume you are adding a ‘Standard page’ from the dropdown. 2.3 Order Next you can choose a number from the dropdown which will specify in what position the page appears within the left hand navigation. If you want the page you are creating to be the first menu item beneath the homepage then select ‘1’ from the dropdown. When you are happy click the ‘Save’ button and this will create the page and open up the editing screen for you. If you change your mind about creating the page, you can click the ‘Cancel’ button at any time which will take you back to the home screen admin and cancel the creation of the page. You have now created a page and can get started with adding your content. See Section 3 of the spec for more information on using the Editor. Nemisys Support Nemisys Enterprises LTD 7 11/08/2009 Nemisys CMS User Manual Page 8 of 57 3 EDITING YOUR CONTENT Page content is often made up of various elements including body text, documents, links and features. We will now look at how you add these in more detail. Clicking on a page in the left hand navigation will bring up the text editor for that particular page. You will see a screen similar to the one shown in Figure 6: Figure 6 You will see that there are various tabs (these will differ according to what type of page you are on). The ‘General’ tab will usually be where you will be entering the main body of your content, within the ‘editor’ as picked out in Figure 8. You may also have tabs for documents, links, features and other page specific functionality which will have been described in your initial specification if applicable. We deal with the most common tabs later in this section. You will also see the edit history at the bottom of the editor and an update or save button - see Figure 7. Please note that when entering page content it is important to regularly save your work. If you navigate away from the page you are editing without saving, the changes you have made will be lost. Nemisys Support Nemisys Enterprises LTD 8 11/08/2009 Nemisys CMS User Manual Page 9 of 57 Figure 7 3.1 Using the editor Figure 8 The editor icons have hover-over descriptions, and should be self-explanatory, but a brief description of each is given below. It should be noted that not all of the icons listed below are available in all editors. Action Icon What it Does HTML code View or edit document source code (for advanced users). Maximize Maximize the editor size Shows a grid outline of how the HTML tags are placed (for Show blocks Headers Nemisys Support Nemisys Enterprises LTD advanced users) or Apply Headers (Use H2 & H3 normally) 9 11/08/2009 Nemisys CMS User Manual Page 10 of 57 Cut Remove the highlighted text. Copy Copy the highlighted text. Paste the text you copied Paste (Avoid this where possible) Paste Paste as Text **** (Preferred) Paste from MS Word Undo/Redo Undo or redo the most recent action taken. Find Find characters or words within your text Replace Replace characters or words within your text Select all Select all content within the editor Indent Increase or decrease the highlighted text's indentation. Inserts a particular HTML tag commonly used for quotes – Block quote you may find this has no visual effect. Alignment of highlighted text (left, centered, right, Alignment justified). Bold, etc. Superscript or Subscript Bold, italic, underscore or strikethrough highlighted text. or Remove format Superscript or subscript the highlighted text. Remove applied Headers and other formats from selected or text Lists Add numbering or bullets to highlighted text lines. Insert/Edit Create a hyperlink to another page or document within the link site or to an external site. Break link Break links from highlighted text / object Image Flash Nemisys Support Nemisys Enterprises LTD Upload or insert images into the HTML page from the image or repository. Used for inserting flash into your content. Please note this is NOT flash video but things like animations. Typically you 10 11/08/2009 Nemisys CMS User Manual Page 11 of 57 would select the flash file from the document library. Insert table. Number of columns or rows, and table width, Table Line height, borders, & alignment can also be set. or Insert/Edit Anchor Special character Page break Embed HTML Insert horizontal rule Create an anchor point Choose from a list of special characters Inserts a break in the text Allows you to insert object tags, commonly provided by Youtube, Google video or Ipadio. 3.1.1 Adding and editing text To avoid unpredictable formatting issues it is best to ensure that you ALWAYS use the CMS Editor. Just copying and pasting content from Word can lead to multiple text formats and unpredictable layout which can be difficult to correct. While there is an icon to “Paste from MS Word”, it’s best to use the “Paste as Plain Text” icon, and do all of your formatting inside the CMS Editor. 3.1.2 Adding and editing hyperlinks To create a hyperlink, first highlight the content that you wish to form the hyperlink then select the ‘Create hyperlink’ icon. This will bring up a pop up that looks something like one of the examples shown in Figures 9 & 10. Best Practice: Avoid having clickable text of “Click here” or “More” as this does not read well contextually by screen readers. Instead go for “More about Nemisys”. If you can’t avoid this the title attribute can be used to improve the accessibility. Nemisys Support Nemisys Enterprises LTD 11 11/08/2009 Nemisys CMS User Manual Page 12 of 57 Figure 9 Here you can add a title and insert the URL of the place that you wish the link to go to. If the link is an internal link (within your own website) you do not need to include the http://www.mywebsite.com you will just need everything following and including the /. So for example, within the following link: http://www.nemisys.uk.com/portfolio.asp?section=00010001000800010002 you would only need the /portfolio.asp?section=00010001000800010002 part if this was a page within your site. However if you are linking to an external site you will need to include the full URL. You will also need to specify whether you wish the link to open in a new window or in the same window. We recommend opening external links in a new window to avoid people navigating away from your site and internal links in the same window. You can also add a ‘mailto:’ link here. Simply enter the following in the URL field - mailto: [email protected] Depending on your version of the CMS you may also have the option to click through and select a particular page from your site using a dropdown and/or click through to the document library to select a document to link to. If you choose to select a page from the dropdown and see that some of the options are greyed out this means that you cannot select them as your system has not yet been fully configured to display that type of page. However, this is only likely to happen whilst your site is still in development. Nemisys Support Nemisys Enterprises LTD 12 11/08/2009 Nemisys CMS User Manual Page 13 of 57 Figure 10 In Figure 10 you can select what type of link you wish to create and insert the URL that you wish to link to. You also have the ability to select different types of Protocol as shown in Figure 11. You are likely to be using http:// or https:// most regularly but if the URL you are linking to is prefixed with any of the other options, please ensure that you select the correct one from the dropdown. Figure 11 Again you may or may not have the ability to select a page or document from within your site. You can also select how you want the link to appear (e.g. in a new window, replacing existing window, as a pop up etc.) by clicking the ‘Target’ Nemisys Support Nemisys Enterprises LTD 13 11/08/2009 Nemisys CMS User Manual Page 14 of 57 tab and selecting from the dropdown. We recommend that you open external links in a new window and internal links in the same window. Once the details have been filled in, select “Ok” to complete the process. 3.1.3 Adding and editing anchors This feature is useful if you are creating pages with a lot of content and you want people to be able to easily find specific content within that page. So for example, you can have a list of keywords at the beginning of your page that then link down to the relevant information further down the page. There are 2 basic steps to the process: • Create the Anchor point • Create the link to that anchor point 3.1.3.1 Creating the Anchor point Place your cursor within the text at the point that you wish the anchor to link to but DO NOT highlight the text. Next press the ‘Insert Anchor’ ( ) icon. This will bring up a box requiring you to give the anchor a name. Type in a sensible name for the anchor that will make it easily recognisable when you come to link to it. We recommend using a consistent format – alphanumeric characters in a common case (all uppercase or lowercase). For example: testanchor or TESTANCHOR. When you have given it a name select ‘Ok’. 3.1.3.2 Creating the link to the anchor point You create the link to the Anchor point in much the same way as you create a hyperlink as outlined in Section 3.1.2. The only difference being that instead of selecting type ‘URL’ from the options you instead select ‘Link to anchor…’. You will then need to select the name of the Anchor that you created in the previous step and click ‘Ok’. See Figure 12: Nemisys Support Nemisys Enterprises LTD 14 11/08/2009 Nemisys CMS User Manual Page 15 of 57 Figure 12 3.1.4 Adding and editing images within the text You can insert images at any point within the editor up to a maximum size of about 500px in width. It should be noted that this will vary between sites and the presence of right hand column content will reduce the available width within the central text area and will therefore require a smaller width of image. Adding an image that is too wide will corrupt the layout of your page so it is important to ensure your images are correctly sized. To add an image, first ensure that your cursor is placed correctly within the editor where you would like the image to sit. Next select the ‘Insert image’ icon ( or ) which will bring up a screen similar to one of the ones shown in Figure 13 and Figure 14: Nemisys Support Nemisys Enterprises LTD 15 11/08/2009 Nemisys CMS User Manual Page 16 of 57 Figure 13 Figure 14 To select an image from the library click either ‘Select image…’ or ‘Browse Server’ depending on which version of the editor you are using. This will then take you through to the image library screen as shown in Figure 15: Nemisys Support Nemisys Enterprises LTD 16 11/08/2009 Nemisys CMS User Manual Page 17 of 57 Figure 15 If the image you wish to insert is already in the library simply find it and click select. If it isn’t, you will need to add it to the library (more details on this are available in Section 6.3). Once you have selected your image you will be taken back to the screen shown in Figure 16 where you will see a preview of the image and can add alt text and select alignment options. Figure 16 Nemisys Support Nemisys Enterprises LTD 17 11/08/2009 Nemisys CMS User Manual Page 18 of 57 You will notice that you also have the option to alter other properties of the image here for example the width and height of the image. However, we do not recommend this as an ideal way to resize images as you risk corruption. It is much better when inserting images into the editor to resize them to the correct dimensions externally and upload the correctly sized image to the library. You do not need to add border as usually a default border will have been specified when the site was built and this will be applied automatically to the image. However, if you do not wish this automatic border to be added you will need to specify “0” in the border field. The border is measured in pixels, so if you want to increase the width of the border, insert the relevant width in pixels into this field. You can also specify Hspace and Vspace here. These control how much padding there is between the image and any surrounding content. This space is also measured in pixels and 5 will usually give you a reasonable amount of padding between the image and the text. If your CMS looks like the one in Figure 16 then HSpace and VSpace should be controlled via the Styles dropdown in the editor (see Figure 16) and you should NOT use these parameters. However if you have an older version of the editor this styles functionality is not supported within the editor and you will need to use Hspace and Vspace. Lastly you can select where you want the image to sit on the page using the ‘Align’ dropdown. Once you are happy select ‘Ok’ which will take you back to the page you are editing and show the image inserted. You can then select styles from the dropdown by right clicking on the image or selecting from the dropdown. See Figure 17: Nemisys Support Nemisys Enterprises LTD 18 11/08/2009 Nemisys CMS User Manual Page 19 of 57 Figure 17 If you are not happy with some of the settings that you specified in the previous step, click on the image, then click to ‘Insert/Edit image’ which will bring up the details box again and allow you to change the settings. Alternatively, the editor also makes use of in context ‘right click’ options for these sorts of things as shown in Figure 18. Figure 18 Nemisys Support Nemisys Enterprises LTD 19 11/08/2009 Nemisys CMS User Manual Page 20 of 57 3.1.5 Adding and editing a table Tables can be added within the text area in much the same way as images. First place your cursor in the editor at the point where you wish the table to sit. Next select the ‘Insert/Edit table’ icon ( ) which will bring up the following options: Figure 19 Here you can specify the following things (please note that these can be changed after you have created the table): • The number of rows and columns you wish the table to have • Specify headers if required – this enables you to set the first row or the first column or both to contain headings. • Border size (measured in pixels) - 0 will mean no outlines are shown on the page, although the grid format will be maintained. 1 will give you a thin border around each cell, higher numbers will give you a thicker border. Please note that when you are first inserting a table it is advisable to set the border to be at least 1 to enable you to clearly see the cells defined on the page when you insert the content. If you then wish to remove the border you can edit the table and change this to 0. • Alignment – this controls where the table will sit on the page. • Width – this enables you to set the width of the table although in general the cells will resize themselves automatically. We recommend 100% as a starting point. • Height – it is best to leave this blank and allow your content to dictate the height of the table • Cell spacing – this controls how much space there is between the cells. We recommend 2px as a good starting point. Nemisys Support Nemisys Enterprises LTD 20 11/08/2009 Nemisys CMS User Manual • Page 21 of 57 Cell padding – this controls how much space there is between the contents of the cell and its border. Again we recommend 2px to give your table a reasonable amount of spacing. • Caption – you can add a caption to the table although generally this is not needed. • Summary – you will need to add a summary of the contents of the table. This is for accessibility purposes and this is what screen readers will read out. Once you have entered this information, select ‘Ok’ which will take you back to the page you are editing with the new table inserted as requested. You can then start to input the content in each of the cells. If you need to make changes to the layout of the table you can right click on it to bring up the editing options or select the table and then click to ‘insert/edit table’ as shown in Figure 20. This will allow you to change any of the details previously added including inserting further columns or rows (See Figures 21 & 22), changing borders & padding etc. You can also make changes to the appearance of the cell by right clicking and then selecting Cell / Cell Properties. This will give you colour options etc. Figure 20 Nemisys Support Nemisys Enterprises LTD 21 11/08/2009 Nemisys CMS User Manual Page 22 of 57 Figure 21 Figure 22 3.2 Meta Tab The meta tab is where you can enter information that will used/displayed in search engines. There are three main sections as shown in Figure 23: • Meta title • Meta description • Meta keywords Nemisys Support Nemisys Enterprises LTD 22 11/08/2009 Nemisys CMS User Manual Page 23 of 57 Figure 23 3.2.1 Meta title Your browser title is made up of page title and website title as a default – see Figure 24. Figure 24 However, you can change the browser title using the meta title field. This will then display in your browser in place of the default. For example, if you change the Meta title to read “Welcome to Nemisys”, the browser title will then display this. 3.2.2 Description Here you can enter a summary of the contents of the page. This will display in the search engine listings. 3.2.3 Keywords This is where you can enter a comma separated list of words associated with the content of your page. These used to be very important for getting your content profiled by search engines. However, search engines have become much more advanced now and the need for keywords is no longer as important. Nemisys Support Nemisys Enterprises LTD 23 11/08/2009 Nemisys CMS User Manual Page 24 of 57 3.3 Documents & Links You may or may not have Documents and Links tabs on your page. If present, these allow you to add Documents and/or Links that will then display in a specific place on the page as specified in your site designs. Some examples are shown in Figures 25, 26 & 27: Figure 25 Figure 26 Nemisys Support Nemisys Enterprises LTD 24 11/08/2009 Nemisys CMS User Manual Page 25 of 57 Figure 27 Please note that if you do not have these tabs on your site, you can still add documents and links within the page editor. See Section 3.1.2 for more details. 3.3.1 Adding a document To add a document, select the ‘Documents’ tab and click the button to ‘Select Documents’. This will take you through to the Document Library as shown in Figure 28, which works in a very similar way to the image library. Click on a specific category on the left hand side to display the documents that are currently in the library or search for the specific document you require. If the document you want to use is not in the library see Section 6.3 for how to add items. Tick all the documents that you wish to display on that page, then select ‘Save selections’ as shown in Figure 28: Nemisys Support Nemisys Enterprises LTD 25 11/08/2009 Nemisys CMS User Manual Page 26 of 57 Figure 28 The documents will then appear in a list on the ‘Documents’ tab for that page as shown in Figure 29: Figure 29 You can change the order that the documents will appear in using the up and down arrows and can delete a document from the page by clicking on the red cross associated with that document. It should be noted that this will only delete the document from that particular page and the document will still be available in the document library and will still display on any other pages that it has been added to. Nemisys Support Nemisys Enterprises LTD 26 11/08/2009 Nemisys CMS User Manual Page 27 of 57 3.3.2 Adding a link To add a link, select the ‘Links’ tab from the top of the page. Here, you may add one or more links to an item. These links could be to a third party website (an external link), or to a related page within your own website (an internal link). To add a link to an item, click the Add New Links icon which will bring up a box similar to that shown in Figure 30: Figure 30 You must specify a title for the link and a URL. You should copy and paste a URL here if the link is to an external site. Click the Select Page button if you wish to link to a related page within your own website. A new window will pop up containing a dropdown list of all the pages in your website. Simply choose the page you wish to link to from the list and click the OK button. The CMS will automatically retrieve the URL for that page. You can also choose whether the link is to open in a new browser window or in the current window. For external links we recommend you choose New Window and for internal links, Same Window. When you have finished click ‘Save’ to go back to the links tab and add more if required. Nemisys Support Nemisys Enterprises LTD 27 11/08/2009 Nemisys CMS User Manual Page 28 of 57 3.4 Features Features generally contain an image and a short amount of text and can be used to highlight important things, direct people to specific sections of your site and to create additional interest on a page if it feels too text heavy. Your homepage may include features, if you have Landing Page types on your site, they will almost certainly make use of features and most of our Standard pages also have a feature option. Features are usually added via a tab on the page you are editing – let’s assume it is called ‘Features’. The appearance of features will vary according to the original site designs we provided for you and you will need to pay careful attention to the help text. When you click on the ‘Features’ tab and select to add a new one, a box such as the one shown in Figure 31 will be displayed: Figure 31 In this example you would need to enter some or all of the following details: • Title • Full text • URL link (if required) Nemisys Support Nemisys Enterprises LTD 28 11/08/2009 Nemisys CMS User Manual • Page 29 of 57 Link target (whether this page need to open in a new window or replace existing) • Make it live • Specify the order You will then need to select the ‘Image’ tab – shown in Figure 32: Figure 32 We will specify here what size the image needs to be, you can then click through to the image library and select an image in the usual way as outlined previously in Section 3.1.4. You will need to ensure that the dimensions do not exceed the guidelines we have provided in the help text within the CMS. Once you are happy select ‘Save & Finish’ to go back to the list of features. Depending on your site designs, you may have different types of features – these will be specified as much as possible within the admin to distinguish between them. You may be able to add unlimited numbers of features or you may only be able to add a set amount – again this will be highlighted in the admin using help text where necessary. Nemisys Support Nemisys Enterprises LTD 29 11/08/2009 Nemisys CMS User Manual Page 30 of 57 3.5 Video You may have the option to add video to your site. This can usually be added in one of two ways: • By uploading your video to Youtube and inputting the relevant Youtube ID into the CMS. To do this you will need to create a Youtube account and upload your video clip to Youtube. When you then browse to your video you will find the ID (the “v” parameter) within the URL. For example in the following URL the ID is picked out in red: http://www.youtube.com/watch?v=2JhEFEQycVo&feature=popular • By creating and uploading a Flash Video (FLV) file to the document library within the CMS and then selecting the appropriate file. We can provide documentation on how to create an FLV file – please contact Nemisys Support if you require this. 3.6 View Item On Site The View Item On Site button allows you to preview how the item looks on the website prior to putting it live. When you click this button, a new window will pop up showing you a preview of the page. You may also have the option to view the site in ‘Preview mode’ which enables you to browse content throughout the site that has not yet been made live rather than having to go to each individual page to preview it. If you are in preview mode you will be notified as shown in Figure 33 and you can then easily switch back to viewing the live site if you wish to. Figure 33 Nemisys Support Nemisys Enterprises LTD 30 11/08/2009 Nemisys CMS User Manual Page 31 of 57 4 ADDING DIFFERENT PAGE TYPES As mentioned in Section 2 you are likely to be able to select from a number of different page types when adding a new page. The majority of your content is likely to be added using Standard pages, but you may also have the option to add Landing pages, Listing page (such as news, events, people lists etc) and other page types that will have been described in the Specification when your site was originally built such as: • Contact pages • Regional pages • Survey pages 4.1 Standard Pages Standard pages are where you are likely input the majority of the content on your site. In general we build our standard pages to cater for a central column of text with optional features on the right hand side that you can make use of if appropriate. We generally give the ability to add documents and links to standard pages as well, which will display either in the right hand column or at the bottom of the page, depending on how your site has been designed. Typically, standard pages can be added as subpages of most page types so their use is fairly flexible. 4.2 Landing Pages Landing pages are generally used as ‘signposting’ pages, added as the front page of a particular section of your site to direct people to specific content within that section. Due to their nature, they are most commonly added as child pages of the homepage. They will typically make use of features with the emphasis on imagery and short specific text that highlights the key areas within that section. 4.3 URL Link Page This page type allows you to add a menu item within your navigation that does not have any content in its own right but instead links directly to another page within your own site or to a page within an external site. If you choose this option from the page type dropdown when creating a new page it will bring up a box similar to that shown in Figure 34 where you can enter the relevant details. Please note that you should ONLY enter a page title and not a short title here. Nemisys Support Nemisys Enterprises LTD 31 11/08/2009 Nemisys CMS User Manual Page 32 of 57 Figure 34 4.4 Listing Pages A listing page is a special type of page template whose content comprises a list of associated items. This type of page is commonly used for lists of news, events or job vacancies and photo or video galleries. When selecting this type of page it will commonly be called ‘News listing’ or ‘Events listing’ – it will never be referred to as simply ‘Listing page’. This type of page may have a paragraph of introductory text. To edit this text, simply click on the name of the page in the left hand menu. To edit the list of items associated with this page, click the list icon adjacent to the name of the page in the left hand menu as shown in Figure 35: Figure 35 You will then see a list of items which will typically show the title of the item and, in the case of news or events also the date as shown by the red arrow on Figure 36. Nemisys Support Nemisys Enterprises LTD 32 11/08/2009 Nemisys CMS User Manual Page 33 of 57 Figure 36 To edit an item, click the edit icon next to that item. To add a new item to the list, click the Add Item button. To delete an item, click the delete icon. To help you find items within the admin you can sort the lists. Click the up or down arrows next to the header of the column by which you want to sort the items. For example, to sort the items in descending date order (showing the most recent items first) click the down arrow next to the Date column as demonstrated by the red arrow in Figure 36. 4.4.1 News & Events Listings A news listing is a very common type of page template and will almost certainly be present in your website. When you click the edit icon for a news item a new window will pop up in which you can change any of the details of the item, or add new content. There are a number of tabs at the top of this edit window, typically General, Meta, Image, Documents and Links. 4.4.1.1 General Tab On the General tab (see Figure 37), you can edit the title of the item, the introductory text and full detail text of the item. The introductory text should contain a one or two sentence summary of the item. This text is typically used on the news listing page or on the homepage, if this type of item is featured there. Nemisys Support Nemisys Enterprises LTD 33 11/08/2009 Nemisys CMS User Manual Page 34 of 57 If you do not enter introductory text, the system may automatically generate this text from the full detail text. You will also be able to edit the live status of the item and usually the homepage status (whether or not this item should appear on the homepage of your site). Figure 37 4.4.1.2 Date Fields To select a date, click on the ‘Calendar’ icon to the left of the date field which will bring up the calendar (see Figure 38). In the pop up calendar, click in the space below the date required to select the date and the date will be automatically entered in the form. Nemisys Support Nemisys Enterprises LTD 34 11/08/2009 Nemisys CMS User Manual Page 35 of 57 Figure 38 Click in this space to select the date. Blue shows today’s date and Red denotes the date that is currently selected 4.4.1.3 Date Fields: News The Date fields represent the publish date of the item. Before this date, the item will not appear on the website. In this way you can create a news item and have it appear on the website at a specific date in the future. 4.4.1.4 Date Fields: Events For events only, there will be a start date and a finish date. Typically, you will also be able to specify a start and end time for the event. For one-day events, you should set the start and finish dates to the same day. You should find that the correct usage of dates for your particular site is outlined in your CMS by the ‘Help text’ in the edit dialogue. Nemisys Support Nemisys Enterprises LTD 35 11/08/2009 Nemisys CMS User Manual Page 36 of 57 4.4.1.5 Image Tab Figure 39 On the image tab, you can specify an image to accompany this item. Clicking on the Select Image button will pop up another window where you can browse the image library. Simply select the image you want to use by selecting the radio button associated with the image and then click the Save Selections button. If the item already has an image associated with it, this image will be displayed below the Select Image button. To remove the image from the item, click the Delete button. Note, this only removes the image from this item - it will remain in the library for use elsewhere on the website. Although your website will typically display the image as a small thumbnail image in listings, and as a larger image on the item detail page, generally you do not need to specify two separate images for an item. The system is capable of resizing a single image for both uses. To avoid corruptions and poor quality ideally images should never be automatically scaled up so the image you select should be at least as large as it will appear on the largest version that is displayed on the site. For example, if your news item detail page displays the associated image at 250px wide, your image should be at least 250px wide. It does not matter if your image is more than 250px wide, as the system can safely scale down the image to the correct size. If however you select an image that is less than 250px, the system will scale the image up to 250px wide and this will cause an undesirable loss of image quality. You should find that the help text in the CMS gives you the guidance you need for uploading correctly sized images. An example of this is show in Figure 40: Nemisys Support Nemisys Enterprises LTD 36 11/08/2009 Nemisys CMS User Manual Page 37 of 57 Figure 40 4.4.1.6 Documents tab On the documents tab you can pick one or more documents from the library to associate with this item. When the item is viewed on the website, a link will enable the user to view or download this document. One such use for this feature is to attach further details to a job vacancy. See Figure 41: Figure 41 Click on the Select Documents button to associate documents with this item. See Section 3.3.1 for more details on adding documents. They will then display as shown in Figure 42: Nemisys Support Nemisys Enterprises LTD 37 11/08/2009 Nemisys CMS User Manual Page 38 of 57 Figure 42 4.4.1.7 Links tab Here, you may add one or more links to an item. See Section 3.3.2 for more details on adding a link. Nemisys Support Nemisys Enterprises LTD 38 11/08/2009 Nemisys CMS User Manual Page 39 of 57 5 YOUR HOMEPAGE Your homepage is an important part of your site, being the page that people are likely to view first. It is therefore important that you make the most of the features that your homepage has available. In some cases the homepage content is generated almost entirely from elsewhere in the site and as such will not require much specific updating. For example you may have featured news and upcoming events that are selected to display on the homepage by a tick-box in the listing admin (See Section 4.4.1 for more information on this). However, a lot of sites will have feature slots specific to the homepage that will need filling. The help text in your CMS should assist you in getting the right content into the right places and your original site designs will also show you how the different features are designed to appear. See Section 3.4 for more information on Features. 5.1 Quicklinks These are added in the usual way and comprise of a Title, URL link and the choice to display the link in the current window or open it in a new window. The majority of sites will have these and they will appear in the dropdown on the homepage. Some examples of different types of homepage and how their content is generated are shown in Figures 43 – 45: Figure 43 Nemisys Support Nemisys Enterprises LTD 39 11/08/2009 Nemisys CMS User Manual Page 40 of 57 Figure 44 Figure 45 Nemisys Support Nemisys Enterprises LTD 40 11/08/2009 Nemisys CMS User Manual Page 41 of 57 6 SYSTEM ADMIN The system admin menu provides access to various administrative options for your website. For example, the option to add and configure access rights for CMS users. 6.1 Admin Users This option allows you to add, remove or edit details of the CMS users. To create a new CMS user, click the Add New User icon. Enter the details of the user, remembering to tick the live checkbox if you want the user to be able to access the CMS. Figure 46 On the Access Rights tab, you specify which areas of the website this user will be able to make changes to (referred to as Permissions) – see Figure 47. Nemisys Support Nemisys Enterprises LTD 41 11/08/2009 Nemisys CMS User Manual Page 42 of 57 Figure 47 Permissions are inherited, meaning that if a user is given access to a particular item, they will automatically be given access to all the pages below that item. The homepage is the root of the website and all other pages come below it, so to grant the user access to all of the website pages and content, put a tick in the box next the Homepage item. Granting access to the system admin functions works in the same way - simply expand the System Admin tree node and put a tick in the box next to the items you wish to give access to. Note that you can only grant access to areas to which you yourself already have access to. If you require access to – or need to grant access to - an area to which you do not have access, please contact your system administrator. 6.1.1 Special Rights Special Rights control whether or not certain CMS functions can be performed by the user. The following special functions may or may not be granted: Add – whether or not the user will be allowed to add new sections, pages and associated content to the website. Users without this right will not see the “Add New ...” icons in the CMS and will therefore not be able to add content. Nemisys Support Nemisys Enterprises LTD 42 11/08/2009 Nemisys CMS User Manual Page 43 of 57 Manage Snippets – whether or not the user has access to add or edit Snippets. See Section 6.5 for an explanation of Snippets and their usage. Delete – whether or not the user will be able to delete pages or content from the website. Note that in most cases when a piece of content or page is deleted, this is a reversible action. The content may be restored at a later date. However, this does not apply to text entered in the editor. If this is deleted it cannot easily be restored. Purge – whether or not the user can permanently delete content that has been previously marked as deleted. Once deleted in this way, content cannot be restored - use this option with care. In general this function is not made available to users. 6.1.2 Resetting Passwords For security reasons, CMS user passwords are stored in an encrypted form. This means that if a user forgets their password, it is not possible for others to see it by logging into the admin. Instead, they can use the Password reminder functionality (See Section 2 for more information) or if necessary you can reset their password so that they can login. Once logged in, they will be able to change their password, provided they have access to the Admin Users function. Figure 48 Nemisys Support Nemisys Enterprises LTD 43 11/08/2009 Nemisys CMS User Manual Page 44 of 57 6.2 Visitor Admin This is a list of all the users who have registered at your website as shown in Figure 49. Figure 49 Click on the edit icon to view all of the information held about a visitor. Figure 50 Under normal circumstances, you will not need to edit any of the details in the form shown in Figure 50. Your website will usually provide tools for users to update their contact details and mailing preferences themselves, and to obtain a password reminder email if they forget their password. It is important to note that fields will differ and you may have a very simple set of details for each user or a much more advanced set of details that include preferences and other options to allow for more detailed profiling of users. This is because some people use their website to collect and store very basic user data, Nemisys Support Nemisys Enterprises LTD 44 11/08/2009 Nemisys CMS User Manual Page 45 of 57 whilst others will be using their site as a much more detailed member management system. 6.3 Manage Libraries The CMS provides you with two libraries – an image library and a document/file library. A library is a collection of items which can be re-used in different places on the website. For example, a standard job application form in PDF format would be stored in the library and associated with each item in a list of job vacancies, thus allowing you to create multiple links to it but only have to edit the document in one place. Figure 51 It is a good idea to add categories to make items easier to find when you want them. To add a new category to a library, click the Add Child icon. Figure 52 Enter the name of category, place a tick in the “Live” checkbox and click “Save”. When you add new items to the library, you will now be able to put them in this category. Nemisys Support Nemisys Enterprises LTD 45 11/08/2009 Nemisys CMS User Manual Page 46 of 57 6.3.1 Adding Library Items To add an item to either the document or image library, click the relevant Manage Library button. A new window will pop up showing the library. Please note that you can also do this at any point when using the library for example when picking a document for a link or an image for a feature. Click on the category that you wish to add the new item to. If you have not set up any categories yet, click Central Library link. Figure 53 Click the Add New Item button (this will not be present until you have selected an area of the library to upload to) and locate the file on your computer. Once you have selected the file you wish to upload, enter a name for it and click Upload File. Once the file is uploaded you have the opportunity to add keywords and a description for the item. These details are optional and are primarily used when a user performs a search on your website or searches the library. Nemisys Support Nemisys Enterprises LTD 46 11/08/2009 Nemisys CMS User Manual Page 47 of 57 Figure 54 By default, the item you have just uploaded will be placed in the category that you clicked on prior to uploading it. To change the category or add additional categories, click the Central Library tab. Please note that all items must be in a category or within the Central Library as they have to have somewhere to be stored. Figure 55 Simply place a tick in the box next to each category you wish to add this item to. This will not duplicate the item, it simply means that the item is placed into (profiled against) more than one category and can be found in all of those categories. If you wish to add more items to the library at this time, click the Save & Add Another button. If you are not going to add any more items, click the Save & Finish button. Nemisys Support Nemisys Enterprises LTD 47 11/08/2009 Nemisys CMS User Manual Page 48 of 57 6.3.2 Changing Library Items It is possible to swap an item in the library for a different file. This may be useful if a document has been updated, or a partner company has changed their logo and you want to upload the new version to the website – it will automatically be updated on all pages that include this library item. To change a file in the library, click the Edit button next to the item in the library and click Change File. You then locate the new file on your computer and click the Upload File button as before. Again you do not have to come via “Manage Libraries” to do this, but can change within the library when you come from the page you are editing to add the document or image. 6.4 Friendly URLs A “friendly” URL is a short, easy to remember URL that can be used in place of a longer, more cumbersome URL. A typical URL on your website will look something like this: http://www.yourwebsite.com/news.asp?section=55§ionTitle=Latest+News A URL like this is not easy to remember, give out over the telephone or use in publicity materials or online communication. Creating a friendly URL solves this problem. To add a new friendly URL, navigate to the page on your website with the URL you wish to shorten. Copy the URL from the browser’s address bar by selecting it and pressing Ctrl-C. Now in the CMS, click the Add URL button. Figure 56 A new window will pop up where you can enter the short name that you wish to use, and the URL that you wish to shorten. Nemisys Support Nemisys Enterprises LTD 48 11/08/2009 Nemisys CMS User Manual Page 49 of 57 Figure 57 Enter the short name for your new friendly URL and paste the long URL into the Redirect URL box by pressing Ctrl-V. In the example above we have created a friendly URL which will look like this: http://www.yourwebsite.com/news When you have created the friendly URL it will appear in the list with a (Test) link alongside it. You can click this to ensure that the friendly URL you have created is working. 6.5 Snippets Snippets exist to enable you to change various small bits of information on your website. Typically these are email addresses and text that is part of a process not a specific page. For example you may want email notifications to be sent to a particular individual within your organisation when a user registers on your website. In the future you may wish to change the individual to whom these notifications are sent. Snippets allow to you to do this. Snippets which contain only email addresses are typically prefixed with the @ symbol. Nemisys Support Nemisys Enterprises LTD 49 11/08/2009 Nemisys CMS User Manual Page 50 of 57 Figure 58 Snippets should generally be named in a manner that makes it easy to work out what each one is for. Note that some snippets are for Nemisys use only and should not be edited. If you are unsure what a particular snippet is used for, please contact Nemisys Support. To edit a snippet, click the edit icon. A new window will pop up where you can change the details of the snippet. You may also add a description of the snippet to remind users what this snippet is used for. Do not change the name of the snippet, as this will stop it from working. 6.6 Taxonomy Admin Your site may have some templates that include dropdown lists by which content is categorised. For example News categories or Events Categories – see Figure 59 which demonstrates a news listing which is broken down into different types: Nemisys Support Nemisys Enterprises LTD 50 11/08/2009 Nemisys CMS User Manual Page 51 of 57 Figure 59 If appropriate, these categories will be manageable via ‘Taxonomy Admin’. You may have a number of these lists and if so these will be listed under ‘Taxonomy Admin’. To add or edit one of these lists, click on the appropriate item in the left hand navigation. This will bring up the items currently in the list, if applicable, and provide you with the option to add more or edit existing ones in the usual way. See Figure 60: Nemisys Support Nemisys Enterprises LTD 51 11/08/2009 Nemisys CMS User Manual Page 52 of 57 Figure 60 Nemisys Support Nemisys Enterprises LTD 52 11/08/2009 Nemisys CMS User Manual Page 53 of 57 7 BLOGS & FORUMS Blogs and Forums are useful ways for users of your site to communicate with you and each other. There are different models and the way that they work will differ from site to site but we will outline the basics here. 7.1 Forums Typically forums are created by you as the administrator, with topics and messages being posted to these forums by your site users. Forums can be: • Open access – anyone can view and post messages • Open access but require login to post a message • Closed – require login to view and post To access the list of forums in the admin, find the Forum page in the left hand navigation then click the ‘list’ icon associated with it as highlighted in Figure 61: Figure 61 This will bring up the list of Forums (if any exist currently). To add a new forum select ‘Add forum’ or you can edit an existing forum by clicking the ‘Edit’ icon associated with the relevant forum. Figure 62 When creating or editing a particular forum you will be presented with various options, an example is shown if Figure 63: Nemisys Support Nemisys Enterprises LTD 53 11/08/2009 Nemisys CMS User Manual Page 54 of 57 Figure 63 Title – this is a required field and must be filled in Open date – if you only want the forum to be open for message posts from a certain date insert this date in here. See Section 4.4.1.2 for details on using the calendar. Close date – if you want the forum to no longer be available for message posts after a certain date insert this here. Moderator – please enter the name of a moderator here whom people can contact if they have any issues with the forum. Moderator email – this is where you enter the email address for the moderator. The moderator will be notified each time a post is made. If no email address is added here, this will use the site default email address. Password – if you want to only make the forum available to a select group of users enter a password here – users will be required to enter the password before they can view or post to the forum. Pre-moderated – select ‘yes’ if you want all forum posts to be approved by the moderator before going live. If you are happy for people to post straight to the forum without approval select ‘No’. Live – ensure this is ticked once you are happy to make the forum live. Order – this controls the order that the forums appear in within the list. 7.1.1 Managing messages and topics To manage messages and topics you will need to click on the Forum title which will bring up the list of topics as shown in Figure 64: Nemisys Support Nemisys Enterprises LTD 54 11/08/2009 Nemisys CMS User Manual Page 55 of 57 Figure 64 Here you can view/edit existing topics by clicking the edit icon or add a new topic by clicking the ‘Add Topic’ button. To view the messages associated with each topic you will need to click the topic title which will then bring up a list of messages for you to view/edit as shown in Figure 65: Figure 65 Your progress through the Forum list/topic list/message list is shown by the text and page icons above the ‘Add message’ link in Figure 65 and you can click on these titles to go back to the relevant list. For example clicking on ‘All forums’ will take you back to the forum listing. Nemisys Support Nemisys Enterprises LTD 55 11/08/2009 Nemisys CMS User Manual Page 56 of 57 7.2 Blogs In general blogs are managed mainly from the front end or public facing part of your website. As a site administrator you will probably only be required to set up the blog in the first instance and ensure that the person who will be doing the blogging has the relevant user account. To access the list of blogs or add a new one in the admin, find the Blogs page in the left hand navigation then click the ‘list’ icon associated with it as shown in Figure 66: Figure 66 This will then bring up the list of blogs if any have been created and the option to add a new one – See Figure 67: Figure 67 When editing or creating a blog you will be presented with some or all of the following options: Title – this is a required field Open date – if you only want the blog to be available from a certain date insert this date here. Close date – if you want the blog to no longer be available after a certain date insert this here. Main or intro text – you may have the option to add some introductory text here Allow comments – if ticked allows viewers to comment Allow new entries –if ticked allows new entries to be added via the public facing side of the website Nemisys Support Nemisys Enterprises LTD 56 11/08/2009 Nemisys CMS User Manual Page 57 of 57 Live – ensure this is ticked once you are happy to make the blog live Authors – this is where you add the users who will have access to post to the blog. You may be able to select these from the list of registered site users (if applicable) or simply add a new user using the ‘Add new’ button. Nemisys Support Nemisys Enterprises LTD 57 11/08/2009