1
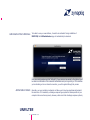
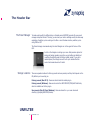
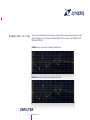
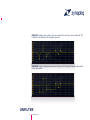
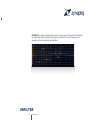
UNFILTER User Manual V1.0.0 Introducing UNFILTER What is UNFILTER? 7 7 System Requirements 8 Mac Requirements 8 Windows Requirements 8 Installation & Authorization Installation Mac 9 9 Installation Windows 10 Authorization Mac & Windows 12 Authorization Details 12 De-Activating a Machine 13 Overview 14 Applications For UNFILTER UNFILTER 2 User Manual v 1.0.0 14 The Parameters 15 General Controls Behavior 15 General GUI Layout 18 The Header Bar 20 The Preset Manager 20 Storage Locations 20 “About” Screen & Update Check 21 The Graphic Display & Editor 22 Overview 22 Display 22 Breakpoint Editor:Overview 23 Breakpoint Editor: Operation 24 Breakpoint Editor: SNAP 25 Breakpoint Editor: Curve Type 26 Notes on INTENSITY BIAS mode 29 UNFILTER 3 User Manual v 1.0.0 Notes on EQ mode 29 Learning Section 30 LEARN 30 RESET 30 DCY 30 AVG 30 NOISE 31 SAVE/LOAD 31 Process Section 32 INTENSITY 32 ƒ RESOLUTION 32 ƒ SMOOTHING 33 WEIGHTING 33 7-BAND EQ 34 Output Section 35 UNFILTER 4 User Manual v 1.0.0 GAIN 35 LIMIT 35 BYPASS 35 LINK 35 High-pass Filter 35 NOISEMON(itor) 35 The Standalone pp 36 Understanding LEARN 37 Overview 37 AVG & DCY 38 Notes on AVG & DCY 39 NOISE 40 Tips on Setting up LEARN 41 FAQ 42 Questions & Answers 42 UNFILTER 5 User Manual v 1.0.0 Authorization Issues Windows 43 CPU Load optimization 46 Getting Support 47 UNFILTER 6 User Manual v 1.0.0 Introducing UNFILTER What is UNFILTER? UNFILTER is a plug-in that can remove filtering effects like resonance, EQ, roll-offs, the effects of comb filtering, or even synthesizer-type resonant filtering. To do this, it uses a process called real-time blind de-convolution to estimate the frequency response of the filter that was applied to your signal. UNFILTER then creates a transfer function that undoes the filtering. You can also apply the estimated transfer function to a different signal, and save it to or import it from an impulse response file. Additionally, UNFILTER doubles up as mastering grade adaptive, free-form and graphic EQ, and features a brick-wall limiter to allow for unsupervised batch processing. Our original intent was to create a tool for removing the peaks and notches introduced by resonance and comb filtering, especially in dialog and location recordings, but it became way more than that. UNFILTER’s intelligent detection of frequency response anomalies makes it a virtually automatic corrective EQ, saving hours and hours of manually identifying and removing trouble peaks & notches. In most cases, you literally adjust one control and you’re good to go. The free-form curve editor, in combination with the very high resolution filter engine, makes it a highly efficient and great sounding general purpose “clean” EQ. The fact that it can extract an inherent impulse response makes it a great tool for sound design, engineering, research, and more. We think that what we’ve actually created is the single most flexible and efficient tool for working with frequency response, and believe you will find many uses for it and save hours upon hours of your precious time. We sincerely hope you will enjoy using UNFILTER. Yours, Stephan M. Bernsee & Denis H. Gökdag zynaptiq headquarters - Hannover, Germany, May 2013 UNFILTER 7 User Manual v 1.0.0 System Requirements Mac Requirements ‣ Intel-based Apple Mac computer ‣ Minimum of 2 CPU cores running at 2.4 gHz or faster ‣ 1 GB of available RAM ‣ Mac OS X 10.6 or newer ‣ 60 MB free Hard-Disk space ‣ Apple AU (AudioUnits), Steinberg VST 2.4 or Avid RTAS/AAX compatible host software ‣ Internet Connection for Activation (though not necessarily on the Computer used for audio) Windows Requirements ‣ Minimum of 2 CPU cores running at 2.4 gHz or faster ‣ 1 GB of available RAM ‣ Microsoft Windows XP SP3, Windows Vista or Windows 7/8 ‣ 60 MB free Hard-Disk space ‣ Steinberg VST 2.4 or Avid RTAS/AAX compatible host software ‣ Internet Connection for Activation (though not necessarily on the Computer used for audio) UNFILTER 8 User Manual v 1.0.0 Installation & Authorization Installation Mac Installing and authorizing UNFILTER on a Mac is very straight-forward. Simply expand the ZIP file you received, navigate to the Mac OS X folder in the resulting directory and mount the contained disk image file (.dmg) by double-clicking it in the Finder. Then launch the installer contained on the resulting, auto-mounted volume. Follow the on-screen instructions to install. The installer will install the following files to the following locations: 1) AudioUnits mono/stereo and 8ch plug-ins for both 32- and 64-bit use to <root drive>/ Library/Audio/Plug-ins/Components/ 2) VST mono/stereo and 8ch plug-ins for both 32- and 64-bit use to <root drive>/Library/ Audio/Plug-ins/VST/ 3) RTAS mono/stereo plug-in to /Library/Application Support/Digidesign/Plug-Ins/ 4) AAX mono/stereo plug-in to /Library/application Support/Avid/Audio/Plug-ins 5) Manual, UNFILTER Authorizer app & stand-alone application to /Applications/Zynaptiq PlugIn Support/ During installation you will be prompted to activate your plug-in, so please keep your activation code at hand. Please note that we strongly advise to activate your software at this point, and not from within your host application. UNFILTER 9 User Manual v 1.0.0 Installation Windows Installing and authorizing UNFILTER on a Windows system is very straight-forward. Simply expand the ZIP file you received and navigate to the Windows folder in the resulting directory. Therein, you will find the following individual installers: 1) VST 2.4 mono/stereo and 8ch plug-ins (32bit) 1) VST 2.4 mono/stereo and 8ch plug-ins (64bit) 2) RTAS mono/stereo plug-in 3) AAX mono/stereo plug-in Choose the appropriate installer and launch it. Please note that you need to be logged in as admin level user! The installers create the following files: 1) The VST installer creates the UNFILTER VST plug-in in <Program Files Folder>\Steinberg \VstPlugins. Note: should you keep your VST plug-ins in a different location, you should point the installer to that directory when provided with the option. Note: please do not rename, move or delete the “Data” folders installed next to the plug-ins 2) The RTAS installer creates the UNFILTER RTAS plug-in as well as the UNFILTER RTAS data folder in <Program Files Folder>\Common Files\Digidesign\DAE\Plug-Ins. Note: please do not rename, move or delete the “Data” folder installed next to the plug-in. 3) The AAX installer creates the UNFILTER AAX plug-in in <Program Files Folder>\Common Files\Avid\Audio\Plug-Ins. UNFILTER 10 User Manual v 1.0.0 All Windows installers will install the UNFILTER Authorizer app to <Program Files Folder> \Zynaptiq\UNFILTER\. Windows Vista, Windows 7/8 users: please make sure you activate the plug-in when the activation dialog is opened during install (and NOT from within your host!). UNFILTER 11 User Manual v 1.0.0 Authorization Mac & Windows To be able to use your new software, it needs to be activated. During installation of UNFILTER, the UnfilterAuthorizer app, will automatically be launched. Enter your serial number and click “Activate”. If your machine has access to the internet, you’ll be shown a confirmation of the successful authorization and you’re good to go. If the machine you’re activating on has no internet connection, you will be guided through the process. Authorization Details Generally, our copy protection mechanism will allow you to have two machines authorized at the same time. It is essentially a challenge-response type system that takes specifics of your computer into account anonymously. However, unlike most other challenge-response systems, UNFILTER 12 User Manual v 1.0.0 the Zynaptiq copy protection allows the user to de-activate a system at any time, and reactivate it later - without contacting us. So essentially, you can pretty much move your authorizations around as needed. The only limitation is that in order to de-activate a machine, it needs to be connected to the internet. De-Activating a Machine To free up an activation, you can de-activate a machine. To do this, please launch the UnfilterAuthorizer app, and click “Deactivate Product”. You will be presented with a confirmation message and you’re done. Please note that the machine to be de-activated needs to be connected to the internet! UNFILTER 13 User Manual v 1.0.0 Overview Applications For UNFILTER UNFILTER has a lot of uses, here are some of them: ‣ Applying corrective equalization to sources in a virtually automatic manner. ‣ Removing unwanted resonance, equalization or filtering from a signal. ‣ Mastering-grade equalization of program material. ‣ Removing issues like comb-filtering, resonance and roll-offs from Dialog recordings. ‣ Enhancing intelligibility of speech in forensics and law enforcement. ‣ Matching tonal character of multiple signals. ‣ Creatively shaping the tonal contour of a signal. ‣ Extracting a filter response curve as IR for use in other applications. ‣ Adaptive equalization of time-varying audio, such as streamed music in broadcast. UNFILTER 14 User Manual v 1.0.0 The Parameters General Controls Behavior UNFILTER sports several control types, which have a variety of usability features. We will describe the ones with extra functionality here. “Trackball” Slider This control is a unique Zynaptiq type - it is essentially a vertical fader, that looks like a knob. The benefits of this configuration are that they are simple to control with a mouse like a fader, yet conserve GUI space like a rotary control. Also, the combination of the horizontal marking on the “Trackball” and the circular value display make it very easy to tell the current value of the parameter. - Drag up/down to change the parameter value. - Hold shift while dragging for finer resolution. - When the control has focus, the up/down arrow keys and the mouse scroll-wheel can be used to increment or decrement the value. The control has focus whenever the mouse hovers over it. - CTRL-click or right-click on the control to reset it to default. - Double-click on the control opens a text box for numerical entry of the value. UNFILTER 15 User Manual v 1.0.0 “Standard” Slider This is a straight-forward slider control, which comes in horizontal as well as vertical configurations. Essentially, it follows the same rules as the “Trackball”: - Drag the thumb along the slider axis to adjust the value - Click anywhere in the slider groove to set the value directly - Hold shift while dragging for finer resolution. - When the control has focus, the up/down arrow keys and mouse scroll-wheel can be used to increment or decrement the value. This control type has focus after it was clicked on AND the mouse hovers over it. - CTRL-click or right-click on the control to reset it to default. - Double-click on the control opens a text box for numerical entry of the value. Toggle Switch A latching switch that activates a function or switches between two different functions. CTRLclick resets it to default. UNFILTER 16 User Manual v 1.0.0 Momentary Button A momentary switch that triggers an action, such as a reset/clear. This control type comes in several sizes, but is always essentially a rectangular outline. Pull-down Selector/Menu Opens a menu on click. You can recognize this control type by its “cut off” top right corner. CTRL-click resets this to default value. Checkbox Switch Functionally identical to the Toggle Switch, this switch type is used within the display area. UNFILTER 17 User Manual v 1.0.0 General GUI Layout The UNFILTER user interface is divided into 5 sections: the Header Bar, the Graphic Display & Editor Area and the Learning, Process and Output Sections. Header Bar Graphic Display & Editor Learning Section Output Section Process Section UNFILTER 18 User Manual v 1.0.0 UNFILTER 19 User Manual v 1.0.0 The Header Bar The Preset Manager To make working with the different plug-in formats easier, UNFILTER provides it’s own preset manager and preset format. This way, you can load your custom settings exactly the same way regardless of whether you’re working on the Mac or on a Windows machine, whether you’re using RTAS or VST. The Preset manager is accessed using the small triangle icon in the upper left corner of the GUI: A click on the triangle icon brings up a menu that provides options for saving and loading presets, saving the current setting as default and re-setting the default preset to factory default values. If you edit a recalled preset, the triangle icon will be lit up to indicate that the current and saved values don’t match. Storage Locations There are separate locations for factory presets and user presets, and they both depend on the OS platform you’re working on: Factory presets (Mac OS X): these are stored inside the actual plug-in. Factory presets (Windows): these are stored in the UNFILTER VST/RTAS/AAX Data folder, which is installed next to the plug-in. User presets (Mac OS X and Windows): these are stored to <your user document directory>/Zynaptiq/UNFILTER/Presets/ UNFILTER 20 User Manual v 1.0.0 “About” Screen & Update Check Clicking on the Zynaptiq Logo opens an “About…” screen which displays version information as well as copyright and and legal notices. Also, from within the About screen, you may check for updates manually or toggle automatic weekly update checking. UNFILTER 21 User Manual v 1.0.0 The Graphic Display & Editor Overview Display The Graphic Display & Editor area serves two purposes:it displays various pieces of information and allows creating and editing a breakpoint curve that generates a frequency dependent bias (offset) to the INTENSITY parameter or serves as free-form EQ. The display shows amplitude versus frequency plots for the input (magenta) and output (mint) signals, as well as the estimated transfer curve, a.k.a. the measured filter response (red). Amplitude/frequency ranges that are covered by both input and output plots are displayed in cyan – this makes it easy to see what is being added or removed by the UNFILTER process. You will note that this “analyzer” type display is extremely fast and accurate - on low-pitched sounds you can actually see the individual harmonics! Also shown are a legend as well as the current sample rate. UNFILTER 22 User Manual v 1.0.0 Breakpoint Editor:Overview The Breakpoint Editor allows creating a free-form curve defined by an arbitrary number of nodes, which are connected by line segments with user selected interpolation. The breakpoint curve can be used either as free-form EQ, or to adjust the INTENSITY BIAS parameter, adding or subtracting to the value of INTENSITY frequency dependently. Which of these two modes is active is selected by the left pull down selector underneath the editor: When in INT BIAS mode, the breakpoint curve & nodes are displayed in blue, and the scale on the left of the display is in the range of -1...+1, corresponding to the value range of the INTENSITY parameter. When in EQ mode, the curve and nodes are displayed in yellow, and the scale is switched to the range of -12...+12 dB. The x and y axis values are displayed next to a node when moving it; the node position in Hz for both INT BIAS and EQ modes, the vertical node position as value -1...1 and -12dB...+12dB, respectively. UNFILTER 23 User Manual v 1.0.0 Breakpoint Editor: Operation Operation of the Breakpoint Editor is described here. While there are many rules on how this works, in practice you will find the breakpoint editor workflow to be very intuitive and fast. Adding and removing nodes - Click anywhere in the Editor area to insert a new node - To remove a node, a) CTRL-click or right-click it, b) drag it out of the editor area and let the mouse button go, or c) select it and press delete/backspace. Whether and how the delete/ backspace keys will work depends on how your DAW handles keyboard events when a plug-in window is in focus. - The first and last nodes can not be removed, a CTRL-click or right-click on either of these will reset them to a vertical zero ( = center) position. - Similarly, CTRL-click, right-click and del/backspace will remove multiple selected nodes (see below for selection mechanics). - The INT BIAS CLR button will remove all except the first and last nodes (which are set to 0). Selecting nodes - Click on a node to select it - Shift-click on a selected node to de-select it - Shift-click another node to add it to the selection - Shift-click on a selected node to remove it from the selection - Shift-drag from anywhere in the Editor area draws a selection box that selects nodes or adds them to an existing selection - Of multiple nodes are selected, clicking anywhere in the editor area will clear the selection UNFILTER 24 User Manual v 1.0.0 Moving nodes - Move a node or multiple selected nodes by dragging with the mouse, use the cursor keys on your keyboard or the mouse wheel to move selected nodes. - The first and last nodes can be moved vertically only. - Moving a node past another node horizontally will remove the other node when you release the mouse button. If you drag the first node back without having released the mouse button, the other node will re-appear. The same is true when moving multiple selected nodes. - When moving multiple nodes, the vertical movement stops when one of the nodes reaches the boundaries of the editor, so you can not accidentally drag out of the editor area (which would remove the relevant node). - Also, when moving multiple nodes, horizontal movement is stopped when one of the outer selected nodes reaches the editor’s left or right boundaries. - When the first or last node is selected together with other nodes, the entire group can be moved vertically only. Breakpoint Editor: SNAP When SNAP is on, a node will snap to zero, and if you’re in INTENSITY BIAS mode, also to the inverse of the current INTENSITY value, when moved to within +-14 pixels of the respective vertical value. This makes it easy to set a specific frequency range up to have no BIAS at all and thus be at exactly the current INTENSITY value (SNAP to zero), or to bypass filtering/un-filtering for a specific frequency range altogether by setting a BIAS that results in an INTENSITY value of zero for that range (SNAP to inverse INTENSITY value). In EQ mode SNAP makes it...a snap to set a node to zero. UNFILTER 25 User Manual v 1.0.0 Breakpoint Editor: Curve Type The curve type selector lets you choose the shape of the line segments connecting the nodes of the breakpoint curve. Choices are LINEAR, EASE I/O (ease-in/ease-out), PEAK/DIP, STEP EDGE and STEP MID. LINEAR simply connects the nodes with straight lines: EASE I/O creates a smooth curve between the nodes: UNFILTER 26 User Manual v 1.0.0 PEAK/DIP creates a narrow peak or dip curve referenced around zero, whose width (aka “Q”) is defined by the distance to the neighboring nodes: STEP EDGE creates a stepped shape without transition, with the edge of the step being placed at the node position: UNFILTER 27 User Manual v 1.0.0 STEP MID also creates a stepped shape, but the node is placed in the center of the segment, the edges being halfway between the node and its neighbors (in terms of frequency, not necessarily in terms of graphical representation): UNFILTER 28 User Manual v 1.0.0 Notes on INTENSITY BIAS mode As described earlier, when the editor is set to INTENSITY BIAS mode, the breakpoint curve is added/subtracted to/from the main INTENSITY control’s value, allowing you to adjust the filtering/unfiltering amount frequency dependently. This feature allows for great flexibility in processing – you could, for example, remove resonances in the upper mid range to enhance intelligibility of dialog, exaggerate frequency response anomalies in the low end for increased weight, and leave the low mid range untouched. The BIAS value set with the Breakpoint Curve has a range of -1...+1, and this is added to the current value of the main INTENSITY control, with values outside of the range -1...+1 being clipped. This means that when INTENSITY is in it’s center/neutral position, the Breakpoint Curve covers the entire range of the control. Notes on EQ mode In EQ mode, the breakpoint curve represents a highly flexible free-form EQ. In comparison to classic bell/shelving or graphic equalizers, this type of EQ allows creating arbitrary response curves. Try setting curve type to EASE I/O and raising just the rightmost node slightly – this will result in a very natural and open sounding high shelf with a super-smooth “knee”. Or you could set up a mid boost with different slopes at the top/bottom, and a flat-top in the middle, or one that has super-steep slopes without the cut/boost needing to be super-narrow at the same time. UNFILTER 29 User Manual v 1.0.0 Learning Section LEARN Activates learning. When off, the current transfer function is kept and static. When active, the transfer function estimate is continuously updated. Generally, you should keep this on until the red curve essentially “settles down”, unless you want to apply the current transfer function to another signal or want to apply the same processing to all channels (see LINK). RESET Resets the transfer function estimate to default, so LEARNing will restart from a neutral state. DCY Sets the rate at which the LEARNed transfer function estimation decays, or how long the algorithm “remembers” the peaks identified as filter components (which are defined by the AVG control). At maximum DCY, memory has an infinite duration (nothing is ever “forgotten”), lower values will adapt the transfer function to changes in the signal. In general, set this to max for removing static anomalies like EQ or room resonance from your signal, and lower this value if you need to process time-varying sounds or remove varying anomalies. AVG Adjusts the time constant that is used to determine which signal components are considered to be part of the transfer function. The higher this value, the longer a component must persist to be considered a filter feature. UNFILTER 30 User Manual v 1.0.0 NOISE When on, the LEARN function evaluates only stochastic/noisy signal components to determine the transfer function. Use this when working with signals that consist mainly of harmonic content or when using very short LEARN DCY times. SAVE/LOAD These buttons open a browser window that allows saving the current transfer function estimate as impulse response file (IR), or importing an IR as transfer function. On SAVE you can choose between linear and minimum phase modes. Linear phase mode gives you the option to select “Zero Phase Ordering” (ZPO), which will result in the IR starting with the peak level instead of at zero. Use ZPO when you plan using the resulting IR within an application that explicitly supports this, and leave this option off for use in regular convolution processors. The minimum phase mode allows you to set the filter order in the range 10-1000. Try both extremes to get a feel for how this influences results. The IR output format is WAV/24 bit, and the sample rate is taken from the current session. On LOAD the IR’s transfer function is inverted, and the data is converted to match the session sample rate. The IR will be truncated to UNFILTER’s internal length, so importing a reverb IR will not allow adding or removing reverb! Supported file formats are WAV, AIF(F), 16 or 24 bit. UNFILTER 31 User Manual v 1.0.0 Process Section INTENSITY The INTENSITY parameter controls the amount of unfiltering or filtering applied. The center position is neutral. Positive values result in the detected filter response being removed from the signal, linearizing its frequency response. Negative values will apply the detected filter response, which will exaggerate the filtering when using the same signal, or apply the filter if using a different, ideally already linear(ized) signal. The Breakpoint Editor in the Graphical Editor Area allows adding positive or negative offsets to this value frequency dependently when in INT BIAS mode, so you could for example linearize just a specific frequency range. ƒ RESOLUTION ƒ RESOLUTION adjusts the behavior of the algorithm with regard to the frequency response anomalies to be removed/ applied. Lower values will remove/apply only anomalies such as resonances or EQ, higher values will also affect harmonics or roll-offs. If you want to attenuate resonances without affecting the general frequency response of the signal, use lower values, if you want to remove roll-offs or generally normalize the frequency response, use higher values. UNFILTER 32 User Manual v 1.0.0 ƒ SMOOTHING ƒ SMOOTHING applies a smoothing algorithm to the process, resulting in less narrow-band boosting/attenuation. The transfer function curve in the display reflects this parameter’s effect. If you hear artifacts similar to pre-ringing or narrow band signal components “breaking out”, increase this value. WEIGHTING WEIGHTING applies a Fletcher-Munson curve to the transfer function of the plug-in. This allows for more natural sounding results when un-filtering aggressively. The most pronounced effect is in the low frequency range, so if you’re losing too much low end in the un-filtering process, increase the value of this control. UNFILTER 33 User Manual v 1.0.0 7-BAND EQ The 7-BAND EQ is a mastering-grade graphic EQ intended for broad-stroke equalization after un-filtering. The sliders have a range of -6...+6 dB. The CLR button resets all sliders to +0dB. UNFILTER 34 User Manual v 1.0.0 Output Section GAIN This control adjusts the output gain of the plug-in, the unit is dB. This control is pre-limiter to allow controlling the amount of limiting applied. LIMIT Activates a brick-wall limiter with a fixed threshold at 0dBFS to catch any overs. The limiter is positioned after the output gain control. This is intended for ensuring clip-free batch processing, and will not replace a fully-featured limiter (even though it is a very good sounding limiter as-is.) Bypasses all processing and routes the input signal directly to the output. BYPASS Applies identical processing to all channels. This option is only active when LEARN is OFF. LINK High-pass Filter Adjusts the cutoff frequency of a 96dB/octave shelving highpass filter, in the range of 0 Hz (which switches the filter off) to 200 Hz. This filter is pre-limiter and sounds excellent. NOISEMON(itor) When on, the signal used for the NOISE LEARN mode is routed to the output. The un-filtering is active, so this can be used for creative sound design. UNFILTER 35 User Manual v 1.0.0 The Standalone pp On MacOS X, UNFILTER comes with a simple stand-alone application, the Zynaptiq StandAlone. This application is intended for quickly previewing audio through the plug-in, and is explicitly NOT intended to be an editing application. See it as a free bonus FYC. The application allows playing files through UNFILTER, as well as recording the results to a new file. As the application is not a full-blown host, it uses the Mac system audio preferences including device & sample rate. As any open application including browsers, the finder etc can request to change the system sample rate, this means that in order to make sure your new file has the correct sample rate written, you should follow the following steps: 1) make sure you set the system sample rate to the rate that your source & destination files have/should have, from within the Audio MIDI Setup utility 2) start playback on the source file *before* you start recording UNFILTER 36 User Manual v 1.0.0 Understanding LEARN Overview The LEARN function lies at the heart of UNFILTER, and thus understanding it will help you getting the most out of the plug-in. Well, how does it work? LEARN first creates a distinction between spurious frequencies in your signal (such as noise), and long term stationary components that contribute more to the overall sound of the recording. Once this distinction has been made, the stationary components are evaluated over time to see which components change rather quickly (= most likely part of an instrument or voice) and which components do not. For instance, filtering effects such as room resonances tend to stay stationary or change only slowly with time when compared to the actual frequencies in a musical performance. This distinction in time and frequency allows the UNFILTER algorithm to separate out a frequency response curve that can estimate and successfully remove an undesired filtering effect. Since both the frequency response of the undesired filtering and the actual filtered signal are unknown to the algorithm in advance this process is called "blind deconvolution". UNFILTER 37 User Manual v 1.0.0 AVG & DCY Additional parameters that affect the way LEARN evaluates your signal give you additional control over how this process works. Most importantly, the parameters AVG and DCY, which control how quickly LEARN responds to changes in the signal, and how quickly it "forgets" what it has seen. AVG takes the average over time to detect components in the signal that contribute notably to the overall sound of the signal. Low values for AVG will make the estimated filter response adapt quickly to the signal. However, it will also make the process react to spurious changes that are not actually part of the original signal, such as a click resulting from a cable being unplugged during a live recording, or transients generated by muting the signal abruptly in your DAW. Higher values will make the process slower to adapt but you will also increase the chance that important parts of the signal, especially attack transients will be missed (and omitted from the filtered response). Likewise, DCY determines how quickly LEARN forgets what it has seen in the signal. Lower values are generally very useful if your recording has overall properties that are changing slowly over time, such as a moving sound source (or mic). A setting > 0.99 for DCY will disable the forgetting process entirely, and everything will be remembered by the algorithm. In this case, you need to press the RESET button in order to reset the algorithms' internal state when working with a different signal. For moving sound sources and filtering effects DCY should be set to a value < 0.99, for removal of stationary filtering effects such as channel EQ you should try the highest possible setting. For channel auto-equalization in order to create a good sound for longer recordings, such as mixes and audio streams, try a value around 0.5 for both AVG and DCY. UNFILTER 38 User Manual v 1.0.0 Notes on AVG & DCY While UNFILTER will in most cases simply work great, there are some trade-offs to consider in terms of how to set DCY and AVG times when you run into a signal that is particularly tricky. Note that “tricky” doesn’t relate to how strong the resonance issues are - in fact, the stronger the resonances, the easier they are to detect. It relates to how similar the signal and transfer function are. For example: long AVG times allow considering only components that have been in the signal for a long time, which causes less signal components to be mistaken for resonances. However, with monotonous speech or other signals that do not vary their pitch a lot, long AVG times also show a tendency towards “preferring” resonances near the fundamental frequency of the sound. Lower values allow a more balanced analysis, but may also result in less accurate detection (as more signal is “allowed into the transfer function”). Similarly, long DCY values have the advantage that if your signal isn’t constantly on - if there are pauses, and/or sections with very different signal - you’ll still be able to “keep track” of what resonance candidates were seen. But: should a signal component be identified as resonance mistakenly, it will also remain in the transfer function longer, and if it is “seen” again before it has decayed, it will be retained indefinitely. Using short DCY values on the other hand ensures that only the components that are “longer” than the decay time are retained, while more spurious components will be discarded faster. UNFILTER 39 User Manual v 1.0.0 NOISE Another important parameter in the LEARN process is NOISE. NOISE removes foreground information from the input sounds before processing, and allows the algorithm to only focus on the background information within the signal. To hear what this sounds like with your recording turn on NOISE MONITORING. If this is on, you will hear exactly what the algorithm will hear when NOISE is enabled. Why is this useful? For instance, if you are processing a piano recording, you will generally have a lot of stationary harmonics and large frequency gaps between them, which are devoid of information that the algorithm could use to estimate a smooth frequency response. By removing the foreground, i.e. the harmonics, the algorithm uses only the frequency response derived from the noise that was present in the original signal. Attack transients, background or environmental noise, stochastic components in the signal will all be used to derive the frequency response in this case. Since this process works independently of strong harmonics you can derive a smooth frequency response in these cases as well. Note: As resonances are typically narrow, and depending on the acoustic situation may persist over a longer period of time, some of them will also be ignored when using NOISE. In a nutshell: NOISE mode may help with some signal types, but at the expense of precision under some circumstances. UNFILTER 40 User Manual v 1.0.0 Tips on Setting up LEARN So how to adjust these values in practice? Generally, you’ll be fine inserting the plug-in with the default preset - which has LEARN set to ON and DCY set to infinite – and de-activating LEARN once the transfer function (red line) in the display has “settled down”. From there, adjusting INTENSITY is probably all you’ll need to do. If you’re not satisfied, play with the two parameters to get a feel for how they influence the result. RESET the LEARN first. Try setting both DCY and AVG to 0.5 . Try setting AVG to 0 and DCY to 0.99, as well as the reverse. Activate NOISE and listen to the noise components by switching in the NOISE MONITORING in the OUTPUT section. Repeat the steps pertaining to DCY and AVG while in noise mode. It should become apparent within a minute or so which combination gets you in the right ballpark, you can then fine-tune from there. UNFILTER 41 User Manual v 1.0.0 FAQ Questions & Answers Q: I am hearing ugly drop-outs/ring-modulation/distortion, what is causing that & what can I do? A: Most likely, you are overloading your CPU. UNFILTER is a computationally very “heavyweight” process. The first thing you should try is to set the I/O and/or processing buffers of your host to higher values, ideally 2048 samples or higher. This will significantly decrease the CPU use and in most cases eliminates the artifacts mentioned above. Q: (Mac) Logic Pro shows me a “Sample Rate Mismatch” or similar error when inserting UNFILTER, and sound is distorted or stops altogether. What can i do? A: You are overloading the CPU, but Logic is displaying the wrong error message. Increasing the I/O and process buffer sizes usually cures this issue. If not, see the CPU load optimization section below for some tips on how to get more out of your machine. UNFILTER 42 User Manual v 1.0.0 Authorization Issues Windows Q: I am using Windows and when I try to activate UNFILTER, I am seeing an error message stating there has been an “Unknown Error” and activation fails. What can I do? A: This means that there is something interfering with the activation process. Disable any firewall, security or anti-virus software and try again. If the problem persists you should temporarily disable your internet connection (by pulling the ethernet cable, for example). The Authorizer app will now display a dialog window that gives you several options for off-line activation: Choose “Activate using a different computer that has web access” and click “next”. This will bring up another window. UNFILTER 43 User Manual v 1.0.0 SOME-WEIRD-CODE-IS-HERE Enter the Installation ID into the webform found at the URL displayed, using a different computer to access the web: You will then receive a response code. UNFILTER 44 User Manual v 1.0.0 Enter the response code into the Authorizer app, click “activate”...and your software should now be activated successfully. UNFILTER 45 User Manual v 1.0.0 CPU Load optimization UNFILTER uses a lot of CPU. The mathematics involved are highly complex, so there’s a lot of computation to be done. However, CPU load is affected by a couple of variables. We’ll outline strategies to get the most out of UNFILTER on your CPU here. 1) Use large buffer sizes. UNFILTER needs to look at a certain amount of signal to be able to discern which parts of the signal are the transfer function and which aren’t. If your buffers are set to values that are shorter than that, CPU load increases significantly. UNFILTER internally operates on a buffer size of 2048 samples, so in most host applications, you’ll want to set the buffer size to the highest possible value. We recommend *at least* 1024 samples. 2) In Pro Tools, use multi-mono instances if possible. Pro Tools can compute the channels of a multi-mono instance on separate CPU cores, which distributes the CPU load more evenly and allows larger channel counts than when running a multi-channel instance on just one core. 3) In Logic Pro, all plug-in that are inserted on a bus, output or aux strip that is fed by a live input source - such as a live input or a virtual instrument track set to record enabled - are rendered on one core. This may result in CPU overload messages even while all except one core are idling. Try changing the routing or disabling any record enable switches on virtual instrument tracks. 4) Closing the plug-in GUI saves some CPU cycles, too. UNFILTER 46 User Manual v 1.0.0 Getting Support If you’re having trouble with UNFILTER that isn’t covered in these FAQ, please email us & we’ll get you up and running ASAP. We can be reached via http://www.zynaptiq.com/support-form/ UNFILTER 47 User Manual v 1.0.0 UNFILTER 48 User Manual v 1.0.0