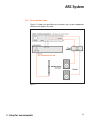
1
The first room correction system in a plug-in Correction Plug-in Measurement Microphone Measurement Software ARC System is powered by User Manual ARC System PLEASE NOTE ARC System™ is a trademark property of IK Multimedia Production Srl. Audyssey™, MultEQ®, Audyssey MultEQ® are trademarks property of Audyssey Laboratories™ Inc. used under license. All other product names and trademarks are property of their respective owners, which are in no way associated or affiliated with IK Multimedia. Use of these names do not imply any cooperation or endorsement. 1 ARC System 2 ARC System Table of Contents I Contents pag. 3 II License Agreement pag. 6 Chapter 1 1.1 1.2 1.3 ARC System Overview Introduction What is ARC System? How does ARC System work? pag. 9 pag. 9 pag. 10 pag. 12 Chapter 2 2.1 2.2 2.3 ARC System components ARC Measurement Microphone ARC Measurement Software ARC Correction Plug-In pag. 15 pag. 15 pag. 15 pag. 16 Chapter 3 3.1 3.1.1 3.2 3.2.1 3.2.2 3.2.3 3.2.4 3.2.5 Setup for measurements What you need to measure your room Audio Interface required features How to setup for measurements Speakers connection Powered Speakers setup Passive Speakers setup Active Subwoofer and Powered Speakers setup How to connect the ARC Measurement Microphone pag. 17 pag. 17 pag. 17 pag. 17 pag. 17 pag. 18 pag. 19 pag. 20 pag. 21 Chapter 4 4.1 4.2 4.3 4.4 4.5 4.5.1 4.5.2 4.6 4.6.1 4.6.2 4.7 Using the ARC Measurement Opening the ARC Measurement Microphone Selection STEP 1 - Welcome to ARC System STEP 2 - Setup your Audio IO STEP 3 - Put the Microphone at Main position and Adjust Levels Microphone orientation Microphone height STEP 4 - Take Measurements Examples of measurement locations in various room types Take Measurements STEP 5 - Calculate and Save your system correction pag. 23 pag. 23 pag. 23 pag. 25 pag. 26 pag. 27 pag. 28 pag. 29 pag. 31 pag. 32 pag. 37 pag. 38 Chapter 5 5.1 5.1.1 5.1.2 5.1.3 5.1.4 5.1.5 5.1.6 5.1.7 5.1.8 Using the ARC Plug-In Opening the ARC Plug-In in your DAW Starting ARC Plug-In (RTAS) in Pro Tools LE Starting ARC Plug-In (TDM) in Pro Tools HD Accel Starting ARC Plug-In in Cubase Starting ARC Plug-In in Logic Pro / Logic Express Starting ARC Plug-In in Digital Performer Starting ARC Plug-In in Live Starting ARC Plug-In in Sonar Starting ARC Plug-In in GarageBand pag. 39 pag. 39 pag. 40 pag. 40 pag. 42 pag. 42 pag. 42 pag. 43 pag. 43 pag. 43 I - Contents 3 ARC System 5.1.9 5.1.10 5.2 5.2.1 5.2.2 5.2.3 5.2.4 5.2.5 5.2.6 5.2.7 5.2.8 5.3 5.4 Starting ARC Plug-In n Nuendo Starting ARC Plug-In in Tracktion ARC Plug-In controls Measurement menu Target Curve menu Full Range Bass Correction Frequency Response Graphs Speaker Icons Peak Meter Correction ON switch and TRIM knob Other controls Using the ARC Plug-In Suggestions for the best ARC System usage pag. 43 pag. 43 pag. 43 pag. 44 pag. 44 pag. 45 pag. 46 pag. 47 pag. 47 pag. 48 pag. 48 pag. 49 pag. 50 Chapter 6 Frequently Asked Questions pag. 51 Chapter 7 Troubleshooting pag. 55 Chapter 8 Support 8.1 User Area pag. 61 pag. 61 4 I - Contents ARC System 5 ARC System License Agreement END-USER LICENSE AGREEMENT FOR IK MULTIMEDIA PRODUCT Please read this document carefully before breaking the seal on the media package. This agreement licenses the enclosed software to you and contains warranty and liability disclaimers. By breaking the seal on the media envelope, you are confirming to have taken notice of terms and conditions of this agreement and you acknowledge your acceptance of the software as well as your acceptance of the terms of this agreement. If you do not wish to do so, do not break the seal. Instead, promptly return the entire package, including the unopened media package, to the dealer from whom you have obtained it, for a full refund. 1) DEFINITIONS “EULA” means this end user license agreement “IK Multimedia Product” means the software program included in the enclosed package, and all related updates supplied by IK Multimedia. “IK Multimedia Product” means the software program and hardware (if any) included in the enclosed package, the related documentation, models, multimedia content (such as animation, sound and graphics) and all related updates supplied by IK Multimedia. “Not for resale (NFR) Version” means a version of IK Multimedia Product, so identified, is intended for review and evaluation purposes, only. 2) LICENSE The “IK Multimedia Product” is protected by copyright laws and international copyright treaties, as well as other intellectual property laws and treaties. The “IK Multimedia Product” is licensed, not sold. This EULA grants you the rights as specified here below. All other actions and means of usage are reserved to the written permission of the right holder IK Multimedia Production Srl: Applications Software. The “IK Multimedia Product” may be used only by you. You may install and use the “IK Multimedia Product”, or any prior version thereof for the same operating system, on up to three (3) computers, provided that (a) each computer is owned by (or leased to) and under the exclusive control of the licensee; (b) the program(s) shall NOT be used simultaneously on more than one machine, and (c) any computer(s) with IK Multimedia software installed shall not be sold, rented, leased, loaned or otherwise be removed from the licensee’s possession without first removing (uninstalling) the licensed software, except as provided in Paragraph 4 (below) pertaining to “Software Transfer”. Storage/Network use. You may also store or install a copy of the “IK Multimedia Product” on a storage device, such as a network server, used only to install or run the “IK Multimedia Product” on your other computers over an internal network; however, you must acquire and dedicate a distinct license for each user of the “IK Multimedia Product” from the storage device. Any given license for the “IK Multimedia Product” may not be shared or used concurrently or otherwise on different computers or by different developers in a given organization. 3) AUTHORIZATION CODE The “IK Multimedia Product” only functions when you are in the possession of an authorization code. You will receive an authorization code upon completing the authorization code request procedure. Once your authorization code is activated, you may use the product. You agree to follow the authorization code request procedure and will provide true, accurate and complete information about yourself. If you provide any information that is untrue, inaccurate, not correct or incomplete, or IK Multimedia has reasonable grounds to suspect that such information is untrue, inaccurate, not correct or incomplete, IK Multimedia has the right to suspend or to revoke the license. The termination of the license shall be without prejudice to any rights, whatsoever, of IK Multimedia. 4) DESCRIPTION OF OTHER RIGHTS AND LIMITATIONS Limitations on Reverse Engineering, Decompilation, and Disassembly. You may not reverse engineer, decompile, or disassemble the “IK Multimedia Product”, except and only to the extent that such activity is expressly permitted by applicable law notwithstanding this limitation of components. The “IK Multimedia Product” is licensed as a single product. Its component parts may not be separated for use on more than one computer. Not for Resale Version. If the “IK Multimedia Product” is labeled “Not for Resale” or “NFR” or “Evaluation Copy”, then, notwithstanding other sections of this EULA, you may not sell, or otherwise transfer the “IK Multimedia Product”. Rental. You may not rent, lease, or lend the “IK Multimedia Product” to any party. Software Transfer. You may not transfer, license or sublicense your rights as Licensee of the software or any IK Multimedia product, as licensed to you under this agreement without prior written consent of the rights owner. The carrier on which the IK Multimedia product has been distributed may be transferred or otherwise made available to any third party only with the prior written consent of the rights owner and provided that (a) the original media 6 II - License Agreement ARC System and license(s) accompany the carrier and (b) the party transferring the media does not retain a copy of the media. 5) UPGRADES If the “IK Multimedia Product” is labeled or otherwise identified by IK Multimedia as an “upgrade”, you must be properly licensed to use a product identified by IK Multimedia as being eligible for the upgrade in order to use the “IK Multimedia Product”. An “IK Multimedia Product” labeled or otherwise identified by IK Multimedia as an upgrade replaces and/or supplements the product that formed the basis for your eligibility for such upgrade. You may use the resulting upgraded product only in accordance with the terms of this EULA. If the “IK Multimedia Product” is an upgrade of a component of a package of software programs that you licensed as a single product, the “IK Multimedia Product” may be used and transferred only as part of that single product package and may not be separated for use on more than one computer. 6) DUAL-MEDIA SOFTWARE You may receive the “IK Multimedia Product” in more than one medium. You may not loan, rent, lease, or otherwise transfer the other medium to another user, except as part of the permanent transfer (as provided above) of the “IK Multimedia Product”. 7) LIMITED WARRANTY IK Multimedia warrants to the original purchaser of the computer software product, for a period of ninety (90) days following the date of original purchase, that under normal use, the software program and the user documentation are free from defects that will materially interfere with the operation of the program as described in the enclosed user documentation. 8) WARRANTY CLAIMS To make a warranty claim under the above limited warranty, please return the product to the point of purchase, accompanied by proof of purchase, your name, your return address and a statement of the defect, or send the CD(s) to us at the below address within ninety (90) days of purchase. Include a copy of the dated purchase receipt, your name, your return address and a statement of the defect. IK Multimedia or its authorized dealer will use reasonable commercial efforts to repair or replace the product and return it to you (postage prepaid) or issue to you a credit equal to the purchase price, at its option. 9) LIMITATIONS ON WARRANTY IK Multimedia warrants only that the program will perform as described in the user documentation. No other advertising, description or representation, whether made by a IK Multimedia dealer, distributor, agent or employee, shall be binding upon IK Multimedia or shall change the terms of this warranty. EXCEPT AS STATED ABOVE, IK MULTIMEDIA MAKES NO OTHER WARRANTY, EXPRESSED OR IMPLIED, REGARDING THIS PRODUCT. IK MULTIMEDIA DISCLAIMS ANY WARRANTY THAT THE SOFTWARE IS FIT FOR A PARTICULAR PURPOSE, AND ANY IMPLIED WARRANTY OF MERCHANTABILITY SHALL BE LIMITED TO A NINETY (90) DAY DURATION OF THIS LIMITED EXPRESS WARRANTY AND IS OTHERWISE EXPRESSLY AND SPECIFICALLY DISCLAIMED. IK MULTIMEDIA SHALL NOT BE LIABLE FOR SPECIAL, INCIDENTAL, CONSEQUENTIAL OR OTHER DAMAGES, EVEN IF IK MULTIMEDIA IS ADVISED OF OR AWARE OF THE POSSIBILITY OF SUCH DAMAGES. THIS MEANS THAT IK MULTIMEDIA PRODUCTION SRL SHALL NOT BE RESPONSIBLE OR LIABLE FOR THE LOSS OF PROFITS OR REVENUES, OR FOR DAMAGES OR COSTS AS A RESULT OF LOSS OF TIME, DATA OR USE OF THE SOFTWARE, OR FROM ANY OTHER CAUSE EXCEPT THE ACTUAL COST OF THE PRODUCT. IN NO EVENT SHALL IK MULTIMEDIA LIABILITY EXCEED THE PURCHASE PRICE OF THIS PRODUCT. 10) CHOICE OF LAW You agree that any and all claims, suits or other disputes arising from your use of the software shall be determined in accordance with the laws of Italy, in the event IK Multimedia, is made a party thereto. You agree to submit to the jurisdiction of the court in Modena, Italy for all actions, whether in contract or in tort, arising from your use or purchase of the software. 11) GENERAL This Agreement contains the complete agreement between the parties with respect to the subject matter hereof, and supersedes all prior or contemporaneous agreements or understandings, whether oral or written. All questions concerning this Agreement shall be directed to: IK Multimedia Production Srl Via dell’Industria 46 41122 Modena Italy © 2007-2009 IK Multimedia. All rights reserved. II - License Agreement 7 ARC System 8 ARC System Chapter 1 ARC System Overview 1.1 Introduction The popularity of Digital Audio Workstation (DAW)-based systems have made them the most used recording and mixing solution for hundreds of thousands of professional, project, and home studios worldwide. While much emphasis is placed on the gear and tools used for composing, mixing, and mastering, one of the most critical factors influencing the quality of a music production is the accuracy of the monitoring system. In fact, the combination of speakers and room acoustics prove to be the weakest link in the music production chain. Near field monitor systems used in studio applications are designed to deliver sound without distortion or coloration. However, when monitors are placed in a room, surrounding walls, ceiling, furniture, and other objects reflect and absorb their sounds, creating complex distortions specific to the room, and causing them to lose the accuracy they have been designed for. In other words, you end up hearing more of the sound of the room than the actual music being produced. The traditional solutions to this problem so far have been acoustic treatments, traditional room correction EQ, or lately, advanced self-calibrated monitor systems. Unfortunately, each of these options has some drawbacks, which may not be the best alternative for today’s DAW-based music production scenarios. Acoustic treatments require a degree of expertise in their set-up that is not commonly available among musicians working in project and home studios. At the same time, it can be extremely expensive for professional studios, especially when a precise sonic target result is required and the room is not optimally shaped. A complete and successful acoustical treatment usually means a hefty price tag for many, making it an option only for a few high-end studios. Traditional room correction EQ and advanced self-calibrated monitor systems are also expensive, and generally are only able to correct the frequency response of a room, but not the phase problems that can be introduced by room acoustics. On the contrary, traditional room correction EQ will alter the phase response by itself, adding this to the already present phase room alterations. All these phase distortions summed up, is one of the reasons that leads many engineers to turn off equalizers on the monitoring setup after briefly trying them. Moreover, traditional correction EQ calibrates the response by only considering one single position in the room (called the “sweet-spot”), usually making the listening experience on other zones of the room even worse. Lastly, all of these systems fail when it comes to easy portability and mobile situations, which is now the growing trend for laptop-based mobile studios and traveling musicians. To offer the definitive solution for DAW-based studios, IK Multimedia has teamed up with Audyssey Laboratories™ Inc., the leading provider of sound equalization solutions, for the production of an innovative, low-cost, and mobile solution to correct the distortion problems caused by room acoustics: ARC System. 1 - Overview 9 ARC System 1.2 What is ARC System? Advanced Room Correction (ARC) System includes 3 components: 1. ARC Measurement Microphone 2. ARC Measurement Software 3. ARC Plug-In The ARC System is a combination of a professional calibrated measurement microphone (figure 1.1), a measuring software (figure 1.2), and a multi-platform plug-in (figure 1.3) that can be integrated with any DAW-based studio, capable of correcting the distortion caused by room acoustics and able to improve how a studio will sound forever. figure 1.2 figure 1.1 10 figure 1.3 1 - Overview ARC System ARC System features Audyssey MultEQ® technology, which measures sound information throughout your listening area, in various zones of the room, and then combines this information to create an accurate equalization solution for the room's acoustical problems. The equalization solution then corrects both time and frequency response problems more effectively and efficiently than any other room correction EQ on the market. ARC System represents one of the most advanced solutions to acoustic problems for any DAW-based studio, dramatically improving the acoustics of home and project studios as well as correcting even the highest acoustically treated high-end studio. The ARC System produces results like you have never heard before, improving the accuracy of your monitoring system. When you experience ARC System, the perspective of what you are recording, mixing, or mastering becomes immediately clear and reliable. The audible results will be: • Low-end alterations (typically added by small rooms) are removed, with better low frequency control. • More consistent frequency response across the entire range. • Tonal balance is restored, allowing you to create accurate mixes. And the following advantages will be achieved: • Room defects will no longer capture your attention, allowing you to focus solely on the music and reducing your ears fatigue. • Work on mixes faster and better, because now you are sure about what you are hearing. • Achieve greater consistency on your music productions. • Create mixes that translate to the outside world without problems. Moreover, if you are a traveling musician, you can conveniently bring ARC System with you and quickly measure/correct any studio or room, so you can produce music in any environment, maximizing your time and fueling your creative power. 1 - Overview 11 ARC System 1.3 How does ARC System work? 1) The first step is to measure your room. To measure your room, just connect the ARC Measurement Microphone to any phantom powered MIC input in your audio interface, and launch ARC Measurement Software (figure 1.4) from your Mac or PC computer. Then, ARC Measurement will guide you through 5 easy steps that will allow you to properly set up the microphone and measure your room. Thanks to Audyssey MultEQ® technology, ARC System not only allows you to measure and correct the sweet-spot (usually, where the mixing engineer is seated), but you can also measure multiple positions in the room, ensuring the most accurate representation of its acoustical problems in the overall space. figure 1.4 In fact, instead of applying a regular standard EQ as all other systems do (that will be “valid” only on the sweet-spot, making all other room areas sound worse than before), the ARC System will analyze all your studio zones, such as your center sweet-spot, producer desk, or client couch. Then, it will provide a correction curve that effectively works on all of the zones, at the same time. Once the measurement sets have been taken, the ARC Measurement Software will save its results as a file that describes the room acoustics and its relative correction. If you have various speakers configurations, just repeat the process, taking multiple measurement sets and saving them in different files. The overall measurement process will take only a few minutes… but the ARC System will give you a timeless solution. 2) The second step is to apply the correction as a plug-in in your preferred DAW. Open your DAW (such as Pro Tools®, Cubase®, Logic®, Sonar®, Live™, Digital Performer™, etc.), and insert ARC Plug-In (figure 1.5) on the Stereo Master BUS, enable the Correction On, and voilà: the alterations introduced by your room acoustics will be corrected. This will allow you to finally trust 12 1 - Overview ARC System the sound of your studio monitors and room. Now, you can easily select the measurement sets already taken from the ARC Plug-In interface. figure 1.5 This particular screen-shot of the ARC Plug-In (figure 1.6) shows how a highly distorted monitoring system is flattened almost perfectly when MultEQ is applied. In Orange is the actual room response, in Green is the flat-response of an ideal speakers/room system, and in White is the corrected room response applied by ARC system. As you can see, the low frequency extension of the speaker is not pushed beyond the physical limits of the speaker, another advantage in comparison to all conventional room correction EQ (“auto” equalizers). figure 1.6 1 - Overview 13 ARC System 14 1 - Overview ARC System Chapter 2 ARC System components 2.1 ARC Measurement Microphone The ARC Measurement Microphone provides an overall higher quality when compared to regular low or mid-priced measurement microphones. Measurement microphones usually exhibit a flat frequency response at the expense of a poor sensitivity and a noise level that is too high for high quality recording. The ARC Measurement Microphone exhibits a flat frequency response, and at the same time, sensitivity, noise level, and max SPL are extremely good. This means, that you will be able to use this mic not only to measure your room, but also to record various acoustic sources. In addition, this microphone is omni-directional. This makes the proximity effect found on studio-used cardioid microphones to disappear, making it sounding very open and natural. This aspect makes it even more useful, considering that on entry-level studios omni-directional microphones are usually not an option. Technical Specifications: • Type: 1/4" precision measurement condenser microphone • Polar pattern: omnidirectional, free field • Capsule frequency response: 20-16,000 Hz • Calibrated frequency response when used with ARC: 16-20,000 Hz, +/- 1.5 dB • Output: transformerless, electronically balanced, 200 ohms output impedance • Sensitivity: 50 mV/Pa • Noise Equivalent Level: 22 dB • Max SPL: 130 dB for 3% THD 2.2 ARC Measurement Software ARC Measurement Software is a standalone application that analyzes your speakers and room system, and automatically calculates the best possible correction intervention (that will be applied later on by the ARC Plug-In). The ARC Measurement Software works by sending test tones to your speakers and at the same time, recording the signal captured in the room by the ARC Measurement Microphone. 2 - Components 15 ARC System 2.3 ARC Correction Plug-In This multi-platform plug-in is the ARC System component that will apply the ARC System correction curve generated by the ARC Measurement Software, to the monitoring system. The ARC Plug-In should be inserted on your DAW Stereo Master BUS, or when possible on the Monitoring BUS. 16 2 - Components ARC System Chapter 3 Setup for measurements 3.1 What you need to measure your room To correctly measure your room you need: • The ARC Measuring Software properly installed. This is included in the ARC System installer and works as a standalone application. • High quality audio interface with at least one Microphone XLR Input with +48V Phantom power. • ARC Measurement Microphone. • Microphone Stand and XLR microphone cable. 3.1.1 Audio Interface required features To correctly measure your room you need a high quality audio interface that can operate at 48 kHz, and can reliably record one channel while playing back two channels (full duplex operation must be supported). The ARC Measurement Software only supports ASIO drivers on Windows, and CoreAudio drivers on Macintosh. Please check that your audio interface supports these standard drivers. IMPORTANT NOTE: considering that the measurement process must be done at 48 kHz, the ARC Measurement Software must set your audio interface sampling rate at 48 kHz. For this reason, please check in your audio interface that the sampling rate is not locked and that 48 kHz is supported and allowed. ARC Measurement will try to set the sampling rate to 48 kHz as soon you select your audio interface. If the audio interface cannot be set at 48 kHz, an alert message will inform you that the room measurements cannot be taken. 3.2 How to setup for measurements To properly measure your room you need to connect the ARC Measurement Microphone to your audio interface, and your audio interface to the speakers. In general, you will already have the speakers properly connected so you do not need to change anything on the speakers connections at all. What is important is having a couple of outputs of your audio interface going to the speakers as directly as possible. 3.2.1 Speakers connection Be sure that your Left (L) and Right (R) speakers are directly connected to a couple of your audio interface outputs. If anything is present between your audio interface and your speakers (like a mixer, a monitor management sys- 3 - Setup for measurements 17 ARC System tem, etc), please check that their settings do not alter the audio signal in any way (e.g., no tone controls, no mono switch or phase reverse, etc). If you use a powered subwoofer that performs bass management, just connect your audio interface outputs to the subwoofer inputs, and your L & R satellites to the proper subwoofer outputs. This way, the system will still be seen as a standard dual channel system (with an increased low frequency extension). 3.2.2 Powered Speakers setup Figure 3.1 shows one possible way to connect your system components when powered speakers are used. figure 3.1 18 3 - Setup for measurements ARC System 3.2.3 Passive Speakers setup Figure 3.2 shows one possible way to connect your system components when passive speakers are used. figure 3.2 3 - Setup for measurements 19 ARC System 3.2.4 Active Subwoofer and Powered Speakers setup Figure 3.3 shows one possible way to connect your system components when an Active Subwoofer is used together with powered speakers. figure 3.3 20 3 - Setup for measurements ARC System 3.2.5 How to connect the ARC Measurement Microphone Please connect the ARC Measurement Microphone to a high quality microphone preamplifier, enabling the +48V phantom power supply. Please check these two options (both are ok): a. The preamplifier is built-in in the audio interface. In this case, the microphone will be directly connected to the XLR input on the audio interface, without using any attenuator pad, and enabling the +48V phantom power. b. The audio interface has no mic preamplifier. In this case, you will need to connect the microphone to an external preamplifier or to a mixer, and connect the preamplifier output to the audio interface line input. To get the necessary precision, the preamplifier should be as clean and flat as possible. For this reason, you should avoid using Tube preamplifiers for this purpose. Also, electronically balanced (transformerless) preamplifiers are preferred for this usage to transformer-based designs, which tends to color the sound too much. To start, set the Gain control on your preamplifier to its middle position. Probably, you will have to adjust this later on while setting up levels. IMPORTANT: TURN DIRECT MONITORING OFF. Any direct monitoring on the audio interface mixer should be turned OFF. To ensure this, simply check that no microphone signal at all is going out to the speakers. 3 - Setup for measurements 21 ARC System 22 3 - Setup for measurements ARC System Chapter 4 Using the ARC Measurement 4.1 Opening the ARC Measurement On Windows, go to your Start Menu \ Programs, and launch ARC Measurement. On Macintosh, go to your Applications folder and launch ARC Measurement. 4.2 Microphone Selection The ARC measurement microphone is available in two slightly different versions. It is important to keep in mind that neither microphone is inherently better or worse: it is simply that due to a small difference in frequency response the software must be told which microphone you are using to ensure the most accurate measurement possible. The microphone selection screen is displayed as soon as the ARC Measurement application is opened (figure 4.1). figure 4.1 4 - Using the ARC Measurement 23 ARC System To determine which microphone type you’re using, simply check the P/N number on the label of your microphone and select the corresponding option on the ARC Measurement application (figure 4.2). This number is located above the XLR connector on your microphone. You can also determine which microphone type you have by looking to see if your microphone has an orange ring around the microphone, located near the XLR connector. figure 4.2 Once you have selected which microphone type you have click NEXT to proceed with the ARC Measurement process. If you have not selected a microphone type, you will not be able to click NEXT to continue. IMPORTANT: if the wrong microphone type is selected, the resulting ARC correction will be incorrect. Please take the time to make sure that you have selected the correct microphone to ensure an accurate measurement! 24 4 - Using the ARC Measurement ARC System 4.3 STEP 1 - Welcome to ARC System After having selected the Microphone Type, ARC will display its welcome screen. Click NEXT to continue (figure 4.3). figure 4.3 Note: after you have completed each step’s instructions, click NEXT. The following step number will be reflected in the top left area as STEP 2 of 5 and the steps indicator will show you the steps already made (1) and the current step (2). 4 - Using the ARC Measurement 25 ARC System 4.4 STEP 2 - Setup your Audio IO Select your audio hardware here, and choose which channels to use for speaker’s outputs and for the microphone input (figure 4.4). figure 4.4 Audio Hardware: click on this menu to select the audio interface you are going to use in the measurement process. ASIO compatible interfaces will be listed on Windows, and CoreAudio compatible interfaces will be listed on Mac OS X. OUTPUT L: click on this menu to select the audio interface output that is connected to the LEFT speaker, for example “Output 1”. OUTPUT R: click on this menu to select the audio interface output that is connected to the RIGHT speaker, for example “Output 2”. Microphone INPUT: click on this menu to select the audio interface input where the ARC Measurement Microphone is connected. (Remember to set the Gain at middle position now, and to turn on +48V phantom power supply). ASIO Panel: this button only appears on Windows, where ASIO drivers are used. IMPORTANT NOTE: considering that the measurement process must be done at 48 kHz, the ARC Measurement Software must set your audio interface sampling rate at 48 kHz. For this reason, please check in your audio interface that the sampling rate is not locked and that 48 kHz is supported and allowed. ARC Measurement will try to set the sampling rate to 48 kHz as soon you select your audio interface. If the audio interface cannot be set at 48 kHz, an alert message will inform you that the room measurements cannot be taken. Click NEXT once the Interface, Outputs, and Microphone Input are properly selected. 26 4 - Using the ARC Measurement ARC System 4.5 STEP 3 - Put the Microphone at Main position and Adjust Levels Step 3 will guide you to how to check levels and properly measure the room (figure 4.5). figure 4.5 The Levels adjustment must be done with the ARC Measuring Microphone positioned at the Main listening position. Therefore, the first thing you need to do is to place the ARC Measurement Microphone at the Main listening position. From now on in this User Manual, we will refer to the “Main position” as the single listening position that refers to the point where you ideally sit when listening to your monitors. On figure 4.6 the number “1” identifies the Main position. figure 4.6 4 - Using the ARC Measurement 27 ARC System The Main position identification is important but not very critical. You can consider the Main position as a point in the middle of the speakers, at a distance from them where you usually sit when working in your mixes. 4.5.1 Microphone orientation The ARC Measurement Microphone must be positioned VERTICALLY for all ARC measurements (figure 4.7). figure 4.7 Do not attempt to measure the room by pointing the microphone to the speakers, because all measurements will be wrong and the resulting correction will be wrong as well. After having securely clipped the microphone on a standard mic stand, be sure to point it to the ceiling. Ideally, the microphone should be perfectly perpendicular to the floor. Try to use a mic stand with a boom arm that is extended as far away from the stand as possible. This helps avoid reflections from the stand that will interfere with the measurements at high frequencies. Do not stand or sit near the microphone while the measurements are running. 28 4 - Using the ARC Measurement ARC System 4.5.2 Microphone height Set the microphone at the same height where your ears usually are when listening to the speakers (figure 4.8). figure 4.8 At this point you should have your ARC Measurement Microphone connected to the audio interface Mic input (+48 V phantom power ON), pointed to the ceiling, and at the correct height. Now place the microphone at the Main position (figure 4.9): figure 4.9 4 - Using the ARC Measurement 29 ARC System Once the microphone is correctly positioned at Main position you can start checking levels. 1. Lower your studio listening volume to ZERO. The studio listening volume can be controlled on your audio interface with the main outputs level control, or with your monitoring management system. If you are using a mixer, you can use your “Control Room” level. 2. Click PLAY TEST (figure 4.10) This will generate a test sound (chirp) and it will be sent to the outputs specified at point 4.4. figure 4.10 3. At this point, SLOWLY increase your studio listening level. You should start hearing the test tone played back continuously. Stop increasing the listening volume at a point where the heard test tone is at a medium intensity, more or less at the level when you work in your studio. CAUTION! DO NOT INCREASE THE LISTENING LEVEL TOO FAST. This could create damage to your speakers and to your hearing if the monitoring system is very powerful. 4. Check the Peak Meter indication on the ARC Measurement Software (figure 4.11). This meter shows the level of the signal captured by the ARC Measurement Microphone. figure 4.11 a. While the Test tone is playing (and leaving the Microphone Level slider in its default position), slowly adjust the MIC GAIN control on your audio interface (or on your microphone preamplifier) to have the Peak Meter indication within the “OK” range. b. In case you have increased the MIC GAIN control on your interface up to the maximum and still see a very low or no signal at all on the Peak Meter, please check that all cabling and connections are ok, and turn Phantom Power On. c. If you need to fine adjust the level shown on Peak Meter, just use the Microphone Level slider on the ARC Measurement Software. d. Always check that your audio interface preamplifier is NOT clipping. If you are not sure about which MIC GAIN control setting is best (in case you have 2 settings that deliver a signal within the OK range) always use the lowest one. You can always trim it by using the ARC Measuring Software Microphone Level slider. 5. Once you found the correct level, click PLAY TEST again to stop the test tones generator. 6. DO NOT CHANGE any of the audio settings (studio listening level, MIC GAIN control, etc) and click NEXT. 30 4 - Using the ARC Measurement ARC System 4.6 STEP 4 - Take Measurements During Step 4, you will be able to take all the necessary measurements to properly analyze the room (figure 4.12). figure 4.12 IMPORTANT NOTE: unlike most other room correction systems, ARC needs from 12 to 32 measurement positions. A minimum of 12 measurement positions is required, and it is not possible to proceed with the measurement wizard until they are properly taken. We STRONGLY suggest to go beyond 12, possibly 16 – 20 measurement positions should be taken. Each measurement should be taken at different points in the room, covering the entire AREA you are planning to sit when listening to your speakers. A single or a few points measurement will never be accurate, and cannot represent the real acoustical problems of the room precisely. Consequently, the ARC System requires at least 12 measurements for two main reasons: 1. ARC System can fix the acoustics of a room from various listening area at the same time. To do that, it needs to measure each listening area. 2. Even if you are planning to listen in a small area, ARC System requires at least 12 measurements to properly describe different listening points, even if they are separated a few inches one from the other. After clicking TAKE MEASUREMENT, this button will change its status to CANCEL. So to stop a running measurement press CANCEL. 4 - Using the ARC Measurement 31 ARC System 4.6.1 Examples of measurement locations in various room types This section will visually describe a number of different audio production rooms with an indication of where the measurement microphone should be placed for each measurement. However, these diagrams should be taken as a guide. The order of each of the 12 required measurements is not enforced. However, it is essential to take the measurements in a symmetrical pattern. Using a clock quadrant as an example, if you take a measurement at 9 o’clock, you need to take another measurement at 3 o’clock, and so on. Now, if you have two listening areas, one chair plus “client couch” like in example 3, the result will be more accurate if you take one measurement set (12 required measurements or more) per listening area. Please check below the following examples: Example 1 Studio, one chair, one main listening position (figure 4.13) figure 4.13 Main position is marked as 1 and it is perfectly centered between the two speakers, at the listening position. This is the position you should use to calibrate levels (see Paragraph 4.5) and for the 1st measurement. All other measurements are symmetrical to an imaginary central line, so 32 4 - Using the ARC Measurement ARC System measurements after the initial one (Main position) are taken alternatively on the Left and Right side. Example 2 Studio, two chairs, wider listening position (figure 4.14) figure 4.14 Main position is marked as 1 and it is perfectly centered between the two speakers, at the listening position. This is the position you should use to calibrate levels and for the 1st measurement. All other measurements are symmetrical to an imaginary central line, so measurements after the initial one (Main position) are taken alternatively on the Left and Right side. The optimized listening area is wider than the one shown in figure 4.13, so the measured points location are distributed in a way that covers the entire listening area. 4 - Using the ARC Measurement 33 ARC System Example 3 Studio, one chair plus “client couch” listening area (figure 4.15) figure 4.15 Main position is marked as 1 and it is perfectly centered between the two speakers, at the listening position. This is the position you should use to calibrate levels and for the 1st measurement. All other measurements are symmetrical to an imaginary central line, so measurements after the initial one (Main position) are taken alternatively on the Left and Right side. The optimized listening area is extended to the client couch as well; placing the microphone as shown on figure 4.15 will create a correction intervention that at the same time optimize the listening at the engineer’s chair and at the client couch. 34 4 - Using the ARC Measurement ARC System In a situation like this, we suggest saving two measurements sets (or corrections), so that one can be done with all 16 measurements at the engineer’s chair, and the other will include the client couch as well. The most suitable correction will be loaded in the ARC Plug-In depending if the client is present and wants to listen from the couch. Example 4 Movie mixing studio/theater (figure 4.16) figure 4.16 Main position is marked as 1 and it is perfectly centered between the two speakers, at the listening position. This is the position you should use to calibrate levels and for the 1st measurement. All other measurements are symmetrical to an imaginary central line, so measurements after the initial one (Main position) are taken alternatively on the Left and Right side. The entire sitting area is covered, and the most “accurate” listening experience will be at main chair, front line. 4 - Using the ARC Measurement 35 ARC System Example 5 Project studio (figure 4.17) figure 4.17 Main position is marked as 1 and it is perfectly centered between the two speakers, at the listening position. This is the position you should use to calibrate levels and for the 1st measurement. All other measurements are symmetrical to an imaginary central line, so measurements after the initial one (Main position) are taken alternatively on the Left and Right side. Only 12 measurements are shown here, but as in all other examples we suggest to take 16-20 measurements at least. Please note that these are just examples. Considering that all rooms are different, you should experiment with various measuring patterns and take several measurement sets, to maximize ARC System capabilities and expand your monitoring options. Then, you can store all measurement sets and recall them later on in the ARC Plug-In, allowing you direct on-the-fly comparisons. It should be noted that the quality of the correction curve is only as good as the accuracy and care taken when doing measurements. Since the measurement process is supposed to be done once, we strongly suggest giving to this process the importance it deserves. See the next paragraph for a step-by-step description on how to take all measurements. 36 4 - Using the ARC Measurement ARC System 4.6.2 Take Measurements figure 4.18 To properly measure the room follow these simple steps. Preparation to the measuring: 1. DO NOT CHANGE ANY OF THE LEVELS THAT HAS BEEN SET AT POINT 4.5. 2. Quiet down the room as much as possible (e.g., if you are using a fan and/or air conditioning, please turn it Off while measuring your room). 3. Be sure that the room doors or windows are set as they will be during your usual listening. For example, don’t close the main door when measuring if this door is never closed while you are working, or vice versa. 4. If you usually work with a few persons attending the sessions, please measure the room in the same conditions (if it is possible). Taking the measurements: figure 4.19 1. Place the ARC Measurement Microphone at Main Position. 2. Click TAKE MEASUREMENT – Do not generate any noise during the measurement process. 3. A measurement Chirp will be played 10 times on the Left speaker and 10 times on the Right per each measurement. 4. Do not walk, talk, or move while the chirps are played or during pauses between the chirps. 5. Do not touch the microphone until the ARC Measurement display says “Move the microphone to the next position then click TAKE MEASUREMENT”, and the arrow has moved to the next measurement number. 6. When a measure has been successfully taken its number is highlighted and the arrow moves to the next one (figure 4.19) This picture shows Measurement #1 successfully taken, and the ARC 4 - Using the ARC Measurement 37 ARC System figure 4.20 Measurement System stands by to acquire Measurement #2. 7. Repeat points 2, 3, 4, 5, 6 for all measurements (figure 4.20) 8. You will not be able to press NEXT until 12 successful measurements are taken. 9. If possible, always take more than the required 12 measurements. We recommend to take from 16 to 20 measurements. 10. Once you are done with the measurements, click NEXT. 4.7 STEP 5 - Calculate and Save your system correction Once all measurements have been taken you will be presented with the screen shown on (figure 4.21) figure 4.21 Measurement name: click on this field and give a name to the recently taken measurement set. You can measure several speaker sets or various listening conditions (see paragraph 4.6.1 - Examples of measurement locations in various room types) giving different names to them. This feature is very useful because you will be able to instantly recall different measurement sets in the ARC Plug-In to match the needed monitoring requirements. Speaker icon: after naming your measurement set (and before pressing the NEXT button), you can choose your preferred speaker icon. This is just a mnemonic help to easily recall and associate your speakers with a particular measurement set, but it does not affect the sound in any way. 38 4 - Using the ARC Measurement ARC System Chapter 5 Using the ARC Plug-In ARC Plug-In (figure 5.1) is a multiplatform audio processor that applies the correction curve calculated by the ARC Measurement Software to the incoming audio stereo signal in real-time. figure 5.1 ARC Plug-In is compatible with TDM, RTAS, VST and AudioUnits plug-in formats, on both (when they apply) Windows XP-Vista and Mac OS X platforms. 5.1 Opening the ARC Plug-In in your DAW ARC Plug-In is a “stereo to stereo” processor that should be inserted on the Stereo Master BUS of your Audio Sequencer or Digital Audio Workstation. The ARC Plug-In should remain inserted and active on the Stereo Master BUS during the entire recording, mixing, and mastering processes. Just before printing the final mixdown to a file or to an external recording device, it should be turned OFF. This is because the ARC Plug-In is used to correct the monitoring/room system response, and it is NOT intended to process the mixdown of your project. A few DAWs support a dedicated Monitoring BUS, where you can insert plug-ins. In those cases, the ARC Plug-In should be inserted on the Monitoring BUS instead of the Stereo Master BUS, considering that the ARC Plug-In will not process the mixdown of your project even if you don’t turn it OFF before printing the mix. Each DAW has its own criteria about how to use Aux tracks, Monitoring Bus, Master tracks/faders, etc. Therefore, the indications about how to start ARC in several host applications are just a starting point, a guideline. For example, if your session already has a Master track, you do not need to create another one, 5 - Using the ARC Plug-in 39 ARC System just insert ARC as the last plug-in. To expand your knowledge, it will probably be a good idea to read your DAW manual, specially the chapters related to outputs, Monitoring bus, Master tracks, routing configurations, etc. 5.1.1 Starting ARC Plug-In (RTAS) in Pro Tools LE Launch Pro Tools® and open your current session. If you do not already have a Stereo Master Fader in use in your session, go to Track/New/Select “stereo” “Master Fader” and click “Create.” Click on the last track insert and select “ARC” from the following path: multi-channel plug-in/Other/ARC. This RTAS plug-in supports all Sample Rates up to 96 kHz and is only available as a “multichannel” plug-in. The ARC RTAS plug-in can be used in Pro Tools HD sessions, however Pro Tools HD adds latency to the whole session when using RTAS plug-ins on the Master Bus. To avoid this added latency we suggest using the TDM ARC plug-in on Pro Tools HD Accel systems. 5.1.2 Starting ARC Plug-In (TDM) in Pro Tools HD Accel Launch Pro Tools® and open your current session. If you do not already have a Stereo Master Fader in use in your session, go to Track/New/Select “stereo” “Master Fader” and click “Create.” 44.1 kHz or 48 kHz sampling rate sessions Click on the last Master Fader insert and select “ARC” from the following path: multichannel TDM plug-in/Other/ARC (stereo) (figure 5.2). figure 5.2 40 5 - Using the ARC Plug-in ARC System ARC TDM multichannel (stereo) plug-in only supports HD Accel systems and up to 48 kHz sampling rates. ARC TDM plug-in will not open on non-HD Accel systems. 88.2 kHz or 96 kHz sampling rate sessions The computing power offered by a single Accel DSP chip is not enough for two channels of ARC correction at these high sampling rates. For this reason when working at 88.2 kHz and 96 kHz the ARC correction plug-in must be used as a “multi-mono” TDM plug-in, this allows Pro Tools HD to share the computing needs on two DSP chips. To use ARC at higher sampling rates, click on the last Master Fader insert and select “ARC” from the following path: multi-mono TDM plug-in/Other/ARC (mono) (figure 5.3). figure 5.3 This way two ARC plug-in instances will open, one for Left and one for Right channel, Pro Tools HD will keep the two instances aligned for you, so any change you apply on one will automatically reflect on the other. ARC TDM multi-mono plug-in only supports HD Accel systems and up to 96 kHz sampling rates, on Stereo Master Faders or Stereo Tracks / Aux. ARC TDM plug-in will not open on non-HD Accel systems. 5 - Using the ARC Plug-in 41 ARC System ARC TDM plug-in authorization Please note that ARC System can be authorized with two different serial numbers. If you bought ARC System TDM you received a serial number printed on the card included in the box, that begins with “ART10-“ prefix. If the product has been authorized with this serial number all plug-in formats will be supported (TDM, RTAS, VST, AU). If you bought ARC System Native (VST, RTAS, AU) it came with a serial number that starts with “ARC10-“. In this case, when trying to instantiate the TDM ARC plug-in you’ll see the authorization wizard appearing, asking for an ARC TDM serial number, that starts with “ART10-“ prefix. Serial numbers starting with “ART10-“ prefix will authorize all plug-in formats (Native and TDM), while serial numbers starting with “ARC10-“ prefix will only authorize Native plug-ins formats (VST, RTAS, AU). Plug-in delay ARC TDM adds zero samples delay by itself. However, Pro Tools HD adds 4 samples when an insert is active, therefore the total delay you will see on Pro Tools HD mixer when inserting this plug-in will be 4 samples. This is the lowest possible delay that you can get from a TDM plug-in, and this low level of latency will allow to apply correction on monitors even during timing critical recording functions. 5.1.3 Starting ARC Plug-In in Cubase Launch Cubase® and open your current project (File/Open). Go to Devices/ Mixer or Mixer 2. In the stereo out channel click the “e” icon and then select ARC as the last insert (from the insert menu). 5.1.4 Starting ARC Plug-In in Logic Pro / Logic Express Launch Logic® and open your current project (File/Open Recent). Then go to Audio/Audio Mixer and insert ARC as the last plug-in in the Out 1-2 track. If you have to create an Audio object, go to Windows/Environment/ New/Audio Object. In the Audio Object’s parameter box, set the Channel parameter to the desired Logic Audio Outputs (e.g., output stereo 1-2). Now, insert ARC Plug-In on the newly created Audio Object. 5.1.5 Starting ARC Plug-In in Digital Performer Launch Digital Performer™ and open your current project (File/Open or Recent Files). Go to Project/Add Track/Master Fader track. Select an active output. Then, click on the last insert and select ARC from the IK Multimedia options. 42 5 - Using the ARC Plug-in ARC System 5.1.6 Starting ARC Plug-In in Live Launch Live™ and open your current Live Set (File/Open Recent Set). In Plug-In devices, drag ARC from the Audio Units or VST plug-in options, and drop it on the stereo Master Track. Remember that ARC should be the last plug-in to be inserted, so organize them accordingly. 5.1.7 Starting ARC Plug-In in Sonar Launch Sonar™ and open your current project (File/Open). On the Master track, right click the FX area and go to Audio FX/vstplugins/ARC. 5.1.8 Starting ARC Plug-In in GarageBand Launch GarageBand® and open your current project. Go to Track/Show Master Track. In the Track Info window choose ARC from the Audio Unit Effects options (included in the “Effects” menu). To open ARC, click on the pencil icon located to right of the “Manual” menu. 5.1.9 Starting ARC Plug-In Nuendo Launch Nuendo® and open your current project (File/Open). Go to Devices/ Mixer or Mixer 2. In the stereo out channel click the “e” icon and then select ARC as the last insert (from the insert menu). 5.1.10 Starting ARC Plug-In in Tracktion Launch Tracktion® and open your current project via the Open Project button. Select an Audio track output as “default audio device”. The default audio output will become the master output for Tracktion’s mixed stereo output from the master fader (located on the right hand corner on the Edit screen). Then, just drag and drop a “new filter” from the top right area to the selected track. When the plug-ins list appears, select “ARC” so its interface will open. Please read 5.2 ARC Plug-In controls to understand how to use ARC Plug-In. 5.2 ARC Plug-In controls Once opened on the Stereo Master BUS, the ARC Plug-In will apply one of the Measurement sets you have saved from the ARC Measurement Software, to match four different Audyssey target curves. You are able to switch from one measurement set to another one on the fly, allowing you to compare your saved options, and match your different needs. It will also show graphical frequency responses for the Left and Right chan- 5 - Using the ARC Plug-in 43 ARC System nels, before and after the correction. The ARC Plug-In alters the Stereo Master BUS level. For this reason, a precision Peak Meter is included to show both Input or Output levels (PRE/POST), so that the actual project Master level can still be kept under control. 5.2.1 Measurement menu Click on this menu (figure 5.4) to select the Measurement set you saved from the ARC Measurement System. figure 5.4 You can save various measurement sets and use them at your convenience (e.g., for several speaker systems, or for various listening situations). 5.2.2 Target Curve menu To cover a wide range of room types, ARC System provides a selection of four Target Curves created by Audyssey. Click on this menu (figure 5.5) to select one of these four Target Curves: figure 5.5 • AUDYSSEY FLAT • AUDYSSEY HF Roll-off 1 • AUDYSSEY FLAT (Mid Comp) • AUDYSSEY HF Roll-off 1 (Mid Comp) Once your measurement is done, listen to material that you’re familiar with, using the ARC Plug-In on your DAW Stereo Master BUS. To start, select the FLAT target curve and listen carefully to the speakers system. AUDYSSEY FLAT: the system will correct the frequency response so that the final response will be very close to flat. However, the system will not extend the low frequency response of the speakers beyond their limits to avoid possible damages and excessive distortion. In fact, the AUDYSSEY Flat curve corrects the response to flat from the low frequency cutoff point that the ARC System has determined, to the upper frequency limit of the tweeters. AUDYSSEY HF Roll-off 1: this should be selected if you feel that FLAT sounds excessively bright in your room. In fact, the AUDYSSEY High Frequency Roll-off 1 curve introduces a slight roll-off at high frequencies that accounts for the balance between direct and reflected sound for small to medium size rooms. Both AUDYSSEY FLAT and AUDYSSEY HF Roll-off 1 target curves are also available with the Midrange Compensation, “Mid Comp”, option. AUDYSSEY MIDRANGE COMPENSATION (Mid Comp) is sometimes neces- 44 5 - Using the ARC Plug-in ARC System sary to correct the directivity differences that often occur in that frequency range due to the crossover circuitry or horn-loaded speakers. Start listening to the corrected systems without Mid Comp, allow yourself to get used to the “new sound” of your studio, and then try the Mid Comp option. Listen to your favorite music, and judge which AUDYSSEY Target Curve sounds more natural on your speakers and room environment. 5.2.3 Full Range Bass Correction ARC System automatically detects the bass roll off point of each speaker to ensure that no correction is applied below that point, as it may potentially overload speakers. However, in some rooms with especially odd low frequency issues, ARC’s measurement system can be mislead and set a Low Frequency roll off point that is actually higher than required, resulting in no correction applied to low frequencies even if it was actually needed. To address this is it possible to disable the Automatic roll off point detection feature, therefore allowing ARC’s correction to be applied to the entire frequency spectrum, down to 20 Hz, no matter what roll off point is detected. Please note that the maximum boost applied to the low frequency range will anyway never be higher than 9 dB to protect your speakers from excessive boost. To select this option, simply click the button labeled “Full Range Bass Correction” at the bottom of the ARC interface screen below the left “Measurement” graph (figure 5.6 and 5.7 – full range bass correction off and on –). On most rooms where the regular automatic roll off point detection works without issues you may notice a deeper low frequency extension of your monitoring system when Full Range Bass Correction is ON, which you may find desirable. figure 5.6 5 - Using the ARC Plug-in 45 ARC System figure 5.7 ARC System goal is to achieve the most accurate room correction possible automatically, however we suggest checking both options after various listening tests to match the preferred low frequency performance. 5.2.4 Frequency Response Graphs The ARC Plug-In shows two frequency response graphs (figure 5.8), one for the Left channel and one for the Right channel. Each frequency response graph is showing three color-coded curves simultaneously. figure 5.8 ORANGE CURVE (Before): represents the original measured speakers/ room frequency response. WHITE CURVE (After): represents the corrected speakers/room frequency response. 46 5 - Using the ARC Plug-in ARC System GREEN CURVE (Target): represents the selected Target Curve. In figure 5.4, the selected target curve was AUDYSSEY FLAT, and you can see that it is actually flat from 20 to 20,000 Hz. Analyze these graphs to understand where the correction curve was applied. 5.2.5 Speaker Icons The ARC Plug-In shows the Speakers Icon that have been chosen after the measurement is saved on the ARC Measurement Software. This is useful to identify and recall the measurement sets already taken and their association with a real speaker model. The speakers icon selection is a mnemonic help and does not interact with the sound of the ARC System in any way. 5.2.6 Peak Meter This precision Peak Meter (figure 5.9) can show the INPUT level (unprocessed) or OUTPUT (processed by the ARC System). figure 5.9 On the Peak Meter, click PRE (figure 5.10) to check the input unprocessed signal level. figure 5.10 This mode is very useful to keep under control the actual Stereo Master level of your project. Remember that ARC is changing the Stereo Master peak level, so the output DAW meters will not actually show the real level anymore. Use the ARC Peak Meter in PRE mode to monitor the actual project level. On the Peak Meter, click POST (figure 5.11) to check the ARC processed signal level. figure 5.11 5 - Using the ARC Plug-in 47 ARC System 5.2.7 Correction ON switch and TRIM knob To enable the correction click on the CORRECTION ON switch (figure 5.12). When it is illuminated, the correction is ON. figure 5.12 TRIM knob: the TRIM knob (figure 5.13) adjusts the level of the corrected sound only, so you can use the TRIM knob to compare between the “before” and “after” sounds. When the TRIM knob is set to its default position (0 dB), the corrected sound will be softer than the uncorrected one. We suggest to increase the TRIM level a little bit, to acoustically match the loudness of the corrected sound with the uncorrected one. figure 5.13 Once the comparison has finished, please bring back the TRIM knob to its default position (0 dB) to avoid unwanted clipping of the signal. Its value range goes from -12 to +12dB. 5.2.8 Other controls LOCK: if you are running the software in demo mode and you click on the LOCK button (figure 5.14), the Product Authorization Wizard will appear. However, if you already registered and authorized your product, clicking on the LOCK button will show you the product Serial Number, Digital ID, and Authorization Code (figure 5.15). figure 5.14 figure 5.15 48 5 - Using the ARC Plug-in ARC System INFORMATION (INFO): by clicking on the “INFO” button (figure 5.16), the credit interface will be displayed. Here you can check your ARC Plug-In version. Clicking anywhere on the credit interface will return to normal mode. figure 5.16 PREFERENCES (PREF): click the PREF button (figure 5.17) to open the Preferences window. To restore last used plug-in settings at opening, select the check box located at the right (unchecked by default) and click SAVE, to keep the recent changes. Click CANCEL to ignore any changes. KEYBOARD MODIFIER: to reset the TRIM knob to its default value, click on it while holding the ALT key. figure 5.17 5.3 Using the ARC Plug-In Before using the ARC Plug-In, be sure you already saved one (or more) Measurement sets so that you can load them in the plug-in. 1. Open your DAW. 2. Create a new session or open an existing one. 3. Open the DAW audio mixer and locate the Stereo Master BUS. If you are using Pro Tools and your session does not have a Stereo Master BUS yet, please create one. 4. Load the ARC Plug-In as the LATEST processor on the Stereo Master BUS. 5. From the Measurements menu, select one of your saved measurement sets. 6. Select one of the Target Curves from its menu. We suggest to start with FLAT. 7. Click on the Correction ON Switch. When it is illuminated, the correction is ON. a. If you are using mastering processors (like T-RackS) be sure to insert the ARC Plug-In AFTER all the other processors. The ARC Plug-In must always be the LAST one in the processing chain. b. If your master level is really hot, (very close to 0dB), be sure to not overload the Stereo Master BUS because of the ARC intervention. c. Use the TRIM knob to lower the level if clipping occurs when checking the ARC Peak Meter in POST mode. 8. Keep the ARC Plug-In inserted on the Stereo Master BUS for the entire recording, mixing, and mastering processes. 9. Switch the ARC Plug-In OFF before bouncing to file the project. Your final mix should NOT include the ARC processing because it is designed for MONITORING usage only. 5 - Using the ARC Plug-in 49 ARC System 5.4 Suggestions for the best ARC System usage You are probably used how your studio acoustical condition sounds. For that reason, and considering that the ARC System will improve the accuracy of your monitoring system and change the sound of your room, please apply the following suggestions to enrich your listening experience while using the ARC System: 1. Use CDs or material you know very well and are very familiar with to evaluate the new way your studio sounds. 2. Always let yourself get used to the new sound. Do not judge the corrected system by only listening a minute or two. Always give your listening the time to understand the room sounds different. 3. Do not change between various measurement sets or between correction ON / OFF too often. Your hearing process needs to get used to it. It is like when your eyes needs some time to adapt to a very different lighting condition. After you select the best measurements set you will start using ARC System without even thinking it is there, it is like a “set it and forget” tool, that will really help you to mix faster and better, and achieve greater consistency on your artistic projects. 50 5 - Using the ARC Plug-in ARC System Chapter 6 Frequently Asked Questions What is the difference between ARC and other room correction EQ systems? ARC is powered by Audyssey MultEQ®, a breakthrough room correction technology that takes an innovative approach at measurement and correction that other room correction EQ systems do not: 1. MultEQ® allows you to measure multiple positions in your room to make a much wider sweet spot. Many systems only correct for one seat in the room. This typically makes other seats in the room sound worse because a single measurement does not provide an accurate representation of the problems of the entire room. 2. MultEQ® measures your room using advanced proprietary methods perfected with years of extensive research from the Audyssey team. MultEQ® looks at patterns in the time domain responses and classifies them into clusters based on the similarities in those patterns, typically in 3-5 groups. A representative response is created from each cluster, and a final response is then created from grouping the representatives. The few EQ systems that do correct for multiple positions simply average the measurement results. This tends to gloss over common acoustical problems and not fix them properly. 3. MultEQ® corrects for both time and frequency domain problems, which solves many of the problems that have plagued room correction EQ systems since their inception. Other EQ systems only correct for frequency domain problems, which leaves the time domain to cause phase distortion and smearing. 4. One of the other benefits of ARC with MultEQ® is that it identifies the limits of the loudspeaker performance and does not apply correction beyond those limits. This is particularly important in the low frequencies where other systems may overcorrect and potentially damage the speakers. My studio already has some acoustical treatment. Will ARC be useful for me? Yes. ARC System improves the clarity and focus of the perceived sound as well, and this will partially mask untreated rooms reverberation and reflections considerably. If you already have any level of acoustical treatment in your room (and if it’s done properly), it will only add to the ARC correction performance, boosting the overall result of the monitor’s accuracy. 6 - Frequently Asked Questions 51 ARC System Does ARC’s results depend on the quality of monitors I use? How does the quality of my monitors affect ARC results? ARC will improve any kind of monitor type in any room, at any level of quality. Of course there are aspect of the monitors that will always translate to the final hearing experience, even after applying the ARC process, for example: good power handling, power amps distortion free performance, detail level, accuracy, and so on. ARC System will improve any kind of monitor-room matching and the higher the quality the monitors, the better the final results will be. Can I use ARC System if I have a subwoofer? Yes. Just connect your system so that ARC System can measure and correct your Left and Right speakers, with the inclusion of the subwoofer. ARC System will correct the subwoofer frequency ranges as well, considering its emission part of the Main Left and Right monitors. Will I need to change the way I am used to working with my DAW? No. The only difference is having the ARC Plug-In always inserted on your Stereo Master BUS (you need to turn OFF the correction when bouncing the final mix down). If you use mastering processors on the main Stereo Master BUS make sure to put these before ARC. ARC will always have to be the very latest processor in your audio path. A few (the list is growing) DAWs also have dedicated Monitoring BUS, so inserting the plug-in on this BUS is the best possible option. Can I use another measurement microphone instead of the included one? No, this is not possible. To achieve the best possible accuracy ARC must know the exact frequency response and directional pattern of the microphone used. That is why the entire system is especially calibrated to the ARC Measurement Microphone and cannot be used with other measurement microphones. Using another measurement microphone with the ARC System will give unpredictable results. Can I use the included microphone for recordings other than for measurement? Yes. Measurement microphones usually exhibit a flat frequency response, at the expense of a poor sensitivity and a noise level that is too high for high quality recording. The ARC Measurement microphone exhibits a flat frequency response as well, but at the same time the sensitivity noise level and max SPL are extremely good. So once you have measured your room you'll be pleased by how well this microphone sounds when recording various acoustic sources, which turns 52 6 - Frequently Asked Questions ARC System this microphone into a valuable tool that will be useful to you even after you have calibrated the room. Plus, this microphone is omni-directional making the proximity effect found in conventionally studio-used cardioid microphones disappear, which is important for home and project entry-level studios, since omni-directional microphones are commonly not a part of the set-up. Does ARC work with surround monitoring systems? Not at the moment. A multi-channel version of ARC System is under way and will be available in the future. 6 - Frequently Asked Questions 53 ARC System 54 6 - Frequently Asked Questions ARC System Chapter 7 Troubleshooting Where can I find my IK product Serial Number? The Serial Number is written on the Registration Card (included with your IK product, inside the license envelope). In the snapshot, please check its exact location (figure 7.1). 1) Here you can find your SERIAL NUMBER 2) At the bottom of the registration card a legend helps you identify the characters in your SERIAL NUMBER figure 7.1 For clear character identification, please analyze the legend. IMPORTANT: the number zero can easily be identified in your Serial Number because it is crossed by a line. Why is the Wizard rejecting my Serial Number? Probably because it found a typo, so please analyze the common errors: *Typing a 0 (“zero” number) instead of an O (“o” letter) *Typing 1 (“one” number) instead of an I (“i” letter) *Typing 2 (“two” number) instead of a Z (“z” letter) *Typing 5 (“five” number) instead of an S (“s” letter) *Typing 8 (“eight” number) instead of a B (“b” letter) *Typing a “.” (point) instead of a “-” (minus) 7 - Troubleshooting 55 ARC System Suggestions: • Whenever is possible, please Copy and Paste the information. • Cut off all the leading and trailing spaces. • Please type all codes UPPERCASE during the Installation and Registration process. • Check that the Serial number that you are entering is in correlation with the product installed. During the Product Registration process, I received this message: The Serial Number is already registered... Remember that you are able to register your product only once. So, if you are trying to get a new Authorization Code, please go to our FAQ page at www.ikmultimedia.com/faq and read the “How can I get a new Authorization Code?” FAQ. Where can I find my Digital ID? The Digital ID is displayed in the Authorization window of your IK product (figure 7.2). figure 7.2 56 7 - Troubleshooting ARC System Why is my Digital ID being rejected during the Online Registration process? There is probably a typo in it. Remember that the Digital ID has NO letter “I” and “O”, only the numbers “1” (one) and “0” (zero). In order to prevent any further mistakes, please Copy the Digital ID from the Authorization Form to the Registration Form. Where can I find my Serial Number, Digital ID and the Authorization Code of a registered IK Product? In your IK product interface, locate the Authorization button (the one with a small lock on it) and click on it. If your product version has no Authorization button, log in into the User Area, and click Authorizations. You will be able to check your product Serial Number. Then click on the View/Request button. You will be able to check the Digital ID and the Authorization Code information. How can I get a new Authorization Code? Please go to our FAQ page at www.ikmultimedia.com/faq and read the “How can I get a new Authorization Code?” FAQ. I have already registered my product online, but I did not get an Authorization Code. Usually, this happens because the Digital ID was not submitted during the registration process. In order to get a new Authorization Code, please go to our FAQ page and read the “How can I get a new Authorization Code?” FAQ. I need to log in into the User Area but I forgot my User Name and Password. What should I do? Please go to www.ikmultimedia.com. On the navigation bar click User Area. On the top left, please click on the “I forgot my username and/or password” link, located below the login button. I have already installed, registered and authorized my IK product in my main computer. What do I have to do to use my IK product in other computers? You need to install the program and get a new Authorization Code. Please go to our FAQ page and read the “How can I get a new Authorization Code?” FAQ. 7 - Troubleshooting 57 ARC System I just bought an IK product. What should I do to register and authorize my new product? Visit our website www.ikmultimedia.com In the Support Area, click on the Product Registration link. In the Serial Number field of the Product Registration Form, please insert the Serial Number written on the Registration Card (included with your IK boxed product, inside the license envelope) or the one that has been delivered to you (e.g., Online purchase, such as a Digital Delivery, or update). Complete the Registration Form and click Submit. Regarding the Authorization process, if you already typed your Digital ID while filling the Product Registration Form, you will receive an email from us with your Authorization Code. If not, after you launch the program the Product Authorization Wizard will appear. Please read and follow the instructions provided in each of the wizard’s windows and get an Authorization Code. While measuring the room, I am getting error messages from the ARC Measurement software related to the low signal and high background noise. As a result, I can’t complete the measurement process. What should I do? Quiet down the room as much as possible, or increase the test tones playback level during the measurement process. Also, check the microphone level again, (returning to the Measurement Step 3). While measuring the room, I am getting “phase” errors from the ARC Measurement software. Please check your speakers wiring. If the speakers are passive, check the polarity of the leads going from the amps to the speakers. If the speakers are active, check the XLR or TRS cables connections and polarities. When I open the Measurements set on my ARC Plug-in and turn the Correction ON, the resulting sound and the displayed response is strange and incorrect, making the monitors sound worse than when ARC Plug-in is not enabled. Do you have any suggestions? Be sure that your audio interface is set to 48 kHz when running the ARC Measurement software, (this is the only supported Sampling Rate by the ARC Measurement Software). Also, check your audio interface buffer size settings. For a proper measurement, it should be set from 128 to 2048 samples. 58 7 - Troubleshooting ARC System I am trying to set the microphone levels on the ARC Measurement software. However, even if the test signal is being played back from the speakers, I cannot see any level. What should I do? Please check which audio input has been selected on the ARC Measurement Software Step 2, if the +48V phantom power is ON, and if the XLR cable is properly connected, (eventually, check if the cable is in good condition). When I open the Measurements set on my ARC Plug-in and turn the Correction ON, the resulting sound is not optimal, and I don’t feel it is correct for my monitors and for my room. Please read carefully the ARC System User Manual (Chapters 3 & 4), and repeat the measurement process. When I open the Measurements set on my ARC Plug-in and turn the Correction ON, the resulting sound and the displayed response is strange and incorrect, making the monitors sound worse than when ARC Plug-in is not enabled. Do you have any suggestions? Please check if the ARC Measurement Microphone is working, by connecting the microphone to a +48V phantom microphone preamp and listening to it through headphones. The microphone should exhibit a neutral, clean sound. If the microphone is not working, producing loud noises, or having a very weak output signal, please contact IK Multimedia Technical Support. 7 - Troubleshooting 59 ARC System 60 7 - Troubleshooting ARC System Chapter 8 Support For any question you may have, please refer to the FAQ webpage at: www.ikmultimedia.com/faq Here you will find answers to the most common questions. To submit a Technical Support Form, go to: www.ikmultimedia.com/Support.php For other requests such as Product, Sales, or Web info, please go to: www.ikmultimedia.com/ContactIKForm.php 8.1 User Area The User Area is a special section of our website specifically designed for our users’ needs (figure 8.1). figure 8.1 8 - Support 61 ARC System Through the User Area, each member of our registered users database will be able to: • Edit your Personal data • Manage your products Authorization Codes • Download the latest products updates and free content • Transfer your License • Find out about the latest promotions • Enter the Preset XChange area To access the User Area go to www.ikmultimedia.com and click User Area from the navigation bar, or visit www.ikmultimedia.com/userarea. To enter to the User Area for the first time, you have to Log in with the Username and Password that you’ve received from us via email after your first IK product registration. If you have already changed your Username and Password, please use your most current information to Log in. 62 8 - Support ARC System™ is a trademark property of IK Multimedia Production Srl. Audyssey™, MultEQ®, Audyssey MultEQ® are trademarks property of Audyssey Laboratories™ Inc. used under license. All other product names and trademarks are the property of their respective owners, which are in no way associated or affiliated with IK Multimedia. Use of these names does not imply any cooperation or endorsement. www.ikmultimedia.com/arc IK Multimedia Production Srl, Via dell’Industria 46, 41122, Modena, Italy. Phone: +39-059-285496 - Fax: +39-059-2861671 IK Multimedia US LLC, 1153 Sawgrass Corporate Pkwy. Sunrise, FL 33323 Phone: (954) 846-9101 - Fax: (954) 846-9077 www.ikmultimedia.com All specifications are subject to change without further notice. PN: MNU-AC-0003