1
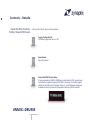
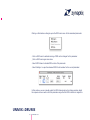
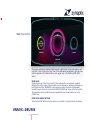
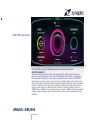
UNMIX::DRUMS
User Manual V1.0.0
!!
!!
!!
!!
!!
!!
!!
!!
!!
Introducing UNMIX::DRUMS
What is UNMIX::DRUMS?
4
4
System Requirements
5
Mac Requirements
Windows Requirements
5
5
Installation & Authorization
Installation
Activation (Demo and full version)
Overview
6
6
6
12
Applications for UNMIX::DRUMS
The Parameters
12
13
Control Types & Behavior
General GUI Layout
13
16
Controls - Details
17
Header Bar Meta Functions: Tooltips, Manual & MIDI Learn
Algorithm Section
MAIN View Controls
FINE-TUNE View Controls
CURVES View Controls
Analyzer Display
Breakpoint Editor: Overview
Breakpoint Editor: Operation
Breakpoint Editor: Notes On Use
Presets
17
19
21
23
26
26
27
28
30
32
UNMIX::DRUMS
2
!
User Manual v1.0.0
The Preset Manager
MIDI Program Change
Storage Locations
32
32
33
Using Presets
Notes On Operation
34
35
Basic Operation
35
Step 1: MAIN VIEW
35
Step 2: FINE-TUNE view.
36
Step 3: Adding frequency-dependent behavior using the CURVES view.
The “About” Screen
38
UPDATE CHECK & DOWNLOAD
FAQ
38
39
Questions & Answers
Getting Support
39
40
UNMIX::DRUMS
3
!
User Manual v1.0.0
37
Introducing
UNMIX::DRUMS
!
What is UNMIX::DRUMS?
!
UNMIX::DRUMS is the world’s first plugin that allows attenuating or boosting drums in mixed
music, in real-time. Using advanced source signal separation technology (a.k.a. de-mixing,
unmixing, sound extraction, sound isolation), UNMIX::DRUMS provides drum level control in a
wide range. Used on pure drum tracks, UNMIX::DRUMS can be used to tailor the punch,
dynamics and frequency response in a unique new way – we like calling this use case “Impact
Equalization”.
Sporting an intuitive multi-level GUI, frequency dependent control of key parameters, a unique
sample-accurate sub-bass synthesizer, SMOOTH and PUNCHY boost modes, our high-precision
analyzer display, M/S operation and an output limiter, UNMIX::DRUMS opens up exciting new
options for mastering, music production, sample-based music creation, mash-up artists,
remixers and DJs.
We hope you enjoy using UNMIX::DRUMS as much as we did creating it!
Yours,
Stephan M. Bernsee & Denis H. Gökdag
zynaptiq headquarters
Hannover, Germany
October 2015
UNMIX::DRUMS
4
!
User Manual v 1.0.0
System
Requirements
!
!
!
!
!
!
!
!
!
!
Mac Requirements
Windows Requirements
•
•
•
•
•
•
•
•
•
Intel-based Apple Mac computer
Minimum of 2 CPU cores running at 2.4 gHz or faster
1 GB of available RAM
Mac OS X 10.6.8 or newer
Apple AU (AudioUnits), Steinberg VST 2.4 or Avid RTAS/AAX compatible host software
AAX requires Pro Tools version 10.3.6 or newer
Internet Connection for Activation (though not necessarily on the Computer used for audio)
iLok.com account for activation
iLok 2 if you want to activate to a dongle (iLok 1 not supported)
•
•
•
•
•
•
•
•
Minimum of 2 CPU cores running at 2.4 gHz or faster
1 GB of available RAM
Microsoft Windows Vista or newer (XP SP3 may work but is not officially supported)
Steinberg VST 2.4 or Avid RTAS/AAX compatible host software
AAX requires Pro Tools 10.3.6 or newer
Internet Connection for Activation (though not necessarily on the Computer used for audio)
iLok.com account for activation
iLok 2 if you want to activate to a dongle (iLok 1 not supported)
!
!
UNMIX::DRUMS
5
!
User Manual v 1.0.0
Installation &
Authorization
!
!
Installation
!
!
!
!
!!
Installation is very easy. On Mac, simply unpack the ZIP archive using the Mac OS X Archive
Utility (third party ZIP tools may cause issues), then launch the installer contained. It will
guide you through the process. On Windows, unpack the ZIP and choose your format and
whether to install 32bit or 64bit plugins (the bit depth of your OS does not matter here).
To authorize your plugin, you can use one of the two methods described below. Please note
that the trial version also needs to be activated, the difference being that you do not need an
activation code.
Activation (Demo and full version)
!
!
!
!
!
!
!
1) Activation using the Authorization Wizard. The authorization wizard will open if the plugin is
not yet authorized and you insert the plugin, or when it is scanned by your host application.
You can choose to start a trial (“Try”), cancel (“Quit”) or activate a full license you have
purchased (“Activate”):
!
UNMIX::DRUMS
6
!
User Manual v 1.0.0
!
!
1) B) TRY. Clicking this brings up the iLok account login screen, where you may enter existing
credentials, or create a new account. Creating an account with iLok.com is free and easy.
Please note that iLok.com is used for many different plugins by many different manufacturers
and that one account will work for all of those. After creating the account, you can log in in the
activation wizard:
!
!
!
UNMIX::DRUMS
7
!
User Manual v 1.0.0
!
!
!
Upon clicking NEXT & successful login, you will be presented with the following options:
Choose whether to activate to your Computer or to an iLok 2. Please note that first generation
iLoks are not supported and will be shown “grayed out” as in the image above. Click next &
you’re good to go!
!
!
!
UNMIX::DRUMS
8
!
User Manual v 1.0.0
!
!
1) C) ACTIVATE. Should you already have purchased an activation code for the plugin, choose
ACTIVATE. You will then be presented with the following window, where you may enter
your code:
!
After entering your code, click NEXT.
!
!
UNMIX::DRUMS
9
!
User Manual v 1.0.0
!
!
!
Clicking this brings up the iLok account login screen, where you may enter existing credentials,
or create a new account. Creating an account with iLok.com is free and easy. Please note that
iLok.com is used for many different plugins by many different manufacturers and that one
account will work for all of those. After creating the account, you can log in in the activation
wizard:
!
!
UNMIX::DRUMS
10
!
User Manual v 1.0.0
!
!
Upon clicking NEXT & successful login, you will be presented with the following options:
Choose whether to activate to your Computer or to an iLok 2. Please note that first generation
iLoks are not supported and will be shown “grayed out” as in the image above. Click next &
you’ll see a progress bar, and once it completes, you’re good to go
!
!
!
UNMIX::DRUMS
11
!
User Manual v 1.0.0
Overview
!
!
!
Applications for UNMIX::DRUMS
UNMIX:DRUMS can be used for a variety of tasks, including:
!
•
•
•
•
•
•
•
•
•
!
!
!
!
Balancing drums frequency-dependently against the rest of a song in mastering.
Restoring dynamics to over-limited music in mastering.
Unique EQ alternative for mixed music.
Shaping punch/impact on drum tracks, we call this “impact EQ”.
Suppression of drums in sampled audio to remove “clashing” or “flamming” when mixing
with new content.
Pre-processing of audio for manual drum extraction to create new drum-kits
Drum suppression for Mash-Up creation.
“Drum Kill Switch” for Dj and other performance applications
Pre-processing for voice extraction or similar applications
UNMIX::DRUMS
12
!
User Manual v 1.0.0
!
The Parameters
!
!
!
Control Types & Behavior
UNMIX::DRUMS sports several control types, which have a variety of usability features. We
will describe them here.
!
“Trackball” Slider
This control is a unique Zynaptiq type - it is essentially a vertical fader,
that looks like a knob. The benefits of this configuration are that they are
simple to control with a mouse like a fader, yet conserve GUI space like a
rotary control. Also, the combination of the horizontal marking on the
“Trackball”, the circular “halo” value display and the gradient-filled “blob”
make it very easy to tell the current value of the parameter. While the
mouse is over the control, the parameter name underneath the Trackball
will change to display the parameter value numerically.
•
•
•
•
•
!
!
UNMIX:DRUMS
13
!
User Manual v1.0.0
Drag up/down to change the parameter value.
Hold shift while dragging for finer resolution.
When the control has focus, the up/down arrow keys and the mouse
scroll-wheel can be used to increment or decrement the value. The
control has focus whenever the mouse hovers over it.
CTRL-click or right-click on the control to reset it to default.
Double-click on the control opens a text box for numerical entry of the
value.
“Standard” Slider
This is a straight-forward slider control, which comes in horizontal as well as
vertical configurations. Essentially, it follows the same rules as the “Trackball”:
!
-
Drag the thumb along the slider axis to adjust the value
Click anywhere in the slider groove to set the value directly
Hold shift while dragging for finer resolution.
When the control has focus, the up/down arrow keys and mouse scroll-wheel
can be used to increment or decrement the value. This control type has focus
after it was clicked on AND the mouse hovers over it.
- CTRL-click or right-click on the control to reset it to default.
- Double-click on the control opens a text box for numerical entry of the value.
- The parameter label will change to display the parameter value when the
mouse hovers over the control.
!
Toggle Switch
A latching switch that activates a function or switches between two different
functions. CTRL-click resets it to default.
UNMIX:DRUMS
14
!
User Manual v1.0.0
!
Momentary Button, Type 1
!
A momentary switch that triggers an action, such as a reset/clear. This control
type comes in several sizes. It has the same “corner cut logic” as a toggle
switch, but is always highlighted (so always is bright) and has no “LED”.
!
Momentary Button, Type 2
!
!
A momentary switch that triggers an action, such as a reset/clear.
!
Pull-down Selector/Menu
!
!
UNMIX:DRUMS
15
!
User Manual v1.0.0
Opens a menu that contains multiple options when clicked.
You can recognize this control type by its “cut off” corners
on both lower sides, as well as the “disclosure triangle”.
CTRL-click resets this to default value.
!
!
!
General GUI Layout
!
The UNMIX::DRUMS UI is laid out in roughly three sections: the header bar, the global
parameters section, and the main parameter section. The main parameter section has three
tabs, the MAIN, FINE-TUNE and CURVES views.
!
!
Meta Functions
!
Algorithm Section
Logo - Opens
About Screen
Preset Manager
Output Mixer
Main
Parameter
Section
UNMIX::DRUMS
16
!
User Manual v1.0.0
Controls - Details
!
Header Bar Meta Functions:
Tooltips, Manual & MIDI Learn
In the top left of the UI, there are three switches:
!
!
!
Toggle Tooltips On/Off
This button toggles tool tips on or off.
!
!
!
!
Open Manual
Opens the manual.
!
!
!
!
Show/Hide MIDI Control Setup
All main parameters of UNMIX::DRUMS can be controlled via MIDI, provided your
host software is capable of relaying MIDI data to the plugin. This button toggles
visibility of the MIDI control UI widgets. When on, a small disclosure triangle will
be displayed next to the name of all parameters that can be MIDI controlled:
!
!
!
UNMIX::DRUMS
17
!
User Manual v1.0.0
!
!
!
!
!
Clicking on this disclosure triangle opens the MIDI Learn menu for the associated parameter:
!
!
!
!
!
- Click on MIDI Learn to activate learning of MIDI control changes for this parameter
- Click on MIDI Learn again when done
- Select MIDI Unlearn to disable MIDI control of the parameter
- Select Settings… to open the advanced MIDI Control window for the current parameter:
!
!
!
!
!
In this window, you can manually select the MIDI channel and control change number, adjust
the response curve as well as limit the parameter range that the MIDI controller is mapped to.
!
UNMIX::DRUMS
18
!
User Manual v1.0.0
!
!
!
!
!
Algorithm Section
!
!
M/S
When M/S is on, the input signal will be mid-side encoded before being processed by
UNMIX::DRUMS, and will be mid-side decoded at the output. As a result, in M/S mode, hardpanned drum sounds will be boosted/attenuated equally in both channels, giving a more
“stable” stereo image, at the expense of possibly causing “pumping” type effects, or boosting/
attenuating non-drum sounds in one of the channels. With M/S switched off, the left and right
channels will be treated separately, preventing the above effects, but also potentially with
more left/right movement in the output audio.
!
Algorithm Select
This pull-down selector allows choosing one of two algorithms to use for boosting drums. It has
no effect on the attenuation circuit.
SMOOTH
As the name implies, this mode gives a drum boost sound with a smooth attack shape.
SMOOTH has a high time resolution, but a lower frequency resolution, which generally
results in a more “unprocessed” sounding result, at the expense of sporting less separation
between drums and other sounds, as well as a lower maximum boost amount. Also, the
reverb tail included in the boost when using UNMIX FEATHER is shorter than in PUNCHY
mode.
PUNCHY
The PUNCHY algorithm has an equally high resolution in both time and frequency, and as a
result, gives higher separation between drums and non-drum-sounds, at the expense of
potentially introducing slightly more frequency-domain artifacts. The attack shape of the
boosted drums is very snappy and punchy, and reminiscent of some very sought-after
high-end vintage compressors - without the inconsistent behavior or distortion associated
with such devices.
Please note that RELEASE, UNMIX FEATHER and DETECTION DENSITY behave somewhat
differently depending on whether you’re running in SMOOTH or PUNCHY mode.
!
UNMIX::DRUMS
19
!
User Manual v1.0.0
!
LVL COMP (Level Compensation)
When on, the output level of the plugin will automatically be lowered by the amount the drums
are boosted, or raised by the amount the drums are attenuated. As a result, when this switch
is active, the drum level will appear to remain constant while the rest of the music changes
level. When this function is off, the level of the music stays constant while the level of the
drums changes according to the DRUM LEVEL setting. Please note that the level compensation
is based on an average compensation curve, so slight level inaccuracies are expected.
!
!
UNMIX::DRUMS
20
!
User Manual v1.0.0
!
!
!
!
MAIN View Controls
This section contains the parameters that have the largest impact on the result and are used
most often - think of this as the “easy” view. These parameters are available in all three views
(with the exception of the Macro Buttons, which appear only in the MAIN and FINE-TUNE
views.)
!
DRUM LEVEL
Adjusts the amount of drum cut or boost. At the center position, no processing is applied,
adjusting the control counter-clockwise results in drum attenuation, adjusting it clockwise will
boost the drums. When THRESHOLD is at its maximum value, drums are not attenuated/
boosted (however, the drum reverb set with UNMIX FEATHER, see below, will still be boosted).
This parameter can be controlled frequency dependently using a break-point curve in the
CURVES view.
!
DRUM LEVEL MACRO BUTTONS
These set the DRUM LEVEL control to maximum cut, neutral, or maximum boost, respectively.
UNMIX::DRUMS
21
!
User Manual v1.0.0
!
!!
!
THRESHOLD
Adjusts the detection threshold. Please note that this is not a RMS level based threshold,
but a “drum-ness” threshold - the higher the threshold, the more drum-like a sound has to be
to be included in the attenuation/boost. Conversely, the lower the THRESHOLD value, the more
non-drum sounds like the attack transients of strummed guitars or slapped bass notes will be
included in the boost. Set this as high as possible but as low as needed. If you’re hearing too
many non-drum sounds being attenuated/boosted, increase THRESHOLD, if some drums aren’t
being detected, lower it. THRESHOLD can be controlled frequency dependently using a breakpoint curve in the CURVES view. At a THRESHOLD value of 1 (max), processing is bypassed. If
using a CURVE, and a value of 1 is reached for a frequency range that frequency range will be
bypassed, accordingly.
!
RELEASE
For the attenuation circuit, RELEASE adjusts how long attenuation persists after a detected
drum sound has stopped playing. Low values will reduce negative effects on the surrounding
audio, but tend to leave the “tail” of a drum sound in place, particularly on snare drums, claps
and similar. Higher values will capture such “tails” better, but tend to affect the surrounding
audio more. Also, in combination with UNMIX FEATHER, higher values may introduce “envelope
phaser” type modulating notches. Set this control as low as possible while still capturing the
full duration of the drums you wish to attenuate.
For the boost circuit, RELEASE adjusts the duration of the reverb tail included in the boost.
Shorter values give a snappier sound, while longer values can “glue” the boosted drums to the
non-drum signal better. Please note that when RELEASE is set to a duration where the release
of one sound overlaps with that of the next one (particularly in PUNCHY boost mode), you may
get some artifacts. Also, the values for RELEASE are much lower in SMOOTH mode than in
PUNCHY mode.
RELEASE can be controlled frequency dependently using a break-point curve in the CURVES
view.
UNMIX::DRUMS
22
!
User Manual v1.0.0
!
!
!
!
FINE-TUNE View Controls
!
!
The FINE-TUNE view contains additional parameters used to optimize results.
DETECTION DENSITY
This control allows adjusting the amount of sounds detected. Higher values include more
sounds in the processing, lower values make the algorithms more selective. For attenuation,
this is achieved by adjusting how many signal components have to exceed the THRESHOLD
setting at a given time in order for a drum sound to be detected; higher values of the control
will lower the number of above-threshold components required, while lower values increase the
number. For boosting, this is achieved by progressively filtering out pitched components the
lower the control is set. Low values can cause a “buzzy” sound when boosting, more so in
SMOOTH than in PUNCHY mode. At the same time, low values in PUNCHY mode can accentuate
cymbals, hihats and shakers nicely. In general, set this control as high as possible but as low
as needed.
!
UNMIX::DRUMS
23
!
User Manual v1.0.0
!
!
MAX CUT
Adjusts the maximum amount of attenuation when suppressing drums. Lower values can result
in a more natural sound when attenuating drums contained in very dense material or drums
that are very low in level compared to other sounds, at the expense of also reducing the
maximum attenuation amount.
!
BASS SYNTH(ESIS AMOUNT)
Controls the amount of synthetic low frequencies added to the boosted drums. The DRUM
LEVEL and DRUM LEVEL break-point curve affect the output of the bass synth, so no bass is
added if the drums are not being boosted.
This circuit is unique in that it uses a sample-accurate re-synthesis engine to create the subharmonics; this translates into a very tight, focused time-response (or: very low “boom-iness”), as well as near zero cancellation artifacts in the cross-over region.
The sub bass synthesizer kicks in below 200hz and adds f/2^n subharmonics that roll of at
6db/octave and cuts out at 20Hz.
!
ATTACK
Attack adjusts the duration of the averaging over spectral changes in the detection circuit. Its
behavior is somewhat similar to the attack parameter of a compressor, however it is technically
a very different parameter that is being controlled.
Lower values tend to include into the processing only sounds that change strongly over short
periods of time - which is true for most drums -, to give a shorter, “snappy” sound, and to
result in less low frequency content being included in the processing.
Higher values include more low frequency energy in the processing, give a longer, “meatier”
sound, while also including more non-drum sounds like guitar attacks, slapped bass notes or
vocal plosives into the processing.
!
UNMIX::DRUMS
24
!
User Manual v1.0.0
!
UNMIX FEATHER
The UNMIX FEATHER parameter allows applying “feathering", as known from image
manipulation software, to smooth out the "edges" of the detection. It does so twodimensionally, so in both time and frequency. Feathering behaves somewhat differently
between CUT and BOOST.
For CUT, values smaller than 0.5 will reduce attenuation at the inner detection boundaries (so
effectively: "err on the side of caution and reduce less drums"), values larger than 0.5 will
increase attenuation on the outside of the detection boundaries (reducing more non-drum
signal to make sure more of the drum is captured).
In BOOST mode, values larger than 0.5 will also include more non-drum signal, but in addition,
the drum’s reverb will be included in the boost. Values smaller than 0.5 tend to reinforce the
“meat” of the detected sound, giving slightly higher boost but also loosing some detail,
especially in the treble. The sonic characteristics and length of the included reverb depend
strongly on the selected algorithm – in SMOOTH mode, reverb times are shorter and density is
lower (giving more of an early reflection type feel), in PUNCHY mode, reverb times are longer
and density/diffusion is much higher.
Boosting a lot of reverb on signals that don’t actually *have* any reverb included can give
some rather interesting results.
!
!!
!
UNMIX::DRUMS
25
!
User Manual v1.0.0
!
!
CURVES View Controls
!
!
!
!
!
!
Analyzer Display
!
This view features a break-point curve editor overlaid over an analyser-type display, several
controls for adjusting break-point curves and break-point curve editor behavior. The breakpoint curve editor allows frequency dependent control of the THRESHOLD, DRUM LEVEL and
RELEASE parameters; for convenience, these three parameters are duplicated at the bottom of
the CURVES view, to keep switching between views to a minimum.
The display shows amplitude versus frequency plots for the detected drums (mint), non-drum
sounds (a.k.a. the “residual” – red) and the output signal (magenta).
Also shown is a legend.
!
UNMIX::DRUMS
26
!
User Manual v1.0.0
!!
!!
!
Breakpoint Editor: Overview
!
The Breakpoint Editor allows creating 3 separate free-form curves, each defined by an
arbitrary number of nodes, which are connected by line segments. The breakpoint curves can
be used to add to or subtract an offset – we call this “bias” – from the value of the
THRESHOLD, DRUM LEVEL and RELEASE parameters, frequency dependently. Which of these
three curves is currently selected for editing is set by clicking on the relevant tab underneath
the editor:
The breakpoint curve & nodes are displayed in
- yellow for the THRESHOLD curve
- magenta for the DRUM LEVEL curve
- blue for the RELEASE curve
!
These colors correspond to the colors of the controls to which they relate, and these three
parameters are duplicated below the editor for your convenience. Additionally, the effective
value of <parameter knob setting> plus <breakpoint curve value> is displayed as gray curve
when the mouse is over the editor.
The x and y axis values are displayed next to a node when
moving it; the horizontal node position in Hz, the vertical node
position as value -1…1.
!
Each tab also features an on/off switch on the left side,
which allows switching the corresponding bias curve on or
off, for example for comparison purposes. Alt-/Optionclicking one of the switches toggles all three curves on or
off.
UNMIX::DRUMS
27
!
User Manual v1.0.0
!
!
!
!
Breakpoint Editor: Operation
!
Operation of the Breakpoint Editor is described here. While there are many rules on how this
works, in practice you will find the breakpoint editor workflow to be very intuitive and fast.
Adding and removing nodes
- Click anywhere in the Editor area to insert a new node
- To remove a node, a) CTRL-click or right-click it, b) drag it out of the editor area and let the
mouse button go, or c) select it and press delete/backspace. Whether and how the delete/
backspace keys will work depends on how your DAW handles keyboard events when a plug-in
window is in focus.
- The first and last nodes can not be removed, a CTRL-click or right-click on either of these will
reset them to a vertical zero ( = center) position.
- Similarly, CTRL-click, right-click and del/backspace will remove multiple selected nodes (see
below for selection mechanics).
!
Selecting nodes
-
Click on a node to select it
Shift-click on a selected node to de-select it
Shift-click another node to add it to the selection
Shift-click on a selected node to remove it from the selection
Shift-drag from anywhere in the Editor area draws a selection box that selects nodes or adds
them to an existing selection
- If multiple nodes are selected, clicking anywhere in the editor area will clear the selection
!
!
!
UNMIX::DRUMS
28
!
User Manual v1.0.0
!!
!!
Breakpoint Function Buttons
!
The UNMIX::DRUMS Breakpoint Editor has several high-level functions controlled by 8 buttons
below the editor.
SNAP
When SNAP is on, a node will snap to zero when moved to within +-14 pixels of the respective
vertical value, as well as in case of the DRUM LEVEL curve, to a neutral value (where the node
value plus the DRUM LEVEL control’s value add up to “no processing”). This makes it easy to
set a specific frequency range up to have no BIAS at all and thus be at exactly the current
parameter value, or to be bypassed (for the DRUM LEVEL curve).
SOLO
When on, a bandpass filter is applied to the audio when dragging a node, its center frequency
equalling the node’s frequency value. This helps fine-tuning the breakpoint curve.
CLR (CLEAR)
The CLR button will clear the currently selected breakpoint curve, by removing all except the
first and last nodes, which are set to 0.
CLR affects the curve currently selected for editing. Alt/Option-click on CLR will clear all 3
curves.
C(OPY CURRENT CURVE)
Copies the currently selected breakpoint curve into the clipboard.
P(ASTE CURVE)
Pastes a copied breakpoint curve, overwriting the currently selected breakpoint curve. ALT/
Option-click on this button will paste the clipboard contents to all three curves.
!
UNMIX::DRUMS
29
!
User Manual v1.0.0
!!
!!
!!
!!
!!
!
!!
!!
!!
!!
!!
!!
!
Breakpoint Editor: Notes On Use
!
INV(ERT CURVE)
Mirrors the currently selected breakpoint curve around zero, inverting it. ALT/Option-click on
this button will invert all three curves.
x2
Doubles the amplitude of the currently selected curve if the positive and/or negative peak is
within 50% of the range; otherwise, the curve is normalized. ALT/Option-click on this button
will scale all three curves.
/2
Halves the amplitude of the currently selected curve. ALT/Option-click on this button will scale
all three curves.
The breakpoint curves are generally added to the base value of a parameter. This makes it
easy to “dial in some more” or “pull back a little” using a curve after having set main
parameter to be in the right ballpark. You can use the curves for some more elaborate
applications though.
!
THRESHOLD CURVE
As a THRESHOLD value of 1 will bypass the cut/boost circuit, you can set THRESHOLD to 1 and
use this curve to lower THRESHOLD for specific frequency ranges only, so that only these
frequency ranges will be included in the processing. Conversely, you can leave THRESHOLD at
a basic value and exclude specific frequency rages from the processing by raising THRESHOLD
using the curve. Or, you could raise THRESHOLD (reduce sensitivity) in the mid-range to
“protect” a vocal from attenuation, or lower THRESHOLD in the treble to better capture hihats
or cymbals.
UNMIX::DRUMS
30
!
User Manual v1.0.0
!
!
DRUM LEVEL CURVE
The uses for this curve are rather obvious - increase boost or cut for a specific frequency
range. If you leave the DRUM LEVEl control at 50% (neutral), you can dial in attenuation and
boost frequency dependently using this curve.
!
RELEASE CURVE
This curve can be used to lengthen or shorten the RELEASE time frequency dependently. This
can be very useful, for example to shorten RELEASE in the mid range so that vocals are less
affected by a DRUM LEVEL cut, or to lengthen the RELEASE to get rid of more cymbal sustain.
Additionally, when performing boosts, the RELEASE curve can be used to shape the decay time
of the boosted reverb frequency dependently.
UNMIX::DRUMS
31
!
User Manual v1.0.0
!
!
Presets
The Preset Manager
To make working with the different plug-in formats easier, UNMIX::DRUMS provides it’s own
preset manager and preset format. This way, you can load your custom settings exactly the
same way regardless of whether you’re working on the Mac or on a Windows machine, whether
you’re using RTAS or VST.
!
!
!
!
!
!
!
!
!
!!
MIDI Program Change!
!
!
!!
!!
!
!
A click on the preset selector pull-down
brings up a menu that provides options for
saving and loading presets, saving the
current setting as default and re-setting the
default preset to factory default values. If
you edit a recalled preset, the preset name
will be displayed in Italic font to indicate
that the current and saved values don’t match. The “<“ and “>” momentary buttons to the left
and right of the pull-down menu allow loading the previous or next preset, respectively.
It is possible to load presets remotely using MIDI
"Bank Select" and "Program Change" messages. To
enable this feature, select a MIDI channel to receive
the events from in the MIDI Program Change menu
item from the presets menu:
UNMIX::DRUMS
32
!
User Manual v1.0.0
!!
!
!
!
!
!
!
!
!
!
!
!
!
!
!
!
!
This setting is a global preference (shared across all instances of the plug-in). Once activated,
the plug-in menu will display the bank number followed by the preset number for each preset:
!!
!!
!
!
!
Every root folder is considered as a new bank, starting with the factory presets (bank 0).
Program and bank numbers may change while you add folders and presets, so you should be
careful when naming them if bank and program numbers matter to you. It is recommended to
use folders to make this task simpler. As a side note, sub folders do not define additional banks
(all presets contained in sub folders are associated with the current bank.
As specified by MIDI, bank select messages are not used until a program is actually selected.
MIDI Implementation note: the software supports all types of Bank Select methods. You can
use either MIDI CC 0 or MIDI CC 32 to select banks. If both are used simultaneously, they are
combined together so that you can use more banks (in this case CC0 is LSB and CC32 is MSB,
and actual bank number is 128*CC0+CC32).
Storage Locations
There are separate locations for factory presets and user presets, and they both depend on the
OS platform you’re working on:
Factory presets (Mac OS X): these are stored inside the actual plug-in.
Factory presets (Windows): these are stored in the UNMIX::DRUMS VST/RTAS/AAX Data
folder, which is installed next to the plug-in.
User presets (Mac OS X and Windows): these are stored to <your user document
directory>/Zynaptiq/UNMIX DRUMS/Presets/ .
UNMIX::DRUMS
33
!
User Manual v1.0.0
!
Using Presets
UNMIX::DRUMS features a lot of presets, organized into the categories Mixed Music - Basics,
Mixed Music - Advanced, Drums, General Purpose and SFX.
!
- The DEFAULT preset was carefully crafted as starting point that requires mainly THRESHOLD,
DRUM LEVEL and RELEASE to be tweaked and may in many cases be all you need.
- As the processing depends on the input signal to a large extent, take both the presets as well
as the categories with a grain of salt - a preset for processing drums may work just fine for a
jazz track master.
- -The presets are intended as starting points that illustrate the functionality, not to be used
as-is.
- After loading a preset, you will be presented with the view that you’ll most likely be wanting
to adjust – in most cases that would be the MAIN view. Adjust THRESHOLD and RELEASE.
- Many presets have LEVEL COMPENSATION switched on, so that boosting drums will result in
the overall level being lowered to prevent level going crazy (as UNMIX DRUMS is capable of
quite some boost). If you want the drums to be boosted rather than everything else being
attenuated, switch of LVL COMP.
- The DRUMS category is intended for processing drum stems and/or individual drums. You
should check this out as it has a lot of PUNCH.
- If a preset shows the CURVES view, we recommend toggling the curves on/off first to get a
feel for what they’re doing. An examples preset with CURVES view active is Exaggerate
BassDrums, where you can use the DRUM LEVEL curve to change the frequency of the
exaggeration.
UNMIX::DRUMS
34
!
User Manual v1.0.0
!
Notes On Operation
!
Basic Operation
!
!
!
!
!
!!
Step 1: MAIN VIEW
!
• Insert UNMIX::DRUMS on the channel you wish to process. For this quick start tutorial, we'll
assume that you'll be working on some contemporary music.
• Using the default preset, you'll be presented with the MAIN view in the main parameter area.
Start out using this view until you’ve reached the “ballpark” of where you’re going.
• To boost the drums, adjust the magenta DRUM LEVEL ball clockwise, to attenuate the drums,
adjust it counter-clockwise
• You can use the three buttons underneath the DRUM LEVEL trackball to quickly set maximum
attenuation, no cut/boost or maximum boost.
BOOSTING DRUMS
• Adjust DRUM LEVEL for the desired amount of drum boost.
• If you're hearing too many non-drum sounds being boosted together with the drums,
increase the THRESHOLD setting
• If not all drums are being included in the boost, lower the THRESHOLD setting.
• If the reverb tail of the boosted drums is too long, lower the RELEASE value.
• If the boosted drums sound too dry/short, raise the RELEASE value.
• If your audio contains hard-panned drums and the stereo image gets too "nervous", try
activating the M/S function
!
ATTENUATING DRUMS
• Adjust DRUM LEVEL for the desired amount of drum attenuation.
• If too many non-drum sounds are being affected, raise the THRESHOLD value
• If you're not getting enough drum attenuation, lower the THRESHOLD value
• If the sound starts loosing too much treble or starts sounding "phased" or "dull", lower the
RELEASE value
• If while the attacks of the drums are being correctly attenuated, too much of their sustain
remains, increase the RELEASE value
!
UNMIX::DRUMS
35
!
User Manual v1.0.0
!!
!
!
!
Step 2: FINE-TUNE view.
BOOSTING DRUMS
• Try switching between SMOOTH and PUNCHY modes in the ALGORITHM section to see which
sound suits your audio best.
• If you're using SMOOTH and hearing a "buzz" in the treble, increase the value of DETECTION
DENSITY.
• If you're hearing too many non-drum sounds being boosted together with the drums, and
adjusting THRESHOLD did not solve this, try lowering the ATTACK value and/or the
DETECTION DENSITY value.
• If bass drums and other lower frequency drum sounds aren't being boosted sufficiently, try
increasing the ATTACK value
• If the boosted drums sound too "wet", try lowering the UNMIX FEATHER value
• If the boosted drums sound too "dry", try increasing the UNIX FEATHER value- If your sound
needs more OOOMPH, increase the BASS SYNTH value (carefully ;-) )
• If you want to accentuate the boost of shakers/hi-hats more, try lowering DETECTION
DENSITY
• If you're hearing too many attacks of pitched sounds in the boosted signal, try lowering
DETECTION DENSITY
!
ATTENUATING DRUMS
• If too many non-drum sounds are being affected, and raising the THRESHOLD didn't fix it, try
reducing the ATTACK, UNMIX FEATHER and/or DETECTION DENSITY values
• To remove more of the drums' sustain/reverb, try increasing the RELEASE value and/or the
ATTACK value
• If you're not getting enough drum attenuation, and lowering THRESHOLD didn't fix it, try
increasing the UNMIX FEATHER value
• If getting too many artifacts when performing strong attenuation, try lowering the MAX CUT
value.
• If you're hearing "envelope phaser" style modulated peaks/notches, increase the UNMIX
FEATHER setting and/or lower the RELEASE
!
UNMIX::DRUMS
36
!
User Manual v1.0.0
!!
!!
!
Step 3: Adding frequencydependent behavior using the
CURVES view.
UNMIX::DRUMS allows frequency dependently adjusting THRESHOLD, DRUM LEVEL and
RELEASE. The breakpoint curves are added/subtracted to/from the main parameter value
setting; the curves are an "offset" on top of the "base value" set with the knob. As the
parameters internally have max/min values, it is thus possible for <the value of the knob plus
the value of the curve> to reach the boundary. To make this transparent, a gray curve is
shown in addition to the yellow (THRESHOLD), magenta (DRUM LEVEL) and blue (RELEASE)
curves, which display the combined value. When adjusting the curves, it may be necessary to
adjust the base parameter values; we have duplicated the three parameters as horizontal
sliders at the bottom of the CURVES VIEW to make this not require switching views.
!
• (Boost & Attenuation) You can bypass processing for a specific frequency range by using the
THRESHOLD curve to increase THRESHOLD for that frequency region; adjust by the amount
needed to make the "effective value" curve (the gray line) cap out at the top of the display.
This can be very useful for example to prevent vocal plosives from being boosted by slightly
raising the threshold in the mid range.
• (Boost & Attenuation) You can use the RELEASE curve to smoothe out a frequency range in
time by increasing RELEASE for specific frequency range when performing a boost, or reduce
the effect of drum attenuation on vocals by reducing RELEASE in the midrange..
• (Boost & Attenuation) To make the process more sensitive for a specific frequency region, use
the curve to lower the THRESHOLD value for that region. This can be very useful to capture
more hihats/shakers, or "beefing up" kick drums.
• (Boost & Attenuation) You can use the DRUM LEVEL curve to tune the boost or attenuation
amount depending on frequency, for example to boost mainly kick drums and hihats by
slightly lowering the DRUM LEVEL in the mid-range
• (Boost & Attenuation) Using the DRUM LEVEL curve it is possible to boost the drums in
specific frequency regions while attenuating them in others -- simply lower the DRUM LEVEL
below 50% using the curve to attenuate the drums in a specific range of frequencies.
• (Boost & Attenuation) To expand on this - if you want to boost and cut simultaneously, we
recommend leaving the base DRUM LEVEL at 50% (no cut/boost), and use the DRUM LEVEL
curve to add the cut/boost
UNMIX::DRUMS
37
!
User Manual v1.0.0
The “About” Screen
!
UPDATE
Clicking on the zynaptiq logo in the top right of the plugin GUI opens the “About” screen. It
displays copyright information and version numbers, and allows opening the manual or going
to our website to find updates.
!
!!
!!
!!
!!
!
!!
!!
!!
!!
!!
!
!
!!
!!
!!
CHECK & DOWNLOAD
!
To check availability of an update, simply click on the “Check Version” button. Provided your
machine has internet access, you will be taken to our website, where you will find indication of
the current version number. If there’s a newer version available, simply download the trial
version from the UNMIX::DRUMS downloads page, and install over your existing installation any activation will carry over, and the trial version is the same as the full version.
UNMIX::DRUMS
38
!
User Manual v1.0.0
FAQ
!
Questions & Answers
!
!
!
!
!
!
!
!
!
!
!
!
!
Q: I am hearing ugly drop-outs/ring-modulation/distortion, what is causing that & what can I
do?
A: Most likely, you are overloading your CPU. The first thing you should try is to set the I/O
and/or processing buffers of your host to higher values, ideally 1024 samples or higher. This
will significantly decrease the CPU use and in most cases eliminates the artifacts mentioned
above.
Q: (Mac) Logic Pro shows me a “Sample Rate Mismatch” or similar error when inserting
UNMIX::DRUMS, and sound is distorted or stops altogether. What can I do?
A: You are overloading the CPU, but Logic is displaying the wrong error message. Increasing
the I/O and process buffer sizes usually cures this issue. If not, see the CPU load optimization
section below for some tips on how to get more out of your machine.
Q: Can UNMIX::DRUMS completely extract the drums of a piece of music?
A: No, UNMIX::DRUMS allows attenuating or boosting the drums strongly, but a full separation
is beyond the scope of what current-gen CPUs can handle in real-time.
Q: Will UNMIX::DRUMS separate the different drums from a stereo drum mix?
A: No, UNMIX::DRUMS treats all drums as “one thing”.
Q: When feeding UNMIX DRUMS with some types of signal – like 808 bass drums – I am
hearing some strange metallic sound. What’s that?
A: UNMIX DRUMS may cause some modulation artifacts when fed signal close to DC. This is
due to how the plugin works and is thus normal. You can prevent this sound by adding a 20hz
lowcut filter before the plugin.
!
UNMIX::DRUMS
39
!
User Manual v1.0.0
!
!
!
!!
Getting Support
If you’re having trouble with UNMIX::DRUMS that isn’t covered in these FAQ, please email us &
we’ll get you up and running ASAP. We can be reached via http://www.zynaptiq.com/supportform/
UNMIX::DRUMS
40
!
User Manual v1.0.0