1
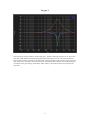
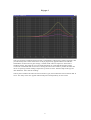
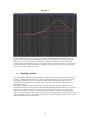
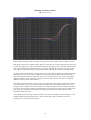
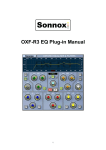
Oxford R3 EQ Plug-in Manual
For
1
Oxford EQ Plug-in Operation Manual
1 Introduction.
Congratulations on acquiring the OXF-R3 EQ for TC PowerCore. This application draws on the
considerable experience of the Oxford Team in professional audio and studio systems, the team that
designed the OXF-R3 console system. The Oxford EQ plug-in is based on the OXF-R3 EQ section and
provides a truly professional EQ processor for the VST and AudioUnit user.
It is a fully functional 5-band application with selectable shelf settings on LF and HF sections.
Additionally, separate variable slope low pass and high pass filters are provided. The EQ also features 4
different selectable EQ types that cover most of the EQ styles currently popular amongst professional
users, including some legacy styles, which are renowned for their artistic capability. The use of novel
coefficient generation and intelligent processing design provides unparalleled performance that
surpasses analogue EQ in both sound quality and artistic freedom.
2 Included Plugins.
Three separate plugin types are provided in this package to enable the user to optimise processing load
depending on requirements during session:
•
5 band EQ with Filters.
•
5 band EQ without Filters
•
Filter section only.
Mono and stereo versions of each type are also provided, for a total of six plugins.
3 System Requirements.
•
Approved TC Works CPU and hardware configuration
•
OSX 10.2 or higher (Macintosh version)
•
Windows XP (Windows version)
•
800x600 minimum display
•
A VST or AudioUnit compliant host application (e.g. Cubase / Logic / Nuendo / Spark /
Digital Performer)
•
One or more TC Works PowerCore devices (PCI or FireWire) with driver version 1.7 or
higher.
2
4 Installation.
All versions of the plug-in can be obtained by purchase from www.sonyplugins.co.uk or
www.sonyplugins.com websites.
When purchasing from the website, after entering your details and credit card number, a download link
will be displayed (and also emailed to you). When the link is followed, you will be prompted to enter
your PowerCore authentication ID and select the platform you require. To obtain your ID, see the
information below.
Once submitted, you will be issued a download link via email for your plugins, which are now uniquely
locked to your PowerCore. NOTE: If you have multiple PowerCores, ensure you enter the
authentication ID for a device that is installed in the system used with your plugins, as this cannot be
changed after it is submitted!
You may re-request your software from this link at any time. This allows you to easily obtain future
updates. Additionally, this allows you to (for example) request a PC rather than Macintosh version (or
vice versa - remember, your software is locked to your PowerCore, not your computer).
The installer file is in .zip format which can be extracted using (for example) Stuffit Expander on the
Macintosh, and by WinZip or the operating system for PC versions.
Obtaining your PowerCore Authentication ID
Macintosh
Click the Apple icon at the top left of your screen, then select ‘System Preferences…’ from the drop
down menu which appears. When the Preferences window is displayed, click ‘POWERCORE’
(normally at the bottom left), ‘Configure’, and then the ‘Information’ tab in the PowerCore control
panel. Your authentication ID is now displayed (in the form XXXXXXX-XXXXXX-XX).
Windows
Click the ‘Start’ icon at the bottom left of your screen, then ‘Settings’->’Control Panel’. When the
Control Panel is displayed, double click the ‘POWERCORE’ icon, and select the ‘Information’ tab.
Your authentication ID is now displayed (in the form XXXXXXX-XXXXXX-XX).
Macintosh Installation
Double click the ‘Setup’ icon to begin. Follow the onscreen prompts.
The installer will install your plugins into the ‘/Library/Audio/Plug-Ins/VST/Sony’ folder, and register
them for use as AudioUnits.
Windows Installation
If any older versions of the plugins are installed, remove them via the ‘Add or Remove Programs’
control panel before continuing.
Double click the ‘Setup’ icon to begin. Follow the onscreen prompts.
The installer will attempt to detect your shared ‘VSTPlugins’ directory, but you may also select
another location if desired.
Revision History
•
8th September 2003 – PowerCore update for v1.7 drivers
3
5 Control list and functions.
The Plug-in user interface consists of two sections for EQUALISATION and FILTERING functions.
The filter section controls, included in the EQ GUI, are greyed out when the filter is not in use, and vice
versa. Note that placing the pointer over any rotary control will indicate the current value without
parameter change.
1. About.
Click the Sony logo to display registration and version information.
2. Response display.
Displays current active EQ and filter response curves. The graph will rescale to match the current
sample rate.
3. LF and HF (19.) SLOPE button.
Selects LF and HF filter Slopes 6dB – 36dB/oct in 6dB/oct steps.
4. / LF and HF \ (17.) button.
Switches low pass and high pass filters in/out.
5. LF and HF (15.) FILTER FREQ controls.
Sets LF and HF filter turnover frequencies.
4
6. FREQ controls.
Sets the centre frequencies or turnover frequencies for shelf curves.
7. Q controls.
Sets bandwidth of EQ curves. Sets amount of overshoot function in shelving sections.
8. LF and HF (14.) Shelving buttons.
Select shelving function for high and low EQ sections.
9. +/- controls.
Sets Boost or cut gains.
10. IN buttons.
Allow individual EQ sections to be switched in/out.
11. A & B (13.) buttons.
Two complete EQ / filter settings can exist simultaneously. The A&B buttons allow toggling between
them for comparison purposes.
12. Gain control.
Sets the attenuation level to the EQ section to avoid clipping signals when in boost.
13. A & B buttons (as 10.)
14. LF and HF Shelving buttons (as 8.)
15. LF and HF FILTER FREQ controls (as 5.)
16. +/- buttons
Selects EQ function types. Four types are offered on the Oxford R3 EQ plug-in.
18. IN button.
Applies the EQ function type selected by +/- push buttons in (22.) The IN button light will go out if
another EQ type is selected, indicating that the EQ remains unchanged until the IN button is depressed.
20. 8 Character display.
Displays the graph type selected by +/- buttons in (22.).
21. Overload indicator.
Displays signal overload at the output of the EQ and Filter sections. The default mode for this function
is latching, requiring a click to reset. Clicking and holding on the overload area produces a pop-down
menu that enables selection of either 2 or 5 second time out settings to facilitate initial EQ adjustment.
No Latency mode
No Latency mode can be switched on or off from the menu which appears when the top left of a plugin
is clicked.
Mouse rate control
In linear mode (see below), fine adjustments to any control setting can be achieved by pressing the
‘Apple command’ (Macintosh version) or ‘Shift’ (PC version) key before clicking on the control to be
adjusted and holding this key down during the operation.
This rescales the control rate with the mouse movement so that very fine adjustments can be made.
5
Knob control modes
If your host application supports it, all plugins can support three modes of control for knobs: Circular
(the control is set to the value at which it is first clicked, and the value then increases or decreases with
circular mouse movement), Relative Circular (the control’s value increases or decreases with circular
mouse movement relative to its initial value), and Linear (the control’s value increases or decreases
with up and down mouse movements respectively).
At this time, Cubase and Nuendo are known to support this feature. For example, in Cubase 5.x, select
the ‘Edit’ menu, and choose ‘General...’ from the ‘Preferences’ submenu. You may then choose the
mode from the ‘Knob Mode’ drop down box in the Preferences dialog. In Nuendo or Cubase SX, select
the ‘File’ menu, and click ‘Preferences’. When the dialog box appears, click the ‘Controls’ item; you
can then choose the mode from the ‘Knob Mode’ drop down box.
If you are using any other host, please consult your user manual for more information.
6 Oxford EQ Specifications and Control ranges.
Section
Gain
Frequency
LF Filter
LF Peak/Shelf
LMF
MF
HMF
HF Peak/Shelf
HF Filter
6dB/Oct steps
+/-20dB
+/-20dB
+/-20dB
+/-20dB
+/-20dB
6dB/Oct steps
20Hz - 500Hz
20Hz - 400Hz
30Hz - 600Hz
100Hz - 6KHz
900Hz - 18KHz
2KHz - 20Khz
1KHz - 20KHz
Total dynamic range
Harmonic Distortion
Control induced noise
Q/Slope
> 138dB* (RMS unweighted)
Undetectable
< -95dBr (peak)
0 –36dB/Oct
0.5 – 16
0.5 – 16
0.5 – 16
0.5 – 16
0.5 – 16
0 –36dB/Oct
Overshoot
0 – 50% (Q adjust in Shelf)
0 – 50% (Q adjust in Shelf)
For any single section, including filters
Using FFT analysis down to –160dBr
During adjustment of any single control
* Excluding excess noise produced by the EQ applying gain to a 24bit dithered but silent input, or cascaded EQ applying gain to
previous sections.
7 EQ types included in the Oxford Plug-in.
Programme equalisers have expanded, beyond their original use as distance correction devices for film
and vision, into highly creative tools that represent a leading part of the sound engineer’s artistic
palette. A great many EQ designs have been developed over the years that have been attributed with
qualities that lend themselves to particular uses and sounds. The Oxford EQ plug-in is designed to be
flexible enough to address as many of these generic types as possible from a single application, by
presenting a variety of types to the user. The following pages are presented as a general explanation of
many of the factors that affect EQ performance and to illustrate how we have addressed these issues
with the Oxford EQ plug-in.
Many types of EQ exist with many areas where they differ. One of the most important areas is the issue
of control ranges and interaction. Whilst it is true that with a parametric unit with continuous controls
(i.e. not quantised) any response could be obtained by matching their curves, many of the popular EQs
have control dependencies that err towards specific application. One of the main areas where EQs differ
is Gain / Q dependency. Most analogue EQ has Gain / Q dependency as a result of the circuits used.
This factor can greatly affect the artistic style that an EQ presents by facilitating certain parameter
settings and encouraging particular uses when the unit is operated.
In the Oxford EQ plug-in we have covered this situation by providing 3 different styles of EQ that take
account of Gain / Q dependency as well as overall control ranges. The following section describes these
options.
6
7.1
Bandpass sections.
EQ type 1
This style has minimal Gain / Q dependency, smaller amounts of boost or cut still have relatively high
Q and it is therefore precise and well defined in use.
However it is sometimes difficult to obtain overall EQ fill on combined sources and subtle EQ on
vocals and the like, as the user needs to adjust the Q control to maintain an effect when the gain is
changed. Failure to understand this fact has often added to the reputation of this type of EQ for
sounding ‘hard’ or ‘harsh’. However, because the user retains separate control of all its parameters, this
EQ is still the most flexible for users that have the time and patience to spend when using it.
It is most like the original 4000 series SSLs, and other ‘clinical’ styles of EQ that became popular in the
1980’s.
7
EQ type 2
The type 2 EQ is exactly similar in boost as the type 1, but has constant Q responses in cut. This is the
only type of EQ offered in the Oxford plug-in that has unsymmetrical curves. Therefore EQ done in
boost cannot be readily reversed by cut afterwards. The EQ resembles some speciality legacy units and
lends itself well to resonance control for percussion instruments such as drums, since relatively high Q
is available at low gain settings, whilst fairly subtle ‘fill EQ’ can be achieved in boost settings at the
same time.
8
EQ type 3
This style of EQ has a moderate amount of Gain / Q dependency whereby the Q reduces with gain. This
provides the EQ with a softer characteristic as EQ is progressively applied and since the effective
bandwidth is increased for low gain settings, it sounds louder and more impressive when used at
moderate settings. The gentler Q curve also lends itself better to overall EQ fills and more subtle
corrections in instrument and vocal sources. Turning the Gain control seems to produce the effect that
the ear is expecting without needing to adjust the Q control too often. Therefore EQs of this type are
often dubbed as ‘more musical sounding’.
This EQ most resembles the older and well-loved Neve types, their modern derivatives and later SSL G
series. Also many of the more popular outboard EQs have this dependency to some extent.
9
EQ type 4
EQ type 4 builds on the type 3, using a far greater Gain / Q dependency which maintains an almost
equal area under the curve in the boosted region with gain control operation. It is extremely soft and
gentle in use and is most suited to overall EQ fill and character modification for mixed parts (and
completed mixes) where subtle changes in overall impressions are required. Therefore it will also prove
useful in mastering situations where there is requirement to match the sounds of tracks from different
sources on a common production release.
7.2
Shelving sections.
In the Oxford EQ, the highest and lowest bandpass sections can be independently switched to shelving
functions. Although shelving functions are often considered elementary, they are by no means all the
same and their importance to the sound engineer should not be underestimated. Various types in
common use are considered to favour certain types of use or are considered preferable by users of
differing persuasions.
Our analysis of common shelving EQs has shown that one of the most important differences in the
sound of the shelving EQ is the response around the band immediately below the HF section (and above
the LF section). Many of the most loved classical EQs have a degree of ‘undershoot’ in this region
(when in boost), either by design or as a result of circuit limitations in legacy units. Therefore most
units can be characterised by control within this region of the frequency response. In appreciation of the
importance of this parameter, the Oxford EQ provides the facility to modify the response in this region
to provide differing styles of shelving EQ.
10
Shelving overshoot control
(HF shelf Q control)
When the HF shelving function is selected, the Q control provides control of the ‘overshoot’ function.
With the Q control set to minimum (yellow plot) the section has no overshoot and performs a basic and
accurate shelving function. This is most like the responses provided by the original SSL 4000 EQs and
many other outboard units often described as ‘clean’ EQs. Although these are still very popular units,
some engineers complain that they can sound harsh and overbearing in comparison with legacy EQs
As the Q control is increased the overshoot factor is also increased. For instance the red plot shows the
slight dip in the response at around 1.5KHz for a boosted HF setting of 6KHz. This has the effect of
suppressing the perceived mid range boost that occurs with the previous ‘clean’ variety, reducing the
apparent ‘hardness’ of the sound. This, along with the increased slope rate, provides more apparent
definition to the EQ in the band of interest.
The purple plot shows the effect of the Q control in mid position. This produces a gain loss of around
10% (of the boost gain) in the overshoot region and further defines the effect described above. This
setting provides a response most like the legacy Neve designs and their derivatives and the later SSL G
series EQs. This response produces an optimum effect by providing what the ear expects to hear as the
gain control is operated and can explain the enduring popularity and renowned musical qualities
attributed to EQs of this type.
At maximum (blue plot), the Q control provides for an overshoot of half the total boosted gain, i.e. for
+20dB total HF boost the maximum loss in the overshoot region will be –8dB. The curves are
symmetrical in cut and boost gain settings.
11
8 Automation
Automation is fully supported by all plugins. Additionally, automation recorded with EQ setting A is
completely independent of automation recorded using EQ setting B. This allows you, for example, to
perform two automation passes and compare the two.
9 Sample Rate Support
All plugins are designed to operate at sample rates of up to 96 kHz. Please be aware that running
plugins at 96 kHz will mean you can use half the number you would be able to run at 48 kHz. When
you change the sample rate, the graph will automatically update (rescaling its range).
You should also note that the stereo EQ and Filters plugin is too large to fit in one chip at 96kHz in the
PCI PowerCore; therefore, it will be split over two chips.
10 Plugin Sizes
The table below shows the number of plugin instantiations possible rate in a single chip at the three
most common sample rates. Note that there are four chips per PowerCore.
Plugin
EQ
Filters
EQ and
Filters
Mono
Stereo
Mono
Stereo
Mono
Stereo
Plugin
EQ
Filters
EQ and
Filters
Mono
Stereo
Mono
Stereo
Mono
Stereo
Instantiations per chip per sample rate (PCI)
44.1 kHz
6
3
5
3
3
1
48kHz
5
3
5
2
3
1
96kHz
2
1
2
1
1
1*
Instantiations per chip per sample rate (FireWire)
44.1 kHz
5
3
5
3
3
2
48kHz
5
3
5
3
3
2
96kHz
2
1
2
1
1
1*
*Too large to fit in one chip; plugin is therefore split over two.
11 Troubleshooting and host notes
11.1 General issues
In general, all issues that apply to the PowerCore and PowerCore plugins in general apply to the Oxford
plugins. It is always worthwhile consulting the PowerCore user manual first if you are experiencing
problems not discussed in this manual, and also TC Electronic’s support database at
http://www.tcelectronic.de/.
For example, if your host supports delay compensation (as current versions of Logic Audio, Cubase,
and Nuendo do), you should ensure this option is enabled to ensure that no additional latency is added
to audio processed by the Oxford plugins. At the time of writing, latency compensation is unsupported
12
by some hosts, and it is necessary to use the TC Compensator plugin. These topics are discussed at
length in the PowerCore manual, so it is suggested the user refer to this for further information.
Latency in general can be reduced by lowering your soundcard’s buffer size, but usually at the expense
of increased CPU usage. This is normally achieved from the soundcard’s control panel when no host
applications are running, but consult your user manual for more details.
In general, if you do experience problems which may be of a general nature, it is always worth doing
the following:
•
•
•
checking to see if the same issue arises with the included TC plugins;
updating your host software to the latest release;
downloading the latest drivers for your hardware;
12 Copyright and acknowledgements
Trademarks and content copyright & copy; 2002 - 2003 Sony Business Europe. All rights reserved
TC PowerCore, the TC PowerCore Logo and all TC product names are trademarks or Registered Trademarks of TC WORKS or
TC ELECTRONIC.
VST is a Trademark of Steinberg AG.
All other product and company names are Trademarks or Registered Trademarks of their respective holders.
13