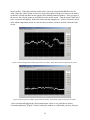
1
ABSTRACT
This report and its accompanying webpage (http://www.whoi.edu/science/PO/rafos/) describe
the processing steps for RAFOS floats, from subscribing to Service Argos to plotting the final
data for a data report. The MATLAB-based tracking software ARTOA-II is described in detail.
ARTOA-II allows the user to convert raw hexidecimal data to decimal format, calculate float
clock drifts, edit raw data, and use the time-of-arrival data to calculate float trajectories. The
intention is that this report will provide a handy reference and it will be kept from becoming outof-date by updates to the relevant webpages.*
*
As of April 2005, ARTOA3 is available for download from http://www.whoi.edu/science/PO/rafos/. This manual
is a necessary starting point for the software, but please visit the website for additional documentation before
starting a project.
i
ii
TABLE OF CONTENTS
ABSTRACT..................................................................................................................................... i
TABLE OF CONTENTS............................................................................................................... iii
I. BACKGROUND ........................................................................................................................ 1
II. DATA ACQUISITION ............................................................................................................. 1
1. Using Service Argos ............................................................................................................... 2
2. Acquiring data from Service Argos ........................................................................................ 3
III. PROGRAM ARTOA-II ............................................................................................................ 4
1. Program Environment............................................................................................................. 4
2. Preparing Parameters for Tracking ......................................................................................... 4
3. Preparing Parameters for ARTOA-II...................................................................................... 5
4. Program Inputs........................................................................................................................ 6
5. Program Outputs ..................................................................................................................... 6
6. Running Program ARTOA-II ................................................................................................. 7
7. Reading Data into ARTOA-II................................................................................................. 8
8. Editing Options ..................................................................................................................... 10
9. Editing Temperature and Pressure ........................................................................................ 11
10. Editing Times of Arrival..................................................................................................... 13
11. Creating the INTerim file.................................................................................................... 17
12. Tracking .............................................................................................................................. 17
13. Error Messages.................................................................................................................... 19
14. Completed Trajectories....................................................................................................... 20
IV. ACKNOWLEDGEMENTS.................................................................................................... 24
V. REFERENCES......................................................................................................................... 24
VI. GLOSSARY ........................................................................................................................... 25
VII. APPENDIX A: Description of input and output files for ARTOA-II.................................. 26
1. Input Files ............................................................................................................................. 26
2. Output Files........................................................................................................................... 30
VIII. APPENDIX B: Description of related programs ................................................................ 33
1. Preparatory Program ............................................................................................................. 33
2. Plotting Programs.................................................................................................................. 33
3. Other Programs ..................................................................................................................... 35
LIST OF FIGURES
Figure 1. Main Toolbar ................................................................................................................... 7
Figure 2. File Selection Window .................................................................................................... 8
Figure 3: Selected temperature window ....................................................................................... 12
Figure 4: Selected pressure window ............................................................................................. 12
Figure 5: Unedited Times of Arrival window............................................................................... 14
Figure 6: Editing-results window – selected TOAs...................................................................... 16
Figure 7: Editing-results window – interpolated TOAs................................................................ 16
iii
Figure 8: Tracking parameter window.......................................................................................... 18
Figure 9: Trajectory window ........................................................................................................ 21
Figure 10: Plot of velocities.......................................................................................................... 22
Figure 11: Magnified plot of Time of Arrivals............................................................................. 22
iv
I. BACKGROUND
Oceanographers have used acoustically tracked sub-surface floats since the 1960's. There have
been many improvements, but tracking them remains a challenge because the submerged
locations are only available indirectly.
In the early 1980's, Bill Schmitz established a small group at WHOI dedicated to using
acoustic floats to measure ocean currents. Tracking software was adapted by Breck Owens from
a set of programs used by Tom Rossby at URI. During the next 14 years the group tracked
around 150 SOFAR floats. In order to decrease the cost of float experiments, Rossby developed
the RAFOS float, which is smaller and cheaper than SOFARs and could be used in larger
numbers. As part of WOCE, Breck Owens and Jim Valdes developed an improved version,
which was deployed in large numbers as part of the Brazil Basin Experiment starting in 1994.
WHOI scientists have now tracked over 350 RAFOS floats, have 50 currently deployed, and
have more planned to deploy in the future.
When we switched to RAFOS floats we modified the SOFAR processing and tracking software
to track RAFOS floats. Recently (1997) it was decided to switch to a newer Matlab-based
tracking scheme. ARTOA-II is a single integrated package of Matlab routines that makes it
possible to track a float in a single session. It represents a complete overhaul of previous
programs and has been developed in stages by Claudia Schmid (at IFM, Kiel), Martin Menzel
(IFM, then IFREMER in Brest), and Olaf Boebel (IFM, URI) (Anderson-Fontana et al., 2001).
Heather Furey and Roger Goldsmith (WHOI) have worked with Olaf Boebel (now at AWI) to be
sure the package includes options such as least-square tracking and Doppler-shift calculations.
The current tracking program, ARTOA-II, takes the float from raw data through the final track.
By having all the steps in a single program, one can go back and correct the track by making
changes at any point in the process --- removing or replacing a bad point in the times-of-arrival
(TOA) series; adding or subtracting a time-constant or drift to the float or any sound source. The
results can be compared and the best one selected.
Modules have been written which permit data to be read into ARTOA-II directly as received
from Service Argos. Previous versions of ARTOA-II included a module to read data from
MARVOR floats (versions 1 and 2). At WHOI we have added an option to read data from
Seascan DLD RAFOS floats.
II. DATA ACQUISITION
SOFAR floats transmitted a signal that was recorded at several Autonomous Listening
Stations. Data tapes had to be recovered from the moored ALS and brought to the laboratory for
processing. The RAFOS floats receive signals transmitted by moored sound sources (hence the
acronym in-version). When the RAFOS float has terminated its mission, it surfaces and
transmits the times it recorded sounds and the sounds’ correlations with a standard pattern. This
1
transmission is heard by satellites that forward the information, ultimately, to the laboratory.
Two satellite-service providers are Orbcomm (http://www.orbcomm.com) and Service Argos.
Because Service Argos is used more frequently, we will discuss it here.
1. Using Service Argos
http://www.argosinc.com/getting_start.htm∗
The first step in using Service Argos is to make an application using the System Use
Agreement form (http://www.argosinc.com/documents/SUA.pdf). Usually the description of the
program can be easily abstracted from the proposal for the experiment. To the question "Is there
a government interest in the collection of the data?" a standard reply is:
Government funded; Data utilized by government agencies.
Special requirements such as non-standard repetition rates can be requested. Include the
technical page with the System Use Agreement (http://www.argosinc.com/documents/SUAtech.pdf). This addresses questions like the brand, power-requirements, and model of the
transmitter to be used.
The System Use Agreement should be submitted several weeks before first deployment. When
it is approved, you will receive a "Program Review" with the program number, Argos ID
numbers (decimal and hexadecimal), and username and password for on-line access, if
requested.
At this point, a Technical File should be completed (http://www.argosinc.com/documents/technical_file.pdf). This covers details of data processing and transmission. If your experiment
requires multi-satellite service (useful in areas of sparse coverage) or accurate time-coding
(thousandths of seconds), request them in the Technical File. If Automatic Distribution Service
is requested, an ADS Technical File (http://www.argosinc.com/documents/ADSTF.pdf should be
included. This states which IDs should have data sent automatically, and how it is to be sent.
Once the platforms have been deployed, it is helpful to send a list of deployment locations to
Service Argos ([email protected]). If the platforms will be submerged for some length
of time, a predicted surfacing date should be included. Service Argos will enter the deployment
location into a database, which should decrease the time it takes to accept locations for the
platform. (One criterion for acceptance is "How fast did this platform travel from its last
location?")
A Service Agreement form must be filled out each year (http://www.argosinc.com/documents/SAxx.pdf). It ratifies the services needed and the method of payment. WHOI has an
arrangement with Service Argos to use grant numbers directly, without requiring Purchase
Orders.
The Argos User's Manual is available on-line at http://www.cls.fr/manuel.
∗
This, and subsequent, Service Argos URL is for use within the United States. The alternate international site is
http://www.cls.fr/html/argos/welcome_en.html.
2
The Argos Joint Tariff Agreement regulates use of Service Argos by scientists. NSF and ONR
usually pay the daily charge per ID directly. This charge is negotiated under the JTA and the
JTA Representative of Country annually requests a form estimating usage for the next calendar
year. For more information, see:
http://www.ogp.noaa.gov/argos/index.htm
2. Acquiring data from Service Argos
Data can be acquired from Service Argos by any of several methods. One approach is to have
a dedicated email address for an experiment, and use scripts to retrieve the data from the mailserver. Another is to use scripts to telnet to Service Argos and download the data. The latter is
currently the less-expensive option. Service Argos will also ftp a file directly to a directory on
your computer, although this can raise security issues.
Data may also be acquired via a web-interface from a PC (Windows OS only). The program
for accessing the web-interface can be downloaded at http://argosdata.argosinc.com. Once
installed, it permits the user to manage an account (request additional ID’s, e.g.). This webpage
can create plots and tables of data, as well as offer data in standard Argos formats. Although this
is a quick way to check data (especially once a “customized download” has been set up), it is not
useful for automating data acquisition.
Sample scripts for both email and telnet methods are available on our webpage. The sample
scripts available for retrieving email were originally written at WHOI by Ellyn Montgomery.
They have been modified by other users.
(http://www.whoi.edu/science/PO/rafos/argos/email.zip)
These sample scripts use Perl modules that can be downloaded from the website:
http://www.CPAN.org/
Some of the module names are:
POP3Client
IMAPClient
Telnet
The webpage for Perl is: http://www.perl.com. Perl is available for Windows computers as well
as UNIX and Macintosh platforms. In addition, the telnet approach uses an Expect script for
the actual telnet session. The sample scripts available on our webpage were written by Claudia
Schmid at NOAA/AOML/PhOD (Miami).
(http://www.whoi.edu/science/PO/rafos/argos/expect.zip) Expect is available for Windows and
UNIX platforms. Webpage: http://expect.nist.gov.
Subsequent discussion of Argos data assumes the data has been transmitted in Service Argos’
“DS” format, using 32-bit variables. Samples of this format are in Appendix A.
3
III. PROGRAM ARTOA-II
1. Program Environment
ARTOA-II uses graphical user interfaces and menus for operator control. Because selection of
times of arrival and tracking are done in a single program, the user can move back and forth
between these two steps as needed. This facilitates correcting bad points at the TOA stage rather
than in the output file, which discards less of the available information, and produces a more
accurate track.
ARTOA-II uses a file of all the parameters for all the sound sources. The Parameter
information for each float is in a separate file.
ARTOA-II uses Matlab Version 7.0 or higher and requires the following toolboxes, routines
and files:
• The ARTOA-II package
• The Matlab Spline Toolbox
• The hydrographic toolbox version 1.4 written at the Woods Hole Oceanographic
Institution by Rich Pawlowicz.
• The Mercator routines written at the Institut fur Meereskunde in Kiel by Wolfgang
Erasmi.
The hydrographic toolbox and the Mercator routines come bundled with the ARTOA-II
software. They can also be obtained with a browser from
http://www.ifremer.fr/lpo/eurofloat/software.html
2. Preparing Parameters for Tracking
Before ARTOA-II can be run, information must be collected on the sound velocity in the
experiment area, and on the drifts of the clocks in the sources and floats. The module that
converts the float data from hexadecimal to "rfb" format computes the float clock drift by
comparing the float clock time to the time recorded by the Argos data system when the float
surfaces, and inserts it into the appropriate header record.
Sound-source clock drifts are often measured directly at the time the source is retrieved, by
comparing its clock to standard time. A dedicated listening device can be used and the results
compared to standard time. A comparison can be made for several floats of the distance between
a float's surfacing location and the source, and the last travel-time between them. Finally,
sometimes a final offset will be derived by trial-and-error. The accuracy of this calculation is
dependent on the accuracy of the sound velocity used. Care should be taken when extrapolating
the float's location back to the time of the last TOA, as this also affects accuracy. The final
offset is added to the initial offset and divided by the number of pongs during the deployment to
calculate the drift.
4
Sound velocity can be calculated using ray-tracing programs, or by comparing the distance
between a known float location (usually the launch location to minimize clock drifts) and source
location and the travel-time between them. To use an a priori sound speed, specify the value in
the Sound Source file and select ‘Sound Source File’ in the tracking-parameter window.
Otherwise, ARTOA-II can compute the sound speed by several methods.
Another thing to consider are leap seconds – one-second adjustments that are made to keep
atomic clocks matched to astronomical time. The difference between a submerged clock
(uncorrected) and a standard clock (corrected) will be affected. All leap seconds are positive.
The website below keeps track of leap seconds:
http://www.boulder.nist.gov/timefreq/pubs/bulletin/leapsecond.htm
ARTOA-II calls ‘leapsec.m’ from ‘uitoa.m’ and applies leap-second corrections to the TOAs.
3. Preparing Parameters for ARTOA-II
Two modules, ‘makeSOSOfile’ and ‘makeHDRfile’, are included in the ARTOA-II package
that build the sound source and RFB (rafos float begin) header input files necessary to run the
ARTOA-II software. These modules exist independently from the ARTOA-II tracking software.
The sound source file contains all metadata (e.g., position, drift) related to each source used in an
experiment, and the header file contains all metadata associated with each float (all the lines in
the RFB file to which the float data is appended).
In previous versions of ARTOA, the sound source and RFB files were created by modifying
metadata and cutting and pasting new data into files, using sample files bundled with the
software package as templates. These sample sound source and RFB files are still bundled with
this release of the software, so users are welcome to continue cutting and pasting. The two
Graphical User Interface (GUI) modules described below are useful for two reasons: (a)
formatting errors are avoided by using the GUIs, and, more importantly, (b) the header file is
necessary input for the ARGOS → RFB data module within the ARTOA-II software if no RFB
file exists.
Program to create sound source file
Typing ‘makeSOSOfile’ at the Matlab command line calls up a GUI that allows the user to
create or modify a sound source file. The GUI contains spaces to enter all information listed and
defined in Appendix A, under ‘The sound source file’. Once a sound source file is named, that
file is either initialized or opened. A sound source can be added or chosen from a pull down list
(if opening an existing file), and that source entry may then be modified.
Program to acquire and format header information
Typing ‘makeHDRfile’ at the Matlab command line calls up a GUI that allows the user to
create or modify a header file. The GUI contains spaces to enter all information listed and
defined in Appendix A, under ‘Main float file: rfbnnn.rfb/Header file: .hdr’. Once a float *.hdr
file is named, that file is either initialized or opened for modification. Two pushbuttons: ‘save
5
HDR file’ and ‘save RFB file’ allow the user to create/save both types of file, with an additional
text box that allows the user to enter the data file location for the RFB file.
4. Program Inputs
Please see Appendix A for the detailed description of the ASCII files mentioned below (i.e.,
not ITM).
•
Initialization file, called ‘artoa.ini’ by default. The initialization file specifies the path to
each kind of input or output file, and its extension. The default is assumed to reside in
the same directory as the ARTOA-II software. To use a different file, invoke it on the
command line (use complete path):
>> artoa('-i','myfile.ini')
•
Sound source file - no restrictions on name; it is specified in the initialization file. This
file contains all information needed for every sound source used.
•
ARGOS file – default extension .arg; the input data as it is received from Service Argos.
Implemented for Marvor and Seascan DLD floats only.
•
RFB file - extension .rfb; the standard input file with unedited TOAs, temperatures and
pressures, and a header specifying all needed information about this "cycle" (or mission)
of the float.
•
Header file – extension .hdr; contains only the header of a RFB file.
Interim (ITM) file - extension .itm; this file is both an output and input file of ARTOA. It is
in Matlab binary format, and stores all information read into or created by ARTOA at the
point when the .itm file was made.
5. Program Outputs
•
Surface (SFC) file – extension .sfc; contains Argos locations for the transmitter.
•
Status (STS) file – extension .sts; contains system information about DLD that gets
transmitted with the data.
•
ITM file - see above
•
RFC file - extension .rfc; the traditional output from ARTOA. It contains date, latitude,
longitude, velocity, temperature, pressure and quality information. It also contains source
and float parameters in a header.
•
TRJ file - extension .trj4; this is an abbreviated format for the trajectory information. It
has a single-line header (float and cycle number) and records each have truncated Julian
day, latitude, longitude, pressure and temperature, only.
6
6. Running Program ARTOA-II
The user must complete the following steps to calculate a float trajectory: (1) acquire the Times
of Arrival (TOAs), correlation, and temperature and pressure information from an Argos or .rfb
file; (2) edit the raw temperature and pressure values; (3) select the TOAs for the float and
apply them to the correct sound sources; and (4) track the float and create a trajectory by
converting the TOAs into distances between floats and sound sources.
Do not close a window by clicking at the upper corner of the figure. This is especially
important for the main window of ARTOA-II. All editing will be lost if you close it by accident.
(Matlab cannot control this window button.) Close the windows by using the “close” button,
either included on the GUI figure or as a pull-down menu item under “File”. When changing the
float being tracked, we recommend that you exit ARTOA-II and execute the “clear all”
command at the Matlab prompt, because some global data can remain when a new float is
loaded.
Editing figures have "print" and "zoom out" buttons. The “print” button prints the figure area.
An area of any plot may be enlarged by placing the cursor at any corner of that area, holding
down the left button, and dragging the cursor in the direction which will enclose the desired area
in the guide lines. When the left button is released, the screen will be redrawn with the new
limits. The "zoom out" button returns the figure to its original limits. Trajectory figures can be
blown up in the same way. Although there is no "zoom out" button, clicking the right mouse
button will increase the area of the figure by steps back to the original limits.
Start Matlab. Be sure to establish the path to ARTOA-II, if needed:
path(path,’c:\matlab\ARTOA\artoa2’)
You may want to change directories, but most paths to input and output are handled by
‘artoa.ini’.
From Matlab, execute ‘artoa.m’ by typing ‘artoa’ at the Matlab command line. There is a flash
screen, and then just the main toolbar:
Figure 1. Main Toolbar.
on which only four buttons are "live", connecting to the following cascading menus:
File → Load → ARGOS file
→ RFB file
→ Interim file
File → Save → TRJ4 File
→ RFC File
→ Interim File
File → Quit
7
Options → reload data → Reload ARTOA Init File - updates initialization information
→ Reload Sound Source Data - updates sound source information during
processing
→ Overload RFB File - reloads the RFB header information for the float
being processed. You may overload the header information even if you
began with an .itm file – this does not reload the rest of the rfb data.
Statistics - not implemented yet
Help → About ARTOA - gives flash-screen (with websites)
→ Float info - gives all information in RFB header
→ Soso info - gives all information in the sound-source file
Click on the File → Load option and select your file type. When you select a kind of data to
load, a file-selection window appropriate to your platform will be opened, and a specific file can
be selected.
Figure 2. File Selection Window (on a PC).
7. Reading Data into ARTOA-II
Starting with Argos data
In an effort to handle all currently deployed floats, the modules read data transmitted under
Service Argos’ previous 20-bit-identifier (ID) format and the current 28-bit-ID format (which
differs a bit depending on how many bits of ID the float actually uses). Determination of the
kind of ID is made by looking for either “20” or “28” in the “-type” record of the header, and by
examining the PTT decimal identifier. Marvors are recognized by “-type” being either
‘MARVORv1’ or ‘MARVORv2’
8
The program expects a raw data file (.arg), and a file with the header information ARTOA-II
needs (either a .hdr or previous .rfb file). This module can be run recursively, as more of the
Argos messages are acquired. Output files include an rfb…rfb file containing the header (with
the optional addition of the float clock-drift) and TOAs, correlations, temperatures, and
pressures; a status file (.sts), containing two records per status message; and a file containing the
locations calculated by Service Argos for the transmitter (.sfc). The default names for the latter
two combine the “-floatname” from the header and the extension. The default name for the rfb
file is the float number (numeric part of “-floatname”) with rfb before and .rfb after.
ARTOA-II brings up a file-selection window (“Select Raw File”) for the Argos data file.
Select a file. Then comes a “Select Header File” window (“.hdr” is the default). The path and
filename of the selected files are echoed in the Matlab command window. The command
window then requests four inputs:
>> Do you want clock error [y/n]?
>> Do you want to keep bad checks [y/n]?
>> Enter new P-target or return:
>> Enter new T-target or return:
If you want ARTOA-II to compute the float clock drift and insert it into the second “-offset”
record (in place of “0.00”), answer “y” to question one. If you are interested in filling in data
gaps with messages that fail the CRC test, answer “y” to the second question. If you want to
override the pressure or temperature “target” (the values at the time the float released its weights,
read from the first part of the status message), type that value in the command window;
otherwise hit “return”.
ARTOA-II will now report
>> Testing for RAFOS data file rfbXXX.rfb
If the file is found, the header and any pre-existing messages will be read and stored. When the
raw data file has been read, the same filename will be re-used and old and new messages written
to it. If a file by that name does not exist, a file-selection window will open (“Get old .rfb file”),
and you may select an alternate file in rfb format. Click the “cancel” button in the file-selection
window and ARTOA-II will report
>> Creating file rfbXXX.rfb
The same steps will now be followed for the status (.sts) and surface (.sfc) files. If files with
the default names are found, they will be wound forward and new data appended. If not, you
may select files with other names, or “cancel” the selection windows, and files with the default
names will be created. In the case of the status file, three header lines will be written to it.
ARTOA-II will read through the Argos file, decoding TOAs, correlations and temperatures and
pressures. When it reaches the end of the Argos raw file, it will report (in the command window)
>> EOF on file xxxxxxxx
If you requested clock-error calculation,
>> Clock stats for 10 messages: mean –1.7257 std 0.00478
Where the numbers in italics are examples (10 is maximum number of input-messages used). Or
>> *** No valid times for clock correction.
indicates no status messages or none passed check. If no messages were added during this run,
you’ll see
9
>> No new messages
Otherwise, ARTOA-II will report
>> Obtained 81 new messages
and list the raw message numbers in the order they were read.
Finally, ARTOA-II will display
>> Messages read: 3464 Passed check: 2281
(where “check” refers to either CRC or checksum) and
>> Normal end
Argos-input error messages
>> ***
ERROR: number of Argos message records
[The Argos-position record is echoed.]
>> *** Position saved.
When a pass of raw Argos data has the wrong record count, ARTOA-II generates this message.
>> *** CLOCK STD. DEV. IS LARGE
This is generated if the standard error of the clock correction is greater than one.
Starting with an rfb…rfb file
The path and filename of the selected file are echoed in the Matlab command window.
>>
filename =
rfb023.rfb
pathname =
E:\float\data\NBC\tracking\
8. Editing Options
At this point, the other two buttons on the main toolbar become "live":
Edit → Times of arrival
→ Temperature
→ Pressure
Track → Track parameter
→ Trajectory output
Editing windows have an editing toolbar, labeled "data", at the right of the figure. The options
are paired (pick and drop) (delete and undelete) (apply and withdraw) and refer to different steps
in the process.
Pick → polygon
→ point
→ semi-auto
→ cancel
If "point" is selected, crosshairs appear, which can be moved with the mouse. Click the left
mouse button when the crosshairs are in place. When a further action is specified, it will be done
to the point nearest the intersection of the crosshairs. For "polygon", crosshairs also appear. By
clicking the left button, you specify one vertex of a polygon, which can be used to enclose data
10
to which a next step will be done. Proceed with left clicks until the area is surrounded, then
right-click to close the polygon. Any number of picks may be made before “apply”ing them to a
variable. "Semi-auto" can only be used in editing TOAs, and is not yet implemented. The
“cancel” button closes the pick pop-up menu.
Any "pick" can be undone by clicking on "drop". A second "drop" will undo the previous pick,
and so on.
The “Apply” button works as follows in the different selection windows:
•
•
In the Temperature and Pressure selection windows, the “Apply” button assigns the
corrected Temperature and/or Pressure data series to the float you are working on for
further processing.
In the Times of Arrival selection window, the “Apply” button brings up a pop up menu
listing all the available sound sources from the source file, so you can click on the sound
source number that corresponds to the selected TOA data that you want to apply.
"Delete" hides selected points from further processing (use "undelete" to undo). For instance,
if a point is "deleted", and then surrounded by a polygon that is "applied", the deleted point will
be omitted from the selected data. Deleted points turn gray. Applied points turn white. The
objective is to have all and only the good values turned white.
"Withdraw" resets points to their initial state and only works on points that have been selected
(and applied). No matter how few points one wishes to withdraw, always use the polygon to
identify them, not “point”.
9. Editing Temperature and Pressure
Because the routine to calculate the nominal arrival times of sound signals at launch and
surface times may use the float’s temperature and pressure to calculate sound speed, it is
recommended that the temperature and pressure records be edited first.
Click on Edit → Temperature and an editing window will open. The experiment name, float
identification and selected variable are noted at the top of the plot. The x-axis is time in
truncated Julian days labeled ‘Message Date’ and the y-axis is temperature in degrees centigrade
labeled ‘Temperature [C]’. Values are shown in yellow. Matlab now controls the window
toolbar, with the exception of the Show button.
Show → Data → all temperature (the default)
→ selected temperature
Show → Grid - toggles whether the grid is visible or not
The “Shift” button is used to handle rollover problems in the floats. Rollovers occur because
the temperatures and pressures are truncated before they are stored. ARTOA-II uses the
“targets” stored in the status files or your input targets to move the truncated values to the correct
range. Occasionally, temperatures or pressures vary over so wide a range that a single target
11
doesn’t suffice. If this data includes useful values, it must be selected and shifted back to be
valid. When the “shift” button is clicked, a request for number of degrees or meters to be added
to shift the selected data back in line appears in the Matlab command window. Once you type in
the answer, the selected points are moved back in line on the screen. Then the useful values need
to be re-selected and applied. Points left unselected and unapplied (i.e. yellow) will not be saved
in the edited temperature record; it is not necessary to delete a point to exclude it from the final
record.
Figure 3: Selected temperature window (good values are white). N.B.: Before selection, all points are yellow.
Figure 4: Selected pressure window (good values are white). N.B.: Before selection, all points are yellow.
After selecting and applying the desired temperature values, it is a good idea to look at
"selected temperature" (Figure 3) before leaving the window as a check that you have what you
12
wanted. Use File → Close to close the figure. If data is missing, return to the “all temperature”
window to add it.
Click on Edit → Pressure and another editing window will open (Figure 4). It works just like
the temperature window. The y-axis is pressure, increasing toward the bottom of the plot labeled
‘Pressure [dbar]’. Again, be sure to use File → Close to close the figure.
Now is a good time to save your work by clicking File → Save →Interim file.
N.B.: at least FOUR TOA values must be selected and assigned to a source before an
rfcnnn.rfc file can be created.
10. Editing Times of Arrival
Click on Edit → Time of Arrivals and a more complicated editing window will open. All
times of arrival heard by the float will be displayed at once, represented by diamonds. The color
intensity of the diamonds depends upon their correlation height (e.g., yellow for low and red for
high). The side toolbar for TOAs differs from that for temperature and pressure: the header
"Source" has been inserted before Apply and Withdraw. When user clicks "Apply", a subwindow opens which offers a button for each source in the source file and a "cancel" button. By
clicking on a particular source, currently selected TOAs are assigned to that source.
In the TOA selection window, the experiment name, float identification and selected variable
are noted at the top of the plot (Figure 5). Both axes of the TOA window represent time: the xaxis is time in truncated Julian days (labeled ‘Message Date’) that represents the float mission
duration, and the y-axis represents the time from the opening of the float’s first listening window
until the close of its last listening window of a cycle, and is labeled ‘TOA [s]’. Matlab now
controls the window toolbar, with the exception of the “Show” button.
The TOA window includes additional information: The predicted point at which a given source
would have been heard at the start and end of the float mission is marked at each y-axis (red
letters, in this case, red numbers, in other cases, depending on how source is named in sound
source file). Identification of a source is only given if the source was operating at the start (or
end) of the float mission. Vertical dashed lines indicate the start or end of a source during the
float's mission, with source identified at top. Vertical solid lines mark the start (down-arrow)
and end (up-arrow) of the float’s mission. Horizontal lines separate the listening windows.
For the TOA window, the choices for the "show" button are:
Show → Data → All TOA - the default
→ Data → Selected TOA
→ Data → Interpolated TOA
→ Grid
→ Sound Speed - brings up the Tracking Parameter window (when needed)
13
Figure 5: Unedited Times of Arrival window.
Choose Show → Data → All TOA from the cascading menu and then select and apply the
TOA values of your choice for each sound source using the appropriate buttons from the side
toolbar labeled “Data” (“pick”, ”drop”, etc., described above). Use the “zoom” feature to permit
working on one listening window at a time (See Figure 11 for an example of a magnified view of
a TOA-editing window.). You can also use the Show → Grid toggle to apply a grid to the TOA
plot, which will help to identify the correct start and end Julian days of each sound source.
The correlation range of the float is specified in the header information of the ‘rfbnnn.rfb’ file
– this controls the color codes in the TOA-editing figure. The colors themselves are set in
Matlab routine ‘uitoa.m’.
A quick method for selecting TOAs in “tidy” data is to pick several overlapping polygons and
then “apply” them all to a source. However, if you have overlapping sources in the TOA
window, take care to pick only those points specific to the current source; previous application,
changing the point’s color to white, will not preclude the point from being applied to a second
source. In the future, when "Semi-auto" is implemented, it will be a quick way to select TOAs.
You will be able to use the crosshairs to select a point at the start of the sound-source record and
ARTOA will try to select the time of arrivals automatically.
The “Shift” button is used to handle rollover problems in the TOAs. Rollovers occur when
TOAs from a sound source are heard in a window after the window in which the sound source
pongs. Because the initial 80 seconds of the listening buffer (the interval required to hear the
14
signal from a source) is not overwritten, some TOA data from window 3 can be seen at the start
of window 1, etc. If this data includes useful TOAs, it must be selected and shifted back in time
to be valid. When the “shift” button is clicked, a request for number of seconds to be added to
shift the selected data back in line appears in the Matlab command window. Once you type in
the seconds to be added for the shift, the selected points are moved back in line on the screen.
Then the useful TOAs need to be re-selected and applied to the correct sound source. For
example, when a float’s TOAs rolled over from window 2 into window 3 in an NBC DLD2 float,
then three minutes (the difference between the 27 minutes the window was open and the 30
minutes between windows) was subtracted or (–180) seconds was added to “shift” them back
into line.
Another application for the "shift" button occurs when the TOAs roll over within a window.
The maximum value of a TOA represented by 12 bits is 4096, which converts to 1259 seconds or
21 minutes when the conversion factor is .3075 seconds and to 12.6 minutes when fast sources
are used (.1846). The windows in the NBC DLD2 RAFOS floats, for example, were set to be
open for 27 minutes; this meant that the TOAs in the first 6 minutes or 361 seconds of the
window were ambiguous. When the TOAs in this experiment rolled over in the same window
(with no window change), 21 minutes or 1260 seconds were added to “shift” them back into line.
In this case, the modulo number of seconds must be added to the rolled-over values (and they
must be re-selected and applied to a source).
When you hit the "shift" button, the Matlab command window displays these questions:
>> Please enter by how many seconds the data shall be
shifted:
>> Please indicate if the cycle needs to be shifted [y/n]:
The second question should be answered "y" only in the case where a TOA has rolled over from
the last window to the first window. This means the cycle of the TOA should change (e.g., a
date-change in a 24-hour float).
Show → Data → Selected or Interpolated TOA displays all the selected TOAs in a format
similar to the TOA-editing window (Figure 6): the color intensity of the symbols varies with
correlation height, but each sound source is differentiated by a different symbol (asterisk, circle,
etc.). Any interpolated points are white (Figure 7). This is an opportunity to check that TOAs
have been attached to the correct sound source. These figures also display the start and end
times for each source in truncated Julian day. These values are used in specifying which
combinations of sources are to be used for tracking different intervals of the float-mission. The
default, linear-interpolated data, will be displayed if no change has been made to the Tracking
Parameter window. Note: the Selected or Interpolated TOA windows are editing windows, and
you can withdraw selected TOAs at this point. To add a point, it is necessary to return to the
“All Data” window (Figure 5), where selected and unselected points can be seen. Use “polygon”
to select any additional points, then “apply” them.
If TOAs were applied to the wrong sound source, they can be corrected by using the Data
toolbar option buttons. Use the “Pick → polygon” buttons to select the data, and the “Withdraw”
button to reset the TOAs back to their raw data values. It is important that you use the
“polygon” button to select the data when withdrawing points. Then reselect the TOAs and apply
them to the correct sound source.
15
Figure 6: Editing-results window – selected TOAs. Note different symbol for each source.
Figure 7: Editing-results window – interpolated TOAs.
16
11. Creating the INTerim file
Whenever you take a break in running ARTOA, it is a good idea to save your work in an
interim, Matlab-binary file. The file-selection window should give you flexibility in naming
files, but the extension should be .itm, to insure that it will be listed if you want to load it. The
“standard” name is ‘rfnnn.itm’. It is important that the interim file name be five characters in
length with the float number in positions 3:5, because the ARTOA program assumes this in
naming the final tracked ‘rfcnnn.rfc’ file. You should always create an interim file on
completion of TOA selection, or information will be lost. A backup copy of the .itm file will be
useful on the rare occasions when an .itm file gets corrupted. You can save the currently
selected values by clicking on File from the ARTOA main toolbar: File → Save → Interim File
An itm-file can be viewed by saying "load filename" (no extension) at the Matlab prompt. The
contents can be listed by typing "whos" at the prompt (or in a Matlab workspace window), and a
specific item by typing its name.
You don’t have to wait until all Temperatures, Pressures and TOAs have been selected and
applied to save the data. However, once you have edited the Temperature and Pressure values,
you must select and apply at least four TOA values to a sound source before you save to an
interim ‘rfnnn.itm’ Matlab binary file or your file will be corrupted. The ‘rfnnn.itm’ file once
created can also be used as an input file and updated throughout the processing.
12. Tracking
When all useful TOAs have been selected and applied to the correct source name, the Tracking
Parameter window gives you control over the next step. If the Tracking Parameter window is
closed, it can be opened clicking “Track → Track parameter” on the ARTOA toolbar. The
Tracking Parameter window is labeled with the experiment and float ID. Select tracking method,
Doppler shift or none, and sound-velocity calculation. You can select one interpolation
algorithm (for input) and two interpolation intervals (the interval for input is in days, that for
output in hours). See Appendix A for a discussion of interpolation applied to output parameters.
Tracking Method → Circular – location by intersecting circles of constant distance from
sources
→ Hyperbolic – location by intersecting spheroidal hyperbolas representing
points of equal difference in distance from sources
→ Least Square – minimizes the sum of the squares of the residuals of estimated locations (default)
Circular and hyperbolic use the local routine ‘xnavai.m’ and a maximum of two sources
(circular) or three sources (hyperbolic) to calculate a location. If hyperbolic method is chosen,
yet only two sources are available, then program defaults to the circular method. least square
uses ‘ls_converge.m’ and a maximum of three sources.
The Doppler correction algorithm uses a centered-difference method to correct the TOAs for the
distortion caused by the speed at which sound is traveling (default is no correction).
17
Figure 8: Tracking parameter window (filled in).
Input Interpolation Method → None
→ Linear - straight-line interpolation is used (‘interp1.m’ - default)
→ Spline - a cubic spline is applied (‘spline.m’)
→ Cubic - a cubic convolution interpolation is applied (‘interp1.m’)
These two routines are part of the Matlab library. Please see Matlab documentation for more
information.
Gap Size (days)
- integer value - the limit in days for TOA interpolation (default is zero).
See Figure 7.
Sound Speed Method → Del Grosso – (default) uses the Del Grosso equation in the Matlab
routine
‘soundspeed.m’ to compute sound velocity from mean temperature and
pressure (Del Grosso, 1974).
→ Linear - calculates the speed of sound by the linearized expression :
sound velocity = (average T - 7) *0.0011 + 1.49
→ Sound Source file - each source must be assigned a velocity in the input
file
→ Levitus - sound velocity computed from climatological data (Boyer and
Levitus, 1994; Levitus et al., 1998) (Not implemented; defaults to 1500 m/s)
Output Interpolation Interval (h) - integer value in hours (default is “schedule”, or input
interval)
18
Now select the sound-source combinations and intervals. Start and end are given in truncated
Julian day (either integer or one decimal place), labeled ‘Message Date’ in editing figures. There
can be gaps between the end of one interval and the start of the next, but overlap of two intervals
is not permitted. List the sound sources as labeled on the TOA window, separated by spaces.
Either two or three sources may be used for an interval. Use the "Add combination" button at the
bottom to get another blank line. You can divide the mission into an unlimited number of
intervals.
The reference point initially defaults to the launch position of the float. Other positions can be
used, and sometimes are needed to overcome a baseline reflection.
You must enter the message date numbers and the sound sources to be used before you choose
the ‘Sound Source File’ option for the sound speed method. If you do not, the following error
message appears in the Matlab command window.
>> No Sound Source selected. Sound Speed estimation method
not applicable. Default to Del Grosso.
If everything is set, the sound-velocity value for each source will appear in the corresponding
block.
"Reset" will empty all combination lines and return other choices to their default values.
"Close" to close window. Note that closing the window does not clear all values.
When all parameters have been entered, click the “track” button to begin tracking. At this
point, you have the option of entering additional clock corrections for the float and the sources in
the Matlab command window. Type in any additional float offset at the beginning or end of the
float mission. Note that an additional float offset at the end will be expressed as a drift
throughout the mission. Enter any additional offsets for sound sources. These will be added to
the entire source record. Give any necessary corrections in seconds and decimal part or press the
<enter> button for no correction.
>> Add additional float offset at the beginning: <ENTER>
>> Add additional float offset at the end: <ENTER>
>> Add additional offset for Sound Source B1: <ENTER>
>> Add additional offset for Sound Source 69: <ENTER>
>> Add additional offset for Sound Source 77: <ENTER>
>> Add additional offset for Sound Source 404: -3.0
Once you have answered the above questions in the Matlab command window the float
trajectory will be calculated and displayed in the Trajectory Output window. While ARTOA-II
is calculating the track, it outputs a two-letter code to the screen, ‘ls’ for least square, ‘hy’ for
hyperbolic, and ‘ci’ for circular.
13. Error Messages
Multiple TOAs in sound source 77 at following times:
11430.5
11522.2
11574
19
Use Edit → Time of Arrivals to return to the TOA editing window and withdraw the incorrect
TOA(s), using the “polygon” option. Do this for each source and Julian day. Then hit "Track"
in the Tracking Parameter window again.
No sound sources selected
a) No record numbers were specified before “Track” button was pushed.
b) The button to specify sound-source method was pushed before sound-source combinations
were selected.
No convergence - this depends on the tracking method selected:
Both circular and hyperbolic tracking use a limit of 20 iterations; least-square tracking uses a
limit of 30 iterations. If no acceptable result is obtained in 20 or 30 tries, the message no
convergence is issued.
Hyperbolic tracking not possible: only 2 sound sources specified,
using circular tracking.
Issued by ‘uitraj.m’ if hyperbolic method does not have the required three sources.
If there are fewer than two good sources, ‘ls_converge.m’ will report NOT ENOUGH VALID
POINTS.
If ARTOA-II bogs down or behaves oddly during tracking, it is possible that a file has gotten
corrupted. If there is no backup “.itm” file, you may need to re-extract the data. If messages
regarding: “Index exceeds dimension” are seen, check the sizes of arrays by typing
>> whos global
Often this problem is caused because the “-cycle” record doesn’t agree with the actual data. It is
a good idea to exit the tracking session and ARTOA, type ‘clear all’ at the Matlab command line,
and start again.
14. Completed Trajectories
The resulting track will be displayed in a new figure (Figure 9), using a square projection.
“Track → Trajectory output” will produce the same figure. Each record tracked is represented
by a dot. Every four days along the track a larger circle is labeled with the truncated Julian day
(to modify this interval, change variable “dateint” at the beginning of ‘uitraj.m’). Earlier tracks
are gray (not visible in Figure 9); the latest track is blue. The launch and surfacing positions of
the float are indicated by an open down-arrow labeled "Start" and a filled up-arrow labeled
"End". The “best” trajectory is usually the one that comes closest to the “start” and “end”. To
exclude bathy-metry and coastlines, modify ‘uitraj.m’.
Each tracking run for this float is listed on the upper right with the method used ("least square",
e.g.). Whichever version is highlighted (default is the latest) will be affected by further
selections.
20
Figure 9: Trajectory window, with sources.
The options are:
• Hide - highlighted track will no longer be visible (listed, preceded by (h))
• Show - highlighted track will become visible
• Velocities - creates a figure with time-series of zonal (cm/sec), meridional (cm/sec), and
vertical (mm/sec) velocities. See Figure 10.
• Delete All - wipes out all tracks (completely)
• Delete Single - deletes highlighted track (completely)
• Mercator/Normal – toggles between Mercator and square (“normal”) projection
• Sound Sources - changes scale as needed and displays sound sources used for the current
trajectory as filled circles. Any other sources that are on the plot will be open circles
(Figure 9). To remove sources, toggle Mercator/Normal button.
• Track → TOA – place crosshairs over a questionable point (“zoom” feature will help);
and left-click to mark it with an open circle. Left-click again to bring up the TOA-editing
window. The TOAs with which that position was calculated are marked with open circles
(Figure 11). You can pick the bad TOA and withdraw it (using “polygon”). Then hit
"Track" again to rerun the improved data.
21
Figure 10: Plot of velocities.
Figure 11: Magnified plot of Time of Arrivals, showing those used in a questionable point.
22
When you are satisfied with the highlighted trajectory in the trajectory output window, you can
save it as the final product of ARTOA-II. Click on “File” in the ARTOA main toolbar and use
the cascading menu as follows: File → Save → RFC File. It is also a good idea to save your
work to an interim ‘.itm’ file again at this time, and every time you go back to do further editing
work on the float data.
File → Save → TRJ4 File
→ RFC File
→ Interim File
•
•
•
"TRJ4 File" saves a single version of the track in a 5-column ASCII file, with a single
header line, described in Appendix A.
"RFC File" saves a single version of the track in an ASCII file, with header information,
in a format described in Appendix A.
"Interim File" will save all versions of the track, as well as the selected inputs. It also
saves the Tracking Parameter information.
A file-selection window will open, listing any files with the output extension selected. Specify
the filename wanted and hit the "Save" button in that window (or "Cancel").
Use File → Quit to close ARTOA-II. If you plan to track another float, be sure to “clear all”
Matlab space before continuing.
23
IV. ACKNOWLEDGEMENTS
Financial support for this research program was provided by the Woods Hole
Oceanographic Institution through Grant No. 32001601 from the George K. Moss Director’s
Discretionary Fund.
V. REFERENCES
Anderson-Fontana, S., P. Lazarevich, P. Perez-Brunius, M. Prater, T. Rossby, and H-M. Zhang,
2001. RAFOS Float Data Report of the Atlantic Climate Change Experiment (ACCE) 19972000. University of Rhode Island, G.S.O. Tech. Rept. 2001-4, 112 pp.
Boyer, T. P. and S. Levitus, 1994. Quality control and processing of historical temperature,
salinity and oxygen data. NOAA Technical Report NESDIS 81:65.
Del Grosso, V.A., 1974. New Equation for the Speed of Sound in Natural Waters (with comparison to other equations). J.Acoust. Soc. Am., 56, 1084-1091.
Del Grosso, V.A., and C.W.Mader, 1972. Speed of Sound in Pure Water. J.Acoust. Soc. Am.,
52, 1442-1446.
Levitus, S., T.P.Boyer, M.E. Conkright, T. O'Brien, J. Antonov, C. Stephens, L. Stathoplos, D.
Johnson, and R. Gelfeld , 1998. World Ocean Database 1998 Volume 1: Introduction, NOAA
Atlas NESDIS 18, U.S. Government Printing Office, Washington, D.C., 346 pp.
24
VI. GLOSSARY
checksum The term "checksum" was created to describe early error detection techniques which
used summing formulas and appended the result to the data. Checksum now has a moregeneral meaning, encompassing sophisticated algorithms such as the CRC (Cyclic
Redundancy Code). The CRC algorithm treats the message as an enormous binary number,
divides it by another fixed binary number, and makes the remainder the "checksum". The
receiver can perform the same division and compare that remainder to see if the message was
correctly received.
correlation height the strength of the signal. Limits, depending on type of float, are specified in
the rfb header.
cycle (a) used by ARTOA-II to mean a float mission; this allows ARTOA-II to work on
multiply-submerging floats (such as Marvor and ALFOS). (b) a complete set of listening
operations (usually listening and stopping three times). Usually the same as line or record.
See also phase.
drift The amount by which a clock can be deduced to change over some time interval. Source
clock drifts are quoted in seconds per interval between pongs. Float clock drifts are quoted in
seconds per day (negative = fast).
edit (a) to select the TOAs you want from all those available for a given float,
(b) to correct your initial selections (of TOAs, temperature or pressure values).
mission The amount of time a float was meant to stay submerged.
offset (a) an amount by which a TOA for a given source or float is always off from the correct
time, (b) a momentary difference between an instrument clock and the correct time.
An "initial offset" (a) would always be applied. A "final offset" (b) would be combined with
an initial offset and divided by the duration of the deployment to calculate the drift.
phase Used by ARTOA-II in headers. Phase is used to mean a complete schedule of listening
intervals. For example, "phases per cycle" means the number of listening intervals in the
mission of a float. [This is to replace "cycle", now used to mean a descent and ascent.]
schedule Hours between first pongs – which has also been called “cycle” (q.v.)
window (a) a figure on the screen, as in "an editing window", (b) a single interval, usually
around 30 minutes, during which a float is listening for pongs.
25
VII. APPENDIX A: Description of input and output files for ARTOA-II
1. Input Files
The ARTOA-II configuration file
The ‘.ini’ file is the main configuration file for the program. It connects the modules to the
directory for each kind of file and its extension. If the program is not called with an alternative
name, it will try to load the standard file called ‘artoa.ini’ which it expects in the same directory
as the software.
Note: directory names are machine-dependent. The example below is from a UNIX machine.
A sample directory from a PC might be: C:\data\tracktest\new_exp\
[files]
soundsourcefile
projectfile
/home/rafos/data/soso.dat
/home/rafos/data/default.prj
[directory]
session
/home/rafos/
argos
header
sts
sfc
interim
rfb
trj4
/home/rafos/argos/
/home/rafos/argos/
/home/rafos/argos/
/home/rafos/argos/
/home/rafos/interm/
/home/rafos/interm/
/home/rafos/final/
rfc
/home/rafos/final/
[filemask]
session
*.sel
argos
header
sts
sfc
rfb
itm
rfc
trj4
*.arg
*.hdr
*.sts
*.sfc
*.rfb
*.itm
*.rfc
*.trj4
% filemask for the session files
(not used yet)
% filemask for the Argos files
% filemask for the header files
% filemask for the status files
% filemask for the surface-navigation files
% filemask for the “rfb” files
% filemask for the “itm” files
% filemask for the “rfc” files
% filemask for the “trj4” files
[load]
savesession
cycledelimiter
0
-
% not used yet
% filename delimiter for multi-cycle floats
% location of the sound source file
% location of the project file (not used yet)
% directory to store the current session
(not used yet)
% directory to store the Argos files
% directory to find header information
% directory to find/store status records
% directory to find/store surface navigation
% directory to store the “itm” files
% directory to store the “rfb” files
% directory to store the “trj4” files
("simple rfc format")
% directory to store the “rfc” files
26
The sound-source file
The sound-source file contains the parameters in key/value pairs. The source file consists of
the following information for each source:
[SQ1]
-sourcename SQ1
-sourcetype WEBB
-sourceowner
IfM Kiel
-position
38.383 -19.021
-depth
-begemis
-endemis
-offset
1000
1995 10 21 00 00
1998 10 01 00 00
1995 10 21 0
-drift
0.034
-reftime
01 30
-schedule
24
-signallength
80
-add_offset NaN
-sound_speed 1480
% reference
% name (should be the same as reference)
% type
% owner
% mooring position of the sound source
(Latitude positive north; longitude positive east)
% depth of the sound source (meters)
% deployment or “begin emission” (year, month, day, hour, min)
% retrieval or “end emission” (year, month, day, hour, min)
% offset (year, month, day, offset in seconds)
This is usually an initial offset.
% drift in seconds per pong-interval or "schedule"
% pong time (hour, min)
% hours between pongs
% time in seconds to complete correlation of source
% any additional constant offset in seconds
% sound velocity in meters per second
The source clock offset and source clock drift, if positive, will be subtracted from the TOA
value; if negative, they will be added to the TOA value. This reflects the fact that a positive
source clock offset means that the source clock shows a time in advance of GMT, therefore the
TOA will be too long, and should be reduced by the time difference between the source clock
and GMT. Similarly, a positive source clock drift, under this convention, indicates that the
source clock is becoming faster.
ARGOS input file: .arg
Previously, Service Argos used only 20-bit ID’s and you received 32 data bytes per message.
If you wanted to check on data-transmission, you needed to include a checksum. In the new
Argos messages, there is a CRC, and 28-bit ID’s are permitted. In this format, if you are using a
20-bit ID, Service Argos will transmit 32 bytes of data. If you are using a 28-bit ID, you will
have only 31 bytes in the data field. In the new Argos messages the CRC is calculated on the 4
bytes of hex address (0hhhhhhh) and 29 bytes of data.
Note in each case below that the first record is the Argos location record, containing program
ID, PTT ID (decimal), record-count for this pass, number of variables, satellite ID (alpha), and –
if available – quality code, date/time of location, latitude, longitude, altitude, and frequency
(estima-ted transmission frequency). In samples a) and c), the observation times are reported to
the thou-sandth of a second. This happens when “accurate time-coding” is requested from
Service Argos. ARTOA-II can cope with either option.
a) Sample data from a 20-bit-ID float, no CRC (note location of 07FF in status message – record
2):
02294 24247
5 8 J 3 2002-08-31 13:42:10
2002-08-31 13:38:25.570 1
8843A83A
27
12.888
54.606 0.000 401647240
506F20AD
5D228334
C8F6118C
2002-08-31 13:41:32.573
1
D20B4419
6607FF02
402C02DA
2832143F
6001F400
2600335
A09C2165
1C8A2D19
1A00095E
87040200
58656500
A8596665
b) Sample data from a 28-bit-ID float with 20-bit identifier and CRC (note location of FF E0 in
status message – record 1):
02683 25316
5 8 D 2 2004-04-11 18:32:09
2004-04-11 18:29:36 1
209DFF
2C0015
2004-04-11 18:35:25 1
28BB8A
38C61473
41.799 310.404 0.000 401650277
E00C0300
D7200C0E
60496D6E
C230455
1E000F14
1E495F60
6D71529A
8CD34440
6A704506
867E3481
83063237
7A2AD691
c) Sample data from a 28-bit-ID float with 28-bit identifier and CRC (note location of FFE0 in
status message – record 1):
02683 37545
5 8 K
2004-08-03 22:30:49.422
1
2004-08-03 22:31:36.408
1
E3F8FFE0
2C00010C
38F0001B
5C20DB1D
C9500D7
9501E91B
1D7082E1
70837FEC
FFFD5821
FFFD56CA
6D8E9B1
10800000
63686800
636868
D70836C7
00
Main float file: rfbnnn.rfb /
Header file: .hdr
The float parameters are given in key/value pairs. Service Argos uses "ptt" to stand for
"platform transmitter terminal", or transmitter. ARTOA-II expects the “–floatname” to be five
characters with the float number (nnn) in the last three; trouble creating an output file may be
traced to this. Note: as described for the source file, a clock offset or drift that is “fast” will be
expressed by a negative number.
rfb164.rfb
% file name
-floatname RF164
% float name
-type
20-bit DLD
% float type (for DLD, must include 20 or 28)
-projectname EUROFLOAT
% project name – See below for special use.
-pttdec
12620
% ptt decimal identifier
-ptthex
3f4b2
% ptt hexadecimal identifier
-pttrep
69
% ptt repetition rate in seconds
-launchpos 32.164 -22.022
% launch position (lat, lon)
-launchtime 1995 10 13 12 00
% launch date/time (year, month, day, hour, min)
-recoverpos 30.259 -24.958
% surfacing position (lat, lon)
-recovertime 1996 01 28 02 30
% surfacing date/time (year, month, day, hour, min)
-offset
1995 10 13 12 00 -60.9 % offset at the beginning of the mission (year,
month, day, hour, min, offset in seconds)
-offset 1996 01 28 02 30 -82.6
% offset at the end of the mission (year, month, day,
hour, min, offset in seconds)
% Second offset should be 0.00 for raw data – ARTOA-II will replace
with derived offset.
-cycle
1 32.165 -22.022 1995 10 12 00 00 30.259 -24.958 1996 01 28 00 00
% cycle information = beginning and end of the cycle (first and last listening phase)
% (cycle number lat lon year month day hour min lat lon year month day hour min)
% For example, the float above started its first listening phase the 12th of October 1995 at
% midnight (00:00) and had its last listening phase the 28th January 1996 at midnight.
% The positions at the beginning and the end are, for RAFOS floats, normally the same as
% the launch and surface positions. Note: this does not exactly match the float turn-on time.
% For Marvor floats they are the last/first reported Argos positions at the end/beginning
% of each cycle.
-progdepth
1000
% programmed depth
28
% programmed temperature
% programmed salinity (not used yet)
% number of phases per cycle (for RAFOS cycle and mission
are the same thing)
-schedule
24
% listening schedule in hours (time between phases)
-field
CCCPCCCP
%defines schedule of float for decoding (see below)
-signal_length
80
% seconds required for signal correlation
-phasereftime
00 00
% reference time (normally 00 00)
-windowsperphase 3
% windows per listening phase (RAFOS record)
-toaperwindow
2
% times of arrival per window
-toaperphase
6
% times of arrival stored at the end of one phase
(product of previous two variables)
-correlationrange 0 3
% range of the correlation heights (0 to 170 for DLD2)
-windowrange
0 2
% range of the window numbering (i.e., 3 windows)
-windowstart
30 60 90
% minutes from the reference time to start of each window
-windowlength
25 25 25
% length of each window (minutes)
-tempequation
1./(tc(1) + tc(2)*log(temp)) - 273.2 % formula for converting counts
to temperature data (use "temp" if none)
-tempcoeff 0.001409 0.00027024001 % the coefficients for the above
formula (use "1" if none)
-presequationb pc(2)./pres - pc(1) % formula for converting counts to
pressure data (use "pres" if none)
-prescoeff 291.89001 1374300
% the coefficients for the pressure (use "1" if none)
-comment
Poseidon
% comments (usually ship name)
Comment lines are unlimited – start each “-comment”
-edited_by C Wooding
% person who created header
-edited_on 2000 11 14
% date created
-variables 17
% total number of columns
[VARIABLE_LIST]
-line_number
1
% column number for the record-count
-time_of_arrival 3 5 7 9 11 13
% for times of arrival
-correlation_height 2 4 6 8 10 12 % for correlation heights
-pressure
17
% for pressure (engineering units)
-temperature
16
% for temperature (engineering units)
-pres_counts
14
% for pressure (raw counts) – not transmitted for DLD
-temp_counts
15
% for temperature (raw counts) – not transmitted for DLD
[DATA]
1 20 0 20 0
40 10931 20
18 40 4185 20 10691 4086 4086 2.950 818.80
2 20 0 20 0
60 5713 40 2825 120 3806 20 9861 4086 4086 5.100 895.10
3 20 0 20 0 120 3397 100 5642 80 3822 40 12177 4086 4086 5.080 907.30
4 20 0 20 0
80 5621 20 11026 120 3871 40
18 4086 4086 5.134 909.00
…
897 20 0 20 0
60 9501 40 7057 60 5587 60 12346 4086 4086 5.270 913.90
898 20 0 20 0
60 9507 40 1949 100 5599 40 8090 4086 4086 5.270 911.30
899 20 0 20 0 100 7090 60
950 80 5590 80 12349 4086 4086 5.270 914.60
900 20 0 20 0
40 9520 40 1562 80 5590 40
18 4086 4086 5.253 912.40
-progtemp
-progsal
-phasespercycle
12
0
300
The data columns are: cycle or line number, window 1 (correlation 1, TOA 1 in deciseconds,
correlation 2, TOA 2 in deciseconds), window 2 (as window 1), window 3 (as window 1),
pressure counts (null value), temperature counts (null value), pressure, and temperature.
In order for ARTOA-II to work properly, each line of the rfb file must contain only a single set
of windows. A float might be set up to store six windows in a day, three just after midnight, say,
and three just after noon. ARTOA-II would plot this as six windows and there would be no way
29
to integrate the noon pongs with the midnight pongs. If this situation occurs, the user must
reformat the data so that each line contains only the data from half a day.
Note: The rfb data file must start with line number 1 as the first line, and increase
monotonically. ARTOA-II has been known to corrupt an rfb file – it is a good idea to have
backup copies in another directory.
Header notes
“-field” describes the programming of the float. “D” indicates pressure and temperature
recorded as two fields of 12 bits, with the pressure expressed in centibars and temperature in
millidegrees C. “C” represents a field of 15 bits corresponding to the ”-toaperwindow” highest
correlation values collected during a listening window. The first 3 bits represent the amplitude on
a scale of 0 to 7, and the next 12 bits the delay expressed in sample period. The sample period is
.3075 sec for the 260-Hz receivers and .1846 sec for the 780-Hz receivers. ARTOA-II currently
uses .3075 as the default (see ‘newparse.m’) but uses .1846 if the program name includes the
letters “red”.
Temperature and pressure coefficients and algorithms used to be required to calculate temperature and pressure from the raw counts. The pressure and temperature calculations are now done
in the conversion software, before ARTOA-II is run, or, in the case of DLD floats, in the float
itself. Therefore, the coefficients can still be included, but are not currently used. If the float
didn't record temperature or pressure, use a column-number larger than the limit of the "variables" value.
2. Output Files
Status messages rfnnn.sts
DLD floats produce a status message every ten messages, which contains information on the
state of the instrument. It contains two separate fields. The first one contains data acquired at
the time the burn wire was first activated; the second, data for the current time – the time of the
Argos transmission. The first field contains message number (FFE0 or 07FF depending on
type); day at release time; minutes (1 day = 1440 min), (seconds at release time), pressure in
cBars, temperature in millidegrees, vacuum reading (0 to 100), controller battery voltage (dV),
PTT battery voltage (dV), SYSTAT variable, STATUS variable, and total number of cycles
acquired.
The second field contains the current day, minutes, and seconds; pressure in cBars, temperature
in millidegrees, vacuum reading, controller battery voltage, and PTT battery voltage.
The SYSTAT variable contains a set of flags that report fault conditions. If more than one
fault occurred, the following would be summed. The values in decimal are:
1 Clock module failed to address at least once
2 Receiver module failed to address at least once
4 PTMOD module failed to address at least once
30
8
32
64
128
Argos-transmitter module failed to address at least once
Low-battery fault condition
Surface fault condition
Too-deep fault condition
Example:
STATUS MESSAGES
Release day,min,sec,P,T,Vac,CBat,PBat,SyStat,Stat,NoCyc
Current day,min,sec,P,T,Vac,CBat,PBat
789: 1220: 0 856.8 14.970
790: 171:14
1.7 27.130
789: 1220: 0 856.8 14.970
790: 534:22
1.6 27.257
88
89
88
89
102
102
102
102
101
102
101
102
0
64
44
730
0
64
44
730
Surface navigation information rfnnn.sfc
The locations of the buoy on the surface are recorded in the WHOI legacy FLOATER format:
The first three columns are program-identifier and the next three are buoy ID (provided by the
Principal Investigator, not Service Argos). There are six digits of date (YYMMDD) and four
digits of time. Latitude (north positive) and longitude (east positive) follow, and the last column
is a quality code (1=low, 5=high).
Surface location example:
294227
294227
294227
294227
294227
294227
294227
0301010534
0301010713
0301010857
0301010931
0301011109
0301011450
0301011451
14.194
14.171
14.150
14.145
14.114
14.059
14.058
50.466
50.498
50.526
50.538
50.560
50.607
50.610
1
1
3
3
1
3
5
Main float output file: rfcnnn.rfc
This is the commonly-used output format for the tracked data. Most header variables are
explained by their labels. The sound source combinations are delimited by truncated Julian
dates. (Julian days, called ‘Message Date’ during the earlier phases of processing, are now
called ‘Rafos days’) .The reference position is usually the launch position. The sound velocities
are taken from the sound source file, although a different method of determination may actually
have been used. The line with a single asterisk, followed by an "l" is an additional comment line
(it is vestigial - the launch date used to be required here). The velocities and header are
calculated by ‘svdata.m’.
**
**
**
**
**
**
**
**
**
Float:
RF022
variables: InterpFlag LineNum RafosDay Temp Pres Lat Lon U V W
Units: #
#
#
degC
dbar
deg
deg
cm/s cm/s mm/s
Dummies: NA
NA
NA
-9.99 -999
999 999
999
999
999
Cycle: 1
Launch position (Cycle Start position): 9.179
-52.439
Surface position (Cycle End position): 12.633
-52.287
Cycle Start time: 1999
2
19
0
0
0 (RAFOS day 11229)
Launch time: 1999
2
19
12
53
0 (RAFOS day 11229)
31
** Cycle End time: 2000
5
14
14
0
0 (RAFOS day 11678.5833)
** First surface Position time: 2000 5 13 14 31 0 (RAFOS day 11678)
** ------** Tracking method: Least Square
** Interpolation method: Spline
** Interpolation step size: 12 hours
** Interpolation gap size: 10
** Doppler correction: yes
** ------** Sound source combinations: (rafos day, sound sources, reference position,
sound speed)
** 11229.5 to 11542: 69 77 B1
9.179
-52.439
1.484
1.484
1.484
** 11542.5 to 11573.5: 69 77 185 9.179
-52.439
1.484
1.484
1.484
** 11574 to 11678.5: 69 404
9.179
-52.439
1.484
1.484
1.484
** ------** Additional Float clock offsets, seconds (beginning, end): 0
0
** ------*
l ---------0
1 11229.50 7.622 -999.0
9.184 -52.444
-10.35
19.63 999.00
0
2 11230.00 7.640 551.5
9.260 -52.473
-1.37
19.52 999.00
0
3 11230.50 7.519 542.0
9.326 -52.462
2.54
11.88
0.14
0
4 11231.00 7.510 542.6
9.348 -52.467
-4.17
0.61
-0.19
-1
5 11231.50 7.655 552.4
9.342 -52.482
-1.63
-2.13
-0.09
0
6 11232.00 7.580 550.4
9.338 -52.478
2.23
0.12
0.00
The data columns are: quality flag, cycle or line number, "Rafos day" (truncated Julian day
with decimal part), temperature, pressure, latitude, longitude, velocities (east, north, vertical).
See units listed in the third header line, and "Dummies" or null values in the fourth line.
The quality flag, located in the first column, gives information about interpolation. If the flag
is zero (0), then no points in the TOA records used to calculate this track location were
interpolated. If the flag is a positive number, it corresponds to the number of interpolated
sources used in computing this point.
The east and north velocities are calculated from the latitudes and longitudes, so they are
influenced by the interpolation applied to the TOAs. The method is set by default to “spline” in
the routine ‘horvelo.m’; but it could be changed by altering ‘uitc.m’. Method “spline” uses the
function ‘csape.m’ from the Matlab Spline Toolbox (see Matlab documentation for more
information). The location data is interpolated to two-hour intervals, and then resampled to the
requested data rate. The vertical velocity is determined using a splined pressure record and the
analytical derivative of the spline, as described for the north and east velocities. The first and
last vertical velocities should be nulls. There will be no vertical velocity if a pressure value is
missing, or if a portion of the trajectory can’t be computed (bad geometry, e.g.), even if pressure
and temperature are available. No interpolation is applied to temperature and pressure.
Simplified RFC file: nnn .trj4
TRJ file - extension ".trj4" - is an abbreviated format for the trajectory information. It has a
single-line header (float and cycle number: "RF511 - cycle 1", e.g.) and saves the track in a 5column ASCII file. Columns are truncated Julian day, latitude, longitude, pressure and
temperature.
# RF023 - cycle 1
11229.50
9.217
-52.420
-999.0
32
5.10
11230.00
9.224 -52.499
11230.50
9.188 -52.574
…
11677.50
7.985 -47.197
11678.00
7.958 -47.201
11678.50 -999.000 -999.000
907.3
909.0
5.08
5.13
911.3
914.6
912.4
5.27
5.27
5.25
VIII. APPENDIX B: Description of related programs
1. Preparatory Program
Toalaunch.m is used before ARTOA-II is run when there is a problem identifying sound
sources. It is particularly helpful when a sound source is deployed or recovered during a float
mission, since ARTOA-II only identifies sources at the start and end of the mission (including
delayed-start missions). Toalaunch uses the sound-source file and a file of float locations (called
LSdata.dat) in the format:
[fltno ID
563 25282
564 25316
launch-date
200402181324
200402181404
lat
lon
45.362 -48.500
45.315 -48.467
surface-date lat
lon]
200404250517 40.909 -50.875
200403090536 42.845 -49.473
It produces a file of estimates of Times of Arrival (in deciseconds) for launch (Lch) and surface
(Sfc) locations of the floats in the file above:
sosoA Lch
Sfc
sosoB Lch
Sfc
sosoC Lch
Sfc
flt#563
6245.55
6583.08
4418.29
4762.34
11455.20
11663.09
flt#564
6248.99
6434.00
4419.95
4599.81
11453.62
11538.37
2. Plotting Programs
There are four main plotting programs:
plotfloattrack.m, plotfloatprops.m, plotdisp….m, and plotvec_and_sosos.m.
These programs are not part of the official ARTOA-II package and are run separately.
FUNCTION plotfloattrack(trackfile)
Function to plot up float track from the rfc*.rfc file, on top of bathymetry.
New 2-minute-interval or 1-minute-interval bathymetry must be prepared for each ocean-area download from GEBCO (http://www.ngdc.noaa.gov/mgg/gebco/gebco.html) or get the CDROM from http://www.ngdc.noaa.gov/mgg/fliers/01mgg04.html
05 February 2000, H.H.Furey.
USAGE: plotfloattrack2( ‘rfc346.rfc ‘)
CALLS: merc.m, lab_geog.m, XXXbathmap.m ... needs data file XXXbath.mat in path.
INPUT: trackfile - name of track file, i.e., rfcnnn.rfc, IN SINGLE QUOTES.
NOTE: MAY want to edit the following constants defined in program;
“titletext” - plot title,
“tickint” - x- and y-axis labelling increment.
“labelrot” - rotation angle for date labels along track.
33
FUNCTION plotfloatprops(trackfile)
Function to plot up float properties: pressure, temperature, u-velocity, v-velocity, and
u-v stick plot, using the data from the rfcnnn.rfc file. 04 Feb. 2000, H.H.Furey.
24 November 2000 CMW revises to get mission from header.
and read Artoa-II output (rfcnnn.rfc)
USAGE: plotfloatprops( ‘rfc384.rfc ‘)
CALLS: pullfloatprops.m, high_calendar.m, gregor.m, scaled_stick.m, nanmin.m, nanmax.m
(must be in path else edit line number 51).
INPUT: trackfile - name of track file, i.e., rfcnnn.rfc, IN SINGLE QUOTES.
NOTE: MAY want to edit the following constant defined in program; “div” - axis marker
Width.
FUNCTION plotdispXXX;
Function to plot all float displacement vectors on bathymetry with sound sources (optional).
20 April 2000, H H. Furey.
11 July 2001 M Pacheco changed figure window to orient landscape
USAGE: plotdispXXX, where XXX denotes the experiment
CALLS: merc.m, lab_geog.m, XXXbathmap.m ... needs data files XXXbath.mat and
XXX_LSdata.dat in path
NOTE: Will/may want to edit the following constants defined in program; name of data file
where experiment's launch and surface data stored, currently XXX_LSdata.dat.
“ax” - axis where vectors plotted.
“tickinc” - axis tick increment.
“sosofile” = name of source.dat file << This read source.dat - OOD
TO RUN:
CREATE XXX_LSdata.dat, which has the following columns:
[fltno ID
563 25282
564 25316
launch-date
200402181324
200402181404
lat
lon
45.362 -48.500
45.315 -48.467
surface-date lat
lon]
200404250517 40.909 -50.875
200403090536 42.845 -49.473
FUNCTION plotvec_and_sosos(fltnum,lims); plots with user-defined limits,
plotvec_and_sosos(fltnum); plots extent of bathy data
Function to plot a single float displacement vector on bathymetry, with sound sources.
20 April 2000, H H. Furey.
USAGE: plotvec_and_sosos(384) - plots vec for float #384
also requires special launch/sfc file - as above
CALLS: merc.m, lab_geog.m, XXXbathmap.m ...
needs data files XXXbath.mat, XXX_LSdata.dat, and source.dat in path
INPUT: fltnum - float number you wish to plot up.
lims - [west east south north], user defined limits, if this variable not entered, program
34
defaults to plotting all data in window.
NOTE: May want to edit the following constants defined in program;
Name of data file where experiment's launch and surface data stored,
currently XXX_LSdata.dat
Name of source file for experiment.
“tickinc” - axis tick increment.
3. Other Programs
Ross2flt
Converts the output of ARTOA-II to the legacy Floater format. This is a Fortran program.
The only input required is the full name of the input file. Any extensions after .rfc will be added
to the extension of the resulting .pri file. The information in the header is lost, as is the quality
coding, but the dates are Gregorian.
A number of plotting, smoothing, etc., routines exist for Floater format, and it has been used
for the ASCII data for the WOCE Subsurface Float Data Archive. These programs can be
accessed at http://wfdac.whoi.edu.
35
DOCUMENT LIBRARY
Distribution List for Technical Report Exchange – July 1998
University of California, San Diego
SIO Library 0175C
9500 Gilman Drive
La Jolla, CA 92093-0175
Fisheries-Oceanography Library
151 Oceanography Teaching Bldg.
University of Washington
Seattle, WA 98195
Hancock Library of Biology & Oceanography
Alan Hancock Laboratory
University of Southern California
University Park
Los Angeles, CA 90089-0371
Library
R.S.M.A.S.
University of Miami
4600 Rickenbacker Causeway
Miami, FL 33149
Gifts & Exchanges
Library
Bedford Institute of Oceanography
P.O. Box 1006
Dartmouth, NS, B2Y 4A2, CANADA
Maury Oceanographic Library
Naval Oceanographic Office
Building 1003 South
1002 Balch Blvd.
Stennis Space Center, MS, 39522-5001
NOAA/EDIS Miami Library Center
4301 Rickenbacker Causeway
Miami, FL 33149
Library
Institute of Ocean Sciences
P.O. Box 6000
Sidney, B.C. V8L 4B2
CANADA
Research Library
U.S. Army Corps of Engineers
Waterways Experiment Station
3909 Halls Ferry Road
Vicksburg, MS 39180-6199
Marine Resources Information Center
Building E38-320
MIT
Cambridge, MA 02139
Library
Lamont-Doherty Geological Observatory
Columbia University
Palisades, NY 10964
Library
Serials Department
Oregon State University
Corvallis, OR 97331
Pell Marine Science Library
University of Rhode Island
Narragansett Bay Campus
Narragansett, RI 02882
Working Collection
Texas A&M University
Dept. of Oceanography
College Station, TX 77843
National Oceanographic Library
Southampton Oceanography Centre
European Way
Southampton SO14 3ZH
UK
The Librarian
CSIRO Marine Laboratories
G.P.O. Box 1538
Hobart, Tasmania
AUSTRALIA 7001
Library
Proudman Oceanographic Laboratory
Bidston Observatory
Birkenhead
Merseyside L43 7 RA
UNITED KINGDOM
IFREMER
Bibliothèque La Pérouse
Centre de Documentation sur la Mer
15 rue Dumont d'Urville
Technopôle Brest-Iroise
BP 70 — 29280 Plouzané — FRANCE