1
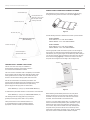
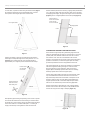
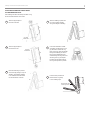
103796*1
Luff Tape Conversions
& Sacrificial Sun Covers
Luff Tape Conversions & Sacrificial Sun Covers
MATERIAL CHOICES
Con
tinu
ous
Sup
por
t Ta
pe
There are two materials that work well as sun covers. Sunbrella, a
solution dyed acrylic, is by far the most common and the most durable
selection. It is available in a wide range of colors; however, Sunbrella is
relatively heavy at 9.5 ounces per yard. For small boats or areas with
light air and moderate sunlight, a 3 oz. UV protected Dacron insignia
cloth is the better choice. This material is only available in white, but it is
light and very easy to install given its adhesive backing. It is also precut
to 18", 14", or 10" wide strips. Both materials will need to be sewn.
If the sail is in questionable condition and needs to be replaced
in the near future, it may be wise to forgo the sun cover and
just install the luff tape. The exposed sailcloth can be protected
with a sock that is pulled up on an extra halyard to cover the
furled sail. This cover can be used with any new sails.
Leech
over
Luff
uff
mL
Foa
Modern reefing/furling units make use of a continuous support tape
along the leading edge of the sail that slides into a groove in the furler.
When converting a sail to roller furling, the existing luff tape, any wire
or rope, and all hanks, grommets, and thimbles must be removed.
Simply cut in back of any grommets in the sail (along the inner edge
of the luff tape is ideal). This cut must be accurate so that an even
width of material is removed from the leading edge of the sail.
Sun C
PREPARING FOR ROLLERFURLING
LP
ADJUSTING THE LENGTH OF THE LUFF
Check the length of the sail’s luff and the length of the roller furling
gear’s extrusion. Most genoas are designed with luffs that stretch
nearly the full length of the head stay. When the roller-furling gear is
added, the drum and the head swivel shorten the usable stay length
and therefore the sail’s luff may need to be shortened. The furling
unit manual will give a sailmaker’s luff deduction measurement. This
measurement is usually relative to the pin to pin length of the forestay.
Deduction
Max. Luff Length
Stretch Reduction
Final Luff Length
12"
6"
Round Stainless Ring (attached with 1" tubular webbing)
(usually 2% of max. luff)
2. Measure from the new sail head one quarter of the way down the luff.
Use a pencil to place a mark in from the sail’s edge (equal 75% of “A”).
29'
-
Foot
(user’s manual)
30'
-
er
Cov
1. Determine how wide the wedge will be at the head of the
sail by measuring up from the tack of the sail to the Final
Luff Length. Mark the leech edge at this distance. Then
measure from here to the forward sail edge. This Cut Off
Distance (labeled “A”) should be perpendicular to the luff.
EXAMPLE:
P-Pin
Sun
28'6”
If the furling unit manual does not give the luff deduction measurement,
then the maximum length that the furling gear will accommodate
must be determined by tying the end of a tape measure to the
halyard swivel shackle and raising it to its uppermost position.
Read the tape at the tack shackle for the maximum luff length.
Apply the 2% stretch reduction to determine the final luff length.
The luff edge of the genoa is probably slightly hollow near the head
and slightly convex near the tack. When cutting a wedge out of the
sail to shorten it, the original luff curve needs to be duplicated.
3. Place a mark half way down the luff (equal to 50% of “A”).
4. Place a mark three-quarters of the way down
the luff (equal to 25% of “A”).
5. The new and old luff will meet at the tack.
After marking these points, connect them with a smooth pencil line
and cut off the wedge (Figure 1). It helps to use a long wooden or
plastic spline to make the pencil line fair, but a yardstick will work if
care is exercised. Shortening the sail this way also raises the height
of the clew which tends to make the sail roll more evenly on the luff.
Luff Tape Conversions & Sacrificial Sun Covers
2
ADDING A SUN COVER USING SUNBRELLA FABRIC
Cut Off Distance (A)
If head patch will be cut
down 50% or more, move
the head patch instead
of cutting it too small.
First determine how many panels to cut. Sunbrella can be cut along
its length but cutting across its width is more efficient (Figure 2).
1/4 Down Luff (.75 A)
46" or 60"
Width
Width
Figure 2
1/2 Down Luff (.5 A)
Use the following formulas to determine the number of panels needed:
How to Reduce the Luff Length
(when necessary)
3/4 Down Luff (.25 A)
Use this technique to
duplicate old luff curve.
Figure 1
THE NEXT STEP—ADDING A SUN COVER
The luff of the sail is now ready for installation of
the appropriate continuous support tape, however a
sun cover should be added first if needed.
The cover must be of sufficient width to completely cover the leech
and foot edges of the sail when furled. Generally the leech width
will be greater than the foot width. This is because the angle at
the tack of the sail is almost always greater than at the head.
Use the two formulas below to determine panel widths. The
formulas require knowledge of the sail’s luff length and LP (length
perpendicular). Find those measurement first (see drawing
previous page) and then plug them into the formulas.
LUFF LENGTH (ft.) / (LP (ft.) /6) = FOOT PANEL WIDTH (in.)
To determine the panel width needed to cover the leech of the furled sail:
LUFF LENGTH (ft.) / (LP (ft.) /8) = LEECH PANEL WIDTH (in.)
The resulting widths are rough guides only, but they are
generally wide enough (excess width is not a problem).
These panels will be cut from Sunbrella OR from a 3
oz. UV protected Dacron insignia material. Follow the
appropriate instructions based upon material selection.
For 46” Sunbrella:
FOOT LENGTH / 3.75 = # OF FOOT PANELS
LEECH LENGTH / 3.75 = # OF LEECH PANELS
For 60” Sunbrella:
FOOT LENGTH / 4.92 = # OF FOOT PANELS
LEECH LENGTH / 4.92 = # OF LEECH PANELS
Cut the appropriate number and widths of panels. The short edges of
each panel do not require hemming (already heat sealed by the cloth
manufacturer). The long (46”) edges can be attached by either creating a
1/2” fold along each 46" side and butting the panel edge up to the edge
of the sail and sewing (Figure 3) or if a leech or foot line is involved,
the panel can be wrapped over the edge of the sail (Figure 5A).
1/2" Hems
Sunbrella
long
placed a
ge
leech ed
ce
fa
m
e
(h
il)
sa
n
o
n
dow
Leech Edge
e of
long edg
placed a
il)
sa
n
o
Sunbrella
n
face dow
foot (hem
Foot Edge
Figure 3
Before attaching the Sunbrella panels to the sail, verify which
direction the sail is to furl. If the drum furls clockwise, sew the
Sunbrella on the port side of the sail. If the drum furls counterclockwise, sew the Sunbrella on the starboard side.
Use pins, a long arm stapler, basting tape, or a combination of all
three to secure the Sunbrella panels in place. 3M Super 77 spray
adhesive also works well for this application (spray the panels
one at a time, away from the surface of the sail). Carefully baste
the panels so they are flat on the sail and not under any stress
which leads to leech flutter. Use plenty of pins, staples, or basting
tape as the stretch in Sunbrella makes it difficult to keep flat.
Luff Tape Conversions & Sacrificial Sun Covers
HOW TO AVOID YOUR LEECH LINE
If the sail has a leech and/or foot line, one long edge of
3
1
1" Fold Over
Sail Edge
2
Sew straight stitch along inner
edge of acrylic at sail edge
Leech or
Foot Edge
each cover panel rectangle should not be hemmed. This
edge will be used along the outer edge or edges of the
sail and should be wrapped around that edge and sewn
in place. Using this technique, the cover will not interfere
with the leech or foot lines (Figure 5A). It is best to use a
hot knife to seal the unhemmed Sunbrella acrylic edges.
Leech/foot line free
in hem or tape
Leech or Foot Edge
Figure 5A
Push line toward sail’s center
as you sew along edge
OR
Follow the original steps, but instead of wrapping the acrylic
Straight Stitch
around the sail’s edge to avoid the leechline, make it flush
with the edge (as done with sails without leech lines). Be
careful to push the leech line in toward the sail’s center
as you sew the acrylic cover down (Figure 6A). As long
as the leech or foot line is free to move inside the edge
of the sail this process will not cause any problems.
Figure 6A (Cross-Section View)
Continue to lay the Sunbrella panels along the edge of the sail
with a 1/2" overlapping each panel. If the leech or foot is sharply
curved, angle each panel so that it follows the sail’s shape
(Figure 4). Fold the hem along the sail edge after basting the
panels in place so an accurate match can be maintained.
If the machine balks in the tack and clew areas, sew by hand
with a sailmaker’s needle and a length of waxed sail. Use a
simple flat stitch (penetrate the material, move forward about
1/4", penetrate it from the other side, and continue).
Trim the Sunbrella away from the rings at the head and
tack. Leave enough to create a 1/2" piece to turn under
for a hem. Sew these hems down (Figure 6).
Panels angled
so that they follow
the sail's shape
Figure 4
After all panels are in place, sew them to the sail using straight or
zigzag stitches. Start with the leech and foot edges and then sew the
inside hemmed edges followed by each of the short overlapping panel
edges. Finish by sewing a diagonal across each panel (Figure 5).
Cut the UV cover cloth
around corner ring
Figure 6
Now, if the Sunbrella has been put on the “right” (as
opposed to the “wrong” side of the sail, it will automatically
provide a cover when the sail is furled.
ADDING A SUN COVER USING
DACRON INSIGNIA MATERIAL
Figure 5
A 3 oz. UV impregnated Dacron insignia material can also be used
for a light weight rollerfurling cover. It comes precut in 10", 14", and
18" wide adhesive-backed strips (review formulas for determining
appropriate panel width). If the insignia material is a few inches too
wide, do not bother cutting it down as extra width is not a problem.
Luff Tape Conversions & Sacrificial Sun Covers
4
In most cases, 3 panels are used along the foot and leech (Figure
7). Divide the sail’s leech and foot measurements by 3 and cut
each panel to those lengths plus about 3 inches extra.
Sew the adhered panels to the sail using a zigzag stitch placed within
1/4" of the panel’s edge. Sew along the inner edge, across the short
overlapping panel edges, along the outer edges of the foot and leech
(Figure 9), and in a diagonal pattern across each panel (Figure 5).
If sail has leech or
foot line sewn behind
it, leave enough
room for movement
UV Insignia Panels
Zigzag Stitch
Leech
Luff
Leech
Foot
Figure 9
CONTINUOUS SUPPORT TAPE INSTALLATION
Foot
Figure 7
Position the panels so they can be folded around the foot and
leech edges. Overlap the edges of the sail by at least 1 to 1-1/2"
(Figure 8), and overlap the ends of the separate panels by
approximately 1/2". Angle the panels to follow the sail’s shape.
This support tape does not need to be stretched as it is attached.
The sail is supported all along its length so a lack of tension
along the luff will not cause scalloping. (See our Choosing
Support Tape for Headstay Systems chart online for matching
headstay systems and continuous support tapes.)
Fold UV cloth 1"
over sail edge
to form hem
Ins
ign
ia P
ane
l
Le
e
ch
Cut the support tape a little longer than the new luff length. Open
it up and sandwich the luff of the sail inside. Let some of the
tape extend beyond the head and the tack. Use staples to hold
the tape in place or apply an acrylic basting tape between the
support tape and the sail on each side. Keep the tape wrinklefree and do not stretch the tape or the sail during application.
UV
A small slit will help
make hems lie flat
when folding over.
Sew continuous support tape along the leading edge of the sail.
These pre-finished tapes are made up of two (three in a one Hood
system) small, hard, braided cords that are sewn into a narrow
fold of Dacron cloth. The size of the braided cords and their
spacing is very important to the proper working of the roller furling
system. For that reason, continuous support tapes are usually
purchased pre-finished and then simply attached to the sail.
Patches
Sew the support tape in place with two rows of zigzag stitches,
the first row as close to the secondary cord as possible and the
second row along the inner edge of the tape (Figure 10).
Figure 8
Next peal the paper backing away starting at the corner of a panel
and smooth the material down as the backing is removed. When
all panels are in place, trim the narrow strip that overlaps the edge
of the sail so that it is a consistent width (3/4 to 1" all along its
length). Fold this strip over against the other side of the sail.
Sail
Figure 10
Luff Tape Conversions & Sacrificial Sun Covers
5
ATTACHING STAINLESS STEEL RINGS
AT THE HEAD AND TACK
Use webbing and follow the 6 steps to attach a ring
at both the head and tack sail corners.
1
Trim the support tape at
the head of the sail.
4
ring
Sew the webbing in place with
two rows of zigzag stitches
along each length of webbing.
3"
Cut along
dashed line
2
Trim the support tape at
the tack of the sail.
5
Cut along
dashed line
8"
Use a #16 sailmaker’s needle
and waxed, double-strand of 4-5
ply sail twine to fasten the ring
firmly in the loop. Pass the needle
through the webbing as close to
the ring as possible. Bring the
needle through the ring and move
3/8" along the ring and repeat.
Proceed until the entire base of
the ring is firmly fixed in position.
ring
3
Place the head ring in position
and secure by placing in loops of
webbing. The width of webbing
is not critical but should extend
into the sail about 10 inches.
6
10"
Use the same procedure to
fasten the tack ring firmly
in its 3 webbing loops.
Optional third strap
bisecting first two
Luff Tape Conversions & Sacrificial Sun Covers
6
ADDENDUM
Con
tinu
ous
Sup
por
t Ta
pe
ADDING A FOAM LUFF
A pad of PVC closed cell foam with a Dacron sailcloth surface is
sometimes installed along the leading edge of a furling sail to help
flatten the sail as it is furled. The foam is wider toward the center of the
sail to create more bulk in the center and help flatten the sail as each
additional wrap is taken. It also maintains the sail’s designed draft.
Cover the exposed surface of the foam with a 3 oz. UV
impregnated Dacron insignia material. Wrap the insignia
material around to the back side of the foam tape to protect
the foam edges and for a neater appearance.
over
Sun C
Cut the foam tape to its proper shape by finding the LP point in the
sail (the LP line is perpendicular to the luff and intersects the clew).
Measure 5% of the total luff length at each side of the LP and make
pencil marks on the foam. The distance between these marks is
the full width. Boats under 25 feet should use a maximum width of
9". Boats from 26 to 35 feet should use 11" tape. Larger boats can
use 12" tape (full width of the material). From these marks, trim
the foam tape down so that it narrows to 2" at both ends. Use a
straight edge and pencil to mark a line on the foam before cutting.
Leech
Luff
Foa
mL
uff
Simply cut the foam tape approximately two feet shorter than the length
of the sail’s luff. Lay the sail out flat and place the foam tape flush along
the luff edge just behind the second braided line in the support tape. The
ends of the foam tape should stop at the sail’s head and tack patches.
LP
Sun
er
Cov
Foot
Round Stainless Ring (attached with 1" tubular webbing)
Baste or staple the foam tape in place (or use the Super 77
spray adhesive) and sew down using a 1/4" zigzag stitch about
3/16" from the edge of the foam all around the perimeter.
NOTE: Oftentimes it is possible to purchase the foam tape in
a shorter length (about half the length of the sail’s luff edge)
instead of the full length of the luff edge. Since the foam tape
is tapered down at its ends, pattern and cut the foam tape out
in two pieces (patterning one half above the other) and join the
pieces with a butt seam somewhere near the middle of the luff.
Sailrite Enterprises, Inc.
2390 East 100 South, Columbia City, IN 46725
Phone (800) 348-2769 / (260) 244-4647
Fax
(260) 818-2005
Email [email protected]
Sailrite.com
© 2015 Sailrite Enterprises, Inc.