1
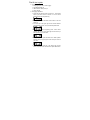
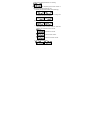
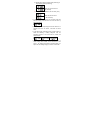
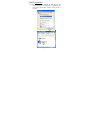
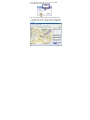
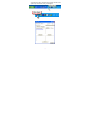
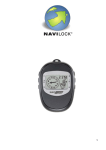
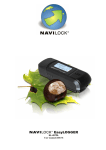
Navilock NL-456DL Artikel 60098 Table of contents Part 1 Product introd uction 2 Part 2 Features 3 Part 3 Safety notes 4 Part 4 User’s guide 5 Part 5 Operation not es 10 Part 6 Access Tool 12 Part 7 Trouble shoot ing 27 1 Part 1 Product introduction Overview Function button: ¾ Press and hold: 1. Normal mode:To enter the setting mode. ¾ Temporarily press: 1. Normal mode:To reset the accumulation of Kilometer and Counter. 2. Setting mode:To set and switch among each setting items. Power button: ¾ Press and hold: 1. Power on/off. ¾ Temporarily press: 1. Normal mode:To cycle through the various information of Easy Showily. 2. Setting mode:To confirm the option of setting items and then back to normal mode. Track button: ¾ Press and hold: 1. Normal mode:To set up a new track. ¾ Temporarily press: 1. Normal mode:To mark a point in the current track. 2. Setting mode:To switch options of selected items. LCD: 1. Normal mode:Display information. Features 2. Setting mode:Display setting items. Part 2 2 Easy Showily is a Auto-show Track Logger with internal antenna. u-blox ATR0625 used in its core is high-tech component and included function of auto-log record of journey. USB interface ensures easy linking with computer to read the log data or programming it any where without install any driver or software. The GPS acquisition status, the last record of time and position could all be stored in non-volatile memory. The EasyLogger not only has 16 GPS channels but also powered by 2x AAA alkaline battery, no need to charge. Furthermore, it is with very low power-consumption, you could use it by full power operation (record 1 point per second) for 15 hours continually. If shake mode is available, then the battery life will be longer. EasyLogger built-in u-blox GPS IC ATR0625. Maximum 16 channels can be acquisitioned quickly. Highest tracking sensitivity: -158 dBm Internal decode”SBAS” is used excluding the need for external hardware in receiving SBAS signal. Data-logging acts like the in-flight black box and can record of position, date and time as long as power source is maintained. For down-load of log-data and programming of EasyLogger, provided software tool “Win_Tool” can simplify usage. USB interface, not need to install any driver or software. System requirement: Windows XP® or Vista®. 3 Part 3 Safety notes GPS (Global Positioning System) is provided by the United States government. Its accuracy may varies depending on special conditions (area at war or if it is blocked). Any control by USA will affect this system and its accuracy. If installed on the transportation device, driver must not operate this while driving. GPS performance is affected when satellite coverage is degraded as near a high-rise building, in the tunnel or under a cover. Personal replacement of components and re-structuring of this is prohibited and may result in loss of legal usage. Operation of this device is strictly prohibited in highly explosive environment such mining, in-flight or other unauthorized area against use of this. Avoid exposing this at places of high temperature and humidity. Return to original dealer immediately if it emits strange smell or fume. 4 Part 4 User’s guide Package: ¾ EasyLogger (Auto-show Track Logger) ¾ AAA alkaline battery x2 ¾ USB extensive cable (15cm) x1 ¾ User’s manual. EasyLogger Operation: ¾ Press and hold “Power” button to power on it. The LCD will show up the main screen to confirm it is in the normal mode and GPS start acquisitioning. ¾ After power on, press and hold “Power” button to turn the power off. ¾ “FIX” show up in the upper right of main screen indicates GPS acquisition is done. If not, the GPS acquisition fails. ¾ In the normal mode, temporarily press “Track” button (“PUSH” will show up in the upper right of main screen) to mark a point in the current track. ¾ In the normal mode, press and hold “Track” button (“NEW” will show up in the upper right of main screen) to re-start a new track. ¾ If the battery icon shows up in the button right of main screen, the power is low and needs to replace batteries for 5 avoiding worse GPS performance or un-working. ¾ In the normal mode, temporarily press “Power” button to change the information showed on LCD. A、Heading and speed information (after positioning): Temporarily press “Function” button to change the information from speed to altitude. B、Kilometer accumulated at present: C、Counter accumulated at present: Temporarily press “Function” button to switch the following 3 accumulative value of counter. Total value of counter. Value of motion counter. Value of non-motion counter. D、Average speed at present: 6 E、latitude and longitude at present (after positioning) or last positioning (before positioning): (When use for the first time or after cold start) F、Local present time:(Based on the zone set by user) (When the first time use or after cold start) ¾ In the normal mode, press and hold “Function” button will enter the setting mode and then the LCD will show up setting information. ¾ In the setting mode, temporarily press “Power” button or no operation more than 15 second, it will back to normal mode. ¾ In the setting mode, temporarily press “Function” button to switch the following 3 setting categories. And the information showed on the second line is present and selected status. ¾ In the setting mode, temporarily press “Track” button to switch setting value showed on the second line of the screen. The setting value would be confirmed when you skip to the other setting category or back to normal mode. 7 1. LOG Mode Setting: Walk mode, Bicycle mode, Car mode, User define mode. 2.Shake mode (power saving) function: 3. Show the usage capacity of the record: ¾ If you want to reset the accumulative value of Kilometer and counter, please enter the information B (kilometer accumulated) under normal mode, and temporarily press “Function” button, then the “RESET?” will be showed up. At this moment, you just press “Function” button again, the kilometer accumulated and counter accumulated will reset simultaneously, otherwise, you just temporarily press “Power” button to switch to other information mode, or ignore it for 5 seconds, and then the “RESET” will be canceled. ¾ When shake mode is enable and stationary more than 5 minutes, its power will be turned off (that interval can be set by yourself), until the device with movement again. The EasyLogger will not auto power on/off while shake mode is disable. And if you turn it off manually while shake mode is 8 enable, then the simultaneously. shake mode will be disabled When the USB is used as interface: ¾ Turn the EasyLogger power off. ¾ Connect EasyLogger to USB port of computer. ¾ The built-in access tool (Win_Tool) will execute automatically, and then read the log data and transfer its format to Google Maps automatically. ¾ User can transfer the log data to other format to suit other software or programming Easy Showily via Win_Tool. Battery Replacement: ¾ Turn off the EasyLogger. ¾ Take off the USB cover. ¾ Take out the battery cover. ¾ Replace new batteries.( AAA alkaline battery x2) ¾ Put the battery cover back. ¾ Put on the USB cover. 9 Part 5 Operation notes EasyLogger will do self-check once it is powered. GPS start to work when LCD shows up the main screen. GPS automatically starts acquisition and auto-logs. If sky is clear overhead, it requires only 34 sec for acquisition. (If the data in its memory is still valid, it needs only 4~33 sec). After acquisition, EasyLogger starts record the track. For the first time if it is placed at the area well exposed to the satellite signal, this device requires approx 13 min (theoretically 12.5 min) to receive or update Almanac. Refer to trouble shooting guide when signal is not received well. If EasyLogger formatting the internal data is not correct, or if satellite data has been deleted, it takes longer time to position. But under the following conditions, it can take even longer time to get cold start. ¾ If it is not in use for over 3 months (the almanac is olddated). ¾ If the last recorded position data is over 500 km. After positioning, EasyLogger begins to auto-log the following way. ¾ Maximum data up to 94000 Points. ¾ Recording in a circular way. ¾ Auto-logging goes on without the need of any device. ¾ Log-data can be read out by way of the ”Win_Tool” included. ¾ Data includes latitude, longitude, and altitude, time in yearmonth-date-hour-min-sec and special point mark status. ¾ After successful positioning, it wills auto-log GPS data into its internal memory chip. It recorded in a rotational order. The earliest (oldest) data will replaced by the latest 10 (newest) one when memory space is full (when data excesses 94000 maximum). 11 Part 6 Access Tool 1. Connect EasyLogger with computer via USB interface. The access tool will execute automatically. If not please find the device in the “My Computer”, and then click on its icon to execute it. 12 2. Key in the password and click “Log in”. If you don’t enable password protect, this step will be omitted. 3. Win_Tool will read log data and transfer it to Google Maps format automatically, and execute it. User also can transfer the log data to another format, such as Google Earth or TimeMachineX formats. 13 At the same time, Win_Tool will become minimum and hide in the system tray. Click the icon, Win_Tool will appear. 14 4. More Setting or function. 4.1 Clear all LOG Data: Click “Clear LOG” to delete all LOG data in the device. Note: If select delete all LOG data, it will spend 30 sec to delete all LOG data while next time the device is power on. Also the LCD on the device will show the message as below, until delete process completely. 15 4.2 Detail Setting: Click “Detail>>” to open detail setting dialog. 16 Click “<<Fundamental” back to fundamental setting dialog. 4.2.1 Enable password protection or change password: User could enable password protection here, and the maximum of password is 10 characters or digits. If you want to disable password protection, just keep blank in both “New” and “Confirm”, and then click “Change Password”. 17 4.2.2 GPS setting: Ⅰ.GPS Cold Start: Click “Cold Start” to restart GPS by cold start mode. Ⅱ.GPS parameters setting: Ⅱ.1 Fix Mode: Select the GPS positioning mode. Ⅱ.2 2D Fix Altitude: Set the “fixed altitude” used when the fix mode is 2D. Ⅱ.3 Initial Min. SVs: Set how many GPS satellites used for the initial positioning. Ⅱ.4 Initial Signal Min Strength: Set the GPS satellite’s strength used for the initial positioning. Ⅱ.5 Navigation Signal Min Strength: Set the GPS satellite’s strength used after positioning. Ⅱ.6 PDOP Mask: When the value is bigger, the inaccuracy is greater, still you can position the GPS in the worse environment. The smaller value brings the better accuracy, but you may not be able to fix position in the worse environment. Ⅱ.7 TDOP Mask: When the value is bigger, the inaccuracy is greater, still you can position the GPS in the worse environment. The smaller value brings the better accuracy, but you may not be able to fix position in the worse environment. Ⅱ.8 P Accuracy Mask: Set the threshold of position accuracy. Ⅱ.9 T Accuracy Mask: Set the threshold of time accuracy. Ⅱ.10 SBAS: Enable/Disable SBAS function. 18 4.2.3 Language selection of operation interface: Support English, Chinese Traditional, Chinese Simplified. 4.2.4 Shake mode (power saving) setting: To enable the Shake mode, the device will be power off when there is no movement after 5 minutes (default); and the device will be power on automatically when it moves. To disable Shake mode, device will be never power off automatically. And if you turn it off manually while shake mode is enable, then the shake mode will be disabled simultaneously. 4.2.5 LOG Mode Setting: LOG mode supports “Walk mode”, “Bicycle mode”, “Car mode” and “User define mode”. In user define mode, there is 5 preset saving intervals can be selected by slide switch, including Time, Range, Heading, Speed and Mix (Time & Range). 19 Note: 1. “Valid Speed for Record” means that if speed exceeds this range will not record any points. 2. “Factory Setting” means that recover all parameters to factory setting at user define log mode. 4.2.6 Transfer LOG data to another export format: EasyLogger support multi translate formats, such as Google Maps, Google Earth, Virtual Earth, OziExplorer, PaPaGO, GPX format, and TimeMachineX format. 20 Note: 1. User could download TimeMachineX free software from the website http://www.navilock.de to integrate photo to your trajectory. 2. In the export file list box, click the right key of mouse, it could copy or delete the export file. 4.2.7 Total LOG points Total LOG points indicate how many points are stored in the device 4.2.8 Change device ID: The device ID could be changed by User. 21 4.2.9 LCD Contrast: Set the LCD Contrast; LCD Contrast depends on the temperature. The higher temperature is, the darker for contrast, in another word, the lower temperature is, the lighter for contrast. Reference Value: 200 at 25℃ (77℉) 4.2.10 Zone: The Zone value could be set to fit in with your trajectory. The default value is the same as the PC you used. You could Click ”Get device Zone” to catch the zone value from the device (same as device), also you could adjust the Zone value by yourself and click ”Set device Zone” to save the modification. Note: The zone setting will affect the presentation of local present time on the LCD of device. 4.2.11 System Unit: Select the system unit you want to use at the device, including Metric System (KPH) and Imperial unit (MPH). 22 4.2.12 Google Maps with Panoramio: Ⅰ. View all nearby public photos on the Panoramio of the selected track points. Ⅰ.1 Keep the “Panoramio User ID” as blank. Ⅰ.2 Click “Google Maps” button to convert LOG data to Google Maps format. Ⅰ.3 Select a trajectory with Google Maps format and double click it to open. Ⅰ.4 Just click any track point icon on the Google Maps. Ⅰ.5 All nearby photos on the Panoramio of the selected track point will show up. 23 24 Ⅱ. View all nearby photos held by yourself on the Panoramio of the selected track points. Ⅱ.1 Click “Upload photo to Panoramio” button, it will link to Panoramio Website, upload your photos and geotag those photo by the geographic data of your trajectory. PS. Before you upload the photos, please register and login Panoramio at first. Ⅱ.2 Back to Win_Tool and key in your Panoramio user number (you can find that in the url of your Panoramio personal page.) in the blank of “Panoramio User number”. Ⅱ.3 Click “Google Maps” button to convert LOG data into Google Maps format with your Panoramio user number. Ⅱ.4 Select a trajectory with Google Maps format and double click it to open. Ⅱ.5 Just click any track point icon on the Google Maps Ⅱ.6 All nearby your own photos on the Panoramio of the selected track point will show up. 25 Ⅲ. Share your Google Maps format trajectory with your friend. Ⅲ.1 Copy and e-mail it to your friend via your mail client such as outlook. Ⅲ.2 Or click the button of “Mail to friend” send it out. 26 Part 7 Trouble shooting If the vehicle enters the tunnel. The GPS signal transmits linearly down to earth and its signal is blocked out in this situation. GPS satellite coverage gets poor because of high-rise building or thick forest. Even though EasyLogger can receive reflected weak GPS signal, the data might be less accurate. The sun shade in the vehicle can partially block out GPS signal and effect good reception. The GPS satellite is under control of USA and the accuracy might vary depending on some special purpose (especially when manipulated by USA). After successful positioning of EasyLogger, if it is moved to another area of 500 km away it cannot be easily re-positioned. This is because the firstly recorded data (position, time and number of satellites acquisitioned) is different from the new area. It will need longer time for re-positioning. When the low battery icon is showed, the battery is critically low and please replaces new batteries within 30 minutes; otherwise the GPS will stop to work or lower the performance. Avoid placing 2 GPS devices too close during positioning. If the EasyLogger works abnormally because of wrong procedure, then please reset it by taking off the battery. It will have factory default without effecting pre-set program. At the factory default, GPS reception begins in a warm start mode and fix position may take longer time. When the Auto-Run function is not working, please refer to MSDN-Enabling And Disabling AutoRun: http://msdn2.microsoft.com/en-us/library/Aa969329.aspx 27