1
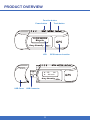
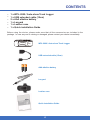
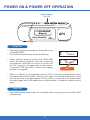
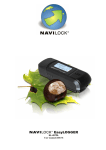
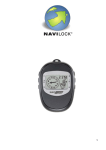
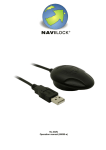
1 SAFETY NOTES GPS (Global Positioning System) is provided by the United States government. Its accuracy may varies depending on special conditions (area at war or if it is blocked). Any control by USA will affect this system and its accuracy. If installed on the transportation device, driver must not operate this while driving. GPS performance is affected when satellite coverage is degraded as near a high-rise building, in the tunnel or under a cover. Personal replacement of components and re-structuring of WPL-2000 is prohibited and may result in loss of warranty. Operation of this device is strictly prohibited in highly explosive environment such mining, in-flight or other unauthorized area against use of this. Avoid exposing this at places of high temperature and humidity. Return to original dealer immediately if it emits strange smell or fume. Set the WPL-2000 on the place where can receive GPS signal easily for 10 to 15 minutes if it is the first time to be used. This procedure enables the device to gather some Almanac Data and ensures the quicker position fixed and better GPS performance. 2 WPL-2000 Auto-show Track Logger CONTENTS 1 3 4 5 7 8 8 11 13 15 16 37 42 Features Product Overview Contents Inserting Batteries Power On & Power Off Operation Function Description • MAIN Mode • Setting Mode Showing Track Google Maps Overview Using Win_Tool Utility Track Editing via TimeMachineX Trouble Shooting FEATUrES Wintec WPL-2000, an auto-show track logger with a u-blox 5 GPS & GALILEO chipset, not only provides extreme sensitivity to recode GPS data but supplies the a LCD display to show real time information. Use this unit and its inbuilt software (Win_Tool), you can: Ð Check the complete route where you ever been. Ð Reconfirm the locations of where you took pictures on a trip. Ð Apply geographic data to the pictures you took. Start to record GPS log Turn on WPL-2000 before you start your trip, make sure it gets acquisition, and take pictures with your digital camera. The device records the GPS log after the power is turned on until turned off. H: 150° FIX S: 100 km/h GPS H: 150° FIX S: 100 km/h Easy Showily Plug & play, auto-show track on Google Maps Ð No need to install any driver or software. Ð Just connect WPL-2000 to your computer via USB interface, and then the GPS log (moving route) will show on Google Maps automatically. H: 150° FIX S: 100 km/h Easy Showily 1 GPS Useful & user-friendly inbuilt software ÐÐ No need to install any extra software, the inbuilt one will pop up after connect WPL-2000 to computer. ÐÐ No matter GPS parameter setting, format converting Geo-tagging…etc. can be done via the inbuilt software. H: 150° FIX S: 100 km/h Easy Showily 2 GPS Product Overview Function button Power button Track button 1.LOG MODE Bicycle GPS Easy Showily LCD GPS Antenna Location H: 150° FIX S: 100 km/h Easy Showily USB Cover USB Connector 3 GPS Contents ÐÐ ÐÐ ÐÐ ÐÐ ÐÐ ÐÐ 1 x WPL-2000 / Auto-show Track Logger 1 x USB extended cable (15cm) 2 x AAA alkaline battery 1 x Lanyard 1 x Leather case 1 x Quick installation Guide Before using the device, please make sure that all the accessories are included in the package. In case any one is missing or damaged, please contact your dealer immediately. 1.LOG MODE Bicycle Easy Showily + GPS WPL-2000 / Auto-show Track Logger USB extended cable (15cm) AAA alkaline battery tw m. .co tec win . w ww Lanyard Leather case Quick installation Guide 4 Inserting Batteries 1. Take off the USB cover. 2. Slide the battery cover. 3. Insert batteries into the unit with correct direction. (AAA 1.5v battery *2; Alkaline batteries are recommended.) 4. Close the battery cover. 5. Put on the USB cover. 5 To remove batteries Be sure WPL-2000 has been turned the power off before removing batteries. The abnormal process may cause damage of log data. NOTE 111 Replace new batteries immediately when the low battery icon pop up. Doing so can avoid worse GPS performance and incomplete log data. 222 Remove batteries when you do not use the unit for a long time. Otherwise, it may result in leakage of batteries. 6 H: 150° FIX S: 100 km/h Battery icon Power On & Power Off Operation Power button On / Off 1.LOG MODE Bicycle GPS Easy Showily Power On ÐÐ Press and hold the power button for 3 seconds to turn on the WPL-2000. ÐÐ The LCD will show the main screen as following. ÐÐ At this moment, antenna portion of the WPL-2000 should be pointing upwards to the sky in open sky environments, and hold it for about a minute until the “FIX” pop up in the upper right of main screen. It indicates GPS acquisition is done and logging function is in progress. H: S: 0° 0 km/h H: 150° FIX S: 100 km/h FIX ÐÐ When it is difficult to get acquisition (see the “FIX”), direct the antenna portion of the unit upward and wait for a while. Don’t put your had on or near the antenna area. If the unit can not track even after waiting for five minutes, you may be in a location where the radio signals from GPS satellites can not be reached. Change the location and try again. Power Off ÐÐ Press and hold the power button for 3 seconds under any screen to turn the WPL-2000 off after using. 7 Function Description Function button Power button 1.LOG MODE Bicycle Track button GPS Easy Showily The WPL-2000 includes two modes, the Main Mode and Setting Mode. Main Mode ÐÐ Heading & speed H: 150° FIX A: 1500 m H: 150° FIX A: 1500 ft Go to Distance accumulated page. Change speed information into altitude. H: 150° FIX S: 100 km/h NOTE ÐÐ H: 150° FIX S: 100 mi/h This information will be updated only after getting acquisition. Distance accumulated DISTANCE FIX 120.5 km DISTANCE FIX 120.5 mi Go to Counter accumulated page Enter the process of distance reset. DISTANCE RESET? NOTE When the “DISTANCE RESET?” screen show up, press the function button again to reset the data of distance accumulated and counter accumulated simultaneously; otherwise, press the power button to switch to next information screen, or ignore it for 5 seconds to skip the “RESET” process. 8 ÐÐ Counter accumulated TOTAL T. 14h51m10s Total Time accumulated. MOVE T. 10h30m35s Move Time accumulated. STOP T. 4h20m35s Stop Time accumulated. Go to Average speed page. Switch around information of Total Time, Move Time and Stop Time. ÐÐ Average speed AVG. SPD FIX 8.2 km/h AVG. SPD FIX 8.2 mi/h Go to Latitude & Longitude page. ÐÐ Latitude & longitude N 24.99690 E 121.48633 ddd.ddddd N 24° 59’49 E 121° 29’10 dddmmss N 24° 59.82 E 121° 29.16 dddmm.mm Go to Current time page. Switch around different formats of latitude & longitude NOTE 111 Before GPS acquisition, the latest location data show up instead. 222 Below screen will show up under following situations. N E 0.00000 0.00000 •• The first time to use this device. •• After cold start but before acquisition. 9 ÐÐ Current time CLOCK 8 : 35 : 25 Back to Heading & speed page. NOTE 111 The clock depends on the time zone set by user 222 Below screen will show up under following situations. CLOCK 0 : 00 : 00 •• The first time to use this device. •• After cold start but before acquisition. 10 Setting Mode How to enter Setting Mode? Under main mode, press the function button longer to enter the setting mode. How to back Main Mode? ÐÐ ÐÐ ÐÐ Press the power button No operation more than 15 seconds. (The setting changed won’t be saved) Log Mode Setting 1.LOG MODE Walk 1.LOG MODE Bicycle Walk Mode Bicycle Mode 1.LOG MODE Car 1.LOG MODE User Car Mode User Mode Confirm the option and back to Main Mode. Confirm the option and Go to Shake Mode Setting. Select Log Mode (Walk, Bicycle, Car, User). NOTE ÐÐ The detail of User Mode can be defined via inbuilt software - Win_Tool. Shake Mode (power saving) Setting 2.SHAKE MODE On 2.SHAKE MODE Off Shake Mode On Shake Mode Off Confirm the option and back to Main Mode. Confirm the option and Go to Usage capacity of log data page. Enable(On) or disable (Off) the Shake Mode. NOTE As Shake Mode On, the WPL-2000 will auto-shut off (sleep) if the device is motionless over 5 minutes (default, the duration can be set via Win_Tool), and then auto-wake up when it feels any vibration. 11 ÐÐ Usage capacity of log data. 3.REC MEMORY 48.6% Back to Main Mode. Go to Time Zone Setting ÐÐ Time Zone Setting 4.ZONE + 8 : 00 Confirm the option and back to Main Mode. Confirm the option and back to Log Mode Setting. Adjust the time zone. 12 Showing Track 111 Remove the USB cover and connect the WPL-2000 with a USB port on a computer. 222 The inbuilt access tool (WIN_TOOL) will be executed automatically and pop up following dialogue, please press “OK”. 333 You probably can not see the above dialogue if the antivirus program in your computer does not accept the “Auto Run” function. Please change the setting to accept it. 444 You also can execute the WPL-2000 manually. Please refer to below process. •• Open “My Computer”. •• Double click the icon of WIN_TOOL as following. 555 The WPL-2000 will auto-connect to Google Maps. And the safety mechanism from IE as following will be shown up, please allow blocked content. 13 666 Now, the recorded track will be shown on Google Maps automatically. 777 At this moment, the inbuilt Win_Tool will be minimized and hidden in the system tray. Click its icon as below anytime when you want to use the Win_Tool. Allow this page to access my computer 14 Google Maps Overview 1. 7. 2. 3. 4. 8. 6. 5. 111 Track Information: Basic information of the device and selected track. 222 Selected Track: Select which track inside WPL-2000 you want to show. The default is the last track. 333 Track Point Tour: Key in the digit which exact point you want to see and press “Go to” button. It will be pointed out on map, and the detail will be shown by left click. 444 Track Points Manager: It can be shown by different combination of track points. 555 Track Line Manager: Select the color of track. 666 Speed Bar: Define colors for speed. The track point shown on Google Maps with color and direction, and different color stands for different speed. 777 Start Point. 888 End Point. 15 Using Win_Tool Utility ÐÐ Version & Language 111 Win_Tool Version. 222 Language Page: Select a language here. Please be aware the language setting only for Win_Tool but device. 1. 2. 16 ÐÐ LOG Data 111 222 333 444 Tab: LOG Data Tab. LOG Data Source: Select a LOG Data Source from Easy Showily (WPL-2000) or other. Transfer: Select a format, and press the “Transfer” button to convert to. China Map: When the track is logged in Mainland China, please tick “China Map” and transfer to Google Maps again. 555 Track list: •• The original track downloaded from WPL-2000 and all file you transferred will be shown here. •• Use right key function to copy, delete or e-mail those files. 666 Total LOG Points: Show the total LOG points of selected track. 777 Clear LOG: Press the “Clear LOG” button to delete all log data inside WPL-2000. NOTE After pressing the “Clear LOG” button, the following message will show on the LCD of WPL-2000 when you turn the device on. And it will take around 30 sec. to complete the clear log process and back to Main screen. CLEAR LOG DATA NOW. . 1. 2. 3. 4. 5. 7. 6. 8. 17 8. Download latest Win_Tool: • Press the Download latest Win_Tool button. • Open the “EasyShowily_Win_Tool.rar file. • Un-compress the rar file to any space you assigned and you will see the following pictures. 18 1. 3. 2. 111 Release Note (English): Elaborate the difference between this version and last version in English. 222 Update file: The main file for update process. 333 Release Note (Chinese): Elaborate the difference between this version and last version in Chinese. 19 How to update WPL-2000 Warning: After the update process, all LOG data inside the WPL-2000 will be deleted. Besides, the password mechanism will be disabled, and back to factory setting. 1. After un-compress the rar file, use the right key function to copy the update file i.e. the WPL2000.img. 2. Go to my computer, find out the Win_Tool icon, and use the right key function to open it via Explore. right click 20 3. Paste the WPL2000.img file here instead of the existing one. right click 4. Plug out the WPL-2000 and turn it on again. The “CLEAR LOG DATA NOW..” message will show on the LCD. It will take around 30 sec. and back to Main screen. Please be aware that the update process is exactly complete after the Main screen show up. 21 1. 2. 3. 4. 5. 6. 7. ÐÐ Device Setting 111 222 333 444 Tab: Device Setting Tab. System Unit: Select Metric or Imperial measure shown on device. Device Zone: Adjust the time zone for device. Password: Key in the password and press the “Enable Password” button to authorize the password mechanism. NOTE 111 The maximum of password is 10 letters or digits. 222 When you want to disable the password protection, just key in nothing in the blanks of both “New” and “Confirm”, and then click “Change Password” button. 555 Device ID: Add the Device Name and press the “Change” button to confirm it. 666 LCD Setting: Set the LCD contrast and back light duration here, and press “SET” button to confirm the setting. NOTE The LCD contrast has relations with the environmental temperature. The higher temperature is, the darker screen has, and then the lower LCD contrast is needed; contrariwise, the lower temperature is, the lighter screen has, and the higher LCD contrast is required. 777 Shake Mode: Enable or disable the shake mode function. •• When shake mode on, please set the duration time. If there is no movement for 5 minutes (default), WPL-2000 will turn off automatically, and turn on again when it feels vibration. •• If WPL-2000 is turned off manually under shake mode on, it will not auto-turn on even with any movement. 22 1. 2. 3. 4. ÐÐ LOG Mode 111 Tab: LOG Mode Tab. 222 LOG Mode: Select a Log mode and press “Set Log Mode” button to confirm the setting. •• Walk: Log a track point per 10 sec. or 20 m (The velocity should be 1 km/h at least.). •• Bicycle: Log a track point per 20 sec. or 100 m (The velocity should be 3 km/h at least.). •• Car: Log a track point when a heading change is bigger than10 degrees (The velocity should be 5 km/h at least.). •• User define: the detail can be set according to point 3. 333 User Define LOG Mode: the detail of “User Define” can be set here. 444 Factory Setting: Press this button to return LOG Mode setting to default. 23 1. 2. 6. 4. 5. 3. ÐÐ GPS Setting 111 Tab: GPS Setting Tab. 222 GPS Mode: Select a GPS Mode here. Please be aware that the higher accuracy is selected, the longer acquisition time is needed. 333 GPS Parameters: In point 2, if the “User define” is selected, the detail can be set here. 444 SBAS: Enable or disable SBAS function. 555 Set: After confirming GPS Parameters & SBAS, please press “SET” button to save it. 666 Cold Start: •• Cold Start is suggested if one of below mentioned is confirmed. a) The WPL-2000 didn’t be operated more than 3 months. b) The distance between your current location and the last time device turn off location is more than 800 km. •• Press the “Cold Start” button to reset almanac data inside the device, and speed up the acquisition time. •• Cold Start also can be done by manually. Press and hold both function and track buttons, and then push the power button to turn the device on simultaneously. •• Please be aware that the function of cold start manually will not work when the battery is low. 24 ÐÐ Photo Tool Press the “Geotagging / Report” button for further application. ÐÐ Geotagging Before Geotagging process, please make sure that the time zone of device and digital camera should be the same as each other, otherwise photos won’t be correctly Geotagged. 25 Combine photos with track 1. 2. 3. 4. 5. 6. 111 Page: Photo Page. 222 Selected LOG Section: Choose a track that you want to combine photos or create a report. 333 Record points: Indicate how many way points included in the selected track. 444 Load JPEG Photos: Press this button to select photos for Geotagging. •• Show Thumbnail: Tick this item to show minimized photos you chose. Please be aware this item would slow down the photo selecting process. •• Ignore already Geotagging Photo: When selected photos have had geographic data inside will not be Geotagged again. •• Generate Original backup photo after Geotagging: Tick this item to backup all selected photos after Geotagging. 555 JPEG Photos area: All selected photos including geographic data will be shown here. NOTE Right key functions are available, including Cancel Photo, Preview Photo Position, Add Photo Description and Manual Geotagging. 26 666 When the auto-Geotagging is not working or you want to modify the geographic coordinates, please use the function of manual Geotagging. •• By Map: Drag the “red sign” on the map to the correct position, and press the “Manual Geotagging” button (right key function) to complete Geotagging process. •• By Coordinates: Key in the exact Latitude (format: dd.ddddddd degree), Longitude (format: ddd. ddddddd degree) and Altitude in blanks, and press the “Manual Geotagging” button (right key function) to complete Geotagging process. Right Click 27 Combine URL (web picture or video link) with track 1. 2. 3. 4. 111 Page: URL page. 222 Add URL: Press this button to add URL item to the [URL Link] area for Geotagging. •• URL Type: Select a URL type for photo or video. •• URL Link: Key in a link of web photo or video. 333 [URL Link] area: All added URL link will be shown here. NOTE Right key functions are available, including Cancel URL, Preview RUL Position, Add URL Description and Manual Geotagging (URL). 28 444 The Geotagging for URL link can be done by Map or Coordinates. •• By Map: Drag the “red sign” on the map to the correct position, and press the “Manual Geotagging” button (right key function) to complete Geotagging process. •• By Coordinates: Key in the exact Latitude (format: dd.ddddddd degree), Longitude (format: ddd. ddddddd degree) and Altitude in blanks, and press the “Manual Geotagging” button (right key function) to complete Geotagging process. Right Click 29 Create a track file including photos and URL link 1. 2. 6. 3. 4. 7. 5. 111 Max. Photo Show Size: Select a size of photo shown on your track. 222 Map Type: Google Earth or Google Maps. NOTE When you choose Google Maps, the extra function of Google Maps API Key as below will show up. Please key in your exclusive “Google Maps API Key” if you want to share your track in your Blog. 333 Track Line Option: Set the color, transparency and width of the track line, also tick the item of “3D Track” if you need the track on Google Earth with height. NOTE When you choose Google Maps, the item of “Hybrid Map” will show up instead of “3D Track”. Tick it if you prefer the map consisted of road and satellite image. 30 444 Photo Map: Create a file only showing Geotagged photos on map (The initial file’s name will be “PGM”). 555 Photo-Track Map: Create a file showing Geotagged photos and track on map (The initial file’s name will be “PTGM”). 666 File Area: All files from point 4 & 5 will be shown here. NOTE Right key function is available for copying and deleting those files. 777 Make Report: Enter “Report Page” for further setting and create a report. Create a report 1. 2. 3. 4. 111 222 333 444 555 5. Page: Report page. Tab: Each tab stands for one analytic chart. Tick charts you want to include in your report. Description: Key in some detail you want to show in report. Create Report: Press this button to create a report with html format and open it by browser automatically. 31 A Complete Report File 1. 3. 2. 4. 5. 7. 6. 32 1. Track Map: A Map with track. NOTE If you have created a Photo-Track Map (PTGM) file during previous process, the track presented on report will include photos. 2. Instantaneous Basic Information: The basic information will be changed along with the dynamic track. 3. Track Point Bar: Indicates the total track points and a moving one along with the dynamic track. 4. 5. 6. 7. • Stop : Stop the dynamic track i.e. the moving icon. • Pause : Pause the dynamic track. • Play : Re-start the dynamic track. • Fast : Speed up the dynamic track. • Slow : Slow down the dynamic track. Moving Icon: Stand for the dynamic track. Track Information: Present detailed data about this track. Analytic Diagrams: There are eight kinds of diagrams Operation Bar for Diagram: The default of diagrams will auto-switching around, you can stop this action via operation bar. • Previous : Back to last diagram and stop auto-switching behavior. • Pause : Stop in current diagram. • Play : Re-start the Auto-switching behavior. • Stop : Stop in current diagram. • Next : Skip to next diagram and stop auto-switching behavior. 33 Save a report Save Report Button 111 Press the “Save Report” button to save it in the specific area you assigned. 222 The complete report can be demonstrated anytime by double clicking the report file. 34 NOTE Please be aware that all files including jpeg, html and xml files should exist in the same folder; otherwise the report file can not be shown normally. 35 1. 2. 3. 4. 5. ÐÐ Help 111 Page: Help Page. 222 WPL-2000 User Manual: Link to a WPL-2000 user manual. 333 Download TimeMachineX: Link to Wintec’s website to download TimeMachineX software. 444 MSCHART Register: Execute the MSCHART Register when the report function is not working. NOTE The computer which is login should be Administrator or the one has the same authorities. 555 Download latest Win_Tool: Download the latest update file. Please refer to page18, How to update WPL-2000, for further operation. 36 Track Editing via TimeMachineX Track editing process, such as deleting some incorrect point or resetting some shift point to its proper position, can be done via TimeMachineX. ÐÐ Install TimeMachineX 111 Please visit our website www.wintec.com.tw, and download the latest version of TimeMachineX by following path. Support/GPS Application/WPL-2000. 222 After downloading, double click the program and follow the InstallShield Wizard to complete the installation process. ÐÐ Convert the track file to TimeMachineX’s format 111 Plug in the WPL-2000 to PC, and execute Win_Tool.. 222 Use Win_Tool to convert the log data of WPL-2000 to TK1 format i.e. the format for TimeMachineX. 37 333 Execute TimeMachineX and stay in “Track Covert” page, the TK1 file transferred via WPL-2000 in last step should be show up in TK1 list as below. NOTE 111 The step2 should be done before executing TimeMachineX; otherwise, the TK1 file won’t auto-show up in the TK1 list. 222 You also can copy the TK1 file by hand if it doesn’t show up automatically. In Win_Tool, use the right key function to copy the TK1 file to desk, and paste it in Track Convert page of TimeMachineX. Right Click 38 444 A TK1 file includes a lot of tracks. That means all tracks inside the WPL-2000 would combine to only one TK1 file. Please use the right key function to convert TK1 format to TK2. A TK2 file stands for one track, so you can choose a TK2 file for track editing. Right Click 39 ÐÐ Track Editing 111 Enter "Track Editor" page, “Edit Track” tab, and select a TK2 file for editing. Double Click 222 Start the track editing process. 40 NOTE If you have completed the installation process of TimeMachineX, the user manual is existed in the system, you can find it according to following picture. 333 Please save the file after editing. Save the TK2 file. NOTE Save as a new TK2 file. The changed TK2 file can not be saved back to WPL-2000, so if you prefer to make a report or complete Geotagging with changed TK2 file, please do it via TimeMachineX. 41 TrOUBLE SHOOTiNG If you run into any problem using WPL-2000, use the following table to troubleshoot the problem. If the problem persists, contact your dealer for further service. Ð The WPL-2000 can not get acquisition. Ð You may be in a location where the radio signals from GPS satellites can not be reached. Ð Avoid using the unit in the locations such as tunnels, underground locations or among obstructions such as tall buildings or thick forest. Ð The sun shade in the vehicle may effect the reception. Ð Avoid placing 2 GPS devices too close during positioning. Ð it takes much time to get acquisition. Ð It may take a long time to track the location under following two situations: • The WPL-2000 didn’t be operated more than 3 months. • The distance between your current location and the last time device turn off location is more than 800 km. At this moment, cold star is suggested. For details, refer to “Cold Start” on page 28. Ð There are some shifted points with incorrect velocity and position in your track. Ð When you stay somewhere without movement or the moving speed is less then 10km/hr or under the environment with tall buildings, the satellite signal is too weak to calculate the accurate data. It’s a GPS character, just move to open sky area and keep moving to get better GPS signal. Ð You press the power button, but the unit is not turned on. Ð Batteries may not be located properly. Locate batteries properly according to the procedures in “Inserting Batteries” on page 5. Ð You may have used batteries with lower remaining power. Replace batteries with new one. Ð Your computer does not Auto-run the WPL-2000. Ð When the Auto-Run function is not working, please refer to MSDN-Enabling And Disabling AutoRun: http://msdn2.microsoft.com/en-us/library/Aa969329.aspx Ð You also can execute the WPL-2000 manually. Please refer to below process. • Open “My Computer”. • Double click the icon of WIN_TOOL as following. 42 43