1
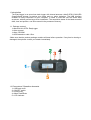
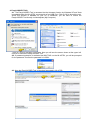
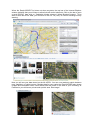
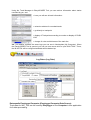
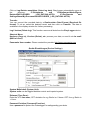
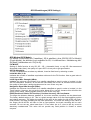
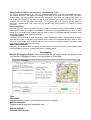
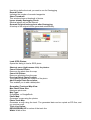
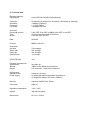
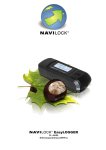
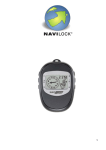
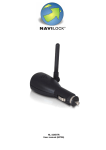
NL-457DL
User manual (60119)
1. Introduction
The EasyLogger is an auto-show track logger with internal antenna u-blox5 GPS & GALILEO
SuperSense® chipset, for saving your tracks and e.g. photo indication. The USB interface
enables an easy connection to your computer, in order to read and use the saved data
anywhere, without performing a driver installation. The acquisition status of the latest recorded
data, time and position, can all be saved in the permanent memory.
1.1. Package content*
1x Navilock NL-457DL EasyLogger
1x User manual
1x 8cm CD ROM
1x USB extension cable 15cm
*Make sure that the product package contains all items before operation. If any item is missing or
damaged, then please contact your dealer immediately.
1.2 Connectors / Operation elements
1= USB port cover
2= ON/OFF switch
3= function key
4= Mark/Track/Enter
5= LCD indicator
Important health- and security information
If you use this product you should take precautions to avoid damages and legal consequences. Follow precisely all security- and
handling advice and keep it carefully. Pay attention to all warning notices in the manual and on the device. To avoid injury, electric
shock, fire and damages on the device, please pay attention to the following notices.
Electrical Security
This product is intended for operation with power of rechargeable battery or standard battery. Any other application can be
dangerous and lead to loss of any warranty claim for this product.
Careful handling of the rechargeable battery
There is danger of fire and burning, when the re-chargeable battery wont be used properly. Do not disassemble, destroy,
perforate, short-out or throw it into water or fire or expose it to temperature higher than 60°C (140° F).
NOTE: RECYCLE OR DISPOSE USED BATTERY ACCORDING TO THE
INSTRUCTION OR THE ENCLOSED INSTRUCTIONS, FOR THIS PRODUCT.
LOCAL
SECURITY ADVICE REGARDING DIRECT SUNLIGHT
Make sure the device is not exposed to over humidity and extreme temperature. Don't let the device, the battery or the re-chargeable
battery for too long in a vehicle or other places where the temperature can rise up to 60°C (140°F), e .g. on the dashboard, window sill
or behind a glas panel, which is exposed to high UV-Light or the sun. In this case the device or the vehicle can be damaged and the
battery superheated.
Damages, which require a repairing
Disconnect in the following cases the device from the grid and contact an authorized repairing specialist or the dealer:
• Liquidity or any item came into the product or an object got into the device.
• The product was exposed to rain or liquidity.
• The product fell down and is damaged.
• There are visible signs of overheating.
• The product does not work properly despite of correct operation.
Avoid using the device after high variation in temperature
If you expose the device to high variation in temperature or humidity, there may be condensation in the device. In order to avoid
damages wait until the humidity is evaporated, before using it.
NOTE: If you bring the device from a cold into a warm or from a warm into a cold environment,
let the device take over the temperature before switching it on.
2. Operation
2.1. Remove the connector cover of the USB connection, open the battery cover, and insert
two Alkali Manganese AAA/LR03 batteries or AAA/LR03 battery cells.
2.2. Close the battery cover, and plug the connector cover back onto the USB connection.
2.3. Now use the ON/OFF switch (1) to power on the NL-457DL. To do so, press and shortly
hold the switch button. The display lights up and shows
.
3. Handling
3.1. You can also use the ON/OFF switch (1) to toggle between various display functions.
3.2. The first display indicates the current direction and the speed. It always shows 0, until you
have a fixed satellite position. After a fixed satellite position you will see your current data.
3.3. Use the (4) to set an additional Push LOG, to which you can add a comment or an image
in the EasyLOGGER Tool later. This function is very popular for photo markings in order to be
able to show an image from the marked point you inserted.
3.4. Press and hold the key for marking and confirmation (4) to start a new track. After restart
of the track function you will see “NEW“ next to the direction indicator on the display.
3.5. When a battery icon appears next to speed, the condition of the battery or of the battery
cells is critical. You should replace or charge them.
3.6. Pressing the function key (3) allows for switch of direction and speed display to direction
and altitude. Instead of “S“ for Speed you will see an “A“ for Altitude“. Km/h can be changed to
miles in WIN TOOL.
3.7. The next display toggled via the ON/OFF switch (1) shows the distance in km or miles,
depending on the setting in WIN TOOL.
3.8. Next, the counter can be toggled. It shows the total time, the movement time and the
down time. When the Shake Mode (movement sensor) is activated, you can see very clearly
how long you did not move. This is shown as “STOP“ time.
3.9. Following the counter display you will see the average speed. It is also indicated in km or
miles, depending on the setting in WIN TOOL.
3.10. Following the AVG display you will see the longitude and the latitude. When there is no
fixed satellite position for the NL-457DL, the display shows 90.00000 and 0.00000. Use the
function key (3) to select the required display.
3.11. The longitude and the latitude display is followed by the time. It is retrieved by the GPS
signal, and is shown immediately after a fixed satellite position. You will only have to adjust
the time zone in WIN TOOL.
3.12. To reset the distance, press the key for marking and confirmation (4), while the distance
is actively displayed, and thereafter immediately press the function key (3), and then again the
key for marking and confirmation (4). Then the display cycles to Distance, Distance Push,
Distance Push Reset, and then jumps back to Distance, which is set to 0.
3.13. You can use the function key (3) to access four menus. To select these three menus,
first press and hold the key 2. Then you will see LOG MODE “XXX“. Shortly press the key for
marking and confirmation (4) to switch to various modes. This LOG MODE is used to record
data. The three pre-configured profiles are meant for various daily speeds. You can fine tune
the “USER“ function in WIN TOOL.
3.14. Shake Mode is for the movement sensor, which can also be set in WIN TOOL and can
be configured for time periods between 1-5 minutes. As well as via the ON or OFF function.
Shortly press the key for marking and confirmation (4) to switch to various modes.
3.15. The REC Memory display informs of memory not yet occupied. Using WIN TOOL
enables you to store tracks on your PC, afterwards you can clear the memory via WIN TOOL.
3.16. To change the time zone without WinTools, press the Track key (4), and change the
time zone to the desired value. This is used for correct indication of PushLogs in the time zone
required at each location.
The EasyLOGGER NL-457DL is designed as Plug and Play device for Windows XP or Vista. It
requires that an active Internet access is available, and Internet Explorer Version 6 or higher with
enabled AktiveX control.
Windows XP, Windows Vista, Internet
Explorer and ActiveX
The EasyLOGGER NL-457DL is not supported by Linux or MAC !!!
4. EasyLOGGER TOOL
4.1. The EasyLOGGER Tool is accessed via the Autostart function by Windows XP and Vista
immediately after the NL-457DL connected to a free USB Port. Click on OK to launch the tool.
When this function is disabled on your PC or Notebook, you will have to launch the
EasyLOGGER Tool directly via Arbeitsplatz (My Computer).
To do so, click on the WIN TOOL drive. Now you will see the screen shown at the upper left.
Use OK to launch the EasyLOGGER Tool.
4.2. If password protection is activated via WIN TOOL on the NL-457DL, you will be prompted
for the password. Confirm the password in LOGIN.
4.3. Now the EasyLOGGER Tool is launched integrated in NL-457DL.
When the EasyLOGGER Tool does not show any data, the top bar of the Internet Explorer
window indicates that you will have to allow ActiveX control elements. Click on the bar to open
a small POPUP, then click on “Geblockte Inhalte zulassen“ (Allow Blocked Content). To be
able to show NL-457DL data, you will have to click on “JA (Yes)“ to confirm following security
warning.
Now you will see your data stored on the NL-457DL. You can now randomly switch between
map, satellites, or hybrid screens. Besides data for your tracks the EasyLOGGER also shows
images and information other users shared with the public in the area of your recording. At
Panoramio you will have a private and a public area. See image !
Using the Track Manager in EasyLOGGER Tool you can retrieve information about tracks
recorded by you, and
< here you will see all track information
< selection window for recorded tracks
< go directly to trackpoint
< display of Trackpoints according to number or display of PUSH
LOG
< change of color and thickness of the track line
4.4. The taskbar contains the same logo you can see in Arbeitsplatz (My Computer). When
the EasyLOGGER Tool is opened, you can use one mouse click to open WIN TOOL. There,
the NL-457DL will be configured and data will be backed up.
Log-Daten (Log Data)
Datenquelle Easylogger/Computer (Easylogger/Computer Data Source):
Track data for Win_Tool can be used by Easylogger or the Computer in this application
for further processing.
Click on Log-Dateien auswählen (Select log data). EasyLogger automatically saves in
the
directory:
C:\Dokumente
und
Einstellungen\Name\Eigene
Dateien\EASYLOGGER
_LOG_DATA\NL-457DL
(C:\Documents
and
Settings\Name\My Documents\EASYLOGGER _LOG_DATA\NL-457DL).
Transfer:
You can convert the recorded data to a Gewünschtes Datei-Format (Required file
format). To do so, select the desired format, and then click on Transfer. The data is
available in the display window for further processing.
Log Löschen (Delete log): This function removes all data from the EasyLogger device.
Shortcut Menu:
Kopieren (Copy to), Löschen (Delete), etc. process your data, or send it out via email
(Mail to friend).
Panoramio User number: Please contact the provider http://www.panoramio.com
Geräte Einstellungen (Device Settings)
System Maßeinheit (System Unit):
System units can be toggled between metric and imperial system.
Zeitzone (Time Zone):
Enter the UTC time zone, CET deviation for e.g. Berlin is +2 hours. CET for e.g. Berlin is
+1 hour.
Passwort-Funktion (Password Function):
Use a password to protect the Datenlogger for safeguarding your data.
LCD Einstellungen (LCD Settings):
Set Kontrast (Contrast) (optimum range between 202 and 205). When the value is set
to zero, the display is switched off, and there are no characters visible on the display.
Hintergrundbeleuchtung (Backlight) indicates the time in seconds, the display will
have an afterglow.
Bewegungsmodus (Movement Mode):
Aus (Off) The device continuously records all GPS data.
An (On) Enter the number of minutes after the which the device should power off
automatically, when there is no movement based on the parameters set in LOG-Modus
(LOG Mode).
LOG Modus (LOG Mode)
Log Modus (Log Mode):
Define one of four modes. When Log Modus (Log mode) is set to Benutzerdefiniert (User
defined), you can define the parameters yourself and store them on the device.
Zeitintervall (Time Interval):
A waypoint is recorded in these intervals
Distanzintervall (Distance Interval):
A waypoint is recorded in these road distances
Richtungsintervall (Direction Interval):
A waypoint is recorded for defined changes of directions
Geschwindigkeitsintervall (Speed Interval):
Waypoints are recorded in time intervals (lower line) for defined speeds (upper line).
Mix Modus (Mixed Mode):
A combination of time interval and distance interval
Werkseinstellungen (Factory Default Settings):
The device will be reset to factory default settings. Please do this, when your device
does not react the way you would expect based on your settings.
GPS Einstellungen (GPS Settings)
GPS Modus (GPS Mode):
Fix Modus (Fixed mode):2D (3 satellites), 3D (4 satellites), Auto (2D/3D) 2D Fix Höhe[m]
(Fixed altitude): As altitude is not available for 2D, it is defined here. Initialisierung min.
SV[3bis6] (Initialization min. SV[3 to 6]):
FIX MODE:
Setting of Satfix function is only 2D, 2D – 3D – Automatik (Auto), or only 3D. We recommend
Automatik mode (Auto), the quality of a pure 2D Fix is too poor to get good tracks.
2D FIX Altitude(m) :
The 2D FIX Mode does not show any altitude, it can be fixed here by selecting a value.
Initial Min SVs (3~6):
Indicates the number of satellites required as minimum for the FIX function. Here a good value is
4 as preset value.
Initial Signal Min. Strenght (dBhz):
Indicates the minimum level shown for a satellite classified as good in order to include it in the
SATFIX calculation. However, do not set the value below 20 or over 40, because this will effect
the quality of the tracks. Lasting signals around or over 40 are very rare.
Navigation Signal Min Strenght (dBhz):
Indicates the minimum level shown for a satellite classified as good in order to include it in the
Track function. However, do not set the value below 20 or over 40, because this will effect the
quality of the tracks. Lasting signals around or over 40 are very rare.
PDOP(Positional Dilution Of Precision); Position Accuracy; 3D Coordinates:
The larger the distance between satellites is, the more accurate a position can be determined.
The factory default setting is 23. This is a good average value for a fast fixed satellite position
and relative accuracy. The higher the setting of the value is, the earlier the NL-457DL will find a
fixed position, but track recording will be more inaccurate. The lower the setting of the value is,
the longer the NL-457DL will take to find a fixed position, but track recording will be more
accurate. Do not set any value lower than 5. Even when set to 5, view to the sky must be
absolutely unobstructed. This value will not provide any fixed position in forests or street
canyons.
PDOP(Positional Dilution Of Precision); Time Accuracy; Time:
The factory default setting is 23. This is a good average value for a fast fixed satellite position
and relative accuracy. The higher the setting of the value is, the earlier the NL-457DL will find a
fixed position, but track recording will be more inaccurate. The lower the setting of the value is,
the longer the NL-457DL will take to find a fixed position, but track recording will be more
accurate. Do not set any value lower than 5. Even when set to 5, view to the sky must be
absolutely unobstructed. This value will not provide any fixed position in forests or street
canyons.
P Accuracy Mask:
Indicates the limit value of position accuracy. When inaccuracy using a fixed position is higher
than the limit value, the signal is considered as not fixed. The standard setting is 100, a value
below 50 is not usable. But consider that the lower a value is, the better satellite reception must
be in order to obtain good position accuracy.
T Accuracy Mask:
Indicates the limit value of time inaccuracy. When inaccuracy using a fixed position is higher
than the limit value, the signal is considered as not fixed. The standard setting is 300, a value
below 50 is not usable. But consider that the lower a value is, the better satellite reception must
be in order to obtain good time accuracy.
SBAS (WAAS/EGNOS):
Usinf this, you might be able to receive correction data. However, this does not necessarily lead
to better position accuracy. It might even have a contrary effect.
Geotagging
Manual Geotagging (Photo): Use red markings on the map to define the position, and
use “Manual Geotagging (Photo)“ to fix the photos in Photo Map.
Tabs:
Photo/URL:
Select the data source for your photos from local or Internet
MAP/Coordinates:
Toggles between map and cordinates view
Setting Options:
Selected LOG Section:
Use this to define the track you want to use for Geotagging
Record Points:
Indicates the number of recorded waypoints
Show Thumbnail:
This window shows a thumbnail of photos
Ignore already Geotagging Photo:
Identical photos will not be allowed
Generate Original backup photo after Geotagging:
A backup of the original will be generated automatically
Load JPEG Photos:
Opens the dialog to load a JPEG photo
Shortcut menu (right mouse click) for photos:
Cancel Selected Photo:
Removes the photo from the map
Cancel All Photos:
Removes all photos from the map
Pre-view/Check Photo Position:
The marking indicates the location of the photo
Add/ Change Photo Description:
This enables you to add a description.
Generating Track and Map View:
Max Photo Show Size:
Maximum photo size
Map Type:
GoogleMap, or GoogleEarth
Photo Map:
Generates a map using the photos
Photo-Track Map:
Generates a map using the track. The generated data can be copied as ZIP files, and
e.g. sent as email.
Track Line Option:
RED/GREEN/BLUE for colors of the track line
Width: Width of line
Hybrid Map: Map with satellites and street view
Risk of explosion when exposed to fire !
Don't expose the receiver to permanent temperature above 60°C/140° F!
5. Possible Sources of Malfunction and Troubleshooting
5.1 The device cannot be switched on.
Make sure batteries, or battery cells are inserted in the device and provide sufficient
power. Used batteries musy be replaced, never keep them too long in the NL-457DL,
they might leak and damage the device to an extent where it cannot be repaired any
more. Please charge empty battery cells externally.
5.2 Batteries or battery cells are inserted in the device, and are fully charged, but it still
cannot be powered on. Please contact the Navilock Support.
5.3 Your PC does not support the Autostart function and does not start the CD ROM
automatically. Please read http://msdn2.microsoft.com/en-us/library/Aa969329.aspx
5.4. Your NL-457DL can’t find a FIX or takes too much time for it. But today´s high sensitive
chipsets enable a reception, even without enough view to the sky. That is only possible if there
are enough good signals of satellites available. Even with a bright blue sky the signals of the
satellites can be so distorted because of electro-magnetic disturbance so that it cannot be used
as Signals for the receiver. This is not due to the receiver but due to the physical basic law of the
electro-magnetic radiation. Switch off the NL-457DL and try later again. Try to find a location
which is not near to a house wall. There can be also reflections which can disturb the reception.
If you changed the configuration, then please reset it before you contact the Support. Please use
factory default settings to test the NL-457DL.
Often malfunctions are caused by minor errors. It is not always necessary to immediately
replace a product, because this will not correct a malfunction that is not caused by the
GPS hardware.
Before contacting your dealer, please contact Navilock support. This will provide you with
help in a fast and easy manner, and help avoid unnecessary replacement.
In such cases, describe the malfunction as accurately as possible in writing, add the
details for your device and the software you are using and send an email to
[email protected].
A member of the support team will take care of your problem and work on a solution.
We hope you enjoy your Navilock product!
6. Technical data
Electrical features:
Chipset/type
u-blox5 GPS & GALILEO SuperSense®
Channels
Sensibility
Frequency
C/A Code
50 channel (32 channel for acquisition 18 channel for tracking)
-160dBm (Tracking)
L1, 1575.42MHz
1.023MHz chip rate
Accuracy:
Horizontal position
Time
Speed
2,5m CEP, 5,0m SEP or SBAS 2,0m CEP, 3,0m SEP
micro-sec synchronized to GPS-time
0.1m/sec 95% (SA off)
Date:
WGS-84
Protocol:
NMEA 0183 V2.3
Acquisition:
Hot start
Warm start
Cold start
Reacquisition
3.5s average
25s average
30s average
1s average
UP-DATE Rate:
1Hz
Dynamic requirements:
Acceleration
Altitude
Speed
less than 4g
18000 meter (60000 feet) maximum
515 meter/sec. (1000 knots) maximum
Performance:
Operation time
Power supply:
maximum 19 hours
2x AAA/LR03 alkali-manganese dry battery or
2x AAA/LR03 battery cell (each 1300mA)
Memory:
maximum 94000 Track Points
Connector:
USB 2.0
Operation temperature:
-10°C ~ 60°C
Weight:
39g without battery
Dimensions:
85 x 31 x 23 mm
7. Certificate
CE
R&TTE
ROHS
8. Warranty period
Your GPS receiver will be repaired free of charge during the legal warranty period, provided the
damage was not caused by external impact, moisture, fall or improper use.
9. Support
If you have further questions, please contact our customer support:
[email protected] / www.navilock.com
You can find current product information on our homepage: www.navilock.com
Please send your repairing transmittals franked to this address:
Navilock Repair Center
Beeskowdamm 13/15
D-14167 Berlin-Zehlendorf
Please include a proof of purchase and a detailed error description. “Doesn’t work” or
“defect” is not detailed. Please pay attention to the occurrence of the error. Transmittals
which are not franked cannot be accepted, due to logistic reasons.
10. Final clause
Information and data contained in this manual are subject to change without notice in advance.
Errors and misprints excepted.
11. Copyright
No part of this user's manual may be reproduced, or transmitted for any purpose, regardless in
which way or by which means, electronically or mechanically, without explicit written approval of
Navilock.
Navilock is a registered trademark and cannot be used without the written permission of its
trademark owner. In no case shall it be modified or amended.
12. Third party trademarks
Marks, trademarks, products names and logos of third parties that are shown in this
documentation are marks or trademarks of their respective owners.
Declaration of conformity
The CE declaration of can be found under http://www.navilock.de/support/ or can be requested under Konformitä[email protected].
WEEE-notice
The WEEE (Waste Electrical and Electronic Equipment)-directive, which became effective as
European law on February 13th 2003, resulted in an all out change in the disposal of disused
electro devices. The primarily purpose of this directive is the avoidance of electrical waste
(WEEE) and at the same time the support of recycling and other forms of recycling in order to
reduce waste. The WEEE-logo on the device and the package indicates that the device should
not be disposed in the normal household garbage. You are responsible for taking the disused
electrical and electronical devices to a respective collecting point. A separated collection and
reasonable recycling of your electrical waste helps handling the natural resources more
economical. Furthermore recycling of electrical waste is a contribution to keep the environment
and thus also the health of men. Further information about disposal of electrical and electronical
waste, recycling and the collection points are available in local organizations, waste management
enterprises, in specialized trade and the producer of the device.
Compliance with RoHS
This product complies with the directive 2002/95/EC of the European parliament and the council
from January 27th 2003 concerning the restricted use of dangerous substances in electrical and
electronical devices (RoHS) as well as its modification.
Date: 08/2009