1
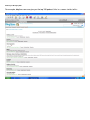
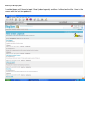
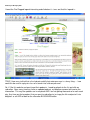
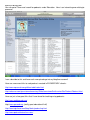
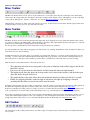
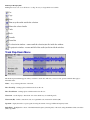
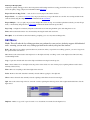
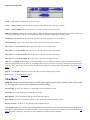
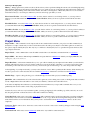
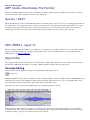
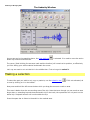
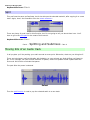
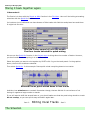
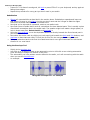
Courtesy of Cheryl Lyman
Integrating Podcasts into Your Curriculum
So, what is a podcast and do I need an iPod?
In short, a podcast is a broadcast created by you and then published for others to hear and
see. If you add pictures or movies to your podcast, it becomes a vodcast. You do not have to
publish your podcast on the Internet – it can be held for private broadcasting. The terminology comes
from the words broadcast and iPod because people began creating the broadcasts using
GarageBand on the Mac platform and moving them into iTunes for the whole world to hear and see.
NO! You do not need an iPod OR an MP3 player. What you do need is an internet connection and
sound with speakers on your PC. If you plan to create your own podcasts, you will need some type of
sound editing software. Audacity is open source freeware for the Windows platform and can be
downloaded at: http://audacity.sourceforge.net/ (Please download the stable versions). If you plan to
create a video using movies or pictures on a Windows machine, you will want to use MovieMaker
(every Windows XP machine comes standard with this software). That is all that you need! (the cool
thing is that you can even do all of this at home – make podcasts of your family members to send to
your loved ones far away….!
OK, I know what it is but why would I use a podcast in my curriculum?
The kids are hooked into this technology NOW and we are losing them! Those of us who teach
high school see it – it is moving down rapidly into the lower grades. Most students have some type of
MP3 player and they are using it in ways we would not dream of – and at ages we would not believe.
We are boring them with our teaching (I wish I would get paid every time I hear that one….). So, why
not beat them at their own game and use the technology to help them learn?
There are lots of ways to use them in the classroom. I suggest you read the book “Blogs, Wikis,
Podcasts and Other Powerful Web Tools for Classrooms” by Will Richardson. Will Richardson is a high
school teacher in New Jersey. I have heard him speak and his basic message is that our students
are not confined to their physical space. They are social creatures who are moving beyond the
physical area they exist in through the use of electronic communities such as facebook and myspace.
Collaboration is key to this generation and what better way than the web including blogs, wikis, and
podcasts!
Colleges are beginning to require their professors to create podcasts of their lectures… YES! It is true
and college students are creating podcasts for everything.
I’m sold that I should be doing this but how do I use it in my curriculum?
Creativity is key in using this technology in your lessons. Instead of having your students orally
present a report, have them do a podcast. A written report? A podcast where the written report is the
script. Have each student in the class do a piece of the podcast to present what they are learning to
the world.
If you go on a field trip with the class, have them create a podcast detailing what they saw and their
thoughts and feelings. Or, why not create your own virtual field trip in a podcast using the Internet.
Courtesy of Cheryl Lyman
Do you dedicate a segment of your curriculum to current events? Why not save time and subscribe
to podcasts bringing you the current events as they occur? You will be teaching CURRENT events!
Teach social studies? Why not have your students create a podcast of the event in history in their
own words, bringing it to life?
Do you teach foreign language or want to learn a foreign language? PODCASTS!
Would you like to collaborate with students across the globe (we called them pen pals and it took
forever to get a letter back or sent out!)? A podcast can open the door to invite others into your world
or you into theirs.
Podcasts can be used for events within the school – a real news broadcast of sorts.
In short, the sky is the limit!
How do I find Podcasts that I might want to use and how do I keep current on their
episodes?
You can search for podcasts on topics of interest on the Internet. When you find them, you can
subscribe to them. This way, every time a new podcast is published, you will either get an e-mail or
you will see it in an aggregator such as bloglines.com.
If you go to this link: http://weblogg-ed.com/wp-content/uploads/2006/05/RSSFAQ4.pdf, you will be
given specific directions on how to set up a blog (weblog or online journal) that will collect these feeds
for you.
Courtesy of Cheryl Lyman
For example, bloglines.com can give you the top 100 podcast links in a screen similar to this:
Courtesy of Cheryl Lyman
I scrolled down until I found a topic I liked (urban legends) and then I clicked on the title. Here is the
screen with the last few podcasts:
Courtesy of Cheryl Lyman
I found the Fire Plugged legend interesting and clicked on it – turns out that this legend is:
TRUE! How scary to think that a fire hydrant could fly but water pressure is a funny thing….. how
could this be used in a physics class or a launch into a lab on pressure?
So, if I like this website and want to get their podcasts, I need to go back to the list and click on
subscribe. Now, every time they have an updated podcast, my bloglines account will receive the
information. This way the updates are in one place AND I am not getting thousands of e-mails each
day. Any time you find a podcast that you want to subscribe to, just copy the link and paste it into
bloglines as an ADD or look for the subscribe BLOGLINES button.
Courtesy of Cheryl Lyman
You can go to iTunes and search for podcasts under Education. Here is an interesting one relating to
grammar:
I can subscribe to this and have each new episode go into my bloglines account!
Here are some more links to cool podcasts created in ELEMENTARY schools:
http://www.mpsomaha.org/willow/radio/index.html
http://web.mac.com/jamestownelementary/iWeb/JamestownSmithsonianSite/Podcast/Podcast.html
Here are just a few great links that I have found for teaching using podcasts:
http://www.weblogg-ed.com/
http://www.epnweb.org (really great educational link!)
http://learninginhand.com/blog/labels/podcasting.html
http://www.podcastforteachers.com/
Courtesy of Cheryl Lyman
http://www.podcastalley.com/forum/forumdisplay.php?f=108
http://k12handhelds.com/mashups/
http://www.techsmith.com/community/articles/schoolpodcasts.asp?DCMP=NLCedunews30&ATT=podcast
My students and I are ready to create our own podcast. What do we do?
First, you will need to devise a script for your podcast. Once that is completed, you will need to
record using recording software that will allow you to edit. I suggest Audacity because it is free and
lots of people use it (download both Audacity and the LAME MP3 encoder offered on the site –
audicatiy.sourceforge.net). Once you have edited your voice tracks, you will probably want to add
music/sound tracks. Just be sure that you are using copyright free music or that the author/artist is
allowing you to use it! Here are a few sites:
http://www.archive.org/details/opensource_audio - my favorite!
http://www.mfiles.co.uk/mp3-classical.htm - classical music, perfect for podcasts because there are
no vocals.
http://creativecommons.org – artists provide the rights for use of 8 seconds of their music.
http://www.podsafeaudio.com
http://www.flashkit.com/soundfx/ - for sound effects
http://www.flashkit.com/loops/ - for loops
Remember – you are creating a broadcast and your music/effects should not overpower your audio
track. When your recording is exactly as you want it, please save your project. You will need to
export it as an MP3 file. This is the reason why you needed to download the LAME MP3 encoder!
NOTE: You may want to have your students’ parent/guardian complete and sign the Podcast
Permission Slip found in the appendix. If you plan to publish your podcasts on the Internet (and why
not???), you do not want to use a student’s full name. If you will be using photos or movies with your
podcasts, be sure you have the proper permission to do so!
For the Audacity user manual, see the appendix.
I would like to share this podcast with the world. How do I do that?
There are a few things you need to consider when publishing your podcast. If you want the entire
world to see your podcasts AND get an e-mail when you publish a new one AND you want to be able
to see it in iTunes, you will need to take the following steps:
Courtesy of Cheryl Lyman
1) Put your podcast on a webserver.
2) Create a feed for your podcast (you only need to do this once – subsequent podcasts
uploaded to the webserver should automatically create).
3) Create a blog and put your subscription link in the blog.
4) Submit your feed to iTunes for verification and update.
If you are not interested in having the world hear your podcasts, you can make it a semi-private
library for your students by completing steps 1-3 above and providing your students with your blog
information so they can subscribe.
1).To put on a webserver:
Your file needs to be in an MP3 format (vocal only). I created an account at www.slapcast.com. Be
aware, that if you like slapcast, you will need to pay a nominal monthly fee for your hosting. You get
3 free podcasts before you have to pay. It does take time to upload your file so be patient. If you
want to upload a vodcast to iTunes, you will need to use an encoder such as Videora
http://www.videora.com/en-us/Converter/iPod/ prior to uploading to your webserver. If you do not
convert your video podcast, people can see it using Windows media players – it just won’t be
available on iTunes!
2). Burn your feed:
The next task you will need to perform is to burn a feed for the services to find your podcast. I use
feedburner for this. Create an account at www.feedburner.com to use. Select anything that will help
you manage your subscription list, etc. This is a fairly straight-forward service and they are now
owned by google.
3). Create your blog and put your subscription information in it:
If you would like to have a spot for your podcasts and encourage feedback, you will need to create a
blog. I use www.edublogs.org for this. Most podcasters have a blog so you may want to get involved
with this soon! (This is the premise of facebook, myspace, etc.) There are blogs for education that
invite feedback from students and it is entirely private. If you are interested in this type of blogging,
that is another workshop but, I would be happy to guide you in your adventure!
That is all there is to podcasting! It seems as if it is a lot but, the hardest part will be not to get excited
about using this technology in your curriculum.
Courtesy of Cheryl Lyman
APPENDIX
Courtesy of Cheryl Lyman
Audacity User Manual – for a complete document, go to
http://audacity.sourceforge.net/help/documentation
Control Toolbar
Editing Tools
Selection tool - for selecting the range of audio you want to edit or listen to.
Envelope tool - for changing the volume over time.
Draw tool - for modifying individual samples.
Zoom tool - for zooming in and out.
Timeshift tool - for sliding tracks left or right.
Multi tool - lets you access all of these tools at once depending on the location of the mouse and the keys
you are holding down.
Audio Control Buttons
Skip to Start - moves the cursor to time 0. If you press Play at this point, you project will play from the
beginning.
Play - starts playing audio at the cursor position. If some audio is selected, only the selection is played.
Loop - if you hold down the Shift key, the Play button changes to a Loop button, which lets you keep
playing the selection over and over again.
Record - starts recording audio at the project sample rate (the sample rate in the lower-left corner of the
window). The new track will begin at the current cursor position, so click the "Skip to Start" button first
if you want the track to begin at time 0.
Pause - temporarily stops playback or recording until you press pause again.
Stop - stops recording or playing. You must do this before applying effects, saving or exporting.
Skip to End - moves the cursor to the end of the last track.
Courtesy of Cheryl Lyman
Mixer Toolbar
The Mixer Toolbar has three controls, used to set the volume levels of your audio device and choose the input source. The leftmost
slider controls the output volume, the other slider controls the recording volume, and the control on the right lets you choose the input
source (such as "Microphone", "Line In", "Audio CD", etc.). Use the Record Level Meter to set the correct level.
Changing these controls has no effect on the audio data in your project - in other words it doesn't matter what the output volume level
is when you Export or Save a project - the end result is the same.
Meter Toolbar
The Meter Toolbar is used for monitoring the input and output audio levels. Typically it is used to make sure that the loudest volume
is as loud as possible (for maximum fidelity) without clipping or distorting it. The output (playback) meter is the green one, on the left
pictured above, and the input (recording) meter is in red, on the right.
It toolbar provides a visual indication of the current audio levels going in and out of audacity.
If you float the Meter Toolbar, either by dragging it out of the toolbar or by selecting "Float Meter Toolbar" from the View menu, you
can resize it and even orient it vertically.
Normally the meters are only active when you are playing or recording audio. However, you can also monitor input when you're not
recording - to do this, either select "Monitor Input" from the input meter's pop-up menu, or else just click on the input meter. If you
have a microphone or other input source attached, you will be able to watch the level of the audio before you start recording.
Each meter shows several characteristics of the audio level at once:
•
•
•
•
•
The right hand end of the meter corresponds to the point at which the audio will be clipped, and the left
hand end is silence
For stereo, the top bar shows the left channel, and the bottom bar shows the right channel.
The brightest part of the bar shows the average audio level (related to the loudness) and the darker part
of the bar shows the peak audio level.
The peak-hold line to the right of this shows the maximum audio level achieved in the last 3 seconds.
Finally, the clipping indicators on the far right of each meter will light up if clipping is detected
(meaning that the audio was too loud and will sound distorted).
If clipping is detected when you are recording, you should stop, lower the volume of your input source, and start recording again from
the start. If the output meter clips then you need to make some or all of your tracks quieter using the track gain control.
If the level of the input (recording) source is too high, you can try to lower the input level using the Mixer Toolbar, but if this doesn't
work, you should try to lower the volume of the external input source (e.g., your microphone, cassette player, or record player).
It is possible, especially if you have an older, slower computer, that the Meter Toolbar may interfere with Audacity's ability to record
or play audio with the highest quality, because your computer is so busy redrawing the meters that it doesn't have time to process
enough audio. In this is the case for you, you can disable the Meter Toolbar in the Interface tab of the Preferences dialog.
Edit Toolbar
All of the buttons on this toolbar perform actions - and with a couple of exceptions, they're all just shortcuts of existing menu items to
save you time.
Courtesy of Cheryl Lyman
Holding the mouse over a tool will show a "tooltip" in case you forget which one is which.
Cut
Copy
Paste
Trim away the audio outside the selection
Silence the selected audio
Undo
Redo
Zoom In
Zoom Out
Fit selection in window - zooms until the selection just fits inside the window.
Fit project in window - zooms until all of the audio just fits inside the window.
Track Pop-Down Menu
The Track Pop-Down Menu appears when you click in a track's title. This lets you access a few special commands that apply to
individual tracks.
Name... - lets you change the name of the track.
Move Track Up - exchange places with the track above this one.
Move Track Down - exchange places with the track below this one.
Waveform - sets the display to Waveform - this is the default way of visualizing audio.
Waveform (dB) - similar to Waveform, but on a logarithmic scale, measured in decibels (dB).
Spectrum - display the track as a spectrogram, showing the amount of energy in different frequency bands.
Pitch (EAC) - highlights the contour of the fundamental frequency (musical pitch) of the audio, using the Enhanced Autocorrelation
(EAC) algorithm.
Courtesy of Cheryl Lyman
Mono - makes this track a mono track, meaning it is played out of just one speaker, or played out of the left and right speakers
equally.
Left Channel - makes this track come out of only the left speaker.
Right Channel - makes this track come out of only the right speaker.
Make Stereo Track - if there is another track below this one, joins them to make a single stereo track, with the top track representing
the left speaker, and the bottom track representing the right speaker. When tracks are joined into a stereo pair, all edits automatically
apply to both the left and right channel.
Split Stereo Track - if the selected track is a stereo track (a pair of left and right tracks joined together as a single track), this
operation splits them into two separate tracks that you can modify and edit independently.
Set Sample Format - this determines the quality of the audio data and the amount of space it takes up. 16-bit is the quality used by
audio CD's and is the minimum quality that Audacity uses internally (8-bit audio files are automatically converted when you open
them). 24-bit is used in higher-end audio hardware. 32-bit float is the highest quality that Audacity supports, and it is recommended
that you use 32-bit float unless you have a slow computer or are running out of disk space.
Set Rate - sets the number of samples per second of the track. 44100 Hz is used by audio CDs. Tracks can have different sample rates
in Audacity; they are automatically resampled to the project sample rate (in the lower-left corner of the window).
File Menu
New - creates a new empty window
Open... - opens an audio file or an Audacity project in a new window (unless the current window is empty). To add audio files to an
existing project window, use one of the Import commands in the Project menu.
Close - closes the current window, asking you if you want to save changes. On Windows and Unix, closing the last window will quit
Audacity, unless you modify this behavior in the Interface Preferences.
Save Project - saves everything in the window into an Audacity-specific format so that you can save and quickly continue your work
later. An Audacity project consists of a project file, ending in ".aup", and a project data folder, ending in "_data". For example, if you
name your project "Composition", then Audacity will create a file called "Composition.aup" and a folder called Composition_data.
Audacity project files are not meant to be shared with other programs; use one of the Export commands (below) when you are finished
editing a file.
Save Project As... - same as Save Project (above), but lets you save a project as a new name.
Recent Files ... - brings up a list of files you have recently opened in audacity to be re-opened quickly.
Export As WAV... - exports all of the audio in your project as a WAV file, an industry-standard format for uncompressed audio. You
can change the standard file format used for exporting from Audacity by opening the File Format Preferences. Note that exporting will
automatically mix and resample if you have more than one track, or varying sample rates. See also File Formats.
Export Selection As WAV... - same as above, but only exports the current selection.
Export as MP3... - exports all of the audio as an MP3 file. MP3 files are compressed and therefore take up much less disk space, but
they lose some audio quality. Another compressed alternative is Ogg Vorbis (below). You can set the quality of MP3 compression in
the File Format Preferences. See also MP3 Exporting.
Export Selection As MP3... - same as above, but only exports the current selection.
Export as Ogg Vorbis... - exports all of the audio as an Ogg Vorbis file. Ogg Vorbis files are compressed and therefore take up much
less disk space, but they lose some audio quality. Ogg Vorbis files tend to take up a little less disk space than MP3 for similar
Courtesy of Cheryl Lyman
compression quality, and Ogg Vorbis is free from patents and licensing restrictions, but Ogg Vorbis files are not as widespread. You
can set the quality of Ogg compression in the File Format Preferences.
Export Selection As Ogg Vorbis... - same as above, but only exports the current selection.
Export Labels... - if you have a Label Track in your project, this lets you export the labels as a text file. You can import labels in the
same text format using the "Import Labels..." command in the Project Menu.
Export Multiple... - lets you split your project into multiple files all in one step. You can either split them vertically (one new file per
track), or horizontally (using labels in a Label Track to indicate the breaks between exported files.
Page Setup - configure how Audacity will print out the track waveforms using the Print option, and what printer to use.
Print - Print out the main window view from audacity showing the tracks and waveforms.
Exit (Quit) - closes all windows and exits Audacity, prompting you to save any unsaved changes first.
Edit Menu
Undo - This will undo the last editing operation you performed to your project. Audacity supports full unlimited
undo - meaning you can undo every editing operation back to when you opened the window.
Redo - This will redo any editing operations that were just undone. After you perform a new editing operation, you can no longer redo
the operations that were undone.
Cut - Removes the selected audio data and places it on the clipboard. Only one "thing" can be on the clipboard at a time, but it may
contain multiple tracks.
Copy - Copies the selected audio data to the clipboard without removing it from the project.
Paste - Inserts whatever is on the clipboard at the position of the selection or cursor in the project, replacing whatever audio data is
currently selected, if any.
Trim - Removes everything to the left and right of the selection.
Delete - Removes the audio data that is currently selected without copying it to the clipboard.
Silence - Erases the audio data currently selected, replacing it with silence instead of removing it.
Split - Moves the selected region into its own track or tracks, replacing the affected portion of the original track with silence. See the
figure below:
Duplicate - Makes a copy of all or part of a track or set of tracks into new tracks. See the figure below:
Courtesy of Cheryl Lyman
Select ... > All - Selects all of the audio in all of the tracks.
Select ... > Start to Cursor - Selects from the beginning of the selected tracks to the cursor position.
Select ... > Cursor to End - Selects from the cursor position to the end of the selected tracks.
Find Zero Crossings - Modifies the selection slightly so that both the left and right edge of the selection appear on a positive-slope
zero crossing. This makes it easier to cut and paste audio without resulting in a large audible clicking sound.
Selection Save - Remembers the current selection (or cursor position), allowing you to restore it later.
Selection Restore - Restores the cursor position to the last position saved by "Selection Save".
Move Cursor ... > to Track Start - Moves the cursor to the start of the current track.
Move Cursor ... > to Track End - Move the cursor to the end of the currently selected track.
Move Cursor ... > to Selection Start - Moves the cursor to the start of the current selection.
Move Cursor ... > to Selection End - Moves the cursor to the end of the current selection.
Snap-To ... > Snap On - Enable Snap-To mode. When Snap-To mode is enabled, the selection will be constrained to the nearest
interval, by default the nearest second. So if you click and drag from 4.2 seconds to 9.8 seconds, it will result in a selection from 4
seconds to 10 seconds, exactly. You can change the units that are snapped to using the "Set Selection Format" option in the View
Menu.
Snap-To ... > Snap Off - Turns Snap-To mode off, letting you select arbitrary ranges of time.
Preferences... - opens the Preferences dialog.
View Menu
Zoom In - Zooms in on the horizontal axis of the audio, displaying more detail about less time. You can also
use the zoom tool to zoom in on a particular part of the window.
Zoom Normal - Zooms to the default view, which displays about one inch per second.
Zoom Out - Zooms out, displaying less detail about more time.
Fit in Window - Zooms out until the entire project just fits in the window.
Fit Vertically - Resizes all of the tracks vertically so they all fit inside of the window (if possible).
Zoom to Selection - Zooms in or out so that the selection fills the window.
Set Selection Format - lets you choose the formatting that is displayed at the bottom of the window indicating the current selection
time. Options include film, video, and audio CD frames, seconds + samples, or pure time. If you turn on Snap-To mode in the Edit
Menu, the selection will snap to the frames or other quantization you have selected in this menu.
Courtesy of Cheryl Lyman
History... - Brings up the history window. It shows all the actions you have performed during the current session, including importing.
The right-hand column shows the amount of hard disk space your operations used. You can jump back and forth between editing steps
quite easily by simply clicking on the entries in the window, the same as selecting Undo or Redo many times in a row. You can also
discard Undo history to save disk space. The history window can be kept open while you work.
Float Control Toolbar - moves the Control Toolbar out of the window and into its own floating window, so you can position it
wherever you want. The menu item changes to Dock Control Toolbar, which you can use to put the toolbar back into the main
window.
Float Edit Toolbar - moves the Edit Toolbar out of the window and into its own floating window, so you can position it wherever
you want. The menu item changes to Dock Edit Toolbar, which you can use to put the toolbar back into the main window.
Float Mixer Toolbar - moves the Mixer Toolbar out of the window and into its own floating window, so you can position it wherever
you want. The menu item changes to Dock Mixer Toolbar, which you can use to put the toolbar back into the main window.
Float Meter Toolbar - moves the Meter Toolbar out of the window and into its own floating window, so you can position it wherever
you want. The menu item changes to Dock Meter Toolbar, which you can use to put the toolbar back into the main window.
Project Menu
Import Audio... - This command is used to import audio from a standard audio format into your project. Use this command if you
already have a couple of tracks and you want to add another track to the same project, maybe to mix them together. You cannot use
this option to import Audacity Projects. The only way to combine two Audacity Projects is to open them in separate windows, then
copy and paste the tracks.
Import Labels... - This command takes a text file which contains time codes and labels, and turns them into a Label Track.
Import MIDI... - This menu command imports MIDI files and puts them into a MIDI Track. Audacity can display MIDI files, but
cannot play, edit, or save them yet.
Import Raw Data... - This menu command allows you to open a file in virtually any uncompressed format. When you select the file,
Audacity will analyze it and try to guess its format. It will guess correctly about 90% of the time, so you can try just pressing "OK"
and listening to the result. If it is not correct, however, you can use the options in the dialog to try some other possible encodings.
At the beginning of your imported track(s), you may notice a little bit of noise. This is probably the file's header, which Audacity was
not able to parse. Just zoom in and select the noise with the Selection Tool, and then choose Delete from the Edit Menu.
Edit ID3 Tags... - Opens a dialog allowing you to edit the ID3 tags associated with a project, for MP3 exporting.
Quick Mix - This command mixes all of the selected tracks together. If you are mixing stereo tracks, or mixing tracks that are marked
as Left or Right channel, the result will be a stereo track (two channels), otherwise the result will be mono.
Your tracks are implicitly mixed whenever you hit the Play button and whenever you export. This command offers a way to do it
permanently and save the results to disk, saving on playback resources.
Note that if you try to mix two very loud tracks together, you may get clipping (it will sound like pops, clicks, and noise). To avoid
this, drag the gain slider on the tracks down to reduce their volume before mixing.
New Audio Track - This creates a new empty Audio Track. This command is rarely needed, since importing, recording, and mixing
automatically create new tracks as needed. But you can use this to cut or copy data from an existing track and paste it into a blank
track. If that track was at a non-default rate then you may need to use Set Rate from the Track Pop-Down menu to set the correct
sample rate.
New Stereo Track - same as above, but creates a stereo track. You can also create a stereo track by joining two tracks using the track
pop-down menu.
New Label Track - This creates a new Label Track, which can be very useful for textual annotation.
Courtesy of Cheryl Lyman
New Time Track - This creates a new Time Track, which is used to vary the speed of playback over time.
Remove Tracks - This command removes the selected track or tracks from the project. Even if only part of a track is selected, the
entire track is removed. You can also delete a track by clicking the X in its upper-left corner. To cut out only part of the audio in a
track, use Delete or Silence.
Align Tracks... - All the Align functions work on whole tracks or groups of tracks, not on selections, even if they span across multiple
tracks. They all operate by time-shifting tracks (moving them left or right), making it easier to synchronize tracks or get rid of silence
at the beginning. The cursor or selection stays in the same place unless you use "Align and move cursor...", below:
Align and move cursor... - same as the functions above, except that the cursor or selection is moved along with the tracks. That
allows you to shift the tracks without losing your relative place.
Add Label at Selection - This menu item lets you create a new label at the current selection. You can title the label by typing with the
keyboard and then hitting "Enter" when you're done.
Add Label at Playback Position - This menu item lets you create a new label at the current location where you are playing or
recording. Do this if you want to mark a certain passage while you're listening to it. You can title the label by typing with the keyboard
and then hitting "Enter" or "Return" when you're done. Only available whilst audacity is playing.
Generate Menu
If you choose an item from the Generate menu when there are no tracks in a project, a new track is created. Otherwise, the current
track is used.
If a track is selected and the cursor is placed in a single place in the track audio is inserted at the cursor position. The default duration
is 30 seconds. The audio created will replace the any selection, otherwise it is inserted into the track, shifting up later parts of the
track.
If a region of audio is selected, audio is inserted at the left edge of the selection, and the length of the inserted audio is equal to the
length of the selection.
Silence - inserts silence
Tone... - you can create a Sine wave, Square wave, or Sawtooth wave.
White Noise - inserts random audio samples, which sounds like pure static.
Any items which appear after these three built-ins are VST, Ladspa, or Nyquist plug-ins. It is possible for a poorly written plug-in to
crash Audacity, so always save your work before using a plug-in. Note that any effect that doesn't take any audio as input will
automatically be placed in the Generate menu.
Effect Menu
The items in this menu only work when you have audio selected. Audacity does not have any real-time effects;
you must select the audio, apply the effect, and then listen to the results.
Most effects have a Preview button. Clicking on this button plays up to three seconds of audio, allowing you to hear what it will sound
like after the effect is applied. This is useful for fine-tuning the effect parameters.
Repeat Last Effect - selecting this command is a shortcut to applying the most recent effect with the same settings. This is a
convenient way to quickly apply the same effect to many different parts of a file.
Courtesy of Cheryl Lyman
Amplify - changes the volume of the selected audio. If you click the "Don't allow clipping" checkbox, it won't let you amplify so
much that the audio ends up beyond the range of the waveform.
BassBoost - enhances the bass frequencies
Change Pitch - changes the pitch/frequency of the selected audio without changing the tempo. When you open the dialog, the starting
frequency is set to Audacity's best guess as to the frequency of the selection. This works well for recordings of singing or musical
instruments without background noise. You can specify the pitch change in one of four different ways: musical note, semitones,
frequency, or percent change.
Change Speed - changes the speed of the audio by resampling. Making the speed higher will also increase the pitch, and vice versa.
This will change the length of the selection.
Change Tempo - changes the tempo (speed) of the audio without changing the pitch. This will change the length of the selection.
Click Removal - This effect is designed to remove the annoying clicks on recordings from vinyl records without damaging the rest of
the audio. You can choose how sensitive the click detection is, and what the maximum length of a click is.
Compressor - compresses the dynamic range of the selection so that the loud parts are softer while keeping the volume of the soft
parts the same. You can optionally apply gain, resulting in the entire piece having higher perceived volume.
Echo - very simple effect that repeats the selection with a decay, sounding like a series of echos. This effect does not change the
length of the selection, so you may want to add silence to the end of the track before applying it (using the Generate Menu).
Equalization - Boost or reduce arbitrary frequencies. You can select one of a number of different curves designed to equalize the
sound of some popular record players, or draw your own curve.
Fade In - fades the selection in linearly
Fade Out - fades the selection out linearly
FFT Filter - similar to Equalization, lets you enhance or reduce arbitrary frequencies. The curve here uses a linear scale for
frequency.
Invert - Flips the waveform vertically, reversing its phase.
Noise Removal - This effect lets you clean up noise from a recording. First, select a small piece of audio that is silent except for the
noise, select "Noise Removal", and click on the "Get Noise Profile" button. Then select all of the audio you want filtered select "Noise
Removal" again, and click the "Remove Noise" button. You can experiment with the slider to try to remove more or less noise. It is
normal for Noise Removal to result in some distortion. It works best when the audio signal is much louder than the noise.
Normalize - allows you to correct for DC offset (a vertical displacement of the track) and/or amplify such that the maximum
amplitude is a fixed amount, -3 dB. It's useful to normalize all of your tracks before mixing.
Nyquist Prompt - for advanced users only. Allows you to express arbitrary transormations using a powerful functional programming
language. See the Nyquist section of the Audacity website for more information.
Phaser - the name "Phaser" comes from "Phase Shifter", because it works by combining phase-shifted signals with the original signal.
The movement of the phase-shifted signals is controlled using a Low Frequency Oscillator (LFO).
Repeat - repeats the selection a certain number of times. This operation is quite fast and space-efficient, so it is practical to use it to
create nearly-infinite loops.
Reverse - This effect reverses the selected audio temporally; after the effect the end of the audio will be heard first and the beginning
last.
Courtesy of Cheryl Lyman
Wahwah - uses a moving bandpass filter to create its sound. A low frequency oscillator (LFO) is used to control the movement of the
filter throughout the frequency spectrum. Adjusts the phase of the left and right channels when given a stereo selection, so that the
effect seems to travel across the speakers.
Any items which appear after these built-in effects are VST, Ladspa, or Nyquist plug-ins. It is possible for a poorly written plug-in to
crash Audacity, so always save your work before using a plug-in effect.
Analyze Menu
The Analyze menu is intended for effects and plug-in effects that do not modify the audio, but simply open a dialog with some
descriptive information. Audacity also supports Analyze commands that create annotations in a Label Track.
Plot Spectrum - To use this feature, first select a region of audio from a single track, then select "Plot Spectrum". It opens up a
window that displays the Power Spectrum of the audio over that region, calculated using the Fast Fourier Transform. The graph
represents how much energy is in each frequency. As you move the mouse over the display, it shows you the nearest peak frequency.
This window can also display other common functions that are calculated using the Fast Fourier Transform, including three versions
of the Autocorrelation function. The Enhanced Autocorrelation function is very good at identifying the pitch of a note.
Audacity does not come with any other built-in Analyze commands, so anything below the separator in this menu must be a plug-in. It
is possible for a poorly written plug-in to crash Audacity, so always save your work before using a plug-in.
Audio Track
Waveform display
This is the waveform display part of the track, although it is also possible to display a spectrogram instead of a waveform here.
This image shows a stereo track, which is a group of two tracks - the top one is for the left channel, and the bottom one is for the right
channel. If you need to edit the two channels as separate tracks, you can split them using the Track Pop-Down Menu.
Courtesy of Cheryl Lyman
Controls
The track Control Panel appears directly to the left of every track. Clicking in the label outside of one of its buttons or controls selects
the entire track. Shift-clicking a track label adds or removes that track from the selection. Also, clicking and dragging a track label is
one way to rearrange the order of tracks.
At the top-right of the label is the close box. Click here to delete the track (though you can Undo this operation).
To the right of the close box is the track's title. Clicking on the title brings up Track Pop-Down Menu, allowing you to rearrange
tracks and change various track options:
The next line in the label tells you the channel of the track (left, right, mono, or stereo) and the sample rate (e.g. 44100 Hz is the audio
CD rate). Beneath that is the quality - 32-bit float is high quality but takes up more disk space, and 16-bit is the same quality as an
audio CD.
The Mute button stops this track from playing. The Solo button plays only this track (or other solo tracks) and overrides the Mute
button. Muting and soloing doesn't affect mixing or exporting, just playback within Audacity.
The top slider is the gain control - it affects the relative volume of the track. By default it only lets you select multiples of 3 dB, but if
you hold down shift you can choose any level. Be careful not to set it too high, or you can exceed the maximum volume of a track,
which results in clipping.
The bottom slider is the pan control - it affects the balance between the left and right speakers.
Vertical Ruler
Courtesy of Cheryl Lyman
The Vertical Ruler is a guide to the levels you see in the waveforms. A level of 1.0 or -1.0 is the maximum supported by the audio file
- anything beyond these levels will be clipped, which can sound like distortion.
When the mouse is over the vertical ruler, it changes to a magnifying glass. By clicking, you can zoom in vertically, and by shiftclicking (or right-clicking) you can zoom back out. You can zoom out as much as a factor of 2, which can be useful for editing
envelopes.
When zooming vertically, Audacity will automatically "snap" to the normal range of -1...1 when you get close. If you are having
trouble resetting the vertical ruler, shift-click a bunch of times until the range is -2...2, then click once to zoom back to -1...1.
If you change the display on the Track Pop-Down menu then the units of the vertical scale will change to reflect this.
Label Track
Label Tracks can be used to annotate an audio file. They can be used for lyrics, markers, or notes, and they can even be used to save
selections.
To create a Label Track, select New Label Track from the Project Menu. Alternatively, simply click or select where you would like to
place a label, and choose Add Label at Selection from the Project Menu, and a Label Track will be created automatically if one doesn't
already exist.
To add a new label, click or select where you want the new label to appear, then select Add Label at Selection from the Project Menu,
then type the name of the label, and finally press Enter or click outside of the label.
In addition, you can use the Add Label at Playback Position command from the Project Menu if you want to add a label at a certain
place while you are listening. By default, this command has a shortcut of Control+M.
To edit the name of a label, click anywhere in it. Zoom in first if there are too many labels crowded together and you are unable to
click on the one you want. When a label is selected for editing, it looks like the first label below:
When editing the name of a label, you are limited to using just the backspace key for editing. There is no way to move the insertion
point to append a letter to the beginning of a label.
Once a label is selected, you can move to the next label by pressing Tab, and move to the previous label by pressing Shift-Tab.
To delete a label or multiple labels, select the area containing the label flags you wish to delete, and choose Silence from the Edit
Menu. Alternatively you can delete an individual label by clicking on it and pressing Backspace until you have deleted all of the
characters in the label, then pressing Enter.
To move labels, use the normal editing commands like Cut, Copy, Paste, Delete, and Silence.
Courtesy of Cheryl Lyman
You can save a selection in a label. When you create a new label, the left selection edge determines the position of the label's flag.
However, the right selection edge is also stored in the label, and when you click on it, the full original selection will be restored. If you
wish to apply this selection to only a subset of the tracks, shift-click in the label area to the left of each track's waveform to change
whether each track is part of the selection or not.
Exporting and Importing label tracks
Label Tracks are saved when you save an Audacity Project, so if you just want to continue using the labels
along with the same file, just save a project. But you can also export the labels to a simple text file, and import
them. This allows you to save information about the locations of events in an audio file for use in another
program, and also provides a way to mass-edit the labels if necessary.
To export a Label Track, choose Export Labels... from the File Menu. The exported file will contain one line per label, starting with
the time offset in seconds, then a tab, and then the name of the label, for example:
1.217995
3.921073
7.584454
11.070002
Bass intro
Guitar enters
Drums enter
Chorus
To import a Label Track, choose Import Labels... from the File Menu.
Time Track
The Time Track is a new feature that lets you change the rate of playback over time. Start by choosing New Time Track from the
Project Menu. Then change the range of time warping by clicking on the Track Pop-Down Menu and choosing Set Range (an option
which only appears for Time Tracks). Older computers may be incapable of playing audio in real-time that makes use of a Time
Track, however you can always Export the file as a WAV and then playback the WAV file later.
To edit the time warping, choose the envelope tool from the Control Toolbar - the same tool you use to edit amplitude envelopes in
Audio Tracks. Click to create and edit control points. Drag points off-screen to delete them.
The Time Track has a ruler. As you edit the warping, the ruler will warp to show you at what time playback will reach each place in
the audio.
Sound File Formats
Audacity Project format (AUP)
Audacity projects are stored in an AUP file, which is a format that has been highly optimized for Audacity so that it can open and save
projects quickly. In order to achieve this speed, Audacity breaks larger audio files into several smaller pieces and stores these pieces in
a directory with a similar name as the project. For example, if you name a project "chanson", then Audacity will create a project file
called chanson.aup to store the general information about your project, and it will store your audio in several files inside a
directory called chanson_data. While the Audacity Project format is based on XML and is meant to be open, it is not currently
compatible with any other audio programs, so when you are finished working on a project and you want to be able to edit the audio in
another program, select Export from the File Menu.
WAV (Windows Wave format)
This is the default uncompressed audio format on Windows, and is supported on almost all computer systems. Audacity can read and
write this format. People working with multichannel audio at very high quality settings, or with very long recordings, should note that
the maximum size of a wav file is 2GB.
Courtesy of Cheryl Lyman
AIFF (Audio Interchange File Format)
This is the default uncompressed audio format on the Macintosh, and it is supported by most computer systems, but it is not quite as
common as the WAV format. Audacity can read and write this format.
Sun Au / NeXT
This is the default audio format on Sun and NeXT computers, and usually u-law compressed, so it is not a very high quality format. Ulaw compression is a very simple, fast but low quality way to reduce the size of the audio by about 50%. This format was one of the
first audio formats supported by Web browsers, and it is still often used for short sound effects where quality is not as important.
Audacity exports both 8-bit u-law files, and 16-bit uncompressed files, which are the same quality as wav or aiff files.
MP3 (MPEG I, Layer 3)
This is a compressed audio format that is a very popular way to store music. It can compress audio by a factor of 10:1 with very little
degradation in quality. Audacity can both import and export this format. For more information on how to export MP3 files from
within Audacity, see Exporting MP3 Files.
Ogg Vorbis
This compressed audio format was designed to be a free alternative to MP3. Ogg Vorbis files are not as common, but they are about
the same size as MP3 with better quality to rival AAC or WMA. Audacity can import and export this format.
Envelope Editing
Audacity lets you edit the amplitude envelope of a track directly using the Envelope Tool:
Envelope tool
Editing the amplitude envelope lets you change the volume of a track gradually over time by adding a number of control points to the
track. Each control point sets the amplitude (volume) at that point in time, which can be as low as zero, and as high as 150% of the
normal maximum volume, and the volume is interpolated smoothly between the points.
The image below shows a track with an amplitude envelope, with the Envelope Tool selected:
In the figure above, there are five control points, at 1.0, 3.0, 5.0, 7.0, and 9.0 seconds. Each control point has up to four "handles"
arranged vertically. The top and bottom handles are positioned at the target volume, and the middle handles are positioned a quarterscreen down, giving you a way to move the envelope above the 1.0 level.
Courtesy of Cheryl Lyman
Note the dotted line at the top and bottom between 5.0 and 8.0 seconds. This indicates that the actual envelope is above the screen.
You can see the entire contour by zooming vertically - position the cursor over the vertical ruler to the left of the track and shift-click
to zoom out.
To create a new control point, just click. To move a point, just drag. To remove a point, click on it and drag it outside of the track, then
let go.
Exporting MP3 Files
Audacity cannot encode MP3 files by itself, because the MP3 encoding algorithm is patented and cannot legally be used in free
programs. However, Audacity has been programmed to recognize other existing MP3 encoders that you can download separately. All
you have to do is obtain the appropriate MP3 encoder for your computer and then show Audacity where it is located.
If you use... You need to...
Windows
Download LAME and look for the file called lame_enc.dll
Linux/Unix Download LAME and compile it as a shared object, then look for the file called libmp3lame.so
Macintosh
Download LAMELib (see our website for more info).
For links to these MP3 encoders, go to the Audacity web page (http://audacity.sourceforge.net/) and go to the page for your operating
system. The first time you try to export an MP3 file, Audacity will ask you to locate your MP3 encoder. Locate the file indicated
above. From then on, Audacity will not need to ask you again and you will be able to export MP3 files easily.
Courtesy of Cheryl Lyman
TUTORIALS!
Tutorial - I.Basics
Part 2 -
Rules of Audacity
- Part 2
If you'd like to get straight playing an imported file or recording something, you can skip this section
and come back later.
Whenever you work with Audacity, there are some rules you should remember:
1. One clip per track
A clip is simply a piece of audio material. Imported, recorded, split or duplicated from another track,
one track can only carry one piece of audio at a time. You can extend it by pasting material or inserting
silence in to it, or cut a piece away, but it will always be one continuous piece of audio.
2. Audacity always records to a new track
This new track is opened at the bottom. You'll have to zoom out and then resize the track view of the
bottom most track to see what is recorded. You can actually use the window sliders at the bottom and
right to do this after starting to record, but this way no performance will be lost to the windowing
system.
I suggest hitting CTRL+F to get an overview of the entire project as well. This only affects the horizontal
zoom by the way (left-right zoom). There is no way to zoom out vertically without using the mouse yet.
3. Edit/Duplicate will not create a new audio file
This may not seem a big deal, but it is if you're editing a large live recording.
What Audacity does is reference the original audio material until you actually perform some kind of edit
on it, such as cutting a piece away, or using any effect on it. One thing to remember is the UNDO
function. You can undo/redo stuff as many times as you like, and yes, even after you have saved your
project.
You may ask what happens if you do, for example, cut away a piece or mark off a 30 minute piece and
split it to a new track. It only writes changed data to disk. Since Audacity works with chunk of audio
data of around one megabyte in size, this happens quite fast. Rest assured that the only big waiting
period might be the importing of large audio files.
Part 3 -
Setup, Audio Import and Playback
- Part 3
1. Create a new project
This is very important!
Audacity writes all the changed and recorded audio to a directory called Projectname_data, which is
located right where you saved the project file itself.
Courtesy of Cheryl Lyman
Thus, select
and choose a location and filename for your project.
Please note that when you startup Audacity fresh, only the " Save As..." menu option is available.
To save your project later on, you can also use the keyboard shortcut: CTRL+S
2. Check the Preferences
Again, this is very important!
Press CTRL+P or go to ...
...set the sample rate of your choice...
(44.1 kHz is the default)
...then check if the right output is selected :
...and here's a crucial screen :
Courtesy of Cheryl Lyman
The File Formats settings need discussing at this point.
When importing uncompressed audio, there are two ways to do it. "Make a copy of the original
before editing" means that Audacity actually copies the entire audio file that you imported in to its
project data directory and in the process sets up the little overview graphics, whose descriptions get
stored in the project data directory too.
The second way is to use the original imported audio. You may think we're actually editing this file, but
no we aren't. In fact, Audacity will now read the imported file once and simply create the graphics
overviews for them in the data directory, and subsequently write to disk all the audio data that you
change. The original file is only used for playback. All audio that remains unchanged will be played from
the original file.
The advantage of choosing to make a copy of the original is that you avoid trouble, should anything
in the original file change.
For example, should you accidentally delete the original file, you're lost.
You have to make up your mind before you start a project. Choose to make a copy of all imported files,
and you'll use more space on your hard disk(s), but it will be easier to back up the project too, because
all files that have anything to do with your project will be in the project data directory.
The Uncompressed Export Format can be set to WAV or AIFF for now. Please check the fileformats page
for further information on export formats.
We'll ignore the Spectrogram settings for now. The Directories setting can be ignored as well for now,
because all it sets is the directory to use for recordings, undo data and other stuff, if you haven't yet
saved your project. Since we already saved our project, this setting is of no importance to us, though
you may want to set it properly later on. Initially this is set to a folder called "audacity_temp_1.2" in the
system temporary directory.
3. Import an audio file
Courtesy of Cheryl Lyman
There are three ways to do this:
1. Simply drag and drop the audio file in to the Audacity window. (If you're using Mac OS 9 or X, drag
the audio file to the Audacity icon instead...)
2. Select Import Audio ... in the Project menu.
3. Use the keyboard shortcut: CTRL+I
Audacity can import WAV, AIFF, AU, IRCAM, MP3 and OGG files. Please refer to the fileformats page for
further reference on these audio formats.
4. Playback
The imported file should now be displayed in an audio track. The track will look a little like this,
depending on what you imported:
Trackpanel and Waveform Overview of the imported Track
If you're not sure where to find audio material, simply rip some off a CD, or in Windows, check the
Media folder in the directory of your Windows installation.
Now click on the green Play button
imported.
Part 4 -
at the top and you should hear the file you have just
Recording with Audacity
- Part 4
1. Create a new project
Save an empty project. Or simply use the one from the previous part. Remember, that if you don't save
your project before you start recording or importing, that all recordings, edit and other files will be
written to the directory set on the Directories tab of the preferences.
2. Check the preferences
Make sure your playback and recording device are set. If you're going to record a stereo signal, set the
number of channels to record to 2 (Stereo) on the Audio I/O preferences.
When picking a device to record from, make sure you've set up all the connections properly, such as
plugging a microphone in to the Mic Input, and any other device in to the Line In of your sound card.
Then check that the gain level knob (the amount by how much the input should be amplified) of the
mixer of your soundcard is set right.
Courtesy of Cheryl Lyman
Since most soundcards can mix the inputs back in to the outputs, the easiest way to test your
microphone is to speak in to it while playing with your sound card mixer. The sound card mixer is a
piece of software either provided by the sound card maker or by the operating system you're using. The
Windows mixer is pretty straight forward, though some soundcards bring their own along. The Mac's
mixer is controlled via the Sound Control Panel, and the Linux users have a variety of mixer applications
at their disposal. Just make sure they work before yelling at your screen that nothing works.
3. Hit Record
Click on the red Record button
to begin recording.
Click on the blue Pause button
to pause the recording. Press it again to continue.
Click on the yellow Stop button
to cease recording. The cursor will return to its previous
position, before the recording was started.
That's it. You can now play around with your recording and explore the editing capabilities of Audacity.
Remember that you can use the Undo function almost without limits whilst the project is open.
II.Editing for Beginners
Part 1 -
Introduction
- Part 1
Sound Editing in the "real world"
Sound editors clean up dialogue tracks, cut layers of special effects, place sounds at certain times, and
create ambiance tracks by cutting out unwanted stuff and mixing in interesting or necessary sounds.
Music production engineers may cut pieces of vocals away or shift them to another spot in a song.
Editing is about cutting, placing, fading, cross-fading, shifting, duplicating and adjusting the volume
(also referred to as level) of audio material. Mixing is a form of editing too of course.
Here is an example of what is done in sound editing during the production of a television show or film.
In the next part we will run you through a few of those techniques in Audacity.
The Path of Sound in Film and TV Postproduction
Film and TV crews have at least two people present that take care of recording sound during principal
photography of a show. Principal photography is usually shooting the scenes with actual live actors or
real backgrounds by the way.
Sound in Principal Photography
The first person is the boom pole operator. The boom pole is an extendible stick with a microphone
attached to it. This is used to capture dialogue either during filming or not. When not filming, it might
be capturing off-scene dialogue or retakes of lines that the actors flunked during actual film takes. The
more expensive the show is and the more time there is to do the work, the more people will resort to
looping those takes, which is recording those lines in a sound studio environment instead of a film
studio or location.
Courtesy of Cheryl Lyman
The second person is the sound mixer, who usually sits in a place farther off from the shooting and
records the sound captured by the boom pole operator, either via cable or wireless devices to tape,
optical disks or hard drive.
This is the raw sound material of a show. It is called production sound and the only desirable parts it
usually contains are dialogue and body sounds. In post production, depending on the complexity,
budget size and time, almost everything you hear except for the dialogue and some body sounds, are
added later during...
Post Production
This is where most of the stuff we'll be describing for Audacity will happen. You've got the recording.
Now what?
After the visual part of the show is cut, the first of which usually isn't the final one, it is handed to the
sound editor. In TV shows, you'll usually have one or two people for this, for major film productions a
whole bunch more, for which tasks will be subdivided on a finer level.
Raw sound - Cleanup time
No shows do without film edits and many have plenty of them.
Scenes may be shot with one or more cameras and mics. Actors might have flunked their lines and
picking up shooting prior to the mistake might be chosen or the entire sequence reshot. The film editor
may have chosen parts from different takes for the cut of the scene. The action might be moving along
at the wrong pace and the film editor shortened or stretched parts of a scene.
The sound editor makes sure transitions between cuts are smooth. He or she removes undesired
sounds, such as breathers of the same person that overlap from one film edit to the next.
Material is cut away that contains unwanted sounds, such as creaking chair legs and sharp impacts of
objects on tables and floors. Some of these may require looping of dialogue in the studio, because the
noise may have been intolerable. Also, material may sometimes be denoised. The most sophisticated
methods remove the whirring of the camera motors from takes. It is used as sparingly as possible
though.
It's always desirable to get the best possible sound from the start, which is the recording stage.
Adding stuff - the really big deal
After this cleanup is complete, sounds are added.
The first is ambiance. Just close your eyes and listen to the sound around you. That's ambiance.
Sophistication of ambiances rises with budgets. From premixed to over a dozen tracks, you'll find it all
in TV shows and feature films. In any indoor scene with a lot of people in the background, nobody
except for the actors being filmed will actually talk. That flurry of conversation is added later on.
Next comes foley. These are clothes rustling (body sounds); foot steps and objects being handled.
People that have the ultimate edition of Terminator 2 will know that all of Arnold Schwarzenegger's
footsteps and rustle of his leather clothing were created by a five foot woman. These people are usually
called foley walkers or foley artists.
The foley editor then cleans these sounds, chooses the most fitting takes and makes sure they all sync
to the picture properly. The foley mixer then does his/her thing.
Courtesy of Cheryl Lyman
Next come effects. Foley are effects too, but they are a special category and can best be described as
live created studio effects. Effects are usually more heavily edited and recorded from all kinds of places.
A lot of effects are created by layering sounds on top of each other, changing their pitch and loudness,
editing bits out and adding others.
Many effects you'll hear are phone and door bells ringing, mobile phone beeps, doors of houses and cars
opening and closing, weapon shots, slaps, car skids, machines of any kind, space ships flying around,
explosions, to name a few.
For example, a friend of mine and I created the sound of a small wooden rowing boat hitting a larger
wooden sailing ship and scraping along its side by pitching down a knock on a large wooden door for the
impact of the rowing boat and ship, and pitching down the sound of a skateboard rolling and scraping
along a halfpipe.
The techniques required to properly handle sounds like these are used in all kinds of productions. Audio
books, music production, sound effects creation ... you name it.
For more on this subject, read the Audio Post FAQ at www.filmsound.org.
So let's jump in to the fray and look at how you can handle your sounds in Audacity.
II.Editing for Beginners
Part 2 -
Cut, Copy and Paste
- Part 2
From here on you may encounter funny letter combinations in boxes like this.
These are keyboard shortcuts to the functions presented to you in the text. These can be either single
keys (e.g. SPACE) or combinations that need to be held down at the same time (e.g.CTRL+C). You can
usually create your own. Check out this page for more details.
The most basic editing step is cut and paste. It's what people did with tape and it's easy with data in
computers, so take a look at these basic operations, referred to as Cut, Copy and Paste. The next
page will handle Silence, Duplicate and Split. You may also want to check out the reference section,
so you'll know where to find all the tools and how to resize tracks for example.
It is assumed that you have a project open and that at least one track of audio material is present.
Let's take a look at this example of an Audacity window:
The View
Courtesy of Cheryl Lyman
The Audacity Window
As you can see by the graphics above, the time shift tool
audio clip around inside its track.
is selected. It is used to move the entire
The cursor (little blinking line across a track and the timeline) will remain at its position, so effectively
you'll be sliding your audio material underneath the cursor.
Let's say we want to cut out that bit in the middle then. First we've got to select it.
Making a selection
To select the part you wish to cut, copy or paste to, use the selection tool
so now by clicking on it in the toolbar.
. If it's not activated, do
Now press and hold the left mouse button while you drag the mouse to mark an area.
This area is darker than the surrounding area of the clip. Note that even though you can mark an area
larger than or extending beyond the actual audio clip in the track, the operations will only work on the
actual clip. Playback however will work outside the clip.
Press the space bar to listen to the audio in the marked area.
Courtesy of Cheryl Lyman
To extend or contract your selection, hold down the SHIFT button and click on the area you wish your
selection to extend or contract to.
If you click at a spot that is on the right hand side from the middle of the current selection, you will set
the right hand boundary of your new selection.
Cutting the selection
Cut the selection by selecting "Cut" from the Edit menu ...
Before the cut
or press CTRL+X.
After the cut
To undo this operation, select Undo in the Edit menu or press CTRL+Z
Copy will copy the selection to the clipboard.
You can then paste that data back in to any track by clicking where you want this audio to be inserted
and select Paste in the Edit menu,
or press CTRL+V.
Thus pasting is the opposite of cutting. You can also copy material, make another selection with the
mouse and then paste. This will replace the selected material with the contents of the clipboard, no
matter how short or long either of them are.
during all operations of this kind, the bottom row of the screen will display two things, namely the start
time and the end time of your selection. The display to the left if that called "Project rate:" and its
value, defaulting to 44100, can be changed by clicking on that number and selecting another from the
drop-down menu. This sets the sample rate of everything you produce in audacity.
Courtesy of Cheryl Lyman
All files, no matter which will be played at the project rate, and exported at that rate. Should the
sample rate of a track be different from the Project Rate, these tracks will be resampled to the
Project Rate as the project is played back or exported.
Audacity will not change the sample rate of any imported audio. If you want to change the rate of an
imported track for any reason this can be done using the Rate option on the track pop-down menu.
Part 3 -
Silence, Duplicate and Split
- Part 3
Silencing unwanted sources
This operation flattens the selection. It essentially is a cut operation without deleting the selection
completely. After all, if you cut a second away, nothing remains. Using the Silence operation will still
leave you with a flatlined area.
When silencing parts between vocal lines, please keep in mind that a sudden drop in background
ambiance can have a bad effect, so at the very least fade the area around the silenced part, to minimize
that effect. Rules to start with are, fade in quickly and fade out slowly.
Alternately, use the envelope tool to lower the volume in that area. That way, you can comfortably
change it later.
Keyboard Shortcut: CTRL+L
Duplicate
The selected area gets copied, a new track is created and the copied material is pasted in to that new
track at the same point in the timeline.
To illustrate, here's the image from the menu reference:
The benefits of a duplicate are many. One of these is experimentation with effects.
Some of you may say "I can do that with the original track too". But you can't change the volume of
your effect and original audio separately. If you put some Reverb on to your audio, you can only lower
that processed audio in volume later on. If you duplicate the audio first and use the reverb on that (with
100% reverb and 0% original signal), you can freely change the volume for both the original and reverb
signal.
Also, you can do weird and wonderful things to your duplicates to create special effects. You'll have two
pieces of the same audio to work with. Silence parts, reverb another, phase a third, filter another and
see how that sounds. It is so easy to duplicate a piece of audio and do weird things to it, so try it.
Combining sounds produces magic.
A special note on performance:
The new piece of audio isn't actually copied on the hard disk. Audacity will still play from the original
audio file(s) until you change a piece of it.
Courtesy of Cheryl Lyman
Keyboard Shortcut: CTRL+D
Split
This performs the same as Duplicate, but it also silences the selected material, after copying it to a new
track. Again, here's the illustration from the menu reference:
There are plenty of good uses for this function, but I'm not going to tell you about them here. You'll
have to go to the next part for the meat of this tutorial.
Keyboard Shortcut: CTRL+Y
Part 4 -
Splitting and Submixes
- Part 4
Moving bits of an Audio track
In all projects you'll be pushing your audio around at some point. Otherwise, what are you doing here?
There are techniques, easily achievable with Audacity, to cover almost any kind shifting you'd want to
do. In our example, we have a small sentence of speech, where the speaker made a pause after the
first word. We'd like to eliminate that pause.
The part after the pause is selected
Select
Then the split function is used to pop the selected audio to a new track
Courtesy of Cheryl Lyman
Split
The Time Shift Tool
is selected and the audio on the lower track is moved left.
Move Audio and select for fading
Now, it's a good idea to listen to the two tracks
individually for breathing sounds for example.
Use the solo button of the tracks for this. Then
listen them both in the mix. Again, you can use
the solo buttons for this.
If you have a lot of other tracks playing at the
same time, press the solo buttons on both tracks.
There should be no over lapping or cut-off
breathing sounds.
When you're satisfied, fade out the last two thirds
of the overlapping upper part of the track, and
fade in the first two thirds of the lower
overlapping audio.
Two thirds, and not the whole overlapping audio,
are chosen to keep the level of audio constant. If
the whole overlapping parts were faded, you
would get a level drop of 3dB in the middle of
those fades.
You can check this out by taking a piece of music,
duplicating it, and then fading the tracks, one
fading out, the second fading in. In the middle of
those fades, the level of the mix will drop audibly.
Do a fade over last two thirds for the fade out and
first two thirds for the fade in, and you probably
won't notice any change in level.
Two thirds is a guideline, but not the law, so you
may have to experiment a little.
Courtesy of Cheryl Lyman
Mixing it back together again
!!!Remember!!!
The final mix is done with the Export as WAV function in the File Menu. Here we'll be looking at creating
submixes with the Quick Mix function.
You've done a lot of edits and now have dozens of little tracks with little bits and pieces here and there.
It might look like this:
Bits and Pieces spread all over the screen
First four tracks selected for quick mixing
We can use the Quick Mix function in the Project menu to bring down the number of tracks. However,
you don't need to mix everything in to one new track.
Select the tracks you want to mix together by SHIFT+click 'ing on the track panels. In the graphics
above, the first four tracks are selected.
Then select Quick Mix. In this example I have quick mixed everything down to two tracks:
Bits and Pieces, quick mixed down to two tracks
And thus, two submixes were created. Remember though, that we did this for convenience of not
having to organize a large number or tracks.
If you still want to shift bits around later on, you should make sure that the parts being mixed to a track
do not overlap, so you can split it away and edit it again later.
Part 2 -
The Situation
Editing Vocal Tracks
- Part 2
Courtesy of Cheryl Lyman
You have:
Vocals, Speech or Wallas (fx made with voices)
You want to:
•
•
•
remove inappropriate breathers, coughing,
bad takes, parts you didn't like and bad
noises
use only the good parts of takes
construct sequences from parts of different
takes
You can combine three ways of handling this:
1. Silence stuff you don't want.
2. Substitute it with,
o a piece of ambience to prevent a
sudden hole in the sound texture
o more fitting breather, that works
better, if you're cutting a breather
away.
3. Use the envelope tool to create volume
automation to pull down those parts, so they
won't sound as loud in the end.
When do I use what ?
The first option is a tool, but is rarely used by
itself.
In audio books, radio interviews and sometimes in
dialog for a film, the vocal tracks will stand alone
in many parts of your project.
Therefore the second option is general practice.
Many times, the third option is used as well
(envelope tool). The holes you create with it are
easier to control and change at later times, but
still need to be filled up with replacement
material.
When using the envelope tool, replacement
material is usually overlayed by placing the filler
material on another track right at the area in the
timeline as the hole is. For this reason only
silence unwanted audio if it's too obtrusive.
Bad takes are of course not usable, so usually
you'll have to cut that stuff away.
Just remember, that cut and delete (cut without
copying to the clipboard) work like cutting tape
away and sticking the remaining pieces together.
If you're doing things that require critical timing,
you need to keep this in mind. Use the Silence
function instead.
Continuous sound is the key in those cases and
having the ambience, even if it's just a bit of quiet
dark noise, drop away in many parts by silencing
them isn't going to sound as good as keeping a
steady sound texture.
Therefore filling those holes with material on
another track and fading the edges to make it all
sound continuous is the preferred way to do it.
There are situations, such as vocals in a song,
that you'd like to sound as clean as possible.
The best way is to have a very quiet recording
room or location.
The second best way is to use volume automation
to get rid of any unwanted stuff. It allows you to
change or take back what you did after you have
made those changes to the volume curve with the
envelope tool.
With volume automation you can mute sections of
the audio without actually making any edits to the
audio data.
The Three Options - a quick How To
Silencing
o
o
o
o
Select an unwanted piece of audio.
Listen to it a couple of times, adjust your selection if necessary, and listen again.
Select Silence from the edit menu or hit CTRL+L on your keyboard.
Fade the edges of the audio beyond your selection to smooth it out.
Courtesy of Cheryl Lyman
o
o
Listen to it. If it doesn't sound good, hit Undo or press CTRL+Z on your keyboard, and try again at
fading those edges.
Repeat this procedure for every part you don't want in your audio.
Substitution
Silence all unwanted bits as described in the section above. Substitution expands and improves
that option. Be sure to only silence the bits you don't want and don't forget to fade the edges
around the silenced material. Then come back here.
Now that you've silenced all unwanted, create a new audio track.
Now find a piece of audio that'll work as a substitute for those deleted parts. This is usually a piece
of ambience somewhere else in the audio track. The speaker might have made a longer pause, so
look in those areas first. Select that bit and duplicate it.
Using the time shift tool, move the duplicated ambience directly beneath the first silenced part in
your vocal track.
Now select the entire track by clicking on track panel just beneath the Mute and Solo buttons, and
duplicate it. Mute that new track. This will be our filler for the next gap in the original track.
Turn your attention back to the first bit of ambience that is now right underneath the bit that we
silenced in our vocal track.
Using the Envelope Tool
o
o
o
o
Switch to the envelope tool
Left-Click in to an area to create a new automation point or left-click on an existing automation
point and drag to change the location of the point.
The automation you have written remains bolted to the audio, so it will move along with the audio
when you use the timeshift tool.
An example:
Using the envelope tool - an example
Courtesy of Cheryl Lyman
PODCAST PERMISSION SLIP
Dear Parents:
Our class is participating in a podcasting program. Podcasting is the publishing of student
work using audio and/or video content to the web. The advantage of podcasting is that
students get very excited using technology and sharing their work with family and friends that
live near and far. It is also a way to connect with other schools to see what other students are
learning, as well as sharing what we have learned with students in other schools.
My Son/Daughter, ___________________________________________,
Has permission to:
_____ use my child’s picture and voice in both the audio and video podcast pilot program. The
credits will include first name only.
OR
_____ use only my child’s voice in the audio portion of the podcast pilot program. The credits
will include first names only.
Podcasts may be accessible to all internet users as well as internal users within the Centennial
School District.
Parent Signature: __________________________________________
Date: ____________________________________________________