1
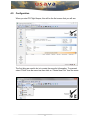
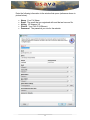
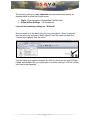
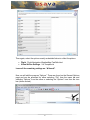
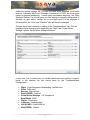
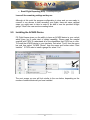
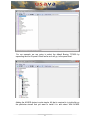
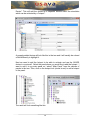
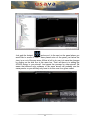
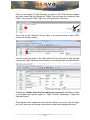
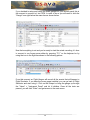
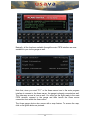
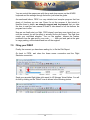
REV. 1.0 FS Flight Keeper Pilot Guide For FS Flight Keeper (FSFK) version 3.1 Flight Simulator add-on for FS2004 & FSX INTRODUCTION FS Flight Keeper (FSFK) combines seven programs in one: A Logbook, a basic Aircraft Black Box, a Flight Weather planning tool, a Flight Information System (ACARS Device), a Ground Proximity Warning System (GPWS), a Cockpit Sound Environment enhancement and Air TV. The Logbook keeps track of the flights you made. It stores Flight Times (also Day and Night), Fuel used, Pilot, Aircraft used, etc. Whilst the Black Box logs all aircraft events like autopilot settings, engine settings, weather, etc. FSFK also features flight weather planning (METARs, TAFs and ALOFTs), data export, configurable flight critique, World (Moving) Map display, Instant Messaging, Screenshot Manager and much more. US Airways Virtual Airlines is in no way affiliated with US Airways Group, its subsidiaries or affiliates. We are a group of Flight Simulator enthusiasts. 1 1.0 Legal Information and Disclosure 1.1 Real World Affiliation and Copyright No part of the USAVA website design, instructional documentation, or software may be reproduced or transmitted in any form or by any other means electronic or mechanical to include photocopying, recording, reproducing, or electronic storage. Any such act represents a copyright violation and theft of intellectual property solely owned by US Airways Virtual Airways. The web site clearly disclaims any affiliation with US Airways and that the site is not a commercial website. Additionally, the website indicates that is not affiliated with or endorsed by US Airways and does not use the trademark to suggest ownership or sponsorship. 2.0 Purpose Welcome to US Airways Virtual Airline! The purpose of this document is to give you a basic tutorial in order to start familiarizing with one of the Pilot Reporting (PIREP) software tools in use with our VA. FS Flight Keeper is a payware product and can be purchased from Aerosoft (www.aerosoft.com) at a significant savings by using the link on our website. It is certainly an excellent addition to both payware and freeware aircraft meant not only to be used as a recording/reporting instrument, but also as a great source of information geared to improve your overall Flight Simulator experience. We sincerely hope you will enjoy this new software. 3.0 Installation Installation is fairly straight forward and simple. Unzip the FSFK file and run the setup. At the end of the installation, you will be prompted to set up the pilot info, select “OK” for all the forms. We will cover those in detail shortly. When complete, close FSFK. Log in to the US Airways VA website and select “FS Flight Keeper” from the right-hand menu. Download the “FSFK Configuration Files” (FSFK_Config.zip) and extract it into the FSFK template folder. The exact path will depend on your operating system, but it will reside in your “My Documents” folder, i.e. User Account\My Documents\FS Flight Keeper\Templates If you’re using Windows Vista and/or Windows 7 you need to restart the system after the installation is completed otherwise you will not be able to find the “Templates” folder in your “My Documents”. 2 4.0 Configuration When you start FS Flight Keeper, this will be the first screen that you will see. The first thing we need to do is to create the new pilot information. To proceed, select “Pilots” form the menu bar then click on “Create New Pilot” from the menu. 3 Enter the following information in the window that opens (reference shown in picture below): Name: Your Full Name Email: The email that you registered with and that we have on file. Airline: US Airways VA Pilot ID: Your Pilot ID (USAxxxx) Password: The password you use for the website. 4 The following options are very important therefore select them exactly as detailed below to reflect the picture shown. Flight: Flight-Navigation-WeatherMap-TaxiPath.html Virtual Airline Settings: VA-Template.txt Leave all the remaining settings as: “# None #”. Next, we need to do the same thing for your new logbook. Select “Logbooks” from the menu bar and select “New Logbook” from the menu bar then click “Create New Logbook” from the menu. You can name your logbook whatever you like, but since you can use FS Flight Keeper with Multiple VAs, you might want to consider naming it “USAVA” so that your data is kept separate. 5 Then again, select the options exactly as detailed below to reflect the picture. Flight: Flight-Navigation-WeatherMap-TaxiPath.html Virtual Airline Settings: VA-Template.txt Leave all the remaining settings as: “# None #”. Now, we will edit the program “Options”. These are found on the General Options page and can be accessed by either selecting “File” from the menu bar and selecting “Options” from the menu or selecting the “Options” icon from the icon bar (shown circled). 6 Under the general settings tab, you can configure some additional functionality such as “Automatic Start” and “Automatic Connection” of FSFK, but those are a matter of personal preference. I would highly recommend selecting “Use Flight Simulator Scenery” as this will save you from having to manually add portions of the data, i.e. gate, airport, runway, etc. to your flight report. For the purposes of this document, the “Units” and “Weather” tabs will be left unchanged. The part we’re most interested in editing is the “Templates/Email” tab. This will basically involve changing once again only the “Flight” and “Virtual Airline Settings” options. Set the items as depicted below. In any case, just to make sure you double check that every setting is correct, below is the itemized list you should have on the “Templates/Email Configuration”: Flight: Flight-Navigation-WeatherMap-TaxiPath.html Pilots: Pilots.html Reports: Reports.html Email (PIREP): Email.txt Virtual Airline Settings: VA-Template.txt Email Mode: MAPI Flights: Flights.html Logbooks: Logbooks.html Live ACARS: LiveACARS.txt Web (PIREP): Web.txt 7 Email Flight Reporting (EFR): EmailReporting.txt Leave all the remaining settings as they are. Although at this point the program configuration is done and you are ready to connect to our servers to start recording your flights, there are some optional steps you might want to take in order to be able to use the provided in-flight gauge. If that’s the case continue reading below. 5.0 Installing the ACARS Device FS Flight Keeper gives you the ability to have an ACARS device in your cockpit which gives you a great deal of added capability. Please read the manual supplied with FSFK to understand all of the capabilities that FSFK has to offer. To install the ACARS device in your simulator, first select “Tools” from the menu bar and then select “ACARS Device” from the menu and further select “Start Installer”. If FSFK asks to install a gauge file, select “Yes”. The next screen you see will look similar to the one below, depending on the number of additional aircraft you have installed. 8 For our example, we are going to select the default Boeing 737-800 by expanding the tree. Expand it down as far as it will go, to the panel level. Adding the ACARS device is quite simple. All that is required is to right-click on the particular aircraft that you want to install it in and select “Add ACARS 9 Device”. This will add the device as a separate window within the simulation which can be activated by a “hotspot”. A properly added device will look like this in the tree and it will usually be colored a little differently to highlight it. Next we need to add the hotspot to be able to activate and use the ACARS device in our aircraft. Select the panel where you would like to add the hotspot. I want to add it to my main panel so I select “Main Panel” form the choices of panels in the tree. Then, click on the hotspot tool (circled in red) to add a hotspot to the panel. The result will look something like this. 10 Just grab the hotspot and move it to the spot on the panel where you would like to access it from. I have placed mine on the panel, just below the visor, in an out of the way area. All that is left to do now is to save the changes by clicking on the disk icon in the menu bar. That’s all there is to adding the ACARS device to your aircraft. Just repeat the process for other aircraft. Be aware that different color schemes of the same aircraft will probably use the same panels, so you will likely only have to do this once for a given variant. 11 NOTE: The self-installer works pretty well, but if you own more sophisticated panels or for some reason the above procedure should not work for some of your aircrafts, you can use the code below to add the gauge manually to your panels: 1) Open the Aircraft panel.cfg with Notepad or any other editor of your choice 2) Add a new window and replace XX with a new unique number in sequence 3) Add the new windows specifics and replace XX with the same sequence number used for the above one 1) [Window Titles] WindowXX=FSFK ACARS Device 2) [WindowXX] BACKGROUND_COLOR=0,0,0 window_size_ratio=1.0,1.0 size_mm=397,274 position=8 visible=0 ident=15372 FSFKDevice=1 gauge00=FSFK-ACARS!Device,0,0,397,274 6.0 Flying your First FSFK Flight! Now that all the configuration settings are set and done, you need to restart FS Flight Keeper before you can start using it to record your very first flight. This is because the program needs to download certain files from our servers and it will perform that operation when you launch it. It does not matter if Microsoft Flight Simulator is open or closed, the program will connect and/or disconnect with FSUIPC automatically. If everything went well, you should now be sitting in front of the FSFK initial welcome window once again. Open Flight Simulator and start loading the desired flight like you do normally. VERY IMPORTANT! Make sure that you load in memory a Flight Plan via the FS Flight planner because that’s where Flight Keeper gets all the flight data and that you’re parked at the gate with the engines off and parking brake set before proceeding any further. 12 Once you are ready in Flight Simulator, go back to the FSFK welcome window and open a new flight log through the “Flights” from the menu bar, selecting “New Flight” or by using the “New Flight” icon on the left side of the menu. Then click on the “Network” icon as show in the picture below to have FSFK retrieve all the flight details. You will notice that some of the fields within the form will auto fill with the data coming from Flight Simulator and normally you should get what is pictured below. At this point, double check that the entries are correct and start filling in some of the blanks with special regard to: Flight Number, Passengers, Cargo and Alternate Airport. The program is also supposed to auto fill more fields as you go on with the flight, but in any case you can always review what is there before sending the pirep. 13 If you decided to setup and install the Acars gauge into your aircraft panel this is the moment to connect to it via FSFK. In order to do so you will need to click the “Gauge” icon right below the menu bar as shown below. Now that everything is set and you’re ready to start the actual recording, it’s time to connect to our Acars server either by pressing “F11” on the keyboard or by using the icon in the flight bar shown in the following picture. From this moment on Flight Keeper will record all the events that will happen in Flight Simulator. If you have the Acars gauge installed, you can go back to Flight Simulator and start using it. Click on the hotspot or bring the gauge up through the “Views” > “Instrument Panel” and let it initialize. Once all the tests are passed, you will click “Enter” and get access to the main menu. 14 Basically, all the functions available through the main FSFK interface are now available to you via the gauge as well. Note that, since you used “F11” or the Acars server icon in the main program interface to connect to the Acars server, the gauge is already connected as well. The other way around is true as well: You could get the flight ready in the main FSFK window, connect to the gauge and then launch the Acars server connection from within the Acars menu. The Acars gauge device also comes with a map feature. To access the map, click on the globe button as pictured. 15 You can control the maps zoom with the up and down arrows on the ACARS keyboard and the settings through the button just below the globe. As mentioned before, FSFK is a very detailed and complex program that has plenty of functions you can use. Since it’s not the purpose of this tutorial to describe them in depth, we strongly suggest and recommend that you take the time to read the user manual in order to take benefit of all the features the program has to offer. Now we can finally start our flight. FSFK doesn’t need any more inputs from you until the moment you will be ready to actually file the pilot report. The flight now needs your undivided attention. Turn on the engines, release the brakes, pushback from the gate and fly your route………. After you land, park at the gate or cargo parking, set the brakes and turn off the engines. 7.0 Filing your PIREP Finally, the moment you have been waiting for; to file the Pilot Report. Go back to FSFK, and close the Acars server connection and the Flight Simulator connection. Send your recorded flight (alias pilot report) to US Airways Virtual Airline. You will do this by clicking on the “Globe” icon as shown in the following picture 16 8.0 Conclusion If you have correctly followed this tutorial and gotten all the way to this point, you will see the following message. Congratulations 17