1
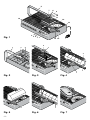
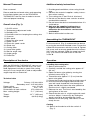
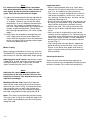
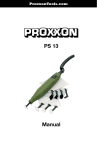
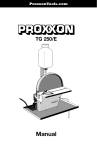
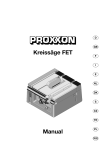
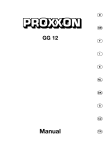
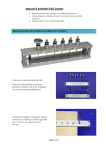
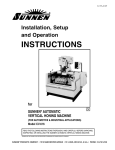
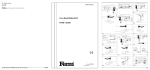
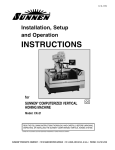
ProxxonTools.com
Thermocut
0
10
90
80
70
60
50
40
30
2-
2
10
0
06
10 3
-2
0
20 4
-5
0
100
50 5
-1
00
10
0-
90
6
14
0
7
80
50
40
10
20
3
30
0
0
2
3
4
60
70
80
90
100
4
15
1
<2
10
30 45 30
m)
0
02
15
Stu
St fe
rke
(m
5
ut
1
oc
10
erm
20
Th
0
05
Manual
15
30
45
30
15
5
6
7
9
8
10
11
13
12
0
10
90
80
70
60
50
40
30
40
30
10
10
Stu
St fe
rke
(m
m)
1
<2
2-
2
10
10 3
-2
0
20 4
-5
0
100
50 5
-1
0
0
10
0-
80
90
60
70
50
30
40
20
10
20
0
15
80
90
100
13
45
30
30
15
15
ut
70
30 45 30
oc
60
6
14
0
15
erm
20
Th
50
0
1
3
1
14 15
2
2
3
1
5
2
4 3
2
Fig. 1
4
1
3
0
10
90
80
70
20
10
15
80
9
30
45
30
15
15
100
80
70
40
30
20
30
20
40
90
100
5
15
0
45
30
30
15
15
15
6
014
10
10
30 45 30
7
90
50
60
80
15
30
0
70
70
30 45 30
40
20
60
10
50
30
50
20
60
80
40
40
30
70
90
50
30
40
80
100
0
06
20
0
06
50
90
10
10
60
0
10
00
01
0
0
1
3
5
2
4
0
1
3
5
2
4
2
1
Fig. 2
Fig. 3
Fig. 4
0
10
90
80
70
60
50
15
100
0
0
1
5
5
3
1
3
1
1
Fig. 5
0
2
3
2
4
Fig. 6
Fig. 7
4
5
1
2
0
4
90
6
14
15
0
-2-
0
80
70
60
50
0 30
220
10
330
200
5
400
10
0
15
60
15
15
70
30
15
80
45
30 45 30
90
30 45 30
15
100
30
30 45 30
15
15
10
30
100
20
45
90
30
30
80
40
15
70
50
0
60
60
10
10
50
70
20
20
10
40
80
30
30
20
30
90
40
40
30
40
20
10
0
10
50
50
60
10
60
60
50
20
70
70
40
100
30
80
6
14
80
30
90
40
90
90
20
80
50
0
10
100
10
70
60
70
15
80
90
100
30
45
30
15
Manual Thermocut
Additional safety instructions
Dear customer!
1. Provide good ventilation, when using the device.
2. Observe the material suppliers safety instructions when cutting.
3. The cutting wire is hot. Risk of skin burn!
4. Do not use the device near curtains or other
combustible materials.
5. Do not leave the device unattended when it is
switched on.
6. Only use the supplied cutting wire or
original PROXXON replacement wire,
otherwise the transformer can become
overloaded.
7. Switch off the device after use.
Please read the enclosed safety and operating
instructions before you use the PROXXON
THERMOCUT the first time in order to ensure
safe and proper handling.
Overall view (Fig. 1):
1. On/Off switch
2. Temperature adjustment knob
3. Standby LED
4. Knurled screw for clamping the cutting wire
5. Overarm
6. Wire spool
7. Screw for wire spool
8. Spool carrier
9. Screw for spool carrier
10. Guide slot
11. Cutting Wire
12. Lower wire guide
13. Slot for angle stop
14. Angle gauge
15. Extension
Fit the overarm 1 (Fig. 2) underneath the device
by using the enclosed knurled screw. Fasten the
cable 2 to the overarm with the screw 3. Tighten
the screw well to ensure good electrical contact
(10.5 volt low voltage). Slide the spool carrier 8
(Fig. 1) on to the arm and fasten it with the
screw 9.
Description of the device
Operation
With the PROXXON THERMOCUT you can cut
polystyrene in a clean and safe way. The standard equipment includes a spool with cutting
wire (ø 0.2 mm, length 30 m) and an adjustable
angle stop with an extension.
Installing the cutting wire
1. Switch off the device.
2. Carefully unwind the cutting wire approx. 8’’
(20 cm).
3. Open the lower wire guide by turning the
knurled screw 4 (Fig. 1).
4. Thread the wire approx. 2’’ (5 cm) into the
lower wire guide.
5. Clamp the wire by turning the knurled screw 4.
6. Push the overarm 5 lightly downwards with
your left hand, thread the wire through the
guide slot 10 and fasten the wire spool 6 so
that the wire is slightly tensioned.
7. Release the arm. The wire is tensioned by the
spring force of the arm.
8. Check that the wire is a right angle with work
surface. Adjust, if necessary by sliding the
spool carrier 8 or by bending the clamp.
9. Connect the mains plug. Your device is now
ready for use.
Technical data
Voltage:
Primary 115 Volt, 60Hz
Secondary max. 10.5 Volt, 60Hz
Power rating:
max. 20 watt
Secondary current:
max. 1.0 A
Dimensions of work surface:
370 x 260 mm
Max. cutting height:
5 1/2’’ (140 mm)
Throat:
13 3/4’’ (350 mm)
Weight:
6,6 lb (2.9 kg)
Assembling the THERMOCUT
Cutting
10. Switch on the device with the switch 1
(Fig. 1).
-3-
Note:
It is normal that the wire extends somewhat
after being heated for the first time. Stretch the
wire slightly by the first heating and tension it
again. The wire will now retain its length.
11. Adjust the temperature with the regulator 2.
The table on the front of the device serves
as a guide. The best way to find the ideal
temperature is to try different temperatures
yourself. For simple, straightforward cuts
you use a high temperature, for complicated
shapes a lower temperature. Please note
that too high temperatures will cause untidy
edges.
12. Now move the workpiece through the wire
with a light pressure and even speed. Be
aware that too high pressure in the direction
of the cut when cutting complicated shapes
will tend to bend the wire.
Miter cutting
Miter cutting can be done in two ways with the
THERMOCUT: by adjusting the spool carrier on
the overarm or with the adjustable angle gauge.
Adjusting the spool carrier: loosen the screws
1 and 2 (Fig. 3) and select the required angle by
sliding the spool carrier. Tighten the screw 1
again and tension the wire as usual.
Note:
Adjusting the spool carrier will lengthen the
heated part of the wire and thus increase the
electrical resistance. The temperature must be
adjusted accordingly.
Working with the stop: Select the required
miter on the angle stop and secure the adjustment with the screw 1 (Fig. 4). Move the extension 2 so that you can pass the cutting wire
without difficulty. Press the workpiece against
the stop and guide the stop along the slot 3.
Note: The stop can be fixed for parallel cutting.
Turn the screw 1 (Fig.5) to clamp the stop in the
slot. Guide the workpiece past the cutting wire
along the stop.
-4-
Important hints:
– When cutting double miter (e.g. roof), don’t
remove the cut off part after the first cutting.
Use it as an underlay for the second cut.
– The wire has a higher temperature at the exit
side of the workpiece, which may cause surface melting. To prevent this, the wire can be
cooled by blowing on it.
– Small sections of long profiles can best be cut
by laying a waste piece 1 (Fig. 6) between the
stop and the work piece and then cutting
against the stop. The cutting wire then cuts
into the waste piece and the edges remain
clean.
– You can make a simple device yourself for
cutting circular segments. Fix a drawing-pin at
the center of the required circle on the working
table with a piece of tape. Fix the workpiece
onto the pin and turn the workpiece around
the pin (Fig. 7).
– The cutting wire normally breaks above the
guide bushing. Insert the wire a few inches
further in the lower wire guide and fasten it
again at regular intervals to prevent the wire
from breaking.
Cleaning the device
Clean the wire and the bushing regularly to
prevent unnecessary evaporation of polystyrene
residue. Caution: First switch off the device!
Notes
-5-