1
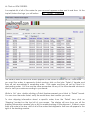
User Manual - V2R4
PMOnline User Manual
To visit PMOnline, enter www.PaulMorrellOnline.com in your browser. Internet Explorer and
Firefox are the preferred browsers.
The first page you see will be our Welcome Page. Start the ‘Application’ by clicking on the
Launch button.
The first time you log in you will enter your assigned User ID twice (as your User ID and
Password) to establish a new, confidential Password. Your User ID will remain the same. Your
password should be a combination of upper and lower case letters and numbers and must
be at least 6 characters. Please read our Terms and Conditions and click on the box to the
left indicating you agree to them. You must check this box each time you create or change
your User ID or Password, or when PMOnline is updated to a new version.
After you log in, the “MAIN MENU” appears:
1
Click on VIEW ORDERS:
A complete list of all of the orders for your account appears online and in real time. At the
top left, below the logo, you will notice
List
Details Shipping.
The default order in which the orders appear on the screen is based on the “order date”. If
you want the orders to appear by ticket number, click on the blue ‘Ticket #’ header and
they will sort accordingly in ascending order. Click again and they will sort by Ticket # in
descending order. You can use the same procedure on any of the other header choices in
blue to view your orders according to your needs.
While in ‘List’ view, double clicking a Ticket Number presents your ticket in “Detail” format.
You can view the entire ticket, verify the rental items, and confirm your work.
To view shipping information about a specific order, from the ‘Detail’ view, click on
‘Shipping’ located on the top left of your screen. The display will now show you all the
shipping information needed, plus a link to enable tracking of the shipment. If there is more
than one order in the box, a list of all of the orders that shipped in that box will appear to the
right of the tracking number.
2
Click on PLACE ORDERS:
CRITCAL Note: Please, never use your ENTER or BACKSPACE keys.
Always exit a data field (size box, etc) using the TAB key.
The TAB key updates the screen and checks real time inventory availability.
After Logging In you will see the Order Entry Screen with a box in the middle:
This box (Customer Order Settings) displays specifications required when entering orders for
the current week and future weeks. Please read these specifications before entering your
order(s). Once you click the box labeled ‘NEW TICKET’ in Box 1, this center window will
disappear.
3
PMOnline is designed with Steps for ease of use. The Steps are found in Boxes 1 – 5.
BOX #1
A. On the upper left of your screen you will see Box 1. Create a new ticket by clicking on
‘New Ticket’. Please enter a ‘ticket number’ for this order. Use your TAB key to move
your cursor to the ‘last name’ box and key the last name of your customer if you use
names on your tickets. TAB again and key your customer’s first name.
B. DROP SHIP ORDERS
You also see a box labeled ‘Create Drop Ship’. This is used to ship to an address
different than your account default address. Click on this box and another screen will
appear. If you are entering a location to be shipped for the first time, you will enter
the company name, address, etc. in the big box at the left of this screen. This is
explained in the directions at the top of the screen. Once you have entered a Drop
Ship Address, you are able to select the “ID NUMBER” of that Customer in the future
instead of re-entering the same information. You can enter multiple Drop Ship
Addresses according to your needs. Once entered, simply scroll up or down with the
arrows to the right, find the “ID NUMBER” of the address you would like for us to ship to,
and click.
4
Click OK and the Drop Ship address appears in the Order Entry screen where you were
entering your order. If you decide NOT to ship to this location at this time, all you do is
click on the box to the left which is now labeled “CLEAR DROP SHIP”. This places the
default company name, address, etc. (YOURS) back on the order.
In Box #1 you can also click on ‘Default’ and designate for the same style(s) and dates
you enter on this ticket to appear on the next ticket, if, in the next ticket you select
‘Copy Default’. This only works if a check is put in the default check box on a previous
ticket.
BOX #2
Use your TAB key to advance to Box 2 which is the upper right of this screen.
A. You will now be asked to provide a ‘USE DATE’. The date shown in this box defaults to
today’s date. The date you enter must be at least 3 days after today’s date or your
order will not be accepted online, and must be called in. Move your cursor to the
small shaded box on the right, click, and view the current month calendar. Click on
the Date indicating the actual date the tuxedo will be worn.
B. Use your TAB key to advance to the next box labeled ‘Occasion’. (Wedding, Prom
Cruise, or Other). Make your selection.
C. Use your TAB key to advance to the next box, labeled ‘Rent for Weeks’. Normal rentals
are for 1 weekend, however, a cruise may involve more than 1 weekend. In that case,
you would click on the shaded box and click on ‘2’ to check item availability for 2
weekends.
D. TAB over to the next section, ‘Day In Store’. The options available are Thursday or
Friday with the default value being in your store by Friday of the week being worn.
You can change this to Thursday by clicking on the arrow and selecting Thursday. If
your order must be in your store Wednesday or earlier, you will need to call your order
in to one of our customer service representatives.
BOX #3
Box #3 is for general measurements to help you determine a coat size. You can enter
measurements for Chest, Height, Weight, and Overarm. There is an “Ordering Guide”
in Box #1 for instructions on how to measure for the chest, height, etc. (Example: If the
height is 5’6”, you would key 5.6). If Box #3 is not necessary for you to determine sizes,
please move to the next box. Information in Box 3 is not required.
BOX #4
A. Receiving the order detail is the function of Box #4. Please note the product
categories you can order are in Blue. You can click on any of the items and view a
new window where you can search for the product you want if you do not know the
PM Style Number. When you locate the tuxedo style you are searching for you can
hover the cursor over the PM style number and a picture of that item appears on the
screen as it is shown in the catalog. This is to help you order the correct product.
5
If you chose to order the ‘complete’ tuxedo as shown in the catalog, click on the box
labeled ‘As Pictured’. A window opens and shows all of the codes for ordering this
complete tuxedo as seen in the PM catalog. You can also hover your cursor above
the blue PM style numbers to see a picture of the item, to confirm you are ordering the
item you intend to rent. If you want to copy these styles to the ticket, click on the
lower left hand box labeled ‘Copy To Ticket’.
A. COATS
To order a Coat, enter the PM Style Code in the style box, or click on the word ‘Coat’
to see a list of the available coat styles. Please note, when you enter a Coat Style and
search for a size, only sizes that are available for your Use Date will appear for
selection. Click on the down arrow in the size box, and select the size you need. The
next two boxes to the right are for coat sleeve adjustments. Sleeve (-) means shorten
sleeves on the coat ‘x’ amount of inches while Sleeve (+) means lengthen the coat
sleeves ‘x’ amount of inches. If your customer needs his coat sleeves shorter 1-1/2”,
you would click on 1.5 in the box by the (-) sign. If your customer has other special
requirements pertaining to the coat sleeves, you can click on “Custom” and key the
requirement(s) in the “Special Instructions” box.
6
B. PANTS
If you clicked on As Pictured after keying the coat style, you will see the PM Pant Code
is already selected. You can also click on “Pant” to view a list of all available pants. If
you need to change the pant to another style, simply change the style code. From
here, all you need to do is TAB over to the WAIST size, click on the arrow, and select the
adjustable waist size needed. Next, TAB over to either the outseam or inseam box
where you will enter the outseam or inseam as required, but not both. If you have a
customer with special needs such as a different outseam or inseam per leg, you can
click on “Custom” and enter the information in the “Special Instructions” box.
C. SHIRTS
The same procedure applies for entering the SHIRT Style and Size selection, excluding
the option for Special Instructions.
D. VESTS
The same procedure applies for the VEST Style and Size selection, excluding the option
for Special Instructions.
E. TIES
Ordering the TIE is the same, however, a men’s tie is ordered by default. If you need a
Boy’s tie, select the box left of the word ‘Boys’ and the tie ordered will be a boy’s size.
F. SHOES
To order SHOES click in the box and enter the shoe style selected. TAB over to the shoe
size, click on the arrow and select the shoe size required.
G. POCKET SQUARES
Pocket Square orders are also the same. Left click in this box and enter the code for
the pocket square needed.
H. JEWELRY and ADDITIONAL ITEMS
There are two additional fields labeled ‘Jewelry’ and ‘Addl (Additional) Items’ listed
underneath the section labeled for Pocket Squares. Jewelry would represent different
rental studs and links or a certain color stud and link set. Click on JEWELRY and a
window appears with all of the option codes for you to select or view.
The same procedure applies for ‘Addl Items’. Click on ‘Addl Items’ and a window
appears showing the codes and what they represent, such as Button Covers,
Suspenders, Armbands, and more.
I. SPECIAL INSTRUCTIONS
There is a large, white, rectangular box to the right of all of the tuxedo information
where you have been entering your order. Above this box and in blue text are the
words ’Special Instructions…’ Any special instructions or notations concerning the
order can be noted. There is a 50 character maximum.
Box #5
There are several important options available in this box. The first item you see in red is,
“PLEASE READ”. Reading this document is critical to understanding the role and value of
a ‘Session’. After reading this document, please continue to:
A. Cancel Ticket
As long as the status is BOOKED or OPEN, the order can be cancelled while in this
screen. Just click Cancel, and then ‘OK’ in the box that appears.
7
B. Verify Ticket
If you enter an order, but do not want to book it, you can click on ‘Verify Ticket’ to
confirm the availability, at that moment, of the items you are considering renting. This
is helpful in Prom Season for confirming before ordering. However, it is only confirming
what is available at that moment, not at any future time.
C. Book Ticket
After you have keyed your order, click on ‘Book Ticket’ to actually place the order.
You will see a message appear in RED at the bottom left of your screen stating ‘Ticket
has been booked’. If you only ordered one or two pieces on the ticket, you will also
receive a message in the same area saying ‘NOTE: Two or fewer items are on this
ticket’. This is an ALERT MESSAGE that a complete outfit was not ordered.
If you are unable to see “TICKET HAS BEEN BOOKED” in RED at the bottom left of
your screen, you will need to increase the “resolution” of your screen. Please
refer to the TROUBLESHOOTING section of your User Manual for instructions on
increasing the screen resolution for users of Windows XP, Windows Vista, &
Windows 7.
Reopening a Booked Ticket in your current Session is possible after you have clicked on
‘Book Ticket’. You can click on Reopen Ticket and the ticket becomes available for
you to make any needed changes. Once you click on this box, in the lower left hand
corner you will see in RED, ‘Ticket has been Re-opened’. Make any changes or
additions then click on ‘Book Ticket’ to Re-Book the order.
D. Edit Ticket
To edit any ticket placed in an earlier Session click on ‘Edit Ticket’, find the ticket
number(s), click on the box to the left of the ticket number(s), and click on the bottom
left hand box (Edit Selected Tickets). This will pull up each ticket you have marked for
a change and let you cancel the ticket or make a change or addition to the ticket.
Edit Ticket is for Booked orders in an earlier Session. To Edit Tickets in your current
Session, simply use the Previous and Next buttons, located in the bottom right of Box
#5.
E. Reset Session
Please Read the document, “What is a Session” in Box #5.
8
WHEN TO CALL PAUL MORRELL
The following conditions are reasons to call Paul Morrell and speak with one of our customer
service representatives.
1. Your order shows a status ‘In Process’ or ‘Shipped’ and you need an Exchange or a
Correction.
2. Your order is for ‘this week’ and it is Tuesday or later.
3. The order(s) is for a Fashion Show, Try On, or Inspection for Color correctness.
4. The order is to be in your store before Thursday.
5. The order is for MORE than a ‘2 WEEK RENTAL’ (you cannot key an order for a rental of
3 consecutive weekends or more).
6. Sale orders, Stock Reduction, New Sales, and Used Sales, need to be called or faxed
in.
7. Supply orders, Order Forms, Catalogs, Brochures, Posters, Banners and Swatch Books,
need to be called in or faxed.
TROUBLESHOOTING
A. There has been a small issue for some users starting PM-Online when using McAfee Internet
Security Suite and Internet Explorer. If after clicking “Launch” on www.PaulMorrellOnline.com
you get a message saying, ”Internet Explorer cannot display the page,” you have 2 options.
Please choose Option 1 OR Option 2.
Option 1 – Check a setting in Internet Explorer that McAfee disables
i. In Internet Explorer, go to the Menu Bar at top and click on “Tools”
ii. Now click on the last item called “Internet Options”
iii. Click on the last tab at top labeled “Advanced”
iv. Inside the settings box, scroll down until you see “Security”
v. Under Security check the box next to “Use TLS 1.0”
vi. Now click on apply then ok at bottom of box. You should now be able to click
the launch button on www.PaulMorrellOnline.com and proceed like normal.
NOTE: Using this method may only temporarily fix the problem.
Option 2 – Use the Firefox browser, instead of Internet Explorer
i.
Go to www.GetFirefox.com and download the latest version of Firefox.
ii.
It will give you the option to copy all your favorites and settings from Internet
Explorer to Firefox. It will not remove them from Internet Explorer.
B. Changing the Screen Resolution
(The minimum screen resolution should read 1024 X 768)
Windows XP Users:
1. Close your browser (Windows Explorer, Firefox, or whatever browser you use to surf
the internet with.
2. On your desk top, RIGHT CLICK on an empty space.
3. LEFT CLICK on Properties.
4. LEFT CLICK on Settings Tab (at the top of the window that appears).
5. Grab the slider under ‘screen resolution’ & slide to the right to raise to a higher
setting.
6. LEFT CLICK ‘APPLY’
9
7. LEFT CLICK ‘OK’.
Open your browser and sign on to PMOnline. The full order entry screen should appear
after increasing your screen resolution to a minimum of 1024 X 768.
Windows Vista Users:
1. Close your browser (Windows Explorer, Firefox, or whatever browser you use to surf
the internet with.
2. On your desk top, RIGHT CLICK on an empty space.
3. LEFT CLICK on Personalize.
4. LEFT CLICK on Display Settings (at the bottom of your screen).
5. Place your cursor on the arrow between the words LOW-------HIGH and advance the
arrow to the right towards HIGH
6. LEFT CLICK ‘APPLY’
7. LEFT CLICK ‘OK’
Open your browser and sign on to PMOnline. The full order entry screen should appear
after increasing your screen resolution to a minimum of 1024 X 768.
Windows 7 Users:
1. Close your browser (Windows Explorer, Firefox, or whatever browser you use to surf
the internet with.
2. On your desk top, RIGHT CLICK on an empty space.
3. LEFT CLICK on Screen Resolution
4. LEFT CLICK on the arrow to the right of the word RESOLUTION
5. Move the slider “UP” to a higher resolution
6. LEFT CLICK ‘APPLY’
7. LEFT CLICK ‘OK’
Open your browser and sign on to PMOnline. The full order entry screen should appear
after increasing your screen resolution to a minimum of 1024 X 768.
We are constantly updating PMOnline with new features and fixes, as well as the PMOnline
User Manual. Visit our User Manual often for updates.
10
11