1
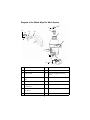
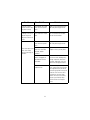
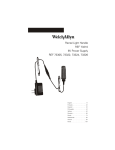
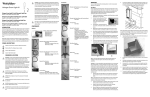
Ear Wash System
Ear Wash System
29300
Operating
Instruction
Manual
Table of Contents
Introduction . . . . . . . . . . . . . . . . . . . . . . . . . . . . . . . . . . . . 1
Getting Started . . . . . . . . . . . . . . . . . . . . . . . . . . . . . . . . . 3
Unpacking and Verifying Contents . . . . . . . . . . . . . . 3
Using the Ear Wash System . . . . . . . . . . . . . . . . . . . . . . . 6
Steps for Irrigation . . . . . . . . . . . . . . . . . . . . . . . . . . 6
Disassembly . . . . . . . . . . . . . . . . . . . . . . . . . . . . . . . 8
Maintenance . . . . . . . . . . . . . . . . . . . . . . . . . . . . . . . . . . . 9
Cleaning and Disinfecting the System . . . . . . . . . . . 9
Troubleshooting . . . . . . . . . . . . . . . . . . . . . . . . . . . . . . . 11
Types of Cerumen . . . . . . . . . . . . . . . . . . . . . . . . . . . . . . 13
Anatomy And Physiology . . . . . . . . . . . . . . . . . . . . 14
Cerumenolytic Agents . . . . . . . . . . . . . . . . . . . . . . 14
Warranty and Service Information . . . . . . . . . . . . . . . . 15
Warranty . . . . . . . . . . . . . . . . . . . . . . . . . . . . . . . . . 15
Technical Service Department . . . . . . . . . . . . . . . . 16
Replacement Parts and Accessories . . . . . . . . . . . . . . . 17
Ordering Information . . . . . . . . . . . . . . . . . . . . . . . 17
Specifications . . . . . . . . . . . . . . . . . . . . . . . . . . . . . . . . .
General Specifications . . . . . . . . . . . . . . . . . . . . . .
Patents . . . . . . . . . . . . . . . . . . . . . . . . . . . . . . . . . .
Eartips . . . . . . . . . . . . . . . . . . . . . . . . . . . . . . . . . . .
18
18
18
18
Introduction
Thank you for purchasing the Welch Allyn Ear Wash System.
The Welch Allyn Ear Wash System provides a safe and effective way to
remove cerumen from patients of all ages. This method of irrigation is
much cleaner and safer than other irrigation methods currently on the
market. Since it is easy to use with built in safety and simplicity, any
healthcare worker at your facility can use this device. The Welch Allyn Ear
Wash System provides the following features:
•
Patient Comfort - Hydrovac action
•
Patient Safety- High temperature water shut-off valve
- Water pressure regulation inside chamber
•
User Friendly - Visual temperature feedback sensor
•
Superior Engineering - Fully functional at variable water pressures
as well as different faucets
This manual describes how to operate and maintain the Welch Allyn Ear
Wash System. Please follow these instructions to ensure many years of
accurate and reliable service.
For additional information on cerumen types and the irrigation process,
see the “Types of Cerumen” section.
About this Manual
This manual serves as guide for ear irrigation using the Welch Allyn Ear
Wash System. The Welch Allyn Ear Wash System is intended for use by
Healthcare Professionals. Any use other than the intended use invalidates
the manufacturer’s warranty.
1
Warnings and Symbols
This manual uses the icons and symbols described below.
ATTENTION: Refer to the operating instructions. This
symbol is intended to advise the user of the presence of
important operating or maintenance instructions in the
documents accompanying the instrument.
Performance specifications verified by ETL Laboratories
US
The CE mark on this device indicates that it has been
tested and conforms to the provisions noted within the
93/42/EEC Medical Device Directive
Authorized European Representative Address:
FDA Requirements
European Regulatory Manager
Welch Allyn, Ltd.
Kells Road, Navan
County Meath, Republic of Ireland
Telephone: 353-46-28122
Fax: 353-46-28536
Always inspect the ear before attempting any irrigation. The
presence of a perforated or damaged tympanic membrane indicates it is unsafe to irrigate the ear. Do not use this device if the
patient has a current or prior history with chronic middle ear
infections, diabetes, PE tubes, or immune compromised.
If the water is too cold, the patient may become dizzy or experience vertigo. Please verify that the thermal indicator is white
before proceeding with the irrigation.
Reimbursement Information
Ear Cleanings using the Welch Allyn Ear Wash System are reimbursable
under CPT Code 69210 - Removal of Impacted Cerumen in one or both
ears.
2
Getting Started
Unpacking and Verifying Contents
Inspect the packaging for any damage incurred during shipping. If you
find any damage, notify the carrier. Complete and return the warranty registration card. It validates the warranty and allows Welch Allyn to send
announcements of product enhancements.
When you unpack your new Welch Allyn Ear Wash System, verify that the
following items are included:
•
Water chamber
•
Handle/Tubing assembly
•
One snap-aerator
•
Three different faucet adapters
•
Chamber Aerator
•
One box of eartips (25 ct)
•
Storage Tray
•
User’s Manual
•
Quick Reference Guide
If you believe any items are missing, contact your Welch Allyn distributor.
Use the figure on page 4 to familiarize yourself with the features of the
Welch Allyn Ear Wash System.
3
Diagram of the Welch Allyn Ear Wash System
1
2
12
14
13
15
3
10
4
11
5
9
7
8
6
16
1
Faucet Interface
9
Water Flow Actuator
2
Faucet Adapter (Optional)
10
Water Temperature Sensor
3
Snap Aerator
11
Cerumen Trapping Screen in
Eartip
4
Snap Connector with white
ring
12
Water Jet Output
5
Handle Rest Grip Ring
13
Water Suction Input
6
Irrigation Port - Irrigation water
to ear (blue)
14
Disposable Eartip
7
Return Port - Return water from
ear (black)
15
Eartip Removal Tab
8
Return Water Exit Port
16
Chamber Aerator
4
Faucet Aerator Installation
1.
Remove your current aerator from your faucet, including any original
washers. You may need to use a pair of pliers to remove your aerator.
If you still have difficulty in removing it, soak your current aerator in
distilled vinegar for about twenty minutes and try again.
2. Try attaching the snap aerator to your faucet by turning it counterclockwise. If it does not fit, try using one of the adapters that is
included with the unit. Attempt to match the adapter to your faucet
and then attach the snap aerator. Verify the rubber washer on the
snap aerator and adapter matches to the old washer on your faucet. If
you need to use the threadless universal adapter (only available in
certain regions), you may need to remove the inner rubber o-ring if it
is too small for your faucet.
3. Once the snap aerator is attached to the faucet, the ear cleaning
chamber is easily attached or removed from the snap aerator. You can
still use your sink normally when the Ear Wash System is not
attached to the snap aerator.
Chamber Aerator Installation
The chamber aerator is an optional attachment that is necessary if you are
experiencing a significant amount of water splash around your sink.
When the chamber aerator is attached, replace the chamber normally into
the storage tray.
1.
Find the notch located on the top of the chamber aerator and line it up
with the blue irrigation port on the chamber.
2. Gently press the chamber aerator against the chamber until it is snug.
NOTE: The chamber aerator is only capable of attaching to the chamber if
it is aligned correctly. It should go on relatively smoothly and there is no
need to force it onto the chamber.
5
Using the Ear Wash System
Steps for Irrigation
Always inspect the ear before attempting any irrigation.
The presence of a perforated or damaged tympanic
membrane indicates it is unsafe to irrigate the ear. Do
not use this device if the patient has a current or prior
history with chronic middle ear infections, diabetes, PE
tubes, or immune compromised.
Attaching the Tubing and Chamber
1.
Connect the tubing to the chamber. Match the black connector to the
black return port on the side of the chamber. Match the blue connector to the blue irrigation port on the lower side of the chamber.
2. To attach the chamber to the faucet, pull down the white plastic ring
on the top of the chamber, and then insert the chamber over the snap
aerator on the faucet. When the chamber is positioned, release the
white plastic ring. The chamber is now secure.
Attaching an Eartip
1.
Line up the grooves on the side of the eartip with the corresponding
indentations on the handle interface. Verify that you are attaching the
eartip with the tab facing upwards.
2. Press firmly on the eartip until it is flush against the handle interface.
You will feel a slight snap when the eartip is in place.
Irrigation
1.
Initially, you may cover the patient with a cloth drape to eliminate
splashing onto his or her clothes. Once the technique of sealing the
ear canal is mastered, this is not necessary.
2. Begin to run water through the unit by first turning the cold water on
completely. Then gradually turn on the hot water until the water exiting the bottom of the chamber feels close to body temperature.
6
3. Check the temperature of the irrigating water by looking at the thermal sensor while depressing the water flow actuator. If the thermal
sensor is blue, the irrigating water is not warm enough. If the thermal
sensor white, the water temperature is at least 90° F and the procedure may begin. You must depress the actuator on the handle
for the temperature sensor to function correctly.
If the water is too cold, the patient may become dizzy or
experience vertigo. Please verify that the thermal indicator is
white before proceeding with the irrigation
4. To irrigate the ear, grasp the patient’s pinna. Pull gently back to
straighten a child’s ear canal or up and back for an adult. While maintaining tension on the pinna, insert the tip of the handle into the ear
to create a seal. Squeeze the actuator on the handle. By adjusting
how much force you push on the actuator, some control over the flow
rate is attained.
5. Aim the stream of water toward the ear canal walls by rotating the
handle during the irrigation. Flood the ear with water. The suction
return system will return the discharge away from the ear. (See the
quick reference guide for a diagram of correct water flow).
6. During the irrigation, conversation regarding patient status will provide confidence to the patient.
7.
If the temperature of the irrigating water becomes too hot, the
unit will restrict the flow to the handle, while continuing to discharge out the bottom of the unit. For the unit to reset, bring the
water temperature down to a safe level by adjusting the knobs on the
faucet until the water cools sufficiently.
8. Release the actuator and keep the eartip in the canal for 5 to 10 seconds to vacuum any residual irrigating water.
NOTE:
The procedure typically takes 30 seconds to 5 minutes
depending on the type of cerumen and whether or not a wax
softening agent is used. In severe cases, the process could
take longer.
7
9. When the irrigation is complete, grasp the tab located on the eartip of
the device and pull the eartip off of the handle with a downward
motion. This eartip is disposable. Please place in an appropriate
receptacle.
If there is no water flow out of the eartip and the actuator is
depressed, check to see if the hot water shut-off has tripped by
running cold water through the unit. This should restore water
flow to the handle.
Eartips are intended for single use only. Discard after use.
Disassembly
1.
Turn off the faucet and disconnect the tubing from the chamber.
2. Detach the chamber from the faucet. Press down the white ring on
top of the chamber and then pull the chamber from the snap aerator.
The chamber will drain through the open hose ports at the front and
bottom.
3. To remove any stagnant water from the tubing, place the open end of
the tubing over the sink. Hold the handle higher than the tubing and
squeeze the actuator. Roll the tubing up into a coil, holding the handle
higher than the tubing. The water should run out of the open end into
the sink basin.
8
Maintenance
Cleaning and Disinfecting the System
Clean the Ear Wash System
after every use and disinfect at
the user’s discretion.
Pour ½ cup of cleaning solution into
chamber.
Cleaning the unit with soap
and water will eliminate any
debris and reduce the number
of microorganisms in the tubing. Disinfect the unit with
70% isopropyl alcohol or 10%
bleach/90% water solution to Place handle into
3½ cup of cleaning
eliminate most bacteria and
solution
fungi growth. It is recommended that alcohol is used
since it will help to evaporate
any remaining water in the tubing.
1.
Remove the eartip and discard.
2. Clean the outside of the chamber, handle and hose with a soft cloth
saturated with a mild solution of soap and water
3. To clean the unit, prepare a 4-cup solution of soap and water. To disinfect the unit, prepare a 2 cup solution of Isopropyl Rubbing Alcohol or
10% bleach / 90% water solution.
4. Detach the chamber from the faucet. Leave hoses attached to the
unit. Pour ½ cup of the solution into the top opening of the coupler.
Save the remainder of the solution later steps of this procedure.
5. Replace the chamber on the faucet head and submerge the exposed
handle interface surface (where the tip attaches) into the remainder
of the solution.
6a. To clean the unit, turn on the water. Squeeze the actuator to allow the
solution to flow from the handle into the container. The suction line
will remove the solution. Continue this process for 5 minutes.
9
Remember to keep the exposed tip of the handle submerged in the
solution.
6b. To disinfect the unit, turn on the water. Do not squeeze the actuator.
After half of the solution is removed, turn the water off at the faucet.
Remove handle from solution and rest in the handle rest / grip ring.
This will trap solution in the return line and allow effective disinfection. If unit is used on a patient with compromised skin, substitute a
solution of .55% Ortho-Phthalaldehyde (Welch Allyn recommends
use of Cidex OPA). Follow manufacturers recommendations on soak
times for maximum benefit. Repeat the cleaning procedure above to
remove any residual disinfecting solutions.
7.
Turn the water off and remove both tubes from the chamber.
8. To remove any stagnant solution in the tubing, disconnect the hoses
from the chamber and place the open end in the sink. Hold the handle higher than the tube and squeeze the actuator. The water will
run out of the open end into the sink basin.
9. Remove the chamber from the faucet. Allow the chamber to drip dry.
Replace the unit in its holding container.
10. To facilitate a recommended thorough flush and faster drying, pour
Isopropyl rubbing alcohol inside the chamber and hoses.
If hard water/ calcium buildup is a concern, a solution
of 100% vinegar can be substituted. Allow the vinegar
to soak in the chamber for no more than 2-3 minutes. A
final flush of isopropyl alcohol is required.
10
Troubleshooting
If your Welch Allyn Ear Wash System is experiencing problems, consult
the following table to find the symptom and the likely cause and the solution. If the information in this table does not describe or solve the problem you are having, contact the Welch Allyn Technical Service
Department or an authorized Welch Allyn Distributor to help you. See
Service and Warranty Information Card for more information.
Problem
No water is coming
out of the handle
even though I am
pulling the actuator.
Excessive water
leaking from the
ear.
Possible Cause
Solution
The temperature
shut-off safety feature has activated
due to the hot water
temperature.
Run COLD water through
the system for 10-30 seconds. This will reset the temperature shut off safety
feature and allow water to
flow again.
There is a kink in the
tubing.
Make sure there are no
bends in the tubing restricting the flow of water.
The tubing on the
INSIDE of the handle
is restricting water
flow.
Prime the actuator 25 - 50
times until water begins to
flow normally.
The water is not
turned on high
enough.
Turn the cold water on full in
order for the suction system
to work properly (but still
within the right temperature
range).
Eartip attachment
problem.
Replace the eartip with the
tab side pointing upwards.
Tubing connection
problem.
Ensure that both tube fittings are fit snugly into the
chamber.
Incorrect technique.
Check the Quick Reference
Guide to verify you are aiming the water correctly.
11
Problem
Possible Cause
Solution
Lack of a clean
water stream coming from eartip.
Installation of eartip
has caused a problem.
Apply a new eartip with the
tab side pointing upwards.
The water splash is
making a mess or
splashing onto
adjacent electrical
units.
Excess water pressure from the water
line.
Ensure that the chamber aerator is attached to the bottom of the chamber.
Installation of eartip
has caused a problem.
Apply a new eartip with the
tab side pointing upwards.
There is leakage
from the chamber
aerator and/or
adapter
Tighten the aerator and/or
adapter with a pair of pliers.
The return water exit
port is clogged on
the bottom of the
chamber.
Remove the chamber from
the faucet and dislodge any
foreign materials from the
exit port. Proceed with the
normal cleaning procedure.
There is an internal
malfunction.
With an eartip attached,
spray water from the handle
into a graduated cylinder or
measuring cup for exactly 20
seconds. If there was less
than 90 mL or more than
110mL of measured water,
contact your Welch Allyn
Technical Service Department.
The water pressure
from the eartip
seems too high or
too low.
12
Types of Cerumen
Cerumen is the natural by-product of the ear canal. It lubricates the skin
lining in the ear canal, acts as a water repellent, and entraps dust, hair follicles, and foreign bodies. Cerumen can take many different forms which
affect the process and time to remove. There are generally two different
types of cerumen found in the ear canal: dry and wet. The following are
subtypes of cerumen that you will commonly encounter and how they
may affect the irrigation procedure.
White/Flaky Cerumen
This form of cerumen will easily dissolve in the irrigation water. The irrigation procedure is relatively short, and a cerumenolytic agent is not always
necessary. Often you will not see solids trapped in the eartip with this
form of cerumen; rather, you will see some of the dissolved cerumen
trapped in the eartip screen. The rest of the dissolved cerumen will leave
through the exit port of the chamber.
Light Brown/”Jelly-Like” Cerumen
This cerumen resembles the consistency of petroleum jelly and does not
completely dissolve in the irrigation water. Some solids may be present in
the eartip, and the procedure time is slightly longer than for the white/
flaky variety. A cerumenolytic agent is recommended to speed the time
of irrigation.
Dark/Hard Cerumen
This cerumen is often found lining the walls of the canal and forms a plug
in the patient that can cause significant hearing loss. Large solids of cerumen are seen trapped in the eartip and the procedure time is often longer
than the wet/”jelly-like” cerumen. A cerumenolytic agent is often necessary to speed the time of irrigation.
13
Anatomy And Physiology
•
Cerumen is produced in the outer third of the ear canal and naturally moves to the outer ear as new tissue grows from the area
around the tympanic membrane.
•
Normal cerumen routinely becomes a medical issue when it
impedes the physicians ability to visualize the tympanic membrane. Less frequently, cerumen can accumulate and harden, in
the canal causing occlusion of the ear canal. In the most severe
cases cerumen can become ‘impacted’ in the deep (bony) canal
causing pain and temporary loss of hearing.
Cerumenolytic Agents
•
Cerumenolytic agents are those agents designed specifically to
dissolve or soften cerumen.
•
Most softening agents, particularly over-the-counter products
contain carbamide peroxide which is the only agent the FDA considers safe for loosening or softening cerumen.
•
In some instances, it is necessary to soften cerumen prior to
removal or instead of removal.
14
Warranty and Service Information
Warranty
Welch Allyn, Inc. warrants the Ear Wash System to be free of original
defects in material and workmanship and to perform in accordance with
manufacturer’s specifications for a period of one year from the date of
purchase. If this instrument or any other component thereof is found to
be defective or at variance from the manufacturer’s specifications during
the warranty period, Welch Allyn will repair or replace the Ear Wash System or component(s) at no cost to the purchaser.
This warranty only applies to products purchased new from Welch Allyn
or its authorized distributors or representatives. The purchaser must
return the product directly to Welch Allyn or an authorized Ear Wash System distributor or representative and bear the cost of shipping.
This warranty does not cover breakage or failure due to tampering, misuse, neglect, accidents, modification or shipping, and is void if the instrument is not used in accordance with manufacturer’s recommendations or
if repaired or serviced by other than Welch Allyn or a Welch Allyn authorized representative.
NOTE:
Return of the instrument registration card is required for
proof of purchase and warranty validation.
15
Technical Service Department
For customers in North America, please return instruments requiring service to Welch Allyn or an authorized Welch Allyn Service Representative.
Please call the Technical Service Department for a Return Authorization
Number prior to shipping the Ear Wash System back to Welch Allyn for
repair.
United States:
Canada:
Welch Allyn, Inc.
Attn: Technical Service Department
4341 State Street Road
Skaneateles Falls, NY 1314-0220
Telephone:
1-800-535-6663
1-315-685-4560
Fax:
1-315-685-3361
Welch Allyn, Ltd - Canada
160 Matheson Blvd. E., Unit #2
Mississauga, Canada L4Z 1V4
Phone: 905-890-0004
Fax: 905-890-0008
For customers outside of North America, return your unit to a local,
authorized Welch Allyn distributor or to your nearest Welch Allyn service
center.
Welch Allyn, Ltd. – UK
Welch Allyn France
Cublington Road
Aston Abbots, Buckinghamshire
England HP22 4ND
Phone: 011-44-1296-689905
Fax: 011-44-1296-682104
814 rue Charles de Gaulle
77100 Mareuil les Meaux
France
Phone: 011-33 1 60 06 33 66
Fax: 011-33 1 60 09 67 97
Welch Allyn, GmbH PSC
Welch Allyn, LTD - Singapore
Zollerstrasse 2-4
72417 Juningen, Germany
Phone: 011-49-7477-927173
Fax: 011-49-7477-927193
300 Beach Road #25-08
The Concourse
Singapore 199589
Phone: 011-65-291-0882
Fax: 011-65-291-5780
Welch Allyn China Service Center
Welch Allyn, Ltd. - Australia
Room 708, 227 Huang Pi Road, North
Central Plaza
Shanghai 200003, China
Phone: 011-86-21-6327-9631
Fax: 011-86-21-6327-9632
Metro Center Unit 5
38 South Street
Rydalmere NSW 2116, Australia
Phone: 011-(612) 9638-3000
Fax: 011-(612) 9638-3500
For service in Latin America and the Caribbean region, contact:
MD International
11300 N.W. 41st Street
Miami, FL 33178 USA
Phone: 1-305-669-9003
Fax: 1-305-669-1971
16
Replacement Parts and
Accessories
Ordering Information
To order replacement parts or accessories, contact your Welch Allyn Service Representative or call the Welch Allyn Customer Service Department in Skaneateles Falls, NY (USA) directly at:
1-800-535-6663
Monday through Friday, 8:00AM to 8:00 PM EST
Part
Part Number
Eartips (Case of Eartips)
29360
Tubing (Hose Assembly)
29330
Snap Aerator
29370
Aerator Adapter Kit:
Domestic
International
29371
29355
17
Specifications
General Specifications
The specifications common to all of the major components of Welch
Allyn Ear Wash System are listed the following table.
Operating Temperature:
50° - +104° F(10° - +40° C
Storage Temperature:
-40° - +120° F(-40° - +49° C)
Flow Rate from Eartip:
100 mL (0.0264 gal) of water per
20 seconds at operating pressure.
Source (faucet) Water
Pressure Range:
40 - 110 Psi (275KPa - 758 Kpa)
Minimum Source Water
Flow Rate:
7.5 l/min (2 gal/min)
Water Pressure from Eartip:
10 Psi (69kPa)
Patents
U.S. Patent Number
5,685,851; other patents pending
Eartips
•
Bio-compatible, latex-free, insert type
•
One size fit patients from pediatric to adult
•
Single-use only
•
Fits most round ear canals
18
Welch Allyn, Inc.
4341 State Street Road
PO Box 220
Skaneateles Falls, NY
13153-0220
Tel: (315) 685-4560
1 (800) 535-6663
Printed in the U.S.A.
Part No. 293044 Rev. B