1
windream web portal
User Guide
windream GmbH,
Bochum
Copyright
© 2001 – 2005
by
windream GmbH
Wasserstr. 219
44799 Bochum
Release: 03/05 – 3.6.0.1
All rights reserved. No part of the contents of this book
may be reproduced or transmitted in any form (print,
photocopy, or any other form) or by any means without
the explicit permission of windream GmbH.
Important Note!
All information and technical specifications in this book have been collected
by the authors with great care. They cannot, however, either guarantee,
take legal responsibility for or make any other warranty for the results
stemming from the usage of this information.
We would also like to point out that all software and hardware logos and
names are the exclusive property of the Trademark, Brandname or Patent
right holders. These are naturally protected by the appropriate laws and
trade agreements.
Table of Contents
i
Table of Contents
windream web portal pro
Welcome
Introduction to windream web portal pro
A survey
Logon to windream web portal pro
Navigation in windream web portal pro
Retrieving documents
Hierarchic search (Explorer)
Simple search
Quick search
Index search
Object type search
Fulltext search
Working with search profiles
The result list
Download documents
Document preview
Viewing and editing fulltexts
Viewing document properties
Creating new objects (upload)
Creating a new folder
Creating a new file (icon New File)
Upload via the Upload icon
Upload directory
Editing documents
Selection of documents and folders
Reporting editing processes (report window)
Requirements for editing objects
Indexing objects
Acquiring or editing indices
windream rights
Editing rights
Creating a new version
Check-in and check-out documents
Check-out documents
Check-in documents
Undo check-out
Setting the edit lock
Set and remove edit lock
Remove edit lock
Copying objects
Moving objects
Renaming objects
Deleting objects
Configuration
1
1
1
1
3
4
9
9
13
15
18
22
23
28
32
32
35
36
40
46
46
49
52
54
57
57
58
58
58
59
62
62
66
69
70
73
77
78
79
82
84
88
91
92
95
ii
Table of Contents
Personal settings (windream web portal pro)
Start view
Listview
Search options
Download
Diagnostics
Preview
Miscellaneous
Toolbar
Portal site – navigation bar
The Portal Site
windream searchlets
95
95
96
98
101
103
103
104
105
109
110
111
Index
115
windream web portal pro
1
windream web portal pro
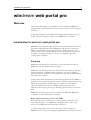
Welcome
The present description is a guideline for the handling of windream
web portal pro. The description presents a brief survey on the program
functions.
A detailed description and additional background information can be
found under the respective topic of the windream user manual.
Introduction to windream web portal pro
windream web portal pro represents an internet-based interface for the
Document Management System windream and allows to access the
DMS via the Internet or an Intranet with a common Browser. The
system supports for example Microsoft Internet Explorer (version 4.0
or higher ), Netscape Navigator (version 7 or higher) and Opera
(version 6.05 or higher).
A survey
windream web portal pro offers access to the document storage of
windream via user authentication at logon.
windream web portal pro allows to find and view documents and their
system properties or DMS-specific properties. It is also possible to
make documents available on a workstation Computer by downloading
them from the Internet.
On the other hand, documents can also be imported into the DMS via
upload, or checked out documents can be checked in again after having
edited them externally. Additionally, the system allows to modify
objects including their system or DMS-specific properties. File
operations like copying, moving or deleting objects can be executed as
well.
windream web portal pro does not require any additional windream
component on the workstation Computer.
Basic requirements for access to the DMS
Each user must be provided with a valid operating system account,
over which he logs on to windream web portal pro in order to get
access to the DMS and the documents stored in it.
A further requirement is that users must have been classified as
windream users in the user and group administration, and they must be
2
windream web portal pro
equipped with the necessary rights. The user and group administration
integrated in the windream Management Console (WMC) offers a
function for determining specific rights for the access to windream
web portal pro. The system differentiates between the following access
modes:
•
Read-only
A user can only retrieve documents with windream web portal pro.
Documents can be retrieved, read and downloaded on a local data
carrier. It is not possible to edit objects from the DMS or to import
files via upload to windream.
•
Full access
Users can use all functions without limits. Documents can be
retrieved, viewed or downloaded. Additionally, documents can for
example be checked out for and checked in after external editing. It
is also possible to upload documents into the DMS and to change or
delete them.
Note: The number of users who can access the DMS via
windream web portal pro depends on the number of available
licences. Additionally, there is a differentiation between full access
and read-only. Users provided with full access licences can
additionally switch to the retrieval mode via an option of the
configuration module of windream web portal pro (read-only
mode).
A detailed description and additional information on the administration
of users and groups in the WMC can be found under the respective
topics of the windream user manual.
After having logged on successfully, windream web portal pro will
offer the functions for getting access to the windream DMS on its
start-up page.
windream web portal pro
3
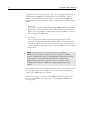
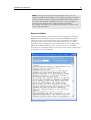
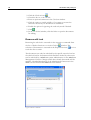
Logon to windream web portal pro
In order to launch windream web portal pro, you will have to start
your Webbrowser. Then, you enter the URL of the Webserver over
which you can log on to the windream DMS.
Figure 1: Logon to the windream Server
When logging on to windream, you enter the user ID (Name and
Password) on the start page, under which you also log on to your
workstation Computer. Enter the domain designator in the respective
field, which you also use when logging in to your workstation. Then,
you select the desired language version and enable the Logon command
button.
Enable the respective button to discard entries and to reset the field
contents of the logon form, if you do not want to log on or if you want
to select another account.
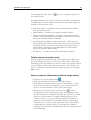
Try logon once again or logon with another user ID
If you want to log on once again or with another ID, you will have to
call the logon form again using icon Logout
data and enable command button Logon.
. Enter the desired user
Log out
Click icon
to log out. For each user, specific system resources are
occupied on the windream Server during a session (for example the
creation of a temporary upload and download directory), which will
only be released again after logoff or when the time limit for the
session has expired.
4
windream web portal pro
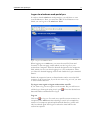
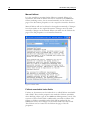
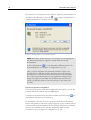
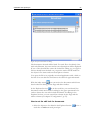
Session expired
Users are connected with the windream Server when logging in to
windream. This connection will automatically be cut if there is no
access to windream within a preset period of time. The limit is
determined by a system administrator. After the time has expired, a
message will be displayed in the Browser, and you can log on again via
link Back to Logon:
Figure 2: Session expired
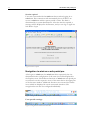
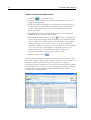
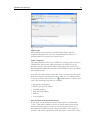
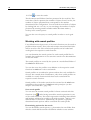
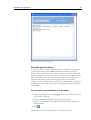
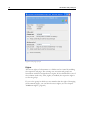
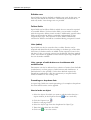
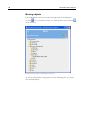
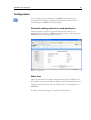
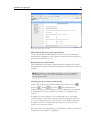
Navigation in windream web portal pro
After logon to windream, the windream drive respectively the site
determined in the configuration of the start view will be displayed in
the Explorer view. The different functions of windream web portal pro
are selected over the respective icons of the menu bar in the upper part
of the browser window. Additional functions are executed via further
icons which are displayed in certain contextual situations. The
navigation bar can also be configured individually.
Figure 3: Navigation in windream web portal pro – default settings
User-specific settings
Figure 4: Navigation bar without first menu line
windream web portal pro
5
Figure 5: Navigation bar – commands as hyperlinks
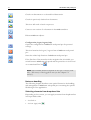
Functions for document retrieval
A click on this icon enables the Explorer view for the windream drive.
A click on this icon will start the simple search.
This icon starts the quick search.
Call the index search of windream web portal pro with this icon.
This icon starts the object type search via windream web portal pro.
Refreshes the Explorer view.
This icon opens the upload directory.
A search from the currently selected search function is started over this
icon.
The icon New search will discard the current search result, which means
that the result list will be initialized. At the same time, all entries and
selected index fields of the current search function will be reset in order
to allow entering new items.
Functions for document editing
Imports a new file into the DMS.
Creates a new folder in the windream drive.
Renames objects in the windream drive.
This icon moves objects within the windream drive.
This icon copies objects in the windream drive.
6
windream web portal pro
Checks out documents to a selected local data carrier.
Checks in previously checked out documents.
This icon will undo a check-out process.
Creates a new version of a document in the windream drive.
Deletes windream objects.
Configuration, logon, logout, help
Opens the configuration of windream web portal pro for personal
settings.
This icon launches the logon / logout form of windream web portal
pro.
Starts the online help function of windream web portal pro.
If the first line of the menu bar in the navigation bar is invisible, you
switch between windream web portal and the portal site via icon Portal
site or windream Web Client
.
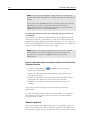
Note: The available functions depend on the type of access (readonly / full access) of the logged-in user (see also chapter "A
survey").
Notes on handling
The following chapter describes some special features in the handling
and management of windream web portal pro concerning the specific
Web design of the application.
Selecting elements from dropdown lists
Depending on the context, you can apply contents from dropdown lists
into input fields either
•
via a link or
•
via icon Apply value
windream web portal pro
7
Opening a dropdown list via a link and applying values
In order to apply an element from a dropdown list into an input field,
you open the list with a click on the respective link (field designator of
the assigned input field). Select the desired entry in the list to apply it
into the input field. The assigned input field can be initialised by
selecting the empty entry from a dropdown list.
Icon for applying a value
In order to apply an element from a dropdown list to an entry field,
you have to open the list and highline the desired entry. Then, you
apply the desired entry to the corresponding input field using icon
Apply value
. The corresponding input field can be initialized for a
new entry by applying an empty dropdown list line.
The Apply value icon applies the selected entry of the dropdown list into
the respective input field. The contents of the field will then be
overwritten.
Entries in tables and charts
Input fields for indexing or for finding documents can also be tables.
Tables are lists in which you can enter index information for objects or
for creating search expressions line any line. Depending on the type of
field, dropdown lists can be defined as an input help.
Adding lines
You can add a line via icon
Add in the title bar of a list field. Enter
the desired contents into the line or apply an entry from the list.
Adding several lines
If you have already added several lines and if you want to add more
lines, highlight the desired number of lines (checkmark in column
Add) and click icon . Now, the list will be extended by the respective
number. The contents of previously selected lines will be applied as
preselection.
Applying contents from dropdown lists or calendar
Icon
at the beginning of a line indicates whether a dropdown list or
the calendar function is available as input help. In this case, you open
the list by clicking the icon. Select the desired entry in the list or in the
calendar to apply it to the line.
Removing lines
In order to remove single lines and their contents from the list, you
select the desired number of lines (checkmark in column
Delete) and
click . The lines will be removed from the list.
8
windream web portal pro
Selecting objects
For specific editing processes, you will have to select the respective
objects from the lists before editing (for example from the Explorer
listview or from a result list).
Single objects can be selected by enabling the checkmark in front of the
entry in column Filename.
Enable the checkmark in the column header of the Filename column to
select all entries of a list.
A folder can also be selected in the Explorer folder view by clicking the
desired folder on the left side of the Explorer window.
Using hyperlinks
Specific links can be used as hyperlinks (external URLs). These are:
•
links on filenames and folders (column Filename), the preview
(column
) and the download Save as
/
(column
) in the Explorer listview and in the result lists.
These links can for example be placed on the Desktop via drag and
drop, they can be copied to the clipboard as link, or they can be sent
via e-mail.
In order to be able to execute actions via these hyperlinks, a user must
be logged in to windream via windream web portal pro.
Send error messages and information to Support
If errors occur while working with windream web portal pro, the
system will display a respective message in a separate browser window.
You can get more details on the respective error by clicking the
respective command button. This description can be sent to the
windream support via e-mail. The link at the end of the message will
start your mail application, and the error description will be attached to
the e-mail message.
Note: Please note that the maximum number of characters in an email message containing error reports is limited to 250 characters, if
you use MS Internet Explorer and MS Outlook as e-mail Client.
This problem is a specific property of the Microsoft Software.
Messages exceeding the number of 250 characters must be copied
in the browser window and must be inserted into the mail body
manually.
windream web portal pro
9
Retrieving documents
The retrieval functions of the Webclient correspond to those of the
windream 3.6 Client software. A retrieval is exclusively executed within
the windream DMS. Documents can be found via the following search
functions:
•
Via the hierarchic document organisation in the document storage
using the Explorer
.
• Via structured document properties within the index properties or
via free search items within the fulltexts of documents. These
functions can be executed with the simple search
, the quick
search
and with the index search
as well.
• According to the document and folder types of documents/folders
within the Object Type search
• Via stored search profiles.
.
Standard search
If you start a search from one of the search functions without
determining a search expression, windream web portal pro will execute
a standard search with which all available documents will be found.
Wildcards and logical links in search expressions
Wildcards can be used in the search. Complex queries can then be
generated from the search conditions by logical links of search
expressions.
Using search profiles
You can save search profiles and use them again for a new search.
Display of retrieval results in result lists
All search results are presented in result lists. Viewing and editing the
documents found is executed with the connected original applications.
You can also use viewers for displaying documents.
You select the documents for viewing or editing from the result list.
You can download documents, edit them, and upload them to the
DMS again.
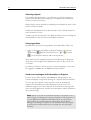
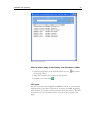
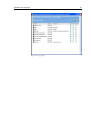
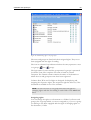
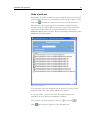
Hierarchic search (Explorer)
With the hierarchic search, windream web portal pro offers an
opportunity to find documents by browsing in the windream file
storage. The search is then executed via the hierarchic document
organisation in folder which are presented in the Windows Explorer.
Only those folders and documents will be displayed that correspond to
10
windream web portal pro
the rights of a user.
Figure 6: Hierarchic search
At first, the list view will only present the number of objects which
have been determined in the configuration under option Search
options>Maximum blocksize for search. If the number of documents found
is bigger than the blocksize determined, you load the next block of
objects into the list by clicking next <n> hits. All objects will be loaded
after having clicked the respective button.
Viewing documents (download via filename)
A document can be opened for being viewed by clicking the entry in
the listview. You can use the link to a document (column Filename) as
hyperlink and place it on the Desktop with drag and drop. The
document can be opened with a double click.
Local storage of documents (download via Save as icon)
You can store documents in a destination directory of a local data
carrier. Single documents can be saved via icon
documents or a folder is / are saved with icon
, several selected
(column
). With
a click on one of the icons
or
in the Explorer listview, you open
the file-download window of the browser and download the selected
objects.
There are different opportunities for downloading several objects at the
same time. You either select the desired objects in the list and execute
the download via icon
a folder and click icon
in the headline of the column, or you select
in column
.
windream web portal pro
11
If you select several objects for a download, these objects will first be
compressed. The objects are then collected in a ZIP-file (default:
download.zip) and are saved in the selected destination directory.
After having finished the download, you extract the objects from the
ZIP-file. Documents will then be available for editing (for example
viewing and editing in the original application, printing and
distribution). However, it is not possible to edit or change the
document properties like the index data outside the DMS.
Downloaded files can be imported into the DMS again via upload (see
also chapter "Create new objects (upload)" page 46). However, this is
only possible if you have a full access licence for windream web portal
pro, if you have the permission for full access and if you have the
respective right for changing documents in the DMS (see also chapter
"A survey", page 1).
Note: Please note that all documents and subfolders of a folder to
be downloaded are collected in the download file. Downloading
folders is executed recursively.
Different options for the download processes can be set in the
configurations
(see chapter "configurations", page 101).
Open folder
A folder can be opened with a click on the respective folder entry in
the result list (column for opening a folder). The contents of the
selected folder are displayed in a separate browser window. The link to
a folder (column Filename) can be used as hyperlink and can thus be
placed as hyperlink on the Desktop. The folder can then be opened
with a double click.
Note: The column for opening a folder will only be displayed, if
this option has been set in the configuration (see chapter
"Configuration", p. 96).
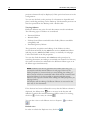
View properties
Via the Properties icon
of an entry in the list (column
) you can
view the document or folder properties of an object selected from the
listview. The properties column will only be displayed, if this option
has been set in the configuration.
Document preview
It is possible to open a document preview for certain filetypes in a
browser window. The preview icon
next to the entry in the listview
indicates the filetypes for which a preview is available. In order to view
a document, you click on icon
of a list entry in column
. The
12
windream web portal pro
preview column will only be displayed, if this option has been set in the
configuration.
You can use the link on the preview of a document as hyperlink and
place it with drag and drop on the Desktop. The document preview can
then be opened from the Desktop with a double click.
Viewing fulltexts
Different fulltexts may exist for each document stored in windream.
The following types of fulltext are considered:
Extracted fulltext
• Manual fulltext
• Fulltext from fulltext-searchable index fields (fulltext-searchable
stringfields) and
• Extended (private) fulltext.
•
The generation, acquisition and editing of the fulltexts is either
executed automatically by the windream services (windream fulltext
indexing service, windream DMS-service) or manually via tab pages
Fulltext and Indices in the file properties.
You can also find documents with windream web portal pro by
searching documents according to contained text elements. In this case,
the search can either be conducted in the different fulltext types or in
all fulltext types simultaneously.
Note: Fulltexts can also be generated for folders. This way, you
can acquire and edit manual fulltext via tab page Fulltext of the
folder properties. Contents which you enter during the editing of
index criteria in fulltext-searchable index fields will be extracted and
stored as fulltext. It is also possible to acquire and edit private
fulltext in the respective fields while editing the index properties (on
tab page Indices).
The display and the editing of different fulltexts is executed in the
same way as for documents.
If the listview has been configured in a way that the fulltext column is
displayed, the fulltext icon
next to an entry in the listview will
indicate for which files and documents a fulltext exists. For viewing,
click icon
of a list entry in column
.
in column
You can also view or edit fulltexts via icon Properties
.
Refresh view
In order to refresh the Explorer view, click icon
.
windream web portal pro
13
Changing the presentation of the listview
The type and the number of columns presented in the Explorer
listview can be modified individually. The index properties to be
viewed in the Explorer can be selected from the list of available
columns (indices). In order to configure columns you switch to the
configuration of windream web portal pro by clicking icon
chapter "Configuration", p. 96).
(see
Changing list sorting
The sorting of the listview can be changed by clicking on the respective
column header. The sorting is reversed by clicking the header once
again.
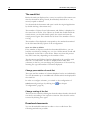
Simple search
With the simple search, windream web portal pro offers a search
function for executing a simultaneous search with alpha-numeric
expressions via index data and the fulltexts of documents.
Search items entered in field Search for are connected with operator
"OR" by windream. This will start a search for documents which at
least contain one of the expressions in the fulltext. In order to find
documents which contain all of the expressions entered, you can
connect the items with "AND". For this, you enable the option to
include all words. windream extends the search expression and
indicates Search for in this field. In order to make the extension visible,
the option for viewing the extended fulltext search item must be
switched on in the configuration (see chapter "Search options", p. 98).
Via icon
, options for the current search can be edited.
Figure 7: Simple search
14
windream web portal pro
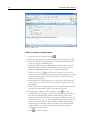
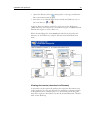
How to conduct a simple search
1. Click icon
of the simple search.
2. Enter the desired search expression in dropdown list Search for or
apply an existing entry.
3. In the dropdown list named In you determine in which fulltext of
the documents a search shall be conducted. In the configurations
on the search options page, you can determine the entry to be
preset as default.
4. Highlight the option to include all words, if the the search items
entered shall be connected with "AND".
5. Determine the search options via icon
or in the configurations
on the search options page. This depends on the conditions which
can be valid for the current search or for all searches (see chapter
"Editing options of the current search", p. 15). E.g., enable the
respective checkboxes, if previous versions shall also be considered
or if a case-sensitive search shall be conducted (optional). If a
search shall only be conducted from a specific folder, you
determine the folder as starting point of the search.
6. Start the search via icon
.
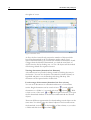
The documents and folders found are presented in the result list. The
status bar of the list presents the number of objects found. At first, the
number of objects presented here corresponds to the number
determined in the configuration. You can load the next block of objects
by clicking link next <n> hits, or you can change the number of objects
presented by entering another number under Maximum number of
blocksize in the search options.
Figure 8: Conducting a simple search
windream web portal pro
15
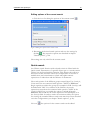
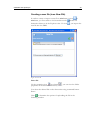
Editing options of the current search
1. Click the icon for edting the options of the current search
.
Figure 9: Editing the options for the current search
2. Determine the desired search options and save the settings by
clicking . The respective options are described in chapter
"Search options", p. 98.
The settings are only valid for the current search.
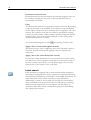
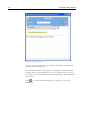
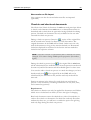
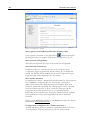
Quick search
An efficient search function with selected criteria is offered with the
Quick search. Documents of a specific object type or a certain creator
(author) can be found with this function. This function also allows a
retrieval over date and time entries (for example date of creation or
modification) and a simultaneous search with alpha-numeric
expressions via index data and the fulltexts of documents.
The search criteria of the different groups named Object Type, Search for,
Creator and Time are connected with operator "AND" by windream.
Single expressions within the groups (for example in field Search for) will
be linked with "OR". For searches in the fulltexts, the search
expressions entered can be connected with operator "AND" in the
Search for field. Thus, you enable the option to include all words.
windream will extend the the search expression and will display it in
the Search for field. In order to make the extension visible, the option
for viewing the extended fulltext search term must have been switched
on in the configurations (see chapter "Search options", p. 98).
Via icon
, the options for the current search can be edited.
16
windream web portal pro
Figure 10: Quick search
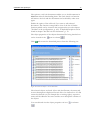
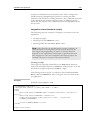
How to conduct a quick search
1. Click the icon of the Quick search
.
2. Select the desired entry from the dropdown list named Object Type.
3. Enter the desired search expression in the dropdown list named
Search for or apply an existing entry.
4. In the dropdown list In you determine, in which fulltext a search
shall be conducted. In the configurations on the search options
page, you can determine the entry to be preset as default.
in field Creator you select one or several
5. Via icon Search user
creators, if the search shall be restricted to the documents of certain
authors (see also chapter "Search documents of specific creators
(Search users)" page 17).
6. Enter the data in the dropdown lists of the group Time and in the
Value field, if you want to restrict the search to specific date and
time stamps.
7. Select the option to include all words, if the search criteria entered
shall be connected with "AND" in the Search for field.
8. Determine the options of the search via icon
or in the
configurations on the page of the search options. This depends on
the question whether the conditions shall only be valid for the
current search or for all searches (see chapter "Editing options for
the current search ", p. 15). E.g., enable the respective checkbox, if
previous versions shall also be included or if the search shall be
executed as case-sensitive search (optional). If the search shall be
conducted from a specific folder, you determine the folder as
starting point of the search.
9. Click
to start the search.
windream web portal pro
17
The documents and folders found are presented in the result list. The
status bar of the list presents the number of objects found. At first, the
number of objects presented here corresponds to the number
determined in the configuration. You can load the next block of objects
by clicking link next <n> hits, or you can change the number of objects
presented by entering another number under Maximum number of
blocksize in the search options.
You can also save the query as search profile in order to use it again
later.
Figure 11: Conducting a Quick Search
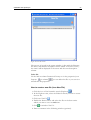
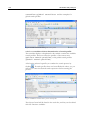
Search documents of specific creators (Search users)
In order to find documents of a specific creator, you apply the creator's
icon (Search user). A list will
name to the Creator field by clicking the
be displayed in the lower part of the browser window, in which you can
find the desired creator names.
Figure 12: Search for creator
After a search, which is started via the
icon, the names of those
windream users whose accounts have been configured on the selected
domain will be displayed.
18
windream web portal pro
Documents of current user
Documents that have been created by the currently logged-in user can
be found by selecting the first entry of the list named Current user
(presented in red letters).
Filter
The filter function allows to restrict the contents of the list. By entering
a value in the fields of the headline of the columns Name and Domain,
the list will be restricted to those elements that correspond to the value
entered. The contents of the list can further be specified by entering
values in several columns. Alpha-numeric character strings are allowed
as input values. You can also enter wildcards (* and?). Using value *
will find all elements of a column.
You start the filtering process with
after having entered a value.
Apply value to Creator field (Quick Search)
The name of a user entry is applied to the Creator field with a click on
the name. Several entries can be applied, if they are separated by
semicolons.
Apply value to the Value field (index search)
If you want to find documents of several creators in the index search,
you will have to enter a separate search term for each creator name in
the list of search criteria. Thus, you can always apply only one name
from the list of user entries to the Value field.
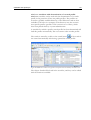
Index search
Each document is equipped with a structured document description
consisting of index properties. These properties are determined during
the acquisition and indexing of documents in the DMS. Documents are
retrieved with the index search according to these index data.
Additionally, a search is also possible via the fulltexts of documents.
Thus, combined retrieval processes can be conducted by connecting
different search expressions over the fulltexts and the indices of
documents. The index search contains three groups for determining
and editing search criteria.
windream web portal pro
19
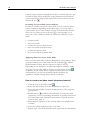
Figure 13: Index Search
Object type
The search can be restricted to specific Object Types with the
respective dropdown list, and you can determine the selection of
possible indices for creating the search criteria.
Index categories
The index properties which are available for creating search criteria are
offered in the Index group. Index properties can either be systemspecific or object type-specific indices. Index properties which have
been determined under the currently selected Object Type in the DMS
are available as well.
You select the desired index which has to be considered for the search
from the categories (the dropdown list). After that, you add the index
) and determine condition and
to the list of search criteria (use icon
value. The following categories are available:
•
•
•
•
•
•
Frequently used indices;
Object type-specific indices;
Available indices;
Date and time indices;
Fulltext;
Vector-indices.
List of search criteria (search terms)
In this area, you determine the search criteria (Index, Condition and
Value). A line will be added to the list of search criteria after having
selected an index property from one of the categories. Then, you
determine the condition and the value in the fields of the respective
columns. The search expressions in the list can be connected to search
20
windream web portal pro
terms by logical operators (dropdown list box in column Operator). The
evaluation order can be changed by setting brackets around selected
search expressions. Single search expressions (lines in the list) can be
deleted via icon
.
Searching via vector fields (vector indices)
In order to conduct a search in vector fields, you can enter the search
term as condition depending on the object type, or you can select a
term from the list of values and use it in the Value field. The selection
from a list or a table via icon Edit index
is only possible, if you
select one of the conditions which are exclusively offered for vector
fields:
•
•
•
•
•
•
contains exactly
does not contain
contains at least one element from
does not contain an element from
contains all elements from
does not contain all elements from.
Applying values into vector index fields
Select a vector index and a condition designed for vector indices. Then,
open the window of the same name via icon Edit index
. Add the
desired number of lines with the respective values to the list.
Depending on the operation, an input help might be available. Apply
the values into the value field in the list of search criteria via icon .
As default, several values will be separated by semicolons. In the
configurations, you can also determine another character for
separation. Already existing entries will be overwritten.
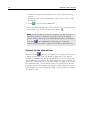
How to conduct an index search (structured search)
1. Click the icon of the index search
.
2. Select the desired entry from the dropdown list Object Type.
3. Select the desired index from the dropdown lists of the categories
(group Index).
to add the selected index to the list of search
4. Enable button
expressions. Notes on searching documents of specific creators can
be found under topic "Search for documents of specific creators
(search users)" page 17.
5. Determine the operator for the selected index over dropdown list
Condition.
6. Enter the search expression in the Value field.
7. Repeat steps 3-6 until all desired search expressions are determined.
windream web portal pro
21
8. If desired, change the evaluation order by setting brackets around
the respective columns (optional).
9. If necessary, change the connecting operator with which the search
expressions shall be connected (optional).
10. Determine the options for the search via icon
or in the
configurations on the search options page. This depends on the
question whether the conditions shall only be valid for the current
search or for all searches (see chapter "Editing options for the
current search; p. 15). E.g., enable the respective checkbox, if
previous versions shall also be included or if the search shall be
executed as case-sensitive search (optional). If the search shall be
conducted from a specific folder, you determine the folder as
starting point of the search and determine whether subfolders shall
also be included.
11. Click icon
to start the search.
The documents and folders found are presented in the result list. The
status bar of the list presents the number of objects found. At first, the
number of objects presented here corresponds to the number
determined in the configuration. You can load the next block of objects
by clicking link next <n> hits, or you can change the number of objects
presented by entering another number under Maximum number of
blocksize in the search options.
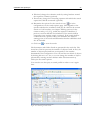
You can also save the query as search profile in order to use it again
later.
Figure 14: Conducting an index search
22
windream web portal pro
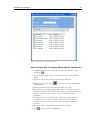
Object type search
With the Object Type Search, windream web portal pro offers a
function to find documents according to their assigned object type and
the connected type-specific index properties. The search expressions
entered in the different index fields are connected with operator
"AND" by windream. Single search expressions within an index field
are connected with "OR". Options for the current search can be edited
via the
icon.
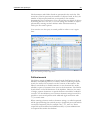
Figure 15: Object Type Search
How to conduct an object type search
.
1. Click the icon of the Object Type Search
2. Select the desired entry from the dropdown list Object Type.
3. Enter the desired values in the object type-specific index fields.
4. Determine the options for the search via the
icon or in the
configurations on the page of the search options. This depends on
the question whether the conditions shall only be valid for the
current search or for all searches (see chapter "Editing options for
the current search", p. 15). E.g., enable the respective checkboxes,
if previous versions shall also be included or if the search shall be
executed as case-sensistve search (optional). If the search shall be
conducted from a specific folder, you determine the folder as
starting point of the search and determine whether subfolders shall
also be included.
5. Start the search by clicking
.
windream web portal pro
23
The documents and folders found are presented in the result list. The
status bar of the list presents the number of objects found. At first, the
number of objects presented here corresponds to the number
determined in the configuration. You can load the next block of objects
by clicking link next <n> hits, or you can change the number of objects
presented by entering another number under Maximum number of
blocksize in the search options.
You can also save the query as search profile in order to use it again
later.
Figure 16: Conducting an Object Type Search
Fulltext search
The fulltext search of windream is based on the find functions of the
database used (MS SQL Server or Oracle). When conducting a fulltext
search, the retrieval is executed over the contents of documents. The
fulltext search allows to find documents via text elements like words,
syllables or parts of sentences that occur in the documents. The fulltext
search allows to find all characters of the alphabet. However, the entry
of single, separate characters or special characters should be avoided in
a search. You should always use coherent character strings instead. It is
possible to enter word prefixes with wildcards (right truncation with
"*") as search term.
When entering coherent words as character strings, so called stopwords
will be ignored during the retrieval process. Stopwords are words which
occur quite frequently, like for example "the", "is", and" etc. These
stopwords are determined and administered by a system administrator
in stopword lists within the database.
24
windream web portal pro
In order to restrict or further specify a search, several search terms can
be connected to a complex query. Possible operators can be AND or
OR.
The fulltext search does not consider a case sensitive search. This is
independent of the current settings of the respective options.
The use of wildcards is supported (only "*" as wildcard for one or any
number of character in expressions that begin with the search
expression entered).
Fulltext searches according to text elements are possible as separate
searches in the different fulltexts existing for a document or also via all
fulltexts:
Extracted fulltext,
• Manual fulltext,
• Fulltext from fulltext-searchable index fields (fulltext-searchable
stringfields),
• Extended (private) fulltext (windream Business Edition).
•
The generation, acquisition and editing of the fulltexts is either
executed automatically by the windream services or manually via the
tab pages Fulltext or Indices in the file properties.
A search in the fulltext can either be executed via the simple search
the quick search
or the index search
.
Further information on the different fulltext types can be found in the
windream user guide.
Searching for text elements in the fulltexts
In dropdown listbox named Search for of a search function, you enter
the search expression according to which a search will be executed in
the fulltexts of documents.
Note: By selecting further search criteria via quick search button
or via the index search button
(for example by restricting
the search to documents of a specific object type), you can restrict
the search in the fulltexts.
In order to determine a search expression in field Search for, you enter
the desired expression in the field or select an item from the list. If you
enter several items separated by blanks, these expressions will
automatically connected for a search with operator "OR". In order to
connect the search expressions with "AND", you enable the checkbox
,
windream web portal pro
25
for including all words. Via the
the current search.
icon, you can edit the options of
In dropdown listbox In or via the selection of an index, you determine
in which fulltext a search shall be executed with the search expression
entered. You can choose from:
•
•
•
•
•
Extracted fulltext – searching in the extracted document fulltext
with the criteria entered.
Manual fulltext – search in the manual document fulltext.
Fulltext-searchable stringfields – a search is executed in all alphanumeric system and DMS-specific indices of the documents, which
have been marked as fulltext-searchable.
Extended (private) fulltext (index search only) – If the selected
object type provides fulltext index fields, these will occur in the list
of category Fulltext and can be selected as search criteria. Then, a
search will be executed in the extended fulltexts of documents
(object type-specific fulltext fields).
All fulltexts – a search is executed in all document fulltexts.
Fulltext search via simple search
Start the simple search and enter the search expression in field Search
for. In the dropdown list In, you select one of the entries offered and
depending on the fact whether you want to search via a specific fulltext
or via all fulltexts. The search expression consists of the words to be
found or fragments of words and the possible operators, for example
AND or OR.
How to conduct a fulltext search with the simple search
.
1. Click the icon of the simple search
2. Enter the desired search expression in field Search for.
3. In dropdown list named In, determine in which fulltext a search
shall be executed. In the configurations, you can determine the
entry to be used as default on the search options page.
4. Determine the options for the search via icon
or in the
configurations on the search options page. This depends on the
question whether the conditions shall only be valid for the current
search or for all searches (see chapter "Editing options for the
current search", p. 15). E.g., enable the respective checkbox, if
previous versions shall also be included or if the search shall be
executed as case-sensitive search (optional). If the search shall be
conducted from a specific folder, you determine the folder as
starting point of the search and determine whether subfolders shall
also be included.
26
windream web portal pro
5. Click
to start the search.
The documents and folders found are presented in the result list. The
status bar of the list presents the number of objects found. At first, the
number of objects presented here corresponds to the number
determined in the configuration. You can load the next block of objects
by clicking link next <n> hits, or you can change the number of objects
presented by entering another number under Maximum number of
blocksize in the search options.
You can also save the query as search profile in order to use it again
later.
Fulltext search via quick search
Start the quick search and enter the search expression in field Search for.
In the dropdown list In, you select one of the entries offered,
depending on the fact whether you want to search in a specific fulltext
or in all fulltexts. The search expression consists of the words to be
found or fragments of words and the possible operators, for example
AND or OR.
How to conduct a fulltext search with the quick search
1. Click the icon of the quick search
.
2. Select the desired entry from the dropdown list Object Type.
3. Enter the desired search expression in the dropdown list Search for
or select an existing entry from the list.
4. In dropdown list named In, determine in which fulltext a search
shall be executed. In the configurations, you can determine the
entry to be used as default on the search options page.
5. Determine the options for the search via icon
or in the
configurations on the search options page. This depends on the
question whether the conditions shall only be valid for the current
search or for all searches (see chapter "Editing options for the
current search", p. 15). E.g., enable the respective checkbox, if
previous versions shall also be included or if the search shall be
executed as case-sensitive search (optional). If the search shall be
conducted from a specific folder, you determine the folder as
starting point of the search and determine whether subfolders shall
also be included.
6. Click
to start the search.
The documents and folders found are presented in the result list. The
status bar of the list presents the number of objects found. At first, the
number of objects presented here corresponds to the number
determined in the configuration. You can load the next block of objects
windream web portal pro
27
by clicking link next <n> hits, or you can change the number of objects
presented by entering another number under Maximum number of
blocksize in the search options.
You can also save the query as search profile in order to use it again
later.
Fulltext search via index search
In order to conduct a search with free expressions via index search, you
select entry Fulltext from the category Fulltext of the Index search. A
fulltext search can be conducted with the help of this index field, or the
fulltext search can be connected with the index search. Search
expressions entered in the text box will be found in the fulltext of
stored documents. The search expression consists of the words to be
found or fragments of words and the possible operators like AND or
OR.
How to conduct a fulltext search with the index search
1.
2.
3.
4.
Click the icon of the index search
.
Select the desired entry from the dropdown list Object Type.
Select index Fulltext from the dropdown list of the categories.
In the dropdown list, determine in which fulltext a search shall be
executed.
5. Click button
to add the selected index to the list of search
expressions.
6. Determine the desired operator via dropdown list Condition.
7. Enter the search expression to be used for searching in the
document fulltext in field Value.
8. Repeat steps 3 to 7 until all desired search expressions are
determined.
9. If necessary, change the evaluation order by setting brackets in the
respective columns (optional).
10. If necessary, change the linking operator with which the lines shall
be connected (optional).
or in the
11. Determine the options for the search via icon
configurations on the search options page. This depends on the
question whether the conditions shall only be valid for the current
search or for all searches (see chapter "Editing options for the
current search", p. 15). E.g., enable the respective checkbox, if
previous versions shall also be included or if the search shall be
executed as case-sensitive search (optional). If the search shall be
conducted from a specific folder, you determine the folder as
starting point of the search and determine whether subfolders shall
also be included.
28
windream web portal pro
12. Click
to start the search.
The documents and folders found are presented in the result list. The
status bar of the list presents the number of objects found. At first, the
number of objects presented here corresponds to the number
determined in the configuration. You can load the next block of objects
by clicking link next <n> hits, or you can change the number of objects
presented by entering another number under Maximum number of
blocksize in the search options.
You can also save the query as search profile in order to use it again
later.
Working with search profiles
User-defined retrieval processes of the search functions can be saved as
profiles without results. Then, all search criteria entered and their links
will be saved in a file. The stored search profiles can be loaded and
used again in the respective search function.
you can determine the search options for each search profile like for
example the consideration of case-sensitive search or the determination
of the start folder.
The search profiles are stored by the system in a user-defined folder of
the windream Webserver.
You can also store the profiles as an addition to the respective search
functions in windream or also send emails.
Search profiles are considered as private and are thus only available for
the user who created them. Furthermore, only those search profiles are
available in a search function which have been created with the
respective search function.
Search profiles of the index search can be executed via the windream
searchlets on the portal site of windream web portal pro (see also
chapter "The Portal Site", page 110).
Save search profile
You can save the current search profile for future retrievals with this
functions (icon ) after having entered the search expressions in one
of the search functions. The search expressions including selected links
and brackets will then be stored in a file with extension .wdf in a userdefined folder of the Server. Additionally, the specific or generally
determined search options will be saved with the search profile.
Determining options for the search
You can determine search options, e.g. determine the start folder from
which a search shall be started or determine whether a case-sensitive
windream web portal pro
29
search shall be conducted. These settings can be determined globally
for all searches on the configuration page of windream web portal or
also specifically for songle profiles in the respective search function
(icon ).
Open search profile
Stored search profiles can be loaded again for renewed retrieval
operations. Please note that the stored search profiles are only available
in the specific search function in which they have been created before.
Delete search profile
Search profiles can also be deleted if they will not be used any more.
Load search profile again
The current search profile can be loaded again via icon
.
Saving a search profile in windream and send it as email
Search profiles can be stored in windream (icon ). You can
determine, whether you also want to send a profile via email to make it
available to other users. In this process, the default email application
will be started, the URL of the search profile will be copied to the
message, and you can determine the receivers to which the profile shall
be sent.
Save search profile as (Download)
You can also save search profiles via download in a selected directory
of a local data carrier (click icon ). The search profile can be opened
and executed with a double click on the WDF file on a windream
Client Computer. Consequently, you can also make the profile available
for other users who access windream via a windream Client Computer.
How to save a search profile
1. Create the desired search profile with one of the search functions
or
).
( ,
2. Enter a name for the search profile.
3. Save the search profile via icon
.
How to open a search profile
1. Click the icon of the search function you want to use (
,
or
).
2. Select the search profile to be used from the dropdown list Open
Search Profile.
30
windream web portal pro
The search profile will be loaded and the search can be started via the
GO button
.
How to delete a search profile
1. Click the icon of the search function you want to use (
,
or
).
2. Select the search profile to be deleted from the dropdown list Open
Search Profile.
3. Delete the profile by clicking icon
.
How to determine the specific search options for a search
profile
1. Click the icon of the search function you want to use (
,
or
).
2. Select the desired search profile from the dropdown list named
Open search profile list.
3. Click the icon for editing the options of the current profile .
4. Determine the desired options here and save the settings by
clicking .
The settings are only valid for the current search profile.
How to load a search profile again
1. Click the icon of the search function you want to use (
,
or
).
2. Select the search profile to be used from the dropdown list Open
search profile.
3. Click the icon for loading the profile again
.
The search profile will be loaded again and the search can be executed
via the Start
button.
Storing search profiles in windream and sending them as
emails
It is possible to make search profiles available to other windream users
and to use profiles created by other users. For this, you can store
profiles in windream by yourself or also send the links to the profiles as
email.
windream web portal pro
31
In order to make a profile avilable to other users, you create and store
the profile in one of the search functions ( ,
or
). Then, you
save the profile in windream and send the link to the profile via email
to the desired address (icon ). The receiver can open the profile via
the URL and execute the respective search.
In order to be able to execute a search via the Hyperlink, the receiver
must be logged on to windream via the windream web portal.
How to store a search profile in windream and how to
send it as email
1. Click the icon of the search function you want to use (
,
or
).
2. Create a search profile or select a profile from the dropdown list
named Open search profile.
3. Click the icon for saving the profile in windream .
4. Select the windream target folder from the Copy window and click
.
5. If required, check the checkbox for replacing available objects and
/ or for including previous versions.
6. Check the checkbox for sending the profile as email, if you want to
send the search profile.
7. Click OK. The search profile will be stored in windream.
8. Close the window.
If you have enabled the option to send the profile as email, the default
mail application will be started now, a new message will be opened, the
URL of the search profile will be inserted and you can determine the
receivers to which the profile shall be sent.
Save search profile on data carrier (Download)
Create and save the respective profile in one of the search functions
( ,
or
). The download is executed after having clicked the
icon for downloading a profile .
The file saved on the selected data carrier can be used for future
retrievals from a windream Client, or you can make it available to other
users via e-mail. Receivers can open and launch the profile with a
double click.
In order to execute a retrieval over the search profile, receivers must be
able to access windream via a windream Client.
32
windream web portal pro
The result list
Retrieval results are displayed as a survey in result lists. Documents can
then be selected for being viewed, downloaded, checked-in or –out,
moved, copied or deleted.
You download the document and open it with the original application
by double clicking a document entry.
The number of objects found (documents and folders) is displayed in
the status bar of the list. If no objects are found that would match the
search criteria, you should further specify the criteria and start the
search process again. This should also be done if the number of hits is
too big.
The number of hits displayed corresponds to the number determined
in the Maximum Blocksize option of the configuration.
next <n> hits or all hits
If the number of objects exceeds the determined blocksize, you can
load the next block by clicking next <n> hits. All documents found will
be displayed via the link to view all hits. Please note that this process
may take some time, depending on the number of hits.
The documents and folders found are displayed in the result list with
their file- or folder name. In order to display further index data
(columns) in the list, you can change the presentation of the result list,
meaning the type and number of columns displayed.
Change presentation of result list
The types and the number of columns displayed can be set individually.
You can determine up to ten additional columns which are displayed in
the result list.
In order to configure columns, you switch to the configuration of
windream web portal pro by clicking icon
"Configuration", page 95).
(see chapter
Change sorting of the list
The list can be sorted by clicking the desired column header, which will
sort the list according to the respective criterion. The selection can be
reversed by clicking once again.
Download documents
You can download documents in order to view or edit them. The
following methods are possible:
windream web portal pro
33
•
Open files directly from their current place of storage (via filename
link or document preview
);
• Store files on an external data carrier outside the DMS (via one of
the icons Save as
or
).
A private directory will be created for each user on the Webserver
(TMP directory). This directory is created after logon to windream and
deleted after logout or after a time-out.
When downloading, files from windream will first be placed in this
directory of the Webserver. Objects will then be downloaded from
there.
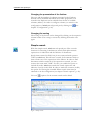
Figure 17: Download files
Viewing documents (download via filename)
A document can be opened by clicking the respective document entry
in the result list. You can use the link to a document (column Filename)
as Hyperlink and for example place it on the Desktop with drag and
drop. The respective document can then be downloaded with a double
click via the Desktop.
34
windream web portal pro
Saving documents on a local data carrier (download via
Save as icon)
You can save documents in a selected destination folder on a local data
, several
carrier. Single documents are saved by clicking icon
selected documents or a folder are saved with icon
.
After a click on one of the icons
or
in the Explorer listview, the
file download windows will be opened. The download process can then
be started for the previously selected objects.
Note: If the option for opening the file from its current place of
storage is selected, it may happen that the dialog for file download
will be displayed once again. In order to avoid this, you will have to
select the respective filetype from the folder options of the
Windows Explorer and disable the option for confirming the
opening of the file after download.
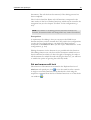
Download of several objects
There are different possibilities for downloading several objects
simultaneously. You either select the desired objects in the list and
execute the download process via icon
from the column header,
or you select a folder and click on icon
in column
.
If you select several objects for download, these objects will first be
compressed. The selected objects will be collected in a ZIP-file (default
name is download.zip) and will be saved in the selected
destination folder. windream web portal will display a respective
message which must be confirmed.
Figure 18: Compress all selected objects for download
After the download process has been finished, you extract the objects
from the ZIP-file. The documents will then be available for editing.
However, it is not possible to edit or change the document properties
outside the DMS.
Downloaded files can be uploaded again (see also chapter "Create New
Objects (Upload)" page 46). However, this is only possible if you have
windream web portal pro
35
a full access licence for windream web portal pro and the respective
rights for changing documents stored in the DMS.
Note: Please note that all files of a folder selected for a download
including optional subfolders are collected in a download file.
Downloading folders is executed recursively.
Configurations for Download
In order to change the preset name of the download (ZIP-) file or to
determine further options for the download, you switch to the
configurations with icon
and select the page for configuring the
download (see chapter "Configuration", page 101).
Opening a folder
A folder can be opened with a click on the respective folder entry in
the result list. The contents of the selected folder are displayed in a
separate browser window. The link to a folder (column Filename) can be
used as a Hyperlink. You can place this link on the Desktop with drag
and drop and open the folder from there with a double click.
Document preview
A preview is possible for certain filetypes in a separate browser
window. The preview icon
of an entry in the respective line
indicates which files can be previewed. In order to enable the preview,
icon of the respective entry in the list. The document
you click the
will then be displayed in a separate window. You can use the link on a
document preview as a Hyperlink and place it on the Desktop. Then,
the preview can be opened directly with a double click.
36
windream web portal pro
Figure 19: Document Preview
Viewing and editing fulltexts
Different fulltexts may exist for each document. There is a
differentiation between the following types of fulltext:
Extracted fulltext
• Manual fulltext
• fulltext from fulltext-searchable index fields
• Extended (private) fulltext.
•
The generation, acquisition and editing of fulltexts is either executed
automatically by the windream services (windream fulltext indexing
service, windream DMS-service) or manually via tab pages Fulltext or
Indices of the file properties.
You can execute a search for documents via text elements contained in
the fulltexts and conduct a search via all fulltexts or a specific fulltext
type.
In order to view or edit the fulltexts, click the Fulltext
icon or the
Properties icon
in the column of the same name. The fulltexts are
displayed on the respective tab page in the window of the object
properties.
windream web portal pro
37
Note: Fulltext can also be created for folders. Thus, you can
acquire and edit manual fulltext via the folder properties. Contents
entered as index criteria in fulltext-searchable index fields will also
be extracted and saved. In addition to this, it is also possible to
acquire private fulltext when editing the index properties.
The display and editing of the different fulltexts for folders is the
same as for documents.
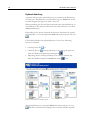
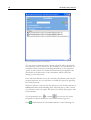
Extracted fulltext
The document fulltext can be extracted from original files stored in
windream, and the fulltext is generated with the windream fulltext
indexing service. After each change of the original files, the fulltext
generation will be started again. The fulltext creation is executed
asynchronously meaning not equal in time with the file storage in the
DMS. The fulltext indexing service searches for new or modified
documents in the database and in specific periods of time. Fulltext will
be created for these documents.
Figure 20: Extracted fulltext
38
windream web portal pro
Manual fulltext
It is also possible to acquire further fulltext as manual fulltext of a
document. This kind of fulltext will not be created by the windream
fulltext indexing service, but is entered manually via the Fulltext tab
page of the document properties or via a respective interface function.
Manual fulltext will not be deleted or changed automatically, if changes
have been made on the original document. Changes must be made
manually. Changes on the manual fulltext are made via the fulltext tab
page of the file properties or via interface functions.
Figure 21: Manual fulltext
Fulltext-searchable index fields
Further on, documents can be indexed via so-called fulltext-searchable
index fields. These index properties are marked as fulltext-searchable
when defining object types in the windream Management Console. The
contents of these index fields is additionally extracted as fulltext. The
fulltext or fulltext-searchable index fields will be updated by the
windream service after changes on the index fields have been made.
This fulltext can be viewed via the fulltext tab page of the file
properties.
windream web portal pro
39
Figure 22: Fulltext-searchable index fields
Extended (private) fulltext
It is also possible to acquire extended (private) fulltext for documents
of specific document types (windream Business Edition required).
Thus, a fulltext index must have been created in the WMC, which will
then be assigned to a document type as a document type-specific index
field. This fulltext, like other object type-specific index properties, is
acquired and edited via the index tab page of the file properties.
Changes on the extended fulltext will only be updated after a respective
modification in this field via the indices tab page of the file properties
in the DMS.
Ho to acquire manual fulltext of a document
1. Open the properties by clicking
of the desired object and switch
to the fulltext tab page.
2. Select entry Manual fulltext from the dropdown list.
3. Add the text (manual or via clipboard) which shall be acquired as
manual fulltext.
4. Click
.
Manual fulltext can also be acquired via interface functions.
40
windream web portal pro
How to acquire fulltext in fulltext-searchable string fields
or extended fulltext of a document
The acquisition and editing of fulltext from fulltext-searchable index
fields and the extended fulltext is executed via the indices tab page of
the file properties when indexing documents.
1. Open the file properties of the document for which the fulltext
2.
3.
4.
5.
shall be acquired manually by clicking
.
Switch to tab page Indices.
Select the desired object type from dropdown list Object type.
Enter the index data in the object type-specific index fields.
If the object type provides a field for acquiring extended fulltext,
enter the text to be used as manual fulltext there.
6. Click
to save the entries.
Viewing document properties
Via the properties icon
of a list entry, you can view and edit the
document or folder properties of a selected object.
Figure 23: Object properties
windream web portal pro
41
Indices
In order to view and edit index data, you switch to tab page Indices.
However, indices can only be changed if you have the right to edit and
modify the respective document (see also chapter "windream rights",
page 62).
The indexing of new objects or existing objects without indices is also
executed in this window (see also chapter "Indexing Objects", page 58).
The index fields can be placed on several tab pages (named Indices 1,
Indices 2 up to Indices n). The single pages are selected via the respective
link on the tabs. The number of tabs per line can be determined in the
configuration.
Figure 24: Tab page Indices
Version
Several document versions can be administered in windream. A new
version of a document is a copy of the original document with an
ascending linear number. Always the current version of a document is
available. Previous versions are automatically equipped with the Hidden
attribute by the system, and they will only be displayed in the Explorer,
if the respective option has been set.
42
windream web portal pro
The current version, the version number, and the previous versions of
a document can be viewed via the respective tab page.
A retrieval may also include previous versions of documents.
New versions are created via function Create new version
or
optionally when checking in documents, or during an upload of files.
Figure 25: Tab page Version
History
A history is written for each document and folder in the windream
drive. The history gives a detailed overview on the creation and
modification of objects. It can be viewed via tab page History.
Adding a history entry
In addition to the entries created by the system, you can also add your
own entries. A basic requirement is that you have the right for changing
the document or folder.
windream web portal pro
43
Figure 26: Tab page History
How to add an entry to the history of a document / folder
1. Open the properties of the desired object via icon
to tab page History.
2. Enter the comment for the history in field Add.
3. Confirm your entry with
and switch
.
Life-cycle
The life-cycle function integrated in windream allows to automatically
administer life-cycle data of documents stored in the DMS, beginning
with the date of creation until final deletion from the archive. The data
of the life-cycle of a document can be viewed via the respective tab
page.
44
windream web portal pro
Figure 27: Tab page Life-Cycle
Rights
The access rights of a document or a folder can be viewed by enabling
the respective tab page. The existing user accounts and groups are
listed there with their assigned access rights. If the checkmark in one of
the columns (read-only, write, rights) is enabled, the respective right is
set for the group.
If you or the group in which you are member has the right of changing
the document rights, you can edit the access rights (see also chapter
"windream rights", page 62).
windream web portal pro
45
Figure 28: Tab page Rights
46
windream web portal pro
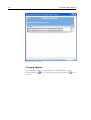
Creating new objects (upload)
You can save new objects in windream via upload. You can import
files and create new folders in the windream drive. Additionally, it is
also possible to index new objects directly after having saved them.
A new folder is created via icon
. windream web portal offers
different possibilities for importig files:
To import single files into windream via function New file
(see
chapter "Create new file (icon New file)", p. 49) or
• to apply several files simultaneously with drag and drop from the
•
Windows Explorer via the Upload
the Upload icon", p. 52).
icon (see chapter "Upload via
Requirement for an upload via Drag&Drop(function Upload)
An upload via drag&drop or via a dialog by clicking the
icon
(Microsoft Web Publishing ActiveX) is only possible with Microsoft's
Internet Explorer. Netscape cannot display any ActiveX components.
Note: If you use Microsoft Internet Explorer and if the upload
icon
does not occur in the windream icon bar, this may have
different reasons. Either, the option for viewing the upload Control
has not been enabled in the configuration on the page for
configuring the navigation bar, or Microsoft Web Publishing
Wizard is not installed. In this case, ask your system administrator.
Creating a new folder
In order to create a new folder, you first switch to the hierarchic search
(Explorer). In the Explorer view, you select the destination
directory and click the New folder
icon.
windream web portal pro
47
Figure 29: New Folder
Create folder
Via the properties icon
in column
you can view the folder
properties of the destination directory. Enter the name of the new
folder in the respective field and click .
48
windream web portal pro
Figure 30: New Folder Created
Index folder
You can index the folder via the link in column Object or via the
in column
. You can also view and edit the
properties icon
folder properties (for example add a history entry or assign access
rights).
In case an error occurs, a message will be displayed in the column of
the Error Description.
How to create a new folder
1. Click the icon of the hierarchic search
(Explorer).
2. In the Explorer view, select the folder in which the new folder shall
be created.
3. Click the icon New folder
.
4. Enter the name of the new folder in window New folder.
5. Click
to create the folder in the determined directory.
The new folder will be displayed as a link in the list. Via this link or via
the folder properties (icon Properties
) you can index the folder.
windream web portal pro
49
Creating a new file (icon New File)
In order to create or import a new file in windream via icon
in
windream, you first switch to the hierarchic search
. Select the
destination directory in the Explorer view. Via icon
new file into the DMS.
, you import the
Figure 31: New file
Select file
Via the properties icon
in column
properties of the destination directory.
, you can view the folder
You select the desired file on the data carrier using command button
Browse.
Click
to determine the options for uploading the file in the
following window.
50
windream web portal pro
Figure 32: Uploading a new file
You can enter a comment in the respective field. The comment will
then be saved in the history.
Via checkmark Replace existing objects, you determine whether already
existing objects will be replaced or not. As a further option, you can
also create a new document version when uploading a file (checkmark
New version).
to execute the download process and to save the file in
Click
windream.
windream web portal pro
51
Figure 33: New file created
The process is logged in the report window. A line with the filename,
the status, and an error description will be edited. If an error occurs,
the entries will be displayed in the status and the error description
column.
Index file
Via the link in column Destination Directory or via the properties (icon
) in column
Properties
and edit the file properties.
, you can index the file or you can view
How to create a new file (icon New File)
1. Click the icon of the hierarchic search (Explorer)
.
2. In the Explorer view, select the folder in which you want to create
the new file.
3. Click icon New File
.
4. Enable the Browse button and select the file on the data carrier
which you want to save in windream.
5. Click
in window New File.
6. Enter a comment in the following window (optional).
52
windream web portal pro
7. Enable the respective checkmark if you want to replace existing
objects.
8. Enable the New Version checkmark to create a new version of the
document
9. Click
to save the file in windream.
The new file will be displayed as a link in the list. You can index the file
over this link or via the file properties with button
.
Note: If you use Microsoft Internet Explorer and Microsoft Web
Publishing ActiveX is installed, you can also execute an upload
process via drag and drop from the Windows Explorer by clicking
the Upload
icon in windream web portal pro. Using this
method, it is also possible to import several files at the same time.
Upload via the Upload icon
With the Upload
function, you import files via drag and drop or in
a dialog-oriented way from the Windows Explorer via the upload
directory into windream. Via the upload function, you can create new
files in windream or check in files again which have been checked out
previously. An upload process can be started for a single or for several
files simultaneously. A requirement is that you use Microsoft Internet
Explorer and that the upload control page is visible, which must have
been configured on the configuration page of the Toolbar (see chapter
"Toolbar", p. 105).
windream web portal pro
53
Figure 34: Importing files via the upload function
How to import files via drag and drop with the Upload icon
1. In windream web portal, click the icon of the hierarchic search
.
(Explorer)
2. In the Explorer view, select the folder in which the files shall be
placed.
3. Select the files to be stored in the Windows Explorer.
4. Drag the files on the Upload
icon in the icon bar of windream
web portal pro.
5. Enter a comment in the file upload window (optional).
6. Check the box for replacing available objects, if available objects
shall be overwritten in the destination folder, and check the box for
the new version, if new versions of the documents shall be
generated.
7. Check the box for checking in files which have previously been
checked out, if you want to check in documents, and click the
checkmark for new version, if you versions shall be created on
check-in.
8. Select the files to be imported in the Filename column.
9. Click
to save the files in windream.
54
windream web portal pro
Upload directory
A private directory (the upload directory) is created on the Webserver
for each user. This directory is created after logon to windream. It will
be deleted again after logout or after a time-out.
When uploading, the files will first be placed in the upload directory on
the Webserver. The objects will then be moved from there to the final
windream directory.
Depending on the action executed, the directory will either be opened
automatically, or it can be opened in windream web portal pro via icon
.
Files will be placed in the upload directory if one of the following
actions is executed:
•
Creating a new file
•
Checking files in
or
via drag and drop or in a dialog-oriented way
from the Windows Explorer by clicking icon
.
• Importing objects via drag and drop or in a dialog-oriented way
from the Windws Explorer in windream via the
icon.
Figure 35: Saving files in the DMS (upload)
The upload directory is opened in windream web portal pro via icon
. The files stored there are displayed in a browser window. Specific
windream web portal pro
55
options can be determined for the file storage in windream (for
example creating new versions).
Additionally, you can also store all objects in windream or single
objects only.
Figure 36: The upload directory
The destination directory is displayed in the upper list. In the lower list,
objects are listed which have currently be placed in the upload
directory. Objects will be displayed with filesize, date, and time of the
upload. All or single documents can be selected from this list in order
to store them in windream.
Via icon
in column
you can view the object properties of
objects in the destination directory and edit them.
You can enter a comment in the respective field. The comment will
then be saved in the history.
You can determine whether existing objects will be overwritten in the
destination folder, or whether checked-out documents are to be
checked-in again.
A further option is to create new versions when uploading files.
56
windream web portal pro
Click
to store the selected objects in windream.
The process is logged in the report window. A line with the filename,
the status and an error description will be edited. If an error occurs, the
entries will be displayed in the status and the error description column.
Index objects
Via the link in column Destination Directory or via the properties (icon
Properties
) in column
and edit the file properties.
, you can index the file, or you can view
windream web portal pro
57
Editing documents
Stored documents can be edited via windream web portal pro. The
modification of the original files is executed with the registered original
application after a file download. Modified documents are stored in
windream again via upload.
When editing documents, copies of the respective documents can be
ex- and imported from/into the DMS, they can be checked out and
checked in again.
In addition to this, documents can also be locked for editing
exclusively. This way, documents will be locked for other users and can
be edited in the DMS directly. After having finished the document
modification, the edit lock will be removed again.
Index data of documents and folders can be acquired for new objects
or changed for existing ones (tab page Indices in the window of the
object properties).
Further on, new versions can be created with windream web portal
pro. The administration of versions allows to administer current
versions and previous versions.
The administration of rights allows the assignment of access rights on
documents and folders on user and group levels (tab page Rights in the
window of the object properties).
The histories of documents and folders in the windream drive present
a detailed overview on creation and modification date, which can be
viewed and extended via tab page History in the window of the object
properties.
Objects can be copied, moved, renamed or deleted from the database
with the functions of the icon bar in windream web portal pro.
In addition to the display of the fulltexts and the contents of fulltextsearchable index fields, further fulltexts for documents can be acquired
manually.
Selection of documents and folders
The selection of documents and folders to be edited is either executed
from the listview of the Explorer (icon
) or from a result list which
has been created with a search function of windream web portal pro.
Specific editing processes can be executed for several objects at the
same time, while others can only be executed for one object at a certain
point of time (for example renaming or all functions concerning
properties). Documents and folders for which an action cannot be
executed (as the requirements like access rights are not fulfilled) will be
58
windream web portal pro
excluded from editing. Respective notes can be found in the report
window of windream web portal pro.
Reporting editing processes (report window)
Specific editing processes will be logged. The result is displayed in a
report window after having finished the process. Information on the
type of process, the procedure and the status will be viewed. If errors
occur, error descriptions will additionally be displayed.
Requirements for editing objects
Access rights
A basic requirement for all editing processes is that you have the
necessary rights. A document can only be changed, if a user or the
group to which he belongs has been equipped with the right of
changing the document. This is also valid for changing index data, for
creating new versions or for changing the rights.
Lock document for editing
Documents will be locked for being edited by windream under certain
circumstances. This ensures that only one user will get access for
editing a document. All other users can only read the document during
this period of time, but they cannot change it.
Indexing objects
When stored in the DMS, all objects will be equipped with object
related index properties, like date, version, object type or keyword,
according to which they can be retrieved in the database or in the
windream archive.
In this context, there is a differentiation between system properties
which are valid for all objects in the Windows operating system, and
the DMS-specific properties, for example object type and object typespecific index properties.
The system properties are automatically generated when an object is
stored in windream. The DMS-specific indexing is executed via tab
page Indices in the object properties (icon
).
You can index objects either directly after having acquired them in the
DMS, or later. This means that index properties are added to the
system-specific properties (assignment of an object type).
A post-indexing of documents or folders can be executed any time
after documents have been stored in the DMS.
windream web portal pro
59
Additionally, already stored index information can be edited. This is
only valid for object type-specific indices. An object type which has
been assigned cannot be changed later.
A detailed description on indexing objects is presented in the
description of the windream Client named "windream User Manual".
Acquiring or editing indices
In order to acquire or change indices, you open the object properties
from a report window, in the listview of the Explorer or from a result
list. Thus, click icon
in column
Then, you open the indices tab page.
of the respective object.
The desired object type can be assigned to an object via the dropdown
list box Object Type. After that, you enter the index data into the fields.
The index data of objects that have already been assigned to an object
type can be edited. However, it is not possible to change the object
type itself.
Figure 37: Indexing objects
The object type-specific index properties will be displayed in the
window after having selected the object type. Depending on the object
60
windream web portal pro
type, the type, the number and the position of index fields may change.
The indices can be placed on several tab pages. The respective pages
are opened via the respective link for the tab. The number of tabs per
line can be determined in the configurations.
Figure 38: Indexing objects – enter index data
Enter the index data into the fields and save the data by clicking
.
Input fields
Fields can also be alpha-numeric, numeric or date fields in which only
specific entries can be made.
Mandatory fields
Input fields can be mandatory, meaning that an entry is required here.
If those fields are not filled correctly, windream web portal pro will
display a respective message. Additionally, mandatory fields are
equipped with a special color in the properties dialog.
windream web portal pro
61
Editable once
Input fields can also be defined as editable once only. In this case, you
can only edit and fill the field once. Afterwards, the field will be in
read-only mode. Later changes are not possible.
Fulltext fields
Input fields can be fulltext fields in which the text entered is acquired
as extended fulltext. Via these index fields, you can make a retrieval
with the respective fulltext search routines. Additionally, specific index
fields can be marked as fulltext-searchable, independent of their
assigned object type. The contents of these fields is additionally
extracted as fulltexts and will be considered during a respective search.
Lists (tables)
Input fields can also be created as lists or tables. Entries can be
acquired and edited line by line according to the data type of the table.
New lines for further entries are added via the respective icons in the
title bar of a list, or existing contents can be deleted. The lines marked
in the Add column are applied as index data As input help, dropdown
lists can be made available:
Lists, groups of radio buttons or checkboxes with
multiselection
Documents can also be indexed via a selection of entries from listfields
(comboboxes) or from groups of radio buttons and checkboxes. A
multiselection is also possible, if it has been defined respectively.
Dropdown comboboxes offer the opportunity to acquire further
entries in addition to the existing ones.
Presettings or dropdown lists
As input help, fields can contain presettings, for example as dropdown
lists from which entries can be applied.
How to index an object
1. Select the object for which you want to edit the index data (in a
report window, in the Explorer listview
2.
3.
4.
5.
or in a result list).
Click the Properties icon
.
Switch to tab page Indices.
Select the object type from the dropdown list Object Type.
Enter the index data into the fields.
6. Click icon
to save the entries.
62
windream web portal pro
windream rights
The administration of rights in windream is based on the user and
group concept of Windows NT. The NT users and groups and the
group membership of users are determined in the Windows NT user
administration. The classification of users and groups as windream
users and groups and their administration is executed over the
windream Management Console (WMC). A description of the user
administration of Windows NT can be found in the windream user
guide.
The access rights of windream users and groups (read, change, assign
rights) to documents and folders are administered over the tab page
Rights of the object properties.
The assignment of access rights is executed by assigning users and
groups with the respectively set rights to selected documents and
folders.
Access rights can be extended or restricted at the workstations. A
requirement is that the user himself or a group in which he is a member
has been equipped with the right of changing the rights on the
respective object.
The rights assignment via windream web portal pro is always executed
for the currently selected object.
Rights on new objects
windream will first assign the rights of the parent folder to new
documents (and folders). These rights can be extended or restricted
later. If you change the rights on a folder in which documents have
already been created, these changes will not be applied to these objects
automatically.
Note: Documents stored in a folder on which a user or a group
does not have reading access will be found in a search process, if
the user / the group has the right of reading on the respective
documents. These documents can be viewed from the result lists.
They will not be displayed in the Explorer listview.
Editing rights
In order to view or edit the rights on an object, you open the object
properties via icon
and switch to tab page Rights.
windream web portal pro
63
Figure 39: Administering rights – tab page Rights
The users and groups are listed with their assigned rights. They are at
least equipped with the right of reading.
The icon in column Group indicates whether the entry represents a user
or a group (
user;
group).
The login name for users and the group name for groups is presented
in column Name. The complete user name is listed in column
Description. The Domain column contains the name of the domain on
which the user and group accounts have been registered.
Columns Read, Write and Set Rights are designed for displaying and
assigning the respective rights. The respective right has been set, if the
checkmark is enabled in one of the columns.
Note: At least one user or one group must have the right for
changing rights and thus for reading in each folder of the windream
drive.
Assigning rights
You can change the rights on a document or a folder for all users and
groups (also in groups which you are not assigned to), if you or a group
you belong to has been equipped with the right of changing rights on
the document / folder.
64
windream web portal pro
Assigning rights can be executed by:
the assignment of users or groups with respective rights to the list of
right holders via icon
or
• the extension or restriction of rights of already assigned users and
groups via checkmark on tab page Rights.
•
Adding users and groups
In order to add further right holders to an object, you select the object
from the result list or from the Explorer listview via icon
you open the object properties (icon
page Rights.
) and click icon
. Then,
on tab
Figure 40: Select users and groups
Display user groups
The domains of the NT Server are displayed in the dropdown list box
Look in. The list contains the windream Server and all domains that are
known to the windream Server (see also topic "User and Group
Administration" in the windream user manual).
The list can be restricted to a selected number of users and groups by
choosing a domain. After a search, which is executed via icon
, the
user groups registered on the selected domain will be displayed.
windream web portal pro
65
Show user
This checkmark decides whether all users registered on the domain are
displayed in addition to the groups (checkmark enabled). As default,
the checkmark is disabled.
Note: The time needed for searching and displaying the users
depends on the number of registered user accounts.
Filtering function
The filtering function will further restrict the contents of the list. When
entering a value in the column headers, the list will only show elements
that correspond to the value. Values can be entered in several columns
in order to restrict the list. You can enter alphanumeric characters.
Wildcards (* and?) are supported. Entering * will find all available
elements of a column.
Execute the filtering process by clicking
value.
after having entered a
Select users and groups and assign rights
button will add the users and groups including the
Clicking the
assigned rights to the list of right holders on tab page Rights of the
object properties.
If you select a user or a group who / which has already had rights on
the documents or folders, he / it will get the currently assigned rights.
Save access rights
Changed access rights are saved via icon
on tab page Rights.
How to add a new user / a new group
1. Select the object to which access rights for new users or groups
shall be assigned in the Explorer listview
or in a result list.
2. Click the properties icon
.
3. Switch to tab page Rights.
4. Click the icon for selecting users and groups .
5. Select the desired domain in dropdown list box Look in.
6. Enable checkmark Show user, if all users of the selected domain shall
be displayed in addition to the groups.
7. Click
.
8. Enable the checkmarks for the rights of users which shall be
assigned.
9. Click
to apply the users and groups into the list of right holders.
66
windream web portal pro
10. Click
to save the changed access rights.
Removing users and groups
Assigned users and groups can be deleted by removing all their rights
on tab page Rights. After that, you save the changes via button . The
respective users and groups will be removed from the list of right
holders.
Note: At least one user or one group must always have the right
for assigning rights and thus the right of reading each folder /
document in the windream drive. If you try to disable all rights for
all users and groups, windream web portal pro will display a
respective message.
Editing rights of assigned right holders
You can change the existing access rights of users and groups on an
object. The restriction or extension of rights of already assigned users
and groups is executed via the checkmarks on tab page Rights.
Creating a new version
In windream web portal pro, you can create new versions of
) will first create a copy of the
documents. This function (icon
document with a version number "+1". The copy is stored in the same
directory as the original document, with the same name, rights, history,
and properties. The fulltext will be regenerated for the new version.
The creation date and a message displaying that this version was
created from a previous version will be entered as first entry of the
history.
The file attribute Hidden is attached to the previous version, and it will
be set into the read-only mode. An entry with information on user,
date, and time of the new version will be added to the history of the
previous version. Previous versions cannot be changed any more.
In order to be able to create a new version, you must have the right for
changing the document. A new version cannot be created from a
previous version.
The current version, the version number, and the previous versions of
a document can be viewed via tab page Version of the object properties
using icon
.
windream web portal pro
67
In order to create new versions of files, you select the desired objects in
the Explorer listview
bar.
or in a result list and click icon
in the icon
Figure 41: Create new version
The selected objects are displayed in the list. The properties of the
selected objects can be viewed and edited via icon
in column
.
It is possible to include subfolders when enabling the respective option.
New versions are created after having clicked icon
.
68
windream web portal pro
Figure 42: Create new version - report
The process is logged in the report window. A line with the filename,
the status, and an error description will be edited. If an error occurs
with one of the objects to be processed, a respective message will be
displayed in column Error description. The report window can be closed
by clicking .
How to create a new version
1. Select the documents for which a new version shall be created in
the Explorer listview
or in a result list.
.
2. Click the icon for creating a new version
3. Enable checkmark Include subfolders (optional).
4. Click icon
in window Create new version.
5. Close the report window with icon
.
New version on check-in
It is possible to determine the automized generation of new versions
when documents are checked in.
On the one hand, it is possible to determine the automatic creation of a
new version on check-in, if this option has been set in the WMC for
documents of a certain object type.
On the other hand, the option can also be set manually for documents
of a different type on check-in. Detailed information can be found in
the descriptions of the windream user manual.
windream web portal pro
69
New version on file import
New versions can also be created when new files are imported
(uploaded).
Check-in and check-out documents
The Check-Out/Check-In function of windream web portal pro allows
to check-out documents from windream to a selected data carrier via
download and to check them in again after having finished the editing
process. Checked-out documents are only available for the user who
executed the check-out process.
), copies of the original files
During a check-out process (function
will be created in the check-out directory of the data carrier. The
original documents in the DMS will be locked. Other users can only
read the documents as long as they remain checked-out. Documents
locked are displayed in red letters in the listview and are marked as
locked in the respective column.
Note: Only the contents of a document that is checked-out can be
changed. You cannot change DMS-specific properties (like indices,
rights).
During the check-in process (icon
), the original files in windream
will be substituted by the modified files, the write protection mode will
be removed, and the documents will be available again for other users.
You can also undo a check-out process to cancel the changes you have
already made (icon
). The original file in the DMS will not be
substituted by the checked-out file, and the read-only mode will be
removed.
Entries are written in the history for each check-out and check-in
process of any document, containing information on user, date, time,
and a comment (optional).
Requirements
The check-out function can only be applied for documents and folders
which are not locked and on which you have the right of changing.
Read-only documents cannot be checked out, either. Nevertheless, in
order to also check out documents for which the read-only filesystem
attribute has been set, you will have to enable the option for ignoring
read-only flags during the check-out process.
70
windream web portal pro
Check-out documents
The selection of documents to be checked-out is executed in the
Explorer listview
or in the result list after a search. Single or several
documents can be checked-out via icon
.
Figure 43: Check-out objects
In the comment field you can enter a personal comment concerning
the check-out process or reason. This comment will be saved with the
respective entry in the history.
Via option Include subfolders it is possible to check-out complete folders
recursively. The check-out function will then be applied to the
documents within all subfolders. Directories will not be checked-out.
Note: The time needed for the download and the following upload
on check-in depends on the number and the size of the selected
files.
If also read-only documents shall be checked out (filesystem attribute
set), you will have to enable the option for ignoring the read-only
mode.
windream web portal pro
71
The option to only lock documents enables you to lock documents in
windream without downloading them. The undo check-out function
will remove the lock and the documents can be edited by other users
again.
Enable the option of the edit lock, if you want to edit selected
documents. The function corresponds to that of the list of further
functions which can be viewed in the navigation bar (see also chapter
"Toolbar" in the configurations, p. 105). A detailed description can be
found in chapter "Set edit lock for documents", p. 78.
The object properties of the objects determined for being checked out
can be viewed via the
Click
icon in column
.
and execute the download process from the following site.
Figure 44: Check-out Objects - execute download
The selected objects are listed. A line with the filename, the status and
an error description is displayed for each file to be checked out. If a file
cannot be checked out (for example due to missing rights), respective
entries will be edited in the status and the error description columns of
the objects.
You can edit and view the object properties via icon
.
in column
72
windream web portal pro
Documents to be checked out can either be separately downloaded via
the link on the filename or via icon
; or you collect several files for
compressing them as a ZIP file via icon
;.
Figure 45: Checking objects out – download completed
Note: By default, all documents to be checked out are highlighted
and will automatically be zipped in a ZIP-file before being
downloaded.
In the configurations
you can determine different options for
downloading files (see chapter "Configuration", p. 101).
Here, you also determine the maximum number of files to be
compressed in a ZIP-file and the maximum size of all selected
documents. If a download cannot be executed for all documents
due to the current document size, the application will generate a
respective logfile. In this XML-file, all documents are listed for
which a download could not be executed (up to 100 entries are
possible).
Check-out process completed
If the check-out process has been completed successfully, you can edit
the files and check them in into the DMS again.
Checked-out documents can be retrieved with the index search
the indices Checked-out or Checked-out by.
via
In the Explorer listview or in the result list, checked-out documents
can be recognized by red letters and a respective icon in column Locked,
if the listview has been extended by this column. The listview columns
can also be extended by the columns named Checked-out and
Checked-out by (see chapter "Configuration", p. 96).
windream web portal pro
73
Figure 46: Presentation of checked-out documents in the explorer listview
How to check-out documents
1. Select the objects to be checked-out in the Explorer listview
.
2. Click icon Check out
.
3. Enter a comment in window Check-out (optional).
4. Enable checkmark Include Subfolders, if folders shall be checked-out
recursively.
5. Check the box for ignoring the read-only mode, if also documents
shall be checked out for which the read-only flag has been set.
6. Click .
7. Select the documents in the Check-out window and either click on
the link or the icon
(single file) or icon
(several files).
8. Execute the file download via the respective dialog window.
The selected documents will be checked out into the determined local
directory and can be edited there.
Check-in documents
The check-in process is executed via icon
. Documents to be
checked in are selected in the Explorer listview
after a retrieval. When using the check-in function
be checked in file by file.
or in a result list
, documents will
74
windream web portal pro
Documents can only be checked in by the user who checked them out
previously. A check-out process executed by other users can be undone
by a system administrator via the windream Management Console. In
this case, changes will not be stored. Further information can be found
in the windream user manual.
Figure 47: Check in objects – select file
The file to be checked in is displayed in the list. The properties of the
object can be viewed when clicking the properties icon
in column
.
The file to be checked in is selected via the browse button.
Click
to determine the check-in options on the following site.
windream web portal pro
75
Figure 48: Check in objects – upload
You can enter a personal comment in the respective field. This entry
will be added to the document history.
A further option is to create a new version during the check-in process.
Click
to upload the file.
76
windream web portal pro
Figure 49: Check in objects – report
The process is logged in the report window. A line with the filename,
the status, and an error description will be edited. If an error occurs
with one of the objects to be checked in, a respective message will be
displayed in column Error description and in the status column.
The files can be indexed via the link in the object column or via the
in column
properties
properties.
. You can also view and edit the file
How to check in documents
1. Select the object to be checked in from the Explorer listview
in a result list.
or
2. Click the Check-in icon
.
3. Select the file to be checked in via the Browse button.
4. Click .
5. Enter an optional comment in the Check-in window.
6. If you do not want to overwrite the documents in the DMS by the
checked-in copy, enable the New Version button.
7. Click
.
8. Close the report window via icon
.
windream web portal pro
77
Undo check-out
Documents for which a check-out process shall be undone are selected
in the Explorer listview or in the result list after a retrieval process. The
Undo icon
will undo the check-out of one or several documents.
This function can only be applied for documents which have been
checked out by yourself. Check-out processes previously executed by
other users can be undone by a system administrator only via the
windream Management Console. Please read further information in the
windream Client description.
Figure 50: Undo Check-out
You can enter a personal comment on the check-out process in the
respective field. The entry will be added to the history.
It is also possible to execute the undo function recursively for
subfolders, if the respective checkmark is enabled.
You can view the object properties via icon
Click
in column
and execute the process on the following site.
.
78
windream web portal pro
Figure 51: Undo Check-out - report
The process is logged in the report window. A line with the filename,
the status, and an error description will be edited. If an error occurs
with one of the objects to be processed, a respective message will be
displayed in column Error description and in the status column.
Via the properties icon
in column
you can view and edit the
object properties, for example the indices or the access rights.
How to undo a check-out process
1. Select the objects for which the check-out shall be undone in the
Explorer listview
or in a result list.
2. Click the Undo button
.
3. Enter an optional comment in the Undo Check-Out window.
4. Enable the checkmark for including subfolders if the process shall
be executed recursively.
5. Click
.
6. Close the report window by clicking
.
Setting the edit lock
With this function, windream web portal pro enables users to
exclusively edit documents in the DMS (original files, index data and
document properties). Documents will be locked for other users, the
documents can be editrd in the DMS directly and can be unlocked
again after the editing process has been completed.
Documents with the edit lock flag will only be available to the specific
user who has locked them for editing. Other users can only the read the
windream web portal pro
79
documents. The edit lock can be removed, if the editing process has
been completed.
The Set edit lock and the Remove edit lock functions correspond to the
same entries in the list of further functions, which can be viewed in the
navigation bar (see also chapter "Toolbar" in the configurations, p.
105).
Note: In contrast to an editing process executed via check-out
function, documents which are changed this way cannot be undone.
Prerequisites
A requirement for editing is that you can access the DMS via an
Intranet and that you have entered the UNC-path in the configurations
(on the site for general settings), via which the Client has been
connected to the windream drive (see also topic "Miscellaneous" in the
configurations, p. 104).
Editing documents via the Internet is not possible with this function.
The editing function can only be used for documents which have not
been locked and on which you have the right of changing. In order to
edit documents for which the read-only flag has been set, you will have
to enable the option of ignoring the read-only mode.
Set and remove edit lock
The selection of documents is executed in the Explorer listview of
) or in the result list after a search.
windream web portal pro (icon
A single or several documents can be edited with a lock using the
respective command from the list of further functions or via the checkout window (
).
80
windream web portal pro
Figure 52: Setting the edit lock for documents
You can enter a comment in the respective field. It will be saved with
the respective entry in the history. It is possible to set the edit lock for
complete folders recursivley (including subfolders) via the respective
option. In this context, the function will exclusively be applied to the
documents in the directories. Only documents will be locked for
editing, not the directories.
If the edit lock shall also be set for read-only documents (read-only file
property has been set), you will have to enable the option for ignoring
the read-only mode.
With the option to only lock the documents you can lock documents in
windream without dowenloading them. The function to undo a checkout will remove the lock again, and other users will be able again to edit
the documents.
in column
you can view the object
Via the properties icon
properties of objects which have been selected for this process.
Click
and download the selected documents on the following site.
windream web portal pro
81
Figure 53: Open a document for editing
The documents selected will be listed. For each file to be edited, a line
with nthe filename, the status and an error description will be displayed.
If one of the selected files cannot be locked for editing (e.g. no right or
file has already been checked out), respective entries will be made for
the object in the status and error description columns.
You open the file in its originally associated application with a click on
the link. You can edit files and remove the edit lock again afterwards.
With the index search
you can retrieve the documents which have
been locked for editing via the flags and editor indices.
In the Explorer listview
or in the result list, you can identify the
documents which are locked for edting by the green presentation. In
order to detect the user who locked documents for editing in the
Explorer listview, you can extend the columns by the flags and the
editor columns (see chapter "Configuration", p. 95).
How to set the edit lock for documents
1. Select the objects to be edited in the Explorer listview (
result list of windream web portal pro.
) or in a
82
windream web portal pro
2.
3.
4.
5.
Click the Check-out icon
.
Check the box to set the edit lock.
Enter an optional comment in the Check-out window.
Click the option to include subfolders, if you want to execute the
functions recursively for documents in subfolders.
6. Enable the option for ignoring the read-only mode if desired.
7. Click .
8. In the Set edit lock window, click the links to open the documents
for editing.
Remove edit lock
Removing the edit lock is executed via the respective command from
the list of further functions or via the Check-in
window. The
selection of documents is executed in the Explorer listview (
result list after a search.
) or in a
The documents can only be unlocked by the specific user who had set
the edit lock before. documents which had been locked by other users
can be unlocked by a windream system administrator via the windream
Management Console. Changes which have already been made will be
applied. A detailed description of the administrative functions in the
WMC can be found in the windream user manual.
Figure 54: Remove edit lock
windream web portal pro
83
Check the box to remove the edit lock.
Figure 55: Remove edit lock
Enter an optional comment in the comment field. The comment will be
saved in the document history.
Via the option to include subfolders, you can finish the editing process
recursively for all documents in the subdirectories of the currently
selected folder.
84
windream web portal pro
Figure 56: Edit lock removed
Copying objects
Files and folders can be copied. Select the desired objects in the
Explorer listview
icon bar.
or in a result list and click the Copy icon
in the
windream web portal pro
85
Figure 57: Copying objects – select destination folder
At first you determine the destination folder (target path). On the
following site, you copy the selected objects to this folder.
86
windream web portal pro
Figure 58: Copying objects
The objects are listed in the upper list. The lower list presents the
destination directory (target path). Via the properties icon
in
you can view and edit the object properties of the
columns
selected objects and the determined target path.
Checkmark Replace existing objects determines whether existing objects
shall be overwritten in the target path or not (disabled). In this context,
you casn also decide whether possibly available previous document
versions shall be overwritten (option Include previous versions). In order to
copy files including index data, you select the respective option. Via the
option to apply the rights, you can set that access rights will also be
taken over.
Selected objects are copied via icon
.
windream web portal pro
87
Figure 59: Copying objects - reporting
The process is logged in the report window. A line with the filename,
the status, and an error description will be edited. If an error occurs
with one of the objects to be processed, a respective message will be
displayed in column Error description. The report window is closed via
the
icon.
Via the properties icon
in column
you can view and edit the
object properties, for example the indices or the access rights.
How to copy a file / a folder
1. Select the objects to be copied in the Explorer listview
result list.
or in a
2. Click the Copy icon
.
3. Select the target path in the Copy window.
4. Click .
5. Enable the checkmark for replacing existing objects, if existing
objects shall be overwritten in the target directory.
6. Select the option to include previous versions if previous versions
shall also be replaced.
7. Enable the option With index data, if you want to copy the files with
associated index data.
8. In the Copy window, click
directory.
to copy the selected files to the target
9. Close the report window via icon
.
88
windream web portal pro
Moving objects
Files and folders can be moved by selecting them in the Explorer
listview
or in a result list. Then, you click the Move objects button
in the icon bar.
Figure 60: Moving objects – determing the target path
At first you determine a target path. On the following site, you move
the selected objects.
windream web portal pro
89
Figure 61: Moving objects
The objects are listed in the upper list. The lower list presents the
destination directory (target path). Via the properties icon
in
you can view and edit the object properties of the
columns
selected objects and the determined target path.
Checkmark Replace existing objects determines whether existing objects
shall be overwritten in the target path or not (disabled). In this context,
you casn also decide whether possibly available previous document
versions shall be overwritten (option Include previous versions). In order to
copy files including index data, you select the respective option. Via the
option to include index data you can set that indices will also be moved
with the documents.
Selected objects are moved via icon
.
90
windream web portal pro
Figure 62: Moving objects - reporting
The process is logged in the report window. A line with the filename,
the status, and an error description will be edited. If an error occurs
with one of the objects to be processed, a respective message will be
displayed in column Error description. The report window is closed via
icon .
Via the properties icon
in column
you can view and edit the
file properties, for example the indices or the access rights.
How to move a file / a folder
1. Select the objects to be moved in the Explorer listview
result list.
or in a
2. Click the Move objects button
.
3. Select the target path in the Move window.
4. Click .
5. Enable the checkmark for replacing existing objects if existing
objects shall be overwritten in the target directory.
6. Enable the option to include previous versions, if previous versions
shall also be replaced.
windream web portal pro
91
7. Enable the option With index data, if indices shall also be moved.
8. Click icon
in the Move window to move the files to the
determined directory.
9. Close the report window by clicking
.
Renaming objects
In order to rename an object, you select the desired object in the
or in a result list and click the Rename Object
Explorer listview
icon. Enter the new name in the Object field. In order to be able to also
rename documents which are read-only (file attribute has been set), you
will have to enable the option to ignore the read-only flags.
Figure 63: Renaming objects
You can edit or view the object properties via icon
Click
in column
to rename the file.
The process is logged in the report window. A line with the filename,
the status, and an error description will be edited. If an error occurs
with one of the objects to be processed, a respective message will be
.
92
windream web portal pro
displayed in column Error description. You close the report window with
a click on .
You can view and edit the object properties via icon
in column
.
How to rename a file / a folder
1. Select the object to be renamed in the Explorer listview
result list.
or in a
2. Click the Rename
icon.
3. Enter the new name in the Rename window (field Object).
4. Check the box to ignore the read-only mode, if read-only
documents shall also be renamed.
5. Click
.
6. Close the report window via icon
.
Deleting objects
In order to delete objects, you select the desired objects in the Explorer
listview
or in a result list and click the Delete icon
.
windream web portal pro
93
Figure 64: Deleting Objects
The selected objects are listed.
With the option to also include previous versions, previous versions
will also be deleted. If you have select the option to include the
contents of folders, the selected folders and the contained objects will
be rmoved.
In order to be able to also delete read-only documents (file property
set), you will have to enable the option for ignoring the read-only
mode.
You can edit and view the object properties via icon Properties
column
.
The objects displayed can be deleted via icon
.
in
94
windream web portal pro
Figure 65: Deleting objects - reporting
The process is logged in the report window. A line with the filename,
the status, and an error description will be edited. If an error occurs
with one of the objects to be processed, a respective message will be
displayed in column Error description. The report window is closed via
icon .
How to delete a file / a folder
1. Select the objects to be deleted in the Explorer listview
result list.
or in a
2. Click the Delete icon
.
3. In the Delete window, enable the option to include previous versions to
also deleted the previous versions of the selected documents.
4. Enable the option to include folders, if selected folders incl. all
contained objects shall be removed.
5. Check the box to ignore the read-only mode, if read-only files shall
also be deleted.
6. Click
in the Delete window to delete the selected objects.
7. Close the report window via icon
.
windream web portal pro
95
Configuration
You can make personal settings in the windream web portal pro
configurations. Changed settings will only become effective after a
renewed logon to windream web portal pro.
Personal settings (windream web portal pro)
This site presents options for general and personal settings (for
example version number of windream web portal pro, the name of the
windream Server or the language version).
Figure 66: Configuration
Start view
Here, you select the site which is displayed after logon. Enable one of
the possible views and confirm the changes with command button Save.
Changed settings will only become effective after a renewed logon to
windream.
In order to discard changes, you enable the Reset button.
96
windream web portal pro
Figure 67: Configuration - Start view
Enable retrieval mode
If you have a full licence for windream web portal pro, you can switch
to the retrieval mode by enabling the respective checkmark. After
having enabled this option and a renewed logon, you will only have
access to the retrieval and Find functions of windream web portal pro
(see chapter "A survey", p. 1).
Listview
Here, you determine the type of presenting the result lists or the
Explorer listview
. You can also determine whether the listview will
always be refreshed automatically or not after file operations. You can
also determine the size of the thumbnails here.
windream web portal pro
97
Figure 68: Configuration - List view
Show hidden files and system-specific files
Via the checkmarks named Hidden files and System files you determine
whether files equipped with the respective attributes shall be displayed
in the Explorer listview or not.
Refresh listview automatically
The checkmark for automatic refresh determines whether the list will
automatically be refreshed after file operations. As default, the option is
enabled.
Note: Depending on the number of objects to be processed in a
file operation, it may be useful to disable this option in order to
increase performance.
Adjusting the presentation of the listview
On the one hand, specific default columns like Filename, Save as
,
Properties
, Preview
or Fulltext
are displayed in the
Explorer listview or in the result lists. You can determine the columns
to be displayed, however, certain views will not be available in the
listview.
In addition to these columns, you can determine up to ten further
columns (indices). The indices selected from the dropdown list boxes
(1 to 10) are presented in the order of the selection fields listed there.
In order to remove a column from the listview, you select the first
(empty) entry from the list box.
With the entry for the thumbnails, you configure a column in which the
thumbnails of documents are displayed.
98
windream web portal pro
Note: If you select the Object Path index as a column, this
column will only be displayed in a result list, but not in the Explorer
listview.
If you select entry Thumbnail for a column, please note that the
thumbnails can only be viewed with documents for which
thumbnails have been created. The generation is executed on the
windream Server by a system administrator.
Configuring thumbnail view and adjusting the presentation of
thumbnails
If you want to configure the thumbnail view in the Explorer listview
and in the result lists, you will have to select the column in which the
thumbnails shall be displayed (dropdown listboxes 1 to 10). Then, you
select entry Thumbnail from the list. Determine the size (width and
height) of the thumbnails and save the settings.
Note: Please note that the thumbnail view can only be executed
for documents, for which thumbnails have been created. The
generation is executed on a windream Server by a system
administrator.
How to determine the presentation of the result list or the
Explorer listview
of windream web portal pro.
1. Click the configuration icon
2. Open the Listview folder.
3. Select the index properties which shall be presented from the
dropdown list boxes.
4. Enable the checkboxes for the default dcolumns which shall be
displayed in the Explorer listview and in the result lists.
5. Enable the Save button at the bottom of the list to save the
changes.
The result lists and the Explorer listview will be presented as
determined.
In order to discard changes and to reset input fields, you enable the
Reset button at the bottom of the list. The previously determined
settings will be restored.
Search options
The search options offer additional options for specifying a retrieval.
The current settings are valid for all search operations. In addition to
this, specific options can be determined in the search functions, which
windream web portal pro
99
will then exclusively be valid for the current search (see chapter
"Editing the options of the current search", p. 15).
Changes can be saved by clicking the Save button.
In order to discard changes and to reset input fields, you enable the
Reset button at the bottom of the list. The previously determined
settings will be restored.
Note: When storing search profiles, specific search options will
also be saved as properties of the search profile (see chapter
"Working with search profiles ", p. 28). If no specific options have
been determined, the globally determined search options will be
valid here.
Figure 69: Configuration - Search options
Maximum blocksize for search results
Here, you determine the blocksize, or respectively the number of
objects to be loaded into the Explorer listview and into the result lists.
The number of objects in a block corresponds to the number which is
determined under Search options>Maximum Blocksize for search results. This
number also determines the number of objects to be loaded after
having clicked the command button for viewing the next block of hits.
Searching objects recursively from a specific folder
Via command button
you can determine a folder as the starting
point of a search process. The folder determined here will then be
displayed on the search options site. Here, you can also determine here
that subfolders will be included in a search process (checkmark
enabled). As default, this option is enabled.
100
windream web portal pro
Further options
You can also enable or disable the checkmarks for considering case
sensitive search and for including previous versions in a search.
Field separators for vector fields
When conducting a search via the contents of vector fields in the index
search
, several values separated by field separators will be entered
as search criterion. As default, the semicolon is used. You can
determine another separator here. All characters and strings up to 3
characters are possible.
Start fulltext search in
and in the quick search
, documents will be
In the simple search
found according to fulltext search routines. Thus, you determine the
fulltext to be searched in via dropdown listbox In. With option Start
fulltext search, you set the fulltext which shall be used as default.
Viewing the extended fulltext search term
This option determines whether the extended fulltext search expression
is displayed in the simple search
and in the quick search
or not.
By default, search expressions entered will be connected with operator
"OR" in search queries of the simple and the quick search, if a fulltext
search is executed. In order to find documents which contain all search
expressions, the items can also be connected with operator "AND".
For this, windream web portal pro offers the option named Include all
words. If this option has been switched on, windream will extend the
search term in the Find field automatically and will display the extended
expression, if the option for viewing the extended fulltext search
expression has been switched on.
Hide non-editable fields in searchlets
Enable this option, if only those fields shall be displayed in searchlets
(=search profile created with the index search), into which search
expressions must be entered (see chapter "windream searchlets", p.
111).
How to determine the blocksize for viewing objects from a
result list
1. Click the configuration icon
of windream web portal pro.
2. Open folder Search options.
3. Enter the desired blocksize in field Maximum blocksize for search
results.
4. Enable the Save button to save the changes.
windream web portal pro
101
How to determine a folder as starting point of a search
1. Click the configuration icon
2. Open folder Search options.
of windream web portal pro.
.
3. Enable command button Search in
4. Select the desired folder in window Search in.
5. Confirm the selection with .
6. In the window of the search configuration, you disable the
checkmark for including subfolders, if subfolders shall not be
considered.
7. Enable the Save button to save the changes.
The selected folder will be displayed on the search options site after a
refresh.
Include previous versions
This checkmark determines whether previous document versions are to
be included in a search or not. This option is disabled as default.
Consider case sensitive search
This checkmark determines whether small and capital letters will be
considered separately in a search process. This refers to the simple
search, the quick search, the index search, and the object type search.
When searching in the fulltext of documents, there will be no
differentiation between small and capital letters. This is also valid when
searching documents according to filenames (also in 8.3 format).
As default, this option is disabled.
Download
When downloading several objects, the selected files and folders will be
collected in a download ZIP-file. The respective configuration is
determined on this site. Changes are saved by clicking the respective
button.
Enable the reset button to discard changes.
102
windream web portal pro
Figure 70: Configuration - Download
Default filename
Enter the filename here, with which the file will be downloaded to the
determined directory (default: download). This name will only be
used if several files / folders are selected for a download. If you select
only one folder, the name of this folder will be used as default.
Options for compression (ratio)
The compression ratio is determined via the respective dropdown list
box. You can also determine whether the file shall be created as selfextracting EXE-file (enable checkmark). Enable Encryption to encrypt
the file before downloading it.
Maximum number of compressed files
This option will restrict the number of files. Up to 100 files can be
collected in a download (ZIP) file. If the current number exceeds the
maximum, only the first 100 files will be included in the download
process.
windream web portal pro will then generate a logfile which lists the
files that have been collected and those that could not be considered.
The logfile is created in XML-format and saved within the download
file. The filename starts with three exclamation marks (!!!). Up to 100
entries will be generated.
Maximum amount of transferred files
This option restricts the filesize of files to be compressed. The ZIP-file
will collect files until the maximum number determined here is reached.
If, due to the volume limit, not all selected files could be collected in
the ZIP-file, windream web portal pro will generate a logfile which lists
the collected files and those that could not be included. The logfile is
windream web portal pro
103
created in XML-format and saved within the ZIP-file. The filename
starts with three exclamation marks (!!!). Up to 100 entries will be
generated.
Diagnostics
This site presents general information on the current system
configuration.
Figure 71: Configuration - Diagnostics
Preview
On this page, you set the format of image files for the presentation in
the HTML preview.
104
windream web portal pro
Figure 72: Configuration - Preview
Miscellaneous
Here, further settings are offered for the user-specific configuration of
windream web portal pro. Changes on the settings can be saved via the
Save button.
In order to undo the changes and to restore the previous settings again,
click the Reset button.
Figure 73: Configuration - Miscellaneous
windream web portal pro
105
Number of tabs per line
The index properties on tab page Indices of the object properties
in the object type search can be placed on several tab pages. The
number of tabs per line can be determined here.
or
Redirect click to filename
By default, a file will be opened and viewed in a browser window with a
click on the filename. However, it is possible to redirect the click to the
filename, meaning that the file is opened in a specific user-defined
window. This way, user-specific events can e.g. be executed for specific
filetypes (e.g. for viewing in special viewers).
Open file on the windream network drive
If you access the windream network drive via the Internet, you can also
open the documents there directly with the associated original
application and edit them. In order to be able to do this, you must
enable the option for redirecting the click to filename and determine
how you have connected the windream drive (UNC-path).
UNC-path to windream drive
Via the UNC-path (Universal Naming Convention) you can directly
access the windream drive. Depending on the operating system, enter
the mode here with which you have mapped the drive.
Set scheme
Here, you can determine the look of windream web portal pro by
selecting a scheme. Select a scheme from the list to open the desired
design.
Toolbar
Here, you configure the navigation bar of windream web portal pro.
For example, you can enable the context menu here via which further
user-specific functions for processing objects can be launched.
106
windream web portal pro
Figure 74: Configuration - Toolbar
Show upload control (Microsoft Internet Explorer only)
will be displayed in
If this option is switched on, the upload icon
the navigation bar (see chapter "Upload via the Upload icon", p. 52).
Show buttons as Hyperlinks
This option will present the icons of the menu bar as hyperlinks.
Show first line of menu bar
Enable this option to view the first line of the menu bar (icons
Configuration, Logon/logoff and Help, default setting. If you disable this
option, the first line will be hidden and the icons Configuration, Logon /
Logoff and Help will be displayed in the second line.
Show further functions
By enabling this option, a dropdown list will be added to the navigation
bar of windream web portal pro. the list contains a selection of
additional functions for editing documents and folders. With these
functions, further file operations for selected objects can be executed
from the Explorer listview or from a result list. The type and the
integration of possible functions is user- or customer-specific.
Depending on the requirements, respective functions can for example
be programmed as scripts and integrated in the list of additional
functions.
Please contact windream GmbH or your windream partner for further
information (www.windream.com).
Configuration of dropdown list "Further functions "
All find and editing functions which are usually launched via the icons
or via hyperlinks from the menu bar can also be started via the
windream web portal pro
107
respective commands from the dropdown list. Thus, configure the
dropdown list by highlighting the options for viewing the main
functions, find functions or editing functions. The commands are listed
in the dropdown list, and the respective icons are hidden from the
menu bar. The entries of the standard functions are highlighted in the
list by colors.
Integration of new functions (script)
The following steps are required to integrate a new function into the
application:
Creating the script.
• Adjusting CSV-file WMOW2CP.csv.
• Adjusting XML-file Context-Menu.xml.
•
Note: Only functions are possible which execute operations on
selected objects in the Explorer listview or from the result list.
The design and programming of scripts for further functions
depends on the requirements and requires a specific know-how.
The description of the tools required for developing scripts (for
example VB script) is not part of this documentation.
Creating a script
The scripts are expected as ASP-files in the Explorer directory
within the installation directory of windream web portal pro. You will
also find an example script there (Sample.asp).
After having created a script, you adjust the files named ContextMenu.xml and WMOW2CP.csv to integrate the new function into
the application.
Example
Example-script Sample.asp:
<%@ LANGUAGE="VBScript" %>
<!doctype html public "-//W3C//DTD HTML 3.2//EN">
<html>
<head>
<meta http-equiv="CONTENT-TYPE" content="text/html; charset=iso8859-1">
<meta http-equiv="EXPIRES" content="0">
<link rel=stylesheet type="text/css" href="../style.css">
<%=WMW2P_COPYRIGHT%>
<title><%=WMW2P_NAME%></title>
</head>
<body class='Func'>
108
windream web portal pro
<%
Const REPLACE_TOKEN4_QUOTATION_MARK
= "%27"
Set aGlobalW2pObj = Session("WMMainObjectKey")
Set aWMSession = aGlobalW2pObj("WMSession")
Response.Write( "<b>Selected Objects:</b>" )
Response.Write( "<br><br>" )
Response.Write( "<table>" )
nCount = 0
for each entry in request.form
if Len(entry) > 3 And Left(entry,3) = "cb_" And
request.form(entry) = "on" then
sForm = replace(entry, "cb_", "path_")
sPath = Replace( request.form(sForm),
REPLACE_TOKEN4_QUOTATION_MARK, "'", 1, -1, 0 )
set aPDObject = aWMSession.GetWMObjectByPath( 0, sPath
)
Response.Write( "<tr>" )
Response.Write( "<td>" )
if aPDObject.aWMEntity = 1 then
Response.Write( "File" )
else
Response.Write( "Folder" )
end if
Response.Write( "</td>" )
Response.Write( "<td>" )
Response.Write( aPDObject.aPath )
Response.Write( "</td>" )
Response.Write( "</tr>" )
nCount = nCount + 1
end if
next
Response.Write( "</table>" )
if nCount = 0 then
response.write( "Nothing selected<br><br>" )
end if
%>
</body>
</html>
End of example
Adjusting XML-file Context-Menü.xml
The script is integrated in the list of further functions with an
additional entry in file Context-Menu.xml. The file will has been
installed in the windream web portal pro installation folder during the
installation of the program. Open the file with an editor and add an
windream web portal pro
109
entry like <ContextMenuEntry> Scriptname
</ContextMenuEntry>. The functions will be displayed in the
windream web portal pro list as entered here and with the respective
sorting.
Example
Entry for a new script SampleNew.asp:
<?xml version="1.0" encoding="iso-8859-1"?>
<W2pContextMenuConfiguration>
<ContextMenuEntry>Sample</ContextMenuEntry>
<ContextMenuEntry>SampleNew</ContextMenuEntry>
</W2pContextMenuConfiguration>
End of example
Adjusting CSV-file WMOW2CP.csv
In file WMOW2CP.csv, you determine the designator with which the
script shall occur in the list of functions. The file will be installed in
folder NLS of the installation directory when installing the program.
Open the file with an editor and add an entry like
TxtScriptname=;Example_New;Sample_New in section
[ContextMenu]. The entry consists of the Txt token.
Example
Entry for a new script named SampleNew.asp:
...
[ContextMenu];;
TxtSample=;Example;Sample
TxtSampleNew=;Example_New;Sample_New
...
End of example
Portal site – navigation bar
Here, you configure the navigation bar of the user-specific portal site.
The available settings correspond to the options of the same name
which are available on the configuration site of the navigation bar of
windream web portal. For example, you can activate and enable the
dropdown list for further functions here, too. The description of the
respective settings can be found in chapter "Toolbar", p. 105.
110
windream web portal pro
Figure 75: Configuration - Navigation bar of the portal site
The Portal Site
The portal site is opened by a click on the logo in the title bar (first line
of the menu bar) of windream web portal pro. Another click will bring
you back to the site from which you launched the portal site.
Figure 76: Portal site
If you have configured the navigation bar in a way that the first line of
the menu bar is hidden, switch between windream web portal and the
portal site via the portal site icon or windream Web Client
.
windream web portal pro
111
Figure 77: Portal site without first line of the menu bar
The portal site can be designed individually as your personal web portal
(for example by placing links on search engines or by integrating your
personal website). The required configurations for the design are
executed by a system administrator.
You can implement a global portal site for all users or a personal site
for single users, which will then be displayed instead of the global site.
You can implement any Internet or Intranet sites and windream
searchlets (windream search profiles).
The navigation bar via which the functions available on the portal site
are started can be configured in the windream web portal configuration
(see chapter "Portal site – navigation bar", p. 109).
windream searchlets
A windream searchlet displays a search profile which has been created
with the index search of windream. In this case, object type, brackets,
operators, and links cannot be edited any more. Search expressions can
be entered in case the respective index fields have not been filled with
values yet. While determining the search options, you can set in the
configuration that exclusively those fields of the search profile shall be
displayed in which search expressions can be entered (option for hiding
editable fields within searchlets in chapter "Search options", p. 98.
windream searchlets can display private search profiles of the current
user or public (global) profiles. It is possible to implement searchlets
with or without determining a search profile in the portal site. A search
profile can be implemented in a way that the respective search routine
will be launched automatically after having called the searchlet directly.
The integration as well as the necessary configurations for the
implementation of searchlets are executed by the responsible system
administrator. By default, those searchlets are available on the portal
site which can be launched via the links named private
112
windream web portal pro
searchlets, global searchlets and the examples for
global search profiles.
Figure 78: windream searchlet with a global search profile
windream searchlets without determination of search profile
The searchlet displays a dropdown list box which contains the available
search profiles. These are either the profiles of the current user
(private search profiles) or the public search profiles
(global search profiles).
After having selected a profile you conduct the search process by
clicking
. If search profiles have not been filled with values yet, you
will have to enter the desired search expression before starting the
process.
Figure 79: windream searchlet with a private search profile
The objects found will be listed in the result list, and they can be edited
with the functions available.
windream web portal pro
113
windream searchlets with determination of a search profile
windream searchlets can be used with the determination of a search
profile in the portal site. These are public profiles. The profiles are
stored in a globally available directory of the Webserver and are thus
available for all users in a company. This directory may also contain
user-specific profiles (profiles of the current user or others), which
have been placed there by a system administrator.
A searchlet for which a specific search profile has been determined will
load this profile automatically. The user cannot select another profile.
, if the search is
The search is started by a click on the search button
not started automatically after having opened the search profile.
Figure 80: windream searchlet with a global search profile and automatically executed search.
The objects found will be listed in the result list, and they can be edited
with the functions available.
Index
115
Index
B
Blocksize 98
Fulltext view 12
Save as 34
Documents save as 10
Download 10, 32, 34
Configuration 101
Documents 32
C
Case sensitive 98
Check in 6
Check out 6
Checkboxes 61
Check-in 69
document 73
check-out
Undo 77
Check-out 69
Document 70
Column configuration 96
Configuration 6, 95
Columns 96
Diagnostics 103
Download 101
List view 96
Miscellaneous 104
Navigation bar – Portal site 109
Preview 103
Retrieval Mode 96
Search Options 98
Start view 95
Toolbar 105
Copy 5
Copy object 84
Create folder 46
Create new object 46
Create new version 6, 66
Creator
Search for 17
D
Default filename 102
Delete 6
Delete object 92
Diagnostics 103
Document
View 10
Document properties
Fulltext 36
Document Properties
History 42
Indices 41
Life-Cycle 43
Rights 44
Documents
E
Edit documents 57
Edit lock
remove 82
Editable once 61
Error message
Send to support 8
Explorer 5, 9
Change listview 13
Change sorting of listview 13
Refresh view 5, 12
F
Field separators
Vector fields 100
File
Create 49
Find all documents 9
Fulltext
Acquire 12
Extended (private) 24
Extracted 24
Index 61
Manual 24
Quick Search 26
Searchable index fields 24
Searchable stringfields 24
Fulltext search
Index Search 27
Simple Search 25
Fulltext Search 23
Functions
Integrate new 106
H
Handling 6
Help 6
Hidden files
Show 97
Hierarchic Search 9
History 42
Hyperlinks 8
116
Index
I
P
Index
Acquire and edit 59
Dropdown lists 61
Fulltext 61
Presetting 61
Index object 58
Index Search 5, 18
Indices 41
Introduction 1
Personal Settings 95
Portal site 6, 110
Preview 35, 103
Previous versions
Include in search 98
L
Life-Cycle 43
List view 96
Lists 61
Logon 3, 6
Logout 3
M
Mandatory fields 60
Maximum amount of transferred files
102
Maximum blocksize for search results
99
Maximum number of compressed
files 102
Miscellaneous 104
Move 5
Move object 88
N
Navigation 4
Navigation bar
Portal site 109
Navigation bar 105
New file 5
Create 49
New folder 5
New search 5
Non-editable fields
Hide 100
Number of tabs per line 104
O
Object
Create 46
Delete 92
Edit 58
Select 8
Object Type Search 5, 22
Open file on the windream network
drive 104
Options for compression (ratio) 102
Options of current search 15
Q
Quick Search 5, 15
R
Radio buttons 61
Redirect click to filename 104
Refresh listview automatically 97
Remove 78, 79
Rename object 91
Renaming 5
Report window 58
Requirements 1
Result List 32
Change columns 32
Sorting 32
Retrieval 9
Retrieval Mode 96
Retrieve documents 9
Right
Edit 62
Rights 44, 62
S
Scripts
Integrate 106
Search
Vector indices 20
Search for creator 17
Search for documents of current user
18
Search options 98
Search profile
Load again 29
Send via email 29
Store 30
Search profiles
Search options 28
Search Profiles 28
Searchlet 112
Public 113
Searchlets 111
Session expired 4
Set edit lock 78, 79
Set scheme 105
Settings
Personal 95
Show buttons as Hyperlinks 106
Show further functions 106
Index
117
Show upload control 106
Simple Search 5, 13
Sorting
Result list 32
Sorting list view 13
Standard search 9
Start fulltext search in 100
Start search 5
Start view 95
Survey 1
System-specific files
Show 97
T
Tables 61
Thumbnail
Configuration 98
Toolbar 105
Portal site 109
U
UNC-path to windream drive 104
Undo check-out 6, 77
Upload Control 105
Upload directory 54
Open 5
User account
Remove 66
User right
Add 64
V
Values
Vector indices 20
Version 41
Create 66
View
Extended search term 100
W
Wildcards 9
Working with search profiles 28