1
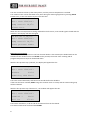
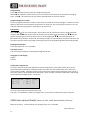
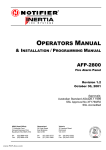
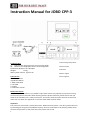
Instruction Manual for JOBO CPP-‐3 1 Overheating safety switch Technical data V: Check in the ratings plate for the connecting loads. 2 Solenoid valve W: Check in the ratings plate for the connecting loads. Dimensions W/H/D in cm: 96/34/37 3 Overflow Weight : 6.8 kg Water-‐jacket volume: approx. 10 l 4 Motor magnet Contents list 5 Level regulator 6 bottles 1.000 ml 4 graduates 260 ml 1 JOBO Tank 2520 1 reel 2502 1 magnet 1 instruction manual Safety instructions Only connect your processor to a standard 3 pin earth socket. Only operate your processor using conventional photo chemicals. When working with the photo chemicals, please ensure that you observe the manufacturer’s safety instructions. The motor head cannot be rinsed or immersed in water. Do not switch the appliance on until the water bath has been filled. Important The processor comes with a power failure fuse. When electrical power is cut off by power failure or by switching off using the unit (ON/OFF-‐button), the unit comes back to the working mode, which controls the processor to the point where the power was cut off. 1 When for example the processor was shut down during heating, the heater and pump will immediately start working once the power has resumed. Attention, when draining the processor in shut off-‐mode! Never switch ON the processor, when insufficiently filled with water in the trough. Before switching the processor off with the ON/OFF button, the tempering mode must be switched off. Commissioning Levelling your processor Your equipment must be level. Place a spirit level on the front edge of your processor and support it underneath if necessary to make it level. Never place your spirit level on top of the tank/drum as this will give an inaccurate reading! Filling the appliance with water Pour water slowly into the water trough: 10l with all bottles and graduates in place. Once the processor is connected to water supply and drainage, the filling can be done automatically. See Modes of operation FILLING. Level regulator This level is used for setting the level of water in the upper bath of the CPP, while the water is circulating. The drum should sit in the water, but must not float. Bottles and graduates should be locked in position. Cooling If the temperature rises above the target value set, the CPP can cool the covered bath down to the target temperature by adding fresh water through the water connection. Important: the overflow must be connected to the waste water pipe. (It must slope at least 10 cm per metre with a free outlet). Turn off the water supply once you have finished processing! Operation of the display See under User Interface Attaching the tank when working w/o Lift Hold the tank base and magnet against the motor magnet. They can be coupled and uncoupled while the motor is running or while it is stationary. The roller bracket should be positioned to support the drum two thirds from the motor head. Attaching the tank, when using the Lift Tank and drum need a cog-‐lid, which fits in the sprocket wheel of the motor drive of the Lift, while stationary. The roller bracket should be positioned to support the drum two thirds from the motor head. Maintenance / Care Drain the water bath once you have finished processing. In order to make the change of water-‐jacket more easy, refilling the trough can be done automatically via the magnetic valve. See under Modes of operation FILLING 2 Trouble-‐shooting When the Nr. 6 appears in the display, the desired temperature was not reached within the expected timeframe. It could arise for the following reasons: Heating does not function. Because the safety fuse was activated: Push back the fuse according description under overheating safety feature. Because the temperature of cold water supply is higher than the temperature of the target value: Increase target value or use other means of cooling. Because the process temperature is below room temperature and there is no availability of connection to a cold water supply . “Fault 5 –sensor interrupted” The temperature sensor is not connected or defect. Please, contact your JOBO service station. Other “fault-‐notions”: Note the fault-‐number and contact your JOBO service station. The temperature sensor is not in connection with its socket: Please, contact your JOBO service station. The pump will not start! The impeller on the pump has become dirty or is off centre. Overheating safety feature The heating mechanism is automatically switched off if the appliance overheats, for example if the heating mechanism is operated without a water bath. Once the processor has cooled down, it can be restarted by pressing the reset switch using a match for example. (See also Safety instructions, Important) User Interface abbreviate Pre-‐notes. The processor comes with a power failure fuse. When electrical power is cut off by power failure or by switching off the unit (ON/OFF-‐button), the unit comes back to the working mode, which controlled the processor until power was cut off. The temperature sensor is positioned in the water-‐jacket. In order to achieve repeatability in the processing quality, it is recommended, to read the temperature (manually) in the bottle, which holds the developer. In case the manufacturer’s adjustment of the sensor needs correction, see under Extended Functions Temperature adjustment. 3 Basic functions The operator-‐input of the unit functions by five buttons, which always work the same way in the main menu. É Activates the rows from above to bottom. Confirms the chosen value setting and returns to the next to set value. F1 Leads back to the previous / higher menu. Interrupts the running function qp Change the value, which is indicated by blinking START Starts and stops, when working in auto-‐mode with process timer in function. Switches rotation motor ON/OFF, in manual-‐mode. When working in Program-‐menuqp is used for navigation. ON/OFF button starts and cuts electric power to the unit. Modes of operation The unit comes with three main operation modes: Man = manual: Process temperature and rotation speed are manually adjusted. Auto = automatic working mode, which integrates process timer. Process-‐temperature, rotation speed and process-‐times are pre-‐programmed. FILLING = Water-‐jacket filling. The magnetic valve opens for influx of water and automatically stops it after 3:30 min. This function can be stopped at any time with F1 Working in Manual Mode (w/o Process timer) The unit starts after switching ON in the previously used working mode. By pressing F1 this can be interrupted for returning in the higher organized menu. Choose with pq between Man and Auto and confirm with É. Activate each row with É. Choose the blinking value withpq (process temperature and rotation speed) and then confirm with É. After pressing START, water circulation pump and heating starts working. Process temperature indicated in row 3 will rise to its set value. Rotation motor begins to work, indicated in row 2. By using the START / STOP button, the rotation motor can be monitored for changing processing solutions and water. F1 always brings the user back to higher menu. Rotation motor and heating is then cut off. 4 Working in Automatic Mode (with process timer) The pre-‐programmed colour processes are numbered and blinking in the first row. They can be selected withpq. É Leads to the lowest row, where the appropriate rotation tank can be chosen with pq. The selected tank is shown in row 2 and confirmed with É. The display tells the required quantity of working solution for the chosen tank in ml. The appropriate rotation speed is automatically set to correct value. When the required process temperature has been reached in the water jacket and in the first chemical bottle, process work can begin with START. In case the required process temperature has not yet been reached, the rotation motor can nevertheless be started by pressing START again. The display tells the user, what to do: • From which bottle chemistry will be taken, for example Chemistry 1. • The amount of working solution in ml. • The required time for this process-‐step in min:sec. • The complete remaining time including final wash, in min:sec. • The row beneath tells what to do next. The pre-‐programmed times for each process step are consecutively calculated. The display and signals of timer lead the user from step to step. The process times are counted backwards to 0:00. Ten seconds before the deadline, an acoustic warning signal is heard, which afterwards changes in a continuous signal. The processing tank continues rotating, until the operator activates the START-‐ (STOP) key. After this, the processing tank can be emptied and filled again with working solution; as soon as the START-‐key is activated, the rotation motor continues its work until the next change of working solution needs to be addressed. The wash water needs a change every 45 sec. See under Extended Functions Renewing wash water. In case the operator does not acknowledge the elapsed time, the timer counts upwards with a “-‐“ indicating , that the process time is exceeded. During count-‐down of process timer, the following inputs are possible: pq ON/OFF of display backlight. F1 interrupts the whole process. É Change between indication of „process-‐temperature“and “actual temperature“. START for interrupting the actual process step. 5 User Interface extended Working in Manual Mode (w/o Process timer) Temp. Control: OFF Rotation: OFF Temp:38,0 act:23,5°C Drum speed: 70 /min The “OFF” next to “Temp. Control” blinks as indication that the heater can be switched ON/OFF with pq. Row 2 indicates whether the rotation motor is activated or not. Selection is made using pq. In row 3 the process temperature is set with pq in fractions of 0,1 oC. (A continuous pressure for fast running requirement.) In row 4 the speed of rotation motor is set withpq. (25-‐100 turns/min). Each selected value needs each time to be confirmed with É. After pressing START, the rotation motor starts. Process temperature indicated in row 3 will adjust to its set value. Rotation motor is working, indicated in row 2. ON/OFF next to Temp. Control in first row will be blinking. Please Note: For easy handling: The rotation motor can be controlled by pqas well as by START. Working in Auto Mode This mode integrates the process timer. With the selection of the appropriate processing tank automatically the correct rotation speed is set and the needed quantity of working solution – chemistry and water-‐ appears in the display. The display also tells the user what to do and gives a summary of all values, relating to the selected process. We recommend to check the process time of each step, that is given by the manufacturer of the photo-‐chemistry with the pre-‐programmed times, that come with the unit. See under Extended functions Edit process. The process timer has the following features. 32 different processes. * One identification name for the type of process. 10 characters, freely programmable. One preselected temperature for each process, (required process temperature) 13 working steps with max times from 59:59 min: sec per process. Selection of motor speed by type of tank. Shows supply quantity of chemistry and water depending of type of tank. *Chanel 1-‐13 is repeated (14-‐27)as a template, in order to provide a structure for individual processes, it simplifies editing your individual processes. 6 Preparation for processing After selecting the Auto mode, the following display appears. 06 E-6 3B +1 38,0°C Rotation:Man= 75/min Supply qty : 170 ml Select process:pq,É Row 1: Number of process, name of process, process temperature. Row 2: rotation speed + process tank selection with the following options: • Manual: the rotation speed is taken over from setting in „man“; no filling amount indication in row 3. • Via process tank-‐selection: the required rotation speed is automatically set. Row 3: When selecting the type of processing tank, the correlating filling amount for chemistry and water appears. (except for Expert) Row 4: Tells the user what to do. The blinking number left in the first row signals, that the desired process can be chosen with pq(next to many pre-‐programmed processes, individual processes can be programmed!) Each process works with an assigned temperature, which is indicated on the right side and does not need to be entered. The selected process is confirmed with É and afterwards the rotation speed can be set manually or is automatically set by the selection of the type of processing tank. Confirm withÉ. Using this, the correct rotation speed is adjusted and in the 3rd row the required amount of chemistry (and water) appears. full stands for reel is loaded completely with film to axel core. half stands for reel is loaded only with one film 120 in outside of reel. Under Extended functions you’ll find a complete Table for required working solution for the operator. É brings the user back to the selected process in row one and START begins the heating of the water jacket, the rotation motor remains stationary. 06 E-6 3B +1 38,0°C Rot.: Tank 2520/full Temp control: 23,5°C Rotatation ON: START With qp the display illumination can be switched ON and OFF (darkroom work). 7 The unit continues to heat up the water jacket, until the process temperature is reached. The rotation motor can be activated at any time during the warming-‐up phase by pressing START button twice, in case one wishes to pre-‐warm the tank. 06 E-6 3B +1 38,0°C Rot.: Tank 2520/full Temp control: 36,8°C Please wait… When the correct temperature is being reached for the first time, a 10 second signal is heard and the readout in the display will have changed. 06 E-6 3B +1 38,0°C Rot.: Tank 2520/full Temp control: 38,0°C Start process: START Beginning of processing When the process temperature in the first chemical bottle is also attained, the loaded tank can be attached to the rotation motor and START can be pressed; the motor starts rotating and all programmed process steps can be worked down. With the first process step “preheat”, the display will appear like this: 06 E-6 3B +1 38,0°C Rot.: Tank 2520/full Preheat 03:59 Remaining time 48:12 The timer counts backwards; and buzzes 10 seconds before the deadline. If the time has been reached, START brings the rotation motor to a stop and the next working step will be indicated. With the first process step “Chemical 1”, the readout will appear like this: 06 E-6 3B +1 38,0°C Rot.: Tank 2520/full Chemical 1 Fill in: 08:30 270 ml The lowest row advises, to fill in 270 ml of chemical from the first bottle. This action needs to be confirmed with START. 8 06 E-6 3B +1 38,0°C Rot.: Tank 2520/full Chemical 1 08:28 Remaining time 44:12 The rotation motor starts again, the timer begins to count down and signals to hold tank again with START/Stop for emptying the chemical bath and the display will read: 06 E-6 3B +1 38,0°C Rot.: Tank 2520/full Wash 1 2:30 Fill in: 360 ml 06 E-6 3B +1 38,0°C To fill in 360 ml wash water. Pressing the START button will get the tank rotating . The wash water needs renewal every 45 seconds. The timer will guide the user accordingly. See also under Special functions Renewal of wash water. Rot.: Tank 2520/full Wash 1 02:28 Remaining time 36:12 In this way all processing steps need to be worked through. At the end the last process step the readout will indicate: 06 E-6 3B +1 38,0°C Rot.: Tank 2520/full Process finished: START,remove drum! The completed processed film now can be taken off the reel and be treated in a wetting agent bath outside the reel and than be hung up for drying. The reels shall not get in touch with wetting agent. Extended functions: Renewal of wash water In order to achieve a thorough wash, the water needs to be replaced 2 to 3 times. The programming in Auto Mode takes care of this, because the timer signals the change of water all 45 seconds, for example: Washing time : 2:30 min. = 150 s. 1. Cycle = 45 s 2. Cycle = 90 s 3. Cycle = 135 s For the remaining 15 seconds no new cycle will be started. 9 The complete wash cycle also cleans the filling system of Lift and tank from all chemical residue, which would otherwise affect the developing result of the next processing work. Table for required working solution for the operator. Process Tank Rotation supply qty supply qty speed working solution of wash water ___________ _______ ______________ ____________ Tank 1510 75 140 ml 190 ml Tank 1520 full 75 240 ml 320 ml Tank 1520 half 75 170 ml 230 ml Tank 1540 75 450 ml 600 ml Tank 2540 75 140 ml 190 ml Tank 2520 full 75 270 ml 360 ml Tank 2520 half 75 170 ml 230 ml Tank 2550 75 640 ml 830 ml Expert Drum 50 * * Full means, the reel is loaded with film to the centre (1 film 135/36 or 2 films 120). Half means, the reel is loaded only on the outside up to the red duo clip (1 film 120). *Expert Drums require chemical solutions according to the amount of films (emulsion surface) Interrupting a process step: In case you want to interrupt a running process step and start the next one you can do this by pressing the START button, while countdown continues. The display looks like this: (for example) 06 E-6 3B +1 38,0°C Wash 2 0:30 Pause:continue=START Abort step: É With É the rotation motor is stopped and jumps the program to the next step. With START the work can be continued. (The process timer continues to count during this interference of the operator). In case the operator wishes to stop the complete process, he needs to activate F1. Display (Example): 06 E-6 3B +1 38,0°C Rot.: Tank 2520/full Abort process? yes:É continue:START The operator is asked to confirm abortion of process with É or he can continue process by pressing START. 10 Programming Press pq simultaneously to open the programming mode. With pq all programm values row-‐by-‐row can be selected and with É be opened for changing them via pq. F1 confirmes the new values and leads back to the main manue. Programming process timer Here the programmed times of each process step are visable and can be changed . A maximum of 32 different processes can be loaded. 10 characters for each row. This is the place, where the user can add their individual programms, especially for his b/w work. Edit process With qp go to the row “Edit process” and confirm with É .Select the process, which should be changed with qp and confirm with É. Each processing step can be accessed with qp and É causes the time figures to blink, which than can be changed with qp and confirmed with É. F1 finalizes this procedure. At the end, the display prompts you permanently memorize the data. You can them store this memory by again confirming with É. Pressing F1 brings back the working mode. Backlight illumination There are steps from 1 to 7 available. Firmware version The actual version appears in the disply during the self test. Languages in the display English German Temperature adjustment This menu helps to make a fine adjustment of the temperature in the water-‐jacket. First set the desired process temperature in Manual mode. Then wait until the temperature at the reference point becomes stable. (measuring with an external precise thermometer) Reference point can be in the water-‐jacket or in the bottle of the devoloper. Then read the reference-‐temperature and change the temperature readout under “real temp.” indicated /real temp 24.0°C / 24.0 °C 38.0°C / 38.0 °C Service Menu This is for authorized service technicians only. The user is not allowed to make any changes here, it will cause a malfunction of the processor. JOBO International GmbH, Kölner Str. 58a, 51645 Gummersbach, Germany Made in Germany -‐ Technical Data may change at any time – 2013/02 www.jobo.com 11