1
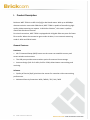
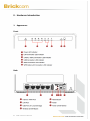
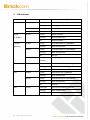
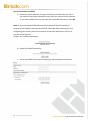
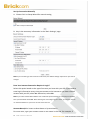
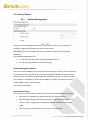
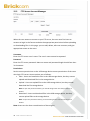
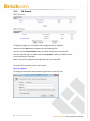
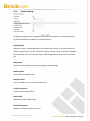
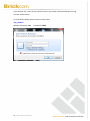
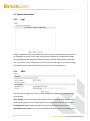
Dual Band Wireless Surveillance Video Router WRT-750N User Manual Quality Service Group Product Name: Release Date: Manual Revision: Web Site: Email: Dual Band Wireless Surveillance Video Router 2014/03 V1.0 www.brickcom.com [email protected] [email protected] © 2014 Brickcom Corporation. All Rights Reserved Table of Content PACKAGE CONTENTS.................................................................................................... 3 I. PRODUCT DESCRIPTION .................................................................................... 4 GENERAL FEATURES .................................................................................................... 4 II. HARDWARE INTRODUCTION ............................................................................. 5 1. APPEARANCE ..................................................................................................... 5 2. LED INDICATORS ................................................................................................ 6 3. SYSTEM REQUIREMENT ........................................................................................ 7 III. SOFTWARE INTRODUCTION .............................................................................. 8 EQUIPMENT NEEDED ................................................................................................... 8 1. Setup Wizard.............................................................................................. 8 2. Running Status ......................................................................................... 13 3. Network Setup ......................................................................................... 16 4. Wireless Setting ....................................................................................... 20 5. Forwarding .............................................................................................. 27 6. Access Control .......................................................................................... 29 7. Dynamic DNS ........................................................................................... 33 8. Static Routes ............................................................................................ 33 9. Email ........................................................................................................ 34 10. Security Options ................................................................................... 35 11. Multicast Control.................................................................................. 38 12. Storage Setup ....................................................................................... 39 13. System Information .............................................................................. 44 CONTACTING TECHNICAL SUPPORT ............................................................................... 47 Package Contents WRT-750N 3 WRT-750N User Manual Power Adapter Ethernet Cable EIG I. Product Description Brickcom WRT-750N is an 802.11 a/b/g/n dual-band router. With up to 450Mbps data transmission rate under 5GHz band, WRT-750N is capable of transferring high quality video streaming on request. In BrickOne Solution®, this router is perfect match with Brickcom cameras. For wired connection, WRT-750N is equipped with 4 Gigabit Ethernet ports for faster file transfer. When the connection goes under wireless, it can transmit streaming under 2.4GHz and 5GHz bands. General Features Hardware • Wi-Fi Protected Setup (WPS) button on the router can establish an easy and secure wireless environment. • The USB port provides users another option for external share storage. • Antenna design (2x2 for 2.4GHz, 3x3 for 5GHz) allows better transmitting and receiving. Software • Quality of Service (QoS) prioritizes the stream for smoother video transmitting performance. • Advanced Security Protection: WPA / WPA2 / SPI / DoS / WPS 4 WRT-750N User Manual II. Hardware Introduction 1. Appearance Front Back 5 WRT-750N User Manual 2. LED Indicators Function Power WLAN Color Green Description Steady Device Ready Flashing Booting Red Solid Light System Failure None Off Device Off Green Steady WLAN Enabled Flashing Data Transmission Off WLAN Disabled Steady Link Detected with 1000Mbps Flashing Data Transmission Steady Link Detected with 10/100Mbps Flashing Data Transmission Off No Link Flashing in Establishing Connection (2.4/5GHz) Internet Status Amber (Modem) Green Amber/Green Rotation WPS LAN Green Amber Green USB 6 Green WRT-750N User Manual Steady Ethernet or WPS Provisioning Flashing WPS is Successfully Triggered Light Off Device Ready for New WPS Setup Steady Link Detect with 1000Mbps Flashing Data Transmission Steady Link Detected with 10/100Mbps Flashing Data Transmission Off No Link Solid Light Device Connected to USB Port Flashing Data Transmission Light Off No Activity 3. System Requirement Computer System • Windows®, Macintosh, or Linux-based Operating System • An Installed Ethernet Adapter Browser Support • Internet Explorer • Safari • Firefox 7 WRT-750N User Manual III. Software Introduction Equipment Needed Brickcom Router, Power Adapter, and Ethernet cable (included) High-speed Internet connection and access to Internet modem (Users should contact their local provider assistance if needed) Additional Ethernet cable (usually provided with the Internet modem) A computer Internet browser (such as Internet Explorer, Firefox, or Safari) 1. Setup Wizard A. To access the configuration utility, open a web-browser such as Internet Explorer and enter the IP address of the router. (Default IP address: 192.168.1.1). B. Type “admin” for User Name and Password in the entry field. 8 WRT-750N User Manual C. When you successfully connect the router into the network, the Smart Setup Wizard menu displays two options for configuring the Internet connection. The Setup Wizard will attempt to auto-detect the type of Internet service you have through your ISP -- or you can configure the router manually. It is recommended that, if you aren't used to setting up Internet connections, you let the Smart Setup Wizard do some of the work for you. 9 WRT-750N User Manual Set Up Connection by PPPoE A. Select this option based on the type of account you have with your ISP. If you need to enter login information every time you connect to the Internet or you have a PPPoE account with your ISP, select Yes. Otherwise, select No. Note: If you have installed PPP software such as WinPoET (from Earthlink) or Enternet (from PacBell), then you have PPPoE. Select Yes. After selecting Yes and configuring your router, you will not need to run the PPP software on your PC to connect to the Internet. Choose ‘Yes’ to do auto detection. B. Detect the PPPoE Connection C. Set up the PPPoE Connection by Keying the Correspondent Information 10 WRT-750N User Manual Set Up Connection Manually A. Choose ‘No’ on Setup Wizard for manual setting B. Key in the necessary information in the ‘Basic Settings’ page. Note: If you are setting up the router for the first time, the default settings may work for you with no changes. Does Your Internet Connection Require A Login? Select this option based on the type of account you have with your ISP. If you need to enter login information every time you connect to the Internet or you have a PPPoE account with your ISP, select Yes. Otherwise, select No. Note: If you have installed PPP software such as WinPoET (from Earthlink) or Enternet (from PacBell), then you have PPPoE. Select Yes. After selecting Yes and configuring your router, you will not need to run the PPP software on your PC to connect to the Internet. Account Name(Also known as Host Name or System Name) For most users, type your account name or user name in this box. For example, if 11 WRT-750N User Manual your main mail account is [email protected], then put JerAB in this box. If your ISP has given you a specific Host name, then type it (for example, CCA7324-A). Internet IP Address If you log in to your service or your ISP did not provide you with a fixed IP address, the router will find an IP address for you automatically when you connect. Select Get Dynamically From ISP. If you have a fixed (or static IP) address, your ISP will have provided you with the required information. Select Use Static IP Address and type the IP Address, Subnet Mask and Gateway IP Address into the correct boxes. For example: • IP Address: 24.218.156.183 • Subnet Mask: 255.255.255.0 • Gateway IP Address: 24.218.156.1 Domain Name Server (DNS) Address The DNS server is used to look up site addresses based on their names. If your ISP gave you one or two DNS addresses, select Use These DNS Servers and type the primary and secondary addresses. Otherwise, select Get Automatically From ISP. Note: If you get ‘Address not found’ errors when you go to a Web site, it is likely that your DNS servers aren't set up properly. You should contact your ISP to get DNS server addresses. Router MAC Address Your computer's local address is its unique address on your network. This is also referred to as the computer's MAC (Media Access Control) address. Usually, select Use Default MAC Address. If your ISP requires MAC authentication, then select either Use Computer MAC address to disguise the Router's MAC address with the Computer's own MAC address or Use This MAC Address to manually type the MAC address for a different computer. The format for the MAC address is XX:XX:XX:XX:XX:XX. This value may be changed if the Use Computer MAC Address is selected once a value has already been set in the Use This MAC Address selection. 12 WRT-750N User Manual 2. Running Status 2.1Router Status You can use the Router Status screen to check the current settings and statistics for your router. This screen shows you the current settings. If something needs to be changed, you will have to change it on the relevant screen. Hardware Version: The router model. Firmware Version: This is the current software the router is using. This will change if you upgrade your router. Internet Port: These are the current settings that you set in the Setup Wizard or Basic Settings screens. • MAC Address. The physical address of the router, as seen from the Internet. 13 WRT-750N User Manual • IP Address. The current Internet IP address If assigned dynamically, and no Internet connection exists, this will be blank or 0.0.0.0. • Internet Access Mode. Indicate DHCP, PPPoE or Fixed IP. • IP Subnet Mask. The subnet mask associated with the Internet IP address. • Domain Name Server. Displays the address of the current DNS. LAN Port. These are the current settings, as set in the LAN IP Setup screen. • MAC Address. The physical address of the router, as seen from the LAN. • IP Address. The LAN IP address of the router. • IP Subnet Mask. The subnet mask associated with the LAN IP address. • DHCP. Indicates if the router is acting as a DHCP server for devices on your LAN. Wireless Port: These are current settings, as set in the Wireless Settings screen. • Name (SSID). SSID of the router. • Region. The location (country). • Channel. The current channel in use. • Mode. Indicates the current mode (802.11b, 802.11g and 802.11b/g/n). • Wireless AP. Indicates if the access point feature of the router is enabled or not. If not enabled, the Wireless LED on the front panel is off. • Enable SSID Broadcast. Indicates if the router is broadcasting its SSID. • Enable Wireless Isolation. Indicates if wireless isolation is enabled. • Wi-Fi Protected Setup. Indicates if the router's wireless settings are configured. Wireless Port-Guest Profile: These are the current settings, as set in the Guest Network screen. • Name (SSID). SSID of the guest network. • Enable SSID Broadcast. Indicates if the guest network is broadcasting its SSID. • Enable Wireless Isolation. Indicates if wireless isolation of the guest network is enabled. • Enable Guest Network. Indicates if the clients connected to this guest network are allowed to access local LAN network. Click Show Statistics to see router performance statistics such as the number of packets sent and the number of packets received for each port. 14 WRT-750N User Manual Click Connection Status to see information about your current connection. 2.2Client List This page shows the IP Address, Device Name and MAC (Media Access Control) Address for each computer attached to the router. 15 WRT-750N User Manual 3. Network Setup 3.1 LAN Setup LAN TCP/IP Setup These are advanced settings that you may configure if you are a network administrator and your network contains multiple routers. If you make any changes to these settings you will need to restart your computer(s) for the settings to take effect. • IP Address: Type the IP address of your router in dotted decimal notation (factory default: routerlogin.net). • IP Subnet Mask: The subnet mask specifies the network number portion of an IP address. Your router will au.tomatically calculate the subnet mask based on the IP address that you assign. Unless you are implementing subnet, use 255.255.255.0 as the subnet mask (computed by the router). • RIP Version: This controls the format and the broadcasting method of the RIP packets that the router sends. (It recognizes both formats when receiving.) By default, this is set for RIP-2. • RIP-1 is universally supported. RIP-2 carries more information. • RIP Direction: RIP (Routing Information Protocol, RFC1058 and RFC1389) allows a router to exchange routing information with other routers. The RIP Direction selection controls how the router sends and receives RIP packets. Both are the default. 16 WRT-750N User Manual • When set to Both or Out Only, the router will broadcast its routing table periodically. When set to Both or In Only, it will incorporate the RIP information that it receives. Note: Multicasting can reduce the load on non-router machines because they do not listen to the RIP multicast address and will not receive the RIP packets. However, if one router uses multicasting, then all routers on your network must use multicasting. Use Router as DHCP Server The Router is set up by default as a DHCP (Dynamic Host Configuration Protocol) server, which provides the TCP/IP configuration for the all the computers that are connected to the router. Unless told to change these settings by your ISP, leave the Use Router As DHCP Server check box selected. If your ISP has you clear this check box, you must have another DHCP server within your network or else you must manually configure the computer. • Starting IP Address: This box specifies the first of the contiguous addresses in the IP address pool. 192.168.1.2 is the default start address. • Ending IP Address: This box specifies the last of the contiguous addresses in the IP address pool. 192.168.1.100 is the default ending address. Address Reservation When you specify a reserved IP address for a PC on the LAN, that PC will always receive the same IP address each time it accesses the DHCP server. Reserved IP addresses should be assigned to servers that require permanent IP settings. 17 WRT-750N User Manual 3.2 WAN Setup Note: If you are setting up the router for the first time, the default settings may work for you with no changes. Does Your Internet Connection Require A Login? Select this option based on the type of account you have with your ISP. If you need to enter login information every time you connect to the Internet or you have a PPPoE account with your ISP, select Yes. Otherwise, select No. Note: If you have installed PPP software such as WinPoET (from Earthlink) or Enternet (from PacBell), then you have PPPoE. Select Yes. After selecting Yes and configuring your router, you will not need to run the PPP software on your PC to connect to the Internet. Account Name (Also known as Host Name or System Name) For most users, type your account name or user name in this box. For example, if your main mail account is [email protected], then put JerAB in this box. If your ISP has given you a specific Host name, then type it (for example, CCA7324-A). 18 WRT-750N User Manual Internet IP Address If you log in to your service or your ISP did not provide you with a fixed IP address, the router will find an IP address for you automatically when you connect. Select Get Dynamically From ISP. If you have a fixed (or static IP) address, your ISP will have provided you with the required information. Select Use Static IP Address and type the IP Address, Subnet Mask and Gateway IP Address into the correct boxes. For example: • IP Address: 24.218.156.183 • Subnet Mask: 255.255.255.0 • Gateway IP Address: 24.218.156.1 Domain Name Server (DNS) Address The DNS server is used to look up site addresses based on their names. If your ISP gave you one or two DNS addresses, select Use These DNS Servers and type the primary and secondary addresses. Otherwise, select Get Automatically From ISP. Note: If you get 'Address not found' errors when you go to a Web site, it is likely that your DNS servers aren't set up properly. You should contact your ISP to get DNS server addresses. Router MAC Address Your computer's local address is its unique address on your network. This is also referred to as the computer's MAC (Media Access Control) address. Usually, select Use Default MAC Address. If your ISP requires MAC authentication, then select either Use Computer MAC address to disguise the Router's MAC address with the Computer's own MAC address or Use This MAC Address to manually type the MAC address for a different computer. The format for the MAC address is XX:XX:XX:XX:XX:XX. This value may be changed if the Use Computer MAC Address is selected once a value has already been set in the Use This MAC Address selection. 19 WRT-750N User Manual 4. Wireless Setting 4.1Basic Setting Enable Wireless Router Radio The Wireless Access Point Router of this router can be enabled or disabled to allow wireless access. The wireless icon on the front of the router will also display the current status of the Wireless Access Point to let you know if it is disabled or enabled. If enabled, wireless stations will be able to access the Internet. If disabled, wireless stations will not be able to access the Internet. Enable SSID Broadcast If enabled, the Wireless Access Point will broadcast its name (SSID) to all Wireless Stations. Stations which have no SSID (or a null value) can then adopt the correct SSID for connections to this Access Point. Enable Wireless Isolation If checked, the wireless client under this SSID can only access internet and it can't access other wireless clients even under the same SSID. 20 WRT-750N User Manual Name (SSID) Enter a value of up to 32 alphanumeric characters. The same name (SSID) must be assigned to all wireless devices in your network. The default SSID is BRICKCOM-2.4G-001, but we strongly recommend that you change your network's name (SSID) to a different value. This value is case-sensitive. For example, SSID is not the same as SSID. Channel This field determines which operating frequency will be used. It should not be necessary to change the wireless channel unless you notice interference problems with another nearby access point. Mode Select the wireless mode you want to use. The options are: • 802.11b/g mode. With a maximum speed of up to 54 Mbps. • 802.11b/g/n mode. The band width is 20M, with a maximum speed of up to 130 Mbps(short preamble, with a maximum speed of up to 150 Mbps);The band width is 40M, with a maximum speed of up to 270 Mbps(short preamble, with a maximum speed of up to 300 Mbps). • 802.11a mode. With a maximum speed of up to 54 Mbps. • 802.11a/n mode. The band width is 20M, with a maximum speed of up to 130 Mbps(short preamble, with a maximum speed of up to 150 Mbps);The band width is 40M, with a maximum speed of up to 270 Mbps(short preamble, with a maximum speed of up to 300 Mbps). The long preamble or short preamble can be set from Advanced Wireless Settings. Security Options • None - no data encryption • WEP - Wired Equivalent Privacy, use WEP 64- or 128-bit data encryption Note: Wi-Fi Protected Setup function is disabled when WEP enabled, and this encryption can not work on 802.11N data rate • WPA-PSK [TKIP] - Wi-Fi Protected Access with Pre-Shared Key, use WPA-PSK standard encryption with TKIP encryption type Note: Wi-Fi Protected Setup function is disabled when WPA-PSK TKIP enabled , and this encryption can not work on 802.11N data rate 21 WRT-750N User Manual • WPA2-PSK [AES] - Wi-Fi Protected Access version 2 with Pre-Shared Key, use WPA2-PSK standard encryption with the AES encryption type • WPA-PSK [TKIP] + WPA2-PSK [AES] - Allow clients using either WPA-PSK [TKIP] or WPA2-PSK [AES] To achieve the best performance with 11N wireless adapters under robust security network, we recommend that you change your network's security option to WPA2-PSK. When you use WEP or TKIP security option, the WPS function will be truned off, howere the WPS can not be activated when you change your encryption back to WPA2 or AES. You need to go to the wps page to enable WPS function. Security Encryption (WEP) Authentication Type Normally this can be left at the default value of Automatic. It can allow adapters use either Open System or Shared Key to do the authentication. If you want to have better secure authentication, then you can select Shared Key and you wireless adapters can only use Shared Key to connect to this network. Encryption Strength Select the WEP Encryption level: • 64-bit (sometimes called 40-bit) encryption • 128-bit encryption Security Encryption (WEP) Key If WEP is enabled, you can input the four data encryption keys. These values must be identical on all PCs and Access Points in your network. WEP key setting Select which of the four keys will be used, and enter the matching WEP key information for your network in the selected key box. For 64-bit WEP - Enter ten hexadecimal digits (any combination of 0-9, A-F). For 128-bit WEP - Enter twenty-six hexadecimal digits (any combination of 0-9, A-F). 22 WRT-750N User Manual Security Encryption (WPA-PSK) If selected, you must use TKIP encryption, and enter the WPA Passphrase (Network key). Enter a word or group of printable characters in the Passphrase box. The Passphrase must be constituted of either 8 to 63 ASCII characters or exactly 64 hex digits. A hex digit is one of the following characters: 0, 1, 2, ..., 8, 9, A, B, C, D, E, and F. Security Encryption (WPA2-PSK) WPA2 is a newer version of WPA. Only select this if all the wireless clients in your network support WPA2. If selected, you must use AES encryption, and enter the WPA passphrase (Network key). Enter a word or group of printable characters in the Passphrase box. The Passphrase must be constituted of either 8 to 63 ASCII characters or exactly 64 hex digits. A hex digit is one of the following characters: 0, 1, 2, ..., 8, 9, A, B, C, D, E, and F. Security Encryption (WPA-PSK + WPA2-PSK) This selection allows clients to use either WPA (with TKIP, broadcast packets also use TKIP.) or WPA2 (with AES). If selected, encryption must be TKIP + AES. The WPA Passphrase (Network key) must also be entered. To reach maximum wireless performance, the 11N clients must connect to this router using WPA2-PSK (with AES). For clients connecting in WPA-PSK (with TKIP), the maximum wireless speed will be at 802.11g. Enter a word or group of printable characters in the Passphrase box. The Passphrase must be constituted of either 8 to 63 ASCII characters or exactly 64 hex digits. A hex digit is one of the following characters: 0, 1, 2, ..., 8, 9, A, B, C, D, E, and F. 23 WRT-750N User Manual 4.2Guest Network This is to allow visitors to use internet access at your home if you don't want to let them know your wireless security key. 24 WRT-750N User Manual 4.3WPS Setup WPS stands for Wi-Fi Protected Setup. This is a process that let you add a wireless client to the network easily, and you don't have to specifically configure the wireless settings like SSID, security mode, and passphrase. With the "Push Button" method, you have to complete the process by clicking a button on the client (either a hardware button or a software button on the client's utility GUI). With the "PIN Number" method, you have to enter the client`s PIN here. You have to start the client WPS process at the same time, and you can fins the client's PIN on the client's utility GUI. 4.4Advanced Setup Warning: The Wireless Router is already configured with the optimum settings. Do not alter these settings unless directed by support. Incorrect settings may disable the Wireless Router unexpectedly. 25 WRT-750N User Manual Wireless Router Settings Enable Broadcom ACS This feature can dynamically select the best bandwidth and channel. It is disabled by default,if you need to open, check this box Enable Broadcom WMF Opening the function, the wireless multicast will be more smoothly. It is enabled by default Enable Broadcom XPress Technology Open the function, and the Broadcom STA docking, better wireless performance. It is disable by default , if you need to open, please check this box. Enable Broadcom PHY Watchdog It is internal PHY mechanisms, implement by ours. You won't do anything.This function is calibration periodic to make the output power and other parameters are more precise. If you are doing throughput test via chariot, you can see failing edge will output between each interval. But it won't influence performance. Fragmentation Threshold, CTS/RTS Threshold, Preamble Mode These settings are reserved for wireless testing and advanced configuration only. Do not change these settings. Wireless Card Access List By default, any wireless PC that is configured with the correct SSID will be allowed access to your wireless network. For increased security, you can restrict access to the wireless network to only allow specific PCs based on their MAC addresses. From the Wireless Settings menu, click the Setup Access List button to display the Wireless Access List menu. Note: This function does not work on wireless guest network. 26 WRT-750N User Manual 5. Forwarding 5.1UPnP Setting Universal Plug and Play (UPnP) helps devices, such as Internet appliances and computers, access the network and connect to other devices as needed. UPnP devices can automatically discover the services from other registered UPnP devices on the network. Turn UPnP On UPnP can be enabled or disabled for automatic device configuration. The default setting for UPnP is disabled. If disabled, the router will not allow any device to automatically control the resources, such as port forwarding (mapping), of the router. Broadcast Period The broadcast Period is how often the router will advertise (broadcast) its UPnP information. This value can range from 1 to 1440 minutes. The default period is for 30 minutes. Shorter durations will ensure that control points have current device status at the expense of additional network traffic. Longer durations may compromise the freshness of the device status but can significantly reduce network traffic. Broadcast Time To Live The time to live for the broadcast is measured in hops (steps) for each UPnP packet sent. A hop is the number of steps allowed to propagate for each UPnP broadcast before it disappears. The number of hops can range from 1 to 255. The default value for the broadcast time to live is 4 hops, which should be fine for most home networks. If you notice that some devices are not being updated or reached correctly, then it may be necessary to increase this value a little. 27 WRT-750N User Manual UPnP port mapping table The UPnP Port Mapping Table displays the IP address of each UPnP device that is currently accessing the router and which ports (Internal and External) that device has opened. The UPnP Port Mapping Table also displays what type of port is opened and if that port is still active for each IP address. 5.2Port Forwarding For the services, applications, or games, that already exist in the pull-down list, you`ll only need to specify the computer`s IP address. Otherwise, the port number and computer`s IP address for each service, game or application should be specified by clicking the Add Custom Service button. 5.3Port Triggering Port Triggering is an advanced feature that can be used for gaming and other Internet applications. Port Forwarding can typically be used to enable similar functionality, but it is static and has some limitations. Port Triggering opens an incoming port temporarily and does not require the server on the Internet to track your IP address if it is changed by DHCP. Port Triggering monitors outbound traffic. When the router detects traffic on the specified outbound port, it remembers the IP address of the computer that sent the data and triggers the incoming port. Incoming traffic on the triggered port is then forwarded to the triggering computer. 28 WRT-750N User Manual 6. Access Control 6.1Time of day to Block If you have set up content filtering on the Block Sites page or service blocking on the Block Services page, you can set up a schedule for when blocking occurs or when access isn't restricted. To block keywords, services, or Internet domains based on a schedule: • Select Every Day. Or Select one or more days. • If you want to limit access completely for the selected days, select All Day. Or if you want to limit access during certain times for the selected days, type a Start Blocking time and an End Blocking time. Note: Enter the values as 24-hour time. For example, 10:30 am would be 10 hours and 30 minutes and 10:30 pm would be 22 hours and 30 minutes. 29 WRT-750N User Manual 6.2Block Sites If you want to limit access to certain sites on the Internet, you need to set up content filtering. There are two ways to filter content: • Blocking access to certain domains (for example, www.badstuff.com/XXX) or • Blocking sites that contain certain words (like profanity or explicit sexual material). When users try to access a blocked site, they will get a message: "Blocked by Firewall". 30 WRT-750N User Manual 6.3Block Service If you want to limit access to certain sites on the Internet, you need to set up content filtering. There are two ways to filter content: • Blocking access to certain domains (for example, www.badstuff.com/XXX) or • Blockingsites that contain certain words (like profanity or explicit sexual material). When users try to access a blocked site, they will get a message: "Blocked by Firewall". 6.4QoS Setup QoS is an advanced feature that can be used to priority some internet applications and on-line gaming, and to minimize the impact when the bandwidth is busy. Wi-Fi Multi-media (WMM) Setting WMM (Wireless Multimedia) is a subset of the 802.11e standard. WMM allows wireless traffic to have a range of priorities, depending on the kind of data. Time-dependent information, like video or audio, will have a higher priority than normal traffic. For WMM to function correctly, Wireless clients must also support WMM. 31 WRT-750N User Manual Turn Internet Access QoS On If Turn On, the QoS function will work to prior ity the Internet access traffic based on the rules of QoS Priority Rule list; if you uncheck the check box to turn off QoS function. Turn Bandwidth Control On If you check this box, you can set the maxi mum allowed through the WAN port upstream bandwidth. 100M is set by default when bandwidth control is unchecked. Note: • If the unit is set to "Kbps", through the W AN port to allow the maximum upstream bandwidth can be set to 1000; • If the unit is set to "Mbps", through the WAN port to allow the maximum upstream bandwidth can be set to 100. QoS Priority Rule list QoS function for the application, online gaming, Ethernet LAN port and MAC address sets different priority to optimize your network performance. From the "QoS Settings " menu, click "Set QoS Rules " button to display the "QoS priority rule list " menu. Enable Trusted IP address In certain heavy traffic circumstance, it may nice to privilege a special host with half of whole WAN bandwidth. I t can be done by checking option Enable Trusted IP address, and filling that host IP address. 32 WRT-750N User Manual 7. Dynamic DNS A Dynamic DNS (DDNS) Service provides a central public database where information (such as e-mail addresses, host names and IP addresses) can be stored and retrieved. The Dynamic DNS server also stores password-protected information and accepts queries based on e-mail addresses. If you want to use a DDNS service, you must register for it. The Dynamic DNS client service provider will give you a password or key. 8. Static Routes Static routes give the router information that it cannot learn automatically through other means. This can happen when RIP is disabled on the LAN. (See the LAN IP Setup page.) All defined static routes appear in the table. To add or delete a route, work in the area under the Static Routes table 33 WRT-750N User Manual 9. Email Alerts can be sent when someone on your LAN (Local Area Network) tries to visit a blocked site. Logs are lists of all the URLs that have been visited. If you'd like to have alerts and logs sent to you by e-mail, fill out the settings on this form. You can always check the logs manually by viewing the Logs page. If you don't want to receive e-mails, leave the boxes blank. 34 WRT-750N User Manual 10. Security Options 10.1 Remote Management Using the Remote Management menu, you can allow a user on the Internet to configure, upgrade and check the status of your router. IMPORTANT: Be sure to change the router's default password to a very secure password. Turn Remote Management On • 1. Click the check box to Turn Remote Management On. • 2. Click the Apply button to save this change. Remote Management Address This is the current address you will use when accessing your router from the Internet. To access the router, you will type your router's WAN IP address into your browser's Address (in IE) or Location (in Netscape) box, followed by a colon (:) and the custom port number. For example, if your external address is 10.0.0.123 and you use port number 8080, enter in your browser: http://10.0.0.123:8080 Allow Remote Access For security, you should restrict access to as few external IP addresses as practical. • Click Only This Computer to allow access by only one IP address. • Click IP Address Range to allow access from a range of IP addresses on the Internet, enter a beginning and ending IP address to define the allowed range. • Click Everyone to allow access by everyone on the Internet. 35 WRT-750N User Manual Port Number Web browser access normally uses the standard HTTP service port 80. For greater security, you can change the remote management web interface to a custom port by entering that number in the box provided. Choose a number between 1024 and 65534, but do not use the number of any common service port. 10.2 WAN Security Setup Using this page, you can set up a Default DMZ Server and allow the router to respond to a ‘ping’ from the internet. Both of these options have security issues, so use them carefully. Disable Port Scan and DoS Protection - The DoS Protection protects your LAN against Denial of Service attacks. This should only be disabled in special circumstances. Default DMZ Server Specifying a Default DMZ Server allows you to set up a computer or server that is available to anyone on the Internet for services that you haven't defined. There are security issues with doing this, so only do this if you're willing to risk open access. If you do not assign a Default DMZ Server, the router discards any incoming service requests that are undefined. Respond To Ping on Internet Port If you want the Router to respond to a 'ping' from the Internet, click this check box. This can be used as a diagnostic tool. Like the DMZ server, this can be a security problem. You shouldn't check this box unless you have a specific reason to do so. 36 WRT-750N User Manual MTU Size The normal MTU (Maximum Transmit Unit) value for most Ethernet networks is 1500 Bytes, 1492 Bytes for PPPoE connections, or 1436 for PPTP connections. For some ISPs you may need to reduce the MTU. But this is rarely required, and should not be done unless you are sure it is necessary for your ISP connection. NAT Filtering This option determines how the router deals with inbound traffic. The Secured option provides a secured firewall to protect the PCs on LAN from attacks from the Internet, but it may cause some Internet games, point-to-point applications, or multimedia applications not to work. The Open option, on the other hand, provides a much less secured firewall, while it allows almost all Internet applications to work. Enable SIP ALG Some SIP applications have their own way to work around the NAT firewall issue, and the SIP ALG would conflict with those solutions. In most cases, you do not have to disable the SIP ALG. However, if your SIP applications cannot work with the router, you can disable the SIP ALG and try the applications again. Click on the check box to disable SIP ALG. Enable L2TP ALG L2TP ALG for L2TP traffic can pass through the data. It is disabled by default, and if you need to enable, check this box Enable PPTP ALG PPTP ALG can pass through the data for PPTP traffic. It is disabled by default, and if you need to enable, check this box. Enable IPSEC ALG IPSEC ALG can pass through the data for such services. It is disabled by default, and if you need to enable, check this box. Enable IPv6 Pass-Through IPv6 pass-through is disabled by default. If you have IPv6 capable devices in your configuration and would like to use IPv6 instead IPv4, you can click on check box to enable "IPv6 Pass-Through. 37 WRT-750N User Manual 11. Multicast Control Through this page, you can enable or disable IGMP functions. Enable IGMP Snooping With IGMP Snooping enabled, the device can make intelligent multicast forwarding toward those hosts, i.e. IPSTBs etc., which request to join (as members of) a specific multicast group, i.e. an IPTV channel etc., within the broadcast domain. As a result, it significantly reduces traffic flooding upon interfaces that are not registered as receivers of specific multicast group Enable IGMP Proxying The IGMP Proxying function lets a LAN PC to receive the multicast traffic it is interested in from the Internet. You can click on this check box to disable the function if you do not need it. 12. Storage Setup 38 WRT-750N User Manual 12. Storage Setup 12.1 FTP Setting This router offers a USB storage device through the built-in FTP server functionality without additional computer and software, it can easily perform uploads and downloads. You can connect a USB storage device connected to the USB port, your friends can read the USB storage device in the remote sharing of files, even away from home, you can be easily obtained through the Internet, the information you need, or into you want to share data. You will enjoy a unlimited sharing of information centers. Start FTP server When you have a USB storage device connected to the router, if you want to enable the FTP server function, then check this box. FTP server is disabled by default. Once enabled, users can connect to your USB storage devices to achieve the shared files. Of course, this requires the users who login the server have an account name and password, and have the appropriate permissions, such as upload, download and other privileges. FTP server port Set the server listening port, the default listening port is 21. 39 WRT-750N User Manual 12.2 FTP Server Account Manager When the user wants to connect to your FTP server, the user must first have an account to login in the future to obtain the appropriate permissions before uploading or downloading files. In this page, you can add, delete, edit user accounts, and give appropriate access to the users. Username Enter the FTP server user's name. The user's name cannot be repeated Password Enter the FTP server password. Max user name and password length should less than 31 characters. Permissions Set the access permissions on the USB storage device access permissions of the users who login FTP server. Access options are as follows: • View - Users can browse the files in the USB storage device, but they cannot upload and download files in the storage device. • Upload - Users can upload files to the USB storage device, but they cannot download the file storage device. Note: to open this permission before, you should also give the users the permission of browse. • Download - Users can download files in the USB storage device, but they cannot upload files to the storage device. Note: To open this permission before, you should also give the users the permission of browse. Note: Users can also have a combination of these rights. 40 WRT-750N User Manual 12.3 USB Browse Through this page, you can browse and manage the file of USB disk. You can click the del button to delete the corresponding file . You can click the Create Folder button to create a directory in current path. You can input the path, or select with clicking Browse... button to add the file to current directory of USB disk. Notice: This device supports max single file size is less then 2GB To view FTP files, please access via the route: ftp:// IP_Address By keying the username and password to get access to the FTP site. 41 WRT-750N User Manual 12.4 Samba Setting Through this page you can configure the device samba function. Samba allows users to share file between windows host and the device. Enable Samba When you have a USB storage device connected to the router, if you do not want to enable samba server, you don't check this option. Samba server is enabled by default. Once enabled, users can connect to your USB storage devices to achieve the shared file. Workgroup Devices on the network where the workgroup name belongs. Netbios Name Set the device network name New Password You can modify the root user's password here Confirm Password Confirm the New Password Enable USB Whether to allow USB storage Enable Anonymous Whether to allow anonymous access. 42 WRT-750N User Manual If you choose this, users do not need to enter a user name and password that can log into the samba server. To view Samba folder, please access via the route: \\IP_Address Default Username: root 43 WRT-750N User Manual Password: 12345 13. System Information 13.1 Logs A log is a detailed record of the Web sites that users on your network have accessed or attempted to access. If you have set up content filtering on the Block Sites page, the Logs page shows you when someone on your network tried to access a blocked site. If you have e-mail notification on, you'll receive these logs in an e-mail message. If you don't have e-mail notification set up, you can view the logs here. 13.2 SNTP Here you can configure your router's time. And good timekeeping is important for accurate logs. Time Setting: If you want your router keep the time synchronize with the Internet automatically, please check "Automatically synchronize with Internet time servers". First NTP time server: Please specify the first server of NTP you want to use. Second NTP time server: you can input an additional time server here, making your 44 WRT-750N User Manual router work in a normal status if the first NTP time server goes down. Time Configuration: Here you can see the current time of your router. Time Zone: According to your region, you have to choose a correct time zone, in order to keep the right time. 13.3 Back Up Setup This screen allows you to back up, restore, and erase the router's current settings. Once you have the router working correctly, you should back up the information to have it available if something goes wrong. When you back up the settings, they are saved as a file on your computer. You can restore the router's settings from this file. 13.4 Set Password You use the Set Password page to change the password you use to access the Settings pages -- NOT your ISP account password. 45 WRT-750N User Manual 13.5 Reset to Factory Default You could reset the router to the factory default setting. 13.6 Router Upgrade You install new versions of the router's software using the Router Upgrade page. IMPORTANT! Once you click Upload do NOT interrupt the process of sending the software to the router and restarting the router. If you think the process may be interrupted in some way, click Cancel to keep the current router software. 13.7 Router Reboot This screen allows you to restart the router. 46 WRT-750N User Manual Contacting Technical Support If you face any issues about the WRT-750N, please contact the technical support. Before contacting the technical support, please check the following information in advance: • Model Name (e.g. WRT-750N) • MAC address and S/N (located on the back side of the router) Technical Support [email protected] 47 WRT-750N User Manual