1
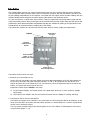
Fielder User Manual
Contents
Introduction
2
Tutorials – How to ….
1. Use a “Quick Start” experiment for data logging
3
2. Create and run a new data logging experiment
4
3. Use the Fielder as a timer
6
4. Set up an experiment in WinTec and run it on the Fielder
6
5. Use the Fielder as a PC interface
7
Using the Menus
Main Menu
7
7
1. Quick Start menu
7
2. My Experiment / Current Experiment
8
3. Results
8
4. New (clear) exp.
9
5. Off (Standby)
9
6. System Status
9
Experiment Settings
9
Run Experiment
10
Retrieving results from the Fielder for viewing in WinTec
11
Auto Power Save feature
11
3rd Edition September 2003
Introduction
The Tainlab Fielder extends your range of experiments away from the computer and beyond the classroom.
The rechargeable battery provides many hours of continuous operation, and the data memory can store over
16,000 readings independently of the computer. The Fielder has four inputs, which can take readings with any
existing Tainlab probes except for the Wave Capture (Microphone) and Ultrasonic Sensor.
For your convenience, a “Quick Start” menu offers a variety of experiments using temperature, light, pH and
Liquid Conductivity probes. More probe types can be selected easily through simple steps with the menus and
pushbuttons. More advanced facilities and additional probes are available by setting up an experiment in the
Tainlab Wintec PC software and then sending this to the Fielder.
The Fielder also operates as a precise timer and the menu offers a variety of light gate experiments.
Steps back in
the menu
Inputs
Indicates
communication
with PC
Select switches
Fielder on and
chooses menu items
Scrolls up and
down through menus
The Fielder can be used in two ways:
1. Remotely (not connected to a PC).
Used in this way, the Fielder can read, display and record data independently of the PC. Experiments can
be set up on the Fielder using the menu(see tutorials 1, 2 and 3). An experiment can also be set up in
WinTec and then sent to the Fielder to be run (see tutorial 4). Once the experiment has been sent to the
Fielder, it is stored and can be used at any time.
Experiment results can be viewed in two ways:
a) On the Fielder’s display. The Results option in the Main Menu allows you to view results for multiple
experiments.
b) In the WinTec PC software. WinTec can retrieve all results from the Fielder for viewing and filing.
2. Connected to the PC and run with WinTec.
The Fielder can operate as an “interface” via a serial cable to a PC running the WinTec PC software. In this
mode, the buttons do not function and the Fielder operates in a similar fashion to a TecFour (except that it
cannot use the ultrasonic sensor).
The next section provides step-by-step tutorial guides to use of the Fielder. Full descriptions of all menus
are given later (pages 7 –11).
2
Tutorials
Tutorial 1: How to use a “Quick Start” data logging experiment
This example traces all the steps in running a data logging experiment on the Fielder without connecting it to a
computer.
1. Turn the Fielder on. (Press Select)
MAIN MENU
Quick start menu
(If the Fielder was already on, you might need to press the Back button until MAIN MENU appears on the
top line and then the Up or Down buttons to achieve this display.)
2. Press Select to enter the Quick Start menu.
QUICK START MENU
Data logging
3. Press Select.
DATA LOGGING
Skin Temp Exp*
4. Plug a Skin & Body Temperature probe into Input 1 and press Select.
Skin Temp Exp*
Run experiment
5. Press Select.
RUN EXPERIMENT
Start experiment
6. Press Down.
RUN EXPERIMENT
Test Readings
7. Press Select.
1:TEMP= 23.2°C
In this “Test Readings” mode, the results are shown on the display but not recorded in the memory. To
return to the RUN menu, press Back and the display appears as in 5 again.
8. To start recording data, press Select. The display shows:
Recording... to
stop, press back
Readings are being taken and stored 10 times per second in this example. After a few seconds, press
Back. For a few seconds, the displays shows the message “Run Finished” and the number of values
recorded. The menu then shows
MAIN MENU
Results
9. Press Select.
Experiment 1
Skin Temp Exp*
3
10. Press Select.
Skin Temp Exp*
Data set 01
Press Select again. The date and time of the first reading is shown on the top line and the value is shown
on the bottom line.
18/08 18:07:02.4
1: Temp=27.7°C
In this example, the time display includes tenths of seconds because of the fast recording rate.
To step though the data values, press Down. The time on the flashing top line advances as Down is
pressed and the corresponding reading appears on the second line, until the end of the data. Up does the
reverse.
11. When you have finished viewing the results, press Back three times to return to the Main Menu. Now both
the menu item Results and the name of the experiment you have just run (Skin Temp Exp*) appear
in the MAIN MENU. This is just for convenience so that it is easy to relate the results to the corresponding
experiment. It is also likely that the same experiment will be run again, so it is made readily available in the
menu.
Results recorded for a “Quick Start” experiment can be transferred to a computer as explained in Section 4.
The asterisk in Skin Temp Exp* indicates a special feature. The same applies in the next experiment in
the “Quick Start” menu, Sealed Temp Exp*. The * means that the Fielder will always read Input 1 and
then test Inputs 2, 3 or 4 for the presence of a probe. When an unused input is found, no more are read.
12. If you repeat step 8 and run this experiment again, another set of results will be stored in the Fielder
memory and the Up and Down buttons scroll through the other sets, ie. Data Set 02 etc. If you or
modify the Input types or Sampling rate of this experiment, or select another experiment, then after you
run the experiment the results will be stored under Experiment 2.
Tutorial 2: How to create and run a new data logging experiment
Tutorial 1 used an experiment from the “Quick Start” menu in the Fielder. If the selection of probes you want
to use is not amongst those experiments, follow these steps to create your own. In this example, a Sealed
Temperature probe and pH will be chosen.
1. Turn the Fielder on. (Press Select)
2. At the MAIN MENU, press Up or Down until you reach New (clear) exp. If the MAIN MENU heading is
not showing, press Back until it does.
3. Press Select to choose New (clear) exp. The first choice to be made is the type of probe to be used on
each input, so that is where the entry menu begins:
My Experiment 1
Input types
4. Press Select. We start with input 1. Nothing has been selected yet, so the display is
INPUT 1
None
The flashing label indicates that this item is ready to be changed. Press Down.
INPUT 1
Sealed Temp.
Sealed Temp. is the first item in the list of probes. If you want to see others, keep pressing Down. If you
reach the end of the list, the menu will wrap around to the start again. Up steps in the opposite direction.
With Sealed Temp. displayed, press Select to choose it.
The top line will now start flashing because it is ready to be changed. Press Down to move to the next
input, number 2. Press Select again. Again the existing entry for input 2 (None) starts to flash because it
is now the item ready to be changed.
5. Press Down to show
4
INPUT 2
pH Amplifier
Press Select to set pH as the probe for Input 2.
6. Input selection is finished now so press Back (to the Input types menu) and then Down
My Experiment 1
Sample timing
Press Select. The first entry shown in the sample timing (ie recording rate) menu is one second.
SAMPLE TIMING
1 per second
This is not the top of the list. Press Up to show 10 per second, but in this example, let us assume we want
to leave the Fielder to record slowly changing quantities for a long period. Press Down to display
SAMPLE TIMING
1 per hour
Press Select to set hourly readings and then Back to return to the main menu.The experiment just
created now appears in the main menu as “My Experiment 1”.
MAIN MENU
My experiment 1
(The number is used to identify results stored in the Fielder for multiple experiments. Each time you run an
experiment, retain its data and then create or modify another experiment, the number increases.)
7. Set up the probes ready for measurement, and plug them into the Fielder inputs in the order chosen.
8. Press Select.
My experiment 1
Run experiment
To run “My experiment 1”, press Select.
RUN EXPERIMENT
Start experiment
Start is the first of three options under the RUN EXPERIMENT menu. In Tutorial 1, Test Readings and
Start Experiment were used. Press the Up (or Down) buttons to step through this menu. There is
also a Lock Experiment choice to prevent “My experiment” from being cleared or changed accidentally.
9. First, go to Test readings and press Select to check that the probes are reading correctly. Live
readings on inputs 1 and 2 appear. (If inputs 3 or 4 were in use also, Up or Down would toggle between
the readings on Inputs 1 and 2, and Inputs 3 and 4.) Press Back when finished.
10. Press Select to start recording. The first reading is taken immediately. The display will alternate between
that recorded value and
Recording... to
stop, press back
After twelve seconds, the Fielder will automatically clear the display and switch to power save mode (unless
the power is supplied through the “plugpack”). At hourly intervals, it will take another set of readings.
11. To see the latest recorded value at any time, press Select. The display will alternate between the last
reading and the Recording... to stop, press back message. Again, after twelve seconds the
Fielder will automatically clear the display and switch to power save mode.
12. You might recall that in Tutorial 1, the “Skin Temperature” experiment did not show the latest readings
during recording. That experiment took ten readings per second and at this rate, a live display of
recordings would be impractical. Whenever the rate is faster than once per second, values are not
displayed during recording.
13. After the Fielder has run for the required time, press Select. As before, the display alternates between the
last recorded value and
Recording... to
stop, press back
5
Press the Back button to end recording.
The display will show the number of readings, then
MAIN MENU
Results
Press Select (for Experiment 1… My Experiment 1. Press Select (Data Set 01 will be visible) and then
press Select again to start at the first reading. The top line shows the time at which each reading was
taken, and the bottom line shows the reading for that input. To move forward and backwards through
readings, press the Up and Down buttons. Pressing Select causes the input to flash and by pressing Up
and Down you may move through each of the inputs. Pressing Select again will enable you to scan
through readings again, and so on. Holding down either button will move through readings more quickly.
Back returns to the main menu.
14. Section 4 explains the procedure for transferring results to a computer for display and filing.
Tutorial 3: How to
to use the Fielder as a timer
Timing experiments can be run on the Fielder without connecting it to a PC. As well as the familiar mechanics
experiments with light gates, the “Agility Test” (PE) is included.
This example measures the time for which an object obstructs a light gate.
1. Turn the Fielder on. (Press Select.) Plug a light gate into Input 1.
2. Press Select to enter the Quick start menu.
3. Press Up or Down for Timing and then Select.
4. Press Up or Down for:
TIMING AND MECH
Obstruction Time
5. Press Select. Run experiment is now shown. Press Select again for Start experiment.
Press Select again to start taking measurements.
6. Waiting for Obstruction is shown. At this point the the Fielder is waiting for an object to pass through
the light gate. Run the palm of your hand through the light gate several times. Note that each time you do
so, the obstruction time is displayed. Press Back when finished.
7. As usual, the number of readings taken is displayed briefly before the main menu is restored.
MAIN MENU
Results
8. To view all the results, press Select. The time when the experiment began is shown on the top line and
then the readings below. Press the Down button to show the next reading and the Up button to show the
previous reading. Holding down either button will move through readings more quickly. For Timing
experiments the date and time displayed is fixed at the start of recording.
9. To finish, press Back to return twice to return to the main menu.
Results can be transferred to a computer as usual (Section 4). Note that mechanics/timing experiments can
only be selected from the Quick Start menu - they cannot be setup via the New (clear) exp. procedure
or loaded from the PC.
Tutorial 4: How to set up an experiment in WinTec and run it on the Fielder
1. Connect the Fielder to the PC via a serial cable. If you are using a USB to serial convertor, connect the
serial cable to the 9-pin socket on the USB to serial convertor.
2. Run WinTec (Version 4 or later)
3. Select the desired experiment from the Quick Start menu, or create a new experiment.
4. Click the Remote button on the WinTec Tool bar.
5. A box appears for a comment. It may be helpful to enter some extra identification for the experiment. Click
Program Fielder. The experiment will be sent to the Fielder and is added to the Fielder Quick Start menu.
6
(The experiment is also placed in the main menu immediately if you choose to have it set as the “current
experiment”. If there is already a My experiment entry in the Fielder main menu, this choice will destroy
it, so be careful. If you are not sure, click No. The experiment will always be available in the Fielder’s Quick
Start menu anyway). The experiment has now been sent to the Fielder and its buttons are active again.
The MAIN MENU appears.
6. On the Fielder, press Down. If you clicked Yes in Wintec, the experiment name will appear here. If not,
press Up again to go to the Quick start menu, then Select. Press Up or Down. As well as the usual
Data logging and Timing items, the experiment just sent also appears here.
7. The experiment may now be run using the same procedures as in Tutorial 1 from step 3 onwards.
8. Note that by NOT making the experiment “current” from Wintec, an extra experiment can be added to the
Quick Start menu while “My Experiment” (possibly another Wintec experiment) remains in the main menu.
9. Only experiments of the Data Logging type may be programmed into the Fielder from the PC.
Tutorial 5: How to use the Fielder as a PC interface
1. Connect the Fielder to the PC via a serial cable.
2. Run WinTec. (Version 4 or later)
3. Select the desired experiment from the WinTec Quick Start menu (or set up a new experiment).
4. Run the experiment on WinTec. While the PC collects data from the Fielder, the buttons are disabled.
Using the Menus
All Fielder menu procedures follow a few simple rules. Each menu offers a range of items. Press the Up and
Down buttons to step through the sequence of items and then Select to make your choice. Mostly, these
operations occur on the lower line. Where both lines can be manipulated, the active line flashes. When Select
is pressed to choose the flashing item, the next step is usually to choose an item on the other line. Therefore,
the flashing usually switches to the other line when Select is pressed.
In most of the menus, the Up and Down buttons cycle through the list of items, so that pressing Down at
the last item returns to the top of the list again.
The Back button returns to the previous menu level without choosing an item. Back will always restore the
MAIN MENU eventually.
Main Menu
In the Main Menu, only the lower line shows the items available. Simply press Up or Down to scroll through
the various items and press Select to make the choice.
1. Quick start menu
The Quick Start menu can contain two or three items:
Data logging
This is the list of standard data logging experiments already in the Fielder - all of which are set up and ready
to run (as in Tutorial 1). When any of these experiments is chosen, it also appears immediately as an item of
the same name in the main menu. Next, this copy of a “Data logging” experiment in the main menu can be
modified. If modified, its name in the main menu changes to “My experiment”. The original versions of the
experiments in the Quick start menu can never be changed or deleted. This menu item always appears.
Timing
Six ready-made timing experiments, generally corresponding to the most commonly used items in the Wintec
“Mechanics & Timing” menu, are presented here. All are fully explained in the Tainlab User Guide, except for
the new “Obstruction time” experiment. This is just a reading of the time for which a single light gate is
obstructed.
7
When any one of these is chosen, it appears also in the main menu. Unlike the Data logging experiments,
Timing experiments cannot be modified.
Programmed Experiment
This third item only appears if an experiment has been programmed into the Fielder via the WinTec software.
The experiment’s name will appear as the third menu item and it can then be selected and run as any other
Quick start experiment. If no programmed experiment is present, then this menu item will not appear.
Once any Quick Start experiment is selected, the Experiment menu is displayed automatically (see page 9).
2. My Experiment / Current Experiment
If an experiment has been
a) chosen from the Quick start menu
b) loaded into the main menu by the Wintec PC software
c) setup entirely with the Fielder buttons
then it will appear as the second item in the main menu (ie. next Down from Quick start). In case c), the
experiment is shown only as “My experiment 1”. For a) and b), the original name itself appears first as the
menu item. If the experiment is changed, the menu item again becomes “My experiment 1”. The number will
automatically increase if the experiment is changed IN ANY WAY (including the Sample timing).
When an experiment is chosen, loaded or set-up by any of these three methods, it will replace the previous
experiment. (To prevent this, use the lock in the Run Experiment menu.)
Once the experiment is selected, the Experiment menu is displayed automatically (see page 9).
If no experiment has been selected this item will not appear.
3. Results
This menu item only appears in the Main Menu when the Fielder has results stored. The Fielder can store
results from many different experiments, but only results for the last experiment run can be viewed via this
menu item. If the Fielder has results stored for other experiments, the data can only be displayed through the
Wintec PC software after transferring it to a computer.
For “Data logging” experiments (ie. not one of the six Timing experiments) the top line shows the date and
time of each reading. The display of results begins with the first reading ie at the start of the experiment. The
second line shows the reading for the first input. When the top line (date and time) is flashing, the Down and
Up buttons step through the sequence of times for each record and the matching reading appears on the
second line.
If more that one input was used, press the Select button to change to input selection (bottom line flashing).
Then the Up and Down buttons are used to move through the readings for the various inputs at the date and
time shown. Press Select again to revert to the date/time flashing mode. As before, Up and Down again step
through the sequence of readings.
Use the Back button to return to the data set number display and again for the Main Menu. If results have
been recorded for multiple runs of an experiment, press Down for the next set. After the last set, the question
“Erase all data ?” appears. To retain data, press Back. To clear, press Select. The next display offers another
opportunity to keep the data, asking “ARE YOU SURE?”. For safety, the second line shows “No”. Press Up or
Down to change to Yes. The data will be cleared if you press Select at this point. Data should not be allowed
to accumulate because it will eventually fill the memory. Very large volumes of data can only be managed
effectively on a computer, so these should be transferred to the Wintec PC software as soon as is convenient
and then cleared from the Fielder.
Note that if the Fielder has recordings of repeated runs of the SAME experiment, the Results list always
starts at the first set (Data Set 01). Use the Down button to move through the list.
4. New (clear) exp.
This menu item allows you to create a new experiment with your own measurements and settings. Selecting
this item will clear any experiment already in the main menu. If the experiment came from the Quick Start
menu, the original experiment is still available by reselecting it from the Quick Start menu. You may then use
the Fielder’s buttons to set up the inputs and run an experiment as in the Tutorials (see also page 9). Note that
an experiment created in this way is given the name “My Experiment”.
8
Note: If the current experiment is locked, you will not be able to use this menu item until you have unlocked
the experiment.
5. Off (Standby)
Selecting this item turns off the Fielder. Once turned off, the display will go blank (the Fielder will enter standby
mode). Press the Select button to turn on the Fielder again. When the “plugpack” is connected and mains
power is on, the Off (Standby) item does not appear in the Main Menu.
6. System Status
Selecting this item displays four pieces of information:
•
•
•
•
Date - the current date that the Fielder is set to (day / month)
Time - the current time that the Fielder is set to (hour : minute : second)
Mem free - the amount of free memory for readings (max is 31 kbyte, ie. empty)
Battery - the level of the battery. [
] = battery fully charged. Recharge when the level falls to only
two squares. Connect the “plugpack” power supply, check that the “External power connected” message
appears and then leave the power on for at least 14 hours. Although longer charging will not damage the
battery, continuous charging is not recommended.
Experiment Settings
This section refers to the menu having either the name of an experiment or else “My experiment” on the top
line. (“Experiment Settings” never appears on the display.)
This menu appears whenever a “Quick start” experiment is selected, a new one created as below, or an
experiment is loaded from a computer by the Wintec PC software. Note that if a Quick start menu or Wintec
experiment is edited, its name changes to “My Experiment”.
The Experiment menu contains the five items (*) described below. Press Up or Down to cycle around the
menu and then press Select to choose. From this menu, the experiment can be run, or its settings can be
edited.
* In the case of a Quick start Timing experiment, Run Experiment is the only menu item displayed.
Run experiment
Selecting this menu item switches to the Run Experiment menu (see page 10), which allows you to run the
experiment, display immediate (“test”) readings, and to lock or unlock the experiment.
Input types
Selecting this menu item moves to the Input Types menu, to view and edit the probe setup for the present
experiment.
There are two items to select in the Input Types menu:
- Input Number on the top line
- Probe Type on the second line
Items on both lines can be changed. The flashing line is ready to respond to the Up and Down buttons.
When the desired item is showing, press Select to choose it. Flashing then changes to the other line.
For each input, a probe must be set before subsequent inputs can be chosen. So, the probe type (or “None”)
or Input 1 will be flashing when starting in the menu. Press Up or Down to cycle through the probe list and
Select to set the required type. Naturally, the next input is the most likely item to be entered now, so the
input number starts to flash. To move to the next input, press Down and then repeat the probe selection
procedure. Press Back to return to the Experiment Settings menu when probe selection is finished.
Sample timing
Selecting this menu item displays the data logging sample rate for the experiment. Press Up or Down to
change the sampling rate. Press Select to choose a new sampling rate and return to the Experiment Settings
menu. To return without changing the logging rate, press Back.
9
Start method
There are two ways to initiate data logging:
-
Manually, by pressing Select at the Start experiment item in the RUN EXPERIMENT menu
-
Automatically, by starting recording readings at a particular time set in the Wintec PC software
Automatic start can only be set in Wintec and transferred from the computer in the experiment. If this has
been done, then the time and date of the start is displayed in the menu. A start time cannot be set or
adjusted through the Fielder menu. By pressing Up or Down, you can toggle between the automatic start at
this time and a manual start. Press Select to enter your choice, or press Back to cancel. Even if disabled, the
automatic start time may be selected again.
Stop method
This menu works in a similar fashion to the Start Method menu, with one exception. If an automatic stop has
been set up via a Wintec experiment and is then disabled by selecting a manual stop in this menu, it cannot
be reinstated if the sample timing is changed.
Run Experiment
The Run experiment menu has the following items* selectable:
* Note that in Timing experiments, the only item is Start experiment.
Start experiment
For a data logging experiment with manual start, press Select to begin recording immediately. The message
“Recording… to stop, press back” is displayed and the Fielder begins taking readings.
For a data logging experiment with automatic (timed) start, press Select to start the timer. The message
“Waiting… to stop, press back” is displayed and the Fielder waits until the specified time before
taking readings for the experiment.
If the Fielder is operating on battery power the display may turn off after seven seconds to save power, but
the Fielder will still be taking readings or waiting for the automatic start. The red “On” lamp will flash as each
reading is taken. To turn the display back on, press the Select button. If the experiment is recording faster
than once per second or involves any counting or timing measurements (such as Heart Rate, Period, etc.) the
Fielder must remain on continuously.
The display contents vary between the six Timing experiments. In general, recordings can only begin when
the Fielder detects events at the Light Gate(s), so a “Waiting …” message is shown.
To stop taking readings at any time, you must ensure that the display is on, and then press Back. If the
display is off, first press Select to turn it on.
The message “Run Finished” is displayed for a few seconds along with the number of readings taken.
Then the main menu is restored, ready to show the results.
Test readings
Use this item to see live readings taken once per second (fixed rate) of the probes set in the current
experiment. This might be done to check that a probe is functioning or simply to display readings immediately
without storing them.
If more than two inputs are in use, press Up or Down to swap between displays.
The Test Readings option is not available for Timing experiments because live readings are shown during the
run.
Lock experiment
By pressing Select at this item, you can prevent the current experiment from being cleared or altered. The
item then changes to Unlock. Before choosing another experiment (or editing the latest one), use the Run
Experiment menu again, choose Unlock and press Select once more.
10
The locking feature is only intended to prevent accidental clearing of experiments. It is optional and need not
be used at all. It is particularly useful for Wintec experiments containing features that cannot be set up
directly on the Fielder (eg. special sample rates or automatic start/stop times).
This item is not offered for Timing experiments as they are all available in the Quick start menu.
Retrieving results for viewing in WinTec
When any experiment has been run on the Fielder, results are stored in the memory. The following procedure
can be used to retrieve and view the results from WinTec.
1. Connect a serial cable between the PC and Fielder.
2. Run WinTec (Version 4 or later).
3. In the Wintec Quick Start menu, click Retrieve. A screen will be shown indicating how many runs are
stored in the Fielder.
4. Click Retrieve Results from Fielder.
5. Type an appropriate file name for the results. Note: Multiple sets of results for the same data logging
experiment are saved in the same file, but each set of results for a timing experiment is saved in a
separate file.
6. Type your name and press Enter or click OK.
7. Decide whether you want to clear the memory on the Fielder. Click Yes if you wish to clear the Fielder’s
memory or click No if you wish to leave the results on the Fielder.
8. The results are now shown at the top of the list in the Tainlab WinTec Results Finder.
9. Select the results that you have just retrieved and open it by clicking Open Selection, or by double
clicking on the row for that results file.
10. Click View Results.
11. If there is more than one set of results in the results file, then they may be viewed by pressing the Next
Set and Previous Set buttons located at the bottom of the screen.
Auto Power Save feature
If the Fielder is left idle it will usually turn off its display (go into standby mode) to save power. This applies if
the Fielder is not logging and the buttons have not been pressed for five minutes.
There are exceptions to this:
• If the Fielder is making data logging recordings at a one per second or slower rate, it will go into standby
mode after seven seconds.
The Fielder will NOT go into standby mode if it is:
• Making data logging recordings at a faster rate than once per second
• Making Timing measurements.
• Connected to mains power.
• Connected to a PC through a serial cable and the WinTec software is communicating with the Fielder.
To bring the Fielder out of standby mode and back into normal operation, press the Select button.
11